

Page 1

※ご使用前にこの説明書を良くお読みになり十分に理解してください。
Before beginning assembly, please read these instructions thoroughly.
R
THE FINEST RADIO CONTROL MODELS
組立/取扱説明書
INSTRUCTION MANUAL
1:10 Scale Radio Controlled Electric Motor Powered 2WD Short Course Truck
アルティマSC-R
目 次 INDEX
●安全のための注意事項 / SAFETY PRECAUTIONS
●キットの他にそろえる物REQUIRED FOR OPERATION
●プロポの準備RADIO PREPARATION
●組立て前の注意BEFORE YOU BEGIN
●ランナー付プラパーツ配置図ARRANGEMENT OF PLASTIC PARTS ON RUNNERS
●本体の組立てASSEMBLY
●分解図EXPLODED VIEW
●スペアパーツ・オプションパーツリストSPARE PARTS & OPTIONAL PARTS
安全のための注意事項
この無線操縦模型は玩具ではありません!
●この商品は高い性能を発揮するように設計されています。組立てに不慣れな方
は、模型を良く知っている人にアドバイスを受け確実に組立ててください。
●小さい部品があるので、組立て作業は幼児の手がとどかない所で必ずおこなっ
てください。
●動かして楽しむ場所は、万一の事故を考えて安全を確認してから、責任をもっ
てお楽しみください。
●組立てた後も、説明書がいつでも見られるように大切に保管してください
●ラジコン保険に加入して安全に楽しみましょう。
※製品改良のため、予告なく仕様を変更する場合があります。
© Copyright 2010 KYOSHO CORPORATION / 禁無断転載複製
30850-T01
*SPECIFICATIONS ARE SUBJECT TO CHANGE WITHOUT NOTICE.
●It is highly recommended that first-time builders seek advice of
●Assemble this kit only in places out of children's reach!
●Take enough safety precautions prior to operating this model.
You are responsible for this model's assembly and safe operation!
●Always keep this instruction manual ready at hand for quick
reference, even after completing the assembly.
●Taking out liability insurance is recommended.
UNDER SAFETY PRECAUTIONS
This radio control model is not a toy!
experienced modelers before beginning assembly.
2 〜 5
6 〜 7
7
8 〜 9
10 〜 11
12 〜 33
34 〜 35
36 〜 42
No. 30850
Page 2
安全のための注意事項
SAFETY PRECAUTIONS
組立て・走行の前に必ずお読みください。
Please read carefully before assembling and operating your model.
警告マーク
WARNING!
禁止マーク
PROHIBITED
:生命や身体に重大な被害が発生する可能性がある危険を示します。
: This symbol indicates where caution is essential to avoid injury to yourself or others.
:事故や故障の原因となるため、やってはいけないことを示します。
: This symbol points out actions that you should NOT do to avoid possible damage
or accidents.
この商品は、本格的な無線操縦模型です。玩具ではありません!
This product is a fully functional radio control model. It is not a toy!
この商品を楽しむために、走行前の組立てや、走行後のメンテナンス、オプションの交換などをおこないます。
To enjoy this model to its fullest, complete assembly properly, perform maintenance and add optional upgrades as desired.
アルカリ乾電池や充電式の電池は、使い方を誤ると大きな電流が流れ、発熱や液(電解液)漏れの可能性があります。
Improper usage of Alkaline cells or rechargeable batteries may damage the electronics of the car and/or the radio.
この商品を安全に取扱うために下記の事項を、必ずお守りください。
In order to operate the model safely, adhere to following instructions:
警告
Warning !
組立て前に必ず説明書を最後までお読みください。また、組立てに不慣
れな方は、模型を良く知っている人にアドバイスを受け確実に組立てく
ださい。
Before you begin, read the manual thoroughly. First time builders should
seek advice from modelers who have experience in assembling models.
*この説明を守らないと生命や身体に重大な被害が発生する可能性がある危険を示します。
*Here are some possibilities of significant damage to life and/or body, if the following explanations are not adhered to:
2
禁止
PROHIBITED
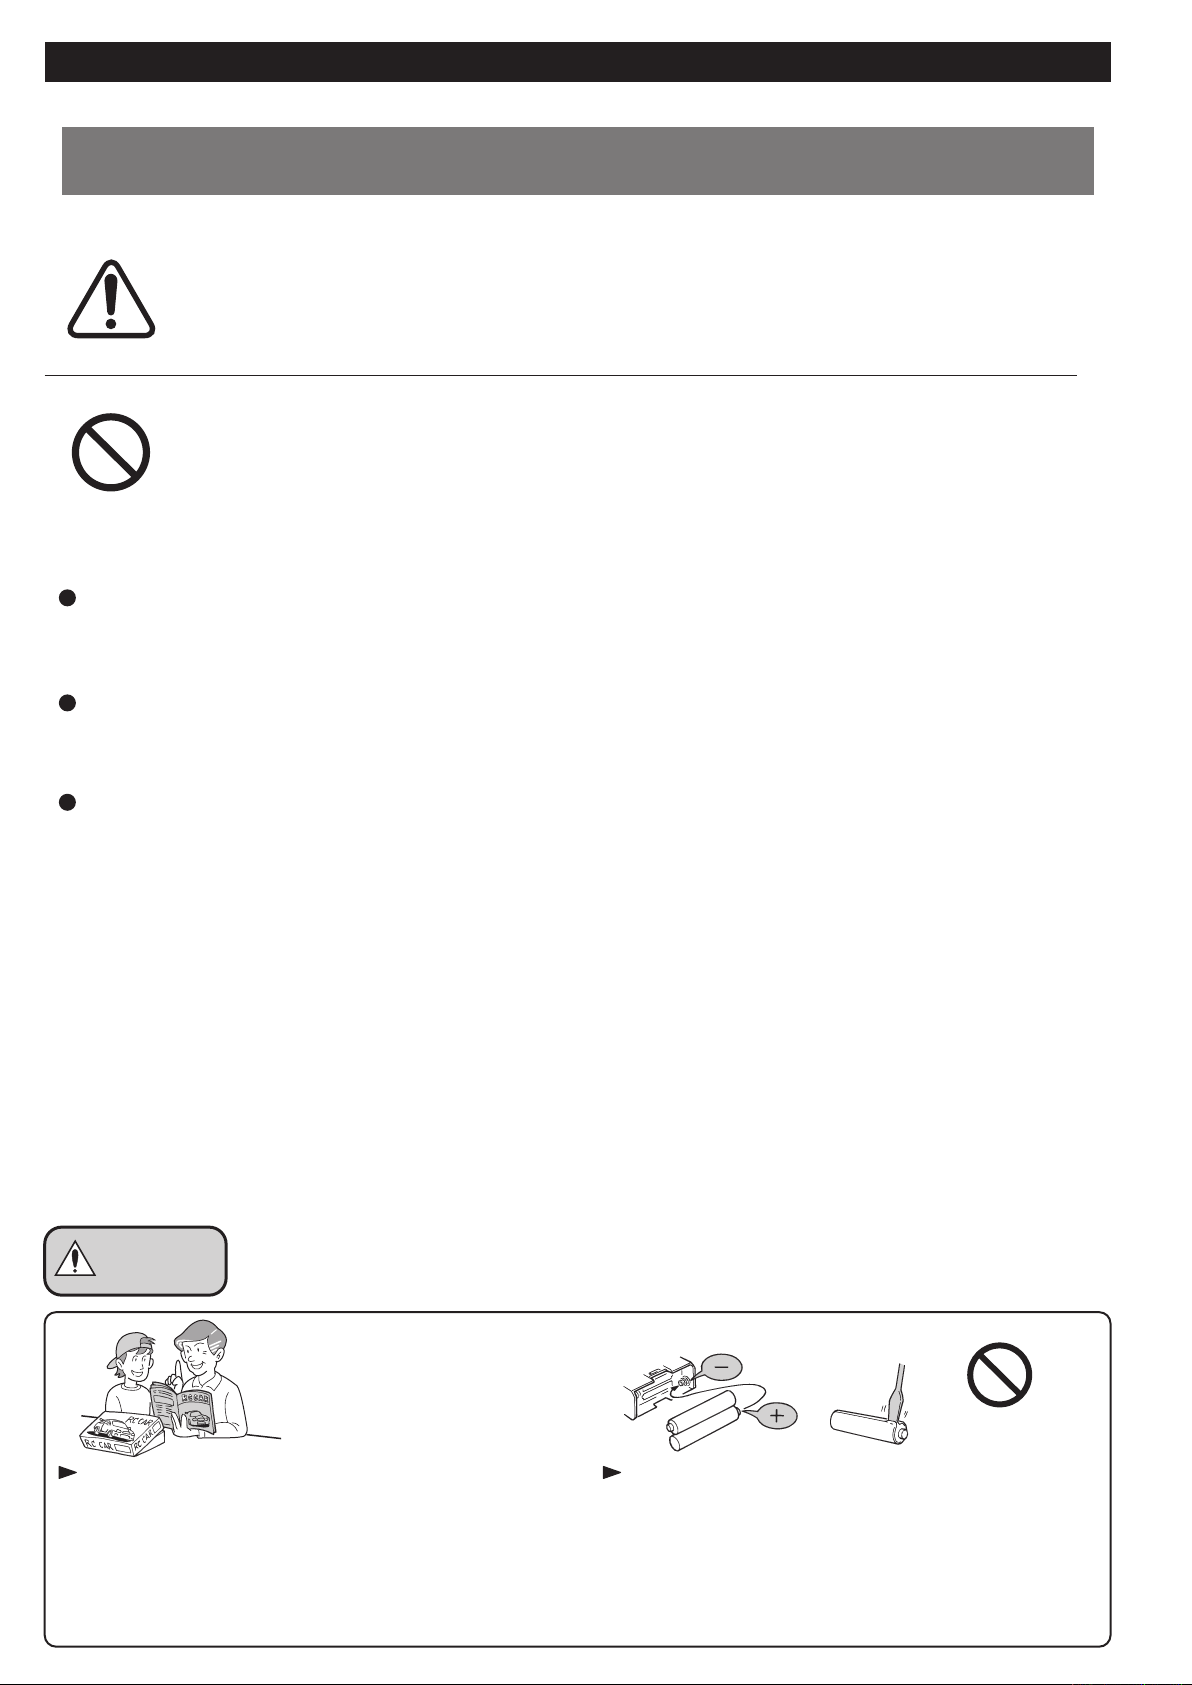
電池は逆接続・分解は絶対にしないでください。
破損や液漏れなどの原因になります。
Never disassemble or install batteries with the polarity reversed.
It's hazardous and will cause damage to the batteries and/or electronics.
Page 3
NO !
D/R
BATT.
ST.REV
TH.REV
N
N
R
R
POWER
禁止 禁止
PROHIBITED
PROHIBITED
小さな部品や、とがった部品がありますので、十分注意してください。
また、小さなお子様のいる場所での作業・保管はさけてください。
This product includes many small, sharp objects, so it should be kept out
of the reach of children.
禁止
PROHIBITED
プロポ関係の電池残量が少ない時。
電池が減ってくるとコントロールができなくなり、暴走や衝突の原因に
なります。
Always check the radio batteries!
With weak dry batteries, transmission and reception of the radio fall off.
Models may become out of control under such condition, which may
cause serious accidents.
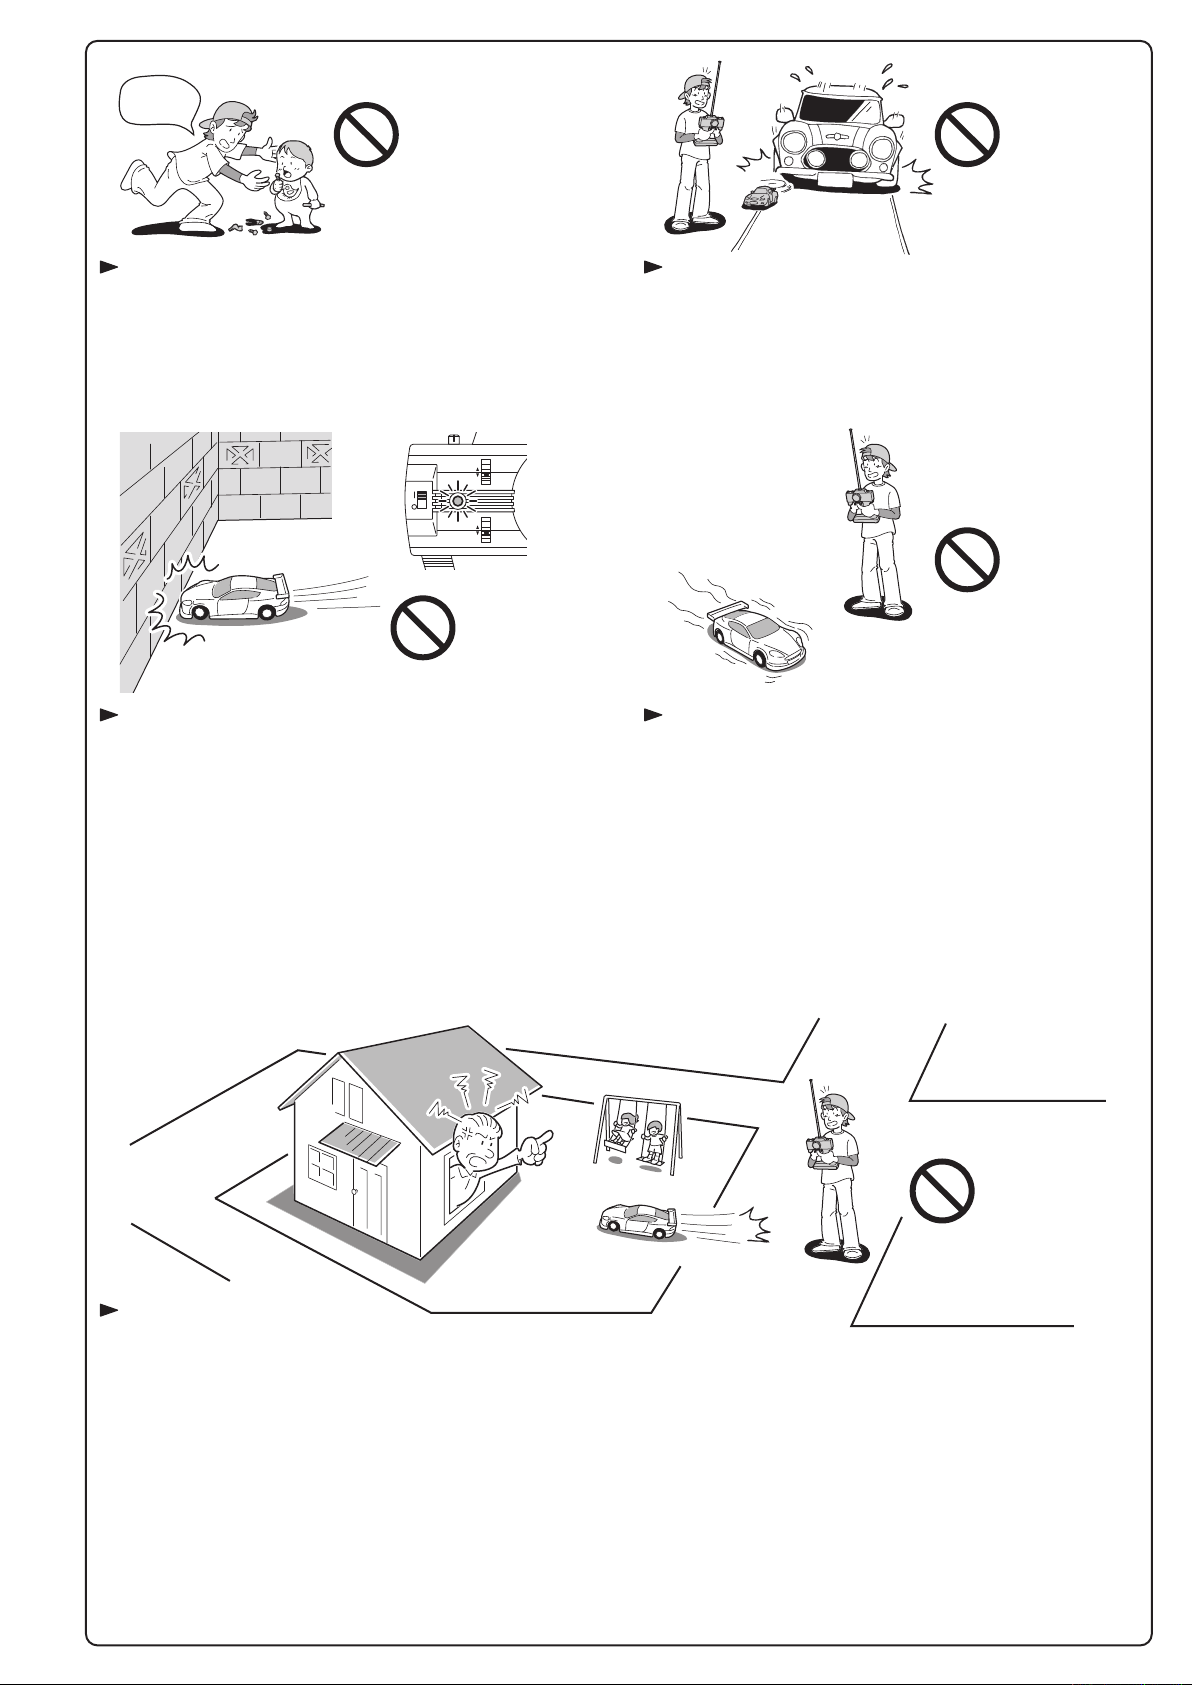
車道・人ごみ・幼児の近くでは走行させないでください。
事故の原因となります。
Do not operate in crowded places, near children or pets, or on public
streets - it may cause serious injury.
禁止
PROHIBITED
車の動きがおかしい時。
すぐに走行を中止して原因を調べてください。原因不明のまま走行させ
ると、思わぬ故障や事故の原因になります。
When the model is behaving strangely . .!
Immediately stop the model and check the reason. Do not operate the
model until the problem is solved. This may lead to further trouble and
unforeseen accidents!
禁止
PROHIBITED
走行させてはいけない場所。
1.民家の近く、公園など。
2.室内、せまいところ。
※人にケガをさせる原因になります。また、物をこわしたり、他人の迷惑になります。
Operate your model ONLY on designated areas, race tracks and other spacious areas. Do NOT operate it:
1. in residential districts and parks!
2. indoors and in limited space!
* Non-observance of the above may be cause for personal injuries and property damages.
3
Page 4

警告
Warning !
*事故やケガ等の危険防止のため、次のことを必ずお守りください。
*In order to avoid accidents and personal injury, be sure to observe the following:
PROHIBITED
回転している部分に、指や物などを入れないでください。 走行後のモーターやスピードコントローラーは熱くなっているので、
Do not put fingers or any objects inside rotating and moving parts!
さわらないでください。ヤケドの恐れがあります。
Motor and ESC may become very hot after use.
Please avoid touching as it may cause burn.
禁止禁止
PROHIBITED
注意
Cautions !
カッターやニッパー、ドライバーなど工具の取り扱いには十分注意して
ください。
All tools require careful handling to avoid injury.
*この説明を守らないと軽傷程度の被害または、物損事故が発生する恐れがあります。
*The following are examples of situations that should be avoided for safe assembly, maintenance and operation:
禁止
PROHIBITED
塗装する場合は室内の換気に十分注意し、作業を行ってください。
Painting must be done only in a well-ventilated area.
4
Page 5

OFF
禁止
PROHIBITED
走行後や、走行させない時は必ず電源スイッチをOFFにし、車体と送信
機の電池を取り外してください。誤作動や電池の発熱・液漏れなど危険
な場合があります。
Always switch off the receiver and transmitter, then disconnect/remove
the batteries when the model is not in use. Failure to do so may cause
damage to the batteries from excessive discharge and leaking.
アンテナの先端でケガをする恐れがありますので顔付近に近づけたり
しないでください。
Do not point the antenna towards another person. Do not store this model in hot or humid conditions, or in direct sunlight.
同じ周波数の近くでは走行させないでください。
混信によりコントロール不能で暴走の原因になります。
Be sure that you're operating on a unique frequency from any other RC
vehicles in the area. Failure to do so will cause a loss of control and may
cause injury.
禁止禁止
PROHIBITEDPROHIBITED
温度の高くなる場所や湿度の高い場所などは長期間の保管はしないで
ください。
禁止
PROHIBITED
走行時は、必ずボディを装着してください。
Always run your car with the body shell mounted!
禁止
PROHIBITED
下記の場所での走行は、故障の原因になりますのでおやめください。
・シャシーにからむような草の生えているところ。
・泥地、砂地、砂利の多いところ。
Do not run your car on ground:
• that is overgrown with grass.
• that is muddy, sandy or rocky.
定期的に、各部のビス類が緩んでいないか確認してください。
Check all screws, nuts etc. on a regular basis for looseness.
純正オプションパーツ以外の組込みや車体の改造はしないでください。
故障の原因となります。
Do NOT install any option parts not made by Kyosho for this model.
To avoid causing irreparable damage, do NOT attempt any modifications.
5
Page 6
キットの他にそろえる物(1)
ITEMS REQUIRED FOR OPERATION (1)
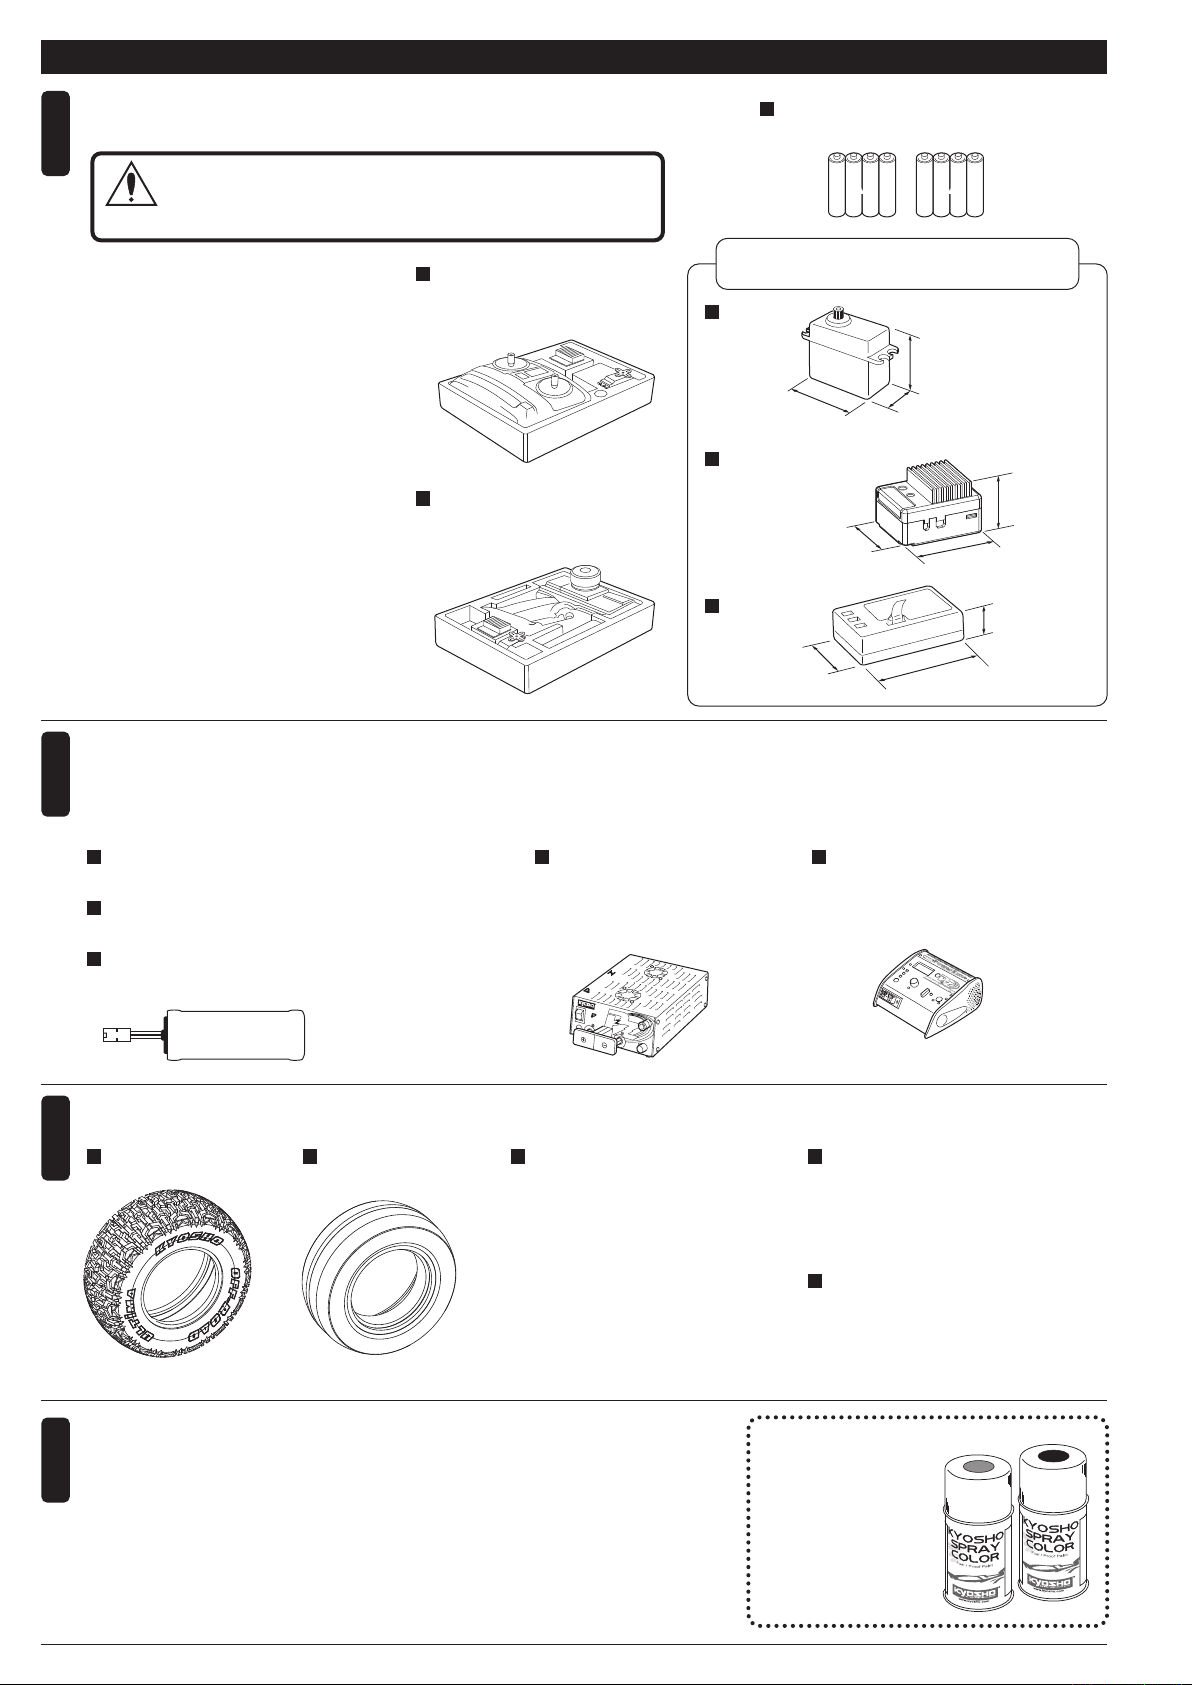
2チャンネルアンプ仕様無線操縦機(プロポ)と電池
2ch with electric speed controller and 1 servo radio control set
1
地上用(自動車用)のプロポ(2チャンネルアンプ仕様)セットを
必ず使用してください。(地上用以外使用禁止)
CAUTION: Only use a surface radio with 2 channels and electric
注意
speed controller! (Any other radio is prohibited!)
●このキットには2チャンネルアンプ仕様
のプロポが必要です。
●送信機にはスティックタイプとハンドル
タイプがありますが、お好みのタイプを
用意してください。
●プロポの取扱いは、プロポに付属の説明
書を参考にしてください。
●This kit requires a 2 channel radio
con-trol set with electric speed
controller.
●Use stick-type or wheel-type transmitter,
whichever suits you best.
●For more information on the transmitter,
kindly refer to the instruction manual of
the transmitter.
スティックタイプ
2チャンネルプロポ
Stick-type
2ch radio set.
ハンドルタイプ
2チャンネルプロポ
Wheel-type
2ch radio set.
単3乾電池(送信機用)
AA-size Batteries (For Transmitter)
AA
AAAA
AA
使用できるサーボ・受信機・アンプサイズ
Suitable servos, receiver & electric speed controller
サーボ
Servo
31〜36mm
38〜41mm
アンプ
Electric speed
controller
30〜37mm
受信機
Receiver
29〜32mm
18〜20mm
20〜30mm
35〜55mm
20〜25mm
43〜48mm
走行+受信機用バッテリー、バッテリー充電器
Operation/Receiver Battery and Charger for Battery
2
< >車体用 < >充電器< >安定化電源
< >For Car
No.ORI10325ORIONスポーツパワー2200
No.ORI10325 ORION SPORTS POWER 2200
No.ORI10326ORIONスポーツパワー3300
No.ORI10326 ORION SPORTS POWER 3300
No.ORI10327ORIONスポーツパワー4000
No.ORI10327 ORION SPORTS POWER 4000
タイヤ/インナースポンジ
Tire / Inner Sponges
3
タイヤ インナースポンジ
Tire Inner Sponge
No.UMT601
タイヤセット(2pcs/ULTIMASC)
No.UMT601
Tire Set (2pcs / ULTIMA SC)
< >
No.72321
パワーゾーンPS-25A
No.72321
POWER ZONE PS-25A
ower one
ower
one
PS-25A
< >
ChargerPower Supply
No.72301
パワーゾーンAC/DCチャージャー
No.72301
PowerZone AC/DC CHARGER
No.612261M2
ショートトラックBow-Tie2.2/3.0M2
No.612261M2
Short Track Bow-Tie 2.2 / 3.0 M2
No.612262M2
ショートトラックSwitch2.2/3.0M2
No.612262M2
Short Track Switch 2.2 / 3.0 M2
塗料
4
Paint
●ボディの塗装には塗料が必要です。
京商では、モデル用塗料、スプレーを販売していますのでご利用ください。
●For painting the body, use Kyosho paints for models!
6
No.76001〜76062
京商スプレーカラー
KYOSHO SPRAY COLOR
Page 7
キットの他にそろえる物(2)
ITEMS REQUIRED FOR OPERATION (2)
組立てに必要な工具
5
Tools required
キットに入っている工具 一般的な工具 アクセサリー
TOOLS INCLUDED TOOLS ACCESSORIES
使用する工具の取扱いには、十分注意してください。
CAUTION: Handle tools carefully!
注意
六角レンチ
(1.5mm, 2mm, 2.5mm)
Hex wrenches
(1.5mm, 2mm, 2.5mm)
1.5mm
2mm
2.5mm
十字レンチ(小)
Cross Wrench (small)
プロポの準備
プロポを下の順番にしたがってセットします。
Set up the radio as explained below.
2
2
11
6
10
ON
OFF
6
10
ON
OFF
+ドライバー(大、中、小)
Phillips screwdrivers (sizes: L, M, S)
ラジオペンチ
Needle Nose Pliers
ニッパー
Wire Cutters
キリ
Awl
PREPARE RADIO TRANSMISSION
10
11
5
充電器
Charger
ハサミ
Scissors
カッターナイフ
Sharp Hobby Knife
グリス
Grease
アンプ
Electric Speed Controller
Grease
No.96154
KYOSHO スペシャルグルー
KYOSHO Special Glue
瞬間接着剤
Instant Glue
ネジロック剤
Screw Cement
SCREW
CEMENT
No.96178
ロックタイト(中強度/10cc)
Loctite (Medium Strength / 10cc)
No.36219
SPナイフエッジリーマー
SP KNIFE EDGE REAMER
下穴加工が不要で、直接1 ~ 15mmの
穴あけができる工具です。
No need to pre-drill! Drills neat 1 ~ 15mm
holes directly!
KYOSHO
Special Glue
バッテリー
Battery
3
8
サーボ
Servo
8
送信機
5
1
Transmitter
1
送信機
Transmitter
●始める時
1
送信機に単3乾電池をセットする。
2
送信機のアンテナをのばす。
3
充電した受信機用バッテリーをつなぐ。
4
受信機のアンテナをのばす。
5
トリムを中央にセットする。
6
送信機のスイッチを入れる。
7
アンプのスイッチを入れる。
8
ハンドル/トリガーを動かしてサーボが動いているか確認。
●終わる時
アンプのスイッチを切る。
9
送信機のスイッチを切る。
10
送信機のアンテナを縮める。
11
受信機
Receiver
●START
1
Insert AA-size batteries into the Transmitter.
2
Extend the antenna of transmitter.
3
Connect the charged battery to the receiver.
4
Unwind the Receiver antenna.
5
Set trims of transmitter to center.
6
Switch "ON" the Transmitter.
7
Switch "ON" the Electric Speed Controller.
8
Check that the servos move in accordance with the control
from transmitter.
●FINISH
Switch "OFF" the Electric Speed Controller.
9
Switch "OFF" the Transmitter.
10
Retract the Transmitter antenna.
11
スイッチ
Switch
7
9
アンテナ
Antenna
モーター
Motor
ON
OFF
4
7
Page 8
組立て前の注意(1)
組立ての前に下記のことに注意してください。
1
Before assembling, please read the following carefully:
BEFORE YOU BEGIN (1)
●この説明書を良く読み、構造を理解する。
●キットの内容を確かめる。
※万一不良、不足がありましたら、お買い求めの販売店か、当社「ユーザー相
談室」までご連絡ください。
●小さな部品の形やサイズを間違えないようにする。図を参考にして確認しなが
ら組立てる。
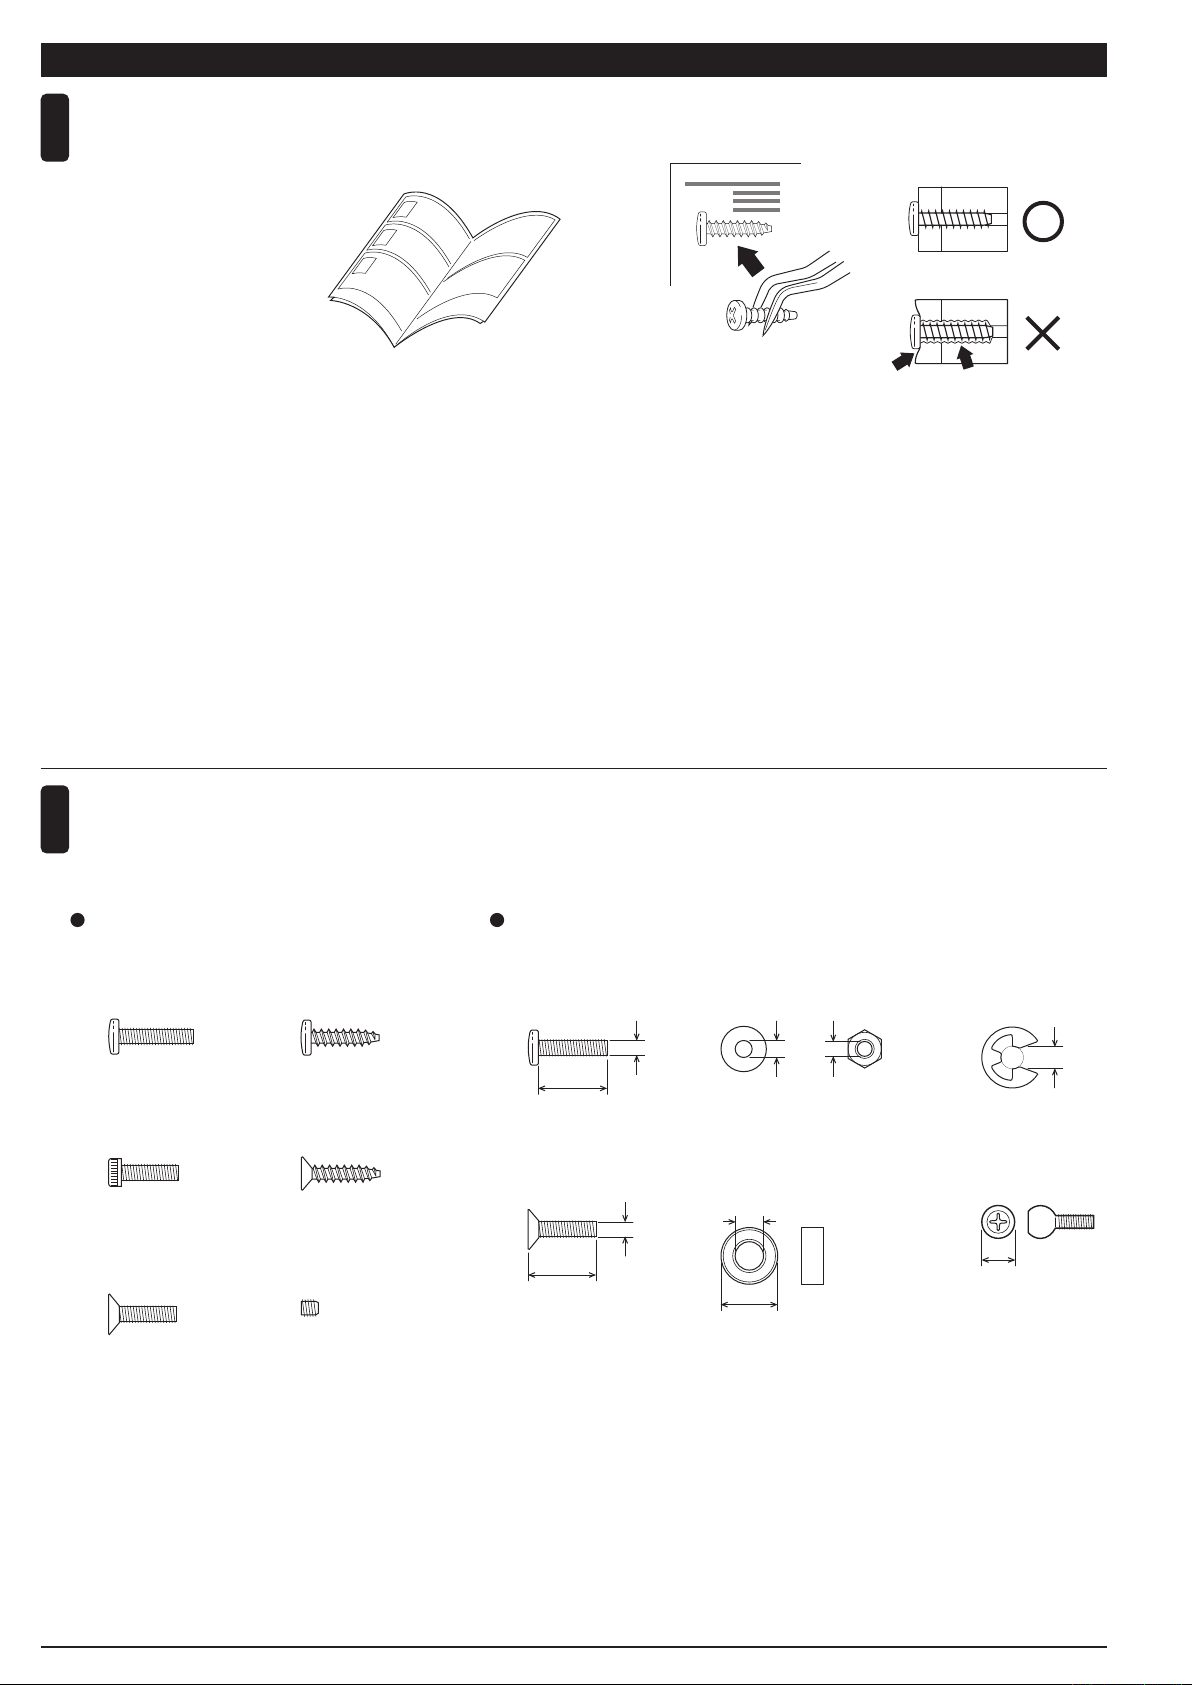
●TPビスを締めるときは・・・
締めこみが固くても部品が固定されるまで締めてください。
ただし、部品が変形するまで締めるとビスがきかなくなります。
●First, read this instruction manual and familiarise yourself with the model’s
construction.
●Check the kit contents. Should any parts be missing, contact the retail shop from
whom the model was purchased.
●Compare nuts, bolts, screws, etc to the "Actual Size" drawings on each page
before fitting to ensure that you are installing the correct parts.
●Tighten Self tapping (TP) screws into parts until you have a secure attachment.
However, be careful not to overly tighten TP screws as the threads may be
damaged.
キットには、形や長さが違うビスや小物部品が多く入っています。説明書には原寸図がありますので確認してから組立てて
2
ください。また、ビス類は多めに入っているものもありますので、予備としてお使いください。
This kit contains screws and hardware in different metric sizes and shapes. Before using them, check the screws on the
true-to-scale diagrams on the left side in each assembly step. Some screws are extras.
ビスの種類 小物部品のサイズ例
SCREWS
ビス
Screw
TPビス
Self-tapping (TP) Screw
OTHER HARDWARE
3x12mm
ビス
Screw
3mm
ワッシャー・ナット
Washer
•
Nut
E4
E-ring
Eリング
キャップビス
Cap Screw
TPサラビス
TP F/H Screw
セットビスサラビス
Set ScrewFlat Head (F/H) Screw
12mm
3x12mm
サラビス
F/H Screw
12mm
3mm
5x10mm
Metal Bushing • Ball Bearing
3mm
メタル・ベアリング
5mm
3mm
10mm
4mm
5.8mm
ピロボール
Pillow Ball
5.8mm
8
Page 9
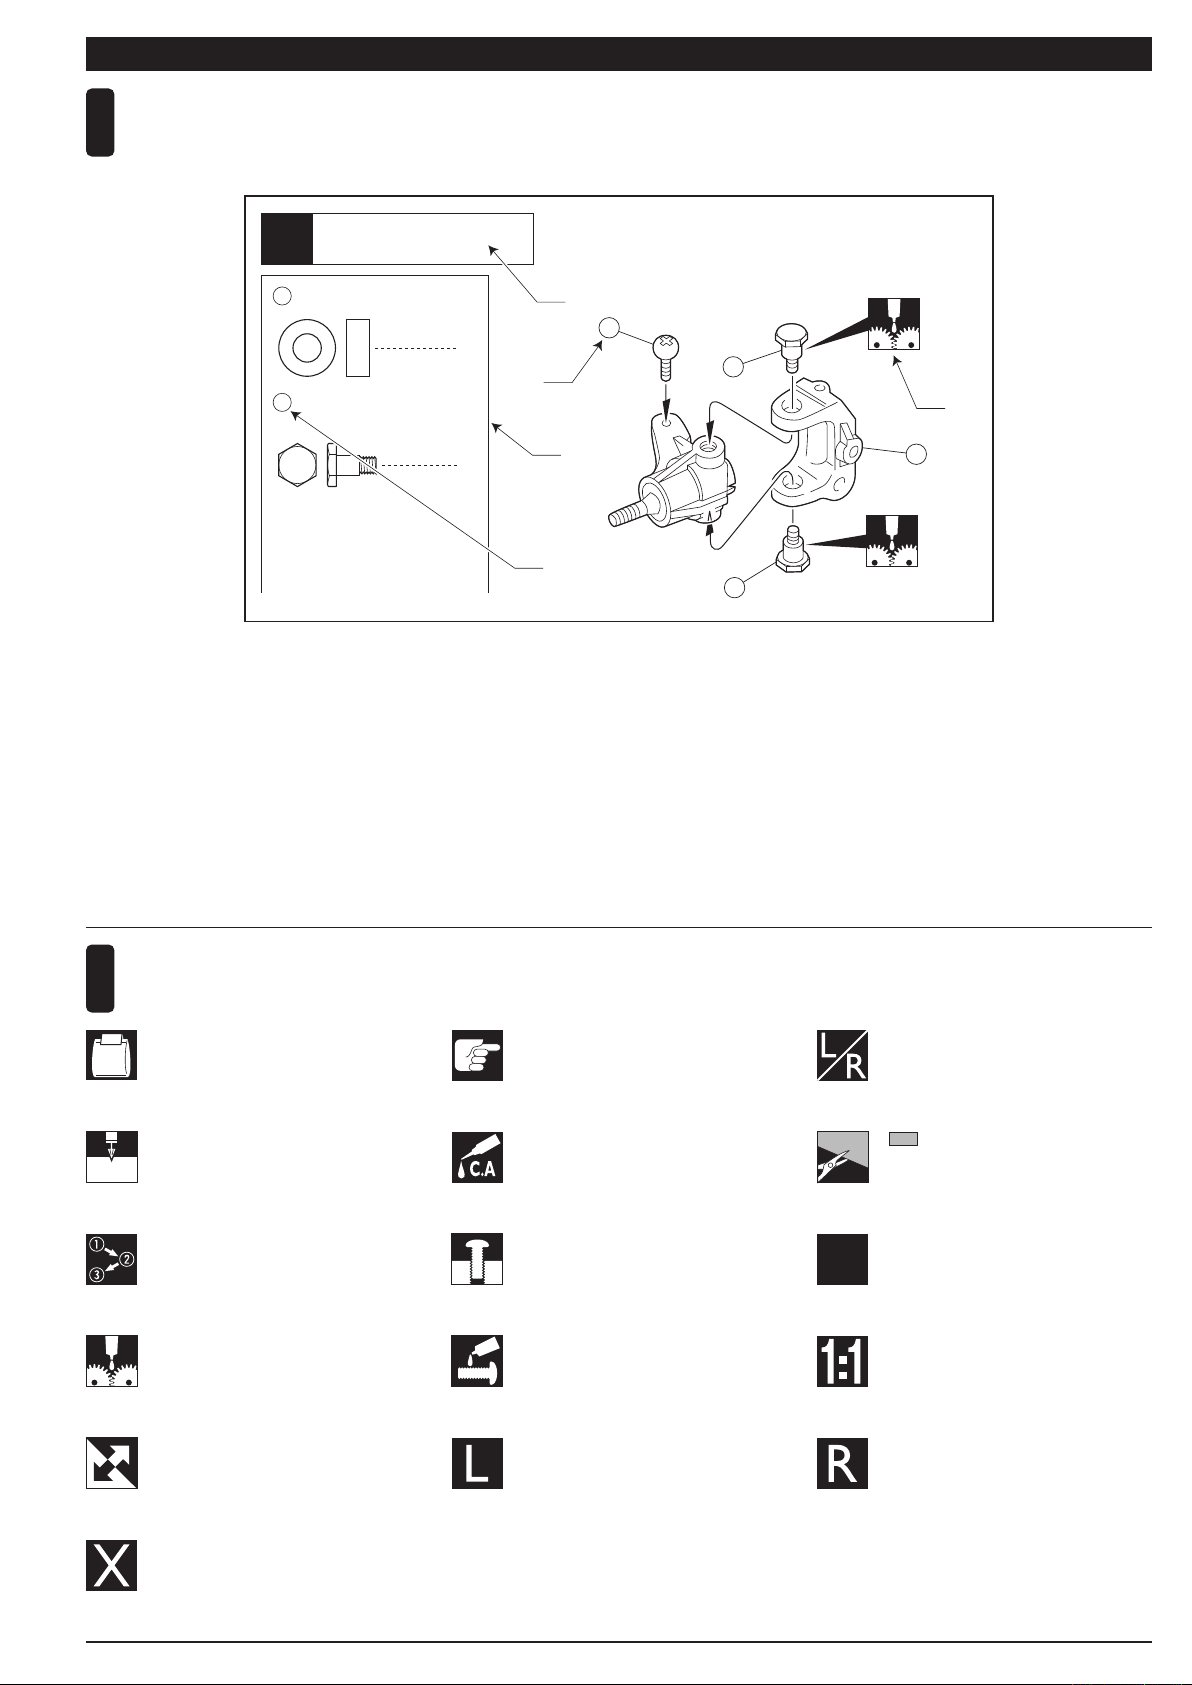
説明書の見かた
3
How to read the instruction manual:
1
組立て前の注意(2)
フロントサスペンション
Front Suspension
BEFORE YOU BEGIN (2)
〔説明例〕
〔Example〕
4 5 x 10mm
Metal Bushing
5
キングピン
King Pin
A: この項目で組立てるおおよその場所。
B: 小物部品の名前、原寸図、使用数。
C: キット内の部品は、ビス類を除いてキーNo.が付
けられています。スペアパーツを購入する時はキ
ーNo.を参照してください。
D: 説明書内では多くのマークが使用されています。
マークに注意して組立てを進めてください。マー
クの説明は、各ページの下にあります。
メタル
4
4
A
6
C
5
D
B
7
C
5
A: Gives the name of the part being made and the serial number of steps for
assembling.
B: Details the key-number of parts, actual-size drawings and quantity of parts to use.
C: All parts, except screws, are identified by key Numbers. When purchasing spare
parts, identify the key number of the part required and cross reference this to the
Spare Parts page, which shows the purchasable spare parts and the key
numbers contained within.
D: This instruction manual uses several symbols. Pay careful attention to them
during construction. Details are given at the bottom of each page.
説明書に使われているマーク
4
Symbols used throughout the instruction manual, comprise:
使用する袋詰。
Part bags used.
3mmの穴をあける(例)。 をカットする。
Drill holes with the specified diameter. Cut off shaded portion.
3mm
番号の順に組立てる。
Assemble in the specified order.
グリスを塗る。 ネジロック剤を塗る。
Apply grease. Apply threadlocker (screw cement).
向きに注意。
Note the direction
注意して組立てる所。
Pay close attention here!
瞬間接着剤で接着する。
Apply instant glue (CA glue, super glue).
仮止め。
Temporarily tighten.
左右同じように組立てる。
Assemble left and right sides the
same way.
2セット組立てる(例)。
Assemble as many times as specified.
x2
原寸図。
True-to-scale diagram.
左側用。 右側用。
For Left. For Right.
別購入品。
Must be purchased separately!
9
Page 10
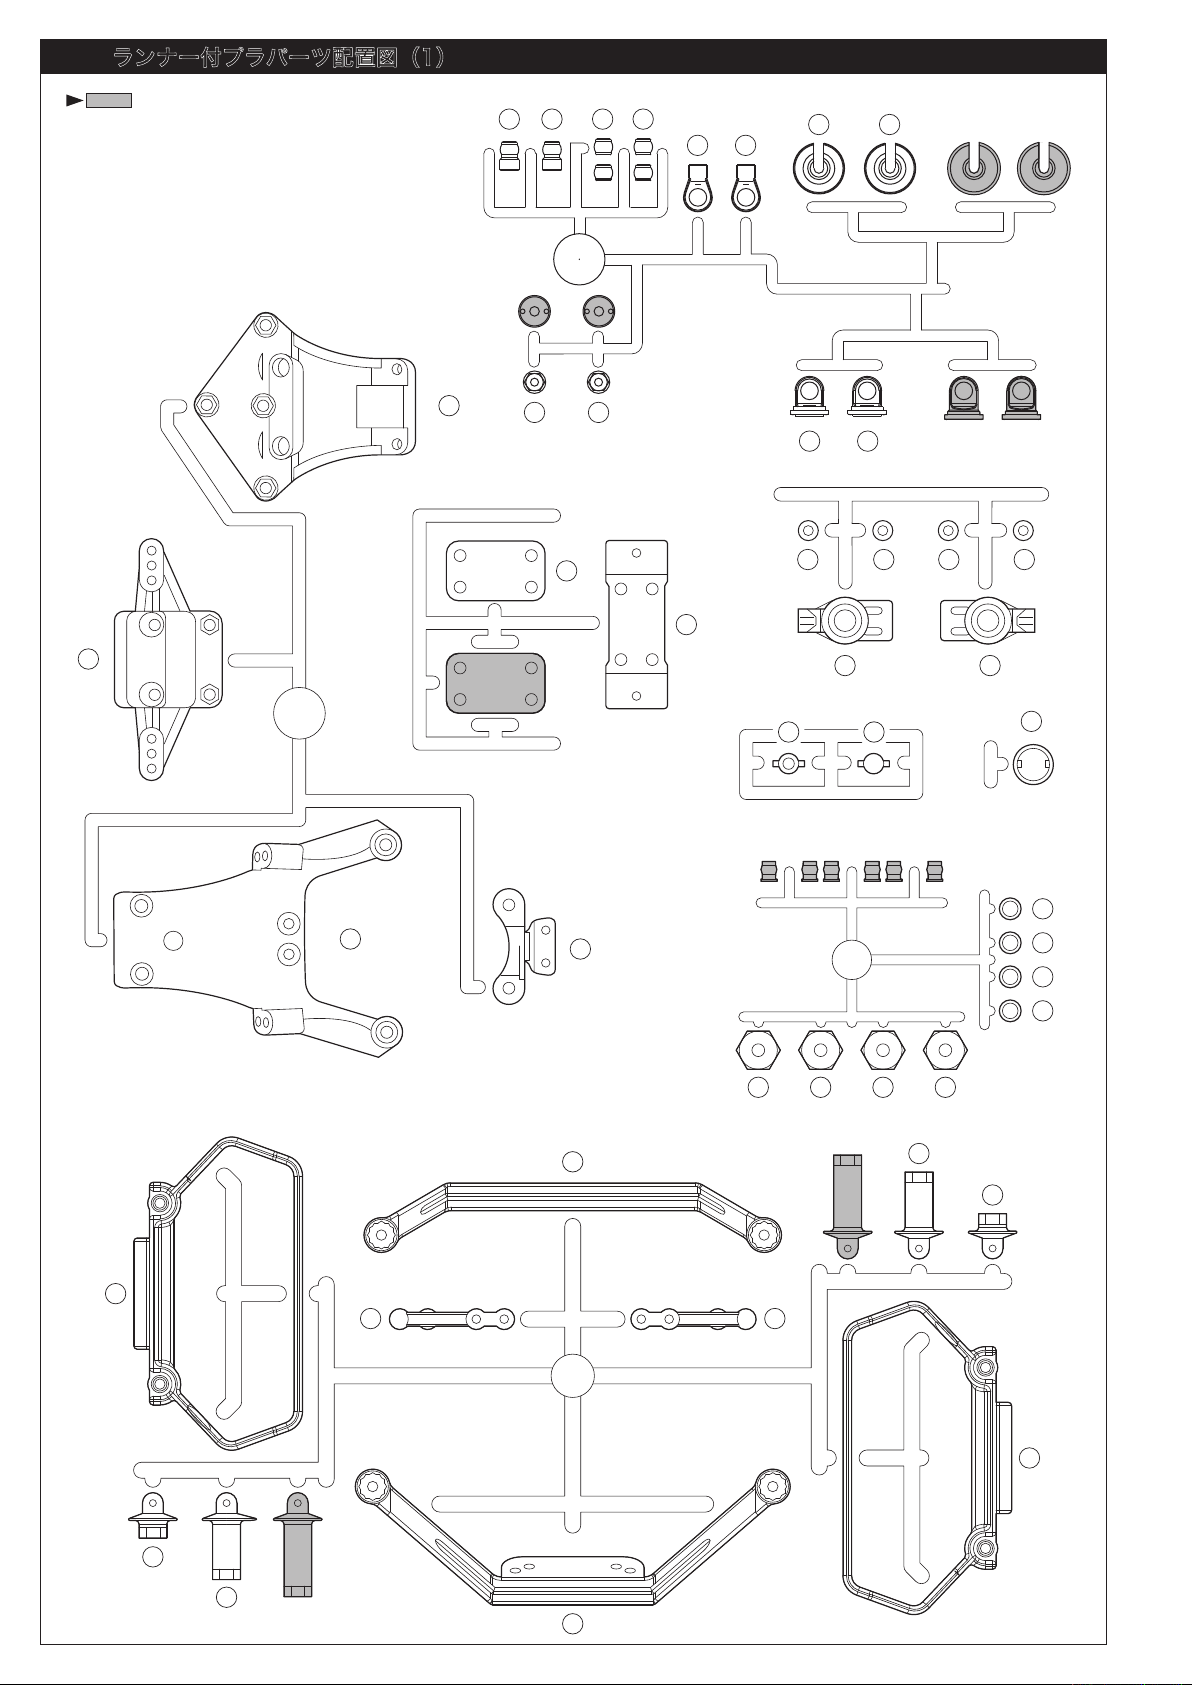
ランナー付プラパーツ配置図(1)
部分の部品は、使用しません。
Shaded parts are not used.
ARRANGEMENT OF PLASTIC PARTS ON RUNNERS (1)
211 211 212 212
208 208
210
210
48
47
213
52
213
51
209 209
33 32 32 33
31 31
175 176
222
25
49
29 29
50
30
21
24
24
23
23
21 21 21
26
27
25
10
27
26
28
Page 11
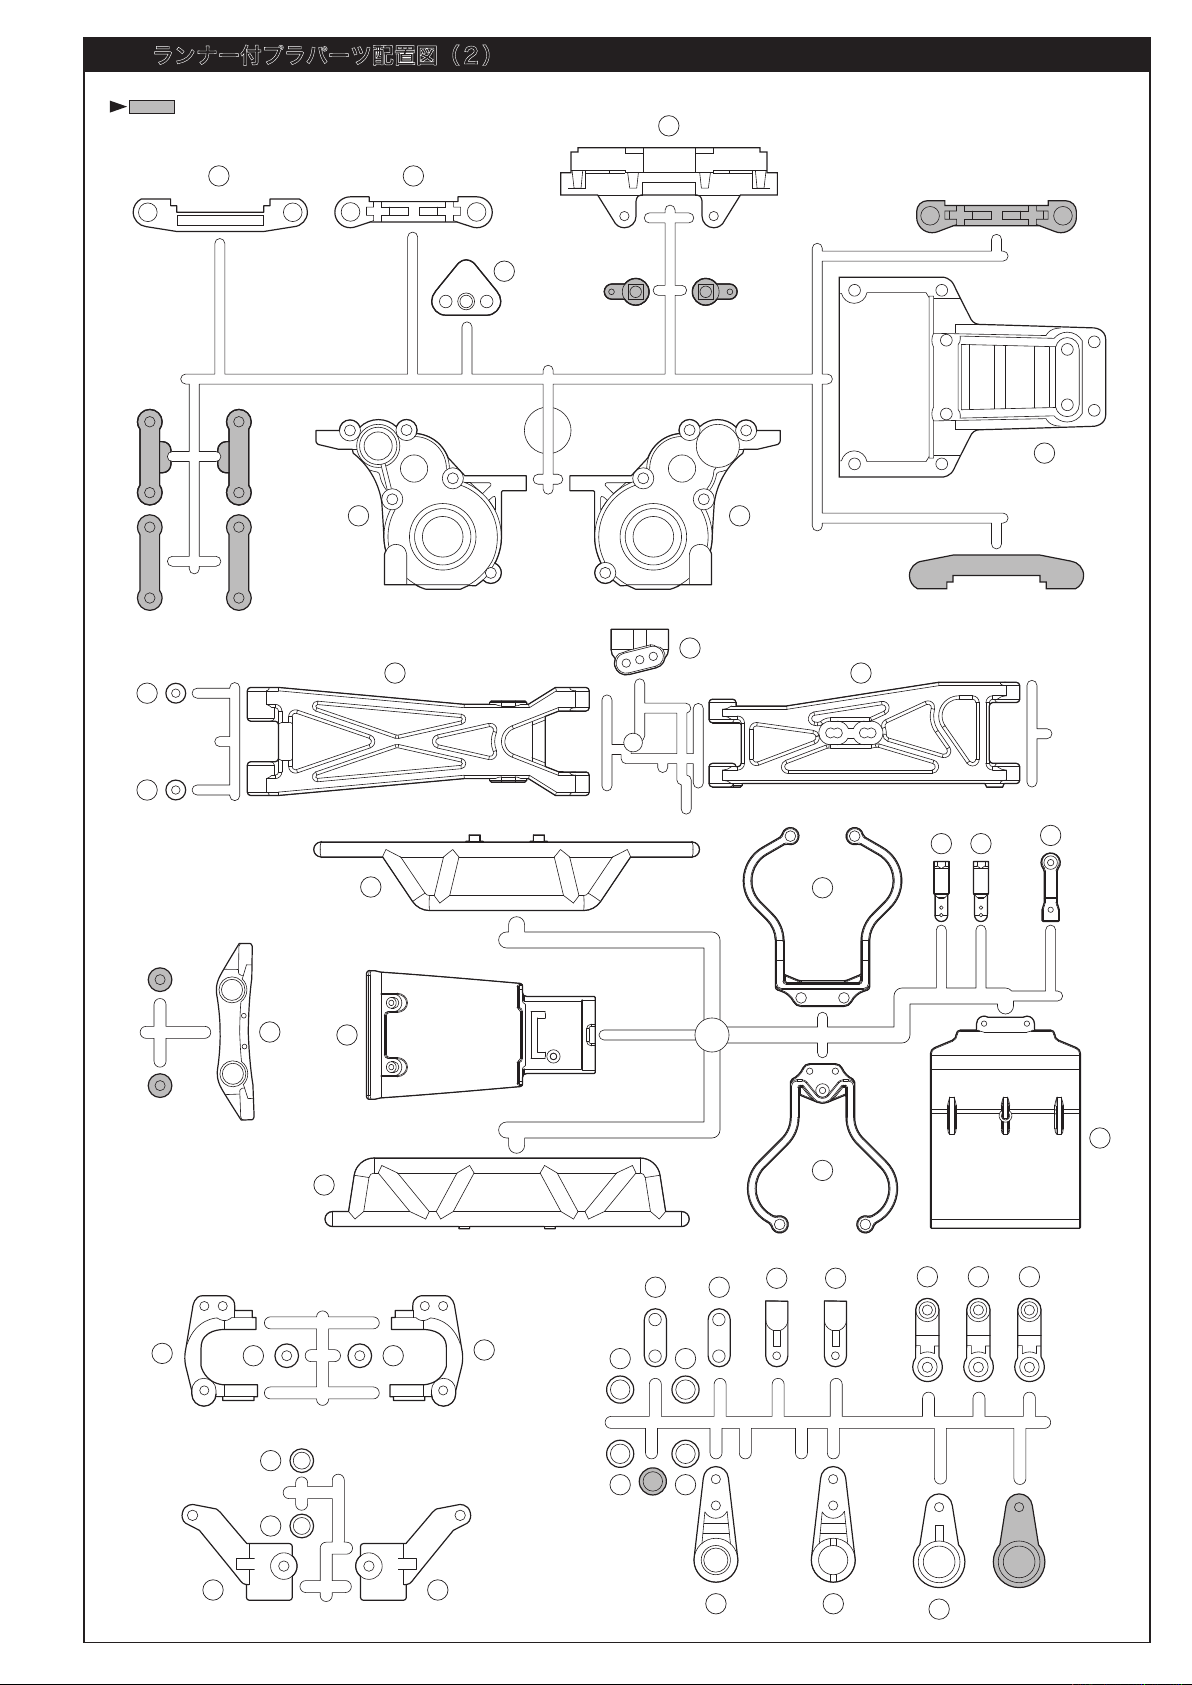
ランナー付プラパーツ配置図(2)
部分の部品は、使用しません。
Shaded parts are not used.
45 44
ARRANGEMENT OF PLASTIC PARTS ON RUNNERS (2)
43
46
42
65
64
24
59
13
40
15
66
41
14
6263
20 20
18
24
19
58
60 60
61
61
55 56
57
226 226
7979
7979
17
78 78
7576
224
77
SFH
16
225
74
11
Page 12
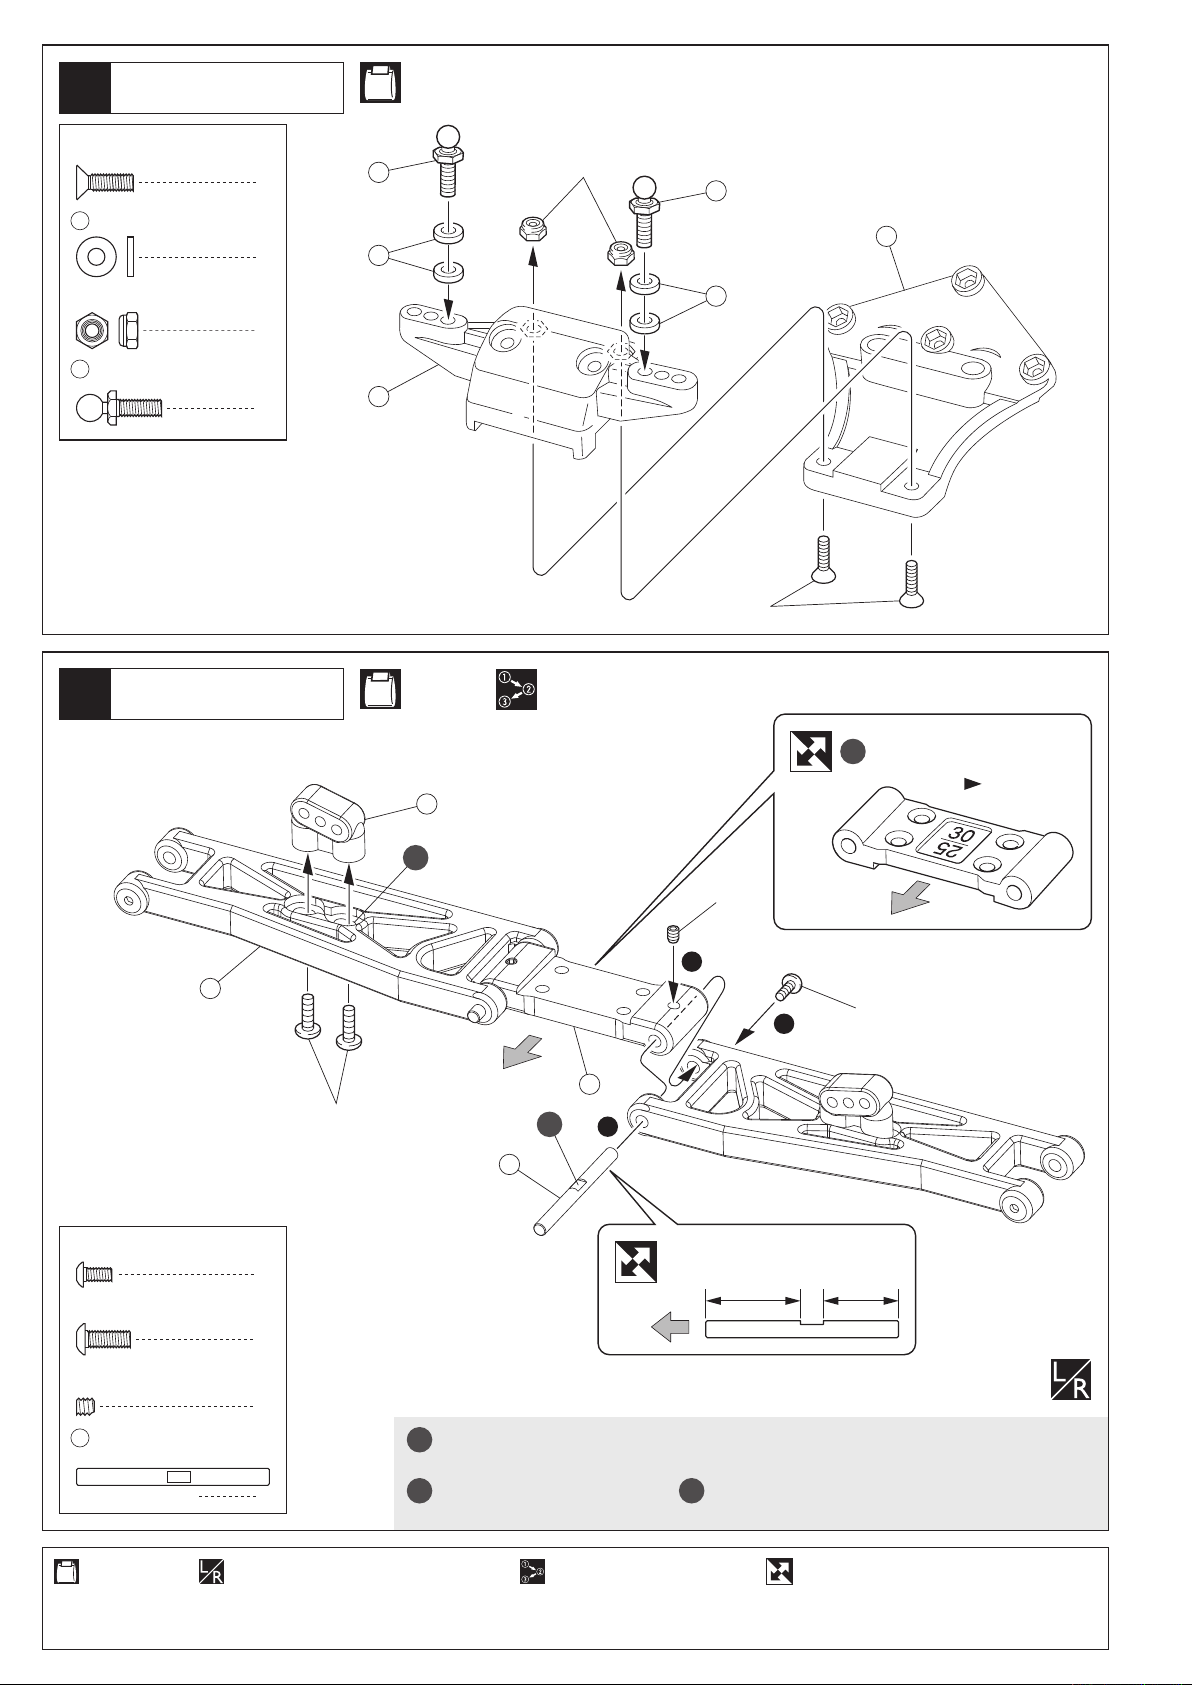
フロントサスペンション
1
Front Suspension
No.1, No.4
3 x 10mm
F/H Hex Screw
32
3mm
Nylon Nut
104
サラヘックスビス
3 x 7 x 1mm
Plastic Collar
4.8mm
Ball Stud (L)
プラカラー
ナイロンナット
ボールスタッド(L)
フロントサスペンション
2
Front Suspension
2
104
3mm
104
47
4
32
32
2
2
48
3x10mm
No.1
62
2.6 x 5mm
Button Hex Screw
3 x 8mm
Button Hex Screw
ボタンヘックスビス
ボタンヘックスビス
C
標準
66
Standard
B
3x3mm
3
1
前
Front
51
3x8mm
A
2
108
2
前
Front
4
長い
Long
前
Front
2.6x5mm
短い
Short
3 x 3mm
Set Screw
108
セットビス
3 x 34mm
Shaft
12
シャフト
2
平らな面にセットビスを固定する。
A
Firmly tighten the set screws onto the flat spots.
内側の穴を使用。
2
左右同じように組立てる。使用する袋詰。
Assemble left and right sides the same way.Part bags used.
B C
Use inside hole position.
番号の順に組立てる。
Assemble in the specified order.
30で使用する場合は向きを逆にします。
When using 30º insert the opposite direction.
向きに注意。
Note the direction.
Page 13
フロントサスペンション
3
Front Suspension
No.1, No.B
3 x 10mm
F/H Hex Screw
サラヘックスビス
4
1
52
(Thinner)
(薄い方)
0.5mm
2
3
3x10mm
4
4
3
3x10mm
80
サーボセイバー
4
Servo Saver
115
4.8mm
ボールスタッド(S)黒
Ball Stud (S) Black
186
5 x 8 x 2.5mm
Ball Bearing
ベアリング
13
5
5
3x10mm
No.1, No.3
1
186
114
115
119
186
4
74
76
186
5x8x2.5mm
ベアリング
Ball Bearing
75
1.5mm
使用する袋詰。
Part bags used.
186
113
186
番号の順に組立てる。 注意して組立てる所。
Assemble in the specified order.
Pay close attention here!
10mm0
13
Page 14
サーボセイバー
5
Servo Saver
3 x 6mm
Button Hex Screw
3 x 8mm
Button Hex Screw
ボタンヘックスビス
ボタンヘックスビス
強く締めすぎないように注意する。
No.1, No.3
3x6mm
A
Do not to over tighten the screws.
A
A
2
112
2
50
111
115
102
3 x 6mm
Flanged Metal
3 x 8 x 0.5mm
Washer
115
4.8mm
Ball Stud (S) Black
フランジメタル
ワッシャー
ボールスタッド(S)黒
フロントサスペンション
6
Front Suspension
3 x 8mm
F/H Hex Screw
3 x 10mm
F/H Hex Screw
3mm
Nylon Nut
サラヘックスビス
サラヘックスビス
ナイロンナット
115
2
2
59
2
3x8x0.5mm 3x8mm
102
102
No.1
3x10mm
4
4
A
3x8mm
4
3x10mm
6
49
2
バリに注意。
A
Make sure to cut off excess plastic (flashing)
ハメておく。
B
Press-fit bulkhead together before attaching to chassis.
3mm
B
1
3
73
2
3x8mm
5
3x10mm3x10mm
使用する袋詰。
Part bags used.
14
番号の順に組立てる。 注意して組立てる所。
Assemble in the specified order.
Pay close attention here!
ネジロック剤を塗る。
Apply threadlocker (screw cement).
Page 15

フロントサスペンション
7
Front Suspension
No.1
上
Top
115
黒
Black
55
115
4.8mm
ボールスタッド(S)黒
Ball Stud (S) Black
128
2 x 11mm
Pin
ピン
58
1
5
57
124
5 x 10 x 4mm
Ball Bearing
4
2.6 x 5mm
2
Button Hex Screw
ベアリング
ボタンヘックスビス
4
105
2.6x5mm
4mm
Flanged Nylon Nut
4
3 x 7 x 1.5mm
60
Plastic Collar
2
黒
115
Black
3
89
124
フランジ付ナイロンナット
2
プラカラー
2
56
60
105
3 x 25mm
Shaft
128
124
61
シャフト
2
21
4mm
2
フロントサスペンション
8
Front Suspension
2.6 x 5mm
Button Hex Screw
ボタンヘックスビス
3 x 7 x 2mm
64
Plastic Collar
2
No.1
プラカラー
105
2
3 x 25mm
Shaft
シャフト
2
64
2.6x5mm
2
使用する袋詰。
Part bags used.
左側用。 右側用。
For Left. For Right.
番号の順に組立てる。
Assemble in the specified order.
左右同じように組立てる。
Assemble left and right sides the same way.
1
105
向きに注意。
Note the direction.
15
Page 16

フロントサスペンション
9
Front Suspension
ボールエンド(LL) ボールエンド(3L)
4.8mm
171
Ball End (LL)
172
4.8mm
Ball End (3L)
No.1
ステアリングタイロッド
Steering Tie Rod
(3L)
172
(LL)
B
170
171
170
3 x 50mm
Adjust Rod
アジャストロッド
A
段のある方が逆ネジ。
A
The side with the step is a reverse screw.
段のある方。
B
Projection. Note direction.
44
171
4
フロントアッパーロッド
Front Upper Rod
(LL)
172
(3L)
171 172
約31mm
approx. 31mm
B
約31mm
approx. 31mm
B
約31mm
approx. 31mm
B
約31mm
approx. 31mm
170
170
170
172
171
x1
(3L)
x1
(LL)
x1
(3L)(LL)
x1
フロントサスペンション
10
Front Suspension
フロントアッパーロッド
Front Upper Rod
ステアリングタイロッド
Steering Tie Rod
A
フロントアッパーロッド
Front Upper Rod
A
A
ステアリングタイロッド
Steering Tie Rod
A
段のある方。
A
Projection. Note direction.
使用する袋詰。
Part bags used.
左側用。 右側用。
For Left. For Right.
16
1セット組立てる(例)。 原寸図。
x1
Assemble as many times as specified. True-to-scale diagram.
注意して組立てる所。
Pay close attention here!
Page 17

フロントダンパーステー
Front Shock Stay
11
No.1, No.B
穴の向きに注意。
A
Note in the direction of the hole.
26
28
3x8mm
3 x 8mm
Button Hex Screw
3 x 25mm
Cap Screw
3mm
Flange Nut
ボタンヘックスビス
キャップビス
フランジナット
3x8mm
6
2
26
3x8mm
3x8mm
3mm
3mm
26
28
A
前
Front
3x25mm
1
67
2
フロントバンパー
Front Bumper
12
3 x 12mm
Button Hex Screw
3 x 25mm
Cap Screw
ボタンヘックスビス
キャップビス
2
No.B
3x12mm
3x25mm
69
2
2
15
14
70
使用する袋詰。
Part bags used.
番号の順に組立てる。 向きに注意。
Assemble in the specified order. Note the direction.
17
Page 18

デフギヤ
13
Differential Gear
185
185
175
184
No.2
177
179
ペンチでつぶす。
Compress with pliers.
ボールデフグリス(クリア)
(両面)
Ball Differential Grease (Clear)
186
(Both sides)
174
を に組込み、ボール
180 174
デフグリスをたっぷり塗る。
Place the differential balls
into and apply ball
180
differential grease.
180
174
175
186
5 x 8 x 2.5mm
Ball Bearing
2.6 x 25mm
183
Ball Diffshaft
182
1/16
インチボール
Inch Ball
180
3/32
インチボール
Inch Ball
ベアリング
ボールデフシャフト
カドが丸い方をボール
側にする。
Face the rounded side
to balls.
2
1
2.6 x 6 x 1mm
181
Washer
8
2.6mm
185
Nylon Nut
12
ボールデフグリス(クリア)
(両面)
Ball Differential Grease (Clear)
(Both sides)
ワッシャー
2
ナイロンナット
1
180
186
179
モリブデングリス(黒)
Molybdenum Grease (Black)
はグリスを塗った に
182 181
8個並べる。
After applying Grease, place
eight differential balls between the two thrust washers
, grouping them around
181
the screw .
183
182
ボールデフグリス(クリア)
Ball Differential Grease (Clear)
178
181
182
181
181
183
182
181
183
176
調整方法
ADJUSTING
と をマイナスドライバーで固定し、本体を回してみる。
177 178
回らなくなるまで をしめ込む。回ってしまう状態のまま
走行させると破損するので注意する。
Secure parts and in place with two flat head
screwdrivers and rotate the differential case until it becomes
tight. Then, tighten screw . When running the car, the
differential must be tight, otherwise it may be damaged.
183
177 178
183
177
178
走行前にもタイヤを取付け再度調整する。
Before running, attach the tires and re-adjust accordingly.
使用する袋詰。
Part bags used.
グリスを塗る。
Apply grease.
次に本体を手で固定し、を回した時、が反対方向に回転
すれば良い。回らない時はしめ込み過ぎなので、をゆるめる。
Now, hold the differential case firmly and rotate part . If part
rotates into the opposite direction to part , no further
178 177
adjustment is necessary. If part does not rotate, screw
is too tight. In this case, gradually loosen screw until part
rotates.
178
調整後、 を取付ける。
176
Once the adjustment is done,
install (see"exploded view").
176
177 178
178
183
177
183
183
176
18
Page 19

14
ミッション
Transmission
No.2
124
5 x 10 x 4mm
Ball Bearing
123
10 x 15 x 4mm
Ball Bearing
96
5 x 15mm
Aluminium Shaft
ベアリング
ベアリング
アルミシャフト
41
4
124
123
2
124
123
1
96
124
187
124
40
ミッション
Transmission
15
3 x 10mm
Button Hex Screw
97
ボタンヘックスビス
5 x 7 x 7.5mm
Collar
カラー
No.2
1
ボールデフグリス
Ball Differential Grease
1
3x10mm
87
ボールデフグリス
Ball Differential Grease
97
デフギヤ
Differential
使用する袋詰。
Part bags used.
グリスを塗る。 左側用。 右側用。
Apply grease.
仮止め。
Temporarily tighten.
For Left. For Right.
19
Page 20

モーターマウント
Motor Mounts
16
No.2
3 x 25mm
Button Hex Screw
ボタンヘックスビス
4
B
81
本締めする。 3x25mmボタンヘックスビスが飛び出ないようにしめる。
A
Tighten securely.
B
Make sure that the 3x25mm button hex screw does not stick out of the plate.
3x25mm
3x25mm
< >左側
< >Left
222
A
メインギヤ
Main Gear
17
4mm
フランジ付ナイロンナット
Flanged Nylon Nut
122
4mm
88
1
White
No.2
88
82
白
White
72
A
82
白
C
約18mm
D
approx. 18mm
20mm100
B
使用する袋詰。
Part bags used.
20
ネジロック剤を塗る。
Apply threadlocker (screw cement).
凸と凹を合わせる。挟み込まないように注意する。
A
Align the 凸 & 凹 grooves. Prevent them from becoming sandwiched.
ペンチでつぶす。
B
Compress with pliers.
原寸図。
True-to-scale diagram.
バリを取る。 走行時、再度調整をする。
C
Remove flashing.
をカットする。
Cut off shaded portion.
D
When running, re-adjust.
Page 21

リヤダンパーステー
Rear Shock Stay
18
27
No.4, No.B
29
27
29
3x22mm
A
3x22mm
3x10mm
3 x 10mm
Button Hex Screw
3 x 12mm
Button Hex Screw
3x10mm
ボタンヘックスビス
ボタンヘックスビス
リヤバルクヘッド
Rear Bulkhead
19
3 x 10mm
Button Hex Screw
ボタンヘックスビス
30
3 x 22mm
Cap Screw
6
フランジナット
3mm
Flange Nut
4
3 x 7 x 1mm
32
Plastic Collar
4
3x10mm
キャップビス
No.2, No.4
プラカラー
3x12mm
3mm
3mm
3x12mm
68
2
2
3x10mm
3x10mm
2
104
104
この穴を使う。
A
Use this hole.
104
ボールスタッド(L)
4.8mm
Ball Stud (L)
2
リヤシャシー
Rear Chasiss
20
サラ ヘックスビ ス
3 x 8mm
F/H Hex Screw
文字が上向き。
A
The letter must face the correct direction.
2
3 x 7 x 2mm
33
Plastic Collar
プラカラー
2
No.2, No.4
32
33
A
32
33
43
44
上
Top
RF
42
3x8mm
使用する袋詰。
Part bags used.
注意して組立てる所。
Pay close attention here!
21
Page 22

リヤサスペンション
21
Rear Suspension
No.1, No.2, No.4
3 x 8mm
F/H Hex Screw
188
107
サラ ヘックスビ ス
スチールサスブッシュ
Steel Suspension Bush
3 x 44mm
Shaft
シャフト
メインシャシー
Main Chassis
22
3 x 8mm
F/H Hex Screw
サラ ヘックスビ ス
2
4
188
188
45
3x8mm(F/H)
2
107
63
188
No.4
4
リヤギヤボックス
Rear Gearbox
23
3 x 8mm
F/H Hex Screw
3 x 10mm
Button Hex Screw
サラ ヘックスビ ス
ボタンヘックスビス
使用する袋詰。
Part bags used.
No.4
2
2
左右同じように組立てる。
Assemble left and right sides the same way.
リヤギヤボックス
Rear Gearbox
3x8mm(F/H)
3x8mm(F/H)3x8mm(F/H)
3x10mm
向きに注意。仮止め。
Note the direction.Temporarily tighten.
22
Page 23

リヤダンパーステー
Rear Shock Stay
24
No.4
3 x 10mm
Cap Screw
キャップビス
リヤバンパー
Rear Bumper
25
3 x 8mm
F/H Hex Screw
3 x 6mm
Button Hex Screw
3 x 10mm
Button Hex Screw
サラ ヘックスビ ス
ボタンヘックスビス
ボタンヘックスビス
4
3x10mm
3x10mm
No.2, No.B
2
1
3x10mm
3x10mm
45
46
19
5
2
3x6mm
16
22ページで仮止めしたビス
A
Screws which were semi tightened in Page22 .
使用する袋詰。
Part bags used.
21
番号の順に組立てる。
Assemble in the specified order.
21
17
3x10mm
18
3
A
1
3x8mm(F/H)
23
Page 24

リヤサスペンション
26
Rear Suspension
189
No.1, No.4
124
23
31
124
104
33
24
104
33
ボールスタッド(L)
4.8mm
Ball Stud (L)
3 x 7 x 2mm
Plastic Collar
プラカラー
リヤサスペンション
27
Rear Suspension
ナイロンナット
3mm
Nylon Nut
21
4mm
4
5 x 7 x 3mm
23
PlasticCollar
2
5 x 7 x 2mm
24
PlasticCollar
2
プラカラー
プラカラー
フランジ付ナイロンナット
4mm
Flanged Nylon Nut
2
128
2 x 11mm
2
Pin
ピン
124
5 x 10 x 4mm
Ball Bearing
2
2
128
ベアリング
x2
No.4
3 x 7 x 2mm
64
Plastic Collar
4
プラカラー
3 x 7 x 4mm
65
Plastic Collar
2
プラカラー シャフト
106
3 x 39.5mm
Shaft
2
2
リヤハブの動きがスムーズな位置でナットを締めるのを止める。
A
Do not over tighten nut too much to prevent binding in the rear hubs.
使用する袋詰。
Part bags used.
注意して組立てる所。
Pay close attention here!
番号の順に組立てる。
Assemble in the specified order.
左右同じように組立てる。
Assemble left and right sides the same way.
24
1
2セット組立てる(例)。
x2
Assemble as many times as specified.
106
2
グリスを塗る。
Apply grease.
3mm
65
64
A
Page 25

リヤサスペンション
28
Rear Suspension
ボールエンド(LL) ボールエンド(3L)
4.8mm
171
Ball End (LL)
170
3 x 50mm
Adjust Rod
アジャストロッド
172
4.8mm
Ball End (3L)
No.1, No.4
22
2
172
(3L)
B
約38mm
approx. 38mm
170
171
(LL)
x1
リヤサスペンション
29
Rear Suspension
171
(LL)
B
A
段のある方が逆ネジ。 段のある方。
A
The side with the step is a reverse screw.
約38mm
approx. 38mm
170
B
Projection. Note direction.
172
(3L)
x1
使用する袋詰。
Part bags used.
左側用。 右側用。
For Left. For Right.
x1
A
A
1セット組立てる(例)。 原寸図。
Assemble as many times as specified. True-to-scale diagram.
左右同じように組立てる。
Assemble left and right sides the same way.
注意して組立てる所。
Pay close attention here!
段のある方。
A
Projection. Note direction.
25
Page 26

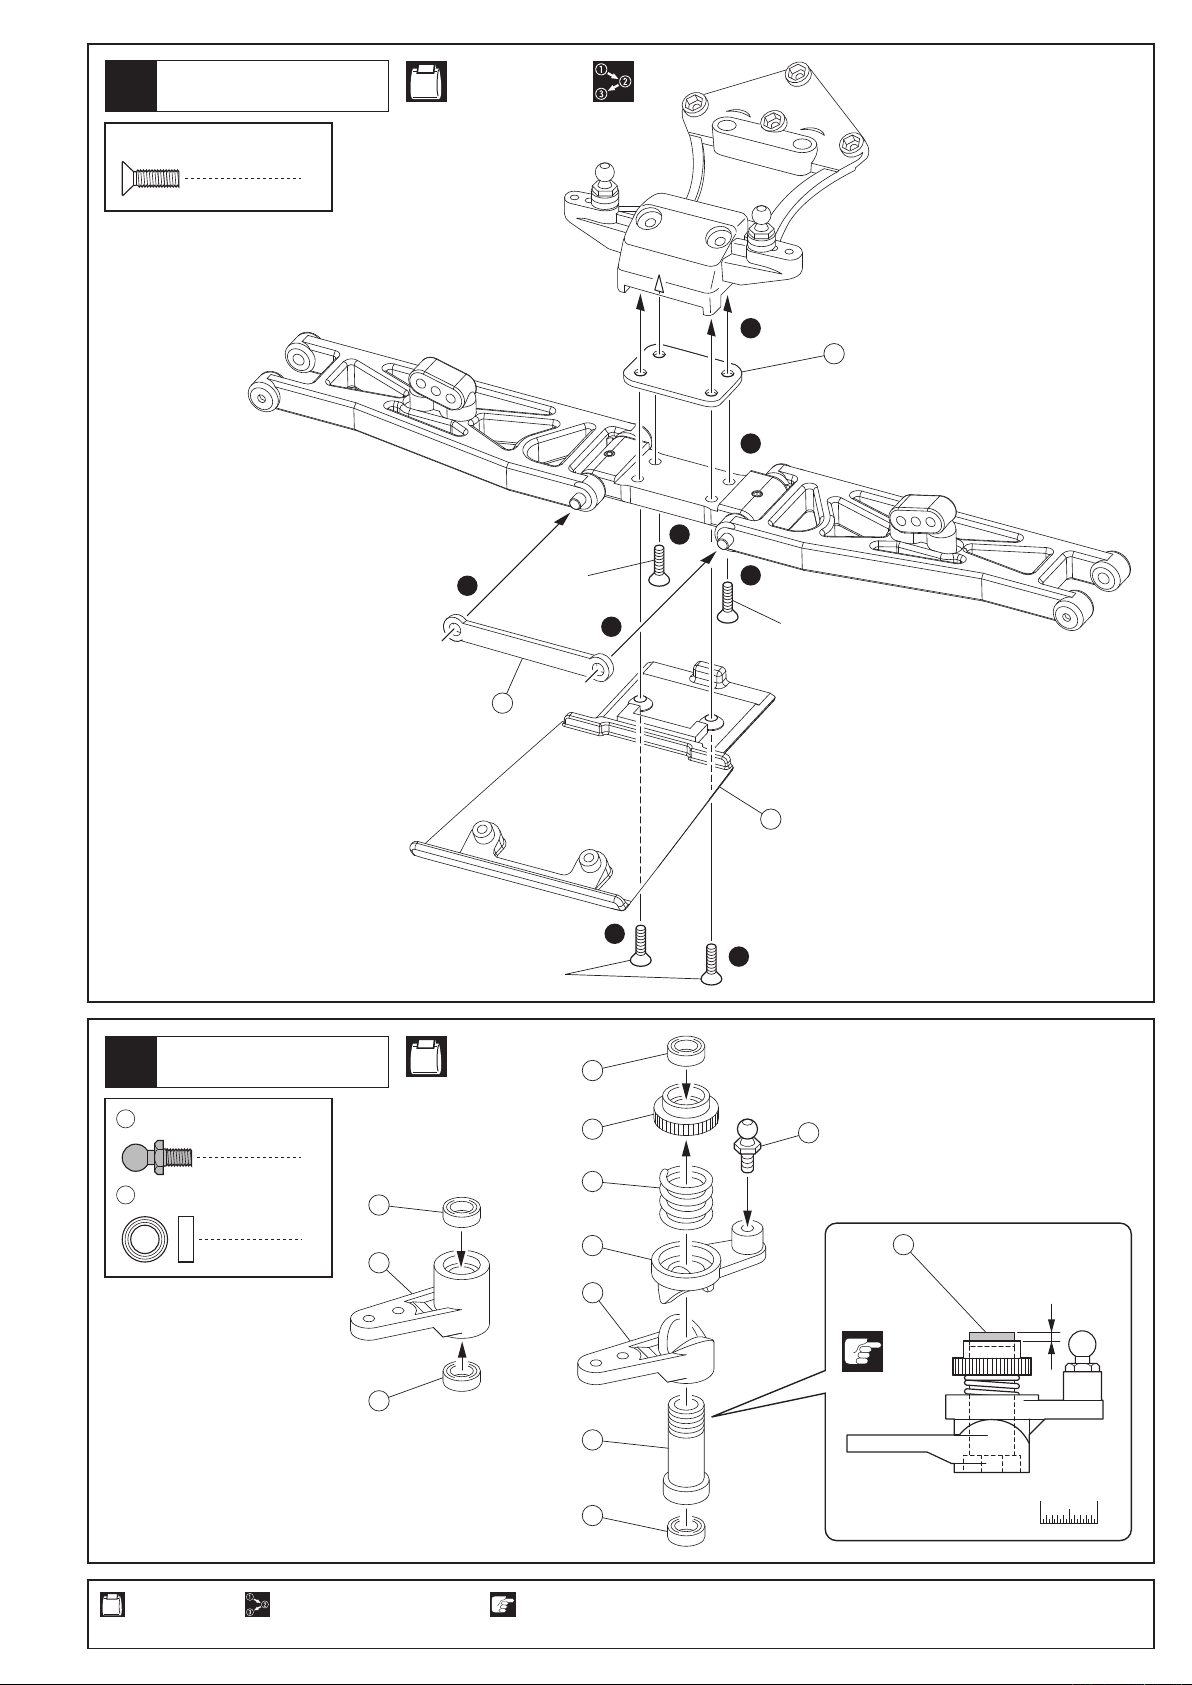
メインシャシー
Main Chassis
30
No.B
25
3 x 8mm
Button Hex Screw
3 x 10mm
F/H Hex Screw
ボタンヘックスビス
サラ ヘックスビ ス
4
3x8mm
2
3x8mm
3x10mm(F/H)
20
20
25
3x10mm(F/H)
ダンパー
31
Shock Absorber
Eリング
201
E2.5
E-ring
Oリング
196
O-ring
195
Oリング(中)
O-ring (Medium)
197
3 x 6.5 x 5mm
Collar
3 x 7 x 2.5mm
198
Plastic Collar
カラー
プラカラー
208
5.8mm
ボールエンド(S)
Ball End (S)
8
200
ダンパーピストン(2C,2B,3A,3B)
Shock Piston
8
4
4
4
No.5
4
4
195
194
196
< >フロント用
< >for Front
< >リヤ用
< >for Rear
2
3x8mm 3x8mm
40mm3010 200
x2
x2
フロント用
For Front
リヤ用
For Rear
208
208
約28mm
approx. 28mm
約36mm
approx. 36mm
208
200
1
201
3
A
オイルを少し付ける。
A
Put a little oil.
使用する袋詰。
Part bags used.
26
A
2セット組立てる(例)。
x2
Assemble as many times as specified.
197
196
198
199
202
フロント用(短)
for Front (Short)
リヤ用(長)
203
for Rear (Long)
番号の順に組立てる。
Assemble in the specified order.
201
原寸図。
True-to-scale diagram.
Page 27

ダンパー
32
Shock Absorber
206
Oリング(大)
O-ring (Large)
No.5
フロント用(短)
204
for Front (Short)
リヤ用(長)
205
for Rear (Long)
4
206
209
207
2
B
4
3
C
1
A
D
215
5
F
E
x4
オイルを入れる。 伸ばしておく。 キャップを軽く止まる所まで締め、1/2回転ゆるめる。
A
Put the oil.
シャフトをゆっくり押し込む。 余分なオイルが出る。 キャップを最後まで締め込み、シャフトを伸ばす。
D
Insert the shaft slowly.
ダンパー
33
Shock Absorber
218
フロント用(短)
for Front (Short)
219
リヤ用(長)
for Rear (Long)
B
Keep expanded.
C
E
Surplus oil comes out.
A
Tighten the cap until it slightly stops, then loosen it for a 1/2nd lap.
F
Tighten the cap firmly,and pull the shaft.
No.5
フロント用(短)
216
B
for Front (Short)
リヤ用(長)
for Rear (Long)
217
C
210
216
Oリング(特大)
O-ring (Extra Large)
211
212
プラブッシュ
5.8mm
Plastic Bushing
5.8mm
プラボール
Plastic Ball
211
4
2
2
212
スプリング調整用。 オイルを付ける。
A
For adjusting the spring tension.
使用する袋詰。
Part bags used.
2セット組立てる(例)。
x2
Assemble as many times as specified.
車高の前後が水平になるように、
走行しながら を調節する。
Adjust while model is running so
the front and rear are same height .
217
217
番号の順に組立てる。
Assemble in the specified order.
B
Put an oil.
スプリングを縮めて を入れる。
C
Compress the spring and install .
210
x4
210
27
Page 28

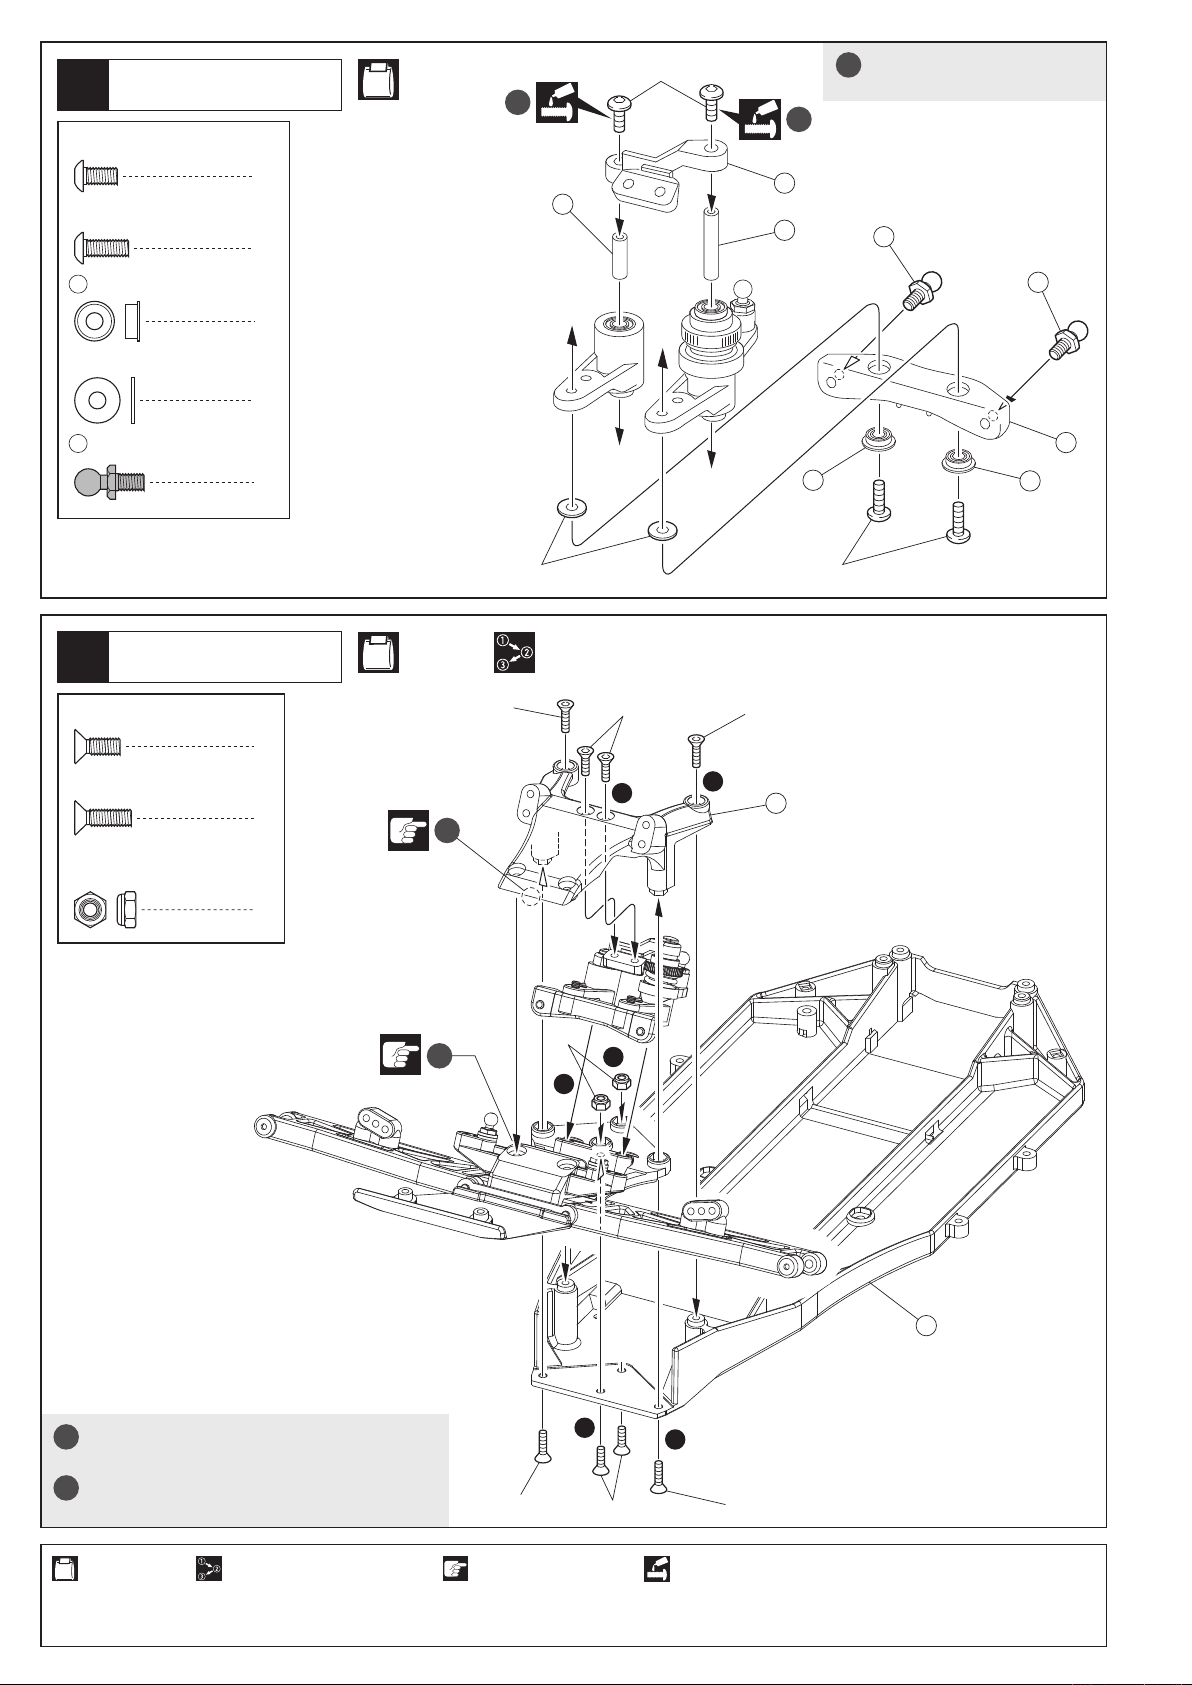
フロントサスペンション
34
Front Suspension
No.5
3 x 12mm
Button Hex Screw
33
213
ボタンヘックスビス
3 x 7 x 2mm
Plastic Collar
3mm
Plastic Nut
プラカラー
プラナット
2
2
2
213
1
フロント用(短)
For Front (Short)
2
33
3x12mm
この穴を使う。
A
Use this hole.
リヤサスペンション
35
Rear Suspension
3 x 12mm
Button Hex Screw
32
213
ボタンヘックスビス
3 x 7 x 1mm
Plastic Collar
3mm
Plastic Nut
プラカラー
プラナット
A
No.5
2
2
2
1
213
リヤ用(長)
For Rear (Long)
2
この穴を使う。
A
Use this hole.
使用する袋詰。
Part bags used.
28
左右同じように組立てる。
Assemble left and right sides the same way.
3x12mm
32
A
番号の順に組立てる。 注意して組立てる所。
Assemble in the specified order. Pay close attention here!
Page 29

ステアリングサーボ
Steering Servo
36
90˚ 90˚
No.1, No.3, No.6
3x10mm
173
A
77
F FUTABA, ORION
224
S SANWA, KO, JR
225
H HITEC
173
0mm
下のサイズの場合は、 を使用します。
In case of the following sizes, use .
ステアリングサーボ
Steering Servo
3x10mm
226
226
10mm以下の場合
Shorter than 10mm.
28mm以上の場合
Longer than 28mm.
78
78
226
226
115
3x10mm
フタバ,オリオンF
サンワ,KO,JRS
ハイテックH
3 x 10mm
Button Hex Screw
3 x 10mm
F/H Hex Screw
使用する袋詰。
Part bags used.
ボタンヘックスビス
サラ ヘックスビ ス
別購入品。
Must be purchased separately!
3 x 10mm
Set Screw
4
115
2
セットビス
4.8mm
ボールスタッド(S)黒
Ball Stud (S) Black
1
173
4.8mm
Ball End (Short)
1
3x10mm
(F/H)
ボールエンド(短) ワッシャー
3mm
Washer
2
サーボ付属
A
Supplied with the servo.
4
29
Page 30

37
プロポ
Radio
No.6
アンテナ
Antenna
受信機
Receiver
220
アンテナキャップ
Antenna Cap
133
アンテナパイプ
Antenna Pipe
スピードコントローラー(ESC)
Electronic Speed Controller
CH2
CH1
BATT
.
ステアリングサーボ
1
Steering Servo
.
2
スピードコントローラー(ESC)
Electronic Speed Controller
両面テープ
221
Double-sided Tape
両面テープ
221
スイッチ
Switch
シャシーのスリットに通す。 コネクターを差し込む。 コードをストラップで束ねる。
A
Pass the cord through the slits of the chassis.
38
モーター
Motor
No.6
B
Insert connector.
Double-sided Tape
C
Bind the wires with strap.
C
B
3 x 6mm
Button Hex Screw
ボタンヘックスビス
2
3 x 6mm
Cap Screw
3mm
Washer
A
3mm
3x6mm(Cap)
53 54
3x6mm
紙1枚分のすき間をつくって固定する。
A
Tighten the screws with one sheet of paper inserted between both gears.
3x6mm
キャップビス
2
ワッシャー
2
使用する袋詰。
Part bags used.
30
をカットする。別購入品。
Cut off shaded portion.Must be purchased separately!
Page 31

39
129
フックピン
Hook Pin
バッテリー
Battery
84
2
フックピン
129
Hook Pin
バッテリー
Battery
No.6
71
227
40
ボディ
Body Shell
7mm
7mm
7mm
使用する袋詰。
Part bags used.
向きに注意。
Note the direction.
をカットする。
Cut off shaded portion.
7mmの穴をあける(例)。 別購入品。
7mm
Drill holes with the specified diameter.
Must be purchased separately!
31
Page 32

塗装
Painting
41
塗装前に、洗剤で油やよごれを洗う。 ウインドウ部分に、内側から
1
Before painting, use a neutral detergent to
remove any oil residues and dirt. Mask the windows from the inside.
2
マスキングシートを貼る。
塗分けはパッケージ写真も
3
参考にしてください。
Refer to the pictures on the
box for the color scheme.
京商スプレーカラーでボディ内側を塗装する。
Paint the body shell from the inside using
Kyosho spray colors.
デカール
Decals
42
A A
塗装後、ボディ表面の保護ビニールシートを
4
はがしておく。
After painting, remove the protective
film from the body shell.
マスキング
Mask Windows
デカールは、取扱説明書を参考に好みの位置に貼って、不要な部分は
A
カットしてください。
Place the decals to your liking to the instruction manual, and cut off the
excess part.
タイヤ&ホイール
Tire & Wheel
43
使用する袋詰。
Part bags used.
x4
140
AA
x4
ピッタリはめてからタイヤとホイールの
A
つなぎ目に瞬間接着剤を流し接着する。
After fitting wheels to tyres, apply instant
glue as shown.
4セット組立てる(例)。瞬間接着剤で接着する。
Assemble as many times as specified.Apply instant glue (CA glue, super glue).
別購入品。
Must be purchased separately!
32
Page 33

タイヤ&ホイール
Tire & Wheel
44
フランジ付ナイロンナット
4mm
Flanged Nylon Nut
< >リヤ
< >Rear
< >フロント
< >Front
4mm
A
4mm
4
A
一度シャシーからはずして使用する。
A
Unscrew the wheel nuts from the chassis, mount the wheels and retighten the nuts.
ボディマウント
Body Mounts
45
フックピン
129
Hook Pin
フックピン
129
Hook Pin
No.6
4
フックピン
129
Hook Pin
使用する袋詰。
Part bags used.
フックピンは、図のように曲げて
おくと取り外しが楽です。
Slightly bend the hook pins as shown
in the diagram for easier removal.
左右同じように組立てる。
Assemble left and right sides the same way.
33
Page 34

分解図
EXPLODED VIEW
Q
57
UM505B
55
UM505B
L
M
67
UM555
15
UM602
14
UM602
70
97002
129
49
UM557
13
UM602
UM501
48
69
UM557
26
28
UM501
52
UM502
51
UM502
一部パーツ販売していないパーツがあります。
Note that some parts are not sold as spare parts!
W5194-01
213
W5196V
W0203
212
W5194-01
W5196V
UM602
UM602
33
UM113
W5194-01
213
W5196V
W5196-01V
FM364BL
FM364BL
218
W5199-65
C
211
207
W5194-01
W5196V
209
W5181-03
W5193-01
B
W5184-01
W0203
W5194-01
W5196V
W5189-01BL
W5196V
206
204
T
104
UM128
32
UM113
W5184-02
N
T
A
47
UM501
D
115
LA246
58
UM505B
128
92051
L
M
W0203
211
W5194-01
W5196V
216
217
W5184-01
W5194-01
W5196V
171
171
97021
89
W5196V
201
200
201
202
P
97021
170
97008-50H
172
UM609
76
59
195
194
196
197
212
170
97008-50H
97021
LA221B
UM505B
102
LA22
196
198
199
210
208
W0203
W5194-01
W5196V
172
97021
112
UM507
186
BRG002
W5184-05
W5194-01
W5196V
77
224
225
102
LA22
115
LA221B
140
C
111
UM507
186
BRG002
92921
119
186
BRG002
115
UM129
D
UM129
173
97021
173
UMH601BK
221
96441B
97021
185
N
50
123
BRG014TS
TF120
UMW602
175
UM509
UMW602
184
114
75
113
186
UM501
UM124
UMW602
92921
115
74
LA221B
92921
BRG002
226
LA221B
A
54
71
177
UM515
UMW602
UM129
LA221B
78
LA221B
226
B
UM514
UM558
179
LA221B
78
221
96441B
UM119
UMW602
186
174
LA221B
97
UM518
40
UM508B
BRG002
UMW602
UM509
UMW602
73
66
Q
80
UM131
© Copyright 2010 KYOSHO CORPORATION / 禁無断転載複製
UM606
108
UMW101
62
UM606
34
33
105
UM113
LA228
P
33
124
BRG001TS
UM113
105
LA228
60
UM505B
115
UM129
56
UM505B
124
BRG001TS
61
UM505B
21
UM603
84
Page 35

122
88
LA207
LA204
53
UM514
96
UM125
124
82
UM516
BRG001TS
187
UMW513
124
72
BRG001TS
124
O
UM564-82
82
UM516
BRG001TS
87
88
UM518
124
BRG001TS
LA204
W5194-01
213
32
W5198V
UM113
30
UM604
211
W0203
W5194-01
W5198V
S
W0203
212
W5194-01
W5198V
206
211
W5198-01V
104
UM128
32
UM113
33
UM113
43
UM508B
W0203
W5194-01
W5198V
FM364BL
219
W5198-65
19
UM602
81
68
UM556
UM517
H
J
E
207
W5189-01BL
W5198V
213
209
W5194-01
W5198V
205
216
217
27
UM604
29
UM604
W5194-01
W5198V
129
97002
180
UM120
UMW602
20
UM602
129
UM607
UM608
186
97002
BRG002
UMW602
179
UM119
UMW602
84
181
UM608
220
1708
178
UM515
UMW602
BRG100
UMW602
122
1708
I
188
182
181
BRG100
UMW602
LAW39
BRG100
UMW602
183
25
UM604
107
LA230
63
J
TF120
UMW602
E
188
UM606
176
UM509
UMW602
F
LAW39
R
K
123
BRG014TS
42
190
128
UM510-02
191
41
UM508B
44
UM508B
UM508B
UM560-01
171
193
UM510-02
UM510-02
124
BRG001TS
G
65
222
97021
23
31
UM606
UM509
UMW602
O
F
170
UM603
UM519
45
UM508B
S
G
I
K
H
97008-50H
192
UM510-02
106
UM561
172
97021
24
18
104
UM128
33
UM603
UM602
UM113
33
46
UM508B
UM113
124
BRG001TS
21
17
UM602
UM603
16
UM602
W5181-03
W5198-02
140
W5184-01
W5184-05
W5184-02
W5184-01
W5194-01
W5198V
W5194-01
W5198V
UMH601BK
201
200
201
W5198V
203
195
194
196
197
196
198
199
210
32
UM519
212
W0203
W5194-01
W5198V
ULTIMA SC-R
208
R
35
Page 36

スペアパーツ SPARE PARTS
★FOR JAPANESE MARKET ONLY.
品番
No.
UM113 263
UM119 525
UM120 315
UM124 315
UM125 210
UM128 420
UM129 420
UM131 210
UM501 630
UM502 420
UM505B
UM507
UM508B
UM509
UM510
UM514
UM515
UM516 1050
UM517 735
UM518 1680
UM519 630
UM555 525
UM556 630
UM557 473
UM558 525
UM560
UM561 735
UM564
UM602 1050
UM603 420
UM604 735
UM606 735
UM607 1890
UM608 420
UM609 525
UMH601
UMW101
UMW601
3mmカラー
3mm Collar
デフリング
Differential Ring
3/32ボール
3/32 Ball
テンションスプリング
Tensionner Spring
アイドラギヤシャフト
Idler Gear Shaft
4.8mmボールスタッド(L)
4.8mm Ball Stud (L)
4.8mmボールスタッド(S)
4.8mm Ball Stud (S)
フロントヒンジピンブレース
Front Hinge Pin Brace
フロントバルクヘッド(RB5)
Front Bulkhead (RB5)
フロントサスマウント(RB5)
Front Suspension Mount (RB5)
フロントナックル&ハブキャリア
セット(RB5/RB5 SP)
Front Knockle & Hub Carrier
Set (RB5/RB5 SP)
サーボセイバーシャフトセット(L/S/RB5)
Servo Saver Shaft Set (L/S/RB5)
ギヤボックスセット(RB5/RB5SP)
Gear Box Set (RB5/RB5SP)
デフギヤセット(52T/RB5)
Diff. Gear Set (52T/RB5)
ホイールシャフト(RB5/1pcs)
-02
Wheel Shaft (RB5/1pcs)
ギヤカバーセット(RB5)
Gear Cover Set (RB5)
デフシャフトセット(RB5)
Diff. Shaft Set (RB5)
デュアルスリッパーシート(ホワイト/RB5/2pcs)
Dual Slipper Sheet (White/RB5/2pcs)
モータープレート(RB5)
Motor Plate (RB5)
メインギヤシャフト(RB5)
Main Gear Shaft (RB5)
リヤハブType-B(Off-4.7/RB5用)
Rear Hub Type-B (Off-4.7/for RB5)
フロントダンパーステー(RT5)
Front Shock Stay (RT5)
リヤダンパーステー(RT5)
Rear Shock Stay (RT5)
フロントボディマウントベース(RT5)
Front Body Mount Base (RT5)
バッテリープレート(RT5)
Battery Plate (RT5)
スイングシャフト(RT5/1pcs)
Swing Shaft (RT5/1pcs)
-01
サスシャフト(39.5/RT5/2pcs)
Suspension Shaft (39.5/RT5/2pcs)
スパーギヤ(48P-82T)(RT5/RB5/RB5 SP)
Spur Gear (48P-82T) (RT5/RB5/RB5 SP)
-82
バンパー・サポートセット(アルティマSC)
Bumper & Support Set (ULTIMA SC)
ドライブワッシャーセット(アルティマSC)
Drive Washer Set (ULTIMA SC)
ボディマウントセット(アルティマSC)
Body Mount Set (ULTIMA SC)
サスアームセット(アルティマSC)
Suspension Arm Set (ULTIMA SC)
メインシャシー(アルティマSC)
Main Chassis (ULTIMA SC)
バッテリースペーサー(アルティマSC)
Battery Spacer Foam (ULTIMA SC)
フロントホイールシャフト(アルティマSC)
Front Wheel Shaft (ULTIMA SC)
ホイール(ブラック/2pcs/アルティマSC)
Wheel (Black/2pcs/ULTIMA SC)
BK
ハードサスシャフト(フロントインナー)
Hard Suspension Shaft (Front Inner)
ユニバーサルスイングシャフト(84mm/2pcs/アルティマSC)
Universal Swingshaft (84mm/2pcs/ULTIMA SC)
パーツ名
Part Names
内容(キーNo.と入数)
Quantity
x 6
32 33
179
x 2
180
x 12
184
x 1
96
x 1
104
x 4
115
x 4
80
x 1
47 48 49 50
51 52
55 56 5760586159
111 112
40 41 424643
44 45
174 175 176 187 222
128 191 192 193
53 54
177 178
82
x 2
81
x 1
87 97
31 32 33
67
x 1
68
x 1
69 70
71
x 1
190
x 1
106
x 2
72
x 1
13 14 151916
20
x 2
21
x 4
25 26 27 29
28 30
62 63 64 65 66
73
x 1
227
x 1
89
x 2
140
x 2
108
x 2
189
x 2
x 1
x 2
x 1
x 1
x 1
x 1
x 1
x 1
23
x 1
x 2
x 1
x 1
17 18
x 2
x 2
x 1
x 1
x 1
x 1
★定価
(税込)
473
210
735
420
1470
315
1050
893
420
735
525
4725
品番
No.
UMW602
BRG001
BRG002
BRG014
BRG100
LA221B
W0203
W5181
W5184
W5184
W5184
W5189
W5193
W5194
W5196
W5196
W5198
W5198
W5198
W5198
W5199
ボールデフセット
(ULTIMA SC/DB/RB5/RT5)
Ball Diff. Set
(ULTIMA SC/DB/RB5/RT5)
テフロンシールドベアリング(5x10x4/4pcs)
TS
Teflon Shield Bearing (5x10x4/4pcs)
5x8x2.5mmベアリング
5x8x2.5mm Bearing
テフロンシールドベアリング(10x15x4/2pcs)
TS
Teflon Shield Bearing (10x15x4/2pcs)
デフスラストベアリング(1入)(96994)
Diff.Thrust Bearing (1pcs) (96994)
ダンパーアジャストナット(ブルー)
FM364
Shock Adjustable Nut (Blue)
BL
ステアリングピン
LA22 263
Steering Pin
ドライブディスク(ZX-5)
LA204 1785
Drive Disk (ZX-5)
スリッパースプリング(ZX-5)
LA207 315
Slipper Spring (ZX-5)
サーボセイバー(ZX-5/ZX-5 FS/TF-5/RB5)
Servo Saver (ZX-5/ZX-5 FS/TF-5/RB5)
サスシャフト(25)(ZX-5)
LA228 420
Suspention Shaft (25) (ZX-5)
サスシャフト(44)(ZX-5)
LA230 420
Suspention Shaft (44) (ZX-5)
ローマウント4.8mmボールスタッド(S/4pcs)
LA246 525
Low Mount 4.8mm Ball Stud (S/4pcs)
アクスルカバー(リヤハブOff-4.7/ZX-5 SP/RB5用)
LA253 315
Axle Color (R-Hub Off-4.7/ZX-5 SP & RB5)
スチールサスブッシュ(8pcs)
LAW39
Steel Sus. Bush (8pcs)
ボールデフスクリューセット(TF-5 スタリオン)
TF120
Ball Diff. Screw Set (TF-5 STALLION)
5.8φプラブッシュセット
5.8φ Plastic Bush Set
ダンパーピストン
-03
Shock Piston
シールカートリッジ(L/2セット入)
Seal Cartridge (L/2-Set)
-01
カートリッジブッシュ(L/2pcs)
Cartridge Bush (L/2pcs)
-02
ダンパーOリング(8pcs)
Shock O-Ring (8pcs)
-05
ショックキャップ(ブルー/2pcs)
-01BL
Shock Cap (Blue/2pcs)
ダンパーシャフト(L=50/2pcs)
-01
Shock Shaft (L=50/2pcs)
ダンパープラパーツセット
-01
Shock Plastic Parts Set
ベルベットコートトリプルキャップ
スレッドショックセット(38)
V
Velvet Coating Triple Cap
Thread Shock Set (38)
ベルベットコートスレッドショックケース(38/1pcs)
-01V
Velvet Coating Thread Shock Case (38/1pcs)
ベルベットコートトリプルキャップ
スレッドショックセット(46)
V
Velvet Coating Triple Cap
Thread Shock Set (46)
ベルベットコートスレッドショックケース(46/1pcs)
-01V
Velvet Coating Thread Shock Case (46/1pcs)
ショックシャフト(58mm/2pcs)
Shock Shaft (58mm/2pcs)
-02
スプリング(R/#65/L=75/2pcs)
Spring (R/#65/L=75/2pcs)
-65
スプリング(F/#65/L=55/2pcs)
Spring (F/#65/L=55/2pcs)
-65
カラーアンテナ(黒キャップ付)
1708 525
Color Antenna (Black Cap)
クロスレンチ(5.5/7.0/8.0/10.0mm)
80164 473
Cross Wrench (5.5/7.0/8.0/10.0mm)
2x11mmピン
92051 315
2x11mm Pin
セイバーチューブ&スプリング
92921
Servo Saver Tube & Spring
スポンジテープ(1x100x150)
96441B
Sponge Tape (1x100x150)
パーツ名
Part Names
内容(キーNo.と入数)
Quantity
174 175 176 178 181
183 184
179 186
182
124
86
123
181
216 217
102
88
122
74 75 76 77
78
105
107
135
223
188
183
211 212
200
194 199
197 198
196
207
202
208 209 210 211 212213
194 195 196 197 198 199
202 204 206 207 208 209
211 212 213 216 217
215
204
194 195 196 197 198 199
203 205 206 207 208 209
211 212 213 216 217
215
205
203
219
218
133
128
113 114 119
221
x 8
x 4
x 4
x 2
x 2
x 2
x 2
x 1
x 2
x 2
x 2
x 4
x 2
x 8
x 1
x 2
x 8
x 2
x 2
x 1
x 1
x 1
x 1
x 2
x 2
x 2
x 4
x 10
177
185 186
x 2
180
182
x 2
79
185
x 8
x 2
x 2
196
196
x 1
x 1
x 12
x 8
x 1
x 4
x 2
215
x 1
x 2 x 4
x 4
x 4
x 2
201
x 2
201
200
210
x 5
200
210
x 5
★定価
(税込)
3990
840
1050
525
420
368
315
525
630
315
210
1050
315
525
525
630
420
4515
1155
5040
1260
630
630
630
525
315
36
Page 37

スペアパーツ SPARE PARTS
★FOR JAPANESE MARKET ONLY.
品番
No.
ボディピン(1.6mm/10pcs/FM29)
97002 263
Body Pin (1.6mm/10pcs/FM29)
97008
ハードアジャストロッド(3x50mm/2pcs)
-50H
Hard Adjust Rod (3x50mm/2pcs)
パーツ名
Part Names
内容(キーNo.と入数)
Quantity
129
x 10
x 2
170
★定価
(税込)
1050
オプションパーツ(1) OPTIONAL PARTS (1)
品番
No.
LA244
リヤハブ(OF-4.7/#0.5/RB5/ZX-5 ミドルサス用)
-05
Rear Hub (OF-4.7/#0.5/RB5/ZX-5 Middle Sus.)
SPサスブッシュ(POM/8pcs/ZX-5)
LAW32
SP Suspension Bush (POM/8pcs/ZX-5)
UM316
UM317
UM318
UM319
UM320
UM321
UM322
UM323
UM324
UM325
UM519
UMB601
UMB651
UMB681
UMD601
UMH601
UMT601
UMW504
UMW505B
UMW506
スチールピニオンギヤ(16T-48P)
Steel Pinion Gear (16T) 1/48 Pitch
スチールピニオンギヤ(17T-48P)
Steel Pinion Gear (17T) 1/48 Pitch
スチールピニオンギヤ(18T-48P)
Z
Steel Pinion Gear (18T) 1/48 Pitch
スチールピニオンギヤ(19T-48P)
Z
Steel Pinion Gear (19T) 1/48 Pitch
スチールピニオンギヤ(20T-48P)
Z
Steel Pinion Gear (20T) 1/48 Pitch
スチールピニオンギヤ(21T-48P)
Steel Pinion Gear (21T) 1/48 Pitch
スチールピニオンギヤ(22T-48P)
Steel Pinion Gear (22T) 1/48 Pitch
スチールピニオンギヤ(23T-48P)
Steel Pinion Gear (23T) 1/48 Pitch
スチールピニオンギヤ(24T-48P)
Steel Pinion Gear (24T) 1/48 Pitch
スチールピニオンギヤ(25T-48P)
Steel Pinion Gear (25T) 1/48 Pitch
リヤハブ Type-B(off-4.7)
Rear Hub Type-B (off-4.7)
-2
プリントボディセット(アルティマSC)
Printed Body Set (ULTIMA SC)
クリアボディセット(アルティマSC)
Clear Body Set (ULTIMA SC)
クリアボディ・ウイングセット(アルティマDB)
Clear Body & Wing Set (ULTIMA DB)
デカール(アルティマSC)
Decal Set (ULTIMA SC)
ホイール(シルバー/2pcs/アルティマSC)
S
Wheel (Silver/2pcs/ULTIMA SC)
タイヤセット(アルティマSC)
Tire Set (ULTIMA SC)
カーボンコンポジットギヤボックス(RB5)
Carbon Composite Gear Box (RB5)
カーボンコンポジットリヤシャシー(RB5)
Carbon Composit Rear Chassis (RB5)
カーボンコンポジットリヤバルク(RB5)
Carbon Composite Rear Bulk (RB5)
UMW508B4.8mmボールスタッド(ハイマウント/4pcs)
4.8mm Ball Stud (High Mount Type/4pcs)
パーツ名
Part Names
内容
Description
31
と交換。
Replaces .
188
と交換。
Replaces .
103
と交換。
Replaces .
103
と交換。
Replaces .
103
と交換。
Replaces .
103
と交換。
Replaces .
103
と交換。
Replaces .
103
と交換。
Replaces .
103
と交換。
Replaces .
103
と交換。
Replaces .
103
と交換。
Replaces .
103
と交換。
Replaces .
31 32 33
プリントボディ,デカール
31
188
103
103
103
103
103
103
103
103
103
103
x 2
Printed Body, Decals
クリアボディ,デカール
Clear Body, Decals
インナーボディとして使用可。
For use as a inner body.
デカール
x 1
Decals
140
と交換。
Replaces .
タイヤ,インナー
140
Tire, Inner
40 41
, と交換。
Replaces , .
42
と交換。
Replaces .
43
と交換。
Replaces .
104
より2mm高いタイプ(セッティング用)
2mm higher than .
40 41
42
43
x 1set
x 1set
x 2
104
★定価
(税込)
7140
5040
3990
1050
1575
630
525
420
420
420
420
420
420
420
420
420
420
735
945
735
735
630
525
品番
No.
4.8mmボールエンドセット(L=10/23/28)
97021 420
4.8mm Ball End Set (L=10/23/28)
キットの部品の一部にはスペアパーツとして販売していない物があります。
京商ではオプションパーツを販売していますのでお買い求めください。
Some of the parts included are not available as spare parts. Purchase optional parts instead.
品番
No.
SPモータープレート(RB5)
UMW509
SP Motor Plate (RB5)
アルミリヤサスホルダー(RF/RB5)
UMW511
Aluminum Rear Suspension Holder (RF/RB5)
アルミリヤサスホルダー(RR/RB5)
UMW512
Aluminum Rear Suspension Holder (RR/RB5)
ワイドアルミリヤサスホルダー(RF/RB5 SP)
UMW514
Wide Aluminum Rear Suspension Holder (RF/RB5 SP)
ワイドアルミリヤサスホルダー(RR/RB5 SP)
UMW515
Wide Aluminum Rear Suspension Holder (RR/RB5 SP)
W0117
W0118
W0119
W0120
W0121
W0122
W0123
W0124
W0125
W0201
W5198
W5199
ハードピニオン(17T-48P)
Hard Pinion Gear (17T-48P)
Z
ハードピニオン(18T-48P)
Hard Pinion Gear (18T-48P)
Z
ハードピニオン(19T-48P)
Hard Pinion Gear (19T-48P)
Z
ハードピニオン(20T-48P)
Hard Pinion Gear (20T-48P)
Z
ハードピニオン(21T-48P)
Hard Pinion Gear (21T-48P)
Z
ハードピニオン(22T-48P)
Hard Pinion Gear (22T-48P)
Z
ハードピニオン(23T-48P)
Hard Pinion Gear (23T-48P)
Z
ハードピニオン(24T-48P)
Hard Pinion Gear (24T-48P)
Z
ハードピニオン(25T-48P)
Hard Pinion Gear (25T-48P)
Z
アルミカラー(3mm厚/ブルー/6pcs)
W0143
Aluminum Color (3mm/Blue/6pcs)
アルミカラー(3x7x2/ブルー/6pcs)
W0144
Aluminum Color (3x7x2/Blue/6pcs)
アルミカラー(3x7x1/ブルー/6pcs)
W0145
Aluminum Color (3x7x1/Blue/6pcs)
5.8mmハードボール(5pcs)
H
5.8mm Hard Ball (5pcs)
スプリング(R/#60/L=75/2pcs)
-60
Spring (R/#60/L=75/2pcs)
W5198
スプリング(R/#70/L=75/2pcs)
-70
Spring (R/#70/L=75/2pcs)
スプリング(F/#70/L=55/2pcs)
-70
Spring (F/#70/L=55/2pcs)
W5199
スプリング(F/#75/L=55/2pcs)
-75
Spring (F/#75/L=55/2pcs)
タングステンカーバイトボール(3/32インチ/UMW123)
97030
Tungsten Carbite Ball (3/32 Inch/UMW123)
パーツ名
Part Names
パーツ名
Part Names
内容(キーNo.と入数)
Quantity
171 172 173
x 4
★FOR JAPANESE MARKET ONLY.
内容
Description
81
と交換。
Replaces .
44
と交換。
Replaces .
45
と交換。
Replaces .
44
と交換(セッティング用)
Replaces .
45
と交換(セッティング用)
Replaces .
103
と交換。
Replaces .
103
と交換。
Replaces .
103
と交換。
Replaces .
103
と交換。
Replaces .
103
と交換。
Replaces .
103
と交換。
Replaces .
103
と交換。
Replaces .
103
と交換。
Replaces .
103
と交換。
Replaces .
212
と交換。
Replaces .
219
と交換。
Replaces .
219
と交換。
Replaces .
218
と交換。
Replaces .
218
と交換。
Replaces .
180
と交換。
Replaces .
81
44
45
44
45
103
103
103
103
103
103
103
103
103
212
219
219
218
218
180
★定価
(税込)
★定価
(税込)
1995
1890
1995
1890
1995
525
525
525
525
525
525
525
525
525
473
525
525
735
630
630
630
630
2310
品番
No.
1700BK
1700KP
1700KY
1701BK
1701KP
1701KY
1702BK
1702KP
1702KY
オプションパーツ(2) OPTIONAL PARTS (2)
パーツ名
Part Names
カラーストラップ(S/ ブラック)
Color Strap (S/Black)
蛍光ストラップ(S)ピンク
Fluorescent Strap (FP)(S)
蛍光ストラップ(S)イエロー
Fluorescent Strap (FY)(S)
カラーストラップ(M / ブラック)
Color Strap (M / Black)
蛍光ストラップ(M)ピンク
Fluorescent Strap (FP)(M)
蛍光ストラップ(M)イエロー
Fluorescent Strap (FY)(M)
カラーストラップ(L / ブラック)
Color Strap (L / Black)
蛍光ストラップ(L)ピンク
Fluorescent Strap (FP)(L)
蛍光ストラップ(L)イエロー
Fluorescent Strap (FY)(L)
18 個入
18 pcs.
18 個入
18 pcs.
18 個入
18 pcs.
18 個入
18 pcs.
18 個入
18 pcs.
18 個入
18 pcs.
12 個入
12 pcs.
12 個入
12 pcs.
12 個入
12 pcs.
内容
Description
★定価
(税込)
189
189
189
263
263
263
336
336
336
品番
No.
1705
1706
1707
1710V
1796BL
1796R
パーツ名
Part Names
カラーアンテナ(白キャップ付)
Color Antenna (White Cap)
カラーアンテナ(蛍光ピンクキャップ付)
Color Antenna (Fluorescent Pink Cap)
カラーアンテナ(蛍光イエローキャップ付)
Color Antenna (Fluorescent Yellow Cap)
スペシャルアンテナホルダーII
Special Antenna Holder II
スパイラルシリコンチューブ(ブルー)
Spiral Silicone Tube (Blue)
スパイラルシリコンチューブ(レッド)
Spiral Silicone Tube (Red)
★FOR JAPANESE MARKET ONLY.
内容
Description
6 個入
(税込)
6 pcs.
6 個入
6 pcs.
6 個入
6 pcs.
アンテナパイプを確実に固定
Securely fix antenna pipe
リード線保護用チューブ
Code protection tube
リード線保護用チューブ
Code protection tube
★定価
525
525
525
840
735
735
37
Page 38

エレクトリック ELECTRIC
★FOR JAPANESE MARKET ONLY.
品番
36207
36213
★
72301
★
72321
★
ORI30126
★
ORI30127
★
ORI20056
★
ORI20057
★
ORI20058
★
ORI20059
★
ORI28200
★
ORI28201
★
ORI28202
★
ORI28203
No.
Part Names
サーモメーターmini
Thermo Meter TN006
K.R.Fモーターチェッカー2.0
K.R.F Motor Checker 2.0
Power Zone AC/DCクイックチャージャー
Power Zone AC/DC Quick Charger
Power Zone PS-25A(安定化電源)
Power Zone PS-25A (AC/DC Power Supplier)
アドバンテージ クラブマンLi-Poチャージャー
Advantage Clubman Li-Po Charger
アドバンテージ レーススペックチャージャー
Advantage Race Spec Charger
KATANA-07 23T 3ZSF
KATANA-07 23T 3ZSF
KATANA-07 23T 4ZSF
KATANA-07 23T 4ZSF
KATANA-07 23T 4SSF
KATANA-07 23T 4SSF
KATANA-07 23T 3TLF
KATANA-07 23T 3TLF
パーツ名
ボルテックス PRO レーシング 2.5 ブラシレスモーター
Vortex PRO Racing 2.5 Brushless Motor
ボルテックス PRO レーシング 3.0 ブラシレスモーター
Vortex PRO Racing 3.0 Brushless Motor
ボルテックス PRO レーシング 3.5 ブラシレスモーター
Vortex PRO Racing 3.5 Brushless Motor
ボルテックス PRO レーシング 4.0 ブラシレスモーター
Vortex PRO Racing 4.0 Brushless Motor
内容
Description
非接触型デジタル温度計
Noncontact digital thermometer
モーターの設定やメンテナンスに便利
Setting & maintenance of motor
1〜12対応チャージャー
1 - 12 compatible charger
AC100V電源-DC12V安定化電源
AC100V-DC12V Electronic equipment.
一式
1 set
★定価
(税込)
2940
17325
18690
14700
7140
9450
2835
2835
2835
2835
9240
9240
9240
★
ORI28204
★
ORI28205
★
ORI28206
★
ORI28207
★
ORI28208
★
ORI28209
★
ORI28210
★
ORI28211
ORI29100
★
ORI29101
★
ORI29102
★
ORI29103
★
ORI29104
★
9240
品番
No.
ボルテックス PRO レーシング 4.5 ブラシレスモーター
パーツ名
Part Names
Vortex PRO Racing 4.5 Brushless Motor
ボルテックス PRO レーシング 5.5 ブラシレスモーター
Vortex PRO Racing 5.5 Brushless Motor
ボルテックス PRO レーシング 6.5 ブラシレスモーター
Vortex PRO Racing 6.5 Brushless Motor
ボルテックス PRO レーシング 7.5 ブラシレスモーター
Vortex PRO Racing 7.5 Brushless Motor
ボルテックス PRO レーシング 8.5 ブラシレスモーター
Vortex PRO Racing 8.5 Brushless Motor
ボルテックス PRO レーシング 9.5 ブラシレスモーター
Vortex PRO Racing 9.5 Brushless Motor
ボルテックス PRO レーシング 10.5 ブラシレスモーター
Vortex PRO Racing 10.5 Brushless Motor
ボルテックス PRO レーシング 13.5 ブラシレスモーター
Vortex PRO Racing 13.5 Brushless Motor
レボリューション RYAN CAVALIERI エディション 9x1
Revolution RYAN CAVALIERI Edition 9x1
レボリューション RYAN CAVALIERI エディション 10x1
Revolution RYAN CAVALIERI Edition 10x1
レボリューション RYAN CAVALIERI エディション 11x1
Revolution RYAN CAVALIERI Edition 11x1
レボリューション RYAN CAVALIERI エディション 12x1
Revolution RYAN CAVALIERI Edition 12x1
レボリューション RYAN CAVALIERI エディション 13x1
Revolution RYAN CAVALIERI Edition 13x1
内容
Description
★定価
(税込)
9240
9240
9240
9240
9240
9240
9240
9240
10290
10290
10290
10290
10290
★
KYOSHO
KYOSHO
OIL
OIL
800
1000
品番
No.
ホビーグリス
1879
Hobby Grease
シリコンシール
96152
Silicon Seal
KYOSHO スペシャルグルー(14g)
96154
KYOSHO Special Glue (14g)
KYOSHO スペシャルプライマー
96155
KYOSHO Special Primer
品番
No.
パーツ名
Part Names
パーツ名
Part Names
ピットボックス(DX)
Pit Box (DX)
ピットボックス
80461
Pit Box
ツールボックス
80462
Tool Box
パーツボックス(L)
80463
Parts Box (L)
パーツボックス(M)
80464
Parts Box (M)
ケミカル・オイル CHEMICAL • OIL
内容
Description
2g/2本入り
2g/2pcs
デフオイルのもれ防止
Prevents diff oil from leaking
瞬間接着剤
Instant Glue
瞬間接着剤の硬化促進剤
Stiffening accelerant of instant glue.
★定価
(税込)
158
840
735
2100
品番
No.
放熱グリス(10g)
96175
Thermol Grease (10g)
マイクロロン プレシジョンオイラー
96180
Microlon Precision Oiler
HGジョイントグリス
96508
HG Joint Grease
SPベアリングリキッド
SP Bearing Liquid
ボックス・バック BOX • BAG
内容
Description
サイズ / 542x300x397mm
Size / 542x300x397mm
工具収納に最適
Good for storing tools
サイズ / 330x230x65mm
420x240x330mm
420x240x330mm
Size / 330x230x65mm
サイズ / 410x264x43mm
Size / 410x264x43mm
サイズ / 232x122x32mm
Size / 232x122x32mm
★定価
(税込)
1680080460
7140
1890
1890
578
品番
No.
パーツボックス(S)
80465
Parts Box (S)
パーツボックス(SS)
80466
Parts Box (SS)
キャリングバッグ(M)(1/10 用)
87614
Carrying Bag (M) (For 1/10)
キャリングバッグ(L)(1/8 用)
87615
Carrying Bag (L) (For 1/8)
パーツ名
Part Names
パーツ名
Part Names
★FOR JAPANESE MARKET ONLY.
内容
Description
熱伝導促進グリス
Grease improves conduction of heat.
ベアリング潤滑剤(7.4cc)
Great fuel bearings (7.4cc)
ジョイント部用グリス
Grease for joint part.
ベアリング本来の性能を発揮
Retrieves potentiality of Bearing.
★FOR JAPANESE MARKET ONLY.
内容
Description
サイズ / 120x83x25mm
Size / 120x83x25mm
サイズ / 89x36x26mm
Size / 89x36x26mm
サイズ / 300x500x450mm
Size / 300x500x450mm
サイズ / 350x550x540mm
Size / 350x550x540mm
3入り
3pcs
★定価
(税込)
945
3150
840
105096625
★定価
(税込)
158
420
7350
8400
品番
No.
36219
36219P
38
パーツ名
Part Names
ダンパーピットスタンド(ブルー)
Shock Pit Stand (Blue)
SPナイフエッジリーマー
SP Knife Edge Reamer
SPナイフエッジリーマープラス
SP Knife Edge Reamer Plus
ダンパー組立てに最適なスタンド
Ideal for shock assembly
ボディのマウント用穴開けに便利
Tool for making holes on bodies.
ボディのマウント用穴開けに便利
Tool for making holes on bodies.
内容
Description
ツール TOOL
★定価
(税込)
735
1890
2100
品番
No.
YKW001
パーツ名
Part Names
メンテナンススタンド
Maintenance Stand
ストレートリーマー(φ3.05)
Straight Reamer (φ3.05)
★FOR JAPANESE MARKET ONLY.
内容
Description
作業性アップの専用スタンド
Aluminum Stand for Maintenance.
3mm穴のギャップ解消ツール
Smooth gaps in 3mm holes
★定価
(税込)
189036218 87651
2940
Page 39

アクセサリー ACCESSORY
★FOR JAPANESE MARKET ONLY.
品番
No.
39081
39778
品番
No.
1889
80821
80822
96161
品番
No.
SIL
シリコンオイル#100(40cc)
Silicone Oil #100 (40cc)
0100
SIL
シリコンオイル#150(40cc)
Silicone Oil #150 (40cc)
0150
シリコンオイル#200(40cc)
SIL
Silicone Oil #200 (40cc)
0200
SIL
シリコンオイル#250(40cc)
Silicone Oil #250 (40cc)
0250
シリコンオイル#300(40cc)
SIL
Silicone Oil #300 (40cc)
0300
シリコンオイル#350(40cc)
SIL
Silicone Oil #350 (40cc)
0350
シリコンオイル#400(40cc)
SIL
Silicone Oil #400 (40cc)
0400
シリコンオイル#450(40cc)
SIL
Silicone Oil #450 (40cc)
0450
シリコンオイル#500(40cc)
SIL
Silicone Oil #500 (40cc)
0500
シリコンオイル#550(40cc)
SIL
Silicone Oil #550 (40cc)
0550
シリコンオイル#600(40cc)
SIL
Silicone Oil #600 (40cc)
0600
SIL
シリコンオイル#650(40cc)
Silicone Oil #650 (40cc)
0650
パーツ名
Part Names
Team KYOSHO ステッカー
Team KYOSHO Sticker
KYOSHO ワークスステッカー
KYOSHO Works Sticker
パーツ名
Part Names
ボディピン
Body Pin
Big K ピットマット Mサイズ
Big K Pit Mat M size
Big K ピットマット Lサイズ
Big K Pit Mat L size
セッティングウエイト
Setting Weight
パーツ名
Part Names
内容
Description
オリジナルステッカー
Original sticker
オリジナルステッカー
Original sticker
内容
Description
5本入
5pcs
サイズ / 400x600mm, 3mm 厚
Size / 400x600mm, 3mm thick
サイズ / 600x1000mm, 4mm 厚
Size / 600x1000mm, 4mm thick
バランス取り用ウエイト
Weights for balance adjustment
内容(
ダンパー用
for shocks.
★定価
キーNo.と入数
)
Qty.
(税込)
各630
品番
No.
SIL
0700
SIL
0800
SIL
0900
SIL
1000
SIL
1100
SIL
1200
SIL
1300
SIL
2000
SIL
3000
SIL
4000
SIL
5000
SIL
6000
★定価
(税込)
3枚入
3pcs.
2枚入
2pcs.
840
525
その他 OTHERS
★定価
(税込)
105
1890
3990
504
オイル OIL
パーツ名
Part Names
シリコンオイル#700(40cc)
Silicone Oil #700 (40cc)
シリコンオイル#800(40cc)
Silicone Oil #800 (40cc)
シリコンオイル#900(40cc)
Silicone Oil #900 (40cc)
シリコンオイル#1000(40cc)
Silicone Oil #1000 (40cc)
シリコンオイル#1100(40cc)
Silicone Oil #1100 (40cc)
シリコンオイル#1200(40cc)
Silicone Oil #1200 (40cc)
シリコンオイル#1300(40cc)
Silicone Oil #1300 (40cc)
シリコンオイル#2000(40cc)
Silicone Oil #2000 (40cc)
シリコンオイル#3000(40cc)
Silicone Oil #3000 (40cc)
シリコンオイル#4000(40cc)
Silicone Oil #4000 (40cc)
シリコンオイル#5000(40cc)
Silicone Oil #5000 (40cc)
シリコンオイル#6000(40cc)
Silicone Oil #6000 (40cc)
品番
No.
96165B
96172
96174
パーツ名
Part Names
アルミテープ(40x2500mm)
Aluminum Tape (40x2500mm)
シリコンオイルケース(16本)
Silicone Oil Case (16pcs)
ノイズキャンセルシート
Noise Cancel Sheet
内容(
ダンパー用
for shocks.
デフ用
for diffs.
★定価
キーNo.と入数
)
Qty.
(税込)
各630
各630
品番
No.
SIL
7000
SIL
10000
SIL
30000
SIL
40000
SIL
50000
SIL
60000
SIL
80000
SIL
100000
SIL
300000
SIL
500000
★FOR JAPANESE MARKET ONLY.
内容
Description
ボディの補修、補強用テープ
Tape to repair/reinforce body
シリコンオイル用ケース
Case for silicone oil
受信機ノイズ防止シート
To suppress receiver noise.
★FOR JAPANESE MARKET ONLY.
パーツ名
Part Names
シリコンオイル#7000(40cc)
Silicone Oil #7000 (40cc)
シリコンオイル#10000(40cc)
Silicone Oil #10000 (40cc)
シリコンオイル#30000(40cc)
Silicone Oil #30000 (40cc)
シリコンオイル#40000(40cc)
Silicone Oil #40000 (40cc)
シリコンオイル#50000(40cc)
Silicone Oil #50000 (40cc)
シリコンオイル#60000(40cc)
Silicone Oil #60000 (40cc)
シリコンオイル#80000(40cc)
Silicone Oil #80000 (40cc)
シリコンオイル#100000(40cc)
Silicone Oil #100000 (40cc)
シリコンオイル#300000(40cc)
Silicone Oil #300000 (40cc)
シリコンオイル#500000(40cc)
Silicone Oil #500000 (40cc)
内容(
キーNo.と入数
Qty.
デフ用
for diffs.
デフ用
for diffs.
★定価
(税込)
473
735
840
★定価
)
(税込)
各630
各1365
品番
No.
6x8mmシムセット
96046
6x8mm Shim Set
3x5mmシムセット
96641
3x5mm Shim Set
4x6mmシムセット
96642
4x6mm Shim Set
5x7mmシムセット
96643
5x7mm Shim Set
8x10mmシムセット
96644
8x10mm Shim Set
11x14mmシムセット
96645
11x14mm Shim Set
12x15mmシムセット
96646
12x15mm Shim Set
パーツ名
Part Names
シムセット SHIM SET
内容
Description
0.1, 0.2, 0.3, 各10枚入り
Includes 10pcs each 0.1, 0.2, 0.3
0.1, 0.2, 0.3, 各10枚入り
Includes 10pcs each 0.1, 0.2, 0.3
0.1, 0.2, 0.3, 各10枚入り
Includes 10pcs each 0.1, 0.2, 0.3
0.1, 0.2, 0.3, 各10枚入り
Includes 10pcs each 0.1, 0.2, 0.3
0.1, 0.2, 0.3, 各10枚入り
Includes 10pcs each 0.1, 0.2, 0.3
0.1, 0.2, 0.3, 各10枚入り
Includes 10pcs each 0.1, 0.2, 0.3
0.1, 0.2, 各4枚入り
Includes 4pcs each 0.1, 0.2
(税込)
★定価
473
473
473
473
473
473
473
品番
No.
10x12mmシムセット
10x12mm Shim Set
13x16mmシムセット
13x16mm Shim Set
8x12mmシムセット
8x12mm Shim Set
5x20mmシムセット
5x20mm Shim Set
4x10mmシムセット
4x10mm Shim Set
12x18mmシムセット
12x18mm Shim Set
12x18mmシムセット
12x18mm Shim Set
パーツ名
Part Names
★FOR JAPANESE MARKET ONLY.
内容
Description
0.1, 0.2, 各4枚入り
Includes 4pcs each 0.1, 0.2
0.15, 各10枚入り
Includes 10pcs each 0.15
0.2, 各5枚入り
Includes 5pcs each 0.2
0.2, 各5枚入り
Includes 5pcs each 0.2
0.15, 各10枚入り
Includes 10pcs each 0.15
0.15, 各10枚入り
Includes 10pcs each 0.15
0.15, 0.2, 各10枚入り
Includes 10pcs each 0.15, 0.2
★定価
(税込)
31596647
47396772
21096773
31596774
31596775
31596946
31596947
39
Page 40

ベアリング BALL BEARING
★FOR JAPANESE MARKET ONLY.
品番
No.
BRG001
BRG001
SUS
BRG001
TS
BRG002
BRG002
SUS
BRG003
BRG003
SUS
BRG004
BRG005
BRG006
BRG006
TS
BRG007
BRG007F
BRG008
BRG008
TS
BRG009
BRG011
BRG012O
BRG013
BRG013F
BRG014
パーツ名
Part Names
シールドベアリング(5x10x4)
Shield Bearing (5x10x4)
SUS シールドベアリング(5x10x4)
SUS Shield Bearing (5x10x4)
テフロンシールドベアリング(5x10x4)
Teflon Shield Bearing (5x10x4)
シールドベアリング(5x8x2.5)
Shield Bearing (5x8x2.5)
SUS シールドベアリング(5x8x2.5)
SUS Shield Bearing (5x8x2.5)
シールドベアリング(4x8x3)
Shield Bearing (4x8x3)
SUS シールドベアリング(4x8x3)
SUS Shield Bearing (4x8x3)
シールドベアリング(8x14x4)
Shield Bearing (8x14x4)
シールドベアリング(8x16x5)
Shield Bearing (8x16x5)
シールドベアリング(6x12x4)
Shield Bearing (6x12x4)
テフロンシールドベアリング(6x12x4)
Teflon Shield Bearing (6x12x4)
シールドベアリング(3x6x2.5)
Shield Bearing (3x6x2.5)
フランジベアリング(3x6x2.5)
Flanged Bearing (3x6x2.5)
シールドベアリング(12x18x4)
Shield Bearing (12x18x4)
テフロンシールドベアリング(12x18x4)
Teflon Shield Bearing (12x18x4)
シールドベアリング(3x8x4)
Shield Bearing (3x8x4)
シールドベアリング(8x12x3.5)
Shield Bearing (8x12x3.5)
オープンベアリング(8x16x4)
Open Bearing (8x16x4)
シールドベアリング(4x7x2.5)
Shield Bearing (4x7x2.5)
フランジベアリング(4x7x2.5)
Flanged Bearing (4x7x2.5)
シールドベアリング(10x15x4)
Shield Bearing (10x15x4)
内容
Description
4個入り
4pcs
2個入り
2pcs
4個入り
4pcs
4個入り
4pcs
2個入り
2pcs
4個入り
4pcs
2個入り
2pcs
4個入り
4pcs
2個入り
2pcs
2個入り
2pcs
4個入り
4pcs
2個入り
2pcs
2個入り
2pcs
2個入り
2pcs
4個入り
4pcs
2個入り
2pcs
2個入り
2pcs
2個入り
2pcs
2個入り
2pcs
2個入り
2pcs
2個入り
2pcs
★定価
(税込)
1050
840
840
1050
840
1050
840
1050
683
1050
1050
735
1050
1890
1260
1050
1050
840
1050
1050
1260
品番
No.
BRG014
BRG015
BRG017O
BRG018
BRG019O
BRG020FO
BRG020O
BRG021
BRG022
BRG023
BRG025
BRG026
BRG027O
BRG028
BRG029
BRG030
BRG031
BRG032
BRG100
BRG102
BRG103
テフロンシールドベアリング(10x15x4)
TS
Teflon Shield Bearing (10x15x4)
シールドベアリング(3/16x3/8x3)
Shield Bearing (3/16x3/8x3)
オープンベアリング(20x25x4)
Open Bearing (20x25x4)
シールドベアリング(12x21x5)
Shield Bearing (12x21x5)
オープンベアリング(3x6x2)
Open Bearing (3x6x2)
フランジオープンベアリング(4x8x2)
Flanged Open Bearing (4x8x2)
オープンベアリング(4x8x2)
Open Bearing (4x8x2)
シールドベアリング(8x22x7)
Shield Bearing (8x22x7)
シールドベアリング(6x10x3)
Shield Bearing (6x10x3)
シールドベアリング(3x7x3)
Shield Bearing (3x7x3)
シールドベアリング(6x13x5)
Shield Bearing (6x13x5)
シールドベアリング(9x14x4.5)
Shield Bearing (9x14x4.5)
オープンベアリング(3x8x2.5)
Open Bearing (3x8x2.5)
シールドベアリング(5x9x3)
Shield Bearing (5x9x3)
シールドベアリング(7x11x3)
Shield Bearing (7x11x3)
シールドベアリング(2x5x2.5)
Shield Bearing (2x5x2.5)
シールドベアリング(5x11x4)
Shield Bearing (5x11x4)
シールドベアリング(5x13x4)
Shield Bearing (5x13x4)
デフスラストベアリング
Differential Thrust Bearing
ステンレススラストベアリング(4x9x4)
SUS
Stainless Thrust Bearing (4x9x4)
スラストベアリング(4.8x10x4)
Thrust Bearing (4.8x10x4)
パーツ名
Part Names
内容
Description
2個入り
2pcs
2個入り
2pcs
1個入り
1pcs
2個入り
2pcs
2個入り
2pcs
2個入り
2pcs
2個入り
2pcs
2個入り
2pcs
2個入り
2pcs
2個入り
2pcs
2個入り
2pcs
1個入り
1pcs
2個入り
2pcs
2個入り
2pcs
2個入り
2pcs
4個入り
4pcs
2個入り
2pcs
2個入り
2pcs
1個入り
1pcs
1個入り
1pcs
1セット
1set
★定価
(税込)
525
1050
1365
1050
735
1260
1260
1050
1050
735
735
735
945
1050
630
1050
1050
1050
420
630
1050
品番
No.
ORG02BK
ORG03
ORG03BK
ORG03X
ORG03XR
ORG04
ORG045
ORG045S
ORG05
パーツ名
Part Names
Oリング(P2/ブラック)
O-ring (P2 / Black)
Oリング(P3/オレンジ)
O-ring (P3 / Orange)
Oリング(P3/ブラック)
O-ring (P3 / Black)
X断面型Oリング(P3/ダンパー用)
X Grooved O-ring (P3 / for oil shock)
X断面型Oリング(P3/オレンジ)
X Grooved O-ring (P3 / Orange)
シリコンOリング(P4/オレンジ)
Silicone O-ring (P4 / Orange)
シリコンOリング(P4.5/オレンジ)
Silicone O-ring (P4.5 / Orange)
シリコンOリング(P4.5 / O / スリム)
Silicone O-ring (P4.5 / O / slim)
シリコンOリング(P5/オレンジ)
Silicone O-ring (P5 / Orange)
内容
Description
10個入り
10pcs
10個入り
10pcs
10個入り
10pcs
8個入り
8pcs
8個入り
8pcs
10個入り
10pcs
15個入り
15pcs
15個入り
15pcs
10個入り
10pcs
Oリング O-RING
★定価
(税込)
210
210
210
630
630
210
420
420
420
品番
No.
ORG06
ORG078
ORG08BK
ORG10BK
ORG12
ORG18
ORG18BK
ORG22
シリコンOリング(P6/オレンジ)
Silicone O-ring (P6 / Orange)
Oリング(0.78/ブラック)
O-ring (0.78 / Black)
Oリング(P8/ブラック)
O-ring (P8 / Black)
Oリング(P10/ブラック/4pcs)
O-ring (P10 / Black / 4pcs)
シリコンOリング(P12/オレンジ)
Silicone O-ring (P12 / Orange)
シリコンOリング(P18/オレンジ)
Silicone O-ring (P18 / Orange)
Oリング(P18/ブラック)
O-ring (P18 / Black)
シリコンOリング(P22/オレンジ)
Silicone O-ring (P22 / Orange)
パーツ名
Part Names
★FOR JAPANESE MARKET ONLY.
内容
Description
15個入り
15pcs
4個入り
4pcs
10個入り
10pcs
4個入り
4pcs
10個入り
10pcs
3個入り
3pcs
3個入り
3pcs
4個入り
4pcs
★定価
(税込)
420
420
420
210
210
315
315
420
40
Page 41

ビス・ナット・リング・ワッシャー(1)
Screw, Nut, Ring, Washer (1)
★ FOR JAPANESE MARKET ONLY.
品番 品名
No. Parts Names
Cリング
C-Ring
Cリング(C11/10入)
1-C11
C-Ring(C11/10pcs)
Eリング
E-Ring
Eリング(E1.5/10入)
1-E015
E-Ring(E1.5/10pcs)
Eリング(E2.0/10入)
1-E020
E-Ring(E2.0/10pcs)
Eリング(E2.5/10入)
1-E025
E-Ring(E2.5/10pcs)
Eリング(E3.0/10入)
1-E030
E-Ring(E3.0/10pcs)
Eリング(E4.0/10入)
1-E040
E-Ring(E4.0/10pcs)
Eリング(E5.0/10入)
1-E050
E-Ring(E5.0/10pcs)
Eリング(E6.0/10入)
1-E060
E-Ring(E6.0/10pcs)
Eリング(E7.0/6入)
1-E070
E-Ring(E7.0/6pcs)
Eリング(E10.0/6入)
1-E100
E-Ring(E10.0/6pcs)
ナット
Nut
1-N2016
1-N2620
1-N3024
1-N4032
1-N2630N
1-N3033N
1-N3043N
1-N4055N
1-N3033NA-B
1-N3033NA-R
1-N3033NA-S
1-N3043NA-B
1-N3043NA-R
1-N3043NA-S
1-N3037F
1-N4045F
1-N4045F-B
1-N4045F-R
1-N4056FN
1-N4056FN-B
1-N4056FN-R
ナット(M2x1.6/10入)
Nut(M2x1.6/10pcs)
ナット(M2.6x2.0/10入)
Nut(M2.6x2.0/10pcs)
ナット(M3x2.4/10入)
Nut(M3x2.4/10pcs)
ナット(M4x3.2/10入)
Nut(M4x3.2)(10pcs)
ナイロンナット
Nylon Nut
ナット(M2.6x3.0)ナイロン(5入)
Nut(M2.6x3.0) Nylon (5pcs)
ナット(M3x3.3)ナイロン(5入)
Nut(M3x3.3) Nylon (5pcs)
ナット(M3x4.3)ナイロン(5入)
Nut(M3x4.3) Nylon (5pcs)
ナット(M4x5.5)ナイロン(5入)
Nut(M4x5.5) Nylon (5pcs)
アルミナイロンナット
Aluminium Nylon Nut
ナット(M3x3.3)ナイロン(アルミ/ブルー/5入)
Nut(M3x3.3) Nylon (Aluminium/Blue/5pcs)
ナット(M3x3.3)ナイロン(アルミ/レッド/5入)
Nut(M3x3.3) Nylon (Aluminium/Red/5pcs)
ナット(M3x3.3)ナイロン(アルミ/シルバー/5入)
Nut(M3x3.3) Nylon (Aluminium/Silver/5pcs)
ナット(M3x4.3)ナイロン(アルミ/ブルー/5入)
Nut(M3x4.3) Nylon (Aluminium/Blue/5pcs)
ナット(M3x4.3)ナイロン(アルミ/レッド/5入)
Nut(M3x4.3) Nylon (Aluminium/Red/5pcs)
ナット(M3x4.3)ナイロン(アルミ/シルバー/5入)
Nut(M3x4.3) Nylon (Aluminium/Silver/5pcs)
フランジナット
Flanged Nut
ナット(M3x3.7)フランジ(10入)
Nut(M3x3.7) Flanged (10pcs)
ナット(M4x4.5)フランジ(10入)
Nut(M4x4.5) Flanged (10pcs)
ナット(M4x4.5)フランジ(スチール/ブルー/8入)
Nut(M4x4.5) Flanged (Steel/Blue/8pcs)
ナット(M4x4.5)フランジ(スチール/レッド/8入)
Nut(M4x4.5) Flanged (Steel/ Red/8pcs)
フランジナイロンナット
Flanged Nylon Nut
ナット(M4x5.6)フランジナイロン(5入)
Nut(M4x5.6) Flanged Nylon (5pcs)
ナット(M4x5.6)フランジナイロン(スチール/ブルー/8入)
Nut(M4x5.6) Flanged Nylon (Steel/Blue/8pcs)
ナット(M4x5.6)フランジナイロン(スチール/レッド/8入)
Nut(M4x5.6) Flanged Nylon (Steel/Red/8pcs)
入数
(税込)
Quantity
★定価
21010pcs
15810pcs
15810pcs
15810pcs
15810pcs
15810pcs
15810pcs
15810pcs
1586pcs
1586pcs
21010pcs
21010pcs
21010pcs
21010pcs
2105pcs
2105pcs
2105pcs
2105pcs
3155pcs
3155pcs
3155pcs
3155pcs
3155pcs
3155pcs
21010pcs
21010pcs
3158pcs
3158pcs
2105pcs
4208pcs
4208pcs
品番 品名
No. Parts Names
アルミフランジナイロンナット
Aluminium Flanged Nylon Nut
1-N4045FNA-B
1-N4045FNA-G
1-N4045FNA-R
1-N4045FNA-S
1-S02604
1-S02606
1-S02608
1-S02612
1-S03006
1-S03008
1-S03010
1-S03012
1-S06016
1-S03018
1-S03025
1-S03030
1-S04006
1-S04010
1-S04015
1-S04020
1-S02606TP
1-S02608TP
1-S02612TP
1-S03008TP
1-S03010TP
1-S03012TP
1-S03015TP
1-S03018TP
1-S03020TP
1-S04010TP
1-S04-015TP
1-S04020TP
1-S03008T
1-S03010T
1-S03012T
1-S03015T
ナット(M4x4.5)フランジナイロン(アルミ/ブルー/4入)
Nut(M4x4.5) Flanged Nylon (Alumi./Blue/4pcs)
ナット(M4x4.5)フランジナイロン(アルミ/ゴールド/4入)
Nut(M4x4.5) Flanged Nylon (Alumi./Gold/4pcs)
ナット(M4x4.5)フランジナイロン(アルミ/レッド/4入)
Nut(M4x4.5) Flanged Nylon (Alumi./Red/4pcs)
ナット(M4x4.5)フランジナイロン(アルミ/シルバー/4入)
Nut(M4x4.5) Flanged Nylon (Alumi./Silver/4pcs)
バインドビス
Bind Screw
バインドビス(M2.6x4/10入)
Bind Screw(M2.6x4/10pcs)
バインドビス(M2.6x6/10入)
Bind Screw(M2.6x6/10pcs)
バインドビス(M2.6x8/10入)
Bind Screw(M2.6x8/10pcs)
バインドビス(M2.6x12/10入)
Bind Screw(M2.6x12/10pcs)
バインドビス(M3x6/10入)
Bind Screw(M3x6/10pcs)
バインドビス(M3x8/10入)
Bind Screw(M3x8/10pcs)
バインドビス(M3x10/10入)
Bind Screw(M3x10/10pcs)
バインドビス(M3x12/10入)
Bind Screw(M3x12/10pcs)
バインドビス(M3x16/10入)
Bind Screw(M3x16/10pcs)
バインドビス(M3x18/10入)
Bind Screw(M3x18/10pcs)
バインドビス(M3x25/10入)
Bind Screw(M3x25/10pcs)
バインドビス(M3x30/10入)
Bind Screw(M3x30/10pcs)
バインドビス(M4x6/10入)
Bind Screw(M4x6/10pcs)
バインドビス(M4x10/10入)
Bind Screw(M4x10/10pcs)
バインドビス(M4x15/10入)
Bind Screw(M4x15/10pcs)
バインドビス(M4x20/10入)
Bind Screw(M4x20/10pcs)
バインドタッピングビス
Bind Self-Tapping Screw
TPバインドビス(M2.6x6/10入)
TP Bind Screw(M2.6x6/10pcs)
TPバインドビス(M2.6x8/10入)
TP Bind Screw(M2.6x8/10pcs)
TPバインドビス(M2.6x12/10入)
TP Bind Screw(M2.6x12/10pcs)
TPバインドビス(M3x8/10入)
TP Bind Screw(M3x8/10pcs)
TPバインドビス(M3x10/10入)
TP Bind Screw(M3x10/10pcs)
TPバインドビス(M3x12/10入)
TP Bind Screw(M3x12/10pcs)
TPバインドビス(M3x15/10入)
TP Bind Screw(M3x15/10pcs)
TPバインドビス(M3x18/10入)
TP Bind Screw(M3x18/10pcs)
TPバインドビス(M3x20/10入)
TP Bind Screw(M3x20/10pcs)
TPバインドビス(M4x10/10入)
TP Bind Screw(M4x10/10pcs)
TPバインドビス(M4x15/10入)
TP Bind Screw(M4x15/10pcs)
TPバインドビス(M4x20/10入)
TP Bind Screw(M4x20/10pcs)
チタンバインドビス
Titanium Bind Screw
バインドビス(M3x8)(チタン/10入)
Bind Screw(Titanium/M3x8/10pcs)
バインドビス(M3x10)(チタン/10入)
Bind Screw(Titanium/M3x10/10pcs)
バインドビス(M3x12)(チタン/10入)
Bind Screw(Titanium/M3x12/10pcs)
バインドビス(M3x15)(チタン/8入)
Bind Screw(Titanium/M3x15/8pcs)
入数
(税込)
Quantity
10pcs
10pcs
10pcs
10pcs
10pcs
10pcs
10pcs
10pcs
10pcs
10pcs
10pcs
10pcs
10pcs
10pcs
10pcs
10pcs
10pcs
10pcs
10pcs
10pcs
10pcs
10pcs
10pcs
10pcs
10pcs
10pcs
10pcs
10pcs
10pcs
10pcs
10pcs
★定価
3154pcs
3154pcs
3154pcs
3154pcs
210
210
210
210
210
210
210
210
210
210
210
210
210
210
210
210
210
210
210
210
210
210
210
210
210
210
210
210
420
420
420
4208pcs
品番 品名
No. Parts Names
ボタンヘックスビス
Button Hex Screw
1-S12605H
1-S13006H
1-S13008H
1-S13010H
1-S13012H
1-S13015H
1-S13018H
1-S13025H
1-S14008H
1-S14010H
1-S14015H
1-S14018H
1-S14020H
1-S14022H
1-S13006HT
1-S13008HT
1-S13010HT
1-S13012HT
1-S13015HT
1-S14008HT
1-S22610
1-S22612
1-S23008
1-S23010
1-S23012
1-S23015
1-S23018
1-S23020
1-S23022
1-S23025
1-S23030
1-S24010
1-S23006F
1-S23008F
1-S24008F
1-S24010F
ボタンビス(M2.6x5)(ヘックス/10入)
Button Screw(Hex/M2.6x5/10pcs)
ボタンビス(M3x6)(ヘックス/10入)
Button Screw(Hex/M3x6/10pcs)
ボタンビス(M3x8)(ヘックス/10入)
Button Screw(Hex/M3x8/10pcs)
ボタンビス(M3x10)(ヘックス/10入)
Button Screw(Hex/M3x10/10pcs)
ボタンビス(M3x12)(ヘックス/10入)
Button Screw(Hex/M3x12/10pcs)
ボタンビス(M3x15)(ヘックス/10入)
Button Screw(Hex/M3x15/10pcs)
ボタンビス(M3x18)(ヘックス/10入)
Button Screw(Hex/M3x18/10pcs)
ボタンビス(M3x25)(ヘックス/5入)
Button Screw(Hex/M3x25/5pcs)
ボタンビス(M4x8)(ヘックス/10入)
Button Screw(Hex/M4x8/10pcs)
ボタンビス(M4x10)(ヘックス/10入)
Button Screw(Hex/M4x10/10pcs)
ボタンビス(M4x15)(ヘックス/5入)
Button Screw(Hex/M4x15/5pcs)
ボタンビス(M4x18)(ヘックス/5入)
Button Screw(Hex/M4x18/5pcs)
ボタンビス(M4x20)(ヘックス/5入)
Button Screw(Hex/M4x20/5pcs)
ボタンビス(M4x22)(ヘックス/5入)
Button Screw(Hex/M4x22/5pcs)
チタンボタンヘックスビス
Titanium Button Hex Screw
ボタンビス(M3x6)(ヘックス/チタン/8入)
Button Screw(Hex/Titanium/M3x6/8pcs)
ボタンビス(M3x8)(ヘックス/チタン/8入)
Button Screw(Hex/Titanium/M3x8/8pcs)
ボタンビス(M3x10)(ヘックス/チタン/8入)
Button Screw(Hex/Titanium/M3x10/8pcs)
ボタンビス(M3x12)(ヘックス/チタン/8入)
Button Screw(Hex/Titanium/M3x12/8pcs)
ボタンビス(M3x15)(ヘックス/チタン/8入)
Button Screw(Hex/Titanium/M3x15/8pcs)
ボタンビス(M4x8)(ヘックス/チタン/5入)
Button Screw(Hex/Titanium/M4x8/5pcs)
キャップビス
Cap Screw
キャップビス(M2.6x10/5入)
Cap Screw(M2.6x10/5pcs)
キャップビス(M2.6x12/5入)
Cap Screw(M2.6x12/5pcs)
キャップビス(M3x8/5入)
Cap Screw(M3x8/5pcs)
キャップビス(M3x10/5入)
Cap Screw(M3x10/5pcs)
キャップビス(M3x12/5入)
Cap Screw(M3x12/5pcs)
キャップビス(M3x15/5入)
Cap Screw(M3x15/5pcs)
キャップビス(M3x18/5入)
Cap Screw(M3x18/5pcs)
キャップビス(M3x20/5入)
Cap Screw(M3x20/5pcs)
キャップビス(M3x22/5入)
Cap Screw(M3x22/5pcs)
キャップビス(M3x25/5入)
Cap Screw(M3x25/5pcs)
キャップビス(M3x30/5入)
Cap Screw(M3x30/5pcs)
キャップビス(M4x10/5入)
Cap Screw(M4x10/5pcs)
フランジ付キャップビス
Flanged Cap Screw
フランジ付キャップビス(M3x6/5入)
Flanged Cap Screw(M3x6/5pcs)
フランジ付キャップビス(M3x8/5入)
Flanged Cap Screw(M3x8/5pcs)
フランジ付キャップビス(M4x8/5入)
Flanged Cap Screw(M4x8/5pcs)
フランジ付キャップビス(M4x10/5入)
Flanged Cap Screw(M4x10/5pcs)
入数
(税込)
Quantity
10pcs
10pcs
10pcs
10pcs
10pcs
10pcs
5pcs
10pcs
10pcs
5pcs
5pcs
5pcs
5pcs
8pcs
8pcs
8pcs
8pcs
8pcs
5pcs
5pcs
5pcs
5pcs
5pcs
5pcs
5pcs
5pcs
5pcs
5pcs
5pcs
5pcs
★定価
42010pcs
315
315
315
315
315
315
315
315
315
315
315
315
315
525
525
525
525
525
7355pcs
210
210
210
210
210
210
210
210
210
210
210
210
4205pcs
4205pcs
4205pcs
4205pcs
41
Page 42

ビス・ナット・リング・ワッシャー(2)
Screw, Nut, Ring, Washer (2)
★ FOR JAPANESE MARKET ONLY.
品番 品名
No. Parts Names
サラビス
Flat Head Screw
1-S32608
1-S32612
1-S33006
1-S33008
1-S33010
1-S33012
1-S33014
1-S33016
1-S33018
1-S33030
1-S34006
1-S34010
1-S34012
1-S34015
1-S34018
1-S34020
1-S33005H
1-S33006H
1-S33008H
1-S33010H
1-S33015H
1-S33018H
1-S34006H
1-S34010H
1-S34012H
1-S34015H
1-S34018H
1-S34020H
1-S34025H
1-S32606TP
1-S32608TP
1-S32612TP
1-S33006TP
1-S33008TP
1-S33010TP
1-S33012TP
1-S33015TP
1-S33018TP
サラビス(M2.6x8/10入)
Flat Head Screw(M2.6x8/10pcs)
サラビス(M2.6x12/10入)
Flat Head Screw(M2.6x12/10pcs)
サラビス(M3x6/10入)
Flat Head Screw(M3x6/10pcs)
サラビス(M3x8/10入)
Flat Head Screw(M3x8/10pcs)
サラビス(M3x10/10入)
Flat Head Screw(M3x10/10pcs)
サラビス(M3x12/10入)
Flat Head Screw(M3x12/10pcs)
サラビス(M3x14/10入)
Flat Head Screw(M3x14/10pcs)
サラビス(M3x16/10入)
Flat Head Screw(M3x16/10pcs)
サラビス(M3x18/10入)
Flat Head Screw(M3x18/10pcs)
サラビス(M3x30/10入)
Flat Head Screw(M3x30/10pcs)
サラビス(M4x6/10入)
Flat Head Screw(M4x6/10pcs)
サラビス(M4x10/10入)
Flat Head Screw(M4x10/10pcs)
サラビス(M4x12/10入)
Flat Head Screw(M4x12/10pcs)
サラビス(M4x15/10入)
Flat Head Screw(M4x15/10pcs)
サラビス(M4x18/10入)
Flat Head Screw(M4x18/10pcs)
サラビス(M4x20/10入)
Flat Head Screw(M4x20/10pcs)
サラヘックスビス
Flat Head Hex Screw
サラビス(M3x5)(ヘックス/10入)
Flat Head Screw(Hex/M3x5/10pcs)
サラビス(M3x6)(ヘックス/10入)
Flat Head Screw(Hex/M3x6/10pcs)
サラビス(M3x8)(ヘックス/10入)
Flat Head Screw(Hex/M3x8/10pcs)
サラビス(M3x10)(ヘックス/10入)
Flat Head Screw(Hex/M3x10/10pcs)
サラビス(M3x15)(ヘックス/10入)
Flat Head Screw(Hex/M3x15/10pcs)
サラビス(M3x18)(ヘックス/10入)
Flat Head Screw(Hex/M3x18/10pcs)
サラビス(M4x6)(ヘックス/10入)
Flat Head Screw(Hex/M4x6/10pcs)
サラビス(M4x10)(ヘックス/10入)
Flat Head Screw(Hex/M4x10/10pcs)
サラビス(M4x12)(ヘックス/10入)
Flat Head Screw(Hex/M4x12/10pcs)
サラビス(M4x15)(ヘックス/10入)
Flat Head Screw(Hex/M4x15/10pcs)
サラビス(M4x18)(ヘックス/6入)
Flat Head Screw(Hex/M4x18/6pcs)
サラビス(M4x20)(ヘックス/5入)
Flat Head Screw(Hex/M4x20/5pcs)
サラビス(M4x25)(ヘックス/5入)
Flat Head Screw(Hex/M4x25/5pcs)
サラタッピングビス
Flat Head Self-Tapping Screw
TPサラビス(M2.6x6/10入)
TP Flat Head Screw(M2.6x6/10pcs)
TPサラビス(M2.6x8/10入)
TP Flat Head Screw(M2.6x8/10pcs)
TPサラビス(M2.6x12/10入)
TP Flat Head Screw(M2.6x12/10pcs)
TPサラビス(M3x6/10入)
TP Flat Head Screw(M3x6/10pcs)
TPサラビス(M3x8/10入)
TP Flat Head Screw(M3x8/10pcs)
TPサラビス(M3x10/10入)
TP Flat Head Screw(M3x10/10pcs)
TPサラビス(M3x12/10入)
TP Flat Head Screw(M3x12/10pcs)
TPサラビス(M3x15/10入)
TP Flat Head Screw(M3x15/10pcs)
TPサラビス(M3x18/10入)
TP Flat Head Screw(M3x18/10pcs)
入数
(税込)
Quantity
★定価
21010pcs
21010pcs
21010pcs
21010pcs
21010pcs
21010pcs
21010pcs
21010pcs
21010pcs
21010pcs
21010pcs
21010pcs
21010pcs
21010pcs
21010pcs
21010pcs
31510pcs
31510pcs
31510pcs
31510pcs
31510pcs
31510pcs
42010pcs
42010pcs
42010pcs
42010pcs
4206pcs
4205pcs
4205pcs
21010pcs
21010pcs
21010pcs
21010pcs
21010pcs
21010pcs
21010pcs
21010pcs
21010pcs
品番 品名
No. Parts Names
1-S34015TP
1-S34020TP
1-S34025TP
1-S33008T
1-S33010T
1-S33012T
1-S33015T
1-S34006T
1-S34010T
1-S34015T
1-S34020T
1-S33006HT
1-S33008HT
1-S33010HT
1-S33012HT
1-S33015HT
1-S33018HT
1-S34010HT
1-S34015HT
1-S34025HT
1-S33008TPT
1-S33010TPT
1-S33012TPT
1-S33015TPT
1-S34015TPT
1-S34020TPT
1-S34025TPT
1-S42008
1-S42010
1-S42015
1-S42625
1-S42630
1-S43006
1-S43012
TPサラビス(M4x15/10入)
TP Flat Head Screw(M4x15/10pcs)
TPサラビス(M4x20/10入)
TP Flat Head Screw(M4x20/10pcs)
TPサラビス(M4x25/10入)
TP Flat Head Screw(M4x25/10pcs)
チタンサラビス
Titanium Flat Head Screw
サラビス(M3x8)(チタン/10入)
Flat Head Screw(Titanium/M3x8/10pcs)
サラビス(M3x10)(チタン/10入)
Flat Head Screw(Titanium/M3x10/10pcs)
サラビス(M3x12)(チタン/10入)
Flat Head Screw(Titanium/M3x12/10pcs)
サラビス(M3x15)(チタン/8入)
Flat Head Screw(Titanium/M3x15/8pcs)
サラビス(M4x6)(チタン/8入)
Flat Head Screw(Titanium/M4x6/8pcs)
サラビス(M4x10)(チタン/6入)
Flat Head Screw(Titanium/M4x10/6pcs)
サラビス(M4x15)(チタン/5入)
Flat Head Screw(Titanium/M4x15/5pcs)
サラビス(M4x20)(チタン/4入)
Flat Head Screw(Titanium/M4x20/4pcs)
チタンサラヘックスビス
Titanium Flat Head Hex Screw
サラビス(M3x6)(ヘックス/チタン/8入)
Flat Head Screw(Hex/Titanium/M3x6/8pcs)
サラビス(M3x8)(ヘックス/チタン/8入)
Flat Head Screw(Hex/Titanium/M3x8/8pcs)
サラビス(M3x10)(ヘックス/チタン/8入)
Flat Head Screw(Hex/Titanium/M3x10/8pcs)
サラビス(M3x12)(ヘックス/チタン/8入)
Flat Head Screw(Hex/Titanium/M3x12/8pcs)
サラビス(M3x15)(ヘックス/チタン/8入)
Flat Head Screw(Hex/Titanium/M3x15/8pcs)
サラビス(M3x18)(ヘックス/チタン/6入)
Flat Head Screw(Hex/Titanium/M3x18/6pcs)
サラビス(M4x10)(ヘックス/チタン/5入)
Flat Head Screw(Hex/Titanium/M4x10/5pcs)
サラビス(M4x15)(ヘックス/チタン/5入)
Flat Head Screw(Hex/Titanium/M4x15/5pcs)
サラビス(M4x25)(ヘックス/チタン/3入)
Flat Head Screw(Hex/Titanium/M4x25/3pcs)
チタンサラタッピングビス
Titanium Flat Head Self-Tapping Screw
TPサラビス(M3x8)(チタン/10入)
TP Flat Head Screw(Titanium/M3x8/10pcs)
TPサラビス(M3x10)(チタン/10入)
TP Flat Head Screw(Titanium/M3x10/10pcs)
TPサラビス(M3x12)(チタン/10入)
TP Flat Head Screw(Titanium/M3x12/10pcs)
TPサラビス(M3x15)(チタン/8入)
TP Flat Head Screw(Titanium/M3x15/8pcs)
TPサラビス(M4x15)(チタン/4入)
TP Flat Head Screw(Titanium/M4x15/4pcs)
TPサラビス(M4x20)(チタン/4入)
TP Flat Head Screw(Titanium/M4x20/4pcs)
TPサラビス(M4x25)(チタン/4入)
TP Flat Head Screw(Titanium/M4x25/4pcs)
ナベビス
Round Head Screw
ナベビス(M2x8/10入)
Round Screw(M2x8/10pcs)
ナベビス(M2x10/10入)
Round Screw(M2x10/10pcs)
ナベビス(M2x15/10入)
Round Screw(M2x15/10pcs)
ナベビス(M2.6x25/10入)
Round Screw(M2.6x25/10pcs)
ナベビス(M2.6x30/10入)
Round Screw(M2.6x30/10pcs)
ナベビス(M3x6/10入)
Round Screw(M3x6/10pcs)
ナベビス(M4x12/10入)
Round Screw(M4x12/10pcs)
入数
(税込)
Quantity
8pcs
6pcs
5pcs
4pcs
8pcs
6pcs
5pcs
5pcs
3pcs
★定価
21010pcs
21010pcs
21010pcs
42010pcs
42010pcs
42010pcs
4208pcs
630
630
630
630
5258pcs
5258pcs
5258pcs
5258pcs
525
683
683
788
735
42010pcs
42010pcs
42010pcs
4208pcs
6304pcs
6304pcs
6304pcs
21010pcs
21010pcs
21010pcs
21010pcs
21010pcs
21010pcs
21010pcs
品番 品名
No. Parts Names
ナベタッピングビス
Round Head Self-Tapping Screw
1-S42008TP
1-S42010TP
1-S43008TP
1-S43012TP
1-S43015TP
1-S53003
1-S53004
1-S53005
1-S53006
1-S53010
1-S53012
1-S53014
1-S53020
1-S53025
1-S54004
1-S54008
1-S54012
1-S54020
1-S55004
1-S55040
1-W200604
1-W260705
1-W300805
1-W301010
1-W401005
1-W401008
1-W501208
1-W701105
1-W701110
1-W300615S
TPナベビス(M2x8/10入)
TP Round Screw(M2x8/10pcs)
TPナベビス(M2x10/10入)
TP Round Screw(M2x10/10pcs)
TPナベビス(M3x8/10入)
TP Round Screw(M3x8/10pcs)
TPナベビス(M3x12/10入)
TP Round Screw(M3x12/10pcs)
TPナベビス(M3x15/10入)
TP Round Screw(M3x15/10pcs)
セットビス
Set Screw
セットビス(M3x3/10入)
Set Screw(M3x3/10pcs)
セットビス(M3x4/10入)
Set Screw(M3x4/10pcs)
セットビス(M3x5/10入)
Set Screw(M3x5/10pcs)
セットビス(M3x6/10入)
Set Screw(M3x6/10pcs)
セットビス(M3x10/10入)
Set Screw(M3x10/10pcs)
セットビス(M3x12/10入)
Set Screw(M3x12/10pcs)
セットビス(M3x14/5入)
Set Screw(M3x14/5pcs)
セットビス(M3x20/5入)
Set Screw(M3x20/5pcs)
セットビス(M3x25/5入)
Set Screw(M3x25/5pcs)
セットビス(M4x4/10入)
Set Screw(M4x4/10pcs)
セットビス(M4x8/10入)
Set Screw(M4x8/10pcs)
セットビス(M4x12/10入)
Set Screw(M4x12/10pcs)
セットビス(M4x20/5入)
Set Screw(M4x20/5pcs)
セットビス(M5x4/5入)
Set Screw(M5x4/5pcs)
セットビス(M5x40/5入)
Set Screw(M5x40/5pcs)
ワッシャー
Washer
ワッシャー(M2x6x0.4/10入)
Washer(M2x6x0.4/10pcs)
ワッシャー(M2.6x7x0.5/10入)
Washer(M2.6x7x0.5/10pcs)
ワッシャー(M3x8x0.5/10入)
Washer(M3x8x0.5/10pcs)
ワッシャー(M3x10x1/10入)
Washer(M3x10x1/10pcs)
ワッシャー(M4x10x0.5/10入)
Washer(M4x10x0.5/10pcs)
ワッシャー(M4x10x0.8/10入)
Washer(M4x10x0.8/10pcs)
ワッシャー(M5x12x0.8/10入)
Washer(M5x12x0.8/10pcs)
ワッシャー(M7x11x0.5/5入)
Washer(M7x11x0.5/5pcs)
ワッシャー(M7x11x1.0/5入)
Washer(M7x11x1.0/5pcs)
スプリングワッシャー
Spring Washer
ワッシャー(M3x6x1.5)スプリング(10入)
Washer(Spring/M3x6x1.5/10pcs)
入数
(税込)
Quantity
★定価
21010pcs
21010pcs
21010pcs
21010pcs
21010pcs
21010pcs
21010pcs
21010pcs
21010pcs
21010pcs
21010pcs
2105pcs
2635pcs
3155pcs
21010pcs
21010pcs
21010pcs
2635pcs
2635pcs
3155pcs
21010pcs
21010pcs
21010pcs
42010pcs
42010pcs
21010pcs
21010pcs
2105pcs
2105pcs
21010pcs
42
Page 43

*発送手数料、消費税率は平成22年6月1日現在のものです。
"Kyosho Direct-Mail-Parts-Order-System" is available only for Japanese market.
京商スペアパーツ・オプションパーツの購入方法
部品を
こわしちゃった
●部品をこわしたり、なくしてしまった場合でもスペアパーツやオ プ ション パ ー ツを購入し、
元どおりに 直 す事がで きま す。
パーツはお店で直接購入していただくか、お店に行けない場合は、インターネットか
●
※これらの購入方法は日本国内に限らせていただきます
注文で京商から通信販売で購入することができます。
(現金書留及び郵便振込みによる通信販売は平成20年3月31日をもって終了させていただいており
ま
すので予めご了承ください)
●商品のご購入に際しては商品代金(税込)とは別に発送手数料が必要です。
※お支払い方法により発送手数料が異なりますので下記の注文専用電話にてご確認ください。
※お届け予定日数は夏・冬期休業または交通事情等運送上の理由により、遅れる場合がございますので
あらかじめご了承ください。
1.まずはお店でお求めください。
まずは、お近くのお店か、この商品をお買い求めいただいたお店にご来店ください。ご希望のパーツの在庫があれば
即購入できます。その際に組立/取扱説明書をお持ちになると購入がスムーズになります。
お店で在庫切れの場合でも京商の『オンラインパーツ直送便』
お店でご希望のパーツがたまたま品切れだった場合でも、京商の『オンラインパーツ直送便』※を利用すればその場で注文できます。
『オンラインパーツ直送便』は、ご希望のパーツの品番や数量等を直接お店にご注文してください。
在庫確認後代金をお支払いいただければ結構です。お客様のご自宅か、お店にお届けします。
※一部取扱っていないお店もございます。
A:取扱説明書で必要なパーツの
品番と数量を確認する。
オンライン
パーツ直送便
取扱店はこの
ステッカ ー が
目印です。
B:お店で必要なパーツを注文し
代金を支払う。
※
でお 店から京商へ申し込めます
C:ご注文から約3〜4日でお客様の
ご自宅か、お店にお届けします。
電話
2.お店に行けない場合は
お店に行けない場合は、京商ホームページ内の京商オンラインショップからお申し込みいただくか、電話注文でお申し込みいただくようになります。
1インターネットで京商に申し込む
次の2つの方法で京商から通信販売で購入できます。
http://www.kyosho.com
京商ホームページ内のインデックスから京商オンラインショップを
クリックして頂き、必要事項を入力してください。
オンラインショップ(インターネット)でお申し込みの場合は、
2種類(各社クレジットカード、代引支払い)からお選びいただけます
のでご利用ください。
http://www.kyosho.com
※発送手数料に関しましては下記の、注文専用電話にお問い合せください。
2電話で京商に注文する
※誤発送を防ぐ為、ご希望のパーツ品番・商品名をお調べのうえ下記、注文専用電話番号にお電話ください。
注文専用電話番号046-229-1541
受付時間:月〜金曜(祝祭日を除く)13:00〜17:00
※電話による注文は、代引販売に限ります。
京商株式会社
〒243-0034神奈川県厚木市船子153
●お問い合せはユーザー相談室まで
電話046-229-4115受付時間:月〜金曜(祝祭日を除く)13:00〜19:00
Page 44

The service mentioned below is available only for Japanese market.
組立や、操作上で不明な点のお問い合せ方法
これらのサービスは日本国内に限らせて頂きます
組立てたり、操作してみて上手くいかない点などございましたら、ご購入いただいた
販売店または、京商ユーザー相談室へお問い合せください。
京商ユーザー相談室へお問い合せの際は、お電話いただくか、下記のお問い合せ用紙
に必要事項をご記入のうえ、
京商へのお問い合せ先→「京商ユーザー相談室」
京商にお問い合せの際は、「京商ユーザー相談室」にご連絡ください。
お問い合せの際は、お手元に商品や組立/取扱説明書をご用意のうえ、組立/取扱説明書のページ数,行程番号,部品番号
(キーNo.)を用いるなど、なるべく具体的にお知らせください。
電話でのお問い合せは:
FAXでのお問い合せは
郵便でのお問い合せは
046-229-4115
:
046-229-1501
:
〒243-0034神奈川県厚木市船子153京商株式会社ユーザー相談室宛
FAX
または郵便でお送りください。
電話でのお問い合せは、月曜〜金曜(祝祭日を除く)13:00〜19:00。
FAXでは、24時間お問い合せの受付をして居ります。回答は、翌営業日以降と
なる場合があります。営業日:月曜〜金曜(祝祭日を除く)
キ リトリ 線
お問い合せ用紙
お問い合せ用紙は、FAXまたは郵便でお送りください。回答方法は、京商で検討のうえ考慮させて頂きます。
郵送の場合は、お問い合せ用紙のコピーを保管してください。
品番 商品名
店名
ご購入店
ご使用
プロポ
ご氏名
ご自宅
住所
ご自宅の
連絡先
平日の昼間に
可能な連絡先
月曜〜金曜(祝祭日を除く)13:00〜19:00で電話連絡可能な時間帯 : 頃
お問い合せご記入欄:
メーカー名 商品名
フリガナ
〒___−____
電話 ( )
電話 ( )
組立/取扱説明書のページ数や部品番号(キーNo.)を用いるなど、なるべく具体的にご記入ください。
(
都道
府県
電話
アルティマSC-RNo.30850
都道府県
) ーー
ご使用の
モーター
エンジン
R/C歴
FAX ( )
FAX ( )
受付No.
ご購入
年月日
(京商記入欄)
平成 年 月 日
約年
※京商株式会社では、お客様の個人情報の保護に力を入れております。お客様よりの、注文及びお問い合せを通じて知りえたお客様の個人情報につきましては、(1)〜(3)の場合を除き無断で第三者に提供
したり開示するようなことはありません。(1)お客様の事前の承諾を受けた場合。(2)法律に基づき開示請求を受けた場合。(3)サービスの提供のため当社の委託先に開示する場合。
R
THE FINEST RADIO CONTROL MODELS
京商ホームページ
www.kyosho.com
お問い合せは:月曜〜金曜(祝祭日を除く)13:00〜19:00
京商株式会社〒243-0034神奈川県厚木市船子153
●ユーザー相談室直通電話046-229-4115
PRINTED IN CHINAXXXXXXXX-1
 Loading...