

※ご使用前にこの説明書を良くお読みになり充分に理解してください。
Before use, please carefully read the explanations!
THE FINEST RADIO CONTROL MODELS
R
ALL BALSA EP TRAINER
FERIAS
FERIAS
RADIO CONTROLLED ELECTRIC POWERED 2-CHANNEL AIRPLANE
目 次 INDEX
●キットの他にそろえる物
REQUIRED FOR OPERATION
●組立て前の注意
BEFORE YOU BEGIN
●プロポの準備
RADIO PREPARATION
●本体の組立て
ASSEMBLY
●パーツリスト
PARTS LIST
●取扱いの注意
OPERATING YOUR MODEL SAFELY
安全のための注意事項
この無線操縦模型は玩具ではありません!
●この商品は高い性能を発揮するように設計されていますので、組
立てに不慣れな方は、模型を良く知っている人にアドバイスを受
け確実に組立ててください。
●組立て作業は、幼児の手のとどかない所で必ず行ってください。
●動かして楽しむ場所は万一の事故を考えて、安全を確認してから
責任をもってお楽しみください。
●組立てた後も説明書がいつでも見られるように大切に保管してく
ださい。
●不要になったニカドバッテリーは、貴重な資源を守るために廃棄しないでリサイクル協力店へお持ちください。
●The product you have purchased is powered by a rechargeable battery. The battery is recyclable. At the end of its useful life, under
●various national / state and local laws, it may be illegal to dispose of this battery into the municipal waste stream. Check with your local
Ni-Cd
solid waste officials for details in your area for recycling options or proper disposal.
●
First-time builders should seek advice from people having building
experience in order to assemble the model correctly and to produce its
performance to full extend.
Assemble this kit only in places out of children's reach!
●
Take enough safety precautions prior to operating this model. You are
●
responsible for this model's assembly and safe operation!
Always keep this instruction manual ready at hand for quick reference,
●
even after completing the assembly.
WINGSPAN : 1010mm
SAFETY PRECAUTIONS
This radio control model is not a toy.
INSTRUCTION MANUAL
組立/取扱説明書
フェリアス
2
2
3
3〜7
7
8
※製品改良のため、予告なく仕様を変更する場合があります。*SPECIFICATIONS ARE SUBJECT TO CHANGE WITHOUT NOTICE.
© 1997 KYOSHO/禁無断転載複製
No. 10723 / 10724
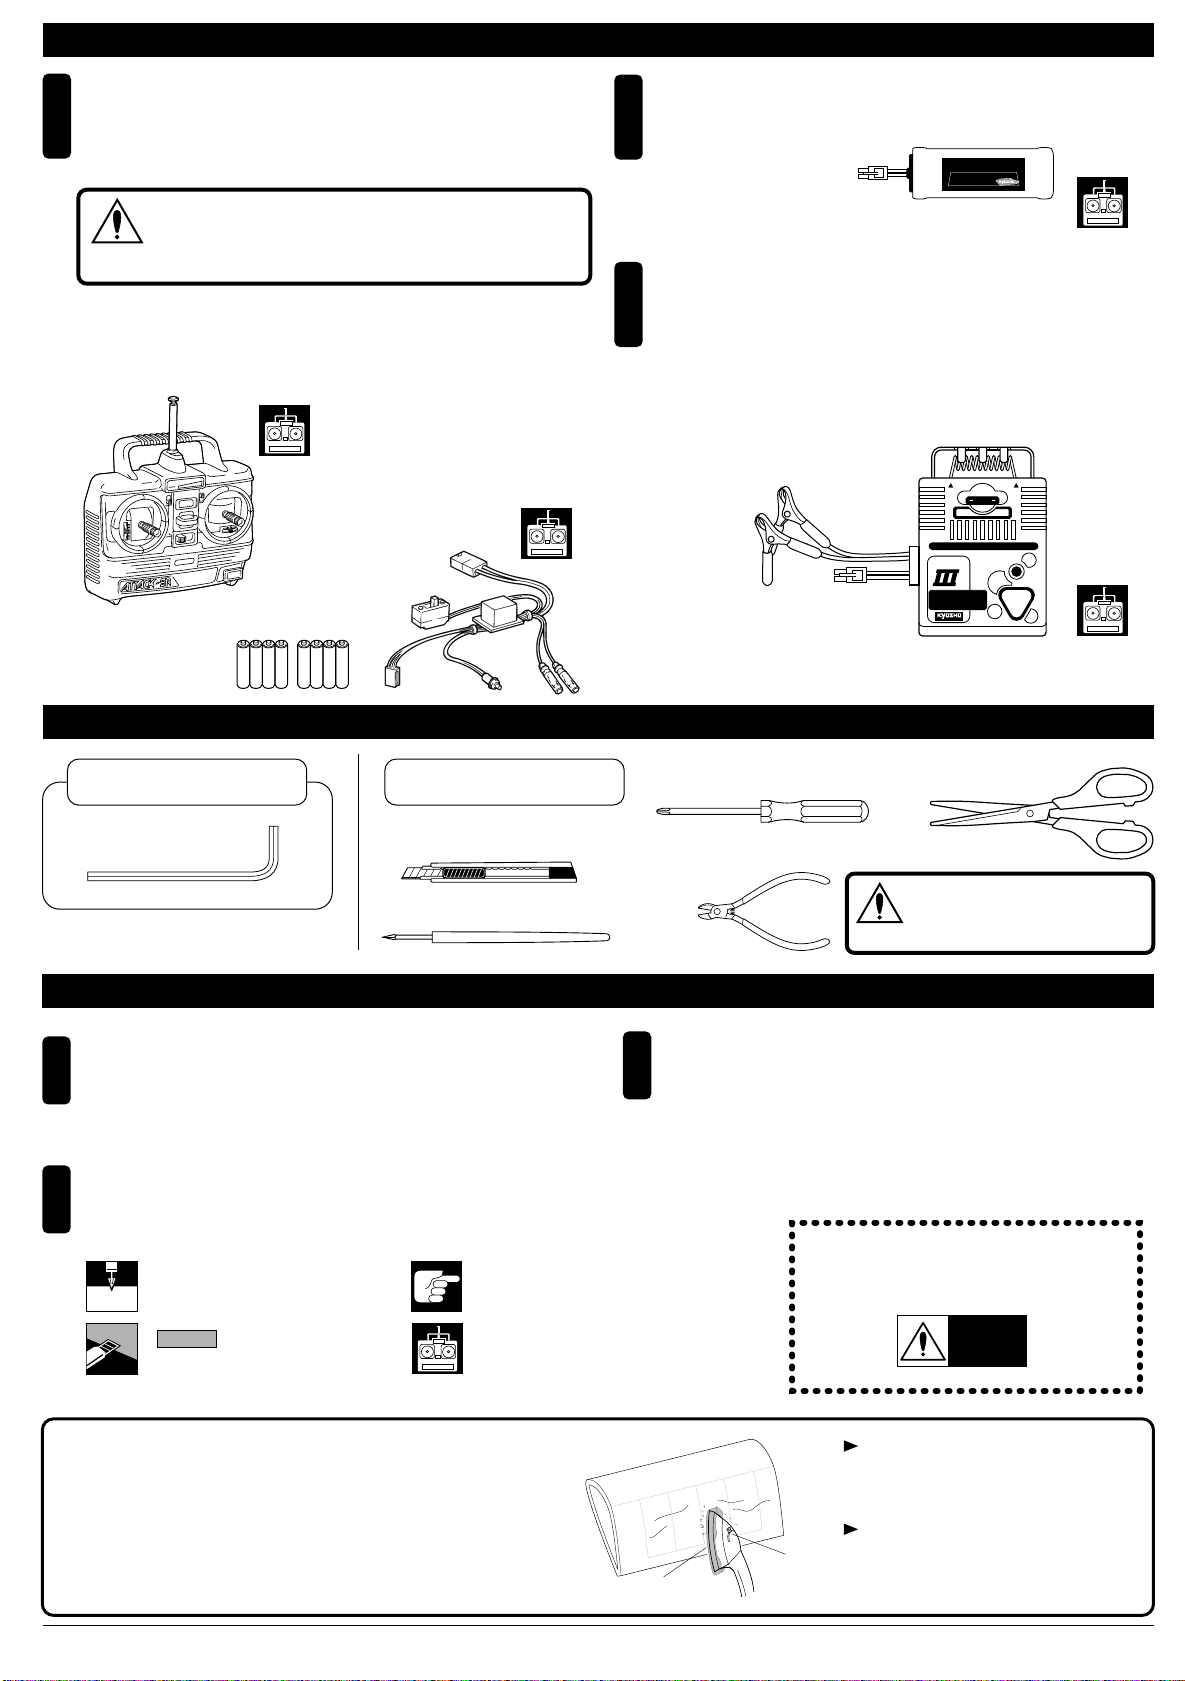
キットの他にそろえる物 REQUIRED FOR OPERATION
2チャンネル以上の飛行機用無線操縦機(プロポ)セット
1
サーボx2,オートカットリレーx1,又は飛行機用アンプx1,
乾電池
Minimum 4 channel radio with 3 servos and 1 electronic
speed controller for airplanes, and AA-size batteries.
上空用(飛行機用)のプロポセットを必ず使用してください。
(上空用以外使用禁止)
CAUTION: Only use a radio for Airplanes!
注意
(Any other radio is prohibited!)
プロポの取扱いは、プロポに付属の説明書を参考にしてください。
Forproperradiooperation,refertoitsmanual.
■
■飛行機用2チャンネル以上
のプロポ
Minimum 2 channel radio
■送信機用単3乾電池(別売)
AA-size Batteries
(Transmitter)
飛行機用アンプ
(使用するモーター,バッテリー
に適合したもの)
Electronic speed controller for
airplanes that matches your
motor and Ni-Cd battery.
又は、KYOSHOの
●No. 90511
オートカットリレー
Auto cut-off relay
AAAAAAAA
ニカドバッテリー(充電式電池)
2
Ni-Cd Battery
■ニカドバッテリー
Ni-Cd Battery
8.4V-600 mAh AE
8.4V‑600mAhSCR充電式ニカドバッテリー
KYOSHO CORPORATION JAPANNo.71721
●No.71721
8.4V-600mAh AE ニカドバッテリー
Ni-Cd Battery
充電器
Charger
3
■
充電器(使用するニカドバッテリーに適合したもの)
Charger
(Choose one that matches your Ni-Cd Battery)
●No. 72701 DCクイックチャージャー III(ミニプレーン用)
DC Quick Charger III (For mini plane)
FUSE 7.5A
WARNING HOT
DELTA PEAK AUTO-CUTOFF
QUICK
DCDC
CHARGER
For 7.2-8.4V
600-1100mAh
Ni-Cd BATTERY
Ni-Cd BATTERYRechargeable
R
THE FINEST RADIO CONTROL MODELS
WARNING HOT
7.5
E
G
R
A
H
C
T
R
A
T
S
組立に必要な工具 TOOLS REQUIRED
キットに入っている工具
TOOLS INCLUDED
■六角レンチ
Hex Wrench
■カッターナイフ
■キリ
用意する工具
TOOLS NOT INCLUDED
Sharp Hobby Knife
Awl
組立て前の注意 BEFORE YOU BEGIN
組立てる前に説明書を良く読んで、おおよその構造を
1
理解してから組立てに入ってください。
Read through the manual before you begin, so you will
have an overall idea of what to do.
説明書に使われているマーク
3
Symbols used throughout the instruction manual, comprise:
2mm
2mmの穴をあける(例)。
Drill holes with the specified
diameter (here: 2mm).
をカットする。
Cut off shaded portion.
注意して組立てる所。
Pay close attention here!
コンプリートセットには含まれています。
Supplied in full set version.
■+ドライバー(大、中、小)
Phillips Screw Driver (L.M.S)
■ニッパー
Wire Cutters
■ハサミ
Scissors
使用する工具の取扱いには、充分
注意してください。
CAUTION: Handle tools carefully!
注意
キットの内容をお確かめください。万一不良、不足があ
2
りましたら、お買い求めの販売店にご相談いただくか、
当社「ユーザー相談室」までご連絡ください。
Check all parts. If you find any defective or missing parts,
contact your local dealer or our Kyosho Distributor.
●重要な注意事項があるマークです。
必ずお読みください。
Do not overlook this symbol!
警告
Warning!
機体に貼ってあるフィルムは、温度や湿度など気候条件が
工場組立の時から変化すると、多少タルミが出ることがあ
ります。飛行には、さしつかえありませんが、アイロンを
あてるとタルミがとれます。
The pre-covered film may become wrin-kly due to
variations of temperature. Smooth out as explained right.
2
あて布
with cover (cloth)
低温
low setting
あて布をしたアイロンを低温であて、
必要に応じて温度を上げてゆく。
温度を上げすぎるとフイルムが溶ける
ので注意する
Use an iron covered with a cloth!
Start at low setting. Increase the
set-ting if necessary. If it is too
high, you may damage the film.
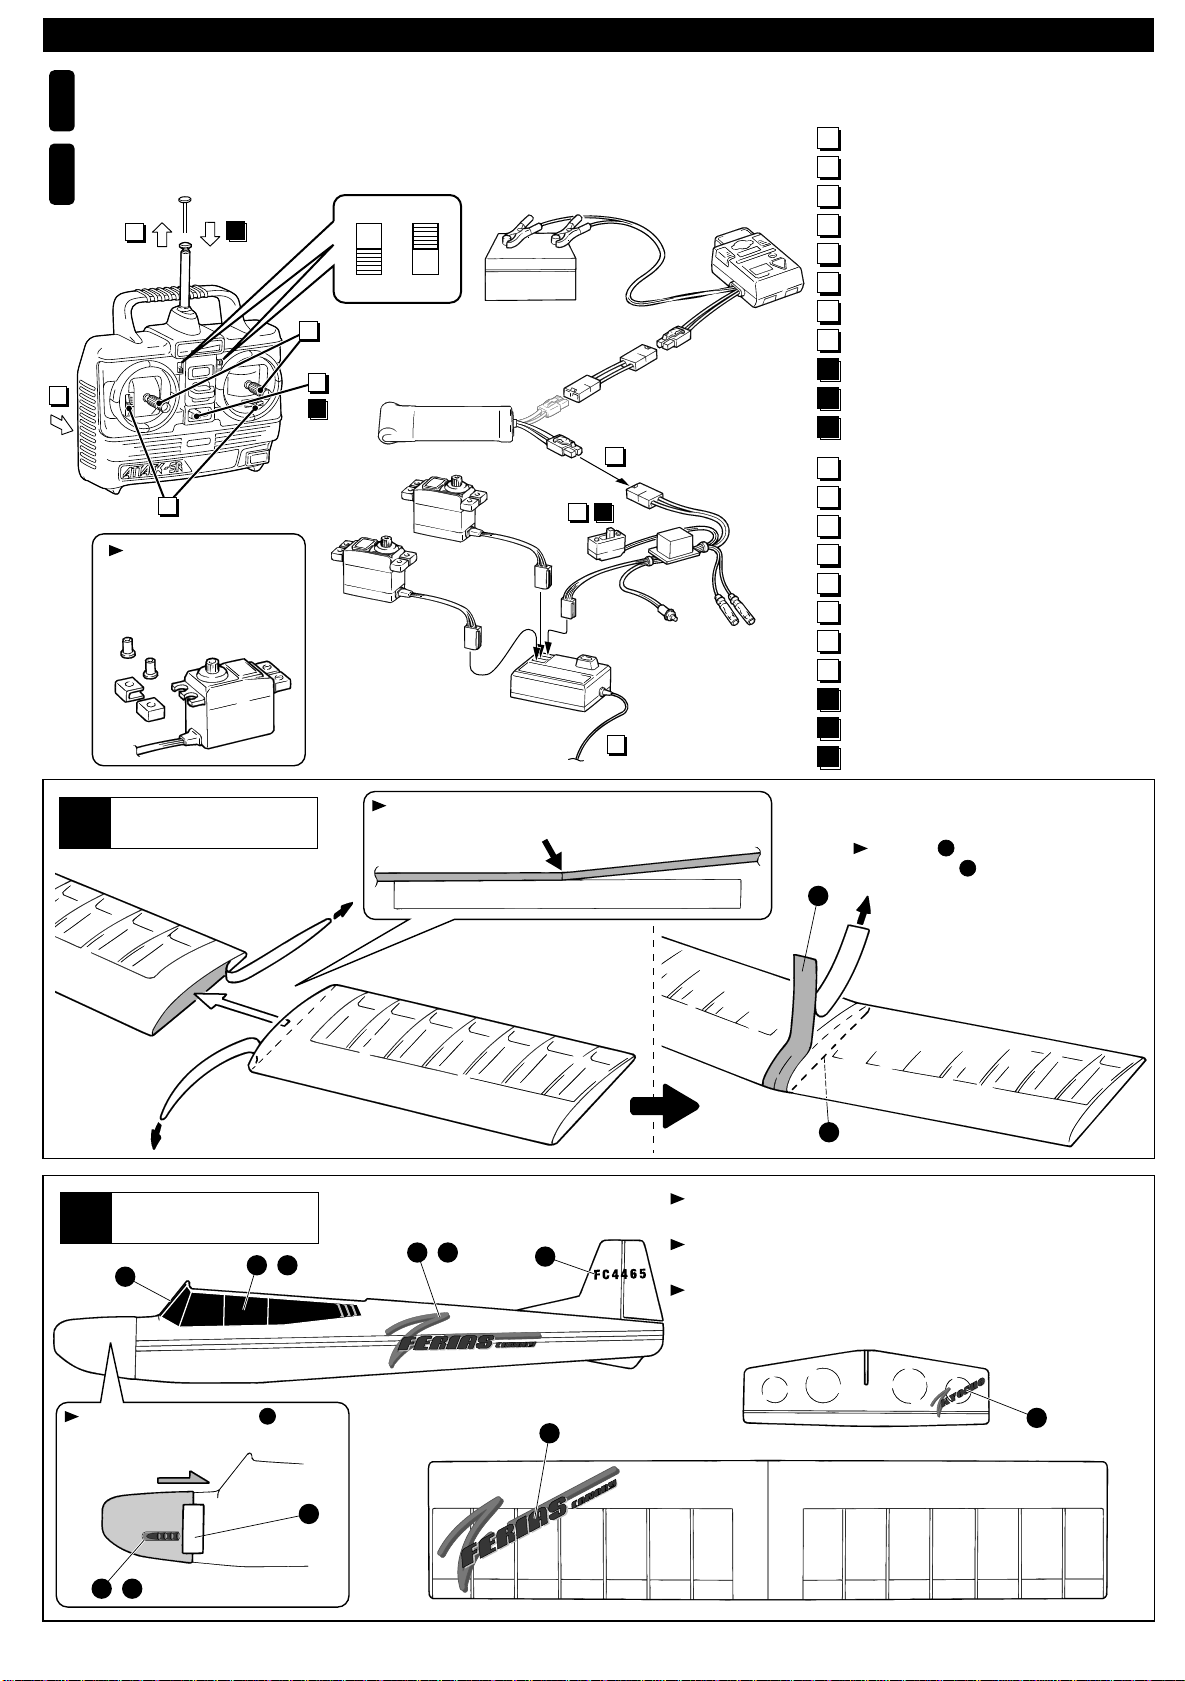
プロポの準備 RADIO PREPARATION
キットの組立てに入る前に、ニカドバッテリーを充電器の説明にしたがって充電しておきます。
1
A new Ni-Cd battery must charged before it is used. Refer to the charger instruction manual for charging.
プロポを下の順序にしたがってセットします。
2
Set up the radio as explained below.
2
1
11
R
N
※ラダーサーボはリバース側で使用。
8
*Switch the reverse (Transmitter)
for ruder control.
ON
6
OFF
10
▲送信機
5
Transmitter
サーボにグロメットを
取り付けておく。
Install the grommets to
the servo as shown.
▲サーボ
Servo
R
N
▲受信機
Receiver
7 9
●終わる時
3
4
¥START
¥FINISH
1
2
3
4
5
6
7
8
9
10
11
1
2
3
4
5
6
7
8
9
10
11
単3乾電池をセットする。(送信機)●始める時
アンテナをのばす。(送信機)
ニカドをつなぐ。
アンテナをのばす。(受信機)
トリムレバーを中央にセットする。
スイッチを入れる。(送信機)
スイッチを入れる。(受信機)
スティックを動かしてサーボが動くか確認する。
スイッチを切る。(受信機)
スイッチを切る。(送信機)
アンテナを縮める。(送信機)
Install AA-size batteries. (Transmitter)
Extend the antenna. (Transmitter)
Connect the Ni-Cd battery.
Extend the antenna. (Receiver)
Center the trims.
Switch on. (Transmitter)
Switch on. (Receiver)
Make sure the servos are in command.
Switch off. (Receiver)
Switch off.(Transmitter)
Retract the antenna.. (Transmitter)
1
2
主翼
Main Wing
デカール
Decals
5
平らな台に置き、ねじれない様にピッタリ合わせる。
Make sure to joint wings certainly.
デカール は、上、下、に貼る。
Apply decal upper and lower sides.
1
1
1
1
図の位置に番号順にデカールを貼る。
Apply the decals to the spots indicated in numerical order.
(
)
8
(
)
6
7
9
10
カッコの中は反対側のデカールナンバーです。
The decal numbers between brackets are only for the opposite side.
ナンバーのついていないデカールは、好きな位置に貼って下さい。
Decals with no number can be placed wherever you like.
後ろによせて、デカール を貼る。
Let cowling at rearest side.
2
2
(
)
3
4
12
11
3

水平尾翼
Horizontal Tail
3
2.3 x 14mm TPビス
TP Screw
水平尾翼
Horizontal Tail
4
2 x 8mm ビス
Screw
1
はずす。
Put off wood block.
2
2.3x14mm
Warning!
向きに注意。
Note the direction.
確実に取付ける。
飛行中にはずれると操縦不能になり
事故につながります。
Securely assemble together. If coming
off during flights, you lose control of your
airplane which leads to accidents!
上
Top
2x8mm
フィルムのみ。
Cut away only the film.
Warning!
確実に取付ける。
飛行中にはずれると操縦不能になり
事故につながります。
Securely assemble together. If coming
off during flights, you lose control of your
airplane which leads to accidents!
中心
Center line
2x8mm
向きに注意。
Note the direction.
胴体
Fuselage
5
2x8mm
2mm
角を合わせる。
Align a corner.
2mmの穴をあける(例)。
2mm
Drill holes with the specified
diameter (here: 2mm).
4
をカットする。
Cut off shaded portion.
注意して組立てる所。
Pay close attention here!
●重要な注意事項があるマーク
です。必ずお読みください。
Do not overlook this symbol!
Warning!
 Loading...