

Page 1
KEW Smart for KEW3552BT
Instruction manual
How to connect with KEW3552BT
Connection and Disconnection
Connect KEW 3552 BT with your PC: P.2
Disconnection P.6
Data saving
How to save the measured data
P.8
Items shown in the Saved data list P.10
Auto-save P.11
Creating/ editing files
Menu P.13
Creating a new file P.15
To show another file P.18
Editing the saved data
Add/ alter file descriptions P.19
Edit comments on records P.20
Deleting the saved data
Delete one record. P.22
Select and delete multiple records P.24
Delete all records P.27
Download all data from KEW 3552 BT P.28
Delete all the KEW 3552 BT internal data P.29
Other features
Show the saved data P.31
Open a map based on the location info. P.32
Display layout change P.33
Link with other apps P.35
File transfer to PC
On Android device: P.36
On iOS device: P.37
Troubleshooting
P.38
Management of KEW 3552 BT internal memory
1
Page 2

Connection and Disconnection
Operating environment
System requirements:
・ OS
・ Android "5.0" to "7.0"
・ iOS
"10.0.0"
or later
・ Devices:
・ Smartphone
・ Tablet
・ Required functions/ authorizations:
・ Bluetooth LE
・ Location services
・ File writing/ reading
Android is a trademark or registered trademark of Google Inc.
iOS is a trademark or registered trademark of Cisco in the U.S. and other countries.
The Android robot is reproduced or modified from work created and shared by
Google and used according to terms described in the Creative Commons 3.0
Attribution License.
iOS
2
Page 3
Connection and Disconnection
Connect KEW 3552 BT with your PC:
STEP 1
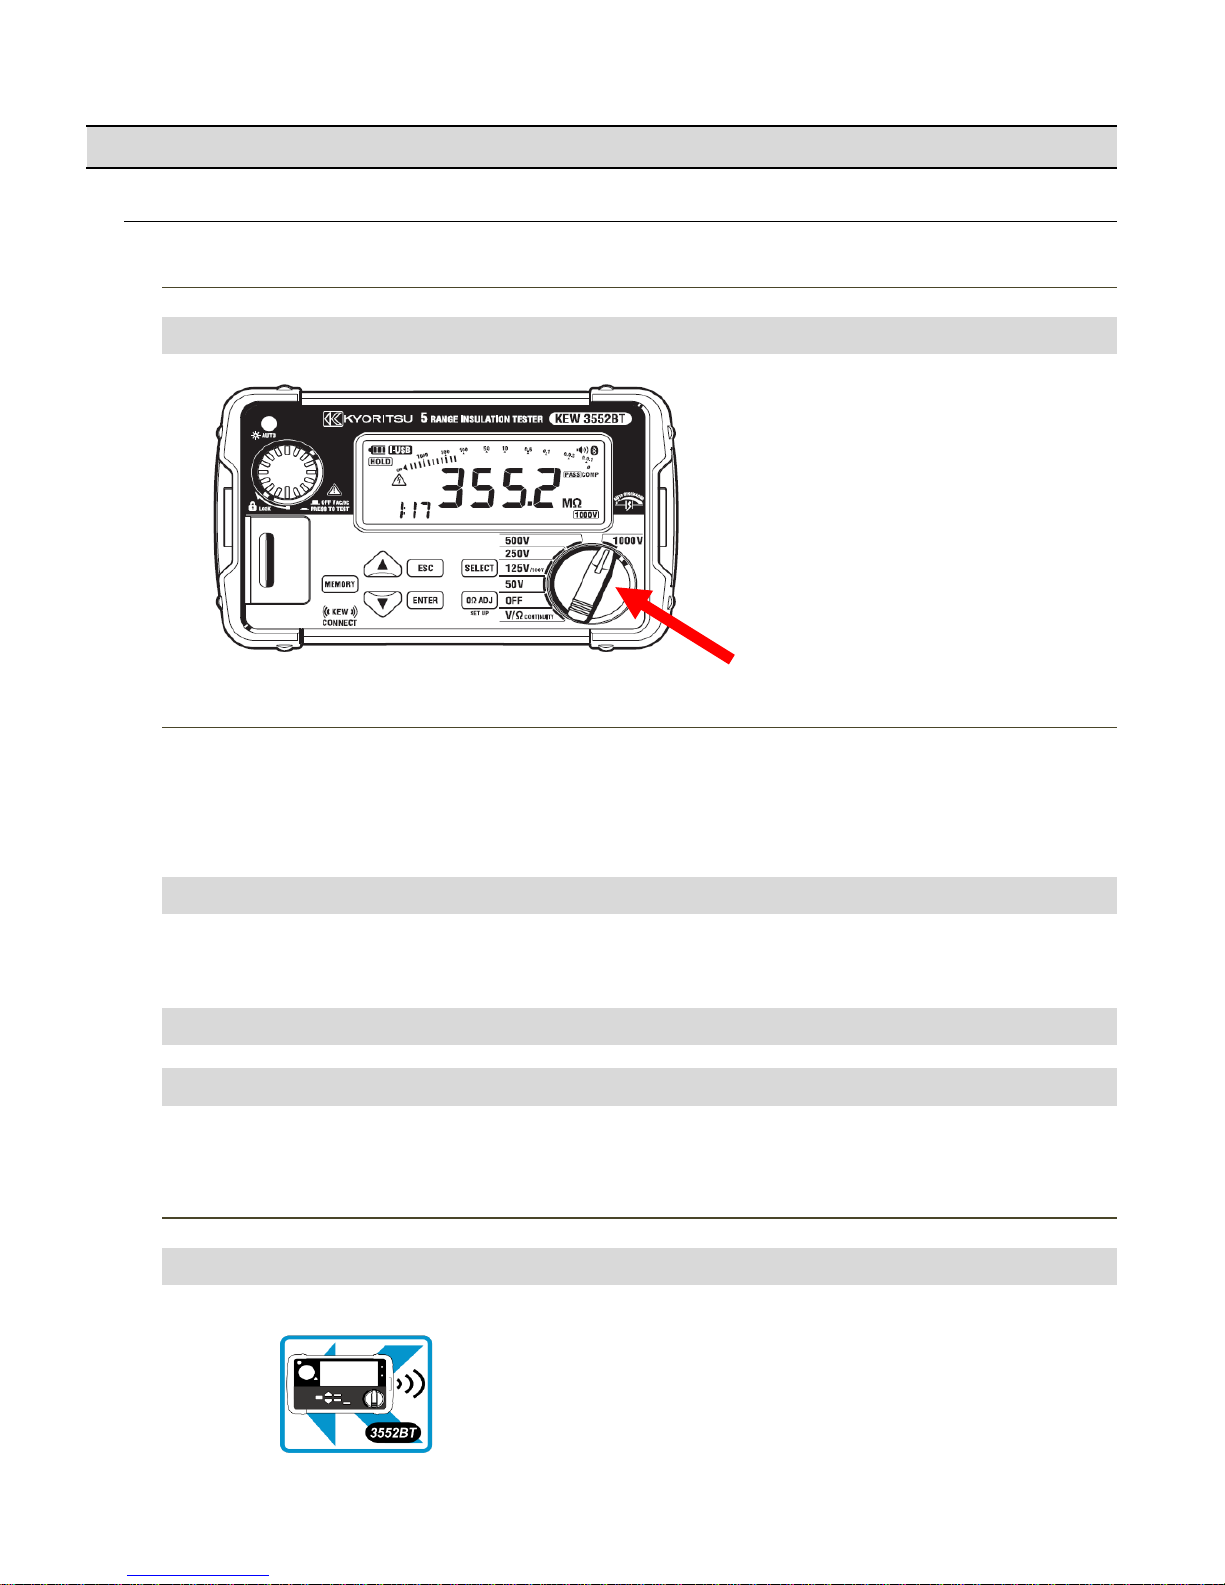
Power on KEW 3552 BT
1
Turn the Function switch and select any desired range.
* Please refer to the instruction manual for KEW 3552 BT for details.
Function switch
STEP 2
1
Open “Settings” on your device.
CAUTION: Setting application depends on the device you’re using.
For details, please refer to the manual of the device you’re using.
2
Turn on the Bluetooth function.
3
Turn on the location services.
iOS
Privacy > Location Services
STEP 3
Start “KEW Smart for KEW 3552 BT”.
1
Tap the icon and get the application started.
← App icon for “KEW Smart for KEW 3552 BT”
Turn on the necessary functions on your device. (If those have been turned
off.)
Follow the procedures below and turn on the required functions mentioned above; if any of them
are off.You can proceed to STEP 3 if all the functions are “On”.
3
Page 4
Connection and Disconnection
STEP 4
Verify that the access is authorized. (required only for the first time)
This authorization check is required when:
- the settings or data of the application is restored to default, or
- the app is re-installed.
If the access right has been already confirmed, you can proceed to STEP 5.
1
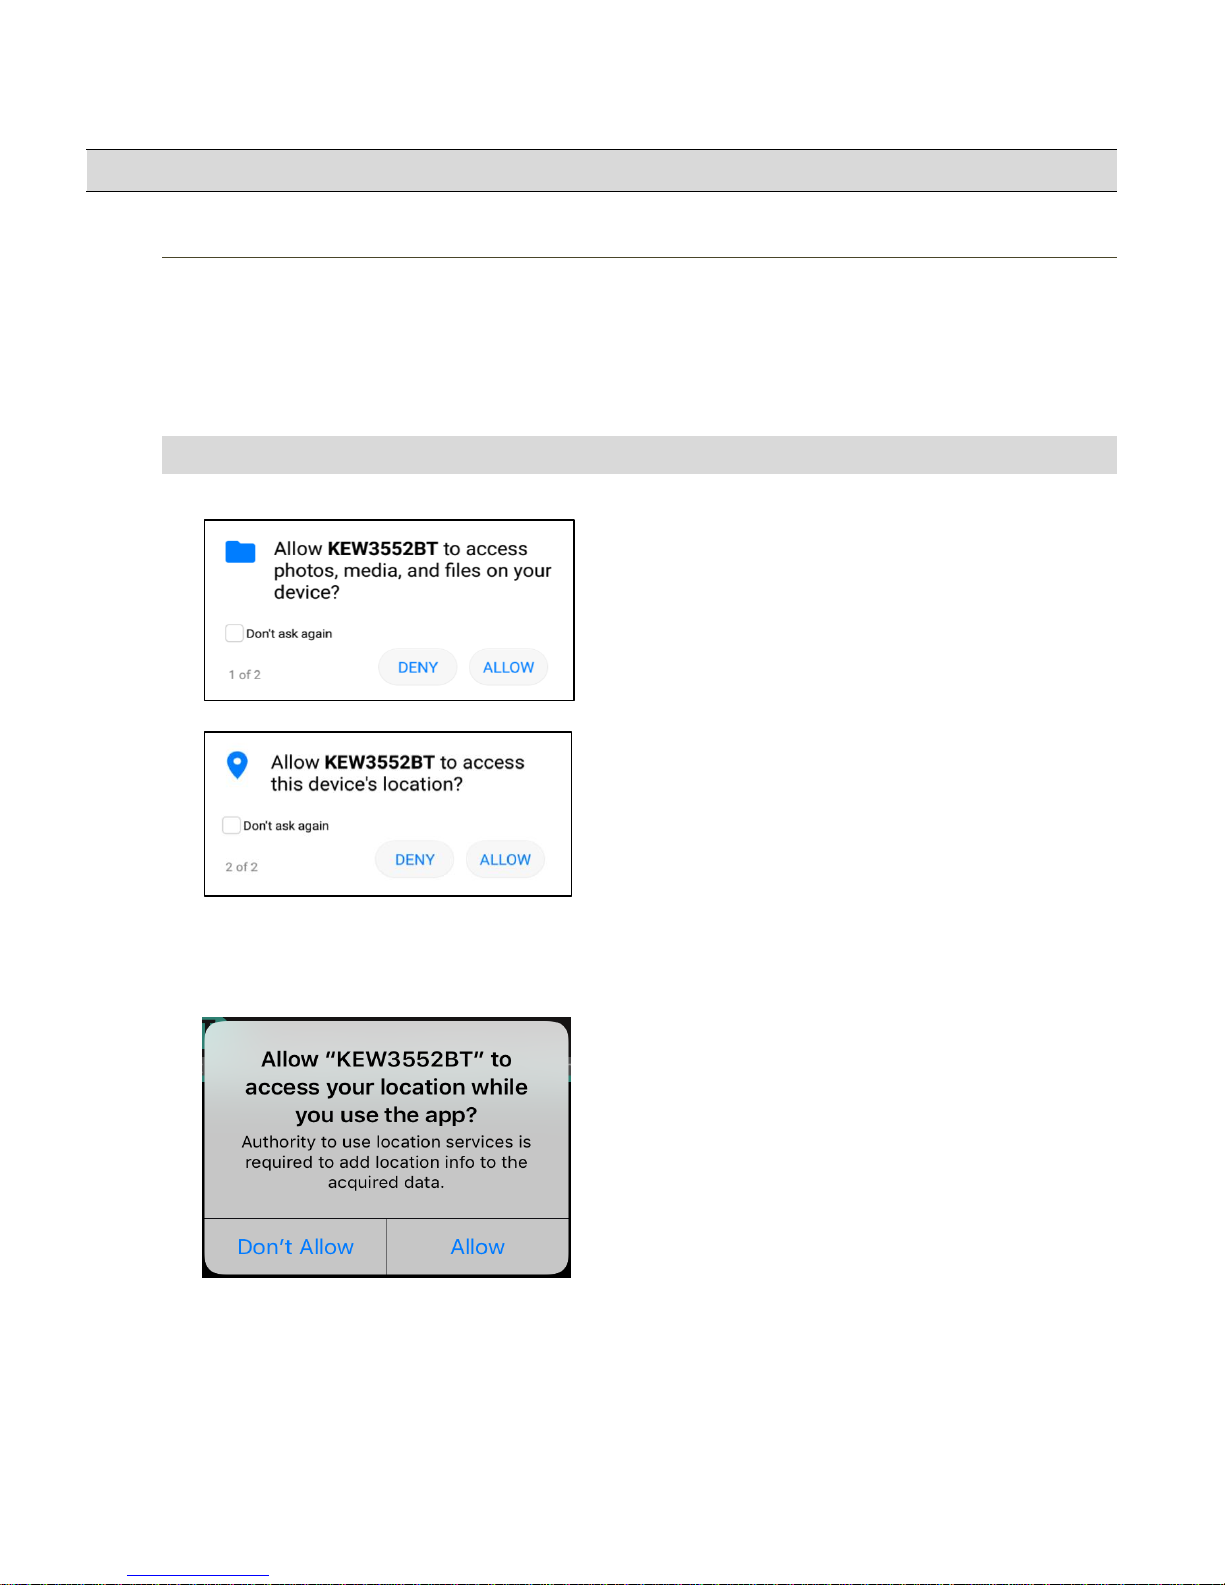
Several authorization checks are performed when the app gets started. Select Allow for all.
Android
Access to files:
Access to device location:
iOS
Location Services:
* This confirmation message appears just once before shifting to the setting screen.
Don't Allow Allow
Access authorization required to use Bluetooth LE
function and to add and save data with location info.
Authorization required to use Bluetooth LE function and
to add location info. to the saved data.
Access authorization required to save/ read measured
data.
4
Page 5
Connection and Disconnection
STEP 5
Search KEW 3552 BT you want to connect:
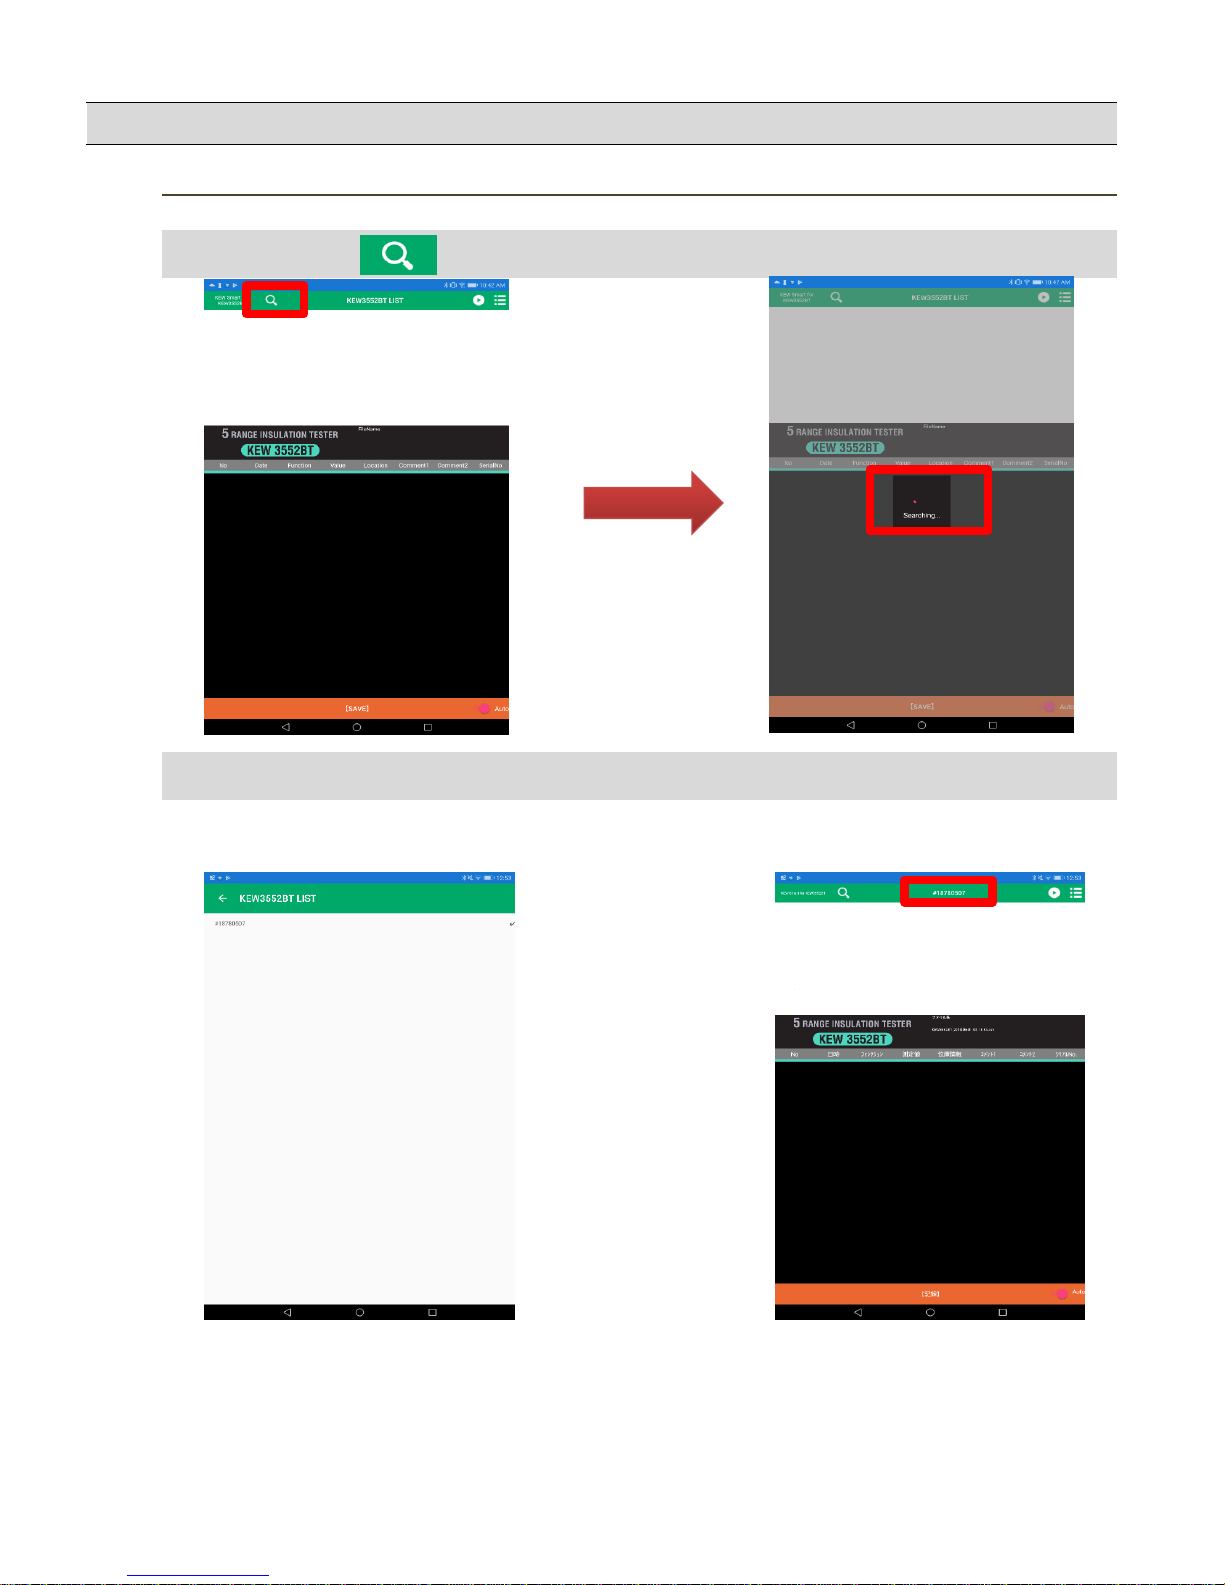
1
Tap the Search button to search KEW 3552 BT in close proximity.
Begins searching…
2
Select the target KEW 3552 BT from the list shown in the app.
* Serial no. is marked on the rear side of the product.
Tap the Serial No. to cancel the
selection.
Founded KEW 3552 BT is/ are
listed and shown in the app.
5
Page 6
Connection and Disconnection
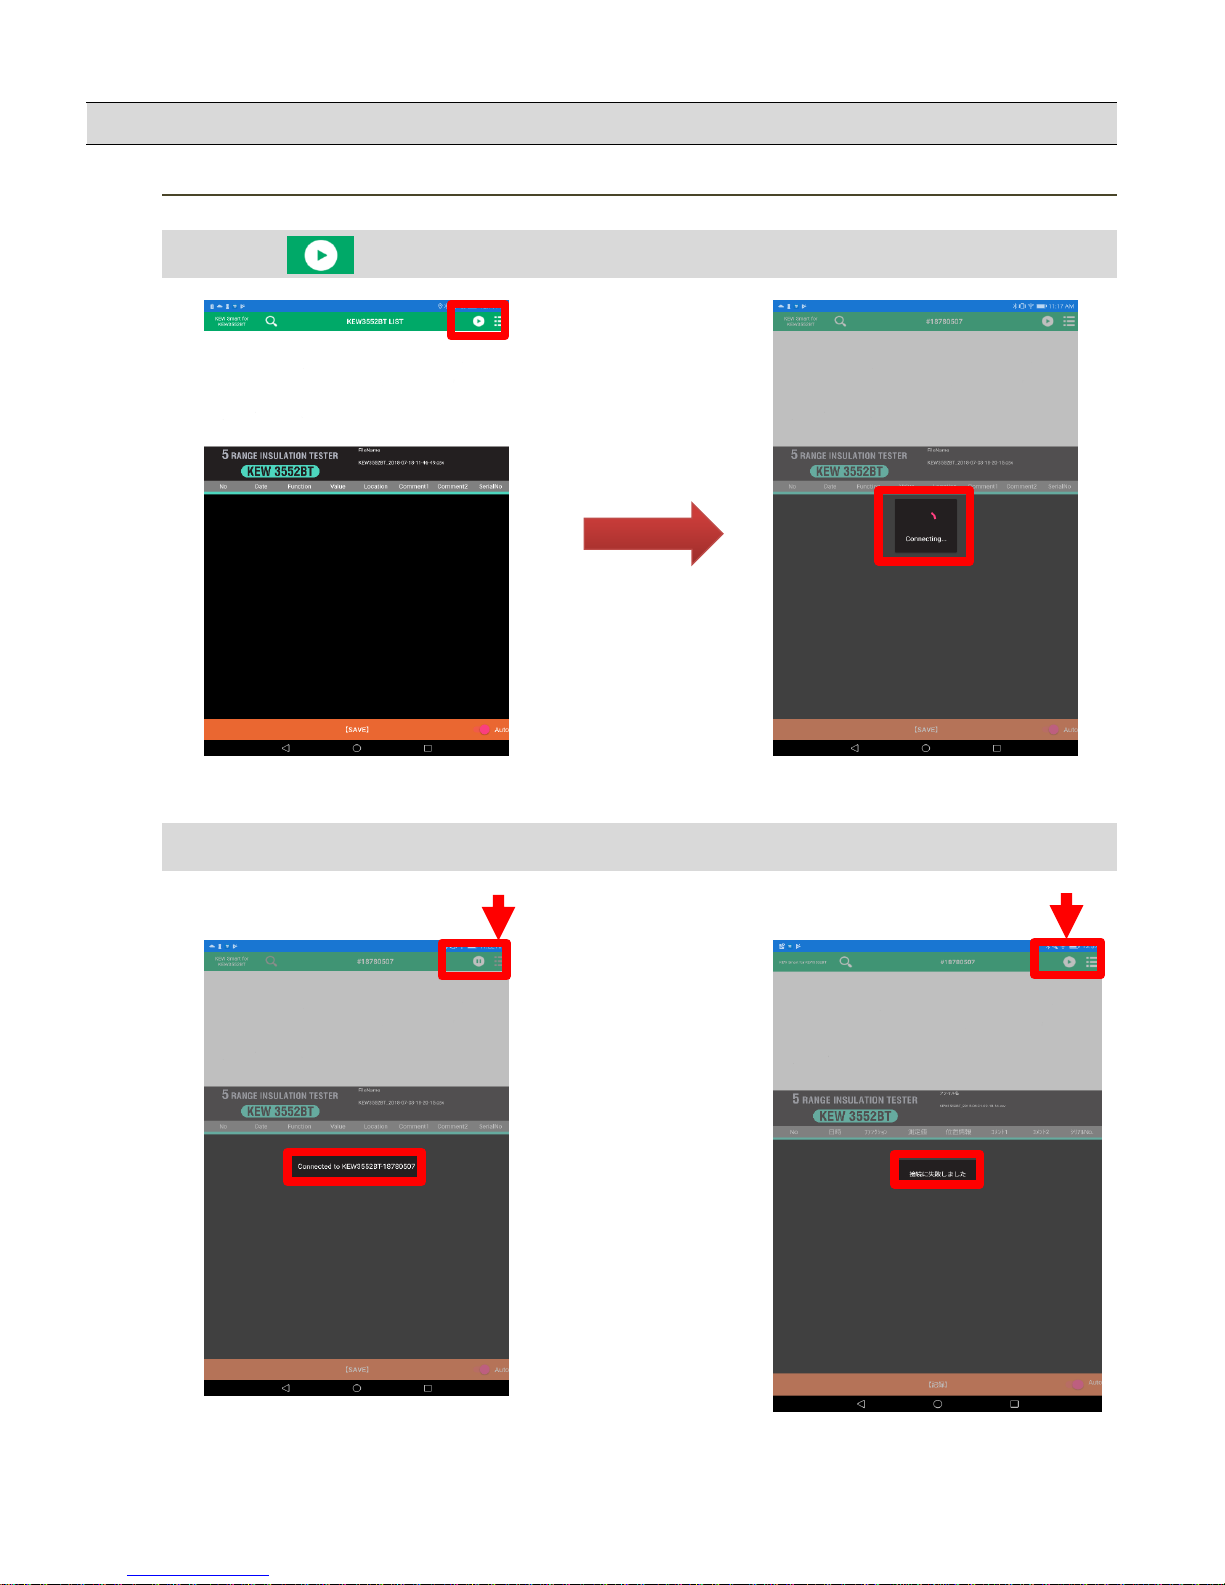
STEP 6
Connection
1
Tap the button to establish connection.
Begins connection…
2
Confirm that the connection has been successfully established.
Disconnect button appears. Connect button appears.
Displayed message: Displayed message:
Connected to "KEW3552BT-xxxxxxxx"
Connection error
Connected:
Filed:
6
Page 7
Connection and Disconnection
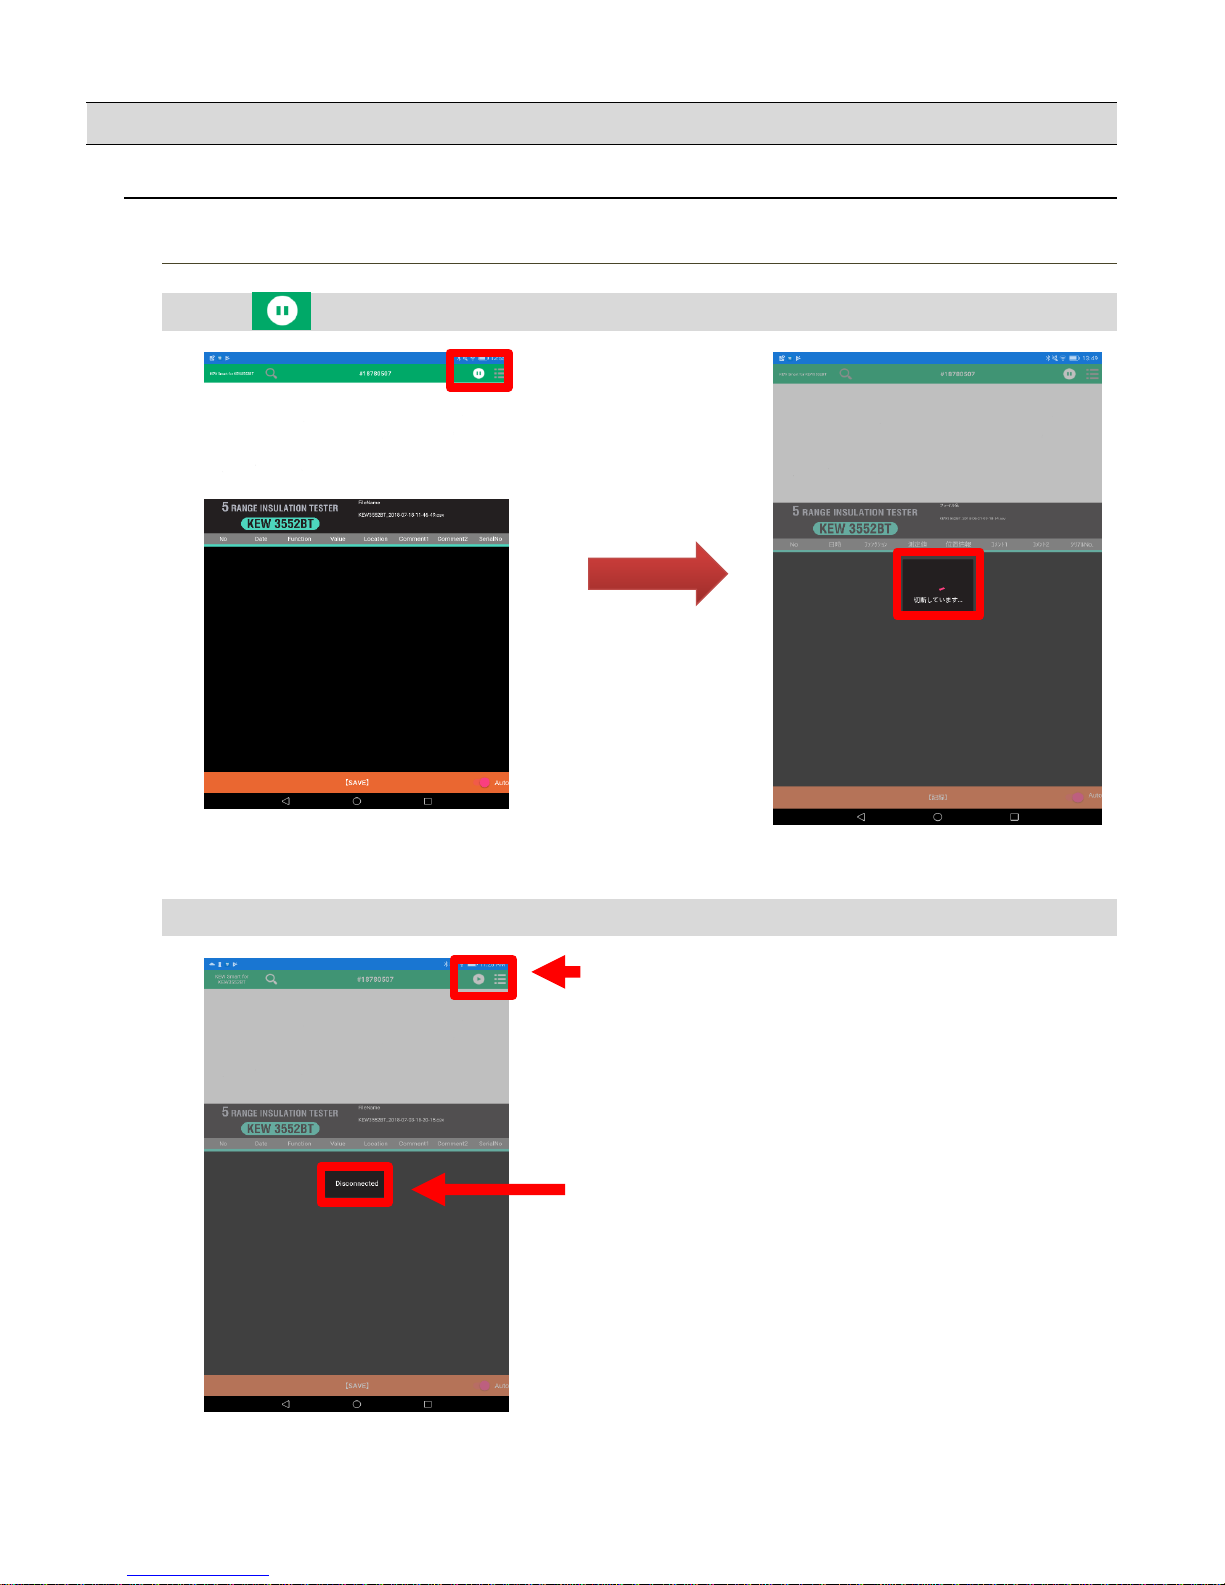
Disconnection
STEP 1
Disconnect your KEW 3552 BT from the app.
1
Tap button to disconnect.
Disconnecting...
2
Now the selected KEW 3552 BT is disconnected.
The button switches to Connect button.
Message - Disconnected - appears.
Bluetooth is automatically disconnected when the
connected KEW 3552 BT is powered off. On an Android
device, connection process automatically resumes
when powering on the previously connected KEW 3552
BT.
7
Page 8
Data saving
How to save the measured data
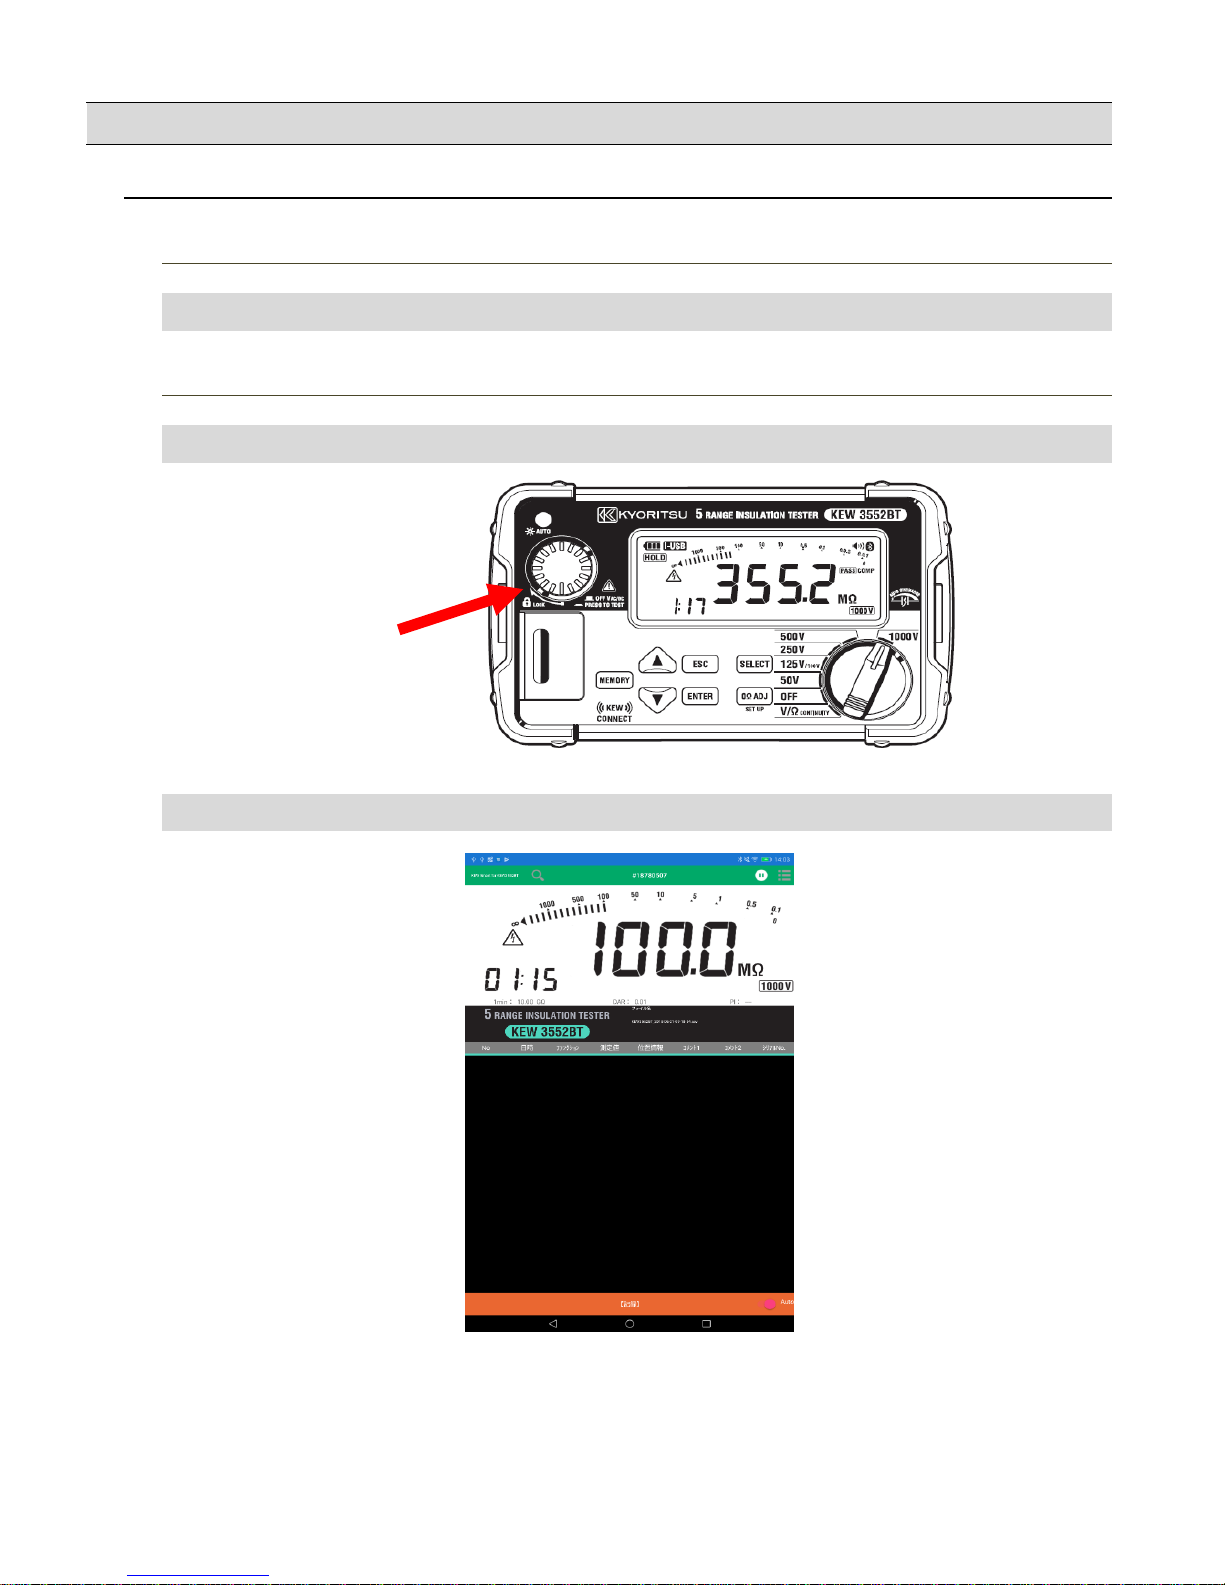
STEP 1
Connect KEW 3552 BT with your PC.
1
Refer to the "Connection and Disconnection" pages to see how to connect the device.
STEP 2
Start measurement.
1
Press the Test button on KEW 3552 BT (or Remote switch) and start a measurement.
Test button
2
Measured result is shown in the app screen.
8
Page 9
Data saving
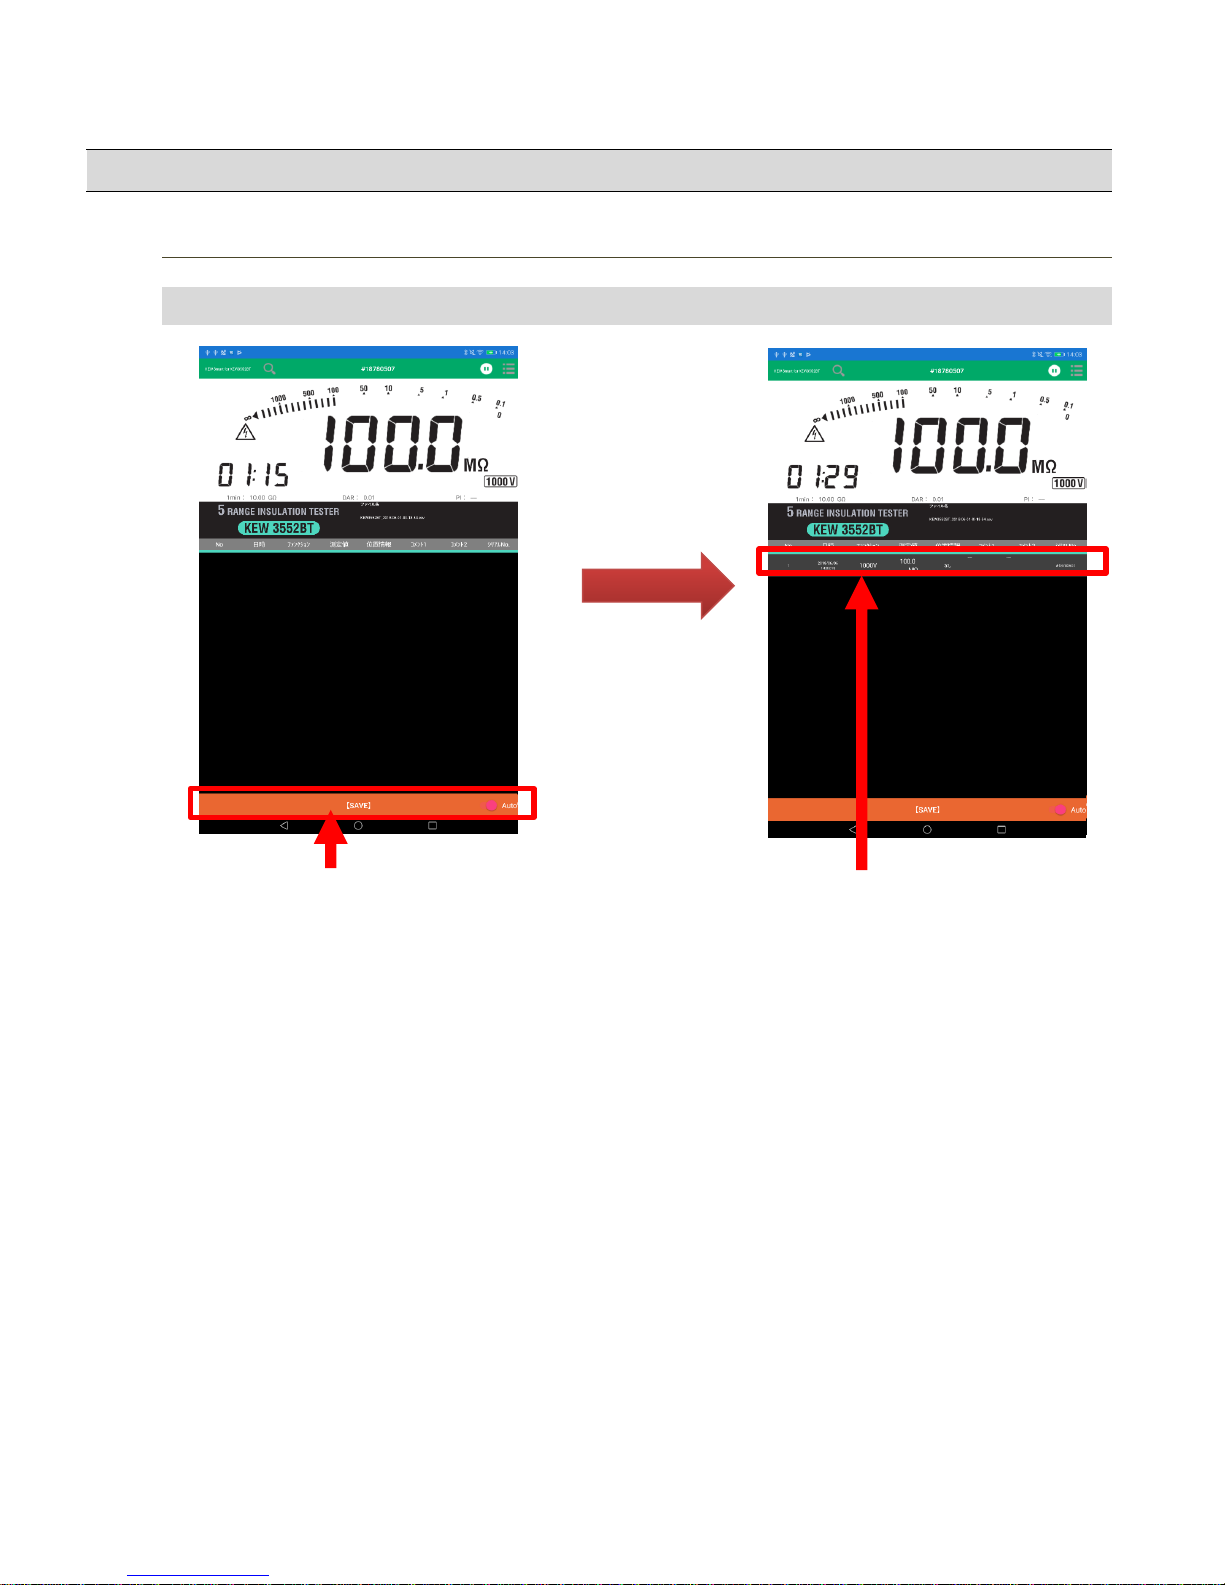
STEP 3
Save the measured data.
1
Tap the [SAVE] button.
Tap the [SAVE] button.
Measured data is
saved and displayed.
After tapping [SAVE]
button,
9
Page 10

Data saving
Items shown in the Saved data list
Title
Detail
Title
No.
* No. 1000 is the max.
Date
Function
Value Results obtained from KEW 3552 BT
Location
Comment 1
Any texts can be entered.
Comment 2
Tap the field to enter texts.
Serial No.
Additional info.
Serial No. of the connected KEW
3552BT
DC/AC of measured voltage, 1-min
value of insulation resistance, and
PI/DAR value
Detail
Data no. is assigned to the saved data.
(starting with no.1)
"VOLT": Voltage measurement
"50V" - "1000V": Insulation resistance
measurement
"CONT": Low-resistance measurement
"ON": saved with location info. "OFF":
saved without location info.
Date and time when the data was saved.
10
Page 11
Data saving
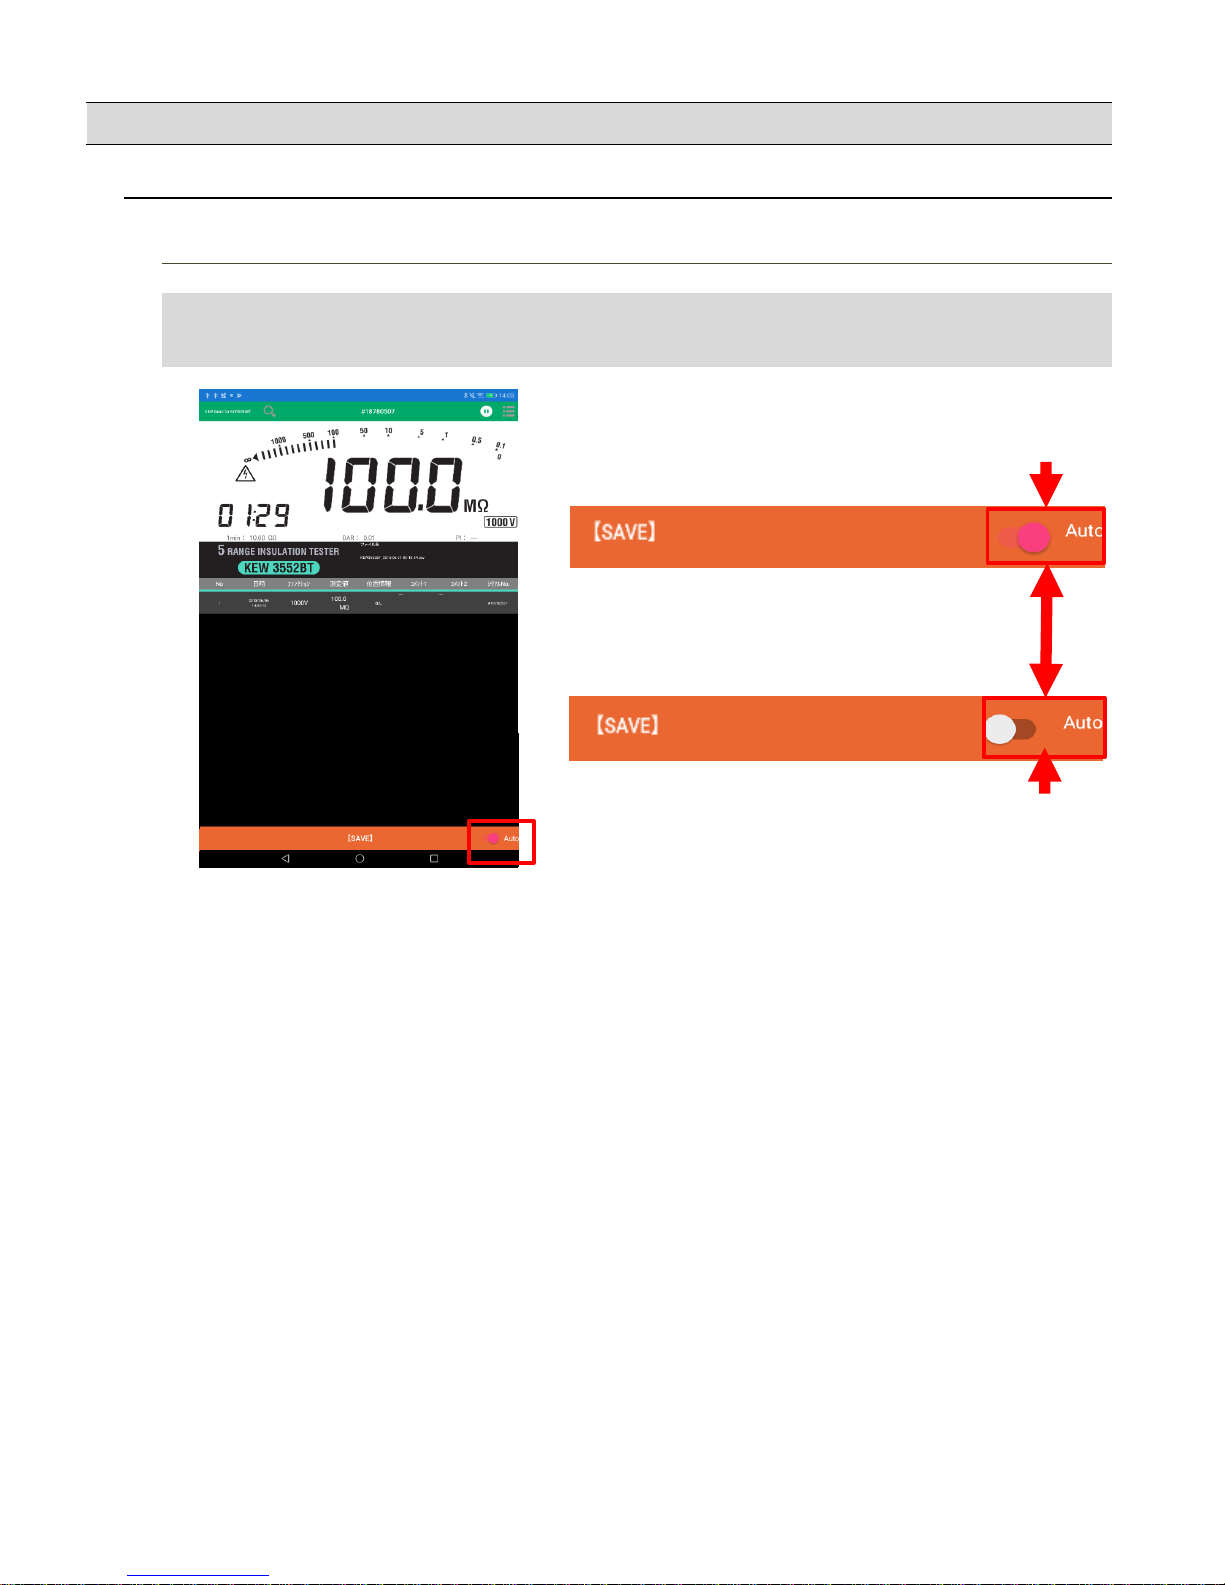
Auto-save
STEP 1
Turn on the Auto-save function.
1
Long press of [SAVE] button turns on this function.
Or, tap □ Auto button.
Auto-save function
Enabled
Tap the Auto button.
Auto-save function
Disabled
11
Page 12
Data saving
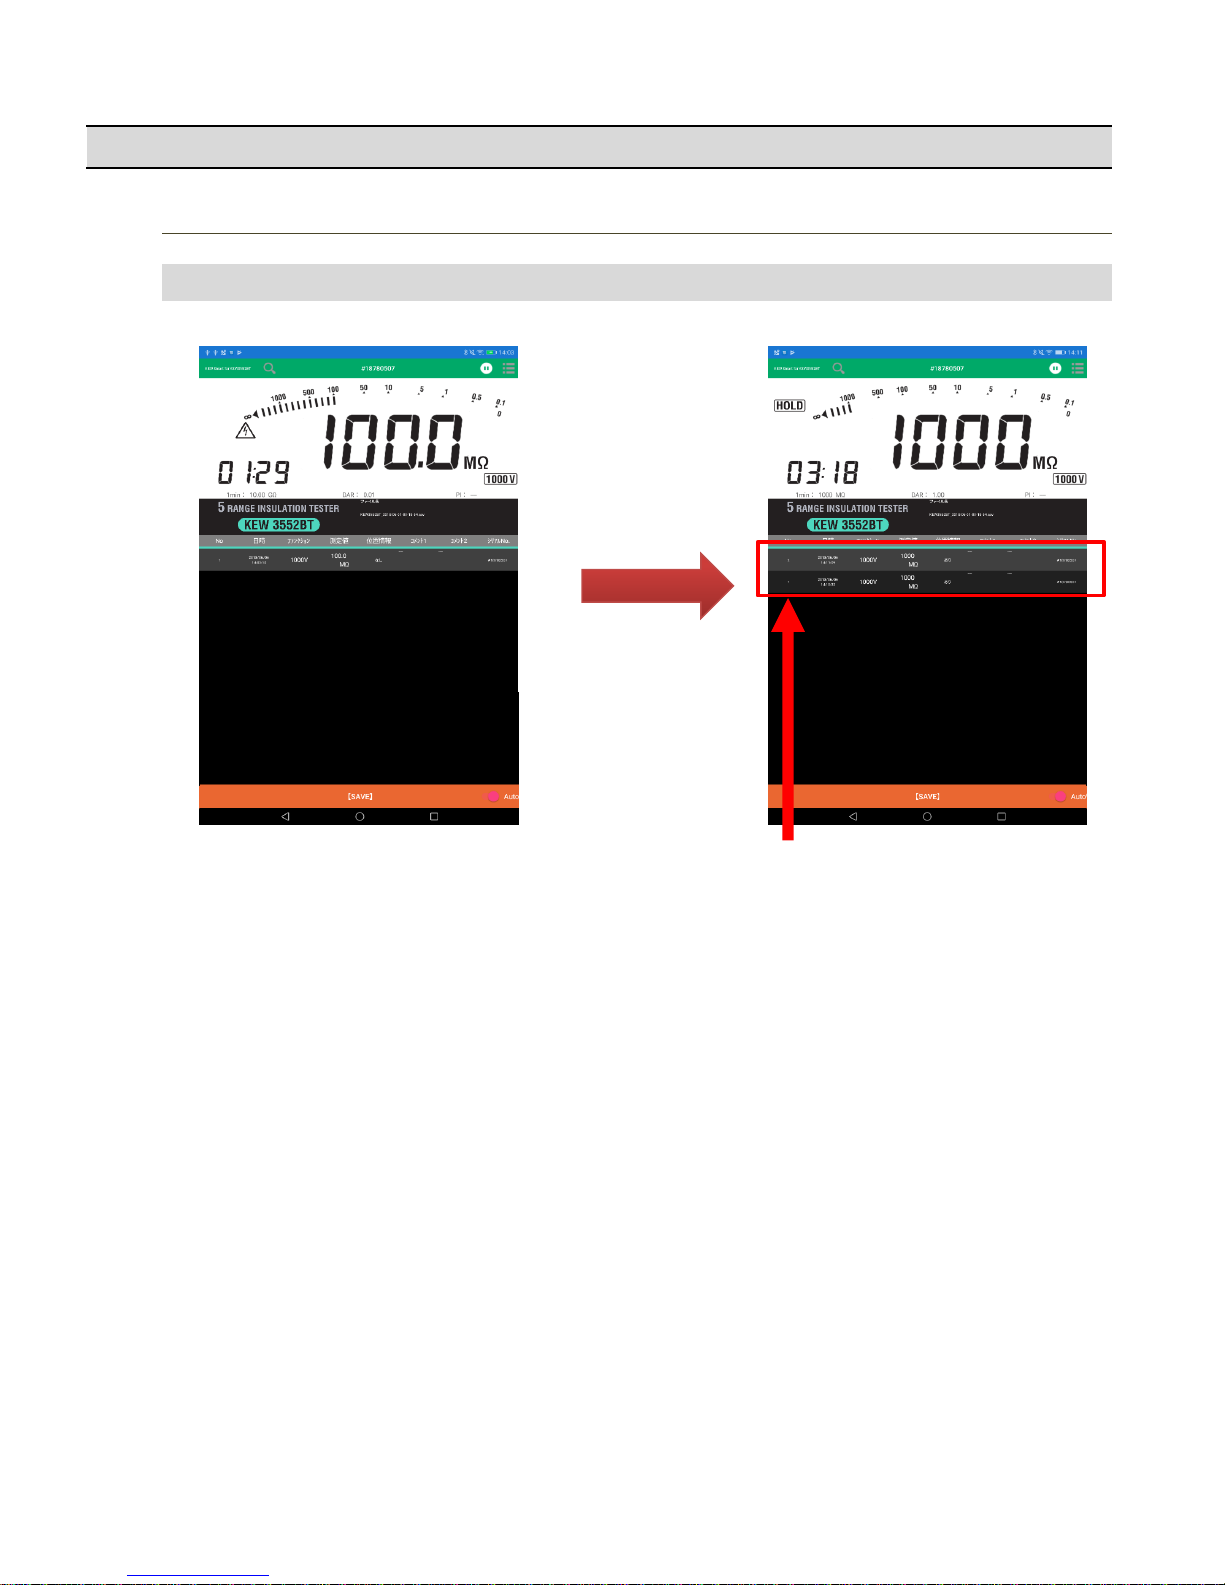
STEP 2
Save the measured result automatically.
1
Press the Test button on KEW 3552 BT and start a measurement.
Measuring… Done
Measurement
completes.
Measured results are shown in the list.
12
Page 13

Creating/ editing files
Menu
STEP 1
Open the Menu.
1
Tap the Option menu button.
Option menu
button
* To open the Menu, you need to disconnect the KEW 3552 BT first.
13
Page 14

Creating/ editing files
STEP 2
Menu contents
1
Details
Insulation status Turn on/ off the insulation status warning buzzer in the app.
buzzer * This setting doesn’t affect nor related to the buzzer setting of
KEW 3552 BT itself.
Display item Select the items to show or hide.
File description You can add annotation in the currently open file.
The entered annotation is displayed below the file name.
Select/create file Switch and select the file to be saved or displayed.
Creating a new file is also possible.
Delete Selection screen is shown. Select the record(s) you wish to delete and
tap “DELETE”. Tap back button to cancel selecting file(s).
Delete all Clear and delete all the records contained in the currently open file.
File descriptions won’t be cleared.
Download data from KEW 3552 BT
Download the saved data from KEW 3552 BT. ⇒P.28
Delete all data in KEW 3552 BT
Clear and delete all the data saved in KEW 3552 BT. ⇒P.29
Open in another app
Open the currently open file in another application.
Title
Detail
Currently displayed file name is displayed at the lower right in the meter screen.
14
Page 15

Creating/ editing files
Creating a new file
STEP 1
Open the Select/ create file screen.
1
Tap "Select/create file" on the menu.
STEP 2
Open Create new screen.
1
Tap the "+" symbol to create a new file.
Tap
File name
File description
FILE1
FILE2
FILE3
15
Page 16

Creating/ editing files
2
A window opens to create a new file.
STEP 3
Name the new file.
1
Tap OK when file name enter completes.
Cancel to create a new file.
Create a new file under this
entered name.
16
Page 17

Creating/ editing files
STEP 4
Created new file is shown.
1
The new file you created appears.
New file name is displayed.
17
Page 18

Creating/ editing files
To show another file
STEP 1
Open Select/ create file screen.
1
Tap "Select/create file" on the menu.
STEP 2
Select the desired file.
1
Select and tap the desired file.
Tap the desired file.
2
The selected file is shown.
Details of the selected file is shown.
File name
File description
Saved records
FILE1
FILE2
FILE3
18
Page 19

Editing the saved data
Add/ alter file descriptions
STEP 1
Open the File description screen.
1
Tap "File description" to show a window to enter descriptions.
2
Enter any descriptions and tap “OK”.
3
New or updated descriptions are saved and displayed.
Entered file description is displayed.
19
Page 20

Editing the saved data
Edit comments on records
STEP 1
Open a dialog box to enter comments on record.
1
Tap the desired comment column in the shown list.
Example: To enter comments on “Comment 1” for “No. 10”
Tap the comment column you wish to modify.
2
A dialog box pops up.
20
Page 21

Editing the saved data
STEP 2
Edit comments on records.
1
Tap the comment column and edit the comments, and then tap “OK”.
2
Updated comments are displayed.
Updated comments are displayed.
21
Page 22

Deleting the saved data
Delete one record.
STEP 1
Select the record you wish to delete.
1
Long press on the record you wish to delete.
Long press on the record you wish to delete.
2
Check the displayed record no.
Confirm the displayed no. is the one you selected.
If a different no. is displayed, tap Cancel.
22
Page 23

Deleting the saved data
STEP 2
Delete the selected record.
1
Tap OK in the confirmation box.
Tap OK.
2
The selected record has been deleted.
Since the record - Data No. 2 - is
cleared, No. 3 now re-numbered to No.
2.
23
Page 24

Deleting the saved data
Select and delete multiple records
STEP 1
Open the selection screen.
1
Tap Delete in the menu to open the selection screen.
Back to Menu
Tap and select.
Tap to delete the
selected record(s).
24
Page 25

Deleting the saved data
STEP 2
Select and delete multiple records
1
Select the records you wish to delete.
Select the records
you wish to delete.
2
Tap DELETE to delete the selected records.
Tap DELETE .
25
Page 26

Deleting the saved data
3
Check the confirmation message.
Back to the previous screen. Delete the selected records.
4
The selected records have been deleted by tapping OK.
The selected records have been deleted.
26
Page 27

Deleting the saved data
Delete all records
STEP 1
Delete all records.
1
Tap Delete all in the menu. Then a confirmation box pops up.
Confirmation box
2
Tap OK to delete all records.
File name
3
All records will be deleted by tapping OK.
27
Page 28

Management of KEW 3552 BT internal memory
Download all data from KEW 3552 BT
STEP 1
Select a target KEW 3552 BT.
1
Disconnection of Bluetooth is required to download the data from KEW 3552 BT.
STEP 2
Open "Download data from KEW 3552 BT" in the menu.
1
2
Tap OK when file name enter completes.
4
Tap Download data from KEW 3552 BT in the menu. A box appears to enter a file name to
save the downloaded data.
All the data in the target KEW 3552 BT internal memory will be downloaded and listed in the screen.
Select the serial no. of the target KEW 3552 BT with refence to
Connection and Disconnection
pages.
28
Page 29

Management of KEW 3552 BT internal memory
Delete all the KEW 3552 BT internal data
STEP 1
Select the target KEW 3552 BT.
1
Disconnection of Bluetooth is required to download the data from KEW 3552 BT.
STEP 2
Open Delete all data in KEW 3552 BT in the menu.
1
Tap Delete all data in KEW 3552 BT in the menu. Then a confirmation box pops up.
Confirmation box
2
Tap OK to delete all the data in KEW 3552 BT.
Select the serial no. of the target KEW 3552 BT with refence to
Connection and Disconnection
pages.
29
Page 30

Management of KEW 3552 BT internal memory
3
All the data have been deleted from KEW 3552 BT.
30
Page 31

File transfer to PC
On Android device:
Caution:
STEP 1
Connect your Android device and PC with a USB cable.
1
Connect a USB cable to your Android device.
2
Tap the notification pops up in the device screen.
3
Tap 【Device file manager(MTP)】.
STEP 2
Transfer files to PC.
1
Access your Android device from PC.
2
Go to 【[Android]\Internal storage\Documents\KEW3552BT】.
3
Copy or drag the target file to your desired folder.
4
Disconnect the device from the PC when file transfer completes.
5
Disconnect the USB cable.
The following procedures are for devices running on Android 5.0 or later and PCs on
Windows 7 or later. The procedures and displays vary depending on the devices and PCs
31
Page 32

File transfer to PC
On iOS device:
Caution: The following procedures are for devices running on iOS 10.0 or later and PCs on Windows.
The procedures and displays vary depending on the devices and PCs you're using.
Before proceeding, ensure that the iTunes app has been installed in your PC.
STEP 1
Connect your iOS device and PC with a Lightning cable.
1
Connect a lighting cable to your iOS device.
2
Click the device button.
STEP 2
File transfer
1
Select “App” shown in the sidebar on the side of your screen.
2
Scroll down the screen and select KEW3552BT listed in File Sharing.
32
Page 33

File transfer to PC
3
Select the file you wish to make a copy and click “Save to”.
4
Select the destination to save the file.
5
The copied file is saved in the specified folder.
6
Disconnect from the PC when file transfer completes.
7
Disconnect the Lighting cable.
* Copying the file can
be done by drag-anddrop.
33
Page 34

Other features
Show the saved data
STEP 1
Show the saved data in screen.
1
Tap the record you wish to check the detail.
Tap any records you wish to check.
Cautions:
1. Disconnect Bluetooth connection to view the records.
2. Be careful – a long press will delete the record.
Measured value saved in the selected record is
shown.
34
Page 35

Other features
Open a map based on the location info.
STEP 1
Select a record saved with location info.
1
Tap the record with “ON” listed in the Location column.
Tap on a record with "ON" .
2
Tap OK in the confirmation box.
Location info. of the saved record.
3
MAP app gets started and shows the location where the record was saved.
For details of the MAP app, please check with the distributor of the app you’re using.
35
Page 36

Other features
Display layout change
STEP 1
Tap the Display item in the menu.
1
Tap the Display item in the menu to open the selection screen.
STEP 2
Select the items you wish to display in the app screen.
1
Tap on the item to show or hide.
Item name
Status Show Tap on the item. Turned On. (=Show)
Item name
Status Hide
Tap and turn Off.
(=Hide)
36
Page 37

Other features
STEP 3
Check the display.
1
Tap back button and return to the previous screen.
No KEW 3552 BT
LCD display
Previous screen
37
Page 38

Other features
Link with other apps
STEP 1
Open the app selection screen.
1
Tap Open in another app in the menu.
2
Choose the desired app.
Caution:
3
The app you chosen will open.
For details of the app, please check with the distributor of the app you’ll use.
The screen image below might be different from yours: it depends on the OS,
model, or device. The apps to be displayed are the some of which have already
been installed in.
38
Page 39

Troubleshooting
* Failed to establish connection with KEW 3552 BT.
1
Check the unit KEW 3552BT itself.
Power off KEW 3552BT once, then on again and do search and connection procedures.
2
Check the settings of your Android/ iOS device.
Turn on the following functions:
Bluetooth and Location services (GPS / Wi-Fi).
3
Check the licensing status of the app.
Authorize KEW Smart for KEW3552BT to access the device.
Turn on the following functions:
Bluetooth and Location services.
As for the authorization procedures, please refer to the manual of the device you’re using.
*
Failed to create/ modify file(s) nor save/ delete record(s).
1
Check for the available space in the memory.
2
Check the licensing status of the app.
Authorize KEW Smart for KEW3552BT to access the device.
Turn on the following functions:
As for the authorization procedures, please refer to the manual of the device you’re using.
* Storage capacity of file
1
Max. 1000 records per file.
2
Limit of the number of files depends on the available memory space of your device.
* Default destination to save file
Android :
Documents\KEW3552BT
iOS
KEW3552BT\Documents
39
 Loading...