

Page 1

Supplementary sheet (KEW6310Quick manual) (English)
Supports 2G / 4G / 8GB CF cards.
● Operation check has completed
Supplier 2GB 4GB 8GB
SanDisk Corp.
Ultra II 15MB/s CF 2GB
SDCFH-002G
*
This instrument supports FAT16 and cannot save data of 2GB or more if a
card of 4GB or more is used.
(Identified as over capacity when the area of usage exceeds 2GB.)
● Max possible recoding time
Twice the recording time for 1GB
e.g. Demand measurement with an interval of 1 sec
1GB: 5 days, 2GB or more: 10 days
*
Max number of file is 512 regardless of memory capacity.
Ultra II 15MB/s CF 4GB
SDCFH-004G
Ultra II 15MB/s CF 8GB
SDCFH-008G
Page 2
Quick manual
POWER QUALITY ANALYZER
KEW 6310
Page 3
− 1 −
KEW6310
Contents KEW6310
●Preface
This Quick manual is a simplified version of the full instruction manual which can be found in the supplied
CD-ROM.
This manual is intended only as a handy reference guide and should only
be used after having read the full instruction manual which contains full details on
each function of this instrument and the items contained in the package.
●Safety Warning!
The instruction manual contains warnings and safety procedures which have to
be observed to ensure safe operation of the instrument and maintain it in a safe
condition. Thus, these operating instructions have to be read prior to using the
instrument.
Contents
1. Instrument Overview …………………………………………………………………………… 2
2. Instrument Layout ……………………………………………………………………………… 5
3. Getting started ………………………………………………………………………………… 7
4. Setting
5. Instantaneous (Inst) value Measurement
6. Integration value Measurement
7. Demand Measurement
8. WAVE Range
9. Harmonic Analysis …………………………………………………………………… 25
10. Power Quality ………………………………………………………………………… 27
Swell / Dip / Short interruption (Int) Measurement
Transient Measurement …………………………………………………………… 29
Inrush current Measurement ……………………………………………………… 31
Unbalance Ratio …………………………………………………………………… 33
Flicker ……………………………………………………………………………… 35
Capacitance Calculation …………………………………………………………… 37
11. CF Card / Saved data ………………………………………………………………………… 39
12. Wiring check …………………………………………………………………………………… 42
………………………………………………………………………………… 10
…………………………………………… 15
……………………………………………………… 17
……………………………………………………………… 19
………………………………………………………………………… 23
……………………………… 27
The latest software can be downloaded from our web site.
http://www.kew-ltd.co.jp
Page 4

KEW6310 Instrument Overview
1.Instrument Overview
Feature
This is a Clamp-type Power Quality Analyzer that can be used for various wiring systems. It can be
used for simple measurements of instantaneous/ integration/ demand values, and also for monitoring
waveforms and vectors, analyzing harmonics and measuring fluctuations in supply voltages and for
the simulation of power factor correction with capacitor banks. Data can be saved either in the internal
memory or a CF card, and can be transferred to a PC either via an USB lead or a CF Card reader.
Safety construction
Designed to meet the international safety standard IEC 61010-1 CAT.III 600V/ CAT.II 1000V
Wiring configuration
KEW6310 supports : Single-phase 2-wire, Single-phase 3-wire, Three-phase 3-wire, Three-phase 4-wire.
Measurement and calculation
KEW6310 measures voltage (RMS), current (RMS), and calculates active/reactive/apparent power,
power factor, phase angle, frequency, neutral current and active/ reactive/ apparent electric energy.
(RMS)
Demand measurment
Electricity consumption can be easily monitored so as not to exceed the target maximum demand values.
Waveform / Vector display
Voltage and current can be displayed by waveform or vector.
Harmonic analysis
Harmonic components of voltage and current can be measured and analyzed.
Power quality analysis
Measuring Swell/ Dip/ Int, Transient, Inrush current, Unbalance ratio and flicker*, moreover, simulating
power factor correction with capacitor banks.
* Flicker measurement function is only available with ver.2.00 or later.
Saving data
KEW6310 is endowed with a logging function with a preset recording interval. Data can be saved by
manual operation or at pre-set time & date. Screen data can be saved by using Print Screen function.
Dual power supply system
KEW6310 operates either with an AC power supply or with batteries. Both dry-cell batteries (alkaline)
and rechargeable batteries (Ni-MH) can be used. Battery charge while rechargeable batteries installed in
the instrument is possible. In the event of interruption, while operating with AC power supply, power to
the instrument is automatically restored by the batteries in the instrument.
Large display
Color display with large screen
Light & compact design
Clamp sensor type, compact and light weight design
Application
Data in the internal memory or CF card can be saved in a PC via a USB lead or a CF Card reader. As
well supplied software facilitates setting, optional analysis software facilitates data analysis.
Input/output function
Analogue signals from thermometers or light sensors can be measured simultaneously with electrical
power data via 2 analogue inputs (DC voltage); signals exceeding a preset threshold values at each
range can be transmitted to alarms devices via 1 digital output.
KEW6310
− 2 −
Page 5
Functional Overview KEW6310
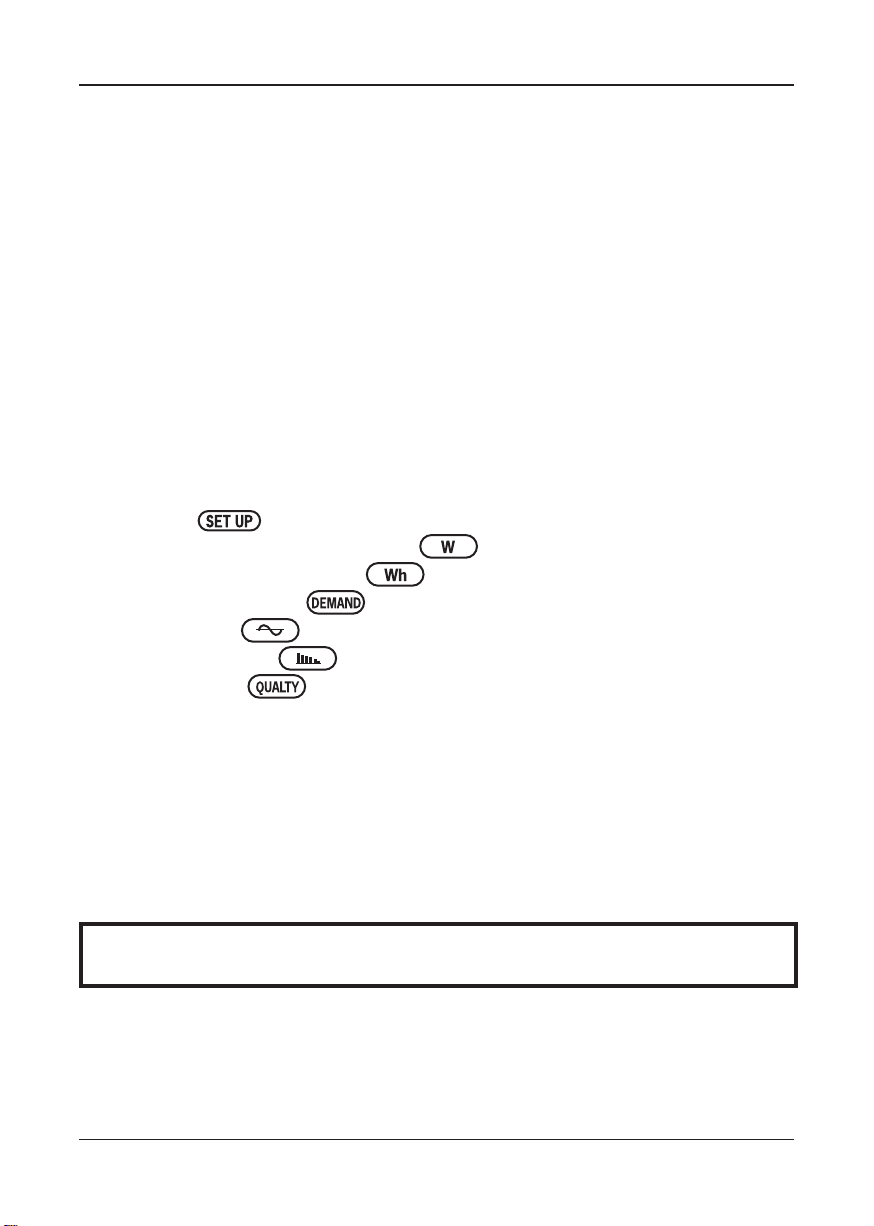
Functional Overview
Instantaneous value measurement
Measures average/max/min values of instantaneous
values of current, voltage and electric power.
See (Section 5) W Range for further details.
Integration value measurement
Measures active/ apparent/ reactive powers on each CH.
See (Section 6) Wh Range for further details.
Demand measurement
Measures demand values based on the preset target
values. Digital output signals alert the user that the
predicted value may exceed the target value.
See (Section 7) DEMAND Range for further details.
− 3 −
SET UP
Setting of KEW6310 or of measurements.
See (Section 4) Setting for further details.
KEW6310
Page 6
KEW6310 Functional Overview
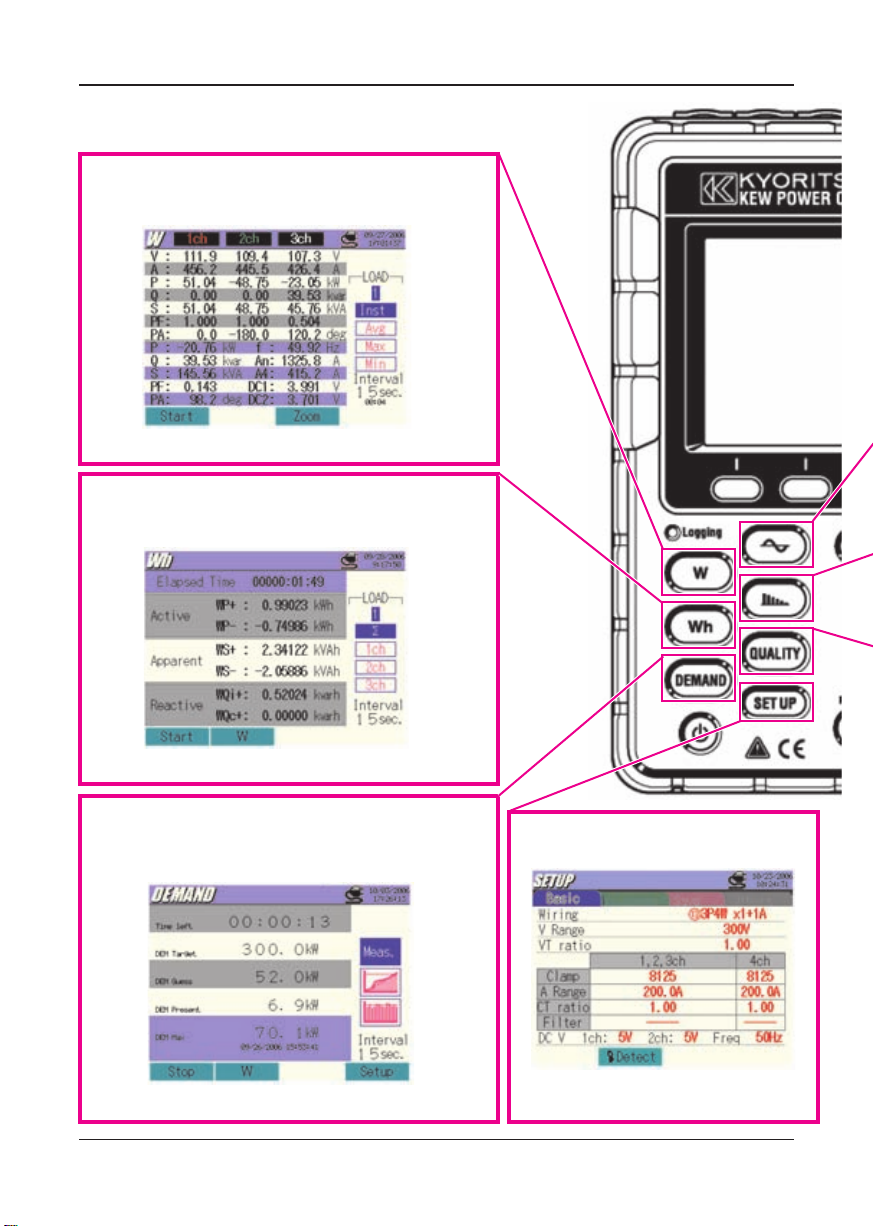
Measurement at WAVE Range
Displays vector / waveform of voltages and currents per CH
See (Section 8) WAVE Range for further details.
Harmonic measurement
Measures / analyzes harmonic components of current &
voltages
KEW6310
See (Section 9) Harmonic Analysis for further details.
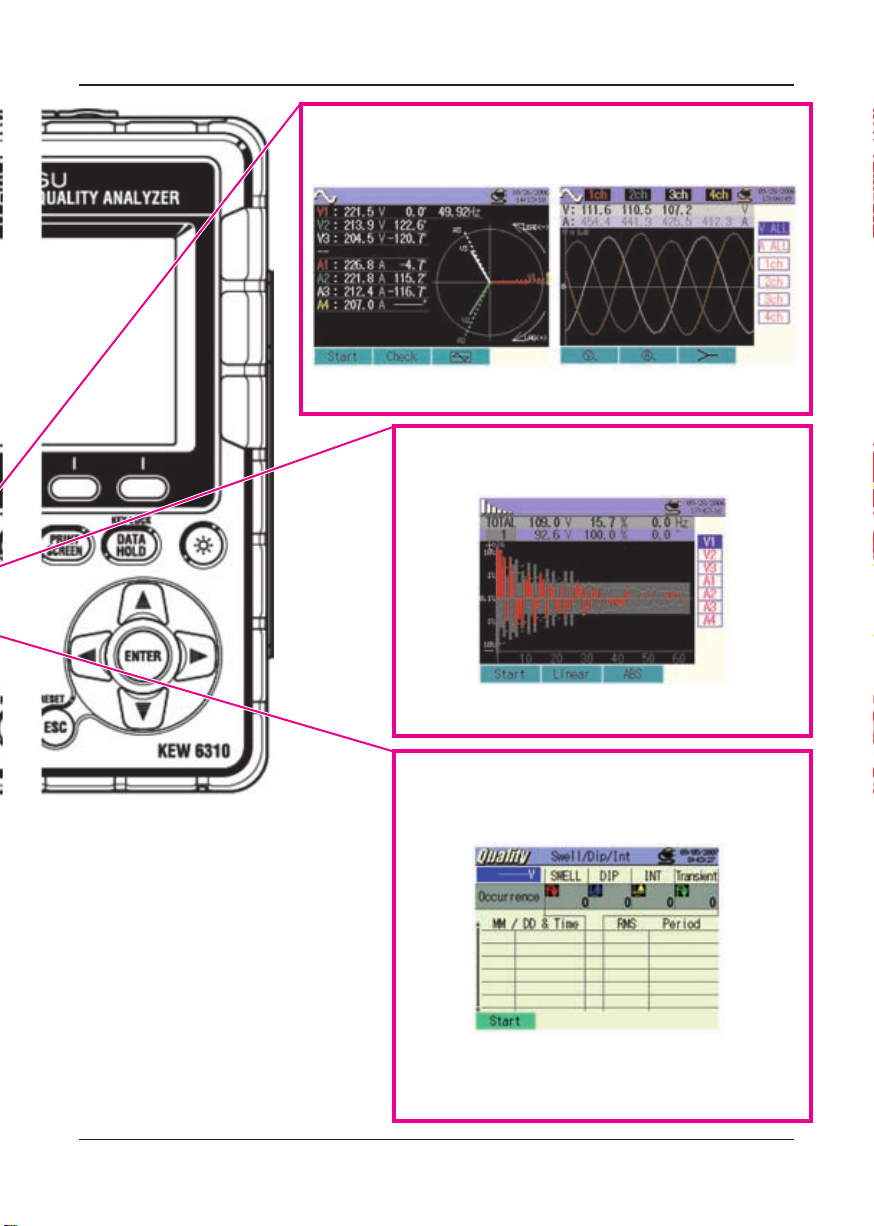
Power quality analysis
Measures sw el l, dip , int, transient, inrush curre nt ,
unbalance ratio and flicker, and also simulates power
factor correction with capacitor banks.
* Flicker measurement function is only available with ver.2.00 or
later.
See (Section 10) Power Quality for further details.
− 4 −
Page 7
Instrument Layout KEW6310
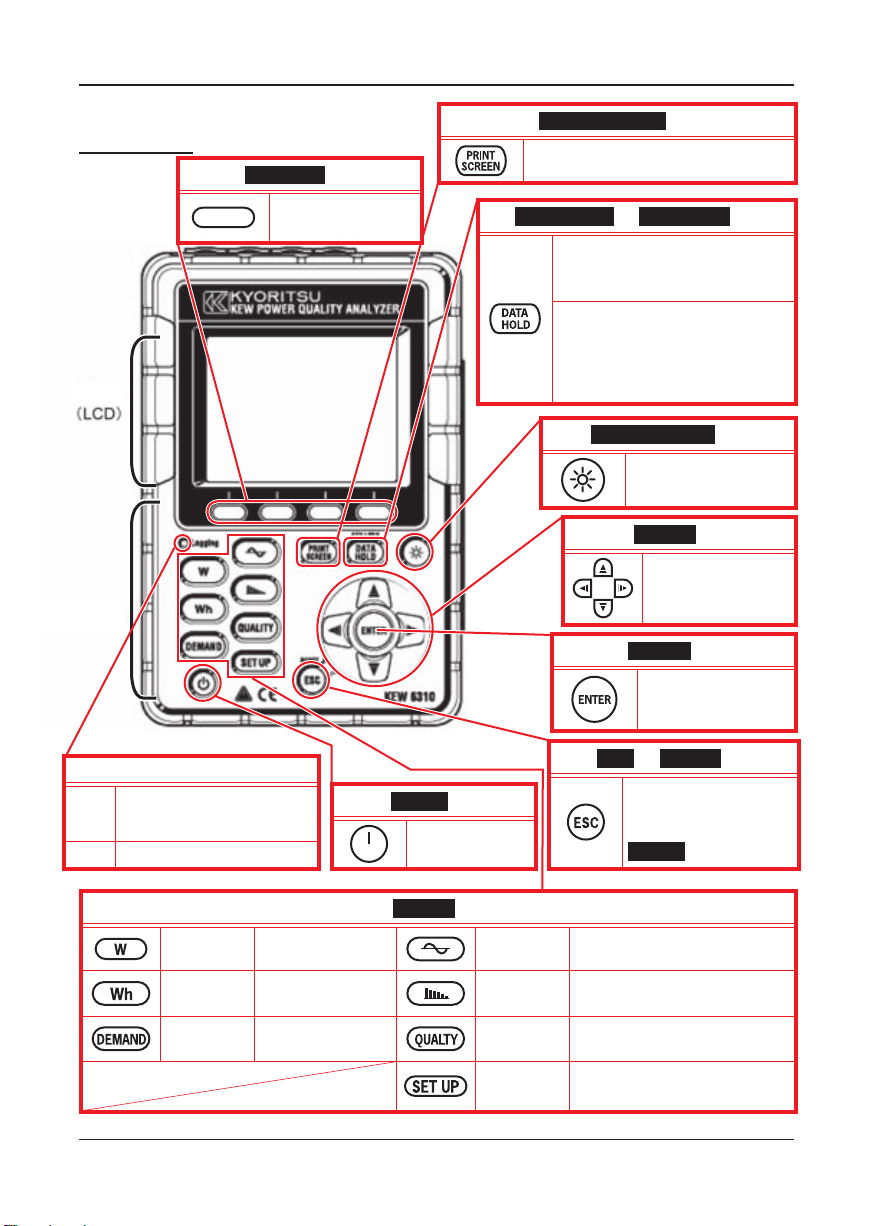
2.Instrument Layout
Front view
Function Key
Execute the displayed
function
Display
Keys
PRINT SCREEN
Save the displayed screen as BMP files
DATA HOLD ╱ KEY LOCK Key
Hold the readings.
* Measurement continues even if
screen is frozen.
Long pr e s s (2 se c or mo re)
disa b l e s all Ke y s to preve n t
opera tional error. Another long
press (2 sec or more) is required
to restore the disabled Keys.
LCD ON ╱ OFF Key
Key
Display / hide the
indications on the LCD
Cursor Key
Select setting,Switch
screens
ENTER Key
LED status indicator
Light up: recording&measuring
Green
Flash: stand-by
Red Flash: charging batteries
W
Wh
DEMAND
Measures
inst values
Measures
integration values
Measures
demand values
Power Key
Power ON/OFF
Menu Key
Waveform Measures waveforms
Harmonic
analysis
QUALITY
SET UP
− 5 −
Confirms entries
ESC ╱ RESET Key
Cancel setting changes,
clear integration
d e m a n d d a t a w i th
Cursor Keys.
Analyzes harmonic components
Records Swell/ Dip/ Int/
transient with time information.
Basic/ Measurement/ Save/
Other settings
KEW6310
/
Page 8
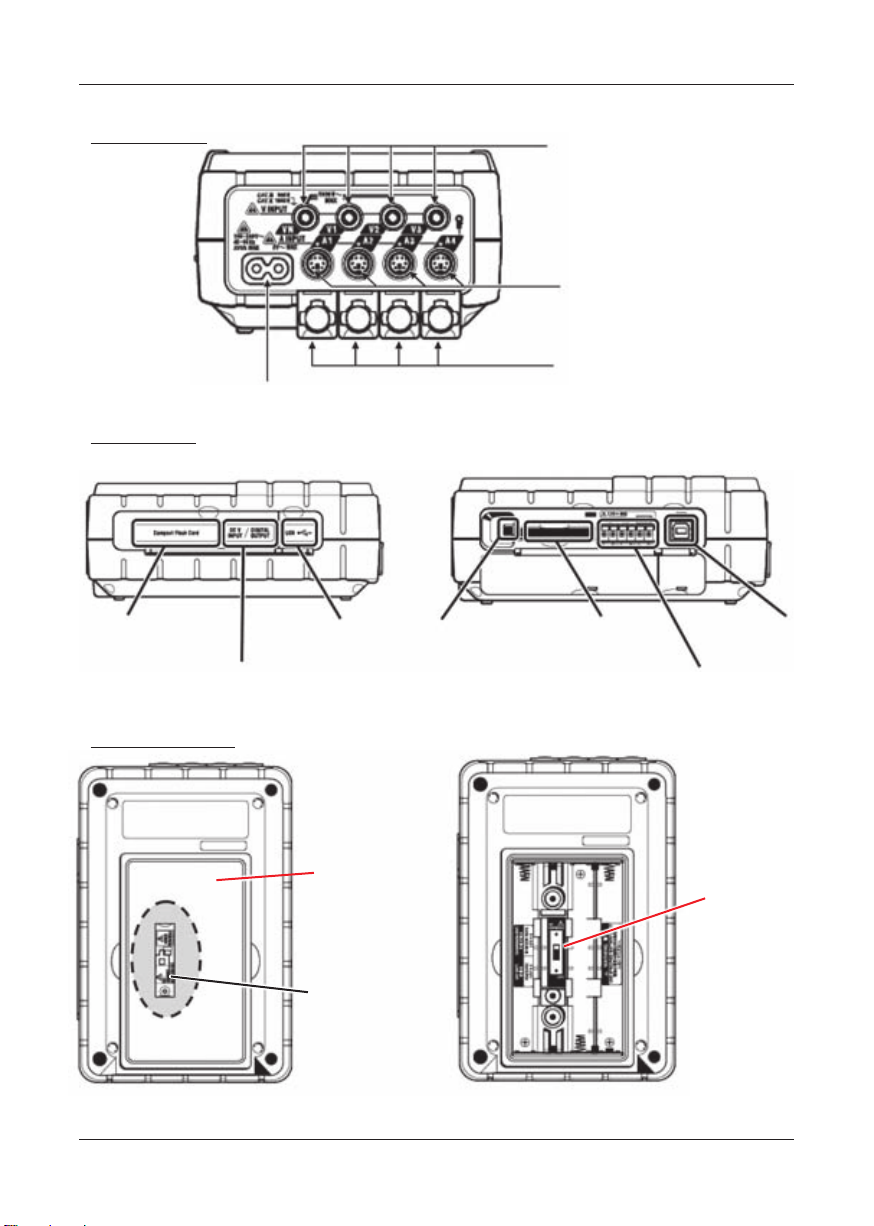
KEW6310 Connector
Connector
Power Connector
Voltage Input Terminal
(VN, V1, V2, V3)
Current Input Terminal
(A1, A2, A3, A4)
Terminal Cover
Side face
<When the Connector Cover is closed> <When the Connector Cover is opened>
CF Card Cover
Analogue Input/ Digital output
USB Port
Eject Button
CF Card Slot
Analogue Input/ Digital output Terminal
USB Connector
Battery Case
KEW6310
Battery Cover
Selector switch
cover
− 6 −
Selector switch
*Selector switch is under the Selector switch cover.
Page 9
Getting Started KEW6310
3. Getting Started
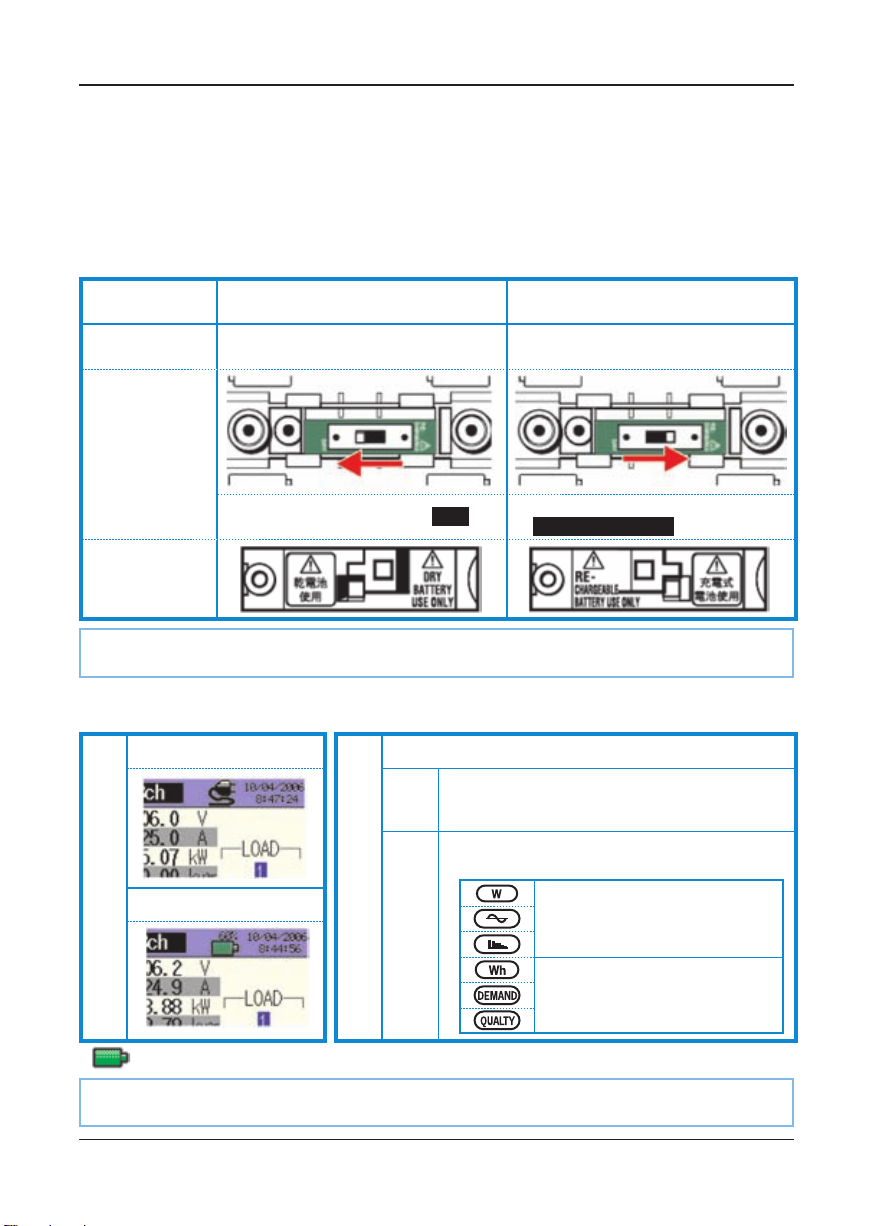
The KEW6310 operates with either an AC power supply or batteries. In the event of AC power
interruption, power to the instrument is automatically restored by the batteries in the instrument. Drycell batteries (alkaline) and rechargeable ones (Ni-MH); can be both used. It is also possible to charge
rechargeable batteries in the instrument.
Remove the Selector Switch Cover, and slide the Selector Switch to left or right depending on the
batteries to be used.
DRY-CELL BATTERY RECHARGEABLE BATTERY
Battery can be
used
Position of
Selector switch
Selector switch
cover
If the AC supply is interrupted and the batteries haven't been installed, the instrument goes off and
the measured data may be lost.
Alkaline dry-cell battery(LR6)
Slide the switch to the left ( DRY )
Ni-MH Rechargeable battery
(HR-15/51)
Slide the switch to the right
( RE-CHARGEABLE )
Battery Mark on the LCD / Battery Level
Powered by AC supply
Battery Mark on the LCD
Powered by Battery
*
0 ~ 100% (count by 20%)
Possible continuous measurement
100%
- approx 2 hours* : with alkaline batteries
Battery Level
- approx 5 hours
Battery is exhausted. (accuracy not guaranteed)
Instrument operates as follows automatically.
0%
*
: with Ni-MH rechargeable batteries
Mea sure men t co n tinu es, Da ta
save is ceased. (Measured data is
saved.)
Dat a sa v e ( m e a s u r e m e n t ) is
ceased.
(Measured data is saved.)
*
mark flashes while charging batteries.
A continuous measurement with alkaline batteries is limited to 1 hour; use of an ac power supply is
recommended. (batteries should be considered and used as a back-up)
*
reference time when using the instrument with indications on the LCD hide.
− 7 −
KEW6310
Page 10
KEW6310 Charging the rechargeable Ni-MH batteries
Charging the rechargeable Ni-MH batteries
Following message to prompt battery charge appears on the LCD automatically when battery level is
40% or less at starting the instrument. Press the
the instructions displayed on the LCD.
Install rechargeable batteries (Ni-MH)
・
Slide the Selector switch to the right (set to RE-CHARGEABLE position)
・
Connect the AC Power cord and power on the instrument.
・
* Refer to (4.2.4.) Other Setting in the full instruction manual to initiate a battery charge anytime it is necessary.
Charge batteries?
Cursor Keys and ENTER Key according to
No
Return to normal screen.
(Batteries aren't charged.)
Rechargeable batteries are installed?
No
Return to normal screen.
(Batteries aren't charged.)
Battery charge doesn't initiate only by installing rechargeable batteries and connecting an AC power cord.
Above operation is required to start a battery charge.
Yes
Proceed to next screen
Yes
Battery charge starts; return to
normal screen.
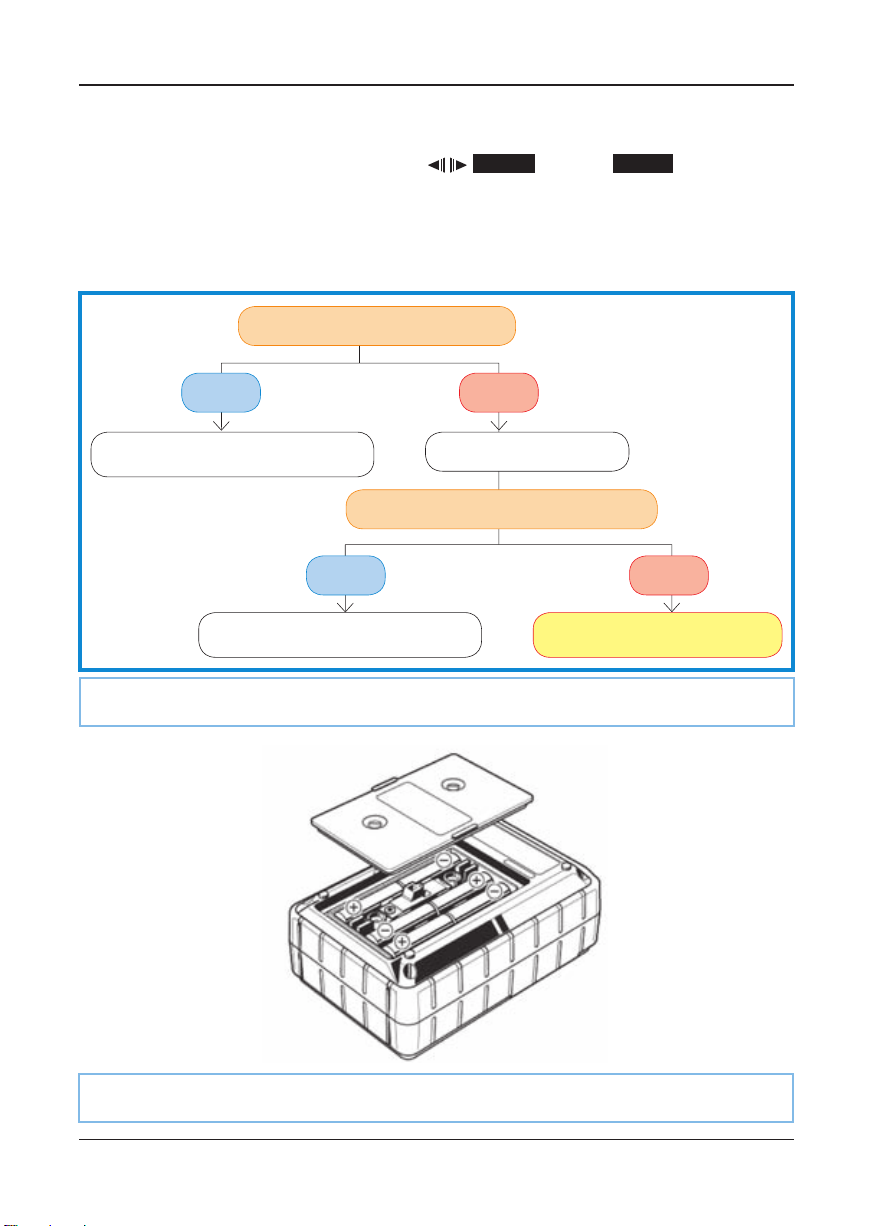
How to install batteries:
Install batteries in correct
polarity as marked inside.
Battery power is consumed even if the instrument is being off. Remove all the batteries if the
instrument is to be stored and will not be in use for a long period.
KEW6310
− 8 −
Page 11
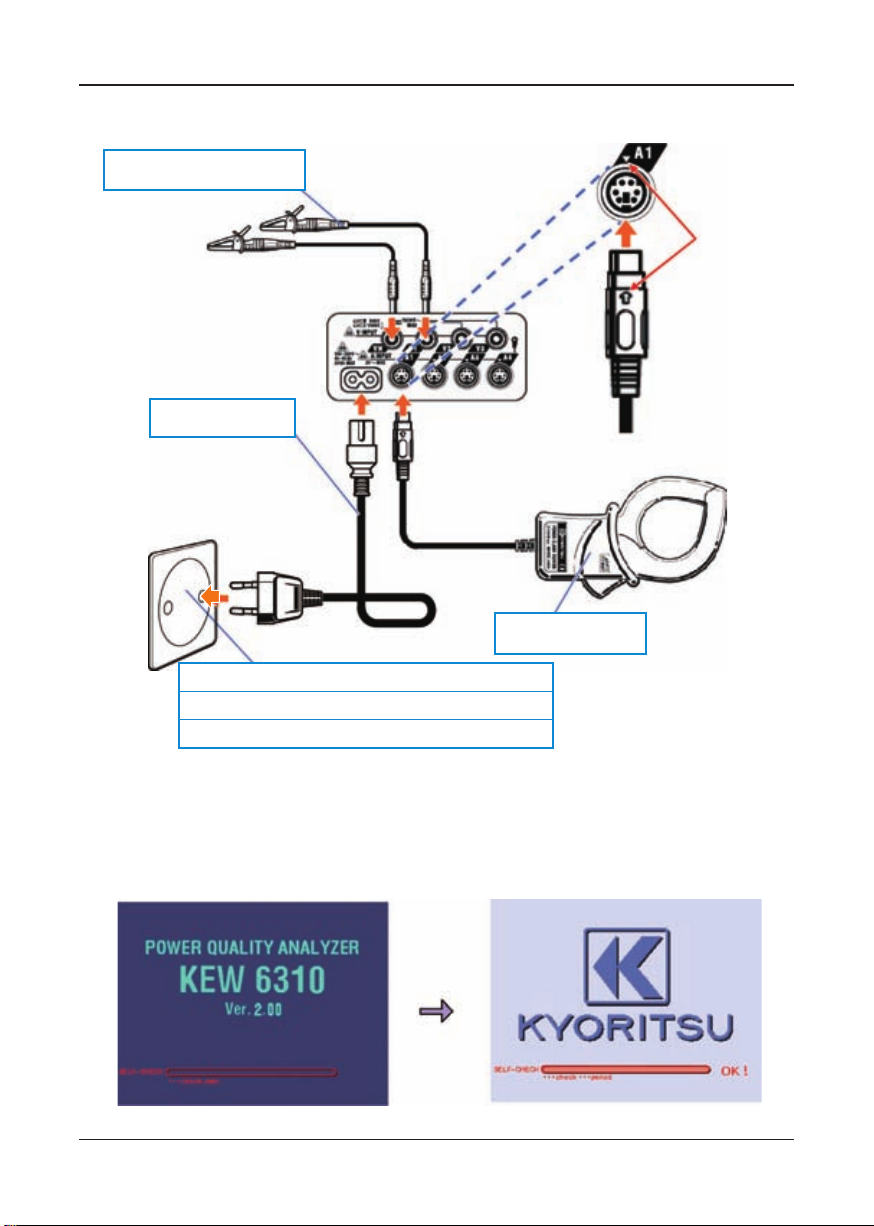
Cord Connection KEW6310
Cord Connection
Voltage Test Leads
Match the
arrow marks
Power Cord
Clamp Sensor
Rated supply voltage
Rated supply frequency
Max power consumption
100 ~ 240VAC (±10%)
:
45 ~ 65Hz
:
20VAmax
:
Start-up Screen
Model name and software version will be displayed upon powering on the instrument, and self-check
routine initiates automatically. The KEW logo will appear. Stop using the instrument if error messages
appear on the LCD after the self-check and refer to (Section 15) Troubleshooting in the full instruction
manual.
− 9 −
KEW6310
Page 12
KEW6310 Setting
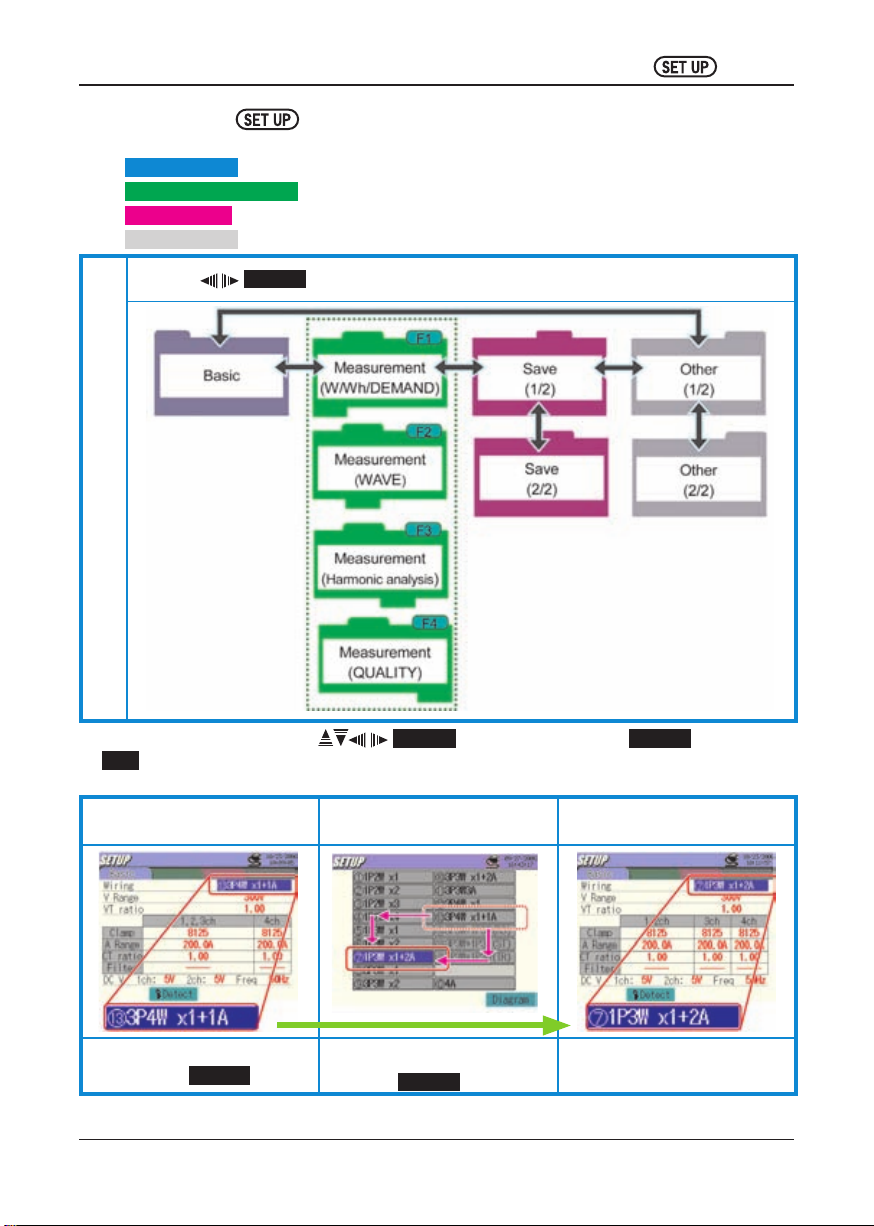
4.Setting
The SET UP consists of following 4 settings.
Basic Setting : Setting of the items common to all measurements
Measurement Setting : Setting of each measurement
Save Setting : Setting of data save methods
Other Setting : Environmental setting
Press the Cursor Keys to browse through setting items.
Each setting
Select any desirable items with
ESC Key cancels the setting change. Following is an example to select the wiring to be tested at
basic setting.
1. Select a setting item
– Wiring
Move the cursor to Wiring,
and press the
* Cursor will move onto any of the red parameters.
KEW6310
ENTER Key.
Cursor Keys and confirm it with ENTER Key. Using the
2. Select a proper wiring
configuration
Move the cursor to the wiring
configuration to be tested, and
press the
ENTER Key.
3. Confirm the selected
wiring configuration
Setting completes.
− 10 −
Page 13
Basic Setting KEW6310
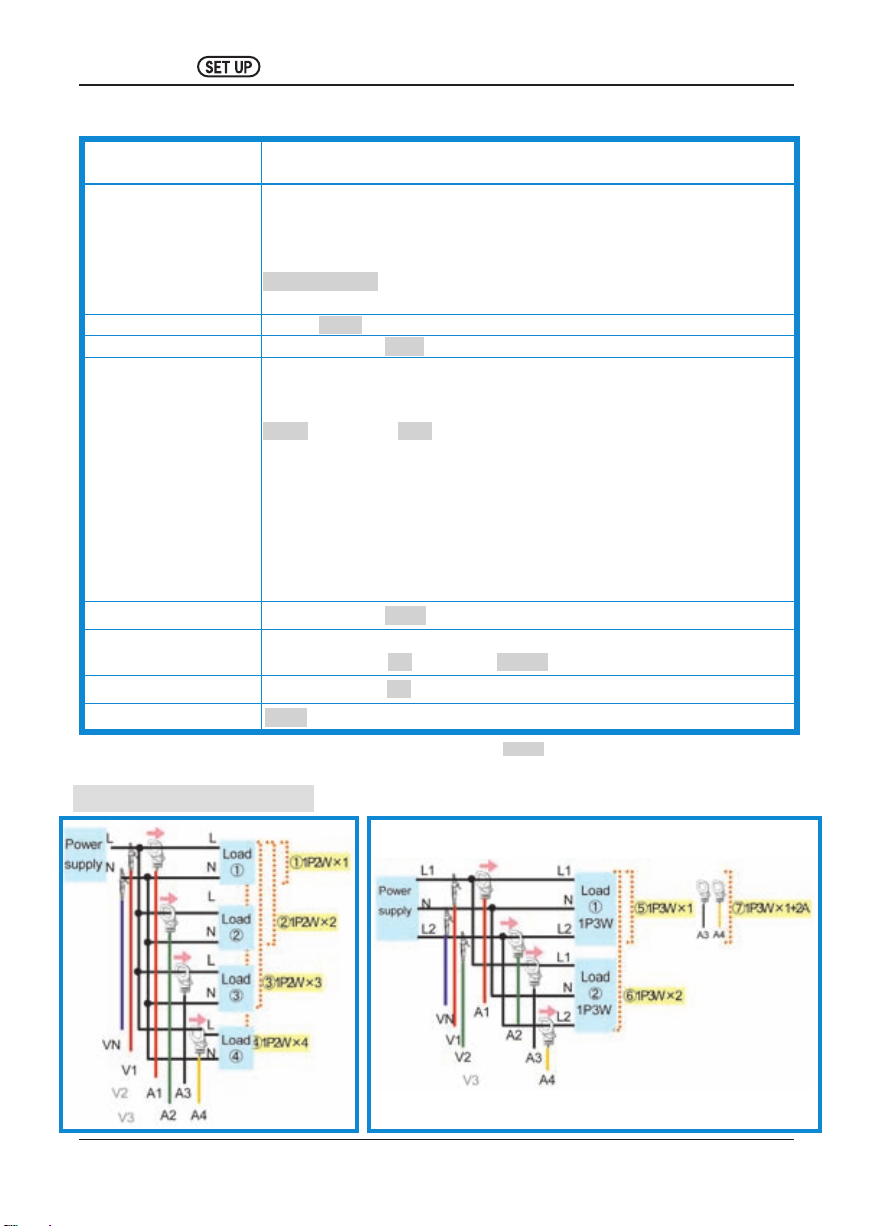
Basic Setting
Setting item Details of Setting
①1P2W×1 ②1P2W×2 ③1P2W×3
④1P2W×4 ⑤1P3W×1 ⑥1P3W×2
Wiring
Voltage Range 150V╱
VT Ratio 0.01~9999.99(1.00 )
Clamp / Current Range
CT Ratio 0.01~9999.99( 1.00 )
Filter
DC V 50mV╱500mV╱ 5V
Frequency
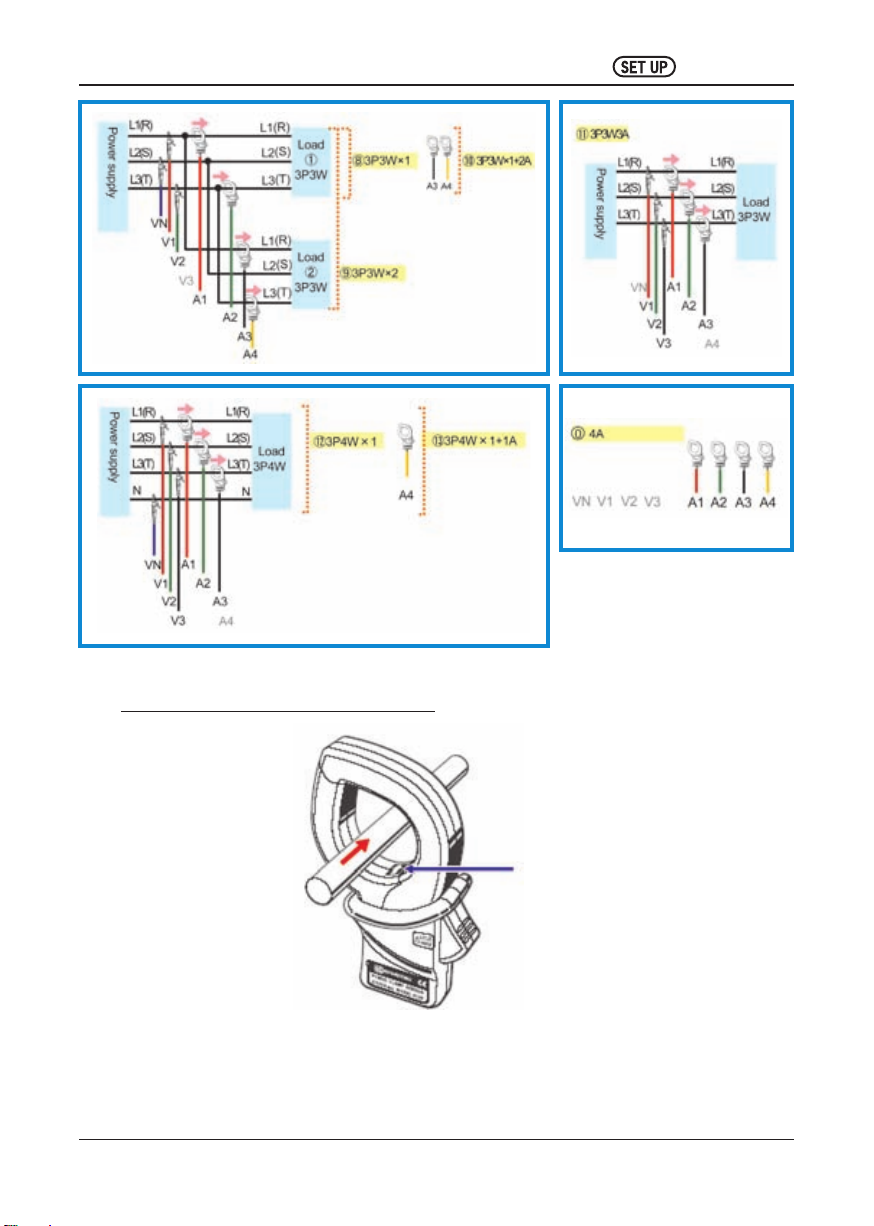
Wiring Configuration
⑦1P3W×1+2A ⑧3P3W×1 ⑨3P3W×2
⑩3P3W×1+2A ⑪3P3W3A ⑫3P4W×1
⑬3P4W×1+1A
⓪4A
300V╱600V╱1000V
8128
1╱5╱10╱20╱50A╱AUTO
:
8127
10╱20╱50╱100A╱AUTO
:
8126
20╱50╱100╱200A╱AUTO
:
8125
50╱100╱
:
8124
100╱200╱500╱1000A╱AUTO
:
8129
300╱1000╱3000A
:
8141
:
8142
8143
8146
8147
8148
8141╱42╱43╱46╱47╱48
8128╱27╱26╱
50Hz╱60Hz
100╱500mA╱1A╱AUTO
:
}
:
:
500mA╱1╱5╱10A╱AUTO
:
}
:
* Default values are highlighted in gray
* Leakage Clamp sensors cannot be used for power measurements but can be used on
wiring configurations: ⑦, ⑩, ⑬ and ⓪.
200 ╱500A╱AUTO
ON╱OFF
:
25 ╱24╱29:--------
Power Clamp sensor
Leakage Clamp sensor
− 11 −
KEW6310
Page 14
KEW6310 Basic Setting
Orientation of Clamp sensor
Power
Supply
Reverse clamping switches the symbols (+/-) for active power.
KEW6310
Load
Arrow mark:
Points towards load side
− 12 −
Page 15

Measurement Setting KEW6310
Measurement Setting
Setting Item Details of Setting
W Instantaneous/avg/max/min values
W╱Wh╱
DEMAND
WAVE
Range*
Harmonic
Analysis*
QUALITY
Wh Detailes
Target demand 1.000mW~999.9TW (
*
Demand inspection cycle
Transient
Flicker
V
A
V
A
V_Reference 70~1000V(
Transient
V_Reference 70~150V 151~300V 301~600V
Transient
(selectable range)
Swell 100~200% against reference voltage (110% )
Dip 5~100% against reference voltage ( 90% )
Int 5~98% against reference voltage ( 10% )
Hysteresis 1~10% against reference voltage (
Trigger point Past:0~200, Next:200~0 (
Voltage range 150V 300V 600V
Threshold value
(selectable range)
Hysteresis 1~10% against Voltage Range (
Trigger point Past:0~200, Next:200~0 (
Clamp
A Range
Reference current
(selectable range)
Filter ON╱ OFF
Threshold value 100~200% against reference current (110% )
Hysteresis 1~10% against reference current (
Data trigger point Past:0~200, Next:200~0 ( 100 each)
V Range 150V 300V 600V
Filter coefficient 230V lamp 120V lamp
Output item Pst(1min) ╱Pst╱Plt
Output Threshold 0.8~20.0 (1.0)
Save item
THD (total harmonic distortion) caluculation
Allowable range Default value ╱Customization
MAX HOLD ON╱OFF
Save item
Swell/ Dip/ Int
measurment
measurement
Inrush current
measurement
Unbalance ratio Output threshold 1~20%( 3% )
Capacitance Target power factor 0.5~1( 1.000 )
− 13 −
ON╱OFF
300.0kW )
Shorter than intervals, 3 different cycles are
available. ( 10 min )
ON╱OFF
THD-F (fundamental wave basis)
THD-R (total RMS basis)
ON╱OFF
100V )
Selectable ranges for threshold vary depending
on the selected reference voltages.
50~310
Vpeak(210)
50~310
Vpeak
8128╱8127╱8126╱
╱8146╱8147╱8148╱8141╱8142╱8143
100.0m╱500.0m╱1╱5╱10╱20╱50╱100
╱
200
Se lec tab le wit hin 10% ~10 0% of C urren t
Ranges ( 200A )
* Default values are highlighted in gray .
90~630
Vpeak
90~630
Vpeak
╱300╱500╱1000╱3000╱AUTO
170~1270
Vpeak
170~1270
Vpeak
8125 ╱8124╱8129
/
601~1000V
340~2000
Vpeak
5% )
100 each)
1000V
340~2000
Vpeak
( 1415 )
5% )
100 each)
5% )
KEW6310
Page 16

KEW6310 Save / Other Setting
Measurement Setting
Setting Item Details of Setting
Interval
* Interval can be selected at W, Wh, DEMAND, WAVE, Harmonic analysis, Swell/ Dip/ Int, Transient, Inrush current,
Unbalance ratio and Capacitance Ranges. At WAVE Range and Harmonic analysis, available intervals depend on the
number of save items. At Harmonic analysis, 1 sec tool is not available.
Save Setting
1sec╱2sec╱5sec╱10sec╱15sec╱20sec╱30sec╱
1min╱2min╱5min╱10min╱15min╱20min╱ 30min ╱1hour
Setting Item Details of Setting
Recording method Manual ╱ Timer
Recording starts
Recording ends
Destination to save data
Destination to save screenshot
Formatting CF Card Format the CF Card.
Deleting data in the CF Card Delete the data in the CF Card.
Formatting internal memory Format the internal memory.
Deleting data in the internal memory Delete the data in the internal memory.
Data transfer Transfer the data in the internal memory to the CF Card.
Load setting Load the pre-set setting.
Save setting Save the settings to the CF Card or the internal memory.
Year / Month / Date Hour : Minute : Second
00 / 00 00 : 00 : 00)
(0000/
CF Card / Internal Memory
( CF Card, if it has been inserted )
Other Setting
Setting Item Details of Setting
Language* 日本語/ English / 中文 / Francais / Espanol
Date format YYYY/MM/DD ╱ MM/DD/YYYY ╱ DD/MM/YYYY
Time and date* yyyy/mm/dd hh:mm:ss
Buzzer ON╱OFF
Decimal point╱Separator
CSV File
ID number 00-001
LCD contrast
CH Color* Default value ╱ Customization
Auto-power-off
LCD auto-off
Battery charge
System reset
* Items listed with * mark won't restore to default after system reset.
KEW6310
. ╱ ,
. ╱
, ╱
Light⇔
Standard ⇔Dark
10 ⇔ 0 ⇔ 10
ON╱OFF
ON╱OFF
ON╱OFF
Reset the system.
〜
;
99-999(
;
00-001 )
− 14 −
Page 17

Instantaneous value measurement KEW6310
5.Instantaneous (Inst) value measurement
Steps for measurement
Ensuring your safety
↓
Preparation for measurement
↓
Setting
↓
Wiring
↓
Inst value measurement
Symbol displayed on the LCD
V Voltage A Current P
+ lagging
S
An
Apparent
Power
Neutral
current
Power
PF
Factor
Analogue input
DC1
voltage at 1ch
− leading − leading
Switching Screens / Zoom
Select a
system
Select an
item
Cursor Key
Cursor Key
Range
Basic Setting Measurement setting Save Setting
Wiring
V Range Save item (W) Recording start
VT Ratio
Clamp Sensor・Avg value Destination to save data
A Range
CT Ratio
Filter
DC V
Frequency
PA
DC2
Interval Recording method
Inst value Recording termination
・
Max value
・
Min value
・
Range
Active
Power
Phase
Angle
Analogue input
voltage at 2ch
+ consumption
− regenerating − leading
+ lagging
Measured
values
per CH
Total
measured
values
List Zoom
Q
f Frequency
Destination to save screen shot
Reactive
Power
+ lagging
Check
setting
details
* Press
Re fe r to (Section 6) Instantaneous (I ns t) value
ENTER Key
Key to switch the Zoom and List display.
F3
measurement for explanation on customizing the Zoom
display.
Save data
File ID : 6310-01
Saved time & date ELAPSED TIME Instantaneous Average Max Min
DATE
yyyy/mm/dd h:mm:ss h:mm:ss (±)x.xxxE±nn
year/month/ date hour:min:sec hour:min:sec (±) value x 10
TIME ELAPSED TIME INST AVG MAX MIN
e.g. 1.234E+02=1.234x102=123.4
− 15 −
±n
KEW6310
Page 18

KEW6310 Instantaneous value measurement
Header of the saved data
A V G _ A 1 [ A ] _ 1
︸ ︸ ︸ ︸
① ② ③ ④ ⑤
︸
* Saved data with no number at this space contains the sum of the measured values.
INST
①
AVG
MAX
MIN
V
②
A
f
P
Q
S
PF
PA
DC
③ CH number
④ Unit
⑤ System
Instantaneous value
:
Average value
:
Max value
:
Min value
:
Voltage per phase
:
Current per phase
:
Frequency
:
Active power
:
Reactive power
:
Apparent power
:
Power factor
:
Phase angle
:
Analogue input voltage
:
* 1
:
4
〜
Saving instantaneous values
Start → Next → Next → Complete
Press
1
Press the
Start
2 Preset start time comes.
Saving
Start Button at least 2 sec to start recording immediately.
≪Manual≫ ≪Timer≫
Data saving starts.
(flashes in red according to the preset interval)
to start recording after checking the
settings.
File name for saving data is displayed.
▼
Status indicator LED flashes.
Stand-by until preset time comes.
▼
Status indicator LED is ON.
flashes and or is displayed.
▼
appears and flashes
▼
▼
No setting change can be made during data saving.
3 ▼ ▼
Press Stop . Preset termination time comes.
Stop
KEW6310
File name for saving data is displayed.
Status indicator LED goes off.
− 16 −
▼
and or goes off.
Page 19

Integration value measurement KEW6310
6.Integration value measurement
Steps for measurement
Ensuring your safety
↓
Preparation for measurement
↓
Setting
↓
Wiring
↓
Integration value measurement Range
* Readings are displayed right after the recording of integration value measurement starts.
Active electric energy
WP+
WP-
(consumption)
Active electric energy
(regenerating)
Basic Setting Measurement setting Save Setting
Wiring
V Range Save item (Wh) Recording start
VT Ratio
Clamp Sensor・Avg value Destination to save data
A Range
CT Ratio
Filter
DC V
Frequency
Symbol displayed on the LCD
Apparent electric energy
WS+
WS-
(consumption)
Apparent electric energy
(regenerating)
Interval Recording method
Inst value Recording termination
・
Max value
・
Min value
・
Details
・
WQi+
WQc+
Switching displays / Viewing W Range
Select
a system
Cursor Key
Range
Destination to save screen shot
Reactive electric energy
(lagging)
Reactive electric energy
(leading)
Select
a channel
Cursor Key
* Press
Range.
Display for
Wh Range
F2
Key to switch on the displays for Wh Range and W
Display for
W Range
Save data
File ID : 6310-02
Saved time & date ELAPSED TIME
DATE TIME ELAPSED TIME INTEG_WP INTEG_WS INTEG_WQ
yyyy/mm/dd h:mm:ss h:mm:ss (±)x.xxxxxE±nn
year/month/ date hour:min:sec hour:min:sec (±) value x 10
* Reactive power (consumption :+ / regenerating :- ) will be recorded with phase information: lagging (i) or leading (c).
* At Wh Range, data measured at W Range and above measurement data are recorded at the same time.
Active Power energy
(consumption /
regenerating )
− 17 −
Apparent Power energy
(consumption /
regenerating )
±n
Reactive Power energy
(consumption /
regenerating )
KEW6310
Page 20

KEW6310 Integration value measurement
.
Header of the saved data
INTEG_WP+[Wh]_1
① ② ③ ④
︸ ︸
︸
︸
① INTEG
WP+
②
WPWS+
WS-
WQi+
WQc+
WQi-
WQc-
③ Unit
④ System
Integration value
:
Active power energy (consumption)
:
Active power energy (regenerating)
:
Apparent power energy (consumption)
:
Apparent power energy (regenerating)
:
Reactive power energy
:
(consumption) : lagging
Reactive power energy
:
(consumption) : leading
Reactive power energy
:
(regenerating): lagging
Reactive power energy
:
(regenerating): leading
Saving integration values
Press
1
Press the
Start
2
Saving
Start → Next → Next → Complete
Start Button at least 2 sec to start recording immediately.
≪Manual≫ ≪Timer≫
File name for saving data is displayed.
▼
Data saving starts.
(flashes in red according to the preset interval)
to start recording after checking the
settings.
▼
appears and flashes
Status indicator LED flashes.
▼
Stand-by until preset time comes.
▼
Preset start time comes.
▼
Status indicator LED is ON.
flashes and or is displayed.
3
Stop
KEW6310
No setting change can be made during data saving.
▼
Press Stop .
File name for saving data is displayed.
Status indicator LED goes off.
Preset termination time comes.
▼
and or goes off.
▼
− 18 −
Page 21

Demand measurement KEW6310
7.Demand measurement
Steps for measurement
Ensuring your safety
↓
Preparation for measurement
↓
Setting
↓
Wiring
↓
Demand measurement
* Readings are displayed right after the recording of demand measurement starts.
Basic Setting Measurement setting Save Setting
Wiring
V Range Save item (W) Recording start
VT Ratio
Clamp Sensor・Avg value Destination to save data
A Range
CT Ratio
Filter
DC V Target demand
Frequency
Interval Recording method
Inst value Recording termination
・
Max value
・
Min value
・
Details
・
Demand inspection
cycle
Range
Range
Destination to save screen shot
Switching displays / Viewing W Range and Wh Range
Switching
screens
Cursor Key
Display for
* Press
Range.
DEMAND
F2
Key to switch the displays for DEMAND, Wh Range and W
Display for
W Range
Save data
Display for
Wh Range
File ID : 6310-03
Saved time & date
DATE
yyyy/mm/dd h:mm:ss h:mm:ss (±)x.xxxxxE±nn (±)x.xxxE±nn
year/month/ date hour:min:sec hour:min:sec
* At DEMAND Range, data measured at W Range and above measurement data are recorded at the same time.
TIME
ELAPSED
TIME
ELAPSED
TIME
Integration
Variation
interval
Active power
energy
(consumption/
regenerating)
INTEG_WP INTEG_WS INTEG_WQ
in
INTVL_WP INTVL_WS INTVL_WQ
− 19 −
Apparent
power energy
(consumption/
regenerating)
(±) value x 10
Reactive
power energy
(consumption/
regenerating)
±n
DEMAND
DEM TARGET
KEW6310
TARGET
Page 22

KEW6310 Demand measurement
Header of the saved data
INTVL_WP+[Wh]_1
① ② ③ ④
︸ ︸
︸
︸
INTEG
①
INTVL
DEM
TARGET
WP+
WPWS+
②
WS-
WQi+
WQc+
WQi-
WQc-
③ Unit
④ System
* ②,③,④ will be blank if ① is DEM or TARGET.
Integration value
:
Variation in interval
:
Sum of demand value
:
Target value
:
Active power energy (consumption)
:
Active power energy (regenerating)
:
Apparent power energy (consumption)
:
Apparent power energy (regenerating)
:
Reactive power energy
:
(consumption) : lagging
Reactive power energy
:
(consumption) : leading
Reactive power energy
:
(regenerating): lagging
Reactive power energy
:
(regenerating): leading
Saving of demand values
Start → Next → Next → Complete
Press
1
Press the
Start
2 Preset start time comes.
Saving
Start Button at least 2 sec to start recording immediately.
≪Manual≫ ≪Timer≫
Data saving starts.
(flashes in red according to the preset interval)
to start recording after checking the
settings.
File name for saving data is displayed.
▼
Status indicator LED flashes.
Stand-by until preset time comes.
▼
Status indicator LED is ON.
flashes and or is displayed.
▼
appears and flashes.
▼
▼
3
Stop
KEW6310
No setting change can be made during data saving.
▼
Press Stop .
File name for saving data is displayed.
Status indicator LED goes off.
Preset termination time comes.
▼
and or goes off.
▼
− 20 −
Page 23

Demand measurement KEW6310
Measurement Screen
Remaining time (Time left)
Demand interval is counted down.
Predicted value
Pr edi cte d d eman d v alu e w hen pre set
demand interval elapses under present load.
(Present value) × (preset interval)
(elapsed time)
* Integrati on and ca lculations are
done as time elapses.
Measured max demand with time & date
information
Max demand recorded in a measuring period is
displayed. Displayed value will be refreshed if
any higher demand is detected.
Shifts in specific period
Remaining time (Time left)
Demand interval is counted down.
Load factor
Percentage of the present value
against the target value.
(present value)
(target value)
Prediction
Percentage of the predicted value against the target value.
Arrow mark on the graph (▲) is blue while the value is within the
target demand, and becomes red when the target value is exceeded.
Target value
Should be s e t fo r
each measurement.
Present value
Demand value (average power) within a demand
interval.
(WP+)×(1 hour)
(interval)
* Integration and calculations are done as time elapses.
(predicted value)
(target value)
Target value
Digital output signal
warns when the
predicted value
exceeds the target
value.
− 21 −
Predicted value
Target value
Demand value
(present value)
KEW6310
Page 24

KEW6310 Demand measurement
Demand change
Measured max demand with
time & date information
De mand value is dis playe d
with recorded time & date info
where cursor is placed.
Target demand
Bar graph
White bar : Percentage of
hidden area
Blue bar: Percentage of the
present displayed area
Cursor
Use the
to move the cursors.
Cursor Key
Recording start time
Target
value
Demand start
Most recent recorded time
Max demand value
( d i s pl a y e d o n t h e
measurement screen)
Demand value
(Elapsed time)
Demand termination
KEW6310
− 22 −
Page 25

WAVE Range KEW6310
8.WAVE Range
Steps for measurement
Ensuring your safety
↓
Preparation for measurement
↓
Setting
↓
Wiring
↓
Measurement Range
Basic Setting Measurement setting Save Setting
Wiring Interval Recording method
V Range Save item Recording start
VT Ratio Recording termination
Clamp Sensor Destination to save data
A Range Destination to save screen shot
CT Ratio
Filter
DC V
Frequency
Symbol displayed on the LCD
V Voltage A Current
Range
Switching displays : Vector / Waveform (switching CH)
Switching CH
Vector Display
* Press the
* Press the
* Pressing the
F3
F2
Key to switch the Waveform and Vector display.
Key to check whether the wiring configuration is correct or not.
F1
F2
or
Keys at Waveform display changes the magnification of vertical axis (voltage/current).
Waveform Display
Cursor Key
Save data
File ID : 6310-04 (Waveform data)
Saved time & date ELAPSED TIME Channel Instantaneous value
DATE
yyyy/mm/dd h:mm:ss h:mm:ss Ai╱Vi (±)x.xxxE±nn
year/month/ date hour:min:sec hour:min:sec A ╱ V (±) value x 10
*1st ~ 128th measured instantaneous values are saved to Line 1, 129th ~ 256th are to Line 2.
Saved time & date ELAPSED TIME Instantaneous Average Max Min
DATE
yyyy/mm/dd h:mm:ss h:mm:ss (±)x.xxxE±nn
year/month/ date hour:min:sec hour:min:sec (±) value x 10
TIME ELAPSED TIME CH * Line 1/Line 2 1╱128
File ID : 6310-05 (Vector data)
TIME ELAPSED TIME INST AVG MAX MIN
±n
− 23 −
129╱256
〜
±n
KEW6310
Page 26

KEW6310 WAVE Range
Header of the saved data
File ID : 6310-04 (Waveform data)
︸ ︸
︸
5/133
︸ ︸
① ②
File ID : 6310-05 (Vector data)
INST_A1[deg]
︸
① ② ③ ④
① 1〜128
② 129〜256
INST
①
AVG
MAX
MIN
V
②
A
③ CH No.
④ Unit
* when [deg] is displayed at space ④, it means phase angle
Sampling sequence
:
ditto (① + 128)
:
Instantaneous value
:
Average value
:
Max value
:
Min value
:
Voltage per phase
:
Current per phase
:
:1〜
4
Saving at WAVE Range
to start recording after checking the
settings.
File name for saving data is displayed
▼
Status indicator LED flashes.
Stand-by until preset time comes.
▼
appears and flashes.
▼
▼
1
Start
Start → Next → Next → Complete
Press
Press the
Start Button at least 2 sec to start recording immediately.
≪Manual≫ ≪Timer≫
Data saving starts.
2 Preset start time comes.
▼
Saving
3
Stop
KEW6310
(flashes in red according to the preset interval)
No setting change can be made during data saving.
Press Stop .
− 24 −
Status indicator LED is ON.
flashes and or is displayed.
▼
Preset termination time comes.
▼
File name for saving data is displayed.
Status indicator LED goes off.
and or goes off.
▼
Page 27

Harmonic Analysis KEW6310
9.Harmonic Analysis
Steps for measurement
Ensuring your safety
↓
Preparation for measurement
↓
Setting
↓
Wiring
↓
Harmonic Analysis Range
Basic Setting
Wiring Interval Recording method
V Range THD calculation Recording start
VT Ratio Allowable range Recording termination
Clamp Sensor MAX HOLD Destination to save data
A Range Save item Destination to save screen shot
CT Ratio
Filter
DC V
Frequency
Measurement setting
Switching displays
Switching CH
Cursor Key
Range
Save Setting
Graph
① Measured value
TOTAL
1〜63 Harmonic order V╱A RMS %
sum V╱A RMS value per CH % THD per CH
② Measured value (values of each order pointed by cursor)
− 25 −
Percentage of
the fundamental
wave (1st)
° Phase angle
KEW6310
Page 28

KEW6310 Harmonic Analysis
Save data
File ID : 6310-06
Saved time & date ELAPSED TIME Channel RMS Total THD Inst at each order
± n
〜
1_[deg]
63_[deg]
DATE TIME ELAPSED TIME CH TOTAL THD
yyyy/mm/dd h:mm:ss h:mm:ss Vi/Ai ( ± )x.xxxxE ± nn
year/month/ date hour:min:sec hour:min:sec V / A ( ± ) value x 10
1_[V/A]
63_[V/A]
Header of the saved data
① ②
1_[V/A]
︸
︸
① 1〜63
V/A
②
deg
Order
:
Voltage / Current
:
Phase angle
:
Saving Harmonic analysis results
〜
Start → Next → Next → Complete
Press
1
Press the
Start
2 Preset start time comes.
Saving
3
Stop
Start Button at least 2 sec to start recording immediately.
Data saving starts.
to start recording after checking the
settings.
≪Manual≫ ≪Timer≫
File name for saving data is displayed.
▼
Status indicator LED flashes.
Stand-by until preset time comes.
▼
Status indicator LED is ON.
flashes and or is displayed.
(flashes in red according to the preset interval)
No setting change can be made during data saving.
▼
Press Stop .
File name for saving data is displayed.
Status indicator LED goes off.
Preset termination time comes.
▼
and or goes off.
▼
appears and flashes.
▼
▼
▼
KEW6310
− 26 −
Page 29

Swell / Dip / Int measurement KEW6310
10.Power Quality
Swell / Dip / Int measurement
Steps for measurement
Ensuring your safety
↓
Preparation for measurement
↓
Setting
↓
Wiring
↓
Swell / Dip / Int Measurement
* Readings are displayed right after the recording of swell/ dip/ int measurement starts.
Measurement setting Save Setting
Swell / Dip / Int Measurement Recording method
Interval Recording start
Reference voltage Recording termination
Transient
Swell Destination to save screen shot
Dip
Int
Hysteresis
Trigger point
Range
Timing of data recording
Measured data will be saved when an event occur or at the preset interval during measurement.
Recording at event occurrence Recording at every interval
File ID:6310-07 File ID:6310-13
Range
Destination to save data
Swell 110%
Setting
Example
Inst value : Avg of 100 data (@50Hz) obtained 1 sec before the preset interval comes (rms)
Avg value : Avg of rms values obtained in the preset inst interval
Max value : Max rms values obtained in the preset inst interval
Min value : Min rms values obtained in the preset inst interval
Hysteresis 1%
Trigger point
Before: 100
After: 100
Setting
Example
Interval 30min
Save data
File ID : 6310-07
Saved time & date Item Start / End
DATE
yyyy/mm/dd h:mm:ss.ss SWELL DIP INT 1 0 1╱0
year/ month/ date hour:min:sec swell dip short-interruption start end Start to end
TIME ITEM* I╱O
− 27 −
KEW6310
Page 30

KEW6310 Swell / Dip / Int measurement
Start to End
Start
End
Swell
(Red)
Dip
(Blue)
Int
(Yellow)
Transient
(Green)
Duration Max / Min Data
DURATION
--:--:--.-- h
start
Saved time & date
DATE
yyyy/mm/dd h:mm:ss
year/month/ date hour:min:sec
:mm:
end max(Swell) min(Dip/Int) (±) value x 10
TIME
ss.ss (±)x.xxxE±nn
File ID : 6310-13
ELAPSED TIME Instantaneous Average Max Min
ELAPSED TIME INST AVG MAX MIN
h:mm:ss (±)x.xxxE±nn
hour:min:sec (±) value x 10
MAX/MIN 201
±n
Header of the saved data
50
①
e.g. Trigger point is set to Past: 50 / Next: 150.
〜
1_1
〜
150
① 201 data in total
Data No.
:
Saving Swell / Dip / Int
Start → Next → Next → Complete
Press
1
Press the Start Button at least 2 sec to start recording immediately.
Start
2 Preset start time comes.
Saving
Data saving starts.
to start recording after checking the settings.
≪Manual≫ ≪Timer≫
File name for saving data is displayed.
▼
Status indicator LED flashes.
Stand-by until preset time comes.
▼
Status indicator LED is ON.
flashes and or is displayed.
▼
appears and flashes.
▼
▼
±10
3
Stop
KEW6310
No setting change can be made during data saving.
▼
Press Stop .
File name for saving data is displayed.
Status indicator LED goes off.
Preset termination time comes.
▼
and or goes off.
▼
− 28 −
Page 31

Transient measurement KEW6310
Interval(30min)
Interval
(reference
Voltage)
Past100
date pts
201date pts
recorded
Tr
igger
Start
Peak(max)
Ave, max and min* values within
each interval are recorded
.
Past100
date pts
Threshold
110
%
100
%
Transient measurement
Steps for measurement
Ensuring your safety
↓
Preparation for measurement
↓
Setting
↓
Wiring
Measurement setting
Transient measurement Recording method
Interval Recording start
V Range Recording termination
Threshold value
Hysteresis Destination to save screen shot
Trigger point
↓
Transient Measurement Range
* Readings are displayed right after the recording of Transient measurement starts.
Timing of data recording
Measured data will be saved when an event occur or at the preset interval during measurement.
Recording at event occurrence Recording at every interval
File ID:6310-08 File ID:6310-14
Range
Save Setting
Destination to save data
Threshold Value 110%
Setting
Example
Inst value : max value of 10,000 data obtained at 100us 1sec before the preset interval comes
Avg value : Avg of inst values obtained in the preset inst interval
Max value : Max inst values obtained in the preset inst interval
Min value : Min inst values obtained in the preset inst interval
Hysteresis 1%
Trigger point
Before: 100
After: 100
Setting
Example
− 29 −
Interval 30min
KEW6310
Page 32

KEW6310 Transient measurement
Save data
File ID : 6310-08
Saved time & date Max Data
DATE
yyyy/mm/dd h:mm:ss.ss (±)x.xxxE±nn
year/month/ date hour:min:sec Max (Peak) (±) value x 10
Saved time & date ELAPSED TIME Instantaneous Average Max Min
DATE
yyyy/mm/dd h:mm:ss h:mm:ss (±)x.xxxE±nn
year/month/ date hour:min:sec hour:min:sec (±) value x 10
TIME MAX 201 data
File ID : 6310-14
TIME ELAPSED TIME INST AVG MAX MIN
±n
Header of the saved data
±n
50
①
e.g. Trigger point is set to Past: 50 / Next: 150.
〜
1_1
〜
150
① 201 data in total
Data No.
:
Saving Transient Measurement
Start → Next → Next → Complete
Press
1
Press the
Start
2 Preset start time comes.
Saving
3
Stop
Start Button at least 2 sec to start recording immediately.
Data saving starts.
to start recording after checking the
settings.
≪Manual≫ ≪Timer≫
File name for saving data is displayed.
▼
Status indicator LED flashes.
Stand-by until preset time comes.
▼
Status indicator LED is ON.
flashes and or is displayed.
No setting change can be made during data saving.
▼
Press Stop .
File name for saving data is displayed.
Status indicator LED goes off.
Preset termination time comes.
▼
and or goes off.
▼
appears and flashes.
▼
▼
▼
KEW6310
− 30 −
Page 33

Inrush Current Measurement KEW6310
Inrush Current Measurement
Steps for measurement
Ensuring your safety
↓
Preparation for measurement
↓
Setting
↓
Wiring
↓
Inrush Current Measurement Range
* Readings are displayed right after the inrush current measurement starts.
Measurement setting
Inrush Current Measurement Recording method
Interval Recording start
Clamp sensor Recording termination
A Range Destination to save data
Reference current Destination to save screen shot
Filter
Threshold value
Hysteresis
Trigger point
Timing of data recording
Measured data will be saved when an event occur or at the preset interval during measurement.
Recording at event occurrence Recording at every interval
File ID:6310-09 File ID:6310-15
Range
Save Setting
Reference current 100A
Setting
Example
Inst value : Avg of 100 data (@50Hz) obtained 1 sec before the preset interval comes (rms)
Avg value : Avg of rms values obtained in the preset inst interval
Max value : Max rms values obtained in the preset inst interval
Min value : Min rms values obtained in the preset inst interval
Threshold value 110%
Hysteresis 1%
Trigger point
Before: 100
After: 100
Setting
Example
− 31 −
Interval 30min
KEW6310
Page 34

KEW6310 Inrush Current Measurement
Save data
File ID : 6310-09
Saved time & date Start / End Duration Max / Min Data
DATE TIME I╱O DURATION MAX/MIN 201 data
yyyy/mm/dd h:mm:ss.ss 1 0 1╱0 -:--:--.-- h:mm:ss.ss (±)x.xxxE±nn
year/month/ date hour:min:sec Start End Start to End Start End Max / Min (±) value x 10
File ID : 6310-15
Saved time & date ELAPSED TIME Instantaneous Avarage Max Min
DATE
yyyy/mm/dd h:mm:ss h:mm:ss (±)x.xxxE±nn
year/month/ date hour:min:sec hour:min:sec (±) value x 10±n
TIME ELAPSED TIME INST AVG MAX MIN
Header of the saved data
50
①
e.g. Trigger point is set to Past: 50 / Next: 150.
〜
1_1
〜
150
① 201 data in total
Data No.
:
Saving Inrush Current Measurement
Start → Next → Next → Complete
Press
1
Press the
Start
2 Preset start time comes.
Saving
Start Button at least 2 sec to start recording immediately.
Data saving starts.
to start recording after checking the
settings.
≪Manual≫ ≪Timer≫
File name for saving data is displayed.
▼
Status indicator LED flashes.
Stand-by until preset time comes.
▼
Status indicator LED is ON.
flashes and or is displayed.
▼
appears and flashes.
▼
▼
±n
3
Stop
KEW6310
No setting change can be made during data saving.
▼
Press Stop .
File name for saving data is displayed.
Status indicator LED goes off.
Preset termination time comes.
▼
and or goes off.
▼
− 32 −
Page 35

Unbalance Ratio KEW6310
Unbalance Ratio
Steps for measurement
Ensuring your safety
↓
Preparation for measurement
↓
Setting
↓
Wiring
Unbalance Ratio
V Voltage A Current P
Apparent
S
Power
Neutral
An
current
* Measurements can be made with any of wiring configurations: ⑪, ⑫, ⑬.
↓
Symbol displayed on the LCD
+ lagging
Power
PF
Factor
− leading
Analogue input
DC1
Voltage at 1ch
Basic Setting
Wiring
V Range Interval Recording start
VT Ratio Output threshold Recording termination
Clamp Destination to save data
A Range Destination to save screen shot
CT Ratio
Filter
DC V
Frequency
PA
DC2
Measurement setting
Unbalance Ratio Recording method
Range
Active
Power
Phase angle f Frequency
Analogue input
Voltage at 2ch
+ consumption
− regenerating − leading
Range
Q
Save Setting
Reactive
Power
+ lagging
Switching displays / Viewing Vector W Range display
Select a system
Select an item
Vector Display
Press the F2 Key to switch the Vector and W Range displays.
W Range Display
Save data
File ID : 6310-10
Saved time & date ELAPSED TIME Instantaneous Average Max Min
DATE
yyyy/mm/dd h:mm:ss h:mm:ss (±)x.xxxE±nn
year/month/ date hour:min:sec hour:min:sec (±) value x 10
TIME ELAPSED TIME INST AVG MAX MIN
− 33 −
±n
Cursor Key
Cursor Key
KEW6310
Page 36

KEW6310 Unbalance Ratio
Header of the saved data
AVG_A1[A]_1
︸ ︸ ︸
① ② ③ ④ ⑤
*Saved data with no number at this space contains the sum of the measured values.
︸ ︸
① INST
AVG
MAX
MIN
UV
②
UA
V
A
f
P
Q
S
PF
PA
DC
③ CH number
④ Unit
⑤ System
Instantaneous value
:
Average value
:
Max value
:
Min value
:
Voltage unbalance ratio
:
Current unbalance ratio
:
Voltage of each phase
:
Current of each phase
:
Frequency
:
Active power
:
Reactive power
:
Apparent power
:
Power factor
:
Phase angle
:
Analogue input voltage
:
:*1〜
4
Saving PFC calculation results
Start → Next → Next → Complete
Press
1
Press the
Start
2 Preset start time comes.
Saving
Start Button at least 2 sec to start recording immediately.
Data saving starts.
to start recording after checking the
settings.
≪Manual≫ ≪Timer≫
File name for saving data is displayed.
▼
Status indicator LED flashes.
Stand-by until preset time comes.
▼
Status indicator LED is ON.
flashes and or is displayed.
(flashes in red according to the preset interval)
▼
appears and flashes.
▼
▼
3
Stop
KEW6310
No setting change can be made during data saving.
▼
Press Stop .
File name for saving data is displayed.
Status indicator LED goes off.
Preset termination time comes.
▼
and or goes off.
▼
− 34 −
Page 37

− 35 −
KEW6310
Flicker KEW6310
Flicker
* An optional voltage sensor KEW8325F is required for Flicker measurement.
Steps for measurement
Ensuring your safety
↓
Preparation for measurement
↓
Setting
↓
Wiring
Flicker
* Preliminary measurement (for 10 sec) will be done automatically prior to Flicker measurement.
↓
Measurement setting
Flicker Recording method
V Range Recording start
Filter Recording termination
Output item Destination to save data
Output Threshold Destination to save screen shot
Range
Range
Save Setting
Save data
File ID : 6310-12
Saved time & date
DATE
yyyy/mm/dd
year/month/ date
* Data is saved at every 1 min, but Pst is saved at every 10 min and Plt is at every 10 min in 2 hours later.
TIME
h:mm:ss h:mm:ss
hour:min:sec hour:min:sec
ELAPSED
TIME
ELAPSED
TIME
Frequency
f AVG_V MAX_V MIN_V
(±)x.xxxE±nn
Voltage
Average
Max Min
(±)x.xxxxxE±nn (±)x.xxxE±nn
(±) value x 10
Short time
intensity
(for 1 min)
Pst
(1min)
±n
Short time
intensity
Pst Plt
Long time
intensity
Saving Flicker data
The saving procedure is same to the one for the other measurements. See the previous corresponding
pages.
Page 38

− 36 −
KEW6310
KEW6310 Flicker
V
Pst
(1min)
Plt
Page 39

Capacitance Calculation
KEW6310
Capacitance Calculation -
Sizing of capacitor banks for Power factor correction (PFC)
Steps for measurement
Ensuring your safety
↓
Preparation for measurement
↓
Setting
↓
Wiring
↓
Capacitance calculation Range
V Voltage A Current P
+ lagging
Power
Factor
− leading
Analogue input
Voltage at 1ch
S
An
Apparent
Power
Neutral
current
PF
DC1
Basic Setting
Wiring Capacitance Recording method
V Range Interval Recording start
VT Ratio Target power factor Recording termination
Clamp sensor Destination to save data
A Range
CT Ratio
Filter
DC V
Frequency
Symbol displayed on the LCD
Active
Power
C Capacitance f Frequency
Analogue input
DC2
Voltage at 2ch
Switching displays / Zoom
Select a
system
Select
an item
Cursor Key
Cursor Key
Total
measured
values
Measured
values
per CH
* Press
to (Section 6) Instanta neous mea sureme nt f or an
explanation on customizing the Zoom display.
Range
Measurement setting
+ consumption
− regenerating − leading
List Zoom
F3
Key to switch on the Zoom and List display. Refer
Q
Save Setting
Destination to save screen shot
Reactive
Power
+ lagging
Save data
File ID : 6310-11
Saved time & date ELAPSED TIME Instantaneous Average Max Min
DATE
yyyy/mm/dd h:mm:ss h:mm:ss (±)x.xxxE±nn
year/month/ date hour:minute:second hour:minute:second (±) value x 10
TIME ELAPSED TIME INST AVG MAX MIN
− 37 −
±n
KEW6310
Page 40

KEW6310 Capacitance Calculation
Header of the saved data
INST
AVG_A1[A]_1
︸ ︸ ︸
① ② ③ ④ ⑤
* Saved data with no number at this space contains the sum of the measured values.
︸ ︸
①
AVG
MAX
MIN
V
②
A
f
P
Q
S
PF
C
DC
③ CH number * 1〜4
④ Unit
⑤ System
Instantaneous value
:
Average value
:
Max value
:
Min value
:
Voltage of each phase
:
Current of each phase
:
Frequency
:
Active power
:
Reactive power
:
Apparent power
:
Power factor
:
Capacitance
:
Analogue input voltage
:
Saving PFC calculation results
Start → Next → Next → Complete
Press
1
Press the
Start
2 Preset start time comes.
Saving
Start Button at least 2 sec to start recording immediately.
Data saving starts.
to start recording after checking the
settings.
≪Manual≫ ≪Timer≫
File name for saving data is displayed.
▼
Status indicator LED flashes.
Stand-by until preset time comes.
▼
Status indicator LED is ON.
flashes and or is displayed.
(flashes in red according to the preset interval)
▼
appears and flashes.
▼
▼
3
Stop
KEW6310
No setting change can be made during data saving.
▼
Press Stop .
File name for saving data is displayed.
Status indicator LED goes off.
Preset termination time comes.
▼
and or goes off.
▼
− 38 −
Page 41

CF Card / Saved data KEW6310
11.CF Card / Saved data
CF Card
SanDisk Corp.* SDCFB-32 SDCFB-64 SDCFB-128 SDCFB-256 SDCFB-512 SDCFG-1
Adtec co., Ltd. AD-CFG32 AD-CFG64 AD-CFG128 AD-CFG256 -----
BUFFALO INC. - - - - - - ----
* CF Card with more or less capacity other than listed above cannot be used with this instrument.
* Company name and model name are the trademark or the registered trademark.
A CF Card may not operate properly even if any of the following cards are used due to manufacture's specification change, etc.
Please be aware above issue when purchasing commercially available CF Cards. We can offer following CF Cards
(proper operation has been verified) as optional parts. Please feel free to inquire.
Max number of saved data / Possible recoding time
Instantaneous value
measurement
Integration value
Measurement
DEMAND measurement
WAVE Range
Harmonic anaysis
Swell / Dip / Int measurement*1
Transient measurement*1
Inrush Current measurement*1
Unbalance Ratio
Flicker*1 1min 7M 1Y Over 1Y Over 1Y Over 1Y Over 1Y 1D
Capacitance
Max number of file
*In case that no file exist in the CF card or the Internal memory.
*1 Assumed one event occur per minute and calculated.
(operation check has completed)
Capacity 32MB 64MB
Destination to save data CF Card
Caiacity 32MB 64MB 128MB 256MB 512MB 1GB 1.8MB
1sec 15H 1D 2D 5D 10D 20D 7min
1min 10D 20D 1M 2M 5M 10M 2H
30min 10M 1Y Over 1Y Over 1Y Over 1Y Over 1Y 2D
1sec 6H 13H 1D 2D 4D 8D 3min
1min 7D 15D 1M 2M 4M 8M 1H
30min 7M 1Y Over 1Y Over 1Y Over 1Y Over 1Y 1D
1sec 4H 8H 17H 1D 2D 5D 2min
1min 6D 12D 24D 1M 3M 6M 1H
30min 6M 1Y Over 1Y Over 1Y Over 1Y Over 1Y 1D
10sec 1D 3D 7D 14D 28D 1M 20min
1min 10D 21D 1M 2M 5M 11M 2H
30min 10M 1Y Over 1Y Over 1Y Over 1Y Over 1Y 2D
15sec 3D 7D 15D 1M 2M 4M 44min
1min 15D 1M 2M 4M 8M 1Y 2H
30min 1Y Over 1Y Over 1Y Over 1Y Over 1Y Over 1Y 3D
1sec 2D 5D 11D 22D 1M 2M 32min
1min 5M 11M 1Y Over 1Y Over 1Y Over 1Y 1D
30min Over 1Y Over 1Y Over 1Y Over 1Y Over 1Y Over 1Y 1M
1sec 3D 6D 12D 24D 1M 3M 35min
1min 6M 1Y Over 1Y Over 1Y Over 1Y Over 1Y 1D
30min Over 1Y Over 1Y Over 1Y Over 1Y Over 1Y Over 1Y 1M
1sec 2D 5D 11D 22D 1M 2M 32min
1min 5M 11M 1Y Over 1Y Over 1Y Over 1Y 1D
30min Over 1Y Over 1Y Over 1Y Over 1Y Over 1Y Over 1Y 1M
1sec 21H 1D 3D 7D 14D 27D 10min
1min 14D 29D 1M 3M 7M 1Y 2H
30min 1Y Over 1Y Over 1Y Over 1Y Over 1Y Over 1Y 3D
1sec 15H 1D 2D 5D 10D 19D 7min
1min 10D 20D 1M 2M 5M 10M 1H
30min 10M 1Y Over 1Y Over 1Y Over 1Y Over 1Y 2D
Measurement data file (CSV)
Graphics file (BMP)
Configuration file (KAS)
where : H= hour(s), D=day(s), M=month(s), Y=year(s)
Numbers and time listed above are the minimum ones.
128MB
RCF-X128MY
256MB 512MB 1GB
RCF-X256MY - - - - - RCF-X1GY
− 39 −
512
AD-CFX
40T1G
Internal
Memory
KEW6310
6
7
20
Page 42

KEW6310 Data transfer
Data transfer
Data in the CF card or internal memory can be transferred to a PC via USB connection or CF card
reader.
Transfer to PC via:
USB Card reader
CF card data (file) △*
Internal memory data (file)
*1 It is reccomended to transfer the data with big size by a use of CF card reader since trasfer of such data via
USB takes time. (transfer time : approx 4MB/ hour)
*2 Data in the internal memory can be tranferred to a CF card.
* As to the manipulation of the CF card, please refer to the instruction manual attached to the card.
* In order to save the data without any problem, make sure to delete the file other than the data
measured with this instrument in the CF card.
Intemal memory data
1
○
○ --------*
2
CF card data
Intemal memory data
File format and name
Measurement data
File Name :01 − CF 001 .CSV
① ② ③ ④
CF card data *
① Measuring
Items
1
01
Data measured at W Range
:
02
Data measured at Wh Range
:
03
Data measured at DEMAND Range
:
04
Waveform data
:
05
Vector data
:
06:Harmonic data
07:Swell / Dip / Int data
08
Transient data
:
09
Inrush current data
:
10:Unbalance ratio
11: Capacitance
12: Flicker date
13
Voltage Interval data
:
14
Voltage Interval data
:
15
Current Interval data
:
CF
CF Card
② Save in
:
ME:Internal memory
③ File No 001〜999
④ Format CSV
Card reader
CF card
KEW6310
− 40 −
Page 43

File format and name KEW6310
Configuration file
File Name : ME 000123 .KAS
① ② ③
Bitmap file
File Name : PS − CF 001 .BMP
① ② ③ ④
① Save in
② File No 000000〜999999
③ Extension KAS
① Save item PS : Print screen
② Save in
③ File No 001〜999
④ Extension BMP
Backup Memory
In case one CF card is removed and inserted while saving data:
Saving
①. A file is created in the CF card,
when CF card is selected as
a destination for saving data,
and measu reme n t d a ta is
saved to the CF card.
②. A bac kup f ile i s creat ed in the int ernal
memory when a CF card is removed at
saving data.
Further data is saved to the internal memory.
CF
CF card
:
ME:Internal memory
CF
CF card
:
ME:Internal memory
③. When inserting the CF card
ag ai n durin g a data sav in g,
further data will be saved to the
last available space in CF card
①or ②.
Saving completes Download completes
Backup files in the internal memory are automatically
transferred to the last available space in a CF card.
(Time-series is as follows.)
− 41 −
Use of supplied software [KEW PQA MASTER]
enables to sort files in time-series.
KEW6310
Page 44

12. Wiring check
Proper wirings can be checked at WAVE Range.
1. Ordinal screen 2. Checking wiring 3. Check completes
Press the
* Check results may by affected if great power factors exist at the measurement sites.
F2 Key.
Wiring check starts.
[Checking status] &
[Proper vector]
are displayed.
Wiring check completes.
In case of NG, Erro r message
appears. (Press the
when OK is displayed.)
Criteria of Judgment and cause
Check Criteria of Judgment Cause
Frequency Frequency of V1 is between 42 and
Voltage input Voltage input is 10% or more of
Voltage
balance
Voltage phase
Current input Curren t input is 5 % or more of
Current phase Current input is within ±60º of
68Hz.
(Voltage Range x VT).
Voltage input is within ±30 º of
reference voltage (V1)
* ( not judge d b y s i ngl e -ph a se
wiring)
Phase of voltage input is within ±10º
of reference value (proper vector).
(Current Range x CT).
reference value (proper vector).
• Voltage clip is firmly connected to the DUT?
• Measuring too high harmonic components?
• Voltage clip is firmly connected to the DUT?
• Voltag e test leads a re firml y connected to the
Voltage input terminals on the instrument?
• Setting against the wiring under test are matched?
• Voltage clip is firmly connected to the DUT?
• Voltag e test leads a re firml y connected to the
Voltage input terminals on the instrument?
• Voltage test leads are properly connected?
(Connected to proper channels?)
• Clamp sensors are firmly connected to the Power
input terminals on the instrument?
• Setting for Current Range is appropriate for input
levels?
• Arrow mark on a Clamp sensor and the orientation
of flowing current is matched? (Power supply to
Load)
• Clamp sensors are connected properly?
ENTER Key
KEW6310
− 42 −
Page 45

DISTRIBUTOR
10-08 92-1882B
 Loading...