

Kyocera Mita KM-1530 Instruction Handbook Manual
Please read the instruction handbook before using the copier. Keep it close to the copier for easy
reference.
The sections of this handbook and parts of the copier marked with symbols are safety warnings meant to
protect the user, other individuals and surrounding objects, and ensure correct and safe usage of the copier.
The symbols and their meanings are indicated below.
a
DANGER:
Indicates that serious injury or even death will very possibly result from insufficient attention to
or incorrect compliance with the related points.
a
WARNING:
Indicates that serious injury or even death may result from insufficient attention to or incorrect
compliance with the related points.
a
CAUTION:
Indicates that personal injury or mechanical damage may result from insufficient attention to
or incorrect compliance with the related points.
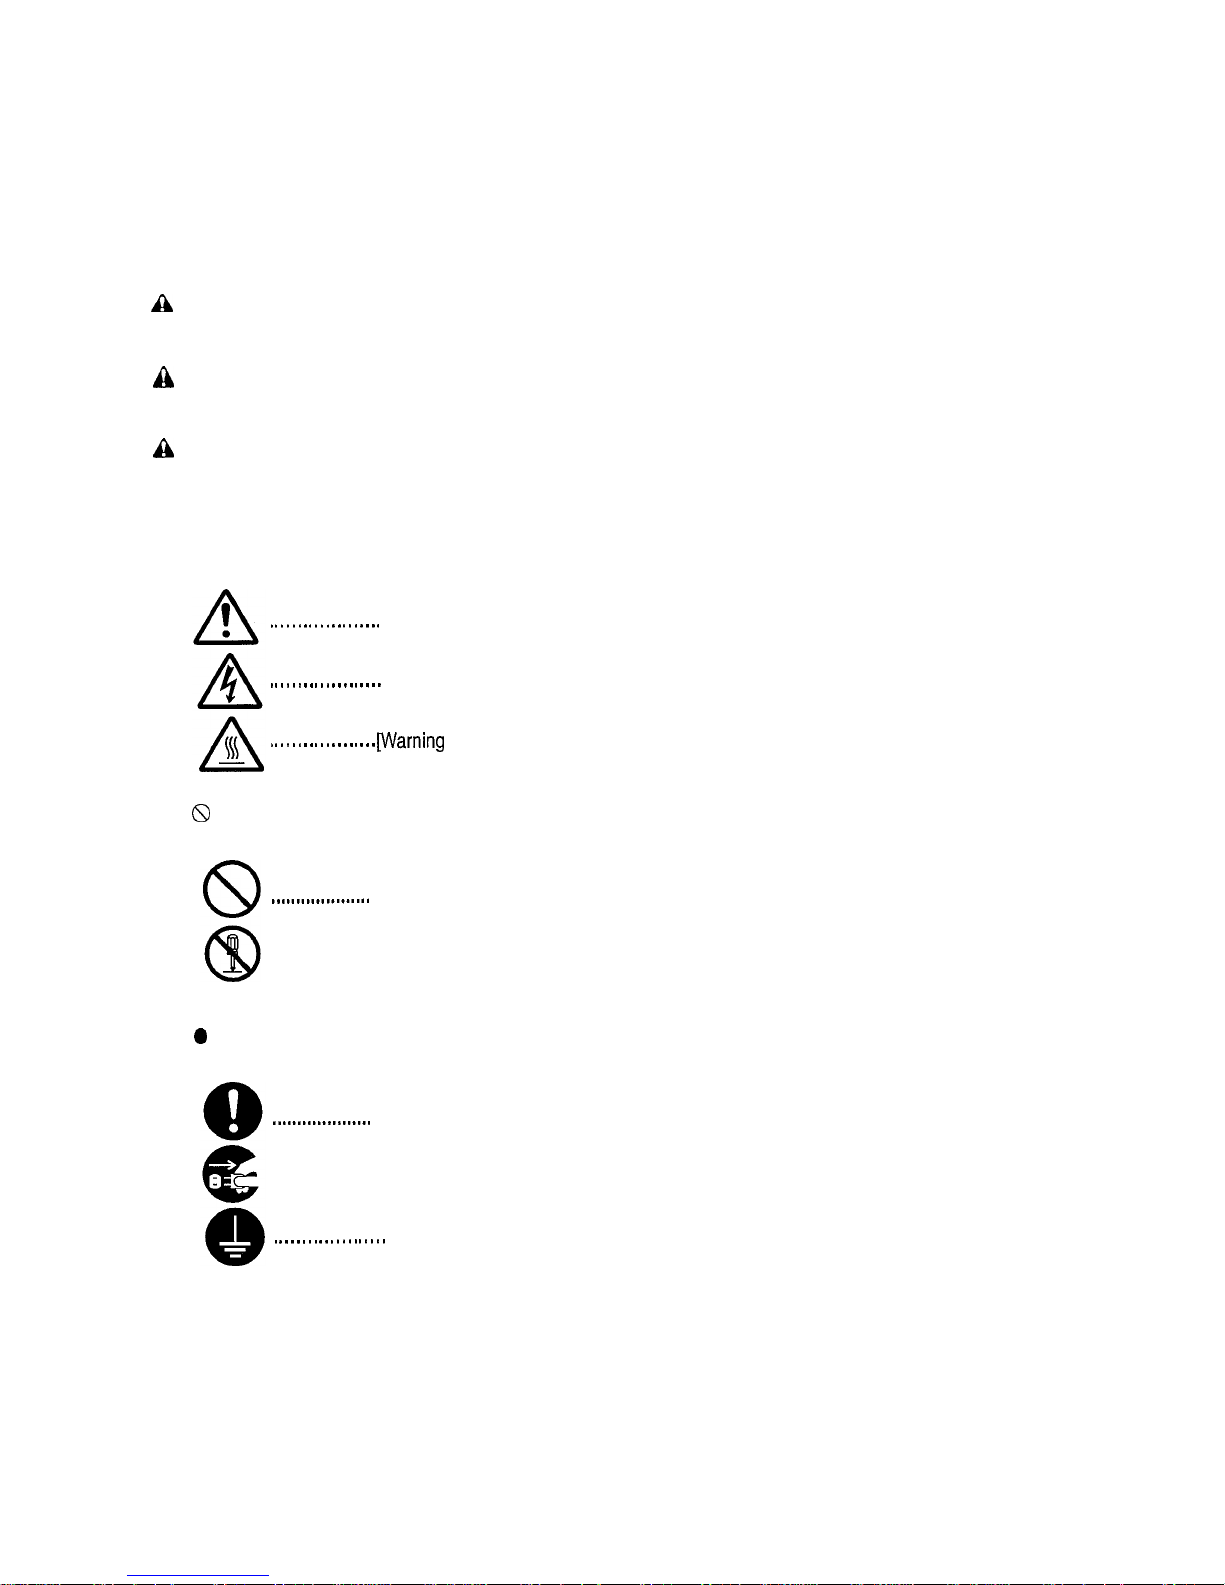
Symbols
The A symbol indicates that the related section includes safety warnings. Specific points of attention are
indicated inside the symbol.
. . . . . . . . . . . . . . . . . . . .
[General warning]
. . . . . . . . . . . . . . . . . . . .
[Warning of danger of electrical shock]
. . . . . . . . . . . . . . . . . . . .
jWarning of high temperature]
The 8 symbol indicates that the related section includes information on prohibited actions. Specifics of the
prohibited action are indicated inside the symbol.
....................
[Warning of prohibited action]
....................
[Disassembly prohibited]
The 0 symbol indicates that the related section includes information on actions which must be performed.
Specifics of the required action are indicated inside the symbol.
....................
[Alert of required action]
....................
[Remove the power plug from the outlet]
. . . . . . . . . . . . . . . . . . . .
[Always connect the copier to an outlet with a ground connection]
Please contact your service representative to order a replacement if the safety warnings in the handbook are
illegible or if the handbook itself is missing. (fee required)

CONTENTS
CHAPTER 1
IMPORTANT! PLEASE READ FIRST.. l-l
A
CAUTION LABELS
...............................................
1-1
A
INSTALLATION PRECAUTIONS
..........................
1-2
A
PRECAUTIONS FOR USE
................................... l-3
CHAPTER 2
NAMES OF PARTS
...............................
2-1
(1) Main body
.........................................................
2-1
(2) Operation panel
................................................
2-3
CHAPTER 3
PREPARATIONS BEFORE USE
..........
3-1
1. How to load paper
.................................................
3-1
(1) Precautions for loading paper
..........................
3-1
(2) Loading paper into the drawer..
........................ 3-l
(3) Loading paper into the multi-bypass
................
3-2
2. Replacing the toner cartridge and waste
toner tank..
............................................................
3-5
CHAPTER 4
BASIC OPERATION
.............................
4-l
1. Basic copying procedure
.......................................
4-1
2. Enlargement/reduction
..........................................
4-3
(1) Auto magnification selection mode
...................
4-3
(2)
Zoom
copy.. ......................................................
4-3
(3)
Size Zoom
copy.. ..............................................
4-4
3. Interrupt copying
...................................................
4-5
4. Energy saver (preheat) function
............................
4-6
5. Auto shut-off function..
...........................................
4-6
CHAPTER 5
FUNCTIONS
..........................................
5-1
1.
Margin mode
......................................................... 5-l
2. Border erase mode
...............................................
5-2
(1) Sheet Erase
......................................................
5-2
(2) Book Erase
.......................................................
5-2
3. Layout copy
...........................................................
5-4
02in1.................................................................
5-4
04in1.................................................................
5-4
4.
Sort copy
...............................................................
5-6
5. Rotate copy
...........................................................
5-6
CHAPTER 6
COPIER
MANAGEMENT......................
6-1
1.
Copy management
................................................ 6-l
(1) Copy management modes
...............................
6-1
(2) How to set the copy management mode..
........
6-2
(3) Making copies when the copier is in the
copy management mode
...................................
6-3
2. Default settings
.....................................................
6-4
(1) Default settings
.................................................
6-4
(2)
How
to make
default settings
...........................
6-8
CHAPTER 7
OPTIONAL EQUIPMENT..
....................
7-1
(1) ADF (Automatic document feeder)
...................
7-1
@
Originals that can be used with the DF
........ 7-l
@
Precautions for the use of DF..
..................... 7-l
@
DF part names..
............................................
7-1
@
How to set originals in the DF
...................... 7-l
@
Auto
selection mode
.....................................
7-2
@
How to set originals on the platen
................
7-2
(2) Drawer
..............................................................
7-3
(3) Job separator
...................................................
7-3
(4) Key counter
......................................................
7-3
(5) Memory board
..................................................
7-4
(6) Printer board
.....................................................
7-4
(7) Printer network board
....................................... 7-4
CHAPTER 8
WHEN A PROBLEM OCCURS..
...........
8-1
1. Error and status indications..
................................. 8-l
2. When paper misfeeds
...........................................
8-3
(1) Misfeed location indicators
...............................
8-3
(2) Cautions
...........................................................
8-3
(3) Removal procedures
........................................
8-3
3. Troubleshooting
....................................................
8-7
CHAPTER 9
CLEANING AND SPECIFICATIONS . . . . 9-1
1. Cleaning the copier
. . . . . . . . . . . . . . . . . . . . . . . . . . . . . . . . . . . . . . . . . . . . . . .
9-1
2. Specifications
. . . . . . . . . . . . . . . . . . . . . . . . . . . . . . . . . . . . . . . . . . . . . . . . . . . . . . . .
9-2
0
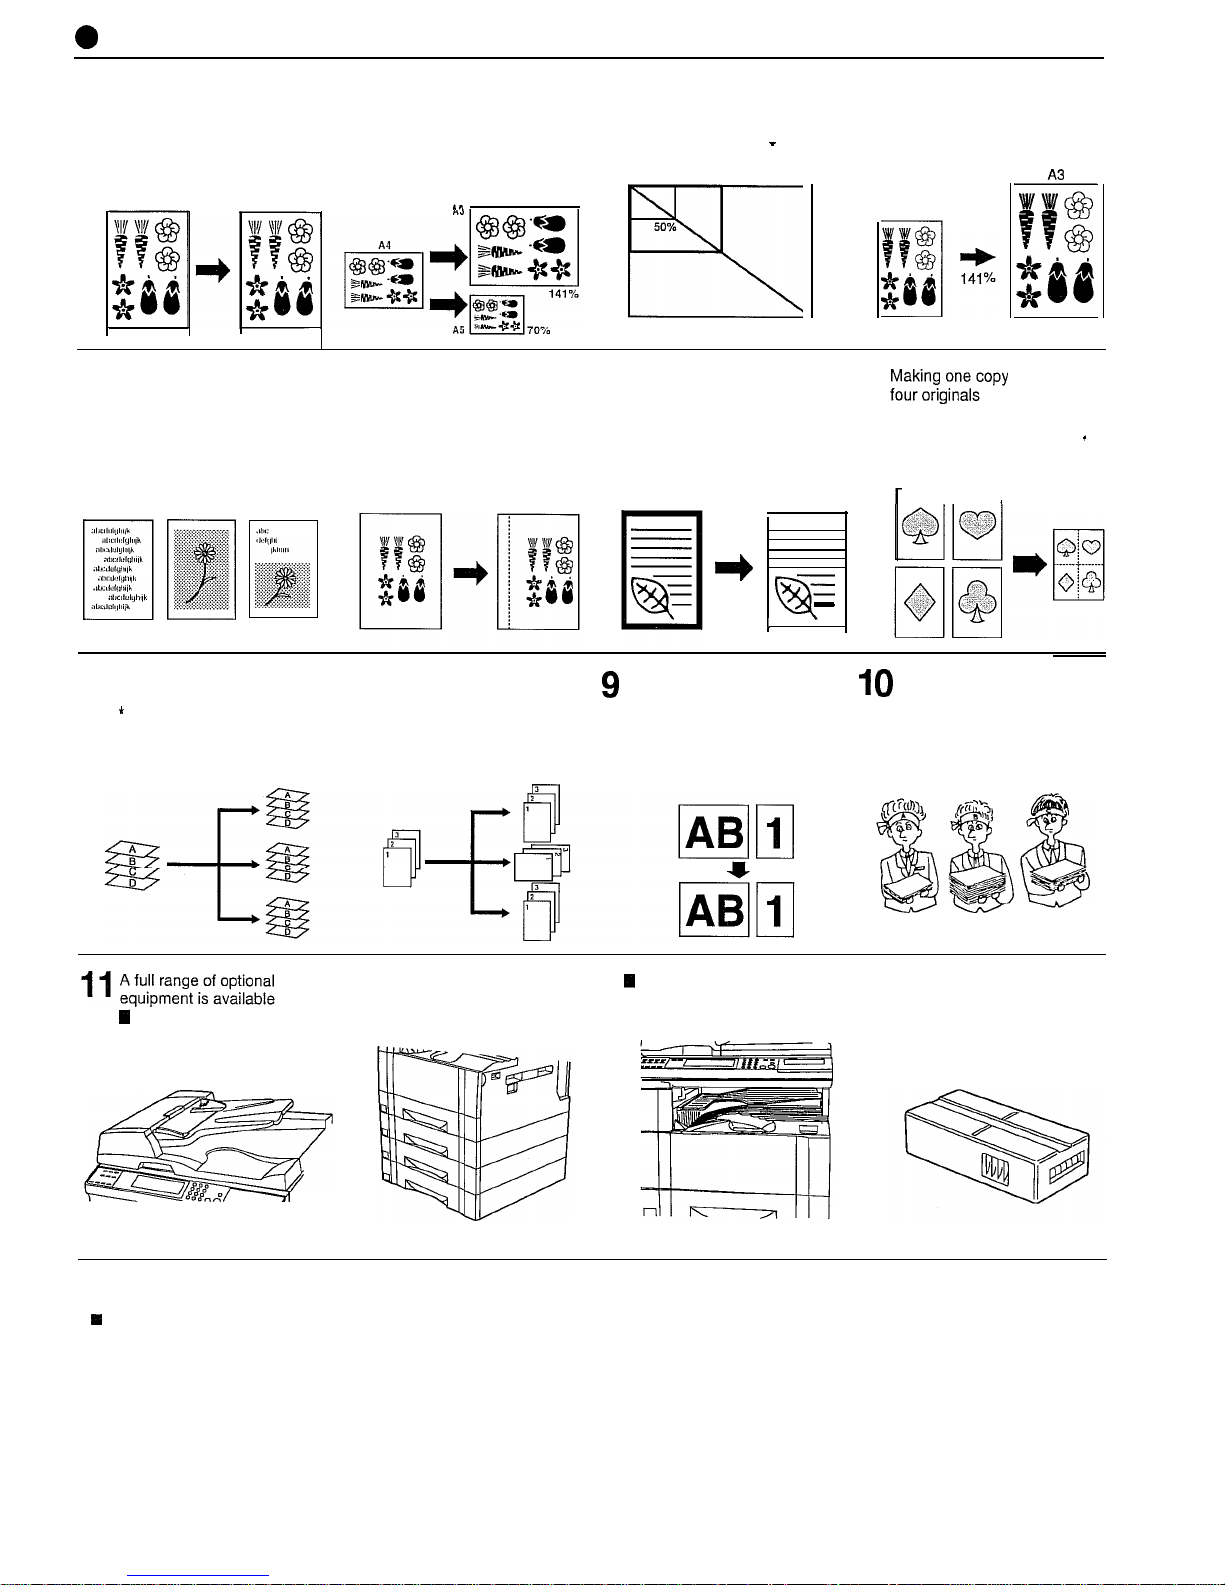
MAKING FULL USE OF THE MACHINE’S ADVANCED FUNCTIONS
1
Having the machine automatically
select paper of the same
2
Various functions for making
n
Enlarging/reducing copies to
n
Specifying the magnification by
enlarged and reduced copies.any
desired size in the 50
-
selecting
the
paper size
size as the original
<Auto
paper selection mode>
n
Enlarging/reducing
copies
to fit the size of paper in a
206% range.
doom copy mode> (page 4-3)
(page
4-i)
+
This mode is not available
on some models.
specified drawer
<Auto magnification
selection mode> (page 4-3)
.”
I
-
50%
FY!T
200%
<Size
zoom modes (page 4-4)
A4
3
Making clear reproductions
of photographs
4
Making a margin on copies
<Margin mode> (page 5-1)
5
Making copies with clean edges
<Border erase mode>
<Copy quality
selection>
* When the optional memory
6
;;;;i;,n,e,wy
from two or
(paw
5-2)
<Layout copy> (page
5-4)
(page
4-2)
.
board is installed.
l
When the optional memory
board is installed.
*
When
the optional memory
I)
-
-
F
-
1
I
board is installed.
’
in
7
Sorting automatically
<Sort copy>
(page 5-6)
8
Changing copy orientation for
easy sorting
g
different sizes at a time
Making
copies from originals of1 0 Managing the number
of
’
When the optional memory
<Rotate
sort copy mode>
copies by ID-code
board is installed.
<Auto selection> (page 7-2)
(page
5-6)
<Copy management>
* When the optional ADF is
* When the optional memory
(page
6-1)
installed.
board is installed.
W
ADF (automatic document
feeder) (page 7-1)
q
Drawer (page 7-3)
4
Job separator (page 7-3)
n
Key counter (page 7-3)
q
Memory board (page 7-4)
n
Printer board (page 7-4)
w
Printer network board
(page
7-4)
CHAPTER 1 IMPORTANT! PLEASE READ FIRST.
A
!
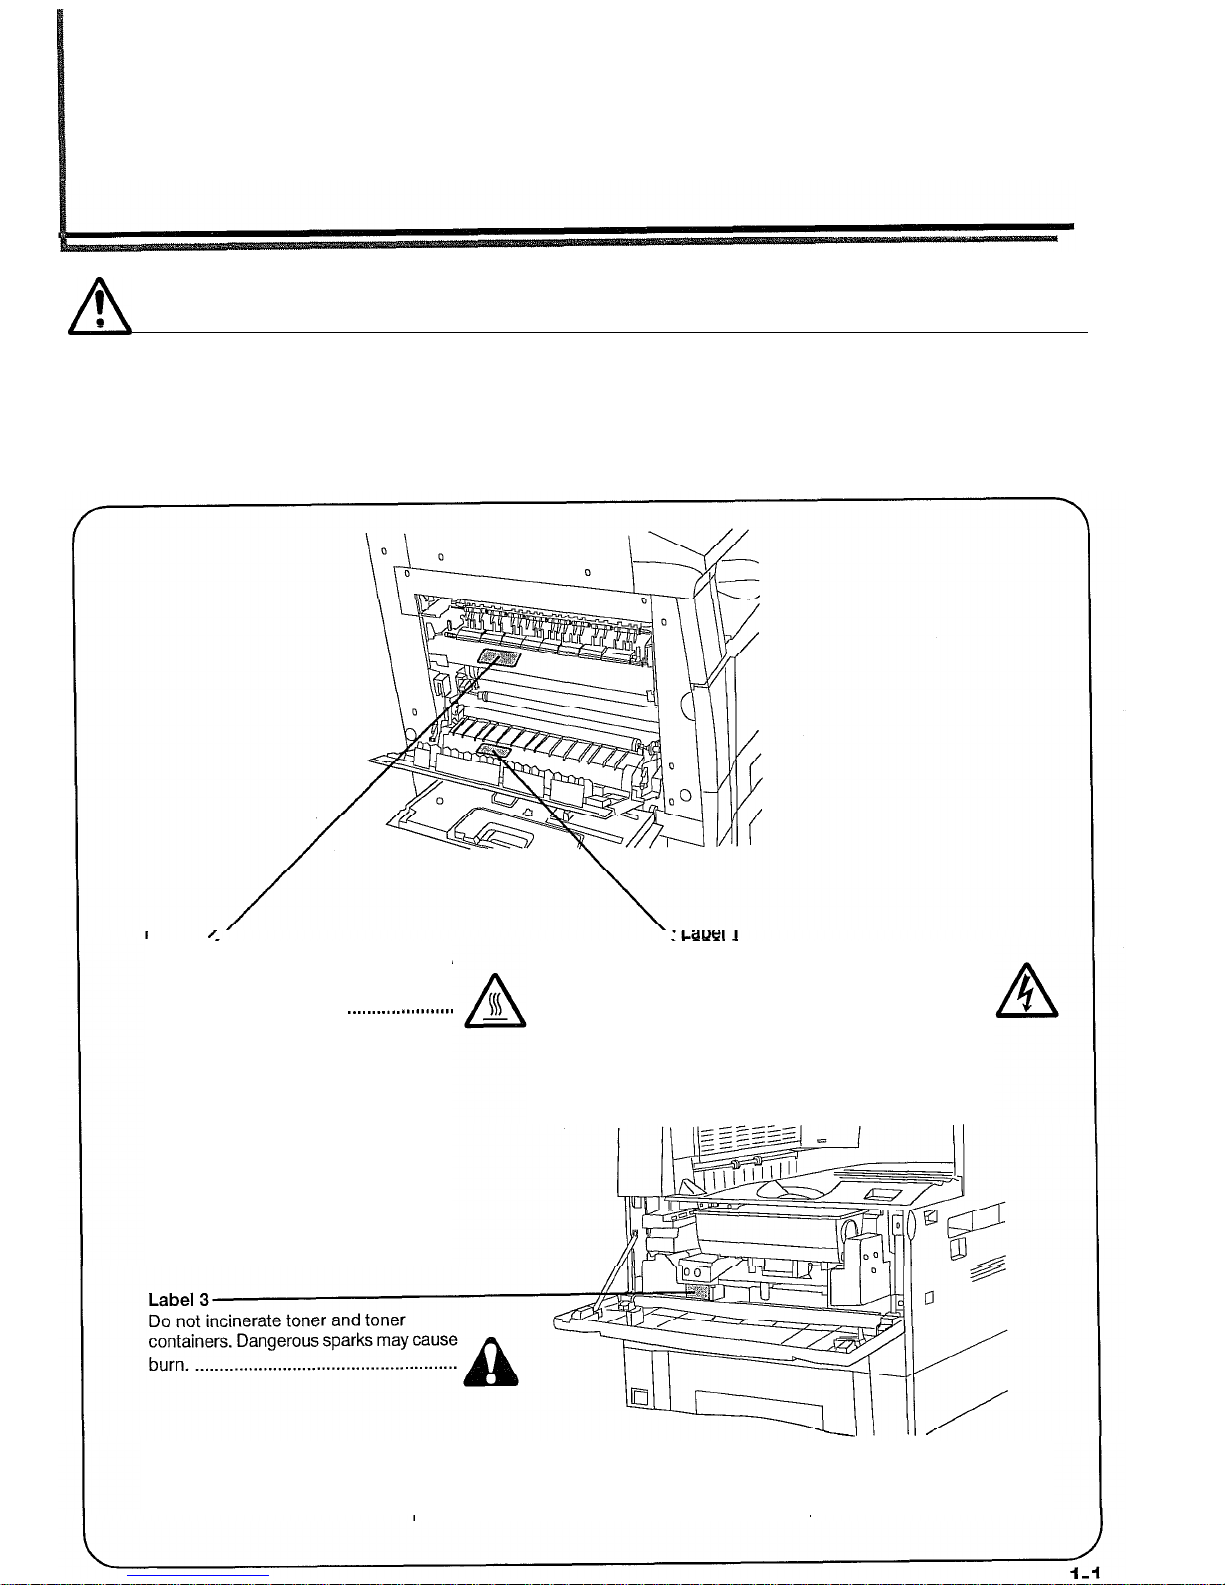
CAUTION LABELS
Caution labels have been attached to the copier at the following locations for safety purposes.
BE SUFFICIENTLY CAREFUL to avoid fire or electric shock when removing a paper jam or
when replacing toner.
Label 2
High temperature inside. Do not touch
parts in this area, because there is a
danger of getting burned.
._....__..............
High voltage inside. NEVER touch parts
in this area, because there is a danger of
electric shock.
........................................
NOTE: DO NOT remove these labels.
A
!
INSTALLATION PRECAUTIONS
•l Environment
&
CAUTION
l Avoid placing the copier on or in locations which are
unstable or not level. Such locations may cause the
copier to fall down or fall over. This type of situation
presents a danger of personal injury or damage to the
copier.
. . . . . . . . . . . . . . . . . . . . . . . . . . . . . . . . . . . . . . . . . . . . . . . . . . . . . . . . . . . . . . . . . . . . . . . . .
l
Avoid locations with humidity or dust and dirt. If dust or
dirt become attached to the power plug, clean the plug
to avoid the danger of fire or electrical shock.
. . . . . . . . . . . .
8
. Avoid locations near radiators, heaters, or other heat
sources, or locations near flammable items, to avoid
the danger of
fire. . . . . . . . . . . . . . . . . . . . . . . . . . . . . . . . . . . . . . . . . . . . . . . . . . . . . . . . .
8
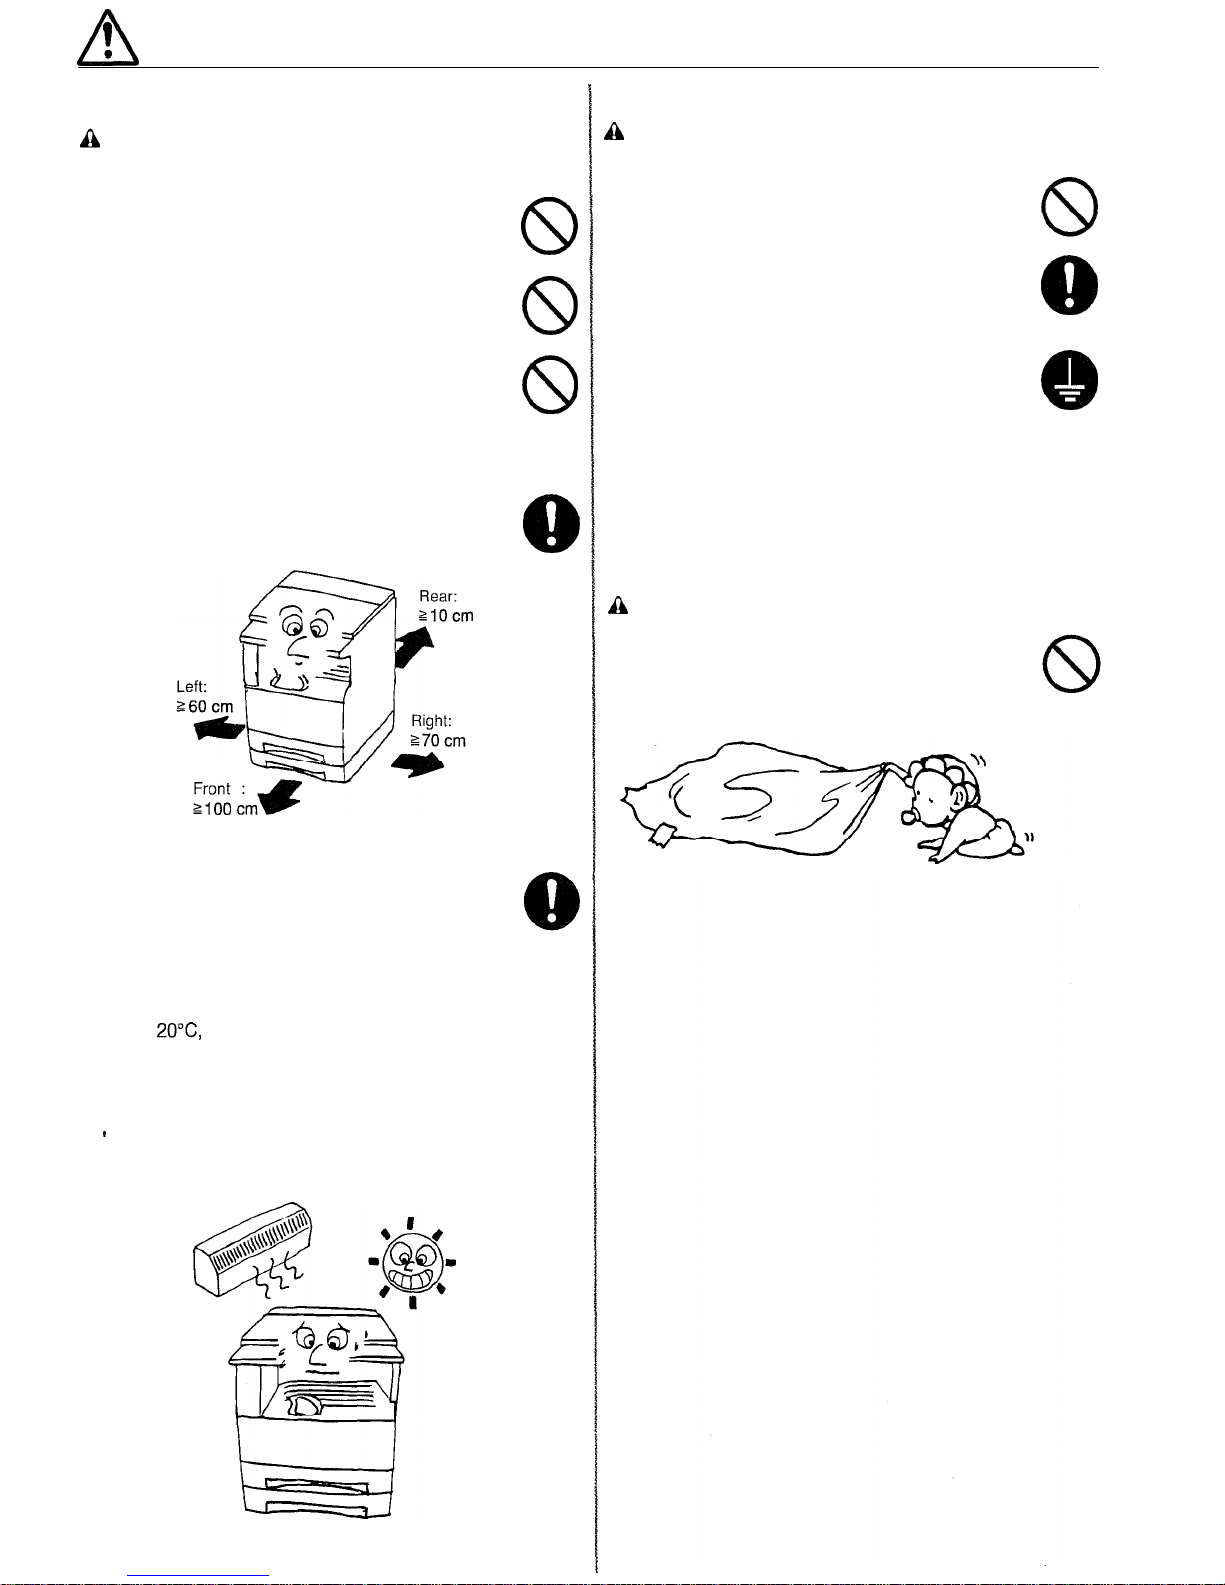
l To keep the copier cool and facilitate changing of
parts and maintenance, allow access space as shown
below.
Leave adequate space, especially around the left
cover, to allow air to be properly ventilated out of
the copier.
. . . . . . . . . . . . . . . . . . . . . . . . . . . . . . . . . . . . . . . . . . . . . . . . . . . . . . . . . . . . . . . . .
8
l
Always use the caster stoppers to stabilize the copier
once it is in place to keep it from moving and/or falling
over and causing
injury. . . . . . . . . . . . . . . . . . . . . . . . . . . . . . . . . . . . . . . . . . . . . . .
Other precautions
l
Adverse environmental conditions may affect the safe
operation and performance of the copier. Install in an
air-conditioned room (recommended room temperature:
around
2O”C, humidity: around 65%RH) and avoid the
following locations when selecting a site for the copier.
. Avoid locations near a window or with exposure to
direct sunlight.
. Avoid locations with vibrations.
_
Avoid locations with drastic temperature fluctuations.
. Avoid locations with direct exposure to hot or cold air.
. Avoid poorly ventilated locations.
l-3
n
Power supply/Grounding the copier
&i
WARNING
l
DO NOT use a power supply with a voltage other than
that specified. Avoid multiple connections in the same
outlet. These types of situations present a danger of
fire or electrical shock. . . .
............................................
l
Plug the power cord securely into the outlet. If metallic
objects come in contact with the prongs on the plug, it
may cause
a fire or electric shock.
. . . . . . . . . . . . . . . . . . . . . . . . . . . . .
8
l Always connect the copier to an outlet with a ground
connection to avoid the danger of fire or electrical shock
in case of an electric short. If an earth connection is
not possible, contact your service representative. . . . . .
Q
Other precautions
l
Connect the power plug to the closest outlet possible to
the copier.
q
Handling of plastic bags
n
WARNING
l
Keep the plastic bags that are used with the copier away
from children. The plastic may cling to their nose and
mouth causing
suffocation. . . . . . . . . . . . . . . . . . . . . . . . . . . . . . . . . . . . . . . . . .
n
!
PRECAUTIONS FOR USE
q
Cautions when using the copier
kh
WARNING
l
DO NOT place metallic objects or containers with water
(flower vases, flower pots, cups, etc.) on or near the
copier. This type of situation presents a danger of fire
or electrical shock should they fall inside.
_..._..............
. DO NOT remove any of the covers from the copier as
there is a danger of electrical shock from high voltage
parts inside the copier.
. . . . . . . . . . . . . . . . . . . . . . . . . . . . . . . . . . . . . . . . . . . . . . . .
l
DO NOT damage, break or attempt to repair the power
cord. DO NOT place heavy objects on the cord, pull it,
bend it unnecessarily or cause any other type of dam-
age.
These types of situations present a danger of fire or
electrical shock. . . . .
. . . . . . . . . . . . . . . . . . . . . . . . . . . . . . . . . . . . . . . . . . . . . . . . . . . . . .
*
NEVER attempt to repair or disassemble the copier or
its parts as there is a danger of fire, electrical shock or
damage to the laser. If the laser beam escapes, there
is
a danger ofitcausing
blindness. . . . . . . . . . . . . . . . . . . . . . . . . . . . . .
l
If the copier becomes excessively hot, smoke appears
from the copier, there is an odd smell, or any other
abnormal situation occurs, there is a danger of fire or
electrical shock. Turn the main switch OFF (0)
immediately, remove the power plug from the outlet and
contact your service representative.
. . . . . . . . . . . . . . . . . . . . . . . . . . .
l
If anything harmful (paper clips, water, other fluids, etc.)
falls into the copier, turn the main switch OFF (0)
immediately. Next, remove the power plug from the
outlet to avoid the danger of fire or electrical shock. Then
contact your service
representative.
. . . . . . . . . . . . . . . . . . . . . . . . . . .
. DO NOT remove or connect the power plug with wet
hands, as there is a danger of electrical shock. . . . . . . . . . .
l ALWAYS contact your service representative for
maintenance or repair of internal parts. . . . . . . . . . .............
g
CAUTION
l
DO NOT pull the power cord when removing it from the
outlet. If the power cord is pulled, the wires may become
broken and there is a danger of fire or electrical shock.
(ALWAYS grasp the power plug when removing the
power cord from the outlet.) . . . . . . . . . . .............................
. ALWAYS remove the power plug from the outlet when
moving the copier. If the power cord is damaged, there
is a danger of fire or electrical shock. ..........................
. If the copier will not be used for a short period of time
(overnight, etc.), turn the main switch OFF (0).
If it will not be used for an extended period of time
(vacations, etc.), remove the power plug from the outlet
for safety purposes during the time the copier is not in
use. . . . . . .
.......................................................................
l
ALWAYS hold the designated parts only when lifting or
moving the
copier.
. . . . . . . . . . . . . . . . . . . . . . . . . . . . . . . . . . . . . . . . . . . . . . . . . . . . . . .
. For safety purposes, ALWAYS remove the power plug
from the outlet when performing cleaning operations. . .
l
If dust accumulates within the copier, there is a danger
of fire or other trouble. It is therefore recommended that
you consult with your service representative in regard
to cleaning of internal parts. This is particularly effective
if accomplished prior to seasons of high humidity.
Consult with your service representative in regard to
the cost of cleaning the internal parts of the copier. . . .
Other
precautions
DO NOT place heavy objects on the copier or cause
other damage to the copier.
DO NOT open the front cover, turn off the main switch,
or pull out the power plug during copying.
During copying, some ozone is released, but the amount
does not cause any ill effect to one’s health. If, however,
the copier is used over a long period of time in a poorly
ventilated room or when making an extremely large
number of copies, the smell may become unpleasant.
To maintain the appropriate environment for copy work,
it is suggested that the room be properly ventilated.
When lifting or moving the copier, contact your service
representative.
b Do not touch electrical parts, such as connectors or
printed circuit boards. They could be damaged by static
electricity.
B DO NOT attempt to perform any operations not
explained in this handbook.
m CAUTION : Use of controls or adjustments or
performance of procedures other than those specified
herein may result in hazardous radiation exposure.
I
Cautions when handling
consumables
a
CAUTION
l Avoid inhalation, ingestion, skin or eye contact. If
ingestion occurs, dilute stomach contents thoroughly
with water and seek medical treatment. If skin contact
occurs, wash with soap and water. If contact with eyes
occurs, flush thoroughly with water and seek medical
treatment
. . . . . . . . . . . . . . . . . . . . . . . . . . . . . . . . . . . . . . . . . . . . . . . . . . . . . . . . . . . . . . . . . . . . .
l
Prolonged inhalation of excessive dusts may cause lung
damage. Use of this product, as intended, does not result
in inhalation of excessive dusts.
. . . . . . . . . . . . . . . . . . . . . . . . . . . . . . . . .
m
Keep away from children. . .
.........................................
8
. Do not incinerate toner and toner containers. Dangerous
sparks may cause burn.
. . . . . . . . . . . . . . . . . . . . . . . . . . . . . . . . . . . . . . . . . . . . . .
Other precautions
l
Always read the safety instructions which are included
in the box or printed on the container when handling
consumables.
. Dispose of the toner or toner containers in accordance
with Federal, State and Local rules and regulations.
. Store consumables in a cool, dark location.
l
If the copier will not be used for an extended period of
time, remove the paper from the cassette, return it to its
original package and reseal it.
1-3
CHAPTER 2 NAMES OF PARTS

CHAPTER 2 NAMES OF PARTS
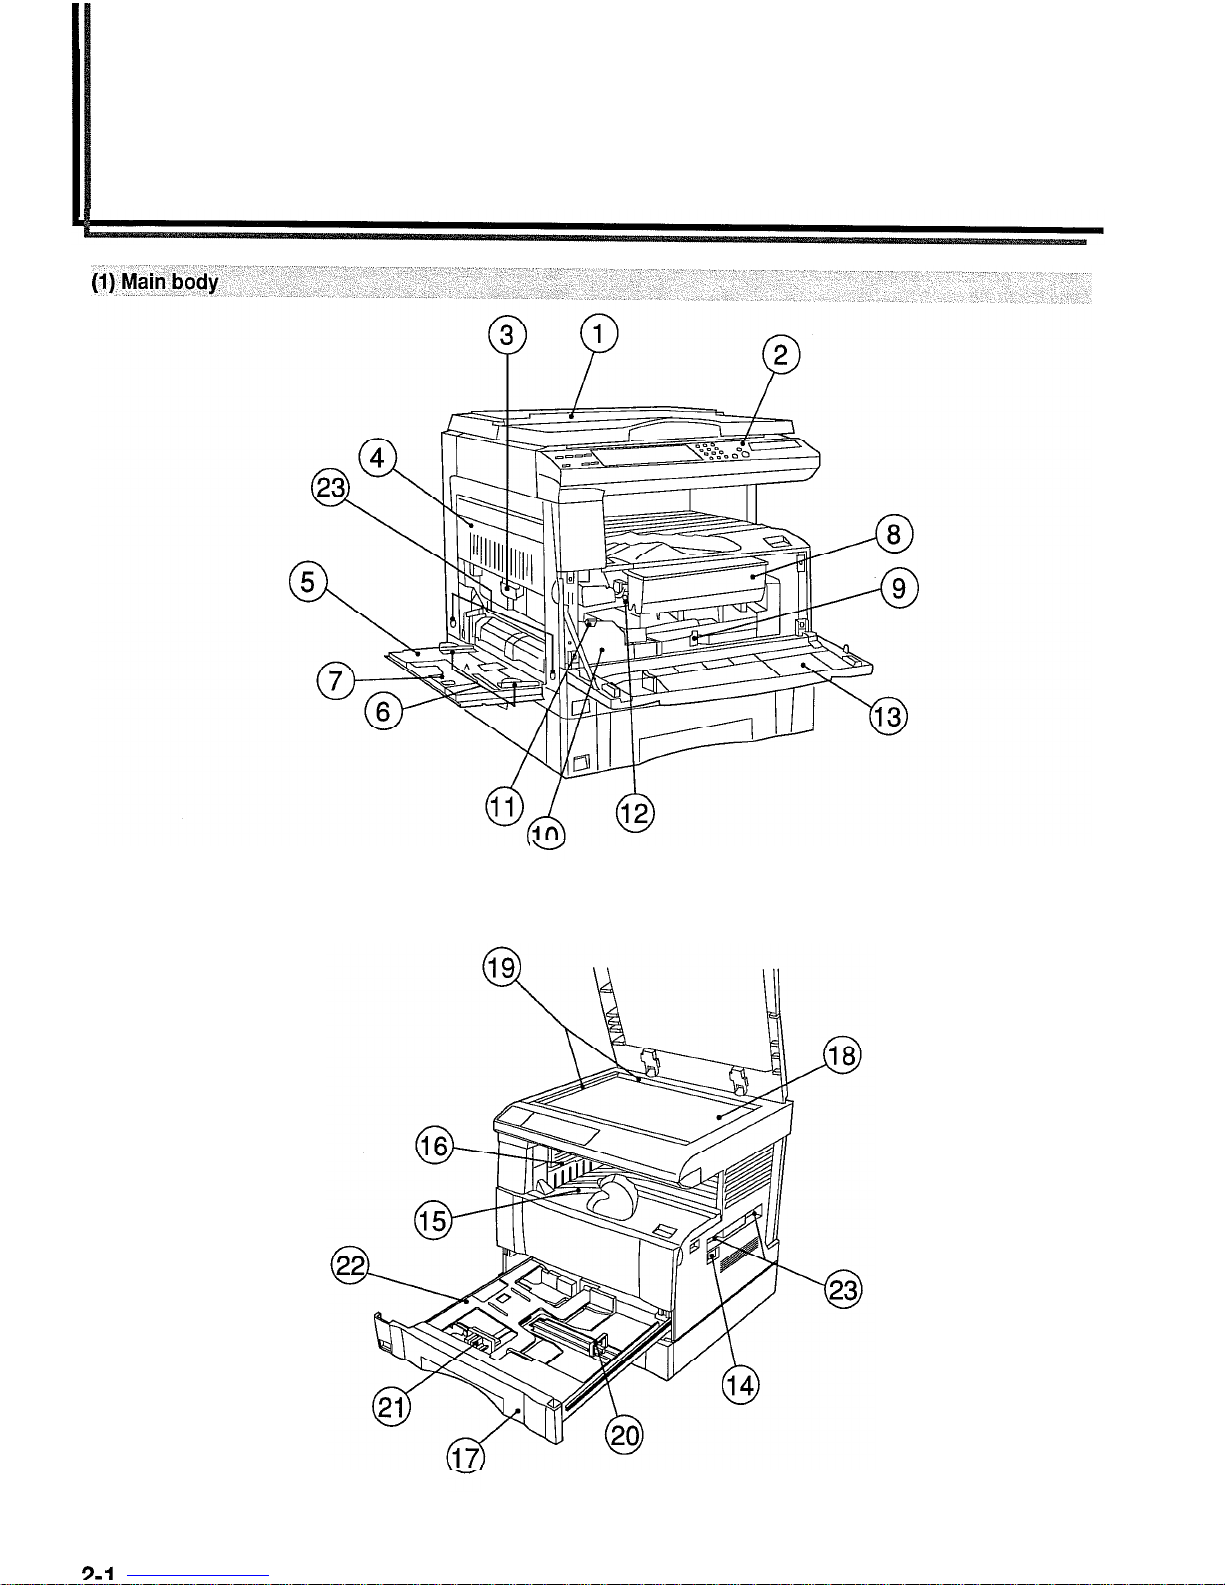
0
Original cover
(Open/close to set the original on the platen.)
@
Operation panel
(Contains the keys and indicators for operating the copier.)
@
Left cover handle
(Hold to open the left cover.)
@
Left cover
(Open when a paper misfeed occurs.)
@
Multi-Bypass
(Load paper here when copying onto small-size or special paper.)
@
Insert guides
(Be sure to set the paper width when loading paper on the
multi-
bypass.)
@
Support guide
@
Toner cartridge
@Toner cartridge release lever
(Operate to replace the toner cartridge.)
@
Waste toner tank
0
Waste toner tank release lever
(Operate to replace the waste toner tank.)
@
Cleaning shaft
(Pull and push back in after toner cartridge replacement or when
copy images become soiled with toner.)
@
Front cover
(Open to replace the toner cartridge or waste toner tank.)
@
Main switch
(Turn ON (I) before starting to make copies.)
@
Copy store section
(Copied paper is stored here.)
@
Ejection section
@
Drawer
(Holds up to 250 sheets of standard paper [standard paper as
specified by our company].)
@
Platen
(Set originals here for copying. Place originals face-down with the
edges aligned with the size scales on the left and rear sides of the
platen.)
@
Original size scales
(Be sure to align the original with these when setting the original
on the platen.)
@
Length adjustment plate
(Adjust to the length of the paper to be set in the drawer.)
@I
Width adjustment lever
(Hold the lever and adjust the width guide to the width of the paper
to be set in the drawer.)
@I
Drawer bottom plate
(Push down when loading paper.)
@
Handles for transport
(The right two handles are indented handles. The left two become
handles when pulled out.)
CHAPTER 2 NAMES OF PARTS
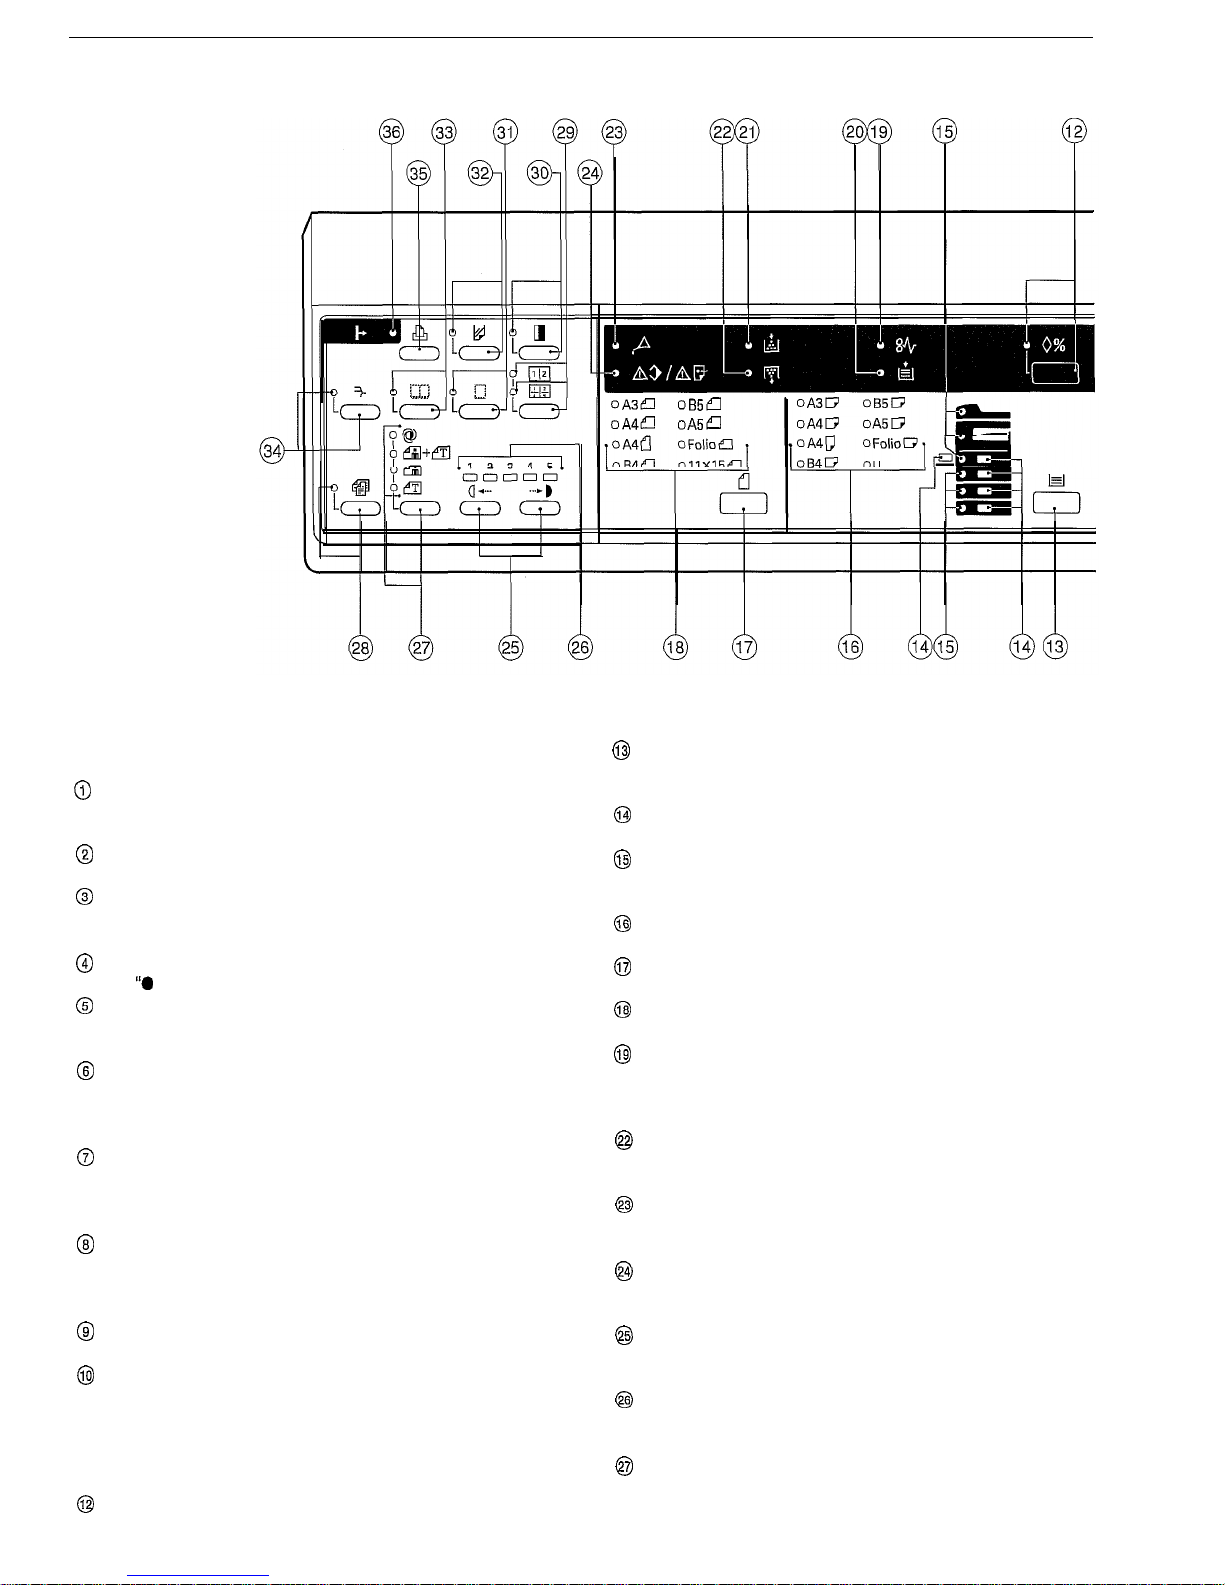
(2) Operation
panel
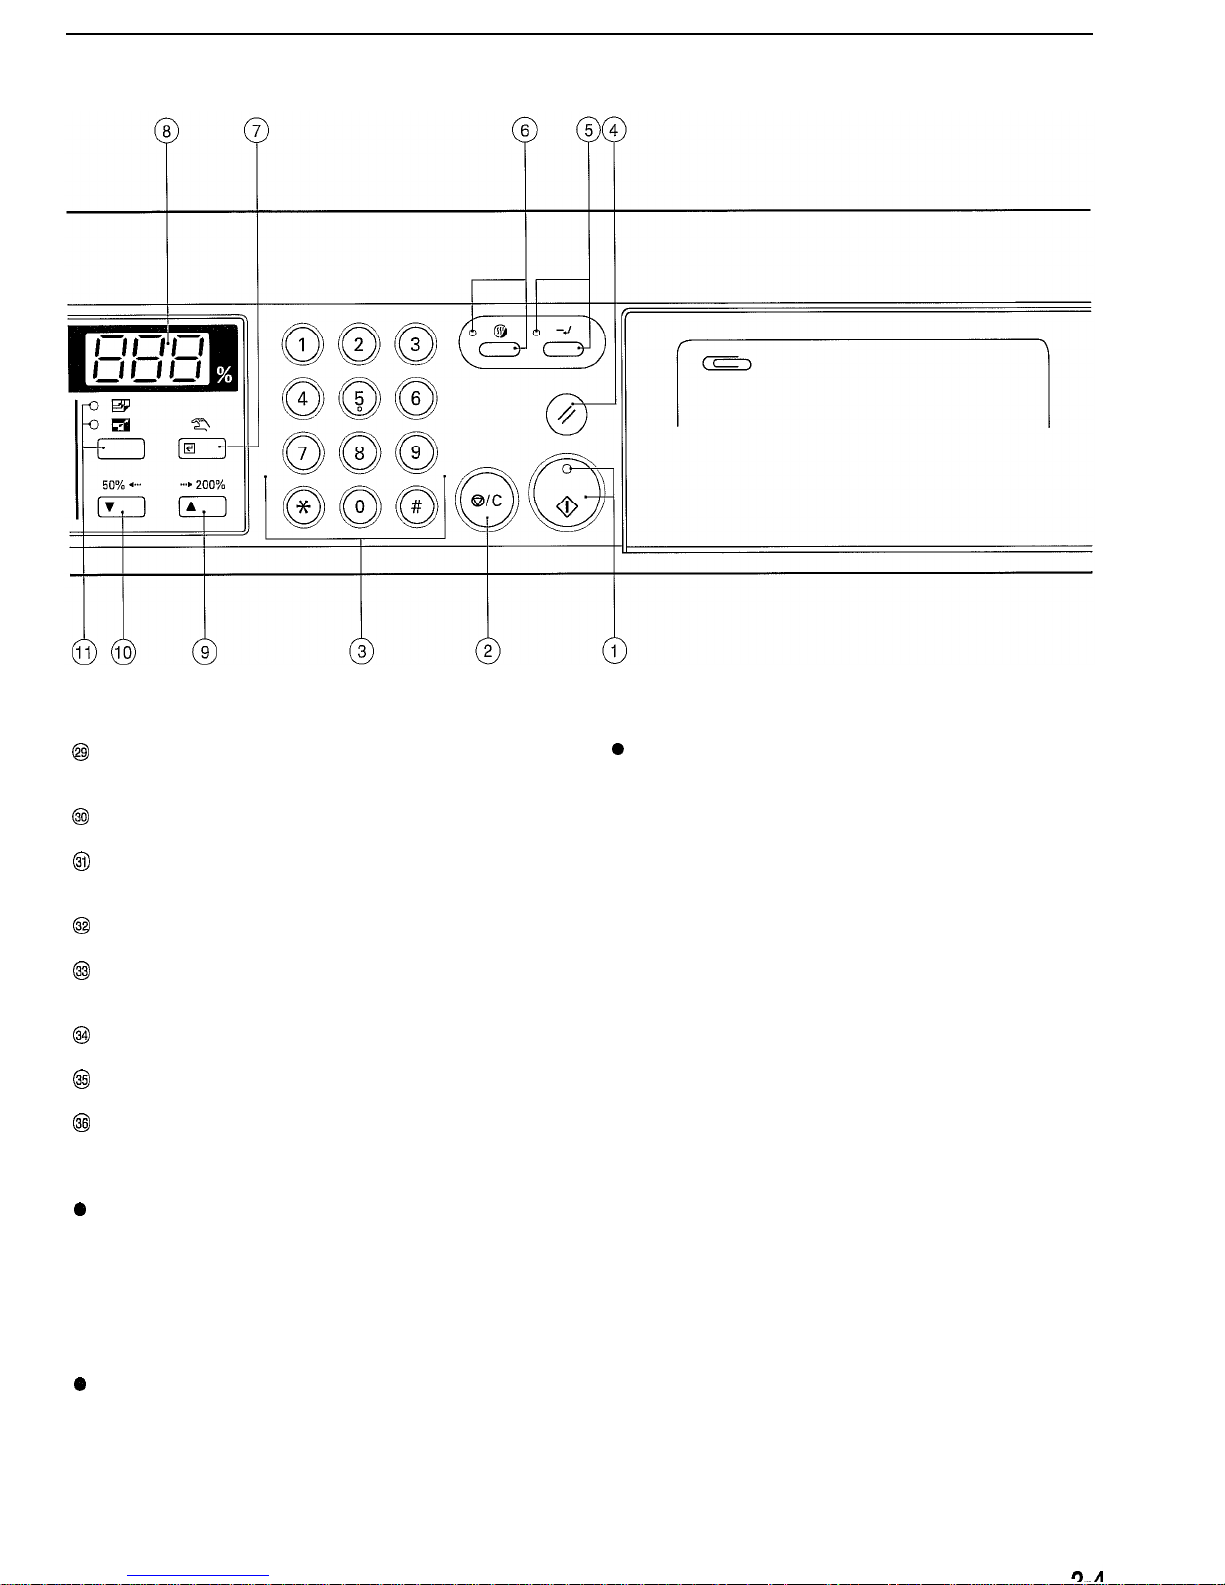
@
Start key (Indicator)
(Press to start copying. Copying is possible when the indicator is lit
green.)
@
Stop/Clear key
(Press to change the settings or number of copies to be made.)
@
Numeric keys
(Press to set the number of copies or enter the magnification
ratio.)
@
Reset key
(See “0 initial mode” on page 2-4.)
@
Interrupt key (Indicator)
(Press to interrupt copying. The indicator will light green when the
key is pressed. See page 4-5.)
@
Energy Saver (preheat) key (Indicator)
(Press to set the power saving mode when the copier is not used.
The indicator is lit green while the power saving mode is ON. See
page 4-6.)
@
Manual/Enter key
(Press to manually select the paper or magnification ratio overriding the auto paper selection mode and auto magnification
selection mode. Also used to confirm selected items.
@
Copy quantity/magnification display
(Displays the number of copies to be made and magnification ratio
for zoom copying. When displaying the magnification ratio, % will
light. Also displays the copy status.)
@
Zoom (+) key
(Press to increase magnification ratio in zoom copying.)
@
Zoom (-) key
(Press to decrease magnification ratio in zoom copying.)
@Auto mode selection
key/APS/AMS
indicators
(Press to select the auto paper selection mode or auto magnification selection mode. The indicators will light green in the respective modes.)
@
Recall %
key
(Press to make copies in the zoom copying mode. See page 4-3.)
OA3Ei
OB5e3
0A4Ei 0A5a
0A3C7
oA4D
on417
0B4W
0B5I3
0A5W
@J
Paper Select key
(Press to select a drawer or the multi-bypass. A drawer select
indicator and a paper size indicator will light green.)
@
Drawer select indicators
(The drawer [paper feed drawer] selected at present is lit green.)
@
Misfeed location indicators
(If a paper misfeed occurs, the indicator corresponding to the
paper misfeed location lights red.)
@
Paper size indicators
(Indicates the paper size of the selected drawer or multi-bypass.)
@
Original key
(Press to select the size of the original.)
@
Original size indicators
(Indicates the selected original size.)
@
Misfeed indicator
@Add Paper indicator
@Add Toner indicator
(Lights red when the level of toner becomes low. See page 3-5.)
f@ Toner Disposal indicator
(Indicates when the waste toner tank needs to be replaced. See
page 3-5.)
@
Maintenance indicator
(Lights red when the machine needs to be serviced. See page
8-2.)
@
Memory Overflow/Data Error indicator
(Lights red when the memory becomes full while scanning
originals.)
@
Copy exposure adjustment keys
(Press the left key to make the copy density lighter; press the right
key to make it darker.)
@
Copy exposure indicators
(In the manual exposure mode, indicates the selected copy
exposure level.)
@I Image mode selection key/Auto Exposure/Text & Photo/Photo/Text
indicators
(Press to select the image mode. See page 4-2.)
@Auto
Selection key (Indicator)
(Can be used when the optional ADF is installed. See page 7-2.)
3-R
CHAPTER 2 NAMES OF PARTS
@
Layout
key/2
in 1 indicator/4 in 1 indicator
(Press to copy multiple images on the same face of the copy. See
page 5-2.)
@
Margin key (Indicator)
(Press to create margins. See page 5-l.)
@J
Border Erase key (Indicator)
(Press to erase blemishes from the edges of copies. See page
5-2.)
@
Transparency key (Indicator)
0
Automatic drawer switching function
If two or more drawers contain paper of the same size in the same
orientation and the paper in one drawer runs out during copying,
this function switches paper feed from the empty drawer to a full
drawer without interrupting copying.
*The automatic drawer switching function can be disabled. (See
“Automatic drawer switching” ON PAGE 6-5.)
(Press to copy onto thick paper or transparencies. See page 3-3.)
@
Book Erase key (Indicator)
(Press to erase blemishes from the edges and middle of copies
made from books. See page 5-2.)
@
Sort key (Indicator)
(Press to sort copies into separate sets. See page 5-6.)
@
Printer key
(Press to use the optional printer function.)
@
Data On-line indicator
(Lights/flashes green while using the optional printer function or
receiving data from a computer.)
0
Initial mode (at the end of warm-up or when the Reset key is
pressed)
In the initial mode, paper of the same size as the original is
selected automatically (“auto paper selection mode”), the number
of copies is set to
“1”
and copy exposure mode is set to “Text
&
Photo mode”.
*The auto paper selection mode is not available on some models.
0
Auto clear function
About 90 seconds after copying stops, the copier will automatically
return to the same settings as those after warm up. (However, the
exposure mode will not change.) Copying can be performed at the
same settings (copy mode, number of copies and exposure mode)
if copying is started before the auto clear function operates.
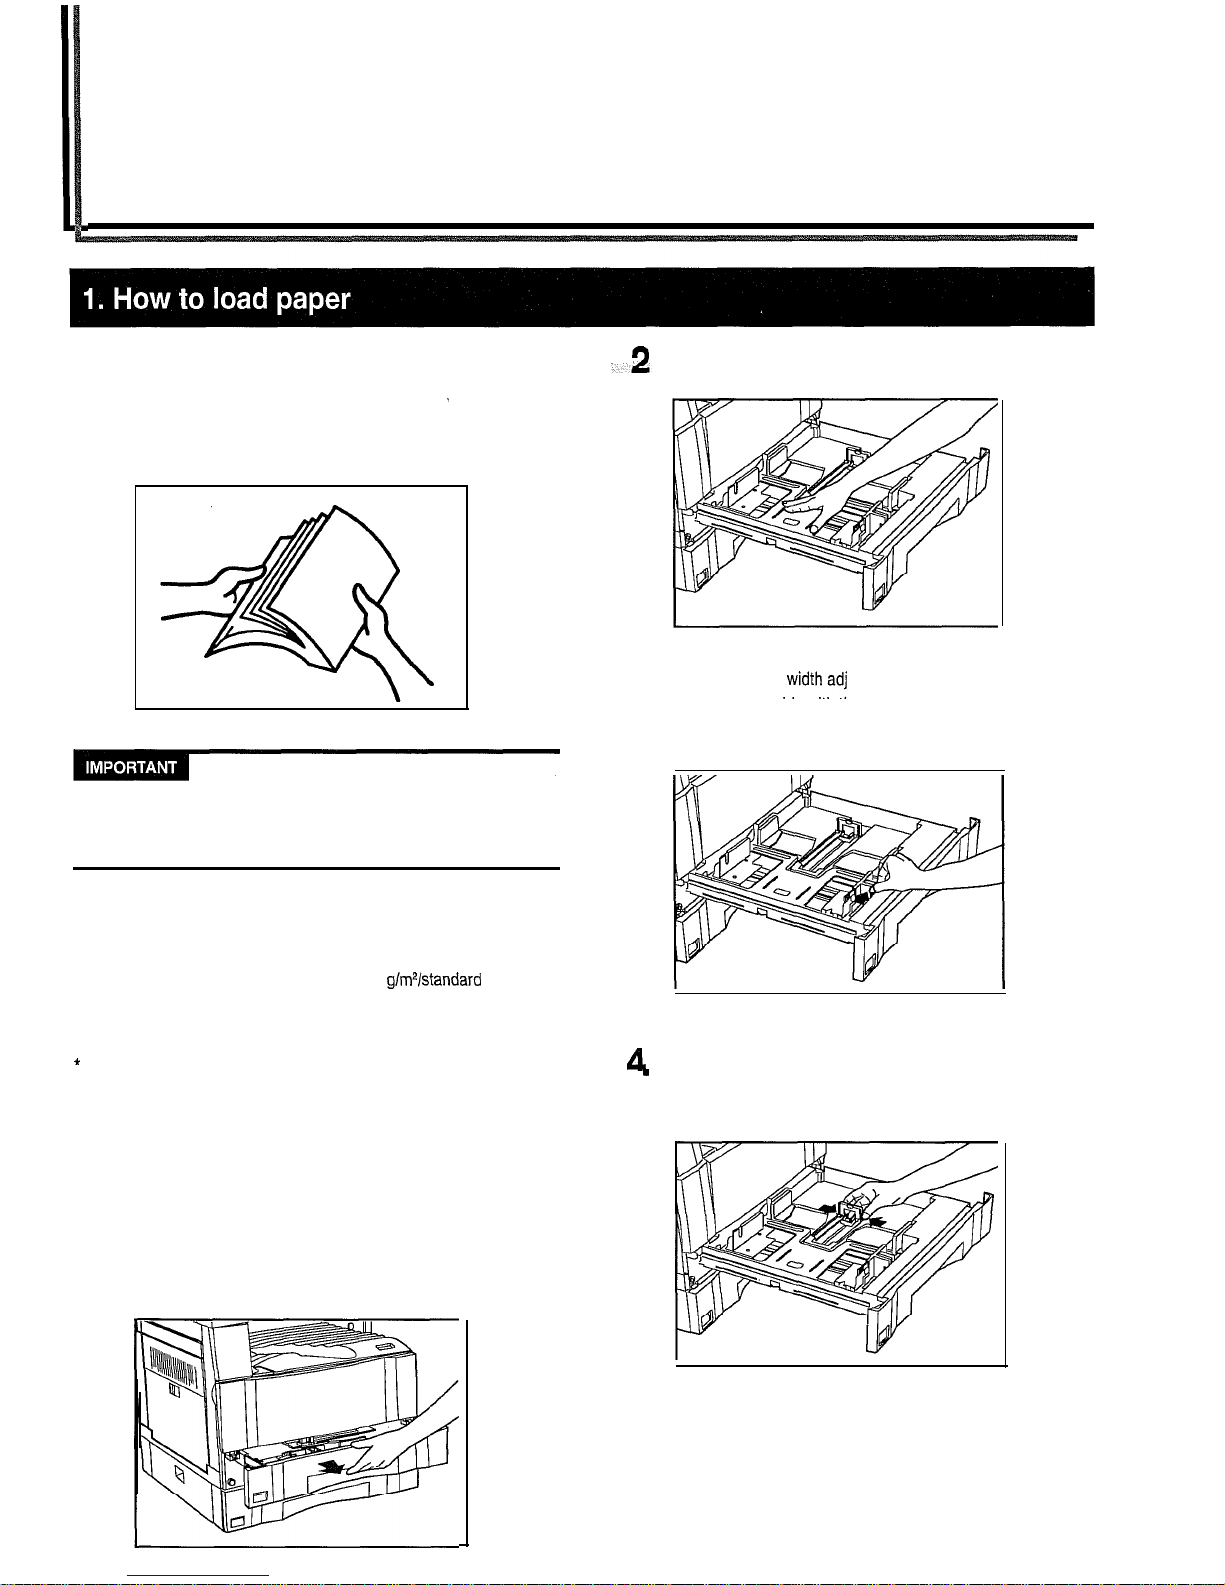
CHAPTER 3 PREPARATIONS BEFORE USE
Paper can be loaded into the drawer and the multi-bypass.
(1)
Precautions
for
loading
paper
.
After unpacking the paper, fan it several times and then load into the
tray.
I I
Loading paper into the standard drawer, optional drawer or
multibypass when some paper is still remaining in each of them may
cause paper misfeeds.
(2)
Loading
paper into the drawer
.
Up to 250 sheets of standard paper (75 or 80
g/mVstandard
paper as
specified by our company) or colored paper can be loaded into the
drawer.
(Inch specifications)
+
The drawer can be set to hold paper of any desired size from
11”
x
17” to 5
l/2”
x 8
1/2”.
(Metric specifications)
* The drawer can be set to hold paper of any desired size from A3 to
A5 (vertical).
1
Pull the drawer out toward you as far as it will go.
* If optional drawers are installed, do not pull more than one
drawer out at a time.
2
Press the drawer bottom
plate
down and fix it there.
3.
::
Hold the width adjustment lever and move it to align the
wrdth guide with the required paper width.
Paper sizes are marked inside the drawer.
A
Hold both sides of the length adjustment plate and move it to
.
align with the required paper length.
1
R-l
CHAPTER 3 PREPARATIONS BEFORE USE
l
There is a sticker (0 in the illustration) indicating paper capacity
attached to the inside of the drawer. Do not load paper above this
limit.
* When loading paper into the drawer, make sure that the copy side is
facing upward. (The copy side is the side facing upward when the
package is opened.)
* Check that the length adjustment plate and width guide make
secure contact with the paper. If there is a gap, adjust the position of
the length adjustment plate or width guide.
* If small-sized paper jams frequently under high temperature and
high humidity conditions, reduce the number of sheets to the level of
the black line indicated on the sticker
(0
in the illustration).
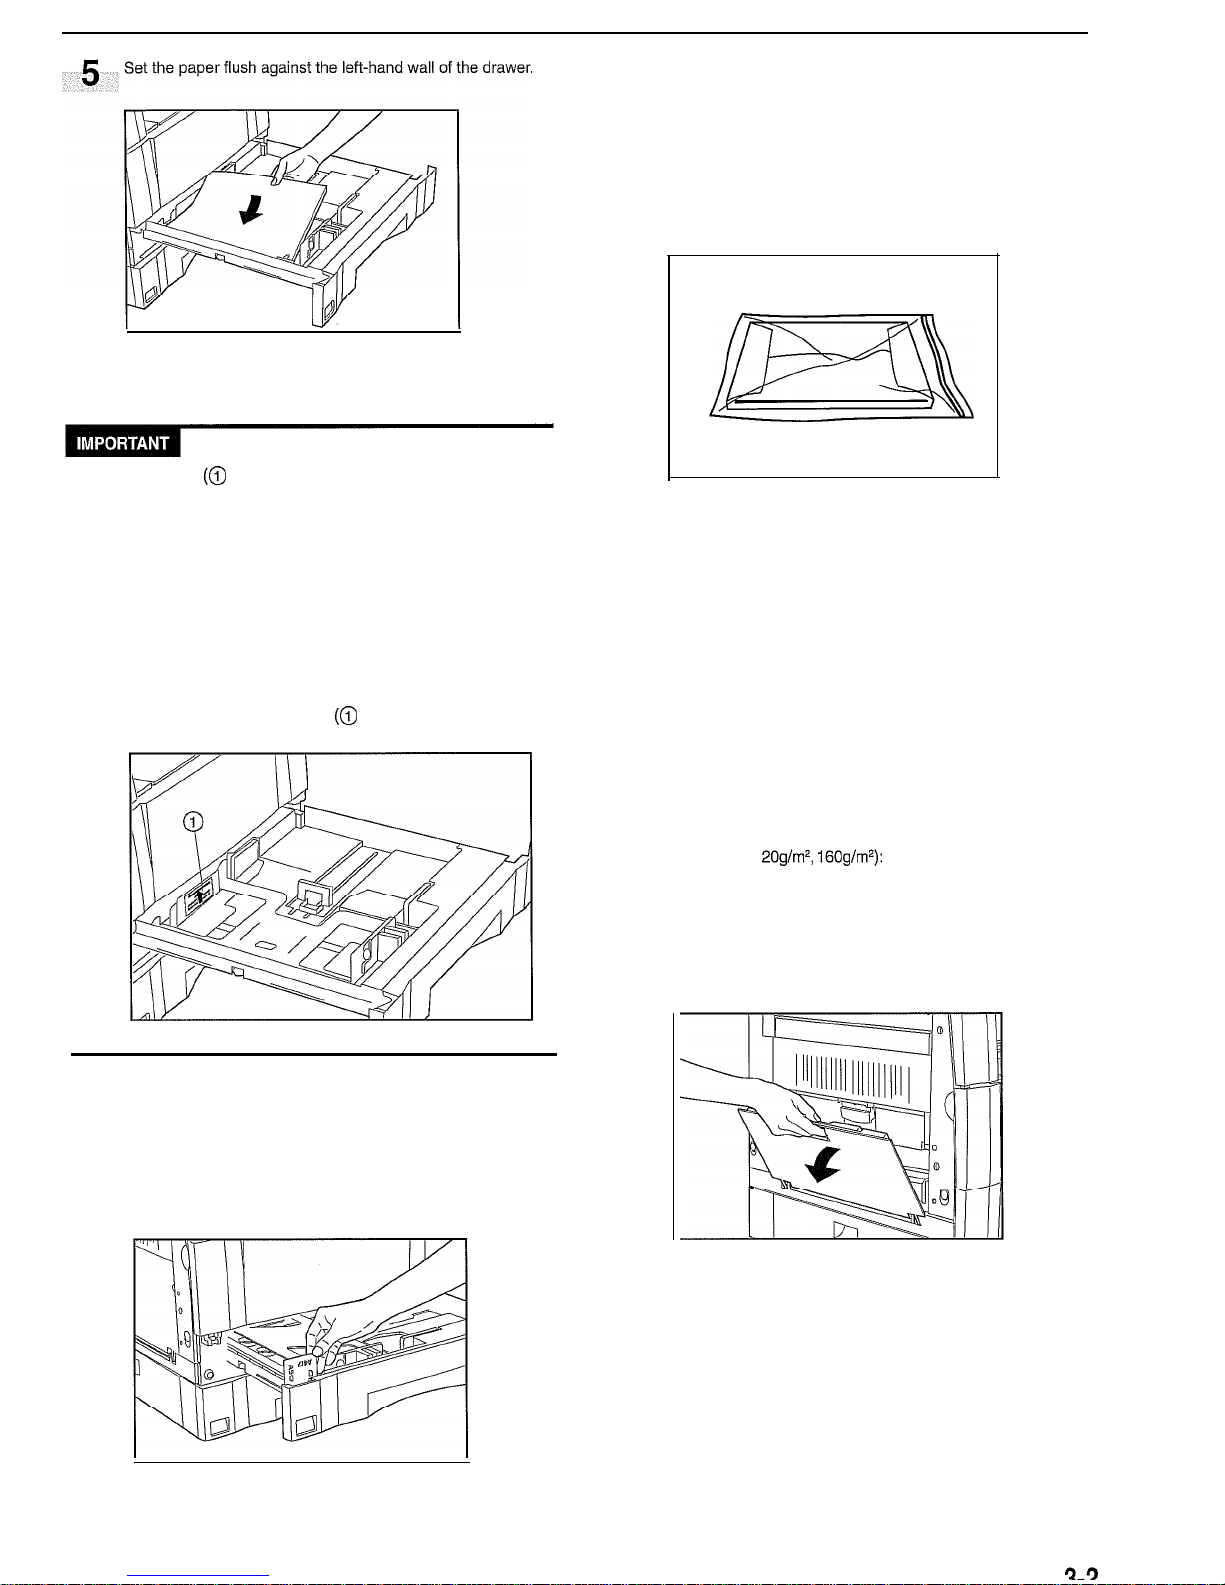
6
Set the supplied paper size sheet so that the size of the
paper loaded can be checked by looking at the front of the
drawer.
7
Gently push the drawer back in.
* If you force the drawer in, paper may come out from under
the claws and paper misfeed may result.
* Before leaving the copier in disuse for a prolonged period
of time, remove the paper from the drawer(s) and seal it in
its original packaging to protect from moisture. Also, when
storing paper in a high temperature and high humidity
environment, seal it in a moisture-proof bag.
(3) Loading paper into the multi-bypass
Special paper as well as standard paper can be loaded into the multi-
bypass. When copying onto special paper, be sure to use the multibypass.
*The number of sheets of standard paper, colored paper and
letterheads that can be loaded into the multi-bypass differ depending on the paper size.
11”
x 17” and 8
l/2”
x 14” (A3, B4 and Folio): 25 sheets
11”
x 8
1/2”
and 5
1/2”
x 8
1/2”
(A4, B5,
A5R, B6R and A6R):
50
sheets
*The types of special paper and the number of sheets that can be
loaded in the multi-bypass are:
*Transparencies: 1 sheet
. Standard paper (1
20g/mZ, 160g/m*): 1
sheet
1
Open the multi-bypass.
CHAPTER 3 PREPARATIONS BEFORE USE
When copying onto thick paper or transparencies, press the Transpar-
ency key to light the indicator.
l When using transparencies or thick paper, select “Transparencies”
or “Thick paper” in the ‘Transparency mode” (see page 6-6) of the
default settings.
2
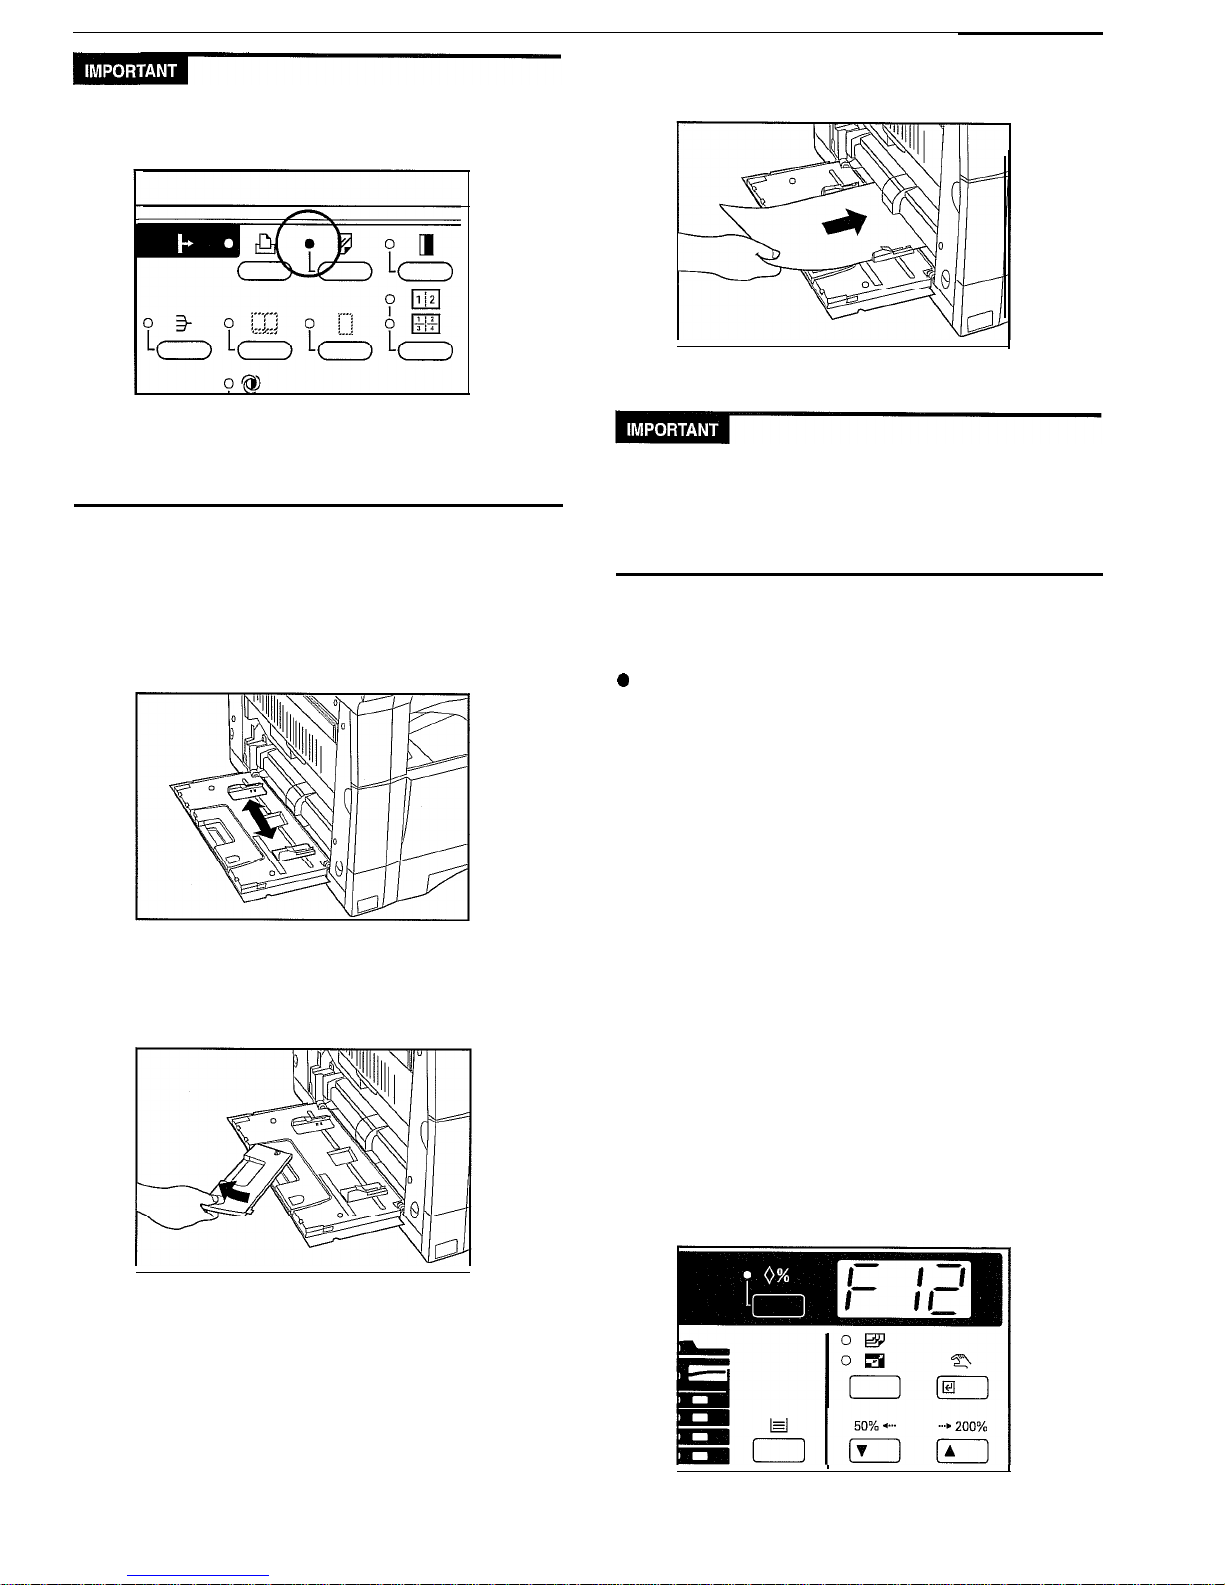
Adjust the insert guides to the size of the paper to be loaded.
* When loading paper that is longer than A4R, pull out the
support guide.
3
Insert the paper along the guides as far as it will go.
When loading paper into the multi-bypass, make sure that the copy
side is facing downward. (The copy side is the side facing upward
when the package is opened.)
If the leading edge of the paper is curled, straighten it out before
loading the paper in the multi-bypass.
0
Setting the paper size for the multi-bypass
If a paper size is set for the multi-bypass, the multi-bypass may be
automatically selected in the auto paper selection mode depending on
the original size.
* For how to set non-standard size paper width for the multi-bypass
for the paper selection, see default code F13 in Default Settings in
COPIER MANAGEMENT on page 6-6.
Press and hold the Paper Select key for 3 seconds. The
1
Indicator for the size of the paper currently loaded in the
multi-bypass lights.
“F12”
appears on the copy quantity
display and, 2 seconds later, a number appears.
The number displayed indicates the paper size as follows:
I: A3
2: A4 (vertical)
3: A4
4:
B4
5: B5 (vertical)
6:
B5
7: Folio
8: U (no size setting)
xxx: Setting of non-standard size paper width for
multi-
bypass
3-3
CHAPTER 3 PREPARATIONS BEFORE USE
r) ._
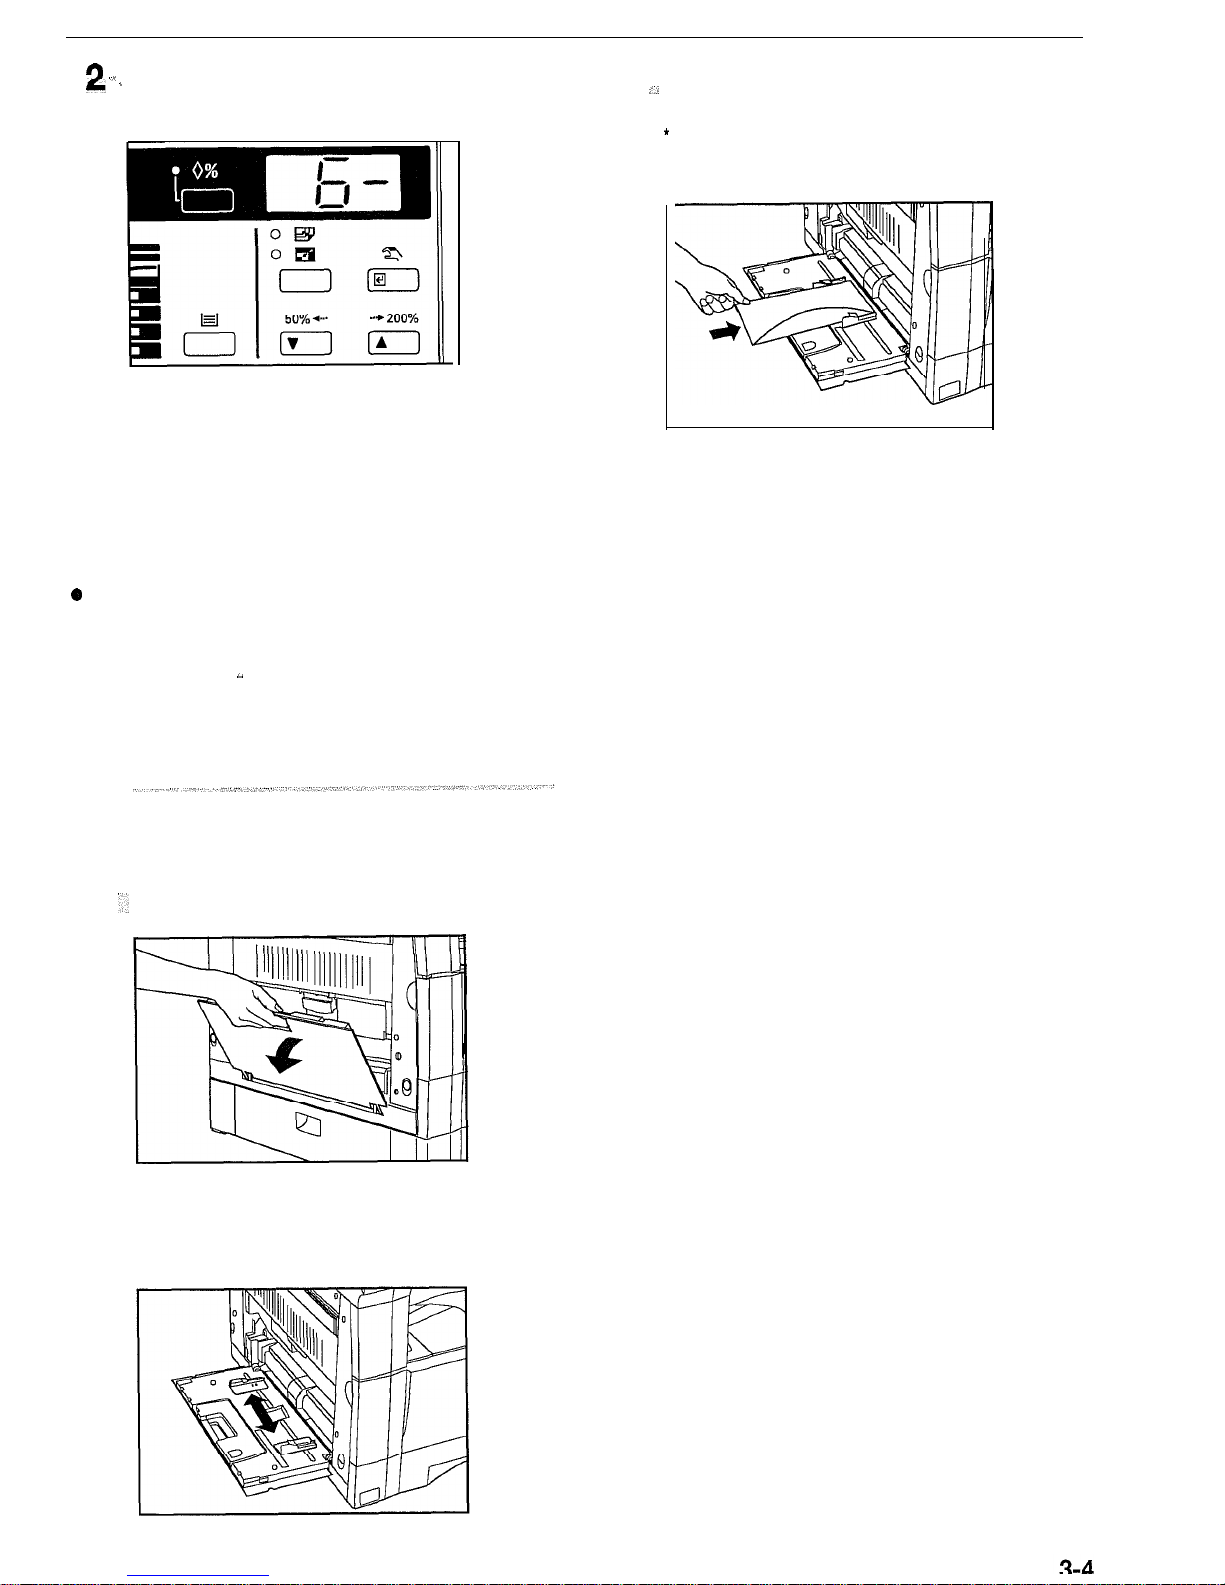
Press the Zoom (+) or Zoom (-) key and change the number
r ‘
to select the paper size.
3
Close the flap of the envelope and set it with the flap toward
‘*
the machine front. Then insert the envelope into the slot
along the insert guides as far as it will go.
* Incorrectly loading envelopes can result in printing in the
wrong orientation or on the wrong side.
3
Press the enter key. The paper size indicator for the selected
paper size will light. Normal copying is enabled.
0
Setting envelopes
When using the optional printer function, envelopes can be set in the
multi-bypass.
,.
NOTE
The types of envelopes that can be used are COM-10, Monarch, DL
and
C5.
Up to 6 envelopes can be loaded in the multi-bypass at a
time.
1 ‘_
Open the multi-bypass.
2
Align the insert guides with the envelope size.
CHAPTER 3 PREPARATIONS BEFORE USE
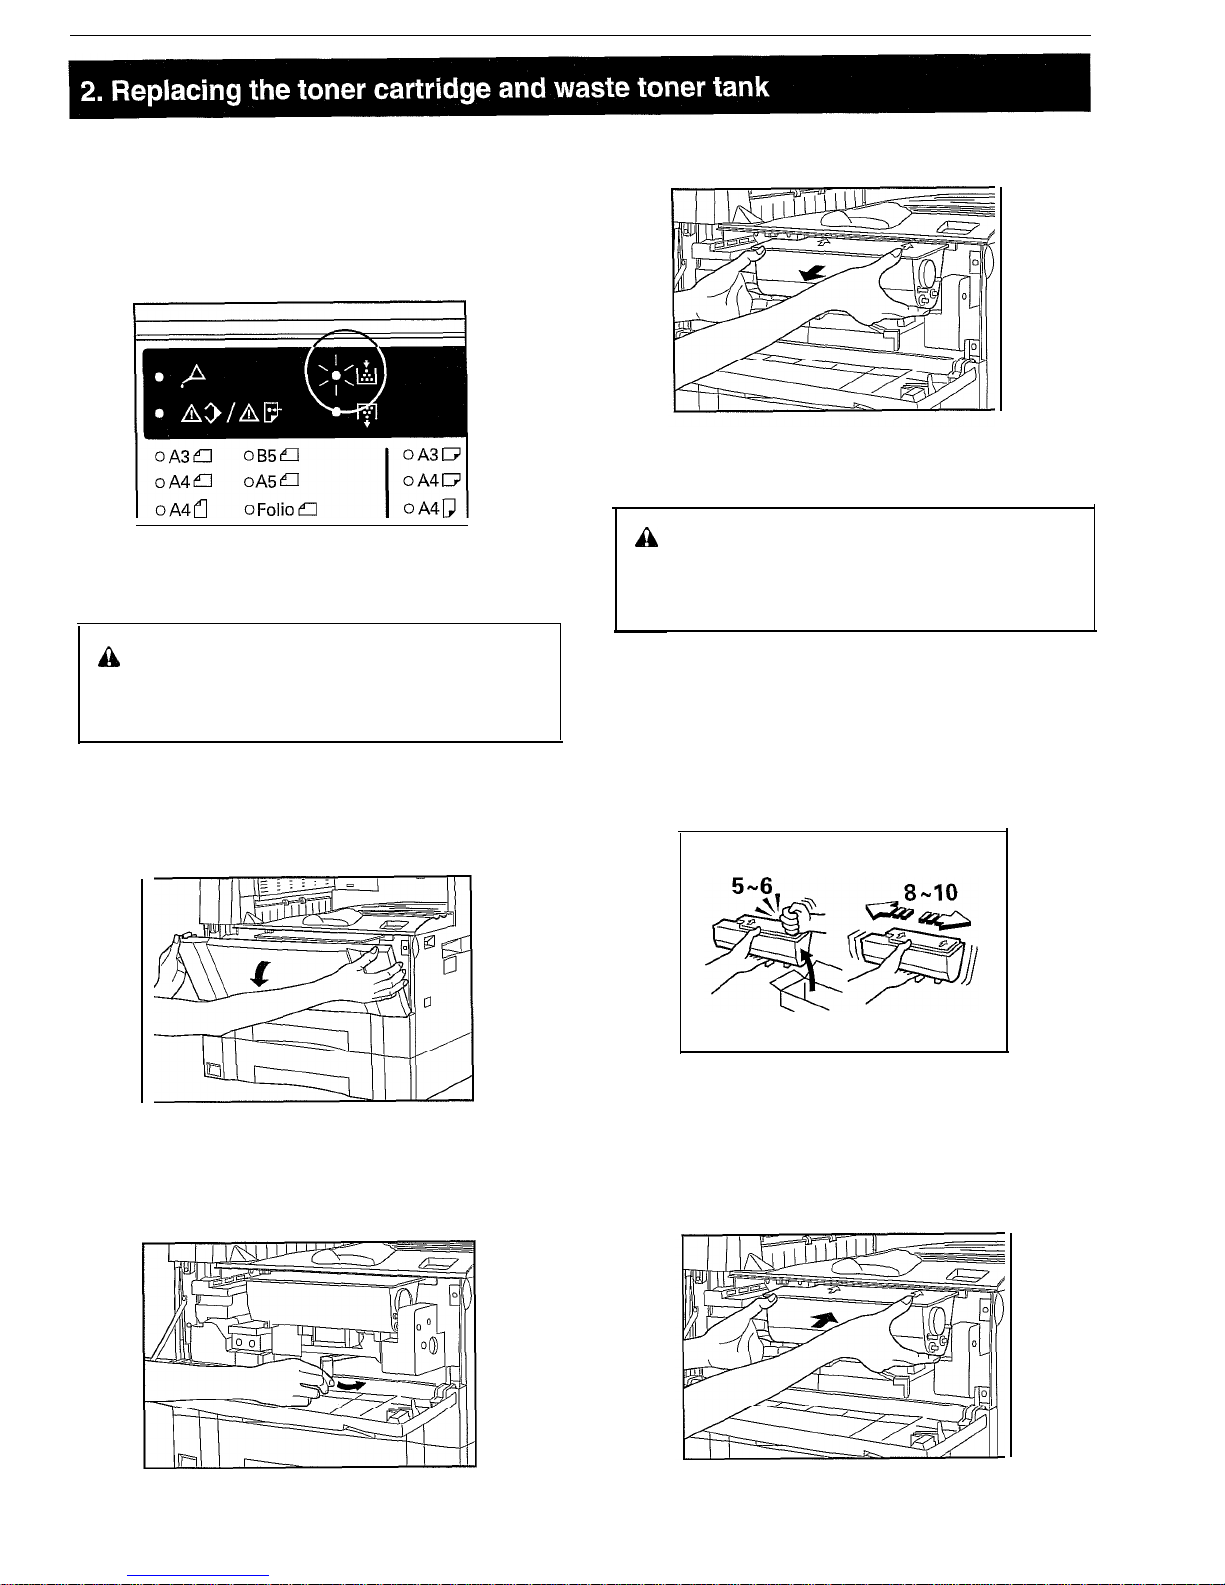
When the Add Toner indicator lights, replenish toner. Although several
copies can be made after the indicator lights, it is recommended to
replace the toner cartridge immediately. Replace the waste toner tank
after replacing the toner cartridge. If you do not replace the waste
toner tank, the Toner Disposal indicator will light.
* Replenish toner only when the Add Toner indicator is lit.
3
Pull the old toner cartridge out toward you.
ih
CAUTION
Do not incinerate toner and toner containers. Dangerous
sparks may cause burns.
1
Open the front cover.
2
Turn the toner cartridge release lever to the right as far as it
will go. The old cartridge will be unlocked.
a
WARNING
High voltage is present in the charger section. Take
sufficient care when working in this area, as there is a
danger of electrical shock.
4
Tap the new toner cartridge on the top 5 or 6 times and
shake it from side to side 8 to IO times.
5
Fit the new toner cartridge into the copier.
*Align
the arrow on the top of the toner cartridge with the
cutout in the copier and then insert the cartridge into the
copier.
3-5
CHAPTER 3 PREPARATIONS BEFORE USE
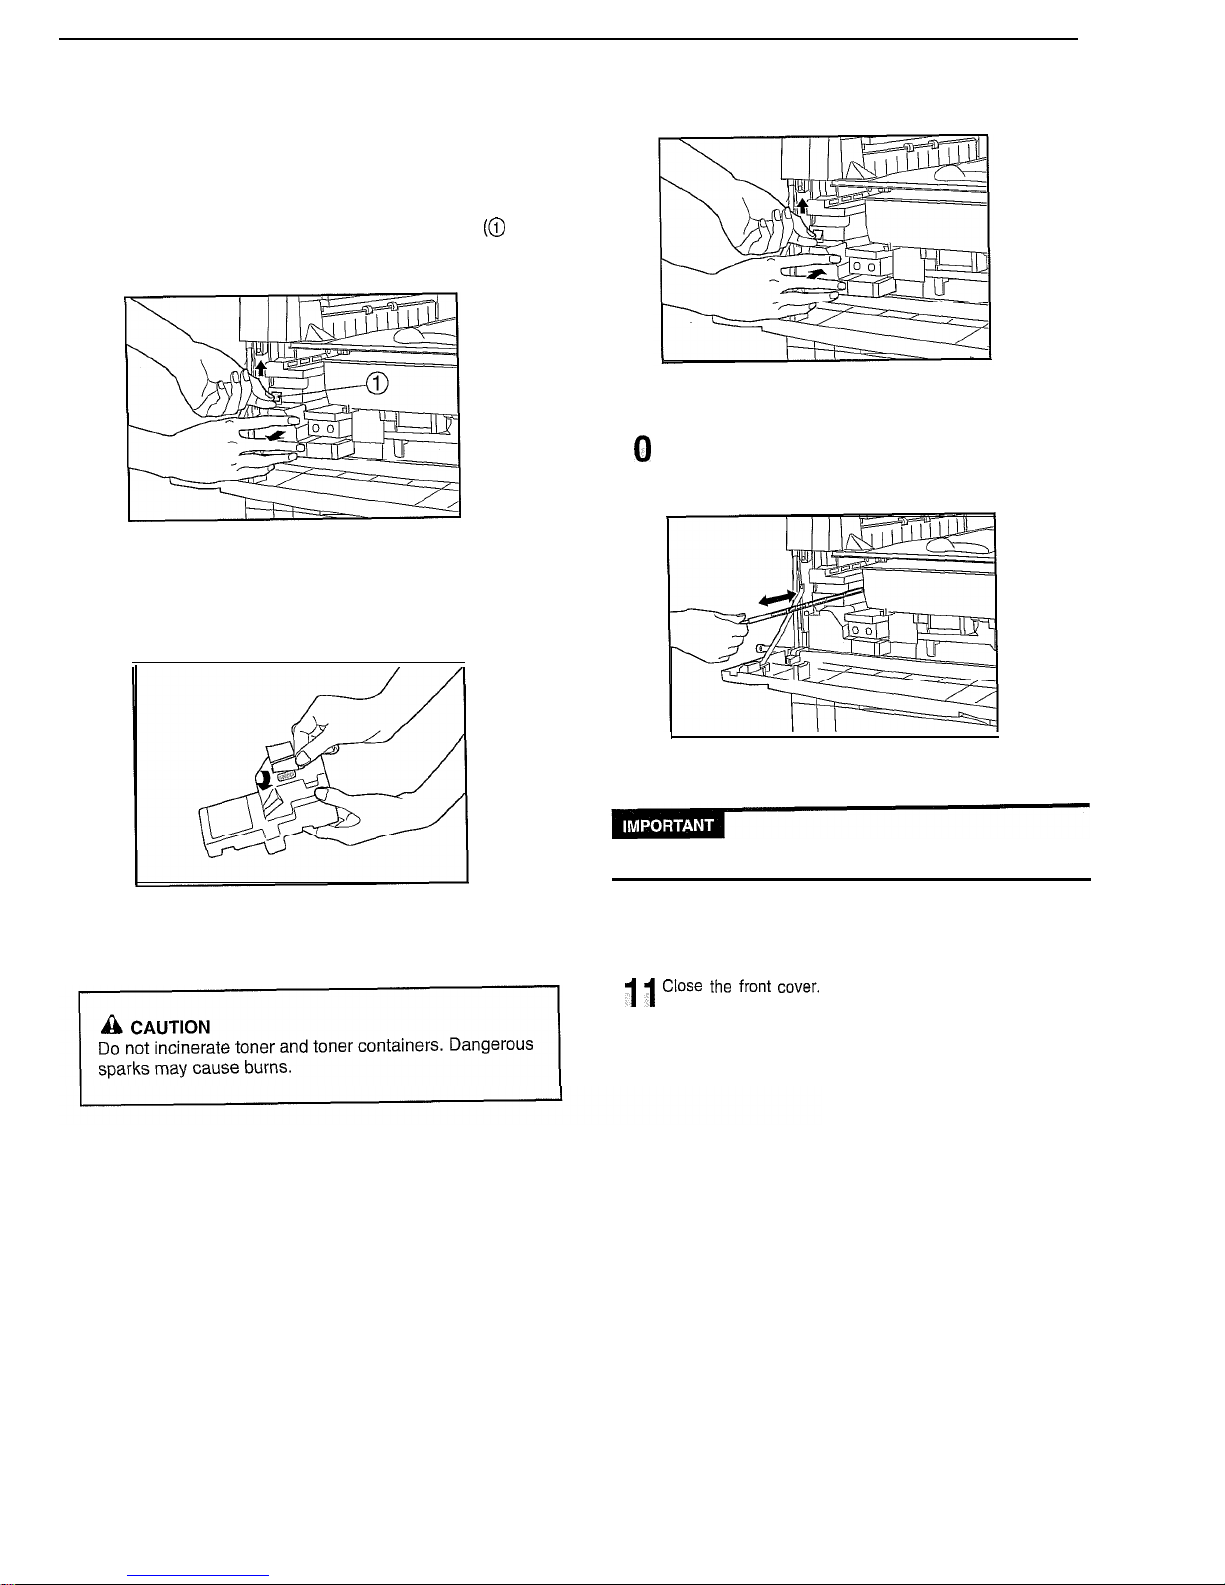
Turn the toner cartridge release lever to the left as far as it
6 will go.
9
While holding the waste toner tank release lever up, fit the
new waste toner tank into the copier.
The new toner cartridge is now be locked.
7
While holding up the waste toner tank release lever (0 in
the illustration), remove the waste toner tank.
8
Close the opening of the waste toner tank with its seal.
’
*
Gently pull the
cleaning shaft as far as it will go and then
push it back in.
Do not pull the cleaning shaft with force or pull it out completely.
1 ’ Close
the
front
cover.
R-R
 Loading...