

Kyocera Mita FS-1116MFP Operation Manual

Facsimile Operation Guide
FS-1116MFP
Please read this Operation Guide before using this machine. Keep it close to the machine for easy reference.


OPERATION GUIDE i
Contents
General Notice
Legal and Safety
Legal Notice . . . . . . . . . . . . . . . . . . . . . . . . . . . . . . . . . . . . . . . . . . . . . . . . . . . . . . . . . . . . . . . . . vii
Safety Conventions in This Guide . . . . . . . . . . . . . . . . . . . . . . . . . . . . . . . . . . . . . . . . . . . . . . . . vii
Important! Please Read First. . . . . . . . . . . . . . . . . . . . . . . . . . . . . . . . . . . . . . . . . . . . . . . . . . . . .ix
Installation Precautions . . . . . . . . . . . . . . . . . . . . . . . . . . . . . . . . . . . . . . . . . . . . . . . . . . . . . . . . .ix
Precautions for Use . . . . . . . . . . . . . . . . . . . . . . . . . . . . . . . . . . . . . . . . . . . . . . . . . . . . . . . . . . . .ix
Introduction
Overview of Operation Guide . . . . . . . . . . . . . . . . . . . . . . . . . . . . . . . . . . . . . . . . . . . . . . . . . . . . . x
Conventions . . . . . . . . . . . . . . . . . . . . . . . . . . . . . . . . . . . . . . . . . . . . . . . . . . . . . . . . . . . . . . . . . . xi
Accessing Menu Items . . . . . . . . . . . . . . . . . . . . . . . . . . . . . . . . . . . . . . . . . . . . . . . . . . . . . . . . . xii
1 Machine Parts
Main Body . . . . . . . . . . . . . . . . . . . . . . . . . . . . . . . . . . . . . . . . . . . . . . . . . . . . . . . . . . . . . . . . . . 1-1
Operation Panel . . . . . . . . . . . . . . . . . . . . . . . . . . . . . . . . . . . . . . . . . . . . . . . . . . . . . . . . . . . . . 1-2
Message Display. . . . . . . . . . . . . . . . . . . . . . . . . . . . . . . . . . . . . . . . . . . . . . . . . . . . . . . . . . . . . 1-2
2 Preparing to FAX
Setting the Current Date and Time (Date & Time Setting) . . . . . . . . . . . . . . . . . . . . . . . . . . . . . 2-1
Entering FAX Information (Local Information) . . . . . . . . . . . . . . . . . . . . . . . . . . . . . . . . . . . . . . . 2-2
Selecting the Line Type. . . . . . . . . . . . . . . . . . . . . . . . . . . . . . . . . . . . . . . . . . . . . . . . . . . . . . . . 2-3
Configuring TTI Settings . . . . . . . . . . . . . . . . . . . . . . . . . . . . . . . . . . . . . . . . . . . . . . . . . . . . . . . 2-4
3 Basic Operation
Sending Documents . . . . . . . . . . . . . . . . . . . . . . . . . . . . . . . . . . . . . . . . . . . . . . . . . . . . . . . . . . 3-1
Stopping Transmission . . . . . . . . . . . . . . . . . . . . . . . . . . . . . . . . . . . . . . . . . . . . . . . . . . . . . . . . 3-3
Receiving Documents (Automatic FAX Reception). . . . . . . . . . . . . . . . . . . . . . . . . . . . . . . . . . . 3-4
Using Phone Book to Select Destination . . . . . . . . . . . . . . . . . . . . . . . . . . . . . . . . . . . . . . . . . . 3-5
Editing Phone Book. . . . . . . . . . . . . . . . . . . . . . . . . . . . . . . . . . . . . . . . . . . . . . . . . . . . . . . . . . . 3-8
Redial . . . . . . . . . . . . . . . . . . . . . . . . . . . . . . . . . . . . . . . . . . . . . . . . . . . . . . . . . . . . . . . . . . . . 3-12
4 Basic Functions
Timer-based Transmission . . . . . . . . . . . . . . . . . . . . . . . . . . . . . . . . . . . . . . . . . . . . . . . . . . . . . 4-1
Broadcast Transmission . . . . . . . . . . . . . . . . . . . . . . . . . . . . . . . . . . . . . . . . . . . . . . . . . . . . . . . 4-2
Manual FAX Transmission . . . . . . . . . . . . . . . . . . . . . . . . . . . . . . . . . . . . . . . . . . . . . . . . . . . . . 4-3
Manual FAX Reception . . . . . . . . . . . . . . . . . . . . . . . . . . . . . . . . . . . . . . . . . . . . . . . . . . . . . . . . 4-4
Auto FAX/Tel Switching . . . . . . . . . . . . . . . . . . . . . . . . . . . . . . . . . . . . . . . . . . . . . . . . . . . . . . . . 4-5
DRD Reception (Inch Model Only) . . . . . . . . . . . . . . . . . . . . . . . . . . . . . . . . . . . . . . . . . . . . . . . 4-6
Polling Reception . . . . . . . . . . . . . . . . . . . . . . . . . . . . . . . . . . . . . . . . . . . . . . . . . . . . . . . . . . . . 4-7
Memory Forwarding . . . . . . . . . . . . . . . . . . . . . . . . . . . . . . . . . . . . . . . . . . . . . . . . . . . . . . . . . . 4-8
Fax Reject Setting. . . . . . . . . . . . . . . . . . . . . . . . . . . . . . . . . . . . . . . . . . . . . . . . . . . . . . . . . . . . 4-9
Managing Jobs in Memory . . . . . . . . . . . . . . . . . . . . . . . . . . . . . . . . . . . . . . . . . . . . . . . . . . . . 4-11
5 FAX System Settings
Reception Mode Settings . . . . . . . . . . . . . . . . . . . . . . . . . . . . . . . . . . . . . . . . . . . . . . . . . . . . . . 5-1
Number of Ring Setting. . . . . . . . . . . . . . . . . . . . . . . . . . . . . . . . . . . . . . . . . . . . . . . . . . . . . . . . 5-2
Redial Settings . . . . . . . . . . . . . . . . . . . . . . . . . . . . . . . . . . . . . . . . . . . . . . . . . . . . . . . . . . . . . . 5-2
Default Settings (image quality and brightness) . . . . . . . . . . . . . . . . . . . . . . . . . . . . . . . . . . . . . 5-3

ii OPERATION GUIDE
Speaker Volume Setting . . . . . . . . . . . . . . . . . . . . . . . . . . . . . . . . . . . . . . . . . . . . . . . . . . . . . . . 5-3
Reception Record . . . . . . . . . . . . . . . . . . . . . . . . . . . . . . . . . . . . . . . . . . . . . . . . . . . . . . . . . . . . 5-4
FAX Tx Report Settings. . . . . . . . . . . . . . . . . . . . . . . . . . . . . . . . . . . . . . . . . . . . . . . . . . . . . . . . 5-4
Printing Activity Report . . . . . . . . . . . . . . . . . . . . . . . . . . . . . . . . . . . . . . . . . . . . . . . . . . . . . . . . 5-5
PBX Setting. . . . . . . . . . . . . . . . . . . . . . . . . . . . . . . . . . . . . . . . . . . . . . . . . . . . . . . . . . . . . . . . . 5-6
Facsimile Maintenance Settings . . . . . . . . . . . . . . . . . . . . . . . . . . . . . . . . . . . . . . . . . . . . . . . . . 5-7
6 Editing Phone Book with Computer (Using QLINK)
Editing Phone Book. . . . . . . . . . . . . . . . . . . . . . . . . . . . . . . . . . . . . . . . . . . . . . . . . . . . . . . . . . . 6-1
Viewing/Saving Phone Book . . . . . . . . . . . . . . . . . . . . . . . . . . . . . . . . . . . . . . . . . . . . . . . . . . . . 6-2
One-touch Dial Dialog box . . . . . . . . . . . . . . . . . . . . . . . . . . . . . . . . . . . . . . . . . . . . . . . . . . . . . 6-3
Speed Dial Dialog box. . . . . . . . . . . . . . . . . . . . . . . . . . . . . . . . . . . . . . . . . . . . . . . . . . . . . . . . . 6-4
Group Dial Dialog box . . . . . . . . . . . . . . . . . . . . . . . . . . . . . . . . . . . . . . . . . . . . . . . . . . . . . . . . . 6-5
7 Trouble Shooting
CAUTIONS before Turning Power OFF . . . . . . . . . . . . . . . . . . . . . . . . . . . . . . . . . . . . . . . . . . . 7-1
Troubleshooting Table . . . . . . . . . . . . . . . . . . . . . . . . . . . . . . . . . . . . . . . . . . . . . . . . . . . . . . . . . 7-2
Warning Messages . . . . . . . . . . . . . . . . . . . . . . . . . . . . . . . . . . . . . . . . . . . . . . . . . . . . . . . . . . . 7-3
Error Code Table . . . . . . . . . . . . . . . . . . . . . . . . . . . . . . . . . . . . . . . . . . . . . . . . . . . . . . . . . . . . . 7-4
8 Reference Information
Specifications . . . . . . . . . . . . . . . . . . . . . . . . . . . . . . . . . . . . . . . . . . . . . . . . . . . . . . . . . . . . . . . 8-1
Character List . . . . . . . . . . . . . . . . . . . . . . . . . . . . . . . . . . . . . . . . . . . . . . . . . . . . . . . . . . . . . . . 8-2
Menu Flow. . . . . . . . . . . . . . . . . . . . . . . . . . . . . . . . . . . . . . . . . . . . . . . . . . . . . . . . . . . . . . . . . . 8-3
Dual Access Function List. . . . . . . . . . . . . . . . . . . . . . . . . . . . . . . . . . . . . . . . . . . . . . . . . . . . . . 8-4
INDEX

OPERATION GUIDE iii
General Notice
Trademark Information
• Microsoft, Windows, and Internet Explorer are registered trademarks of
Microsoft Corporation in the U.S. and other countries.
• Windows ME and Windows XP are trademarks of Microsoft Corporation.
• Ethernet is a registered trademark of Xerox Corporation.
• IBM and IBM PC-AT are trademarks of International Business Machines
Corporation.
• Adobe and Acrobat are registered trademarks of Adobe Systems Incorporated.
All other company and product names in this Operation Guide are trademarks or
registered trademarks of their respective companies. The designations™ and ® are
omitted in this guide.

General Notice
iv OPERATION GUIDE
FCC PART 68 REQUIREMENTS
1. This equipment complies with Part 68 of the FCC rules and the requirements
adopted by the ACTA. On the rear side of the equipment to install FAX Assembly
Board is a label that contains, among other information, a product identifier in the
format US:AAAEQ##TXXXX. If requested, this number must be provided to the
telephone company.
2. This equipment connects to the network via USOC RJ11C.
3. A plug and jack used to connect this equipment to the premises wiring and
telephone network must comply with the applicable FCC Part 68 rules and
requirements adopted by the ACTA. A compliant telephone cord and modular plug
is provided with this product. It is designed to be connected to a compatible modular
jack that is also compliant. See installation instructions for details.
4. The REN is used to determine the number of devices that may be connected to a
telephone line. Excessive RENs on a telephone line may result in the devices not
ringing in response to an incoming call. In most but not all areas, the sum of RENs
should not exceed five (5.0). To be certain of the number of devices that may be
connected to a line, as determined by the total RENs, contact the local telephone
company. For products approved after July 23, 2001, the REN for this product is part
of the product identifier that has the format US:AAAEQ##TXXXX. The digits
represented by ## are the REN without a decimal point (e.g., 03 is a REN of 0.3). For
earlier products, the REN is separately shown on the label.
5. If this equipment causes harm to the telephone network, the telephone company
will notify you in advance that temporary discontinuance of service may be required.
But if advance notice isn't practical, the telephone company will notify the customer
as soon as possible. Also, you will be advised of your right to file a complaint with the
FCC if you believe it is necessary.
6. The telephone company may make changes in its facilities, equipment, operations
or procedures that could affect the operation of the equipment. If this happens the
telephone company will provide advance notice in order for you to make necessary
modifications to maintain uninterrupted service.
7. If trouble is experienced with this equipment, please contact the following
company for repair and (or) warranty information:
If the equipment is causing harm to the telephone network, the telephone company
may request that you disconnect the equipment until the problem is resolved.
8. This equipment cannot be used on public coin service provided by the telephone
company. Connection to Party line service is subject to state tariffs. Contact the state
public utility commission, public service commission or corporation commission for
information.
9. If your home has specially wired alarm equipment connected to the telephone line,
ensure the installation of this equipment does not disable your alarm equipment. If
you have questions about what will disable alarm equipment, consult your telephone
company or a qualified installer.

General Notice
OPERATION GUIDE v
10. The Telephone Consumer Protection Act of 1991 makes it unlawful for any
person to use a computer or other electronic device, including FAX machines, to
send any message unless such message clearly contains in a margin at the top or
bottom of each transmitted page or on the first page of the transmission, the date and
time it is sent and an identification of the business or other entity, or other individual
sending the message and the telephone number of the sending machine or such
business, other entity, or individual. (The telephone number provided may not be a
900 number or any other number for which charges exceed local or long-distance
transmission charges.)
In order to program this information into your FAX machine, you should complete the
following steps:(Insure that it will be transmitted, see Entering FAX Information
(Local Information) on page 2-2, Setting the Current Date and Time (Date & Time
Setting) on page 2-1, and Configuring TTI Settings on page 2-4.)

General Notice
vi OPERATION GUIDE
IMPORTANT SAFETY INSTRUCTIONS
When using your telephone equipment, basic safety precautions should always be
followed to reduce the risk of fire, electric shock and injury to persons, including the
following:
CAUTION: To reduce the risk of fire, use only No.26 AWG or larger UL listed or
CSA certified telecommunication line cord.
1. Do not use this product near water, for example, near a bath tub, wash bowl,
kitchen sink or laundry tub, in a wet basement or near a swimming pool.
2. Avoid using a telephone (other than a cordless type) during an electrical storm.
There may be a remote risk of electric shock from lightning.
3. Do not use the telephone to report a gas leak in the vicinity of the leak.
4. Use only the power cord and batteries indicated in this manual. Do not dispose of
batteries in a fire. They may explode. Check with local codes for possible special
disposal instructions.
SAVE THESE INSTRUCTIONS
Safety Instructions Regarding the Disconnection of Power
CAUTION: The power plug is the main isolation device! Other switches on the
equipment are only functional switches and are not suitable for isolating the
equipment from the power source.

OPERATION GUIDE vii
Legal and Safety
Legal Notice
WE SHALL HAVE NO LIABILITY FOR LOSS, WHETHER OR PARTIAL, OF
RECEIVED DOCUMENTS WHEN SUCH LOSS IS CAUSED BY DAMAGES TO
THE FAX SYSTEM, MALFUNCTIONS, MISUSE, OR EXTERNAL FACTORS SUCH
AS POWER OUTAGES; OR FOR PURELY ECONOMIC LOSSES OR LOST
PROFITS RESULTING FROM MISSED OPPORTUNITIES ATTRIBUTABLE TO
MISSED CALLS OR RECORDED MESSAGES RESULTING THEREFROM.
Safety Conventions in This Guide
Please read the Operation Guide before using the machine. Keep it close to the
machine for easy reference.
The sections of this handbook and parts of the machine marked with symbols are
safety warnings meant to protect the user, other individuals and surrounding objects,
and ensure correct and safe usage of the machine. The symbols and their meanings
are indicated below.
Symbols
The symbol indicates that the related section includes safety warnings. Specific
points of attention are indicated inside the symbol.
DANGER: Indicates that serious injury or even death will
very possibly result from insufficient attention to or incorrect
compliance with the related points.
WARNING: Indicates that serious injury or even death may
result from insufficient attention to or incorrect compliance
with the related points.
CAUTION: Indicates that personal injury or mechanical
damage may result from insufficient attention to or incorrect
compliance with the related points.
.... [General warning]
.... [Warning of danger of electrical shock]
.... [Warning of high temperature]

Legal and Safety
viii OPERATION GUIDE
The symbol indicates that the related section includes information on prohibited
actions. Specifics of the prohibited action are indicated inside the symbol.
The z symbol indicates that the related section includes information on actions
which must be performed. Speci fics of the required action are indicated inside the
symbol.
Please contact your service representative to order a replacement if the safety
warnings in the guide are illegible or if the guide itself is missing. (fee required)
<Note>
Due to performance updating, information in this Operation Guide is subject to
change without notice.
.... [Warning of prohibited action]
.... [Disassembly prohibited]
.... [Alert of required action]
.... [Remove the power plug from the outlet]
....
[Always connect the machine to an outlet with a ground
connection]

Legal and Safety
OPERATION GUIDE ix
Important! Please Read First.
This Operation Guide includes information on using the facsimile functions of this
machine. Be sure to read the Operation Guide as well. Keep both guides near the
machine for ready reference.
During use, refer to the Operation Guide for your machine to obtain the following
information.
• Caution Labels
• Installation Precautions
• Precautions for Use
• Loading Paper
• Cleaning the Machine
• Toner Container Replacement
• Troubleshooting
• Paper Jam
Installation Precautions
Power supply/Grounding the product
Do not connect this product to the same outlet as an air conditioner or copier, etc.
Precautions for Use
• Do not open the front cover, turn off the power switch, or pull out the power plug
while transmitting, receiving, or copying.
• This product may only be used within the country of purchase due to the
different safety and communication standards in each country. (International
communication standards, however, make the communication between
countries possible.)
• This product may be inoperable in areas with poor telephone lines or
communication conditions.
• “CALL WAITING” or other telephone company optional services that produce
audible tones or clicks on the line can disrupt or cause termination of facsimile
communications.
• Be sure that the size of the paper loaded in the paper source matches the size of
the paper configured with the paper source size selection. Failure to do so may
cause the part of the received documents not printed.

Introduction
x OPERATION GUIDE
Introduction
Overview of Operation Guide
This Operation Guide has the following chapters:
1 Machine Parts - Identifies the names and functions of the machine and
operation panel.
2 Preparing to FAX - Describes preliminary settings and how to prepare the Fax
System for use.
3 Basic Operation - Describes basic fax operations, such as sending and
receiving documents.
4 Basic Functions - Describes basic functions, such as timer-based or
broadcast transmission provided by the Fax System.
5 FAX System Settings - Describes mechanical and functional settings.
6 Editing Phone Book with Computer (Using QLINK) - Describes how to edit
your phone book using computer.
7 Trouble Shooting - Describes how to resolve problems and respond to error
messages.
8 Reference Information - Provides the facsimile specifications, or available
character list, etc.

Introduction
OPERATION GUIDE xi
Conventions
This manual uses the following conventions:
Convention Description Example
Italic Typeface Used to emphasize a key word,
phrase or references to additional
information.
Open the Front Cover.
For details on Auto Sleep, refer to Sleep
Mode on page 8-1.
Courier Typeface Used to denote messages or
names displayed on the operation
panel.
Access 13. Sleep Mode.
Bracket Bold Text
Typeface
Used to denote operation panel
keys.
Press [Copy Mode] to select the desired
mode.
Bold Typeface Used to emphasize buttons or
items to be selected in dialog
boxes, and titles displayed in
dialog boxes.
Click Next.
Notes Used to provide additional or
useful information about a function
or feature. Can also contain
references to other publications.
NOTE: For information about storing the
pin, refer to step 10.
Important Used to provide important
information.
IMPORTANT: Ensure paper is not folded,
curled, or damaged.
Caution Cautions are statements that
suggest mechanical damage as a
result of an action.
CAUTION: Do not pull the cassette out
when holding the front of the machine.
Warning Used to alert users to the
possibility of personal injury.
WARNING: High voltage is present in
the charger section.

Introduction
xii OPERATION GUIDE
Accessing Menu Items
When you configure the machine, you do so by accessing a menu item and making
your setting from there. Each configuration instruction in this guide tells you to
access the menu item and provides a route map to direct you to that item. An
example of a route map and its significance is shown below.
.
[Menu] This represents the operation panel button to be pressed.
W or X
Press the left or right button until 1. Common Setup is displayed.
1. Common Setup
[OK]
W or X
Press the left or right button until 12. Paper Size is displayed.
12. Paper Size
[OK]
OPERATION GUIDE 1-1
1 Machine Parts
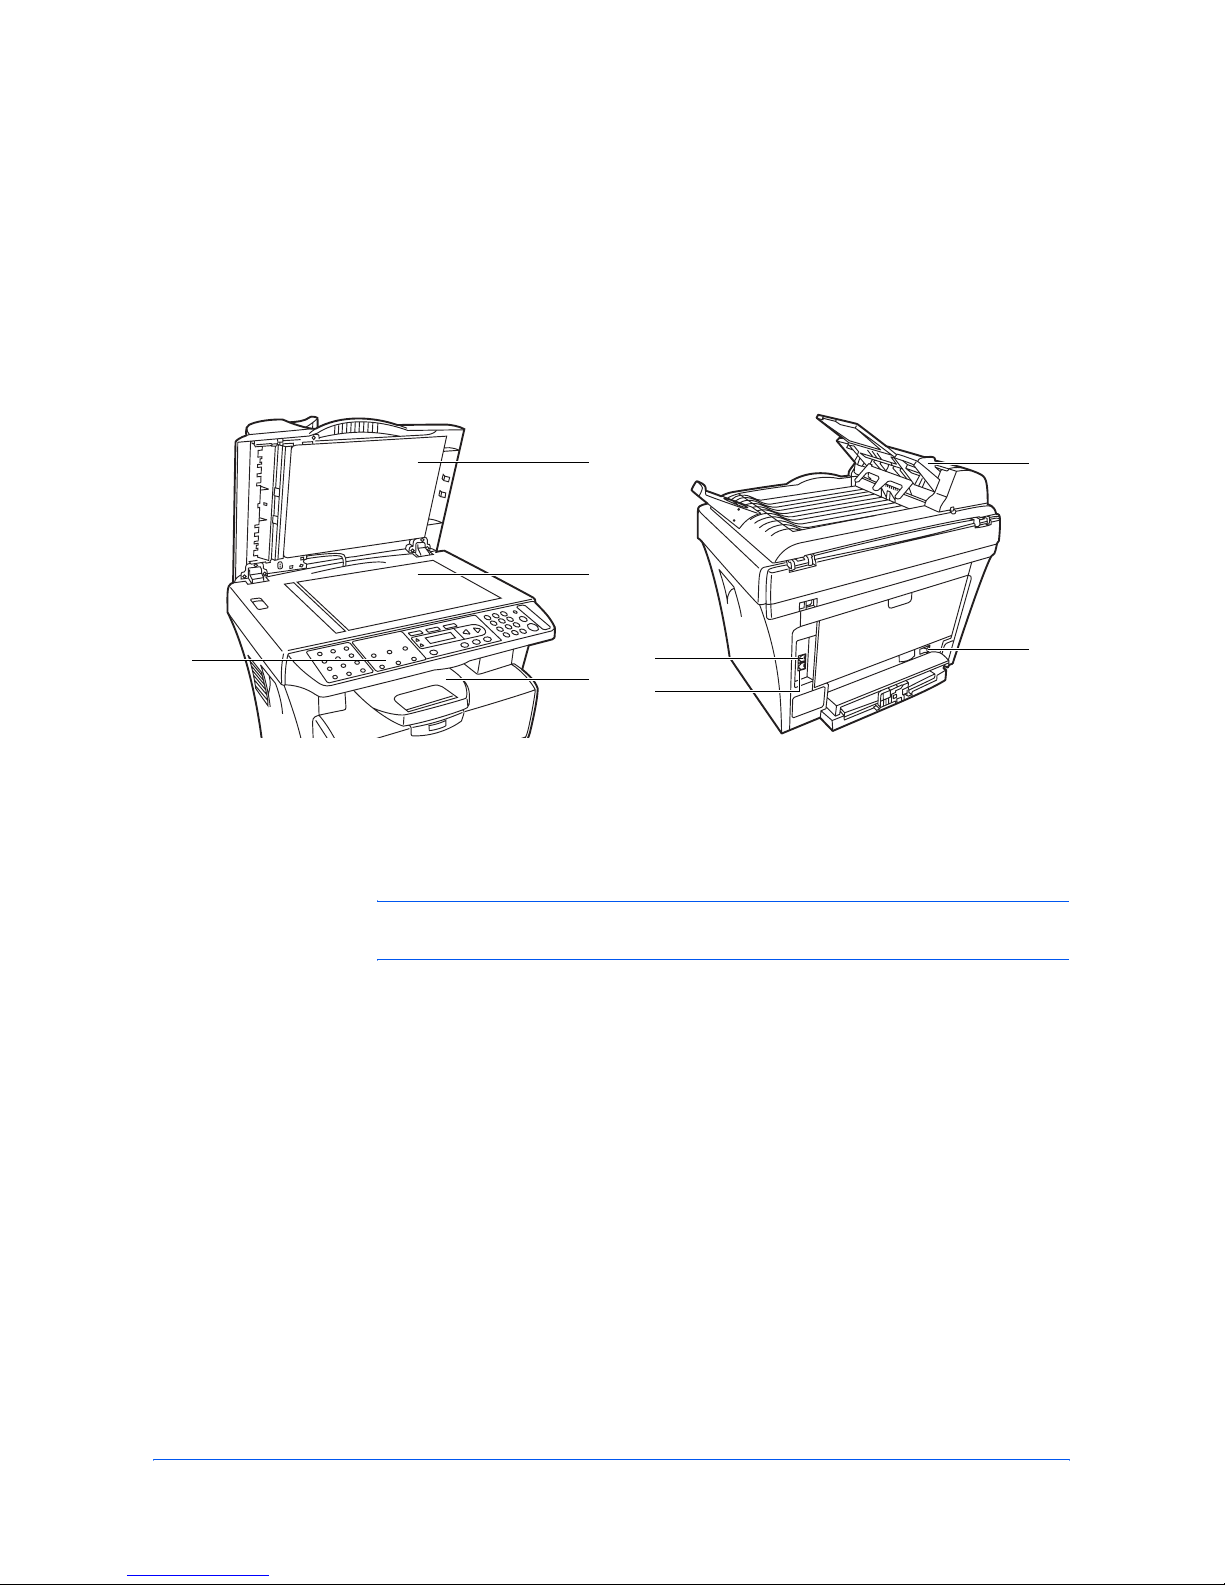
Main Body
Main body parts pertaining to FAX are described below. For information on other
parts, refer to the Operation Guide.
NOTE: Connect modular phone cable to the Line jack. To connect an external
phone, connect modular phone cable to the Telephone Jack.
1 Operation Panel 5 Telephone Jack
2 Original Cover 6 LINE Jack
3 Platen 7 Power Switch
4 Output Tray 8 Document Processor
1
2
3
4
5
6
7
8
Machine Parts
1-2 OPERATION GUIDE
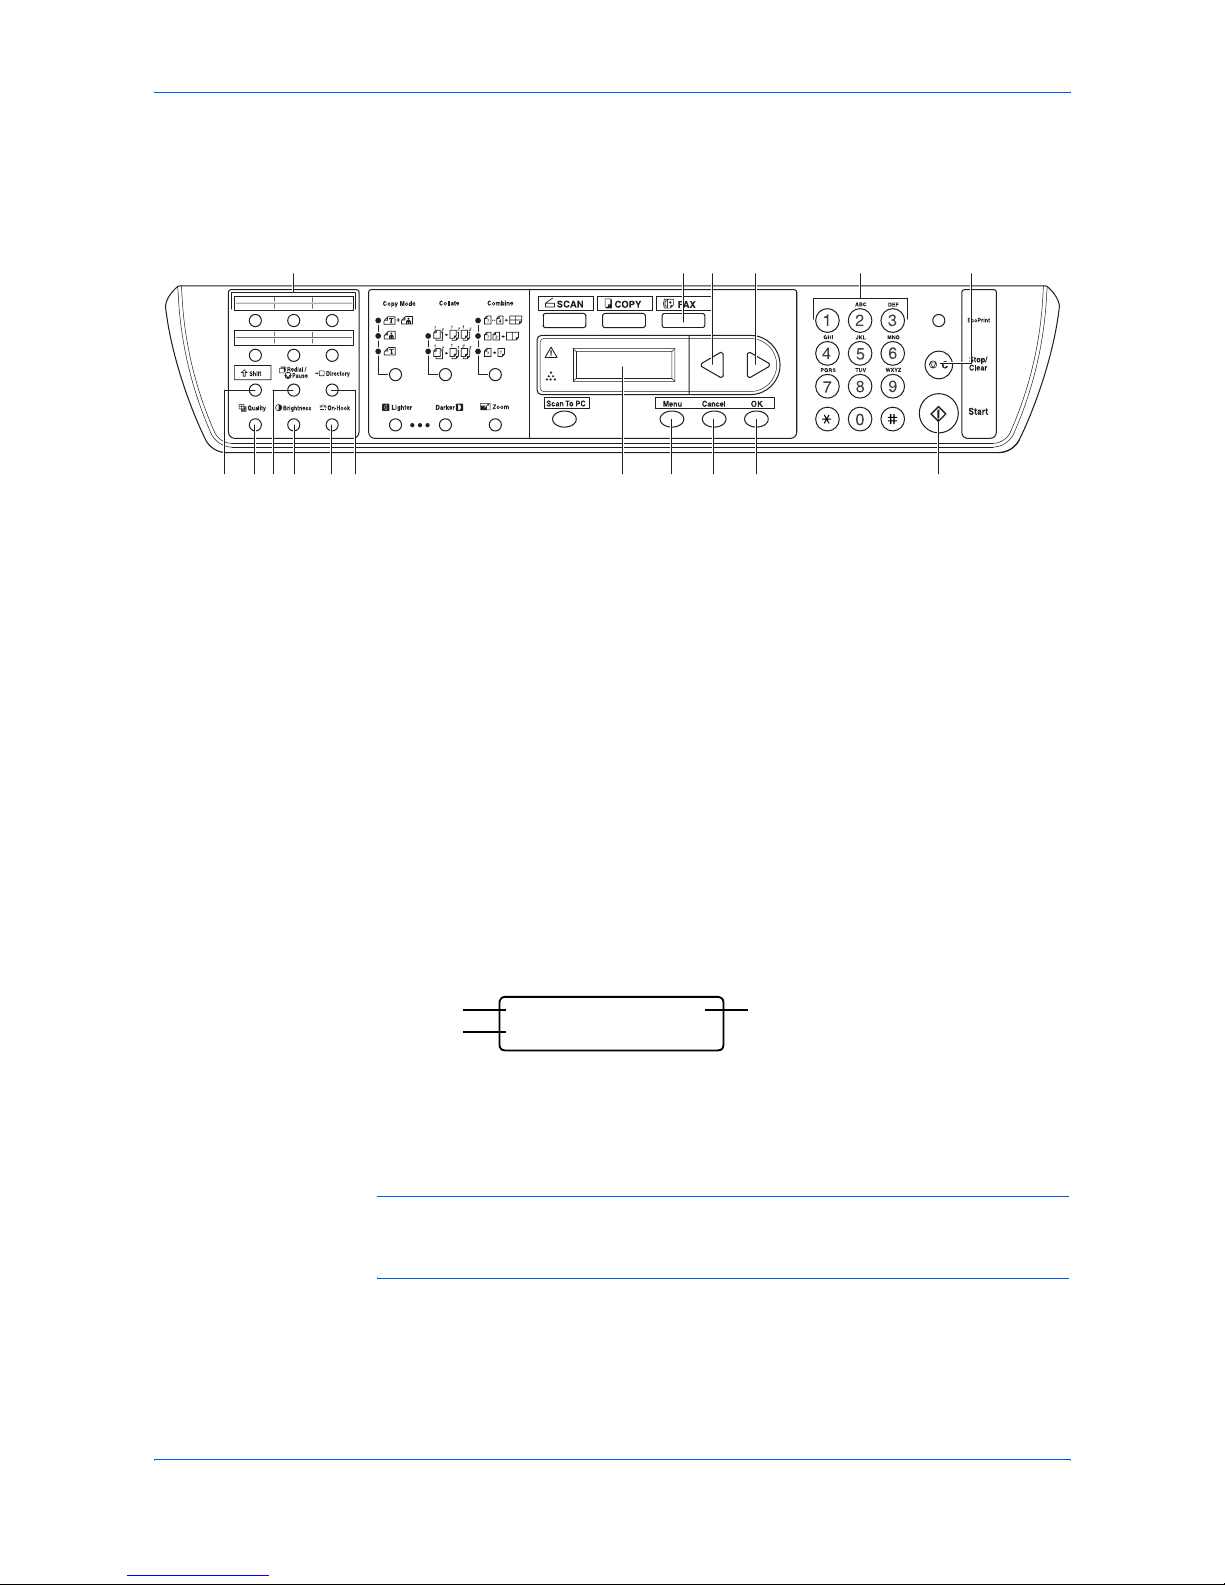
Operation Panel
The following keys and indicators are used to send or receive faxes. For information
on keys and indicators used for another functions, refer to the Operation Guide.
Message Display
FAX Ready Screen
Press [FAX] to use FAX function. FAX indicator turns on and FAX ready screen
appears.
NOTE: Menus or error messages are shown on the Message Display during FAX
operation. For information about error codes or error messages, refer to Warning
Messages on page 7-3.
1 FAX Key and Indicator 10 Start Key
2 W Key 11 One-touch Keys (1 to 12)
3 X Key 12 Shift Key
4 Numeric Keys 13 Quality Key
5 Stop/Clear Key 14 Redial/Pause Key
6 Message Display 15 Brightness Key
7 Menu Key 16 On-Hook Key
8 Cancel Key 17 Directory Key
9 OK Key
/
11
13 15 1612 14 17
1 42 3 5
7 8 9 106
Normal S TD.
06/12 20:52
Normal STD.
06/12 20:52
21
3
1 Brightness
2 Quality
3 Date and Time

OPERATION GUIDE 2-1
2 Preparing to FAX
Setting the Current Date and Time (Date & Time Setting)
Set the date and time of the built-in clock. Confirm that the date and time set here
are correct (they will serve as the basis for all scheduled transmissions).
IMPORTANT: Battery used for the built-in clock is rechargeable. Do not turn off the
machine immediately after setting the date and time. Keep it being turned on for
approximately 2 hours until charging is completed.
Periodically check the time that is shown in the message display and adjust as
necessary to match the current time.
1 Access 41.Date/Time.
If you are unsure how to use this route map refer to Accessing Menu Items on
page xii.
2 Enter the current date and time using the numeric keys and press [OK]. The
display returns to the ready screen.
Date and Time Configuration
NOTE: Set the time on 24-hour configuration.
[Menu]
W or X
4.Fax Setup
[OK]
W or X
41.Date/Time
[OK]
Destination On Date & Time
setting screen
On Information/
Report
Note
USA/Canada ’YY-MM-DD hh:mm MM/DD/YYYY hh:mm Y: year, M:
month, D: day,
h: hour, m:
minute
Europe DD/MM/YYYY hh:mm
Others YYYY/MM/DD hh:mm

Preparing to FAX
2-2 OPERATION GUIDE
Entering FAX Information (Local Information)
Enter your station name and FAX number.
NOTE: Refer to Character List on page 8-2 for available characters to be entered
using the numeric keys.
1 Access 42.Fax Header.
If you are unsure how to use this route map refer to Accessing Menu Items on
page xii.
2 Enter your station name using the numeric keys and press [OK].
3 Enter your FAX number using the numeric keys and press [OK]. The display
returns to the ready screen.
Item Description
Name Enter your station name with up to 20 characters.
Fax Enter your FAX number with up to 20 digits. 0-9, +
and space can be used.
[Menu]
W or X
4.Fax Setup
[OK]
W or X
42.Fax Header
[OK]

Preparing to FAX
OPERATION GUIDE 2-3
Selecting the Line Type
Choose the line type corresponding to your telephone service. Note that the FAX
system cannot send faxes if this setting is incorrect.
NOTE: This menu works for Inch model only.
1 Access 43.Tone/Pulse.
If you are unsure how to use this route map refer to Accessing Menu Items on
page xii.
2 Press W or X to select Tone or Pulse 10PPS and press [OK]. The display
returns to the ready screen.
[Menu]
W or X
4.Fax Setup
[OK]
W or X
43.Tone/Pulse
[OK]

Preparing to FAX
2-4 OPERATION GUIDE
Configuring TTI Settings
TTI (Transmit Terminal Identifier) information identifies the time of transmission,
number of pages, and your station name and FAX number. It can be sent
automatically to the other party’s FAX to be printed on the faxed document. This
machine lets you choose whether to send TTI information.
1 Access 46.Header.
If you are unsure how to use this route map refer to Accessing Menu Items on
page xii.
2 Press W or X to select On or Off and press [OK]. The display returns to the
ready screen.
[Menu]
W or X
4.Fax Setup
[OK]
W or X
46.Header
[OK]
Basic Operation
OPERATION GUIDE 3-1
3 Basic Operation
Sending Documents
The basic method for sending documents is described below.
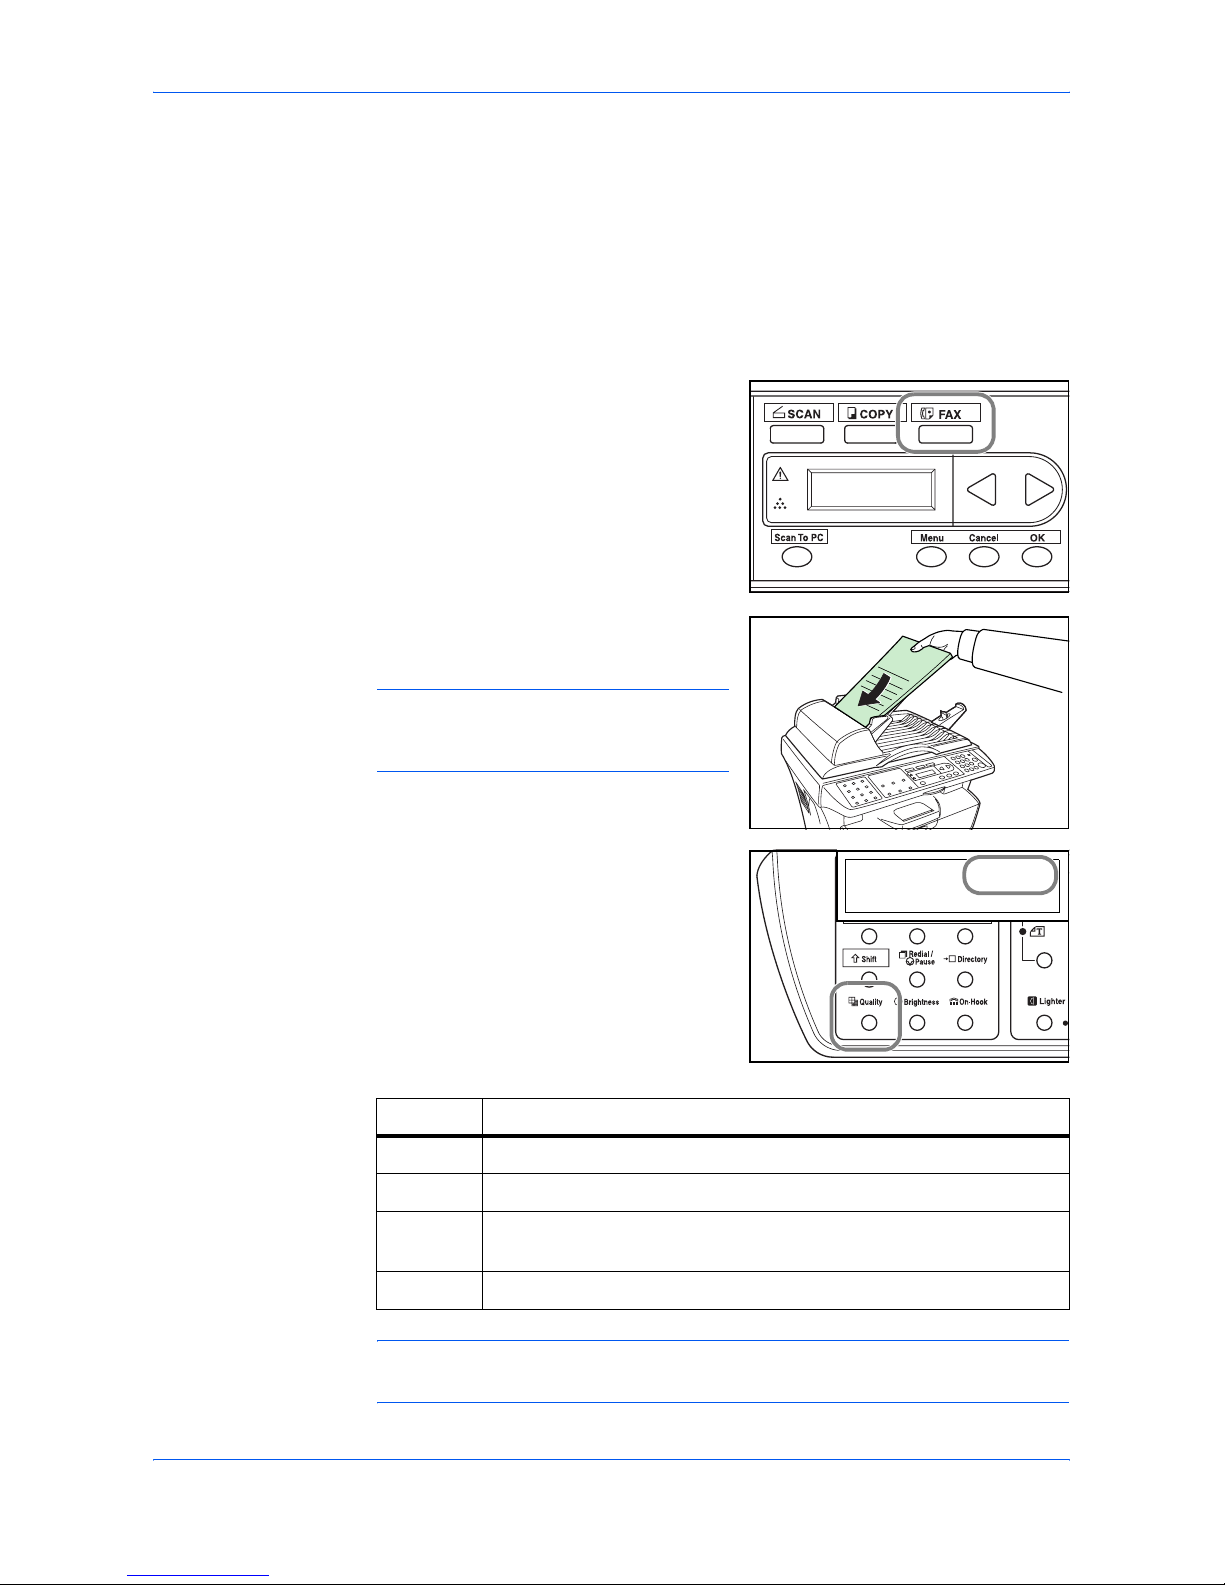
1
Press [FAX]. The FAX indicator is lit and the
facsimile enters FAX mode.
FAX ready screen is displayed on the
message display.
2
Place the original document to transmit in
the document processor or on the platen.
NOTE: Refer to the Operation Guide for
how to place the original. Max. 50 sheets
can be placed on the document processor.
3
Press [Quality] repeatedly until your
desired image quality is displayed on the
message display.
NOTE: Default setting of image quality can be changed. For details, refer to
Default Settings (image quality and brightness) on page 5-3.
Normal STD.
06/12 20:52
ABC
Mode Description
STD. Select this mode if the original contains standard size text.
Fine Select this mode if the original contains small size text or thin lines.
S-Fine Select this mode if the original contains smaller size text or fine
lines.
Photo Select this mode if the original contains photographs.
Normal STD.
06/12 20:52
Basic Operation
3-2 OPERATION GUIDE
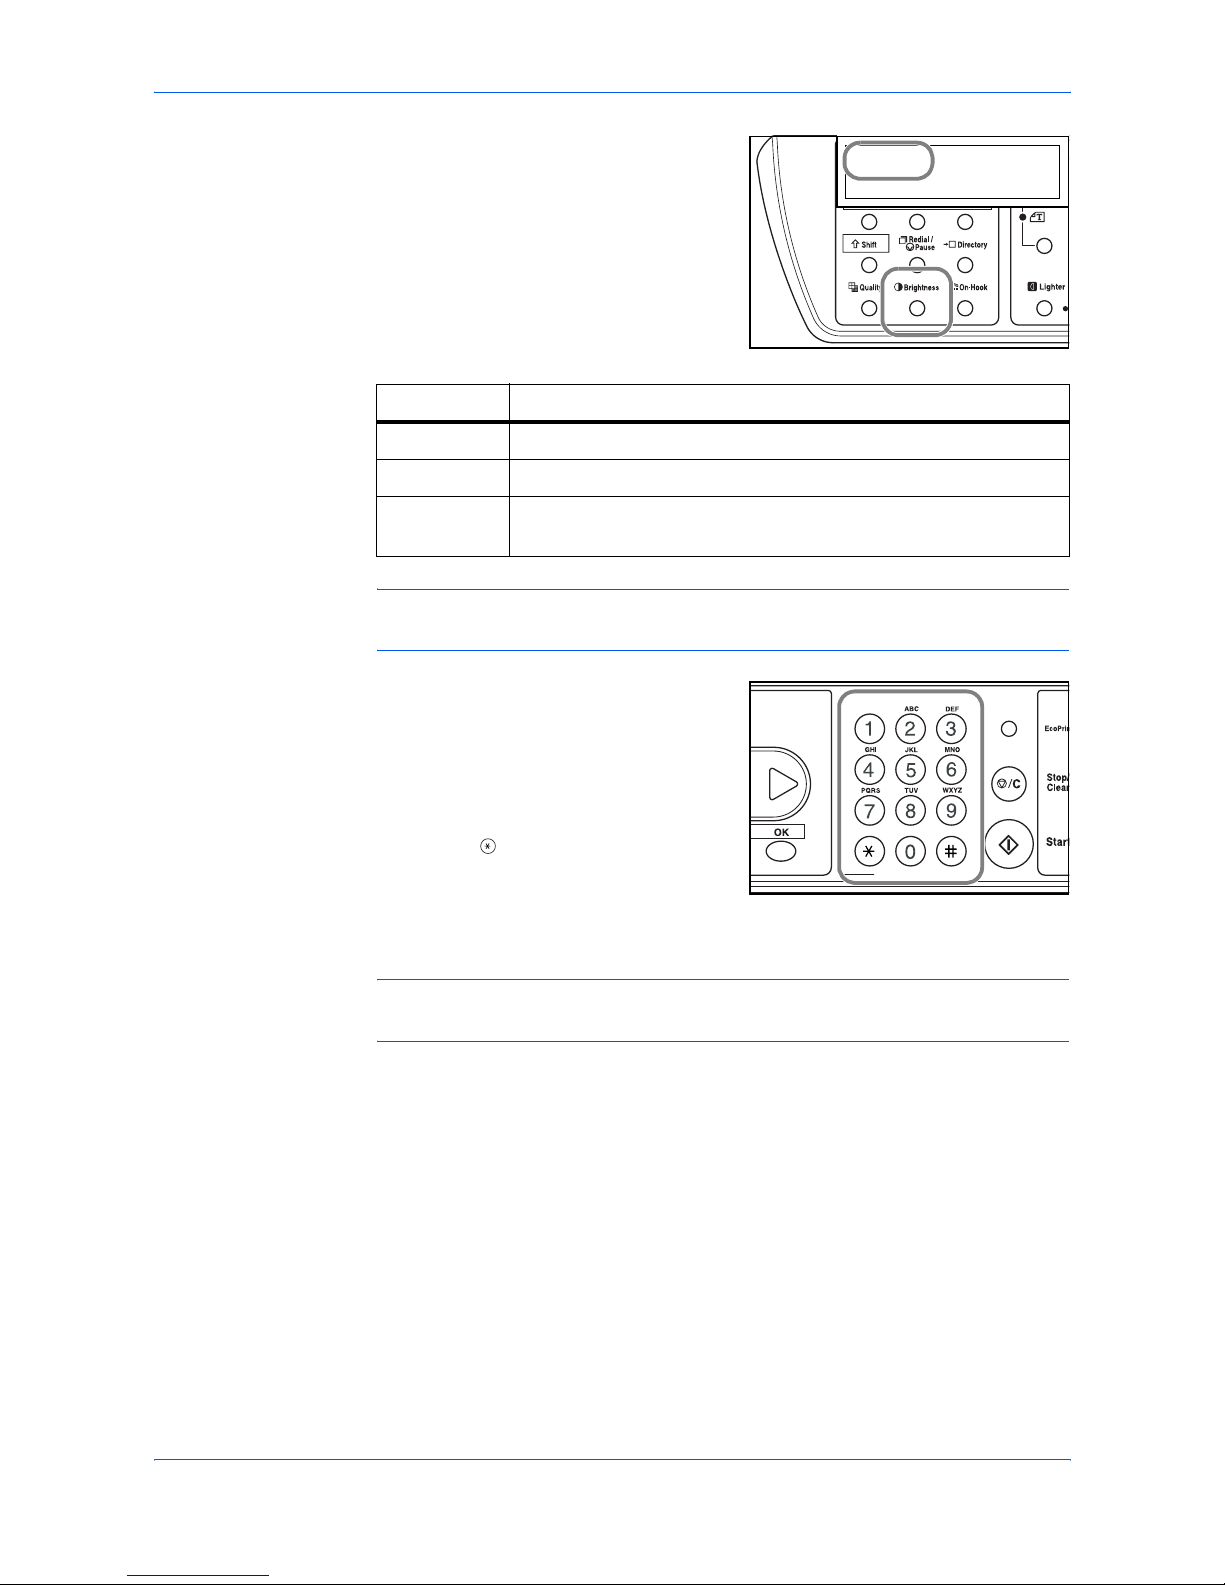
4
Press [Brightness] repeatedly until your
desired brightness is displayed on the
message display.
NOTE: Default setting of the brightness can be changed. For details, refer to
Default Settings (image quality and brightness) on page 5-3.
5
Enter the destination FAX number using the
numeric keys.
• Press W to delete the entered number.
• Press [Redial/Pause] to insert 2second pause when dialing the FAX
number.
• Press [] on the numeric keys to
switch to tone dial temporarily if pulse
is selected for the line type. Press
[On-Hook] to switch back to pulse dial again.
• Press [×Shift] to insert F(Flash) if used in Private Branch eXchange(PBX).
NOTE: FAX can be sent to multiple destinations simultaneously. For details, refer
to Broadcast Transmission on page 4-2.
To dial without using the numeric keys, use:
• One-touch dial (Refer to page 3-5)
• Speed dial (Refer to page 3-5)
• Group dial (Refer to page 3-6)
• Manual redial (Refer to page 3-12)
Mode Description
Normal To send in normal brightness
Dark To send pale original in dark color
Light To send dark original (original with background color, etc.) in pale
color
Normal STD.
06/12 20:52

Basic Operation
OPERATION GUIDE 3-3
6
Press [Start].
If you want continuous scanning using the
platen, change the first original document
when scanning is completed, and then
change document and press [Start] again.
Scanning of the next original starts. When
all originals are scanned, press [] on the
numeric keys to start FAX.
NOTE: If 30 seconds pass without operation after a confirmation screen prompting
you to continue scanning or not is displayed, transmission will automatically start.
Stopping Transmission
Press [Stop/Clear] to stop transmission of
the job displayed on the message display.
Transmission can be stopped during:
•Scanning
• Dialing
• Transmission
NOTE: To cancel the timer-based transmission or waiting job (waiting for Auto
Redialing, etc.), refer to Managing Jobs in Memory on page 4-11.
 Loading...