

Page 1
Page 2

ii
User Guide for PhantomTM Phones
This manual is based on the production vers ion of the Kyocera KE413
and KE414 phones. Software changes may have occurred after this
printing. Kyocera reserves the right to make changes in technical and
product specifications without prior notice. The products and equipment
described in this documentation are manufactured under license from
QUALCOMM Incorporated under one or more of the following
U.S. patents:
4,901,307 5,056,109 5,099,204 5,101,501 5,103,459 5,107,225
5,109,390 5,193,094 5,228,054 5,257,283 5,265,119 5,267,261
5,267,262 5,280,472 5,283,536 5,289,527 5,307,405 5,309,474
5,337,338 5,339,046 5,341,456 5,383,219 5,392,287 5,396,516
D356,560 5,408,697 5,414,728 5,414,796 5,416,797 5,426,392
5,437,055 D361,065 5,442,322 5,442,627 5,452,473 5,461,639
5,469,115 5,469,471 5,471,497 5,475,870 5,479,475 5,483,696
5,485,486 5,487,175 5,490,165 5,497,395 5,499,280 5,504,773
5,506,865 5,509,015 5,509,035 5,511,067 5,511,073 5,513,176
5,515,177 5,517,323 5,519,761 5,528,593 5,530,928 5,533,011
5,535,239 5,539,531 5,544,196 5,544,223 5,546,459 5,548,812
5,559,881 5,559,865 5,561,618 5,564,083 5,566,000 5,566,206
5,566,357 5,568,483 5,574,773 5,574,987 D375,740 5,576,662
5,577,022 5,577,265 D375,937 5,588,043 D376,804 5,589,756
Page 3

User Guide for the Kyocera Phantom phone iii
5,590,069 5,590,406 5,590,408 5,592,548 5,594,718 5,596,570
5,600,754 5,602,834 5,602,833 5,603,096 5,604,459 5,604,730
5,608,722 5,614,806 5,617,060 5,621,752 5,621,784 5,621,853
5,625,876 5,627,857 5,629,955 5,629,975 5,638,412 5,640,414
5,642,398 5,644,591 5,644,596 5,646,991 5,652,814 5,654,979
5,655,220 5,657,420 5,659,569 5,663,807 5,666,122 5,673,259
5,675,581 5,675,644 5,680,395 5,687,229 D386,186 5,689,557
5,691,974 5,692,006 5,696,468 5,697,055 5,703,902 5,704,001
5,708,448 5,710,521 5,710,758 5,710,768 5,710,784 5,715,236
5,715,526 5,722,044 5,722,053 5,722,061 5,722,063 5,724,385
5,727,123 5,729,540 5,732,134 5,732,341 5,734,716 5,737,687
5,737,708 5,742,734 D393,856 5,748,104 5,751,725 5,751,761
5,751,901 5,754,533 5,754,542 5,754,733 5,757,767 5,757,858
5,758,266 5,761,204 5,764,687 5,774,496 5,777,990 5,778,024
5,778,338 5,781,543 5,781,856 5,781,867 5,784,406 5,784,532
5,790,589 5,790,632 5,793,338 D397,110 5,799,005 5,799,254
5,802,105 5,805,648 5,805,843 5,812,036 5,812,094 5,812,097
5,812,538 5,812,607 5,812,651 5,812,938 5,818,871 5,822,318
5,825,253 5,828,348 5,828,661 5,835,065 5,835,847 5,839,052
5,841,806 5,842,124 5,844,784 5,844,885 5,844,899 5,844,985
5,848,063 5,848,099 5,850,612 5,852,421 5,854,565 5,854,786
5,857,147 5,859,612 5,859,838 5,859,840 5,861,844 5,862,471
5,862,474 5,864,760 5,864,763 5,867,527 5,867,763 5,870,427
5,870,431 5,870,674 5,872,481 5,872,774 5,872,775 5,872,823
Page 4

iv
5,877,942 5,878,036 5,870,631 5,881,053 5,881,368 5,884,157
5,884,193 5,884,196 5,892,178 5,892,758 5,892,774 5,892,816
5,892,916 5,893,035 D407,701 5,898,920 5,903,554 5,903,862
D409,561 5,907,167 5,909,434 5,910,752 5,911,128 5,912,882
D410,893 5,914,950 5,915,235 5,917,708 5,917,811 5,917,812
5,917,837 5,920,284 D411,823 5,923,650 5,923,705 5,926,143
5,926,470 5,926,500 5,926,786 5,930,230 5,930,692
Other patents pending.
Kyocera is a registered trademark of Kyocera Corporation. Brick Attack,
Doodler, Mask, and Phantom are trademarks of Kyocera Wirel ess Corp.
QUALCOMM is a registered trademark of QUALCOMM, Inc. Tetris is a
registered trademark of Elorg Company LLC. Openwave is a trademark
of Openwave Systems Incorporat ed. eZiText is a registered trademark of
Zi Corporation. All other trademarks are the property of their res pective
owners.
Copyright © 2004 Kyocera Wireless Corp. All rights reserved. Ringer
Tones Copyright © 2000-2002 Kyocera Wireless Corp.
82-K5781-1EN, Rev 001
Page 5

User Guide for the Kyocera Phantom phone v
FCC/IC Notice
This device complies with part 15 of the FCC rules. Operation is subject
to the following two conditions:
(1) This device may not cause harmful interference, and (2) this device
must accept any interference re ceived, including interference that may
cause undesired operation.
To maintain compliance with FCC RF exposure guidelines, if you wear a
handset on your body, use the Kyocera Wireless Corp. (KWC) supplied
and approved case CA90-G2603-01 and universal belt clip
55-B1795-01.
Other accessories used with this device for body-worn operations must
not contain any metallic components and must provide at least 22.5 mm
separation distance including the antenna and the user’s body.
THIS MODEL PHONE MEETS THE GOVE RNMENT’S REQUIREMENTS FOR
EXPOSURE TO RADIO WAVES.
Page 6

vi
Your wireless phone is a radi o transmitter and receiver. It is designed and
manufactured not to exceed the emission limits for exposure to radio
frequency (RF) energy set by the Federal Communications Commission of
the U.S. Government. These li mits are part of comprehensive guidelines
and establish permitted level s of RF energy for the general population. The
guidelines are based on standards that were developed by independent
scientific organizati ons through periodic and thorough evaluation of
scientific studies. The st andards include a subst antial safety margin
designed to assure the safety of all persons, regardless of age and health.
The exposure standard for wireless mobil e phones employs a unit of
measurement known as the S pecific Absorption Rate, or SAR. The SAR limit
set by the FCC is 1.6 W/kg.* Tests for SAR are conducted using standard
operating positions specified by the FCC with the phone transmitti ng at it s
highest certified power level in all t ested frequency bands.
Although the SAR is determined at the highest certified power level, the
actual SAR level of the phone while operating can be well below the
maximum value.
Page 7

User Guide for the Kyocera Phantom phone vii
This is because the phone is designed to operate at multiple power levels so
as to use only the power required to reach the network. In general, the closer
you are to a wireless base stati on antenna, t he lower the power output.
Before a phone model is available for sale to the public, it must be tested
and certified to the FCC that it does not exceed the limit established by
the government-adopted requirement for safe exposure. The tests are
performed in positions and locations (e.g., at the ear and worn on the
body) as required by the FCC for each model. The highest SAR values
for these model phones are:
FCC ID: OVFKWC-KE4X3 (Phone model: KE413)
Head: 1.32 mW/g; Body-worn: 0.544 mW/g.
FCC ID: OVFKWC-KE4X4 (Phone model: KE414)
AMPS mode - Head: 1.39 mW/g; Body-worn: 0.686mW/g
PCS mode - Head: 1.46 mW/g; Body-worn: 0.524 mW/g.
(Body-worn measurements differ among phone models, depending upon
availability of accessories and FCC requirements. The body-worn SAR
values provided above were obtained by usi ng Kyocera Wireless Corp.
[KWC] supplied and approved case CA90-G2603-01 and universal belt
clip 55-B1795-01).
Page 8

viii
While there may be differ ences between the SAR level s of various
phones and at various positions, they all meet the government
requirement for safe exposure.
The FCC has granted an Equipment Authorization for this model phone
with all reported SAR levels eval uated as in compli ance with t he FCC RF
emission guidelines. SAR information on this model phone is on file with
the FCC and can be found under the Display Grant section
http://www.fcc.gov/oet/fccid after searching on the FCC ID:
Additional information on SAR can be found on the Cellular
Telecommunications and Int ernet Association (CTIA) web-site at http://
www.wow-com.com.
* In the United States and Canada, the SAR limit for mobile phones
used by the public is 1.6 watts/kg (W/kg) averaged over one gram of
tissue. The standard incorporates a substantial margin of safety to
give additional protection for the public and to account for any
variations in measurements.
Model: KE414 FCC ID: OVFKWC-KE4X4
Model: KE413 FCC ID: OVFKWC-KE4X3
Page 9

User Guide for the Kyocera Phantom phone ix
Caution
The user is cautioned that changes or modifications not expressly
approved by the p arty respons ible for compliance could void t he warranty
and user’s authority to operate the equipment.
Warning
Use only Kyocera approved accessories with Kyocera phones. Use of
any unauthorized accessories (includes faceplates/front housings) may
be dangerous and will invalidate the phone warranty if said accessories
cause damage or a defect to the phone.
Optimize your phone’s performance
Use the guidelines on page 3 to learn how to optimize the performance
and life of your phone and battery.
Air bags
If you have an air bag, DO NOT place installed or portable phone
equipment or other objects over the air bag or in the air bag deployment
area. If equipment i s not properly inst alled, you and your passengers risk
serious injury.
Page 10

x
Medical devices
Pacemakers—Warning to pacemaker wearers: Wireless phones,
when in the ‘on’ position, have been shown to interfere with
pacemakers. The phone should be kept at least six (6) inches away
from the pacemaker to reduce risk.
The Health Industry Manufacturers Association and the wireless
technology research community recommend that you follow these
guidelines to minimize the potential for interference.
• Always keep the phone at least six i nches (15 centi meter s) away from
your pacemaker when the phone is turned on.
• Do not carry your phone near your heart.
• Use the ear opposite the pacemaker.
• If you have any reason to suspect that interference is ta king place, turn
off your phone immediately.
Hearing aids—Some digital wireless phones may interfere with hearing
aids. In the event of such interference, you may want to consult your
service provider or call the customer service line to discuss alter natives.
Page 11

User Guide for the Kyocera Phantom phone xi
Other medical devices—If you use any other personal medical device,
consult the manufacturer of the device to determine if it is adequately
shielded from exter nal RF energy. Your physici an may be able to help you
obtain this information.
In health care facilities—Turn your phone off in health care facilitie s
when instructed. Hospitals and health care facilities may be using
equipment that is sensitive to external RF energy.
Potentially unsafe areas
Posted facilities—Turn your phone off in any facility when posted
notices require you to do so.
Aircraft—FCC regulations prohibit usi ng your phone on a plane that is in
the air. Turn your phon e off or switch it to Air plane Mode (p age 14) befo re
boarding aircraft.
Vehicles—RF signals may affect improperly insta lled or inadequately
shielded electronic syst ems in motor vehi cles. Check with the
manufacturer of the device to deter mine if it is adequately shielded from
external RF energy. Your physician may be able to help you obtain this
information.
Page 12

xii
Blasting areas—Turn off your phone where blasting is in progress.
Observe restrictions, and follow any regulations or rules.
Potentially explosi ve atmospheres—Turn off your phone when you are
in any area with a potentially explosive atmosphere. Obey all signs and
instructions. Sparks in such areas could cause an explosion or fire,
resulting in bodily i njury or death.
Areas with a potentially explosive atmosphere are often, but not always,
clearly marked. They include:
• fueling areas such as gas stations
• below deck on boats
• transfer or storage facilities for fuel or chemicals
• vehicles using liquefied petroleum gas, such as propane or butane
• areas where the air cont ains chemicals or parti cles such as grain,
dust, or metal powders
• any other area where you would normally be advised to turn off your
vehicle engine
Page 13

User Guide for the Kyocera Phantom phone xiii
Use with care
Use only in normal position (to ear). Avoid dropping, hitting, bending, or
sitting on the phone.
Keep phone dry
If the phone gets wet, turn the power off immediately and contact your
dealer. Water damage may not be covered under warranty.
Resetting the phone
If the screen seems frozen and the keypad does not respond to
keypresses, reset the phone by completing the following steps:
1. Remove the battery door.
2. Remove and replace the battery.
If the problem persists, return the phone to the dealer for service.
Page 14

xiv
Accessories
Use only Kyocera-approved accessories with Kyocera phones. Use of any
unauthorized accessories may be dangerous and will invalidate the phone
warranty if said accessories cause damage or a defect to the phone.
To shop online for a Hands-free Car Kit and othe r phone accessories,
visit www.kyocera-wireless.com/store.
To order by phone, call (800) 349-4188 (U.S.A. only) or (858) 882-1410.
Radio Frequency (RF) energy
Your telephone is a radio transmitter and receiver. When it is on, it
receives and sends out RF energy. Your service provider’s network
controls the power of the RF signal. This power level can range from
0.006 to 0.6 watts.
In August 1996, the U.S. Federal Communications Commission (FCC)
adopted RF exposure guidelines with safety levels for hand-hel d wireless
phones. These guidelines are consistent with the safety standards
previously set by both U.S. and international standards bodies in the
following reports:
Page 15
User Guide for the Kyocera Phantom phone xv
• ANSI C95.1 (American National Standar ds Institute, 1992)
• NCRP Report 86 (National Council on Radiation Protect ion and
Measurements, 1986)
• ICNIRP (International Commissi on on Non-Ioni zing Radiation
Protection, 1996)
Your phone complies with the standards set by these rep orts and the
FCC guidelines.
E911 Mandates
Where service is available, this handset complies with the Phase I and
Phase II E911 Mandates issued by the FCC.
Battery and charger specifications
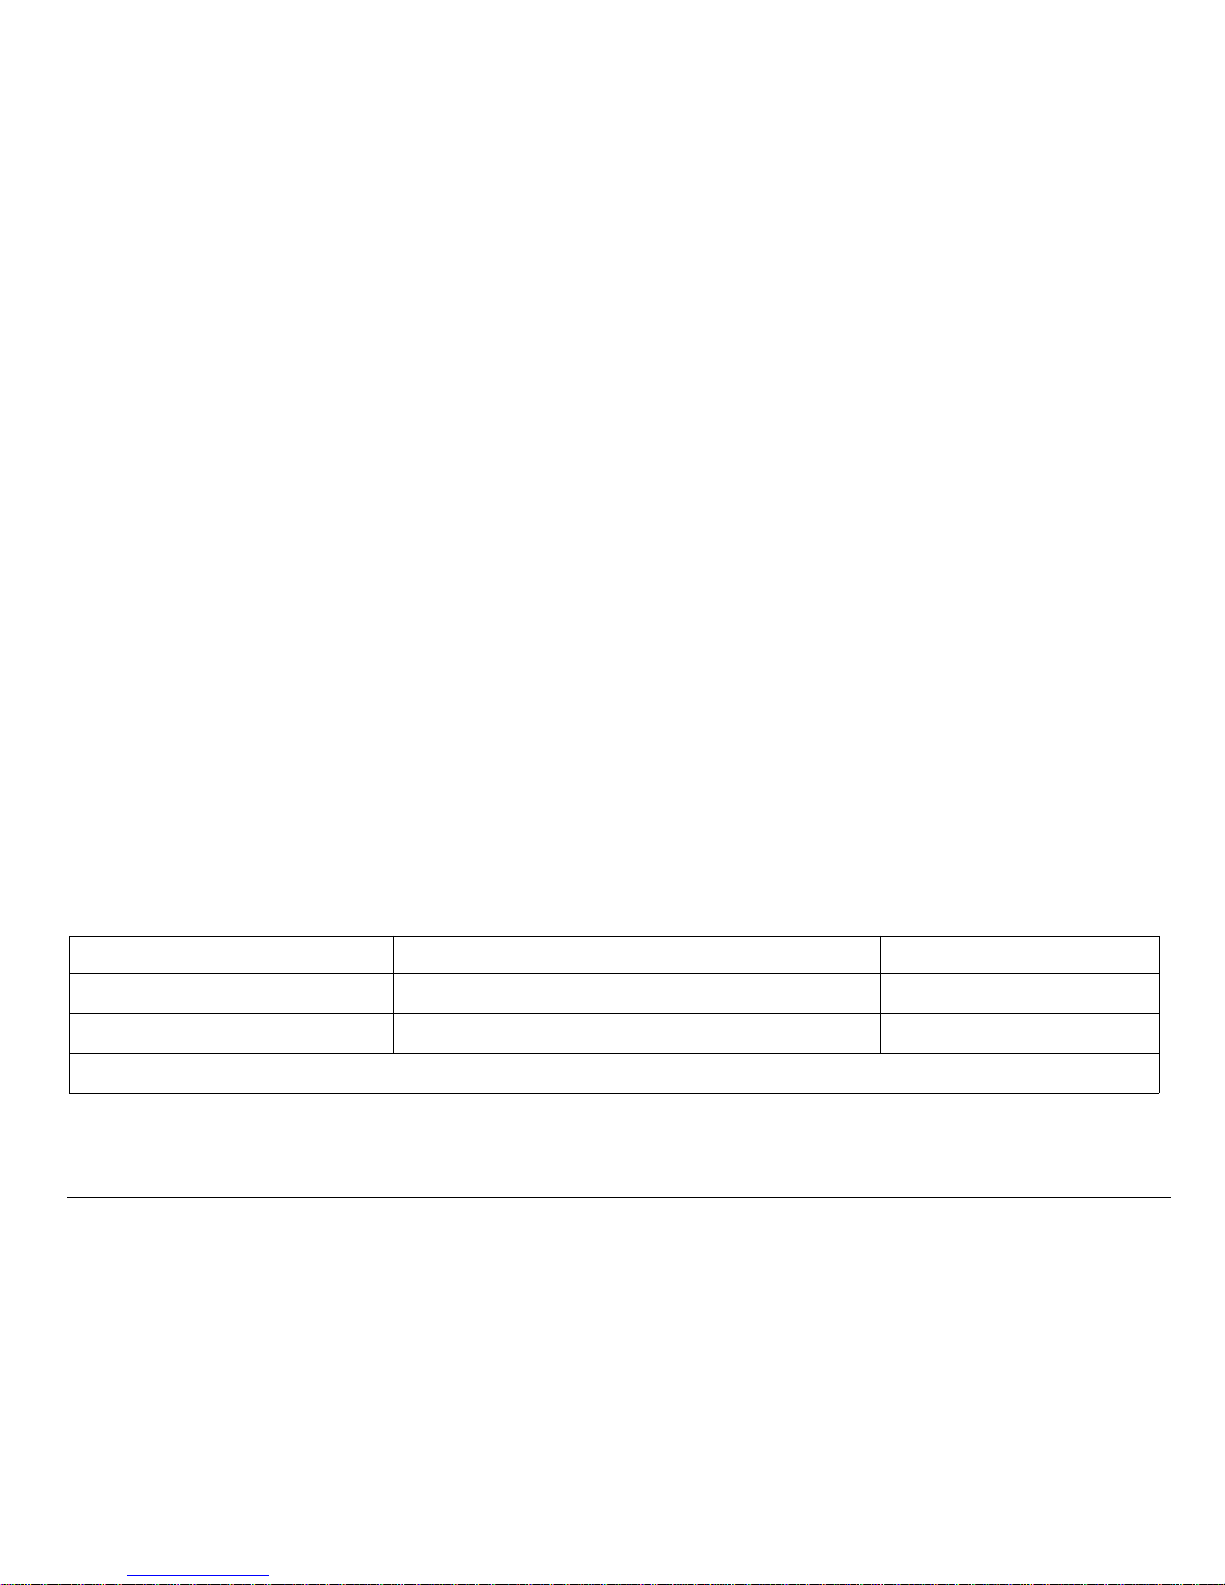
Charger Input Output
CV90-60858-01 100-240VAC / 50/60Hz 4.5V 1.5A
CV90-60859-1 120VAC / 60Hz 5.2V 400mA
Standard Batt ery: 3.6V / 900mAh
Page 16

xvi
Customer support
Your service provider’s customer support dep artment may be accessible
directly from your phone when you dial a number such as *611 (check
with your service provider). They can answer questions about your
phone, phone bill, call coverage area, and specifi c features available to
you, such as call forwarding or voicemail.
For questions about the phone features, refer to the materials provided
with your phone, or visit
www.kyocera-wireless.com.
For additional quest ions, you may contact the Kyocera Wireless Corp.
Customer Care Center in any of the following ways:
• Web site: www.kyocera-wireless.com
•Email: [email protected]
Before requesting support, please try to reproduce and isolate the
problem. When you contact the Customer Care Center, be ready to
provide the following information:
• The name of your service provider.
Page 17

User Guide for the Kyocera Phantom phone xvii
• The actual error message or problem you are experiencing.
• The steps you took to reproduce the problem.
• The phone’s electr onic serial number (ESN).
To find the ESN:
a.
Remove the battery.
b. Locate the white label on the back of the phone. Your phone’s 11-digit
ESN begins with “D” and is located on the label.
Qualified service
If the problem with your phone persists, return the phone with all
accessories and packaging to the dealer for qualified service.
Become a product evaluator
To parti cipate in the testing and evaluation of Kyocera Wireless Corp.
products, including cellular or PCS phones, visit beta.kyocera-
wireless.com.
Page 18

xviii
093 453 037
Kyocera Wireless Corp.
10300 Campus Point Drive, San Diego, CA 92121 U.S.A.
Visit us at
www.kyocera-wireless.com
To purchase accessories, visit
www.kyocera-wireless.com/store
Page 19

User Guide for the Kyocera Phantom phone xix
Page 20

xx Contents
CONTENTS
1 Getting Started. . . . . . . . . . . . . . . . . . . . . . . . . . . . . . . . . . . . . . . . . . . 1
Charging the battery . . . . . . . . . . . . . . . . . . . . . . . . . . . . . . . . . . . . . . . 2
Replacing the mask . . . . . . . . . . . . . . . . . . . . . . . . . . . . . . . . . . . . . . . 4
Using menus . . . . . . . . . . . . . . . . . . . . . . . . . . . . . . . . . . . . . . . . . . . . . 7
2 Making and Answering Calls . . . . . . . . . . . . . . . . . . . . . . . . . . . . . . 11
Making a call . . . . . . . . . . . . . . . . . . . . . . . . . . . . . . . . . . . . . . . . . . . . 11
Calling emergency services . . . . . . . . . . . . . . . . . . . . . . . . . . . . . . . . 13
Speed dialing . . . . . . . . . . . . . . . . . . . . . . . . . . . . . . . . . . . . . . . . . . . 18
Setting up voicemail . . . . . . . . . . . . . . . . . . . . . . . . . . . . . . . . . . . . . . 20
Silencing an incoming call . . . . . . . . . . . . . . . . . . . . . . . . . . . . . . . . . . 21
Locking the keypad . . . . . . . . . . . . . . . . . . . . . . . . . . . . . . . . . . . . . . . 22
Understanding roaming . . . . . . . . . . . . . . . . . . . . . . . . . . . . . . . . . . . . 24
3 Entering Letters, Numbers, and Symbols . . . . . . . . . . . . . . . . . . . . 27
4 Storing Contacts . . . . . . . . . . . . . . . . . . . . . . . . . . . . . . . . . . . . . . . . 33
Saving a contact entry . . . . . . . . . . . . . . . . . . . . . . . . . . . . . . . . . . . . 33
Editing or erasing a contact . . . . . . . . . . . . . . . . . . . . . . . . . . . . . . . . 36
Finding contact information . . . . . . . . . . . . . . . . . . . . . . . . . . . . . . . . . 39
5 Sending and Receiving Text Messages. . . . . . . . . . . . . . . . . . . . . . 42
Sending text messages . . . . . . . . . . . . . . . . . . . . . . . . . . . . . . . . . . . . 42
Page 21

User Guide for the Kyocera Phantom phone xxi
Retrieving text messages . . . . . . . . . . . . . . . . . . . . . . . . . . . . . . . . . . 51
Customizing message settings . . . . . . . . . . . . . . . . . . . . . . . . . . . . . . 57
6 Customizing Your Phone. . . . . . . . . . . . . . . . . . . . . . . . . . . . . . . . . . 60
Silencing all sounds . . . . . . . . . . . . . . . . . . . . . . . . . . . . . . . . . . . . . . . 61
Choosing a different ringer . . . . . . . . . . . . . . . . . . . . . . . . . . . . . . . . . 62
Adjusting volume . . . . . . . . . . . . . . . . . . . . . . . . . . . . . . . . . . . . . . . . . 64
Using shortcuts . . . . . . . . . . . . . . . . . . . . . . . . . . . . . . . . . . . . . . . . . . 65
Personalizing the screen . . . . . . . . . . . . . . . . . . . . . . . . . . . . . . . . . . . 66
Creating a secure environment . . . . . . . . . . . . . . . . . . . . . . . . . . . . . . 72
Setting message alerts . . . . . . . . . . . . . . . . . . . . . . . . . . . . . . . . . . . . 76
Network settings . . . . . . . . . . . . . . . . . . . . . . . . . . . . . . . . . . . . . . . . . 78
Data settings . . . . . . . . . . . . . . . . . . . . . . . . . . . . . . . . . . . . . . . . . . . . 79
Setting position location . . . . . . . . . . . . . . . . . . . . . . . . . . . . . . . . . . . 81
7 Using Voice Recognition. . . . . . . . . . . . . . . . . . . . . . . . . . . . . . . . . . 83
Setting up voice dialing . . . . . . . . . . . . . . . . . . . . . . . . . . . . . . . . . . . . 83
Calling using voice tags . . . . . . . . . . . . . . . . . . . . . . . . . . . . . . . . . . . . 84
Using voice features with accessories . . . . . . . . . . . . . . . . . . . . . . . . 85
Training voice recognition . . . . . . . . . . . . . . . . . . . . . . . . . . . . . . . . . . 88
8 Using Tools. . . . . . . . . . . . . . . . . . . . . . . . . . . . . . . . . . . . . . . . . . . . . 89
Scheduler . . . . . . . . . . . . . . . . . . . . . . . . . . . . . . . . . . . . . . . . . . . . . . 89
Alarm Clock . . . . . . . . . . . . . . . . . . . . . . . . . . . . . . . . . . . . . . . . . . . . 90
Page 22

xxii Contents
Tip Calculator . . . . . . . . . . . . . . . . . . . . . . . . . . . . . . . . . . . . . . . . . . . 91
Calculator . . . . . . . . . . . . . . . . . . . . . . . . . . . . . . . . . . . . . . . . . . . . . . 92
Timer . . . . . . . . . . . . . . . . . . . . . . . . . . . . . . . . . . . . . . . . . . . . . . . . . 93
Stopwatch . . . . . . . . . . . . . . . . . . . . . . . . . . . . . . . . . . . . . . . . . . . . . 93
9 Fun & Games . . . . . . . . . . . . . . . . . . . . . . . . . . . . . . . . . . . . . . . . . . . 94
Tetris . . . . . . . . . . . . . . . . . . . . . . . . . . . . . . . . . . . . . . . . . . . . . . . . . 94
Brick Attack . . . . . . . . . . . . . . . . . . . . . . . . . . . . . . . . . . . . . . . . . . . . 96
Doodler . . . . . . . . . . . . . . . . . . . . . . . . . . . . . . . . . . . . . . . . . . . . . . . 97
My Sounds . . . . . . . . . . . . . . . . . . . . . . . . . . . . . . . . . . . . . . . . . . . . 100
My Pictures . . . . . . . . . . . . . . . . . . . . . . . . . . . . . . . . . . . . . . . . . . . 100
10 Connecting to the Internet . . . . . . . . . . . . . . . . . . . . . . . . . . . . . . . 102
Using the Web Browser . . . . . . . . . . . . . . . . . . . . . . . . . . . . . . . . . . 102
Index . . . . . . . . . . . . . . . . . . . . . . . . . . . . . . . . . . . . . . . . . 106
Page 23
User Guide for the Kyocera Phantom phone 1
1GETTING STARTED
Your phone comes with a removable lithium ion (LiIon) battery. Fully
charge the battery before using the phone.
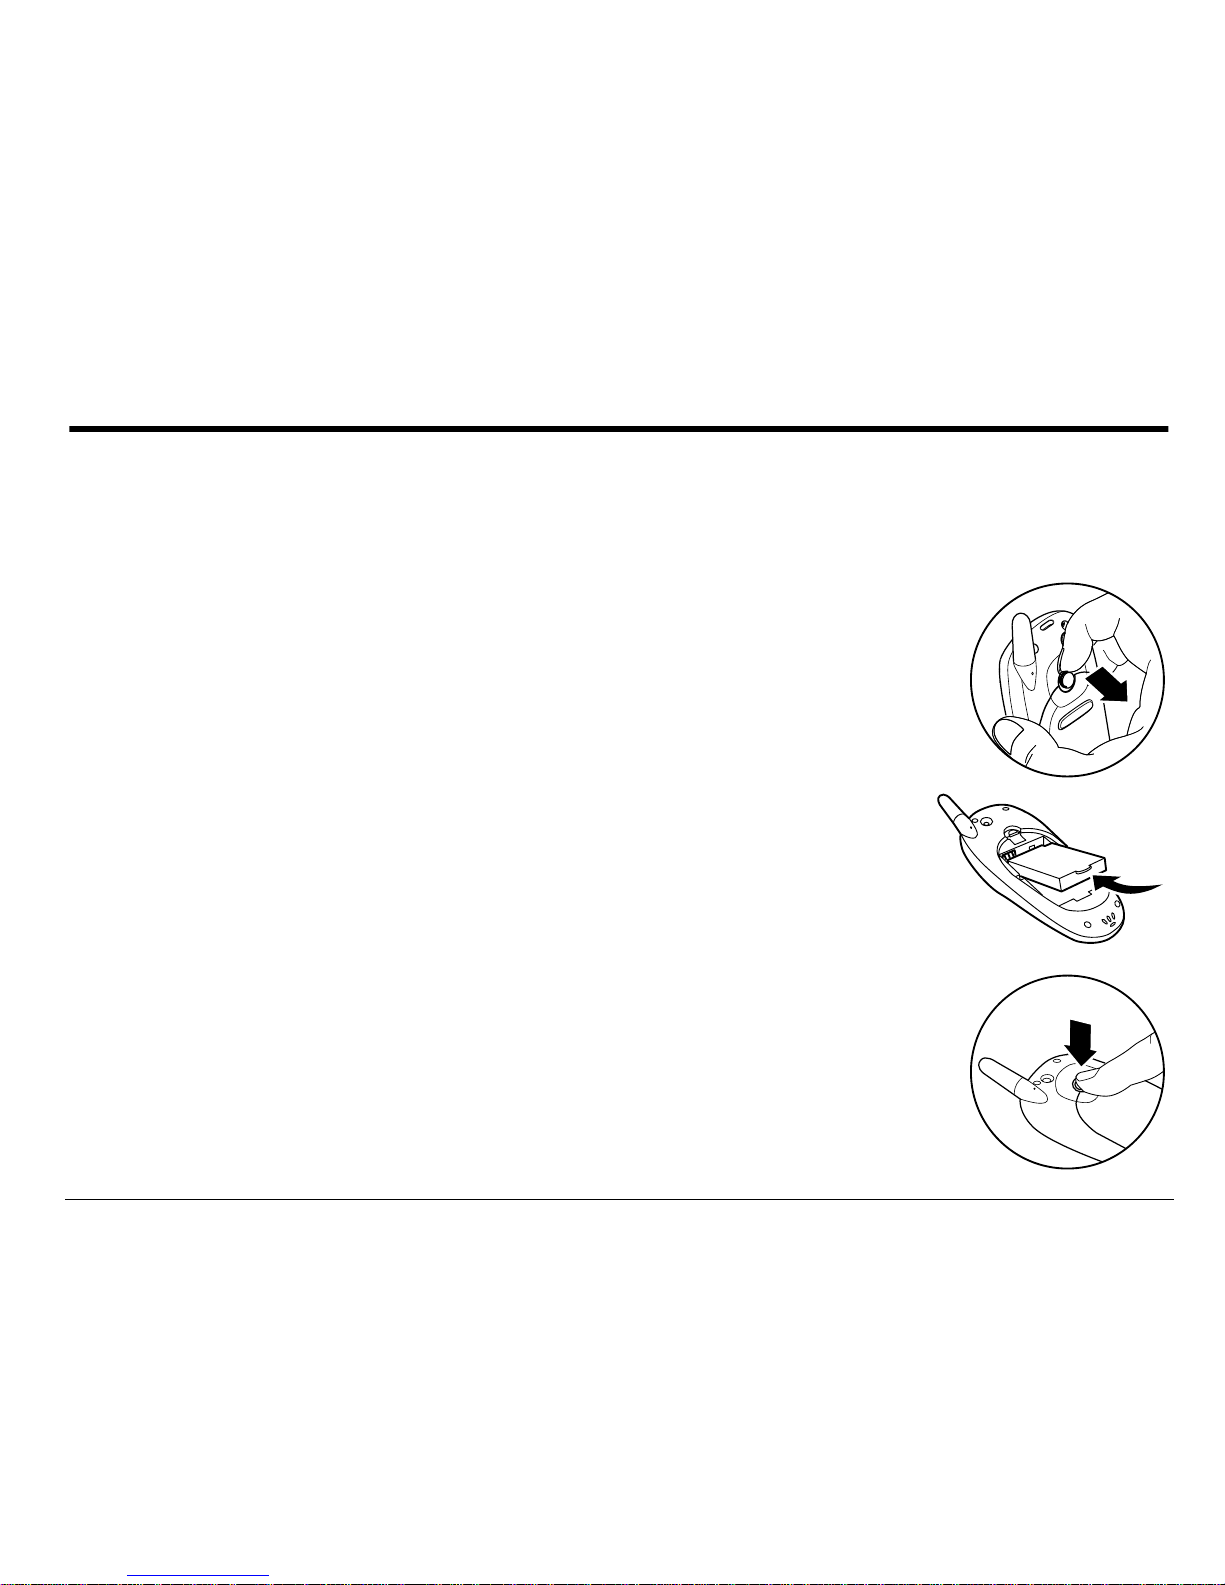
Installing the battery
1. Hold the phone facing away from you.
2. Use your fingern a il to pul l the ci rc ul ar la tc h towa rd th e
bottom of th e phone and pull the battery door away.
3. Place the battery in th e phone casing wit h the metal
contacts toward th e top of the phone .
4. Place the battery door notches in the openings near the
bottom of th e phone.
5. Press the ci rcular latch until it clicks.
Page 24

2 Getting Started
Charging the battery
You must have at le ast a p ar tia l ch arge in the battery to make or receive calls.
To charge the ba tte ry, connect the AC ada pter t o t he j ack on the
lower right sid e of the phone, then plug the adapte r into a wall outl et.
The battery icon in the upper-right corner of the screen tells you
whether the ph on e i s:
• Charging (the icon is animated)
• Partiall y charged
• fully charged
Recharging the battery: You can safely re ch arg e the battery at any time, even
if it has a partial c ha rge .
Page 25

User Guide for the Kyocera Phantom phone 3
Caring for the battery
General safety guidelines
• Do not take apart, pu n ct ure , or sh o r t-circuit the bat te ry.
• If you have not used the battery for more th an a month, rech arge it before
using your phone.
• Avoid e xposing the battery to extreme temperatu res, direct su nlight, or
high humidity.
• Never dispose of any batter y in or near a fire. It could expl ode.
Common causes of battery drain
• Playing games
•Using the Web
• Keeping backlight on
• Operating in analog ( ) mode. Your phone switches between modes to
find the best signal. To set your phone to operate in a single mode , select
Menu
→ Settings → Network →
Digital or Analog.
• Operating in digital mode when far away from a base station or cell site.
• Using data cables or accessories, such as the Hands-free he adset.
Page 26
4 Getting Started
• Operatin g when no ser vice is availa ble, or se rvice is availa ble inte rmitte ntly.
• High earpiece and ringer vo lume settings.
• Repeating sound, vibration, or lighted alerts.
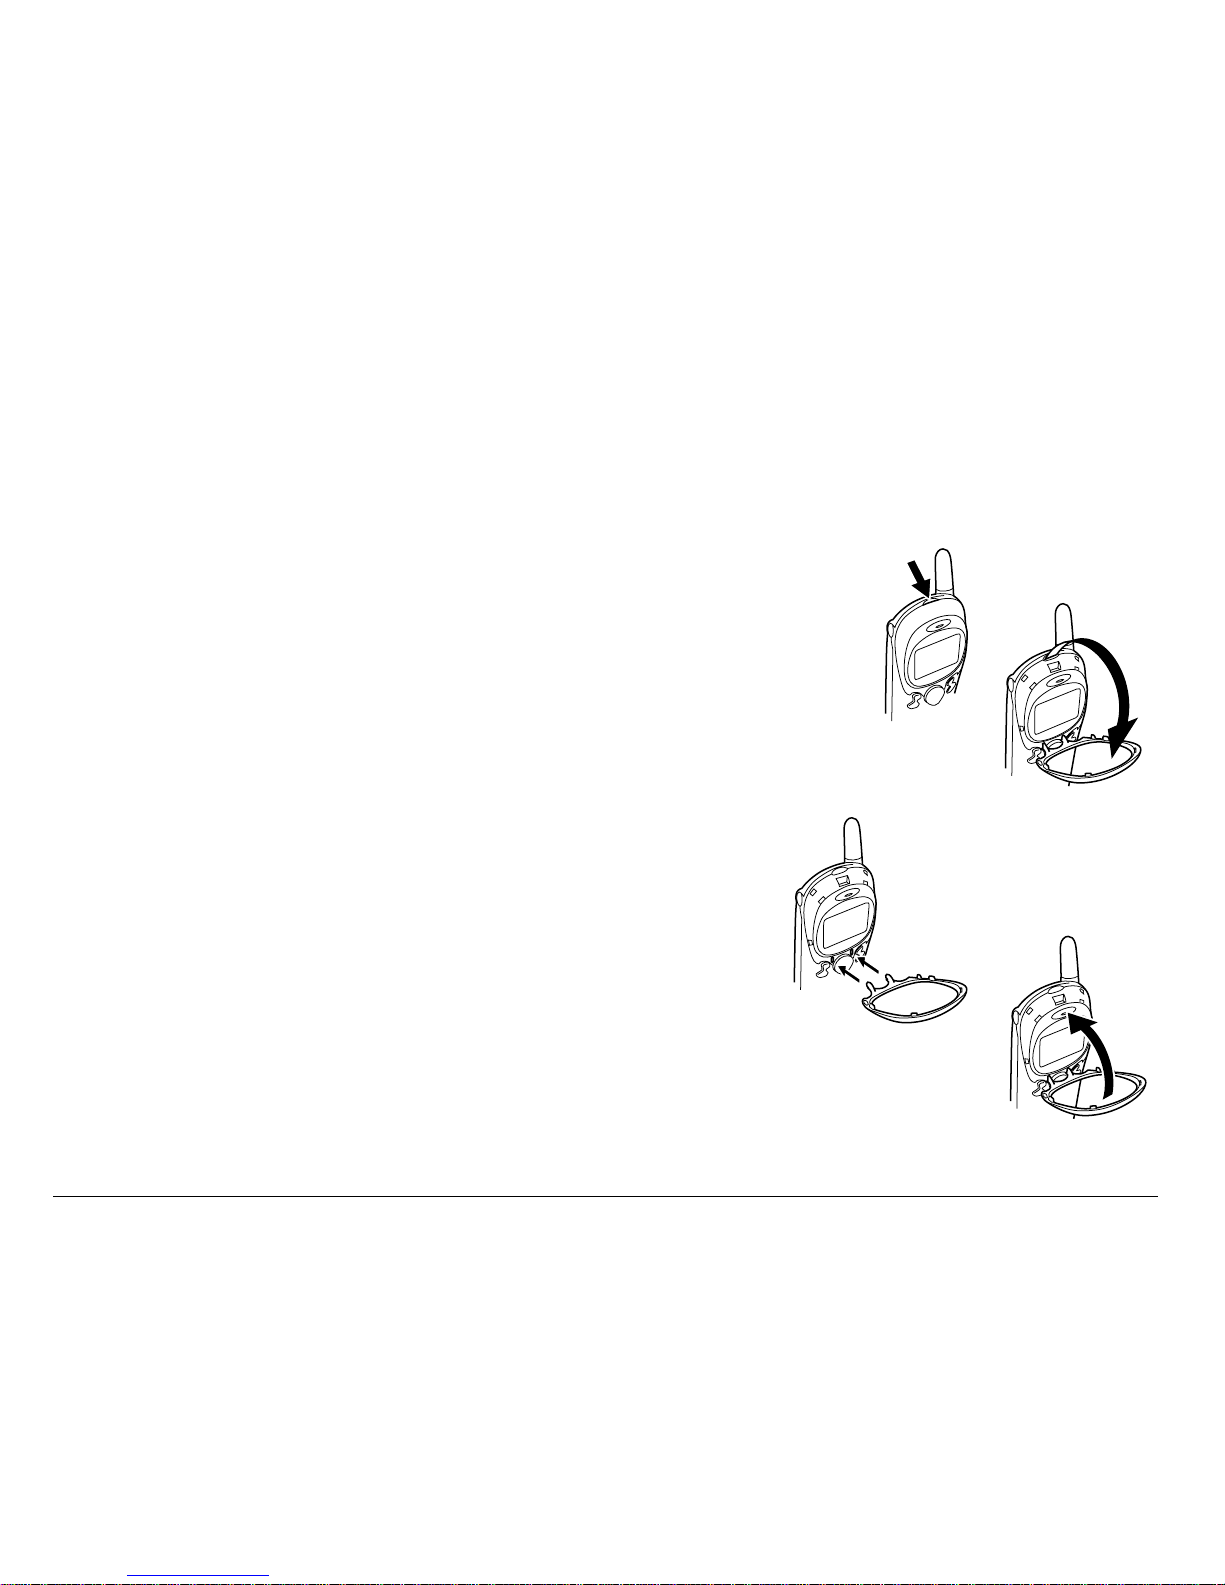
Replacing the mask
Your Phantom phon e h as a rem o va ble mask.
To remove the mask and replace it with a new one:
1. Place your thumb nail under the notch at the top of
the phone.
2. Lift the ma s k away from the ph on e .
3. Place the point ed tip s at the bo tto m of th e new
mask into th e notches to the left and right of
the navig at io n key.
4. Press the top of the mask ont o t he ph one unt il
it latches int o place.
Page 27
User Guide for the Kyocera Phantom phone 5
Note:Extra masks may not be provided with your phone. T o shop online for
masks and other accessories, visit www.kyocera-wireless.com/store.
To order by phone, call ( 800) 349-4188 (U.S.A. only) or (858) 882-1410.
Performing basic functions
• Turn the phone on: Press and wait until the hourglass icon appears.
• Turn the phone off: Press and hold un til the phone beeps or the s c reen
goes blank.
• Make a call: Enter the numb er an d pres s .
• End a call: Press (t he red key).
• Answer a call: Press (the green key).
• Access voicemail: Press and hold and follow the system prompts.
• Verify your phone number: Select Menu → Phone Info. Press down to scroll
through information.
• Silence the ringer: Press , then to answer.
• Silence all sounds: Select Menu → Setting s → Sile nt M od e and select an option.
• Lock the keypad: Press and hold .
• Access your personal shortcut: Press up.
Page 28
6 Getting Started
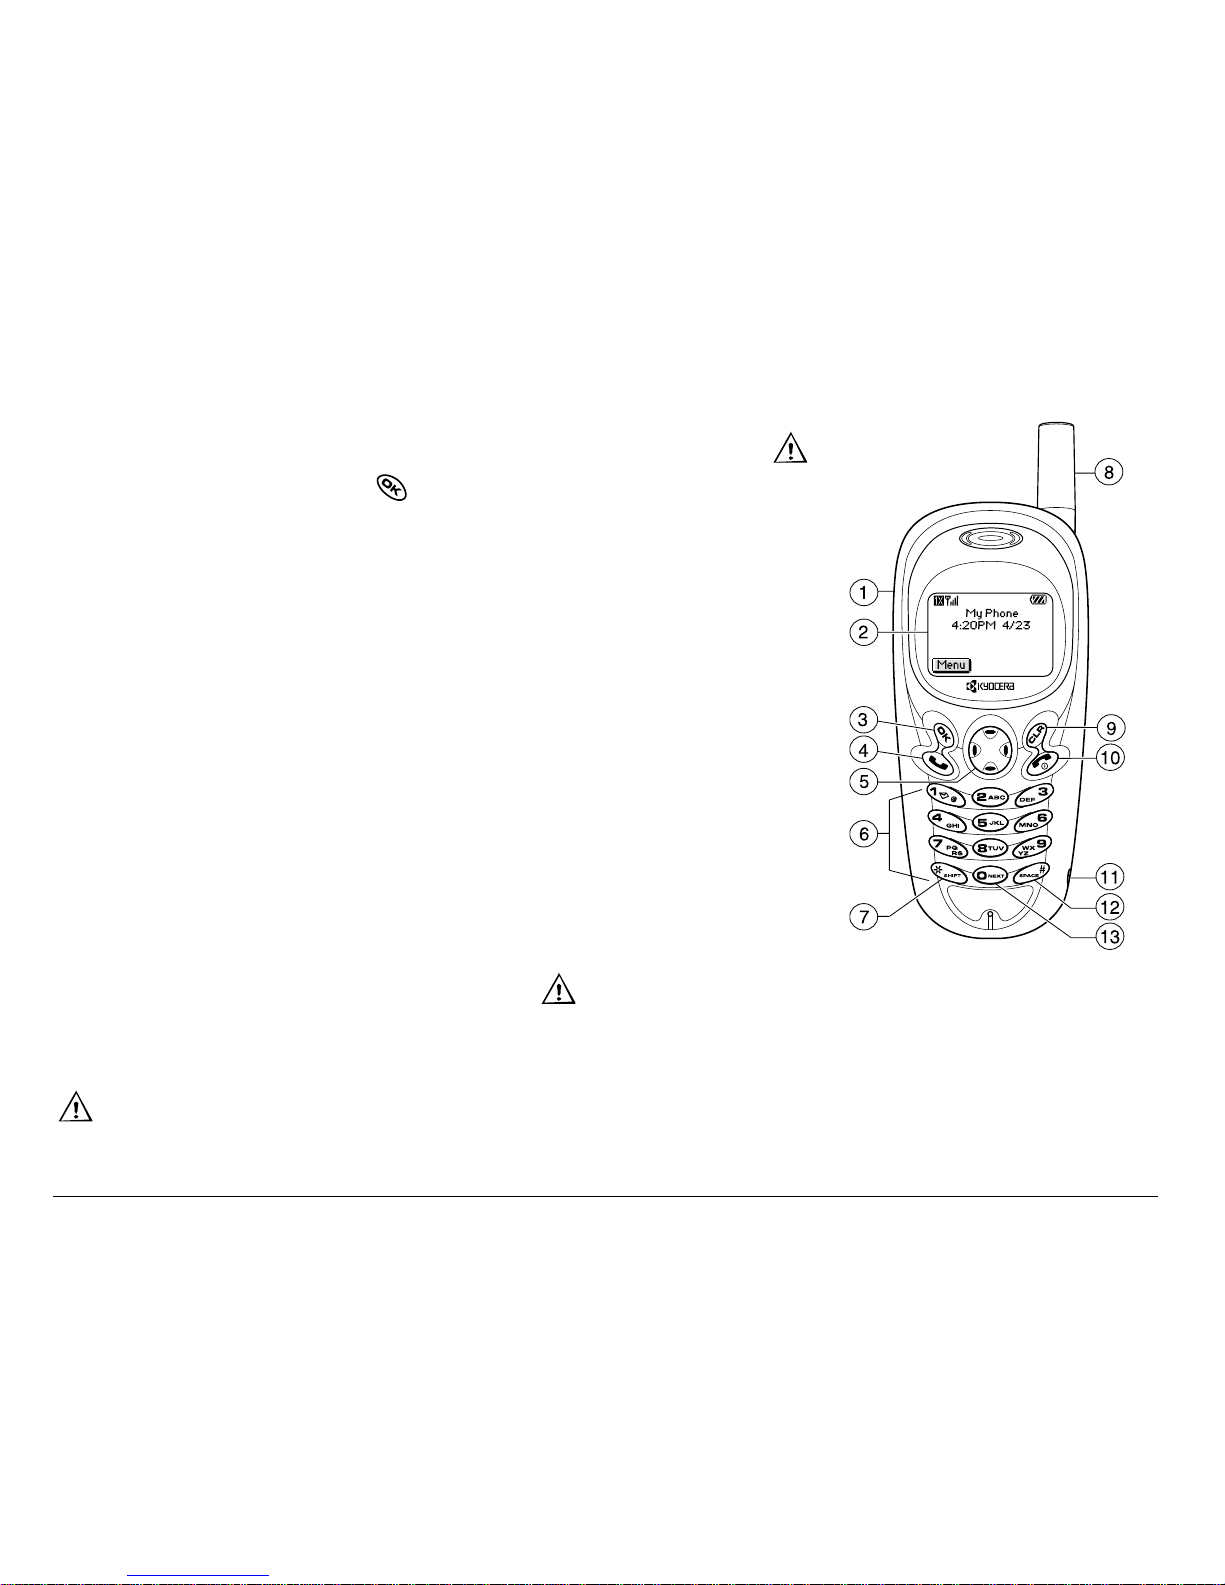
Getting to know your phone
1. Jack for Hands-free Headset (sold separately) only.
2. Home screen. Press (item 3) to select Menu.
3. OK key selects a menu item or option.
4. Send/Talk key starts or answers a call.
5. Navigation key scrolls through lists and positions
cursor. Also accesses shortcuts from the home
screen.
6. Keypad for entering enter numbers, letters, or
symbols.
7. * Shift key changes the text mode in text entry.
8. Antenna does not extend.
9. Clear key erases the last character in text entry, or
returns to the previous menu.
10. E nd/Power key turns the phone on or off, ends a call,
or returns you to the home screen.
11. Jack for AC adapter (included).
12. Space # key enters a space during text entry.
13. 0 Next key cycles through word choices during text entry.
Warning: Inserting an accessory into the incorrect jack will damage the phone.
Page 29

User Guide for the Kyocera Phantom phone 7
Using menus
The contents of the main menu are as follows:
Recent Calls
Incoming Calls
Outgoing Calls
Missed Calls
Erase Lists
Contacts
View All
Add New
Find Name
Add Voice Dial
Speed Dial List
Voice Dial List
Business List
Personal List
Information
Messages
Voicemail
Send New*
InBox
Net Alerts*
OutBox*
Saved
Erase Msgs
Group Lists*
Msg Settings
Web
Browser
Connects to
Internet
Settings
Silent Mode
Keyguard
Sounds
Display
Voice
Services
Security
Call
Information
Network
Convenience
Messaging
Accessories
Fun &
Games*
Tetris
©
Brick Attack
TM
Doodler
TM
My Sounds
My Pictures
Tools
Scheduler
Alarm Clock
Tip Calculator
Calculator
Timer
Stopwatch
Phone Info
Your Phone
Number
SW Version
PRI Version
ESN
Technology
SID
Browser Name
Browser Version
Icon Key
(Scroll down to
view information.)
* Not available on all phones. Check with your service provider.
Page 30
8 Getting Started
• From the home scr een, press to select Menu.
• Press left, right, up, or down to see menus.* Press to select a
menu or menu item.
• Press up or down to view menu items.
• Press to back up a menu level.
• Press to return to the home screen.
*To chan g e th e w ay th e m enus appe ar, select Menu → Settings → Display →
Main Menu View, then select e ith er Graphic or List and press .
In this guide, an arrow
→ tells you to select an option from a menu. For
example, Menu → Settings means select Menu, then select the Settings option.
Page 31
User Guide for the Kyocera Phantom phone 9
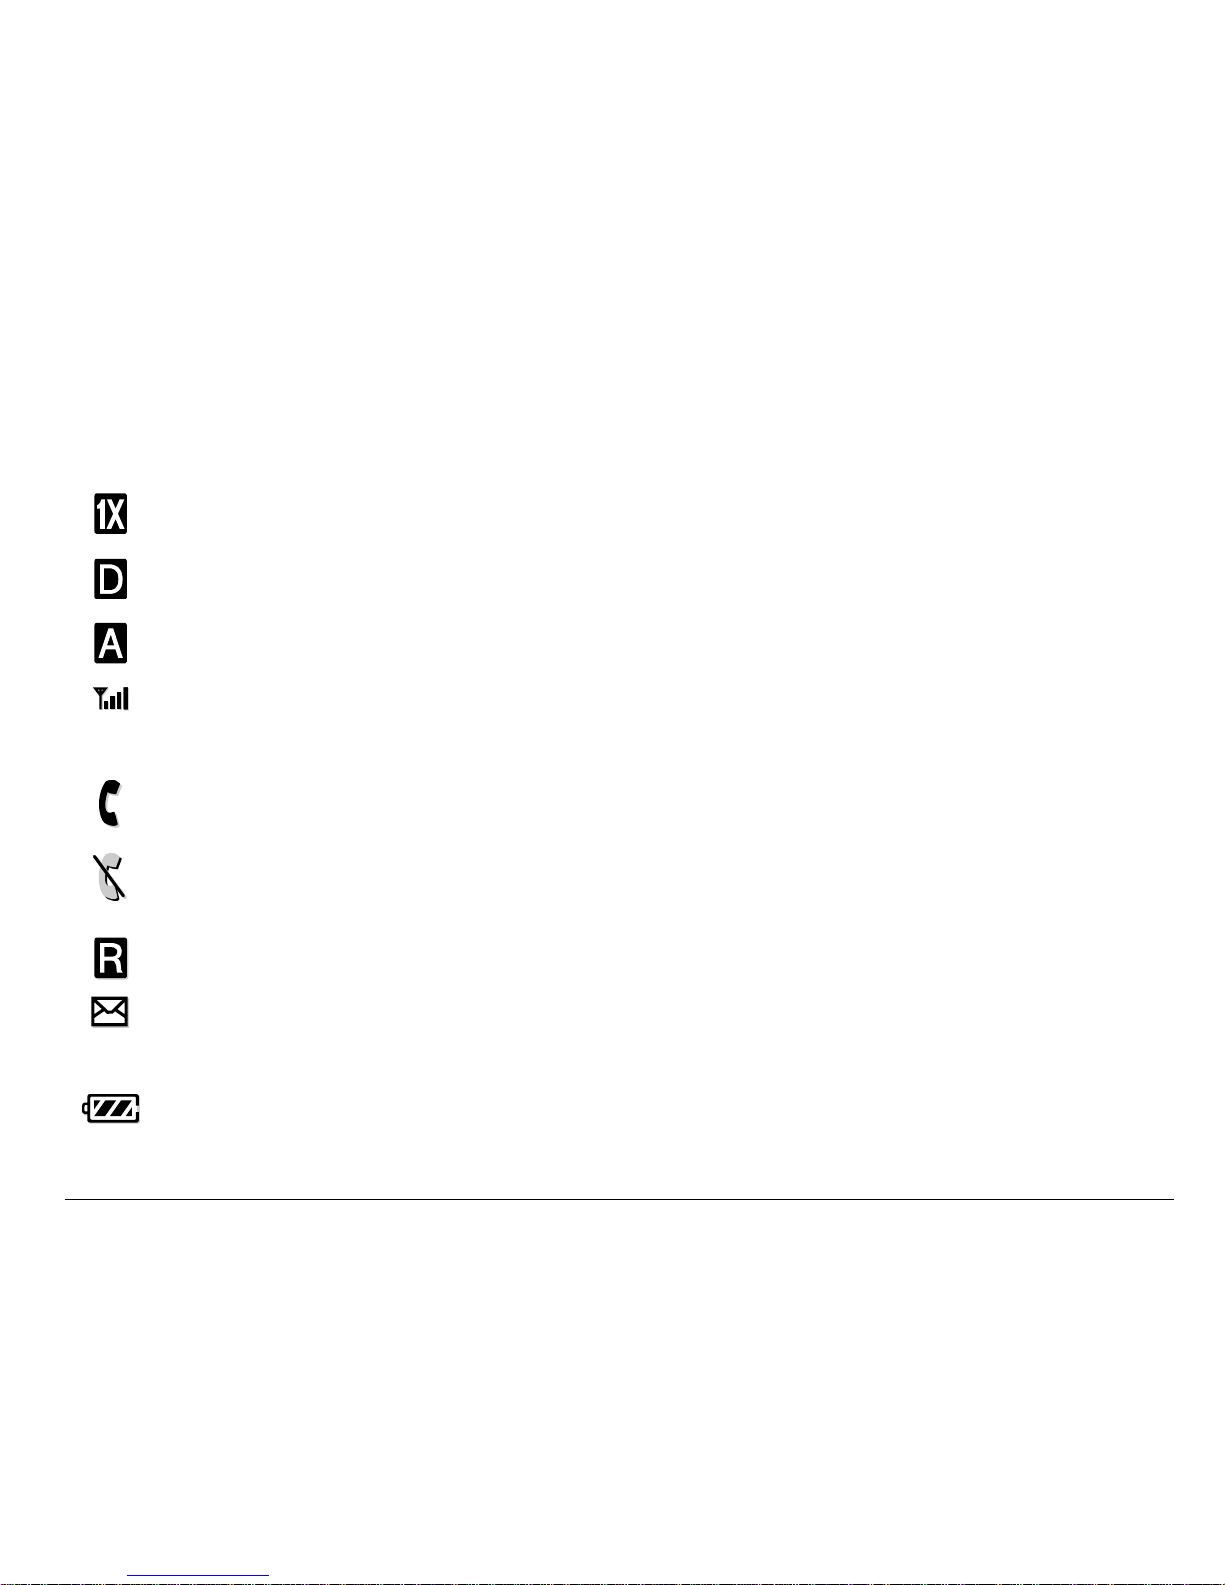
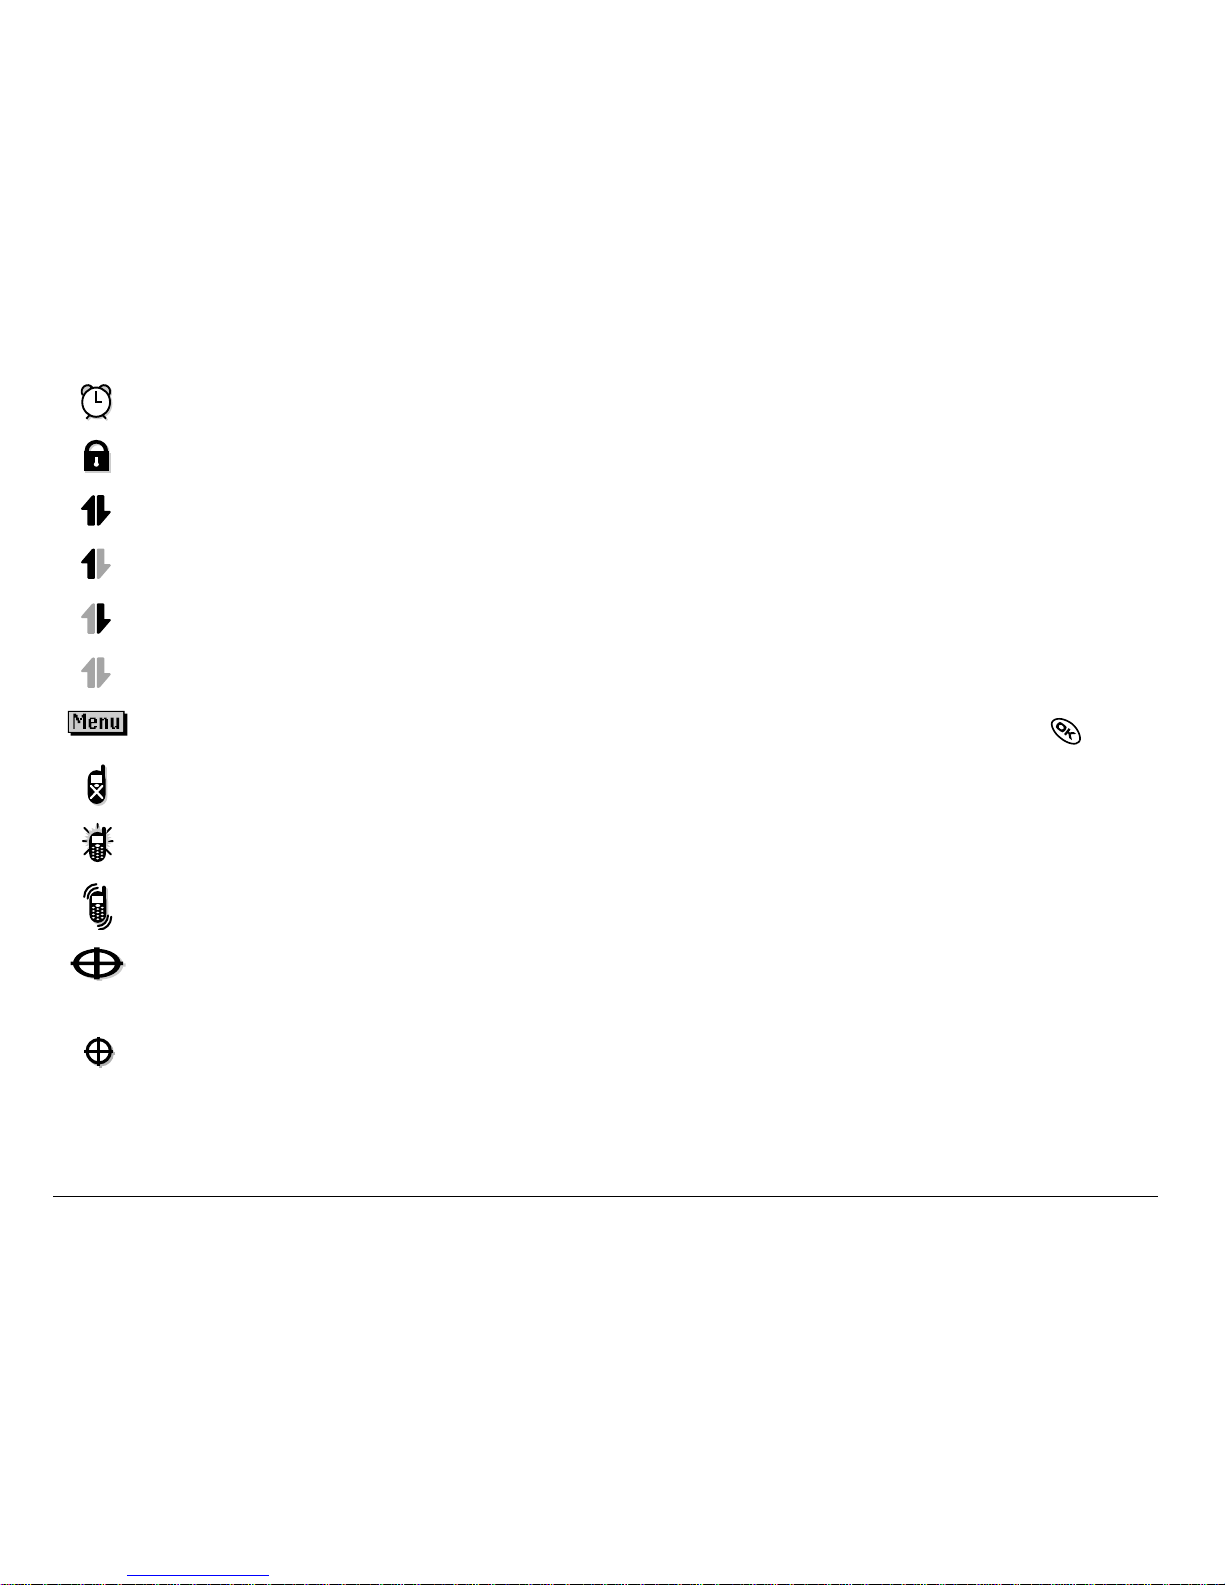
Understanding screen icons
These ic on s ma y ap pe ar on your ph on e’s sc re en .
The phone is operating i n IS2000 (1X) digital mode.
The phone is operating i n IS95 digital mode.
The phone is operating in Analog (FM) mode.
The phone is receiving a signal. You can make and receive calls.
Fewer bar s indicate a weaker signal.
A call is in progress.
The phone is not receiving a signal.
You cannot make or receive calls.
The phone is roaming outside of its home service area.
You hav e a te xt message, vo ic e m ail, or page.
(Blinking icon indicates an urgent message, voicemail, or page.)
The battery is full y cha rg ed . Th e m ore blac k bars , th e gre a te r
the charge.
Page 32
10 Getting Started
The alarm clock is set.
The phone is in privacy mode or is accessing a secure Web site.
High-speed (3G) data servi ce is available and active on your phone.
(blinking) The phone is sending high-speed data.
(blinking) The phone is receiving high-speed data.
High-speed data service is available, but the phone is dorm ant.
The phone is at the home screen. To access the menus, press .
Keyguard is on. The keypad is locked.
The phone is set to light up instead of ring.
The phone is set to vibrate or to vibrate and then ring.
Position location is set to Verizon Wireless and to
emergency services.
Position location is set to emergency services only.
Page 33
User Guide for the Kyocera Phantom phone 11
2MAKING AND ANSWERING CALLS
Making a call
1. Make sure you a re in an are a wher e the sig nal ca n be rec ei ved . L ook for
the symbol on the home screen.
Note:The more bars you see in this symbol , the clearer the recep tion will be.
If there are no bars, try to move to where the reception is better.
2. Enter the phone number.
3. Press .
4. Press to end the call.
Redialing a number
To redial the last number called, press twice. If you see a message
promptin g y ou to s pe ak a na m e, press again.
Page 34
12 Making and Answering Calls
Calling a saved number
If you have already saved a phone number, you can use the contacts list to
find it quick ly.
1. Press down. This brings up a list of all saved contacts.
2. Scroll down the list, find the contact you want, and press to dial
the number.
For more about finding contact information, see page 39.
Tip: To call a saved number using your phone’s voice recognition fea ture,
see “Calling using voice tags” on page 84.
Answering a call
When a cal l comes i n, th e phone r ing s, vibr ates, or lights up , and a dan cing
phone ic on appea rs. The phone number of the c aller al so appe ars if it is not
restricted. If the number is stored in your Contacts directory, the contact
name appears.
• To answer the call, press .
Page 35

User Guide for the Kyocera Phantom phone 13
• If you do not wish to answer the call, Silence or Ignore=and press .
Silence mutes the ringer. Ignore mutes the ringer an d returns you to the
screen that was ac tive at the ti me the ca ll came in . Bot h action s will se nd
the caller to voicemail if you do not pick up the call.
Calling emergency services
Note:Regardless of your 3-digit emergency code (911, 111, 000, etc.), your
phone wil l op er ate as descri be d below.
• Dial
your 3-digit emergency code and press .
You can call the code even if your phone is locked or your account is
restricted. When you call, your phone enters Emergency mode. This
enables th e e m erg en cy s erv ic e ex clusive access to your ph on e to call you
back, if necessary. To make or receive regular calls after dialing the code,
you must exit this mode.
Page 36
14 Making and Answering Calls
To exit Emergency mode
When you have completed the emergency call:
1. Press to select Exit.
2. Press again to confirm you r choice.
Note: To determin e who has access to your location, see “Setting position
location” on page 81.
Using your phone in an airplane
While in an airplane, it is normally required that you turn off your mobile
phone, because it emits RF signals that interfere with air traffic control. You
can, howev e r, keep your Kyo ce ra Phantom ph o ne po w ere d on if yo u s et it
to Airplane mode.
In Airplane mode, your phone will not emit RF signals. You cannot make or
receive regular phone calls, send text messages, or use the Web, but you
can play ga m es , u se the Schedul er, set the cl oc k, an d m a ke emergenc y
calls to designated emergency services.
Page 37

User Guide for the Kyocera Phantom phone 15
To set Airplane mode
1. Select Menu → Settings → Convenience → Airplane Mode.
2. At the message, press .
3. Highlight an option and press .
– Enabled—Activate Airp lane mode.
– Disabled—Turn off Airplane Mode and return the phone to
normal state.
Dealing with missed calls
When you have missed a call, “Missed” appea rs on your sc reen unless the
caller le av es a vo ic em a il.
• Press or to clear the screen.
• To view the caller’s number or name, se lect Calls. In the Recent Calls list,
the missed call is indicated with a flashing .
• If the caller left a voicemail message, select Call.
Page 38
16 Making and Answering Calls
Setting missed call alerts
You can set an ale rt to beep every five minutes after you have missed a call.
• Select Menu
→ Settings → Sounds → Missed Call → Enabled.
• To turn off the alert when it rings, press or .
• To cancel th e al ert, select Menu
→ Settings → Sounds → Missed Call →
Disabled.
Viewing recent call details
Details on the la st 29 c all s y o u m ade or receive d are stored in th e R ec en t
Calls list. You can get details on the caller’s name and phone number,
along wit h the time and le ngth of the ca ll. Icon s indic ate t he ty pes of cal ls in
the list.
Outgoing call Forwarded call
Incoming ca ll Three-way call
Missed call (flashing)
Page 39

User Guide for the Kyocera Phantom phone 17
Viewing recent calls
1. Select Menu → Recent Calls.
2. Select a list: Incoming Calls, Outgoing Calls, or Missed Calls.
3. Select a recent call item.
4. Select an option:
– Time—Show the time of the call.
– Number—Show the call er’s number (for an incoming call), or the
number you called (for an outgoing call).
– Prepend—Place the cursor at the begi nning of t he phone number so you
can add an area code, i f you pl an t o save the number as a contact.
– Save New—Save the phone number as a contact.
– Add to—Add t he phone number to a saved contact.
– View Contact— Show det ail s on the con t act if t he caller’s i nforma tion is
already in your Contacts directory.
Page 40
18 Making and Answering Calls
Note: If the phone number has been classif ied as “secret,” you must enter
your four-digit lock code to view or edit it. For information o n the lock
code, see “Changing your lock code” on page 73. To classify a phone
number as secret, see “Saving a contact entry” on page 33.
Erasing recent calls
1. Select Menu → Recent Calls → Erase Lists.
2. Select an option: Incoming Calls, Outgoing Calls, Missed Calls, or Erase All.
3. Press right and press to select Yes.
Speed dialing
Speed dialing allows you to quickly dial a stored phone number by entering
a one- or two-digit speed dialing location. You can speed dial a number
once you have saved it as a contact and assigned a speed dial number to
it. (See “Saving a contact entry” on page 33 and “Editing or erasing a
contact” on page 36.)
Page 41
User Guide for the Kyocera Phantom phone 19
Using speed dialing
From the h o me s cre en , e nte r th e on e- or two-digit sp ee d di aling locatio n
assigned to the contact and press .
Setting up 1-Touch Dialing
1-Touch Dialing is a for m o f spee d di a ling th at all ows yo u to pr e ss and hol d
a speed dial location to make a call. It is the fastest way to speed dial.
1. Select Menu
→ Settings → Convenience → 1-Touch Dialing → Enabled.
2. Press .
Using 1-Touch Dialing
To dial a phone number, press and hold the assigned speed dialing location
for the ph on e n um b er. If it is a two-dig it nu mb er, press the firs t number,
then pres s an d h ol d the second. For ex am ple, if the s pe ed di ali ng nu m ber
is 15, pre ss , then press an d h old .
Page 42

20 Making and Answering Calls
Setting up voicemail
Before you r ph on e can receive voicemail m essages, yo u m u st set up a
password and reco rd a personal gr ee tin g wi th y ou r s ervic e p r ov id er. When
you have s et u p yo ur voicemai l, a ll un an sw e r ed c al ls to your phone a re
automatically transferred to voicemail, even if your phone is in use or
turned off.
1. From the home screen, press and hold .
2. Enter your passcode, which you obtain from your service providerK
3. Follow the system prompts to create a password and record a greeting.
Note: If you are having trouble accessing your voicemail, contact your
service provider.
Checking voicemail mess ages
When a vo ic e m e ss ag e is receive d, yo ur sc reen will display a message:
“New Message [x ] Voicemail.” This text will remai n fo r a bo ut five m in u tes .
After that, look fo r the symbol at th e top of your s cr ee n. Th e symbol
flashes i f th e m e ss ag e is urgent.
Page 43
User Guide for the Kyocera Phantom phone 21
If you see “New Message” on your sc reen
1. Press to select Call. This i nitiates a call to your voicemail number.
2. Follow the prompts to retrieve the message. For specific information on
getting voicemail messages, contact your service provider.
If you see the symbol
1. Press to initiate a call to your voicemail number.
2. Follow the prompts to retrieve the message.
Note:You can set the phone to beep, li ght up, or play a t une every five
minutes to remi nd yo u that you hav e voi cemai l. See “Set t ing m essage
alerts ” on page 76 and “Setting backlighting to flash” on page 69.
Silencing an incoming call
• To silence an incoming call quickly, press . Then press to answer
the call.
This action silences the current call only. The next call will ring as normal.
Adjusting the volume during a call
• To adjust the earpiece vol ume during a call, press up or down.
Page 44

22 Making and Answering Calls
Locking the keypad
The Keyguard locks your keypad to prevent accidental keypresses when
the phone is turned on and a call is no t in p r og res s. You can still answe r or
silence a n inc om ing call.
• To lock the keypad from the home screen, press left and hold.
• To unlock the keypad, press in this order.
Changing the keyguard setting
1. Select Menu → Settings → Keyguard.
2. Highlight an option. You can set the phone to lock the keypad
immediately, or automatic a lly if no ke y is pre ss e d aft er 30 s e co n ds ,
1 minute, or 5 minutes.
3. Press to save.
Page 45

User Guide for the Kyocera Phantom phone 23
Tracking calls
You can track the number and duration of calls made and received on your phone.
1. Select Menu
→ Settings → Call Information.
2. Select a timer:
– Recent Calls— Tracks all calls you hav e made and received since you
last reset thi s timer.
– All Calls Timer—Tracks all calls you have made and received. This
timer canno t be reset.
– Kbyte Counter—Tracks the kilobytes of data sent and received by the
phone. It co unts only SO 33 packet data. When the total reac hes
999,999kb, the counters reset automatically.
3. To reset a timer, highlight Reset and press .
Timing your calls
You ca n set your ph on e to beep 10 secon ds b efo re each min ute pass e s
when you are on a call.
• Select Menu
→ Settings → Sounds → Minute Alert → Enabled.
Page 46

24 Making and Answering Calls
Receiving data or faxes
Your phone may be able t o receive certain data or faxes, depending on t he
system sen di ng the informati on . You cannot rec ei ve voice calls w h ile th e
phone is in data/fax mode. For more inf ormat ion , see “Data settings” on
page 79.
Making calls using a headset
If you are u sing a hand s-f ree h eadse t (so ld s epar at ely), pres s th e butt on o n
your head se t to a ns w er or e nd a ca ll.
Understanding roaming
Controlling network roaming
Dependin g on services avail able from your service provider, you may force
the phone into either digital or analog mode. This is useful if you are in an
area that borders on digital service and the automatic feature is causing the
phone to k e ep sw i tc hin g between modes.
1. Select Menu
→ Settings → Network → Digital/Analog.
2. Select an option and press .
– Automatic automatical ly swit ches the p hone be tween di git al and a nalog.
Page 47

User Guide for the Kyocera Phantom phone 25
– Analog only sets the phone to work in analog mode only.
– Analog call forces a call int o a nalog mode for the durati on of the ne xt call.
– Digital only sets the phone to work in digital mode only.
Setting an alert for roaming
Depending on services available from your service provider, you may use
this setting if you want the phone to alert you when you roam outside of
your home service area.
1. Select Menu
→ Settings → Network → Roam/SvcAlert.
2. Select an opt ion and press .
– When no svc alerts you with three tones decreasing in pitch when
service is lost and three tones increasing i n pitch when service is
acquired again.
– Roam Change alerts you with two decreasing tones when roaming
service is acquired and three increasing tones when home area
service is acquired again.
– Any Change aler ts y ou with th ree incr easing tones i f there is a change in
roaming service or three decreasing tones if the phone loses service.
Page 48

26 Making and Answering Calls
Setting the roam ringer
You can set a ringer to indicate when an incoming c al l wil l b e s u bje ct to
roaming charges.
1. Select Menu
→ Settings → Sounds → Roam Ringer.
2. Highlight Enabled and press . You’ll hear a sample of the ringer.
3. Press to set the ring er.
Setting Call Guard to avoid roaming calls
You can se t your p hone to warn you before y ou an swer o r place a ca ll
while roaming.
• Select Menu
→ Settings → Convenience → Call Guard → Call prompt.
The phone makes a distinctive ring to indicate an incoming call while you
are roaming, and you must press to accept the call or to place a call
while roaming.
Page 49
User Guide for the Kyocera Phanotom phone 27
3ENTERING LETTERS, NUMBERS, AND SYMBOLS
You ca n enter letters, num b ers , a nd sy m bo ls in c on tacts, tex t m e ss ag es ,
and your banner.
Understanding text entry screens
The current text entry mode (and capitalization setting, when applicable)
are indic ate d by ic on s .
Text entry modes
There are fou r te xt entry modes :
Number mode
Normal text mode
Rapid tex t e ntry m od e
text
capitalization text
Page 50
28 Entering Letters, Numbers, and Symbols
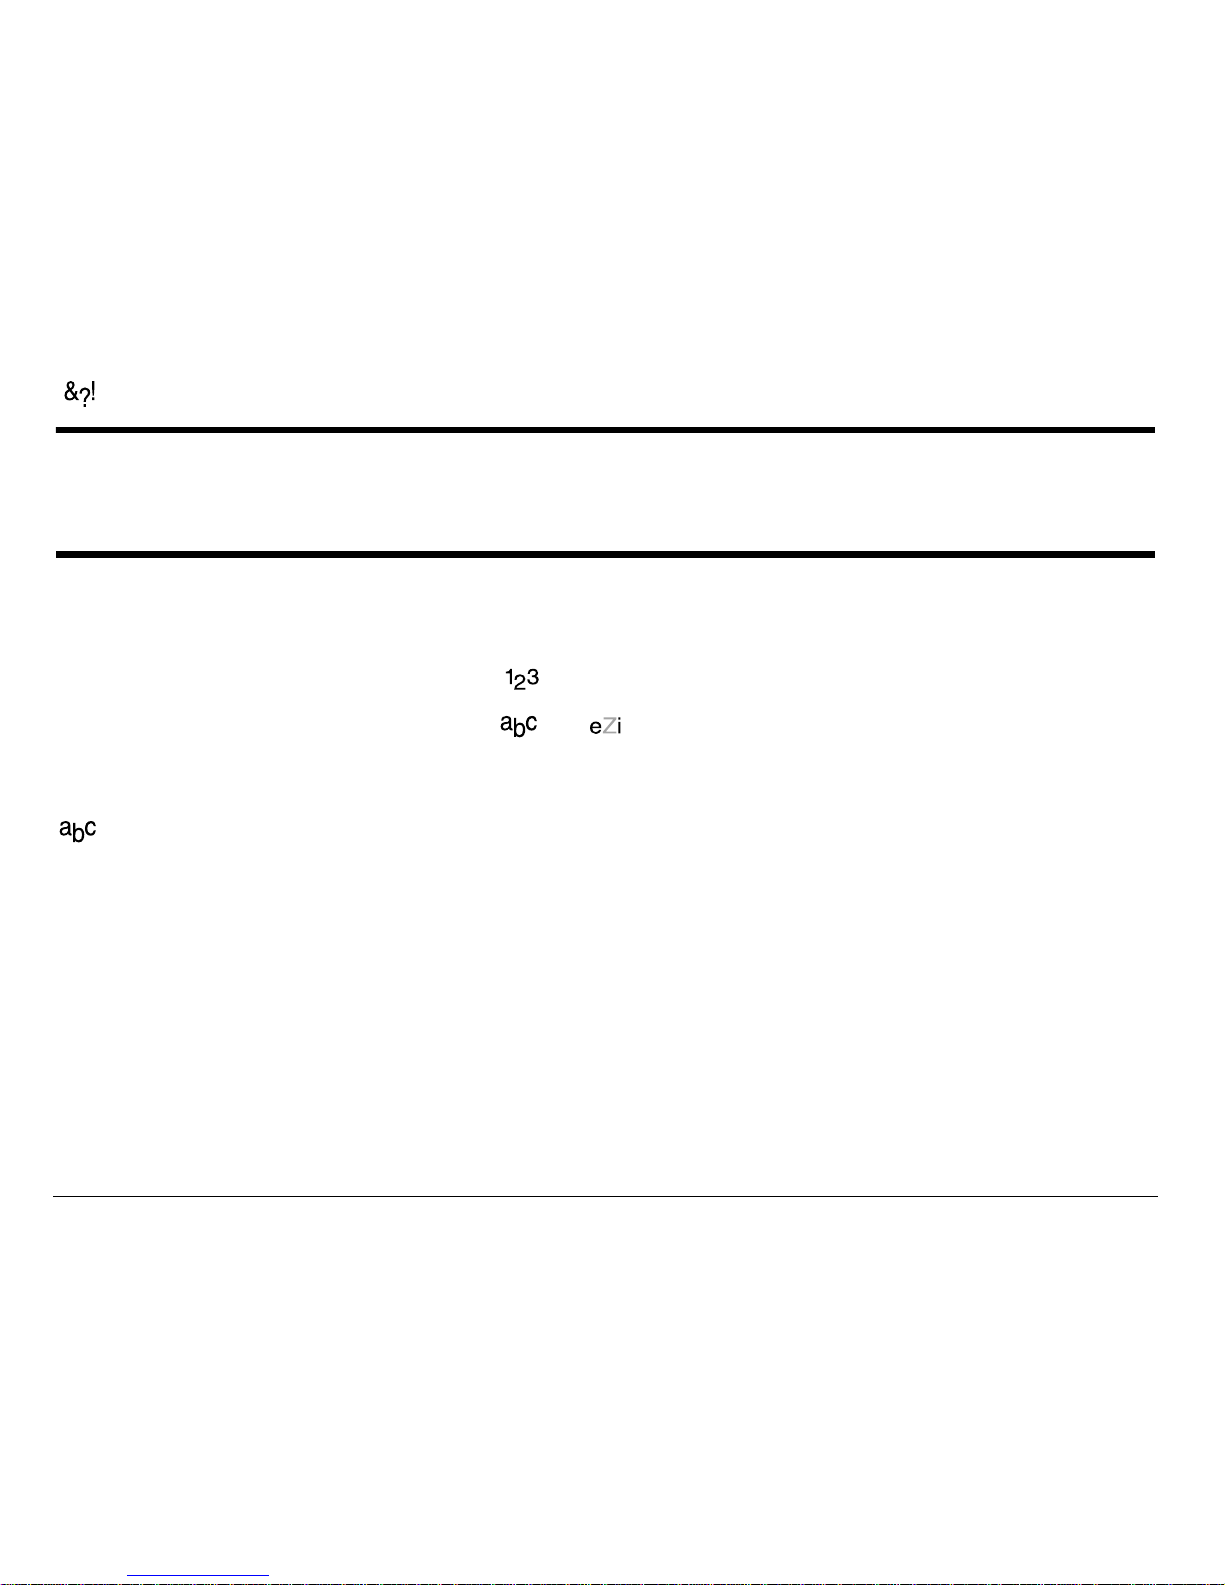
Symbol mode
Note: The mode you star t in depends on t he task you are doi ng. For example,
when entering a pho ne number, you’re in number mode. Whe n enteri ng
a name for a contact, you’re in normal text mode.
Entering numbers
• To enter a number while in mode, press a number key once.
• To enter a number wh il e in or mode, press a nd hold a n umbe r ke y
until the number appears on the screen.
Entering words letter by letter
Use normal te xt mo de to e nte r le tte rs.
1. Press a key once for the first letter, twice for the second letter, and so on.
If your ph one is set to Spanish, French, or Portugu ese, accente d letters
are available.
2. Wait for the cursor to move right and enter the next letter.
Page 51
User Guide for the Kyocera Phanotom phone 29
Entering words quickly
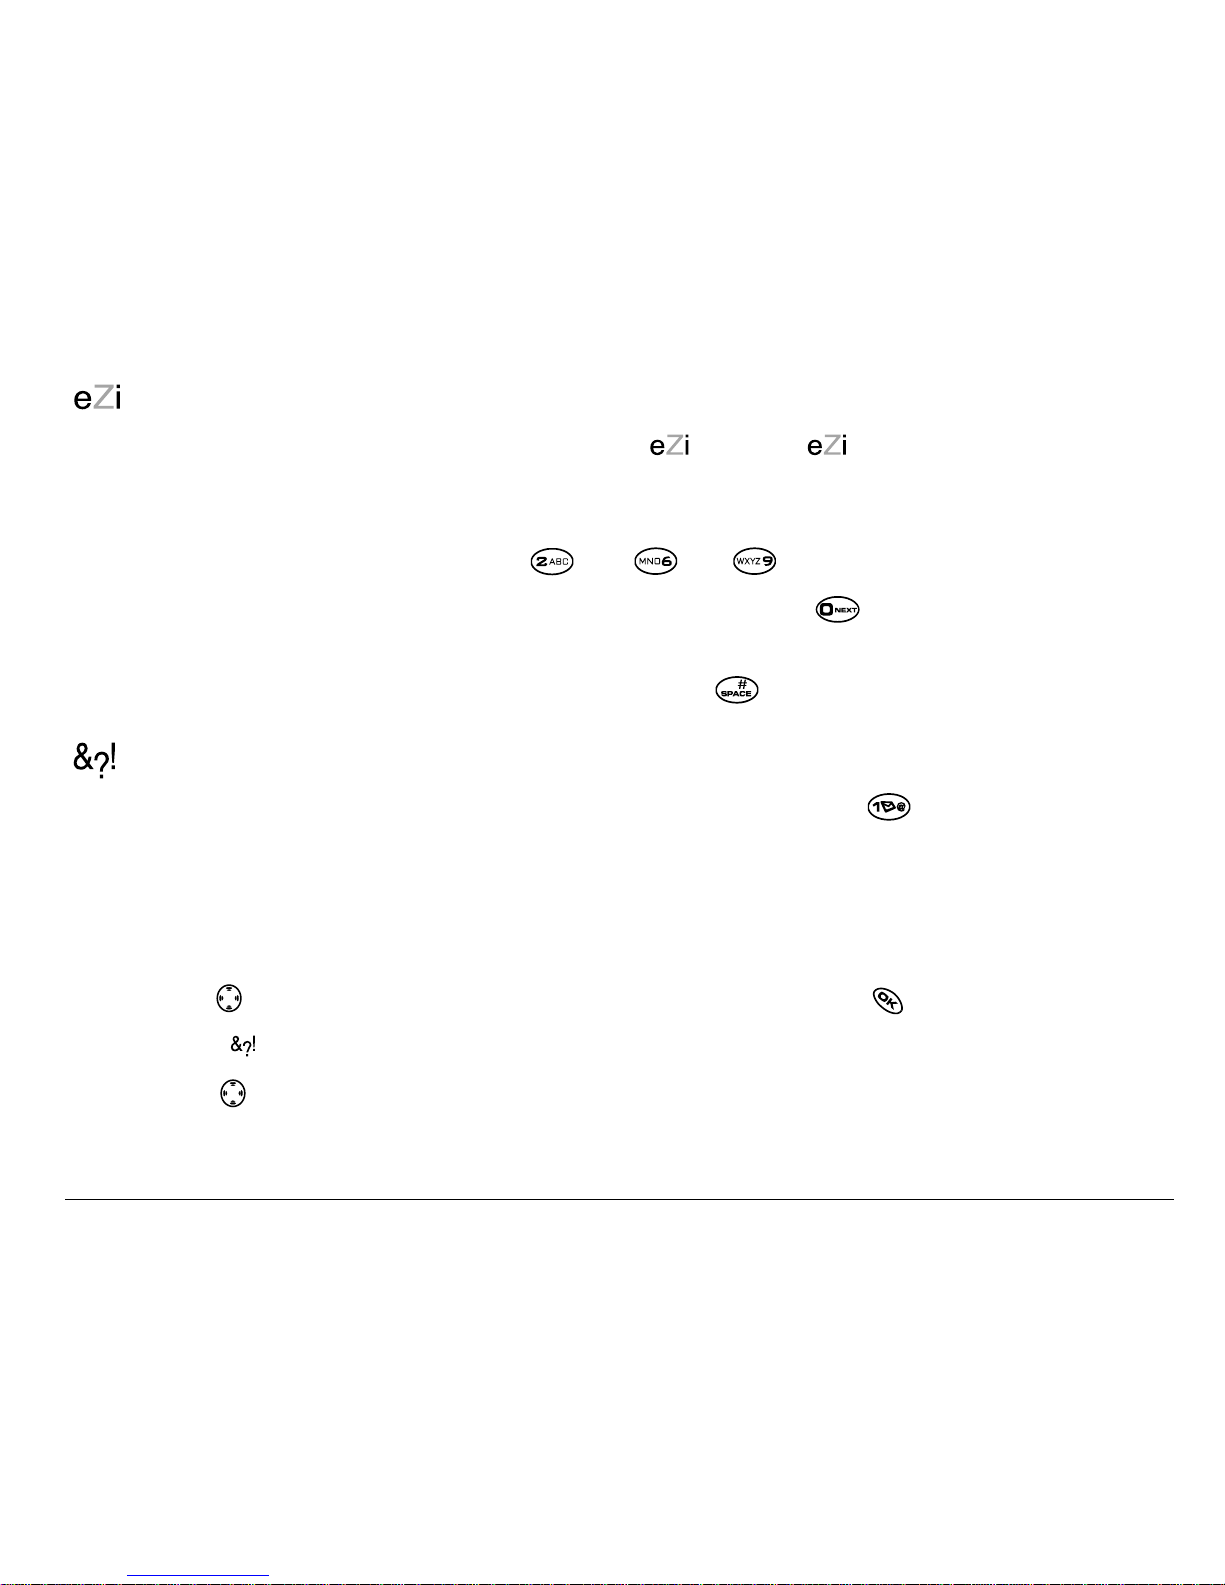
When you press a series of keys using mode, checks its dictionary
of common w o rds an d guesses at the wo rd y ou are trying to sp ell.
1. For each lett er of the w ord you want , press the key once. For example, t o
enter the word “any” press:
→ → .
2. If the word doesn’t match what you want, p ress to look at other
word matches.
3. When you see the word you want, press .
Entering symbols
While entering text, you can enter symbols by pressing until you see the
symbol you want. Using this method, you have access to the following symbols:
To access th e full set of sy m bo ls :
1. Press r ight to high light t he cur rent mode an d press to ent er the menu.
2. Select
=Symbols.
3. Press down to view the list of symbols.
4. Press the number key corresponding to the symbol you want.
.&@,-‘:;?/“()_
Page 52

30 Entering Letters, Numbers, and Symbols
Changing modes
Sometimes you need to change modes. For example, to enter numbers in
an email address while in mode, you must change to mode, enter
the numbers, and then change back to mode to complete the address.
To change text entry modes, you can either:
• Press and hold until icon for the mode you want appears.
-or-
• Press right to highlight the current text mode, pr ess to enter the
menu, then select a different mode.
Capitalization settings
Three capitalization settings are available in and modes:
Capitalize next letter
Capitalize every lette r
Capital ize first lett er of e very wor d (in a cont act) or sent ence (in a
text me ss age)
If no icon a ppea r s, all letters will be in lo we r ca s e.
Page 53
User Guide for the Kyocera Phanotom phone 31
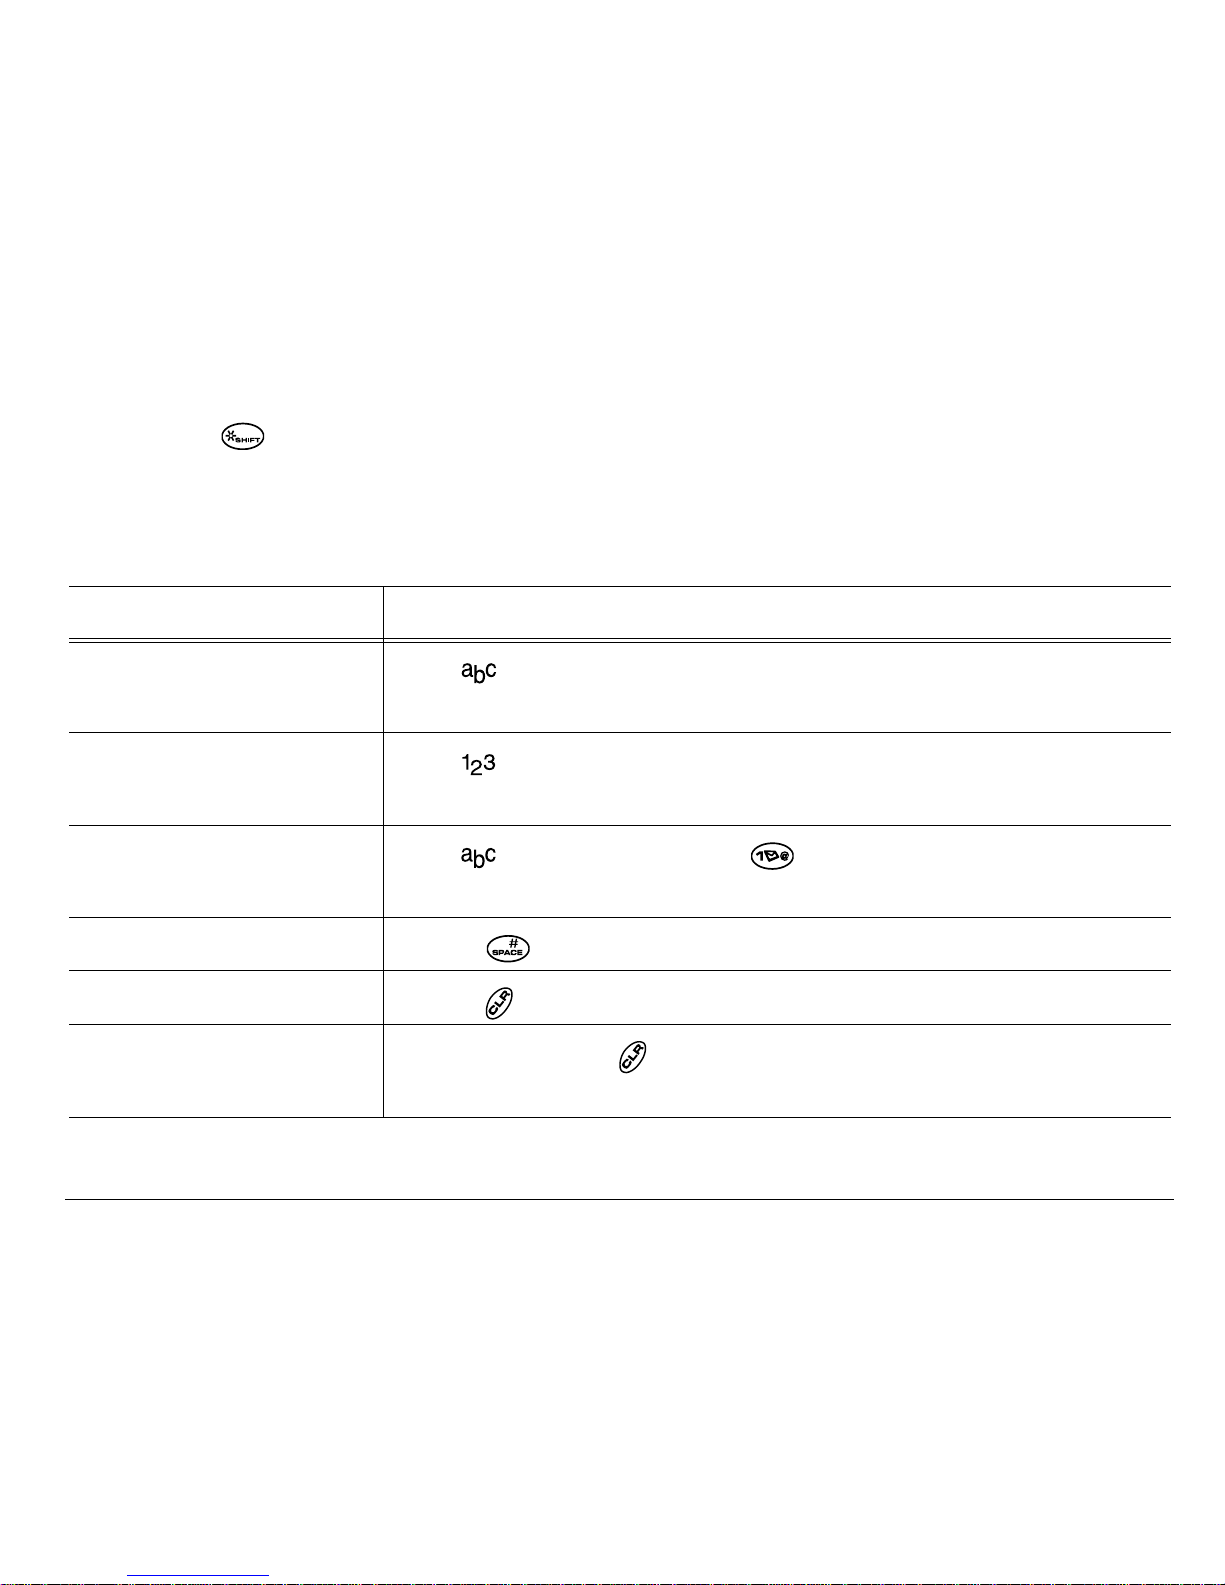
To cha ng e ca pitalization setting s:
• Press until the icon for the setting you want appears.
Quick reference to text entry
This t able gi ves gener al inst ructio ns for e nterin g lett ers, numb ers, and s ymbols.
To... Do this...
Enter a letter Use mode and press a ke y un til you se e the le tt er
you want. For more information, see page 27.
Enter a number Use mode and press a key once to enter its
number. For more options, see page 27.
Enter a symbol Use mode and press until you find the symbol
you want. See page 29.
Enter a space Press .
Erase a character Press .
Erase all
characters
Press and hold .
Page 54
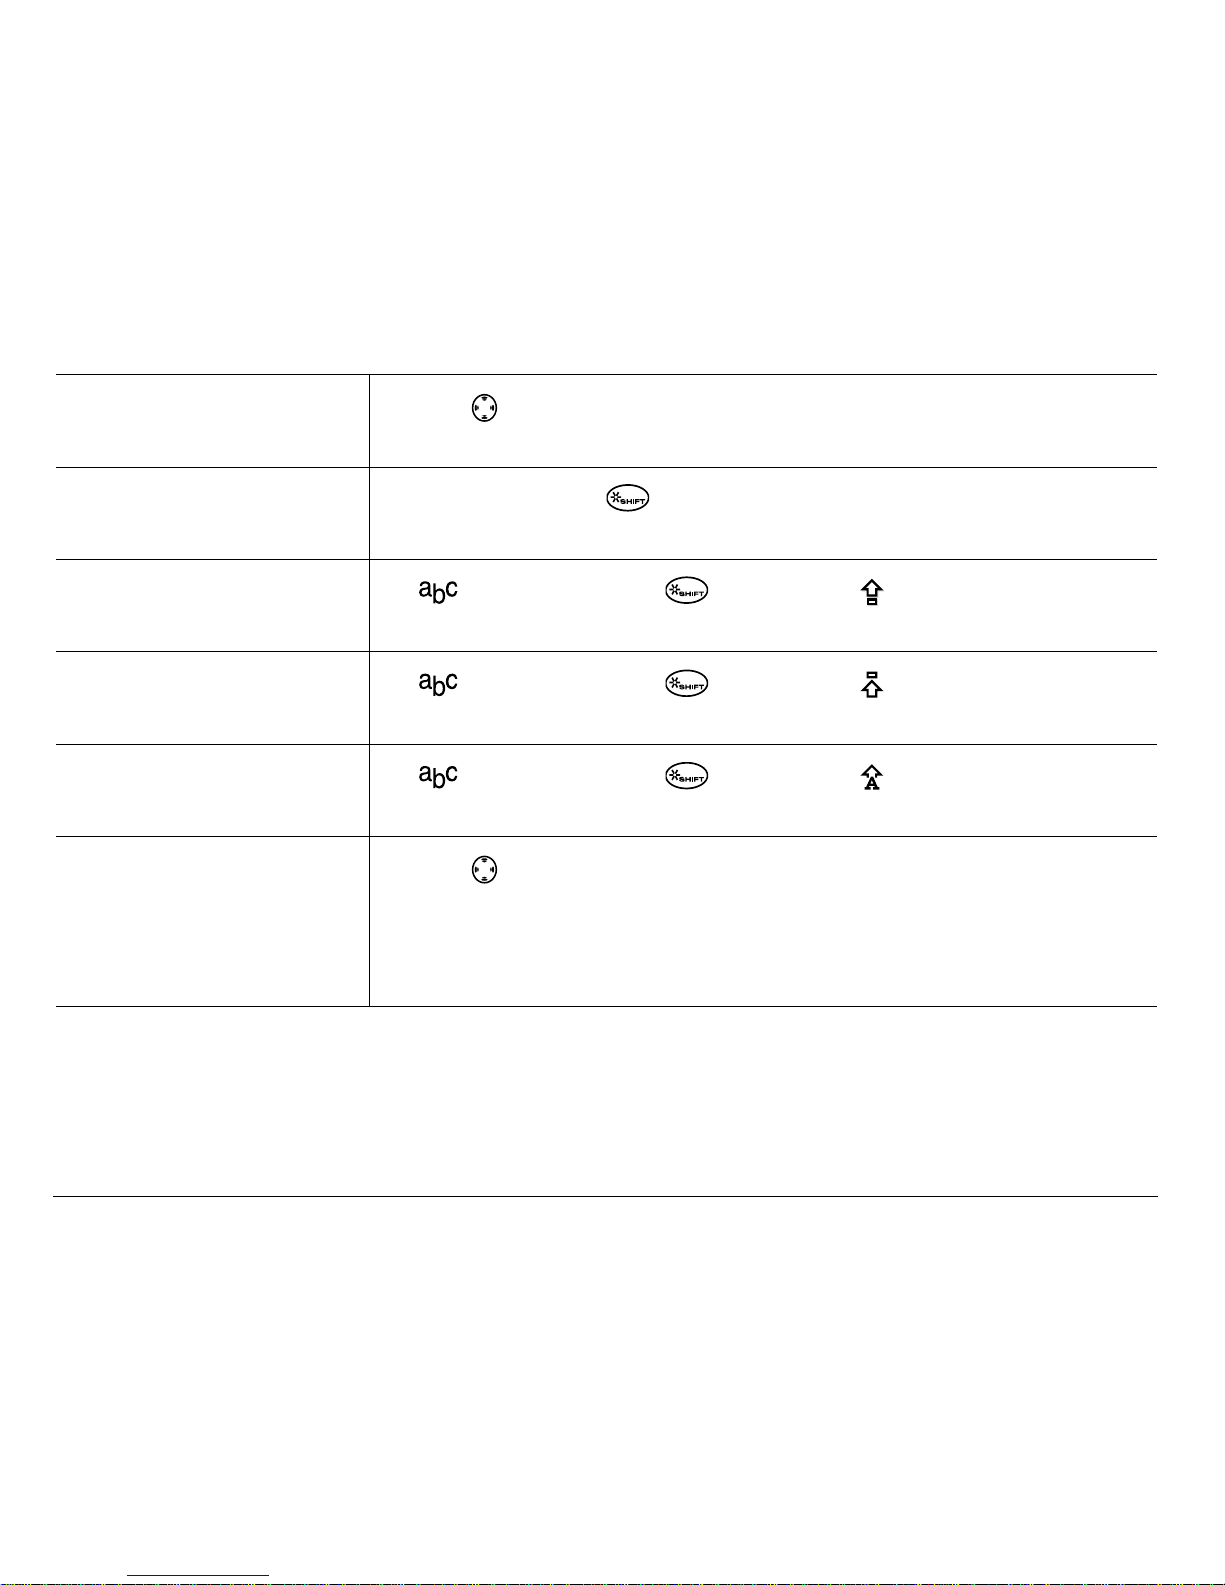
32 Entering Letters, Numbers, and Symbols
Move the cursor
right or left
Press up or down.
Change text entry
modes
Press and hol d .
Capitalize the next
letter
In mode, press . Choose .
Capitalize every
letter
In mode, press . Choose .
Capitalize the first
letter of each word
In mode, press . Choose .
Highlight an
option at the
bottom of
the screen
Press left or right.
Page 55
User Guide for the Kyocera Phantom phone 33
4STORING CONTACTS
Use your phone’s Contacts directory to store information about a person or
company. Your phone can hold, on average, about 200 phone numbers.
Saving a contact entry
To save a co ntact, take these ste ps.
1. From the home screen, enter the phone number you want to save.
Tip: Enter the area code with the phone number so that you can dial it from
any service area.
Note:To save a contact without entering a phone number, select Menu →
Contacts → Add New, select an option, and skip to step 3.
2. Press to select Save New.
Page 56

34 Storing Contacts
3. Enter a name for the contact. If you need to learn how to enter letters,
see page 27. Either save the contact now or assign options.
To save now, press to select Save.
-orTo assign options, press right twice, then press to select Options.
Press up or down to highlight an op tion:
– Assign Rin ger or Unassign Ringer—Selec t or rem ove a r ing er t o id en ti fy
an incoming call from this contact.
– Assign Picture or Unassign Picture—Select or remove a pi cture to
identify an incoming call from this contact.
– Save—Save the information and return to the home screen.
– Number Type—Select work, home, mobile, pager, or fax. The number
type will appear as an icon next to the number in the Contacts list.
– Add Voic e Dial—Speak the name of the c onta ct pe rson for t his number
so that you can dial it using voice recognition (VR). For more
information, see page 84.
– Speed Dialing—Select a sp eed dialing location from the list.
– Secret—Select Yes to lock the phone number. If a phone number is
locked, you must enter your four-digit lock code (see page 73) to
view or edit the number.
Page 57

User Guide for the Kyocera Phantom phone 35
– Primary Number—C lassify this number as the pr imary number for
the contact.
– Classify Contact—Classify the contact as Personal=or BusinessK
(See page 63 to set the phone to ring differently for personal and
business calls.)
4. Press to select Save. A check mark and the word “Saved” appear.
Adding a code or extension
When you save the phone number of an automated service, you may
include a pause where your phone would stop dialing; for example, where
you would wait to dial an extension.
1. Enter the first portion of the phon e number.
2. Press right to scroll through the options at the bottom of the screen.
3. Press to select a type of pause.
– A Time Pause—S tops dialing for two seconds, then continues to dial .
– A Hard Pause—Stops dialing until you select Release.
4. Enter the remaining numbers.
5. Select Save New.
X
Page 58

36 Storing Contacts
Adding a plus sign for international calling
Depending on s erv ic es available f rom y ou r s erv ic e p rov id er, you may be
able to save contact phone numbers with a plus sign so that you do not
need to ente r an international a cc es s cod e.
1. As you enter the phone number in a contact, press and hold to
enter a “+”.
2. Enter the local area code and phon e number.
If you save the phone number with a +, you should be able to call the
contact from any country that supports “plus” dialing.
Editing or erasing a contact
To make ch ange s to a contact, take the se steps. (To e rase all sa ved
contacts, see page 76.)
1. Select Menu
→ Contacts.
2. Select View All or Find Name
=to=find the contact you want to edit.
3. Highlight the contact to edit and press .
4. Select Options.
Page 59
User Guide for the Kyocera Phantom phone 37
5. Highlight an option and press to select it:
– Add New to add a number, address, or note.
– Assign Ringer or Unassign Ringer to selec t or r emove a ri nger to iden tif y
an incoming call from this contact.
– Assign Picture or Unassign Picture to select or remov e a pi cture to
identify an incoming call from this contact.
– Erase Contact
=to erase the entire contact.
– Edit Name of the contact.
– Classify Contact as personal or business.
6. Enter the new inf or mati on .
7. Press to select Save.
Editing a phone number
1. Select Menu → Contacts.
2. Select View All or Find Name
=to=find the contact you want to edit.
3. Highlight the contact to edit and press .
4. Press down to highlight the phone number you w ant to edit and
press .
Page 60

38 Storing Contacts
5. Highlight an option for the phone number and pr ess :
– Send Text Msg—Send a text message to t he phone number you sel ected.
– View Number—See the phone number you selected.
– Add Voic e Dial—Speak the name of the c onta ct pe rson for t his number
so that you can dial it using voice recognition (VR). For more
information, see page 84.
– Speed Dialing—Assig n or rem o v e th e location you us e to sp ee d dia l
the numbe r.
– Edit Type—Assign a type: work, home, mobile, pager, or fax. The type
icon appears next to the phone number in the Contacts list.
– Erase Number—Erase the number from the contact.
– Erase Voice Dial—Erase the voice dial name associated with the number.
– Edit Number—Change the phone number.
– Edit Voice Dial—Record a new voice dial name.
– Secret—Make the number secret so tha t it will not ap pear on the
screen until the lock cod e is entered. S ecret numbers ca n be called
without a lock code. (For more inform ation, see “Restricti ng calls” on
page 75.)
Page 61

User Guide for the Kyocera Phantom phone 39
– Primary Number—Make this number the first one that shows up when
you open the co ntac t.
– Prepend—Mo ve the curso r to th e beginnin g of the number so you can
add the area code.
– Exit—Exit without makin g changes.
6. Enter the ne w information an d fo llo w th e pro m pts.
7. Press to select Save,=if necessary.
Finding contact information
To find a phone number or contact, either (1) check the frequent contacts
list, (2) search the Contacts directory, or (3) use Fast Find.
Checking the Frequent List or the All Contacts list
From the h o me s cre en , p r ess dow n t o s ee th e last 15 of your most
frequently called contacts (if you have enabled the Frequent List setting). You
also see the All Contacts list if you scroll down past the double line.
To enable the Frequent List s e tting
• Select Menu
→ Settings → Convenience → Frequent List=→ Enabled.
Page 62

40 Storing Contacts
Searching the Contacts directory
1. Select Menu → Contacts.
2. Select a search method:
– View All—List all saved contacts.
– Find Name—Locate a specif ic name.=Enter part of the contact name,
then select Find.
– Speed Dial List, Voice Dial List, Business List, or Personal List—Select a
contact from a list.
3. Scroll down until you find the name you want, then press .
– To call the contact, highlight the number and press .
– To display contact information, press .
Setting Fast Find
With Fast Find, you press one or two keys to view close matches of the
number yo u are looking for.
• From the home scre en, sele ct Menu
→ Settings → Convenience → Fast Find
→ Enabled.
Page 63
User Guide for the Kyocera Phantom phone 41
Using Fast Find
1. From the h ome scree n, pres s the keys co rre spondi ng to t he let ters o f th e
name you want to find. A matching contact or speed dial entry appears.
Press down to scroll through matching entries.
2. View the na me you want, then pres s to call the number or press to
view contact details.
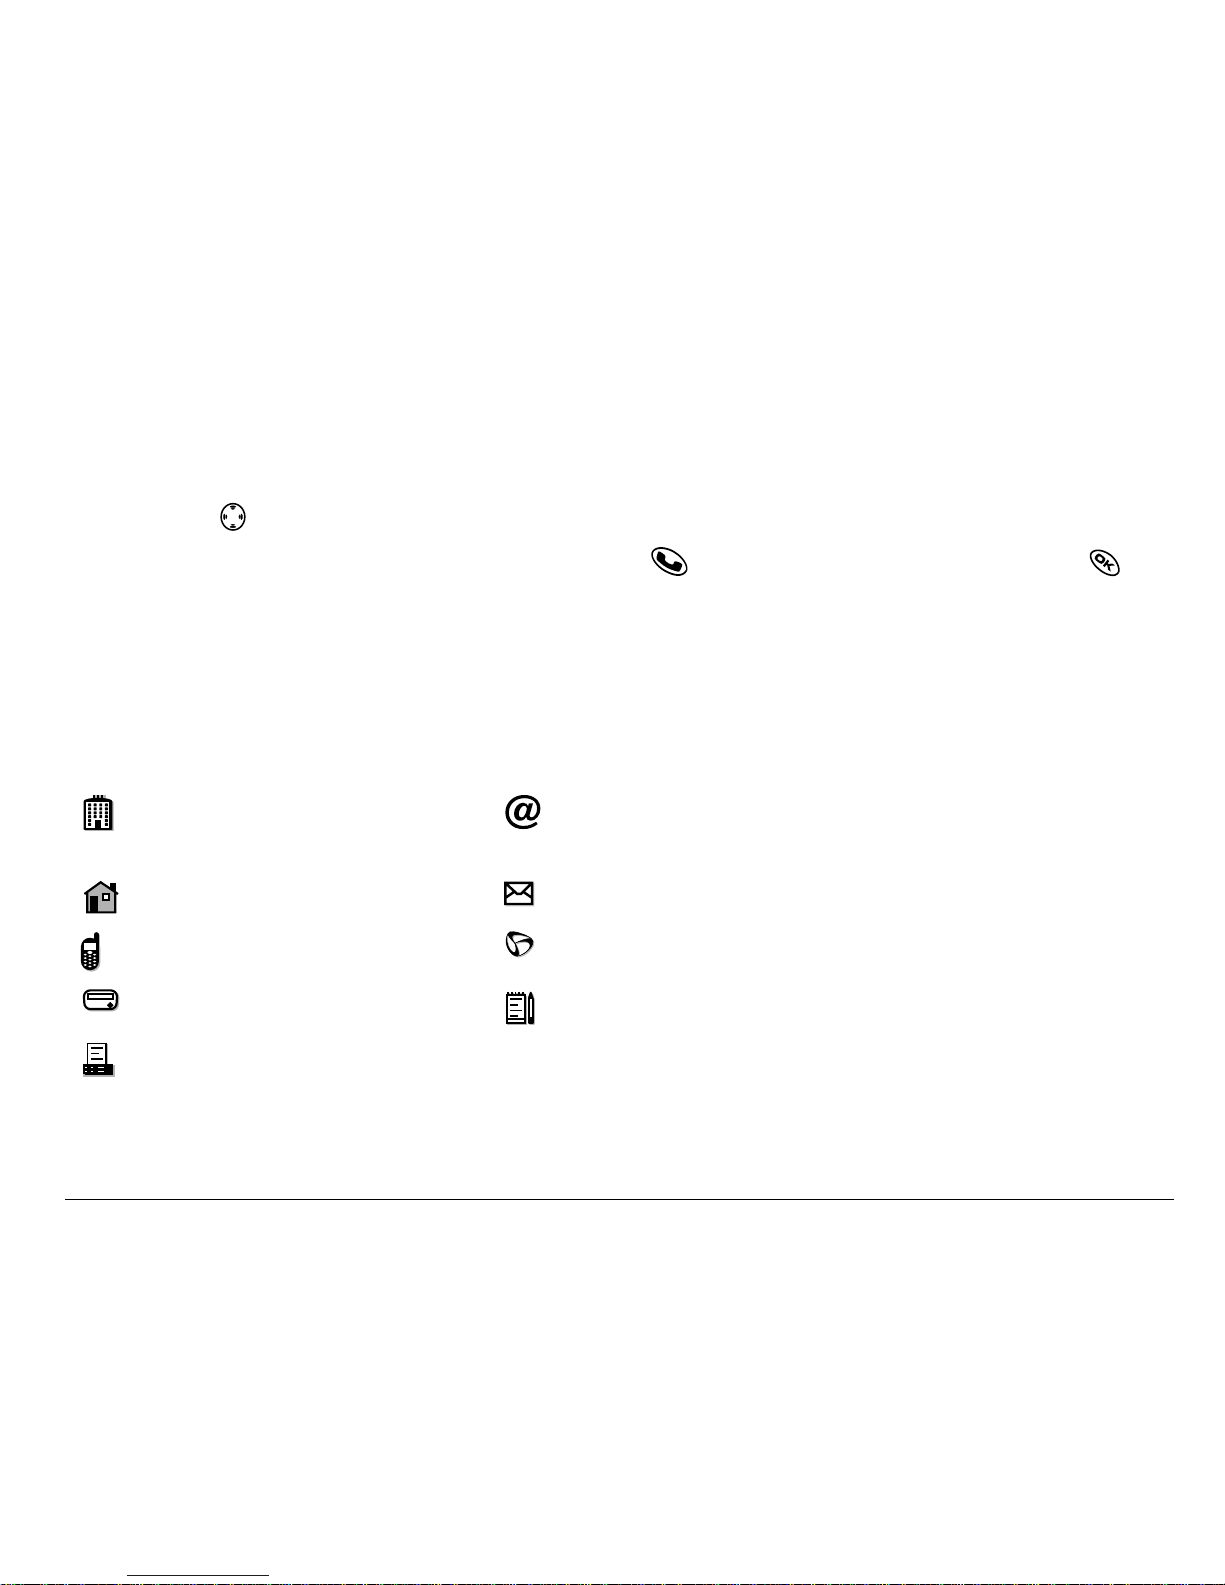
Viewing contacts
The foll owi n g ic ons may ap pea r next t o i nfo r mati on i n yo ur C ontact en t rie s.
work email address
home street address
mobile Web page URL
pager Note
fax
Page 64

42 Sending and Receiving Text Messages
5SENDING AND RECEIVING TEXT MESSAGES
This chap te r de sc rib es h ow t o s e nd , rec e iv e, a nd e r as e tex t m e ss ag es
from your phone. For information on voicemail messages, see page 20.
Important: The features and menus described in this chapter may vary
depending on services available in your area. In addition, usage
charges may a pply to each message. For details, check with
your service provider.
Sending text messages
You can o nly s en d tex t m ess ag es to p ho ne s t ha t a re c apab le of rec eiving
them, or to email addresses.
Writing a message
To send a text message to a single recipient:
1. Select Menu → Messages → Send New.
2. Choose a method to enter the recipien t’s phone number or email address:
Page 65
User Guide for the Kyocera Phantom phone 43
– Select a saved number from the=Recent List or Contacts List, or select a
Group List you h ave cre ated. F or mor e abo ut g roup l ist s , see page 57.
– Enter a New Address manual ly.
(To learn how to enter text, see page 27.)
3. To add another recipient to this message, choose a method:
– Press right to select Options. Then select Recent List, Contacts, or
Group Lists.
– Enter a space or comma after the first number. Then enter another
recipient manually.
Note:You can send a message to up to 10 contacts at once. The messages
will be sent one at a time, once to each addressee.
4. When you are do ne entering addresses, press right to high light Next=
and press
= .
5. Enter the message. To learn how to enter text, see page 27. To add
special fea tures such as smiley faces, see “Including pictures, sounds,
and prewritten text” on page 44.
Note:Depending on your service pr ovid er, you may be char ged for more t han
one message if your message exceeds a certain number of characters. For
Page 66
44 Sending and Receiving Text Messages
mo re information, s ee “ Und erstanding appende d message s” on
page 48.
6. When you have completed the message, pr ess to select Send.
Including pictures, sounds, and prewritten text
Depending on the services available from your carrier, you may include
smiley fa ce s, gra phics, and so un d in your tex t m es s ag es .
1. Create a text message and enter addresses.(See page 42.)
2. Select Next to advance to the message text entry screen.
3. From the text entry screen, press right twice, select Options → Insert
and select from the options:
– My Sounds—Add a sound or melody. Highlight one from the list and
press to select Insert.
– My Pictures—Add a graphic you have received in a text message,
created usin g Doodl er, or downloade d to your p hone. Press right or
left to scroll through graphics and press to select Insert
K
Page 67
User Guide for the Kyocera Phantom phone 45
– Emoticons—Select a smiley face icon. I f the recipient’s phone does
not support t he same techn ology as your pho ne, the icons wil l appear
to them in a more simplistic form.
Tip: Press and hold to cycl e through emoti cons while in t he text entry
screen. Highlight one and press to select=Insert.
– AutoText—Select a pre wr itten message.
Highlight one from the list and press to select Insert. (To edit or
create new prewritten messages, see page 58.)
– Contacts—Add informatio n ab o ut a sav e d co n tact. Hi gh li gh t th e
contact from the li s t and press to insert it.
4. When you have completed th e message, you can send it immediately or
set sending options. To send it immediately, press to select Send. To
set sending options, see the following procedure.
Setting sending options
When you are ready to send a message, you have several options for how
and when you want the message to be received.
1. Once you have completed the message, press right to highlight
Options and press . Then choose f rom the list:
Page 68

46 Sending and Receiving Text Messages
– Insert—Enhance your message with sounds, graphics, smiley faces,
prewritten text, or contact inf ormation (if available from your service
provider). See optio ns on page 44.
– Add Address—Return to the “To” screen to add another recipient
without losing the message text. Enter the new address, then select
Next to return to the message entry screen.
– Msg Receipt—Request notifi cation when the message=has been received.
– Set Priority—Label the message as “Urgent.”
– Callback Number—Include a call back numbe r wit h the mes sage to l et the
recipient know at what number they can call you back. Select Yes to
include your own numbe r, or Edit to enter a different callback number.
– Send Later—Schedule when to send the message.
– Save Message—Save the message in your Saved folder. This prevent s
the message from being deleted if you have activated AutoErase,
and enables you to send the message to other s .
– Save AutoTextÔSave the message you have just ent ered as a
prewritten message, then return to the message entry screen so you
can send the message.
2. When you have finished setting options, press to return to the
message window.
Page 69
User Guide for the Kyocera Phantom phone 47
3. Highlight Send and press .
Adding a signature
This settin g allows you to create signa ture te xt. The signatu re does not
display in the message creation screen; however, the signature is included
at the end of all outgoing messages. To create a signature:
1. Select Menu → Settings → Messaging → Signature.
2. Enter you r sig n at ure in the te xt field.
3. Press to select OK and save the setting.
Note:The signature text is tallied by the ch aracter counter because the
signatur e is included in the text field.
If you cannot send messages
You may not be able to send or receive messages if your phone’s memory
is nearly fu ll, or if digital serv ice is n ot av ailable at th e t im e. To fre e u p
memory, erase old messag es . See “Erasing messages” on page 55.
Page 70
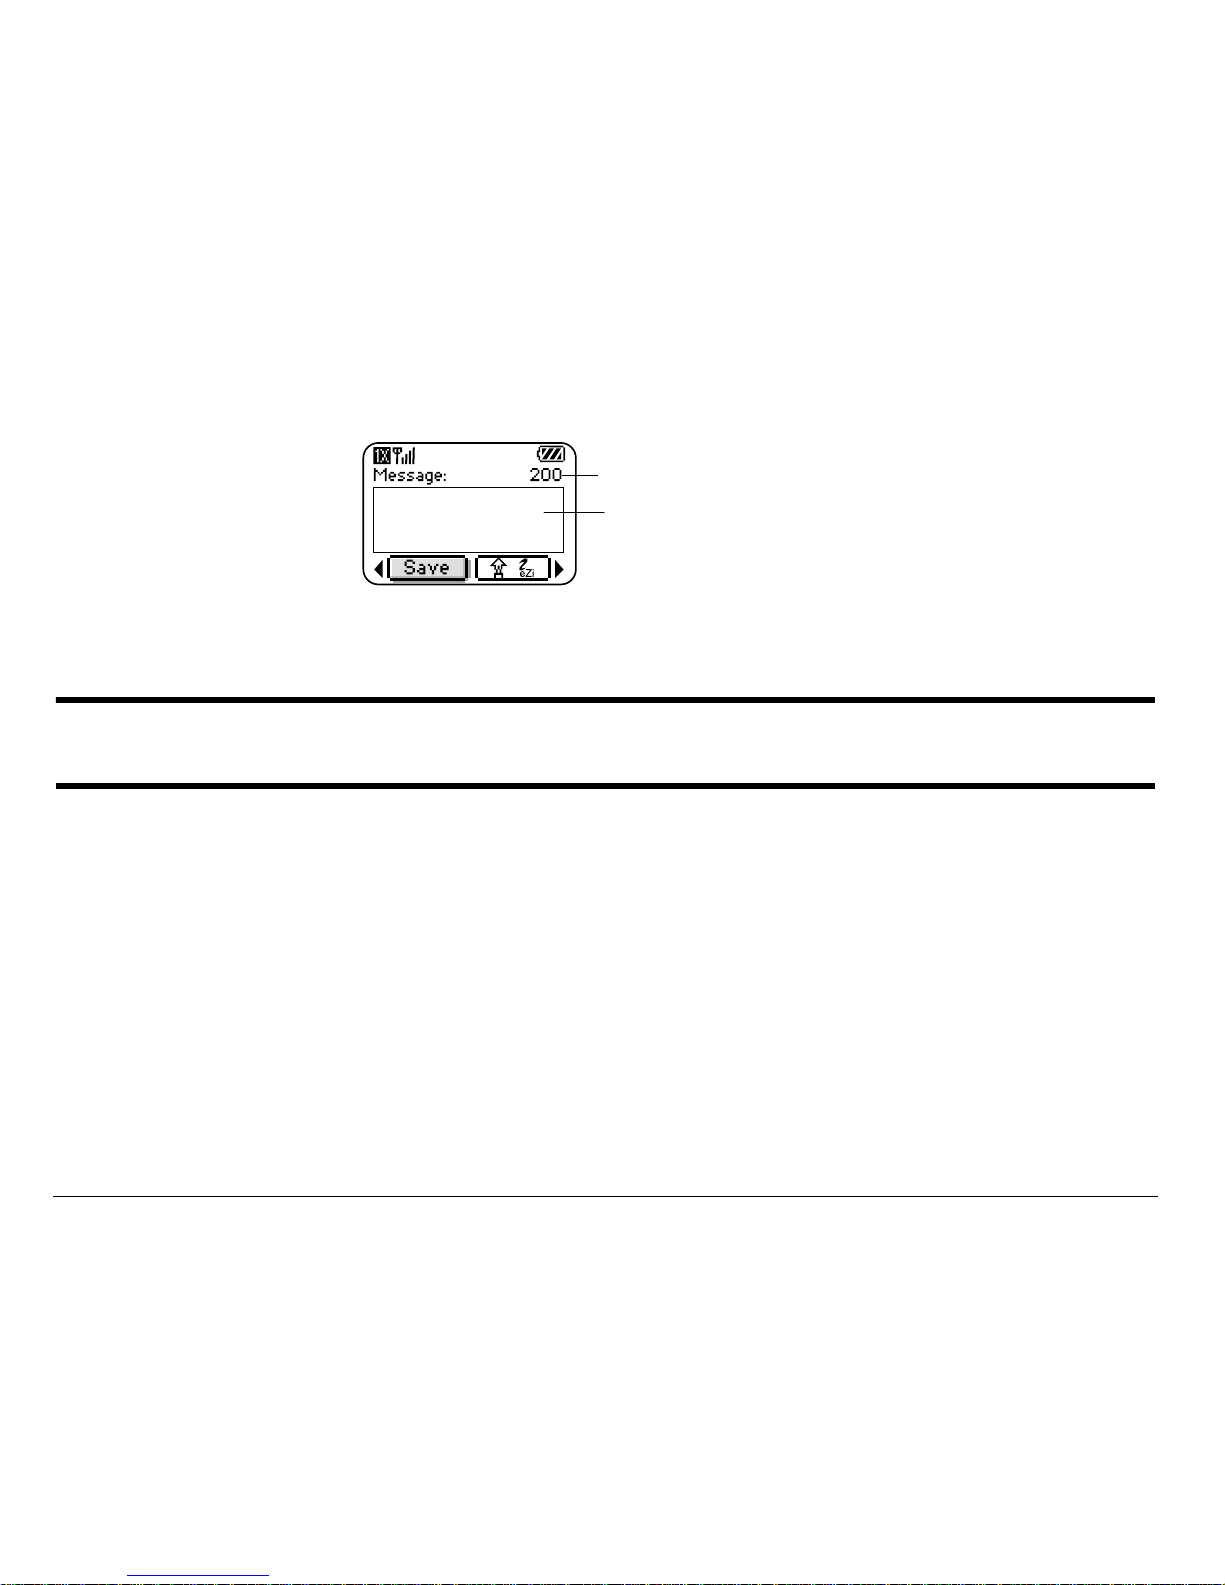
48 Sending and Receiving Text Messages
Understanding appended messages
If you go over the character limit for a single message, the phone may
automatical ly ap pend an empty s eg m en t to yo ur message to m ak e s pac e.
Important: Your service provider will charge you for each message
segment.
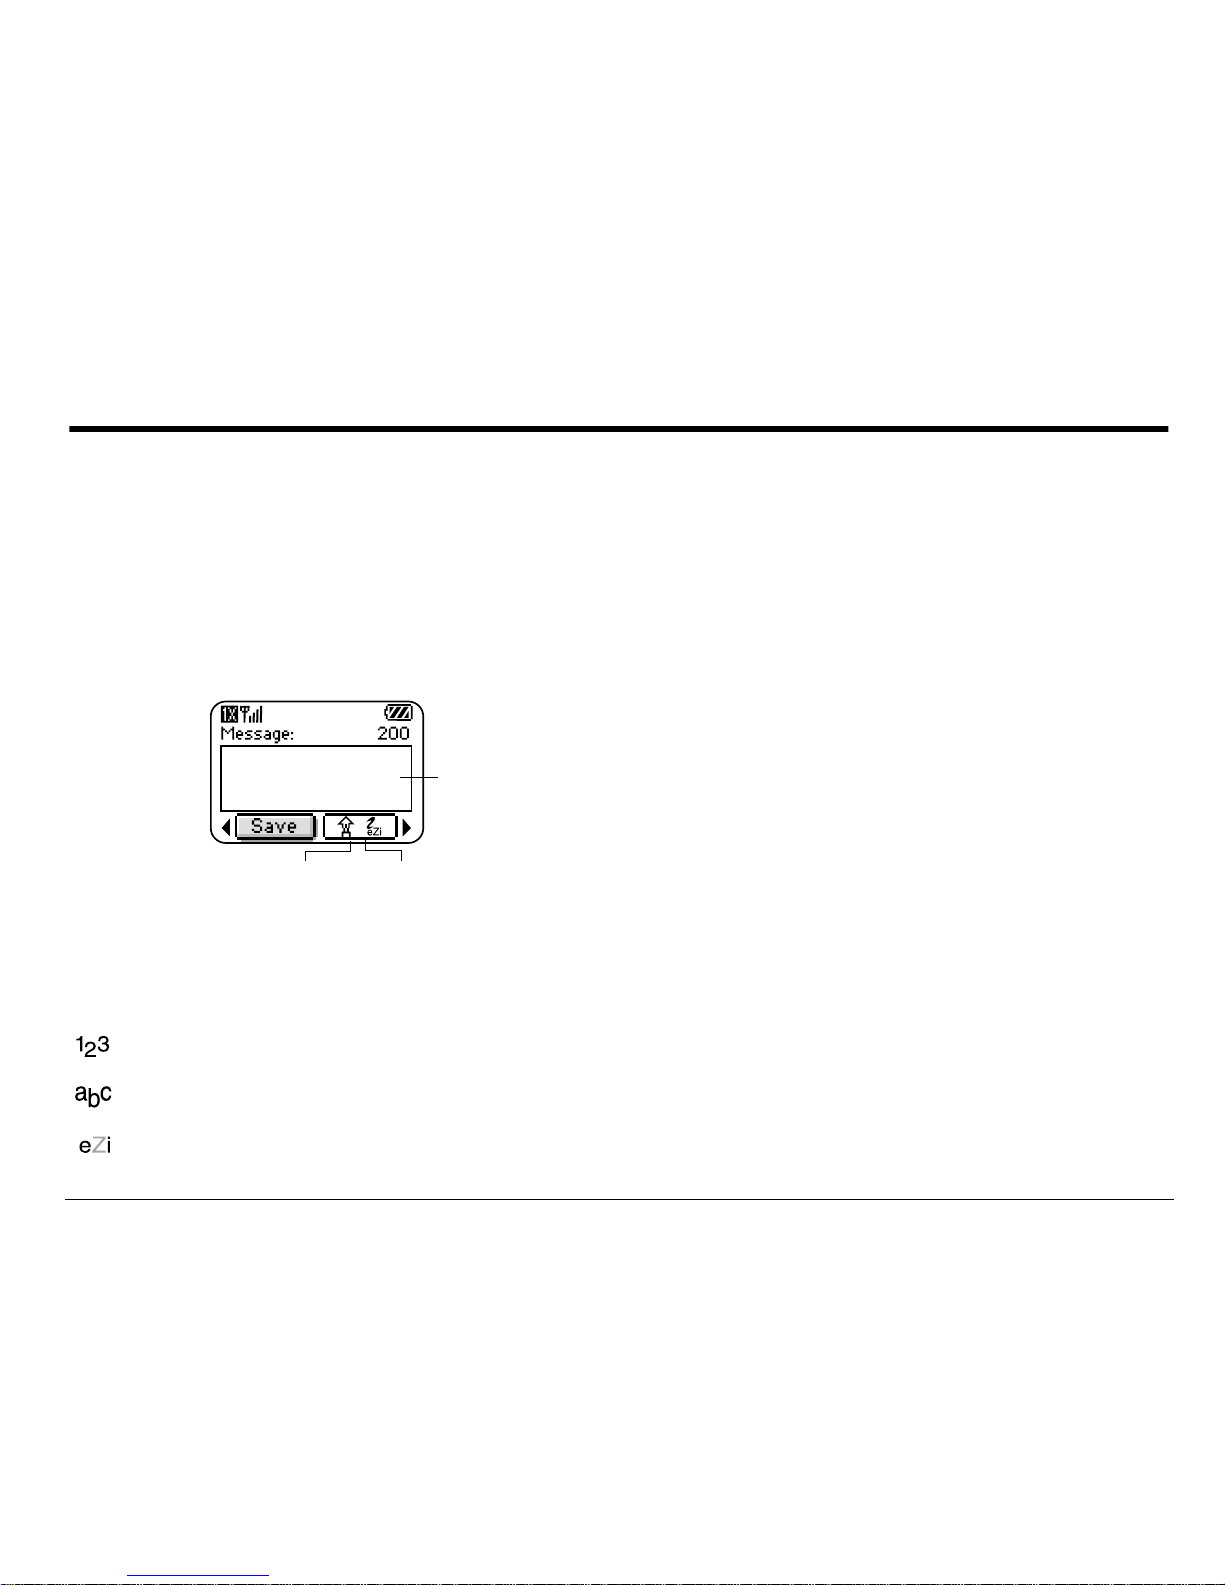
Text entry field
Characters
Page 71

User Guide for the Kyocera Phantom phone 49
When you start a message, the maximum character limit (“200” in the
example) appears above the text entry screen. This number counts down
as you ent er ch ara ct ers , un til i t r e aches 0. If yo u co nt i nue t o en ter te xt a f te r
this counte r re ac hes 0, a me ss ag e se gm en t m a y be append ed . If a
segment is appended, a message will appear on the phone screen.
Receiving incoming calls while creating messages
• If you don’t wish to answer the call, select Ignore.
• To answer the call, press . The message you were working on will be
saved in the Saved folder. To return to the message, select
Menu → Messages → Saved and select it.
Viewing the OutBox
You can check the status of messages you have sent as long as they have
been save d to the OutB ox.
Note:If messages yo u have sent were not saved t o the OutBox, select Menu
→ Messages → Msg Settings → Save to Outbox.
Page 72
50 Sending and Receiving Text Messages
To v iew the OutBox:
1. Select Menu → Messages → OutBox.
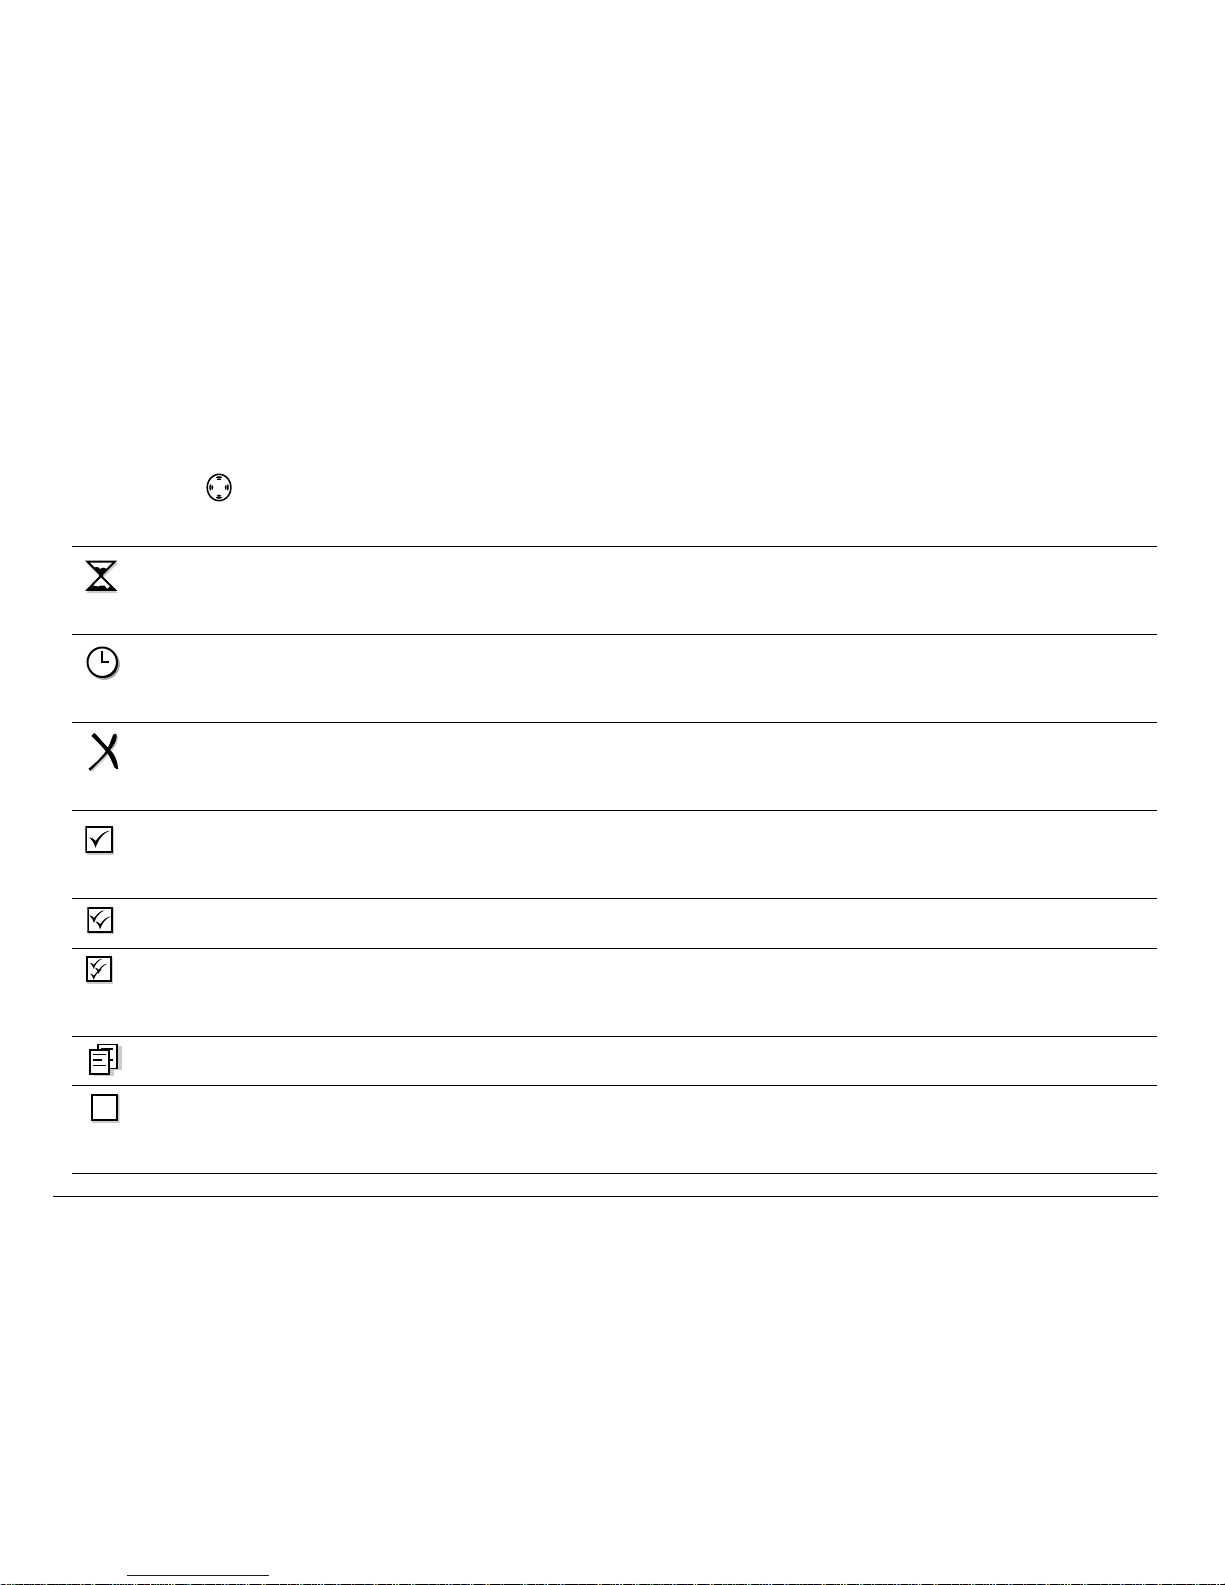
2. Press up or down through the lis t of messages. One of the following
symbols appears next to eac h message:
The message is pending and wil l be sent when possible. You can
cancel delivery of the message.
The scheduled message will be sent at the scheduled time. You
cannot cancel delivery of th e message.
The message cannot be sent because service is not available. An
alert appears on your phone if the message cannot be sent.
The scheduled message has been sent and will be delivered as
scheduled. You cannot cancel delivery of the message.
The message has been received by the recipient you specified.
The message has been received and opened by th e recipient y ou specified.
(This symbol may not be available. Check with your serv ice provider.)
The message has been sent to more than one recipient.
The message has never been sent, or has not been sent since it was
last modified. You can cancel delivery of the message.
Page 73
User Guide for the Kyocera Phantom phone 51
Retrieving text messages
When a tex t m es sage is re ce iv ed , y ou r s cre en wil l d is pla y te xt sim i lar to:
“New message 1 Tex t M sg”. This text will rem ain fo r abo ut f ive m in ut es.
After that, look for th e symbol at the top of your screen. The symbol
flashes if the message is urgent.
If your ph one is set t o Dire ct V iew, the body of the
message will appear on the
phone screen automatically.
(To activate Direct View, select Menu → Messages
→ Msg Settings → Direct View → Enabled.)
If you see the “New Message” note
You can ch oo se to:
• View the messageÔPress .
• Ignore=the messageÔPre ss right and pre s s .
• Clear th e sc re enÔPress .
If you see the body of the message
The body of an incoming message will appear on your home screen only if
your phone is set to Direct View.
You can ch oo se to:
• Ignore=the messageÔPress .
Page 74
52 Sending and Receiving Text Messages
• Read the message . See “Reading the message” on page 53.
Note: If you receive a new message while you are reading a message, the
one you ar e reading will be replaced by the new one. You can find the
older message in the InBox: Select Menu → Messages → InBox.
If you see the symbol
If the symbol is flashing, the message is urgent.
1. Select Menu → Messages → InBox.
A list of all your received messages appears.
New, unread messages appear in bold.
indicates an “Urgent” message.
2. Pres s up or down to scrol l th rou g h th e lis t of me ss a ge s .
3. Press to read a message.
Page 75

User Guide for the Kyocera Phantom phone 53
Reading the message
The optio ns a va ila bl e to you ma y v ary. Check with your service prov ide r.
Note:Sounds embedded in text messages will not play if the phone is set to
Silence All mode.
1. If the text m essage is long, press down to vi ew the entire message.
2. When you are fi nished, you can Reply to the sender, Play the sound
embedded in the mes sage, Erase the message, Save the message to your
Saved folder, or set additional Options=for the message:
–View Sender information.
– Forward the message.
– Reply with Copy to reply to the message with a copy of the original attached.
– Save Object(s), such as sound or pictu res, from the message. (This opt ion
is available if the incoming message includes a graphic or sound.)
– Save Contact to save the sender’s phone number or email address in
your Contacts list. (This option is available if a vCard is included in
the message.)
Page 76

54 Sending and Receiving Text Messages
– Save as AutoText to save the text from the message as Aut oText, which
you can insert into other messages. Graphics and sound will not be
saved as part of AutoText.(For more about Auto Text, see page 58.)
3. Select Done.
Note: The symbol indicates:
• A graphic did not come through. It may be to o large or incorrectly
formatted.
• An appended message is missing. (For more about appended
messages, see page 48.)
Setting message alerts
You can set your phone to alert you of incoming text messages or pages.
For more inform a tion, see “Setting message alerts” on page 76.
Page 77
User Guide for the Kyocera Phantom phone 55
Erasing messages
Your ph on e is design ed to st ore 99 text me s sa ge s an d pag es . It is a good
idea to erase old messages, as messages take up memory in your phone.
You ha ve the option o f e ras ing text mes s ag es an d page s a s yo u se nd or
read them, erasing them one-at-a-time from the list in the OutBox or InBox,
or erasing them all at on ce .
Erasing single messages
1. Select Menu → Messages.
2. Press down and press to select the type of t ex t mess age yo u want
to erase (InBox, OutBox, or Saved).
3. Press to select the message to erase.
4. Select Erase to erase the message. A notification appears: “Erase this
message?”
5. Select Yes to erase the messag e.
Note:You can erase a scheduled message from the OutBox, but you cannot
cancel delivery of the message.
Page 78

56 Sending and Receiving Text Messages
Erasing all messages
1. Select Menu → Messages → Erase Msgs.
2. Press up or dow n and press to select an option:
– InBox erases all messages in your InBox.
– OutBox erases all messages in your OutBox.
– Saved Folder erases all messages in your Sa ved folder.
– All Messages erases all text messages in all folders listed above.
3. A message appears: “Erase all messages?” Select Yes to erase
messages or No to cancel.
Erasing messages automatically
Use this setting to have old messages automatically erased from the InBox
when memory is lo w.
1. Select Menu → Messages → Msg Settings → Auto-Erase Text.
2. Press to select Old InBox Msgs.
Page 79

User Guide for the Kyocera Phantom phone 57
Customizing message settings
To make messaging easier, you can customize settings for sending and
receivin g m e ss ag es .
Creating group lists
You can create and save a list of multiple recipients. Your Phantom phone
will store five group lists w ith up to 10 re ci pie nts p er l is t.
1. Select Menu → Messages → Group Lists → Create New.
2. Enter a name for the list. For help entering text, see page 27.
3. Press to select Next.
4. To enter the first phone number or email address, select an option:
– Recent List—Select numbers from your Recent List.
– New Address—Enter the phone number or email address yourself. To
learn how to enter text, see page 27.
– Contacts List—Select contacts from your phone book.
5. To enter the next addr ess, en te r a space or c omma af t er the f i rst numb er
or email address. (If you insert a saved contact or a number from the
Recent List, the phone will inse rt the comma automatically.) Then press
right twice, select Options, and choose fr om the options.
Page 80
58 Sending and Receiving Text Messages
6. Whe n fin is h ed , pre s s right and pres s to select Done.
7. To send a message to yo ur new group, see “ Sending text messages” on
page 42.
Creating and editing prewritten messages (AutoText)
Your phone comes with prewritten (AutoText) messages, such as “Please
call me ,” wh ic h yo u can i nser t in t o the b ody o f a t ex t me ss ag e. You can ed it
these mess ag es a nd c r ea te n e w on es . Your phone w ill sto re up to 20
AutoText me ss ag es , with up to 10 0 ch ara ct ers per message.
1. Select Menu → Messages → Msg Settings → Edit AutoText.
2. To create a new pre-written message, highlight New AutoText and pres s .
-orTo edit an existing pre-written message, highlight the message and
press .
3. Enter or edit the text and press to select Done.=For help entering text,
see page 27.
Note: You can also save an incoming message as AutoText. For directions,
see page 54.
Page 81

User Guide for the Kyocera Phantom phone 59
Switching default text entry mode
You ca n set the defau lt t ex t e ntry m od e to appear in m e ss ag e tex t e nt r y
screens.
1. Select Menu → Messages → Msg Settings → Default Text.
2. Select Normal Alpha or Rapid Mode.
For more info rm ati on on te xt entry modes , see page 27.
Page 82

60 Customizing Your Phone
6CUSTOMIZING YOUR PHONE
The contents of the Settings menu are as follows.
Silent Mode, Keyguard, Sounds
Ringer Volume
Ringer Type
Business Ring
Personal Ring
Roam Ringer
Earpiece Volume
Key Volume
Key Length
Missed Call
Smart Sound
Minute Alert
Display
Backlighting
My Banner
Flashing Lights
Main Menu View
Screen Saver*
Wallpaper**
Color Themes**
Display
(continued)
Auto-Hyphen
Language
Time Format
Contrast
Voice Services
Add Voice Dial
Erase Voice Dial
Voice Training
Voice Wake-Up
Voice Answer
Security
Lock Phone
Limit Calls
Lock Code
Erase Contacts
Emergency #’s
Network
Data/Fax Calls
Privacy Alert
Voice Privacy
Data Setup
User Name
Set Phone Line
Roam/Svc
Alert***
Roam Option***
Digital/Analog***
Location
Convenience
Airplane Mode
Shortcut Key
Fast Find
Frequent List
1-To uch Dialing
Web Prompt
Call Guard
Messaging
Voicemail Num.
Alerts
Signature
Edit AutoText
Callback Numb er
Msg Receipt
Direct View
Auto-Erase
Default Text
Accessories
Pwr Backlight
Headset Ring
Auto-Answer
TTY Device
Com Speed
Call Information
Recent Calls
All Calls Timer
Data Timer
Kbyte Counter
* Available on grayscale phones only
** Available on color phones only
*** Not available on all phones. Check with your service provider.
Page 83
User Guide for the Kyocera Phantom phone 61
Silencing all sounds
Your ph on e is set to mak e sounds wh en y ou rec eive calls, pre ss k ey s ,
navigate through menus, and receive alerts (such as new messages).
You can silence all sounds and set the phone to vibrate
or light up when you
receive ca lls a nd al erts.
Setting the phone to vibrate or light up
1. Select Menu
→ Settings → Silent Mode.
2. Choose an option and press :
– Vibrate Only—Causes the phone to vibrate for the duration of the
incoming call or other alert. appears.
– Vibrate, Ring—Causes the phone to vibrate for the first 10 seconds
and then ri ng for the remainder of the incoming call alert. appears.
– Lights Only—Causes the phone to light u p for the duration of the
incoming call or other alert. appears.
3. Press to return to the home screen.
Note:The phone will ring when it is attached to an external po wer source
(such as a charger), even if all sounds have been silenced.
Page 84

62 Customizing Your Phone
Shortcut to Vibrate Only mode
• From the home screen, press right and hold. appears .
Turning sounds back on
To re sto re all s ou nd s t o t he ph on e:
• From the home screen, press right and hold. The or disappears.
Choosing a different ringer
Your Kyocera Phantom phone has 20 ringers you can from choose to use
for incoming calls.
1. Select Menu
→ Settings → Sounds → Ringer Type.
2. Scroll down the list to hear the differ ent rings.
3. Press to select a ringer from the list.
Page 85
User Guide for the Kyocera Phantom phone 63
Specify ing ringe rs for diff e rent callers
You can assign ringers that identify calls from different phone numbers
saved in your Contacts directory.
• To assign a ringer to an indi vidual contact, see page 34.
• To assign a ringer to a class of contacts:
a. Select Menu → Settings → Sounds.
b. Ηighlight Business Ring or Personal Ring and press .
c. Select a ringer and press .
Note:To classify a c ontact as Business or Personal, see page 35.
Importing additional ringers
You can import additional ringers into your Kyocera Phantom phone using
the Kyocera Ph on e De s kto p so ftware (s ol d s epara te ly). To p urc ha se th is
software and other ac cesso ries , visit
www.kyocera-wireless.com/store.
You may be able to download ringers over-the-air. Check with your service
provider f or a v ail ab ili ty.
Page 86

64 Customizing Your Phone
Adjusting volume
You can adjust the volume of the earpiece, the ringer, or the beeps you
hear when the keys are pressed.
Adjusting the earpiece volume
To a dju s t th e e arp ie ce volume ma nu al ly du rin g a call, press up or down
to find a comfortable level.
Adjusting the ringer volume
1. Select Menu → Settings → Sounds → Ringer Volume.
2. Press right to increase the volume, or left to decrease the volume.
Changing the key tones
You can change the volume and duration of the tones the phone makes
when you press the keys. Select
=Menu → Settings → Sounds and choose
Key Volume or Key Length.
Page 87

User Guide for the Kyocera Phantom phone 65
Using shortcuts
From the home screen, you can access shortcuts by pressing the
navigation k ey in di fferent directions.
Three shor tc uts a re a utomatically programme d i nto y ou r ph on e (left, right,
and down). Fo r th e f ou r th dire c tio n (u p), yo u can set a sh ortcut to one of
the featu res of yo u r ph on e.
Defining the “up” feature shortcut
1. Select Menu → Settings → Convenience → Shortcut Key.
2. Highlight the feature you want a shortcut to, and press to select it.
Using the up feature shortcut
• From the home screen, press and hold up.
Creating a shortcut to your frequent contacts list
By default, your phone list s your ent ire contacts list w hen you press down.
You can set the phone also to show a list of your most frequ ent cont acts.
1. Select Menu
→ Settings → Convenience → Frequent List.
2. Select Enabled to include the list or Disabled to remove it.
Page 88

66 Customizing Your Phone
Using the Frequent Contacts shortcut
• From the home screen, press down. The Frequent Conta cts ap pear at
the top of the li st , fol lo w e d by yo ur c omplete Contacts List.
Choosing a different language
Your phone may display alternative languages.
1. Select Menu
→ Settings → Display → Language.
2. Select a language, and press .
Personalizing the screen
Changing your banner
The banner is the person al la bel f or your pho ne. It appears on the home
screen above the time and date. The banner can be up to 14 characters l ong.
1. Select Menu
→ Settings → Display → My Banner.
2. Select Edit.
3. Press to clear the screen.
4. Enter your new text.
5. Press to save.
Page 89
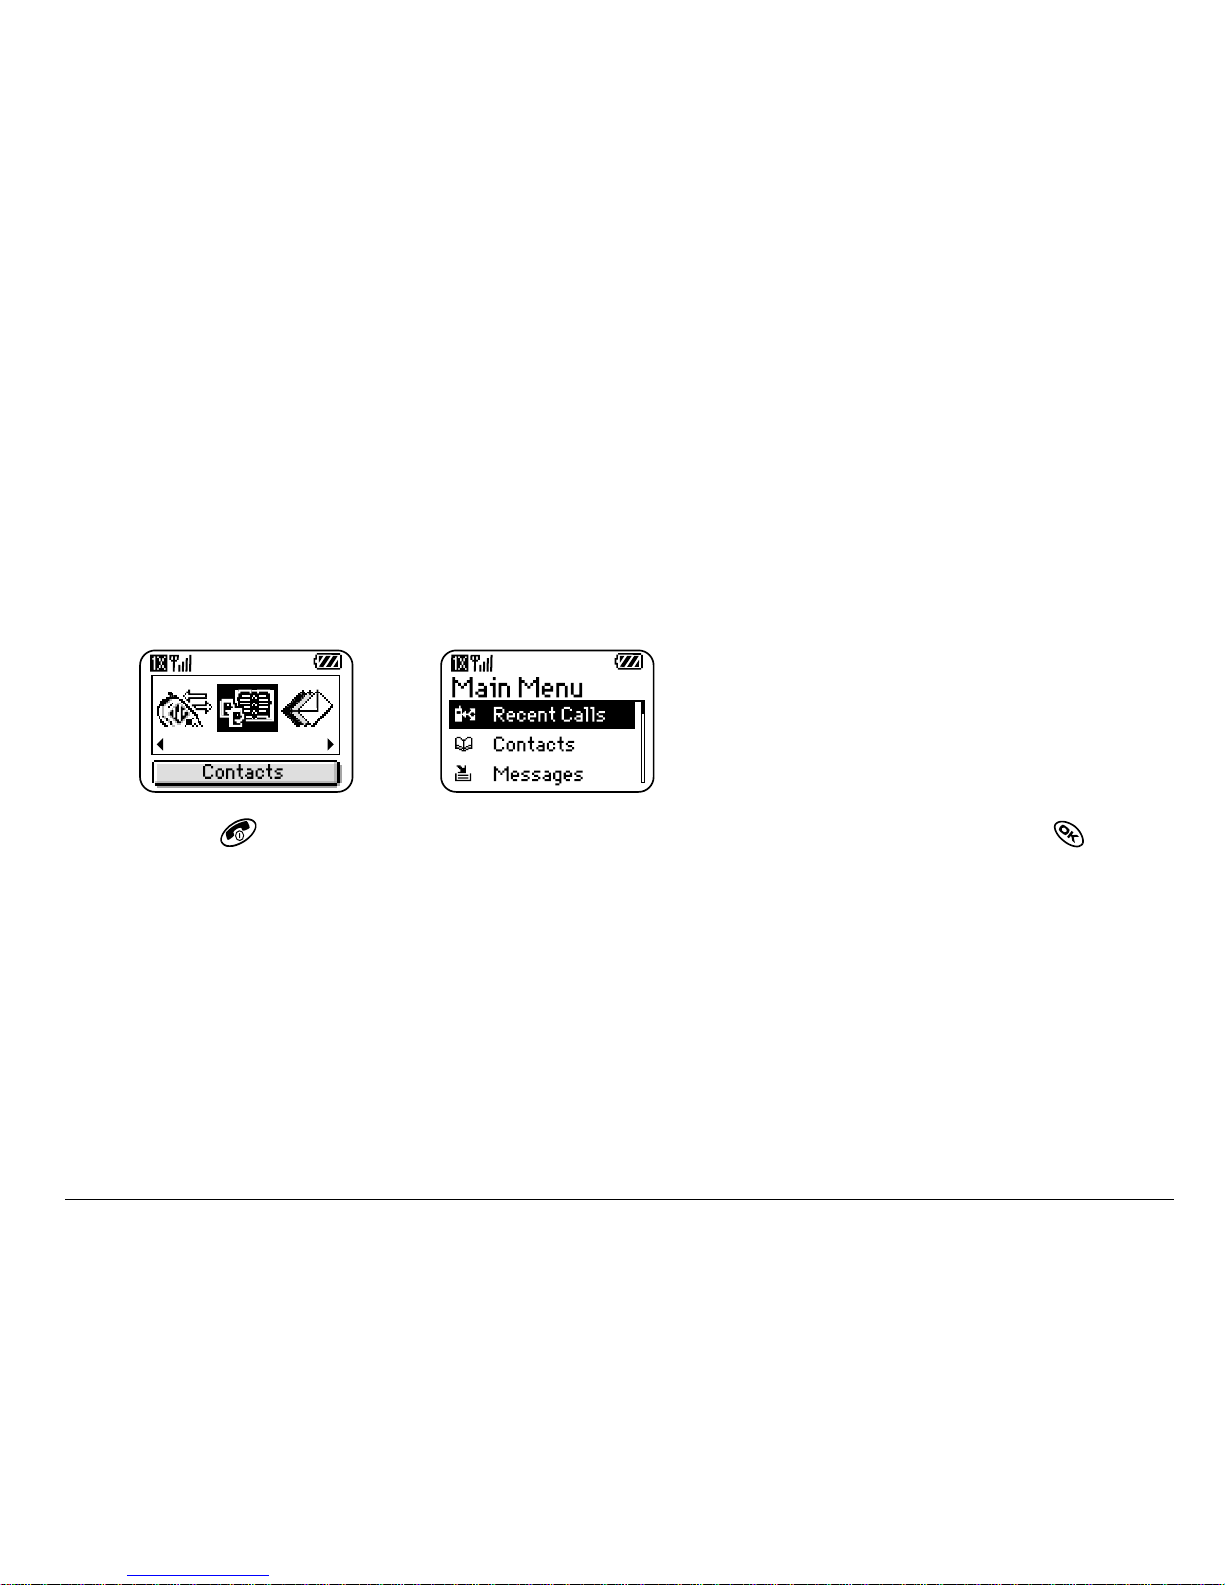
User Guide for the Kyocera Phantom phone 67
Choosing a different menu view
You ca n change th e a pp ea r an c e o f the menus yo u se e when you s el ec t
Menu from the hom e s c ree n.
1. Select Menu
→ Settings → Display → Main Menu View, then the option
you want:
2. Press to return to the home screen. The next time you press ,
you will see the menu view you selected.
Graphic List
Page 90

68 Customizing Your Phone
Adjusting the backlighting
Your scree n li gh t s up whi le you ar e in a cal l o r whe n y ou pr e ss a key on t he
keypad. How ev er, you can ch an ge when and how backl igh ting lights up.
1. Select Menu
→ Settings → Display → Backlighting.
2. Sele c t an option from the list:
– 5 seconds, 10 seconds, or 30 seconds—(Default)
=T ur n b ack li ghti ng on for
5, 10, or 30 seconds after your last keypress.
– 5 sec. & in call , 10 sec. & in call, or 30 sec. & in call—Turn bac kl ig hting on
for the duration of a call, and for 5, 10, or 30 seconds after your
last keypress. (Note: These th ree settings drain the battery more
quickly and reduce talk and standby times.)
Page 91

User Guide for the Kyocera Phantom phone 69
Setting power backlighting
You can set backl ightin g to remai n on when an ext ernal po wer sourc e, such
as the AC adapter, is used with the phone.
Note:Power backlighting may not be available with some access ories.
Check with your service provider.
1. Select Menu
→ Settings → Accessories → Pwr Backlight.
2. Select Always On to keep backlighting on. (The battery charges more
slowly when power backlighting is on.)
Setting backlighting to flash
You can set the backlighting on your phone to flash in a certain style when
an incomin g ca ll is rec eived. When th is se tti ng is ac ti va ted , the lights will
flash even if you silen ce the ring er.
1. Select Menu
→ Settings → Display → Flashing Lights.
2. Select f rom Fast Flash , Slo w Flash, or Heartbeat, or Rhythm. As you highlight
the options a sample of each flash is provided.
3. Press to select your option.
Page 92

70 Customizing Your Phone
Caution: A small percentage of users may be photo sensitive to flashing
lights. In rare cases, exposure to flashing lights, under certain
circumstances, may produce seizures. While such an event is not known to
occur with m o bile phone u se , a nd th e Phantom pho ne ha s be en designed
to minimize the possibility of any such occurrence, those who believe they
may be photo sensiti ve s ho uld n ot en able the Flas hi ng Li gh ts fea t ure .
Changing the display contrast
1. Select Menu → Settings → Display → Contrast.
2. Select the level of contrast yo u want.
Setting numbers to auto-hyphenate
Auto-hyphe na tio n is a s e ttin g that automati ca lly in s erts hy p he ns in to yo ur
phone nu mb ers to b e c on s ist en t w it h t he U .S. dia li ng plan.
For example, 1-222-333-4444.
• Select Menu → Settings → Display → Auto-Hyphen → Enabled.
Page 93
User Guide for the Kyocera Phantom phone 71
Selecting a screen saver
This feature is available only on Phantom phones with a grayscale screen
display. The screen s av ers wo rk only from the ho m e s c ree n, and they ar e
activate d 1 0 se co nd s after the last keypress. Inco mi ng c all s and alerts
override screen savers.
1. Select Menu → Settings → Display → Screen Saver.
2. Highlight a screen saver an d press .
3. Press to return to the home screen and wait 10 seconds to view the
screen saver you chose.
Note:You can add gr aphics you ha ve creat ed or saved to the S creen Sav ers
list. Refer to “My Pictures” on page 100.
Selecting wallpaper
Wallpaper appears on the home screen, when the phone is not in use. This
feature is available only on Phantom phones with a color screen display.
1. Select Menu → Settings → Display → Wallpaper.
2. Highlight a wallpaper design and press .
3. Press to return to the home screen and view the wallp ap er you chose.
Page 94

72 Customizing Your Phone
Selecting a color theme
You can select a color theme to display on your phone. This feature is
available only on phones with a color screen display.
1. Select Menu → Settings → Display → Color Themes.
2. Highlight a color theme from the list and press .
3. Press to return to the home screen.
Choosing a different time/date format
1. Select Menu → Settings → Display → Time Format.
2. Highlight the option you want.
Creating a secure environment
This section describes all the features involved in securi ng your phone and
preventing access to personal information. All security features are
shielded by a four-digit lo ck cod e.
Page 95

User Guide for the Kyocera Phantom phone 73
Changing your lock code
The lock c od e i s typ ic al ly 00 00 or the last 4 dig its o f y our phone nu mb er.
1. Select Menu
→ Settings → Security.
2. Enter you r four- digit l ock code and select Lock Code. A messa ge appears:
“Change Code?”
3. Select Yes and enter a new four -digi t co de. Enter your new l ock code again.
Locking your phone
When your phone is locked, you can call only emergency numbers or your
service pro vider number. You can sti ll re c eiv e incoming c all s.
1. Select Menu
→ Settings → Security.
2. Enter your four-digit lock code.
3. Select Lock Phone.
4. Highlight an option:
– Never—Does not lock the phone.
– On power up—Locks the phone every time you turn it on.
– Now—Locks the phone immediately.
5. Press .
Page 96

74 Customizing Your Phone
Unlocking the phone
1. From the home screen, press to select Unlock.
2. Enter your four-digit lock code.
Designating emergency numbers
The emergency numbers feature allows you to specify three personal
phone nu mb ers th at can be ca ll ed w he n the p hone is locked.
1. Select Menu
→ Settings → Security.
2. Enter your four-digit lock code.
3. Select Emergency #’s.
4. Select an Unassigned slot.
Note: Enter the p hone number, in cluding the area code. Do no t enter 1 b efore
the area code.
5. Press to select Done.
Page 97

User Guide for the Kyocera Phantom phone 75
Notes:
• You can view thes e numbers only when they’re b e ing entered for the
first time.
• You cannot edit these numbers.
• To make a call to an emergency number from a locked phone, you must
dial the numb er (including area code) exact ly as it was stored in
Emergency Numbers.
Restricting calls
You ca n res tric t the calls that can be m ad e f r om your phone to on ly tho s e
that hav e b een saved in yo ur Co ntac ts Di rectory.
1. Select Menu
→ Settings → Security.
2. Enter your four-digit lock code.
3. Select Limit Calls.
4. Select Contacts Only.
Page 98

76 Customizing Your Phone
Erasing all contacts
You can erase all contacts from the Contacts directory.
1. Select Menu
→ Settings → Security.
2. Enter your four-digit lock code.
3. Select Erase Contacts.
4. Select Yes to erase all conta ct s. A message appear s: “Erase ALL cont acts?”
5. Select Yes to erase all contacts.
Setting message alerts
You can choose how you want be alerted of incoming voicemail, pages, or
text messag es.
1. Select Menu
→ Settings → Messaging → Alerts.
2. Select the type of al ert: Message Alert, Net Alert, Page Alert, or Voicemail Alert.
3. Press to select an option:
– Vibrate, Beep, Tune1, Tune2, or Tune3—Set the phone to vibrate, beep,
or play a tune once when a new message is received.
Page 99

User Guide for the Kyocera Phantom phone 77
– Options with remind—Set the phone to notify you once when a new
message is re ceive d and then noti fy you a gain e very fi ve minu tes. To
stop a reminder alert, press to select Ignore.
– Disabled—Turn off message alerts.
Setting alerts for your headset
When a headset (sold separately) is attached to the phone, you can set
alert sounds to originate from the headset.
1. Select Menu
→ Settings → Accessories → Headset Ring.
2. Select Out of headset to have alerts originate from the he a ds e t.
Page 100

78 Customizing Your Phone
Network settings
Switching between phone lines
Your phone can have two service accounts, or phone lines, associated with
it. Each phone line has its own phone number. When you are using one line,
you cannot r eceive cal ls fr om th e o th er. It would be as if t he p hon e were “o ff”
for that number. Your voicemail, however, will still t ake messages. All
contacts and settings are shared for both lines.
1. Select Menu
→ Settings → Network → Set Phone Line.
2. Select the other line and press .
Note: Once a second phone l ine is established, a second phone number
becomes available for selection.
 Loading...