

Page 1
Page 2

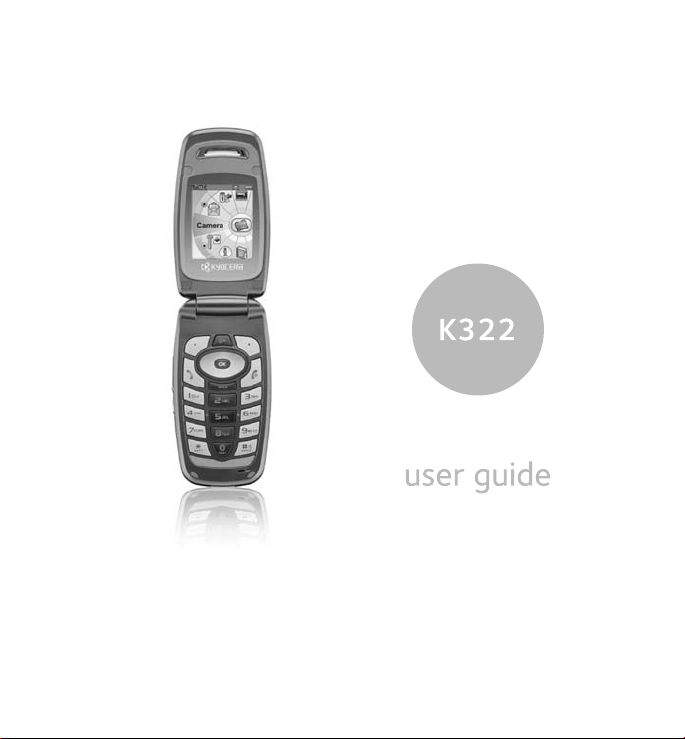
User Guide for the Kyocera K322 Phone
This manual is based on the production version of
the Kyocera K322 phone. Software changes may
have occurred after this printing. Kyocera reserves
the right to make changes in technical and product
specifications without prior notice. The products
and equipment described in this documentation
are manufactured under license from QUALCOMM
Incorporated under one or more of the following
U.S. patents:
4,901,307 5,109,390 5,267,262 5,416,797 5,506,865
5,544,196 5,657,420 5,101,501 5,267,261 5,414,796
5,504,773 5,535,239 5,600,754 5,778,338 5,228,054
5,337,338 5,710,784 5,056,109 5,568,483 5,659,569
5,490,165 5,511,073
The Kyocera Wireless Corp. (“KWC”) products
described in this manual may include copyrighted
KWC and third party software stored in
semiconductor memories or other media. Laws in
the United States and other countries preserve for
KWC and third party software providers certain
exclusive rights for copyrighted software, such as
the exclusive rights to distribute or reproduce the
copyrighted software. Accordingly, any copyrighted
software contained in the KWC products may not
be modified, reverse engineered, distributed or
reproduced in any manner not permitted by law.
Furthermore, the purchase of the KWC products
shall not be deemed to grant either directly or by
implication, estoppel, or otherwise, any license
under the copyrights, patents or patent applications
of KWC or any third party software provider, except
for the normal, non-exclusive royalty-free license to
use that arises by operation of law in the sale of
a product.
Kyocera is a registered trademark of Kyocera
Corporation. Brick Attack and Race 21 are
trademarks of Kyocera Wireless Corp.
QUALCOMM is a registered trademark of
QUALCOMM Incorporated. Openwave is a
trademark of Openwave Systems Incorporated.
eZiText is a registered trademark of Zi Corporation.
TransFlash is a trademark of SanDisk Corporation.
All other trademarks are the property of their
respective owners.
Copyright © 2006 Kyocera Wireless Corp.
All rights reserved.
Ringer Tones Copyright © 2000-2002 Kyocera
Wireless Corp.
82-N8863-1EN, Rev. 001
FCC/IC Notice
This device complies with part 15 of the FCC rules.
Operation is subject to the following two conditions:
(1) This device may not cause harmful
interference, and (2) this device must accept any
interference received, including interference that
may cause undesired operation. To maintain
compliance with FCC RF exposure guidelines, if
you wear a handset on your body, use the Kyocera
Wireless Corp. (KWC) supplied and approved case
CV90-M2339-01, CV90-M2340-01, and holster
CV90-M2396-01.
Other accessories used with this device for bodyworn operations must not contain any metallic
components and must provide at least 15 mm
separation distance including the antenna and the
user’s body.
THIS MODEL PHONE MEETS THE GOVERNMENT’S
REQUIREMENTS FOR EXPOSURE TO RADIO WAVES.
Your wireless phone is a radio transmitter and
receiver. It is designed and manufactured not to
exceed the emission limits for exposure to radio
frequency (RF) energy set by the Federal
Communications Commission of the U.S.
Government. These limits are part of
comprehensive guidelines and establish permitted
levels of RF energy for the general population. The
guidelines are based on standards that were
developed by independent scientific organizations
through periodic and thorough evaluation of
scientific studies.
ii
Page 3

The standards include a substantial safety margin
designed to assure the safety of all persons,
regardless of age and health.
The exposure standard for wireless mobile phones
employs a unit of measurement known as the
Specific Absorption Rate, or SAR. The SAR limit
set by the FCC is 1.6 W/kg.*
Tests for SAR are conducted using standard
operating positions specified by the FCC with the
phone transmitting at its highest certified power
level in all tested frequency bands.
Although the SAR is determined at the highest
certified power level, the actual SAR level of the
phone while operating can be well below the
maximum value.
This is because the phone is designed to operate
at multiple power levels so as to use only the
power required to reach the network. In general,
the closer you are to a wireless base station
antenna, the lower the power output.
Before a phone model is available for sale to the
public, it must be tested and certified to the FCC
that it does not exceed the limit established by the
government-adopted requirement for safe
exposure. The tests are performed in positions and
locations (e.g., at the ear and worn on the body) as
required by the FCC for each model.
Body-worn measurements differ among phone
models, depending upon availability of accessories
and FCC requirements. While there may be
differences between the SAR levels of various
phones and at various positions, they all meet the
government requirement for safe exposure.
The FCC has granted an Equipment Authorization
for this model phone with all reported SAR levels
evaluated as in compliance with the FCC RF
emission guidelines. SAR information on this
model phone is on file with the FCC and can be
found under the Display Grant section
http://www.fcc.gov/oet/fccid after searching on the
FCC ID: OVFKWC-K24.
Additional information on SAR can be found on the
Cellular Telecommunications and Internet
Association (CTIA) web-site at
http://www.wow-com.com.
* In the United States and Canada, the SAR limit
for mobile phones used by the public is 1.6 watts/
kg (W/kg) averaged over one gram of tissue. The
standard incorporates a substantial margin of
safety to give additional protection for the public
and to account for any variations in measurements.
Caution
The user is cautioned that changes or
modifications not expressly approved by the party
responsible for compliance could void the warranty
and user’s authority to operate the equipment.
Optimize your phone’s performance
Use the guidelines on page 2 to learn how to
optimize the performance and life of your phone
and battery.
Air bags
If your vehicle has an air bag, DO NOT place
installed or portable phone equipment or other
objects over the air bag or in the air bag
deployment area. If equipment is not properly
installed, you and your passengers risk
serious injury.
Medical devices
Pacemakers—Warning to pacemaker wearers:
Wireless phones, when in the ‘on’ position, have
been shown to interfere with pacemakers. The
phone should be kept at least six (6) inches away
from the pacemaker to reduce risk.
The Health Industry Manufacturers Association
and the wireless technology research community
recommend that you follow these guidelines to
minimize the potential for interference.
• Always keep the phone at least six inches
(15 centimeters) away from your pacemaker
when the phone is turned on.
User Guide for the Kyocera K322 Phone iii
Page 4

• Do not carry your phone near your heart.
• Use the ear opposite the pacemaker.
• If you have any reason to suspect that
interference is taking place, turn off your
phone immediately.
Hearing aids—Some digital wireless phones may
interfere with hearing aids. In the event of such
interference, you may want to consult your service
provider or call the customer service line to
discuss alternatives.
Other medical devices—If you use any other
personal medical device, consult the manufacturer
of the device to determine if it is adequately
shielded from external RF energy. Your physician
may be able to help you obtain this information.
In health care facilities—Turn your phone off in
health care facilities when instructed. Hospitals
and health care facilities may be using equipment
that is sensitive to external RF energy.
Potentially unsafe areas
Posted facilities
when posted notices require you to do so.
Aircraft—FCC regulations prohibit using your
phone on a plane that is in the air. Turn your phone
off or switch it to Airplane Mode before
boarding aircraft.
Vehicles—RF signals may affect improperly
installed or inadequately shielded electronic
systems in motor vehicles. Check with the
manufacturer of the device to determine if it is
adequately shielded from external RF energy.
Blasting areas—Turn off your phone where blasting
is in progress. Observe restrictions, and follow any
regulations or rules.
Potentially explosive atmospheres—Turn off your
phone when you are in any area with a potentially
explosive atmosphere. Obey all signs and
instructions. Sparks in such areas could cause an
explosion or fire, resulting in bodily injury or death.
—Turn your phone off in any facility
Areas with a potentially explosive atmosphere are
often, but not always, clearly marked.
They include:
• fueling areas such as gas stations
• below deck on boats
• transfer or storage facilities for fuel or
chemicals
• vehicles using liquefied petroleum gas, such as
propane or butane
• areas where the air contains chemicals or
particles such as grain, dust, or metal powders
• any other area where you would normally be
advised to turn off your vehicle engine
Use with care
Use only in normal position (to ear). Avoid
dropping, hitting, bending, or sitting on the phone.
Keep phone dry
If the phone gets wet, turn the power off
immediately and contact your dealer. Water
damage may not be covered under warranty.
Resetting the phone
If the screen seems frozen and the keypad does
not respond to keypresses, reset the phone by
completing the following steps:
1. Remove the battery door.
2. Remove and replace the battery.
If the problem persists, return the phone to the
dealer for service.
Accessories
Use only Kyocera-approved accessories with
Kyocera phones. Use of any unauthorized
accessories may be dangerous and will invalidate
the phone warranty if said accessories cause
damage or a defect to the phone.
iv
Page 5
Radio Frequency (RF) energy
Your telephone is a radio transmitter and receiver.
When it is on, it receives and sends out RF energy.
Your service provider’s network controls the power
of the RF signal. This power level can range from
0.006 to 0.6 watts.
In August 1996, the U.S. Federal Communications
Commission (FCC) adopted RF exposure
guidelines with safety levels for hand-held wireless
phones. These guidelines are consistent with the
safety standards previously set by both U.S. and
international standards bodies in the
following reports:
• ANSI C95.1 (American National Standards
Institute, 1992)
• NCRP Report 86 (National Council on
Radiation Protection and
Measurements, 1986)
• ICNIRP (International Commission on
Non-Ionizing Radiation Protection, 1996)
Your phone complies with the standards set by
these reports and the FCC guidelines.
E911 mandates
Where service is available, this handset complies
with the Phase I and Phase II E911 Mandates
issued by the FCC.
Battery and charger specifications
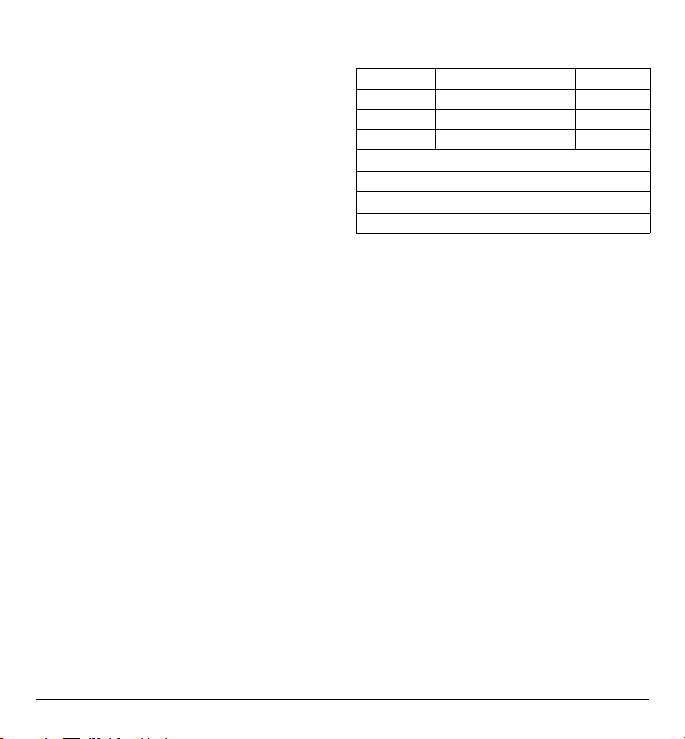
Charger Input Output
CV90-G2968-01 120VAC 60Hz 7W 5.2VDC 400mA
CV90-G2588-01 100-240VAC 50/60Hz 0.2A 4.2VDC 0.6A
CV90-G2589-01 100-240VAC 50/60Hz 0.3A 4.5VDC 1.2A
Standard Battery:
CV90-P3031-01 3.7V 900mAh
Extended Battery:
CV90-P3032-03 1800mAh
10300 Campus Point Drive, San Diego, CA 92121
Kyocera Wireless Corp.
Visit us at
www.kyocera-wireless.com
U.S.A.
User Guide for the Kyocera K322 Phone v
Page 6

CONTENTS
1 Getting Started. . . . . . . . . . . . . . . . . . . . . . 1
Installing the battery . . . . . . . . . . . . . . . . . . . . . . 1
Getting to know your phone . . . . . . . . . . . . . . . . 3
2 Making and Answering Calls . . . . . . . . . . 9
Making a call . . . . . . . . . . . . . . . . . . . . . . . . . . . 9
Silencing an incoming call . . . . . . . . . . . . . . . . 10
Using the speakerphone . . . . . . . . . . . . . . . . . . 10
Speed dialing . . . . . . . . . . . . . . . . . . . . . . . . . . 12
Setting up voicemail . . . . . . . . . . . . . . . . . . . . . 13
Understanding roaming. . . . . . . . . . . . . . . . . . . 14
Using your phone in an airplane. . . . . . . . . . . . 15
3 Entering Letters, Numbers,
and Symbols . . . . . . . . . . . . . . . . . . . . . . 17
4 Storing Contacts . . . . . . . . . . . . . . . . . . . 20
Creating a new contact . . . . . . . . . . . . . . . . . . . 20
Adding a code or extension. . . . . . . . . . . . . . . . 20
Customizing your contacts. . . . . . . . . . . . . . . . . 20
Editing a contact . . . . . . . . . . . . . . . . . . . . . . . . 22
Erasing a contact. . . . . . . . . . . . . . . . . . . . . . . . 22
Customizing a phone number . . . . . . . . . . . . . . 22
Finding contact information . . . . . . . . . . . . . . . 23
5 Sending and Receiving
Text Messages . . . . . . . . . . . . . . . . . . . . . 24
Sending text messages. . . . . . . . . . . . . . . . . . . . 24
Retrieving text messages . . . . . . . . . . . . . . . . . . 28
Customizing message settings . . . . . . . . . . . . . . 29
6 Sending and Receiving Multimedia
Messages . . . . . . . . . . . . . . . . . . . . . . . . . 31
Sending multimedia messages. . . . . . . . . . . . . . 31
Receiving multimedia messages . . . . . . . . . . . . 32
Viewing multimedia messages. . . . . . . . . . . . . . 33
7 Customizing Your Phone . . . . . . . . . . . . 35
Silencing all sounds . . . . . . . . . . . . . . . . . . . . . 36
Choosing ringers. . . . . . . . . . . . . . . . . . . . . . . . 36
Setting sounds for your phone . . . . . . . . . . . . . 36
Using shortcuts. . . . . . . . . . . . . . . . . . . . . . . . . 38
Personalizing the screen. . . . . . . . . . . . . . . . . . 39
Creating a secure environment . . . . . . . . . . . . . 41
Setting position location . . . . . . . . . . . . . . . . . . 43
8 Using Voice Recognition . . . . . . . . . . . . 44
Setting up voice dialing. . . . . . . . . . . . . . . . . . . 44
Making a call using voice tags. . . . . . . . . . . . . . 44
Making a call using digit dialing . . . . . . . . . . . . 45
Training voice recognition . . . . . . . . . . . . . . . . 47
9 Using the Camera . . . . . . . . . . . . . . . . . . 48
Taking a picture . . . . . . . . . . . . . . . . . . . . . . . . 50
Camera key map. . . . . . . . . . . . . . . . . . . . . . . . 50
10 Using Media Gallery . . . . . . . . . . . . . . . . 52
Accessing files . . . . . . . . . . . . . . . . . . . . . . . . . 52
11 Using Tools and Games . . . . . . . . . . . . . 54
Voice Memo . . . . . . . . . . . . . . . . . . . . . . . . . . . 54
Scheduler . . . . . . . . . . . . . . . . . . . . . . . . . . . . . 54
Alarm Clock . . . . . . . . . . . . . . . . . . . . . . . . . . . 56
Tip Calculator. . . . . . . . . . . . . . . . . . . . . . . . . . 56
Calculator. . . . . . . . . . . . . . . . . . . . . . . . . . . . . 57
Timer . . . . . . . . . . . . . . . . . . . . . . . . . . . . . . . . 57
Stopwatch. . . . . . . . . . . . . . . . . . . . . . . . . . . . . 57
Games . . . . . . . . . . . . . . . . . . . . . . . . . . . . . . . 58
12 Connecting to the Internet . . . . . . . . . . . 61
Using the Web Browser. . . . . . . . . . . . . . . . . . . 61
13 Getting Help . . . . . . . . . . . . . . . . . . . . . . . 63
Index . . . . . . . . . . . . . . . . . . . . . . . . . . . . . . . . . 64
vi Contents
Page 7

1GETTING STARTED
Installing the battery
Your Kyocera K322 phone comes with a
removable lithium ion (LiIon) battery.
the battery before using the phone.
You must use a Kyocera-authenticated
Note:
battery in your phone. If you attempt to use a
battery that has not been authenticated you will
receive a security warning. Contact your service
provider to obtain a Kyocera-authenticated battery.
To install the battery:
1. Hold the phone
face down.
2. Place your thumb on the
ribs at the top of the
battery door and slide the
battery door downward to
remove it.
3. Place the battery in the
phone casing with the
metal contacts facing
towards the bottom end
of the phone.
4. Replace the battery door
by sliding the notches
Fully charge
Charging the battery
You must have at least a partial charge in the
battery to make or receive calls.
To charge the battery:
1. Connect the AC adapter
to the jack on the bottom
of the phone.
2. Plug the adapter into a
wall outlet.
The battery icon in the upper-right corner of the
screen tells you whether the phone is:
• Charging (the icon is animated)
• Partially charged
• Fully charged
Note: The battery will not charge if you use the
phone while it is connected to an AC adapter.
Recharging the battery
You can safely recharge the battery at any time,
even if it has a partial charge.
Note: To remove the battery, make sure the phone
is powered off.
into the openings at the
bottom and outside edges
of the battery casing.
5. Slide the door up to secure the cover
into place.
User Guide for the Kyocera K322 Phone 1
Page 8
Caring for the battery
General safety guidelines
• Do not take apart, puncture, or short-circuit
the battery.
• If you have not used the battery for more than
a month, recharge it before using your phone.
• Avoid exposing the battery to extreme
temperatures, direct sunlight, or
high humidity.
• Never dispose of any battery in or near a
fire. It could explode.
Common causes of battery drain
• Playing games or using the Web.
• Playing music files.
• Taking pictures with the flash on.
• Keeping backlighting on.
• Operating in analog ( ) mode. Your phone
switches between modes to find the best
signal. To set your phone to operate in a single
mode, select
Digital/Analog.
• Operating in digital mode when far away from
a base station or cell site.
• Using data cables or accessories.
• Operating when no service is available, or
service is available intermittently.
• High earpiece and ringer volume settings.
• Repeating sound, vibration, or lighted alerts.
Menu → Settings → Network →
Accessing keypad shortcuts
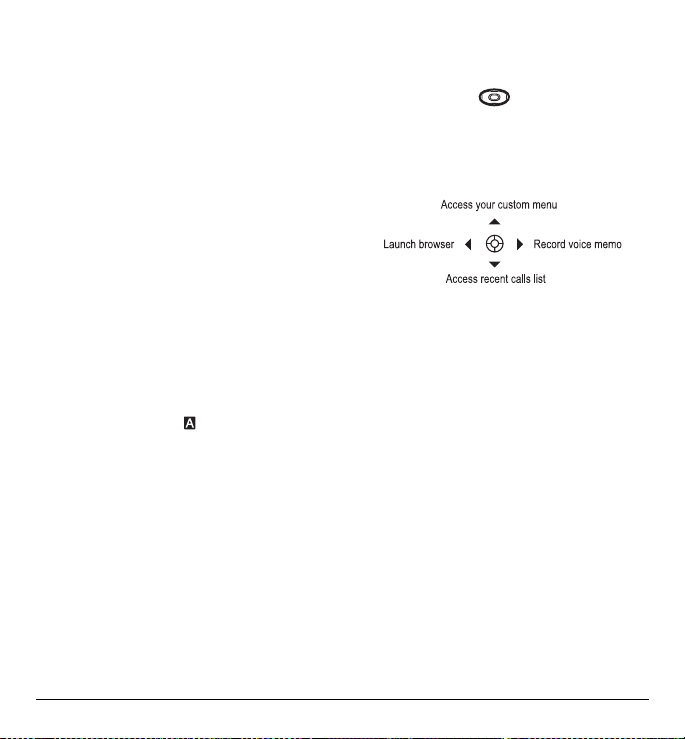
Navigation key shortcuts
From the home screen, press the navigation key in
one of four directions to access three shortcuts
and one custom menu (see page 38 for
instructions on setting up your custom menu).
2 Getting Started
Page 9
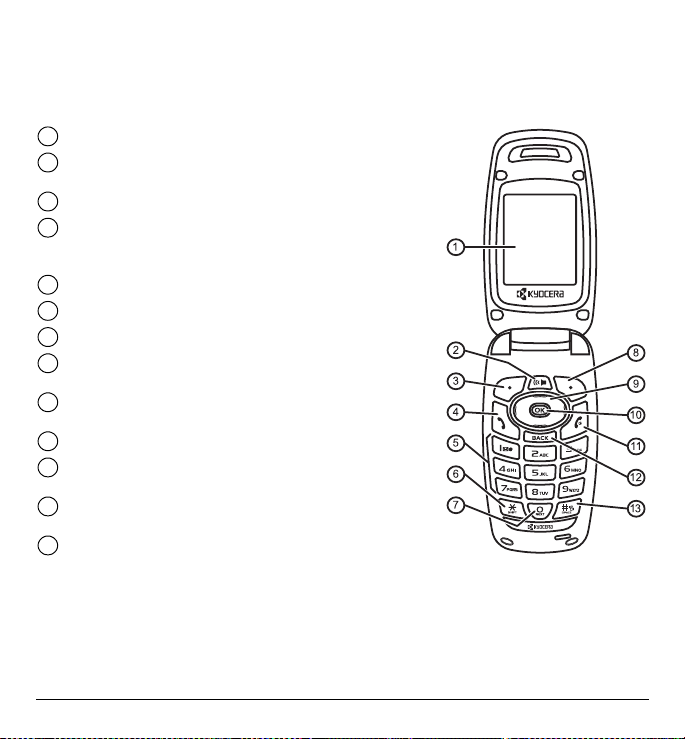
Getting to know your phone
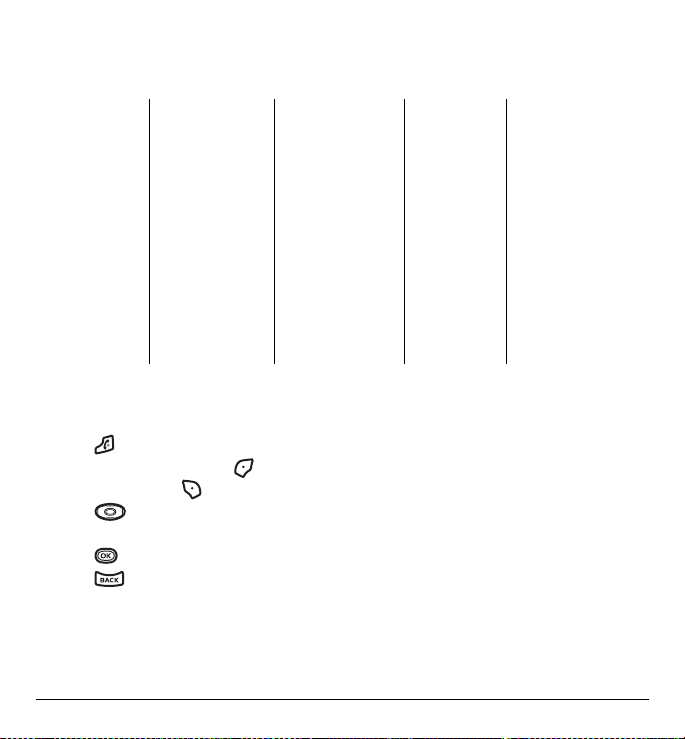
The phone is shown here in open position. You must open the flip to use the keys on the lower portion of
the phone. When the phone is closed, the keys are locked to prevent accidental key presses
Home screen.
1
Speakerphone key activates the speakerphone and answers
2
incoming calls.
Left softkey accesses menus and functions.
3
Send/Talk key starts or answers a call. Press once to activate
4
voice dialing, twice to display the Recent Calls list, and three
times to redial the last number dialed.
Keypad for entering numbers, letters, or symbols.
5
*/Shift key changes the text mode in text entry.
6
0/Next key cycles through word choices during text entry.
7
Right softkey accesses the Contacts directory and other
8
menu options.
Navigation key scrolls through lists and text entry fields and
9
accesses shortcuts from the home screen.
OK key selects a menu item or option.
10
End/Power key turns the phone on and off, ends a call or
11
browser session, and returns you to the home screen.
BACK key erases characters in text entry and returns you to
12
the previous screen.
Space/# key enters a space during text entry. Press and hold to
13
activate or deactivate Silent mode.
.
User Guide for the Kyocera K322 Phone 3
Page 10
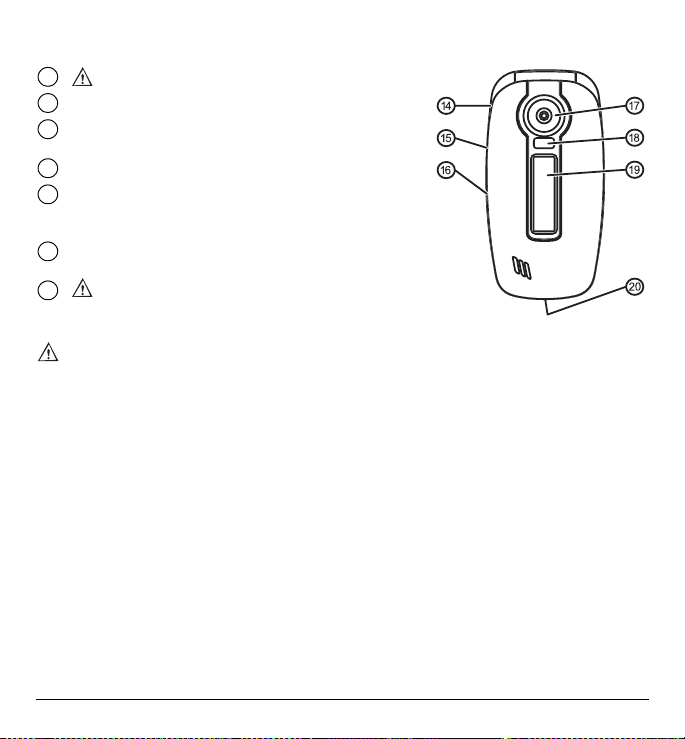
Jack for Hands-free Headset only (sold separately).
14
Volume key to raise or lower ringtone volume.
15
Camera key activates Camera mode. To activate Camera
16
mode, press and hold until you hear two beeps.
Camera lens.
17
Camera Flash/Message Indicator Light light flashes when
18
taking a picture or lights when you have a message or
missed call.
External screen displays time, caller ID, signal and
19
battery strength.
Jack for AC adapter (included) and data cable
20
(sold separately).
Warning: Inserting an accessory into the incorrect jack will damage the phone.
4 Getting Started
Page 11
Using menus
The contents of the main menu are as follows:
Recent Calls
All Calls
Incoming Calls
Outgoing Calls
Missed Calls
Erase Call Lists
Recent Calls Timer
All Calls Timer
Contacts
View All
Add New
View Groups*
Speed Dial List
Voice Dial List
*Not available on all phones. Check with your service provider.
** Menu name varies by service provider.
Accessing menu items
• Press to view the home screen.
• From the home screen, press to
select
Menu or press to select Contacts.
• Press left, right, up, or down to see
menus and options.
• Press to select a menu item.
• Press to back up a menu level.
Messages
New Text Msg
Voicemail
InBox
Browser Alerts*
Sent
OutBox*
Saved
Drafts
Msg Settings
Group Lists*
Erase Messages
Camera
Launches the camera
Media Gallery
Camera Pictures
Images
Sounds
Settings
Silent Mode
Sounds
Display
Convenience
Voice Features
Messaging
Security
Network
Accessories
Gamepad Keymap
Tools & Games
Brick Attack
TM
Race 21
TM
Doodler
Voice Memo
Scheduler
Alarm Clock
Tip Calculator
Calculator
Time r
Stopwatch
Web Browser
TM
Connects to Internet
Phone Info
Build Info
Icon Keys
BREW Apps**
In this guide, an arrow → tells you to select an
option from a menu.
For example, Menu → Settings means select
Menu, then select the Settings option.
Note: To change the way the menus appear, see
“Choosing a menu view” on page 39 for details.
User Guide for the Kyocera K322 Phone 5
Page 12
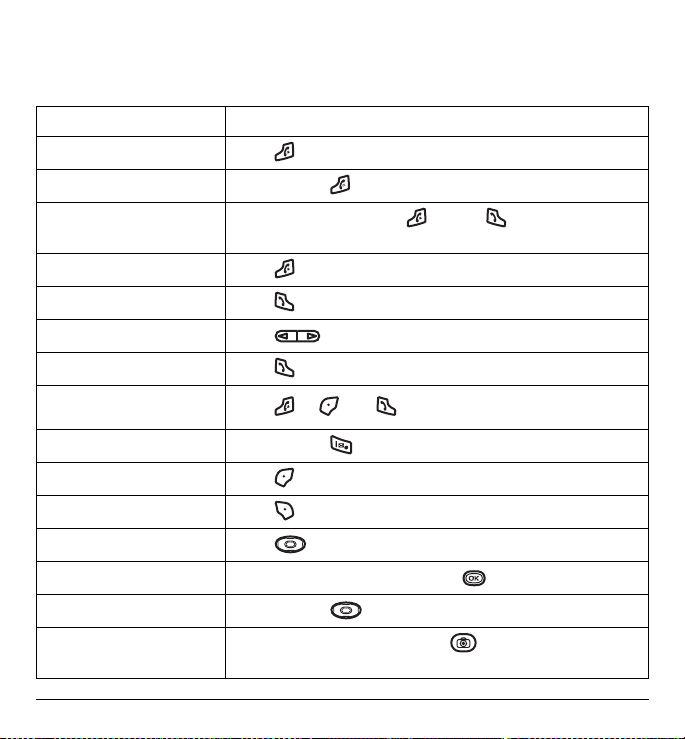
Performing basic functions
Note: The phone must be powered ON to perform the following functions.
To... From the home screen...
Turn the phone on
Turn the phone off
Make a call
End a call
Answer a call
Adjust volume during a call
Acknowledge an alert
Silence the ringer on an
incoming call
Access voicemail
Access menus
Access Contacts list
Scroll menus
Select menus
Access Recent Calls list
Activate Camera mode
Press and wait until the phone plays a sound.
Press and hold until the phone plays a sound.
Enter the number and press or press to initiate voice
dialing. Contact must have voice tag assigned (see page 44).
Press .
Press .
Press up or down.
Press when you see OK.
Press or then to answer.
Press and hold and follow the system prompts.
Press once.
Press once.
Press up and down.
Highlight a menu or option and press once.
Press and hold down.
Press and hold the side camera key . Focus on the image and
select
Capture to take a picture.
6 Getting Started
Page 13
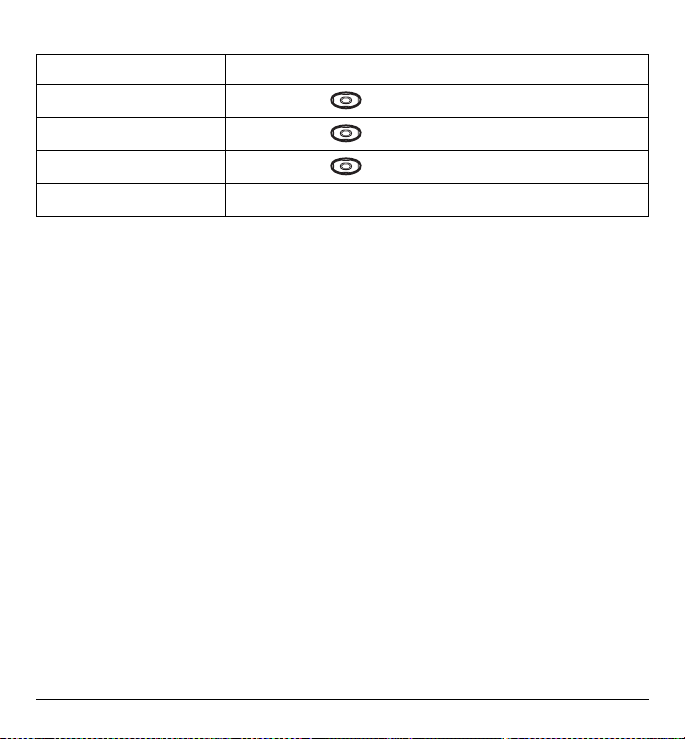
To... From the home screen...
Launch the browser
Record a voice memo
Access Custom Menu
Verify your phone number
Press and hold left.
Press and hold right.
Press and hold up.
Select Menu → Phone Info → Build Info
User Guide for the Kyocera K322 Phone 7
Page 14
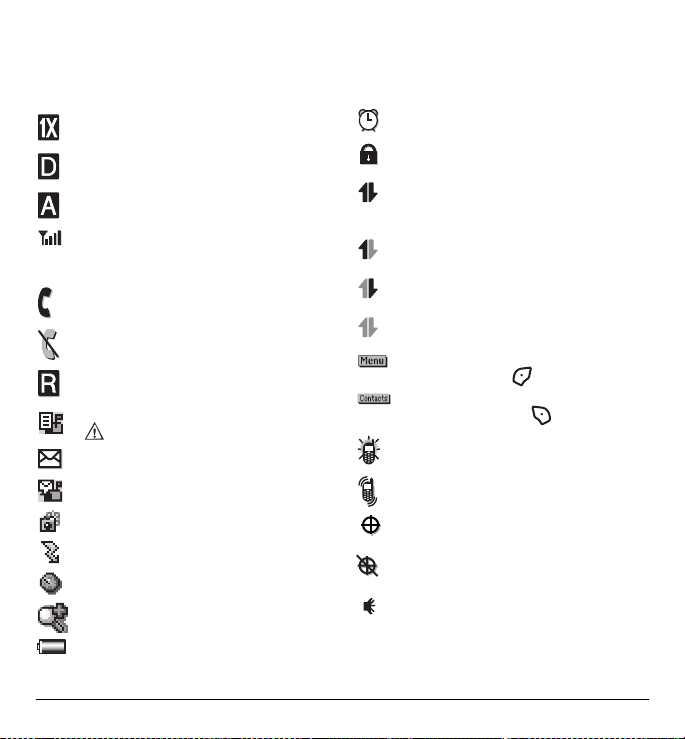
Understanding screen icons
These icons may appear on your phone’s screen.
The phone is operating in IS2000 (1X)
digital mode.
The phone is operating in IS95
digital mode.
The phone is operating in Analog
(FM) mode.
The phone is receiving a signal. You can
make and receive calls. Fewer bars
indicate a weaker signal.
A call is in progress.
The phone is not receiving a signal. You
cannot make or receive calls.
The phone is roaming outside of its home
service area.
You have a text message.
( indicates the message is urgent.)
You have a voice message.
You have a voice/text message.
The phone is in camera mode.
Camera flash mode is ready.
Camera timer mode is ready.
Camera zoom mode is ready.
The battery is fully charged. The more
black bars, the greater the charge.
The alarm clock is set.
The phone is in privacy mode or is
accessing a secure Web site.
High-speed (3G) data service is available
and active on your phone. Check with your
service provider for availability.
(blinking) The phone is sending
high-speed data.
(blinking) The phone is receiving
high-speed data.
High-speed data service is available, but
the phone is dormant.
The phone is at the home screen. To
access
Menu, press .
The phone is at the home screen. To
access
Contacts, press .
The phone is set to light up instead
of ring.
The phone is set to vibrate or to vibrate and
then ring.
Position location is set to your service
provider and to emergency services.
Position location is set to emergency
services only.
Speakerphone is on.
8 Getting Started
Page 15
2MAKING AND ANSWERING CALLS
Making a call
Make sure you are in an area where a signal can
be received. Look for the symbol on the home
screen. The more bars you see in this symbol, the
stronger the signal. If there are no bars, move to
where the signal strength is better.
When the phone has been idle for a time, it
changes to power save mode. Press any key to
return to normal operating mode.
1. Open the flip.
2. Enter the phone number and press .
3. Press or close the flip to end the call.
Voice or Digit dialing
You can make a voice call by speaking the name
of the person/place you want to call
- or -
you can speak the digits of a phone number.
Note: Voice call requires that a contact be saved
with a voice tag. See “Creating a voice tag for a
contact” on page 44.
1. Press .
2. Follow the voice prompts to initiate voice or
digit dialing. The phone places the call.
3. Press to end the call.
Answering a call
When a call comes in, the phone rings, vibrates,
or lights up. The phone number of the caller
appears on the screen if it is not restricted. If the
number is stored in your Contacts directory, the
contact name appears.
1. Open the flip.
2. Press to answer the incoming call.
- or Press to answer the incoming call and
turn on the speakerphone.
Answering calls using the flip
You can set the phone to answer immediately
when you open the flip. This feature does not
apply to incoming data or fax calls.
• Select
Menu → Settings → Convenience →
Open to Answer → Enabled.
Disabled to have the phone
– Select
continue ringing when you open the flip.
Adjusting the volume during a call
• To adjust the earpiece or speakerphone
volume during a call, press up
or down.
User Guide for the Kyocera K322 Phone 9
Page 16
Silencing an incoming call
• Press , , or to silence a call.
Press if you choose to answer the call.
- or -
• Press to select
voicemail.
Note: Press to select Options then select
Ignore if Hold Call is enabled. See “Setting the
phone to hold calls”.
Note: This action silences the current call only.
The next call will ring as normal. In the absence
of voicemail, this feature drops the call.
Ignore. The call goes to
Redialing a number
• To redial a recent call, from the home screen
press twice to open your Recent Calls list.
Highlight a phone number or name and
press .
Tip: To redial the last number called,
received, or missed, press three times.
Calling a saved number
If you have already saved a phone number, you
can use the Contacts list to find it quickly.
1. From the home screen, press to
select
Contacts.
2. Scroll down the list to find the contact you
want to call.
3. Highlight the name and press to dial
the number.
10 Making and Answering Calls
Using the speakerphone
Your Kyocera K322 phone has a built-in
speakerphone.
• To turn on the speaker, open the flip and press
. If you press during an incoming
call alert, you answer the call.
The icon at the top of the phone screen
indicates that the speakerphone is on.
• To turn off the speakerphone, press .
Dialing a three-way
conference call*
To dial a three-way conference call, dial the first
number and press , dial the second number,
press again.
*May not be available on your phone, check with
your service provider
Setting the phone to hold calls
The Hold Call feature allows you to place
incoming calls on hold until you are ready to
answer them.
Note: This feature will not work if “Open to
Answer” is enabled. See “Answering calls using
the flip” on page 9.
1. Select Menu → Settings → Convenience →
Hold Call → Enabled.
Page 17
Note: If you have not recorded a hold
message, you will be prompted to record one,
such as “Please hold. I’ll answer in a minute.”
2. Press to select Record.
3. Record the message twice, as prompted.
4. Select Save or Options (Play, Re-Record,
or
Exit).
The next time a call comes in, you will have the
option of placing it on hold.
Note: To ignore the call and send it to voicemail,
press to select
Ignore. In the absence of voicemail, this feature
Options and then select
drops the call.
Placing a call on hold
You can place a call on hold once you have
enabled this feature.
Note: If you are already on a call and you receive
another call, you cannot place the incoming call
on hold. It will go to voicemail.
1. When a call comes in, press to select
Options, press down to select Hold Call
and then press . The caller will be placed
on hold and will hear your recorded
hold message.
2. To speak to the caller, select Answer.
- or To hang up without speaking to the caller,
End Call.
select
Changing the hold message
1. Select Menu → Settings → Convenience →
Hold Call → Re-Record Msg and follow the
prompts.
2. Record the message twice.
3. Select Save or Options (Play, Re-Record,
or Exit).
Dealing with missed calls
When you have missed a call, “Missed Call”
appears on your screen unless the caller
leaves a voicemail.
• To clear the screen, press to select
• To view details of the call, press to select
Calls then press .
• To return the call, press to select
then press .
Setting missed call alerts
You can set an alert to beep every five minutes
after you have missed a call.
1. Select Menu → Settings → Sounds →
Alerts → Missed Call Alert.
2. Select an option and press .
OK.
Calls
User Guide for the Kyocera K322 Phone 11
Page 18
Viewing recent call details
Details on the last 60 calls you made, received, or
missed are stored in the Recent Calls list and are
identified by the following icons:
Outgoing call Incoming call
Missed call (flashing)
Viewing recent calls
1. Select Menu → Recent Calls.
2. Select a list: All Calls, Incoming Calls,
Outgoing Calls, or Missed Calls.
3. Select a recent call item and press to
select
Options:
Save adds the phone number to the
–
Contacts list.
– Send Text Msg sends a text message to
the contact.
–
Send Picture Msg sends a picture message
to the contact.
–
Erase Record erases the selected call
record.
Note: If the phone number has been classified as
“secret,” you must enter your four-digit lock code
to view or edit it. For information on the lock
code, see “Changing your lock code” on page 41.
To classify a phone number as secret, see
“Creating a new contact” on page 20.
Calling recent calls
1. Press and hold down.
2. Highlight the number you want to call and
press .
- or -
Menu → Recent Calls.
Select
Select an option:
Outgoing Calls, or Missed Calls.
All Calls, Incoming Calls,
Highlight the number you want to call and
press .
Erasing recent calls
1. Select Menu → Recent Calls →
Erase Call Lists.
2. Select an option: All Calls, Incoming Calls,
Outgoing Calls, or Missed Calls.
3. Press to select Yes.
Speed dialing
Before you can use speed dialing, you must save a
phone number as a contact and assign a speed
dial location to it.
• To add a speed dial location to a saved or new
contact, see “Customizing a phone number”
on page 22.
Using speed dialing
To call a contact that has a speed dial location:
• From the home screen, enter the one- or twodigit speed dialing location and press .
12 Making and Answering Calls
Page 19
1-Touch dialing
1-Touch dialing is the fastest way to speed dial a
contact that has a speed dial location.
Note: You must (1) enable 1-Touch dialing on
your phone and (2) have a speed dial location
assigned to a contact.
Enabling 1-Touch dialing
• Select Menu → Settings → Convenience →
1-Touch Dialing → Enabled.
Using 1-Touch dialing
To call a contact that has a speed dial location:
• From the home screen, press and hold the
speed dialing number. If it is a two-digit
number, press the first digit briefly, then press
and hold the second digit. For example, if the
speed dialing location is 15, press briefly,
then press and hold .
Setting up voicemail
Before your phone can receive voicemail
messages, you must set up a password and record
a personal greeting with your service provider.
When you have set up your voicemail, all
unanswered calls to your phone are automatically
transferred to voicemail, even if your phone is in
use or turned off.
1. From the home screen, press and hold .
2. Press at the message.
3. Follow the system prompts to create a
password and record a greeting.
Note: If you are having trouble accessing your
voicemail, contact your service provider.
Checking voicemail messages
When a voice message is received, your screen
displays “New Messages” along with the
symbol at the top of your screen. The symbol
flashes if the message is urgent.
If you see “New Messages”
1. Press to select Call, which initiates a call
to your voicemail number.
2. Follow the prompts to retrieve the message.
To clear the screen without checking messages:
• Press to select Ignore.
If you see only the symbol
1. Press and hold to initiate a call to your
voicemail number.
2. Follow the prompts to retrieve the message.
Note: You can set the phone to beep or
vibrate every five minutes to remind you that
you have voicemail.
See “Setting message alerts” on page 38.
Calling emergency services
Note: Regardless of your 3-digit emergency code
(911, 111, 999, 000, etc.), your phone operates
as described below.
User Guide for the Kyocera K322 Phone 13
Page 20
• Dial your 3-digit emergency code and
press .
You can call the code even if your phone is locked
or your account is restricted. When you call, your
phone enters
Emergency mode. This enables the
emergency service exclusive access to your phone
to call you back, if necessary. To make or receive
regular calls after dialing the code, you must exit
this mode.
To exit Emergency mode
When you have completed the emergency call:
1. Press to select Exit.
2. Press again to confirm your choice.
Note: To determine who has access to your
location, see “Setting position location” on
page 43.
Tracking calls
You can track the number and duration of calls
made and received on your phone.
1. Select Menu → Recent Calls.
2. Select a timer:
Recent Calls Timer tracks all calls you
–
have made and received since you last
reset this timer. To reset this timer to zero,
press to select
All Calls Timer tracks all calls you have
–
made and received. This timer cannot
be reset.
Reset.
Timing your calls
You can set your phone to beep 10 seconds
before each minute passes when you are on a call.
• Select Menu → Settings → Sounds →
Minute Alert → Enabled.
Receiving data or faxes
Your phone may be able to receive certain data or
faxes, depending on the system sending the
information. For more information, see page 42.
Understanding roaming
Controlling network roaming
Depending on services available from your
service provider, you may set the phone to either
digital or analog mode. This is useful if you are in
an area that borders on digital service and the
automatic feature is causing the phone to keep
switching between modes.
1. Select Menu → Settings → Network →
Digital/Analog.
2. Select an option and press .
Automatic automatically switches the
–
phone between digital and analog.
–
Analog only sets the phone to work in
analog mode only.
– Analog call forces a call into analog mode
for the duration of the next call.
14 Making and Answering Calls
Page 21
– Digital only sets the phone to work in
digital mode only.
Setting an alert for roaming
You may use this setting if you want the phone to
alert you when you roam outside of your home
service area.
1. Select Menu → Settings → Network →
Roam/Svc Alert.
2. Select an option and press .
When no svc alerts you with three tones
–
decreasing in pitch when service is lost
and three tones increasing in pitch when
service is acquired again.
–
On roam change alerts you with two
decreasing tones when roaming service is
acquired and three increasing tones when
home area service is acquired again.
–
On any change alerts you with three
increasing tones if there is a change in
roaming service or three decreasing tones
if the phone loses service.
Setting the roam ringer
You can set a ringer to indicate when an incoming
call will be subject to roaming charges.
• Select Menu → Settings → Sounds →
Roam Ringer → Enabled.
Setting Call Guard
You can set the phone to warn you before you
answer or place a call while roaming.
• Select
Menu → Settings → Convenience →
Call Guard → Call prompt.
– The phone now emits a distinctive roam
ring to indicate when you are roaming
during calls.
– To accept or place a call while roaming,
you must press .
Note: Call Prompt is disabled when the phone is
in Emergency Mode.
Using your phone in an airplane
While in an airplane, it is normally required that
you turn off your mobile phone because it emits
RF signals that interfere with air traffic control.
In Airplane mode, however, your phone will not
emit RF signals. You cannot make or receive calls,
send text messages, or use the Web, but you can
play games, use the Scheduler, set the clock, and
make emergency calls to designated
emergency numbers.
Please check with uniformed personnel before
operating your phone in Airplane mode.
User Guide for the Kyocera K322 Phone 15
Page 22

Setting Airplane mode
1. Select Menu → Settings →
Convenience → Airplane Mode.
2. Select OK after reading the message.
3. Select Disabled or Enabled.
16 Making and Answering Calls
Page 23
3ENTERING LETTERS, NUMBERS, AND SYMBOLS
You can enter letters, numbers, and symbols in
contacts, text messages, and your banner.
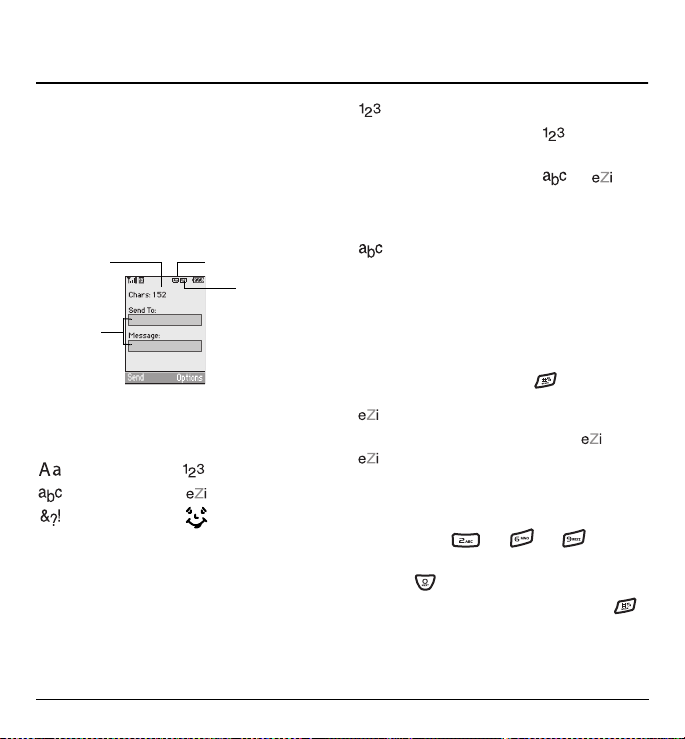
Understanding text entry
screens
The current text entry mode (and capitalization
setting, when applicable) are indicated by icons.
characters
remaining
text entry
fields
capitalization setting
text entry mode
Text entry modes
There are six text entry modes:
Case change Numbers only
Normal alpha Rapid Entry
Add Symbol Add Smiley
Note: The mode you start in depends on the task
you are doing. For example, when entering a
phone number, you’re in number mode. When
entering a name for a contact, you’re in normal
text mode. See “Changing modes” on page 18.
Entering numbers
• To enter a number while in mode, press
a number key once.
• To enter a number while in or
mode, press and hold a number key until the
number appears on the screen.
Entering words letter by letter
1. Press a key once for the first letter, twice for
the second letter, and so on. If your phone is
set to Spanish, accented letters are available.
2. Wait for the cursor to move right and enter the
next letter.
Note: To enter a space, press .
Entering words quickly
When you press a series of keys using mode,
checks its dictionary of common words and
guesses at the word you are trying to spell.
1. For each letter of the word you want, press the
key once. For example, to enter the word
“any” press → → .
2. If the word doesn’t match what you want,
press to look at other word matches.
3. When you see the word you want, press .
User Guide for the Kyocera K322 Phone 17
Page 24
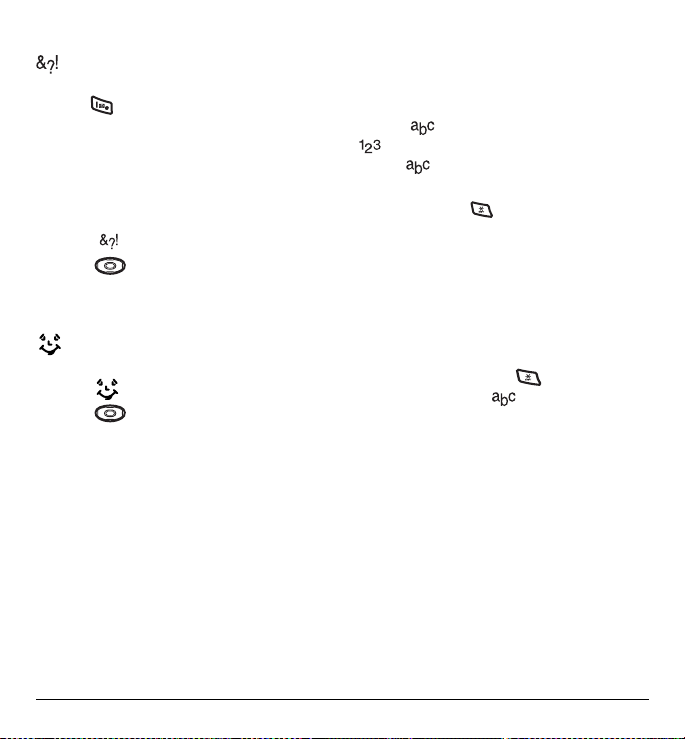
Entering symbols
While entering text, you can enter symbols by
pressing until you see the symbol you want.
Using this method, you have access to the
following symbols:
.@?!-,&:‘1
To access the full set of symbols:
1. From the text entry screen, select Options.
2. Select Add Symbol.
3. Press down to view the list of symbols.
4. Press the number key corresponding to the
symbol you want.
Entering smileys
1. From the text entry screen, select Options.
2. Select Add Smiley.
3. Press down to view the list of smileys.
4. Press the number key corresponding to the
smiley you want.
Switching default text entry modes
You can change the default text entry mode when
creating a text message. This setting applies only
to the message body screen, not the “To” screen.
1. Select Menu → Messages →
Msg Settings → Default Text.
2. Select Normal Alpha or Rapid Mode.
Changing modes
Sometimes you need to change modes. For
example, to enter numbers in an email address
while in mode, you must change to
mode, enter the numbers, and then change
back to mode to complete the address.
To change text entry modes:
• Press and hold until the icon for the
mode you want appears at the top of
the screen.
- or -
• Select
Options then select a different mode.
Capitalization settings
You can change capitalization at any time while
entering text. Simply press to choose upper
or lower case while in Normal Alpha mode.
18 Entering Letters, Numbers, and Symbols
Page 25
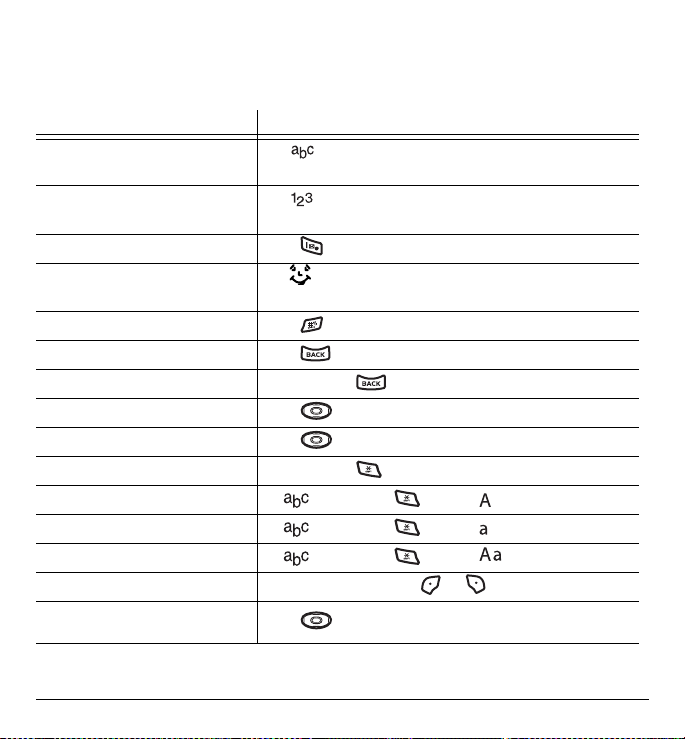
Quick reference to text entry
This table gives general instructions for entering letters, numbers, and symbols.
To... Do this...
Enter a letter
Enter a number
Enter a symbol
Enter a smiley
Enter a space
Erase a character
Erase all characters
Move the cursor right or left
Move the cursor up or down
Change text entry modes
Capitalize any letter
Lowercase any letter
Change to Initial Caps
Select soft options on the screen
Highlight an option at the bottom
of the screen
Use mode and press a key until you see the letter you
want. For more information, see page 17.
Use mode and press a key once to enter its number.
For more options, see page 17.
Press until you find the symbol you want. See page 18.
Use mode and press a key once to enter its number.
For more options, see page 18.
Press .
Press .
Press and hold .
Press right or left.
Press up or down.
Press and hold .
In mode, press . Choose .
In mode, press . Choose .
In mode, press . Choose .
Press the appropriate key, or .
Press right or left.
User Guide for the Kyocera K322 Phone 19
Page 26
4STORING CONTACTS
Use your phone’s Contacts directory to store
information about a person or company. Each
contact entry can have up to six phone numbers,
two email addresses, two Web addresses, two
street addresses, and a space for notes.
Creating a new contact
1. From the home screen, enter the phone
number you want to save, including the
area code.
2. Press to select Save.
3. Press to select Save New Contact.
4. Enter a name for the contact.
– If you need to learn how to enter letters,
see “Understanding text entry screens” on
page 17.
– To add a symbol or smiley to the contact
name, or to change the text entry mode,
press to select
5. Either save now or add more contact
information.
– To save now, press to select
– To enter additional phone numbers, email
and Web addresses, or notes, press
down repeatedly. For help switching
between numbers and letters for email or
Web addresses, see “Changing modes” on
page 18.
Options.
Save.
Note: From the home screen, you can also press
to select
select
Contacts and then press to
New.
Adding a code or extension
When you save the phone number of an
automated service, you may include a pause to
stop dialing, for example, where you would wait
to dial an extension.
1. From the home screen, enter the phone
number.
2. Press to select Options.
3. Select a type of pause:
X
Time Pause causes the phone to
–
stop dialing for two seconds.
– Hard Pause causes the phone to
stop dialing until you select
Options → Release.
4. Enter the remaining numbers.
5. Press to select Save.
Customizing your contacts
You can customize each contact in your Contacts
directory by assigning ringers, pictures, and
number types, or by classifying your contacts as
Personal or Business.
20 Storing Contacts
Page 27
Assigning ringers
1. Press to select Contacts.
2. Highlight a contact and press .
3. Highlight the contact name and press to
select
Options.
4. Select Ringer → Assign Ringer.
5. Scroll down the list to hear the different
ringers and press to select one.
Assigning pictures
1. Press to select Contacts.
2. Highlight a contact and press .
3. Highlight the contact name and press to
select
Options.
4. Select Picture → Assign Picture →
Camera Pictures and continue at step 5
- or -
Picture → Assign Picture → Images.
Select
Select an option,
or Caller IDs and then press .
5. Scroll through the list to view your options
and press to assign it to your contact.
Note: With mobile PhoneTools for Kyocera, you
can transfer digital pictures to your phone. To
purchase MPT or other accessories, visit
www.kyocera-wireless.com/store.
Saved Images, Wallpapers,
Classifying contacts as Personal
or Business
1. Press to select Contacts.
2. Highlight a contact and press .
3. Highlight the contact’s phone number and
press to select
4. Highlight Add to Group and press
5. Select Business or Personal and press .
Note: To assign Personal or Business ringers, see
Options.
“Assigning business and personal ringers” on
page 36.
Assigning number types
When you assign a number type, an icon is placed
in front of a contact number to specify the type of
number, such as work, home, or mobile.
1. Press to select Contacts.
2. Highlight a contact and press .
3. Highlight the contact number and press
4. Press down once and press .
5. Highlight an option to designate the number
Edit.
to select
as
General, Work, Home, Mobile, Pager, or
Fax and press . You can also add email
addresses, street addresses, Web page URLs,
and a note.
User Guide for the Kyocera K322 Phone 21
Page 28
The associated icon will appear next to the
entry in your Contacts directory and
Recent Calls list.
general fax
work email address
home street address
mobile Web page URL
pager note
6. Press to select Save.
Editing a contact
1. Press to select Contacts.
2. Highlight a contact and press .
3. Highlight the contact name or number and
press to select
4. Enter your changes and press to select
Save.
Edit.
Erasing a contact
1. Press to select Contacts.
2. Highlight the contact to erase and press .
3. Select Options.
4. Highlight Erase Contact and press .
5. Press to confirm.
Customizing a phone number
1. Press to select Contacts.
2. Highlight the contact to edit and press .
3. Press down to highlight the
contact number.
4. Press to select Options.
5. Highlight an option and press :
Add Speed Dial assigns or removes the
–
speed dial location.
–
Secret makes the number secret so that it
will not appear on the screen until the
lock code is entered. Secret numbers can
be called without a lock code. (For more
information, see “Limiting calls” on
page 41.)
–
Primary Number makes this number the
first one that shows up when you open the
contact.
–
Add to Group adds a contact to a Business
or Personal group.
–
Add Voice Dial to record a voice tag so you
can call a contact using voice recognition
(VR). For more information, see page 44.
–
Erase Voice Dial erases the voice tag
associated with the number.
–
Edit Voice Dial records a new voice tag.
6. Enter the new information and follow
the prompts.
7. Select Save, if necessary.
22 Storing Contacts
Page 29
Finding contact information
To find a phone number or contact, you can (1)
check the Frequent list, (2) search the Contacts
directory, or (3) use Fast Find.
Checking the Frequent List
From the home screen, select Contacts. The last
15 of your most frequently called contacts appear
when the Frequent List is enabled. Scroll past the
double line to view the All Contacts list.
To enable the Frequent List setting
• Select
Menu → Settings → Convenience →
Frequent List → Enabled.
Searching the Contacts directory
1. Select Contacts for a list of all contacts.
To quickly get down the list, enter the first
letter of the contact. The menu skips to that
letter of the alphabet.
- or Select
Menu → Contacts.
2. Select a search method:
View All lists all saved contacts.
–
View Groups select a contact from
–
the specified list,
Personal List.
Speed Dial List or Voice Dial List selects a
–
contact from the specified list.
3. Highlight a contact and press .
Business List or
Note: To call the contact, highlight the
number and press .
Setting Fast Find
With Fast Find, you press one or two keys to view
close matches of the number you are looking for.
• Select
Menu → Settings → Convenience →
Fast Find → Enabled.
Using Fast Find
1. From the home screen, press the keys
corresponding to the letters of the name you
want to find. A matching contact or speed dial
entry appears.
2. Press down to scroll through
matching entries.
3. Highlight the name you want then press
to call the number.
User Guide for the Kyocera K322 Phone 23
Page 30
5SENDING AND RECEIVING TEXT MESSAGES
This chapter describes how to send, receive, and
erase text messages from your phone. For
information on voicemail messages, see “Setting
up voicemail” on page 13.
Important: The features and menus described in
this chapter may vary depending on services
available in your area. Check with your service
provider for details and possible usage charges.
Sending text messages
You can only send text messages to phones
that are capable of receiving them or to
email addresses.
Creating a text message
1. Select Menu → Messages → New Text Msg.
2. Enter a recipient’s phone number or
email address:
– Select
Options to access your Recent List,
Contacts, or Group Lists and press .
Select a contact and press .
Highlight the number field and press .
For more about group lists, see “Creating
group lists” on page 29.
- or -
– Enter a
New Address manually. (To learn
how to enter text, see “Understanding text
entry screens” on page 17.)
3. Add another recipient if desired:
– Press to select
Recent List, Contacts, or Group Lists.
Options then select
- or -
– Enter a space or comma after the
first number then enter another
recipient manually.
Note: You can send a message to up to 10
recipients at once. The messages will be sent
one at a time, once to each addressee.
4. When you are done entering addresses,
press
5. Enter the message. To learn how to enter text,
twice.
see “Understanding text entry screens” on
page 17.
- or Add QuickText, symbols, or smileys to your
message. See “Including prewritten text and
symbols” on page 25 for information.
6. Press to select Send. See “Setting sending
options” on page 25 for information about
how and when you want the message to
be received.
24 Sending and Receiving Text Messages
Page 31
Including prewritten text and
symbols
During text entry, you can insert QuickText,
symbols, or smileys into your message.
1. From the text entry screen, select Options.
2. Select an option and press :
Insert QuickText scroll through the list of
–
options and press to select one.
– Add Symbol scroll through the list and
press the corresponding number key
to select it.
–
Add Smiley scroll through the list and
press the corresponding number key to
select it.
3. When you have finished your message, select
Send. See “Setting sending options” for
information about how and when you want the
message to be received.
Setting sending options
When you are ready to send a message, you have
several options for how and when you want the
message to be received.
1. Once you have completed the message,
select
Options:
Add Address returns to the “Send To”
–
screen to add another recipient without
losing the message. Select
access your
Group Lists and press .
Recent List, Contacts, or
Options to
Select a contact and press .
Highlight the number field and press .
Save Message saves the message in
–
your
Drafts folder. This prevents the
message from being deleted if you have
activated AutoErase and enables you to
send the message to others.
–
Save QuickText saves the message you
have just entered as a prewritten message
then returns to the message entry screen
so you can send the message.
–
Settings allows you to choose from the
following after pressing :
•
Request Receipt to request notification
when the message
•
Set Priority labels the message as
has been received.
“Urgent.”
Callback Number includes a callback
•
number with the message to let recipients
know at what number they can call you
back. Select
number or
OK to include your own
Edit to enter a different
callback number.
Send Later schedules a time to send
•
the message.
Validity Period defines expiration period
•
limit for a message.
2. When you have finished setting options, press
to return to the message window.
3. Press to select Send.
User Guide for the Kyocera K322 Phone 25
Page 32
Adding a signature
The signature you create is included at the end of
all outgoing messages and is counted as
characters in your messages; however, it does not
appear in the message creation screen.
To create a signature:
1. Select Menu → Settings → Messaging →
Signature.
2. Enter your signature in the text field.
3. Select OK to save the setting.
Note: The characters in the signature are
included in the total character count of the
message. See the note under step 5 in “Creating a
text message” on page 24.
If you cannot send messages
You may not be able to send or receive messages
if your phone’s memory is nearly full, or if digital
service is not available at the time. To free up
memory, erase old messages. See “Erasing
messages” on page 29.
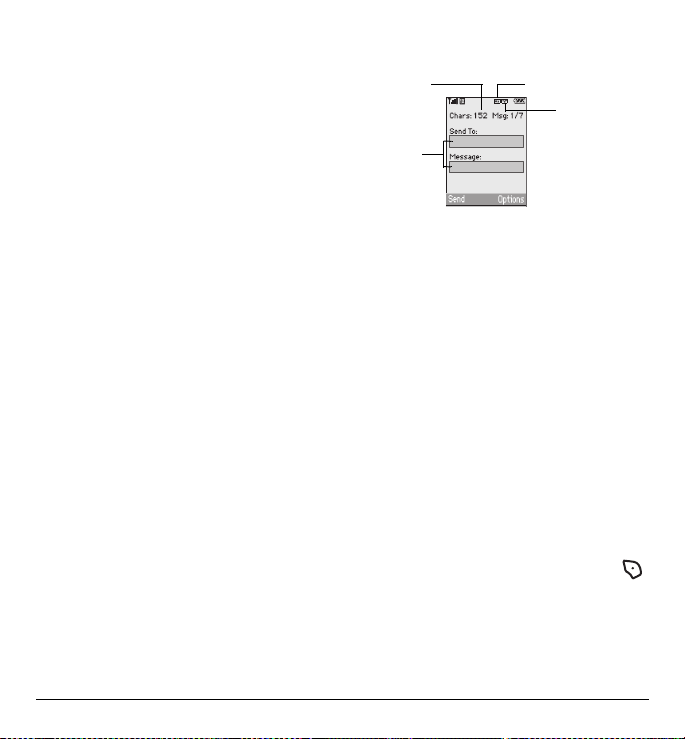
Understanding appended messages
characters
remaining
text entry
fields
If you go over the character limit for a single
message, the phone may automatically append an
empty segment to your message to make space.
Important: Your service provider will charge you
for each message segment.
When you start a message, the maximum
character limit appears once you are in the
message entry field. This number counts down as
you enter characters, until it reaches 0.
If you continue to enter text after this counter
reaches 0, a message segment may be appended.
When you reach the message size limit, you are
prompted to edit the message or alerted that the
message is being appended.
capitalization setting
text entry mode
Receiving incoming calls while
creating messages
• If you don’t wish to answer the call, press
to select
Ignore. The phone returns to the
message screen.
26 Sending and Receiving Text Messages
Page 33
• To answer the call, press . Your message
is saved to the Drafts folder. To return to the
message, select
Drafts → Resume.
Menu → Messages →
Viewing your sent messages
To save your outgoing messages, you must first
enable
Save to Sent.
1. Select Menu → Messages →
Msg Settings → Save to Sent.
2. Select an option and press .
Enabled automatically saves all
–
successfully sent messages in the
Sent folder.
Prompt allows you to choose whether or
–
not to save your message when you send it.
To view successfully sent messages:
1. Select Menu → Messages → Sent.
2. Press up or down to scroll through the
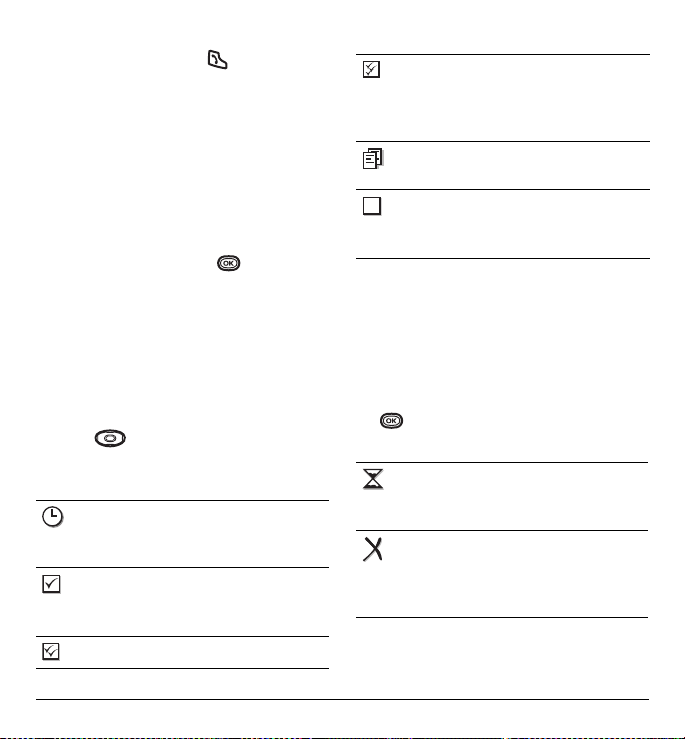
list of messages. One of the following symbols
appears next to each message:
The scheduled message will be sent at the
scheduled time. You cannot cancel
delivery of the message.
The scheduled message has been sent and
will be delivered as scheduled. You
cannot cancel delivery of the message.
The message has been received.
The message has been received and
opened. (This symbol may not be
available. Check with your service
provider.)
The message has been sent to more than
one recipient.
The message has never been sent or has
not been sent since it was last modified.
You can cancel delivery of the message.
Viewing failed or pending messages
Failed or pending messages are stored in
your
OutBox. To view your OutBox:
1. Select Menu → Messages → OutBox. A list of
all failed or pending messages appears.
2. Scroll through the list of messages and press
to read one.
symbols appears next to each message:
The message is pending and will be sent
when possible. You can cancel delivery of
the message.
The message cannot be sent
because service is not available. An alert
appears on your phone if the message
cannot be sent.
One of the following
User Guide for the Kyocera K322 Phone 27
Page 34
Retrieving text messages
When a text message is received, the outer screen
displays “New Text”, the inner screen displays
“New Messages” with the symbol at the top
of your screen. The symbol flashes if the message
is urgent.
If you see the “New Messages” note
• To view the message
InBox, highlight the message, and press
to select
View.
Ignore the message, press .
•To
Note: If you receive a new message while you are
reading a message, the one you are reading will
be replaced by the new one. You can find the
older message in the
• Select
Menu → Messages → InBox.
If you see the symbol
1. Select Menu → Messages → InBox. A list of
all your received messages appears.
– indicates an “Urgent” message.
2. Scroll through the list of messages and press
to read one.
, press to select
InBox:
Reading the message
The options available to you may vary. Check with
your service provider.
1. If the text message is long, press down
to view the entire message.
2. When you are finished, you can press to
Reply to the sender or press to select
additional
–
–
Options:
Erase the message.
Lock Msg to protect the message from
being accidentally deleted.
– Forward the message.
Reply with Copy to reply to the message
–
with a copy of the original attached.
–
Save Message to save the message.
Save as QuickText to save the text from the
–
message as QuickText, which you can
insert into other messages. Graphics and
sound are not saved as part of
QuickText.(For more about QuickText, see
page 30.)
–View
Sender information.
Note: The symbol indicates that a graphic did
not come through. It may be too large or
incorrectly formatted.
Setting message alerts
You can set your phone to alert you of incoming
text messages or pages. For more information,
see “Setting message alerts” on page 38.
28 Sending and Receiving Text Messages
Page 35
Erasing messages
It is a good idea to erase old messages to free up
memory in your phone.
You have the option of erasing text messages and
pages as you send or read them, erasing them one
at a time from the list in the OutBox or InBox, or
erasing them all at once.
Erasing single messages
1. Select Menu → Messages.
2. Select the type of text message you want to
erase and press :
or
Saved.
3. Highlight the message to erase and
press .
4. Select Options.
5. Select Erase to erase the message. A message
appears: “Erase this message?”
6. Select Yes to erase the message.
Note: You can erase a scheduled message from
the
OutBox, but you cannot cancel delivery of
the message.
Erasing all messages
1. Select Menu → Messages →
Erase Messages.
InBox, OutBox, Sent,
2. Select a folder from which to erase all
messages:
Drafts Folder, or All Messages. To erase
InBox, OutBox, Sent, Saved Folder,
messages from all folders, select
All Messages.
3. A message appears: “Erase all messages?”
Select
Yes to erase messages or No to cancel.
Erasing messages automatically
Use this setting to have old messages
automatically erased from the
InBox when
memory is low.
• Select Menu → Messages →
Msg Settings → Auto-Erase →
Old InBox Msgs.
Older messages will be erased as new
messages are received.
Customizing message settings
To make messaging easier, you can customize
settings for sending and receiving messages.
Creating group lists
You can create and save a list of multiple
recipients. Your Kyocera K322 phone stores five
group lists with up to 10 recipients per list.
1. Select Menu → Messages → Group Lists →
Create New.
2. Enter a name for the list. For help entering
text, see “Understanding text entry screens”
on page 17.
User Guide for the Kyocera K322 Phone 29
Page 36
3. Select Next.
4. To enter the first phone number or email
address, select an option:
– Recent List to select numbers from your
Recent List.
–
Enter from Scratch to enter the phone
number or email address manually.
–
Contacts List to select numbers from your
phone book.
5. Locate the contact number and press .
6. Select Options → Recent List or Contacts.
7. Locate the contact number and press .
8. When finished, select Done.
To send a message to your new group, see
“Sending text messages” on page 24.
Creating and editing prewritten
messages (QuickText)
Your phone comes with prewritten (QuickText)
messages, such as “Please call me,” which you
can insert into the body of a text message. You can
edit these messages and create new ones. Your
phone will store up to 40 QuickText messages,
with up to 100 characters per message.
1. Select Menu → Messages →
Msg Settings → Edit QuickText.
2. To create a new pre-written message,
select
New Msg.
- or To edit an existing pre-written message,
highlight the message and select
3. Enter or edit the text.
Note: To change text mode press to select
Options. Press to select Text Mode or you
can choose
Information for text mode help. For
Edit.
additional help entering text, see “Understanding
text entry screens” on page 17.
4. Press to select Save.
Note: You can also save a message you have
written or received as QuickText. See “Setting
sending options” on page 25 or “Reading the
message” on page 28.
30 Sending and Receiving Text Messages
Page 37
6SENDING AND RECEIVING MULTIMEDIA MESSAGES
Sending multimedia messages
You can only send multimedia messages to
phones that are capable of receiving them or to
email addresses.
Note: The multimedia messages feature is not
available on all phones. Check with your
service provider.
Multimedia messages have a predetermined
character and file size limit. When you reach the
character and file size limit for a single
multimedia message, you must edit the message
to meet the size limitation.
Note: For details, check with your
service provider.
Creating a multimedia message
1. Select Menu → Messages →
New Picture Msg.
2. Enter the recipient’s phone number or email
address in the
3. To add additional recipients:
Enter a space or comma after the first phone
number or email address, then enter another
recipient manually
- or Press to select
Contacts or Group Lists.
To field.
Options. Then select
Note: You can send one multimedia message
to a maximum of 10 recipients.
You can choose to send a copy or blind copy.
4. Press down to enter a recipient in the
CC or BCC fields.
5. Press down to enter a message in the
Subject field. Choose a method:
– Enter the subject text manually, or
– Press to select
6. Press down to enter a brief text
message in the
Options.
Text field.
– Enter the text manually, or
– Press to select
7. Press down once to enter an image in
the
Image field.
Note: You may add only one picture per
Options.
multimedia message.
8. Press to select Options. Select an option:
Take Picture to instantly take a new photo
•
and attach it to your message.
• Media Gallery to access all picture files in
the phone:
–
Camera Pictures displays your photos
taken in a table/thumbnail view.
User Guide for the Kyocera K322 Phone 31
Page 38
• Highlight a photo to add to the
multimedia message. Press
to choose
Select.
– Images displays stored images on
the phone.
9. Press down once to enter the Sound
field and press to select
Record Sound to instantly record a new
•
Options. Choose:
sound and attach it to your message.
•
Media Gallery to display a list of
categories that contain saved or
downloaded sounds and voice memos.
– Highlight
Saved Sounds.
Press to select
OK.
– Highlight a sound to add to the
multimedia message. Press to
choose
Select.
Note: You may add only one new or stored
sound per multimedia message sent.
10. Before sending your message, press to
select additional
Preview Message plays your multimedia
–
Options. Choose:
message prior to sending.
–
Save Message allows you to save your
multimedia message to the Drafts Folder
and send it later.
–
Add Address allows you to add additional
addresses to your multimedia message
prior to sending it.
–
Message Priority allows you to send
your multimedia message with Normal or
Urgent priority.
11. Press to select Send. This will send your
multimedia message.
Receiving multimedia messages
There are two settings for receiving a multimedia
message on your K322 phone:
(default) and
Prompt.
Auto retrieve mode
When a multimedia message is received, it is
automatically downloaded onto your phone.
The alert “New Message(s)” appears along with
the text “Message Received. View now?”
•
To View the multimedia message, press .
•To view
Note: If a multimedia message is received
during a call, then the phone downloads the
message approximately one minute after the last
key is pressed.
Note: To activate Auto Retrieve mode:
1. Select Menu → Messages → Msg Settings.
2. Press up or down to scroll through the
3. Highlight Auto Retrieve.
Later, press .
list.
Auto receive
32 Sending and Receiving Multimedia Messages
Page 39
4. Press to select Auto Retrieve.
Enabled downloads messages
–
automatically from the server.
– Disabled will prompt you for download,
when a Pix Alert is received.
Prompt mode
When a multimedia message is received, your
screen displays the alert “New Message(s)” along
with the question “Retrieve Now?”
•To
View the multimedia message, press .
Erase to never download the
• Select
multimedia message.
•To view
Note: If a multimedia message is received during
a call, then the phone screen displays the alert
“New Message(s)” after the call ends.
To activate Prompt mode:
1. Select Menu → Messages → Msg Settings.
2. Press up or down to scroll through the
3. Highlight Auto Retrieve and press .
4. Press up or down through the list and
Later, press .
list.
highlight
Disabled. Press .
Viewing multimedia messages
When you receive a multimedia message, a
appears on your phone’s screen and remains until
all messages are viewed. The message is stored in
the InBox until the full message has been received,
regardless of the auto receive or prompt setting.
1. Press to View the multimedia message. If
the message is long, press down to view
the entire multimedia message.
2. Press to select Options. Press down
to highlight additional options for the multimedia
message (options vary according to selection):
Note: The options available to you may vary.
Check with your service provider.
–
Mute to silence the message.
Erase Msg allows you to delete the
–
currently displayed multimedia message.
–
Forward launches the message creation
screen, allowing you to forward the
multimedia message. The original address
will not be shown, nor will the graphic,
sound, and text fields.
–
Lock Msg to avoid accidentally erasing it.
Message Info displays multimedia
–
message information (priority, sender,
subject, time sent and received, and
message size).
–
Replay plays the multimedia message
again from the beginning.
–
Done exits the multimedia message.
User Guide for the Kyocera K322 Phone 33
Page 40

– Call initiates call to sender of
multimedia message.
– Save Picture saves the currently
viewed picture embedded in the
multimedia message.
–
Save Sound saves the current sound
embedded in the multimedia message.
–
Save Address extracts email addresses,
phone numbers, and/or URLs from the
sender information and multimedia
message body.
–
Save as QuickText saves the text in the
multimedia message to the QuickText list.
– Save Message saves the multimedia
message to the Saved Folder on the phone.
3. When you are finished viewing the multimedia
message, select
Reply or press .
34 Sending and Receiving Multimedia Messages
Page 41

7CUSTOMIZING YOUR PHONE
The contents of the Settings menu are as follows.
Silent Mode
Vibrate Only
Vibe then Ring
Lights Only
Normal Sounds
Sounds
Ringer Volume
Ringer Type
Business Ringer
Personal Ringer
Roam Ringer
Flip Open
Flip Closed
Pwr On/Off Sound
Key Volume
Key Length
Key Sound
Alerts
Smart Sound
Minute Alert
Earpiece Volume
Spkrphone Volume
*Not available on all phones. Check with your service provider.
Display
My Banner
Main Menu View
Color Themes
Wallpaper
Screen Saver
Backlighting
Auto-Hyphen
Language
Time/Date Format
Contrast
Brightness
Convenience
Airplane Mode
Open to Answer
Fast Find
Frequent List
Hold Call
1-Touch Dialing
Web Prompt
Call Guard
Voice Features
Add Voice Dial
Erase Voice Dial
Voice Training
Voice Wake-Up
Voice Answer
Expert Mode
Messaging
Alerts
Signature
Edit QuickText
Callback Number
Text Msg Receipt
Save to Sent
Auto-Erase
Default Text
Voicemail Num.
Security
Lock Phone
Limit Calls
New Lock Code
Erase Contacts
Emergency Numbers
Network
Data/Fax Calls
Privacy Alert*
Set Phone Line*
Roam/Svc Alert
Roam Option
Digital/Analog
Location
Accessories
Pwr Backlighting
Headset Ringing
Auto-Answer
Com Port Speed
TTY Device
Gamepad Keymap*
Edit
Reset
User Guide for the Kyocera K322 Phone 35
Page 42
Silencing all sounds
Your phone is set to make sounds when you
receive calls, press keys, navigate through menus,
and receive alerts (such as new messages).
You can silence all sounds and set the phone to
vibrate
or light up when you receive calls
and alerts.
Setting the phone to vibrate or
light up
1. Select Menu → Settings → Silent Mode.
2. Choose an option and press :
–
Vibrate Only the phone vibrates for the
duration of the incoming call or other
alerts. appears.
–
Vibe then Ring the phone vibrates for the
first 10 seconds and then rings for the
remainder of the incoming call alert.
appears.
–
Lights Only the phone lights up for the
duration of the incoming call or other
alerts. appears.
–
Normal Sounds the phone rings for the
incoming call or alert (in effect, returns
phone to a non-silent mode).
Note: The phone will ring when it is attached to
an external power source (such as a charger),
even if all sounds have been silenced.
Shortcut to Vibrate Only mode
• Press and hold .
Turning sounds back on
• Press and hold .
Choosing ringers
Your Kyocera K322 phone has multiple ringers
you can choose to use for incoming calls.
1. Select Menu → Settings → Sounds →
Ringer Type.
2. Scroll down the list to hear the different rings
and press to select one.
Note: Downloaded ringers are added to the end
of the standard list of ringers.
Assigning business and
personal ringers
You can assign ringers to contacts classified as
Business or Personal in your Contacts directory.
Note: To classify a contact as Business or
Personal, see page 20.
1. Select Menu → Settings → Sounds.
2. Highlight Business Ringer or Personal Ringer
and press .
3. Select a ringer and press .
Setting sounds for your phone
You can set your phone to sound tones when you
open and close the flip and when you turn the
phone on and off. Sounds will not occur during
an incoming call, if you are in a call, or if a
headset or hands-free car kit is attached to
your phone.
36 Customizing Your Phone
Page 43
Set sound when flip opens
1. Select Menu → Settings → Sounds →
Flip Open.
2. Scroll through the list to hear the sounds and
press to select one.
Set sound when flip closes
1. Select Menu → Settings → Sounds →
Flip Closed.
2. Scroll through the list to hear the sounds and
press to select one.
Set sound when phone powers on
or off
• Select Menu → Settings → Sounds →
Pwr On/Off Sound → Enabled.
– Select
Disabled to deselect this sound.
Adjusting volume
You can adjust the earpiece, speakerphone, and
ringer volume as well as key tones.
Adjusting the earpiece volume
To adjust the earpiece volume manually during a
call, press or up or down.
To set the earpiece volume:
1. Select Menu → Settings → Sounds →
Earpiece Volume.
2. Press right to increase the volume, or
left to decrease the volume.
3. Press to select Save.
Using smart sound
You can set a baseline volume that the phone uses
to automatically adjust the earpiece volume when
there is a change in the amount of noise around
you or the caller’s voice.
• Select
Menu → Settings → Sounds →
Smart Sound→ Enabled.
Adjusting the ringer volume
1. Select Menu → Settings → Sounds →
Ringer Volume.
2. Press right to increase the volume, or
left to decrease the volume.
3. Press to select Save.
Adjusting speakerphone volume
1. Select Menu → Settings → Sounds →
Spkrphone Volume.
2. Press right to increase the volume, or
left to decrease the volume.
3. Press to select Save.
Adjusting key tone volume
You can change the volume of the tones the phone
makes when you press the keys.
1. Select Menu → Settings → Sounds →
Key Volume.
2. Press right to increase the volume, or
left to decrease the volume.
3. Press to select Save.
User Guide for the Kyocera K322 Phone 37
Page 44
Setting key length
You can change the duration of the tones the
phone makes when you press the keys.
1. Select Menu → Settings → Sounds →
Key Length.
2. Choose Normal or Long and press .
Setting message alerts
You can choose how you want be alerted of
incoming voicemail, pages, or text messages.
1. Select Menu → Settings → Sounds →
Alerts.
2. Select the type of alert: Message Alert,
Page Alert, Voicemail Alert or
Missed Call Alert.
3. Press to select an option:
–
Vibrate, Beep, Freeway, Game, Bloop,
Winner, Zilofon sets the phone to alert you
once when a new message is received.
–
Vibrate & Remind, Beep & Remind, FwY &
Remind, Game & Remind, Bloop &
Remind, Winner & Remind, Zilofon &
Remind sets the phone to notify you once
when a new message is received and then
notify you again every five minutes.
a reminder alert, press to
Ignore.
select
–
Disabled turns off message alerts.
To stop
Setting alerts for your headset
When a headset (sold separately) is attached to
the phone, you can set alert sounds to originate
from the headset.
1. Select Menu → Settings → Accessories →
Headset Ringing.
Select
Out of headset to have alerts originate from
the headset.
Using shortcuts
From the home screen, press in one of four
directions to access three shortcuts and one
custom menu.
Up: Access your Custom Menu
Down: Access Recent Calls
Left: Launch Web Browser
Right: Record Voice Memo
Creating and updating your
custom menu
You can create a custom menu that contains your
favorite features. After you set up your menu,
simply press and hold up to access it.
1. Press and hold up to launch
Custom Menu.
2. Press to select Edit.
3. Scroll through the menu list and press to
select or deselect your favorite features.
38 Customizing Your Phone
Page 45
– You may select more than one menu item.
Items appear in alphabetical order in
the menu. A check mark appears in the
box when selected.
4. Press to select Save.
Choosing a different language
Your phone may display alternative languages.
1. Select Menu → Settings → Display →
Language.
2. Select a language and press .
Personalizing the screen
Changing your banner
The banner is the personal label for your phone.
It appears on the home screen above the time and
date. The banner can be up to 14 characters long.
1. Select Menu → Settings → Display →
My Banner.
2. Press to select Edit.
3. Press to clear the screen.
4. Enter your new text.
5. Press to select Save.
Choosing a menu view
Three menu views are available: Wheel, Graphic,
and List.
1. Select Menu → Settings → Display →
Main Menu View.
2. Select an option and press .
–
Graphic displays icons of each menu item,
with its name at the bottom of the screen.
–
List displays a list of each menu item.
–
Wheel displays a rotating graphic image of
the menu items.
3. Press to return to the home screen. The
next time you select
Menu, you will see the
menu view you selected.
Adjusting the backlighting
Your screen lights up while you are in a call or
when you press a key on the keypad. However,
you can set the length of time that bright
backlighting remains on.
1. Select Menu → Settings → Display →
Backlighting → Duration.
2. Select an option and press :
–
7 seconds, 15 seconds, or 30 seconds—
Turn backlighting on for 7, 15,
(Default)
or 30 seconds after your last keypress.
–
7 sec. & in call, 15 sec. & in call, or 30 sec.
& in call—Turn backlighting on for the
duration of a call, and for 7, 15, or 30
seconds after your last keypress.
Note: The “in call” settings drain the battery
more quickly.
Using Power Save Mode
You can conserve battery life by activating Power
Save mode to dim the backlight. The backlighting
appears for the selected duration but is less bright
than with Power Save off.
User Guide for the Kyocera K322 Phone 39
Page 46
• Select Menu → Settings → Display →
Backlighting → Pwr Save Mode → On.
Setting power backlighting
You can set backlighting to remain on when an
external power source, such as the AC adapter, is
used with the phone.
Note: Power backlighting may not be available
with the optional desktop charger or
other accessories.
Tip: Use the power backlighting as a night light
when traveling.
1. Select Menu → Settings → Accessories →
Pwr Backlighting.
2. Select Always On to keep backlighting on.
Note: The battery charges more slowly when
power backlighting is on.
Changing the display contrast
1. Select Menu → Settings → Display →
Contrast.
2. Press left or right to adjust the contrast
and select
Save.
Setting numbers to auto-hyphenate
Auto-hyphenation, when enabled, automatically
inserts hyphens into your phone numbers to be
consistent with the U.S. dialing plan.
For example, 1-222-333-4444.
• Select
Menu → Settings → Display →
Auto-Hyphen → Enabled.
Selecting a screen saver
Screen savers appear on the home screen when
the flip is open or closed and are activated 10
seconds after the last keypress. Incoming calls
and alerts override screen savers.
1. Select Menu → Settings → Display →
Screen Saver.
2. Highlight a screen saver and press . The
image displays.
3. Press to assign the screen saver.
4. Press to return to the home screen
and wait 10 seconds to view the screen saver
you chose.
Note: Downloaded screen savers are added to
the end of the list.
Selecting wallpaper
Wallpaper appears on the home screen.
1. Select Menu → Settings → Display →
Wallpaper.
2. Highlight a wallpaper design and press .
3. Select Assign to save your selection.
4. Press to return to the home screen.
Selecting a color theme
You can select a color theme for the display
background of your phone.
1. Select Menu → Settings → Display →
Color Themes.
2. Scroll through the options to view the
color themes and press to select one.
40 Customizing Your Phone
Page 47
–
Choosing a different time/date format
1. Select Menu → Settings → Display →
Time/Date.
2. Highlight an option and press .
Creating a secure environment
This section describes all the features involved in
securing your phone and preventing access to
personal information. All security features are
shielded by a four-digit lock code.
Changing your lock code
The lock code is typically 0000 or the last 4 digits
of your phone number.
1. Select Menu → Settings → Security.
2. Enter your four-digit lock code.
3. Select New Lock Code. A message appears:
“Change Code?”
4. Press to select Yes and enter a new four-
digit code.
5. Enter your new lock code again.
Locking your phone
When your phone is locked, you can call only
emergency numbers or your service provider’s
number. You can still receive incoming calls.
1. Select Menu → Settings → Security.
2. Enter your four-digit lock code.
3. Select Lock Phone.
4. Highlight an option:
–
Never does not lock the phone.
User Guide for the Kyocera K322 Phone 41
On power up locks the phone every time
you turn it on.
–
Now locks the phone immediately.
5. Press .
Unlocking the phone
1. From the home screen, press to
Unlock.
select
2. Enter your four-digit lock code.
Designating emergency numbers
The emergency numbers feature allows you to
specify three personal phone numbers that can be
called when the phone is locked.
1. Select Menu → Settings → Security.
2. Enter your four-digit lock code.
3. Select Emergency Numbers.
4. Select an Unassigned slot.
5. Enter the phone number, including the area
code. Do not enter 1 before the area code.
6. Press to select Done.
Note: To make a call to an emergency number
from a locked phone, you must dial the number
(including area code) exactly as it was stored in
Emergency Numbers.
Limiting calls
You can limit the calls that can be made from your
phone to emergency numbers, your contacts, and
your service provider’s numbers.
1. Select Menu → Settings → Security.
Page 48
2. Enter your four-digit lock code.
3. Select Limit Calls.
4. Choose an option and press :
–
No Limit limits no calls.
–
Limit Outgoing calls only. Incoming calls
can still be received and answered.
–
Limit All calls, both incoming
and outgoing.
Erasing all contacts
You can erase all entries from your
Contacts directory.
1. Select Menu → Settings → Security.
2. Enter your four-digit lock code.
3. Select Erase Contacts.
4. Select Yes to erase all contacts. A message
appears: “Erase ALL Contacts?”
5. Press to select Yes to erase all contacts.
Network settings
Switching between phone lines
Your phone can have two service accounts, or
phone lines, associated with it. Each phone line
has its own phone number.
When you are using one line, you cannot receive
calls from the other. It would be as if the phone
were “off” for that number. Your voicemail,
however, will still take messages. All contacts and
settings are shared for both lines.
Note: You must first establish a second phone
line with your service provider. Once established,
a second phone number becomes available in the
menu for selection:
1. Select Menu → Settings → Network →
Set Phone Line.
2. Select one of the two lines and press .
Data Settings
Setting Com port speed
The Com Speed sets the data rate at which your
phone connects to a laptop or PC, or at which it
sends and receives over-the-air text messages.
1. Select Menu → Settings → Accessories →
Com Port Speed.
2. Select the speed. The options are: 19.2 kbps,
115.2 kbps (default), 230.4 kbps, and Other.
Note: There may be a higher charge for
making calls using high-speed data in areas
where 1X service is available. Check with your
service provider for details.
Setting the phone to receive data
or faxes
Your phone may be able to receive certain data or
faxes, depending on the system sending the
information. You cannot receive voice calls while
the phone is in data/fax mode.
To receive data or faxes, you must connect the
phone to a laptop or PC and switch the phone
from voice mode to data/fax mode.
42 Customizing Your Phone
Page 49
Note: To purchase a cable, call 800-349-4188
(U.S.A. only), 858-882-1410, or visit
www.kyocera-wireless.com/store.
1. Connect the phone to the laptop or PC.
2. Set the Com speed.
3. Select Menu → Settings → Network →
Data/Fax Calls.
4. Press to select an option:
–
Voice only allows only voice calls.
–
Fax, next call or Data, next call sets the
phone to fax mode or data mode for the
next incoming call or the next 10 minutes.
–
Fax, until off or Data, until off forces the
phone into fax mode or data mode until
the phone is turned off.
Connecting to a TTY/TDD device
You can connect the phone to a TTY device for the
hearing impaired.
Note: Enable TTY only when using the phone with
a TTY device.
1. Connect the TTY device to the phone.
2. Enter from
your keypad.
3. Press to select the TTY option.
4. Close the Information window by pressing
5. Highlight TTY On and press .
to select
OK.
Setting position location
This setting allows you to share your location
information with network services other than
emergency services (For example: 911, 111, 999,
and 000) in markets where service has
been implemented.
Note: This feature works only when your phone is
in digital mode. You do not have the option of
turning off the locator to emergency services.
1. Select Menu → Settings → Network →
Location.
2. Select 911 Only or Location On.
–
911 Only (default) shares your position
information only with emergency services
when you call your 3-digit emergency
code (911, 000, 111, etc.).
–
Location On shares your position
information with your service provider’s
network, in addition to
emergency services.
User Guide for the Kyocera K322 Phone 43
Page 50
8USING VOICE RECOGNITION
Voice recognition allows you to make and
answer calls by speaking commands into the
phone’s microphone.
Note: You cannot use voice recognition to end a
call; you must press when the flip is open.
Setting up voice dialing
To make or receive calls using voice dialing,
contacts must be saved with associated voice tags.
Creating a voice tag for a contact
1. Press to select Contacts.
2. Highlight the contact and press .
3. Press down to highlight the number.
4. Press to select Options.
5. Highlight Add Voice Dial and press .
6. Follow the voice prompts. You will need to say
the name twice.
Viewing entries with voice tags
• Select Menu → Contacts → Voice Dial List.
A list of all contacts with assigned voice
tags appears.
Editing a voice tag
1. Select Menu → Contacts → Voice Dial List.
2. Highlight the contact to edit, and press .
3. Highlight the phone number and
select
Options.
4. Select Add Voice Dial, Edit Voice Dial, or
Erase Voice Dial.
5. Follow the prompts.
Making a call using voice tags
1. If you haven’t already done so, record a voice
tag for the person you wish to call.
2. With the flip open, from the home screen,
press . The phone responds:
“Say a name.”
3. Say the name of the person you want to call.
4. If the name you said matches a contact in the
Voice Dial List, the phone responds: “Calling
(Name).” Remain silent to make the call, or
say
No to cancel.
Note: If the phone finds multiple voice tags
that sound like the name you said, you will be
asked to verify which name you want to call.
Say
Yes when you hear the correct name. Say
No when you hear an incorrect name.
5. When you are finished with the call,
press to end the call.
44 Using Voice Recognition
Page 51

Erasing voice tags
To erase all voice dial recordings in your phone:
1. Menu → Settings → Voice Features →
Erase Voice Dial.
2. Select Yes .
Making a call using digit dialing
When using digit dialing, you speak digits to dial a
phone number.
Note: You cannot speak a string of digits. You
must speak one digit at a time and wait for
the prompt.
1. From the home screen, press . The phone
responds: “Say a name or say Dial.”
2. Say “Dial”. The phone responds:
“Speak a digit.”
3. Speak the first digit of the phone number you
want to call. Once the phone repeats the digit,
you can speak the next digit.
If you pause, the phone will prompt you with
the following five options. After the prompt,
speak an option.
– Say “
Clear” to erase the last digit entered.
The phone responds: “Digit cleared.”
To clear the entire phone number, say
“
Clear” again. When the phone prompts
you with “Clear entire phone number?”,
say “
Yes ” to clear or “No” to cancel.
Call” to dial the number.
– Say “
Veri fy” to cause phone to repeat the
– Say “
set of digits that you input.
– Say “Cancel” to exit voice recognizer and
return to the home screen.
– Speak a digit to enter the next digit. Once
the phone repeats the digit, you can speak
the next digit or pause to hear the prompt.
Using voice features with
hands-free car kits
You can use voice commands to make a phone
call or to answer the phone only if your phone is
connected to a professionally installed Kyocera
hands-free car kit (sold separately).
Note: The following features apply only to
installed hands-free car kits unless noted.
To shop for hands-free car kits, visit
www.kyocera-wireless.com/store or call
800-349-4188 (U.S.A. only) or 858-882-1410.
Waking up the phone
If your phone is connected to a Kyocera installed
hands-free car kit, you can use the voice
command to activate the phone to make a
phone call.
User Guide for the Kyocera K322 Phone 45
Page 52
To activate the Voice Wake-up setting:
Menu → Settings →
• Select
Voice Features → Voice Wake-Up →
With accessory.
To wake up the phone:
1. Say “Wake Up” and listen for a tone.
2. Say “Wake Up” again until you hear two tones.
If the phone does not recognize your
“Wake up” command, see “Training voice
recognition” on page 47.
Answering the phone
You can set your hands-free car kit to
(1) answer automatically or (2) answer using
a voice command.
Answering automatically
You can set your phone to answer automatically.
Note: This setting also works with the portable
hands-free car kit.
• Select
Menu → Settings → Accessories →
Auto-Answer → After 5 secs.
Answering using voice commands
If Auto-Answer is turned off, you can use a voice
command to answer an incoming call using the
installed hands-free car kit.
• Select
Menu → Settings → Accessories →
Auto-Answer → Disabled.
To activate the Voice Answer setting:
Note: The accessory must be attached to use
this feature.
1. Select Menu → Settings →
Voice Features → Voice Answer.
2. Highlight Enabled and press .
3. Select Menu → Settings → Silent Mode →
Normal Sounds, then press .
To answer a call:
When you receive an incoming call, the phone
responds: “Incoming call, answer?” or “Incoming
roam call, answer?” If the caller is recognized as a
contact entry in your phone, then the phone will
say “Incoming call from (Name), answer?”
• Say “
Yes ” or press any key except .
Ignoring an incoming call
To ignore an incoming call, do one of
the following:
• Say “
No” and press to silence the alert.
• Remain silent. The voice alert repeats twice
and the phone rings once, then returns to the
home screen.
46 Using Voice Recognition
Page 53

Using Expert Mode
Expert Mode allows you to use voice recognition
at a faster pace by reducing the number of voice
instructions and replacing them with tones.
Simply speak a command after the tone.
Select
Menu → Settings → Voice Features→
Expert Mode → Expert.
Training voice recognition
If your phone is having trouble recognizing your
voice, you can train it with the commands
No, and Wake up.
1. Select Menu → Settings → Voice Features.
2. Select Voice Training.
3. Read the message and press to select OK
and continue.
Cancel returns you to the
previous screen.
4. Select Trai n A ll or the item you want to train.
5. Follow the prompts for each word until
training is complete.
Yes ,
User Guide for the Kyocera K322 Phone 47
Page 54
9USING THE CAMERA
Tips before operating
your camera
• You cannot activate the camera while
on an active call or while browsing files in the
media gallery.
• Once the camera is active, the home screen
acts as the viewfinder.
• If you get a “Low memory” error, check your
resolution and quality compression settings.
See “Setting up the camera for photos” on
this page.
• If there is no activity within 45 seconds after
you turn your camera on, the camera quits
and returns to the previous launch point.
• Menu settings and options can only be
accessed when the camera is active.
Accessing camera mode
1. Open flip.
2. Press
- or select
Menu → Camera.
Setting up the camera
for photos
1. Select Menu → Camera.
2. Press to select Options.
3. Press to select Settings.
4. Highlight an option and press :
Flash options are On, Off, or Automatic.
–
–
Resolution options are 1280 x 1024 (best
for printing), 640 x 480, 320 x 240 (best
for sending to email), and 160 x 120.
–
Low Light Mode brightens the picture for
low light environments.
–
Self Timer options are Off (default) or 3,
5, or 10 second pauses. When set, the
camera beeps from 3 seconds down to the
time the shutter snaps the picture
automatically. Self Timer is not available
when
Multishot mode is activated.
–
Multishot allows you to take up to six
multiple pictures while the camera key is
pressed and held. A tone will play each
time a picture is taken. A second tone will
play when the final picture is taken.
–
Shutter Sound sets the sound used when
the camera takes a picture.
–
White Balance allows the camera to adjust
for different lighting. Options are
Automatic, Fluorescent, Incandescent,
or Daylight.
–
Color Tone sets the color tone of
the picture.
48 Using the Camera
Page 55
– Quality sets the picture compression. The
higher the compression, the better the
detail of the picture (higher pixel rate).
Options are Low, Medium, or High
(default). When set to High, the picture
file size is larger, using more memory.
–
LED flashes a light to indicate a picture
has been taken. Options are On (default)
and Off.
–
Viewfinder Display options are Fullscreen
and Actual.
Restoring camera menu settings
The following settings revert to the default setting
each time you enter and exit the camera
application:
– Low Light Mode, Self Timer,
MultiShot, Viewfinder.
The following settings
you selected each time you enter and exit the
camera application:
– Flash, Resolution, Shutter Sound, White
Balance, Quality, and LED.
remain at the setting
Menu options for camera mode
1. Press or press Menu → Camera to
activate camera mode
2. Select Options.
3. Press up or down to scroll through the
options on the vertical menu bar:
– Settings displays available camera settings
you may set up prior to taking a picture.
–
Brightness allows you to adjust the
brightness of the image in the home
screen LCD.
–
Camera Pictures displays all pictures
taken and stored.
–
Last Picture displays the most recently
taken picture.
–
Frames allows you to add a frame or a
stamp to your picture. A frame or stamp
cannot be removed once it has been used
in a picture.
Note: The picture resolution changes to
160 x 120 while taking pictures with frames.
The resolution returns to the original setting
once Frames is disabled.
.
User Guide for the Kyocera K322 Phone 49
Page 56
Camera mode indicators
and icons
The camera mode displays the following onscreen
indicators and icons:
Icon Description
Flash on
Camera mode
Top right corner
numbers
Number of
snapshots remaining
Zoom level
Bottom left
corner numbers
Resolution setting
Multishot
Self Timer
Taking a picture
1. Open flip.
2. Select Menu → Camera
- or press .
3. Focus on the image using the phone’s display
as the viewfinder.
Tip: Press up or down to zoom in or
zoom out.
4. Take the picture using one of two methods:
– Press or .
5. Press to select OK or to select Erase.
6. Press when finished taking pictures.
Camera key map
Key Camera Menu Screen
Take picture Dismiss menu options
Select Capture to
take picture
Select Options Cancel, dismisses
Zoom in Scrolls menu options
Up
Zoom out Scrolls menu options
Down
Takes picture Select menu option
Viewing a saved picture
1. Select Menu → Camera.
2. Press to select Options.
3. Press down to select Camera Pictures
and then press
4. Press to scroll through the pictures and
press to view it.
Press for more options:
Assign allows you to assign a picture to a
–
Contact, assign the picture as Wallpaper,
or a Screen Saver.
.
Select OK
menu
right
left
50 Using the Camera
Page 57

– Modify options are Rotate, Resize,
Brightness, Sharpness, Saturation, Hue,
Auto Adjust, Color Tone. Only unlocked
pictures can be modified.
–
Zoom is available by scrolling up (zoom
in) or down (zoom out) with the scroll
keys. When zoomed to maximum or
minimum a tone plays.
–
Take Picture allows you to take a picture.
–
Lock allows you to lock or unlock a
picture for editing. If a file is locked, you
cannot erase, rename, or modify the file.
–
Rename allows you to edit the name of a
picture file.
–
Details allows you to view details of
the picture.
User Guide for the Kyocera K322 Phone 51
Page 58
10 USING MEDIA GALLERY
The Media Gallery stores camera pictures,
images, and sounds in the phone and displays
those files on the phone’s screen.
Accessing files
1. Select Menu → Media Gallery.
2. Select an option:
Camera Pictures displays thumbnails of
–
the photos you have taken in
chronological order.
–
Images displays a list of categories that
contain preloaded, downloaded, saved, or
created files such as wallpaper, screen
savers, or caller IDs.
–
Sounds displays a list of categories that
contain saved or downloaded sounds such
as ringers and voice memos.
Browsing pictures
1. Select Menu → Media Gallery →
Camera Pictures.
2. Highlight a picture and press to
select
View.
3. Press to select Options:
Assign picture as a Caller ID or
–
as wallpaper.
–
Zoom allows you to zoom in or out on
the picture.
–
Modify press to select Options.
Options are Rotate, Resize, Brightness,
Sharpness, Saturation, Hue, Auto Adjust,
Color Tone. Only unlocked pictures can be
modified.
–
Take Picture to snap another photo.
–
Lock to prevent accidentally erasing
the photo.
–
Rename the photo.
–
Details of the file.
Browsing images
The images menu allows you to assign your files
to various applications.
1. Select Menu → Media Gallery → Images.
2. Highlight an option and press :
Saved Images displays available images.
–
–
Wallpapers displays wallpaper selections.
Screen Savers displays available
–
screensavers.
–
Caller IDs displays pictures and images
saved and the text IDs you assigned them.
–
Doodles saved from Doodler.
3. Press to select Options (options vary
according to selection):
–
Assign to assign the image to a contact.
–
Details gives you the file size of the image.
52 Using Media Gallery
Page 59
– Erase All erases all images stored (images
must not be locked).
4. Select Close or press when done.
Browsing sounds
1. Select Menu → Media Gallery → Sounds.
2. Highlight an option and press :
Saved Sounds contains sounds saved on
–
your phone.
–
Ringers contains ringers saved on
your phone.
–
Voice Memos contains voice memos you
made to yourself.
3. Highlight an option and press
(options vary according to selection):
–
Assign to assign the ringer to a contact.
–
Play to review the sound.
Record New allows you to record
–
new sounds.
–
Erase the sound.
–
Lock to prevent accidentally erasing
the sound.
–
Rename allows you to rename the
sound file.
–
Details gives you the file size of the sound.
–
Erase All erases all sounds stored.
4. Select Close when done.
User Guide for the Kyocera K322 Phone 53
Page 60
11 USING TOOLS AND GAMES
Voice M emo
The Voice Memo tool allows you to record and
play back audio memos.
Recording a voice memo
1. Select Menu → Tools & Games →
Voice Me mo → Record New.
- or Press and hold right.
2. Say your memo and press to select Stop.
3. Select Save to save your memo.
Note: If an incoming call is received while you’re
recording a memo, the memo is saved and the
incoming call screen appears.
Playing or reviewing a voice memo
1. Select Menu → Tools & Games →
Voice Memo → Recorded Memos.
2. Highlight the voice memo to review and
select
Play.
3. Press right and left to select a function
and press to perform it
Play
Stop
Pause
:
Naming a saved voice memo
1. Select Menu → Tools & Games →
Voi ce M emo → Recorded Memos.
2. Highlight the memo and select Options.
3. Select Rename.
4. Press and hold to clear the
default name.
5. Use the keypad to enter a name for the memo.
6. Select Save.
Erasing a saved voice memo
1. Select Menu → Tools & Games →
Voi ce M emo → Recorded Memos.
2. Highlight the memo and select Options.
3. Select Erase. The prompt “Erase file?”
appears.
4. Select Yes or No.
Scheduler
The Scheduler allows you to schedule events and
set reminder alerts.
Creating an event
1. Select Menu → Tools & Games →
Scheduler → Add New Event.
2. Enter a name for the event and press
down. For help entering text, see page 17.
54 Using Tools and Games
Page 61
3. Select Options and classify the type of event
and press :
Birthday, Anniversary, Vacation, Medical,
or
Other.
4. Press to change the date of the event (the
Meeting, Phone Call,
current date is the default date of the event).
– Press left or right to move between
the month, day, and year fields.
– Press up or down to change the
month, day, or year.
– Press to save your changes.
5. Press to set the time of the event.
– Press left or right to move between
the hour, minute, and AM/PM fields.
– Press up or down to change the
hour, minute, or AM/PM.
– Press to save your changes.
6. Press to set the duration of the event.
– Press left or right to move between
the hour and minute fields.
– Press up or down to change the
hour and minute.
– Press to save your changes.
7. Press to set the priority of the event.
– Press to select an option: None, High,
Medium, or Low.
8. Press to set a reminder of the event.
– Select an option and press .
9. Press to set the reminder sound.
– Select an option and press .
10. Press to select a Silent Mode setting
No or During Event and press .
– Select
11. Press to select whether or not this is a
recurring event.
– Select an option and press :
Weekly, Monthly, or Annually.
12. Select Save.
No, Daily,
Editing, erasing, or sending an event
1. Select Menu → Tools & Games →
Scheduler → View Month.
2. Press up, down, left or right to highlight
the day with the event to view, edit, or erase
and press .
3. Press up or down to highlight the event
and press .
4. Press to select Options.
5. Select Edit, Erase, or Send and press .
– For more information about editing the
event, see “Scheduler” on page 54.
– To erase the event, highlight
press . Press to confirm.
– For more information about sending the
event, see “Sending and Receiving Text
Messages” on page 24.
Erase and
User Guide for the Kyocera K322 Phone 55
Page 62
Alarm Clock
You can set up to four alerts with your phone’s
three alarm clocks and one quick alarm.
Note: The alert occurs only if the phone is on.
Setting an alarm clock
1. Select Menu → Tools & Games →
Alarm Clock.
2. Highlight one of the alarms and select Set.
3. Use the phone keypad to enter numbers and
to switch between AM and PM.
– Press left or right to move between
hours, minutes, and AM/PM fields.
– Press up or down to change the
hours, minutes, and AM/PM options.
4. Press to set the time of the alarm.
5. Select Options to set the alarm sound.
6. Highlight an option and press .
7. Select Options to set the recurring time.
8. Highlight an option and press .
9. Enter a note for the alarm and press .
10. Press to select Save and set the alarm(s).
11. When the alarm rings, select Off to turn off the
alarm or
Snooze to silence the alarm for
10 minutes.
Note: Opening the flip turns off the alarm.
Setting the QuickAlarm
1. Select Menu → Tools & Games →
Alarm Clock.
2. Highlight QuickAlarm and select Set.
3. Select an option and press : 5 minutes, 15
minutes (default), 30 minutes, or 60 minutes.
A message appears telling you the
QuickAlarm is On.
4. When the alarm rings, select Off to turn off the
alarm or
Reset to set the QuickAlarm again.
Tip Calculator
The Tip Calculator helps you calculate how much
tip to include with a bill.
1. Select Menu → Tools & Games →
Tip Calculator.
2. Enter the amount of your bill.
3. Select Next.
4. Select the amount you want to include as a tip
(10%, 15%, 18%, 20%, Other) and press
. Your total bill appears, including tip.
5. To split the bill, press to select Split.
6. Press to clear the default of 2 guests.
7. Enter the number of guests and press to
select
Next. The amount each guest pays
is calculated.
8. Select Done.
56 Using Tools and Games
Page 63
Calculator
Use the calculator for basic
mathematical equations.
1. Select Menu → Tools & Games → Calculator.
2. Use the keypad to enter numbers.
3. Use to select mathematical operations:
Left
x (multiply)
Right
÷ (divide)
4. Press to calculate the result. Example:
Enter 5, press left to select
then press to obtain the result of 10.
5. Press to return to the home screen.
- or Press to clear the screen.
Options
Adds displayed digit to the value
M+
stored in memory.
Displays currently stored value on
MR
screen.
Clears value currently stored in
MC
memory.
Up
Down
+ (add)
- (subtract)
X, enter 2,
Timer
This timer counts down for a specified amount
of time. It beeps when that amount of time
has elapsed.
1. Select Menu → Tools & Games → Timer.
2. Select Set.
– Press to move the cursor left
or right.
– Press up or down to set the hours,
minutes, and seconds.
3. Select Start to begin the countdown.
Select
Stop to pause the countdown.
Select
Reset to clear the timer.
4. Select Sound to set the alarm sound and
press .
5. Press or to silence the alarm.
Stopwatch
1. Select Menu → Tools & Games →
Stopwatch.
2. Select Start to begin counting.
Select
Stop to stop counting.
Select
Reset to clear the counter.
User Guide for the Kyocera K322 Phone 57
Page 64
Games
The games in this section may not be available
on your phone. Check with your service provider
for availability.
If you receive an
playing a game, the game is paused and exited.
You can return to play once the call alert ends.
Games do not remain paused if the phone is
turned off or loses power.
Gamepad Keymap setting
If you have purchased a Kyocera Gamepad, this
setting allows you to modify the gamepad keymap.
1. Connect the Kyocera Gamepad to the phone.
2. Select Menu → Settings →
Gamepad Keymap.
– Edit allows you to modify the gamepad key
–
Note: To purchase a Gamepad, call 800-349-
4188 (U.S.A. only), 858-882-1410, or visit
www.kyocera-wireless.com/store.
incoming call alert while you are
mappings.
Reset resets the gamepad to the factory
default settings.
Brick Attack
The goal of this game is to eliminate bricks
arranged in levels. You send a moving ball
upward using a paddle at the bottom of
the screen.
1. Select Menu → Tools & Games →
Brick Attack.
2. Press to select Yes at the prompt, “Turn
off backlight to conserve battery?”
3. Press to select New.
– To pause the game, press , then
press to Resume.
– To move the paddle, press left
or right.
– To exit the game, highlight
Exit and
press .
Race 21
This game is a timed variation of Black Jack. Each
game comprises three 90-second rounds. To
score points, add cards in each of the four
columns, trying to reach but not exceed 21 in
each column during the course of the game.
1. Select Menu → Tools & Games → Race 21.
2. Press to select Yes at the prompt, “Turn
off backlight to conserve battery?”
58 Using Tools and Games
Page 65
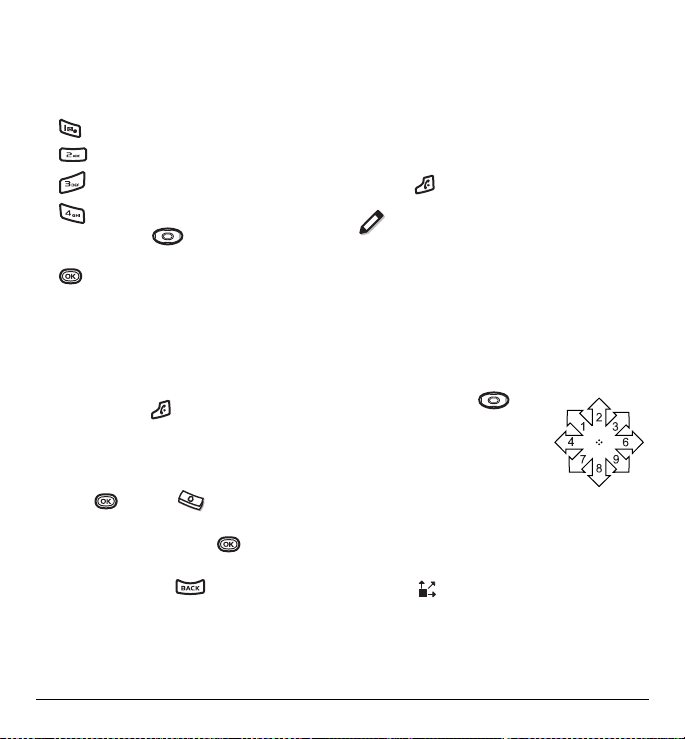
3. Select New Game. The first card to be placed
is shown at the top left of the screen. Press a
key to add a card to the row as follows:
Add cards to the first row.
Add cards to the second row.
Add cards to the third row.
Add cards to the fourth row.
Shortcut: Press left or right to choose
arrows at the bottom of the screen then press
to add cards to corresponding rows.
Note: Each time you place a card, a new card
appears for placement.
4. Continue placing cards until you are satisfied
with your selections.
– You can pause or end the game at any time
by pressing .
– You lose points each time you exceed 21
in a column.
– Select
Skip to skip one card per round.
5. Press to select to get your score
and advance to the next round
6. Select an option and press to select it.
New Game initiates game play. To pause
–
.
the game, press . From here you can
choose
Resume, New or Quit.
– Resume Game returns you to the game
you were last playing.
–
Scoreboard provides you with the top
five scores.
– Music plays music with this game. Select
from
Music Always, Sound Effects,
Instructions, Credits, During Title, or
No Music.
7. Press to end all games.
Doodler
You can create and save graphics on your phone.
1. Select Menu → Tools & Games → Doodler.
2. Select New Doodle to open the drawing screen
The cursor is located in the middle of
the screen.
3. Select Options to choose the Colors, Tools,
Lines, or Shape you want to use.
4. Use keys 1–9 or to
move the cursor around the
screen as indicated.
5. When finished, select
Options → Save. The
image is saved to
Media Gallery.
To move the cursor away from the drawing:
1. Select Options → Colors and Tools.
2. Select then Done.
3. Press a number key to move the cursor.
User Guide for the Kyocera K322 Phone 59
Page 66
To erase part of a drawing:
1. Select Options → Colors and Tools.
2. Select then Done.
3. Press a number key to move the eraser.
To Navigate: Use the following keys to doodle.
To: Use:
Select Options
Clear screen
Shortcut to Colors & Tools
Draw, erase, or move cursor/
shape UP
Draw, erase, or move cursor/
shape DOWN
Draw, erase, or move cursor/
shape LEFT
Draw, erase, or move cursor/
shape RIGHT
up
down
left
right
Return cursor to center
Previous screen
Saving a doodle
It is a good idea to save the doodle while you are
working on it. If you receive a call while creating
an unsaved doodle, it will be lost.
• Select
Options → Save. The image will be
saved in
Menu → Media Gallery →
Images → Doodles.
Resuming a doodle
To return to another saved doodle:
Menu → Tools & Games →
• Select
Doodler → Resume Doodle.
- or Select
Menu→ Media Gallery →
Images → Doodles.
60 Using Tools and Games
Page 67
12 CONNECTING TO THE INTERNET
Using the Web Browser
You can use your phone to browse the Internet if
you have obtained phone Internet services from
your service provider and if over-the-air Internet
access is available in your area.
Note: You cannot receive incoming calls while
you are using Web Browser.
Launching the Web Browser
1. Select Menu → Web Browser.
A message about airtime fees appears every
time you start the browser.
For more information about how airtime is
charged, contact your service provider.
2. Press to continue.
If this is the first time you have connected to
the Internet, a message informs you that
security is not yet enabled for your
Web Browser.
3. Press to select Yes to enable security.
When you are connected, a browser home
page appears. It has a list of bookmarks and
some Web menu options at the bottom of
the screen.
– A appears in a secure session.
– An underline and an arrow indicate that
there is more text. Press down to
view more text. Press to return to
the previous screen.
– To choose a site, highlight it and press
to select
Go.
4. When you have finished using the Internet,
press to exit the Web Browser.
Using the Web menu options
The following options may appear on your screen:
Home returns you to the main Web Browser
•
window, or home page.
•
Mark Site saves the current location as a
bookmark for easy access.
• Bookmarks displays a list of your saved
Web sites.
•
Setup gives you options for changing how
information is displayed.
–
Show URL displays the entire URL.
About Openwave displays information
–
about your Web Browser version.
– Encryption should not be used unless you
are instructed to do so by your
service provider.
User Guide for the Kyocera K322 Phone 61
Page 68
– UP.Link selects a different browser server.
You can use this option if you have more
than one Web Browser account.
–
Restart restarts the Web Browser.
Searching for a Web site
How you search for a Web site depends on
your service provider. For more information,
contact your service provider.
Going to a bookmarked site
1. Select Menu → Web Browser. If you see a
message prompt, press to continue.
2. From your Web home page, select
Bookmarks. A list of bookmarks appears.
3. Enter the number corresponding to the
bookmark you want and press .
Checking Net alerts
Alerts received from a Web site are sent to your
Browser Alerts inbox.
1. Select Menu → Messages → Browser Alerts.
This action launches the browser inbox.
2. Press to accept browser fees.
3. Select an alert and follow the prompts.
62 Connecting to the Internet
Page 69

13 GETTING HELP
Customer support
Your service provider’s customer support
department may be accessible directly from your
phone when you dial a number, such as *611
(check with your service provider). They can
answer questions about your phone, phone bill,
call coverage area, and specific features available
to you, such as call forwarding or voicemail. For
questions about the phone features, refer to the
materials provided with your phone, or visit
www.kyocera-wireless.com. For additional
questions, you may contact the Kyocera Wireless
Corp. Customer Care Center in any of the
following ways:
• Web site:
• Email: [email protected]
• Phone: 1-800-349-4478 (U.S. and Canada)
• Customer support phone numbers are also
User Guide for the Kyocera K322 Phone 63
www.kyocera-wireless.com
or 1-858-882-1401.
available in the following countries:
Argentina: 0-800-666-0052
Australia: 1-800-507-000
Brazil: 0-800-55-2362
Chile: 800-43-1212
Colombia: 01-800-700-1546
India: Toll free#: 1-600-121214
Toll#: 0124-284-5000
Mexico: 001-866-650-5103
New Zealand: 0-800-990-100
Panama: 001-800-201-1984
Peru: 0-800-51-934
Puerto Rico: 1-866-664-6443
Venezuela: 0-800-100-2640
Before requesting support, please try to
reproduce and isolate the problem. When you
contact the Customer Care Center, be ready to
provide the following information:
• The name of your service provider.
• The actual error message or problem you
are experiencing.
• The steps you took to reproduce the problem.
• The phone’s electronic serial number (ESN).
– To locate the ESN select
Phone Info → Build Info and scroll down
Menu →
to ESN: for the 11-digit number.
Qualified service
If the problem with your phone persists, return
the phone with all accessories and packaging to
the dealer for qualified service.
Phone accessories
To shop for K322 phone accessories, visit
www.kyocera-wireless.com/store. You may also
call us at 800-349-4188 (U.S.A. only) or
858-882-1410.
Become a product evaluator
To participate in the testing and evaluation of
Kyocera Wireless Corp. products, including
cellular or PCS phones,
visit
beta.kyocera-wireless.com.
Page 70

INDEX
Numerics
1-Touch dialing, 13
A
Alarm Clock, 8
alarm clock, 56
alerts
for headsets, 38
for messages, 38
for missed calls, 11
analog mode, 8
auto-hyphenation, 40
B
banner, 39
battery, 1
blocking outgoing calls, 41
Brick Attack, 58
C
calculator, 57
call counters, 14
callback number, 25
calls
answering, 9
missed, 11
redialing, 10
camera
menu options, 49
sending a picture, 49
setting up, 50
taking a picture, 50
color themes, 40
Com Port speed, 42
contacts directory, 20
contrast, 40
countdown timer, 57
custom menu
creating, 38
D
data/fax setup, 14, 42
digital mode, 8
display contrast, 40
Doodler, 59
E
emergency
calls, 13
emergency mode, 14
exit emergency mode, 14
position location, 8, 43
erasing
contact entries, 22, 42
text messages, 29
expert mode, 47
F
fast find, 23
fax mode, 42
finding contact information, 23
frequent contacts, 23
G
games
Brick Attack, 58
Doodler, 59
Race 21, 58
H
hands-free car kit
answering using voice, 46
purchasing, 63
hands-free headset
and phone ringer, 38
jack, 4
purchasing, 63
hard pause, 20
I
icons, 8
contacts, 22
messages, 27
InBox, 28
K
Key descriptions, 3
L
language, 39
lights
lights-only mode, 8, 36
limiting calls out, 41
lock code, 41
locking
phone, 41
M
memory
saving, 29
menu view, 39
N
number mode, 17
O
OutBox, 27
P
phone numbers
verifying your own, 7
phone, unlocking, 41
position location, 8, 43
Q
QuickAlarm, 56
QuickText, 25, 30
64
Page 71

R
Race 21, 58
recent call icons, 12
resetting the phone, iv
ringers
choosing types, 36
for contacts, 21
for roaming calls, 15
silencing, 6
volume, 37
roaming, 8
alerts, 15
controlling, 14
ringer, 15
S
scheduler, 54
screen contrast, 40
screen icons, 8, 17, 27, 36
screen savers, 40
secret contacts, 12, 22
security, 41
sent messages, 27
silent mode, 8, 36
smart sound, 37
smiley mode, 18
speed dialing, 22
stopwatch, 57
symbol mode, 18
T
technical support, 63
text entry, 17
quick reference, 19
text messages, 24
time format, 41
timer, 57
timing calls, 14
tip calculator, 56
TTY/TDD, 43
U
unlocking the phone, 41
V
vibrate, 8, 36
Voice Answer, 46
voice dialing, 44
voice memo
erasing, 54
naming, 54
recording, 54
voicemail, 13
setting up, 6
volume
earpiece, 9, 37
key beep, 37
ringer, 37
W
wallpaper, 40
Web Browser, 61
User Guide for the Kyocera K322 Phone 65
Page 72
 Loading...