

Page 1
iBurst Modem Card Model (UTC) Manual
iBurst Modem Card Model (UTC) Manual
iBurst Modem Card Model (UTC) Manual iBurst Modem Card Model (UTC) Manual
Approved
Koyama
Kyocera Corporation Revision 1.01 --- June.08.2006
Checked
Designed
Hirao Yamamoto
- 1 -
Reference:
Revision:
Date:
Q34T-EE-001
1.01
June.08.2006
Page 2

Revision Record
Revision
1.00 Hirao May.10.2006 First Release
1.01 Miyasaka June.08.2006 Correct some writings
Author Date Detail
iBurst Modem Card Model (UTC) Manual
iBurst Modem Card Model (UTC) Manual
iBurst Modem Card Model (UTC) Manual iBurst Modem Card Model (UTC) Manual
Kyocera Corporation Revision 1.01 --- June.08.2006
- 2 -
Page 3

iBurst Modem Card Model (UTC) Manual
iBurst Modem Card Model (UTC) Manual
iBurst Modem Card Model (UTC) Manual iBurst Modem Card Model (UTC) Manual
CONTENTS
CONTENTS
CONTENTS CONTENTS
Safety Precautions on iBurst Modem
Safety Precautions on iBurst Modem ................................
Safety Precautions on iBurst ModemSafety Precautions on iBurst Modem
Chapter 1 Introduction
Chapter 1 Introduction ................................
Chapter 1 IntroductionChapter 1 Introduction
Components List
Components List ................................
Components ListComponents List
Outlook of iBurst Modem
Outlook of iBurst Modem ................................
Outlook of iBurst ModemOutlook of iBurst Modem
Requirements on your PC
Requirements on your PC ................................
Requirements on your PCRequirements on your PC
Outlook to use the iBurst Modem
Outlook to use the iBurst Modem................................
Outlook to use the iBurst ModemOutlook to use the iBurst Modem
Indicators
Indicators ................................
IndicatorsIndicators
Chapter 2 Setup Procedure
Chapter 2 Setup Procedure ................................
Chapter 2 Setup ProcedureChapter 2 Setup Procedure
iBurst Software Installation
iBurst Software Installation .............................................................................................................. 12
iBurst Software InstallationiBurst Software Installation
Installation for Windows XP
Installation for Windows XP ................................
Installation for Windows XPInstallation for Windows XP
Installation for Windows 2000
Installation for Windows 2000 ................................
Installation for Windows 2000Installation for Windows 2000
Insta
Installation for Windows Me
llation for Windows Me ................................
InstaInsta
llation for Windows Mellation for Windows Me
Installation for Windows 98SE
Installation for Windows 98SE................................
Installation for Windows 98SEInstallation for Windows 98SE
Installation for Mac OS X
Installation for Mac OS X................................
Installation for Mac OS XInstallation for Mac OS X
Connection Establishment
Connection Establishment ................................................................................................................. 60
Connection EstablishmentConnection Establishment
Connection Establishment for Windows XP
Connection Establishment for Windows XP ................................
Connection Establishment for Windows XPConnection Establishment for Windows XP
Connection Establishment for Wind
Connection Establishment for Windows 2000/Me/98SE
Connection Establishment for WindConnection Establishment for Wind
Connection Establishment for Mac OS X
Connection Establishment for Mac OS X ................................
Connection Establishment for Mac OS XConnection Establishment for Mac OS X
Chapter 3 Utility Software
Chapter 3 Utility Software ................................
Chapter 3 Utility SoftwareChapter 3 Utility Software
................................................................
................................................................
................................................................
................................................................
................................................................
................................................................
................................................................
................................................................
................................................................
................................................................
................................................................
................................................................
................................................................
................................................................
................................................................
................................................................
................................................................
................................................................
................................................................
................................................................
................................................................
................................................................
................................................................
................................................................
................................................................
................................................................
ows 2000/Me/98SE ................................
ows 2000/Me/98SEows 2000/Me/98SE
................................................................
................................................................
................................................................
................................................................
................................................................
................................................................
................................................................
................................................................
................................................................
................................................................
................................................................
................................................................
................................................................
................................................................
................................................................
................................................................
................................................................
................................................................
................................................................
................................................................
................................................................
................................................................
................................................................
................................................................
................................................................
................................................................
................................................................
................................................................
..........................................................
................................................................
................................................................
................................................................
................................................................
................................................................
................................................................
................................................................
................................................................
................................................................
................................................................
................................................................
..........................................................
................................................................
............................................
................................................................
..................................
................................................................
................................................
................................................................
................................................................
................................................................
................................................................
................................................................
.....................................................
................................................................
.........................................................
................................................................
............................................................
................................................................
.........................................................
................................................................
............................................................
................................................................
.........................................................
................................................................
................................................................
................................................................
...................................................
................................................................
.........................................
................................................................
............ 4444
........................
.. 8888
....
................ 9999
................................
...................................
................................................................
................................ 10
................................................................
..................... 10
..........................................
......................... 10
..................................................
.......................... 11
....................................................
............................ 12
........................................................
......................... 15
..................................................
............................ 18
........................................................
......................... 36
..................................................
.................................... 56
................................................................
.....................................
................................................................
................... 65
......................................
.......................... 70
....................................................
..... 60
..........
......... 66
..................
... 9999
......
10
1010
10
1010
10
1010
11
1111
12
1212
15
1515
18
1818
36
3636
56
5656
60
6060
65
6565
66
6666
70
7070
Using Utility Software
Using Utility Software........................................................................................................................ 71
Using Utility SoftwareUsing Utility Software
Using Utility Software for Windows
Using Utility Software for Windows................................
Using Utility Software for WindowsUsing Utility Software for Windows
Using Utility Software for Mac OS X
Using Utility Software for Mac OS X ................................
Using Utility Software for Mac OS XUsing Utility Software for Mac OS X
Chapter 4 MTU Optimizer Software & Network Property
Chapter 4 MTU Optimizer Software & Network Property ................................
Chapter 4 MTU Optimizer Software & Network PropertyChapter 4 MTU Optimizer Software & Network Property
MTU Optimizer Software & Network Property
MTU Optimizer Software & Network Property................................................................................ 84
MTU Optimizer Software & Network PropertyMTU Optimizer Software & Network Property
Chapter 5 Uninstallation
Chapter 5 Uninstallation ................................
Chapter 5 UninstallationChapter 5 Uninstallation
iBusrt Software Uninstallation
iBusrt Software Uninstallation.......................................................................................................... 88
iBusrt Software UninstallationiBusrt Software Uninstallation
Uninstallation for Windows X
Uninstallation for Windows XP/2000
Uninstallation for Windows XUninstallation for Windows X
Uninstallation for Windows Me/98SE
Uninstallation for Windows Me/98SE ................................
Uninstallation for Windows Me/98SEUninstallation for Windows Me/98SE
Uninstallation for Mac OS X
Uninstallation for Mac OS X ................................
Uninstallation for Mac OS XUninstallation for Mac OS X
Chapter 6 Trouble shooting
Chapter 6 Trouble shooting................................
Chapter 6 Trouble shootingChapter 6 Trouble shooting
Windows
Windows............................................................................................................................................. 100
WindowsWindows
Illegal hang
Illegal hang----up when install iBurst Modem.
Illegal hangIllegal hang
Illegal hang
Illegal hang----up when set up dialer
Illegal hangIllegal hang
Mac
Mac .....................................................................................................................................................104
MacMac
Data rate
Data rate ................................
Data rateData rate
Chapter 7 Information
Chapter 7 Information ................................
Chapter 7 InformationChapter 7 Information
FCC Compliance Statement
FCC Compliance Statement............................................................................................................. 106
FCC Compliance StatementFCC Compliance Statement
FCC RF Radiation Exposure Statement
FCC RF Radiation Exposure Statement......................................................................................... 106
FCC RF Radiation Exposure StatementFCC RF Radiation Exposure Statement
up when install iBurst Modem. ................................
up when install iBurst Modem.up when install iBurst Modem.
up when set up dialer................................
up when set up dialerup when set up dialer
................................................................
................................................................
................................................................
................................................................
................................................................
................................................................
................................................................
................................................................
................................................................
................................................................
P/2000 ................................
P/2000P/2000
................................................................
................................................................
................................................................
................................................................
................................................................
................................................................
................................................................
................................................................
................................................................
................................................................
................................................................
................................................................
................................................................
................................................................
................................................................
................................................................
................................................................
................................................................
.............................................................
................................................................
................................................................
................................................................
................................................................
................................................................
................................................................
................................................................
..........................................................
................................................................
................................................................
................................................................
................................................................
................................................................
................................................................
................................................................
...............................................................
................................................................
.................................................
................................................................
...............................................
................................................................
..........................................
................................................................
...............................................
................................................................
..............................................
................................................................
............................................................
................................................................
..................................................
................................................................
.........................................................
................................................................
............................... 105
..............................................................
................. 71
..................................
............... 77
..............................
.......... 83
....................
............................. 87
..........................................................
............... 88
..............................
.............. 90
............................
............................ 97
........................................................
.......................... 99
....................................................
...................................
................................................................
..................102
....................................
......................... 104
..................................................
71
7171
77
7777
83
8383
87
8787
88
8888
90
9090
97
9797
99
9999
...100
100
......
100100
102
102102
104
104104
105
105105
Kyocera Corporation Revision 1.01 --- June.08.2006
- 3 -
Page 4

iBurst Modem Card Model (UTC) Manual
iBurst Modem Card Model (UTC) Manual
iBurst Modem Card Model (UTC) Manual iBurst Modem Card Model (UTC) Manual
Safety Precautions on iBurst
Safety Precautions on iBurst Modem
Safety Precautions on iBurst Safety Precautions on iBurst
Modem
ModemModem
• Things you must know
• When using the product, use it correctly according to the safety precautions.
• The product uses particular radio frequency band tuned for the network operator.
• The safety precautions, hardware, software, and the design of the product may be changed
in the future without any announcement to the customers.
• About use restriction
• The product is designed as an OA apparatus for home use. Please use it neither in the
medical apparatus directly to affect a human life, nor the system of which very high
reliability is required.
• Do not use the product in the zone where the wireless machines are forbidden, such as an
airplane and a hospital. An electric device and medical apparatus are affected and it
becomes the cause of the accident.
• About Qualification
• Our company does not take any responsibility about the damage produced by use under
the conditions such as natural disasters, earthquake, flood, fires, misuse by intent or
carelessness or other than the responsibility of our company.
• Our company does not take any responsibility about the damage produced by external
factor, failure, malfunction, and fault of product, such as loss of enterprise profits,
enterprise discontinuation, change and disappearance of the contents of memory etc.
• Our company takes no responsibility about the damage produced by not keeping the
written contents of an owner's manual.
• Our company takes no responsibility about the damage produced from incorrect operation
in combination with the connection apparatus and software in which our company is not
participating etc.
• iBurst ™ is a registered trademark of ArrayComm, Inc.
• Mac OS X is a registered trademark of Apple Computer, Inc.
• Windows is a registered trademark of Microsoft Corporation.
• In addition, the name of the software carried in this document and peripheral equipment is
each company’s trademark, or a registered trademark.
Kyocera Corporation Revision 1.01 --- June.08.2006
- 4 -
Page 5

iBurst Modem Card Model (UTC) Manual
iBurst Modem Card Model (UTC) Manual
iBurst Modem Card Model (UTC) Manual iBurst Modem Card Model (UTC) Manual
• For your safety
-------- Danger
(If used improperly, may cause death or serious injury.)
• Do not use with an abnormal condition, such as with emission of smoke or odor. It may
• Do not disassemble or remodel the product. It may cause fire or electrical shock.
• Do not use or place the product at places with high humidity such as in the bath room or
Danger --------
Danger Danger
cause fire or electric shock.
near the humidifier. It may cause fire or electric shock. And do not touch the product with
wet hands.
--------
----------------
Kyocera Corporation Revision 1.01 --- June.08.2006
- 5 -
Page 6

iBurst Modem Card Model (UTC) Manual
iBurst Modem Card Model (UTC) Manual
iBurst Modem Card Model (UTC) Manual iBurst Modem Card Model (UTC) Manual
------- Warning
Warning --------
Warning Warning
(If used improperly, may cause disability or physical damage.)
• Do not give a shock strong against the product, such as dropping and throwing. It becomes
the cause of failure. Moreover, do not ride on the product. It may become the cause of an
injury.
• Do not put the product under direct sunshine or near equipment with high temperature
such as a stove and a heater. It may raise the temperature of the interior and cause fire.
• Do not put the product at places with an extreme fluctuation of temperature, such as near
the air conditioner or a heater. The dew condensation may occur in the interior and cause
fire, electrical shock, and malfunction.
• Do not put the product at places with oil and steams such as in the kitchen. In addition, do
not put it at dusty places and places where metal powder and toxic gas occur. It may cause
fire or electric shock.
• Do not place the product on unstable places such as on an unsteady desk or slanted
surfaces. In addition, do not put any object on the product. It may loose balance and tumble,
or fall and cause injury.
• When the thunder occurs in near, do not use the product and its peripheral equipment. It
may become the cause of an electric shock.
• Do not touch the connector pins directly with your hands. Static electricity may affect the
components. As static electricity is created from both the cloth and the human body, before
putting or removing the product, release static electricity by touching a metal object such
as a small cabinet.
• Do not use it in the intense place of vibration. It becomes the cause of failure.
--------
----------------
Kyocera Corporation Revision 1.01 --- June.08.2006
- 6 -
Page 7

iBurst Modem Card Model (UTC) Manual
iBurst Modem Card Model (UTC) Manual
iBurst Modem Card Model (UTC) Manual iBurst Modem Card Model (UTC) Manual
-------- Caution
• Do not put the product at low temperature. The product may not function properly.
• Do not put the product on the top of magnetic objects and places where electromagnetic
• The product lifetime may shorten if used at places with hydrogen sulfide such as at a hot
• Data communication will be disabled or a data file may corrupt if the PC is turned off or the
Caution --------
CautionCaution
(If treated improperly, the equipment may not perform or work properly.)
waves occur. This includes electrical appliances, AV, and OA (microwave oven, speaker, TV,
radio, fluorescent light, inverter air conditioner, and electric kitchen appliances). The
product will not be able to make communication properly if effected by magnetism or
electronic noise. Putting the product near TV or radio may cause RF receive error.
spring.
product is separated from the PC during the communication. Important data must be
verified against the original data.
Kyocera Corporation Revision 1.01 --- June.08.2006
- 7 -
Page 8

Chapter 1 Introduction
Chapter 1 Introduction
Chapter 1 IntroductionChapter 1 Introduction
This chapter
This chapter describes what should be confirmed
This chapter This chapter
using iBurst
using iBurst Modem
using iBurst using iBurst
iBurst Modem Card Model (UTC) Manual
iBurst Modem Card Model (UTC) Manual
iBurst Modem Card Model (UTC) Manual iBurst Modem Card Model (UTC) Manual
describes what should be confirmed before
describes what should be confirmed describes what should be confirmed
Modem....
ModemModem
before
before before
7
Kyocera Corporation Revision 1.01 --- June.08.2006
- 8 -
Page 9
iBurst Modem Card Model (UTC) Manual
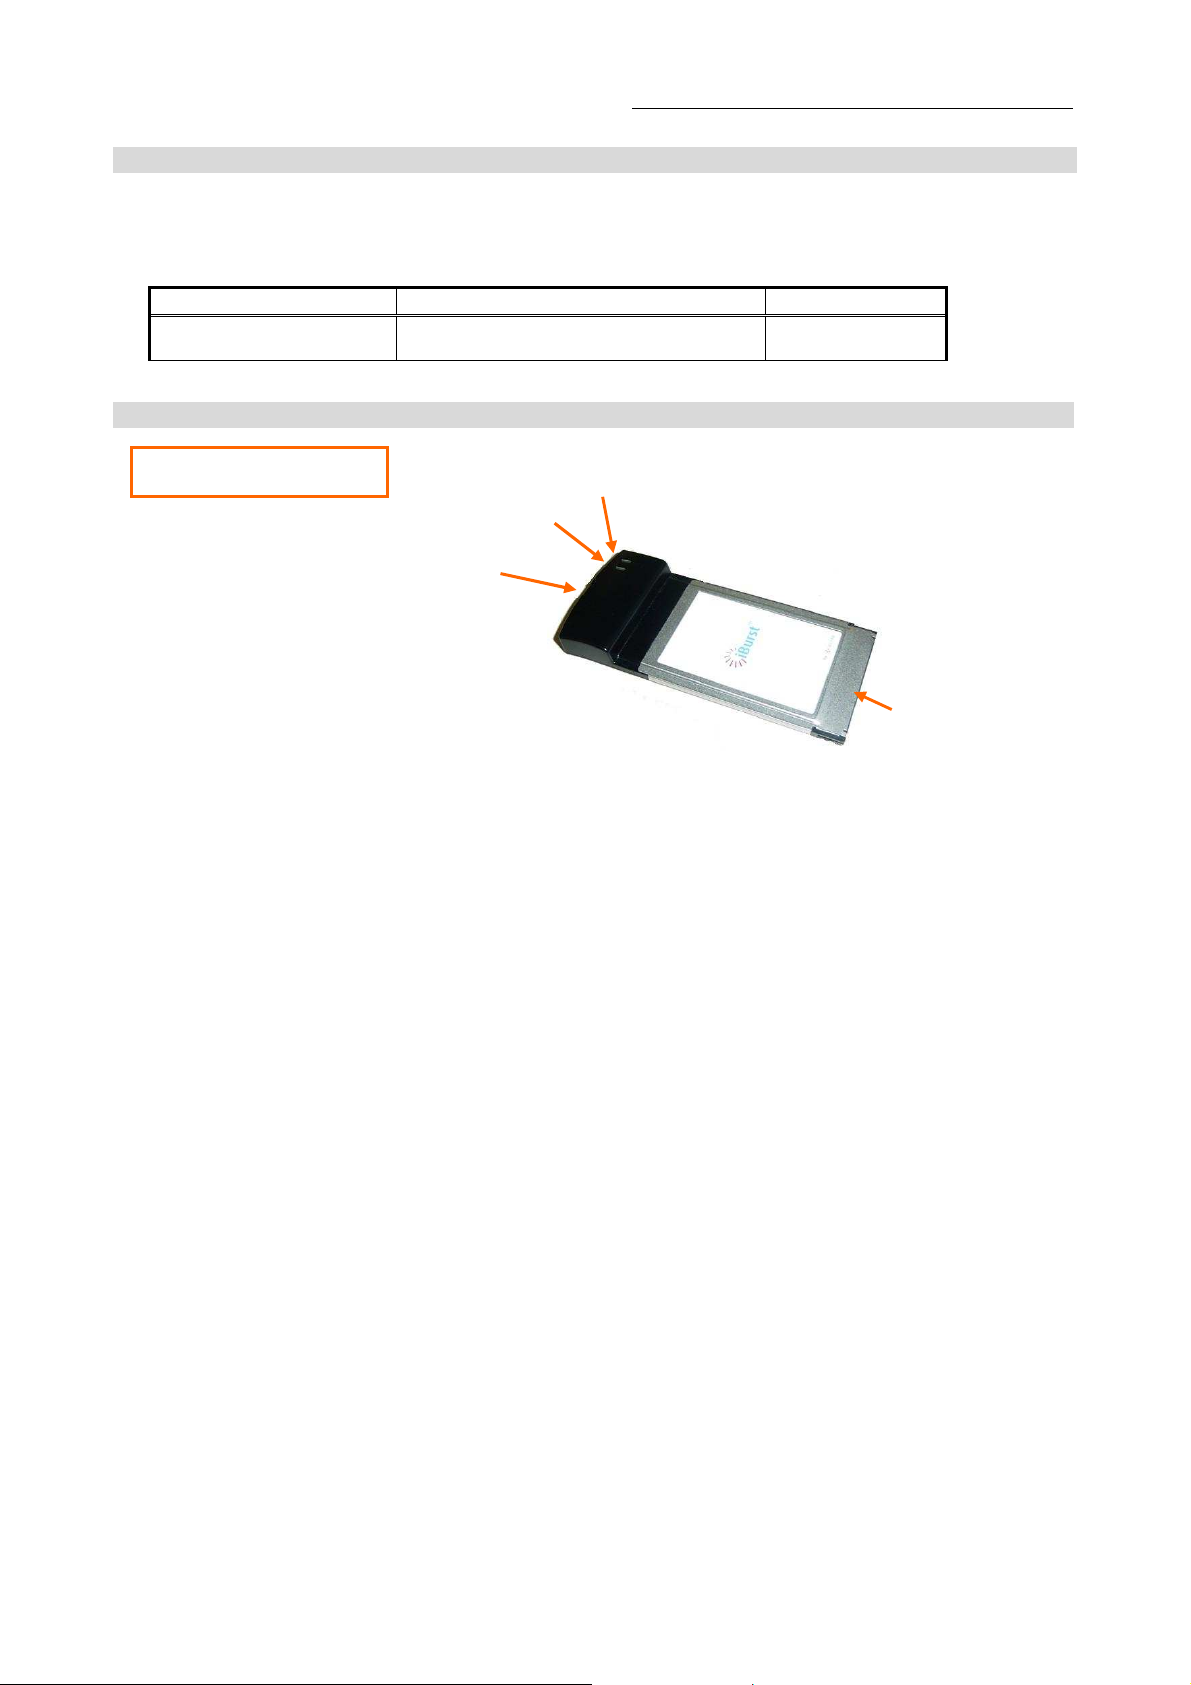
External antenna port
Power Indicator
Link/Communication Indicator
iBurst Modem Card Model (UTC) Manual
iBurst Modem Card Model (UTC) Manual iBurst Modem Card Model (UTC) Manual
Components List
Components List
Components List Components List
The table below shows the list of components. Please confirm items in the package.
UTC model
Component
Component Notes
ComponentComponent
iBurst Modem UTC model Refer to the pictures shown
below.
Notes Q’
NotesNotes
Q’ty
Q’Q’
1
ty
tyty
Outlook of iBurst
Outlook of iBurst Modem
Outlook of iBurst Outlook of iBurst
Modem
Modem Modem
UTC model
PC card connector
Kyocera Corporation Revision 1.01 --- June.08.2006
- 9 -
Page 10

iBurst Modem Card Model (UTC) Manual
iBurst Modem Card Model (UTC) Manual
iBurst Modem Card Model (UTC) Manual iBurst Modem Card Model (UTC) Manual
Requirements on your PC
Requirements on your PC
Requirements on your PCRequirements on your PC
• PC/AT Compatible PC with WindowsXP/2000/Me/98SE; or
version 10.1.5 or later version of Mac OS X except Mac Intel model.
• PCMCIA Type II slot complied with the PC card standard 95 or later.
Outlook to use the
Outlook to use the iBurst
Outlook to use theOutlook to use the
iBurst Modem
iBurst iBurst
Modem
ModemModem
A UTC model shall be plugged into a PC card slot of your PC. Before inserting it, you have to
install iBurst software which includes device drivers. Please read through every sections related
with the operating system for details.
Insertion of iBurst Modem
iBurst Modem
PC card slot
Indicator
Indicators
IndicatorIndicator
s
s s
The table below describes meaning of each indicator.
Indicator State Meaning
Power Indicator OFF Turned OFF
Blue Turned ON
Red Fault
Link/Communication Indicator OFF Turned OFF
Amber No signal receiving
Yellow Weak signal receiving
Blinking when communicating.
Green Strong signal receiving
Blinking when communicating.
Kyocera Corporation Revision 1.01 --- June.08.2006
- 10 -
Page 11

Cha
Chapter 2 Setup Procedure
ChaCha
pter 2 Setup Procedure
pter 2 Setup Procedurepter 2 Setup Procedure
iBurst Modem Card Model (UTC) Manual
iBurst Modem Card Model (UTC) Manual
iBurst Modem Card Model (UTC) Manual iBurst Modem Card Model (UTC) Manual
This chapter describes how to install
This chapter describes how to install iBurst software,
This chapter describes how to install This chapter describes how to install
guides you how to make a network connection so as
guides you how to make a network connection so as to use
guides you how to make a network connection so asguides you how to make a network connection so as
data communication service.
data communication service.
data communication service.data communication service.
iBurst software, then
iBurst software,iBurst software,
then
then then
to use
to use to use
Kyocera Corporation Revision 1.01 --- June.08.2006
- 11 -
Page 12
iBurst Modem Card Model (UTC) Manual
iBurst Modem Card Model (UTC) Manual
iBurst Modem Card Model (UTC) Manual iBurst Modem Card Model (UTC) Manual
iBurst Software Installatio
iBurst Software Installation
iBurst Software InstallatioiBurst Software Installatio
This section shows the procedure to install iBurst software on your PC for utilizing iBurst Modem.
The procedure shall be done once before using it.
n
n n
Installation for Windows XP
Installation for Windows XP
Installation for Windows XPInstallation for Windows XP
ATTENTION: Don’t choose “PCIC Compatible” mode of PC card controller in BIOS menu if
your PC has such menu. Please choose “Auto-Selected” or “CardBus/16bit” if
BIOS has it. There is a case that some models of PCs cannot drive iBurst
Modem due to BIOS or PC card driver problem.
1. Make sure to remove the iBurst Modem from your PC.
ATTENTION:
Don
Don’’’’t
t plug
plug the
the iBurst Modem
DonDon
t t
plugplug
iBurst Modem into
the the
iBurst ModemiBurst Modem
into your PC until
your PC until completion of installation.
into into
your PC until your PC until
completion of installation.
completion of installation.completion of installation.
2. Turn your PC on.
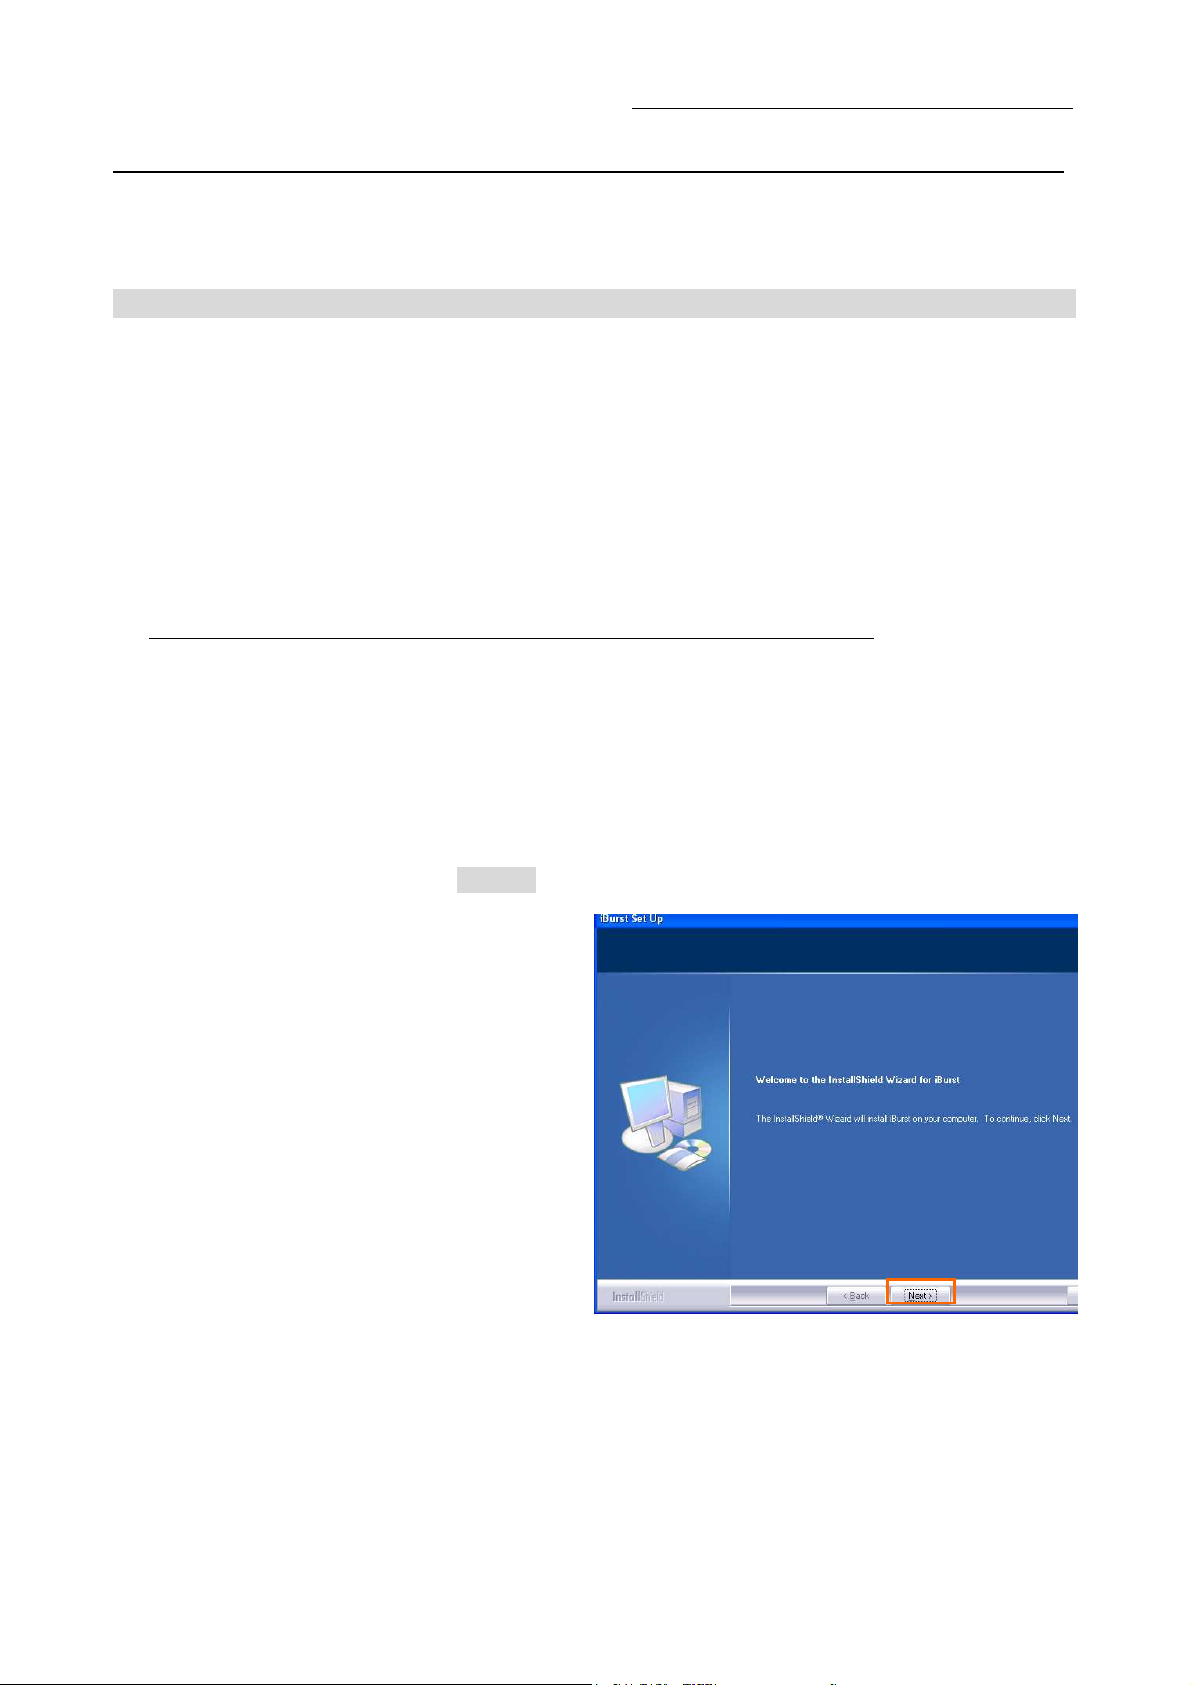
3. Insert the Software Utility CD provided by the network operator into your CD-ROM drive; or
execute the appropriate installation software.
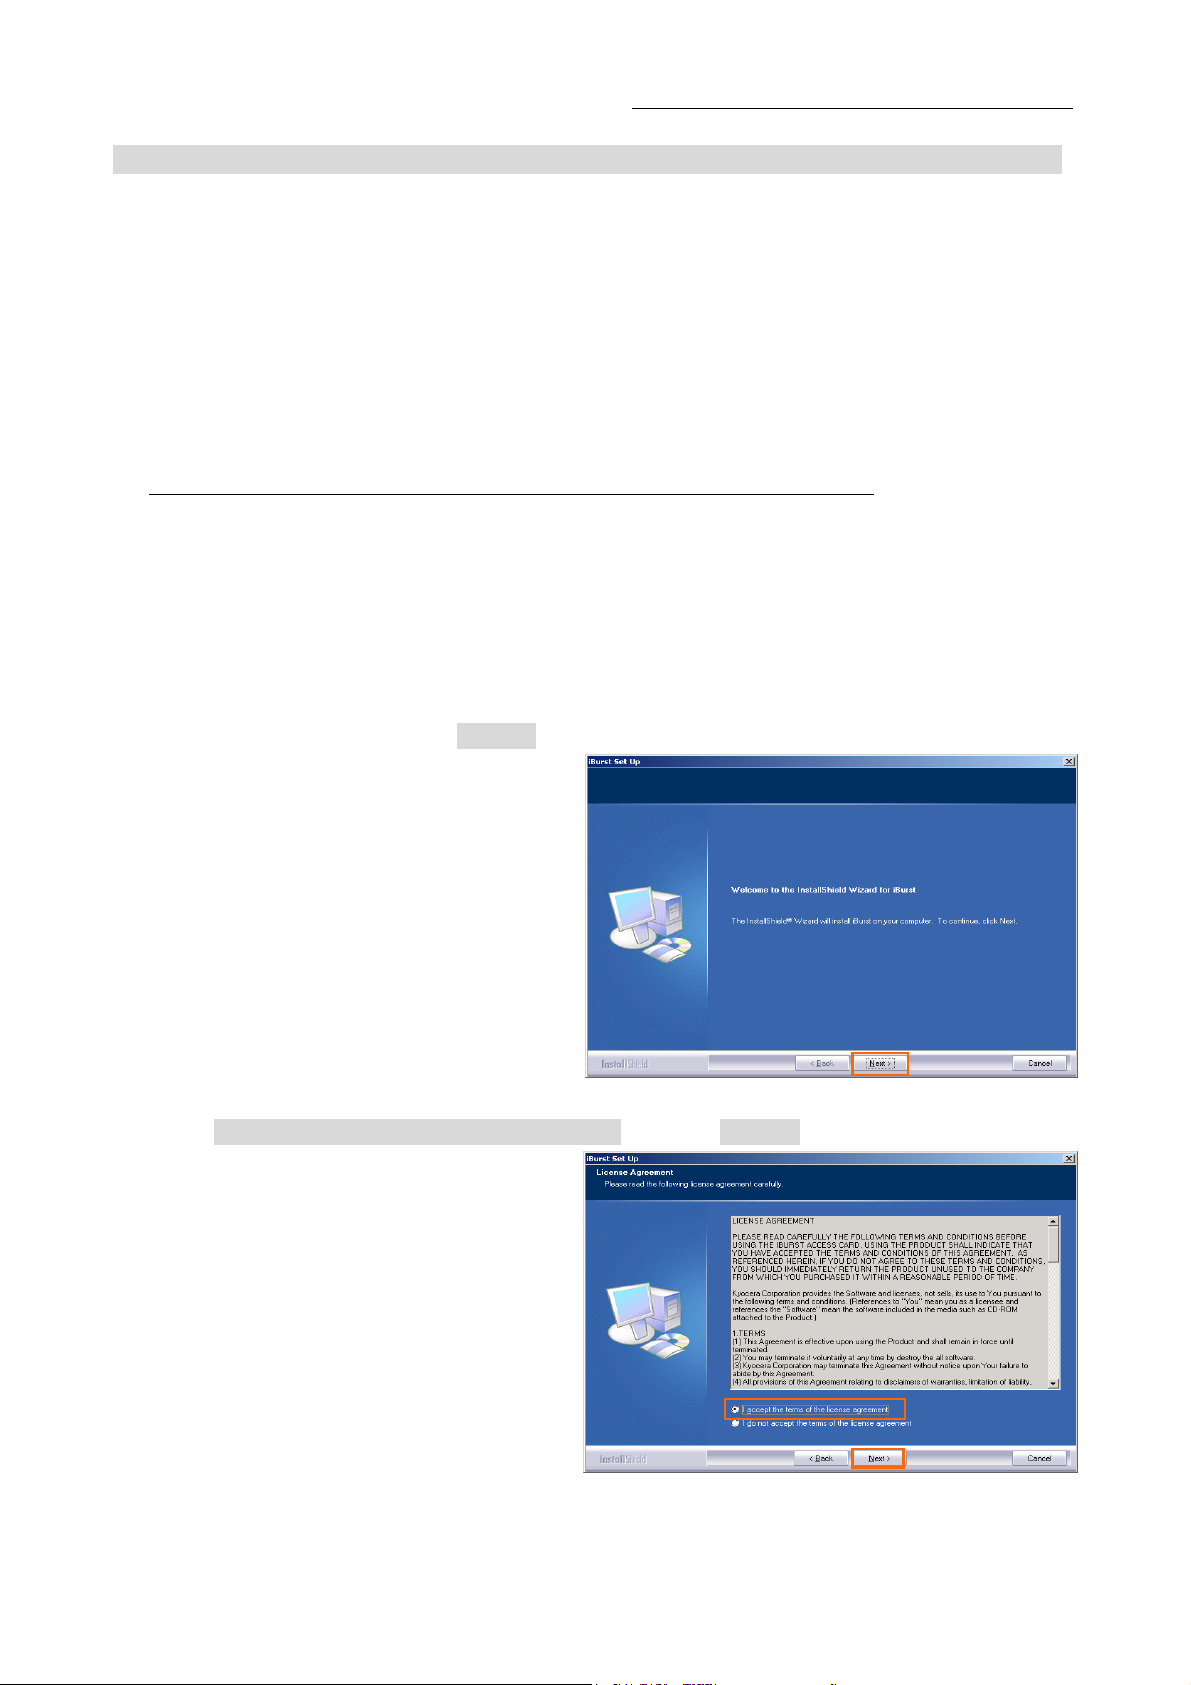
4. iBurst Setup starts. Click the [Next >] button.
Kyocera Corporation Revision 1.01 --- June.08.2006
- 12 -
Page 13

iBurst Modem Card Model (UTC) Manual
iBurst Modem Card Model (UTC) Manual
iBurst Modem Card Model (UTC) Manual iBurst Modem Card Model (UTC) Manual
5. Select [I accept the terms the license agreement], click the [Next >] button.
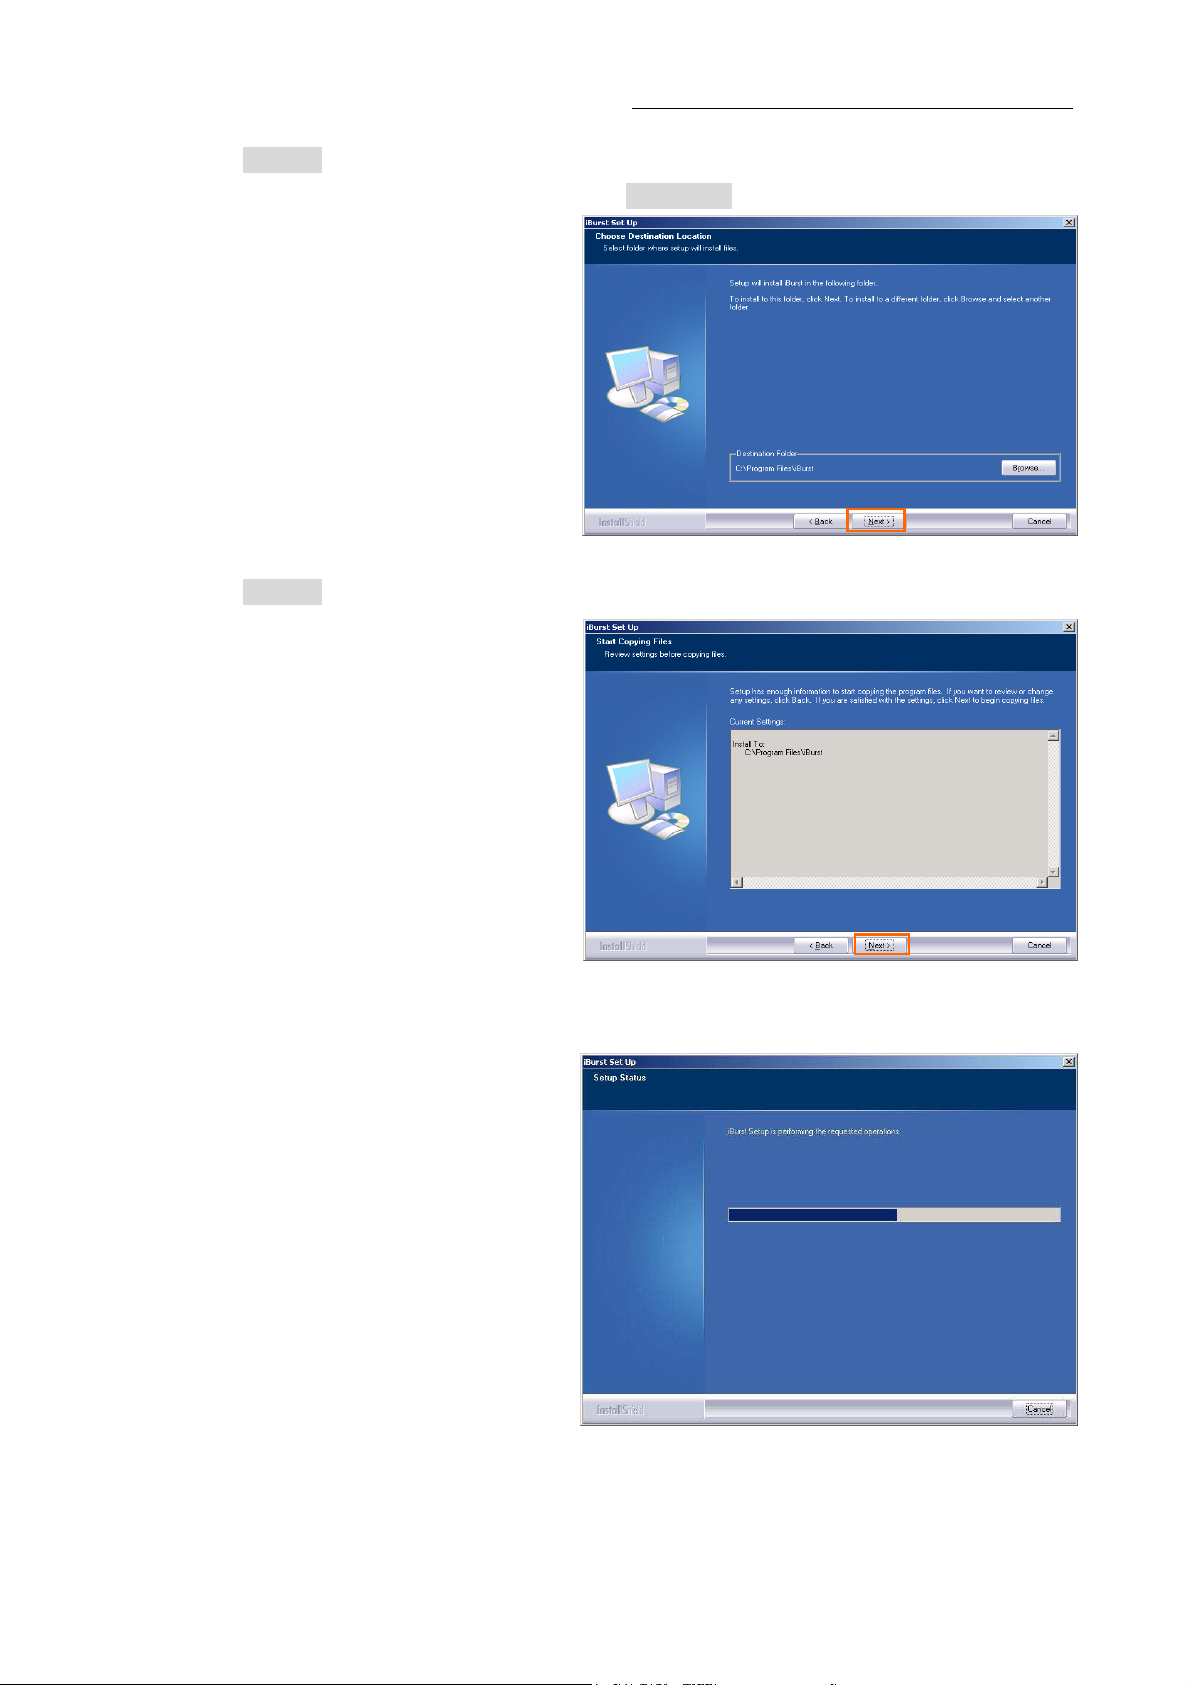
6. Click the [Next >] button after appearing dialog window as shown below.
NOTE: To install to a different folder, click [Browse…] and specify another folder.
7. Click the [Next >] button.
Kyocera Corporation Revision 1.01 --- June.08.2006
- 13 -
Page 14
iBurst Modem Card Model (UTC) Manual
iBurst Modem Card Model (UTC) Manual
iBurst Modem Card Model (UTC) Manual iBurst Modem Card Model (UTC) Manual
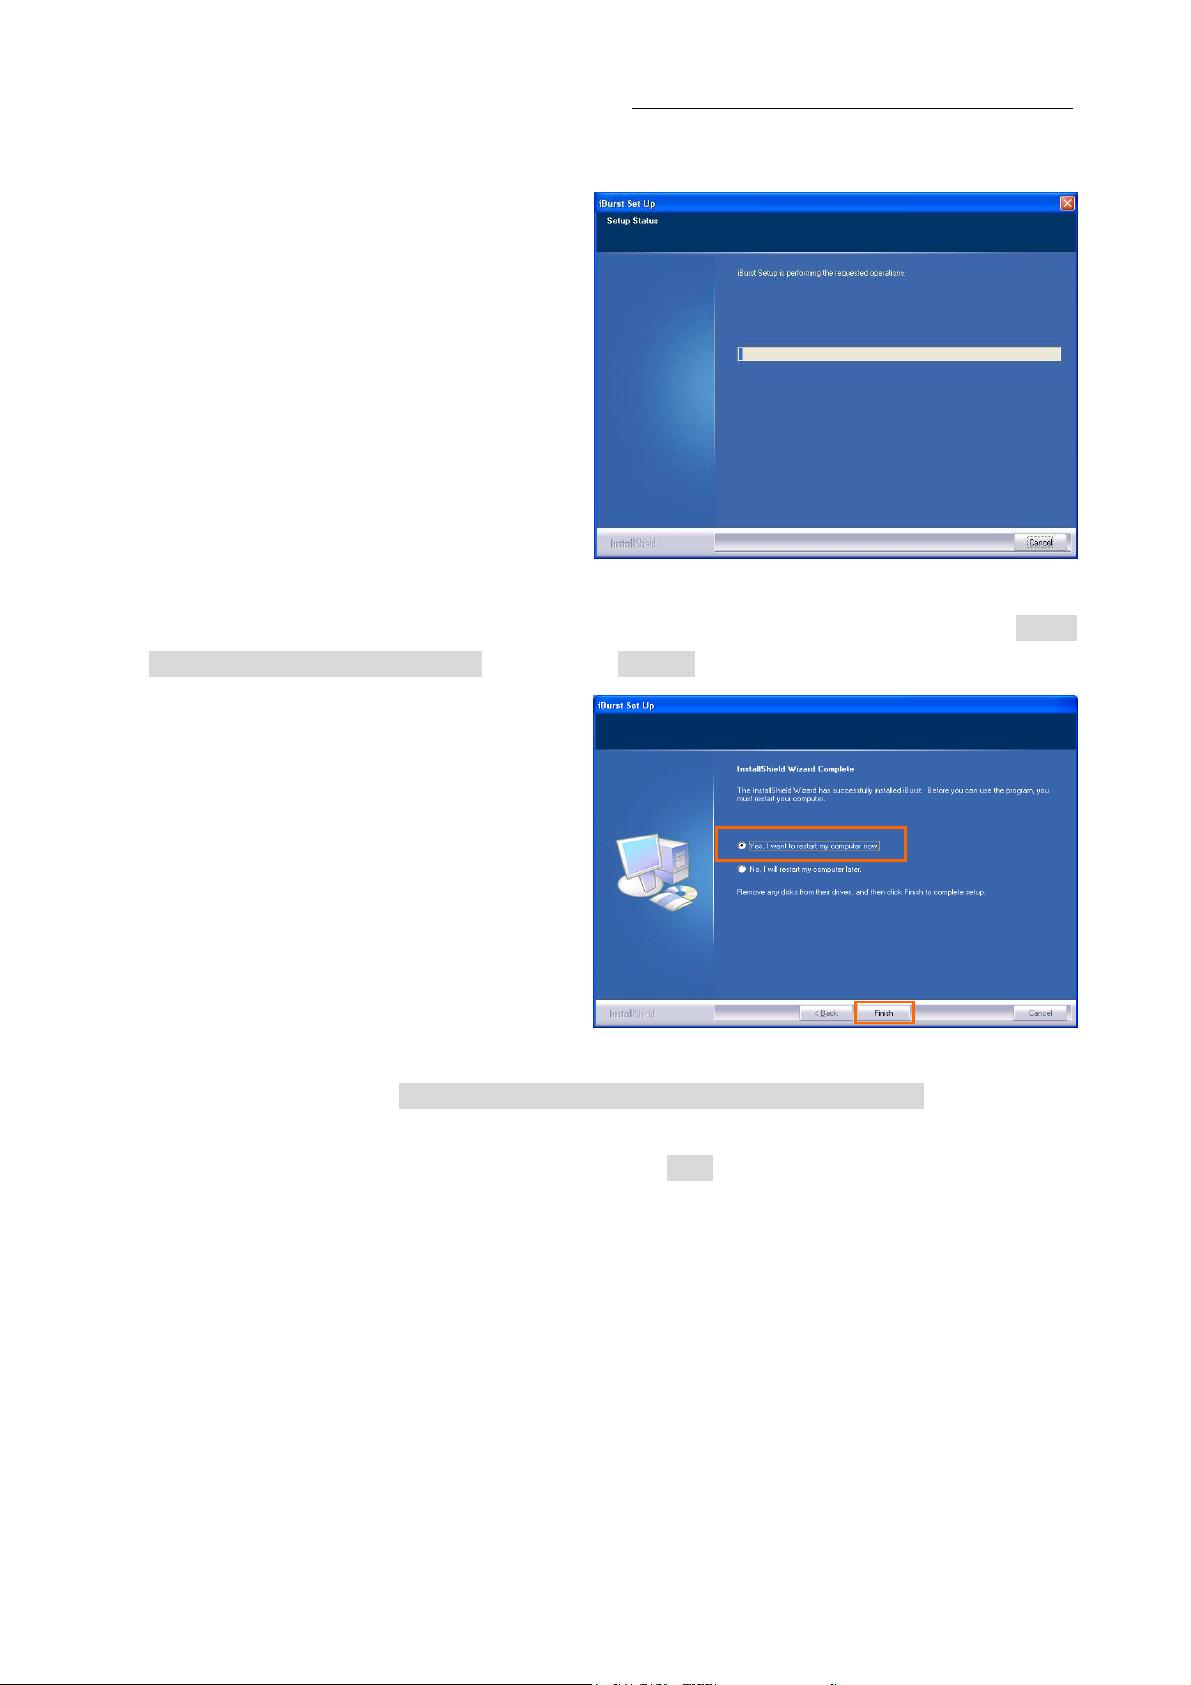
8. The following dialog window will appear, and installation of software begins.
9. When the installing process finishes, the dialog window shown below will appear. Select “Yes, I
want to restart my computer now” and click the [Finish] button in the dialog window.
10. After finish of restarting, plug the iBurst Modem into a PC card slot of your PC.
The iBurst Modem will be recognized and will be ready to use automatically.
NOTE: If the PC request to restart again, click [Yes] to restart the PC.
NOTE: To connect to the Internet, refer to page 59.
Kyocera Corporation Revision 1.01 --- June.08.2006
- 14 -
Page 15
iBurst Modem Card Model (UTC) Manual
iBurst Modem Card Model (UTC) Manual
iBurst Modem Card Model (UTC) Manual iBurst Modem Card Model (UTC) Manual
Installation for Windows 2000
Installation for Windows 2000
Installation for Windows 2000Installation for Windows 2000
ATTENTION: Don’t choose “PCIC Compatible” mode of PC card controller in BIOS menu if
your PC has such menu. Please choose “Auto-Selected” or “CardBus/16bit” if
BIOS has it. There is a case that some models of PCs cannot drive iBurst
Modem due to BIOS or PC card driver problem.
1. Make sure to remove the iBurst Modem from your PC.
ATTENTION:
Don
Don’’’’t
t plug
plug the
the iBurst Modem
DonDon
t t
plugplug
2. Turn your PC on.
3. Insert the Software Utility CD provided by the network operator into your CD-ROM drive; or
execute the appropriate installation software.
iBurst Modem into
the the
iBurst ModemiBurst Modem
into your PC until completion of installation.
your PC until completion of installation.
into into
your PC until completion of installation.your PC until completion of installation.
4. iBurst Setup starts. Click the [Next >] button.
5. Select [I accept the terms the license agreement], click the [Next >] button.
Kyocera Corporation Revision 1.01 --- June.08.2006
- 15 -
Page 16
iBurst Modem Card Model (UTC) Manual
iBurst Modem Card Model (UTC) Manual
iBurst Modem Card Model (UTC) Manual iBurst Modem Card Model (UTC) Manual
6. Click the [Next >] button after appearing dialog window as shown below.
NOTE: To install to a different folder, click [Browse…] and specify another folder.
7. Click the [Next >] button.
8. The following dialog window will appear, and installation of software begins.
Kyocera Corporation Revision 1.01 --- June.08.2006
- 16 -
Page 17

iBurst Modem Card Model (UTC) Manual
iBurst Modem Card Model (UTC) Manual
iBurst Modem Card Model (UTC) Manual iBurst Modem Card Model (UTC) Manual
9. When the installing process finishes, the dialog window shown below will appear. Select [Yes, I
want to restart my computer now] and click the [Finish] button in the dialog window.
10. After finish of restarting, plug the iBurst Modem into a PC card slot of your PC.
The iBurst Modem will be recognized and will be ready to use automatically.
NOTE: If the PC request to restart again, click [Yes] to restart the PC.
NOTE: To connect to the Internet, refer to page 64.
Kyocera Corporation Revision 1.01 --- June.08.2006
- 17 -
Page 18

iBurst Modem Card Model (UTC) Manual
iBurst Modem Card Model (UTC) Manual
iBurst Modem Card Model (UTC) Manual iBurst Modem Card Model (UTC) Manual
Installation for Windows M
Installation for Windows Me
Installation for Windows MInstallation for Windows M
ATTENTION: Don’t choose “PCIC Compatible” mode of PC card controller in BIOS menu if
your PC has such menu. Please choose “Auto-Selected” or “CardBus/16bit” if
BIOS has it. There is a case that some models of PCs cannot drive iBurst
Modem due to BIOS or PC card driver problem.
e
e e
Since t
Since the installation disk of W
Since tSince t
prepare
prepare th
prepare prepare
1. Make sure to remove the iBurst Modem from your PC.
he installation disk of Windows
he installation disk of Whe installation disk of W
the CD or copy the CD
e CD or copy the CD into
thth
e CD or copy the CDe CD or copy the CD
indows Me
indowsindows
into a hard disk in your PC
a hard disk in your PC for it.
intointo
a hard disk in your PC a hard disk in your PC
Me may
may b
MeMe
maymay
be
e required while
required while driver installation, please
b b
e e
required while required while
for it.
for it.for it.
driver installation, please
driver installation, please driver installation, please
ATTENTION: Don
2. Turn your PC on.
3. Insert the Software Utility CD provided by the network operator into your CD-ROM drive; or
execute the appropriate installation software.
4. iBurst Setup starts. Click the [Next >] button.
Don’’’’t
DonDon
t plug
plug the
the iBurst Modem
t t
plugplug
iBurst Modem into
the the
iBurst ModemiBurst Modem
into your PC until completion of installation.
your PC until completion of installation.
into into
your PC until completion of installation.your PC until completion of installation.
5. Select [I accept the terms the license agreement], click the [Next >] button.
Kyocera Corporation Revision 1.01 --- June.08.2006
- 18 -
Page 19

iBurst Modem Card Model (UTC) Manual
iBurst Modem Card Model (UTC) Manual
iBurst Modem Card Model (UTC) Manual iBurst Modem Card Model (UTC) Manual
6. Click the [Next >] button after appearing dialog window as shown below.
NOTE: To install to a different folder, click [Browse…] and specify another folder.
7. Click the [Next >] button.
8. The following dialog window will appear, and installation of software begins.
Kyocera Corporation Revision 1.01 --- June.08.2006
- 19 -
Page 20

iBurst Modem Card Model (UTC) Manual
iBurst Modem Card Model (UTC) Manual
iBurst Modem Card Model (UTC) Manual iBurst Modem Card Model (UTC) Manual
9. Click the [Finish] button.
10. Plug the iBurst Modem into a PC card slot of your PC.
Windows will detect the iBurst Modem as a new hardware so that [Add New Hardware
Wizard] will begin.
11. Confirm the device name indicated shall be [iBurst Modem] or [iBurst Modem Type 02-01].
Select [Specify the location of the driver (Advanced)] and click the [Next >] button in the dialog
window.
The device name detected shall be;
“Kyocera Corporation-iBurst Modem” or
“Kyocera Corporation-iBurst Modem Type 02-01”.
Kyocera Corporation Revision 1.01 --- June.08.2006
- 20 -
Page 21

iBurst Modem Card Model (UTC) Manual
iBurst Modem Card Model (UTC) Manual
iBurst Modem Card Model (UTC) Manual iBurst Modem Card Model (UTC) Manual
12. Select [Search for the best driver for your device.(Recommended)], then check [Specify a
location] and click the [Browse] button.
13. Select [C:\Program Files\iBurst\bin], and click the [OK] button.
14. Click the [Next >] button.
Kyocera Corporation Revision 1.01 --- June.08.2006
- 21 -
Page 22

iBurst Modem Card Model (UTC) Manual
iBurst Modem Card Model (UTC) Manual
iBurst Modem Card Model (UTC) Manual iBurst Modem Card Model (UTC) Manual
15. Confirm the driver file name indicated shall be [NETIBST.INF] or [NETIBT21.INF].
Click the [Next >] button.
The device name detected shall be;
“iBurst Modem” or
“iBurst Modem Type 02-01”.
The driver file name shall be;
“NETIBST.INF” or
“NETIBT21.INF”.
16. Click the [Finish] button.
The name of the network adaptor shall be;
“iBurst Modem” or
“iBurst Modem Type 02-01”.
17. The dialog window shown below will appear, click the [Yes] button, and restart your PC.
NOTE: If the PC doesn’t shutdown itself, try to press Alt+Ctrl+Del keys several times.
Kyocera Corporation Revision 1.01 --- June.08.2006
- 22 -
Page 23

iBurst Modem Card Model (UTC) Manual
iBurst Modem Card Model (UTC) Manual
iBurst Modem Card Model (UTC) Manual iBurst Modem Card Model (UTC) Manual
18. Click the [Start] -> [Settings] -> [Control Panel] to open Control Panel as shown below, and
then double click [Add New Hardware].
19. Click the [Next >] button.
20. Click the [Next >] button.
Kyocera Corporation Revision 1.01 --- June.08.2006
- 23 -
Page 24

iBurst Modem Card Model (UTC) Manual
iBurst Modem Card Model (UTC) Manual
iBurst Modem Card Model (UTC) Manual iBurst Modem Card Model (UTC) Manual
NOTE: If the dialog window shown below appears, select [No, the device isn’t in the list]
and click the [Next >] button.
21. Select [No, I want to select the hardware from a list], and click the [Next >] button.
22. Select [Ports (COM & LPT)], and click the [Next >] button.
Kyocera Corporation Revision 1.01 --- June.08.2006
- 24 -
Page 25

23. Click the [Have Disk..] button.
24. Click the [Browse...] button.
iBurst Modem Card Model (UTC) Manual
iBurst Modem Card Model (UTC) Manual
iBurst Modem Card Model (UTC) Manual iBurst Modem Card Model (UTC) Manual
25. Select [C:\Program Files\iBurst\bin], and click the [OK] button.
NOTE: You don’t have to select a file name. Windows will find an appropriate file
automatically.
Kyocera Corporation Revision 1.01 --- June.08.2006
- 25 -
Page 26

iBurst Modem Card Model (UTC) Manual
iBurst Modem Card Model (UTC) Manual
iBurst Modem Card Model (UTC) Manual iBurst Modem Card Model (UTC) Manual
26. Click the [OK] button.
27. Select [iBurst Virtual COM Port], and click the [Next >] button.
28. Click the [Next >] button.
Kyocera Corporation Revision 1.01 --- June.08.2006
- 26 -
Page 27

29. Click the [Finish] button.
iBurst Modem Card Model (UTC) Manual
iBurst Modem Card Model (UTC) Manual
iBurst Modem Card Model (UTC) Manual iBurst Modem Card Model (UTC) Manual
30. The dialog window shown below will appear, click the [Yes] button to SHUTDOWN
NOTE: If the PC doesn’t shutdown itself, try to press Alt+Ctrl+Del keys several times.
31. Turn your PC on again.
SHUTDOWN your PC.
SHUTDOWNSHUTDOWN
Kyocera Corporation Revision 1.01 --- June.08.2006
- 27 -
Page 28

iBurst Modem Card Model (UTC) Manual
iBurst Modem Card Model (UTC) Manual
iBurst Modem Card Model (UTC) Manual iBurst Modem Card Model (UTC) Manual
32. Click the [Start] -> [Settings] -> [Control Panel] to open Control Panel as shown below, and
then double click [Modems].
NOTE: If the dialog window as shown below appears, click the [Add] button.
Kyocera Corporation Revision 1.01 --- June.08.2006
- 28 -
Page 29

iBurst Modem Card Model (UTC) Manual
iBurst Modem Card Model (UTC) Manual
iBurst Modem Card Model (UTC) Manual iBurst Modem Card Model (UTC) Manual
33. Check [Don’t detect my modem; I will select it from a list], and click the [Next >] button.
34. Click the [Have Disk...] button.
35. Click the [Browse…] button.
Kyocera Corporation Revision 1.01 --- June.08.2006
- 29 -
Page 30

iBurst Modem Card Model (UTC) Manual
iBurst Modem Card Model (UTC) Manual
iBurst Modem Card Model (UTC) Manual iBurst Modem Card Model (UTC) Manual
36. Select [C:\Program Files\iBurst\bin], and click the [OK] button.
NOTE: You don’t have to select a file name. Windows will find an appropriate file
automatically.
37. Click the [OK] button.
38. Select [iBurst Virtual MODEM], and click the [Next >] button.
Kyocera Corporation Revision 1.01 --- June.08.2006
- 30 -
Page 31

iBurst Modem Card Model (UTC) Manual
iBurst Modem Card Model (UTC) Manual
iBurst Modem Card Model (UTC) Manual iBurst Modem Card Model (UTC) Manual
39. Select [iBurst Virtual COM Port (COM X)], and click the [Next >] button.
NOTE: The ‘X’ in “COM X” above is a COM port number assigned automatically.
NOTE: If the dialog window as shown below appears, type a dummy number in “What
are (or city) code are you in now ?” and then click the [Next >] button.
40. Click the [Finish] button.
Kyocera Corporation Revision 1.01 --- June.08.2006
- 31 -
Page 32

41. Click the [OK] button.
iBurst Modem Card Model (UTC) Manual
iBurst Modem Card Model (UTC) Manual
iBurst Modem Card Model (UTC) Manual iBurst Modem Card Model (UTC) Manual
42. Click the [Start] -> [Settings] -> [Control Panel] to open Control Panel as shown below, and
then double click [Network].
Kyocera Corporation Revision 1.01 --- June.08.2006
- 32 -
Page 33

43. Click the [Add…] button on [Configuration] tab.
The name of a network adaptor shall be;
“iBurst Modem” or
“iBurst Modem Type 02-01”.
iBurst Modem Card Model (UTC) Manual
iBurst Modem Card Model (UTC) Manual
iBurst Modem Card Model (UTC) Manual iBurst Modem Card Model (UTC) Manual
44. Select [Protocol] and click the [Add…] button.
45. Click the [Have Disk…] button.
Kyocera Corporation Revision 1.01 --- June.08.2006
- 33 -
Page 34

iBurst Modem Card Model (UTC) Manual
iBurst Modem Card Model (UTC) Manual
iBurst Modem Card Model (UTC) Manual iBurst Modem Card Model (UTC) Manual
46. Click the [Browse…] button.
47. Select [C:\Program Files\iBurst\bin], and click the [OK] button.
NOTE: You don’t have to select a file name. Windows will find an appropriate file
automatically.
48. Click the [OK] button.
49. Select [NDIS(PPPoE) Usermode I/O Protocol], click the [OK] button.
Kyocera Corporation Revision 1.01 --- June.08.2006
- 34 -
Page 35

iBurst Modem Card Model (UTC) Manual
iBurst Modem Card Model (UTC) Manual
iBurst Modem Card Model (UTC) Manual iBurst Modem Card Model (UTC) Manual
NOTE: If the same dialog at step 45 is popped up again, cancel once and repeat from step
43.
50. Click the [OK] button.
NOTE: One of the protocols added shall be;
“NDIS(PPPoE) User mode I/O Protocol -> iBurst Modem”; or
“NDIS(PPPoE) User mode I/O Protocol -> iBurst Modem Type 02-01”.
51. The dialog window shown below will appear, click the [Yes] button, and restart your PC.
NOTE: If the PC doesn’t shutdown itself, try to press Alt+Ctrl+Del keys several times.
NOTE: To connect to the Internet, refer to page 64.
Kyocera Corporation Revision 1.01 --- June.08.2006
- 35 -
Page 36

iBurst Modem Card Model (UTC) Manual
iBurst Modem Card Model (UTC) Manual
iBurst Modem Card Model (UTC) Manual iBurst Modem Card Model (UTC) Manual
Installation for Windows 98SE
Installation for Windows 98SE
Installation for Windows 98SEInstallation for Windows 98SE
ATTENTION: Don’t choose “PCIC Compatible” mode of PC card controller in BIOS menu if
your PC has such menu. Please choose “Auto-Selected” or “CardBus/16bit” if
BIOS has it. There is a case that some models of PCs cannot drive iBurst
Modem due to BIOS or PC card driver problem.
Since t
Since the installation disk of WINDOWS 98SE
Since tSince t
prepare
prepare the CD or copy the
prepare prepare
1. Make sure to remove the iBurst Modem from your PC.
2. Turn your PC on.
he installation disk of WINDOWS 98SE may
he installation disk of WINDOWS 98SE he installation disk of WINDOWS 98SE
the CD or copy the CD into
the CD or copy the the CD or copy the
ATTENTION:
Don
Don’’’’t
t plug
plug the
the iBurst Modem
DonDon
t t
plugplug
iBurst Modem into
the the
iBurst ModemiBurst Modem
CD into a hard disk in your PC
CD into CD into
a hard disk in your PC for it.
a hard disk in your PC a hard disk in your PC
into your PC until completion of installation.
your PC until completion of installation.
into into
your PC until completion of installation.your PC until completion of installation.
may bbbbe
may may
e required while
required while driver installation, please
e e
required while required while
for it.
for it.for it.
driver installation, please
driver installation, please driver installation, please
3. Insert the Software Utility CD provided by the network operator into your CD-ROM drive; or
execute the appropriate installation software.
4. iBurst Setup starts. Click the [Next >] button.
5. Select [I accept the terms the license agreement], click the [Next >] button.
Kyocera Corporation Revision 1.01 --- June.08.2006
- 36 -
Page 37

iBurst Modem Card Model (UTC) Manual
iBurst Modem Card Model (UTC) Manual
iBurst Modem Card Model (UTC) Manual iBurst Modem Card Model (UTC) Manual
6. Click the [Next >] button after appearing dialog window as shown below.
NOTE: To install to a different folder, click [Browse…] and specify another folder.
7. Click the [Next >] button.
8. The following dialog window will appear, and installation of software begins.
Kyocera Corporation Revision 1.01 --- June.08.2006
- 37 -
Page 38

iBurst Modem Card Model (UTC) Manual
iBurst Modem Card Model (UTC) Manual
iBurst Modem Card Model (UTC) Manual iBurst Modem Card Model (UTC) Manual
9. Click the [Finish] button.
10. Plug the iBurst Modem into a PC card slot of your PC.
Windows will detect the iBurst Modem as a new hardware so that [Add New Hardware
Wizard] will begin.
11. Confirm the device name indicated shall be [iBurst Modem] or [iBurst Modem Type 02-01].
Click the [Next >] button.
The device name detected shall be;
“Kyocera Corporation-iBurst Modem” or
“Kyocera Corporation-iBurst Modem Type 02-01”.
Kyocera Corporation Revision 1.01 --- June.08.2006
- 38 -
Page 39

iBurst Modem Card Model (UTC) Manual
iBurst Modem Card Model (UTC) Manual
iBurst Modem Card Model (UTC) Manual iBurst Modem Card Model (UTC) Manual
12. Select [Search for the best driver for your device.(Recommended)], and then check the [Next >]
button.
13. Check [Specify a location] and click the [Browse] button.
14. Select [C:\Program Files\iBurst\bin], and click the [OK] button.
Kyocera Corporation Revision 1.01 --- June.08.2006
- 39 -
Page 40

iBurst Modem Card Model (UTC) Manual
iBurst Modem Card Model (UTC) Manual
iBurst Modem Card Model (UTC) Manual iBurst Modem Card Model (UTC) Manual
15. Click the [Next >] button.
16. Confirm the driver file name indicated shall be [NETIBST.INF] or [NETIBT21.INF].
Click the [Next >] button.
The device name detected shall be;
“iBurst Modem” or
“iBurst Modem Type 02-01”.
The driver file name shall be;
“NETIBST.INF” or
“NETIBT21.INF”.
NOTE: If the dialog window as shown below appears, insert [Windows 98SE CD-ROM]
into the CD-ROM drive and click the [OK] button.
Kyocera Corporation Revision 1.01 --- June.08.2006
- 40 -
Page 41

iBurst Modem Card Model (UTC) Manual
iBurst Modem Card Model (UTC) Manual
iBurst Modem Card Model (UTC) Manual iBurst Modem Card Model (UTC) Manual
NOTE: If the dialog window as shown below appears, insert [Windows 98SE CD-ROM]
into your PC and enter the directory of your [Windows 98SE CD-ROM], click the
[OK] button. “xxxxxxxx“ in the picture below is a file name that can not be
found.
17. Click the [Finish] button.
The name of the network adaptor shall be;
“iBurst Modem” or
“iBurst Modem Type 02-01”.
18. The dialog window shown below will appear, click the [Yes] button, and restart your PC.
NOTE: If the PC doesn’t shutdown itself, try to press Alt+Ctrl+Del keys several times.
Kyocera Corporation Revision 1.01 --- June.08.2006
- 41 -
Page 42

iBurst Modem Card Model (UTC) Manual
iBurst Modem Card Model (UTC) Manual
iBurst Modem Card Model (UTC) Manual iBurst Modem Card Model (UTC) Manual
19. Click the [Start] -> [Settings] -> [Control Panel] to open Control Panel as shown below, and
then double click [Add New Hardware].
20. Click the [Next >] button.
21. Click the [Next >] button.
Kyocera Corporation Revision 1.01 --- June.08.2006
- 42 -
Page 43

iBurst Modem Card Model (UTC) Manual
iBurst Modem Card Model (UTC) Manual
iBurst Modem Card Model (UTC) Manual iBurst Modem Card Model (UTC) Manual
NOTE: If the dialog window as shown below appears, select [No, the device isn’t in the
list] and click the [Next >] button.
22. Select [No, I want to select the hardware from a list.], and click the [Next >] button.
23. Select [Ports (COM & LPT)], and click the [Next >] button.
Kyocera Corporation Revision 1.01 --- June.08.2006
- 43 -
Page 44

24. Click the [Have Disk..] button.
25. Click the [Browse…] button.
iBurst Modem Card Model (UTC) Manual
iBurst Modem Card Model (UTC) Manual
iBurst Modem Card Model (UTC) Manual iBurst Modem Card Model (UTC) Manual
26. Select [C:\Program Files\iBurst\bin], and click the [OK] button.
NOTE: You don’t have to select a file name. Windows will find an appropriate file
automatically.
Kyocera Corporation Revision 1.01 --- June.08.2006
- 44 -
Page 45

iBurst Modem Card Model (UTC) Manual
iBurst Modem Card Model (UTC) Manual
iBurst Modem Card Model (UTC) Manual iBurst Modem Card Model (UTC) Manual
27. Click the [OK] button.
28. Select [iBurst Virtual COM Port], and click the [Next >] button.
29. Click the [Next >] button.
Kyocera Corporation Revision 1.01 --- June.08.2006
- 45 -
Page 46

iBurst Modem Card Model (UTC) Manual
iBurst Modem Card Model (UTC) Manual
iBurst Modem Card Model (UTC) Manual iBurst Modem Card Model (UTC) Manual
NOTE: If the dialog window as shown below appears, insert [Windows 98SE CD-ROM]
into the CD-ROM drive and click the [OK] button.
NOTE: If the dialog window as shown below appears, insert [Windows 98SE CD-ROM]
into your PC and enter the directory of your [Windows 98SE CD-ROM],click the
[OK] button. “xxxxxxxx“ in the picture below is a file name that can not be
found.
30. Click the [Finish] button.
31. The dialog window shown below will appear, click the [Yes] button to SHUTDOWN
SHUTDOWN your PC.
SHUTDOWNSHUTDOWN
NOTE: If the PC doesn’t shutdown itself, try to press Alt+Ctrl+Del keys several times.
Kyocera Corporation Revision 1.01 --- June.08.2006
- 46 -
Page 47

iBurst Modem Card Model (UTC) Manual
iBurst Modem Card Model (UTC) Manual
iBurst Modem Card Model (UTC) Manual iBurst Modem Card Model (UTC) Manual
32. Turn your PC on again.
33. Click the [Start] -> [Settings] -> [Control Panel] to open Control Panel as shown below, and
then double click [Modems].
NOTE: If the dialog window as shown below appears, click the [Add] button.
Kyocera Corporation Revision 1.01 --- June.08.2006
- 47 -
Page 48

iBurst Modem Card Model (UTC) Manual
iBurst Modem Card Model (UTC) Manual
iBurst Modem Card Model (UTC) Manual iBurst Modem Card Model (UTC) Manual
34. Select [Other], and click the [Next >] button.
35. Check [Don’t detect my modem, I will select it from a list] and click the [Next >] button.
36. Click the [Have Disk…] button.
Kyocera Corporation Revision 1.01 --- June.08.2006
- 48 -
Page 49

iBurst Modem Card Model (UTC) Manual
iBurst Modem Card Model (UTC) Manual
iBurst Modem Card Model (UTC) Manual iBurst Modem Card Model (UTC) Manual
37. Click the [Browse…] button.
38. Select [C:\Program Files\iBurst\bin], and click the [OK] button.
NOTE: You don’t have to select a file name. Windows will find an appropriate file
automatically.
39. Click the [OK] button.
40. Select [iBurst Virtual MODEM], and click the [Next >] button.
Kyocera Corporation Revision 1.01 --- June.08.2006
- 49 -
Page 50

iBurst Modem Card Model (UTC) Manual
iBurst Modem Card Model (UTC) Manual
iBurst Modem Card Model (UTC) Manual iBurst Modem Card Model (UTC) Manual
41. Select [iBurst Virtual COM Port (COM X)], and click the [Next >] button.
NOTE: The ‘X’ in “COM X” above is a COM port number assigned automatically.
NOTE: If the dialog window as shown below appears, type a dummy number in “What
are (or city) code are you in now ?” and then click the [Next >] button.
42. Click the [Finish] button.
Kyocera Corporation Revision 1.01 --- June.08.2006
- 50 -
Page 51

iBurst Modem Card Model (UTC) Manual
iBurst Modem Card Model (UTC) Manual
iBurst Modem Card Model (UTC) Manual iBurst Modem Card Model (UTC) Manual
43. Click the [OK] button.
44. Click the [Start] -> [Settings] -> [Control Panel] to open Control Panel as shown below, and
then double click [Network].
Kyocera Corporation Revision 1.01 --- June.08.2006
- 51 -
Page 52

45. Click the [Add] button on [Configuration] tab.
The name of a network adaptor shall be;
“iBurst Modem” or
“iBurst Modem Type 02-01”.
iBurst Modem Card Model (UTC) Manual
iBurst Modem Card Model (UTC) Manual
iBurst Modem Card Model (UTC) Manual iBurst Modem Card Model (UTC) Manual
46. Select [Protocol] and click the [Add…] button.
47. Click the [Have Disk…] button.
Kyocera Corporation Revision 1.01 --- June.08.2006
- 52 -
Page 53

iBurst Modem Card Model (UTC) Manual
iBurst Modem Card Model (UTC) Manual
iBurst Modem Card Model (UTC) Manual iBurst Modem Card Model (UTC) Manual
48. Click the [Browse…] button.
49. Select [C:\Program Files\iBurst\bin], and click the [OK] button.
NOTE: You don’t have to select a file name. Windows will find an appropriate file
automatically.
50. Click the [OK] button.
Kyocera Corporation Revision 1.01 --- June.08.2006
- 53 -
 Loading...