

Page 1

2
Using a Web Browser to Manage the IB-51
2
Page 1 of 2
Using a Web Browser to Manage the IB-51
This section describes how to manage the IB-51 using a web browser.
1. IB
-51's Web Page Overview
2.Status Page
3.General Settings Page
4.Advanced Page
5.Troubleshooting
1. IB-51's Web Page Overview
Configure and monitor the IB-51 from the unit's internal webpage, through the IB-51's Web page. The IB-51's Web page is your web
interface for managing the IB-51 from your computer. The computer and IB-51 are linked via TCP/IP.
Note:
Confirm the following points before accessing the IB-51's Web page.
— Your computer must support TCP/IP.
— The IB-51's IP address must be configured.
1-1. Compatible Systems
The IB-51's Web page can be used with these operating systems.
— Windows 2000 (32bit)
— Windows XP (32bit/64bit)
— Windows Vista (32bit/64bit)
— Windows 7 (32bit/64bit)
— Windows Server 2003 (32bit/64bit)
— Windows Server 2008 (32bit/64bit)
— Apple Macintosh OS X 10.x
1-2. Compatible Web Browsers
The following web browsers have been verified for the IB-51's Web page.
OS
Windows Microsoft Internet Explorer 6.0 or newer
Mac OS Safari 2 or newer
Web Browser
Mozilla Firefox1.5 or newer
Chrome 1.0 or newer
Safari 2 or newer
1-3. Accessing IB-51's Web page
1. Launch a web browser.
2. In the address bar, enter the IP address assigned to the IB-51 as the URL. The home page gives basic information about the IB51 and shows the current status and control panel display.
3. Login to the IB-51's Web page by entering the user name and password.
file:///C:/Tom/PDF/IB-51/IB-51%20Setup%20Guide%20HTML%20English/card_homepa...
10/2/201
Page 2
A
2
Using a Web Browser to Manage the IB-51
2
Page 2 of 2
— If "Network Authentication" is disabled on the printer/MFP, the default user name and password are "
— If "Network Authentication" is enabled on the printer/MFP, the user name and password to be entered will change
depending on the configuration of Windows Server or printer/MFP.
For details, refer to the operation manual of the printer/MFP.
4. To view or configure settings, choose a category from the navigation bar on the left.
— Enclose the IPv6 address with "[ ]" before you enter it to the address bar of the Web browser.
Example: http://[FE80:0:0:0:2C0:EEFF:FE11:2233]/
2. Status Page
You can do the following from the Status Page.
— Change the display language of the IB-51's Web page
— Check the IB-51 network settings
— Check the IB-51's Wireless Settings
— Display the Web page of the printer/MFP that has the IB-51 attached
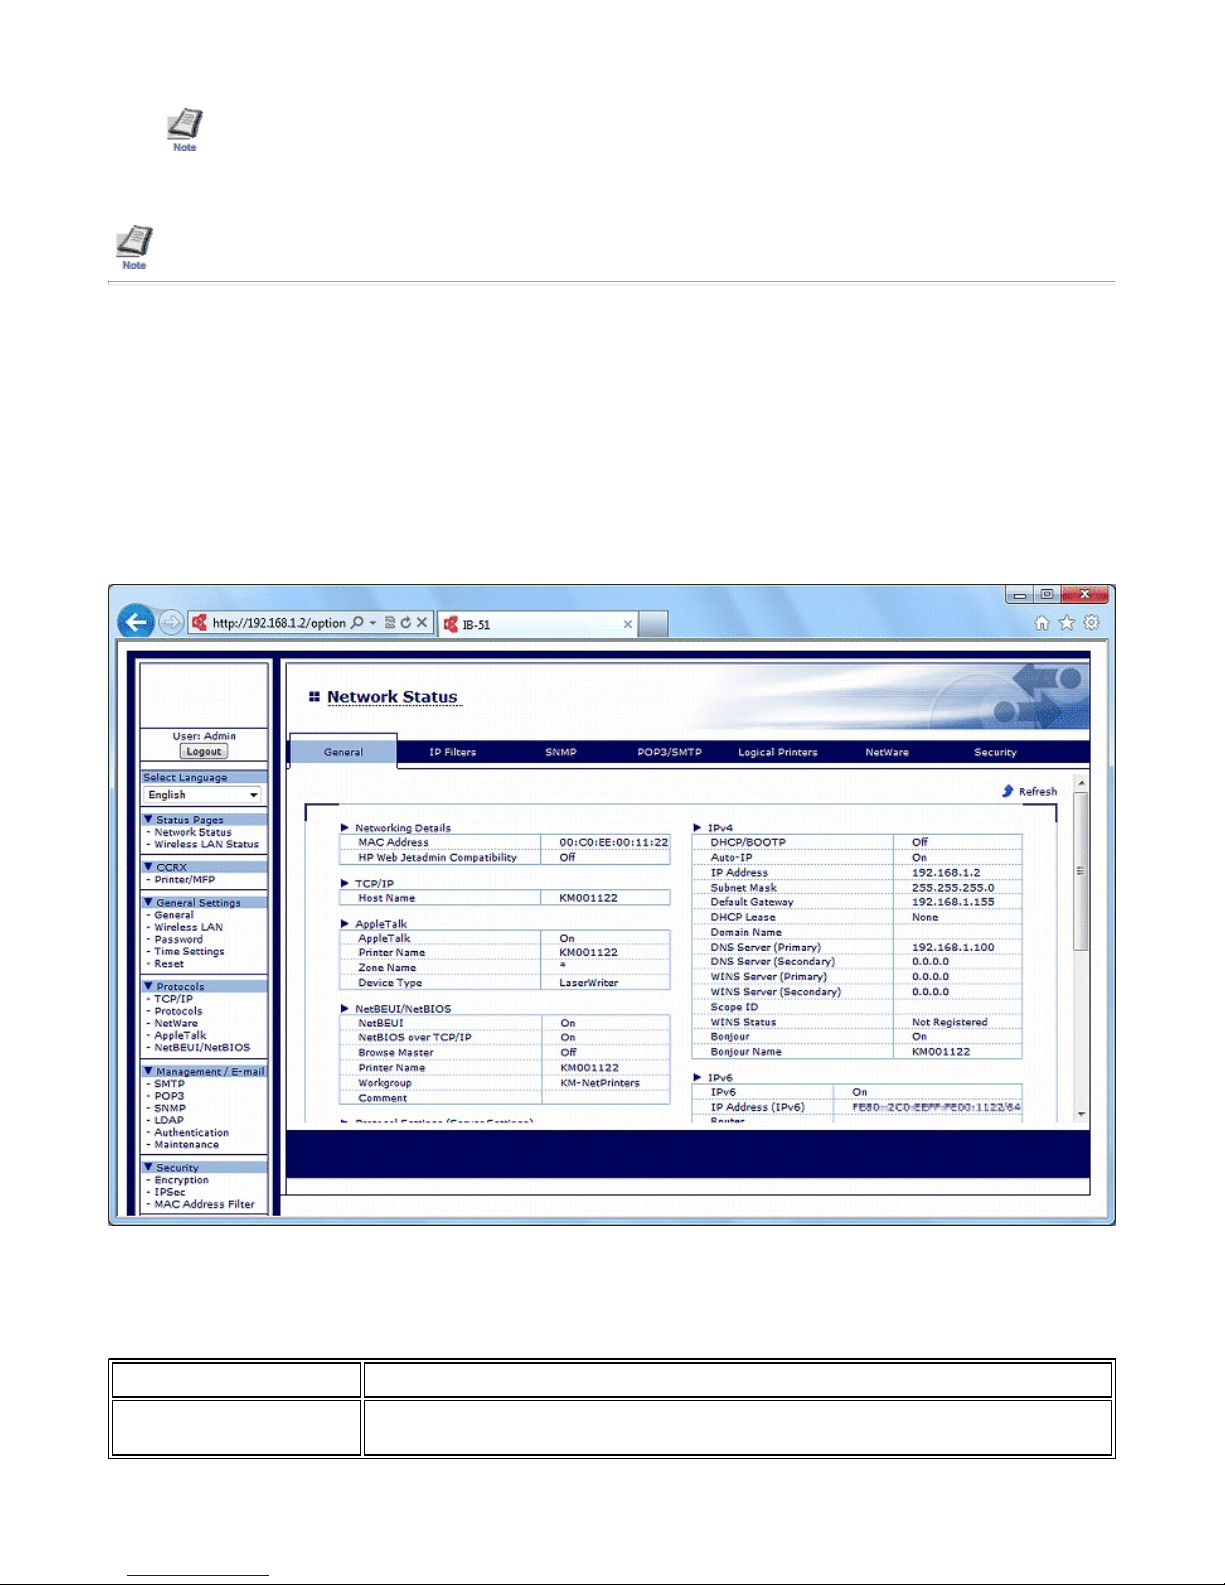
2-1. Home Page
dmin".
This is the first screen displayed after the IB-51's Web page is launched. You can check the status of the IB-51 from this page.
Item Description
Language Displayed for multilingual versions of the IB-51's Web page. Choose the desired language from the
drop down list.
file:///C:/Tom/PDF/IB-51/IB-51%20Setup%20Guide%20HTML%20English/card_homepa...
Figure 1. IB-51's Web page Status Page
10/2/201
Page 3
2
Using a Web Browser to Manage the IB-51
2
Note:
If the IB-51's Web page display language does not match the display language of the operation panel, some characters may not be
displayed correctly.
Page 3 of 2
2-2. Status Page < Network Status
On the Status page, you can check the settings for a range of operations executed using the control panel or IB-51's Web page, such
as printing and network settings.
Page Description
Status Pages > Network Status
> General
Status Pages > Network Status
> IP Filters
Status Pages > Network Status
> SNMP
Status Pages > Network Status
> POP3/SMTP
Status Pages > Network Status
> Logical Printers
Status Pages > Network Status
> NetWare
Status Pages > Network Status
> Security
For checking TCP/IP, IPv4, IPv6, AppleTalk, NetBEUI/NetBIOS, Protocol Settings, and LDAP
settings.
For TCP/IP, IPv4 and IPv6 details, refer to 4
For AppleTalk details, refer to 4-9. Protocols > AppleTalk.
For NetBEUI/NetBIOS details, refer to 4-10. Protocols > NetBEUI/NetBIOS.
For Protocol Settings details, refer to 4-5. Protocols > Protocols > Server Settings or 4-6.
Protocols > Protocols > Client Settings.
For LDAP details, refer to 4
For checking the range of IP address that can access the IB-51. If no IP address is specified, all
addresses have access rights to the IB-51.
For details, refer to 4-2. Protocols > TCP/IP > IP Filters (IPv4) or 4-3. Protocols > TCP/IP > IP
Filters (IPv6).
For checking the SNMP settings.
For details, refer to 4
For checking e-mail-related settings.
For details, refer to 4
POP3 > General.
For checking the logical printer settings.
For details, refer to 4
For checking the NetWare page settings and status.
For details, refer to 4
For checking the security settings.
For details, refer to 4
Server Settings.
-17. Management/E-mail > LDAP.
-15. Management/E-mail > SNMP > General.
-11. Management/E-mail > SMTP > General or 4-13. Management/E-mail >
-4. Protocols > TCP/IP > Logical Printers.
-7. Protocols > NetWare > General.
-20. Security > Encryption > General or 4-5. Protocols > Protocols >
-1. Protocols > TCP/IP > TCP/IP.
2-3 Status Pages > Wireless LAN Status
On this Status Page, you can check the wireless settings currently used by the IB-51.
Item Description
Wireless LAN Status Displays the current wireless status.
Current SSID Displays the SSID configured for the IB-51.
BSSID Displays the BSSID of the access point that the IB-51 is communicating with.
Current Channel Displays the channel configured in the IB-51.
Transfer Rate Displays the transmission rate.
2-4 CCRX > Printer/MFP
You can display the Web page of the printer/MFP that has the IB-51 attached.
If the printer/MFP does not support this feature, it is not displayed in the navigation bar.
file:///C:/Tom/PDF/IB-51/IB-51%20Setup%20Guide%20HTML%20English/card_homepa...
10/2/201
Page 4
2
Using a Web Browser to Manage the IB-51
2
Page 4 of 2
3. General Settings Page
From this page, you can configure settings applicable to all aspects of IB-51 operation, such as Security and Network settings. You can
restrict access to this page by setting an administrator password. Refer to 3
-4. General Settings > Password for details.
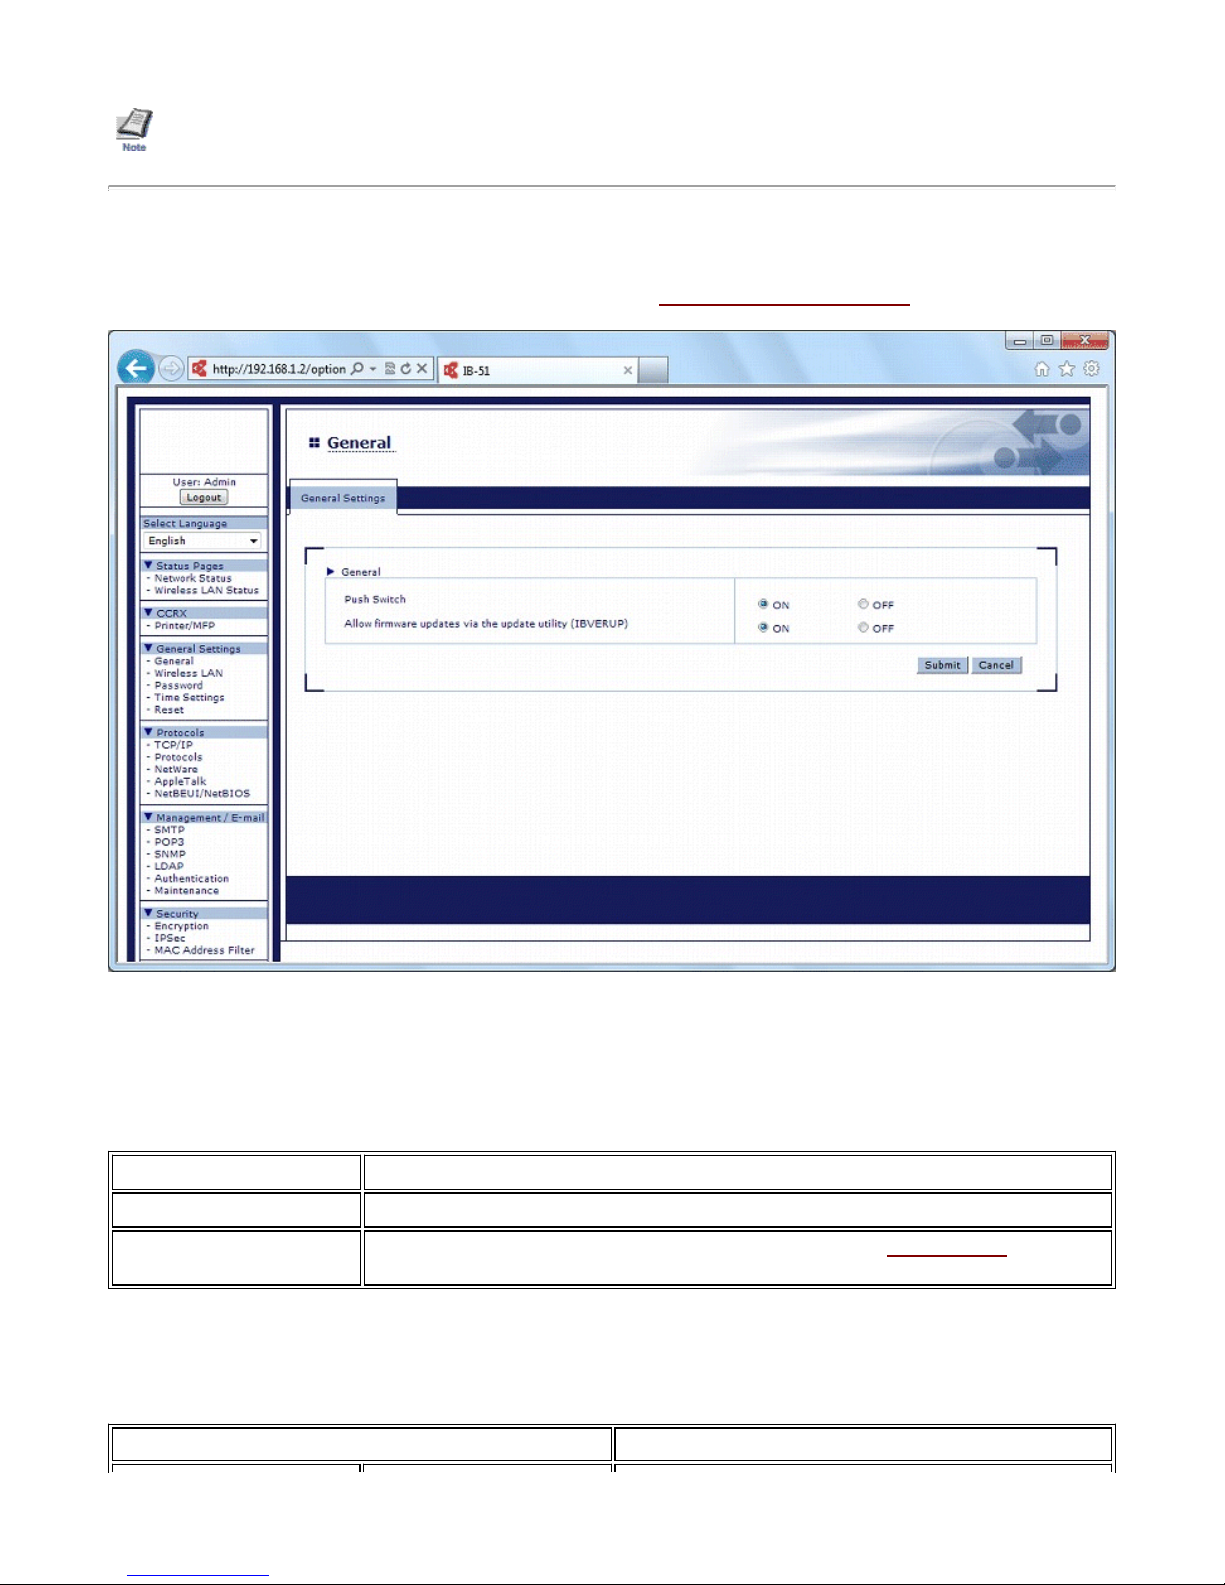
3-1. General Settings > General
From this page, the general settings can be configured.
Item Description
Push Switch
Allow firmware updates via the
update utility (IBVERUP)
Enables (On) or disables (Off) the function of Push Switch.
Enables (On) or disables (Off) updates using IBVERUP. Refer to the firmware update for details
on the update utility (IBVERUP).
3-2 General Settings > Wireless LAN > Wireless LAN
From this page, the IB-51's wireless settings can be configured.
Item Description
file:///C:/Tom/PDF/IB-51/IB-51%20Setup%20Guide%20HTML%20English/card_homepa...
Figure 2. IB-51's Web Page General Settings Page
10/2/201
Page 5

2
Using a Web Browser to Manage the IB-51
2
Page 5 of 2
Auto Wireless Setup Feature PIN-Code Clicking "Auto Generate" will generate the IB-51's PIN code.
Wireless LAN Basic
Configuration
Wireless Mode Select from below the method of connection to the IB-51's
wireless network.
— Infrastructure
— AdHoc
SSID Set the SSID of the wireless LAN to connect the IB-51.
Wireless Authentication Configure the authentication method used when connecting to
the wireless LAN router (access point).
— Open
— Shard
— WPA
— WPA2
— WPA Enterprise
— WPA2 Enterprise
Channel Set the channel used by wireless LAN.
WEP Configuration WEP Enable (On) or disable (Off) the WEP encryption feature.
WEP Key Set the encryption key (WEP key) used for WEP encryption.
WPA/WPA2 Configuration Encryption Mode Select from below the wireless encryption method to use.
When WPA2/WPA2 Enterprise is set as the wireless
authentication method, this is fixed at AES.
— TKIP
— AES
— AUTO
Pre-Shared Key Only when WPA/WPA2 is selected, enter the shared key.
When WPA Enterprise/WPA2 Enterprise is selected, this cannot
be set.
Authentication Protocol Select from below the authentication protocol.
— PEAP
— EAP-TLS
— EAP-TTLS
— EAP-FAST
EAP User Name Enter the EAP user name.
EAP Password Only when EAP-TTLS/PEAP/EAP-FAST is selected, enter the
EAP password.
Internal Authentication Method Only when EAP-TTLS/PEAP is selected, specify from the
following protocols.
When set to PEAP, this is fixed at MSCHAPv2.
— PAP
— CHAP
— MSCHAP
— MSCHAPv2
Server Authentication Enables (On) or disables (Off) the server authentication, when
EAP-TLS/EAP-TTLS/PEAP is selected for the authentication.
Import CA Certificate Imports the CA certificate when EAP-TLS/EAP-TTLS/PEAP is
selected for the authentication.
Import Client Certificate Imports the client certificate, when EAP-TLS is selected for the
Automatic PAC File
Distribution
file:///C:/Tom/PDF/IB-51/IB-51%20Setup%20Guide%20HTML%20English/card_homepa...
authentication.
Enables (On) or disables (Off) the automatic configuration of the
PAC file, when EAP-FAST is selected for the authentication.
10/2/201
Page 6

2
Using a Web Browser to Manage the IB-51
2
Page 6 of 2
Import PAC Select and import the PAC file, when EAP-FAST is selected for
Password Enter the password when importing certificates.
the authentication, and automatic PAC file is disabled (Off).
32 characters maximum.
3-3 General Settings > Wireless LAN > Certificate
From this page, the details of the certificates of wireless LAN settings can be checked.
Item Description
Client Certification Part of the client certificate can be referenced.
CA Certification Part of the CA certificate can be referenced.
PAC Part of the PAC file can be referenced.
3-4. General Settings > Password
By setting an administrator password, the access to IB-51's Web page can be restricted (excluding the Status Page).
Note:
— The default password is "Admin". We recommend setting an administrator password to prevent unauthorized changes to the IB-
51 settings.
— The password can be up to 15 characters long.
— Make a note of the password in case you forget.
Item Description
New Password Enter the new password.
Confirm New Password Enter the new password again for confirmation.
Follow these steps to set up or change the password.
1. Enter the desired password in the new password field.
2. Re-enter the same password in the confirmation field.
3. Click Submit at the bottom of the page.
3-5. General Settings > Time Settings
The IB-51 obtains the current time from a time server on the network. The time is used in various reports sent from the IB-51 via e-mail.
Item Description
Current Local Time Shows the time as obtained from the time server.
Time Zone For designating the offset from UTC.
Time Protocol For designating the server to obtain for the time. The available servers are as follows.
— None: Do not obtain the time from a server.
— NetWare: Obtain the time from a NetWare server.
file:///C:/Tom/PDF/IB-51/IB-51%20Setup%20Guide%20HTML%20English/card_homepa...
10/2/201
Page 7
2
Using a Web Browser to Manage the IB-51
2
— SNTP Server: Obtain the time from a SNTP server. Designate the server name or IP
address.
SNTP Server Set the SNTP server name or IP address.
Page 7 of 2
3-6. General Settings > Reset
To enable the changes you have made to IB-51 network settings, you must restart the network interface. You can also restore the
default settings as needed.
Item Description
Restart Network Interface Click the Restart button to restart the network interface.
Set all Network Settings to
Factory Default
Click the Reset button to restore the default network interface settings.
4. Advanced Page
This page includes advanced settings applicable to all aspects of IB-51 operation. You can restrict access to this page by setting an
administrator password. Refer to 3-4. General Settings > Password for details.
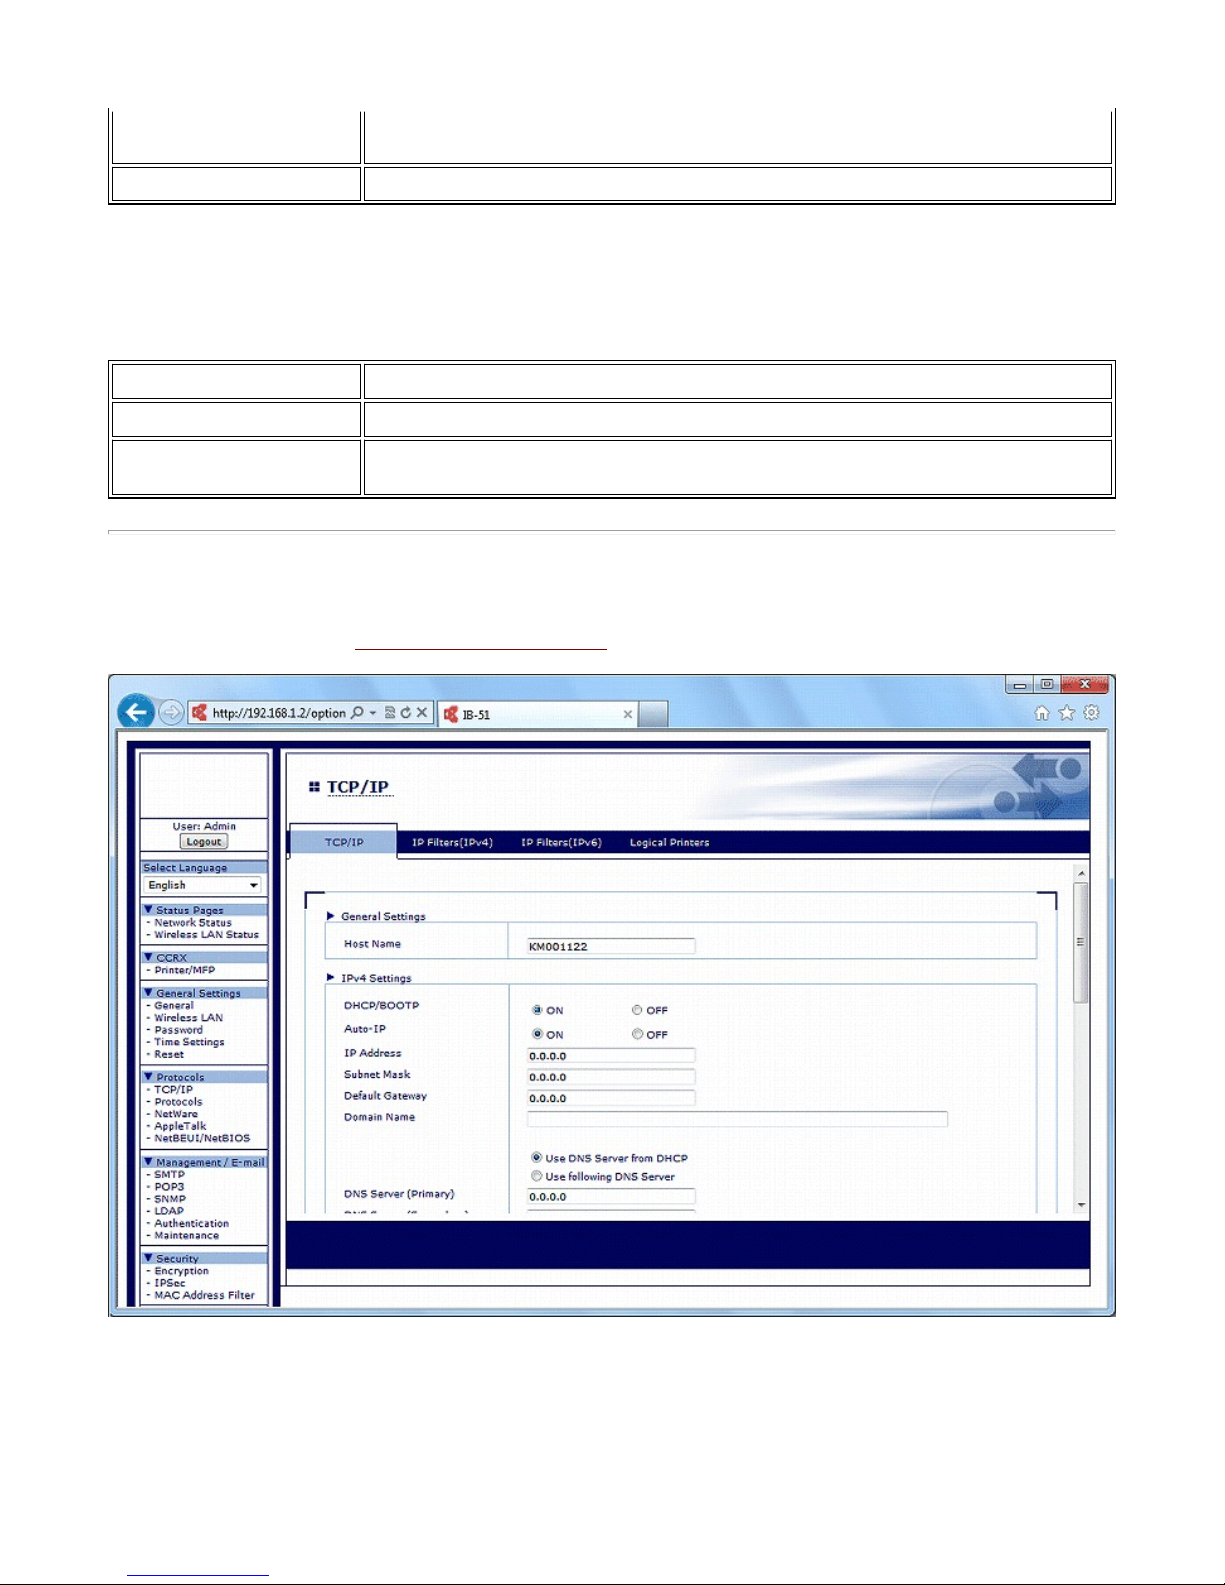
4-1. Protocols > TCP/IP > TCP/IP
This table gives an overview of the items displayed on this page.
file:///C:/Tom/PDF/IB-51/IB-51%20Setup%20Guide%20HTML%20English/card_homepa...
Figure 3. IB-51's Web Page Advanced Page
10/2/201
Page 8

2
Using a Web Browser to Manage the IB-51
2
Item Description
Page 8 of 2
General Settings
IPv4 Settings DHCP Enable (On) or disable (Off) the auto IP address configuration
Host Name For designating the name of IB-51.
using DHCP.
Auto-IP Enable (On) or disable (Off) the IP address assignment using
IP Address
Subnet Mask
Default Gateway
Domain Name For designating the DNS name of the domain to which the IB-51
DNS Server (Primary,
Secondary)
WINS Server (Primary,
Secondary)
Scope ID For determining the scope of IP addresses the Windows server
Bonjour
Auto-IP.
For assigning the IB-51's IP address. Example: 192.168.110.171
For designating the subnet mask.
For designating the IP address of the default gateway.
belongs. Do not designate the host name.
For designating the primary and secondary IP addresses of the
DNS (Domain Name System) server. To obtain an IP address
from the DHCP server, Use DNS Server from DHCP must be
selected.
For designating the primary and secondary IP addresses of the
WINS server. To obtain an IP address from the DHCP server,
Use WINS Server from DHCP must be selected.
can assign or lease.
Bonjour can be switched on and off. Activate Bonjour if you want
to be able to add printers/MFPs through Print Center in Mac OS
X. Printers/MFPs must support KPDL for printing.
IPv6 Settings
Bonjour Name
IPv6
IP Address
Prefix Length
RA (Stateless) Enable (On) or disable (Off) the IPv6 address assignment using
Default Gateway For designating the IP address of the default gateway.
DHCPv6 (Stateful)
Domain Name For designating the DNS name of the domain to which the IB-51
DNS Server (Primary,
Secondary)
For designating a name to be used with Bonjour.
Switches IPv6 on and off. When this setting is on, the IB-51
supports IPv6. In order to use IPv6, however, all of the devices
on a network need to support IPv6.
Assign the IPv6 address to IB-51.
Specifies the prefix length for IPv6.
RA.
Enable (On) or disable (Off) the auto IP address configuration
using DHCPv6.
belongs. Do not designate the host name.
For designating the primary and secondary IP addresses of the
DNS (Domain Name System) server. To obtain an IP address
from the DHCP server, Use DNS Server from DHCP must be
selected.
4-2. Protocols > TCP/IP > IP Filters (IPv4)
IP Filters(IPv4) can be used to specify the host or network that can use IB-51. Up to 10 access list entries can be specified.
Item Description
IP Address
file:///C:/Tom/PDF/IB-51/IB-51%20Setup%20Guide%20HTML%20English/card_homepa...
Specify the IP address or work address to allow access from.
10/2/201
Page 9

2
Using a Web Browser to Manage the IB-51
2
Page 9 of 2
Subnet Mask
Specify the subnet mask to allow access from. To allow access from all hosts over the network
192, enter "192.0.0.0" for IP address and "255.0.0.0" for subnet mask. It is possible to leave this
field blank.
Protocols Select the protocols that will be allowed to access from the following choices.
— LPD
— FTP
— IPP
— HTTP
— RAW Port
— SNMP
— HTTPS(IPPS)
— ThinPrint
4-3. Protocols > TCP/IP > IP Filters (IPv6)
IP Filters(IPv6) can be used to specify the host or network that can use IB-51. Up to 10 access list entries can be specified.
Item Description
IP Address (IPv6)
Prefix Length
Protocols Select the protocols that will be allowed to access from the following choices.
Specify the IP address to allow access from.
Specify the prefix length for IPv6 (0-128 decimal characters).
— LPD
— FTP
— IPP
— HTTP
— RAW Port
— SNMP
— HTTPS(IPPS)
4-4. Protocols > TCP/IP > Logical Printers
The IB-51 can be used as a virtual printer that adds or replaces strings (commands) at the start or end of job data. You can configure
up to eight logical printers.
Logical printers use FTP, LPR, or IPP as the communication protocol. Printouts to nonexistent ports are all sent to Logical Printer 1.
Item Description
TCP/IP Port Number You can designate the port number for logical printers just as you can designate the physical port
number for TCP (such as 9100). Data sent to the designated physical port is converted in a way
corresponding to the designated logical printer. If you designate the same port number as a port
that was previously designated (such as for FTP or LPD), the port designation is invalid.
Bi-directional Printing You can enable (On) or disable (OFF) bi-directional printing that uses the physical port for TCP/IP
communication. If this setting is off, all data received from the printer is disregarded. When printing
with PostScript, PJL, or other commands, bi-directional printing must be on to return data to the
client that was received from the printer.
Start of Job String You can designate a string to be sent to the printer before direct output to the output port (lp port).
If you need to send a control code before printing, designate that string.
End of Job String You can designate a string to be sent to the printer after direct output to the output port (lp port). If
you need to send a control code after printing, designate that string.
Banner Page Banner page printing can be enabled (On) or disabled (Off) when printing via FTP or LPD.
Filter Setting Select ASCII to KPDL to enable the filter setting.
file:///C:/Tom/PDF/IB-51/IB-51%20Setup%20Guide%20HTML%20English/card_homepa...
10/2/201
Page 10

.
2
Using a Web Browser to Manage the IB-51
2
4-5. Protocols > Protocols > Server Settings
The protocols to use can be selected.
Item Description
Page 10 of 2
Server Settings
Enable (On) or disable (Off) the following protocols.
— IPP
— IPP over SSL*
— LPD
— RAW Port
— HTTP
— HTTPS*
*Note : To activate the configuration, the Encryption
set to ON
FTP Server FTP Server Enables (On) or disables (Off) the FTP server.
FTP Server Port Number Sets the FTP Port Number. (Default port: 21)
FTP Status Check
Enables (On) or disables (Off) the FTP status check.
FTP Server over SSL Encrypts using SSL. Select "OFF" to not use it.
— OFF
— StartTLS
— FTP Server over SSL
— To activate the configuration, the Encryption needs
to be set to ON.
ThinPrint ThinPrint
Enables (On) or disables (Off) ThinPrint. ThinPrint is a
technology that distributes the network load due to printing
through compression and bandwidth control of the print data. To
use ThinPrint, .printServerEngine is required on the server,
and .printClient is required on the client ( printer/MFP ). When
the ThinPrint feature of the IB-51 is turned on, the IB-51
operates as a ThinPrint client.
needs to be
ThinPrint Port Number
ThinPrint over SSL Select to enable (On) or disable (Off) encryption by SSL.
Import Client Certificate Imports the client certificate, when EAP-TLS is selected for the
Password Enter the password when importing certificates.
Import CA Certificate Imports the CA certificate when EAP-TLS/EAP-TTLS/PEAP is
4-6. Protocols > Protocols > Client Settings
The FTP client and CIFS client can be configured.
file:///C:/Tom/PDF/IB-51/IB-51%20Setup%20Guide%20HTML%20English/card_homepa...
Specifies the port that is used for communication
with .printServerEngine. The default value is 4000.
— To activate the configuration, the Encryption needs
to be set to ON.
authentication.
32 characters maximum.
selected for the authentication.
10/2/201
Page 11

n
2
Using a Web Browser to Manage the IB-51
2
Item Description
Page 11 of 2
FTP Client
FTP Client Port Number Sets the FTP Port Number. (Default port: 21)
FTP Client over SSL
CIFS Enables ( On ) or disables ( Off ) the CIFS Protocol.
Enables (On) or disables (Off) the FTP client.
Encrypts using SSL. Select "OFF" to not use it.
— OFF
— StartTLS
— FTP Client over SSL
— To activate the configuration, the Encryptio
needs to be set to ON.
4-7. Protocols > NetWare > General
This print system supports both NDS and bindery printing in either printer server mode or remote printer mode.
To set up NetWare, client software must be installed and you must be logged on with administrator rights. Consult your network
administrator for assistance.
Printing with NetWare is supported with Novell or Microsoft NetWare Client as the client.
Network operations such as creating the queue require admin, supervisor, or equivalent rights.
Item Description
NetWare Protocol Choose whether NetWare protocol is enabled (On) or disabled (Off).
Bindery Mode Choose whether bindery mode is enabled (On) or disabled (Off).
Frame Type Choose from four supported four frame types: 802.2, SNAP, ETHERNET-II, and 802.3. You can
also choose auto-detect.
NDS Tree Designate the name of the NDS tree for the connection.
NDS Context Designate the NDS context for connections in print server mode.
Print Server Mode Choose whether print server mode is enabled (On) or disabled (Off).
Print Server Name Shows the print server name.
Queue Polling Interval The polling interval can be designated.
Banner Page Requests Choose whether to print banner page when printing in print server mode.
Password (Optional) A password can be designated as desired. Login requires that the password here match the print
server password set by the NetWare utility.
Remote Printer Mode Choose whether remote printer mode is enabled (On) or disabled (Off).
Printer Name Shows the print server name.
Job Timeout Set the timeout value to complete jobs in remote printer mode in a range of 4 to 255 seconds.
4-8. Protocols > NetWare > Bindery Services
You can register the file server in print server mode and the print server in remote printer mode that are connected by the print system.
If none are registered, network discovery is performed at startup, and the first servers (up to eight) are automatically connected.
file:///C:/Tom/PDF/IB-51/IB-51%20Setup%20Guide%20HTML%20English/card_homepa...
10/2/201
Page 12

A
A
.
2
Using a Web Browser to Manage the IB-51
2
fter system startup, the system conducts polling at regular intervals to connect to servers automatically even when registered file
servers are running.
Item Description
Print Server Mode Up to eight file servers can be registered. If there are nine or more file servers, register the priority
file server names. If none are registered, up to eight servers are automatically connected at
startup. However, print server names in the file server must match IB-51 print server names.
Remote Printer Mode Up to eight print servers can be registered. If there are nine or more print servers, register the
priority print server names. If none are registered, up to eight servers are automatically connected
at startup. However, printer/MFP names (printer port names) in the print server must match IB-51
remote printer names (printer port names). Even if registered file servers are started after the IB-
51, the IB-51 regularly conducts polling so they will be automatically connected.
Page 12of 2
4-9. Protocols > AppleTalk
This print system supports Mac OS. (See 1-1. Compatible Systems) and is compatible with LaserWriter driver version 8.x. To print in
ppleTalk networks, activate AppleTalk protocol
Item Description
AppleTalk Choose whether AppleTalk protocol is enabled (On) or disabled (Off).
Printer Name Identifies printers/MFPs in the AppleTalk network.
Zone Name Identifies the AppleTalk zone (network). An asterisk (*) here indicates the default zone.
4-10. Protocols > NetBEUI/NetBIOS
Print systems connected via NetBEUI are registered in Windows in My Network.
Item Description
NetBEUI Protocol Choose whether NetBEUI protocol is enabled (On) or disabled (Off).
NetBIOS over TCP/IP Enables (On) or disables (Off) NetBIOS over TCP/IP. When this setting is on, NetBIOS can be
used in a TCP/IP network environment.
Browse Master When this option is selected, the print system changes to browse master, and a workgroup is
created in My Network. When the option is not selected, the print system is added to an existing
workgroup.
Printer Name The printer/MFP name is interrelated with the host name configured at TCP/IP setting page
(Protocols > TCP/IP > TCP/IP). If you want to change the NetBEUI printer/MFP name, change the
TCP/IP host name.
Workgroup The printing workgroup is a workgroup shown in Entire Network in My Network. The default
workgroup name is "KM-NetPrinters" or "NC-NetPrinters".
Comment You can enter a comment as desired. This field can also be left blank.
4-11. Management/E-mail > SMTP > General
The IB-51 can notify registered users by e-mail when the toner is running out, or send other information. SMTP is used for this feature.
You must configure the SMTP protocol settings before the IB-51 can connect to an SMTP server.
Item Description
SMTP Protocol Choose whether SMTP protocol is used (On) or not (Off).
file:///C:/Tom/PDF/IB-51/IB-51%20Setup%20Guide%20HTML%20English/card_homepa...
10/2/201
Page 13

2
Using a Web Browser to Manage the IB-51
2
Page 13of 2
SMTP Port Number For designating the SMTP port number. (Default setting is 25) Click the Test button to check the
connection.
SMTP Server Name Enter the SMTP server name or IP address.
SMTP over SSL Allows the SSL encryption for mail sever communication. Select OFF when it is not used.
— OFF
— StartTLS
— SMTP over SSL
— To activate the configuration, the Encryption needs to be set to ON.
Authentication Protocol Select the SMTP authentication setting from the following.
— ON : Uses the SMTP authentication
— POP before SMTP : Uses [POP before SMTP] as a protocol.
— OFF : Does not use the SMTP authentication
Authenticate as Select one of the POP3 users (1-3) for SMTP authentication using the selected POP3 account. If
you select Other, your designated login user name and login password will be used.
Login User Name If you select Other for POP3 user authentication, the account name you designate here is used for
SMTP authentication. Up to 64 characters can be entered.
Login Password If you select Other for POP3 account authentication, the password you designate here is used for
SMTP authentication.
Sender Address For designating the address of the printer/MFP administrator or other print system manager so that
replies or non-delivery reports reach the administrator.
Signature Enter an e-mail signature.
4-12. Management/E-mail > SMTP > E-mail Recipient (1-3)
Status information, such as notification of errors or that the toner is running out, can be sent automatically at the designated times to the
designated e-mail addresses. Configure this setting after the SMTP > General.
Item Description
Recipient Address 1-3 In Recipient Address 1-3, enter recipients' e-mail addresses. You can easily send to multiple
Subject For designating the subject name of e-mail messages with reports sent from the IB-51. This field
Event Report Items For choosing the type of events for notification.
Event Report Interval Enter the interval for sending notification messages after events occur. Only if errors meeting your
recipients by entering a distribution list address.
also supports variable strings such as "%printer" (Model), "%serial" (Serial Number), "%
etheraddr" (MAC Address), "%host" (Host Name), "%ip" (IP Address) and "%status"iPrinter
Statusj.
— Add Paper
— Low Toner
— Add Toner
— Cover Open
— Paper Jam
— All Other Errors
chosen conditions occur will a message be sent at the designated interval. You can designate an
interval from 1-10000 minutes.
Scheduled Report Items Choose the status information to include to the report.
— Network Status
Scheduled Report Interval For designating the timing and interval for sending status information.
file:///C:/Tom/PDF/IB-51/IB-51%20Setup%20Guide%20HTML%20English/card_homepa...
10/2/201
Page 14

2
Using a Web Browser to Manage the IB-51
2
— None: No reports are sent.
— Monthly: Reports are sent monthly on the designated day.
— Weekly: Reports are sent weekly on the designated day.
— Daily: Reports are sent daily at the designated hour.
— Hourly: Reports are sent hourly according to the designated interval.
If you designate a day of the month such as 31 that does not exist in the current month, the setting
is treated as if you had designated the last day of the month.
Page 14of 2
Run once now Click the Send button to send an event report and scheduled report to the address designated in
Recipient Address, regardless of the interval setting.
4-13. Management/E-mail > POP3 > General
The IB-51 can receive the print data in e-mail attachments and print it. POP3 is used for this feature. You must configure the POP3
protocol settings before the IB-51 can connect to a POP3 server.
Item Description
POP3 Protocol Choose whether POP3 protocol is used (On) or not (Off).
Check Interval The POP3 server is checked regularly for e-mail messages at the interval you designate. The
Run once now Click the Receive button to receive any mail on the POP3 server immediately.
supported range is 3-60 minutes. By default, the interval is 15 minutes.
4-14. Management/E-mail> POP3 > User (1-3)
For configuring user and password settings to print from e-mail. You can enter up to 3 user accounts. Additionally, you can restrict
printing of received e-mail messages depending on the file size and the content of Subject, To, Cc, and From. It is also possible to print
file attachments.
Item Description
User 1-3 Choose On or Off in this setting to enable or disable e-mail deliveries to that user.
E-mail Address Enter the e-mail addresses of users 1-3.
POP3 Server Name Designate the POP3 server name (up to 64 characters). Enter the domain name or IP address.
POP3 Port Number For designating the POP3 port number. (Default setting is 110)
POP3 Server Timeout Enter the timeout in seconds during which this machine tries to connect to the POP3 server.
Login User Name Designate the user account login name (up to 64 characters).
Login Password Designate the password for this account (up to 64 characters).
Use APOP Choose whether APOP protocol is used (On) or not (Off). Enable this setting (On) when
Test Click the Test button to confirm that the user accounts are correctly configured.
Delete e-mail after retrieval Choose whether or not to delete messages from the server after they are received.
E-mail Size Limit For designating the maximum size of messages that can be received. Messages over the
connecting to mail servers that support APOP.
designated size are not received. Even if you have chosen to delete messages from the server,
these unreceived messages are not deleted. If you prefer not to restrict reception, designate 0 as
the size.
file:///C:/Tom/PDF/IB-51/IB-51%20Setup%20Guide%20HTML%20English/card_homepa...
10/2/201
Page 15

n
2
Using a Web Browser to Manage the IB-51
2
Page 15of 2
Filter Setting You can designate strings to filter messages (up to 255 characters). Create filter strings using the
following prefixes.
— S: Filter by Subject
— T: Filter by To
— C: Filter by Cc
— F: Filter by From
To filter by any of several conditions (OR), separate strings with "|". To filter by several conditions
(AND), all of which must be met, separate strings with "&". For example, to print only messages
with a subject of "Service" or "Technical", use "S:Service | S:Technical".
Cover Page When you have set up printing from e-mail, designate whether or not to print the message body as
well. Choose On to add a cover page when printing messages. If there is text in the message
body, it will be printed as the cover page. Choose Off to print file attachments only. If there is no
file attachment, nothing is printed.
POP over SSL Allows the SSL encryption for mail sever communication. Select OFF when it is not used.
— OFF
— StartTLS
— POP over SSL
— To activate the configuration, the Encryption needs to be set to ON.
4-15. Management/E-mail > SNMP > General
The SNMP protocol is used to transfer administrative information across a network. You can choose between SNMPv1/v2c or SNMPv3.
Utilities that use a management information base (MIB) may not operate if SNMPv3 is turned on. In this situation, turn SNMPv3
off and set SNMPv1/v2c to Onor Read Only.
Item Description
SNMPv3 Enables (On) or disables (Off) SNMPv3. The SNMPv3 protocol provides security using DES
User Name Enter the username used by SNMPv3. Maximum of 32 single-byte characters.
Authentication Protocol You can choose between MD5 and SHA1.
Encryption Select the encryption algorithm from the following choices. Select OFF when it is not used.
Authentication Password Enter the password for authentication. Maximum of 40 single-byte characters.
Privacy Password Enter the password for encryption. Maximum of 32 single-byte characters.
encryption and MD5/SHA authentication. When SNMPv3 is on, set SNMPv1/v2c to Read Only or
Off.
— OFF
— DES
— AES
— To activate the configuration, the Encryptio
needs to be set to ON.
SNMPv1/v2c SNMPv1/v2c can be set to enabled (On), Read Only, or disabled (Off). Turn SNMPv3 off if this
setting is set to On.
Read Community This is used to read device information. The default read community string is public. The correct
read community needs to be entered for an administration utility to send an SNMP request to read
a value, otherwise the IB-51 will reject the request.
file:///C:/Tom/PDF/IB-51/IB-51%20Setup%20Guide%20HTML%20English/card_homepa...
10/2/201
Page 16

2
Using a Web Browser to Manage the IB-51
2
Page 16of 2
Write Community This setting functions similarly to the read community setting except that it is used for SNMP
sysContact
sysName
sysLocation
HP Web Jetadmin
Compatibility
requests to write values.
This is the MIB-II sysContact object, which typically contains the email address of the network
administrator.
This is the MIB-II sysName object, which typically contains the host name or domain name of the
IB-51.
This is the MIB-II sysLocation object, which typically contains information about the location of the
IB-51.
Enables (YES) or disables (NO) compatibility with HP Web Jetadmin.
4-16. Management/E-mail > SNMP > Trap
If you are using the SNMP protocol and an error such as paper out occurs, the IB-51 generates a trap and sends it to the trap
recipients. You can setup two trap recipients. The setting details are the same for both recipients.
Item Description
Enables (On) or disables (Off) the MIB-II EnableAuthenTrap object. If this setting is enabled (On),
Authentication Traps
Trap Community The SNMP trap community string used when the IB-51 generates a trap.
Trap IP Address (IPv4/IPv6) The IP address that receives traps.
an SNMP trap is generated if an attempt is made to read or write using an invalid community
string. The trap is sent to the contained trap address.
Trap IPX Address The IPX address that receives traps.
Selected Errors
Select the events that generate traps from Low Toner, Add Toner, Paper Jam, Add Paper,
Cover Open, and All Other Errors.
4-17. Management/E-mail > LDAP
The IB-51 can refer to the LDAP server.
Item Description
LDAP Settings
Shared Address Book LDAP Encryption Selects the type of encryption according to the type of security
LDAP Enable (on) or disable (off) the LDAP server.
employed by the LDAP server. Select Off when encryption is not
used.
— LDAPv3/TLS
— LDAP over SSL
— Off
— To activate the configuration, the Encryption needs
to be set to ON.
LDAP Server Name Specifies a name or IP address for the LDAP server.
LDAP Port Number Specifies a port number for LDAP or use the LDAP default port
389.
Search Timeout Specifies a period of time for searching the LDAP server.
Login User Name Specifies the user name.
Login Password Specifies the password.
file:///C:/Tom/PDF/IB-51/IB-51%20Setup%20Guide%20HTML%20English/card_homepa...
10/2/201
Page 17

A
.
n
2
Using a Web Browser to Manage the IB-51
2
Page 17of 2
Max Search Results Specifies a maximum number of displayed results which have
Search Base Specifies a base object which indicates the starting point in the
Authentication Type Select the Authentication Type algorithm from the following
Information Server LDAP Encryption Selects the type of encryption according to the type of security
LDAP Server Name Specifies a name or IP address for the LDAP server.
LDAP Port Number Specifies a port number for LDAP or use the LDAP default port
been searched on the LDAP address book. The actual number
of results displayed varies from model to model.
tree structure of the database for the LDAP directory searching.
choices.
— Simple
— SASL
employed by the LDAP server. Select Off when encryption is not
used.
— LDAPv3/TLS
— LDAP over SSL
— Off
— To activate the configuration, the Encryptio
to be set to ON.
389.
needs
Search Timeout Specifies a period of time for searching the LDAP server.
Authentication Type Select the Authentication Type algorithm from the following
choices.
— Simple
— SASL
4-18. Management/E-mail > Authentication
Setting Authentication allows only the predefined users to access pages.
Item Description
Domain Name Specifies the domain name of the Windows domain network when Network Authentication is
Host Name Specifies the domain controller name of the Windows domain network when Network
specified in the preceding item.
Authentication is specified in the preceding item.
4-19. Management/E-mail > Maintenance
printer/MFP maintenance request mail can be sent periodically to a specified address
Item Description
Equipment ID You can specify any arbitrary number as the system ID number. Enter up to a maximum of 15
Recipient Address Enter the email address of the recipient of the mail.
Subject Enter the subject line of the mail. This field also supports variable strings such as "%
file:///C:/Tom/PDF/IB-51/IB-51%20Setup%20Guide%20HTML%20English/card_homepa...
single-byte characters.
printer" (Model), "%serial" (Serial Number), "%etheraddr" (MAC Address), "%host" (Host Name)
10/2/201
Page 18

2
Using a Web Browser to Manage the IB-51
2
and "%equipid" (Equipment ID).
E-mail Interval For designating the interval for sending maintenance notifications.
— None: No maintenance notifications are sent.
— Monthly: Notifications are sent monthly on the designated day.
— Weekly: Notifications are sent weekly on the designated day.
— Daily: Notifications are sent daily at the designated hour.
— Hourly: Notifications are sent hourly according to the designated interval.
If you designate a day of the month such as 31 that does not exist in the current month, the setting
is treated as if you had designated the last day of the month.
Page 18 of 2
Run once now Click the Send button to immediately send maintenance notifications to the mail addresses
specified in the recipient addresses without waiting for the e-mail interval.
4-20. Security > Encryption > General
Communication between the PC and IB-51 is encrypted using the SSL protocol.
Item Description
Encryption Enables (On) or disables (Off) encryption.
— If the Encryption is set to OFF, SNMP and each SSL encryption setting are disabled
and the configuration will no longer be available.
Privacy Mode Select the encryption scheme from the following choices.
— All
— ARCFour-128
— DES-56
— 3DES-168
— AES-128
— AES-256
4-21. Security > Encryption > Certificate
This page contains settings related to certificates used for encryption.
Item Description
Country/Region code
State/Province
City/Locality
Organization
Organization Unit
Common Name
file:///C:/Tom/PDF/IB-51/IB-51%20Setup%20Guide%20HTML%20English/card_homepa...
Enter a two character code that represents the country (region) where the user resides.
Examples: Japan = JP, United States = US
Enter the state or province where the user resides.
Example: Tokyo
Enter the city or locality where the user resides.
Example: Setagaya
Enter the organization to which the user belongs.
Example: IB-51 CORPORATION
Enter the unit within the organization to which the user belongs.
Example: Sales
Enter an arbitrary name to represent the printer/MFP .
Example: Sales-PRINTER
10/2/201
Page 19

2
Using a Web Browser to Manage the IB-51
2
Page 19of 2
E-mail Address Enter the e-mail address. Whitespace is allowed.
Issue Date Displays the date that the certificate was issued.
Expiration Date Specifies the expiration date of the certificate.
4-22. Security > Encryption > Exporting Certificate
The certificate can be downloaded to Windows Vista / 7 for printing via IPP over SSL.
Item Description
Certificate Click Export to download the certificate.
4-23. Security > IPSec > General
Contact information can be registered for support. This is a convenient setting for entering contact information of the dealer or service
center, for example.
Item Description
IPSec Enable (on) or disable (off) the IPSec.
Restriction
Authentication Type
Pre-shared Key
Specify the default policy for packets other than IPSec protocol.
Select the encryption scheme that will be used for IKE phase1 from the following choices.
— Pre-Shard
— Certificate
Enter the string of the pre-shared key.
Expiration Verification Enable (on) or disable (off) the verification of certificate expiration.
Root Certificate Upload the root certificate by clicking Browse button.
CA-issued Device Certificate Upload the CA-issued device certificate by clicking Browse button.
Password Enter the password for the CA-issued device certificate.
Mode Select the key exchange mode from the following choices.
— Main Mode
— Aggressive Mode
Hash Select the hash algorithm from the following choices.
— MD5
— SHA-1
Encryption Select the encryption algorithm from the following choices.
— 3DES
— AES
Diffie-Hellman Group Select the Diffie-Hellman group to use from the following choices.
— modp768(1)
— modp-1024(2)
— modp-1536(5)
— modp-2048(14)
— modp-4096(16)
— modp-6144(17)
file:///C:/Tom/PDF/IB-51/IB-51%20Setup%20Guide%20HTML%20English/card_homepa...
10/2/201
Page 20

g
2
Using a Web Browser to Manage the IB-51
2
Lifetime (Time) Specifies the lifetime of an ISAKMP SA in seconds.
4-24. Security > IPSec > Rule (1-3)
The rules to use can be selected or edited.
Item Description
Rule Enable (on) or disable (off) the selected IPSec policy.
Page 20 of 2
Protocols
Select the protocol from the following choices.
— ESP
— AH
Encryption Select the encryption algorithm from the following choices. (Only when ESP is selected for
Protocols.)
— 3DES
— AES
Hash Select the hash algorithm from the following choices.
— MD5
— SHA-1
PFS Select the PFS to use from the following choices.
— NONE
— modp768(1)
— modp-1024(2)
— modp-1536(5)
— modp-2048(14)
— modp-4096(16)
— modp-6144(17)
Lifetime (Time) Specifies the lifetime of an ISAKMP SA in seconds.
IP Version Select the IP version of the device to be connected from the following choices.
— IPv4
— IPv6
IP Address (IPv4) Specify the IPv4 address of the host or network to be connected in IPSec.
Subnet Mask Prefix Length Specify the subnet mask of the host or network to be connected in IPSec.
IP Address (IPv6) Specify the IPv6 address of the host or network to be connected in IPSec.
Prefix Length Specify the prefix length for IPv6.
4-25. Security > IPsec > Certificate
The detailed information of the certificate can be seen.
Item Description
Root Certificate Shows the detailed information of Root Certificate.
CA-issued Device Certification Shows the detailed information of CA-issued Device Certificate.
4-26 Security > MAC Address Filterin
file:///C:/Tom/PDF/IB-51/IB-51%20Setup%20Guide%20HTML%20English/card_homepa...
10/2/201
Page 21

.
2
Using a Web Browser to Manage the IB-51
2
The IB-51 can allow or deny communication from registered MAC addresses.
Item Description
Filter Setting Enables (On) or disables (Off) filtering setting by MAC address.
Policy Select to allow or deny communication from registered MAC addresses.
Page 21 of 2
File Select a list file of MAC addresses to register, if one exists.
Text Select when directly entering a MAC address.
— Enter the MAC address two characters at a time, separated by a colon.
To set multiple MAC addresses, set one address per line.
Click the [Browse...] button and select the list file of MAC addresses.
Enter the MAC address you want to register directly in the entry field.
— If the MAC address is already registered, it will be displayed in the text entry field.
To delete a registered MAC address, delete the MAC address from the text entry
field
4-27. Send Data > Printable Data
This sends files directly to the IB-51 for printing. The following files can be printed. You can also print text that you enter through the IB51's Web page.
Item Description
File Click the Browse button to select a file. Files with the extensions *.ps, *.prn, *.pdf, and *.txt are
supported. For PostScript and PDF files, set the printer/MFP's emulation to KPDL or KPDL
(AUTO).
Text Enter the text for printing in the input field. Up to 255 characters can be entered.
4-28. Information > Contacts
The contact information of a store, service center, support center, etc. can be registered. It could be used conveniently in case of the
emergency.
Item Description
Company Sets the company name. Enter up to 31 single-byte characters.
Account # Sets the account number. Enter up to 31 single-byte characters.
Address Sets the address. Enter up to 31 single-byte characters.
Website Sets the URL. Enter up to 31 single-byte characters.
Contact Sets the contact information. Enter up to 31 single-byte characters.
Phone Sets the telephone number. Enter up to 15 single-byte characters.
FAX Sets the fax number. Enter up to 15 single-byte characters.
Cellular phone Sets the mobile telephone number. Enter up to 15 single-byte characters.
E-mail Sets the e-mail address. Enter up to 31 single-byte characters.
4-29. Information > About
file:///C:/Tom/PDF/IB-51/IB-51%20Setup%20Guide%20HTML%20English/card_homepa...
10/2/201
Page 22

T
2
Using a Web Browser to Manage the IB-51
2
The model name and firmware version can be seen.
Item Description
Page 22of 2
Model
Version
Shows the model name.
Shows the firmware version.
5. Troubleshooting
If problems occur when using the IB-51's Web page, investigate the following items and take the appropriate action. If the problem
persists, contact your dealer or an authorized service center.
Problem Check point Action
Cannot access the IB-51's
Web page
Are the IB-51 wireless LAN
settings correct?
Is the IP address of the IB-51
entered correctly?
Are the web browser settings
correct?
Has the administrator set up
an IP Filter function?
Is the web browser version
supported by the IB-51's Web
page?
Check the IB-51 wireless LAN settings.
Enter the correct IP address. Ask the network administrator to
verify that the IB-51 is configured with the correct IP address.
If the web browser connects via a proxy server, check the proxy
settings. For details, see the web browser Help.
Access the IB-51's Web page from an approved IP address.
Use a web browser verified to work with the IB-51's Web page.
The text of the IB-51's Web
page does not display
properly.
Cannot access the General
Settings Page or Advanced
Page.
The settings I made are not
registered.
I forgot the administrator
password.
op of page
Is the web browser version
supported by the IB-51's Web
page?
Has the administrator set a
password? If so, you must
enter it.
Did you click the Submit
button, after entering the
settings?
Use a web browser verified to work with the IB-51's Web page.
Enter the correct administrator password.
After making the desired settings of IB-51, click the Submit
button.
The administrator password can be cleared by restoring the IB51 settings to the factory default settings using the procedure
described in Resetting to Factory Defaults.
file:///C:/Tom/PDF/IB-51/IB-51%20Setup%20Guide%20HTML%20English/card_homepa...
10/2/201
 Loading...