

Page 1

Page 2

Contents
Introduction ................................................................................... 4
Kyocera Mita Network Library CD-ROM ...................................... 4
Using the Quick Setup Wizard ..................................................... 5
IB-2x Hardware Installation........................................................... 5
NetWare Printing............................................................................ 6
NetWare 3.x ................................................................................................................6
NetWare 4.x, 5.x, and 6.x............................................................................................6
Windows Printing .......................................................................... 7
Windows Printing via NetWare ...................................................................................7
Windows Printing via TCP/IP......................................................................................8
Windows Printing via NetBEUI..................................................................................1 0
Windows Printer Sharing.......................................................................................... 11
English
Macintosh Configuration ............................................................ 11
IB-2x Setup Utility Installation ...................................................................................12
Setting KPDL Emulation and AppleTalk Name and Zone.......................................12
Installing PPDs and Configuring the Printer.............................................................12
IP Address Configuration ........................................................... 13
DHCP Configuration (Dynamic Host Configuration Protocol).................................1 3
WINS (Windows Internet Naming Service) Configuration .......................................13
IP Address Setup with the Printer Front Panel..........................................................1 4
IP Address Persistence .............................................................................................15
Security and Followup Management ......................................... 15
Password Security ....................................................................................................15
Web Browser.............................................................................................................1 5
Quick Setup Wizard ..................................................................................................15
AdminManager.........................................................................................................16
KM-NET VIEWER .....................................................................................................1 6
Wireless Networking ................................................................... 16
Modes of Operation..................................................................................................16
Encryption .................................................................................................................16
IB-22 Automatic Configuration..................................................................................16
Confirming Successful Connection.........................................................................17
IB-22 Manual Configuration .....................................................................................17
3
Page 3

Introduction
Thank you for choosing the high quality Kyocera Mita network printing products. We are sure you will
appreciate the exceptional performance and low cost of ownership that are the hallmarks of Kyocera
English
Mita products.
This product is an internal network interface card for Kyocera Mita printers and digital copiers. It can be
easily installed without removing the main board on the printer. This product enables Kyocera Mita
printers and digital copiers to communicate over an Ethernet network with many different network
operating systems, including Windows, NetWare, Macintosh, and UNIX.
This Quick Configuration Guide provides concise software configuration instructions allowing an
experienced system administrator to get the IB-2x up and running quickly. If you have any questions,
see the operating instructions on the included CD-ROM (Kyocera Mita Network Library or Kyocera
Mita Software Library).
Kyocera Mita Network Library CD-ROM
Inserting the KMNL CD-ROM causes the Main Menu to be displayed. If the Main Menu is not shown
automatically, run the Setup.exe file in the root directory of the CD-ROM. This Quick Configuration
Guide refers to the following utilities in the Configuration section of the CD-ROM:
Quick Setup Wizard: A wizard interface for configuring the necessary settings to get the IB-2x up and
printing quickly.
Advanced Setup: It enables advanced settings and network interface card monitoring.
KPrint: Installs a client port monitor to enable Windows TCP/IP printing to any IB-2x connected
Kyocera Mita printer/copier. With the IB-20/21, KPrint supports LPR and IPP printing in Windows 95/98/
Me. With the IB-21E/22, KPrint additionally supports printing via E-mail in Windows 95/98/Me/NT4/
2000.
Trademarks
KYOCERA®, KYOCERA MITA® are registered trademarks of KYOCERA CORPORATION. NetWare® is a registered trademark of Novell,
Incorporated. Windows® is a registered trademark of Microsoft Corporation. Macintosh® is a registered trademark of Apple Computer,
Incorporated. PostScript® and Acrobat® are registered trademarks of Adobe Systems, Incorporated. All other products referenced are
trademarks or registered trademarks of their respective companies.
FCC Notice:
This equipment complies with Part 15 of FCC Rules. Operation is subject to the following two conditions: (1) this device may not cause
harmful interference, and (2) this device must accept any interference received, including interference that may cause undesired operation.
4
Page 4
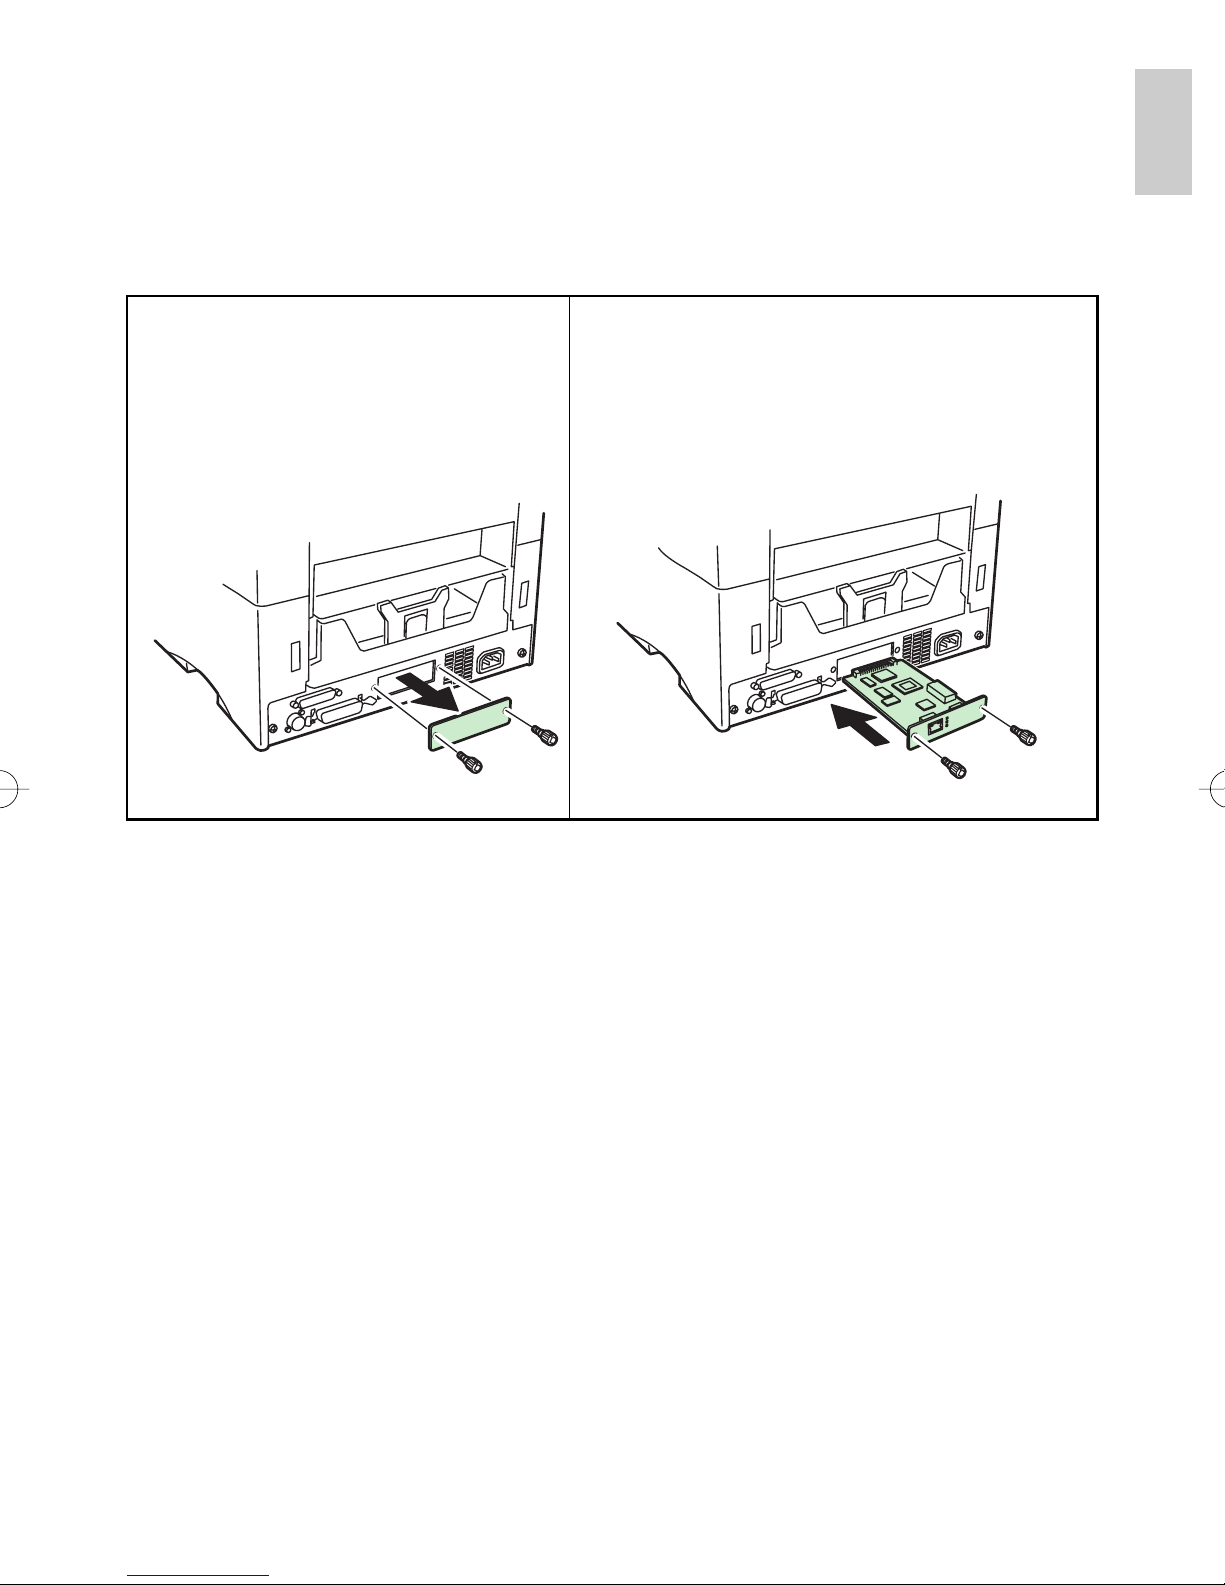
IB-2x Hardware Installation
IB-2X is a slide-in interface board. It can be installed easily without removing the main board on the
printer or copier.
English
1. Remove the screws fastening the expan-
sion interface slot cover to the printer/
copier, then remove the interface slot
cover.
2.Insert the board so that its edges are aligned with
the interface slot rails, then fasten it in place using
the screws removed in step 1.
Using the Quick Setup Wizard
While the wizard is easy to use, this section provides some additional information on locating and
connecting to the printer. Insert the CD-ROM (Kyocera Mita Network Library or Kyocera Mita Software
Library) and select Quick Setup Wizard in the Configuration section.
The printer selection screen will be displayed. Quick Setup will discover printers over either IPX or IP
as long as the protocol is installed on the Windows machine running Quick Setup, e.g., if only IPX is
installed, then Quick Setup will find and display only IPX printers.
If a printer is not displayed on the list, an alternate method for connecting is to enter its Ethernet address
in the space provided. The Ethernet address may be found on the IB-2x status page. If an IP printer is
not on the local segment, then it must also have a correctly configured Default Gateway address, and
the network router(s) must be configured to forward IP broadcasts.
If a printer cannot be found by Quick Setup, (e.g. IPX is not in use and IP broadcasts are not forwarded), then use a web browser or AdminManager for setup. In a web browser, IP broadcasts are
not necessary since the IP address is entered directly. In AdminManager, specific networks may be
defined for searching. See the Security and Followup Management section for more information on
connecting with a web browser or AdminManager.
5
Page 5
NetWare Printing
There are a number of printing options in NetWare. The following gives an explanation of the various
printing methods for each NetWare version and describes how to set up printing for each method.
English
NetWare 3.x
NetWare 3.x supports only Bindery based printing. Two modes are supported; 1) Print Server mode
and 2) Remote Printer mode.
Print Server mode (recommended): The IB-2x acts as the Print Server and polls the print queue
looking for jobs to service. This mode uses a NetWare logon slot (i.e. 1 user license).
Remote Printer mode: The IB-2x acts as a Remote Printer accepting jobs from a Print Server running
on a dedicated workstation or on the file server. This mode does not require a NetWare user license.
NetWare 3.x Bindery
1. Run the Quick Setup wizard on the CD-ROM (Kyocera Mita Network Library or Kyocera Mita
Software Library).
2. In the NetWare section choose Bindery Setup. All required NetWare objects are created by the
Quick Setup wizard.
3. After running the wizard, wait a couple minutes then use the printer front panel to print the status
pages. Check the IB-2x status page for the NetWare connection information and verify that the
queue status is Ready.
4. Setup the Windows clients to print to the associated NetWare queue (see the Windows Printing
via NetWare section).
NetWare 4.x, 5.x, and 6.x
NetWare 4.x, 5.x, and 6.x support NetWare Directory Services (NDS) printing. For backwards
compatibility, Bindery based printing is also supported. Print Server mode and Remote Printer mode
(see descriptions in the previous section) are supported for NDS, however, only Print Server mode is
supported for Bindery printing.
NetWare NDS or Bindery
1. Run the Quick Setup wizard on the CD-ROM (Kyocera Mita Network Library or Kyocera Mita
Software Library).
2. In the NetWare section choose NDS Setup (recommended) or Bindery Setup. All required
NetWare objects are created by the Quick Setup wizard.
3. After running the wizard, wait a couple minutes then use the printer front panel to print the status
pages. Check the IB-2x status page for the NetWare connection information and verify that the
queue status is Ready.
4. Setup the Windows clients to print to the associated NetWare queue (see the Windows Printing
via NetWare section).
6
Page 6
NetWare NDPS
1. Install the Kyocera NDPS Gateway from the CD-ROM (Kyocera Mita Network Library or Kyocera
Mita Software Library). Select Novell NDPS from the CD-ROM Main Menu. The Gateway supports
NetWare 5.x and 6.x. For use with NetWare 4.x, see the requirements in the Readme.txt file
included with the Gateway on the CD.
2. The Gateway supports IPX and IP printing. If using IP printing (recommended), set the IB-2x IP
Address (see the IP Address Configuration section).
3. Use NWAdmin to create the Printer Agent for the printer. See the Admin Guide (in PDF format)
included with the Gateway for additional information.
4. Configure the Windows clients to print to the Printer Agent.
Windows Printing
Windows encompasses a wide range of client versions; from Windows 3.1 to Windows XP, and thus a
wide range of printing capabilities. The various versions of Windows in combination with the IB-2x offer
the network printing capabilities described below.
Ø
Via Novell NetWare: Printing to NetWare print queues when a NetWare server is present.
English
Via LPR: Printing to a Windows LPR spooler over TCP/IP.
Ø
Ø
Via IPP: Printing over the Internet or intranet using the Internet Printing Protocol.
Via E-Mail: This is only available with the IB-21E/22. With this function, a print job can be e-mailed
Ø
to a remote printer, such as over the Internet, using the standard print function in any Windows
application.
Ø
Via NetBEUI: Peer to Peer printing using the NetBEUI protocol. Printers are available in Network
Neighborhood.
Ø
Via Windows Printer Sharing: Printing to a shared network printer which is configured on
another Windows machine.
Which Print Method to Use?
The optimum Windows printing configuration depends upon your particular environment including user
and administrator experience and preferences. Generally, NetWare Print Services will be utilized when
a NetWare server is present. In the absence of a NetWare server, LPR printing in combination with
printer sharing is often utilized when TCP/IP is already in use. NetBEUI Peer to Peer printing is most
often utilized when a centralized NetWare or Windows Print Server is not used. IPP or e-mail printing
is utilized when printing across the Internet is required.
Windows Printing via NetWare
Prior to printing from the Windows client via NetWare, the IB-2x must be configured for NetWare
printing (see the NetWare Printing section). Once NetWare printing is configured, use the Windows
Add Printer wizard (Start, Settings, Printers, Add Printer) to access the IB-2x NetWare print queue
or printer agent. Within the wizard, select Network and browse the network to the IB-2x NetWare print
object.
7
Page 7
Windows Printing via TCP/IP
The following sections cover TCP/IP configuration for Windows 95/98/Me, NT 4.0 and 2000. The IB-2x
provides support for several methods of TCP/IP printing, including the Internet Printing Protocol (IPP)
English
and E-mail printing (for the IB-21E/22 only), both of which enable printing over the Internet.
Windows 95/98/Me LPR or IPP
Verify that TCP/IP is Installed
Check under Start, Settings, Control Panel, Network. If TCP/IP is not on the list, it must be installed
prior to configuring TCP/IP printing.
Configure the IB-2x IP Address
See the IP Address Configuration section later in this guide.
Configure the Port and Install the Printer Driver
1. Insert the CD-ROM (Kyocera Mita Network Library or Kyocera Mita Software Library), select
Configuration and run the KPrint Add Port wizard. The wizard will guide you through the port
configuration. For information on the Print via E-mail option in KPrint, see the section on the
following page on e-mail printing.
2. Run the Windows Add Printer wizard (Start, Settings, Printers, Add Printer).
2.1. When the wizard asks, “How is this printer attached to your computer?”, select Local printer.
2.2. On the list of available ports, select the IPP or LPR port which was created by the KPrint Add
Port wizard.
3. Follow the prompts to complete the Add Printer wizard.
4. Use the following procedure to set the printer for sharing.
4.1. Go to Start, Settings, Control Panel, Network and verify that File and printer sharing
for Microsoft Networks is installed. On the same screen, click the File and Print Sharing
button and click the appropriate checkbox to allow printer sharing.
4.2. Under Start, Settings, Printers, right click on the printer just created with the Add Printer
wizard, select Sharing, click on Shared As and enter the desired Share Name.
Windows NT 4.0 LPR
TCP/IP Required Components
The following steps describe how to check for and, if necessary, add the Windows TCP/IP components
which are necessary for LPR Printing.
1. Check under Start, Settings, Control Panel, Network, Protocols. If TCP/IP Protocol is not in
the list of Network Protocols, click on Add to install it.
2. Select the Services tab. If either Microsoft TCP/IP Printing or Simple TCP/IP Services is not in the
list of Network Services, click on Add to install them.
3. Click on OK when all protocols and services have been added. If the TCP/IP protocol has just
been added, Windows will prompt for the IP address and other TCP/IP parameters. The new
protocols and services will not be available until the system is restarted.
Configure the IB-2x IP Address
See the IP Address Configuration section later in this guide.
8
Page 8
Install the Printer Driver and Configure the Port
1. Insert the CD-ROM included with the printer (Kyocera Mita Software Library or Kyocera Mita
Digital Library), then select the printer driver installation option from the main menu.
2. On the Printer Connection dialog, select Local.
3. On the Select a Printer Port dialog, click on the Add LPR Port button.
4. In the Name or address of server providing lpd: field, enter the IB-2x IP address.
5. In the Name of printer or print queue on that server: field, enter any desired port name, e.g.
LPR1, and click on OK.
6. If the printer is to be shared, then on the appropriate wizard dialog select Shared and enter the
desired share name. Select any other Windows versions which you would like to automatically
receive the driver when connecting to this share.
Windows 95/98/Me, NT 4.0 and 2000 E-mail Printing
The IB-21E/22 offers a new function for e-mail printing. With this function, a print job can be e-mailed to a
remote printer, e.g. over the Internet, using the standard print function in any Windows application.
An IB-21E/22 configured for e-mail printing connects to an e-mail server via POP3 and retrieves emailed print jobs. For information on the setup procedure, see the POP3 and email setup procedure in
the operating instructions (HTML) on the included CD-ROM (Kyocera Mita Network Library or Kyocera
Mita Software Library).
English
Once the IB-21E/22 is configured to retrieve e-mail, KPrint is used to create a port in Windows which
directs print jobs to the printer via e-mail. After creation with KPrint, the port may be selected when
adding a new printer with the Windows Add Printer wizard (“Local printer” is selected for ports created
by KPrint).
A common implementation is to create a shared printer on a Windows server and configure it to use the
e-mail port created by KPrint to e-mail print jobs to a remote office printer. Users can then easily connect
to the shared printer using only the Windows Add Printer wizard and send print jobs to the remote office.
This offers an attractive alternative to faxing.
Windows 2000 Standard TCP/IP Printing
Configure the IB-2x IP Address
See the IP Address Configuration section later in this guide.
Install the Printer Driver and Configure the Port
1. Run the Windows Add Printer wizard (Start, Settings, Printers, Add Printer).
2. Select Local Printer and uncheck Automatically detect and install my Plug and Play printer.
3. Select Create a new port and choose Standard TCP/IP port from the drop down Type list. This
will launch the Add Standard TCP/IP Printer Port wizard.
4. In the Printer Name or IP Address field, enter the IB-2x IP address.
5. In the Port Name field, enter the desired port name or accept the default.
6. After completion of the Add Standard TCP/IP Printer Port wizard, the Add Printer wizard will
continue. Select the appropriate printer model.
7. After assigning the printer a name, the Printer Sharing dialog is displayed. If the printer is to be
shared, select Share As and enter the share name. (Printer Sharing will only be available if the
9
Page 9
File and Printer Sharing service is installed. Check under Start, Settings, Network and Dial-up
Connections, Local Area Connection, Properties.)
8. Follow the prompts to complete the Add Printer wizard.
English
9. If you have selected the printer for sharing and would like other Windows versions to automatically
receive the printer driver when connecting to the printer share, use the following procedure:
9.1. In the Printers dialog, right click on the printer just created with the Add Printer wizard and select
Sharing.
9.2. On the Sharing tab, click Additional Drivers and select the drivers to associate with this printer.
Windows 2000 IPP Printing
Windows 2000 offers printing via the Internet Printing Protocol (IPP). IPP is most often used for printing
across the Internet but may be used for intranet printing as well.
Configure the IB-2x IP Address
See the IP Address Configuration section later in this guide.
Install the Printer Driver and Configure the Port
1. Run the Windows Add Printer wizard (Start, Settings, Printers, Add Printer).
2. Select Network Printer.
3. On the Locate your Printer dialog, select Connect to a printer on the Internet or on your
intranet and enter the URL using syntax as shown in the example: http://212.74.53.19/ipp
4. Follow the prompts to complete the Add Printer wizard.
Windows Printing via NetBEUI
Peer to Peer printing is available using the NetBEUI protocol. With this method, the printers are
conveniently located in Network Neighborhood.
Windows 95/98/Me, NT 4.0, and 2000 Printing via NetBEUI
1. The Windows machine must already be configured to use NetBEUI.
In Windows 95/98/Me, check under Start, Settings, Control Panel, Network.
In Windows NT 4.0, check under Start, Settings, Control Panel, Network, Protocols.
In Windows 2000 check under Start, Settings, Network and Dial-up Connections, Local
Area Connection, Properties.
2. Use the Quick Setup wizard on the CD-ROM (Kyocera Mita Network Library or Kyocera Mita
Software Library) to modify the default Workgroup (KY-NetPrinters) and Printer Name (KYxxxxxx)
to the desired names.
3. In Network Neighborhood, select Entire Network, then open the KY-NetPrinters (or the renamed)
workgroup and select the desired printer.
4. Right click on the Printer icon and select Install. This launches the Windows Add Printer wizard.
Follow the prompts to complete the Add Printer wizard.
5. Printer sharing is not commonly used with NetBEUI printing, however, some admins may want to
utilize sharing on NT 4.0 or 2000 to take advantage of their automatic driver download capability.
For steps on setting up printer sharing, see the Windows NT 4.0 LPR or Windows 2000 Standard
TCP/IP Printing instructions.
10
Page 10
Windows Printer Sharing
Windows printer sharing involves a Windows machine functioning as a “host”. This host acts as a print
server; spooling jobs sent from Windows clients to the shared printer and forwarding them to the
physical printer. Any Windows machine (after 3.1) may function as either a client or a host or both.
The protocols used from client to host and from host to printer do not need to be the same. For example,
if a Windows NT machine is configured to share an LPR printer, clients running only IPX or NetBEUI
can still send jobs to the shared printer. The NT host will accept the jobs over IPX or NetBEUI and send
them to the printer over TCP/IP. This capability provides tremendous flexibility in Windows network
printing architecture.
Creating a Shared Printer
Defining a Shared Printer is part of the process of adding a printer and is explained in each of the
previous Windows sections.
Connecting to a Shared Printer
This section briefly describes the steps for connecting a client to a shared printer. Although slight
variations exist in the procedures for Windows 95/98/Me, NT 4.0, and 2000, such as selecting
Network printer in 95/98/Me or Network printer server in NT 4.0, they are essentially the same and
are thus combined in the following instructions.
English
Connect Windows 95/98/Me, NT 4.0, and 2000 Clients to a Shared Printer
If the host is an NT or 2000 machine which has been configured to download the driver to connecting
clients, then:
Run the Windows Add Printer wizard, select Network printer and browse the network for the shared
printer. The driver will be downloaded automatically.
If the host is a 95/98/Me machine or the NT or 2000 host has not been configured to download the
driver to connecting clients, then:
Install the printer driver from the CD-ROM (Kyocera Mita Software Library or Kyocera Mita Digital
Library) included with the printer. On the Printer Connection screen select Network and browse the
network for the shared printer.
Macintosh Configuration
KPDL (Kyocera Page Description Language) is a PostScript-compatible page description language.
You can check the printer/copier status page to determine whether KPDL is installed on the printer.
The IB-2x supports MacOS 8.x and MacOS 9.x and is compatible with LaserWriter driver version 8.x.
There is very little required setup for Macintosh printing. Once an IB-2x is installed and connected to the
network, the printer appears in the Macintosh Chooser as a LaserWriter device. To enable successful
printing, the user must simply configure the printer to be in KPDL (PostScript) emulation and install the
PostScript Printer Description (PPD) files.
11
Page 11
A Macintosh Setup Utility is included on the CD-ROM (Kyocera Mita Network Library or Kyocera Mita
Software Library) which allows the user to perform management tasks such as remotely configure KPDL
emulation, set the AppleTalk name and zone, and set TCP/IP parameters.
English
l The AppleTalk protocol must be active on your Macintosh computer to support printing to the IB-2x.
IB-2x Setup Utility Installation
1. Load the CD-ROM (Kyocera Mita Network Library or Kyocera Mita Software Library) and double
click the KM Network Library icon on the desktop.
2. Open the Utility folder.
3. Double click the IB-2x Installer.
4. Select the desired language and click OK.
5. Confirm the destination folder or browse to the desired folder. Click Next to begin copying the files.
6. Click Finish to exit the installer.
Setting KPDL Emulation and AppleTalk Name and Zone
1. Open the IB Tools folder and double click Setup Utility to launch the utility.
2. The utility will search for all available IB-2x devices on the AppleTalk network (in the current zone)
and display them in the Printer List. The Setup Utility may be configured to search in a different
AppleTalk zone or to search for printers via TCP/IP. See the on-line IB-2x User’s Manual for
additional information on configuring searches.
3. Double click on the desired printer in the Printer List to open the device configuration window.
4. Click on the Set Emulation icon. Choose the appropriate KPDL option and click SET.
5. Click on the AppleTalk icon. Enter the desired Printer Name as it will be displayed in the Chooser.
Enter the desired Zone Name to indicate the zone that the printer will appear in. An asterisk (*)
indicates the printer will appear in the default zone.
6. Click SET to send the changes to the printer.
7. Setting the AppleTalk name or zone require a reset before they will take effect. Close the device
configuration window and select Reset from the Setup menu.
Installing PPDs and Configuring the Printer
Macintosh support for Kyocera printers and copiers is provided by the LaserWriter driver included with
the Macintosh Operating System and by installation of model specific PPD files. These instructions apply
to Mac OS 8 and 9 only.
1. PPD files are installed from the CD-ROM (Kyocera Mita Software Library or Kyocera Mita Digital
Library) provided with the printer. Insert the CD-ROM, open the appropriate language folder, and
double click on the Installer program.
2. Once PPD installation is complete, select Chooser from the Apple menu to open the Chooser.
3. Select the LaserWriter 8 driver, the AppleTalk Zone (if any) and the IB-2x printer.
4. Click on Create. The driver will automatically select the appropriate PPD file and will display a
dialog allowing selection of the installed printer options.
5. Select installed options as necessary and confirm that the list of installed options matches the printer
configuration. Click on OK. A desktop printer for this model will be built on the desktop. Macintosh
printing configuration is now complete.
12
Page 12

IP Address Configuration
There are many ways to configure the IB-2x IP address parameters. The easiest and most common methods
are: via the Quick Setup wizard, via DHCP,and via the printer’s front panel. The Windows Internet Naming
Service (WINS) is often used in conjunction with DHCP and is therefore also covered in this section.
The Quick Setup wizard allows easy setup of the IP address and many other parameters. See Using the Quick
Setup Wizard earlier in this guide.
DHCP (Dynamic Host Configuration Protocol) Configuration
DHCP provides a mechanism for delivering IP configuration parameters, including IP address, subnet
mask, etc. to devices (hosts) on an IP network. DHCP alleviates the administrative burden of
managing individual IP addresses.
A DHCP server processes IB-2x DHCP Discovery broadcasts and returns an IP address to the IB-2x.
The DHCP server may be set up to grant an IP address for a limited time (a temporary lease) or for an
unlimited time (an unlimited lease), or it may be configured with a permanent address reservation for
each IB-2x.
IMPORTANT: In a non-WINS environment, it is highly recommended to set up the DHCP server to
grant the IB-2x an unlimited lease or permanent address reservation.
English
Unlimited Lease or Address Reservation in Windows NT 4.0 and Windows 2000
In Windows NT and 2000, lease duration is set for a particular scope, or group of addresses. Thus,
lease duration should be set to Unlimited for the scope to which the IB-2x belongs. If this is not
desired, then the IB-2x should be defined as a Reserved Client.
A Reserved Client may be added with the Windows DHCP Manager by selecting Scope and then Add
Reservations. Enter the IB-2x Ethernet address (do not enter the colons, e.g. 008092a371d8), the IP
address and other IP parameters. The Ethernet address may be obtained from the IB-2x Network
Status Page.
Disabling DHCP
If IP address assignment with DHCP is not desired, it may be disabled using the Quick Setup wizard,
the printer front panel, a web browser, or several other methods.
IMPORTANT: Note, however, that DHCP IS AUTOMATICALLY DISABLED when the IP address is
set using any other method such as the Quick Setup wizard, printer front panel, etc.
WINS (Windows Internet Naming Service) Configuration
WINS is used by Windows NT to provide a mechanism for mapping the NetBIOS name, commonly
referred to as host name, to an IP address. WINS requires an NT or 2000 server to be configured as a
WINS server.
WINS enables defining a printing configuration which references the printer by its name rather than by
its IP address. Thus, even if the printer IP address is changed via DHCP, the printing configuration will
still be valid and printing will continue uninterrupted. Another advantage of WINS is that a new printer
may seemlessly replace an old printer simply by, 1) giving the new printer the same host name as the
old printer, or 2) modifying the Windows LPR port configuration for the old printer with the host name
ofthe new printer.
13
Page 13

WINS Registration and Naming
The IB-2x must be given the address of the primary WINS server where it will register its host name. It
may optionally be given the address of a secondary WINS server. The DHCP server is often setup to
English
provide the IB-2x with its host name and the WINS server addresses. Refer to your DHCP server
documentation for the proper setup procedures. Alternatively, the host name and WINS server
addresses may be configured using a web browser or the IB-2x AdminManager utility. See the
Security and Followup Management section later in this guide for information on using these utilities.
WINS registration may be verified by printing the IB-2x Network Status Page. Once the IB-2x has
successfully registered with a WINS server, the WINS Status will show as Registered in the TCP/IP
section.
IP Address Setup with the Printer Front Panel
The following applies to Kyocera Mita printers. See the copier operation manual for information on the
front panel settings for copiers.
1. Press the MENU key. If the first line of the LED panel does not already display INTERFACE, press
∧∧
∨∨
∧
∨
∧∧
the
2. If the line below INTERFACE does not already display OPTION, press the ENTER key, then
∨∨
∨
∨∨
until OPTION is displayed and press ENTER.
3. Press the > key to enter the Option submenu. (Note: Some older printers may not support front
panel setup. If there is no Option submenu or not all choices are available on the submenu,
please check the firmware requirements listed in the following section.)
4. Press
accessible when the TCP/IP protocol is On).
5. Press
the last digit of the IP address.
6. Press the < or > key to move the cursor to the desired digit to change. Press
value of a digit.
7. Once all digits are set as desired, press the ENTER key to accept the new address.
8. Repeat steps 5 - 7 for Subnet Mask and Default Gateway (the router’s IP address). If unsure of
the correct Subnet mask and the first number in the IB-2x IP address is from 192 to 254, then use
255.255.255.0 as the Subnet mask.
9. When all settings for IP Address, Subnet Mask, and Default Gateway are completed, press the <
key to return to the Option submenu (TCP/IP is displayed).
Note: It is recommended to turn off protocols that are not in use.
10. Optional: Press
and a ? will appear next to On. Press
the new value. Repeat for each protocol to turn off.
11. Press the < key to return to the Interface menu (Option is displayed).
∨∨
or
key until INTERFACE is displayed.
∧∧
∨∨
∧
∨
∧∧
∨∨
or
until TCP/IP is displayed. Press the > key to enter the TCP/IP submenu (only
∧∧
∨∨
∧
∨
∧∧
∨∨
or
until IP Address is displayed. Press the ENTER key and a cursor will appear under
∧∧
∨∨
∧
∨
∧∧
∨∨
or
to display the protocol to turn off, e.g. EtherTalk. Press the ENTER key
∧∧
∧
∧∧
∧∧
∨∨
∧
∨
∧∧
∨∨
or
to change the
∨∨
∨
∨∨
or
to toggle the value to Off and press ENTER to accept
∧∧
∧
∧∧
or
∧∧
∨∨
∧
∨
∧∧
∨∨
or
12. Press
until Print Status Page is displayed. Press the ENTER key twice to print a status
page and verify the new settings.
13. When completed, press the MENU key to exit the menu system.
14
Page 14

IP Address Persistence
When the printer is turned off and back on will the IB-2x retain its IP address?
Temporary: If a temporary address is obtained from the DHCP server, an IP address is set tempo-
rarily. That is, when the printer is turned off and back on, the IB-2x does not begin using its IP address
until it has negotiated with a DHCP server. Thus, if a DHCP server is not available, the IB-2x will not
have an IP address. This is necessary to prevent IP address conflicts in a DHCP environment.
Permanent: If an unlimited lease or address reservation is obtained from a DHCP server, or if set by
any method other than DHCP, then the IP address is permanent. This means that the initially set IP
address will be applied even after the printer is turned off and restarted.
Security and Followup Management
While this guide focuses on the initial configuration of the IB-2x, this section is included to give a brief
explanation of security and available options for ongoing IB-2x management.
Password Security
An Admin password is used to control unauthorized modification of IB-2x settings. The factory default is
a blank Admin password. Unless an Admin password is defined, anyone with access through a web
browser or any of the IB-2x utilities may change the IB-2x settings. Therefore, defining an Admin
password is recommended.
English
WARNING: If the Admin password is forgotten, the only way to recover is to reset the IB-2x back to its
factory default condition (by using a jumper setting as described in Troubleshooting of the User’s
Manual contained as an html format in the CD-ROM (Kyocera Mita Network Library or Kyocera Mita
Software Library) supplied with this product).
Web Browser
If the IB-2x is used on a TCP/IP network and has a valid IP address, it may be managed from any web
browser. The browser allows full configuration of all IB-2x settings, however, unlike the Quick Setup
wizard, the browser cannot create NetWare print objects. If a browser is used for NetWare configuration, then NWAdmin must also be used to create the NetWare print objects.
Connect to the IB-2x with a web browser by entering the IP address as the URL, e.g. http://
206.129.6.54
The home page displays basic information about the printer/copier and the IB-2x as well as the current
status of the printer and the current printer front panel display. When you click the Refresh button, the
message display shown on the browser will be updated.
Select a category from the navigation bar on the left to view and set values for that category. If the IB-2x
Admin password has been set, you will be prompted to enter a user name and password when
entering any screens where values may be modified. For user name enter any name, including blank.
If no Admin password has been set, access to all other pages is unrestricted. The Admin password may
be defined on the Security tab.
Quick Setup Wizard
The Windows-based Quick Setup wizard is designed for fast and easy initial configuration. It does not
include all possible IB-2x settings, however, for changing the basic settings, it is also convenient for
followup configuration. For more information, see Using the Quick Setup Wizard earlier in this guide.
15
Page 15

AdminManager
The Windows-based AdminManager utility may be used in either an IP or IPX environment to fully
configure any of the IB-2x settings. AdminManager may be installed or run from the CD-ROM (Kyocera
English
Mita Network Library or Kyocera Mita Software Library) by selecting Advanced Setup from the
Configuration menu.
KM-NET VIEWER
Ongoing printer management and monitoring is often done with the Windows-based KM-NET VIEWER.
KM-NET VIEWER allows advanced grouping, filtering, and sorting of multiple Kyocera Mita and other
vendor printers or copiers. It provides several options for notification of printer warnings or errors and
may be used to view or modify a wide variety of printer and IB-2x settings. KM-NET VIEWER is
available on the provided CD-ROM (Kyocera Mita Software Library or Kyocera Mita Digital Library).
Wireless Networking
With the IB-22, all IB-21E networking functionality, including TCP/IP, NetWare, AppleTalk, Web based
management, etc., is now available in a wireless network. The IB-22 supports wireless networking as
defined by the 802.11b standard and will interoperate with other devices that support this standard.
This section explains how to connect the IB-22 to your wireless network.
Modes of Operation
The IB-22 supports the following modes of operation:
Infrastructure: One or more Access Points (also called Base Stations) are used to create a wireless
Ø
network and may also be used to connect the wireless network to a wired network.
802.11 Ad hoc : Direct connection between wireless devices without using an Access Point. This
Ø
mode uses the Service Set Identification (SSID). SSID acts as a logical network identifier.
Ø
Ad hoc: Direct connection between wireless devices without using an Access Point. This mode
does not use the SSID.
Automatic: Automatically detect one of the modes above. This is the IB-22 default.
Ø
Encryption
Wired Equivalent Privacy (WEP) is a security protocol that is intended to provide wireless data with
security equivalent to data on a standard wired network. WEP uses 64 bit (also called 40 bit) or 128 bit
encryption; both of which are supported by the IB-22.
IB-22 Automatic Configuration
The IB-22 will automatically detect and connect to an 802.11b wireless network, except when:
Ø The wireless network is using encryption, or
Ø SSID broadcasts are disabled, or
Ø The PC and the IB-22 are not set to the same channel when in Ad hoc mode, or
Ø Multiple distinct wireless networks are accessible (the IB-22 may not connect to the desired
network).
If any of the above are applicable to your network, refer to the IB-22 Manual Configuration section.
If automatic configuration can be used on your network, you only need to confirm that the IB-22 has
made a successful connection.
16
Page 16

Confirming Successful Connection
With DHCP: If your network has a DHCP server, print a status page or view the IP address on the front
panel to verify that the IB-22 obtained an IP address. If it has obtained an IP address, then connection
to the network is confirmed.
Without DHCP: If no DHCP server is present, set the IB-22 IP address using the operator panel (see IP
Address Setup with the Printer Operator Panel) and connect to the IB-22 using a browser, e.g. http://
192.168.10.240. If the browser connection is successful, then connection to the network is confirmed.
Once connection to the network is confirmed, proceed with IB-22 protocol setup in the same manner as
with any IB-2x by referring to the appropriate sections of this manual.
If the IB-22 is not able to establish connection to the network, manual configuration will be necessary. In
some cases it may be desirable to return the IB-22 to its factory default settings.
For information on how to restore the factory default settings, see the troubleshooting section of the
operating manual (HTML) on the included CD-ROM (Kyocera Mita Network Library or Kyocera Mita
Software Library).
IB-22 Manual Configuration
If the IB-22 cannot automatically connect to the network, such as when encryption is enabled, use the
following procedure:
English
1. Set a PC to 802.11 Ad hoc mode (or Ad hoc mode) with WEP encryption disabled and set the
channel to match the IB-22 channel. The IB-22 default channel is 11. Refer to your PC wireless
LAN adapter instructions if necessary.
2. Turn on the IB-22 printer.
3. Set the IB-22 IP address at the operator panel (see IP Address Setup with the Printer Operator
Panel).
4. Connect to the IB-22 by entering the IP address in a browser, e.g.
http://192.168.10.240
5. Select Wireless LAN from the navigation panel.
6. The Wireless LAN Mode will be detected by the IB-22, however, if there are wireless networks of
different modes available, set the mode to match the network that you want to connect to.
7. Set SSID to match your wireless network (Infrastructure or 802.11 Ad hoc modes only).
8. Set Channel to match your wireless network.
9. If using WEP:
a. Set Encryption (WEP) to 64 bit (also called 40 bit) or 128 bit to match your wireless network.
b. Set the WEP Key to match your wireless network. For 64 bit, your key will be 5 pairs of
hexadecimal characters, e.g. 4C 75 63 6B 79. For 128 bit, your key will be 13 pairs of
hexadecimal characters.
WARNING: Be sure to enter your key correctly. If you enter the key incorrectly, you will no
longer be able to connect to the IB-22 and you will have to reset to factory defaults to clear the
incorrect WEP key.
10. Click Submit to send your new settings to the IB-22. To verify communication, see Confirming
Successful Connection.
17
Page 17

English
18
Page 18

Inhaltsverzeichnis
Einleitung ..................................................................................... 20
Kyocera Mita Network Library CD-ROM .................................... 20
IB-2x-Hardware-Installation ........................................................ 21
Verwenden des Schnell-Setup-Assistenten .............................. 21
Drucken mit NetWare .................................................................. 22
NetWare 3.x ..............................................................................................................22
NetWare 4.x, 5.x und 6.x...........................................................................................22
Drucken mit Windows ................................................................. 23
Drucken mit Windows über NetWare.......................................................................23
Drucken mit Windows über TCP/IP .........................................................................24
Drucken mit Windows über NetBEUI .......................................................................27
Windows-Druckerfreigabe........................................................................................27
Deutsch
Macintosh-Konfiguration ............................................................ 29
Installieren des IB-2x Setup-Hilfsprogramms ..........................................................2 9
Einstellen der KPDL-Emulation und des AppleTalk-Namens
und der AppleTalk-Zone ............................................................................................29
Installieren von PPDs und Konfigurieren des Druckers ............................................30
Konfigurieren der IP-Adresse .................................................... 30
Konfigurieren über DHCP (Dynamic Host Configuration Protocol) ........................... 31
Konfigurieren über WINS (Windows Internet Naming Service).................................31
Einrichten der IP-Adresse über das Bedienfeld des Druckers .................................. 32
Bewahren der IP-Adresse ......................................................................................... 33
Sicherheit und nachfolgende Verwaltung ................................. 33
Paßwortsicherheit......................................................................................................33
Web-Browser.............................................................................................................33
Schnell-Setup-Assistent ............................................................................................34
AdminManager ..........................................................................................................34
KM-NET VIEWER .....................................................................................................34
Wireless Networking ................................................................... 34
Betriebsarten .............................................................................................................34
Verschlüsselung ........................................................................................................35
IB-22 – Automatische Konfiguration..........................................................................35
Erfolgreiche Verbindungsherstellung bestätigen.......................................................35
IB-22 – Manuelle Konfiguration .................................................................................36
19
Page 19

Einleitung
Vielen Dank für den Erwerb der hochwertigen Kyocera Mita IB-2x-Produkte für den Druck im
Netzwerk. Wir sind überzeugt, daß Sie von der außergewöhnlichen Leistung und den günstigen
Anschaffungs- und Instandhaltungskosten, durch die sich alle Produkte von Kyocera/ Kyocera Mita
auszeichnen, beeindruckt sein werden.
Dies ist eine interne Netzwerkschnittstellenkarte fur Drucker und Digitalkopierer von Kyocera Mita. Sie
kann einfach installiert werden, ohne dass die Hauptplatine des Druckers herausgenommen werden
Deutsch
muss.
IB-2x ermöglicht den Druckern und digitalen Kopierern von Kyocera Mita die Kommunikation mit vielen
verschiedenen Netzwerk-Betriebssystemen wie Windows, NetWare, Macintosh und UNIX über ein
Ethernet-Netzwerk.
Diese Konfigurations-Kurzanleitung liefert präzise Anleitungen zur Software-Konfiguration, anhand
derer ein erfahrener Systemverwalter die IB-2x blitzschnell installieren und in Betrieb nehmen kann.
Antworten auf Ihre Fragen finden Sie in der Bedienungsanleitung auf der beiliegenden CD-ROM
(Kyocera Mita Network Library oder Kyocera Mita Software Library).
Kyocera Mita Network Library CD-ROM
Nach Einlegen der KMNL-CD-ROM in das Laufwerk wird das Hauptmenü angezeigt. Wird das
Hauptmenü nicht automatisch angezeigt, die Datei Setup.exe im Stammverzeichnis der CD-ROM
ausführen. Die vorliegende Konfigurations-Kurzanleitung enthält Informationen zu den folgenden
Dienstprogrammen im Abschnitt Konfiguration der CD-ROM:
Schnell-Setup-Assistent: Eine Assistenten-Schnittstelle zum Konfigurieren der notwendigen
Einstellungen für eine schnelle Installation und einen schnellen Druck mit IB-2x.
Erweitertes Setup: Sie ermöglicht erweiterte Einstellungen und die Überwachung der
Netzwerkschnittstellenkarte.
KPrint:
Installiert einen Client-Anschluß-Monitor, damit der TCP/IP-Druck unter Windows über jeden
angeschlossenen IB-2x Kyocera Mita Drucker/Kopierer möglich ist. Bei Verwendung der IB-20/21
unterstützt KPrint den LPR- und IPP-Druck unter Windows 95/98/Me. Bei Verwendung der IB-21E/22
unterstützt KPrint zusätzlich das Drucken per E-Mail unter Windows 95/98/Me/NT4/2000
.
Warenzeichen
KYOCERA®, KYOCERA MITA® sind eingetragene Warenzeichen der Kyocera Corporation. NetWare® ist ein eingetragenes Warenzeichen
von Novell, Incorporated. Windows ® ist ein eingetragenes Warenzeichen der Microsoft Corporation. Macintosh ® ist ein eingetragenes
Warenzeichen von Apple Computer, Incorporated. PostScript® und Acrobat® sind eingetragene Warenzeichen von Adobe Systems,
Incorporated. Alle anderen hierin genannten Produkte sind Warenzeichen oder eingetragene Warenzeichen der entsprechenden Firmen.
FCC-Hinweis:
Das Gerät entspricht Teil 15 der Regeln des FCC. Der Betrieb unterliegt den folgenden zwei Bedingungen: (1) dieses Gerät kann
Funkstörungen verursachen und (2) dieses Gerät muß alle empfangenen Störungen annehmen, einschliesslich Störungen, die zu
unerwünschtem Betrieb führen können.
20
Page 20

IB-2x-Hardware-Installation
IB-2X ist eine Einschub-Schnittstellenkarte. Sie kann einfach installiert werden, ohne dass die
Hauptplatine des Druckers herausgenommen werden muss.
Deutsch
1.Entfernen Sie die Schrauben von der
Abdeckung des Steckplatzes f
Erweiterungs-Schnittstellen am
Drucker/Kopierer und nehmen Sie dann
die Abdeckung ab.
ür
2.Setzen Sie die Karte so ein, dass ihre Kanten mit
den Schienen des Schnittstellen-Steckplatzes
fluchten und befestigen Sie sie anschliesend mit den
in Schritt 1 entfernten Schrauben.
Verwenden des Schnell-Setup-Assistenten
Der Assistent ist einfach zu verwenden. Dieses Kapitel enthält weitere Informationen zum Ermitteln
des Druckers und Herstellen einer Verbindung zum Drucker. Die CD-ROM (Kyocera Mita Network
Library oder Kyocera Mita Software Library) einlegen und Schnell-Setup-Assistent im
Konfigurationsabschnitt von IB-2x wählen.
Wird der Auswahl-Bildschirm des Druckers angezeigt. Schnell-Setup ermittelt Drucker entweder
über IPX oder über IP, solange das Protokoll auf dem Windows-Computer installiert ist, auf dem
Schnell-Setup läuft. Wenn z. B. nur IPX installiert ist, ermittelt Schnell-Setup nur IPX-Drucker.
Wenn ein Drucker nicht in der Liste erscheint, kann die Ermittlung durch Eingabe seiner EthernetAdresse im entsprechenden Feld erfolgen. Die Ethernet-Adresse kann auf der IB-2x-Netzwerkstatus-Seite gefunden werden. Wenn ein IP-Drucker sich nicht im lokalen Netzabschnitt befindet,
muß er auch eine korrekt konfigurierte Standard-Gateway-Adresse haben und der bzw. die
Netzwerkrouter müssen so konfiguriert sein, daß sie IP-Broadcast-Sendungen weiterleiten.
Wenn ein Drucker nicht durch Schnell-Setup ermittelt werden kann, (z. B. wenn IPX nicht
verwendet wird und IP-Broadcast-Sendungen nicht weitergeleitet werden), muß für die Einrichtung
ein Web-Browser oder AdminManager verwendet werden. In einem Web-Browser sind IPBroadcast-Sendungen nicht notwendig, da die IP-Adresse direkt eingegeben wird. In
AdminManager können spezifische Netzwerke für die Suche definiert werden. Für weitere
Informationen über die Verbindung mittels Web-Browser oder AdminManager siehe den Abschnitt
Sicherheit und nachfolgende Verwaltung.
21
Page 21
Drucken mit NetWare
NetWare bietet eine Reihe von Druckoptionen. Im Folgenden werden die verschiedenen Druckmethoden für jede NetWare-Version und die Einrichtung des Drucks für jede dieser Methoden
beschrieben.
NetWare 3.x
NetWare 3.x unterstützt nur Bindery-basiertes Drucken. Zwei Modi werden unterstützt: 1) Druckserver-
Deutsch
Modus und 2) Ferndrucker-Modus.
Druckserver-Modus (empfohlen) IB-2x fungiert als Druckserver und fragt die Warteschlange nach
durchzuführenden Aufträgen ab. In diesem Modus wird ein NetWare-Anmeldeschlitz (z. B. 1 Benutzerlizenz) verwendet.
Ferndrucker-Modus IB-2x fungiert als Ferndrucker und akzeptiert Aufträge von einem Duckserver, der
auf einer speziell dafür eingerichteten Arbeitsstation oder einem Dateiserver läuft. In diesem Modus
wird keine NetWare-Benutzerlizenz benötigt.
NetWare 3.x Bindery
1. Den Schnell-Setup-Assistenten auf der CD-ROM (Kyocera Mita Network Library oder Kyocera
Mita Software Library) ausführen.
2. Im NetWare-Abschnitt Bindery-Setup wählen. Alle erforderlichen NetWare-Objekte werden vom
Schnell-Setup-Assistenten erstellt.
3. Nachdem der Assistent abgelaufen ist, einige Minuten warten und dann die Statusseiten über das
Bedienfeld des Druckers ausdrucken. Die IB-2x-Statusseite auf NetWare-Verbindungsinformationen prüfen und ob für den Status Bereit angezeigt wird.
4. Die Windows-Clients so einrichten, daß sie in die dazugehörige Warteschlange drucken (siehe
den Abschnitt Drucken in Windows über NetWare)
NetWare 4.x, 5.x und 6.x
NetWare 4.x, 5.x und 6.x unterstützen den NetWare Directory Services (NDS)-Druck. Damit eine
Rückwärtskompatibilität gewährleistet wird, wird der Bindery-basierte Druck ebenfalls unterstützt.
Druckserver-Modus und Ferndrucker-Modus (siehe Beschreibungen im vorangehenden Abschnitt)
werden für NDS unterstützt. Für den Bindery-Druck wird jedoch nur der Druckserver-Modus
unterstützt.
NetWare NDS oder Bindery
1. Den IB-2x Schnell-Setup-Assistenten auf der CD-ROM (Kyocera Mita Network Library oder
Kyocera Mita Software Library) ausführen.
2. Im NetWare-Abschnitt NDS-Setup (empfohlen) oder Bindery-Setup wählen. Alle erforderlichen
NetWare-Objekte werden vom Schnell-Setup-Assistenten erstellt.
3. Nachdem der Assistent abgelaufen ist, einige Minuten warten und dann die Statusseiten über das
Bedienfeld des Druckers ausdrucken. Die IB-2x-Statusseite auf NetWare-Verbindungsinformationen prüfen und ob für den Status Bereit angezeigt wird.
4. Die Windows-Clients so einrichten, daß sie in die dazugehörige Warteschlange drucken (siehe
den Abschnitt Drucken in Windows über NetWare)
22
Page 22

NetWare NDPS
1. Das Kyocera NDPS Gateway von der CD-ROM (Kyocera Mita Network Library oder Kyocera
Mita Software Library) installieren. Im Hauptmenü der CD-ROM Novell NDPS auswählen. Das
Gateway unterstützt NetWare 5.x und 6.x. Bei Einsatz von NetWare 4.x siehe die Anforderungen
in der Readme.txt-Datei, die mit dem Gateway auf der CD enthalten ist.
2. Das Gateway unterstützt den IPX- und IP-Druck Bei Verwendung des IP-Drucks (empfohlen) die
IB-2x-IP-Adresse einstellen (siehe den Abschnitt Konfigurieren der IP-Adresse)
3. Den Druckeragenten für den Drucker mit Hilfe von NWAdmin erstellen. Für weitere Informationen
siehe das Verwalterhandbuch (im PDF-Format), das mit dem Gateway geliefert wird.
4. Die Windows-Clients so konfigurieren, daß sie zum Druckeragenten drucken.
Drucken mit Windows
Windows umfasst eine Vielzahl von Client-Versionen, von Windows 3.1 bis Windows XP, und deshalb
auch eine Vielzahl von Druckfähigkeiten. Die verschiedenen Windows-Versionen zusammen mit der IB2x-Karte bieten folgende Netzwerk-Druckfähigkeiten:
••
• Über Novell NetWare: Druck in NetWare-Druckwarteschlangen, wenn ein NetWare-Server
••
vorhanden ist:
Deutsch
••
• Über LPR: Druck zu einem Windows LPR-Spooler über TCP/IP.
••
••
• Über IPP: Druck über das Internet oder ein Intranet mittels dem Internet Printing Protocol (IPP).
••
••
• Über E-Mail: Nur bei der IB-21E/22-Karte verfügbar. Hiermit kann ein Druckauftrag unter
••
Verwendung der Standarddruckfunktion in jeder Windows-Anwendung an einen entfernten
Drucker gesendet werden (z. B. über das Internet).
••
• Über NetBEUI: Peer-to-Peer-Druck mittels dem NetBEUI-Protokoll. Drucker stehen unter
••
Netzwerkumgebung zur Verfügung.
••
• Über Windows Druckerfreigabe: Druck auf einem gemeinsam benutzten Netzwerkdrucker, der auf
••
einem anderen Windows-Computer konfiguriert ist.
Welche Druckmethode sollte verwendet werden?
Die optimale Windows-Druckkonfiguration hängt von der jeweiligen spezifischen Umgebung ab sowie
von der Erfahrung und den Vorlieben von Benutzer und Verwalter. Im allgemeinen werden NetWare
Print Services verwendet, wenn ein NetWare-Server vorhanden ist: Ist kein NetWare-Server
vorhanden, wird oft der LPR-Druck zusammen mit einem gemeinsam benutzten Drucker eingesetzt,
wenn TCP/IP bereits verwendet wird. NetBEUI Peer-to-Peer-Druck wird meist dann eingesetzt, wenn
kein zentraler NetWare- oder Windows-Druckserver verwendet wird. IPP oder Drucken per E-Mail wird
verwendet, wenn über das Internet gedruckt werden soll.
Drucken mit Windows über NetWare
Bevor der Druck vom Windows-Client über NetWare möglich ist, muß IB-2x für den Druck mit NetWare
konfiguriert werden (siehe den Abschnitt Drucken mit NetWare). Nachdem der NetWare-Druck
konfiguriert ist, mit dem Windows-Druckerinstallations-Assistenten (Start, Einstellungen, Drucker,
Drucker hinzufügen) auf die NetWare-Warteschlange oder den NetWare-Druckeragenten von IB-2x
zugreifen. Im Assistenten Netzwerk auswählen und das Netzwerk nach dem IB-2x-NetWareDruckobjekt durchsuchen.
23
Page 23

Drucken mit Windows über TCP/IP
In den folgenden Abschnitten wird die TCP/IP-Konfiguration für Windows 95/98/Me, NT 4.0 und 2000
beschrieben. Die IB-2x-Karte unterstützt verschiedene Methoden des TCP/IP-Drucks, einschließlich
das Internet Printing Protocol (IPP) und Drucken per E-Mail (nur bei der IB-21E/22-Karte), mit denen
über das Internet gedruckt werden kann.
Windows 95/98/Me LPR oder IPP
Deutsch
Überprüfen, ob TCP/IP installiert ist.
Dazu unter Start, Einstellungen, Systemsteuerung, Netzwerk nachsehen. Wenn TCP/IP nicht in
der Liste erscheint, muß es vor dem Konfigurieren des TCP/IP-Drucks installiert werden.
Die IB-2x-IP-Adresse konfigurieren.
Siehe hierzu den Abschnitt Konfigurieren der IP-Adresse weiter hinten in dieser Kurzanleitung.
Den Druckertreiber installieren und die Anschluß konfigurieren.
1. Die CD-ROM (Kyocera Mita Network Library oder Kyocera Mita Software Library) einlegen,
Konfiguration wählen und den KPrint-Anschlußinstallations-Assistenten ausführen. Der Assistent
gibt die zur Anschlußkonfiguration notwendigen Schritte an. Für Informationen über die Option
Drucken per E-Mail in KPrint siehe den entsprechenden Abschnitt auf der folgenden Seite.
2. Den Windows-Druckerinstallations-Assistenten ausführen (Start, Einstellungen, Drucker,
Drucker hinzufügen).
2.1. Wenn der Assistent danach fragt, wie der Drucker an den Computer angeschlossen ist,
Lokaler Drucker auswählen.
2.2. In der Liste der verfügbaren Drucker den IPP- oder LPR-Anschluß wählen, der durch den
KPrint-Anschlußinstallations-Assistenten erstellt wurde.
3. Die Aufforderungen befolgen, um den Druckerinstallations-Assistenten abzuschließen.
4. Die folgenden Schritte beschreiben, wie der Drucker für eine gemeinsame Benutzung eingerichtet
wird.
4.1. Start, Einstellungen, Systemsteuerung, Netzwerk wählen und sicherstellen, daß Datei
und Druckerfreigabe für Microsoft Netzwerke installiert ist. Im gleichen Bildschirm auf
Datei- und Druckerfreigabe klicken und anschließend auf das entsprechende
Kontrollkästchen klicken, um die gemeinsame Druckerbenutzung zu ermöglichen.
4.2. Unter Start, Einstellungen, Drucker mit der rechten Maustaste auf dem soeben mit dem
Druckerinstallations-Assistenten erstellten Drucker klicken, Freigabe wählen, auf
Freigegeben als klicken und den gewünschten Freigabenamen eingeben.
Windows NT 4.0 LPR
Für TCP/IP erforderliche Komponenten
Die folgenden Schritte beschreiben, wie die für den LPR-Druck erforderlichen Windows TCP/IP-
Komponenten überprüft und ggf. hinzugefügt werden.
1. Unter Start, Einstellungen, Systemsteuerung, Netzwerk, Protokolle nachsehen. Wenn TCP/IP
Protokoll nicht in der Liste der Netzwerkprotokolle erscheint, auf Hinzufügen klicken, um es zu
installieren.
24
Page 24
2. Das Register Services wählen. Wenn weder Microsoft TCP/IP Druck noch Simple TCP/IP
Services in der Liste der Netzwerkdienste erscheinen, auf Hinzufügen klicken, um sie zu
installieren.
3. Nachdem alle Protokolle und Services hinzugefügt wurden auf OK klicken. Wenn das TCP/IPProtokoll gerade hinzugefügt wurde, fragt Windows nach der IP-Adresse und weiteren TCP/IPParametern. Die neuen Protokolle und Services stehen erst zur Verfügung, wenn das System
erneut gestartet wird.
Die IB-2x-IP-Adresse konfigurieren.
Siehe hierzu den Abschnitt Konfigurieren der IP-Adresse weiter hinten in dieser Kurzanleitung.
Den Druckertreiber installieren und den Anschluß konfigurieren.
1. Legen Sie die dem Drucker beiliegende CD-ROM ein (Kyocera Mita Software Library oder
Kyocera Mita Digital Library) und wählen Sie dann im Hauptmenü die Option für die
Druckertreiberinstallation aus.
2. Im Dialogfeld Druckerverbindung Lokal wählen.
3. Im Dialogfeld Druckeranschluß wählen auf LPR-Anschluß hinzufügen klicken.
4. Im Feld Name oder Adresse des Hosts, der lpd bereitstellt: die IB-2x-IP-Adresse eingeben.
5. Im Feld Name des Druckers auf dem Computer: den gewünschten Anschlußnamen, z. B.
LPR1, eingeben und dann auf OK klicken.
Deutsch
6. Wenn der Drucker gemeinsam benutzt werden soll, im entsprechenden Dialogfeld des Assistenten
Freigabe wählen und den gewünschten Freigabenamen eingeben. Alle weiteren WindowsVersionen wählen, die den Treiber automatisch erhalten sollen, wenn eine Verbindung zu diesem
Freigabenamen aufgebaut wird.
Drucken mit Windows 95/98/Me, NT 4.0 und 2000 per E-Mail
Die IB-21E/22-Karte bietet eine neue Funktion, mit der per E-Mail gedruckt werden kann. Hiermit kann
ein Druckauftrag unter Verwendung der Standarddruckfunktion in jeder Windows-Anwendung an einen
entfernten Drucker gesendet werden (z. B. über das Internet).
Eine für das Drucken per E-Mail konfigurierte IB-21E/22-Karte wird mit dem E-Mail-Server über POP3
verbunden und ruft dann die E-Mail-Druckaufträge ab. Informationen zur Einrichtung erhalten Sie im
Abschnitt über die Einrichtung von POP3 und E-Mail in der Bedienungsanleitung (HTML) auf der
beiliegenden CD-ROM (Kyocera Mita Network Library oder Kyocera Mita Software Library).
Nachdem die IB-21E/22-Karte für den Abruf von E-Mail konfiguriert ist, wird mit KPrint ein Anschluß in
Windows erstellt, über den Druckaufträge per E-Mail an den Drucker gesendet werden. Nach dem
Erstellen des Anschlusses mit KPrint kann dieser im Windows-Druckerinstallationsassistenten als neuer
hinzuzufügender Drucker ausgewählt werden („Lokaler Drucker“ wird für Anschlüsse gewählt, die
durch KPrint erstellt wurden).
Eine häufig eingesetzte Implementierung ist die Erstellung eines freigegebenen Druckers auf einem
Windows-Server. Der Server wird dann so konfiguriert, daß er den durch KPrint erstellten E-MailAnschluß zum Senden von Druckaufträgen per E-Mail an einen Drucker in einem entfernt gelegenen
Büro verwendet. Die Benutzer können in diesem Fall mit dem Windows-Druckerinstallationsassistenten
problemlos eine Verbindung zum freigegebenen Drucker herstellen und Druckaufträge an das entfernt
gelegene Büro senden. Dies ist eine attraktive Alternative zum Senden per Fax-Mitteilung.
25
Page 25
Windows 2000 Standard-TCP/IP-Druck
Die IB-2x-IP-Adresse konfigurieren.
Siehe hierzu den Abschnitt Konfigurieren der IP-Adresse weiter hinten in dieser Kurzanleitung.
Den Druckertreiber installieren und den Anschluß konfigurieren.
1. Den Windows-Druckerinstallations-Assistenten ausführen (Start, Einstellungen, Drucker,
Deutsch
Drucker hinzufügen).
2. Lokaler Drucker wählen und Automatische Erkennung und Installation von Plug and Play
Druckern deaktivieren.
3. Einen neuen Anschluss erstellen wählen und Standard TCP/IP-Anschluss aus dem
Listenmenü Typ wählen. Der Installationsassistent für eines Standard TCP/IP-Druckeranschluß
wird gestartet.
4. Im Feld Druckername oder IP-Adresse die IB-2x-IP-Adresse eingeben.
5. Im Feld Anschlußname den gewünschten Anschlußnamen eingeben oder die Vorgabe
akzeptieren.
6. Nach Abschluß des Installationsassistenten für den Standard TCP/IP Druckeranschluß fährt der
Druckerinstallations-Assistent fort. Das geeignete Druckermodell wählen.
7. Nach dem Zuordnen eines Namens für den Drucker wird das Dialogfeld Druckerfreigabe
angezeigt. Soll der Drucker gemeinsam benutzt werden, Freigegeben als wählen und den
Freigabenamen eingeben. (Die Druckerfreigabe steht nur zur Verfügung, wenn der Datei- und
Druckerfreigabedienst installiert wurde. Unter Start, Einstellungen, Netzwerk und DF-
Verbindungen, LAN-Verbindung, Eigenschaften prüfen.)
8. Die Aufforderungen befolgen, um den Druckerinstallations-Assistenten abzuschließen.
9. Wenn die Druckerfreigabe gewählt wurde und andere Windows-Clients nach Herstellung der
Verbindung zum freigegebenen Drucker automatisch den richtigen Druckertreiber erhalten sollen,
das folgende Verfahren verwenden:
9.1. Im Dialogfeld Drucker mit der rechten Maustaste auf den soeben mit dem
Druckerinstallations-Assistenten erstellten Drucker klicken und Freigabe wählen.
9.2. Im Register Freigabe auf Zusätzliche Treiber klicken und die mit diesem Drucker
assoziierten Treiber wählen.
Windows 2000 IPP-Druck
Mit Windows 2000 ist der Druck über das Internet Printing Protocol (IPP) möglich. IPP wird meist zum
Drucken über das Internet verwendet, kann aber auch zum Drucken im Intranet verwendet werden.
Die IB-2x-IP-Adresse konfigurieren.
Siehe hierzu den Abschnitt Konfigurieren der IP-Adresse weiter hinten in dieser Kurzanleitung.
Den Druckertreiber installieren und den Anschluß konfigurieren.
1. Den Windows-Druckerinstallations-Assistenten ausführen (Start, Einstellungen, Drucker,
Drucker hinzufügen).
2. Netzwerkdrucker wählen.
26
Page 26

3. Im Dialogfeld Drucker suchen Mit einem Drucker im Internet oder Intranet verbinden wählen
und die URL eingeben. Dabei die Syntax wie im folgenden Beispiel verwenden: http://
212.74.53.19/ipp
4. Die Aufforderungen befolgen, um den Druckerinstallations-Assistenten abzuschließen.
Drucken mit Windows über NetBEUI
Der Peer-to-Peer-Druck ist bei Verwendung des NetBEUI-Protokolls verfügbar. Bei dieser Methode
befinden sich die Drucker unter Netzwerkumgebung.
Drucken mit Windows 95/98/Me, NT 4.0 und 2000 über NetBEUI
1. Der Windows-Computer muß bereits für die Verwendung von NetBEUI konfiguriert sein.
In Windows 95/98/Me unter Start, Einstellungen, Systemsteuerung, Netzwerk nachsehen.
In Windows NT 4.0 unter Start, Einstellungen, Systemsteuerung, Netzwerk, Protokolle
nachsehen.
In Windows 2000 unter Start, Einstellungen, Netzwerk und DF-Verbindungen, LAN-
Verbindung, Eigenschaften nachsehen.
2. Den Schnell-Setup-Assistenten von IB-2x auf der CD-ROM (Kyocera Mita Software Library oder
Kyocera Mita Digital Library) verwenden, um die Arbeitsgruppe (KY-NetPrinters) und den
Druckernamen (Kyxxxxxx) auf die gewünschten Namen zu ändern.
Deutsch
3. Unter Netzwerkumgebung Gesamtes Netzwerk wählen, dann die KY-NetPrinters (oder die
umbenannte) Arbeitsgruppe öffnen und den gewünschten Drucker wählen.
4. Mit der rechten Maustaste auf dem Druckersymbol klicken und Installieren wählen. Der
Windows-Druckerinstallations-Assistent wird gestartet. Die Aufforderungen befolgen, um den
Druckerinstallations-Assistenten abzuschließen.
5. Die gemeinsame Benutzung von Druckern wird normalerweise nicht beim Drucken mit NetBEUI
verwendet. Verwalter können jedoch die Druckerfreigabe unter Windows NT 4.0 oder 2000
einsetzen, um vom automatischen Herunterladen von Treibern zu profitieren. Für Schritte zum
Einrichten der Druckerfreigabe siehe die Anleitungen für das Drucken mit Windows NT 4.0 LPR
oder Windows 2000 Standard TCP/IP.
Windows-Druckerfreigabe
Die Windows-Druckerfreigabe erfordert einen Windows-Computer, der als Host funktioniert. Der Host
fungiert als Druckserver und spult Aufträge von Windows-Clients an den gemeinsam benutzten
Drucker und leitet diese dann an den physikalischen Drucker weiter. Jeder Windows-Computer (nach
3.1) kann entweder als Client, als Host oder als beides fungieren.
Die zwischen Client und Host und Host und Drucker verwendeten Protokolle müssen nicht identisch
sein. Wurde z. B. ein Windows-NT-Computer so konfiguriert, daß er einen LPR-Drucker freigibt,
können Clients, die nur IPX oder NetBEUI verwenden, trotzdem Aufträge an den freigegebenen
Drucker senden. Der NT-Host akzeptiert die Aufträge über IPX oder NetBEUI und sendet sie über
TCP/IP an den Drucker. Diese Fähigkeit bietet eine außerordentliche Flexibilität in der WindowsNetzwerkdruck-Architektur.
27
Page 27
Freigegebenen Drucker erstellen
Die Festlegung eines freigegebenen Druckers ist Teil des Hinzufügens eines Druckers und wird in
jedem der vorstehenden Windows-Abschnitte beschrieben.
Herstellen einer Verbindung zu einem freigegebenen Drucker
In diesem Abschnitt wird kurz beschrieben, wie eine Verbindung zu einem freigegebenen Drucker
hergestellt wird. Obwohl sich die einzelnen Vorgänge für Windows 95/98/Me, NT 4.0 und 2000
geringfügig voneinander unterscheiden, wie z. B. die Wahl von Netzwerkdrucker in 95/98/Me oder
Deutsch
Druckserver im Netzwerk in NT 4.0, sind die grundlegenden Schritte gleich und werden in der
folgenden Anleitung gemeinsam beschrieben:
Herstellen einer Verbindung von Windows 95/98/Me, NT 4.0 und 2000 Clients mit
einem freigegebenen Drucker
Wenn der Host ein NT- oder 2000-Computer ist, der so konfiguriert wurde, daß die Treiber auf
verbundene Clients heruntergeladen werden, folgendes ausführen:
Den Windows-Druckerinstallations-Assistenten ausführen, Netzwerkdrucker wählen und das
Netzwerk nach dem freigegebenen Drucker durchsuchen. Der Treiber wird automatisch
heruntergeladen.
Wenn der Host ein 95/98/Me-Computer ist oder der NT- bzw. 2000-Computer nicht so konfiguriert
wurde, daß die Treiber auf verbundene Clients heruntergeladen werden, folgendes ausführen:
Den Druckertreiber von der mit dem Drucker gelieferten CD-ROM (Kyocera Mita Software Library)
installieren. Im Bildschirm Druckerverbindung Netzwerkdrucker wählen und das Netzwerk nach dem
freigegebenen Drucker durchsuchen.
28
Page 28
Macintosh-Konfiguration
KPDL (Kyocera Page Description Language) ist eine mit PostScriptc kompatible
Seitenbeschreibungssprache. Die Drucker-/Kopierer-Statusseite gibt darüber Auskunft, ob KPDL auf
dem Drucker installiert ist.
Die IB-2x-Schnittstellenkarte unterstützt MacOS 8.x und MacOS 9.x und ist mit dem LaserWriterTreiber, Version 8.x, kompatibel.
Das Setup zum Drucken mit Macintosh ist denkbar einfach. Nachdem die IB-2x-Schnittstellenkarte
installiert und mit dem Netzwerk verbunden wurde, erscheint der Drucker in der Macintosh Auswahl
als LaserWriter-Gerät. Um Drucken zu können, muss der Benutzer nur die KPDL (PostScript)Emulation für den Drucker konfigurieren und die PostScript Printer Description (PPD)-Dateien
installieren.
Ein Macintosh-Setup-Dienstprogramm, das die Durchführung von Verwaltungsaufgaben wie die
Fernkonfigurierung der KPDL-Emulation und das Einstellen von AppleTalk-Name, AppleTalk-Zone
und TCP/IP-Parametern ermöglicht, ist auf der CD-ROM (Kyocera Mita Network Library oder Kyocera
Mita Software Library) enthalten.
••
• Das AppleTalk-Protokoll muss im Macintosh-Computer aktiviert werden, damit das Drucken zur IB-
••
2x-Schnittstellenkarte unterstützt wird.
Deutsch
Installieren des IB-2x Setup-Hilfsprogramms
1. Die CD-ROM (Kyocera Mita Network Library oder Kyocera Mita Software Library) laden und auf
das KM Network Library-Symbol auf dem Desktop doppelklicken.
2. Den Ordner Dienstprogramme öffnen.
3. Auf das IB-2x-Installationsprogramm doppelklicken.
4. Die gewünschte Sprache auswählen und auf OK klicken.
5. Den Zielordner bestätigen oder nach dem gewünschten Ordner suchen. Auf Weiter klicken, um
die Dateien zu kopieren.
6. Auf Fertigstellen klicken, um das Installationsprogramm zu verlassen.
Einstellen der KPDL-Emulation und des AppleTalk-Namens und der AppleTalk-Zone
1. Den Ordner IB Tools (IB-Hilfen) öffnen und auf Setup-Dienstprogramm doppelklicken, um
das Dienstprogramm zu starten.
2. Das Dienstprogramm sucht das AppleTalk-Netzwerk nach allen in der aktuellen Zone verfügbaren
IB-2x-Geräten ab und zeigt sie in der Druckerliste an. Das Setup-Dienstprogramm kann für die
Suche nach Druckern in einer anderen AppleTalk-Zone oder über TCP/IP konfiguriert werden. Für
weitere Informationen zur Konfiguration von Suchen siehe das Online-Benutzerhandbuch der IB2x-Karte.
3. In der Druckerliste auf den gewünschten Drucker doppelklicken, um das Fenster
Gerätekonfiguration zu öffnen.
4. Auf das Symbol Emulation einstellen klicken. Die gewünschte KPDL-Option auswählen und auf
Einstellen klicken.
29
Page 29

5. Auf das AppleTalk-Symbol klicken. Den Druckernamen eingeben, so wie er in der Auswahl
angezeigt werden soll. Den Zonennamen für die Zone eingeben, in der der Drucker erscheinen
soll. Ein Sternchen (*) bedeutet, dass der Drucker in der Standardzone angezeigt wird.
6. Auf Einstellen klicken, um die Änderungen zum Drucker zu senden.
7. Nach dem Einstellen von AppleTalk-Name und -Zone ist ein Neustart erforderlich, bevor die
Änderungen wirksam werden. Das Fenster Gerätekonfiguration schließen und Rücksetzen im
Setup-Menü auswählen.
Deutsch
Installieren von PPDs und Konfigurieren des Druckers
Die Macintosh-Unterstützung für Kyocera/ Kyocera Mita Drucker und Kopierer wird durch den mit dem
Macintosh-Betriebssystem gelieferten Laser Writer-Treiber bereitgestellt und durch die Installation von
Modell-spezifischen PPD-Dateien. Diese Anleitungen gelten nur für Mac OS 8 und 9.
1. Die PPD-Dateien werden von der mit dem Drucker gelieferten CD-ROM (Kyocera Mita Software
Library oder Kyocera Mita Digital Library) installiert. Die CD-ROM einlegen, den entsprechenden
Fremdsprachenordner öffnen und auf das Installationsprogramm für Kyocera Mita klicken.
2. Nach Abschluß der PPD-Installation Auswahl unter dem Apple Menü wählen und so die Auswahl
öffnen.
3. Den Laser Writer 8-Treiber wählen sowie ggf. die Apple Talk Zone und den IB-2x-Drucker.
4. Auf Erstellen klicken. Der Treiber wählt automatisch die geeignete PPD-Datei und zeigt ein
Dialogfeld an, in dem die Optionen ausgewählt werden können.
5. Die benötigten installierten Optionen wählen und bestätigen, daß die Liste der installierten
Optionen mit der Druckerkonfiguration übereinstimmt. Auf OK klicken. Ein Schreibtisch-Drucker
für dieses Modell wird auf dem Schreibtisch erstellt. Hiermit ist die Konfiguration für den Druck mit
einem Macintosh abgeschlossen.
Konfigurieren der IP-Adresse
Die Parameter der IB-2x-IP-Adresse können auf verschiedene Weise konfiguriert werden: Die
einfachsten und am häufigsten eingesetzten Methoden sind: Verwenden des IB-2x-Schnell-SetupAssistenten, Verwenden von DHCP und Verwenden des Bedienfelds des Druckers. Der Windows
Internet Naming Service (WINS) wird häufig zusamen mit DHCP verwendet und wird deshalb
ebenfalls hier beschrieben.
Der IB-2x-Schnell-Seutp-Assistent ermöglicht die einfache Einrichtung der IP-Adresse und vieler
verschiedener Parameter. Siehe Verwenden des Schnell-Setup-Assistenten weiter vorn in dieser
Anleitung.
Hinweis: Für Anleitungen zu den Einstellungen des Bedienfelds von digitalen Kopierern siehe das
Bedienungshandbuch.
30
Page 30

Konfigurieren über DHCP (Dynamic Host Configuration Protocol)
DHCP stellt einen Mechanismus zur Bereitstellung von IP-Konfigurationsparametern, wie z. B. IPAdresse, Subnetzmaske usw., für Geräte (Hosts) in einem IP-Netzwerk zur Verfügung. DHCP
erleichtert die Verwaltung von mehreren IP-Adressen.
Ein DHCP-Server verarbeitet IB-2x-DHCP-Ermittlungsrundsendungen und gibt eine IP-Adresse an
das IB-2x zurück. Der DHCP-Server kann so eingerichtet werden, daß er eine IP-Adresse für eine
begrenzte Zeit (temporäre Lease) oder unbegrenzte Zeit (unbegrenzte Lease) gewährt. Er kann auch
mit einer dauerhaften Adressenreservierung für jedes IB-2x konfiguriert werden.
WICHTIG: In einer Nicht-WINS-Umgebung wird auf jeden Fall empfohlen den DHCP-Server so
einzurichten, daß IB-2x eine unbegrenzte Lease der IP-Adresse gewährt bekommt oder eine
dauerhafte Adressenreservierung erhält.
Unbegrenzte Lease der IP-Adresse oder Adressenreservierung in Windows NT 4.0 / 2000
In Windows NT und 2000 wird die Dauer der Lease bzw. Bereitstellung der IP-Adresse für einen
bestimmten Bereich bzw. eine Gruppe von Adressen festgelegt. Deshalb sollte die Lease-Dauer für den
Bereich, dem IB-2x angehört, auf Unbegrenzt eingestellt werden. Ist dies unerwünscht, dann sollte IB2x als Reservierter Client definiert werden.
Ein Reservierter Client kann mit dem Windows DHCP-Manager durch Wählen von Bereich und
Reservierungen hinzufügen hinzugefügt werden. Die IB-2x-Ethernet-Adresse (ohne Semikolon, d.
h. 00c0eea371d8), die IP-Adresse und weitere IP-Parameter eingeben. Die Ethernet-Adresse kann
der IB-2x-Netzwerkstatus-Seite entnommen werden.
Deaktivieren von DHCP (Dynamic Host Configuration Protocol)
Wenn eine Zuordnung der IP-Adresse mit DHCP nicht erwünscht ist, kann es mit dem IB-2x-SchnellSetup-Assistenten, über das Bedienfeld des Druckers, mit Hilfe eines Web-Browsers und mit anderen
Methoden deaktiviert werden.
Deutsch
WICHTIG: Bitte beachten, daß DHCP AUTOMATISCH DEAKTIVIERT WIRD, wenn die IP-Adresse
mittels einer anderen Methode als dem Schnell-Setup-Assistenten, das Bedienfeld, etc. eingestellt
wird.
Konfigurieren über WINS (Windows Internet Naming Service)
WINS wird von Windows NT verwendet, um eine Methode für die Zuordnung des NetBIOS-Namens,
der normalerweise mit Hostname bezeichnet wird, zu einer IP-Adresse bereitzustellen. WINS setzt
einen als WINS-Server konfigurierten NT- oder 2000-Server voraus.
WINS ermöglicht die Definition einer Druckerkonfiguration, in der der Name anstatt die IP-Adresse des
Druckers verwendet wird. Auf diese Weise ist die Druckerkonfiguration stets gültig, selbst wenn die IPAdresse über DHCP geändert wird, und der Druck kann ungehindert fortfahren. Ein weiterer Vorteil
von WINS ist, daß ein neuer Drucker nahtlos einen alten Drucker ersetzen kann, indem 1) der neue
Drucker den gleichen Hostnamen wie der alte Drucker erhält oder 2) die Windows LPRAnschlußkonfiguration für den alten Drucker auf den Hostnamen des neuen Druckers geändert wird.
Registrieren und Benennen mit WINS
IB-2x muß die Adresse des WINS-Hauptservers erhalten, wo ihr Hostname registriert wird. Als Option
kann die IB-2x-Karte die Adresse eines WINS-Sekundärservers erhalten. Der DHCP-Server wird
häufig so eingerichtet, daß er der IB-2x den Hostnamen und die WINS-Serveradressen liefert. Für die
richtigen Einichtungsverfahren siehe die Dokumentation zu DHCP. Alternativ hierzu können der
31
Page 31

Hostname und die WINS-Serveradressen mit einem Web-Browser oder dem AdminManagerDienstprogramm von IB-2x konfiguriert werden. Für Informationen über diese Dienstprogramme siehe
den Abschnitt Sicherheit und nachfolgende Verwaltung weiter hinten in dieser Anleitung.
Die WINS-Registrierung kann durch Ausdrucken der IB-2x-Netzwerkstatus-Seite überprüft werden.
Nachdem IB-2x erfolgreich in einem WINS-Server registriert wurde, wird für den WINS-Status
Registriert im TCP/IP-Abschnitt angezeigt.
Einrichten der IP-Adresse über das Bedienfeld des Druckers
Deutsch
Die folgenden Angaben beziehen sich auf Kyocera Mita Drucker. Informationen über die Einstellungen
auf dem Bedienfeld von Kopierern sind der Bedienungsanleitung zu entnehmen.
1. Die Menütaste betätigen. Wenn in der ersten Zeile der LED-Anzeige noch nicht
SCHNITTSTELLE angezeigt wird, die Taste
∧
oder ∨ betätigen, bis dieser Begriff erscheint.
2. Wenn in der Zeile unter SCHNITTSTELLE noch nicht OPTION angezeigt wird, die Eingabetaste
∧
betätigen und anschließend
oder ∨, bis dieser Begriff erscheint. Dann die Eingabetaste
betätigen.
3. Die Taste > betätigen, um das Options-Untermenü aufzurufen. (Hinweis: Einige ältere Drucker
unterstützen eventuell nicht die Einrichtung über das Bedienfeld. Ist kein Options-Untermenü
vorhanden oder wenn nicht alle Möglichkeiten im Untermenü verfügbar sind, die Anforderungen
der Firmware im folgenden Abschnitt prüfen.)
∧
4.
oder ∨ betätigen, bis TCP/IP angezeigt wird. Die Taste > betätigen, um das TCP/IP-Untermenü
aufzurufen (nur zugänglich, wenn das TCP/IP-Protokoll eingeschaltet wurde).
∧
5.
oder ∨ betätigen, bis die IP-Adresse angezeigt wird. Die Eingabetaste betätigen. Ein Cursor
wird unter der letzten Ziffer der IP-Adresse angezeigt.
6. Die < oder > Taste betätigen, um den Cursor an die Ziffernstelle zu bewegen, die geändert
∧
werden soll. Zum Ändern des Ziffernwertes
oder ∨ betätigen.
7. Nachdem alle Ziffern wie gewünscht festgelegt wurden, die Eingabetaste betätigen, um die
neuenAdressen zu bestätigen.
8. Die Schritte 5-7 für Subnetzmaske und Standard-Gateway (die IP-Adresse des Routers)
wiederholen. Wenn Unklarheit über die Subnetzmaske besteht und die erste Zahl in der IB-2x IPAdresse zwischen 192 und 254 liegt, 255.255.255.0 als Subnetzmaske verwenden.
9. Nachdem alle Einstellungen für IP-Adresse, Subnetzmaske und Standard-Gateway durchgeführt
wurden, die < Taste betätigen, um wieder in das Options-Untermenü (es wird TCP/IP angezeigt)
zurückzukehren.
Hinweis: Es wird empfohlen, unbenutzte Protokolle auszuschalten.
∧
10. Optionsfrei:
oder ∨ betätigen, um das auszuschaltende Protokoll, z. B. Ethernet, anzuzeigen.
Die Eingabetaste betätigen und ein ? wird neben Ein angezeigt. ∧ oder ∨ betätigen, damit der
Wert auf Aus umgeschaltet wird. Anschließend die Eingabetaste betätigen, um den neuen Wert
zu bestätigen. Für jedes Protokoll, das ausgeschaltet werden soll, wiederholen.
11. Die < Taste betätigen, um erneut das Schnittstellenmenü aufzurufen (es wird „Option“ angezeigt).
∧
12.
oder ∨ betätigen, bis „Statusseite drucken“ angezeigt wird. Zweimal die Eingabetaste
betätigen, um eine Statusseite auszudrucken und die neuen Einstellungen zu überprüfen.
13. Im Anschluß an diesen Vorgang zum Beenden des Menüsystems die MENÜTASTE betätigen.
32
Page 32

Bewahren der IP-Adresse
Bewahrt IB-2x beim Aus- und Wiedereinschalten des Druckers die IP-Adresse?
Temporäre Lease: Falls vom DHCP-Server eine temporäre Lease-Datei bezogen wird, wird eine
temporäre IP-Adresse festgelegt. Das bedeutet, daß beim Aus- und Wiedereinschalten des Druckers
die IB-2x-Karte ihre IP-Adresse erst verwendet, wenn sie mit dem DHCP-Server verhandelt hat. Steht
kein DHCP-Server zur Verfügung, hat IB-2x keine IP-Adresse. Dies istzur verhinderung von IPAdressenkonflikten in einer DHCP-Umgebung erforderlich.
Permanente Lease: Wird eine unbegrenzte Bereitstellung oder Adressenreservierung von einem
DHCP-Server zugeteilt oder wird die IP-Adresse mit einer anderen Methode eingestellt, dann handelt
es sich um eine dauerhafte Adresse. Demzufolge wird die eingangs festgelegte IP-Adresse auch nach
dem Aus- und Wiedereinschalten des Druckers weiterverwendet.
Sicherheit und nachfolgende Verwaltung
Diese Kurzanleitung behandelt hauptsächlich die erstmalige Konfiguration von IB-2x. In diesem
Abschnitt wird jedoch eine kurze Beschreibung der Sicherheitsaspekte und der Optionen gegeben, die
für eine fortlaufende Verwaltung des IB-2x verfügbar sind.
Paßwortsicherheit
Ein Verwalterpaßwort wird verwendet, um eine Änderung der IB-2x-Einstellungen durch Unbefugte zu
verhindern. Werksseitig ist noch kein Verwalterpaßwort definiert. In diesem Zustand kann jeder, der
Zugriff auf einen Web-Browser oder eines der IB-2x-Dienstprogramme hat, die Einstellungen von IB2x ändern. Aus diesem Grund wird empfohlen, ein Verwalterpaßwort zu definieren.
Deutsch
ACHTUNG: Wird das Verwalterpasswort vergessen, so muss IB-2x auf die werksseitigen
Standardeinstellungen zurückgesetzt werden (mit der im Abschnitt Fehlerbehebung des
Benutzerhandbuchs beschriebenen Jumper-Anordnung. Die im html-Format vorliegende Anleitung
finden Sie auf der mit dieser Schnittstellenkarte ausgelieferten CD-ROM [Kyocera Mita Network Library
or Kyocera Mita Software Library]).
Web-Browser
Wird IB-2x in einem TCP/IP-Netzwerk eingesetzt und verfügt über eine gültige IP-Adresse, kann sie
von jedem Web-Browser aus verwaltet werden. Mit dem Browser können die IB-2x-Einstellungen voll
konfiguriert werden, anders als beim Schnell-Setup-Assistenten kann der Browser jedoch keine
NetWare-Druckobjekte erstellen. Wird zur NetWare-Konfiguration ein Browser verwendet, dann muß
NWAdmin zum Erstellen der NetWare-Druckobjekte verwendet werden.
Die Verbindung zu IB-2x mit einem Web-Browser wird durch Eingabe der IP-Adresse als URL, z. B.
http://206.129.6.54, hergestellt.
Auf der Home Page werden grundlegende Informationen über den Drucker/Kopierer und die IB-2xKarte sowie der aktuelle Status des Druckers und die aktuelle Anzeige des Bedienfelds angegeben.
Wenn Sie auf die Schaltfläche Aktualisieren klicken, wird das im Browser angezeigte MeldungsDisplay auf den aktuellsten Stand gebracht.
Eine Kategorie auf der Navigationsleiste links wählen, um die Werte für diese Kategorie einzusehen und
einzustellen. Wenn ein IB-2x-Verwalterpaßwort definiert wurde, wird der Benutzer beim Zugriff auf
einen der Bildschirme, in denen Werte geändert werden können, aufgefordert, den Benutzernamen
und das Paßwort einzugeben. Für den Benutzernamen kann ein beliebiger Name eingegeben oder
das Feld freigelassen werden. Wurde kein Verwalterpaßwort definiert, dann ist der Zugriff auf alle
anderen Seiten ungehindert. Das Verwalterpaßwort kann im Register Sicherheit definiert werden.
33
Page 33

Schnell-Setup-Assistent
Der Windows-basierte Schnell-Setup-Assistent von IB-2x wurde für eine schnelle und problemlose
erstmalige Konfiguration entwickelt. Er umfaßt jedoch nicht alle möglichen IB-2x-Einstellungen. Er eignet
sich zum Ändern der grundlegenden Einstellungen, ist aber auch für nachfolgende Konfigurationen
praktisch. Für weitere Informationen siehe Verwenden des Schnell-Setup-Assistenten weiter vorn in
dieser Anleitung.
AdminManager
Deutsch
Das Windows-basierte Dienstprogramm AdminManager kann in einer IP- oder IPX-Umgebung zum
vollständigen Konfigurieren der IB-2x-Einstellungen verwendet werden. AdminManager kann installiert
werden oder durch Wahl von Erweitertes Setup im Konfigurationsmenü von IB-2x von der CD-ROM
(Kyocera Mita Network Library oder Kyocera Mita Software Library) aus ausgeführt werden.
KM-NET VIEWER
Die fortlaufende Verwaltung und Überwachung des Druckers wird häufig mit Hilfe von Windowsbasierten KM-NET VIEWER durchgeführt. KM-NET VIEWER ermöglicht die erweiterte Gruppierung,
Filterung und Sortierung von mehreren Kyocera Mita Druckern/Kopierern und Druckern anderer
Hersteller. Es bietet mehrere Optionen für die Benachrichtigung des Benutzers bei Druckerwarnungen
und –fehlern und kann zum Einsehen oder Ändern einer Vielzahl von Drucker- und IB-2xEinstellungen verwendet werden. KM-NET VIEWER sind auf der mitgelieferten CD-ROM (Kyocera
Mita Software Library oder Kyocera Mita Digital Library) enthalten.
Wireless Networking
Mit dem IB-22 sind jetzt alle IB-2x Networking-Funktionalitäten einschließlich TCP/IP, NetWare,
AppleTalk, Web-basierter Verwaltung usw. in einem drahtlosen Netzwerk verfügbar. Der IB-22
unterstützt Wireless Networking gemäß der Definition des Standards 802.11b und interagiert mit
anderen Geräten, die diesen Standard unterstützen.
In diesem Kapitel wird erläutert, wie der IB-22 an Ihr drahtloses Netzwerk angeschlossen wird.
Betriebsarten
Der IB-22 unterstützt folgende Betriebsarten:
Ø
Infrastruktur: Ein oder mehr Zugriffspunkte (auch als Basisstationen bezeichnet) werden
verwendet, um ein drahtloses Netzwerk herzustellen. Damit kann das drahtlose Netzwerk auch
mit einem verdrahteten verbunden werden.
Ø
802.11 Ad hoc: Direktverbindung zwischen drahtlosen Geräten ohne Verwendung eines
Zugriffspunkts. Diese Betriebsart verwendet Service Set Identification (SSID). SSID fungiert als
logischer Netzwerkidentifikator.
Ø
Ad hoc: Direktverbindung zwischen drahtlosen Geräten ohne Verwendung eines Zugriffspunkts.
Diese Betriebsart verwendet SSID nicht.
Ø
Automatisch: Stellt automatisch eine der obigen Betriebsarten fest. Dies ist der IB-22-Standard.
34
Page 34

Verschlüsselung
Wired Equivalent Privacy (WEP) ist ein Sicherheitsprotokoll, das für drahtlose Daten die gleiche
Sicherheit wie für Daten in einem standardmäßigen, verdrahteten Netzwerk bereitstellen soll. WEP
verwendet 64 Bit (wird auch als 40 Bit bezeichnet) oder 128 Bit-Verschlüsselung. Beide werden vom
IB-200 unterstützt.
IB-22 – Automatische Konfiguration
Der IB-22 erfasst ein drahtloses Netzwerk 802.11b automatisch und stellt eine Verbindung her,
außer wenn:
Ø Das drahtlose Netzwerk Verschlüsselung einsetzt oder
Ø SSID-Broadcasts deaktiviert sind oder
Ø Der PC und der IB-22 im Ad hoc-Modus nicht auf den gleichen Kanal eingestellt sind oder
Ø Auf mehrere unterscheidbare drahtlose Netzwerke zugegriffen werden kann (der IB-22 stellt evtl.
keine Verbindung mit dem gewünschten Netzwerk her).
Falls einer der obigen Punkte für Ihr Netzwerk gilt, schlagen Sie bitte unter IB-22 – Manuelle
Konfiguration nach.
Falls in Ihrem Netzwerk die automatische Konfiguration verwendet werden kann, müssen Sie
lediglich bestätigen, dass der IB-22 erfolgreich eine Verbindung hergestellt hat.
Deutsch
Erfolgreiche Verbindungsherstellung bestätigen
Mit DHCP: Falls Ihr Netzwerk über einen DHCP-Server verfügt, drucken Sie eine Statusseite aus oder
zeigen Sie die IP-Adresse am Bedienfeld an, um zu gewährleisten, dass der IB-22 eine IP-Adresse
erhalten hat. Hat er eine IP-Adresse erhalten, wird die Verbindung mit dem Netzwerk bestätigt.
Ohne DHCP: Falls kein DHCP-Server vorhanden ist IP-Adresse des IB-22 mit dem Bedienfeld
einstellen Sie mit einem Browser, z. B. http://192.168.10.240, eine Verbindung mit dem IB-22 her.
Wird die Browser-Verbindung erfolgreich hergestellt, wird die Verbindung mit dem Netzwerk bestätigt.
Wenn die Netzwerkverbindung bestätigt wurde, fahren Sie auf die gleiche Art und Weise wie bei
anderen IB-2x Geräten mit dem IB-22-Protokollsetup fort. Beziehen Sie sich dabei auf die
entsprechenden Abschnitte dieser Anleitung.
Kann der IB-22 keine Verbindung mit dem Netzwerk herstellen, ist eine manuelle Konfiguration
notwendig. In einigen Fällen ist es möglicherweise empfehlenswert, den IB-22 auf seine factory
default settings zurückzusetzen.
Informationen zur Wiederherstellung der werksseitigen Standardeinstellungen erhalten Sie im
Abschnitt Fehlerbehebung der Bedienungsanleitung (HTML) auf der beiliegenden CD-ROM
(Kyocera Mita Network Library oder Kyocera Mita Software Library).
35
Page 35

IB-22 – Manuelle Konfiguration
Falls der IB-22 nicht automatisch eine Netzwerkverbindung herstellen kann, z. B. falls die
Verschlüsselung aktiviert ist, gehen Sie wie folgt vor:
1. Stellen Sie einen PC auf 802.11 Ad hoc-Modus (oder Ad hoc-Modus) bei deaktivierter WEPVerschlüsselung und stellen Sie den Kanal so ein, dass er dem IB-22-Kanal entspricht. Der IB22-Standardkanal ist 11. Schlagen Sie ggf. in der Anleitung zum Adapter für PC und drahtloses
LAN nach.
Deutsch
2. Schalten Sie den Drucker IB-22 ein.
3. Set the IB-22 IP address at the operator panel (see IP Address Setup with the Printer Operator
Panel).
4. Verbinden Sie den IB-22, indem Sie die IP-Adresse in einen Browser eingeben, z. B. http://
192.168.10.240.
Wählen Sie im Navigationsfeld Wireless LAN (Drahtloses LAN).
5.
6. Der drahtlose LAN-Modus wird vom IB-22 festgestellt. Falls drahtlose Netzwerke anderer
Betriebsarten verfügbar sind, stellen Sie die Betriebsart jedoch so ein, dass sie dem Netzwerk
entspricht, mit dem Sie eine Verbindung aufnehmen möchten.
7. Stellen Sie SSID so ein, dass die Einstellung mit Ihrem drahtlosen Netzwerk übereinstimmt
(nur Infrastruktur- oder 802.11 Ad hoc-Betriebsarten).
8. Stellen Sie Channel (Kanal) so ein, dass die Einstellung mit Ihrem drahtlosen Netzwerk
übereinstimmt.
9. Falls Sie WEP verwenden:
a. Stellen Sie Encryption (Verschlüsselung) (WEP) auf 64 Bit (wird auch als 40 Bit
bezeichnet) oder 128 Bit, damit die Einstellung mit Ihrem drahtlosen Netzwerk
übereinstimmt.
b. Stellen Sie WEP Key (WEP-Schlüssel) so ein, dass die Einstellung mit Ihrem
drahtlosen Netzwerk übereinstimmt. Für 64 Bit besteht Ihr Schlüssel aus 5
Paaren von Hexadezimalzeichen, z. B. 4C 75 63 6B 79. Für 128 Bit besteht Ihr
Schlüssel aus 13 Paaren von Hexadezimalzeichen.
WARNUNG: Vergewissern Sie sich, dass Sie Ihren Schlüssel richtig eingeben.
Wird der Schlüssel falsch eingegeben, können Sie keine Verbindung mit dem IB22 mehr herstellen. Sie müssen dann Werksvoreinstellungen, um den falschen
WEP-Schlüssel zu löschen.
10. Klicken Sie auf Submit (Senden), um Ihre neuen Einstellungen an den IB-22 zu senden.
Angaben zur Überprüfung der Kommunikation finden Sie unterErfolgreiche Verbindung wird
bestätigt
.
36
Page 36

Contenido
Presentación................................................................................ 38
CD-ROM de Kyocera Mita Network Library ............................... 38
Instalación del hardware IB-2x ................................................... 39
Uso del asistente de configuración rápida ............................... 39
Impresión NetWare ...................................................................... 40
NetWare 3.x ..............................................................................................................40
NetWare 4.x, 5.x y 6.x................................................................................................40
Impresión con Windows ............................................................. 41
Impresión en Windows mediante NetWare .............................................................4 1
Impresión en Windows mediante TCP/IP................................................................42
Impresión en Windows mediante NetBEUI .............................................................45
Uso compartido de impresoras en Windows ..........................................................45
Configuración para Macintosh ................................................... 46
Instalación de la utilidad de configuración IB-2x ....................................................46
Configuración de la emulación KPDL y asignación de un nombre y una zona
AppleTalk...................................................................................................................47
Instalación de PPD y configuración de la impresora.................................................47
Configuración de la dirección IP................................................ 48
Configuración DHCP (Dynamic Host Configuration Protocol)...................................48
Configuración de WINS.............................................................................................48
Español
Configuración de la dirección IP por el panel frontal de la impresora .......................49
Persistencia de dirección IP ......................................................................................50
Seguridad y gestión de seguimiento ......................................... 50
Seguridad con contraseña ........................................................................................50
Navegador Web.........................................................................................................51
Asistente de configuración rápida ............................................................................. 51
AdminManager ..........................................................................................................51
KM-NET VIEWER .....................................................................................................51
Conexión de red inalámbrica ..................................................... 52
Modos de operación..................................................................................................52
Cifrado.......................................................................................................................52
Configuración automática de IB-22 ...........................................................................52
Confirmación del establecimiento de la conexión ..................................................... 53
Configuración manual de la IB-22 .............................................................................53
37
Page 37

Presentación
Gracias por elegir los productos de alta calidad para impresión en red Kyocera Mita IB-2x. Estamos
seguros de que sabrá apreciar el excepcional rendimiento y bajo coste que caracterizan todos los
productos de Kyocera Mita.
Este producto es una tarjeta interna de interfaz de red para impresoras y copiadoras digitales Kyocera
Mita. Puede instalarse fácilmente sin extraer la placa madre de la impresora. IB-2x permite a las
impresoras y fotocopiadoras digitales Kyocera Mita comunicarse a través de una red Ethernet con
numerosos sistemas operativos para redes, inclusive Windows, NetWare, Macintosh y UNIX.
Esta Guía de configuración rápida ofrece instrucciones concisas para la configuración del software,
permitiendo que un administrador experimentado configure IB-2x con rapidez. Si tiene cualquier duda,
consulte las instrucciones de funcionamiento del CD-ROM que se incluye (Kyocera Mita Network
Library o Kyocera Mita Software Library).
Español
CD-ROM de Kyocera Mita Network Library
La inserción del CD-ROM de KMNL hace aparecer el menú principal. Si el menú no aparece
automáticamente, ejecute el archivo Setup.exe ubicado en el directorio raíz del CD-ROM. Esta Guía
de configuración rápida hace referencia a las siguientes herramientas de la sección Configuración de
IB-2x en el CD-ROM:
Asistente de configuración rápida: una interfaz de asistente para configurar los parámetros
necesarios para configurar IB-2x e imprimir rápidamente.
Configuración avanzada: Habilita las configuraciones avanzadas y la supervisión de la tarjeta de
interfaz de red.
KPrint: instala un monitor del puerto del cliente para permitir la impresión Windows TCP/IP a cualquier
impresora/copiadora Kyocera Mita conectada a IB-2x. Con IB-20/21, KPrint permite imprimir mediante
LPR e IPP en Windows 95/98/Me. Con IB-21E/22, KPrint permite imprimir también mediante correo
electrónico en Windows 95/98/Me/NT4/2000.
Marcas registradas
KYOCERA®, KYOCERA MITA® y son marcas registradas de Kyocera Corporation. NetWare® es marca registrada de Novell, Incorporated.
Windows® es marca registrada de Microsoft Corporation. Macintosh® es marca registrada de Apple Computer, Incorporated. PostScript® y
Acrobat® son marcas registradas de Adobe Systems, Incorporated. Todos los demás productos mencionados son marcas registradas o
marcas comerciales propiedad de las empresas respectivas.
Aviso de la FCC:
Este equipo cumple con la Sección 15 de las reglas de la FCC (Federal Communications Commission). El funcionamiento está sujeto a las
dos siguientes condiciones: (1) este dispositivo no debe ocasionar interferencias perjudiciales, y (2) este dispositivo debe aceptar cualquier
interferencia recibida, inclusive aquellas que puedan ocasionar un funcionamiento no deseado.
38
Page 38

Instalación del hardware IB-2x
IB-2X es una tarjeta de interfaz insertable. Puede instalarse fácilmente sin extraer la placa madre de la
impresora o copiadora.
1.Quite los tornillos que sujetan a la impresora/
copiadora la tapa de la ranura de la interfaz de
expansión y, a continuación, quite la tapa de la
ranura de la interfaz.
2.Inserte la tarjeta de modo que sus bordes queden
alineados con los railes de la ranura de la interfaz
y, a continuación, fíjela en su lugar con los tornillos
que quitó en el paso 1.
Uso del asistente de configuración rápida
Mientras que el asistente es fácil de usar, esta sección ofrece información adicional sobre cómo
ubicar y conectar la impresora. Introduzca el CD-ROM (Kyocera Mita Network Library o Kyocera Mita
Software Library) y seleccione Asistente de configuración rápida en la sección de Configuración
de IB-2x.
Español
Aaparecerá la pantalla de selección de impresora. El programa de configuración rápida detectará las
impresoras a través de IPX o I, siempre que el protocolo esté instalado en la máquina Windows que
ejecute el programa de configuración rápida; es decir, si sólo está instalado IPX, el programa de
configuración rápida sólo encontrará y mostrará las impresoras IPX.
Si una impresora no aparece en la lista, otro método es introducir su dirección Ethernet en el espacio
suministrado. Encontrará la dirección Ethernet en la página de estado IB-2x. Si una impresora IP no
está en el segmento local, entonces también tendrá que tener una dirección de gateway definida por
el sistema, y el encaminador o encaminadores de la red tienen que estar configurados para volver a
enviar difusiones IP.
Si no puede encontrar una impresora con el programa de configuración rápida, (es decir, IPX no está
en uso y las difusiones de IP no se vuelven a enviar), entonces utilice un navegador Web o
AdminManager para realizar la configuración. En un navegador Web, las difusiones de IP no son
necesarias, dado que la dirección IP se escribe directamente. En AdminManager, pueden definirse
redes específicas para la búsqueda. Véase la sección Seguridad y gestión de seguimiento para
mayor información sobre cómo conectar con un navegador Web o con AdminManager.
39
Page 39

Impresión NetWare
Existen diversas opciones de impresión en NetWare. A continuación, se detallan los diversos métodos
de impresión para cada versión de NetWare y se describe cómo configurar la impresión para cada
uno de los métodos.
NetWare 3.x
NetWare 3.x sólo es compatible con la impresión por agrupador en dos modos; 1) modo de servidor
de impresoras y 2) modo de impresora remota.
Modo de servidor de impresoras (recomendado): IB-2x actúa como servidor de impresoras e interroga
la cola de impresión para buscar las tareas a imprimir. Este modo utiliza un espacio de conexión
NetWare (es decir, una licencia de usuario).
Modo de impresora remota: IB-2x actúa como impresora remota, aceptando tareas de un servidor de
Español
impresoras ejecutado en una estación de trabajo dedicada o en el servidor de archivos. Este modo no
requiere una licencia de usuario NetWare.
Agrupador de NetWare 3.x
1. Ejecute el Asistente de configuración rápida en el CD-ROM (Kyocera Mita Network Library o
Kyocera Mita Software Library).
2. En la sección NetWare, elija Configuración de agrupador. El asistente creará todos los objetos
NetWare necesarios.
3. Después de ejecutar el asistente, espere unos minutos y utilice el panel frontal de la impresora
para imprimir las páginas de estado. Verifique la página de estado IB-2x para ver la información
de conexión NetWare y comprobar que el estado de la cola indica Preparado.
4. Configure los clientes Windows para imprimir la cola NetWare asociada (véase la sección
Impresión en Windows a través de NetWare).
NetWare 4.x, 5.x y 6.x
NetWare 4.x, 5.x y 6.x son compatibles con la impresión por NetWare Directory Services (NDS). Para
compatibilidad retroactiva, también se ofrece impresión por agrupador. NDS es compatible con los
modos de servidor de impresoras y de impresora remota (véanse las descripciones en la sección
anterior), aunque sólo se admita el modo de servidor de impresoras para impresión por agrupador.
NetWare NDS o agrupador
1. Ejecute el asistente de configuración rápida IB-2x en el CD-ROM (Kyocera Mita Network Library o
Kyocera Mita Software Library).
2. En la sección NetWare, elija Configuración de NDS (recomendado) o Configuración de
agrupador. El Asistente creará todos los objetos NetWare necesarios.
3. Después de ejecutar el asistente, espere unos minutos y utilice el panel frontal de la impresora
para imprimir las páginas de estado. Verifique la página de estado IB-2x para ver la información
de conexión NetWare y comprobar que el estado de la cola indica Preparado.
4. Configure los clientes Windows para imprimir la cola NetWare asociada (véase la sección
Impresión en Windows mediante NetWare).
40
Page 40

NetWare NDPS
1. Instale Kyocera NDPS Gateway desde el CD-ROM (Kyocera Mita Network Library o Kyocera
Mita Software Library). Seleccione Novell NDPS desde el Menú principal del CD-ROM. El
Gateway es compatible con NetWare 5.x y 6.x. Para su uso con NetWare 4.x, consulte los
requisitos en el archivo Readme.txt suministrado con el Gateway en el CD.
2. El Gateway es compatible con la impresión IPX e IP. Si emplea la impresión IP (recomendada),
configure la dirección IP de IB-2x (consulte la sección Configuración de la dirección IP).
3. Utilice NWAdmin para crear el agente de impresora para la impresora. Véase la Guía de
administración (en formato PDF) suministrada con el Gateway para información adicional.
4. Configure los clientes Windows para imprimir con el agente de impresora.
Impresión con Windows
Windows ofrece varias versiones cliente, desde Windows 3.1 hasta Windows XP y, por tanto, una
amplia gama de funciones de impresión. Las diversas versiones de Windows en combinación con IB2x ofrecen las funciones de impresión descritas a continuación.
¾
Mediante Novell NetWare: impresión por colas de impresión NetWare cuando existe un servidor
NetWare.
Mediante LPR: impresión por una cola de impresión Windows LPR mediante TCP/IP.
¾
Español
Mediante IPP: impresión mediante Internet o intranet empleando el protocolo de impresión Internet
¾
(Internet Printing Protocol).
Mediante correo electrónico: sólo está disponible con IB-21E/22. Con esta función, se puede
¾
enviar un trabajo de impresión por correo electrónico a una impresora remota, a través de
Internet, por ejemplo, utilizando la función de impresión estándar en cualquier aplicación de
Windows.
Mediante NetBEUI: impresión de igual a igual utilizando el protocolo NetBEUI. Las impresoras
¾
están disponibles en el Entorno de red.
Mediante el uso compartido de impresoras con Windows: impresión por impresora de red
¾
compartida que esté configurada en otra máquina Windows.
Qué método de impresión debe utilizarse?
La configuración de impresión óptima con Windows depende de su entorno concreto, teniendo en
cuenta también la experiencia y las preferencias del usuario y del administrador. Por lo general, se
utilizarán los servicios de impresión NetWare siempre que exista un servidor NetWare. Cuando TCP/IP
ya está en uso y no ha un servidor NetWare, por lo general se utiliza la impresión LPR en combinación
con el uso compartido de impresoras. La impresión NetBEUI de igual a igual se utiliza con mayor
frecuencia cuando no se utiliza un servidor de impresión centralizado NetWare o Windows. Se utiliza la
impresión mediante IPP o correo electrónico cuando es necesario imprimir a través Internet.
Impresión en Windows mediante NetWare
Antes de imprimir con el cliente Windows mediante NetWare, IB-2x debe configurarse para la impresión
con NetWare (véase la sección Impresión con NetWare). Una vez que haya configurado la impresión
con NetWare, utilice el Asistente para agregar impresora de Windows (Inicio, Configuración,
Impresoras, Agregar impresora) para acceder a la cola o agente de impresión IB-2x NetWare. En
el asistente, seleccione Red y busque en la red el objeto de impresión IB-2x NetWare.
41
Page 41

Impresión en Windows mediante TCP/IP
Las secciones siguientes describen la configuración de TCP/IP para Windows 95/98/Me, NT 4.0 y
2000. IB-2x ofrece soporte para diversos métodos de impresión TCP/IP, inclusive mediante el
protocolo de impresión Internet (Internet Printing Protocol, IPP) y mediante correo electrónico (en IB21E/22 solamente), que permiten imprimir por Internet.
Windows 95/98/Me LPR o IPP
Verifique que TCP/IP está instalado
Compruébelo bajo Inicio, Configuración, Panel de control, Red. Si TCP/IP no está en la lista,
tiene que instalarlo antes de poder configurar la impresión TCP/IP.
Configure la dirección IP de IB-2x
Español
Consulte la sección Configuración de la dirección IP más abajo en esta guía.
Configure el puerto e instale el controlador de impresión
1. Introduzca el CD-ROM (Kyocera Mita Network Library o Kyocera Mita Software Library),
seleccione Configuración ejecute el Asistente para añadir puerto KPrint. El asistente le guiará a
través el proceso de configuración del puerto. Para obtener información acerca de la opción de
impresión mediante correo electrónico en KPrint, consulte la sección correspondiente en la página
siguiente.
2. Ejecute el Asistente para agregar impresora de Windows (Inicio, Configuración, Impresoras,
Agregar impresora).
2.1. Cuando el asistente le pregunte, “¿Cómo está conectada esta impresora a su PC?”,
seleccione Impresora local.
2.2. En la lista de puertos disponibles, seleccione el puerto IPP o LPR que se creó con el Asistente
para añadir puerto KPrint.
3. Siga las instrucciones para terminar el Asistente para agregar impresora.
4. Utilice el siguiente procedimiento para configurar la impresora para uso compartido.
4.1. Vaya a Inicio, Configuración, Panel de control, Red y verifique que está instalado
Compartir impresoras y archivos para redes Microsoft. En la misma pantalla, haga clic
en Compartir impresoras y archivos y haga clic en la casilla de verificación adecuada para
permitir el uso compartido de impresoras.
4.2. Bajo Inicio, Configuración, Impresoras, haga clic con el botón derecho del ratón sobre la
impresora que acaba de crear con el Asistente para agregar impresora, seleccione
Compartir, haga clic en Compartida como y entre el Nombre del recurso compartido.
Windows NT 4.0 LPR
Componentes TCP/IP necesarios
Los siguientes pasos describen cómo verificar y, si es necesario, añadir los componentes TCP/IP
necesarios para la impresión LPR.
1. Vaya a Inicio, Configuración, Panel de control, Protocolos de red. Si Protocolo TCP/IP no
está en la lista de Protocolos de red, haga clic en Agregar para instalarlo.
2. Seleccione la ficha Servicios. Si Impresión Microsoft TCP/IP o Servicios TCP/IP simples no está
en la lista de Servicios de red, haga clic en Añadir para instalarlos.
42
Page 42

3. Haga clic en Aceptar cuando haya añadido todos los protocolos y servicios. Si acaba de añadir el
protocolo TCP/IP, Windows le pedirá la dirección IP y otros parámetros TCP/IP. Los nuevos
protocolos y servicios no estarán disponibles hasta que reinicie el sistema.
Configure la dirección IP IB-2x
Véase la sección Configuración de dirección IP luego en esta guía.
Instale el controlador de impresora y configure el puerto
1. Inserte el CD-ROM que se incluye con la impresora (Kyocera Mita Software Library o Kyocera
Mita Digital Library), y seleccione en el menú principal la opción de instalación del controlador de
impresora.
2. En el cuadro de diálogo Conexión de impresora, seleccione Local.
3. En el cuadro de diálogo Seleccionar un puerto para impresora (Select a Printer Port), haga clic en
el botón Agregar puerto LPR.
4. En el campo Nombre o dirección del servidor que ofrece lpd:, introduzca la dirección IP de IB2x.
5. En el campo Nombre de la impresora o cola de impresión en ese servidor:, introduzca
cualquier nombre para el puerto, por ejemplo LPR1, y haga clic en Aceptar.
Español
6. Si la impresora va a ser compartida, seleccione Compartida en el cuadro de diálogo adecuado y
escriba el nombre que desee. Seleccione cualquier otra versión de Windows para la que desee
recibir automáticamente el controlador de impresora cuando se conecte con este recurso
compartido.
Impresión por correo electrónico en Windows 95/98/Me, NT4.0 y 2000
IB-21E/22 ofrece una nueva función de impresión por correo electrónico. Con esta función, se puede
enviar un trabajo de impresión por correo electrónico a una impresora remota, a través de Internet,
por ejemplo, utilizando la función de impresión estándar en cualquier aplicación de Windows. IB-21E/
22, configurado para la impresión por correo electrónico, se conecta a un servidor de correo
electrónico mediante POP3 y recibe trabajos de impresión enviados por correo electrónico. Para ver
información sobre el procedimiento de configuración, vea el procedimiento de configuración de POP3 y
correo electrónico en las instrucciones de funcionamiento (HTML) del CD-ROM que se incluye
(Kyocera Mita Network Library o Kyocera Mita Software Library).
Una vez configurado IB-21E/22 para recibir correo electrónico, se utiliza KPrint para crear un puerto
en Windows que dirige los trabajos de impresión a la impresora mediante correo electrónico. Una vez
creado el puerto mediante KPrint, se puede seleccionar dicho puerto al agregar una nueva impresora
mediante el asistente para agregar impresoras de Windows (“Impresora local” estará seleccionada
para los puertos creados por KPrint).
Una práctica común es crear una impresora compartida en un servidor Windows y configurarla para
utilizar el puerto de correo electrónico creado por KPrint para enviar trabajos de impresión por correo
electrónico a una impresora de una oficina remota. Los usuarios pueden conectarse fácilmente a la
impresora compartida utilizando únicamente el asistente para agregar impresoras de Windows y
pueden enviar sus trabajos de impresión a la oficina remota, lo cual ofrece una atractiva alternativa al
uso de fax.
43
Page 43

Impresión TCP/IP estándar en Windows 2000
Configure la dirección IP IB-2x
Véase la sección Configuración de la dirección IP luego en esta guía.
Instale el controlador de impresión y configure el puerto
1. Ejecute el Asistente para agregar impresora de Windows (Inicio, Configuración, Impresoras,
Agregar impresora).
2. Seleccione Impresora local y quite la marca en Instalar y detectar automáticamente mi
impresora Plug and Play.
3. Seleccione Crear un nuevo puerto y elija Puerto TCP/IP estándar en la list desplegable Tipo.
Esto abrirá el Asistente para agregar puerto de impresión TCP/IP estándar.
4. En el campo Nombre de la impresora o dirección IP, escriba la dirección IP IB-2x.
Español
5. En el campo Nombre del puerto, escriba el nombre que desee o acepte el ofrecido por omisión.
6. Cuando termine el Asistente para agregar puerto de impresión TCP/IP estándar, continuará el
Asistente para agregar impresora. Seleccione el modelo de impresora adecuado.
7. Después de asignar un nombre a la impresora, aparecerá el cuadro de diálogo Uso compartido
de impresoras. Si la impresora va a ser compartida, seleccione Compartir como y escriba el
nombre del recurso compartido. (El uso compartido de impresoras sólo estará disponible si está
instalado el servicio de uso compartido de impresoras y archivos. Puede comprobarlo en Inicio,
Configuración, Conexiones de red y acceso telefónico a redes, Conexión de área local,
Propiedades.)
8. Siga las instrucciones para terminar el Asistente para agregar impresora.
9. Si ha elegido compartir la impresora y le gustaría que otras versiones de Windows reciban
automáticamente el controlador correcto cuando se conecten a la impresora compartida, siga
estos pasos:
9.1. En el cuadro de diálogo Impresoras, haga clic con el botón derecho del ratón en la
impresora que acaba de crear con el Asistente para agregar impresora y seleccione
Compartir.
9.2. En la ficha Compartir, haga clic en Controladores adicionales y seleccione el controlador
que desea asociar con esta impresora.
Impresión IPP en Windows
Windows 2000 ofrece impresión mediante el protocolo de impresión Internet (Internet Printing
Protocol, IPP). IPP se utiliza principalmente para imprimir por Internet, pero también puede utilizarse
para imprimir por la intranet.
Configure la dirección IP IB-2x
Véase la sección Configuración de la dirección IP más adelante en esta guía.
Instale el controlador de impresión y configure el puerto
1. Ejecute el Asistente para agregar impresora de Windows (Inicio, Configuración, Impresoras,
Agregar impresora).
2. Selecione Impresora de red.
44
Page 44

3. En el cuadro de diálogo Ubicar su impresora, seleccione Conectar a una impresora de Internet
o de su intranet e introduzca el URL con el formato indicado en el siguiente ejemplo: http://
212.74.53.19/ipp
4. Siga las instrucciones para terminar el Asistente para agregar impresora.
Impresión en Windows mediante NetBEUI
La impresión de igual a igual está disponible mediante el protocolo NetBEUI. Con este método, las
impresoras se encuentran en el Entorno de red.
Impresión en Windows 95/98/Me, NT 4.0 y 2000 mediante NetBEUI
1. El PC con Windows tiene que estar configurado para utilizar NetBEUI.
En Windows 95/98/Me, compruébelo bajo Inicio, Configuración, Panel de control, Red.
En Windows NT 4.0, compruébelo bajo Inicio, Configuración, Panel de control, Red,
Protocolos.
En Windows 2000 compruébelo bajo Inicio, Configuración, Conexiones de red y acceso
telefónico, Conexión de área local, Propiedades.
2. Utilice el Asistente de configuración rápida I en el CD-ROM (Kyocera Mita Network Library o
Kyocera Mita Software Library) para modificar el grupo de trabajo por omisión (KY-NetPrinters) y
el nombre de la impresora (KYxxxxxx) y darles los nombres que desee.
3. En el entorno de red, seleccione Toda la red, y abra el grupo de trabajo KY-NetPrinters (o el
nombre que le haya asignado) y seleccione la impresora que desee.
4. Haga clic con el botón derecho del ratón en el icono Impresora y seleccione Instalar. Esto abrirá
el Asistente para agregar impresora de Windows. Siga las instrucciones para terminar el
Asistente para agregar impresora.
5. El uso compartido de impresoras no se utiliza frecuentemente con la impresión por NetBEUI. No
obstante, es posible que algunos administradores deseen utilizar el uso compartido en NT 4.0 o
2000 para hacer uso de la función de descarga automática de controladores. Para ver los pasos
necesarios para configurar el uso compartido de impresoras, véanse las instrucciones de
Impresión TCP/IP estándar en Windows NT 4.0 LPR o Windows 2000.
Español
Uso compartido de impresoras en Windows
En el uso compartido de impresoras en Windows existe un PC Windows que opera como “anfitrión”.
Este anfitrión actúa como servidor de impresión, colocando en la cola de la impresora compartida las
tareas de impresión enviadas desde clientes Windows y reenviándolos a la impresora en sí. Cualquier
PC con Windows (cualquier versión posterior a 3.1) puede opera como cliente o anfitrión, o ambos.
Los protocolos utilizados entre cliente y anfitrión, y entre anfitrión e impresora no tienen que ser los
mismos. Por ejemplo, si se configura una máquina Windows NT para compartir una impresora LPR,
los clientes que sólo tengan IPX o NetBEUI también pueden enviar tareas de impresión a la
impresora compartida. El anfitrión NT aceptará las tareas mediante IPX o NetBEUI y enviarlas a la
impresora mediante TCP/IP. Esta funcionalidad ofrece un amplio grado de flexibilidad en la
arquitectura de impresión de Windows.
45
Page 45

Creación de impresoras compartidas
La definición de una impresora compartida forma parte del proceso de adición de una impresora, y se
describe en cada una de las secciones anteriores referentes a Windows.
Conexión a impresoras compartidas
Esta sección describe brevemente los pasos para la conexión de un cliente a una impresora
compartida. A pesar de que existen pequeñas variaciones en los procedimientos para 95/98/Me, NT
4.0 y 2000, como por ejemplo la selección de Impresora de red en 95/98/Me o Servidor de
impresión de red en NT 4.0, son esencialmente idénticos y por tanto se combinan en las
instrucciones siguientes.
Conexión de clientes Windows 95/98/Me, NT 4.0 y 2000 a una impresora compartida
Español
Si el anfitrión es un PC NT o 2000 configurado para descargar los controladores a los cientes que se
conecten, entonces:
Ejecute el Asistente para agregar impresora de Windows, seleccione Impresora de red y busque la
impresora compartida en la red. El controlador se descargará automáticamente.
Si el anfitrión es un PC 95/98/Me o el anfitrión NT o 2000 no se ha configurado para descargar el
controlador a los clientes que se conecten, entonces:
Instale el controlador de impresión del CD-ROM (Kyocera Mita Software Library o Kyocera Mita Digital
Library) suministrado con la impresora. En la pantalla Conexión de la impresora, seleccione Red y
busque la impresora compartida en la red.
Configuración para Macintosh
KPDL (Kyocera Page Description Language) es un lenguaje de descripción de páginas compatible
con PostScript. Puede consultar la página de estado de la impresora/copiadora para determinar si
KPDL está instalado en la impresora.
IB-2x es compatible con MacOS 8.x y MacOS 9.x y con la versión 8.x del controlador de impresión
LaserWriter.
Se requiere poco trabajo para configurar la impresión con Macintosh. Una vez que IB-2x ha sido
instalado y conectado a la red, la impresora aparece en el Selector del Macintosh como un dispositivo
LaserWriter. Para poder imprimir, el usuario debe simplemente configurar la impresora para
emulación KPDL (PostScript) e instalar los archivos de descripción de impresora (PPD) PostScript.
El CD-ROM (Kyocera Mita Network Library o Kyocera Mita Software Library) incluye una herramienta de
configuración Macintosh que permite al usuario realizar tareas tales como configurar de la emulación KPDL
desde un sitio remoto, definir el nombre AppleTalk y la zona y establecer los parámetros TCP/IP.
Para imprimir en IB-2x el protocolo AppleTalk debe estar activado en el Macintosh.
Instalación de la utilidad de configuración IB-2x
1. Inserte el CD-ROM (Kyocera Mita Network Library o Kyocera Mita Software Library) y haga
doble clic en el icono KM Network Library en el escritorio.
2. Abra la carpeta Utility.
3. Haga doble clic en Installer.
46
Page 46

4. Seleccione el idioma deseado y haga clic en OK.
5. Confirme la carpeta de destino o busque la carpeta deseada. Haga clic en Siguiente para
comenzar a copiar los archivos.
6. Haga clic en Terminar para finalizar el proceso.
Configuración de la emulación KPDL y asignación de un nombre y una zona
AppleTalk
1. Abra la carpeta IB Tools y haga doble clic en Setup Utility para iniciar la herramienta de
configuración.
2. La herramienta buscará los dispositivos IB-2x disponibles en la red AppleTalk (en la zona actual)
y los mostrará en la Lista de impresoras. Se puede ajustar la herramienta de configuración
para buscar en una zona AppleTalk diferente o para buscar impresoras mediante TCP/IP.
Consulte la guía electrónica del usuario de IB-2x para obtener información adicional sobre la
configuración de búsquedas.
3. En la Lista de impresoras, haga doble clic en la impresora deseada para abrir la ventana de
configuración del dispositivo.
4. Haga clic en el icono Configurar emulación. Elija la opción KPDL adecuada y haga clic en
DEFINIR.
Español
5. Haga clic en el icono AppleTalk. Escriba el Nombre de la impresora tal como aparecerá en el
Selector. Escriba el Nombre de la zona deseado para indicar la zona en la que aparecerá la
impresora. El asterisco (*) indica que la impresora aparecerá en la zona por omisión.
6. Haga clic en DEFINIR para enviar los cambios a la impresora.
7. Después de definir el nombre o la zona AppleTalk, es necesario reiniciar el Macintosh para que
los cambios entren en efecto. Cierre la ventana de configuración y seleccione Reinicializar en el
menú Configuración.
Instalación de PPD y configuración de la impresora
El soporte de Macintosh para impresoras y copiadoras Kyocera/ Kyocera Mita se obtiene a través del
controlador LaserWriter suministrado con el sistema operativo Macintosh, e instalando archivos PPD
específicos para cada modelo de impresora. Estas instrucciones sólo corresponden a Mac OS 8 y 9.
1. Los archivos PPD se instalan con el CD-ROM (Kyocera Mita Software Library o Kyocera Mita
Digital Library) suministrado con la impresora. Introduzca el CD-ROM, abra la carpeta
correspondiente a su idioma, y haga doble clic en el programa Instalador de Kyocera Mita.
2. Una vez haya terminado la instalación de PPD, elija Selector en el menú Apple para abrir el
Selector.
3. Seleccione el controlador LaserWriter 8, la zona AppleTalk (si existe) y la impresora IB-2x.
4. Haga clic en Crear. El controlador seleccionará automáticamente el archivo PPD
correspondiente, y mostrará un cuadro de diálogo que permite seleccionar las opciones de
impresora instaladas.
5. Seleccione las opciones instaladas que necesite, y confirme que la lista de opciones instaladas
concuerda con la configuración de la impresora. Haga clic en OK. Se creará una impresora en el
escritorio para este modelo. La configuración para la impresión desde Macintosh ha terminado.
47
Page 47

Configuración de la dirección IP
Existen diversas maneras de configurar los parámetros de dirección IP IB-2x. Los métodos más
fáciles y habituales son: mediante el asistente de configuración rápida IB-2x, mediante DHCP, y
mediante el panel frontal de la impresora. WINS (Windows Internet Naming Service) se utiliza por lo
general conjuntamente con DHCP y por tanto se cubre en esta sección.
El asistente de configuración rápida IB-2x permite configurar la dirección IP y muchos otros parámetros
con facilidad. Véase la sección Uso del asistente de configuración rápida en páginas anteriores de esta
guía.
Nota: Para instrucciones de configuración mediante el panel frontal de copiadoras digitales, consulte el
manual de operación.
Configuración DHCP (Dynamic Host Configuration Protocol)
Español
DHCP ofrece un mecanismo para enviar los parámetros de configuración IP, inclusive la dirección IP,
máscara de subred, etc. a los dispositivos (anfitriones) de una red IP. DHCP alivia la carga
administrativa necesaria para gestionar direcciones IP individuales.
El servidor DHCP procesa las difusiones IB-2x DHCP Discovery y devuelve una dirección IP a IB-2x.
El servidor DHCP puede configurarse para otorgar una dirección IP por un corto plazo (una cesión
temporal), o por un plazo ilimitado (una cesión ilimitada), o puede configurarse con una reserva de
dirección permanente para cada IB-2x.
IMPORTANTE: En un entorno ajeno a WINS, se recomienda configurar el servidor DHCP para
otorgar a IB-2x una cesión ilimitada o una reserva de dirección permanente.
Cesión ilimitada o reserva de direcciones en Windows NT 4.0 y Windows 2000
En Windows NT y 2000, la duración de la cesión se determina para un grupo de direcciones concreto.
Por tanto, la duración de la cesión debe configurarse como Ilimitada para el grupo al que pertenezca
IB-2x. Si no lo desea hacer así, entonces IB-2x tiene que definirse como Cliente reservado.
Un Cliente reservado puede añadirse con el Administrador DHCP de Windows seleccionando
Alcance y después Agregar reservas. Escriba la dirección Ethernet de IB-2x (no entre los dos
puntos, es decir: 008092a371d8), la dirección IP y otros parámetros IP. La dirección Ethernet puede
obtenerse en la página de Estado de la red IB-2x.
Desactivación de DHCP (Dynamic Host Configuration Protocol)
Si no desea la asignación de dirección IP con DHCP, puede desactivarla utilizando el asistente de
configuración rápida IB-2x, el panel frontal de la impresora, un navegador Web, o por otros métodos.
IMPORTANTE: Observe que DHCP SE DESACTIVA AUTOMÁTICAMENTE cuando la dirección IP
se determinan utilizando otros métodos, como por ejemplo el asistente de configuración rápida IB-2x,
el panel frontal de la impresora, etc.
Configuración de WINS
WINS se utiliza con Windows NT para ofrecer un mecanismo de asignación del nombre NetBIOS,
normalmente denominado nombre de anfitrión, a una dirección IP. WINS necesita un servidor NT o
2000 configurado como servidor WINS.
48
Page 48

WINS permite definir una configuración de impresión que haga referencia a la impresora por su
nombre en lugar de por su dirección IP. Por tanto, aunque se cambie la dirección IP a través de
DHCP, la configuración de impresión seguirá siendo válida y no se interrumpirá la impresión. Otra
ventaja de WINS es que puede reemplazarse transparentemente una impresora antigua por una
nueva simplemente, 1) dando a la nueva impresora el mismo nombre de anfitrión que la antigua, o 2)
modificando la configuración de puerto Windows LPR para la impresora antigua con el nombre de
anfitrión de la nueva.
Registro y asignación de nombres WINS
IB-2x tiene que recibir la dirección del servidor WINS principal en el que registrará su nombre de
anfitrión. De manera optativa, puede recibir la dirección de un servidor WINS secundario. El servidor
DHCP por lo general se configura para ofrecer al IB-2x su nombre de anfitrión y las direcciones del
servidor WINS. Para conocer los procedimientos correctos de configuración, consulte la
documentación de su servidor DHCP. Alternativamente, el nombre de anfitrión y las direcciones del
servidor WINS pueden configurarse utilizando un navegador Web o la herramienta IB-2x
AdminManager. Consulte la sección Seguridad y gestión de seguimiento más adelante en esta guía
para información sobre cómo utilizar estas herramientas.
El registro WINS puede verificarse imprimiendo la Página de estado de la red IB-2x. Una vez IB-2x se
ha registrado satisfactoriamente con un servidor WINS, la página de estado WINS aparecerá como
Registrado en la sección TCP/IP.
Configuración de la dirección IP por el panel frontal de la impresora
Lo siguiente se aplica a las impresoras Kyocera Mita. Consulte el manual de funcionamiento de la
impresora para ver información sobre las opciones del panel frontal para copiadoras.
1. Pulse la tecla MENU. Si la primera línea del panel LED no muestra la palabra INTERFACE, pulse
la tecla
2. Si la línea debajo de INTERFACE no muestra OPTION, pulse la tecla ENTER, y
∧
ó ∨ hasta que aparezca dicha palabra.
∧
ó ∨ hasta que
aparezca dicha palabra y pulse ENTER.
3. Pulse la tecla > para entrar en el submenú Option. (Nota: Algunos modelos antiguos de
impresora no permiten efectuar la configuración mediante el panel frontal. Si no hay un submenú
Option o no todas las opciones están disponibles en el submenú, verifique los requisitos de
firmware en la sección siguiente.)
4. Pulse
∧
ó ∨ hasta que aparezca TCP/IP. Pulse la tecla > para entrar en el submenú TCP/IP (sólo
es accesible cuando el protocolo TCP/IP está activado - «On»).
5. Pulse
∧
ó ∨ hasta que aparezca la dirección IP. Pulse la tecla ENTER; aparecerá un cursor bajo
el último dígito de la dirección IP.
6. Pulse la tecla < ó > para mover el cursor hasta el dígito que desee cambiar. Pulse
∧
ó ∨ para
cambiar el dígito.
7. Una vez haya configurado todos los dígitos, pulse la tecla ENTER para aceptar la nueva
dirección.
8. Repita los pasos del 5 al 7 para Subnet Mask (máscara de subred) y Default Gateway (la
dirección IP del encaminador). Si no está seguro de cuál es la máscara de subred correcta y el
primer número en la dirección IP IB-2x está entre 192 y 254, utilice 255.255.255.0 como la
máscara de subred.
Español
49
Page 49

9. Cuando haya terminado la configuración de la dirección IP, máscara de subred, y Default
Gateway, pulse la tecla < para regresar al menú Option (aparecerá TCP/IP).
Nota: Se recomienda desactivar todos los protocolos que no estén en uso.
∧
10. Optativo: Pulse
ó ∨ para mostrar el protocolo que desea apagar, por ejemplo EtherTalk. Pulse
la tecla ENTER, aparecerá un símbolo ? junto a «On». Pulse ∧ ó ∨ para cambiar el valor a «Off»
(No) y pulse la tecla ENTER para aceptar el nuevo valor. Repita estos pasos para cada protocolo
que desee desactivar.
11. Pulse la tecla < para volver al menú Interface (aparece Option).
12. Pulse
∧
ó ∨ hasta que aparezca la página de estado de la impresora. Pulse ENTER dos veces
para imprimir una página de estado y verificar la nueva configuración.
13. Cuando haya terminado, pulse la tecla MENU para salir del menú del sistema.
Español
Persistencia de dirección IP
Si apaga y vuelve a encender la impresora, ¿ retiene IB-2x su dirección IP?
Temporal: Si se obtiene un permiso temporal del servidor DHCP, se establecerá una dirección IP
temporal. Es decir, cuando se apaga y se vuelve a encender la impresora, IB-2x no comienza a
utilizar su dirección IP hasta que ha negociado con un servidor DHCP. Por tanto, si no hay un servidor
DHCP disponible, IB-2x no tendrá un dirección IP. Esto es necesario para prevenir conflictos de
dirección IP en entornos DHCP.
Permanente: si se ha obtenido una cesión ilimitada o una reserva de dirección de un servidor DHCP,
o si se configura por un método que no se DHCP, entonces la dirección IP es permanente. Eso
significa que se aplicará la dirección IP inicialmente establecida incluso después de apagar y reiniciar la
impresora.
Seguridad y gestión de seguimiento
Mientras esta guía se concentra en la configuración inicial de IB-2x, esta sección se incluye para dar
una breve descripción de la seguridad y de las opciones disponibles para la gestión de IB-2x.
Seguridad con contraseña
Se utiliza una contraseña de administración para controlar el acceso no autorizado a los parámetros
de IB-2x. La opción de fábrica por omisión es una contraseña Admin en blanco. A no ser que defina
una contraseña Admin, cualquier persona con acceso a través de un navegador Web o a cualquiera
de las herramientas IB-2x puede cambiar la configuración de IB-2x. Por tanto, recomendamos
establecer una contraseña Admin.
AVISO: Si le mot de passe d’administrateur est oublié, le seul moyen de récupération existant est de
rétablir la carte IB-2X sur ses valeurs d’usine par défaut (en utilisant un réglage de cavalier tel que
décrit dans la section Dépannage du mode d’emploi contenu sous format html sur le CD-ROM
(Bibliothèque réseau Kyocera Mita ou bibliothèque de logiciels Kyocera Mita) fourni avec ce produit).
50
Page 50

Navegador Web
Si se utiliza IB-2x en una red TCP/IP y cuenta con una dirección IP válida, puede gestionar la unidad
desde cualquier navegador Web. El navegador le permitirá configurar por completo todos los
parámetros de IB-2x, aunque, a diferencia del asistente de configuración rápida, el navegador no
puede crear objetos de impresión NetWare. Si se utiliza un navegador para la configuración NetWare,
también debe utilizarse NWAdmin para crear los objetos de impresión NetWare.
Conéctese con IB-2x con un navegador escribiendo la dirección IP en el campo de URL, por ejemplo.
http://206.129.6.54
La página de inicio mostrará información básica sobre la impresora/copiadora y IB-2x, así como el
estado actual de la impresora y la pantalla actual del panel frontal de la impresora. Cuando haga clic en
el botón Actualizar, se actualizará la pantalla de mensaje que se muestra en el explorador.
Seleccione una categoría en la barra de navegación de la izquierda para ver y determinar los valores
para dicha categoría. Si ha determinado una contraseña Admin para IB-2x, tendrá que escribir un
nombre de usuario y una contraseña cuando acceda a cualquiera de las pantallas que permiten la
modificación de valores. Para el nombre de usuario, escriba cualquier nombre, incluso un espacio en
blanco. Si no se ha establecido una contraseña Admin, tendrá libre acceso a las demás páginas.
Puede definir la contraseña Admin en la ficha Seguridad.
Asistente de configuración rápida
El asistente de configuración rápida IB-2x basado en Windows ha sido diseñado para facilitar la
configuración inicial. Si bien no incluye todos los parámetros IB-2x posibles, es un método práctico
para la configuración de seguimiento para cambiar los parámetros básicos. Para mayor información,
véase Uso del asistente de configuración rápida en la páginas anteriores de esta guía.
Español
AdminManager
La herramienta AdminManager basada en Windows puede utilizarse en un entorno IP o IPX para
configurar por completo cualquiera de los parámetros IB-2x. AdminManager puede instalarse o
ejecutarse desde el CD-ROM (Kyocera Mita Network Library o Kyocera Mita Software Library)
seleccionando Configuración avanzada en el menú Configuración de IB-2x.
KM-NET VIEWER
La gestión y control continuada de la impresora por lo generar se realiza con KM-NET VIEWER
basados en Windows. KM-NET VIEWER permite realizar operaciones avanzadas de agrupación,
filtrado, ordenación de varias impresoras/copiadoras de Kyocera Mita y de otros fabricantes. Ofrece
diversas opciones para la notificación de avisos o mensajes de error de la impresora, y puede
utilizarse para ver o modificar una amplia gama de parámetros de la impresora o IB-2x. KM-NET
VIEWER están en el CD-ROM (Kyocera Mita Software Library o Kyocera Mita Digital Library)
suministrado.
51
Page 51

Conexión de red inalámbrica
Con la IB-22, todas la funciones de la conexión de red IB-2x, incluso las características TCP/IP,
NetWare, Apple Talk, administración basada en la Web, etc.; se encuentran ahora disponibles en
una red inalámbrica. La IB-22 permite mantener una conexión de red inalámbrica como se define en
la norma 802.11b y puede interoperar con otros dispositivos que brinden soporte a esta norma.
En esta sección se explica cómo se conecta la IB-22 a su red inalámbrica.
Modos de operación
IB-22 admite los modos de operación siguientes:
Ø Infraestructura: Uno o más Puntos de acceso (también llamados Estaciones base) se utilizan para
Español
crear una red inalámbrica y pueden utilizarse, a su vez, para conectar esta red a una red
cableada.
Ø 802.11 Ad hoc: Conexión directa entre dispositivos inalámbricos sin utilizar un punto de acceso.
Este modo utiliza la identificación SSID (Service Set Identification). SSID cumple la función de
un identificador de red lógica.
Ø
Ad hoc: Conexión directa entre dispositivos inalámbricos sin utilizar un Punto de acceso. Este
modo no hace uso de la identificación SSID.
Ø
Automático: Detecta automáticamente alguno de los modos anteriormente indicados. Éste es el
modo predeterminado de la IB-22.
Cifrado
El protocolo de seguridad WEP (Wired Equivalent Privacy) tiene como fin garantizar que los datos en
un entorno inalámbrico cuenten con un nivel de seguridad equivalente al de los datos de una red
cableada normal. El protocolo EP utiliza cifrado de 64 bits (también conocido como de 40 bits) o de
128 bits, ambos compatibles con la conexión IB-22.
Configuración automática de IB-22
IB-22 detectará y se conectará automáticamente a una red inalámbrica 802.11b, salvo en caso de que:
Ø la red inalámbrica utilice algún tipo de cifrado, o
Ø la transmisión de la identificación SSID se encuentre desactivada, o
Ø la PC y la IB-22 no estén definidas en el mismo canal cuando se encuentran en modo Ad hoc, o
Ø sea posible acceder a varias redes inalámbricas diferentes (puede que IB-22 no se conecte con la
red deseada).
Si alguno de los casos anteriores se aplica a su red, consulte la sección Configuración manual de la IB-22.
Si se puede usar la configuración automática en su red, sólo deberá confirmar el establecimiento de la
conexión de la IB-22.
Pour des informations sur la procédure de restauration des valeurs d’usine par défaut, consultez la
section Dépannage du mode d’emploi (HTML) qui se trouve sur le CD-ROM fourni (Bibliothèque
réseau Kyocera Mita ou bibliothèque de logiciels Kyocera Mita).
52
Page 52

Confirmación del establecimiento de la conexión
Con DHCP: Si su red cuenta con un servidor DHCP, imprima una página de estado o consulte la
dirección IP en el panel frontal para verificar que la IB-22 ha obtenido una dirección IP. Si ha
obtenido una dirección IP, la conexión con la red se confirma.
Sin DHCP: Si no cuenta con un servidor DHCP, defina la dirección IP de la impresora IB-22
utilizando el panel del operador y conéctese a la IB-22 utilizando un navegador, por ejemplo http://
192.168.10.240. Si la conexión del navegador se establece correctamente, la conexión con la red
está confirmada.
Una vez confirmada la conexión con la red, continúe con el protocolo de configuración de la IB-22
de la misma forma que con cualquier IB-2x consultando las secciones correspondientes del manual.
Si la IB-22 no puede establecer una conexión con la red, deberá realizar la configuración
manualmente. En algunos casos, resulta conveniente restablecer los ajustes predeterminados de
fábrica de la IB-22.
Configuración manual de la IB-22
Si no es posible conectar automáticamente la IB-22 a la red, como sucede cuando el cifrado se
encuentra activado, utilice el siguiente procedimiento.
1. Defina una PC en el modo Ad hoc 802.11b (o en modo Ad hoc) con el cifrado WEP desctivado y
defina el canal de forma que coincida con el canal de la IB-22. El canal predeterminado de la
IB-22 es el 11. Consulte las instrucciones del adaptador de LAN inalámbrica para PC de ser
necesario.
2. Encienda la impresora IB-22.
3. Defina la dirección IP de la IB-22 en el panel del operador.
4. Conecte la IB-22 ingresando la dirección IP en un navegador, por ejemplo http://
192.168.10.240.
5. Seleccione la opción correspondiente a LAN inalámbrica en el panel de navegación.
6. El Wireless LAN Mode (modo de LAN inalámbrica) será detectado por la IB-22. No obstante,
si existen varias redes inalámbricas con modos diferentes disponibles, deberá ajustar el modo
para que coincida con la red con la que desea conectarse.
7. Defina la identificación SSID para que coincida con su red inalámbrica (sólo en modo de
Infraestructura u 802.11 Ad hoc).
8. Defina Channel (Canal) de forma que coincida con su red inalámbrica.
9. Si utiliza el protocolo WEP:
a. Defina Encryption (WEP) (Cifrado - WEP) en 64 bits (también conocido como cifrado de 40
bits) o en 128 bits para que coincida con el de su red inalámbrica.
b. Defina la WEP Key (Clave WEP) de forma que coincida con la de su red inalámbrica. Si
utiliza el cifrado de 64 bits, la clave tendrá 5 pares de caracteres hexadecimales, por
ejemplo: 4C 75 63 6B 79. Si utiliza el cifrado de 128 bits, la clave tendrá 13 pares de
caracteres hexadecimales.
ADVERTENCIA: Asegúrese de ingresar la clave correctamente. Si ingresa la clave de
forma incorrecta, no podrá conectar la IB-22 y deberá restablecer los ajustes
predeterminados de fábrica para borrar la clave WEP incorrecta.
10. Haga clic en Submit (Enviar) para aplicar los ajustes nuevos a la IB-22. Para verificar el estado
de la comunicación, consulte la sección Confirmación del establecimiento de la comunicación.
Español
53
Page 53

Español
54
Page 54

Contenu
Introduction ................................................................................. 56
CD-ROM Kyocera Mita Network Library .................................... 56
Installation de la carte IB-2x........................................................ 57
Utilisation de l’assistant de configuration rapide ..................... 57
Impression NetWare .................................................................... 58
NetWare 3.x ..............................................................................................................58
NetWare 4.x, 5.x et 6.x ..............................................................................................58
Impression sous Windows ......................................................... 59
Impression sous Windows via NetWare...................................................................5 9
Impression sous Windows via TCP/IP .....................................................................60
Impression sous Windows via NetBEUI ...................................................................6 3
Partage d’imprimantes sous Windows ....................................................................63
Configuration sur le Macintosh .................................................. 64
Installation de l’utilitaire IB-2x...................................................................................65
Configuration de l’émulation KPDL et des nom et zone AppleTalk.........................6 5
Installation des fichiers PPD et configuration de l’imprimante ...............................6 5
Configuration de l’adresse IP ..................................................... 66
Configuration DHCP.................................................................................................66
Configuration WINS ..................................................................................................66
Configuration de l’adresse IP via le panneau avant de l’imprimante......................67
Persistance de l’adresse IP......................................................................................6 8
Sécurité et suivi ........................................................................... 68
Mot de passe ............................................................................................................6 8
Français
Navigateur web.........................................................................................................6 8
Assistant de configuration rapide .............................................................................6 9
AdminManager.........................................................................................................69
KM-NET VIEWER .....................................................................................................6 9
Réseau sans fil ............................................................................ 70
Modes de fonctionnement .......................................................................................70
Cryptage....................................................................................................................70
Configuration automatique de IB-22........................................................................70
Confirmation que la connexion a été établie...........................................................71
Configuration manuelle de IB-22 .............................................................................71
55
Page 55

Introduction
Nous vous félicitons de votre choix d’un produit d’impression réseau Kyocera Mita IB-2x ! Nous
sommes certains que vous apprécierez les performances et le faible coût d’utilisation qui font la
réputation des produits Kyocera Mita.
Ce produit est une carte d'interface réseau interne pour les imprimantes et photocopieuses numériques
Kyocera Mita. Elle peut être facilement installée sans avoir à retirer la carte mère de l'imprimante. La
carte IB-2x permet aux imprimantes et photocopieuses Kyocera Mita de communiquer sur un réseau
Ethernet avec différents systèmes d’exploitation, tels que Windows, NetWare, Macintosh et UNIX.
Ce guide de configuration rapide contient des instructions de configuration permettant à un
administrateur système de rapidement profiter des avantages présentés par la carte IB-2x. Pour toutes
questions, consultez le mode d'emploi qui se trouve sur le CD-ROM fourni (Kyocera Mita Network
Library ou Kyocera Mita Software Library).
CD-ROM Kyocera Mita Network Library
L’insertion du CD-ROM KMNL dans le lecteur de votre ordinateur entraîne l’apparition du menu
Français
principal. Si le menu principal n’apparaît par automatiquement, vous devrez exécuter le fichier
Setup.exe qui se trouve à la racine du CD-ROM. Ce guide de configuration rapide mentionne les
utilitaires suivants qui se trouvent dans la section IB-2x Configuration du CD-ROM :
Assistant de configuration rapide : une interface permettant de configurer les paramètres
nécessaires à l’utilisation de IB-2x.
Configuration avancée : Il permet une configuration avancée et le contrôle de la carte d'interface
réseau.
KPrint : installe un moniteur de port client activant l’impression TCP/IP sur n’importe quelle imprimante/
photocopieuse Kyocera Mita connectée à la carte IB-2x. Avec la carte IB-20/21, KPrint supporte
l’impression LPR et IPP sous Windows 95/98/Me. Avec la carte IB-21E/22, KPrint supporte également
l’impression via messagerie sous Windows 95/98/Me/NT4/2000.
Marques commerciales
KYOCERA®, KYOCERA MITA® et sont des marques déposées de Kyocera Corporation. NetWare® est une marque déposée de Novell,
Incorporated. Windows® est une marque déposée de Microsoft Corporation. Macintosh® est une marque déposée de Apple Computer,
Incorporated. PostScript® et Acrobat® sont des marques déposées de Adobe Systems, Incorporated. Tous les autres produits mentionnés
sont des marques commerciales, pouvant être déposées, appartenant à leurs détenteurs respectifs.
Déclaration FCC :
Cet équipement est conforme aux réglementations de la FCC, Partie 15. Son utilisation est soumise aux deux conditions suivantes : (1) cet
appareil ne doit pas produire d’interférences et (2) doit pouvoir supporter les interférences reçues, y compris celles pouvant entraîner un
fonctionnement indésirable.
56
Page 56

Installation de la carte IB-2x
IB-2X est une carte d'interface à glissement. Elle peut être facilement installée sans avoir à retirer la
carte mère de l'imprimante ou de la photocopieuse.
1.Retirez les vis retenant le couvercle du logement
d'interface d'extension de l'imprimante ou de la
photocopieuse, puis enlevez le couvercle.
2.Insérez la carte en veillant à bien aligner ses bords
avec les rails du logement d'interface, puis
attachez-la avec les vis retirées à l'étape 1.
Utilisation de l’assistant de configuration rapide
L’assistant de configuration rapide est très simple à utiliser. Cette section contient cependant quelques
informations permettant de rechercher et établir une connexion à l’imprimante. Insérez le CD-ROM
(Kyocera Mita Network Library ou Kyocera Mita Software Library) et sélectionnez Assistant de
configuration rapide dans la section Configuration IB-2x.
Français
R’écran de sélection de l’imprimante apparaît. L’assistant de configuration rapide recherche les
imprimantes sur les connexions IPX ou IP tant que le protocole est installé sur l’ordinateur Windows
exécutant l’assistant (par exemple, si seul IPX est installé, l’assistant ne détecte que les imprimantes
IPX).
Si aucune imprimante n’apparaît dans la liste, une autre méthode de connexion est d’entrer l’adresse
Ethernet dans l’espace réservé à cet effet. L’adresse Ethernet se trouve sur la page d’état IB-2x. Si
une imprimante IP ne se trouve pas sur le segment local, elle doit également avoir une adresse de
passerelle par défaut correctement spécifiée et le(s) routeur(s) doivent être configurés pour la diffusion
des paquets IP.
Si une imprimante ne peut pas être détectée par l’assistant (par exemple, IPX n’est pas utilisé et les
paquets IP ne peuvent pas être diffusés), utilisez un navigateur web ou l’utilitaire AdminManager pour
la configuration. Dans un navigateur web, la diffusion de paquets IP n’est pas nécessaire étant donné
que l’adresse est entrée correctement. Dans AdminManager, la recherche peut être spécifiée pour
des réseaux spécifiques. Consultez la section Sécurité et suivi pour plus d’informations sur la
connexion avec un navigateur web ou AdminManager.
57
Page 57

Impression NetWare
Il existe plusieurs options d’impression sous NetWare. Vous trouverez ci-dessous une explication des
différentes méthodes d’impression pour chaque version de NetWare, ainsi qu’une description de la
façon de configurer l’impression pour chacune de ces méthodes.
NetWare 3.x
NetWare 3.x supporte l’impression basée sur le mode Bindery. Deux modes sont supportés : 1) le
mode Serveur d’impression et 2) le mode Imprimante distante.
Mode Serveur d’impression (recommandé) : la carte IB-2x agit en tant que serveur d’impression et
interroge la file d’impression de façon périodique. Ce mode utilise un logon NetWare (licence pour un
utilisateur).
Mode Imprimante à distance : la carte IB-2x agit en tant qu’imprimante à distance acceptant les tâches
d’impression à partir d’un serveur d’impression exécuté sur une station de travail distincte ou sur un
serveur de fichiers. Ce mode ne requiert pas de licence NetWare.
NetWare 3.x Bindery
Français
1. Exécutez l’assistant de configuration rapide du CD-ROM (Kyocera Mita Network Library ou
Kyocera Mita Software Library).
2. Dans la section NetWare, sélectionnez Configuration Bindery. Tous les objets NetWare requis
sont créés par l’assistant de configuration rapide.
3. Une fois l’assistant utilisé, attendez quelques minutes avant d’utiliser le panneau avant de
l’imprimante pour imprimer des pages d’état. Consultez l’information de connexion NetWare sur la
page d’état IB-2x et vérifiez que l’état de la file d’attente est Prêt.
4. Configurez les clients Windows pour l’impression sur la file d’attente NetWare associée (consultez
la section Impression sous Windows via NetWare).
NetWare 4.x, 5.x et 6.x
NetWare 4.x, 5.x et 6.x supportent l’impression NDS. L’impression basée sur Bindery est également
supportée afin de fournir une compatibilité en amont. Les modes Serveur d’impression et Imprimante
distante (voir les descriptions dans la section précédente) sont supportés pour NDS. Cependant, seul
le mode Serveur d’impression est supporté pour l’impression Bindery.
NetWare NDS ou Bindery
1. Exécutez l’assistant de configuration rapide IB-2x du CD-ROM (Kyocera Mita Network Library ou
Kyocera Mita Software Library).
2. Dans la section NetWare, sélectionnez Configuration NDS (recommandé) ou Configuration
Bindery. Tous les objets NetWare requis sont créés par l’assistant de configuration rapide.
3. Une fois l’assistant utilisé, attendez quelques minutes avant d’utiliser le panneau avant de
l’imprimante pour imprimer des pages d’état. Consultez l’information de connexion NetWare sur la
page d’état IB-2x et vérifiez que l’état de la file d’attente est Prêt.
4. Configurez les clients Windows pour l’impression sur la file d’attente NetWare associée (consultez
la section Impression sous Windows via NetWare).
58
Page 58

NetWare NDPS
1. Installez la passerelle NDPS Kyocera à partir du CD-ROM (Kyocera Mita Network Library ou
Kyocera Mita Software Library). Sélectionnez Novell NDPS dans le menu principal du CD-ROM.
La passerelle supporte NetWare 5.x et 6.x. Pour une utilisation avec NetWare 4.x, consultez les
conditions requises indiquées dans le fichier Lisez-moi.txt accompagnant la passerelle sur le CDROM.
2. La passerelle supporte l’impression IPX et IP. Pour l’impression basée sur IP (recommandée),
définissez l’adresse IP de la carte IB-2x (consultez la section Configuration de l’adresse IP).
3. Utilisez NWAdmin pour créer l’agent d’imprimante pour votre imprimante. Consultez le Guide
d’administration (au format PDF) fourni avec la passerelle pour plus d’informations.
4. Configurez les clients Windows pour l’impression avec l’agent d’imprimante.
Impression sous Windows
Windows offre une vaste gamme de versions de clients ; de Windows 3.1 à Windows XP, et donc une
aussi vaste gamme de fonctions d’impression. Les différentes versions de Windows, combinées aux
fonctions IB-2x, offrent les possibilités d’impression présentées ci-dessous.
•
Via Novell NetWare : impression sur des files d’attente NetWare lorsqu’un serveur NetWare est
présent.
Français
•
Via LPR : impression sur un spouleur LPR Windows sur TCP/IP.
Via IPP : impression sur Internet ou intranet avec le protocole IP.
•
Via messagerie : disponible uniquement avec la carte IB-21E/22. Cette fonction permet d’envoyer
•
une tâche d’impression via message électronique, sur Internet par exemple, grâce aux
commandes d’impression standard des applications Windows.
•
Via NetBEUI : impression homologue à homologue avec le protocole NetBEUI. Les imprimantes
sont disponibles dans le voisinage réseau.
Via partage d’imprimante sous Windows : impression sur une imprimante partagée en réseau et
•
configurée sur une autre machine Windows.
Quelle méthode utiliser ?
La configuration optimum pour l’impression sous Windows dépend de l’environnement dans lequel
vous travaillez, les préférences, ainsi que l’expérience de l’administrateur et des utilisateurs du
système. En général, les services d’impression NetWare sont utilisés lorsqu’un serveur NetWare est
présent. En l’absence d’un serveur NetWare, l’impression LPR est souvent utilisée en combinaison au
partage d’imprimante lorsque la méthode TCP/IP est déjà utilisée. L’impression homologue à
homologue NetBEUI est plus généralement utilisée lorsqu’un serveur d’impression NetWare ou
Windows n’est pas utilisé. IPP ou l’impression via messagerie sont utilisés lorsque l’impression sur
Internet est nécessaire.
Impression sous Windows via NetWare
L’impression à partir d’un client Windows via NetWare demande la configuration de la carte IB-2x pour
l’impression avec NetWare (consultez la section Impression avec NetWare). Une fois l’impression
avec NetWare configurée, utilisez l’assistant d’ajout d’imprimante de Windows (Démarrer,
Paramètres, Imprimantes, Ajout d’imprimante) pour accéder à la file d’attente ou à l’agent
d’imprimante IB-2x NetWare. Sélectionnez Réseau et indiquez l’objet d’impression IB-2x NetWare.
59
Page 59

Impression sous Windows via TCP/IP
Les sections suivantes présentent la configuration TCP/IP sous Windows 95/98/Me, NT 4.0 et 2000.
La carte IB-2x supporte plusieurs méthodes d’impression TCP/IP, telles que le protocole IPP (Internet
Printing Protocol) et l’impression via messagerie (dans le cas de la carte IB-21E/22), ces deux
méthodes permettant d’imprimer via Internet.
Windows 95/98/Me LPR ou IPP
Vérifiez que TCP/IP est installé
Ouvrez le panneau de configuration Démarrer, Paramètres, Panneau de configuration, Réseau.
Si TCP/IP n’apparaît pas dans la liste, il doit être installé avant la configuration de l’impression TCP/IP.
Configurez l’adresse IP de la carte IB-2x
Consultez la section Configuration de l’adresse IP plus loin dans ce guide.
Configurez le port et installez le pilote d’imprimante
1. Insérez le CD-ROM (Kyocera Mita Network Library ou Kyocera Mita Software Library),
Français
sélectionnez Configuration IB-2x et exécutez l’assistant d’ajout de port KPrint. L’assistant vous
guide dans les étapes de configuration. Pour plus d’informations sur l’option d’impression via
message électronique de Kprint, consultez la section correspondante ci-dessous.
2. Exécutez l’assistant d’ajout d’imprimante de Windows (Démarrer, Paramètres, Imprimantes,
Ajout d’imprimante).
2.1. Lorsque l’assistant vous invite à indiquer la méthode de connexion de l’imprimante à votre
ordinateur, sélectionnez Imprimante locale.
2.2. Dans la liste des ports disponibles, sélectionnez le port IPP ou LPR créé par l’assistant
d’ajout de port KPrint.
3. Suivez les invites pour compléter les étapes de l’assistant d’ajout d’imprimante.
4. Utilisez la procédure suivante pour partager l’imprimante.
4.1. Ouvrez le panneau de configuration Démarrer, Paramètres, Panneau de configuration,
Réseau et vérifiez que le partage de fichiers et d’imprimantes pour les réseaux
Microsoft est installé. Dans le même écran, cliquez sur le bouton Partage de fichiers et
d’imprimantes et cochez la case appropriée pour permettre le partage d’imprimante.
4.2. Sous Démarrer, Paramètres, Imprimantes, cliquez du bouton droit sur l’imprimante que
vous venez de créer avec l’assistant d’ajout d’imprimante, sélectionnez Partage, cliquez sur
Partagée en tant que et entrez le nom souhaité.
Windows NT 4.0 LPR
Composants TCP/IP requis
Les étapes suivantes décrivent la façon de vérifier et, si nécessaire, ajouter les composants TCP/IP
nécessaires à l’impression LPR.
1. Ouvrez le panneau de configuration Démarrer, Paramètres, Panneau de configuration,
Réseau, Protocoles. Si le protocole TCP/IP n’apparaît pas dans la liste des protocoles réseau,
cliquez sur Ajouter pour l’installer.
60
Page 60

2. Sélectionnez l’onglet Services. Si les protocoles Impression TCP/IP Microsoft ou Services TCP/IP
simples n’apparaissent pas dans la liste des protocoles réseau, cliquez sur Ajouter pour les
installer.
3. Cliquez sur OK une fois tous les protocoles et services ajoutés. Si le protocole TCP/IP vient d’être
ajouté, Windows vous invitera à entrer l’adresse IP et les autres paramètres TCP/IP. Les
nouveaux protocoles et services ne seront disponibles qu’après le redémarrage du système.
Configurez l’adresse IP de la carte IB-2x
Consultez la section Configuration de l’adresse IP plus loin dans ce guide.
Installez le pilote d’imprimante et configurez le port
1. Insérez le CD-ROM fourni avec l'imprimante (Kyocera Mita Software Library ou Kyocera Mita
Digital Library), puis sélectionnez l'option d'installation du pilote d'imprimante à partir du menu
principal.
2. Dans la boîte de dialogue Connexion de l’imprimante, sélectionnez Locale.
3. Dans la boîte de dialogue Sélectionnez un port d’imprimante, cliquez sur le bouton Ajouter un
port LPR.
4. Dans le champ Nom ou adresse du serveur fournissant le lpd, entrez l’adresse IP de la carte
IB-2x.
Français
5. Dans le champ Nom de l’imprimante ou de la file d’attente sur ce serveur, entrez un nom de
port (tel que LPR1) et cliquez sur OK.
6. Si l’imprimante doit être partagée, sélectionnez Partagée et entrez le nom que vous souhaitez lui
donner. Sélectionnez les versions de Windows sur lesquelles vous souhaitez placer le pilote lors
d’une connexion à cette imprimante partagée.
Impression via messagerie sous Windows 95/98/Me, NT 4.0 et 2000
La carte IB-21E/22 offre une nouvelle fonction d’impression via message électronique. Cette fonction
permet d’envoyer une tâche d’impression via message électronique, sur Internet par exemple, grâce
aux commandes d’impression standard des applications Windows.
Une carte IB-21E/22 configurée pour l’impression via message électronique se connecte à un serveur
de messagerie POP3 et récupère les tâches d’impression qui s’y trouvent. Pour des informations sur la
procédure d'installation, consultez les procédures POP3 et du courrier électronique dans le mode
d'emploi HTML qui se trouve sur le CD-ROM fourni (Kyocera Mita Network Library ou Kyocera Mita
Software Library).
Une fois la carte IB-21E/22 configurée pour récupérer les messages, KPrint est utilisé pour créer un
port Windows permettant d’envoyer les tâches d’impression à l’imprimante par courrier électronique.
Une fois créé par KPrint, le port peut être sélectionné à l’aide de l’assistant d’ajout d’imprimante de
Windows (en choisissant une imprimante locale).
Une implémentation commune est la création d’une imprimante partagée sur un serveur Windows et sa
configuration lui permettant d’utiliser le port de messagerie créé par KPrint pour envoyer les tâches
d’impression à une imprimante distante. Les utilisateurs pourront alors se connecter à l’imprimante
partagée à l’aide de l’assistant d’ajout d’imprimante de Windows et envoyer leurs tâches d’impression à
l’imprimante distante. C’est là une méthode permettant de remplacer la télécopie.
61
Page 61

Impression TCP/IP standard sous Windows 2000
Configurez l’adresse IP de la carte IB-2x
Consultez la section Configuration de l’adresse IP plus loin dans ce guide.
Installez le pilote d’imprimante et configurez le port
1. Exécutez l’assistant d’ajout d’imprimante de Windows (Démarrer, Paramètres, Imprimantes,
Ajout d’imprimante).
2. Sélectionnez Imprimante locale et désactivez Détection automatique et installation de
l’imprimante Plug-and-Play.
3. Sélectionnez Créer un nouveau port et choisissez Port TCP/IP standard dans la liste Type.
L’assistant Ajout de port imprimante TCP/IP standard apparaît.
4. Dans le champ Nom d’imprimante ou adresse IP, entrez l’adresse IP de la carte IB-2x.
5. Dans le champ Nom de port, entrez le nom souhaité ou acceptez la valeur par défaut.
6. Une fois l’assistant Ajout de port imprimante TCP/IP standard terminé, l’assistant d’ajout d’imprimante
reprend. Sélectionnez le modèle d’imprimante appropriée.
7. Une fois un nom affecté à l’imprimante, la boîte de dialogue de partage d’imprimante apparaît. Si
Français
l’imprimante doit être partagée, sélectionnez Partagée en tant que et entrez le nom que vous
souhaitez lui donner. Le partage n’est disponible que si le service de partage de fichiers et
d’imprimantes est installé. Vérifiez qu’il est bien installé sous Démarrer, Paramètres, Connexions
réseau et accès à distance, Réseau local, Propriétés.
8. Suivez les invites pour compléter les étapes de l’assistant d’ajout d’imprimante.
9. Si vous avez sélectionné l’imprimante à partager et souhaitez que les autres versions de Windows
reçoivent automatiquement le pilote approprié lors d’une connexion à cette imprimante partagée,
suivez la procédure suivante :
9.1. Dans la boîte de dialogue Imprimantes, cliquez du bouton droit sur l’imprimante que vous
venez de créer à l’aide de l’assistant d’ajout d’imprimante et sélectionnez Partage.
9.2. Dans l’onglet Partage, cliquez sur Pilotes supplémentaires et sélectionnez les pilotes à
associer à cette imprimante.
Impression sous Windows 2000 via IPP
Windows 2000 offre une nouvelle méthode d’impression via le protocole IPP (Internet Printing
Protocol). Le protocole IPP est plus souvent utilisé pour l’impression sur Internet mais peut également
être utilisé pour l’impression sur les réseaux intranet.
Configurez l’adresse IP de la carte IB-2x
Consultez la section Configuration de l’adresse IP plus loin dans ce guide.
Installez le pilote d’imprimante et configurez le port
1. Exécutez l’assistant d’ajout d’imprimante de Windows (Démarrer, Paramètres, Imprimantes,
Ajout d’imprimante).
2. Sélectionnez Imprimante réseau.
3. Dans la boîte de dialogue Rechercher votre imprimante, sélectionnez Vous connecter à une
imprimante sur Internet ou sur votre réseau intranet et saisissez l’adresse URL à l’aide
d’une syntaxe telle que http://212.74.53.19/ipp.
4. Suivez les invites pour compléter les étapes de l’assistant d’ajout d’imprimante.
62
Page 62

Impression sous Windows via NetBEUI
L’impression homologue à homologue est disponible avec le protocole NetBEUI. Avec cette méthode,
les imprimantes se trouvent dans le voisinage réseau.
Impression sous Windows 95/98/Me, NT 4.0 et 2000 via NetBEUI
1. L’ordinateur Windows doit déjà être configuré pour utiliser NetBEUI.
Sous Windows 95/98/Me, ouvrez le panneau de configuration Démarrer, Paramètres, Panneau
de configuration, Réseau.
Sous Windows NT 4.0, ouvrez le panneau de configuration Démarrer, Paramètres, Panneau de
configuration, Réseau, Protocoles.
Sous Windows 2000, ouvrez le panneau de configuration Démarrer, Paramètres, Connexions
réseau et accès à distance, Réseau local, Propriétés.
2. Utilisez l’assistant de configuration rapide IB-2x à partir du CD-ROM (Kyocera Mita Network
Library ou Kyocera Mita Software Library) pour modifier le groupe de travail par défaut (KYNetPrinters) et le nom de l’imprimante (KYxxxxxx).
3. Dans le voisinage réseau, sélectionnez Tout le réseau, puis ouvrez le groupe de travail KYNetPrinters (ou le nom correspondant que vous lui avez donné) et sélectionnez l’imprimante
souhaitée.
Français
4. Cliquez du bouton droit sur l’icône Imprimante et sélectionnez Installer. L’assistant d’ajout
d’imprimante de Windows apparaît. Suivez les invites pour compléter les étapes de l’assistant
d’ajout d’imprimante.
5. Alors que le partage d’imprimante n’est généralement pas utilisé avec l’impression NetBEUI, il est
possible d’utiliser la méthode de partage de NT 4.0 ou 2000 pour tirer parti des fonctions de
téléchargement automatique de pilotes. Pour plus d’informations sur la configuration du partage
d’imprimantes, consultez les instructions portant sur l’impression sous Windows NT 4.0 via LPR
ou Windows 2000 TCP/IP standard.
Partage d’imprimantes sous Windows
Le partage des imprimantes Windows implique l’utilisation d’une machine fonctionnant en tant
qu’“ hôte ”. Cet hôte agit en tant que serveur d’impression, recueillant les tâches d’impression
envoyées depuis les clients Windows à l’imprimante partagée et les faisant parvenir à l’imprimante.
N’importe quel ordinateur Windows (supérieur à la version 3.1) peut fonctionner en tant que client ou
hôte.
Les protocoles utilisés entre le client et l’hôte et de l’hôte à l’imprimante ne doivent pas forcément être
les mêmes. Par exemple, si un ordinateur Windows NT est configuré pour partager une imprimante
LPR, des clients n’utilisant que IPX ou NetBEUI peuvent tout de même envoyer des tâches à
l’imprimante partagée. L’hôte NT acceptera les tâches IPX ou NetBEUI et les enverra à l’imprimante
sur une connexion TCP/IP. Cette fonction offre une énorme souplesse dans l’architecture d’impression
réseau Windows.
Création d’une imprimante partagée
La définition d’une imprimante partagée fait partie du processus d’ajout d’une imprimante et est
expliquée dans les différentes sections précédentes.
63
Page 63

Connexion à une imprimante partagée
Cette section présente brièvement les étapes nécessaires à la connexion d’un client à une imprimante
partagée. Bien que de légères variations existent dans les procédures applicables à Windows 95/98/
Me, NT 4.0 et 2000, telles que la sélection d’une Imprimante réseau sous 95/98/Me ou d’un Serveur
d’impression réseau sous NT 4.0, ces procédures sont essentiellement semblables et sont
regroupées dans les instructions suivantes.
Connexion de clients Windows 95/98/Me, NT 4.0 et 2000 à une imprimante
partagée
Si l’hôte est un ordinateur NT ou 2000 configuré pour télécharger le pilote permettant la connexion au
client :
Exécutez l’assistant d’ajout d’imprimante de Windows, sélectionnez Imprimante réseau, puis
l’imprimante partagée. Le pilote sera ensuite automatiquement téléchargé.
Si l’hôte est un ordinateur 95/98/Me ou si l’hôte NT ou 2000 n’a pas été configuré pour télécharger le
pilote permettant la connexion au client :
Installez le pilote d’imprimante à partir du CD-ROM (Kyocera Mita Software Library ou Kyocera Mita
Français
Digital Library) fourni avec l’imprimante. Dans l’écran Connexion de l’imprimante, sélectionnez Réseau,
puis l’imprimante partagée.
Configuration sur le Macintosh
KPDL (Kyocera Page Description Language) est un langage de description de page compatible
PostScript. Vous pouvez vérifier la page d'état de l'imprimante pour déterminer si KPDL est installé sur
l'imprimante.
La carte IB-2x supporte MacOS 8.x et MacOS 9.x et est compatible avec le pilote LaserWriter,
version 8.x.
La configuration nécessaire pour l’impression sur le Macintosh est vraiment minimale. Une fois la
carte IB-2x installée et connectée au réseau, l’imprimante apparaît dans le Sélecteur du Macintosh en
tant que périphérique LaserWriter. L’utilisateur n’a plus qu’à placer l’imprimante en émulation KPDL
(PostScript) et installer les fichiers de description PostScript.
Un utilitaire de configuration pour le Macintosh est inclus sur le CD-ROM (Kyocera Mita Network
Library ou Kyocera Mita Software Library) et permet à l’utilisateur d’effectuer des tâches de gestion
telles que la configuration à distance de l’émulation KPDL, la définition du nom et de la zone AppleTalk
et des paramètres TCP/IP.
Le protocole AppleTalk doit être activé sur le Macintosh pour le support de l’impression IB-2x.
64
Page 64

Installation de l’utilitaire IB-2x
1. Insérez le CD-ROM (Kyocera Mita Network Library ou Kyocera Mita Software Library) dans le
lecteur et double-cliquez sur l’icône du KM Network Library sur le bureau.
2. Ouvrez le dossier Utility.
3. Double-cliquez sur IB-2x Installer.
4. Sélectionnez la langue souhaitée et cliquez sur OK.
5. Confirmez le dossier de destination ou indiquez le dossier de votre choix. Cliquez sur Suivant
pour commencer la copie des fichiers.
6. Cliquez sur Terminer pour fermer le programme d’installation.
Configuration de l’émulation KPDL et des nom et zone AppleTalk
1. Ouvrez le dossier IB Tools et double-cliquez sur Setup Utility pour démarrer l’utilitaire.
2. L’utilitaire recherche tous les périphériques IB-2x disponibles sur le réseau AppleTalk (dans la
zone sélectionnée) et les affiche dans la liste des imprimantes. L’utilitaire peut être configuré pour
effectuer une recherche dans une zone AppleTalk différente ou via TCP/IP. Consultez le mode
d’emploi en ligne de la carte IB-2x pour plus d’informations sur la configuration des recherches.
3. Double-cliquez sur l’imprimante souhaitée dans la liste des imprimantes pour ouvrir la fenêtre de
configuration.
Français
4. Cliquez sur l’icône Sélectionner l’émulation. Sélectionnez l’option KPDL appropriée et cliquez
sur Définir.
5. Cliquez sur l’icône AppleTalk. Entrez le nom de l’imprimante tel que vous souhaitez qu’il
apparaisse dans le Sélecteur. Entrez le nom de la zone dans laquelle vous souhaitez que
l’imprimante apparaisse. Un astérisque (*) indique la zone par défaut.
6. Cliquez sur Définir pour envoyer les modifications à l’imprimante.
7. La définition du nom ou de la zone AppleTalk requiert une réinitialisation. Fermez la fenêtre de
configuration et choisissez Réinitialiser dans le menu Configuration.
Installation des fichiers PPD et configuration de l’imprimante
Le support Macintosh des imprimantes et des photocopieuses Kyocera Mita est fourni par le pilote
LaserWriter inclus avec le système d’exploitation Mac OS et par l’installation de fichiers PPD spécifiques
au modèle de votre imprimante. Ces instructions ne s’appliquent qu’aux versions Mac OS 8 et 9 du
système d’exploitation Macintosh.
1. Les fichiers PPD sont installés à partir du CD-ROM CD-ROM (Kyocera Mita Software Library ou
Kyocera Mita Digital Library) fourni avec l’imprimante. Insérez le CD-ROM, ouvrez le dossier
français et double-cliquez sur le programme d’installation Kyocera Mita.
2. Une fois l’installation des fichiers PPD terminée, ouvrez le Sélecteur à partir du menu Pomme.
3. Sélectionnez le pilote LaserWriter 8, la zone AppleTalk (le cas échéant) et l’imprimante IB-2x.
4. Cliquez sur Créer. Le pilote sélectionne automatiquement le fichier PPD et affiche une boîte de
dialogue permettant la sélection des options de l’imprimante installée.
5. Sélectionnez les options en fonction de vos besoins et confirmez que la liste des options installées
correspond à la configuration de l’imprimante. Cliquez sur OK. Une icône d’imprimante apparaît sur
le bureau du Macintosh. La configuration est maintenant terminée.
65
Page 65

Configuration de l’adresse IP
Il existe plusieurs façons de configurer les paramètres d’adresse IP de la carte IB-2x. Les méthodes les
plus faciles sont : via l’assistant de configuration rapide IB-2x, DHCP ou le panneau avant de
l’imprimante. Le service WINS est souvent utilisé en conjonction à DHCP et est également abordé dans
cette section. L’assistant de configuration rapide IB-2x permet de configurer l’adresse IP et de nombreux
autres paramètres. Consultez Utilisation de l’assistant de configuration rapide dans ce guide.
Remarque : Vous trouverez des instructions spécifiques aux photocopieuses dans le mode d’emploi
qui les accompagne.
ConfigurationDHCP (Dynamic Host Configuration Protocol)
DHCP offre un mécanisme de livraison des paramètres de configuration IP, tels que l’adresse IP, le
masque de sous-réseau, etc. aux périphériques (hôtes) d’un réseau IP. DHCP facilite les tâches
administratives de gestion des adresses IP.
Un serveur DHCP traite les diffusions de recherche DHCP IB-2x et renvoie une adresse IP à la carte
IB-2x. Le serveur DHCP peut être configuré pour offrir une adresse IP pour une durée limitée (un
lease temporaire) ou illimitée (un lease illimité) mais peut également être configuré avec une adresse
permanente pour chaque carte IB-2x.
Français
Important : dans un environnement autre que WINS, il est vivement recommandé de configurer le
serveur DHCP afin qu’il offre à la carte IB-2x un lease illimité ou une adresse permanente.
Lease illimité ou adresse permanente sous Windows NT 4.0 et Windows 2000
Sous Windows NT et 2000, la durée d’un lease est établie pour un groupe d’adresses particulier. Cette
durée devrait donc être définie sur Illimitée pour le groupe auquel la carte IB-2x appartient. Si cela n’est
pas souhaitable, la carte IB-2x devrait être définie sur Client réservé.
Un client réservé peut être ajouté avec le gestionnaire DHCP de Windows en sélectionnant Étendue,
puis Ajouter des réservations. Saisissez l’adresse Ethernet de la carte IB-2x (sans les deux-points,
comme 00c0eea371d8 par exemple), son adresse, ainsi que les autres paramètres IP. L’adresse
Ethernet peut être obtenue à partir de la page d’état réseau de la carte IB-2x.
Désactivation de DHCP
Si l’affectation de l’adresse IP avec DHCP n’est pas souhaitable, elle peut être désactivée à l’aide de
l’assistant de configuration rapide IB-2x, le panneau avant de l’imprimante, un navigateur web ou
d’autres méthodes.
Important : notez cependant que DHCP est automatiquement désactivé lorsque l’adresse IP est
définie à l’aide d’une autre méthode telle que l’assistant de configuration rapide, le panneau avant de
l’imprimante, etc.
Configuration WINS
WINS est utilisé par Windows NT pour fournir un mécanisme de correspondance du nom NetBIOS,
généralement appelé nom d’hôte, et d’une adresse IP. WINS requiert un serveur NT ou 2000 pour une
configuration en tant que serveur WINS.
WINS permet la définition d’une configuration d’impression faisant référence à l’imprimante par son nom
plutôt que par son adresse IP. Ainsi, même si l’adresse IP de l’imprimante est modifiée via DHCP, la
configuration d’impression reste valide. Un autre avantage présenté par WINS est qu’une nouvelle
imprimante peut facilement en remplacer une autre en 1) lui donnant le même nom d’hôte que l’ancienne
imprimante ou en 2) modifiant la configuration du port LPR de Windows de l’ancienne imprimante avec
le nom d’hôte de la nouvelle imprimante.
66
Page 66

Inscription et nom WINS
La carte IB-2x doit recevoir l’adresse du serveur WINS principal sur lequel elle peut inscrire son nom
d’hôte. Elle peut également recevoir l’adresse d’un serveur WINS secondaire. Le serveur DHCP est
souvent configuré pour fournir à la carte IB-2x son nom d’hôte et les adresses de serveur WINS. Veuillez
consulter la documentation de votre serveur DHCP pour plus d’informations sur la configuration. Le nom
d’hôte et les adresses de serveur WINS peuvent également être configurés à l’aide d’un navigateur web
ou de l’utilitaire IB-2x AdminManager. Consultez la section Sécurité et suivi plus loin dans ce guide pour
plus d’informations sur l’utilisation de ces utilitaires.
L’inscription WINS peut être vérifiée en imprimant la page d’état réseau IB-2x. Une fois la carte IB-2x
correctement inscrite sur le serveur WINS, l’état WINS indique Enregistrée dans la section TCP/IP.
Configuration de l’adresse IP via le panneau avant de l’imprimante
Les choses suivantes s'appliquent aux imprimantes Kyocera Mita. Consultez le mode d'emploi de la
photocopieuse pour plus d'informations sur la configuration du panneau frontal des photocopieuses.
1. Appuyez sur la touche MENU. Si la première ligne de l’écran LED ne contient pas déjà le mot
INTERFACE, appuyez sur la touche ∧ ou ∨ jusqu’à ce que INTERFACE apparaisse.
2. Si la ligne placée en dessous de INTERFACE ne contient pas déjà le mot OPTION, appuyez sur la
touche ENTRÉE, puis sur ∧ ou ∨ jusqu’à ce que OPTION apparaisse, puis appuyez sur ENTRÉE.
3. Appuyez sur la touche > pour passer au sous-menu des options. Remarque : certaines imprimantes
plus anciennes ne supportent pas la configuration via le panneau avant. Si le sous-menu Option
n’apparaît pas ou si tous les choix ne sont pas affichés, consultez les conditions requises dans la
section suivante.
4. Appuyez sur ∧ ou ∨ jusqu’à ce que TCP/IP apparaisse. Appuyez sur la touche > pour passer au
sous-menu TCP/IP (accessible uniquement lorsque le protocole TCP/IP est activé).
5. Appuyez sur ∧ ou ∨ jusqu’à ce que Adresse IP apparaisse. Appuyez sur la touche ENTRÉE. Un
curseur apparaît sous le dernier chiffre de l’adresse IP.
6. Appuyez sur la touche < ou > pour faire passer le curseur sous le chiffre à changer. Appuyez sur
ou ∨ pour changer la valeur du chiffre.
7. Une fois l’adresse correcte, appuyez sur la touche ENTRÉE pour l’accepter.
8. Répétez les étapes 5 - 7 pour le masque de sous-réseau et la passerelle par défaut (l’adresse IP du
routeur). Si vous ne connaissez pas l’adresse exacte du masque de sous-réseau et que le premier
numéro de l’adresse IP IB-2x est compris entre 192 et 254, utilisez 255.255.255.0 comme adresse
de masque de sous-réseau.
9. Une fois les paramètres d’adresse IP, de masque de sous-réseau et de passerelle par défaut entrés,
appuyez sur la touche < pour repasser au sous-menu des options (TCP/IP est affiché).
Remarque : il est recommandé de désactiver les protocoles qui ne sont pas utilisés.
10. Facultatif : appuyez sur ∧ ou ∨ pour afficher le protocole à désactiver (par exemple, EtherTalk).
Appuyez sur la touche ENTRÉE et un ? apparaît à côté de la mention d’activation. Appuyez sur ∧ ou
∨
pour faire apparaître la mention de désactivation et appuyez sur ENTRÉE pour accepter la
nouvelle valeur. Faites de même pour tous les protocoles à désactiver.
11. Appuyez sur la touche < pour revenir au menu Interface (Option est affiché).
∧
Français
12. Appuyez sur ∧ ou ∨ jusqu’à l’affichage de Imprimer la page d’état. Appuyez deux fois de suite sur la
touche ENTER pour imprimer une page d’état et vérifier les nouveaux paramètres.
13. Une fois l’opération terminée, appuyez sur la touche MENU pour quitter le système de menus.
67
Page 67

Persistance de l’adresse IP
La carte IB-2x conserve-t-elle son adresse IP lorsque l’imprimante est éteinte et rallumée ?
Temporaire : Si un bail temporaire est obtenu du serveur DHCP, une adresse IP est définie
temporairement. Lorsque l’imprimante est éteinte puis rallumée, la carte IB-2x ne commence pas à
utiliser son adresse IP avant de la négocier avec un serveur DHCP. Si un tel serveur DHCP n’est pas
disponible, la carte IB-2x ne pourra pas posséder d’adresse IP. Cette mesure est nécessaire afin
d’éviter des conflits d’adresse IP dans les environnements DHCP.
Permanente : dans le cas d’un lease illimité ou d’adresse permanente obtenue auprès d’un DHCP,
ou de l’établissement d’une adresse via une méthode autre que DHCP, l’adresse IP est permanente.
Cela signifie que l'adresse IP définie initialement sera appliquée même si l'imprimante est mise hors
tension puis redémarrée.
Sécurité et suivi
Alors que ce guide se concentre sur la configuration initiale de la carte IB-2x, cette section contient une
explication des mesures de sécurité et des options disponibles pour la gestion de la carte IB-2x.
Mot de passe
Français
Un mot de passe d’administrateur est utilisé pour contrôler les modifications apportées aux paramètres
de la carte IB-2x. Par défaut, le mot de passe est laissé vierge. À moins que vous ne définissiez de mot
de passe d’administrateur, n’importe qui pourra accéder aux paramètres de la carte IB-2x à l’aide d’un
navigateur web ou d’un utilitaire IB-2x. Il est donc recommandé d’utiliser un mot de passe
d’administrateur.
Attention : si le mot de passe d’administrateur est oublié, une réinitialisation aux paramètres par
défaut à l’aide d’un cavalier est obligatoire.
Si le mot de passe d’administrateur est oublié, le seul moyen de récupération existant est de rétablir la
carte IB-2X sur ses valeurs d’usine par défaut (en utilisant un réglage de cavalier tel que décrit dans la
section Dépannage du mode d’emploi contenu sous format html sur le CD-ROM (Bibliothèque réseau
Kyocera Mita ou bibliothèque de logiciels Kyocera Mita) fourni avec ce produit).
Navigateur web
Une carte IB-2x utilisée sur un réseau TCP/IP et possédant une adresse IP valide pourra être gérée à
l’aide d’un navigateur web. Le navigateur permet une configuration complète de tous les paramètres IB2x mais, à la différence de l’assistant de configuration rapide, ne peut pas créer d’objet d’impression
NetWare. Lorsqu’un navigateur est utilisé pour la configuration NetWare, NWAdmin doit également être
utilisé pour créer les objets d’impression NetWare.
Établissez une connexion à la carte IB-2x à l’aide d’un navigateur web en saisissant son adresse IP
comme URL, telle que http://206.129.6.54.
La page d’accueil affiche des informations de base concernant l’imprimante ou la photocopieuse et la
carte IB-2x, de même que l’état de l’imprimante et les informations affichées sur son panneau avant.
Lorsque vous cliquez sur le bouton Actualiser, le message affiché sur le navigateur est mis à jour.
Sélectionnez une catégorie dans la barre de navigation de gauche pour en afficher et définir les
valeurs. Si le mot de passe administrateur de la carte IB-2x n’a pas été défini, vous serez invité(e) à
entrer un nom d’utilisateur et un mot de passe lors de l’ouverture de fenêtres permettant de modifier des
valeurs. Vous pouvez entrer n’importe quel nom d’utilisateur, ou même laisser l’espace vierge. Si aucun
mot de page d’administrateur n’a été défini, l’accès à toutes les autres pages n’est pas limité. Le mot de
page d’administrateur peut être défini sous l’onglet Sécurité.
68
Page 68

Assistant de configuration rapide
L’assistant de configuration rapide de la carte IB-2x est conçu pour faciliter la configuration initiale. Il
ne permet pas d’accéder à tous les paramètres de la carte IB-2x mais est un moyen très pratique
d’établir la configuration de base. Pour plus d’informations, consultez Utilisation de l’assistant de
configuration rapide dans ce guide.
AdminManager
L’utilitaire AdminManager peut être utilisé dans un environnement IP ou IPX pour configurer les
paramètres de la carte IB-2x. AdminManager peut être installé ou exécuté à partir du CD-ROM
(Kyocera Mita Network Library ou Kyocera Mita Software Library) en sélectionnant Configuration
avancée dans le menu de configuration IB-2x.
KM-NET VIEWER
Le suivi et le contrôle de l’impression sont généralement effectués à l’aide de KM-NET VIEWER sous
Windows. KM-NET VIEWER offre des fonctions de regroupement, de filtrage et de tri des imprimantes
ou des photocopieuses Kyocera Mita ou d’autre marque. Ce programme offre plusieurs options de
notification des avertissements ou erreurs issus des imprimantes et peut être utilisé pour afficher ou
modifier de nombreux paramètres des imprimantes ou de la carte IB-2x. KM-NET VIEWER se trouvent
sur le CD-ROM fourni (Kyocera Mita Software Library ou Kyocera Mita Digital Library).
Français
69
Page 69

Réseau sans fil
Avec IB-22, toutes les fonctions de réseau IB-2X, y compris TCP/IP, NetWare, AppleTalk, la gestion
basée sur le Web, etc., sont maintenant disponibles sous réseau sans fil. IB-22 prend en charge la
réseautique sans fil, telle que définie par la norme 802.11b et peut interagir avec d’autres dispositifs
conformes à cette norme.
Cette section explique comment connecter IB-22 à votre réseau sans fil.
Modes de fonctionnement
IB-22 prend en charge les modes de fonctionnement suivants :
Infrastructure : Un ou plusieurs points d’accès (également appelés « stations de base ») sont
Ø
utilisés pour créer un réseau sans fil et peuvent également être utilisés pour connecter le
réseau sans fil à un réseau câblé.
Ø
802.11 Ad hoc : Connexion directe entre dispositifs sans fils sans utilisation d’un point d’accès.
Ce mode utilise « Service Set Identification (SSID) ». SSID joue le rôle d’identificateur de
réseau logique.
Français
Ø
Ad hoc : Connexion directe entre dispositifs sans fils sans utilisation d’un point d’accès. Ce
mode n’utilise pas SSID.
Ø
Automatique : Détecte automatiquement l’un des modes ci-dessus. Il s’agit de la valeur par
défaut de IB-22.
Cryptage
« Wired Equivalent Privacy (WEP) » est un protocole de sécurité servant à transmettre les données
sur un réseau sans fil avec un niveau de sécurité équivalent à celui d’un transfert de données par
réseau câblé standard. WEP utilise un cryptage de 64 bits (également appelé 40 bits) ou 128 bits ; les
deux cryptages sont supportés par IB-22.
Pour des informations sur la procédure de restauration des valeurs d’usine par défaut, consultez la
section Dépannage du mode d’emploi (HTML) qui se trouve sur le CD-ROM fourni (Bibliothèque
réseau Kyocera Mita ou bibliothèque de logiciels Kyocera Mita).
Configuration automatique de IB-22
IB-22 détecte et se connecte automatiquement à un réseau sans fil 802.11b, sauf si :
Ø le réseau sans fil est crypté, ou
Ø les diffusions SSID sont désactivées, ou
Ø le PC et IB-22 n’utilisent pas le même canal avec le mode « Ad hoc », ou
Ø plusieurs réseaux sans fil distincts sont accessibles (il se peut que IB-22 ne se connecte pas au
réseau souhaité).
Si l’une des conditions ci-dessus s’applique à votre réseau, reportez-vous à Configuration manuelle
de IB-22.
Si votre réseau peut être configuré manuellement, il vous suffit de confirmer que IB-22 a établi la
connexion avec succès.
70
Page 70

Confirmation que la connexion a été établie
Avec DHCP : Si votre réseau est équipé d’un serveur DHCP, imprimez une page d’état ou affichez
l’adresse IP sur le panneau avant pour vérifier que IB-22 a obtenu une adresse IP. Dans l’affirmative,
la connexion avec le réseau est confirmée.
Sans DHCP : Si aucun serveur DHCP n’est présent, spécifiez l’adresse IP de IB-22 en utilisant le
panneau de l’opérateur et établissez la connexion avec IB-22 à l’aide d’un explorateur, par exemple
http://192.168.10.240. Si la connexion est établie avec l’explorateur, la connexion avec le réseau est
confirmée.
Une fois la connexion avec le réseau établie et confirmée, configurez le protocole de IB-22 comme
celui de n’importe quel IB-2x en vous reportant aux sections appropriées de ce manuel.
Si IB-22 n’est pas capable d’établir la connexion avec le réseau, une configuration manuelle est alors
nécessaire. Dans certains cas, il est préférable de rétablir la configuration d’usine par défaut de IB-22.
Configuration manuelle de IB-22
Si IB-22 ne peut pas se connecter automatiquement au réseau, par exemple si le cryptage est activé,
utilisez la procédure suivante :
1. Spécifiez un mode PC à 802.11 Ad hoc (ou mode Ad hoc) avec cryptage WEP désactivé et
spécifiez le canal correspondant à celui de IB-22. Le canal par défaut de IB-22 est le canal 11. Si
nécessaire, reportez-vous aux instructions de l’adaptateur de réseau local sans fil du PC.
Français
2. Mettez l’imprimante IB-22 sous tension.
3. Spécifiez l’adresse IP de IB-22 en utilisant le panneau de l’opérateur.
4. Établissez la connexion avec IB-22 en entrant l’adresse IP dans l’explorateur, par exemple http://
192.168.10.240.
5. Sélectionnez un réseau local sans fil sur le panneau de navigation.
6. Le mode de réseau local sans fil sera détecté par IB-22 ; toutefois, si les réseaux sans fil
disponibles ont différents modes, spécifiez le mode du réseau auquel vous souhaitez vous
connecter.
7. Configurez SSID pour qu’il corresponde à votre réseau sans fil (modes infrastructure ou 802.11
Ad hoc seulement).
8. Spécifiez un canal correspondant à votre réseau sans fil.
9. Si vous utilisez WEP :
a. Spécifiez le cryptage (WEP) à 64 bits (également appelé 40 bits) ou à 128 bits, de façon à
ce qu’il corresponde à votre réseau sans fil.
b. Spécifiez une clé WEP correspondant à votre réseau sans fil. Avec 64 bits, votre clé sera
composée de 5 paires de caractères hexadécimaux, par exemple 4C 75 63 6B 79. Pour 128
bits, elle sera composée de 13 paires de caractères hexadécimaux.
AVERTISSEMENT : Assurez-vous d’entrer correctement votre clé. Si vous n’avez pas entré
correctement votre clé, vous ne pourrez plus vous connecter à IB-22 et vous devrez rétablir la
configuration d’usine par défaut pour effacer le clé WEP incorrecte.
10. Cliquez sur Soumettre pour envoyer vos nouveaux paramètres à IB-22. Pour vérifier la communication, reportez vous à Confirmation que la connexion a été établie.
71
Page 71

Français
72
Page 72

Contenuto
Introduzione ................................................................................ 74
CD-ROM Kyocera Mita Network Library .................................... 74
Installazione dell’hardware IB-2x ............................................... 75
Utilizzo della configurazione guidata rapida............................. 75
Stampa da NetWare ..................................................................... 76
NetWare 3.x ..............................................................................................................76
NetWare 4.x, 5.x e 6.x ...............................................................................................76
Stampa da Windows ................................................................... 77
Stampa da Windows tramite NetWare.....................................................................77
Stampa da Windows tramite TCP/IP .......................................................................7 8
Stampa da Windows tramite NetBEUI .....................................................................81
Condivisione delle stampanti in Windows ...............................................................82
Configurazione per Macintosh ................................................... 83
Installazione dell’utility di configurazione IB-2x........................................................83
Impostazione dell’emulazione KPDL e di nome e zona AppleTalk.........................8 3
Installazione de file PPD e configurazione della stampante ...................................8 4
Configurazione degli indirizzi IP ................................................ 84
Configurazione DHCP (Protocollo di configurazione Host dinamica)....................84
Configurazione di WINS (Servizio di denominazione Internet di Windows) ............85
Configurazione degli indirizzi IP con il pannello anteriore della stampante ...........86
Mantenimento degli indirizzi IP ................................................................................87
Sicurezza e gestione di controllo .............................................. 87
Sicurezza della password.........................................................................................87
Browser Web.............................................................................................................8 7
Configurazione guidata rapida.................................................................................88
AdminManager.........................................................................................................88
KM-NET VIEWER .....................................................................................................8 8
Italiano
Connessione di rete wireless ..................................................... 88
Modalità operative ....................................................................................................88
Cifratura ....................................................................................................................88
Configurazione automatica IB-22 ............................................................................89
Conferma di connessione avvenuta.........................................................................89
Configurazione manuale IB-22 ................................................................................89
73
Page 73

Introduzione
Grazie per aver selezionato i prodotti di stampa in rete Kyocera Mita IB-2x di alta qualità. Siamo sicuri
che apprezzerete le prestazioni d’eccezione ed i costi proprietari contenuti, il fiore all’occhiello dei
prodotti Mita Kyocera.
Questo prodotto é una scheda di interfaccia di rete interna per le stampanti e le copiatrici digitali Kyocera
Mita. Esso può essere installato facilmente senza rimuovere la scheda principale della stampante. IB-2x
permette a stampanti Mita Kyocera e fotocopiatrici digitali di comunicare tramite una rete Ethernet con
svariati sistemi operativi di rete, inclusi Windows, NetWare, Macintosh e UNIX.
La Guida di configurazione rapida contiene istruzioni concise per la configurazione del software, che
permettono ad un amministratore di sistema esperto di impostare ed utilizzare IB-2x con la massima
rapidità. Per qualsiasi domanda, riferirsi alle istruzioni per l'uso nel CD-ROM incluso (Kyocera Mita
Network Library o Kyocera Mita Software Library).
CD-ROM Kyocera Mita Network Library
Inserendo il CD-ROM KMNL si visualizza il menu principale; se questo non viene visualizzato
automaticamente, eseguire il file Setup.exe nella directory principale del CD-ROM. Questa Guida di
consultazione rapida fa riferimento alle seguenti utility nella sezione Configurazione di IB-2x del CDROM:
Impostazione rapida guidata: interfaccia guidata per la configurazione delle impostazioni necessarie
per impostare rapidamente IB-2x e stampare.
Italiano
Impostazione avanzata: Esso permette regolazioni avanzate e il monitoraggio della scheda di
interfaccia di rete.
KPrint: installa un monitor per porte client per abilitare la stampa in Windows con protocollo TCP/IP su
stampanti/copiatrici Kyocera Mita collegate a IB-2x. Con l’opzione IB-20/21, KPrint supporta la stampa
LPR e IPP in Windows 95/98/Me. Con l’opzione IB-21E/22, KPrint supporta inoltre la stampa tramite
posta elettronica in Windows 95/98/Me/NT4/2000.
Marchi di fabbrica
KYOCERA®, KYOCERA MITA® è sono marchi depositati della Kyocera Corporation. NetWare® è un marchio depositato della Novell,
Incorporated. Windows® è un marchio depositato della Microsoft Corporation. Macintosh® è un marchio depositato della Apple Computer,
Incorporated. PostScript® ed Acrobat® sono marchi depositati della Adobe Systems, Incorporated. Tutti gli altri prodotti a cui si fa riferimento in
questa sede sono marchi di fabbrica o marchi depositati delle rispettive aziende.
Avviso FCC
Questo apparecchio è conforme alla Parte 15 dei regolamenti FCC. Il suo funzionamento è soggetto alle due condizioni che seguono: (1)
questo dispositivo non può causare interferenze dannose e (2) questo dispositivo deve accettare qualsiasi interferenza, include quelle che
potrebbero portare ad un funzionamento indesiderato.
74
Page 74

Installazione dell’hardware IB-2x
IB-2X è una scheda di interfaccia inseribile. Essa può essere installata facilmente senza rimuovere la
scheda principale della stampante o copiatrice.
1.Togliere le viti che fissano il coperchio dello slot di
interfaccia di espansione alla stampante/copiatrice,
e rimuovere il coperchio dello slot di interfaccia.
2.Inserire la scheda in modo che i suoi bordi siano
allineati con le guide dello slot di interfaccia, e
fissarla poi in posizione usando le viti rimosse al
passo 1.
Utilizzo della configurazione guidata rapida
Sebbene la configurazione guidata sia semplice da utilizzare, questa sezione contiene informazioni
addizionali su come individuare e collegare la stampante. Inserire il CD-ROM (Kyocera Mita Network
Library o Kyocera Mita Software Library) e selezionare Quick Setup Wizard (Configurazione
guidata rapida) nella sezione Configuration (Configurazione) di IB-2x.
Italiano
Si visualizza lo schermo di selezione della stampante. La configurazione rapida rileva le stampante
tramite IPX o IP, ammesso che il protocollo sia installato su un computer con sistema operativo
Windows e con il programma di configurazione rapida; se ad esempio è installato solo IPX, la
configurazione rapida rileva e visualizza solo le stampanti IPX.
Se una stampante non è inclusa nell’elenco, un metodo alternativo per il collegamento è l’immissione
dell’indirizzo Ethernet della stampante nello spazio apposito. L’indirizzo Ethernet è disponibile sulla
pagina di stato della rete IB-2x. Se una stampante IP non si trova sul segmento locale, deve disporre
anche di un indirizzo gateway predefinito e configurato correttamente; infine, per inoltrare le
trasmissioni IP occorre, configurare il router della rete.
Se una stampante non può essere collegata tramite la configurazione rapida (se ad esempio IPX non
è in uso e le trasmissioni IP non vengono inoltrate), usare un browser web o AdminManager per la
configurazione. In un browser web, le trasmissioni IP non sono necessarie in quanto l’indirizzo IP
viene immesso direttamente. In AdminManager è possibile definire reti specifiche per la ricerca. Per
ulteriori informazioni sul collegamento con un browser web o AdminManager, consultare la sezione
Sicurezza e gestione di controllo.
75
Page 75

Stampa da NetWare
NetWare prevede diverse opzioni di stampa. Segue una descrizione dei vari metodi di stampa per
ciascuna versione di NetWare, con relativa modalità di stampa.
NetWare 3.x
NetWare 3.x supporta solo la stampa basata su Bindery. Vengono supportate due modalità: 1) server
di stampa e 2) Stampante remota.
Server di stampa (metodo consigliato): IB-2x funge da server di stampa ed interroga la coda di stampa
controllando quali processi di stampa vanno elaborati. Questa modalità utilizza lo slot di collegamento in
rete NetWare (ossia, licenza per 1 utente).
Stampante remota: IB-2x funge da stampante remota accettando processi di stampa da un serve
funzionante su una stazione di lavoro dedicata o su un file server. Questa modalità non richiede una
licenza NetWare.
Bindery NetWare 3.x
1. Eseguire la configurazione guidata rapida sul CD-ROM (Kyocera Mita Network Library o Kyocera
Mita Software Library).
2. Nella sezione NetWare selezionare Bindery Setup (Configurazione bindery). La configurazione guidata rapida crea tutti gli oggetti NetWare richiesti.
3. A completamento della configurazione guidata, attendere un paio di minuti ed usare quindi il
Italiano
pannello anteriore della stampante per stampare le pagine di stato. Controllare la pagina di stato
IB-2x per informazioni sul collegamento NetWare e controllare che lo stato della coda di stampa sia
Pronto.
4. Configurare i client di Windows in modo da stampare la coda NetWare corrispondente (consultare
la sezione Stampa da Windows tramite).
NetWare 4.x, 5.x e 6.x
NetWare 4.x, 5.x e 6.x supportano la stampa tramite NDS (NetWare Directory Services - Servizi di
directory NetWare). Per la compatibilità inversa viene supportata anche la stampa su base bindery. Le
due modalità Server di stampa e Stampante remota (consultare le relative descrizioni nella sezione
precedente) vengono supportate per NDS; tuttavia per la stampa bindery viene supportata solo la
modalità Server di stampa.
NetWare NDS o bindery
1. Eseguire la configurazione guidata rapida sul CD-ROM (Kyocera Mita Network Library o Kyocera
Mita Software Library).
2. Nella sezione NetWare selezionare NDS Setup (Configurazione NDS) (consigliata) o Bindery Setup
(Configurazione bindery). La configurazione guidata rapida crea tutti gli oggetti NetWare richiesti.
3. A completamento della configurazione guidata, attendere un paio di minuti ed usare quindi il pannello
anteriore della stampante per stampare le pagine di stato. Controllare la pagina di stato IB-2x per
informazioni sul collegamento NetWare e controllare che lo stato della coda di stampa sia Pronto.
4. Configurare i client di Windows in modo da stampare la coda NetWare corrispondente (consultare
la sezione Stampa da Windows tramite).
76
Page 76

NetWare NDPS
1. Installare il gateway NDPS Kyocera dal CD-ROM (Kyocera Mita Network Library o Kyocera Mita
Software Library). Selezionare Novell NDPS dal menu principale del CD-ROM. Il gateway
supporta NetWare 5.x y 6.x. Per l’uso con NetWare 4.x, leggere i requisiti esposti nel file
Readme.txt in dotazione al gateway sul CD-ROM.
2. Il gateway supporta la stampa IPX e IP. Se si opta per la stampa IP (consigliata), impostare
l’indirizzo IP IB-2x (consultare la sezione Configurazione degli indirizzi IP).
3. Tramite NWAdmin creare l’agente per la stampante. Per ulteriori informazioni, consultare Guida
per l’amministratore (nel formato PDF), in dotazione al gateway.
4. Configurare i client Windows per stampare sull’agente della stampante.
Stampa da Windows
Windows prevede un’ampia scelta di versioni client, da Windows 3.1 a Windows XP, e di conseguenza
una vasta gamma di capacità di stampa. Le diverse versioni di Windows combinate con IB-2x offrono le
opzioni di stampa in rete di cui sotto.
••
• Tramite Novell NetWare: stampa sulle code NetWare in presenza di un server NetWare.
••
Italiano
••
• Tramite LPR: stampa sullo spooler LPR di Windows attraverso TCP/IP.
••
••
• Tramite IPP: stampa attraverso Internet o Intranet utilizzando il protocollo di stampa Internet.
••
••
• Tramite posta elettronica: questa opzione è disponibile solo con IB-21E/22. Con questa
••
funzione, è possibile inviare per posta elettronica un lavoro di stampa a una stampante remota (p.
es., su Internet), avvalendosi del comando di stampa comune nelle applicazioni Windows.
••
• Tramite condivisione delle stampanti di Windows: stampa su una stampante di rete condivisa,
••
configurata su un altro computer di Windows.
Quale metodo di stampa utilizzare?
La configurazione di stampa ideale per Windows dipende dall’ambiente di lavoro specifico, incluse
l’esperienza e le preferenze dell’utente e dell’amministratore. Solitamente i servizi di stampa NetWare
vengono utilizzati in presenza di un server NetWare. In assenza di un server NetWare, spesso si fa
uso della stampa LPR combinata con la condivisione della stampante se il protocollo TCP/IP è già in
uso. La stampa NetBEUI peer-to-peer è quella utilizzata con maggiore frequenza se non si fa uso di
un server di stampa NetWare o Windows centralizzato. L’opzione IPP o la stampa tramite posta
elettronica vengono applicate se occorre stampare attraverso l’Internet.
Stampa da Windows tramite NetWare
Prima di stampare dal client di Windows tramite NetWare occorre configurare IB-2x per la stampa
NetWare (consultare la sezione Stampa da NetWare). Dopo aver completato la configurazione, usare
il programma Installazione stampante di Windows (Avvio, Impostazioni, Stampanti Aggiungi
stampante) per accedere alla coda di stampa NetWare di IB-2x o all’agente della stampante.
All’interno del programma di installazione, selezionare Rete e passare all’oggetto di stampa NetWare
di IB-2x.
77
Page 77

Stampa da Windows tramite TCP/IP
Le sezioni che seguono trattano la configurazione TCP/IP per Windows 95/98/Me, NT 4.0 e 2000. IB2x offre supporto per svariati metodi di stampa TCP/IP, inclusi il protocollo di stampa Internet (IPP) e
la stampa tramite posta elettronica (solo per IB-21E/22), che consentono entrambi di stampare tramite
Internet.
Windows 95/98/Me LPR o IPP
Controllare che TCP/IP sia installato
Controllare sotto Avvio, Stampanti, Pannello di controllo, Rete. Se TCP/IP non risulta nell’elenco,
andrà installato prima di configurare la stampa TCP/IP.
Configurare l’indirizzo IP di IB-2x
Consultare la sezione Configurazione degli indirizzi in questa guida.
Configurare la porta ed installare il driver di stampa
1. Inserire il CD-ROM (Kyocera Mita Network Library o Kyocera Mita Software Library), selezionare
Configuration (Configurazione di IB-2x) ed eseguire il programma di aggiunta porte KPrint. Il
programma guida l’utente attraverso il processo di configurazione della porta. Per informazioni
sull’opzione di stampa tramite posta elettronica in KPrint, consultare la pagina che segue relativa
Italiano
alla stampa tramite posta elettronica.
2. Eseguire il programma Installazione stampante di Windows (Avvio, Impostazioni, Stampanti
Aggiungi stampante).
2.1. Al messaggio, “
Modalità di collegamento della stampante”, selezionare Stampante locale.
2.2. Nell’elenco di porte disponibili, selezionare la porta IPP o LPR creata dal programma di
aggiunta porte KPrint.
3. Seguire i prompt per completare il programma Installazione stampante.
4. Attenersi alla procedura che segue per condividere la stampante.
4.1. Andare a Avvio, Impostazioni, Pannello di controllo, Rete e controllare che sia installato
Condivisione file e stampanti per reti Microsoft. Sullo stesso schermo, fare clic sul
pulsante
Condivisione di file e stampanti e fare clic sulla casella corrispondente per
consentire la condivisione della stampante.
4.2. Sotto Avvio, Impostazioni, Stampanti, fare clic con il pulsante destro sulla stampante
appena creata con Installazione stampante, selezionare Condivisione ed immettere il Nome
di condivisione desiderato.
78
Page 78

Windows NT 4.0 LPR
Componenti di TCP/IP richiesti
Segue una descrizione della modalità di controllo e -se necessario- di aggiunta dei componenti TCP/IP
di Windows necessari per la stampa LPR.
1. Controllare sotto Avvio, Stampanti, Pannello di controllo, Rete, Protocolli. Se Protocollo
TCP/IP non risulta nell’elenco dei protocolli di rete, fare clic su Aggiungi per installarlo.
2. Selezionare la scheda Servizi. Se Stampa TCP/IP Microsoft o Servizi TCP/IP semplici non risulta
nell’elenco dei servizi di rete, fare clic su Aggiungi per installarli.
3. Dopo aver aggiunto tutti i protocolli ed i servizi, fare clic su OK. Se si è appena aggiunto il
protocollo TCP/IP, Windows richiede l’indirizzo IP e gli altri parametri TCP/IP. Per rendere
disponibili i nuovi protocolli e servizi occorre riavviare il computer.
Configurare l’indirizzo IP di IB-2x
Consultare la sezione Configurazione degli indirizzi in questa guida.
Installare il driver di stampa e configurare la porta
1. Inserire il CD-ROM incluso con la stampante (Kyocera Mita Software Library o Kyocera Mita
Digital Library), e selezionare poi l'opzione di installazione del driver della stampante dal menu
principale.
Italiano
2. Nella finestra di dialogo Connessione alla stampante, selezionare Locale.
3. Nella finestra di dialogo Select a Printer Port (Seleziona una porta della stampante), fare clic sul
pulsante Add LPR Port (Aggiungi la porta LPR).
4. Nel campo Name or address of server providing lpd: (Nome o indirizzo del server che
fornisce lpd:) immettere l’indirizzo IP IB-2x.
5. Nel campo Name of printer or print queue on that server: (Nome della stampante o della
coda di stampa su quel server:) immettere il nome della porta desiderato, ad esempio LPR1 e
fare clic su OK.
6. Se si desidera condividere la stampante, nella finestra di dialogo corrispondente, selezionare
Condivisione ed immettere il nome di condivisione desiderato. Selezionare tutte le altre versioni di
Windows per le quali si desidera ricevere automaticamente il driver al collegamento con questa
condivisione.
Stampa tramite posta elettronica su Windows 95/98/Me, NT 4.0 e 2000
La scheda IB-21E/22 offre una nuova funzione per la stampa tramite posta elettronica, che consente di
inviare tramite posta elettronica un processo di stampa ad una stampante remota (ad esempio tramite
Internet) utilizzando la funzione di stampa standard delle applicazioni di Windows. Una scheda IB-21E/
22 configurata per la stampa tramite posta elettronica si collega ad un server di posta elettronica tramite
POP3 e recupera i processi di stampa inviati tramite posta elettronica. Per le informazioni sulla
procedura di impostazione, riferirsi alla procedura di installazione POP3 ed e-mail nelle istruzioni per
l'uso (HTML) nel CD-ROM incluso (Kyocera Mita Network Library o Kyocera Mita Software Library).
Dopo aver configurato la scheda IB-21E/22 per il recupero della posta elettronica, KPrint viene usato
per creare una porta in Windows che dirige i processi di stampa alla stampante tramite posta elettronica.
Dopo la creazione con KPrint è possibile selezionare la porta quando si aggiunge una nuova
stampante con l’opzione Aggiungi stampante di Windows (per le porte create da KPrint viene
selezionata la stampante locale).
79
Page 79

Un metodo di applicazione comune è la creazione di una stampante condivisa su un server di
Windows e la sua configurazione per l’uso della porta di posta elettronica creata da KPrint sui processi
di stampa inviati tramite posta elettronica su una stampante remota. Gli utenti potranno collegarsi con
facilità alla stampante condivisa utilizzando solo l’opzione Aggiungi stampante di Windows per inviare
i processi di stampa all’ufficio remoto. Questo costituisce un’interessante alternativa all’invio tramite
fax.
Stampa TCP/IP standard da Windows 2000
Configurare l’indirizzo IP di IB-2x
Consultare la sezione Configurazione degli indirizzi in questa guida.
Installare il driver di stampa e configurare la porta
1. Eseguire il programma Installazione stampante di Windows (Avvio, Impostazioni, Stampanti
Aggiungi stampante).
2. Selezionare Stampante locale e deselezionare Automatically detect and install my Plug and
Play printer (Rileva ed installa automaticamente la mia stampante plug-and-play).
3. Selezionare Create a new port (Crea una nuova porta) e Standard TCP/IP port (Porta TCP/IP
standard) dall’elenco a discesa Tipo. Così facendo si lancia il programma Add Standard TCP/IP
Printer Port wizard (Aggiunta della porta della stampante TCP/IP standard).
4. Nel campo Printer Name or IP Address (Nome stampante o Indirizzo IP), immettere l’indirizzo
Italiano
IP IB-20x.
5. Nel campo Nome porta immettere il nome della porta desiderato o accettare quello predefinito.
6. A completamento del programma Add Standard TCP/IP Printer Port wizard (Aggiunta della porta
della stampante TCP/IP standard), il programma continua. Selezionare il modello di stampante
desiderato.
7. Dopo aver assegnato un nome alla stampante, si visualizza la finestra di dialogo Condivisione
stampante. Se la stampante non verrà condivisa, selezionare Condivisione ed immettere il nome
di condivisione. (La condivisione della stampante è disponibile solo se si installa il servizio
Condivisione file e stampanti. Controllare sotto Avvio, Impostazioni, Rete e connessioni
remote, Connessione alla rete locale, Proprietà.)
8. Seguire i prompt per completare il programma Installazione stampante.
9. Se si è selezionata la condivisione della stampante e si desidera ricevere automaticamente il
driver di stampa corretto per altre versioni di Windows al collegamento con questa stampante
condivisa, attenersi alla procedura che segue:
9.1. Nella finestra di dialogo Stampanti, fare clic con il pulsante destro sulla stampante appena
creata con il programma Installazione stampante e selezionare Condivisione.
9.2. Sulla scheda Condivisione, fare clic su Driver addizionali e selezionare i driver da
associare a questa stampante.
80
Page 80

Stampa da Windows 2000 IPP
Windows 2000 offre un’opzione di stampa tramite il protocollo di stampa Internet (IPP), spesso utilizzato
per la stampa attraverso Internet, sebbene possa essere usato anche per la stampa Intranet.
Configurare l’indirizzo IP di IB-2x
Consultare la sezione Configurazione degli indirizzi in questa guida.
Installare il driver di stampa e configurare la porta
1. Eseguire il programma Installazione stampante di Windows (Avvio, Impostazioni, Stampanti
Aggiungi stampante).
2. Selezionare Stampante di rete.
3. Nella finestra di dialogo Ricerca stampante, selezionare Connect to a printer on the Internet or
on your intranet (Collegamento ad una stampante su Internet o sull’Intranet proprio) ed
immettere l’URL usando la sintassi come indicato nel seguente esempio: http://212.74.53.19/ipp
4. Seguire i prompt per completare il programma Installazione stampante.
Stampa da Windows tramite NetBEUI
Stampa peer-to-peer utilizzando il protocollo NetBEUI. Con questo metodo le stampanti sono tutte
situate nelle risorse di rete.
Italiano
Stampa da Windows 95/98/Me, NT 4.0 e 2000 tramite NetBEUI
1. Il computer Windows deve essere già configurato per l’utilizzo di NetBEUI.
In Windows 95/98/Me, controllare sotto Avvio, Stampanti, Pannello di controllo, Rete.
In Windows NT 4.0, controllare sotto Avvio, Stampanti, Pannello di controllo, Rete, Protocolli.
In Windows 2000, controllare sotto Avvio, Impostazioni, Rete e connessioni remote, Connessione
alla rete locale, Proprietà.
2. Usare la configurazione guidata rapida di I sul CD-ROM (Kyocera Mita Network Library o Kyocera Mita
Software Library) per modificare il gruppo di lavoro (KY-NetPrinters) ed il nome della stampante (KYxxxxxx)
predefiniti con selezioni proprie.
3. Nelle risorse di rete, selezionare Tutta la rete, quindi aprire il gruppo di lavoro KY-NetPrinters (o il gruppo
rinominato) e selezionare la stampante desiderata.
4. Fare clic con il pulsante destro del mouse sull’icona Stampante e selezionare Installa. Così facendo si
lancia il programma Installazione stampante di Windows. Seguire i prompt per completare il questo
programma.
5. La condivisione della stampante solitamente non viene applicata con la stampa tramite NetBEUI; tuttavia
alcuni amministratori preferiscono utilizzare la condivisione su NT 4.0 o 2000 per sfruttare l’opzione di
scaricamento automatico dei driver. Per istruzioni sulla condivisione delle stampanti, consultare la
documentazione sulla stampa TCP/IP standard da Windows NT 4.0 LPR o Windows 2000.
81
Page 81

Condivisione delle stampanti in Windows
La condivisione delle stampanti in Windows prevede il funzionamento di uno dei computer Windows
come “host”. L’host funge da server di stampa, inviando nello spooler i processi di stampa ricevuti dai
client Windows alla stampante condivisa ed inoltrandoli alla stampante vera e propria. Qualsiasi
computer Windows (versioni successive a 3.1) può fungere da client o host o entrambi.
I protocolli usati dal client all’host e dall’host alla stampante non devono necessariamente essere gli
stessi. Se ad esempio un computer Windows NT è configurato per la condivisione di una stampante
LPR, i client che eseguono solo IPX o NetBEUI possono inviare senza problemi i propri processi di
stampa alla stampante condivisa. L’host NT accetta i processi di stampa attraverso IPX o NetBEUI e li
invia alla stampante attraverso TCP/IP. Questa funzione offre una straordinaria flessibilità nella
struttura di stampa della rete di Windows.
Creazione di una stampante condivisa
La definizione di una stampante condivisa è parte del processo di aggiunta di una stampante,
spiegato nelle sezioni precedenti dedicate a Windows.
Collegamento ad una stampante condivisa
Questa sezione descrive brevemente le varie fasi per il collegamento di un client ad una stampante
condivisa. Sebbene esistano leggere differenze tra Windows 95/98/Me, NT 4.0 e 2000, quali la
selezione della Stampante di rete in 95/98/Me o Server della stampante di rete in NT 4.0, le
procedure sono essenzialmente le stesse e sono pertanto combinate nelle istruzioni che seguono.
Italiano
Collegamento di client Windows 95/98/Me, NT 4.0 e 2000 ad una stampante
condivisa
Se il computer host ha installato NT o 2000 ed è stato configurato per scaricare il driver ai client
collegati
Eseguire il programma Installazione stampante di Windows, selezionare Stampante di rete e cercare
nella rete la stampante condivisa. Il driver verrà scaricato automaticamente.
Se il computer host ha installato Windows 95/98/Me o se l’host NT o 2000 non è stato configurato per
scaricare il driver ai client collegati
Installare il driver di stampa dal CD-ROM (Kyocera Mita Software Library o Kyocera Mita Digital
Library) in dotazione alla stampante. Nella finestra di dialogo Connessione alla stampante, selezionare
Rete e cercare nella rete la stampante condivisa.
82
Page 82

Configurazione per Macintosh
KPDL (Kyocera Page Description Language) è un linguaggio di descrizione di pagina compatibile PostScript. Si può
controllare la pagina dello stato della stampante/copiatrice per determinare se il KPDL è installato nella stampante.
La scheda IB-2x supporta le versioni MacOS 8.x e MacOS 9.x ed è compatibile con la versione 8.x del driver
LaserWriter.
La stampa con un computer Macintosh richiede una configurazione minima. Dopo aver installato e collegato in rete la
scheda IB-2x, la stampante appare nella Scelta risorse Macintosh come periferica LaserWriter. Per garantire la
riuscita della stampa, l’utente deve semplicemente configurare la stampante per l’emulazione KPDL (PostScript) ed
installare i file PPD (PostScript Printer Description - Descrizione stampanti PostScript).
Il CD-ROM (Kyocera Mita Network Library o Kyocera Mita Software Library) include un’utility di installazione
Macintosh, che consente all’utente di eseguire operazioni, quali la configurazione a distanza dell’emulazione KPDL,
l’impostazione del nome e della zonaTalk e l’impostazione dei parametri TCP/IP.
••
• Il protocollo AppleTalk va attivato sul computer Macintosh al fine di supportare la stampa sulla
••
scheda IB-2x.
Installazione dell’utility di configurazione IB-2x
1. Caricare il CD-ROM (Kyocera Mita Network Library o Kyocera Mita Software Library) e fare
doppio clic sull’icona KM Network Library del desktop.
2. Aprire la cartella Utility.
Italiano
3. Fare doppio clic sul programma di installazione di IB-2x.
4. Selezionare la lingua desiderata e fare clic su OK.
5. Confermare la cartella di destinazione o passare a quella desiderata. Fare clic su Avanti per
cominciare a copiare i file.
6. Fare clic su Fine per uscire dal programma di installazione.
Impostazione dell’emulazione KPDL e di nome e zona AppleTalk
1. Aprire la cartella IB Tools (Strumenti IB) e fare doppio clic su Utility di installazione per lanciare
l’utility.
2. L’utility cerca tutte le periferiche IB-2x disponibili sulla rete AppleTalk (nella zona corrente) e le
visualizza in Printer List (Elenco stampanti) (vedere sotto). L’utility di installazione può essere
configurata in una zona AppleTalk diversa per ricercare stampanti tramite TCP/IP
3. Fare doppio clic sulla stampante desiderata in Printer List (elenco stampanti) per aprire la finestra
di configurazione delle periferiche.
4. Fare clic sull’icona Set Emulation (Imposta emulazione). Scegliere l’opzione KPDL desiderata e
fare clic su SET (Imposta).
5. Fare clic sull’icona AppleTalk. Immettere il Nome stampante come verrà visualizzato nella
Scelta risorse. Immettere il Nome zona per indicare la zona in cui appare la stampante. Un
asterisco (*) indica che la stampante appare nella zona predefinita.
6. Fare clic su SET (Imposta) per inviare le modifiche apportate alla stampante
7. L’impostazione del nome o della zona AppleTalk va ripristinata prima che diventi effettiva.
Chiudere la finestra di configurazione delle periferiche e selezionare Reset (Ripristina) dal menu
Installazione.
83
Page 83

Installazione de file PPD e configurazione della stampante
Il supporto Macintosh per stampanti e copiatrici Kyocera Mita proviene dal driver LaserWriter in
dotazione al sistema operativo Macintosh e dall’installazione dei file PPD specifici per il modelli di
stampante. Queste istruzioni valgono solo per i Mac OS 8 e 9.
1. I file PPD vengono installati dal CD-ROM (Kyocera Mita Software Library o Kyocera Mita Digital
Library) in dotazione alla stampante. Inserire il CD-ROM, aprire la cartella della lingua desiderata e
fare doppio clic sul programma di installazione Kyocera Mita.
2. A completamento dell’installazione PPD, selezionare Scelta risorse dal menu Apple per aprire il
programma corrispondente.
3. Selezionare il driver LaserWriter 8, la zona AppleTalk (se presente) e la stampante IB-2x.
4. Fare clic su Crea. Il driver seleziona automaticamente il file PPD corrispondente e visualizza una
finestra di dialogo, consentendo la selezione delle opzioni per la stampante installata.
5. Selezionare le opzioni installate secondo necessità e confermare che l’elenco delle stesse
corrisponde alla configurazione della stampante. Fare clic su OK. Sul desktop viene creata una
stampante da scrivania per questo modello. Questo completa la configurazione di stampa per i
computer Macintosh.
Italiano
Configurazione degli indirizzi IP
Vi sono molti modi per configurare i parametri degli indirizzi IP di I IP; quelli più semplici e comuni
sono: tramite la configurazione guidata rapida di IB-2x, tramite DHCP e tramite il pannello anteriore
della stampante. Il servizio WINS (Windows Internet Naming Service - Servizio di denominazione
Internet di Windows) spesso viene usato unitamente a DHCP e viene pertanto spiegato in questa
sezione.
La configurazione guidata rapida di IB-2x consente la facile configurazione dell’indirizzo IP e di molti
altri parametri. Per dettagli in merito, consultare la sezione Utilizzo della configurazione guidata rapida
in questa guida.
Nota: per istruzioni sull’impostazione del pannello anteriore delle fotocopiatrici digitali, consultare il
manuale di funzionamento.
Configurazione DHCP (Protocollo di configurazione Host dinamica)
DHCP prevede un meccanismo di parametri di configurazione IP, incluso l’indirizzo IP, la maschera di
sottorete ecc. su periferiche (host) su una rete IP. Questo programma facilita le mansioni
amministrative di gestione dei singoli indirizzi IP.
Un server DHCP elabora le trasmissioni IB-2x DHCP, rinviando ad IB-2x un indirizzo IP; questo server
può essere configurato in modo da concedere un indirizzo IP per un periodo di tempo limitato
(indirizzo provvisorio) o illimitato (indirizzo illimitato), oppure può essere configurato con la
prenotazione di un indirizzo permanente per ciascun IB-2x.
IMPORTANTE: in un ambiente non WINS si consiglia di configurare il server DHCP in modo da
concedere ad IB-2x un indirizzo illimitato o la prenotazione di un indirizzo permanente.
84
Page 84

Indirizzo illimitato o prenotazione di un indirizzo in Windows NT 4.0 e Windows 2000
In Windows NT e 2000 la durata dell’indirizzo viene configurata in base ad uno scope oppure ad un
gruppo di indirizzi. In questo modo la durata dell’indirizzo va configurata come illimitata per lo scope al
quale appartiene IB-2x. Se questa non è la selezione desiderata, IB-2x andrà definito come client
riservato.
Un client riservato può essere aggiunto con il manager DHCP di Windows selezionando Scope e
quindi Add Reservations [Aggiungi prenotazioni]. Immettere l’indirizzo Ethernet di IB-2x (non
immettere i due punti, ad esempio 008092a371d8), l’indirizzo IP ed altri parametri IP. L’indirizzo
Ethernet è disponibile sulla pagina di stato della rete IB-2x.
Disattivazione di DHCP
Se non si desidera procedere all’assegnazione degli indirizzi IP con DHCP, disattivare questa
funzione tramite la configurazione guidata rapida di IB-2x, il pannello anteriore della stampante, un
browser web o svariati altri metodi.
IMPORTANTE: notare tuttavia che DHCP VIENE AUTOMATICAMENTE DISATTIVATO se l’indirizzo
IP è configurato usando un altro metodo, quale la configurazione guidata rapida, il pannello anteriore
della stampante ecc.
Configurazione di WINS (Servizio di denominazione Internet di Windows)
Windows NT si avvale di WINS per utilizzare un meccanismo di mappatura del nome NetBIOS,
comunemente noto come nome host, su un indirizzo IP. Per essere configurato come server WINS,
WINS richiede un server NT o 2000.
Italiano
WINS attiva la definizione di una configurazione di stampa che fa riferimento alla stampante nel nome
anziché nell’indirizzo IP. Pertanto, anche se l’indirizzo IP della stampante viene cambiato tramite
DHCP, la configurazione della stampante rimane valida e la stampa non viene interrotta. Un altro
vantaggio di WINS è che una nuova stampante può sostituire senza interruzioni una vecchia 1) dando
alla nuova stampante lo stesso nome host di quella vecchia, oppure 2) modificando la configurazione
della porta LPR di Windows per la vecchia stampante con il nome host di quella nuova.
Registrazione e denominazione di WINS
L’utente dovrà dare ad IB-2x l’indirizzo del server WINS principale, nel quale registra il proprio nome
host; egli avrà anche l’opzione di dare l’indirizzo di un server WINS secondario. Il server DHCP
spesso viene configurato in modo da assegnare ad IB-2x il proprio nome host e gli indirizzi del server
WINS. Per le procedure di configurazione, consultare la documentazione del server DHCP. In
alternativa, gli indirizzi del nome host e del server WINS possono essere configurati tramite un
browser web o l’utility IB-2x AdminManager. Per informazioni su come utilizzare queste utility,
consultare la sezione Sicurezza e gestione di controllo, in questa guida.
La registrazione WINS può essere verificata stampando la pagina di stato della rete IB-2x. Dopo la
registrazione di IB-2x con un server WINS, lo stato di WINS appare nella sezione TCP/IP come
Registrato.
85
Page 85

Configurazione degli indirizzi IP con il pannello anteriore della stampante
Quanto segue é applicabile alle stampanti Kyocera Mita. Per le informazioni sulle regolazioni del
pannello anteriore delle copiatrici, riferirsi al manuale di istruzioni della copiatrice.
1. Premere il pulsante MENU (Modo). Se la prima riga del pannello con i LED non visualizza già
INTERFACE (Interfaccia), premere il tasto
∧
o ∨ fino a visualizzare tale voce.
2. Se la riga sotto INTERFACE (Interfaccia) non visualizza già OPTION (Opzione), premere il tasto
INVIO, quindi
∧
o ∨ fino a visualizzare tale voce e premere quindi INVIO.
3. Premere il tasto > per passare al sottomenu Option (Opzione). (Nota: alcuni modelli precedenti di
stampanti potrebbero non supportare la configurazione del pannello anteriore. Se non esiste un
sottomenu Option (Opzione) o non tutte le selezioni sono disponibili sul sottomenu, controllare i
requisiti firmware elencati nella sezione che segue).
4. Premere
∧
o ∨ fino a visualizzare TCP/IP. Premere il tasto > per passare al sottomenu TCP/IP
(accessibile solo se il protocollo TCP/IP è attivo [On]).
∧
5. Premere
o ∨ fino a visualizzare IP Address (Indirizzo IP). Premere il tasto INVIO per
visualizzare un cursore sotto l’ultima cifra dell’indirizzo IP.
6. Premere il tasto < o > per spostare il cursore sulla cifra che si desidera cambiare. Premere
per cambiare il valore di tale cifra.
7. Dopo aver impostato tutte le cifre come desiderato, premere il pulsante INVIO per accettare il
nuovo indirizzo.
8. Ripetere le fasi da 5 a 7 per la maschera della sottorete ed il gateway predefinito (indirizzo IP del
Italiano
router). Se non si è sicuri quale sia la maschera della sottorete corretta ed il primo numero
nell’indirizzo IP IB-2x è compreso tra 192 e 254, usare come maschera della sottorete
255.255.255.0.
9. Al completamento di tutte le impostazioni per l’indirizzo IP, la maschera della sottorete ed il
gateway predefinito, premere il tasto < per tornare al sottomenu Option (Opzione) (viene
visualizzato TCP/IP).
Nota: si consiglia di disattivare i protocolli non in uso.
10. Opzionale: premere
∧
o ∨ per visualizzare il protocollo da disattivare (off), ad esempio EtherTalk.
Premere il tasto INVIO; accanto all’opzione di attivazione (on) appare un punto interrogativo (?).
Premere
∧
o ∨ per disattivare (off) il valore e premere INVIO per accettare il nuovo valore.
Ripetere la procedura per tutti i protocolli da disattivare (off).
11. Premere il tasto < per tornare al menu Interface (Interfaccia) (si visualizza Option [Opzione]).
∧
12. Premere
o ∨ fino a visualizzare Print Status Page (Stampa pagina di stato). Premere due volte
il tasto INVIO per stampare una pagina di stato e controllare le nuove impostazioni.
13. Al termine, premere il tasto MENU per uscire dal sistema di menu.
∧
∨
o
86
Page 86

Mantenimento degli indirizzi IP
Quando la stampante viene spenta (off) e quindi riaccesa (on), IB-2x conserva il suo indirizzo IP?
Provvisorio:Se si ottiene un lease temporaneo dal server DHCP, viene regolato un IP temporaneo.
Pertanto quando la stampante viene spenta (off) e quindi riaccesa (on), IB-2x non comincia ad usare il
suo indirizzo IP senza prima aver negoziato con un server DHCP. Qualora un server DHCP non fosse
disponibile, IB-2x non disporrà di un indirizzo IP. In questo modo si evitano conflitti di indirizzi IP in un
ambiente DHCP.
Permanente: se dal server DHCP si è ottenuto un indirizzo illimitato o una prenotazione di indirizzo,
oppure se l’indirizzo è impostato adottando un metodo diverso da DHCP, l’indirizzo IP risulta
permanente. Ciò significa che l'indirizzo IP regolato inizialmente viene applicato anche dopo che si
spegne e riaccende la stampante.
Sicurezza e gestione di controllo
Sebbene la presente guida si concentri sulla configurazione iniziale di IB-2x, questa sezione contiene
una breve descrizione delle opzioni di sicurezza e disponibilità per la gestione continua di IB-2x.
Sicurezza della password
Per controllare modifiche non autorizzate alle impostazioni di IB-2x viene usata una password per
l’amministratore. La password predefinita di fabbrica per l’amministratore è vuota e pertanto, a meno
che non ne venga definita una, chiunque disponga di accesso attraverso un browser Web o una delle
utility di IB-2x potrà apportare modifiche alle impostazioni di IB-2x. Si consiglia pertanto di definire una
password per l’amministratore.
Italiano
AVVERTENZA: Se la password dell’amministratore viene dimenticata, non si può far altro che
ripristinare la condizione predefinita della fabbrica dell’IB-2x (usando la regolazione dei ponticelli
descritta nella sezione Correzione dei Problemi del Manuale dell’Utente, in formato html, nel CD-ROM
(Kyocera Mita Network Library o Kyocera Mita Software Library) fornito con questo prodotto).
Browser Web
Se IB-2x viene usato su una rete TCP/IP e dispone di un indirizzo IP valido, potrà essere gestito da un
browser Web. Il browser consente la configurazione completa di tutte le impostazioni di IB-2x; tuttavia,
a differenza della configurazione guidata rapida, il browser non sarà in grado di creare oggetti di
stampa NetWare. Se per la configurazione di NetWare viene usato un browser, occorre usare anche
NWAdmin per creare gli oggetti di stampa NetWare.
Collegarsi ad IB-2x con un browser Web immettendo l’indirizzo IP come URL, ad esempio http://
206.129.6.54
La pagina home visualizza le informazioni di base sulla stampante o copiatrice e su IB-2x, così come
anche lo stato corrente della stampante ed il display del pannello anteriore della stessa. Quando si
clicca il pulsante Refresh, il display dei messaggi visualizzato sul browser viene aggiornato.
Selezionare una categoria dalla barra di navigazione a sinistra per visualizzare ed impostare i valori
per tale categoria. Se si è impostata una password per l’amministratore di IB-2x, per poter accedere
ad uno degli schermi che non siano la pagina home l’utente dovrà immettere un nome utente e la
password prima di passare a schermate i cui valori potrebbero essere stati modificati. Per il nome
utente immettere qualsiasi nome, inclusi gli spazi. Se invece non si è impostata una password per
l’amministratore, l’accesso a tutte le altre pagine è illimitato. La password per l’amministratore può
essere definita sulla scheda Security (Sicurezza).
87
Page 87

Configurazione guidata rapida
La configurazione guidata rapida di IB-2x su Windows è concepita per garantire una configurazione
iniziale veloce e semplice. Non include tuttavia tutte le possibili impostazioni di IB-2x per apportare
modifiche alle impostazioni, ma risulta conveniente per la configurazione di controllo. Per dettagli in
merito, consultare la sezione Utilizzo della configurazione rapida guidata in questa guida.
AdminManager
L’utility AdminManager su Windows può essere usata in un ambiente IP o IPX per configurare
completamente una qualsiasi delle impostazioni di IB-2x. AdminManager può essere installato o
eseguito dal CD-ROM (Kyocera Mita Network Library o Kyocera Mita Software Library) selezionando
Advanced Setup (Configurazione avanzata) dal menu Configuration (Configurazione) IB-2x.
KM-NET VIEWER
Le funzioni di gestione e controllo continui della stampante spesso avvengono tramite KM-NET VIEWER
su Windows. KM-NET VIEWER consente operazioni avanzate di raggruppamento, filtraggio ed
ordinazione di più stampanti o copiatrici, Kyocera Mita e di terze parti. Prevede svariate opzioni per
l’invio di avvisi relativi alla stampante o di errori e può essere usato per visualizzare o modificare una
vasta gamma di impostazioni per la stampante ed IB-2x. KM-NET VIEWER sono disponibili sul CDROM (Kyocera Mita Software Library o Kyocera Mita Digital Library) in dotazione.
Connessione di rete wireless
Italiano
Con IB-22, la funzionalità di connessione in rete IB-2x, compresi i protocolli TCP/IP, NetWare,
AppleTalk, la gestione tramite Web e così via, diventa disponibile in una configurazione di rete senza
fili (wireless). IB-22 supporta la connettività di rete wireless definita dalla normativa 802.11b ed è
interoperabile con altre periferiche che supportano questo standard.
La presente sezione descrive la modalità di collegamento di IB-22 alla rete wireless.
Modalità operative
IB-22 supporta le seguenti modalità operative:
Ø
Infrastruttura: L’uso di uno o più punti di accesso (anche denominati Stazioni base) consente di
creare una rete wireless. Un punto di accesso, inoltre, può essere utilizzato per collegare la rete
wireless a una rete tradizionale.
Ø
802.11 “ad hoc”: Connessione diretta tra periferiche wireless senza ricorso a punti di accesso.
Questa modalità utilizza SSID (Service Set Identification), che funge da identificatore logico della
rete.
Ø
Ad hoc: Connessione diretta tra periferiche wireless senza ricorso a punti di accesso. Questa
modalità non utilizza SSID.
Ø
Automatico: Rileva automaticamente una delle suddette modalità. Questa è la modalità operativa
di IB-22.
Cifratura
Il protocollo WEP (Wired Equivalent Privacy) è un protocollo di sicurezza inteso per conferire ai dati di
una rete wireless le stesse caratteristiche di sicurezza tipiche dei dati trasferiti su una rete tradizionale.
WEP utilizza la cifratura a 64 bit (40 bit) oppure a 128 bit; IB-22 supporta entrambi.
88
Page 88

Configurazione automatica IB-22
IB-22 può rilevare una rete wireless 802.11b e collegarsi automaticamente ad essa, salvo che in uno
dei casi seguenti:
Ø sulla rete wireless è attivata la cifratura;
Ø le trasmissioni SSID sono disabilitate;
Ø il PC e IB-22 non sono impostati sul medesimo canale in modalità Ad hoc;
Ø sono presenti più reti wireless distinte e IB-22 potrebbe collegarsi a una rete non desiderata.
Se si presenta una delle condizioni succitate sulla rete in uso, consultare Configurazione manuale IB-22.
Se è possibile utilizzare la configurazione automatica sulla rete in uso, è sufficiente confermare che IB-22
ha stabilito la connessione.
Conferma di connessione avvenuta
Con DHCP:
se sulla rete è presente un server DHCP, stampare una pagina di stato o visualizzare l’indirizzo IP sul
pannello anteriore per verificare che IB-22 sia riuscito a rilevarlo. In questo caso, la connessione alla
rete è avvenuta correttamente.
Senza DHCP:
se la rete non dispone di un server DHCP, impostare l’indirizzo IP di IB-22 attraverso il pannello
dell’operatore e accedere a IB-22 mediante un browser (p. es.: http://192.168.10.240). Se il browser
visualizza l’indirizzo specificato, la connessione alla rete è avvenuta correttamente.
Italiano
Dopo aver verificato la connessione alla rete, è possibile impostare il protocollo IB-22 attenendosi alla
stessa procedura per IB-2x e consultando le sezioni pertinenti di questo manuale.
Se IB-22 non riesce a stabilire una connessione con la rete, sarà necessario procedere alla
configurazione manuale. In alcuni casi è opportuno ripristinare le impostazioni predefinite di IB-22.
Per le informazioni sul modo di ripristinare le regolazioni predefinite della fabbrica, riferirsi alla sezione
sulla correzione dei problemi del manuale di istruzioni (HTML) nell’incluso CD-ROM (Kyocera Mita
Network Library o Kyocera Mita Software Library).
Configurazione manuale IB-22
Se IB-22 non riesce a collegarsi automaticamente alla rete, ad esempio perché è attivata la cifratura,
attenersi alla seguente procedura:
1. Immettere il PC sulla modalità 802.11 “ad hoc” (oppure su Ad hoc), disattivando la cifratura WEP,
quindi impostare il canale in modo corrispondente al canale IB-22. Il canale predefinito per IB-22
è 11. Consultare eventualmente le istruzioni acclude alla scheda LAN wireless.
2. Attivare la stampante IB-22.
3. Impostare l’indirizzo IP di IB-22 attraverso il pannello dell’operatore.
4. Collegare IB-22 immettendo nel browser il corrispondente indirizzo IP, p. es.: http://
192.168.10.240.
5. Nel pannello di navigazione, selezionare Wireless LAN.
6. IB-22 rileverà la modalità wireless LAN; tuttavia se sono disponibili altre reti wireless di modalità
diversa, impostare la modalità in modo corrispondente alla rete alla quale collegarsi.
7. Impostare SSID in modo che corrisponda al valore della rete wireless (solo per le modalità
Infrastruttura e 802.11 “ad hoc”).
89
Page 89

8. Impostare Channel in modo corrispondente alla rete wireless.
9. Se si utilizza il protocollo WEP:
a. Impostare Encryption (WEP) su 64 bit (40 bit) oppure su 128 bit, a seconda
dell’impostazione della rete wireless.
b. Impostare WEP Key in modo corrispondente alla rete wireless. Per la cifratura a 64 bit, la
chiave è composta da 5 coppie di caratteri esadecimali (p. es.: 4C 75 63 6B 79), mentre nel
caso della cifratura a 128 bit, la chiave è composta da 13 coppie di caratteri esadecimali.
AVVERTENZA: verificare la correttezza della chiave immessa, poiché se si commette un
errore non sarà più possibile collegarsi a IB-22 e si dovranno reimpostare i valori predefiniti
per cancellare la chiave WEP errata.
10. Clique em Submit (enviar) para enviar as novas configurações para a IB-22. Para testar a
comunicação, consulte Confirmação de conexão bem-sucedida.
Italiano
90
Page 90

Conteúdo
Introdução .................................................................................... 92
CD-ROM Kyocera Mita Network Library .................................... 92
Instalação do hardware da IB-2x................................................ 93
Como usar o Assistente de Configuração ................................ 93
Impressão em NetWare ............................................................... 94
NetWare 3.x .............................................................................................................. 94
NetWare 4.x, 5.x e 6.x ............................................................................................... 94
Impressão no Windows .............................................................. 95
Impressão no Windows via NetWare ....................................................................... 96
Impressão no Windows via TCP/IP .......................................................................... 96
Impressão no Windows via NetBEUI ........................................................................ 99
Compartilhamento de impressora no Windows .................................................... 100
Configuração para Macintosh .................................................. 101
Utilitário de Configuração IB-2x .............................................................................101
Definição da emulação KPDL e de nome e zona AppleTalk ................................ 101
Instalação de PPDs e configuração da impressora ..............................................102
Configuração do endereço IP .................................................. 102
Configuração do DHCP (Dynamic Host Configuration Protocol) .........................102
Configuração do WINS (Windows Internet Naming Service) ................................103
Configuração do endereço IP pelo painel frontal da impressora ......................... 104
Persistência do endereço IP .................................................................................. 104
Gerenciamento de segurança e acompanhamento ............... 105
Segurança por senha ............................................................................................. 105
Navegador da Web ................................................................................................. 105
Assistente de Configuração Rápida....................................................................... 105
AdminManager ....................................................................................................... 105
KM-Net Viewer ........................................................................................................ 106
Redes sem fio ............................................................................ 106
Português
Modos de operação ...............................................................................................106
Criptografia ............................................................................................................. 106
Configuração automática da IB-22 ........................................................................ 106
Confirmação de conexão bem-sucedida.............................................................. 107
Configuração manual da IB-22 .............................................................................. 107
91
Page 91

Introdução
Agradecemos por ter escolhido os produtos de impressão para rede Kyocera Mita IB-2x. Temos
certeza de que você gostará muito do desempenho excepcional e do baixo custo de uso e
manutenção característicos dos produtos Kyocera Mita.
Este produto é uma placa de rede interna para impressoras e copiadores digitais da Kyocera Mita.
Pode instalar esta placa facilmente sem remover a placa principal da impressora. Com a IB-2x as
copiadoras digitais e impressoras Kyocera Mita podem se comunicar em redes Ethernet com diversos
sistemas operacionais de rede, inclusive Windows, NetWare, Macintosh e UNIX.
Este Guia de Configuração Rápida contém instruções concisas de configuração do software, para que
administradores de rede experientes instalem e configurem rapidamente a IB-2x. Se tiver alguma
questão, consulte as instruções de funcionamento fornecidas no CD-ROM incluído (Kyocera Mita
Network Library ou Kyocera Mita Software Library).
CD-ROM Kyocera Mita Network Library
Quando o CD-ROM KMNL é introduzido na unidade de CD-ROM, o menu principal é
automaticamente apresentado. Se isso não acontecer, execute o arquivo setup.exe, localizado no
diretório raiz do CD. Este Guia de Configuração Rápida refere-se aos seguintes utilitários que
constam na seção de Configuração da IB-2x, no CD-ROM:
Assistente de Configuração Rápida: Uma interface de Assistente para a configuração dos
parâmetros necessários para instalar e usar a IB-2x rapidamente.
Configuração Avançada: Permite fazer as definições avançadas e a monitorização da placa de
rede.
KPrint: Instala um monitor de porta de cliente para habilitar a impressão TCP/IP em qualquer
impressora/copiadora Kyocera Mita com placa IB-2x. Com a placa IB-20/21, o KPrint suporta
Português
impressão LPR e IPP em Windows 95/98/Me. Com a placa IB-21E/22, o KPrint também suporta
impressão via e-mail em Windows 95/98/Me/NT4/2000.
Marcas comerciais e registradas
KYOCERA®, KYOCERA MITA® e são marcas registradas da Kyocera Corporation. NetWare® é marca registrada da Novell, Incorporated.
Windows® é marca registrada da Microsoft Corporation. Macintosh® é marca registrada da Apple Computer, Incorporated. PostScript® e
Acrobat® são marcas registradas da Adobe Systems, Incorporated. Todos os outros produtos mencionados são marcas comerciais ou
marcas registradas de suas respectivas empresas.
Aviso da FCC (Comissão federal de comunicações, E.U.A.):
Este equipamento está de acordo com a Parte 15 das Regras da FCC. A sua operação está sujeita às duas condições seguintes: (1) este
aparelho não deve causar interferência nociva e (2) este aparelho deve necessariamente aceitar qualquer interferência recebida, inclusive
interferência que possa causar operação indesejável.
92
Page 92

Instalação do hardware da IB-2x
A IB-2X é uma placa deslizante. Pode instalar esta placa facilmente sem remover a placa principal da
impressora ou do copiador.
.
1.Remova os parafusos de fixação da
ranhura de expansão à impressora/
copiador e, em seguida, remova a tampa
da ranhura
.
2.Insira a placa para que as extremidades
fiquem alinhadas com as calhas da ranhura e,
em seguida, fixe-a com os parafusos
removidos no passo 1
.
Como usar o Assistente de Configuração
Embora o Assistente seja fácil de usar, esta seção apresenta algumas informações adicionais sobre
como localizar e conectar-se à impressora. Introduza o CD-ROM (Kyocera Mita Network Library ou
Kyocera Mita Software Library) na unidade de CD-ROM e selecione Assistente de Configuração
Rápida, na seção de Configuração IB-2x.
Será apresentada a tela para seleção da impressora. A Configuração Rápida detectará impressoras
IPX ou IP, contanto que o protocolo tenha sido instalado em uma máquina com Windows que esteja
rodando a Configuração Rápida. Por exemplo, se somente IPX estiver instalado, a Configuração
Rápida detectará apenas as impressoras IPX.
Se determinada impressora não constar na lista, um método alternativo para conectá-la é digitar seu
endereço Ethernet no espaço correspondente. O endereço Ethernet pode ser encontrado na página
de status da IB-2x. Se uma impressora IP não estiver no segmento local da rede, ela também
precisará ter um endereço de Gateway padrão correto configurado, e o roteador ou roteadores da
rede devem ser configurados para encaminhar broadcasts (difusões) IP.
Se uma impressora não for detectada pela Configuração Rápida (ex.: se IPX não estiver sendo usado
e os broadcasts IP não estiverem sendo encaminhados), use um navegador de Web ou o
AdminManager para fazer a configuração. Com um navegador da Web, os broadcasts IP não são
necessários, porque o endereço IP é digitado diretamente. Com o AdminManager, podem ser
definidas redes específicas nas quais procurar a impressora. Consulte a seção Gerenciamento de
segurança e acompanhamento para obter mais informações sobre a conexão com um navegador da
Web ou o AdminManager.
Português
93
Page 93

Impressão em NetWare
Há uma série de opções de impressão para o NetWare. A seguir, apresentamos explicações dos
vários métodos de impressão para cada versão do NetWare, e descrições de como configurar a
impressão para cada método.
NetWare 3.x
O NetWare 3.x é compatível apenas com impressão baseada em Bindery. São aceitos dois modos: 1)
Modo de servidor de impressão e 2) Modo de impressora remota.
Modo de servidor de impressão (recomendado): A IB-2x funciona como servidor de impressão e faz o
polling (averiguação) da fila de impressão, à procura de tarefas a serem realizadas. Este modo usa
um slot de login do NetWare (ou seja, 1 licença de usuário).
Modo de impressora remota: A IB-2x funciona como impressora remota, aceitando tarefas de
impressão de um servidor de impressão que roda em uma estação de trabalho dedicada ou no
servidor de arquivos. Este modo não requer uma licença de usuário do NetWare.
NetWare 3.x Bindery
1. Execute o Assistente de Configuração Rápida contido no CD-ROM (Kyocera Mita Network Library
ou Kyocera Mita Software Library).
2. Na seção do NetWare, escolha Configuração Bindery. Todos os objetos de NetWare necessário são criados pelo Assistente de Configuração Rápida.
3. Após executar o Assistente, aguarde alguns minutos e, usando o painel frontal da impressora,
imprima as páginas de status. Confira na página de status da IB-2x as informações de conexão
do NetWare e verifique se o status da fila indica Pronta.
4. Configure os clientes de Windows para imprimir usando a fila de NetWare associada (consulte a
Português
seção Impressão em Windows via NetWare).
NetWare 4.x, 5.x e 6.x
NetWare 4.x, 5.x e 6.x são compatíveis com impressão NDS (NetWare Directory Services). Para fins
de compatibilidade com as versões anteriores, também há suporte para impressão baseada em
Bindery. Os modos de servidor de impressão e de impressora remota são suportados para NDS, no
entanto, apenas o modo de servidor de impressão é suportado para a impressão em Bindery. .
NetWare NDS ou Bindery
1. Execute o Assistente de Configuração Rápida da IB-2x no CD-ROM (Kyocera Mita Network
Library ou Kyocera Mita Software Library).
2. Na seção do NetWare escolha Configuração NDS (recomendado) ou Configuração Bindery.
Todos os objetos de NetWare necessários são criados pelo Assistente de Configuração Rápida.
3. Após executar o Assistente, aguarde alguns minutos e, usando o painel frontal da impressora,
imprima as páginas de status. Confira na página de status da EcosysNet as informações de
conexão do NetWare e verifique se o status da fila indica Pronta.
4. Configure os clientes de Windows para imprimir usando a fila de NetWare associada (consulte a
seção Impressão em Windows via NetWare).
94
Page 94

NetWare NDPS
1. Instale o Gateway NDPS Kyocera a partir do CD-ROM (Kyocera Mita Network Library ou
Kyocera Mita Software Library). Selecione NDPS da Novell no menu principal do CD-ROM. O
Gateway é compatível com o NetWare 5.x e 6.x. Para usá-lo com o NetWare 4.x, veja os
requisitos no arquivo Readme.txt incluído com o Gateway no CD.
2. O Gateway é compatível com impressão IPX e IP. Ao usar impressão IP (recomendado), defina o
endereço IP da IB-2x (consulte a seção Configuração do endereço IP).
3. Use o NWAdmin para criar um Agente de Impressora para a impressora. Consulte o Guia do
Administrador (em formato PDF) incluído com o Gateway para obter mais informações.
4. Configure os clientes do Windows para enviar a impressão para o Agente de Impressora.
Impressão no Windows
O Windows abrange uma ampla variedade de versões de clientes; desde o Windows 3.1 até o
Windows XP, e oferece, portanto, uma ampla variedade de recursos de impressão. As diversas
versões do Windows, junto com os recursos de impressão em rede IB-2x oferecem o seguinte.
••
•
Via Novell NetWare: impressão para filas de impressão NetWare quando o servidor NetWare
••
está presente.
••
Via LPR: impressão para spooler LPR no Windows, em TCP/IP.
•
••
••
•
Via IPP: impressão pela Internet ou intranet usando IPP (Internet Printing Protocol).
••
••
Via E-Mail: esta opção só está disponível com a IB-21E/22. Através desta função, pode-se enviar
•
••
um trabalho de impressão para uma impressora remota por e-mail, como, por exemplo, pela
Internet, usando a função padrão de impressão em qualquer aplicativo Windows.
••
•
Via NetBEUI: impressão em rede ponto-a-ponto (peer-to-peer) usando o protocolo NetBEUI. As
••
impressoras encontram-se disponíveis no Ambiente de Rede.
••
•
Via compartilhamento de impressora do Windows: impressão em impressora compartilhada
••
na rede, configurada em outra máquina Windows.
Que método de impressão deve ser usado?
A configuração ideal de impressão para o Windows depende do seu ambiente específico, inclusive de
suas preferências e experiência como usuário ou administrador. Em geral, os serviços de impressão
do NetWare (NetWare Print Services) são utilizados quando há um servidor NetWare na rede. Na
ausência de um servidor NetWare, a impressão por LPR combinada com o compartilhamento da
impressora é freqüentemente usada quando já se está usando TCP/IP. A impressão tipo ponto-aponto (rede não-hierárquica, peer-to-peer) por protocolo NetBEUI é, em geral, mais usada quando
não há um servidor de impressão centralizado de Windows ou NetWare. Impressão por IPP ou e-mail
é utilizada quando é necessário imprimir pela Internet.
Português
95
Page 95

Impressão no Windows via NetWare
Antes de imprimir a partir de um cliente Windows via NetWare, a IB-2x deve ser configurada para
impressão em NetWare (Consulte a seção Impressão em NetWare). Após configurar a impressão
para NetWare, use o Assistente Adicionar impressora, do Windows (Iniciar, Configurações,
Impressoras, Adicionar impressora), para acessar o agente de impressão ou a fila de impressão
NetWare da IB-2x. No Assistente, selecione Rede e procure na rede o objeto de impressão NetWare
para a IB-2x.
Impressão no Windows via TCP/IP
As seções a seguir tratam da configuração de TCP/IP para Windows 95/98/Me, NT 4.0 e 2000. A
EcosysNet é compatível com diversos métodos de impressão TCP/IP, inclusive o protocolo IPP e a
impressão por e-mail (somente com a IB-21E/22), que permitem imprimir pela Internet.
LPR ou IPP em Windows 95/98/Me
Verifique se TCP/IP está instalado
Verifique em Iniciar, Configurações, Painel de controle, Rede. Se TCP/IP não constar na lista, será
necessário instalá-lo antes de configurar a impressão para TCP/IP.
Configure o endereço IP da EcosysNet
Consulte a seção Configuração do Endereço IP mais adiante neste guia.
Configure a porta e instale o driver da impressora
1. Introduza o CD-ROM (Kyocera Mita Network Library ou Kyocera Mita Software Library) na
unidade de CD-ROM, selecione Configuração e execute o Assistente Adicionar porta KPrint. O
Assistente o orientará durante a configuração da porta. Para obter informações sobre a opção de
impressão via e-mail com Kprint, consulte a seção na próxima página, relacionada à impressão
Português
por e-mail.
2. Execute o Assistente Adicionar impressora do Windows (Iniciar, Configurações, Impressoras,
Adicionar impressora).
2.1. Quando o Assistente perguntar “Como esta impressora está conectada ao seu
computador?”, selecione Impressora local.
2.2. Na lista de portas disponíveis, selecione a porta IPP ou LPR criada pelo Assistente Adicionar
porta KPrint.
3. Siga as instruções para completar o procedimento do Assistente Adicionar impressora.
4. Use o seguinte procedimento para definir a impressora para compartilhamento.
4.1. Vá para Iniciar, Configurações, Painel de controle, Rede e verifique se Compart. de
arquivos/impressoras p/ Redes Microsoft está instalado. Na mesma tela, clique no botão
Compartilhamento de impressão e arquivos e clique na caixa de seleção apropriada para
permitir o compartilhamento da impressora.
4.2. Em Iniciar, Configurações, Impressoras, clique com o botão direito do mouse na
impressora que acaba de ser criada com o Assistente Adicionar impressora, selecione
Compartilhamento, clique em Compartilhado como e digite o Nome do
compartilhamento desejado.
96
Page 96

LPR no Windows NT 4.0
Componentes necessários para TCP/IP
As etapas a seguir descrevem como procurar os componentes de TCP/IP no Windows, ou adicioná-
los, se necessário, para poder imprimir por LPR.
1. Confira em Iniciar, Configurações, Painel de controle, Rede, Protocolos. Se Protocolo TCP/IP
não constar na lista de Protocolos de rede, clique em Adicionar para instalá-lo.
2. Selecione a guia Serviços. Se Impressão TCP/IP Microsoft ou Serviços TCP/IP Simples não
constarem na lista de Serviços de Rede, clique em Adicionar para instalá-los.
3. Clique em OK quando todos os protocolos e serviços tiverem sido adicionados. Se o protocolo
TCP/IP acaba de ser adicionado, o Windows pedirá o endereço IP e outros parâmetros de TCP/
IP. Os novos protocolos e serviços não estarão disponíveis até o sistema ser reiniciado.
Configure o endereço IP da IB-2x
Consulte a seção Configuração do endereço IP mais adiante neste guia.
Instale o driver da impressora e configure a porta
1. Insira o CD-ROM fornecido com a impressora (Kyocera Mita Software Library ou Kyocera Mita
Digital Library) e, em seguida, seleccione a opção de instalação do controlador de impressora no
menu principal.
2. Na caixa de diálogo Conexão da impressora, selecione Local.
3. Na caixa de diálogo Selecionar impressora, clique no botão Adicionar porta LPR.
4. No campo Nome ou endereço do servidor provendo o lpd: digite o endereço IP da IB-2x.
5. No campo Impressora ou fila de impressão no servidor: digite qualquer nome desejado de
porta, como, por exemplo, LPR1, e clique em OK.
6. Se a impressora vai ser compartilhada, selecione, na caixa de diálogo apropriada do Assistente,
Compartilhada, e digite o nome desejado do compartilhamento. Selecione as outras versões do
Windows para as quais gostaria de receber automaticamente o driver ao se conectar ao
compartilhamento.
Impressão por e-mail em Windows 95/98/Me, NT e 2000
A IB-21E/22 oferece uma nova função de impressão por e-mail. Com esta função, pode-se enviar um
trabalho de impressão para uma impressora remota, por e-mail, como, por exemplo, pela Internet,
usando a função padrão de impressão em qualquer aplicativo Windows.
Uma IB-21E/22 configurada para impressão por e-mail conecta-se a um servidor de e-mail via POP3,
e recupera trabalhos de impressão enviados por e-mail. Para mais informações sobre o procedimento
de configuração, consulte o procedimento de configuração do POP3 e do correio electrónico nas
instruções de funcionamento (HTML) fornecidas no CD-ROM incluído (Kyocera Mita Network Library
ou Kyocera Mita Software Library).
Português
Após a IB-21E/22 ter sido configurada para recuperar e-mail, o KPrint é usado para criar uma porta
no Windows, que encaminha os trabalhos de impressão para a impressora, via e-mail. Após a porta
ser criada pelo Kprint, ela pode ser selecionada quando se adicionar uma nova impressora usando o
assistente Adicionar Impressora do Windows (para as portas criados pelo Kprint, deve-se selecionar
“Impressora local”).
97
Page 97

Um uso comum é criar uma impressora compartilhada em um servidor Windows e configurá-la para
usar a porta de e-mail criada pelo Kprint para enviar trabalhos de impressão para uma impressora
remota por e-mail. Os usuários podem conectar-se facilmente à impressora compartilhada usando
apenas o assistente Adicionar Impressora do Windows, e assim enviar trabalhos de impressão a
escritórios em outros locais. Esta é uma opção muito prática como alternativa ao envio por fax.
Impressão TCP/IP padrão no Windows 2000
Configure o endereço IP da IB-2x
Consulte a seção Configuração do endereço IP mais adiante neste guia.
Instale o driver da impressora e configure a porta
1. Execute o Assistente Adicionar impressora do Windows (Iniciar, Configurações, Impressoras,
Adicionar impressora).
2. Selecione Impressora local e desmarque Detectar automaticamente e instalar minha
impressora Plug-and-Play.
3. Selecione Criar nova porta e escolha Porta TCP/IP padrão na lista suspensa Tipo. Isso
inicializará o Assistente Adicionar porta de impressora TCP/IP padrão.
4. No campo Nome da impressora ou endereço IP digite o endereço IP da EcosysNet.
5. No campo Nome da porta, digite o nome de porta desejado ou aceite a predefinição.
6. Após completar o procedimento do Assistente Adicionar porta de impressora TCP/IP padrão, o
Assistente Adicionar Impressora continuará seu procedimento, Selecione o modelo adequado de
impressora.
7. Após atribuir um nome à impressora, será exibida a caixa de diálogo Compartilhamento de
impressora. Se a impressora vai ser compartilhada, selecione Compartilhada como, e digite o
nome do compartilhamento. (O Compartilhamento da impressora só estará disponível se o
Português
serviço de Compartilhamento de arquivos/impressora estiver instalado. Confira isso em Iniciar,
Configurações, Rede e conexões dial-up, Conexão de área local, Propriedades.)
8. Siga as instruções apresentadas para completar o procedimento do Assistente Adicionar
impressora.
9. Se tiver selecionado a impressora para o compartilhamento e gostaria que outras versões do
Windows recebessem automaticamente o driver de impressora correto aos e conectar ao
compartilhamento da impressora, use o seguinte procedimento:
9.1. Na caixa de diálogo Impressoras, clique com o botão direito do mouse na impressora que
acaba de ser criada com o Assistente Adicionar impressora, e selecione
Compartilhamento.
9.2. Na guia Compartilhamento, clique em Drivers adicionais e selecione os drivers a serem
associados a esta impressora.
98
Page 98

Impressão IPP no Windows 2000
O Windows 2000 oferece impressão via IPP (Internet Printing Protocol). IPP em geral é usado para
imprimir pela Internet, mas também pode ser usado para imprimir pela intranet.
Configure o endereço IP da IB-2x
Consulte a seção Configuração do endereço IP mais adiante neste guia.
Instale o driver da impressora e configure a porta
1. Execute o Assistente Adicionar impressora do Windows (Iniciar, Configurações, Impressoras,
Adicionar impressora).
2. Selecione Impressora da rede.
3. Na caixa de diálogo Localizar a impressora, selecione Conectar a uma impressora na Internet
ou na sua intranet e digite o URL usando a sintaxe mostrada no exemplo a seguir,
http://212.74.53.19/ipp
4. Siga as instruções apresentadas na tela para completar o procedimento do Assistente Adicionar
impressora.
Impressão no Windows via NetBEUI
A impressão em rede ponto-a-ponto (peer-to-peer) está disponível usando-se o protocolo NetBEUI.
Com este método, as impressoras são localizadas convenientemente no Ambiente de Rede.
Impressão via NetBEUI em Windows 95/98/Me, NT 4.0 e 2000
1. A máquina com sistema Windows já deve estar configurada para usar o NetBEUI.
No Windows 95/98/Me, confira isso em Iniciar, Configurações, Painel de controle, Rede.
No Windows NT 4.0, confira isso em Iniciar, Configurações, Painel de controle, Rede,
Protocolos.
No Windows 2000 confira isso em Iniciar, Configurações, Conexões de rede e dial-up,
Conexão de área local, Propriedades.
2. Use o Assistente de Configuração Rápida I no CD-ROM (Kyocera Mita Network Library ou
Kyocera Mita Software Library) para modificar o grupo de trabalho padrão (KY-NetPrinters) e o
nome de impressora padrão (KYxxxxxx) para os nomes desejados.
3. No Ambiente de Rede, selecione Toda a rede; em seguida, abra o grupo de trabalho KYNetPrinters (ou o grupo com o novo nome) e selecione as impressoras desejadas.
4. Clique com o botão direito do mouse no ícone Impressora e selecione Instalar. Isso inicializa o
Assistente Adicionar impressora. Siga as instruções para completar o procedimento do
Assistente Adicionar impressora, do WIndows.
5. O compartilhamento de impressora normalmente não é usado na impressão com NetBEUI,
contudo, às vezes pode-se querer usá-lo no Windows NT 4.0 ou 2000 para poder aproveitar sua
capacidade de download automático de driver. Para ver as etapas de como definir o
compartilhamento de impressora, consulte as instruções de impressão TCP/IP padrão no
Windows ou de Impressão LPR no Windows NT 4.0 LPR.
Português
99
Page 99

Compartilhamento de impressora no Windows
Para compartilhamento de impressora no Windows é necessário haver uma máquina com Windows
que funcione como “host”. Esse host funciona como um servidor de impressão, fazendo o spool de
tarefas de impressão enviadas de clientes Windows para a impressora compartilhada e
encaminhando-as para a impressora propriamente dita. Qualquer máquina com Windows (versão
superior à 3.1) pode funcionar como cliente, como host, ou como ambos.
Os protocolos usados do cliente para o host e do host para a impressora não precisam ser os mesmos.
Por exemplo, se uma máquina com Windows NT estiver configurada para compartilhar uma
impressora LPR, clientes que rodarem apenas IPX ou NetBEUI mesmo assim podem enviar tarefas
para a impressora compartilhada. O host NT aceitará tarefas por IPX ou NetBEUI e as enviará à
impressora por TCP/IP. Essa capacidade oferece uma extraordinária flexibilidade na arquitetura de
impressão em rede para o Windows.
Criação de uma impressora compartilhada
Definir uma Impressora Compartilhada faz parte do processo de adicionar impressora, e é explicado
em cada uma das seções anteriores relacionadas ao sistema Windows.
Conexão a uma impressora compartilhada
Esta seção descreve brevemente as etapas para conectar um computador cliente a uma impressora
compartilhada. Embora haja ligeiras variações nos procedimentos para Windows 95/98/Me, NT 4.0 e
2000, como, por exemplo, a seleção de Impressora da rede no 95/98/Me ou de Servidor de
impressão da rede no NT 4.0, elas são praticamente as mesmas e, logo, estão combinadas nas
instruções abaixo.
Conexão de clientes Windows 95/98/Me, NT 4.0 e 2000 a uma impressora
compartilhada.
Português
Se o host for uma máquina com NT ou 2000 que foi configurada para fazer o download do driver nos
clientes conectados, então:
Execute o Assistente Adicionar impressora, do Windows, e selecione Impressora da rede; procure
na rede a impressora compartilhada. O download do driver será feito automaticamente.
Se o host for uma máquina com 95/98/Me ou o host NT ou 2000 não foi configurado para fazer o
download do driver nos clientes conectados, então:
Instale o driver da impressora usando o CD-ROM (Kyocera Mita Software Library ou Kyocera Mita
Digital Library) que acompanha a impressora. Na tela de Conexão da impressora, selecione Rede
(Network) e procure na rede a impressora compartilhada.
100
Page 100

Configuração para Macintosh
A KPDL (Linguagem de Descrição de Página da Kyocera) é uma linguagem de descrição de página
compatível com PostScript. Pode consultar a página de estado da impressora/copiador para verificar se
a KPDL está instalada na impressora.
A IB-2x é compatível com sistemas MacOS 9.x e com o driver LaserWriter versão 8.x.
Não é necessária muita configuração para poder imprimir em sistemas Macintosh. Após instalar a IB-2x
ter sido instalada e conectada à rede, ela aparecerá no Seletor do Macintosh, como um dispositivo
LaserWriter. Para ativar corretamente a impressão, basta configurar a impressora para usar emulação
KPDL (PostScript), e instalar os arquivos PPD (PostScript Printer Description).
O CD-ROM (Kyocera Mita Network Library ou Kyocera Mita Software Library) contém o Utilitário de
configuração Macintosh, que possibilita ao usuário realizar tarefas de gerenciamento, tais como
configurar remotamente a emulação KPDL, definir o nome e a zona AppleTalk, e definir os parâmetros
de TCP/IP.
••
• Para o Macintosh possa imprimir em impressoras com a placa IB-2x, é necessário ativar o
••
protocolo AppleTalk.
Utilitário de Configuração IB-2x
1. Introduza o CD-ROM (Kyocera Mita Network Library ou Kyocera Mita Software Library) na
unidade de CD e clique duas vezes no ícone KM Network Library, na mesa de trabalho.
2. Abra a pasta Utilitário.
3. Clique duas vezes no Instalador IB-2x. .
4. Selecione o idioma desejado e clique em OK.
5. Clique em Encerrar para sair do instalador.
Definição da emulação KPDL e de nome e zona AppleTalk
1. Abra a pasta Ferramentas IB e clique duas vezes em Utilitário de configuração para
inicializá-lo.
2. O utilitário procurará todos os dispositivos IB-2x disponíveis na rede AppleTalk (na zona atual) e
os exibirá na Lista de impressoras (abaixo). O Utilitário de configuração pode ser configurado
para fazer a busca em uma outra zona AppleTalk ou para procurar as impressoras através de
TCP/IP. Consulte o Manual do Usuário On-line da IB-2x para obter informações adicionais sobre
como configurar buscas.
3. Clique duas vezes na impressora desejada, na Lista de impressoras para abrir a janela de
configuração de dispositivo.
4. Clique no ícone Configurar emulação. Escolha a opção apropriada de KPDL e clique em
DEFINIR.
5. Clique no ícone AppleTalk. Digite o Nome da impressora desejado, conforme ele deverá
aparecer no Seletor. Digite o Nome da zona desejado, para indicar a zona na qual a impressora
deverá aparecer. Um asterisco (*) indica que a impressora aparecerá na zona padrão.
Português
6. Clique em DEFINIR para enviar à impressora as mudanças efetuadas.
7. Na configuração de nome e zona AppleTalk, será necessário reiniciar o sistema para que as
mudanças tenham efeito. Feche a janela de configuração de dispositivo e selecione Redefinir no
menu Configurar.
101
 Loading...