

Page 1

KYOCERA Hydro PLUS
User Guide
Page 2

Table of Contents
Device Basics ................................................................................................ 1
Battery .................................................................................................... 1
Install the Battery..................................................................................... 1
Charge the Battery .................................................................................... 2
Turn the Device On and Off ............................................................................ 2
Turn the Device On ................................................................................... 2
Turn the Device Off ................................................................................... 2
Turn the Screen On and Off ............................................................................ 3
Turn the Screen On and Unlock It .................................................................. 3
Turn the Screen Off When Not in Use .............................................................. 3
Device Overview ......................................................................................... 3
Key Functions .......................................................................................... 4
Touchscreen Navigation ................................................................................ 5
Home Screen ............................................................................................. 6
Home Screen Overview ............................................................................... 6
Extended Screens ..................................................................................... 6
Customize the Home Screens ....................................................................... 7
Status Bar ................................................................................................. 8
Text Entry .................................................................................................. 11
Touchscreen Keyboard ................................................................................. 11
Android Keyboard ....................................................................................... 11
Swype ..................................................................................................... 14
Copying and Pasting Text .............................................................................. 18
Phone........................................................................................................ 20
Make Phone Calls ....................................................................................... 20
Call Using the Phone Dialpad ....................................................................... 20
Call From Call Log ................................................................................... 20
Call From People ..................................................................................... 21
Call a Number in a Text Message .................................................................. 21
Call an Emergency Number ......................................................................... 21
Call a Number with Pauses ......................................................................... 22
i
Page 3

Call Using the Plus (+) Code Dialing ............................................................... 22
Call Using the Internet Calling ..................................................................... 23
Receive Phone Calls .................................................................................... 24
Answer an Incoming Call ............................................................................ 24
Mute the Ringtone Without Rejecting a Call ..................................................... 24
Reject an Incoming Call ............................................................................. 24
Reject a Call and Send a Text Message ........................................................... 24
Voicemail ................................................................................................ 24
Set Up Voicemail ..................................................................................... 24
Voicemail Notification ............................................................................... 25
Retrieve Your Voicemail Messages ................................................................. 25
Voicemail Settings ................................................................................... 26
Phone Call Options ..................................................................................... 26
Caller ID ............................................................................................... 26
Call Waiting ........................................................................................... 26
3-Way Calling ......................................................................................... 27
Call Forwarding ....................................................................................... 27
Other Call Settings ................................................................................... 28
In-Call Options ........................................................................................ 31
Call Log ................................................................................................... 32
View Recent Calls .................................................................................... 32
Call Log Options ...................................................................................... 32
Clear Call Logs ........................................................................................ 33
People ....................................................................................................... 34
Display People ........................................................................................... 34
The People List Options ............................................................................. 34
Add a New Entry to People ............................................................................ 35
Save a Phone Number From the Phone Dialpad .................................................... 37
Edit an Entry in People ................................................................................ 37
Add or Edit Information on an Entry .............................................................. 37
Assign a Picture to an Entry ........................................................................ 37
Assign a Ringtone to an Entry ...................................................................... 38
Assign a Vibration to an Entry ...................................................................... 38
ii
Page 4

Add an Entry to Favorites ........................................................................... 38
Send an Entry’s Call to Voicemail ................................................................. 39
Delete an Entry ....................................................................................... 39
Synchronize the Entries in People .................................................................... 39
Share an Entry in People............................................................................... 40
Accounts and Messaging .................................................................................. 41
Gmail ..................................................................................................... 41
Create a Google Account ........................................................................... 41
Sign In to Your Google Account .................................................................... 42
Access Gmail .......................................................................................... 42
Send a Gmail Message ............................................................................... 43
Read and Reply to Gmail Messages ................................................................ 44
Email ..................................................................................................... 44
Add an Email Account (POP3 or IMAP) ............................................................ 44
Add a Corporate Account ........................................................................... 45
Create Another Email Account ..................................................................... 46
Compose and Send Email ........................................................................... 46
View and Reply to Email ............................................................................ 47
Manage Your Email Inbox ........................................................................... 47
Email General Settings .............................................................................. 48
Email Account Settings .............................................................................. 48
Delete an Email Account ............................................................................ 49
Text Messaging and MMS ............................................................................... 50
Compose Text Messages ............................................................................. 50
Send a Multimedia Message (MMS) ................................................................. 51
Save and Resume a Draft Message ................................................................. 52
New Messages Notification ......................................................................... 53
Managing Message Conversations .................................................................. 53
Text and MMS Options ............................................................................... 55
Social Networking Accounts ........................................................................... 56
YouTube ............................................................................................... 56
Google Talk .............................................................................................. 57
Signing In and Chatting .............................................................................. 57
iii
Page 5

Managing Your Friends .............................................................................. 58
Mobile Indicators ..................................................................................... 59
Signing Out ............................................................................................ 60
Google Talk Settings ................................................................................. 60
Applications and Entertainment ......................................................................... 62
Google Play .............................................................................................. 62
Find and Install an App .............................................................................. 62
Create a Google Wallet Account ................................................................... 63
Request a Refund for a Paid App .................................................................. 63
Open an Installed App ............................................................................... 64
Uninstall an App ...................................................................................... 64
Get Help with Google Play .......................................................................... 64
Cricket Shop ............................................................................................. 65
Navigation ............................................................................................... 65
Google Maps .......................................................................................... 65
Cricket Navigator .................................................................................... 67
Muve Music™ ............................................................................................. 67
Google Play Music ....................................................................................... 67
Opening the Music Library .......................................................................... 67
The Listen Now Screen .............................................................................. 68
More Screens .......................................................................................... 68
Backing Up Your Downloaded Music Files ......................................................... 68
Mobile Web .............................................................................................. 68
Cricket411 ............................................................................................... 69
My Account .............................................................................................. 69
Evolve Money ............................................................................................ 69
Web and Data .............................................................................................. 70
Wi-Fi ...................................................................................................... 70
Turn Wi-Fi On and Connect to a Wireless Network .............................................. 70
Check the Wireless Network Status ............................................................... 71
Connect to a Different Wi-Fi Network ............................................................ 71
Data Services ............................................................................................ 71
Launch a Web Connection .......................................................................... 71
iv
Page 6

Data Connection Status and Indicators ........................................................... 72
Browser................................................................................................... 72
Learn to Navigate the Browser ..................................................................... 72
Browser Menu ......................................................................................... 73
Select Text on a Web Page ......................................................................... 74
Adjust Browser Settings ............................................................................. 75
Adjust Browser Privacy and Security Settings .................................................... 75
Adjust Browser Accessibility Settings ............................................................. 76
Adjust Browser Advanced Settings ................................................................ 77
Adjust Browser Bandwidth Management Settings ............................................... 78
Adjust Browser Labs Settings ....................................................................... 78
Set Search Engine .................................................................................... 78
Create Website Settings............................................................................. 78
Reset the Browser to Default....................................................................... 79
Set the Browser Home Page ........................................................................ 79
Read Web Page Offline .............................................................................. 79
Manage Bookmarks ................................................................................... 79
Portable Wi-Fi Hotspot ................................................................................. 80
Camera and Video ......................................................................................... 83
Take Pictures ............................................................................................ 83
Open the Camera .................................................................................... 83
Camera Viewfinder Screen ......................................................................... 83
Review Screen ........................................................................................ 84
Take a Picture ........................................................................................ 85
Close the Camera .................................................................................... 85
Record Videos ........................................................................................... 85
Video Viewfinder Screen ............................................................................ 85
Record a Video ....................................................................................... 86
Camera/Video Settings ................................................................................ 87
View Pictures and Videos Using Gallery ............................................................. 87
Open Gallery .......................................................................................... 87
View Photos and Videos ............................................................................. 88
Zoom In or Out on a Photo .......................................................................... 89
v
Page 7

Watch a Video ........................................................................................ 89
Close Gallery .......................................................................................... 90
Working with Photos ................................................................................... 90
Photo Options Menu ................................................................................. 90
Edit a Photo ........................................................................................... 90
Rotate and Save a Photo ............................................................................ 91
Crop a Photo .......................................................................................... 91
Share Photos and Videos ............................................................................... 92
Send Photos or Videos by Email/Gmail ........................................................... 92
Send Photos or Videos by Multimedia Message .................................................. 93
Send Photos or Videos Using Bluetooth ........................................................... 93
Share Photos or Videos on Google+ ................................................................ 93
Share Photos on Picasa .............................................................................. 94
Share Videos on YouTube ........................................................................... 94
Tools and Calendar ........................................................................................ 95
Calendar ................................................................................................. 95
Add an Event to the Calendar ...................................................................... 95
Invite Guests to Your Calendar Event ............................................................. 96
Event Alerts ........................................................................................... 96
View Calendar Events ............................................................................... 97
Erase Calendar Events ............................................................................... 99
Show or Hide Calendars ............................................................................100
Synchronize Calendars with Your Device ........................................................100
Clock & Alarm ..........................................................................................100
Opening Clock .......................................................................................100
Setting an Alarm ....................................................................................101
Changing Alarm Settings ...........................................................................102
Calculator ...............................................................................................103
Voice Service ...........................................................................................103
Automatic Speech Recognition (ASR) ............................................................103
Text-to-Speech Settings ............................................................................104
Voice Search .........................................................................................104
Eco Mode ................................................................................................105
vi
Page 8

Bluetooth ...............................................................................................106
Turn Bluetooth On or Off ..........................................................................106
The Bluetooth Menu ................................................................................106
Pair With a Device ..................................................................................107
Disconnect or Unpair From a Bluetooth Device .................................................108
Send and Receive Information Using Bluetooth .................................................108
microSD Card ...........................................................................................110
Remove the microSD Card .........................................................................110
Install a microSD Card ..............................................................................111
View the microSD Card Memory ...................................................................112
Format the microSD Card ..........................................................................112
Unmount and Mount the microSD Card ..........................................................113
Use the Device’s microSD Card as a USB Drive .................................................113
Use the Device’s microSD Card as a Media Device .............................................113
Settings ....................................................................................................115
Wireless & Networks Settings ........................................................................115
Wi-Fi ..................................................................................................115
Bluetooth .............................................................................................115
Data Usage ...........................................................................................115
Airplane Mode .......................................................................................117
Tethering & Portable Hotspot .....................................................................117
Mobile Networks .....................................................................................117
Roaming ..............................................................................................117
Device Settings .........................................................................................119
Sound .................................................................................................119
Display ................................................................................................122
Storage ...............................................................................................123
Battery ................................................................................................123
PC Connection .......................................................................................123
Apps ...................................................................................................124
Personal Settings.......................................................................................124
Accounts & Sync .....................................................................................124
Add Account .........................................................................................124
vii
Page 9

General Sync Settings ..............................................................................125
Location Services ....................................................................................125
Security ...............................................................................................126
Language & Input ...................................................................................130
Backup & Reset ......................................................................................130
System Settings ........................................................................................131
Date & Time .........................................................................................131
Accessibility ..........................................................................................132
Developer Options ..................................................................................133
About Phone .........................................................................................133
System Update ......................................................................................133
Notes .......................................................................................................135
Copyrights .................................................................................................136
Index .......................................................................................................137
viii
Page 10

Device Basics
Battery
Install the Battery
1. Slide the battery cover release latch to the unlocked position ( ).
2. Insert your thumb- or fingernail into the slit ( ) and lift the battery cover ( ).
3. Insert the battery, contacts end first, and gently press into place ( ).
4. Replace the cover, applying equal pressure from the top down on both sides and
making sure all the locking tabs of the cover are seated with no gaps ( ).
Caution: Ensure that the battery cover release latch is in the unlocked position when
replacing the cover.
1
Page 11

5. Slide the battery cover release latch to the locked position ( ).
Charge the Battery
1. Open the cover of the charger/accessory jack.
2. Plug the smaller end of the micro-USB cable into the device’s charger/accessory jack.
3. Plug the other end of the USB cable into the charger, and then plug the charger into
an electrical outlet.
Note: Your device’s battery should have enough charge for the device to turn on and find a
signal, set up voicemail, and make a call. You should fully charge the battery as soon
as possible.
Turn the Device On and Off
Turn the Device On
►
Press and hold the Power button.
Turn the Device Off
►
Press and hold the Power button to open the phone options menu. Touch Power off >
OK.
Your screen remains blank while your device is off.
2
Page 12

Turn the Screen On and Off
Turn the Screen On and Unlock It
To save battery power, the device automatically turns off the screen after a certain period of
time when you leave it idle. You will still be able to receive messages and calls while the
device’s screen is off. For information on how to adjust the time before the screen turns off,
see Sleep.
1. Press the Power button.
2. Flick to any direction to unlock the screen.
To disable the slide lock or enable a more secure lock, see Screen Lock.
Turn the Screen Off When Not in Use
►
Press the Power button.
Device Overview
3
Page 13

Key Functions
CAUTION! Inserting an accessory into the incorrect jack may damage the device.
●
Earpiece lets you hear the caller and automated prompts.
●
LED Indicator shows your device’s battery status. It also flashes for incoming calls or
pending notifications.
●
Back Key ( ) returns you to the previous screen or closes the dialog box.
●
Home Key ( ) returns you to the Home screen.
●
Microphone allows other callers to hear you clearly when you are speaking to them.
●
Recent Apps Key ( ) allows you to show the Recent Apps screen.
●
Menu Key ( ) lets you open the menus of the current screen or application.
●
Display Screen displays all the information needed to operate your device. Use finger
gestures to navigate and interact with items on the screen.
●
Proximity Sensor/Light Sensor automatically deactivates the touchscreen when you
hold the device near your face. This prevents you from unintentionally activating
device functions during a call. It also automatically turns off the backlight and
brightens the display when you are in sunlight or a bright room, and dims the display
in darker places.
●
Charger/Accessory Jack allows you to connect the micro-USB cable (included) to
charge the battery or to transfer files to and from a computer.
●
Speaker lets you hear the different ringtones and sounds. It also lets you hear the
caller’s voice in speakerphone mode.
●
Power Button lets you turn the device on or off, or turn the screen backlight on or off.
This button can be configured to end a call.
●
microSD Card Slot (internal) allows you to insert a microSD card to support external
memory. Your device comes with the microSD card preinstalled under the device’s
battery.
●
Internal Antennas facilitate reception and transmission. To maximize performance,
do not obstruct while using the device.
●
Battery Cover Release Latch locks the battery cover.
●
Camera Lens, as part of the built-in camera, lets you take pictures and videos.
4
Page 14

●
Volume Button allows you to adjust the ringtone and media volumes when you are not
on a call, or the voice volume during a call.
●
Camera Flash allows you to take pictures and videos in low light conditions.
●
Headphone Jack allows you to plug in an optional headset for convenient, hands-free
conversations.
Touchscreen Navigation
Warning: Do not touch with a pen or stylus. It may damage the touch screen.
Touch
Touch the screen with your finger to select or launch a menu, option, or application. A light
touch works best.
Touch and Hold
To open the available options for an item (for example, options for a contact), simply touch
and hold the item.
Drag
Touch and hold your finger before you start to move it. Do not release your finger until you
have reached the target position.
Slide or Flick
To slide, quickly move your finger vertically or horizontally across the screen. To flick, move
your finger in lighter, quicker strokes than sliding.
Pinch and Spread
Pinch the screen using your thumb and forefinger to zoom out or spread the screen to zoom in
when viewing a picture or a Web page. (Move fingers inward to zoom out and outward to
zoom in.)
Rotate
For most screens, you can automatically change the screen orientation from portrait to
landscape by turning the device sideways. When entering text, you can turn the device
sideways to bring up a bigger keyboard.
Note: The Auto-rotate screen check box in Home > Menu > System settings >
Display needs to be selected for the screen orientation to automatically change.
5
Page 15

Home Screen
The Home screen is the starting point for all applications, functions, and menus. From any
application screen, press to return to the Home screen.
Home Screen Overview
●
Status Bar: Displays the time, notification, and device status icons. Slide down to
display the Notifications panel.
●
Shortcut: Allows users to quickly launch applications.
●
Application Launcher: Touch to display available applications and widgets on the
device.
●
Favorites Tray: Keeps icons of your favorite application. The icons in the tray remain
visible on every Home screen. You can change icons except the Application launcher
icon (center).
●
Screen Position Indicator: Indicates where you are among the five Home screens.
●
Folder: Allows users to store multiple application icons as a group.
●
Google Search Bar: Allows users to enter text or spoken keywords for a quick search
on the device or on the Internet. Touch to enter text or touch to speak your
keyword.
Extended Screens
In addition to the main Home screen, your phone has four extended Home screens to provide
more space for adding icons, widgets, and more.
6
Page 16

►
Press Home and then drag across the screen to move from the main screen to an
extended screen.
Note: You cannot add more screens.
Customize the Home Screens
Add Application Icons or Widgets to the Home Screens
1. Touch on the Favorites Tray.
2. Slide the APPS and WIDGETS screens to find the item you want to add to the Home
screen.
3. Touch and hold an application icon or widget. The Home screen appears.
4. Pressing the item, move your finger to find the place to add it to. The blue frame
indicates where it might be placed.
5. Release your finger.
Move or Remove Items on the Home Screens
►
Touch and hold the item you want to move or remove on the screen.
To move the item, drag it to a new area and release it.
To remove the item, drag it over “X Remove” at the top of the screen and release
it when it turns red.
Change the Wallpaper
1. Touch and hold the empty area on the Home screen.
2. Select one of the following options:
7
Page 17

Icon
Description
Gallery/Graphics: Select to use saved or captured pictures on your device. Touch
to select a picture, and crop it before setting it as wallpaper.
Live Wallpapers: Select to use Live wallpapers. Select the wallpaper and touch Set
wallpaper.
Wallpapers: Select to use preset wallpapers. Select the wallpaper and touch Set
wallpaper.
Favorites Tray
Favorites Tray takes up to five icons and those icons in the tray remain visible on every Home
screen. You can change icons except the Application launcher icon located in the center of
the tray.
To add a new icon to the Favorites Tray:
1. Remove the current icon on the tray. See Move or Remove Items on the Home
Screens.
2. Touch and hold an application icon and drag it to the Favorites Tray.
3. Release your finger.
Use Folders
You can combine several application icons in a folder.
1. Touch and hold an application icon and drag it over another icon.
2. Release your finger. You can see two icons piled within a folder (a black circle).
3. Touch the folder to see the application icons within the folder.
4. Touch Unnamed Folder. The keyboard opens and you can name the folder. To
rename it, touch the name.
Status Bar
The status bar at the top of the screen provides device and service status information on the
right side and notification alerts on the left. To view notification alerts, slide the status bar
down.
Status Icons
8
Page 18
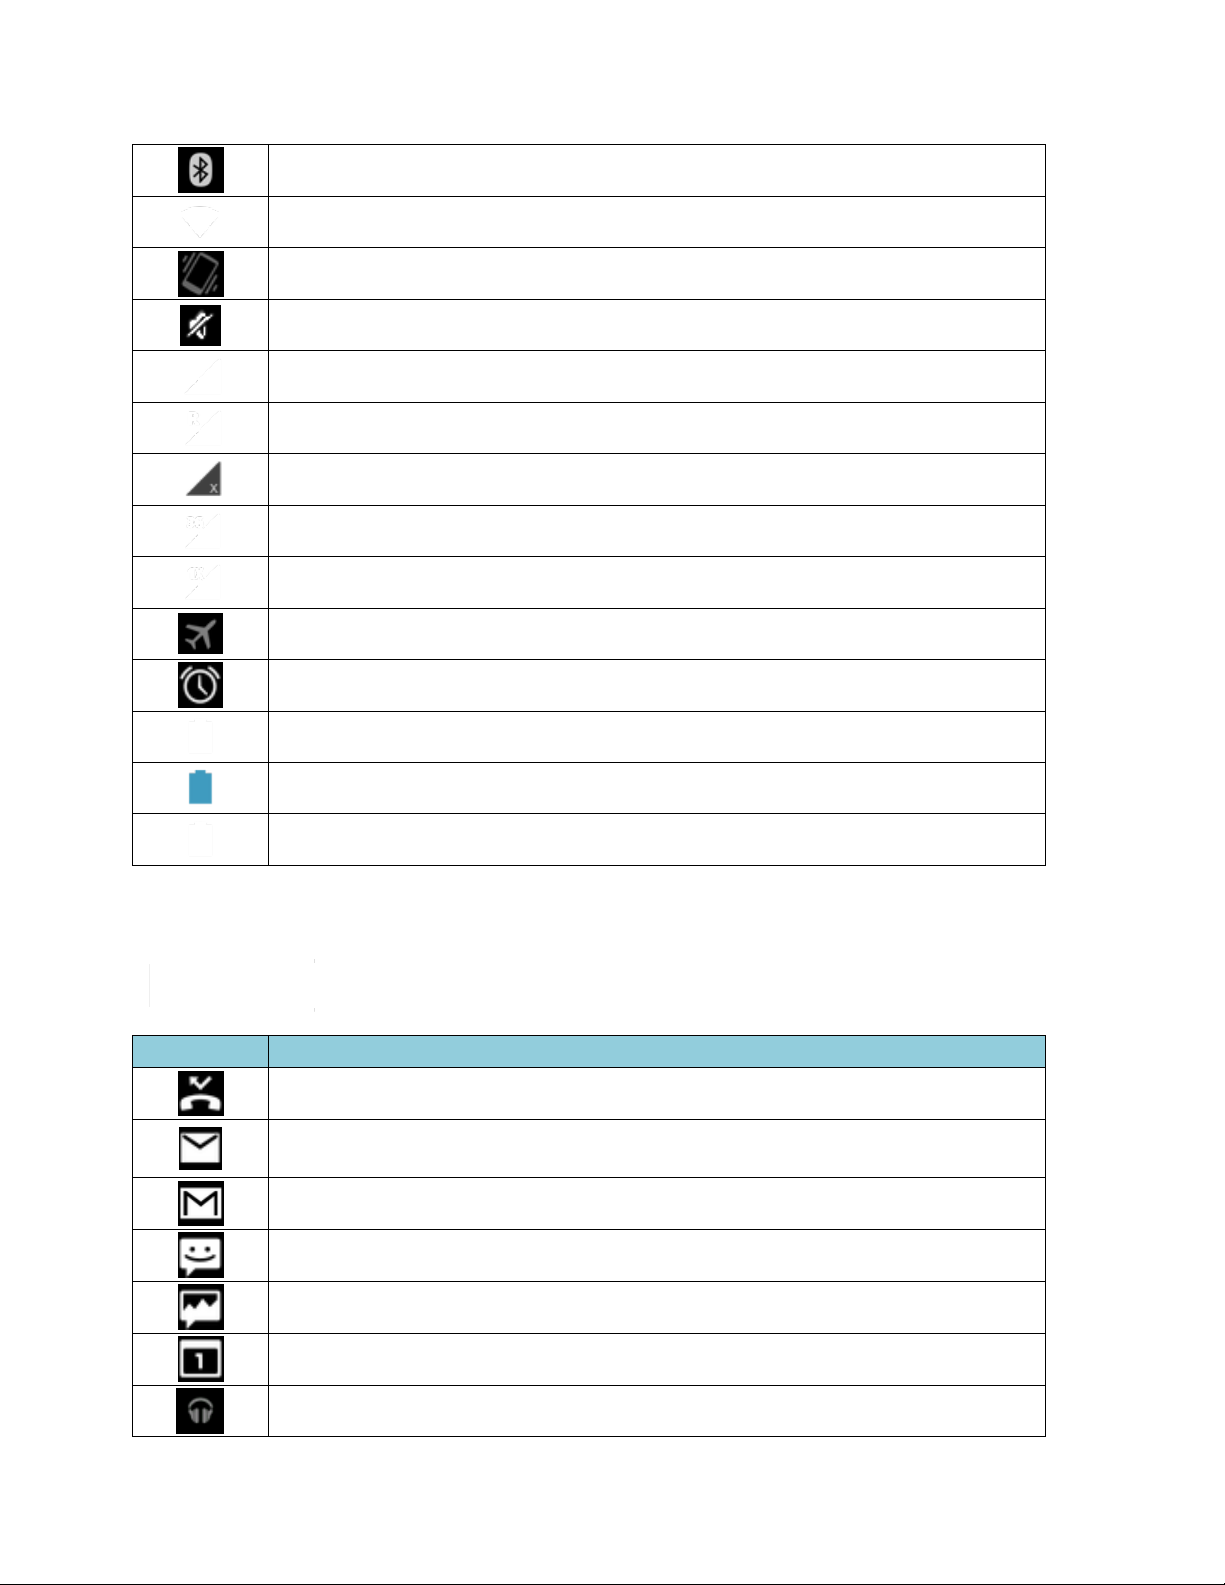
Bluetooth® enabled
Wi-Fi® active (full signal)
Vibrate
Silent
Network (full signal)
Network (roaming, full signal)
Network (no signal)
3G (data service)
1x (data service)
Airplane mode
Alarm set
Battery (charging)
Battery (full charge)
Battery (discharged)
Icon
Description
Missed call
New email
New Gmail
New SMS message
New MMS message
Event
Music application is running background
Notification Icons
9
Page 19

USB connection
Alarm
When animating, GPS is active
Downloading
10
Page 20

Text Entry
Touchscreen Keyboard
Two types of keyboards are available on your device: Android keyboard and Swype. Simply
touch a text field where you want to enter text to call up a keyboard. You can turn the
device sideways to bring up a bigger keyboard. See Auto-Rotate Screen.
To switch the keyboard from Settings:
1. Press Home > Menu and touch System settings > Language & input.
2. Touch Default.
3. Touch Android keyboard or Swype.
To switch the keyboard when a keyboard is displayed:
1. Drag the Notifications panel down and touch Select input method.
2. Touch Android keyboard or Swype.
Android Keyboard
Android Keyboard Overview
Note: Key appearance may vary depending on the selected application or text field.
11
Page 21
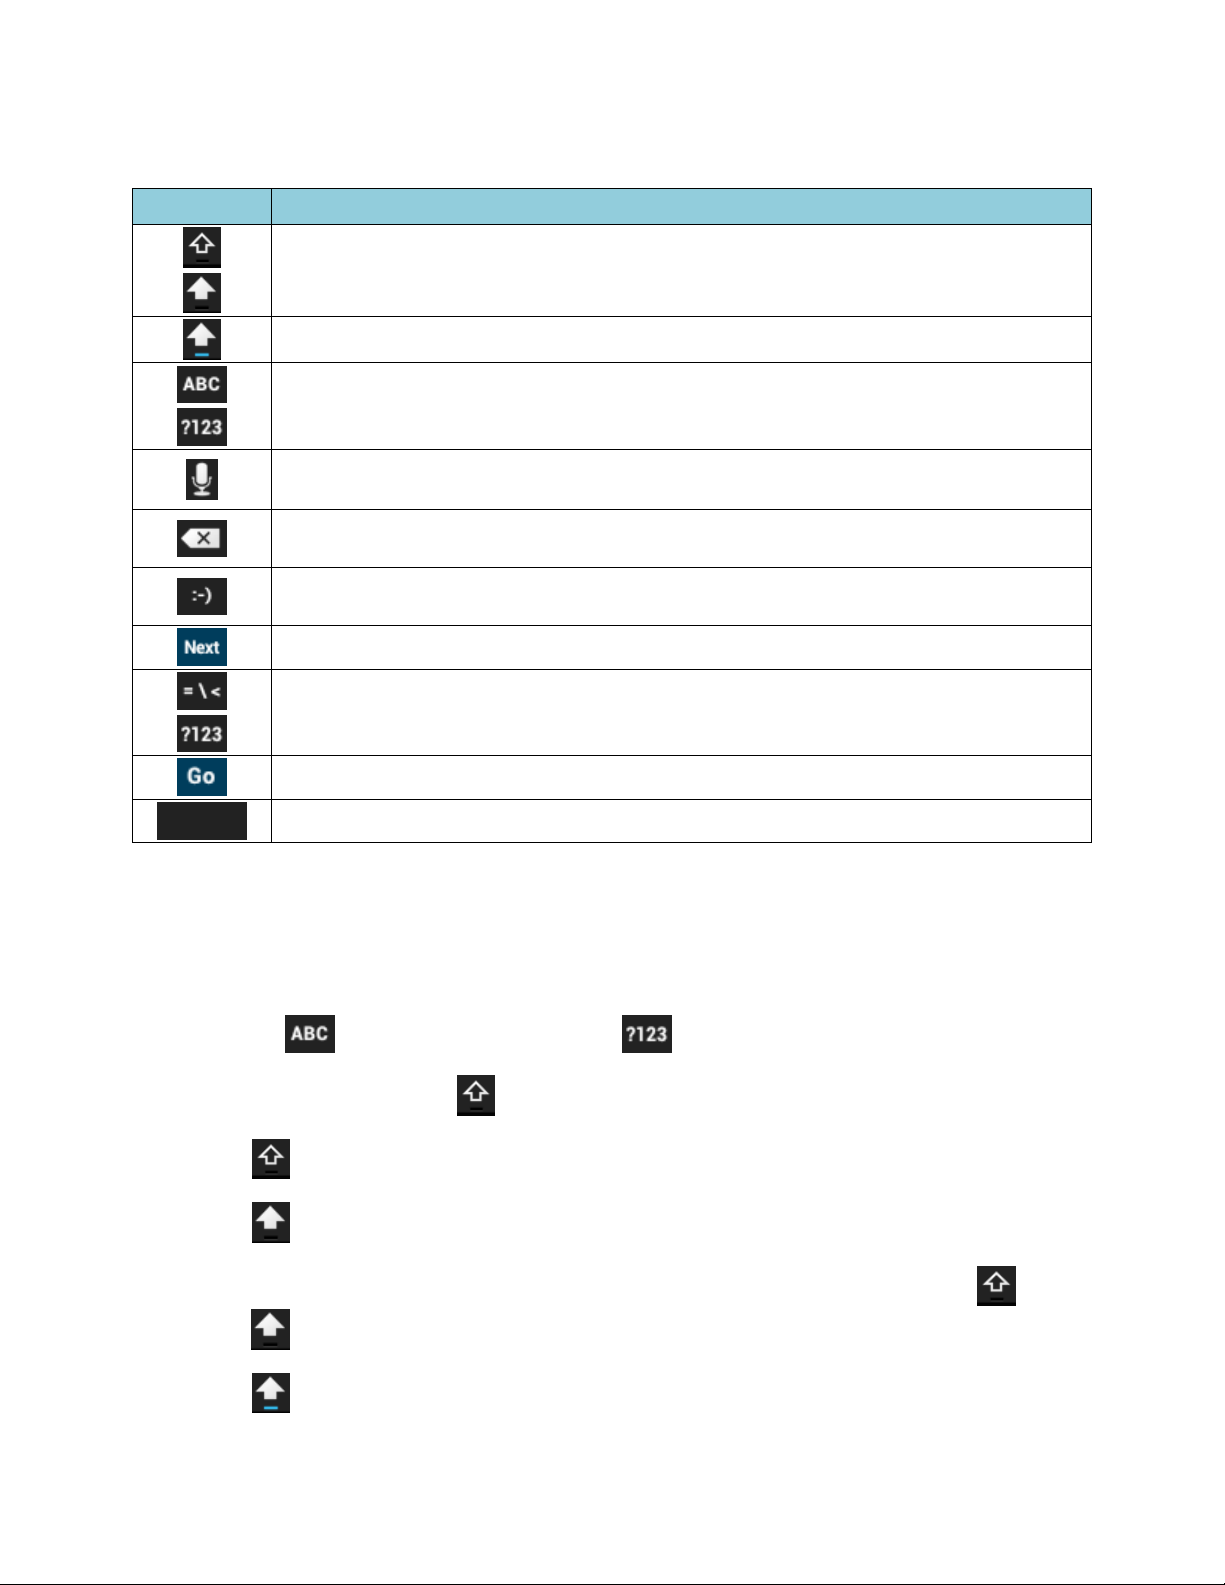
Key
Description
Shift: Touch to toggle between lower case and upper case.
Capslock: Double-touch the lower case or upper case shift key.
Text mode: Touch to toggle between the Alphabet keyboard and Number &
Symbol keyboard.
Voice input mode: Touch to enter text using your voice.
Backspace: Touch to delete a character. Touch and hold to delete multiple
characters.
Smiley: Touch to insert a smiley. Touch and hold to view and select other
smileys.
Next: Touch to go to the next text entry field.
Alternate: Touch to toggle between the default Number & Symbol keyboard
and additional Number & Symbol keyboard.
Go: Touch to go to a Web address.
Space: Touch to insert a space. Touch and hold to select the input method.
Keyboard Functions
Text Mode
ABC mode is primarily used for entering letters while Number & Symbol mode for numbers
and symbols.
►
Touch to select ABC mode. Touch to select Number & Symbol mode.
In ABC mode, touch to alter the capitalization:
(Unshifted) to enter all letters in a word lowercase.
(One-character-shifted) to capitalize only the first letter of a word.
You can select the caps lock by double-touching or touching and holding or
to make all letters in a word uppercase.
(Caps Lock) to enter all letters in a word uppercase.
12
Page 22

In Number & Symbol mode, touch to display more symbols.
Some keys have alternate characters. In either mode, if a key displays an extra
character at the upper right corner, touch and hold the key to enter the character.
Or, touch and long hold a key to call up a list of all the characters available on
that key. Touch the character you want to enter from the list.
Entering Text by Speaking
Voice input is an experimental feature that uses Google’s speech-recognition service, so you
must have a data or Wi-Fi connection to use it. The touchscreen keyboard displays when
voice input is turned on.
To turn on voice input:
1. Press Home > Menu and touch System settings > Language & input.
2. Select the Google voice typing check box.
3. Touch next to Android keyboard.
4. Touch Voice input key and select On main keyboard or On symbols keyboard.
To enter text by speaking:
1. Touch on the keyboard.
2. Say the text you wish to enter into the microphone and touch Done.
Adding a Word to the User Dictionary
1. Press Home > Menu and touch System settings > Language & input >
Personal dictionaries.
2. Select a language.
3. Touch .
4. Type the word you want to add and touch OK. (A list of words you have added to the
dictionary is displayed.)
Touch a word to edit it.
Touch to delete it.
13
Page 23

Android Keyboard Settings
1. On the Android keyboard, touch and hold the space key and touch Configure input
methods.
- or –
Press Home > Menu and touch System settings > Language & input.
2. Touch next to Android keyboard.
Tip: You can also touch > Android keyboard settings on the Android keyboard. See
Show settings key to display this key on the keyboard.
3. Choose from the following options.
Input languages: Touch to select the input language. The dictionary for the
selected language will be enabled.
Auto-capitalization: Select to automatically set the first letter of a sentence to
upper case where available.
Swype
Vibrate on keypress: Select to activate vibration when a key is touched.
Sound on keypress: Select to activate a clicking sound when a key is touched.
Popup on keypress: Select to display a larger image of the key above it when you
touch it.
Show settings key: Select to display the keyboard settings key on the keyboard.
Voice input key: Touch to select where the Voice Input key is displayed from On
main keyboard, On symbols keyboard, or Off.
Add-on dictionaries: Touch to select the dictionary you want to use.
Auto correction: Touch to allow the space bar and punctuation to automatically
correct mistyped words.
Show correction suggestions: Touch to select when correction suggestions are
displayed.
Advanced settings: Touch to open the settings for expert users.
Swype® allows you to enter text by sliding your finger from letter to letter rather than
touching each key individually.
14
Page 24

Swype Keyboard Overview
Note: Key appearance may vary depending on the selected application or text field.
15
Page 25
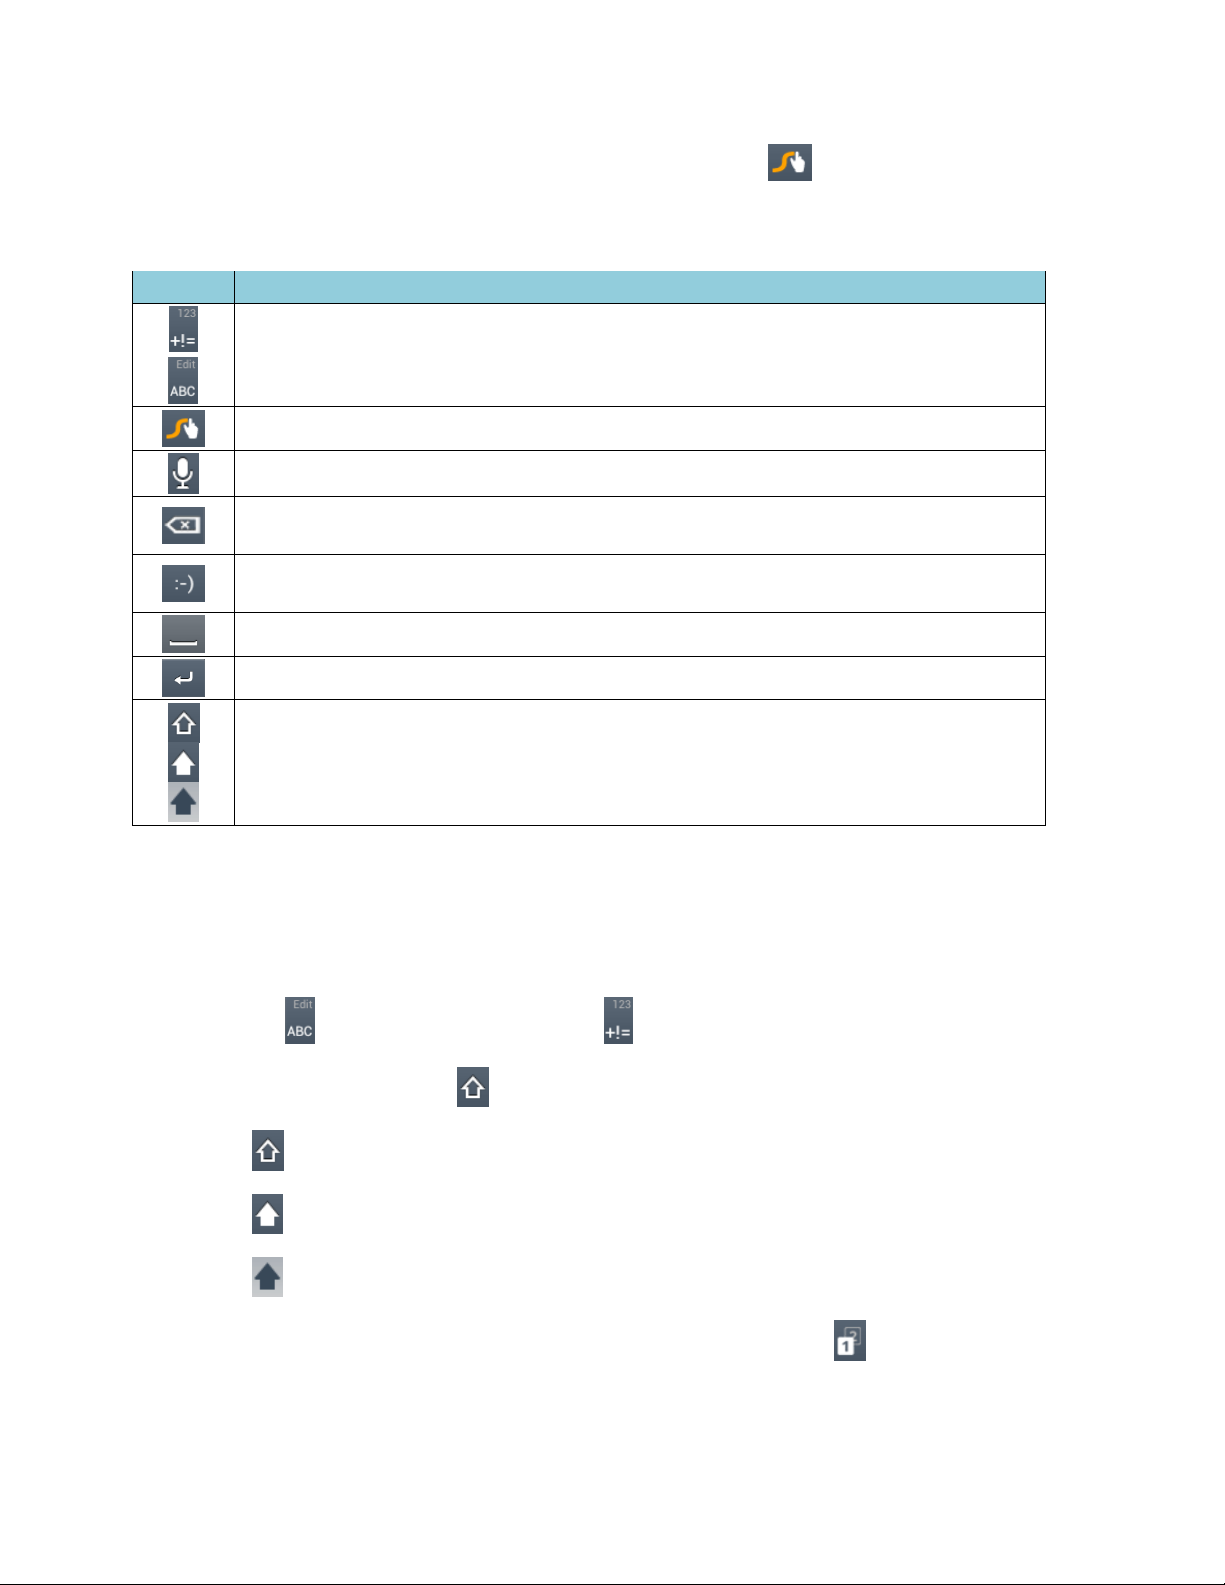
Key
Description
Text mode: Touch to toggle between the Alphabet keyboard and Number &
Symbol keyboard.
Swype: Touch and hold to access the tips or the settings of Swype.
Voice input mode: Touch to enter text using your voice.
Backspace: Touch to delete a character. Touch and hold to delete multiple
characters.
Smiley: Touch to insert a smiley. Touch and hold to view and select other
smileys.
Space: Touch to insert a space.
Enter: Touch to confirm your entry.
Shift: Touch to toggle between the lowercase, uppercase and caps lock text
input.
Tip: For tips on using Swype, touch and hold the Swype key and then touch How to
Swype.
Keyboard Functions
Text Mode
ABC mode is primarily used for entering letters while Number & Symbol mode for numbers
and symbols.
►
Touch to select ABC mode. Touch to select Number & Symbol mode.
In ABC mode, touch to alter the capitalization:
(Unshifted) to enter all letters in a word lowercase.
(One-character-shifted) to capitalize only the first letter of a word.
(Caps Lock) to enter all letters in a word uppercase.
The Number & Symbol keyboards are in two layers. Touch to display the
second keyboard.
16
Page 26
Some keys have alternate characters. In either mode, if a key displays an extra
character on the upper right corner, touch and hold the key to enter the character.
Or, touch and long hold a key to call up a list of all the characters available on
that key. Touch the character you want to enter from the list.
Entering Text by Speaking
You can use voice input to enter text by speaking anywhere that you can enter text with the
touchscreen keyboard.
1. Touch on the keyboard.
2. Say the text you wish to enter into the microphone.
Adding a Word to the User Dictionary
You can add new words into the dictionary.
1. On the Swype keyboard, touch and hold the Swype key .
- or -
Press Home > Menu and touch System settings > Language & input. Touch
next to Swype.
2. Touch Personal dictionary.
3. Touch , type the word you want to add, and touch . (A list of words you
have added to the dictionary is displayed.)
Touch a word to edit it.
To delete a word, touch , select a word and then touch > OK.
•
Touch to select all the words in the dictionary.
•
Touch to cancel deleting and go back to the previous screen.
Swype Settings
1. On the Swype keyboard, touch and hold the Swype key .
- or -
Press Home > Menu and touch System settings > Language & input. Touch
next to Swype.
17
Page 27

2. Choose from the following options:
Select Input Method: Touch to select the Swype or Android keyboard.
How to Swype: Touch to learn Swype in quick steps.
Personal dictionary: Touch to make your personal dictionary for Swype.
Preferences: Touch to show the following settings menu for Swype:
•
Audio feedback: Select to turn on sounds from Swype.
•
Vibrate on keypress: Select to activate vibration when a key is touched.
•
Show tips: Select to turn on a flashing indicator for quick help.
•
Auto-spacing: Select to automatically insert spaces between words.
•
Auto-capitalization: Select to automatically capitalize the first letter of
sentence-initial words within the specific text entry fields.
•
Show complete trace: Select to display the complete Swype path.
•
Word suggestion: Touch to activate word prediction when typing in Swype.
•
Speed vs. accuracy: Touch to set how quickly Swype responds to input.
•
Reset Swype’s dictionary: Touch to delete all the words you have added to
Swype’s dictionary.
•
Version: Displays the current Swype version.
Language Options: Touch to select the language to use on Swype.
Copying and Pasting Text
To copy and paste the text:
1. Open the application or received message that you want to copy text from.
2. Touch and hold the text body. Selection tabs appear, and the currently selected
words or characters are highlighted. Drag the tabs to expand or reduce the range of
the selected text.
18
Page 28

Tip: Touch , , or SELECT ALL to select all the text on the Web page.
3. Touch or (Copy).
4. Open the application that you want to paste the text to.
5. Touch and hold the text box where you want to paste the text to, and touch PASTE.
If you want to add the selected text to the current text, drag a selection tab to the
position where you want to insert the selected words or characters.
To copy text from a Web page:
1. Scroll to the area of the Web page containing the text you want to select.
2. Touch and hold the text you want to copy. Drag tabs to expand or reduce the range of
selected text. Any selected text will appear highlighted.
Tip: Touch SELECT ALL to select all the text on the Web page.
3. Touch > Copy.
4. Open the application that you want to paste into.
5. Touch and hold the text box where you want to paste the text to, and touch PASTE.
To copy a URL:
1. To copy a URL, touch and hold the URL to display the options menu.
2. Touch Copy link URL or .
3. Open the application that you want to paste into.
4. Touch and hold the text box where you want to paste the URL to, and touch PASTE.
19
Page 29

Phone
Make Phone Calls
Call Using the Phone Dialpad
1. Press Home and touch to display the phone screen.
If the dialpad is not displayed when the Phone application opens, touch the Phone
tab .
2. Touch the number keys on the dialpad to enter the phone number.
3. Touch the Talk key to call the number.
4. To end the call, touch .
Call From Call Log
1. Press Home and touch to display the phone screen.
2. Touch the Call Log tab to display the Call log list.
20
Page 30
3. Touch the phone icon next to the name or number you want to place a call.
4. For additional options, touch the name or number.
Call From People
1. Press Home and touch to display the phone screen.
2. Touch the People tab to display the People list.
The entries with phone numbers in People are listed.
The frequent entries in People are displayed at the top of the list.
3. Touch the entry you want to call.
Touch to search an entry in People.
Press Menu and touch Contacts to display to customize the People list. See
Display Options.
Call a Number in a Text Message
1. Press Home and touch > Messaging.
2. Touch the message with the phone number. The Phone screen opens with the phone
number automatically filled in and ready to be dialed.
3. Touch to place a call.
Call an Emergency Number
You can place calls to 911 even if the device’s screen is locked or your account is restricted.
To call the 911 emergency number:
1. Flick to unlock the screen, if the slide screen lock is on.
2. Touch on the Home screen.
3. Touch .
To call the 911 emergency number when the device’s screen is locked with a pattern, PIN, or
password:
1. Touch Emergency call on the screen.
21
Page 31

2. Touch .
Once an emergency call is placed, your device will be in Emergency mode for the following
five minutes after the call where non-emergency calls cannot be made.
To exit Emergency mode immediately:
►
Press Menu and touch Exit Emergency mode > Yes.
Enhanced 911 (E911) Information
This device features an embedded Global Positioning System (GPS) chip necessary for utilizing
E911 emergency location services where available.
When you place an emergency 911 call, the GPS feature of your device seeks information to
calculate your approximate location. Depending on several variables, including availability
and access to satellite signals, it may take up to 30 seconds or more to determine and report
your approximate location.
Important: Always report your location to the 911 operator when placing an emergency
call. Some designated emergency call takers, known as Public Safety Answering
Points (PSAPs), may not be equipped to receive GPS location information from
your device.
Call a Number with Pauses
You can dial phone numbers with pauses for use with automated systems, such as voicemail or
credit card billing numbers.
There are two types of pauses available on your device:
●
Add 2-sec pause: Automatically sends the next set of numbers after two seconds.
●
Add wait: Sends the next set of numbers when you touch Yes in the pop-up window.
1. Press Home and touch and enter all or part of a number.
2. Press Menu and touch Add 2-sec pause or Add wait.
3. Enter additional numbers.
4. Touch to dial the number.
Call Using the Plus (+) Code Dialing
When placing international calls, Plus Code Dialing automatically enters the international
access code for your location (for example, 011 for international calls made from the U.S.).
22
Page 32

1. Press Home and touch to display the phone screen.
2. Touch and hold until you see a “+” on the display screen.
3. Enter the country code and phone number, and then touch . The device
automatically prepends the access code for international dialing, followed by the
country code and phone number.
Call Using the Internet Calling
When Wi-Fi network is available, you can make and receive calls through an Internet calling
account.
Important: Calling a phone number using Internet calling may incur additional charges.
Adding an Internet Calling Account
1. Press Home and touch to display the phone screen.
2. Press Menu and touch Settings > Accounts > ADD ACCOUNT.
3. Enter your account details and touch SAVE.
4. To set your phone to receive Internet calls on your added account, select the Receive
incoming calls check box.
Note: This requires the phone to maintain a connection with a Wi-Fi data network, which
reduces the life of your phone’s battery.
Making an Internet Call
1. Press Home and touch > People.
2. Touch an entry and then touch Internet call.
Internet Calling Setting
1. Press Home and touch to display the phone screen.
2. Press Menu and touch Settings > Use Internet calling.
3. Select an option:
For all calls when data network is available to use Internet calling for all calls
when Wi-Fi network is available.
Only for Internet calls to use Internet calling only for calls to Internet calling
addresses.
23
Page 33

Ask for each call to ask each time you make a call.
Receive Phone Calls
When you receive a phone call from an entry stored in People, the Incoming call screen
appears and displays the caller ID icon, name, and phone number of the calling party. When
you receive a phone call from someone who is not stored in People, only the default caller ID
icon and phone number appear on the Incoming call screen.
Note: If your device is turned off, all calls automatically go to voicemail.
Answer an Incoming Call
►
On the Incoming call screen, flick the Answer icon .
Mute the Ringtone Without Rejecting a Call
►
Press the volume button up or down.
Reject an Incoming Call
►
Flick the Ignore icon to send the call to your voicemail inbox.
Reject a Call and Send a Text Message
►
Flick the Ignore & Text icon to ignore the call and send a message to the caller.
To edit a text message beforehand:
1. Press Home and touch .
2. Press Menu and touch Settings > Quick responses.
3. Touch a message, edit it and touch OK.
Voicemail
Your device automatically transfers all unanswered calls to your voicemail, even if your
device is in use or turned off. Set up your Voicemail to access the service.
Set Up Voicemail
1. Press Home and touch .
2. Touch and hold to dial your voicemail number.
24
Page 34

3. Follow the system prompts to:
Create your password.
Record your name announcement.
Record your greeting.
Important: Voicemail Password – It is strongly recommended that you create a password
when setting up your voicemail to protect against unauthorized access. Without
a password, anyone who has access to your device is able to access your
voicemail messages.
Voicemail Notification
There are several ways your device alerts you to a new voicemail message.
●
By sounding the assigned notification sound.
●
By vibrating the device.
●
By displaying in the notifications area of the status bar when new unheard
voicemail message(s) is received. The figure is the number of new messages. This icon
means you have 10 unheard new messages.
Note: Your device accepts messages even when it is turned off. However, your device
notifies you of new messages only when it is turned on and you are in the service area.
Retrieve Your Voicemail Messages
Use Your Device to Access Messages
1. Press Home and touch .
2. Touch and hold . If prompted, enter your voicemail password.
3. Follow the voice prompts to listen to and manage your voicemail messages.
Note: Depending on your plan, you may be charged when you are accessing your voicemail
from your wireless device.
Use Another Phone to Access Messages
1. Dial your wireless phone number.
2. When your voicemail answers, press the asterisk key (*) on the phone.
3. Enter your password.
25
Page 35

Voicemail Settings
1. Press Home and touch .
2. Press Menu and touch Settings.
3. Configure the following settings:
Touch Voicemail service to select the voicemail service provider.
Touch Voicemail settings to configure the voicemail number if necessary.
Touch Vibrate and select when the device responds with vibration to a new
voicemail message.
Phone Call Options
Caller ID
Caller ID identifies a caller before you answer the phone by displaying the number of the
incoming call.
To make a call without your number displayed:
1. Press Home and touch .
2. Touch .
3. Enter a phone number.
4. Touch .
Call Waiting
When you’re on a call, Call Waiting alerts you to incoming calls by sounding beeps. Your
device’s screen informs you that another call is coming in and displays the caller’s phone
number (if it is available).
To respond to an incoming call while you’re on a call:
►
Flick .
To switch back to the first caller:
►
Touch Switch calls.
26
Page 36

Call Waiting Settings
To activate or deactivate the Call Waiting setting:
1. Press Home and touch .
2. Press Menu and touch Settings > Call waiting.
3. Touch Activate or Deactivate. Your device will place a call to activate or deactivate
the setting.
3-Way Calling
With 3-Way Calling, you can talk to two people at the same time. When using this feature,
the normal airtime rates will be charged for each of the two calls.
1. On the Phone screen, enter a number and touch .
2. Once you have established the connection, touch Add call, and dial the second
number. (This puts the first caller on hold and dials the second number.)
3. When you’re connected to the second party, touch Merge calls.
If one of the people you called hangs up during your call, you and the remaining caller stay
connected. If you initiated the call and are the first to hang up, all callers are disconnected.
►
To end the 3-way call, touch .
Call Forwarding
Call Forwarding lets you forward all your incoming calls to another phone number – even when
your device is turned off. You can continue to make calls from your device when you have
activated Call Forwarding.
Note: You are charged a higher rate for calls you have forwarded.
To activate a Call Forwarding setting:
1. Press Home and touch .
2. Press Menu and touch Settings > Call forwarding.
3. Select when you want to forward a call.
4. Touch Activate.
5. Enter a phone number you want to forward your calls to by:
Typing the number using a keyboard.
27
Page 37

- or -
Touching and selecting the number from your People list.
6. Touch OK. Your device will place a call to activate the setting.
To deactivate a Call Forwarding setting:
1. Press Home and touch .
2. Press Menu and touch Settings > Call forwarding.
3. Select the setting you want to deactivate.
4. Touch Deactivate. Your device will place a call to deactivate the setting.
To cancel all Call Forwarding settings:
1. Press Home and touch .
2. Press Menu and touch Settings > Call forwarding > Cancel all. Your device will
place a call to cancel all the settings.
Other Call Settings
North American Dialing
1. Press Home and touch .
2. Press Menu and touch Settings.
3. Select the North American dialing check box when placing international calls while in
the United States or Canada. See Call Using the Plus (+) Code Dialing.
International Dialing
1. Press Home and touch .
2. Press Menu and touch Settings.
3. Clear the North American dialing check box and touch International dialing to set
the international dialing code when placing international calls from outside the
United States or Canada.
Auto Retry
With Auto Retry enabled, your device will automatically redial the number it failed to
connect to.
28
Page 38

To enable Auto Retry:
1. Press Home and touch .
2. Press Menu and touch Settings.
3. Select the Auto Retry check box.
TTY Mode
A TTY (teletypewriter, also known as a TDD or Text Telephone) is a telecommunications
device that allows people who are deaf, hard of hearing, or who have speech or language
disabilities to communicate by telephone.
Your device is compatible with select TTY devices. Please check with the manufacturer of
your TTY device to ensure that it supports digital wireless transmission. Your device and TTY
device will connect using a special cable that plugs into your device’s headset jack. If this
cable was not provided with your TTY device, contact your TTY device manufacturer to
purchase the connector cable.
To turn TTY mode on or off:
1. Press Home and touch .
2. Press Menu and touch Settings > TTY mode.
3. Touch TTY Full, TTY HCO, or TTY VCO to turn TTY mode on.
- or -
Touch TTY Off to turn TTY mode off.
Note: When enabled, TTY mode may impair the audio quality of non-TTY devices connected
to the headset jack.
Warning: 911 Emergency Calling
It is recommended that TTY users make emergency calls by other means,
including Telecommunications Relay Services (TRS), analog cellular, and
landline communications. Wireless TTY calls to 911 may be corrupted when
received by public safety answering points (PSAPs), rendering some
communications unintelligible. The problem encountered appears related to
TTY equipment or software used by PSAPs. This matter has been brought to the
attention of the FCC, and the wireless industry and the PSAP community are
currently working to resolve this.
Voice Privacy
You can enable the enhanced privacy mode.
29
Page 39

To enable Voice Privacy:
1. Press Home and touch .
2. Press Menu and touch Settings.
3. Select the Voice Privacy check box.
Call Timer
Your device displays the duration of your last call, outgoing calls, incoming calls, roaming
calls, etc.
To view a Call Timer:
1. Press Home and touch .
2. Press Menu and touch Settings > View call timer.
To reset a Call Timer:
1. Press Home and touch .
2. Press Menu and touch Settings > View call timer.
3. Touch and hold the item you want to reset and touch Reset > OK to reset individual
timer.
– or –
Touch Reset all timer > OK to reset all timers.
Note: You cannot reset Lifetime calls, which is the total duration of all the calls you have
made and received since the activation of the device.
Call Restrictions
You can restrict the phone calls your device can make and receive. Emergency calls will not
be affected by this restriction setting.
To restrict your calls:
1. Press Home and touch .
2. Press Menu and touch Settings > Call restrictions.
3. Touch Outgoing calls or Incoming calls.
4. Touch Allow all, Allow contacts, or Allow none.
30
Page 40

Note: If a pattern, PIN, or password is set for the screen lock, you need to enter the pattern,
PIN, or password to change the restriction settings.
DTMF Tones
Follow the steps below if you need to change the DTMF tones.
1. Press Home and touch .
2. Press Menu and touch Settings > DTMF Tones.
3. Select either Normal or Long.
In-Call Options
●
Add call: Touch to initiate a 3-way call.
●
End: End the current call.
●
Dialpad/Hide: Toggle the appearance of the onscreen dialpad to enter additional
numbers, for example, an extension or access code.
For example: When you call your bank’s 800 number, use your dialpad to enter
your account number and PIN.
●
Mute: Mute ( ) or unmute ( ) the microphone during an active call.
●
Speaker: Route the device’s audio through the speaker ( ) or through the earpiece
( ).
31
Page 41

Warning: Because of higher volume levels, do not place the device near your ear during
speakerphone use.
Press Menu during a call to display a list of additional in-call features. Touch an option
to select it.
●
Contacts: Displays your People list.
●
Bluetooth: Routes the device’s audio through a connected Bluetooth headset when
selected.
Call Log
The Call log tab of the Phone application lists max. 500 recent incoming, outgoing, and
missed calls.
View Recent Calls
1. Press Home and touch to display the phone screen.
2. Touch to display the Call log list.
You can determine if an entry was an incoming, outgoing, or a missed call from the
icons shown below.
= Incoming Call
= Outgoing Call
= Missed Call
Call Log Options
To make a call from Call log, see Call From Call Log.
For additional options:
1. Press Home and touch to display the phone screen.
2. Touch to display the Call log list.
3. Touch the name to display the options list.
Touch to send a text message.
Touch to view an entry in People.
Touch to add the number to People.
32
Page 42

Press Menu and touch Remove from call log to remove the log.
Press Menu and touch Edit number before call to edit the number before
calling.
Clear Call Logs
1. Press Home and touch to display the phone screen.
2. Touch to display the Call log list.
3. Press Menu and touch Clear call log > OK.
33
Page 43

People
The People application lets you store and manage contacts from a variety of sources,
including contacts you enter and save directly in your device as well as contacts synchronized
with your Google Account or compatible email programs.
Display People
►
Press Home and touch > People.
There are four tabs on People:
●
●
●
●
Groups to display the Group of entries.
All to display all entries.
Favorite to display your favorite entries.
ICE to display your ICE (in case of emergency) entry.
Scroll through the list to view all your entries. To see a specific entry, scroll to it and touch it.
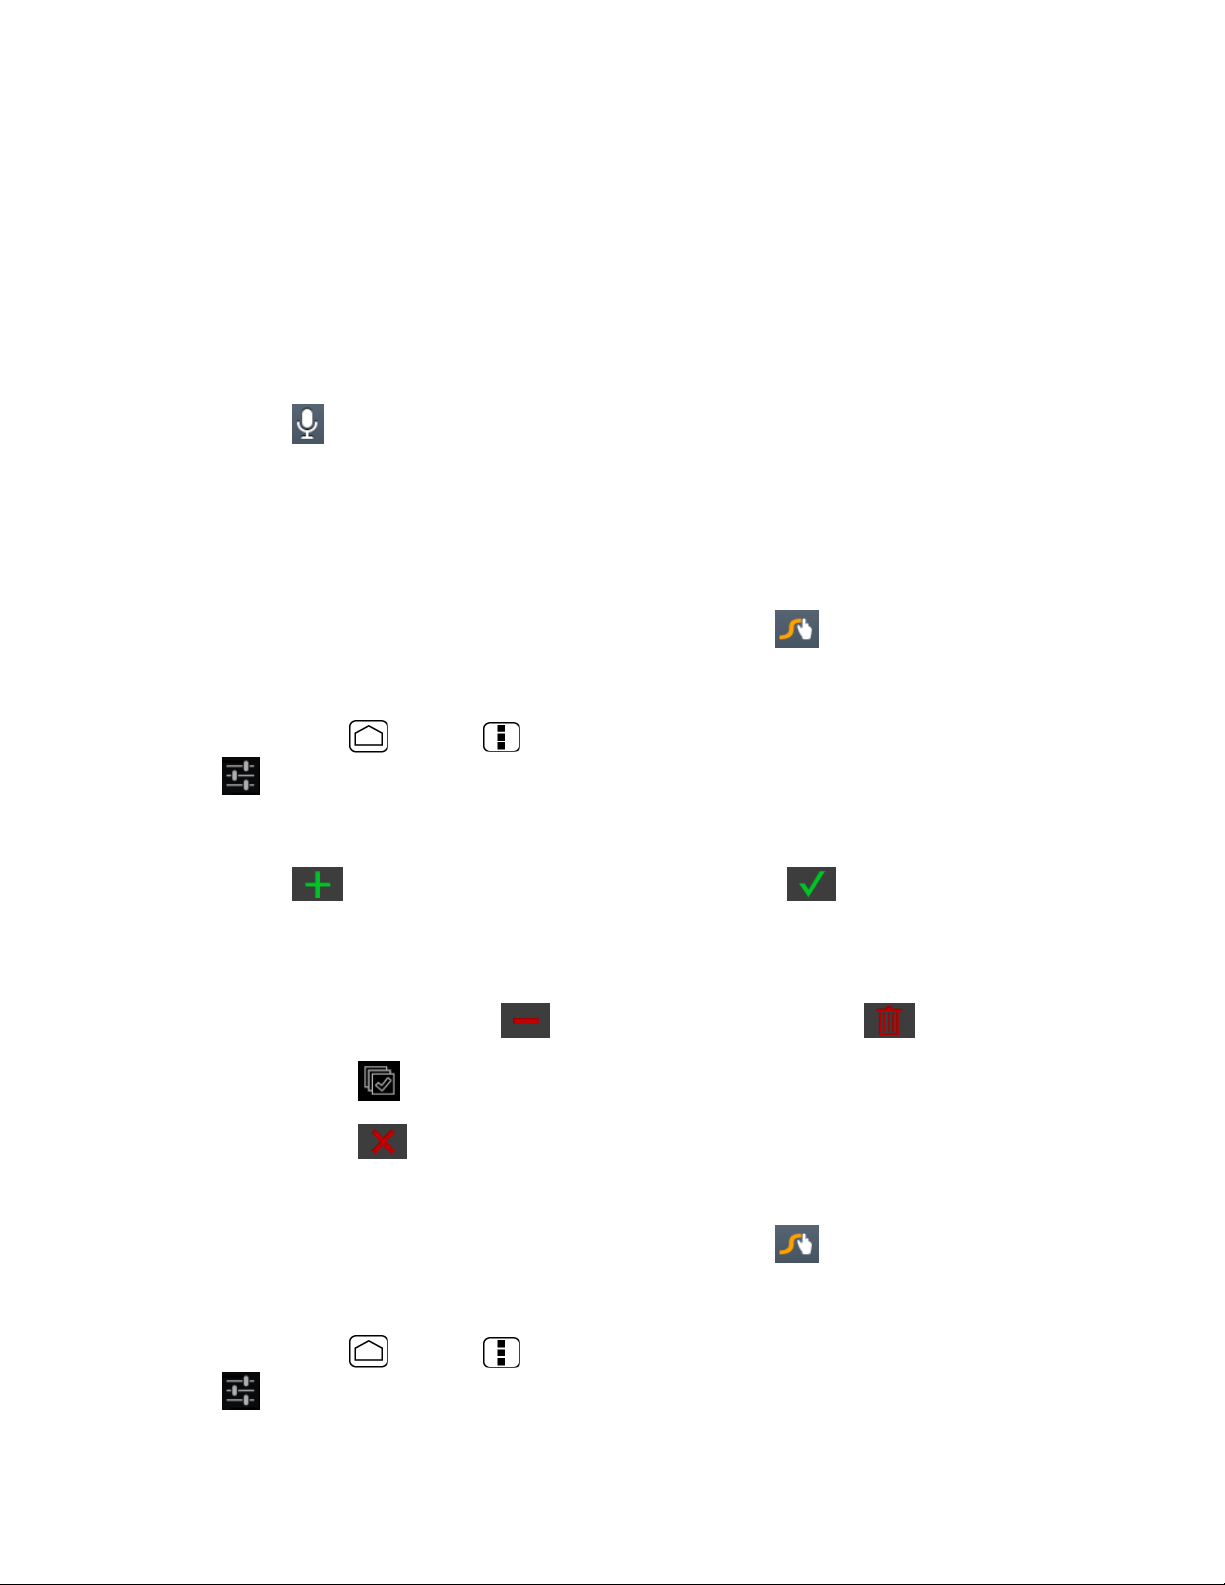
The People List Options
●
Touch to add an entry. See Add a New Entry to People.
●
Touch to search an entry.
34
Page 44

●
Press Menu :
Contacts to display: Selects the People list to be displayed. See Display Options.
Import/export: Imports/exports entries from/to the microSD card.
Accounts: Opens the Accounts & sync settings screen. See Accounts & Sync.
Settings: Opens the Display options page. You can select how your entries are
displayed. See Display Options.
Display Options
To select an account to display its People list when you have multiple accounts:
1. Press Home and touch > People > .
2. Press Menu and touch Contacts to display.
3. Select an account from the displayed list.
If you select All contacts, all the entries you save will be displayed.
To select the categories to display in the People list:
1. Press Home and touch > People > .
2. Press Menu and touch Contacts to display.
3. Touch Customize and select an account.
4. Select the categories and touch OK.
To select how your People list is displayed:
1. Press Home and touch > People.
2. Press Menu and touch Settings.
3. Set the following options:
Sort list by to choose how your entries are sorted.
View contact names as to choose how your entries name is displayed.
Add a New Entry to People
1. Press Home and touch > People.
35
Page 45

2. If this is the first time to open the People application, select where to save a new
entry:
Existing to save to your existing Google Account.
New to save to your new Google Account.
Not now to save to your device only.
3. Touch .
You may be prompted to select an account to synchronize the new contact with.
•
Select an account from the displayed list.
•
Touch Add new account to add a new account. Select Google or Corporate.
•
They will be synced automatically with your Google Account online.
4. Use the keyboard to enter as much information as you want.
(People icon): Touch to assign a photo to the entry. See Assign a Picture to
an Entry .
Name
Add organization
PHONE
EMAIL
36
Page 46

ADDRESS
Add another field: Touch to include additional information such as IM (address),
Notes, Nickname, Website, Internet call, etc.
Note: To select a type (label) for a phone number, email address, or postal address (such as
Mobile, Home, Work, etc.), touch the type to the right of the field.
Note: To add more phone numbers, email addresses, etc., touch Add new under the current
numbers or addresses.
5. When you have finished adding information, touch DONE.
Save a Phone Number From the Phone Dialpad
1. Press Home and touch > .
2. Enter a phone number, press Menu and touch Add to contacts.
3. To add the number to an existing entry, touch the contact, select a number type for
the new number, and then touch OK.
- or -
To add the number to a new entry, touch CREATE NEW CONTACT, enter the name
and any additional information, and then touch DONE. See Add a New Entry to
People.
Edit an Entry in People
Add or Edit Information on an Entry
1. Press Home and touch > People.
2. Touch an entry, press Menu and touch Edit.
3. Touch any field you want to change or add. See Add a New Entry to People.
4. Add or edit the information, and then touch DONE.
Note: To select a type (label) for a phone number, email address, or postal address (such as
Mobile, Home, Work, etc.), touch the type at the right of the field.
Assign a Picture to an Entry
The assigned picture will be displayed when the entry calls.
1. Press Home and touch > People.
37
Page 47

2. Touch an entry, press Menu and touch Edit.
3. Touch the entry icon to the right of the name.
4. To assign a stored picture, touch Choose photo from Gallery, select a location and
then select a picture.
- or -
To assign a new picture, touch Take photo and take a picture by touching . Touch
to continue if you are satisfied with the picture, or touch and take another
picture.
5. You may be prompted to size the picture for use with entries. Touch and drag the
square to frame the portion of the picture to use. Touch and drag the side of the
square to resize the square and touch CROP.
6. Touch DONE to save the entry.
Assign a Ringtone to an Entry
Identify the caller with an assigned ringtone to the entry.
1. Press Home and touch > People.
2. Touch an entry, press Menu and touch Set ringtone.
3. Touch an available ringtone.
When you touch a ringtone, you will hear a sample.
4. Touch OK to assign the ringtone.
Assign a Vibration to an Entry
1. Press Home and touch > People.
2. Touch an entry, press Menu and touch Set vibrate.
3. Touch an available vibration.
When you touch a vibration, you will feel a vibration.
4. Touch OK to assign the vibration.
Add an Entry to Favorites
1. Press Home and touch > People.
38
Page 48

2. Touch an entry.
3. Touch the star at the upper right corner. The star turns to white.
Send an Entry’s Call to Voicemail
You can transfer your entry’s voice call to voicemail anytime you receive it.
1. Press Home and touch > People.
2. Touch an entry and press Menu .
3. Select the All calls to voicemail check box.
Delete an Entry
1. Press Home and touch > People.
2. Touch an entry, press Menu and touch Delete.
3. Touch OK.
Synchronize the Entries in People
Syncing data from your managed accounts allows you to add and manage a new or existing
entry from your online or remote accounts to your device. Prior to syncing, you must first
have an active Google or Corporate account with the current entries in People, and be signed
into your account via the device.
With syncing, any entries (with phone numbers, email addresses, pictures, etc.) are updated
and synced with your device.
For more information about syncing existing managed accounts, see General Sync Settings.
1. Press Home > Menu and touch System settings > Accounts & sync.
2. Touch the account you want to sync your People with.
3. Select the Sync Contacts check box.
Note: The process of updating your People can take several minutes. If after 10-20 minutes,
your list has not been updated, repeat steps 2 and 3.
Your People then reflects any updated entry information.
This update process works both ways. For example, any changes on the device are
updated to your Gmail contacts list after sync.
39
Page 49

Share an Entry in People
You can quickly share the entries in People using Bluetooth, Email, or Gmail.
1. Press Home and touch > People.
2. Touch an entry, press Menu and touch Share.
3. In the Share contact via menu, select a method:
Bluetooth to send the information via Bluetooth. See Bluetooth for information on
pairing and sending via Bluetooth.
Email to send the information as an email attachment. If prompted, select an
email account. Address the message, add a subject and a message, and then touch
. See Compose and Send Email for details on sending email.
Gmail to send the information as a Gmail attachment. Address the message, add a
subject and a message, and then touch . See Send a Gmail Message for details.
40
Page 50

Accounts and Messaging
With the data service and your device’s messaging capabilities, you have the opportunity to
share information through many different channels and accounts.
Gmail
You will need a Google Account to access several device features such as Gmail, Google Talk,
and the Google Play Store applications. Before you can access Google applications, you must
enter your account information. These applications sync between your device and your online
Google Account.
Create a Google Account
If you do not already have a Google Account, you can create one online or by using your
device.
Note: Although you need a Gmail account to use certain features of your device, such as
Google Play Store, you do not need to use Gmail as the default account for your device.
Create a Google Account Online
1. From a computer, launch a Web browser and navigate to google.com.
2. On the main page, click Sign in > Create an account for free.
3. Follow the onscreen prompts to create your free account.
Create a Google Account Using Your Device
1. Press Home > Menu and touch System settings > Accounts & sync.
2. Touch ADD ACCOUNT > Google > New.
3. Enter your First name, Last name, and touch Next.
4. Enter your desired username, which will be the first part of your Gmail address, and
touch Next. The system will check the availability of the entered username.
If it is not available, enter another desired username and touch Try again. You can
also select an available username from the list of Suggested usernames. Touch
Touch for suggestions, touch a name and then touch Try again.
5. When prompted, enter and reenter a password and touch Next.
6. Create a security question and answer, enter a secondary email address to help you
recover your password if you ever lose it, and then touch Next.
41
Page 51

Note: When setting up a new Google Account, either on your device or online, you will be
prompted to add a secondary email address. Enter a second Gmail address or any
other email address from which you currently send and receive email. This address is
used to authenticate your account should you ever encounter problems or forget your
password. It is strongly encouraged for Android users so you can regain access to
Google Mobile™ services and purchases on your device.
7. Select if you join Google+ now.
8. Select account settings, read and accept Google Terms of Service, and then touch I
accept.
9. Type the displayed texts for authentication and touch Next.
10. Select if you save your credit card information now to enable purchases at the Google
Play Store.
11. If you do not want to use your Google Account to back up your apps, settings and
other data, clear the check box.
12. Touch Next. Your account is displayed on the list.
Sign In to Your Google Account
If you already have a Google Account, sign in with the account.
1. Press Home > Menu and touch System settings > Accounts & sync.
2. Touch ADD ACCOUNT > Google > Existing.
3. Enter your Gmail username and password, and then touch Sign in.
4. Select if you join Google+ now.
5. Select if you save your credit card information now to enable purchases at the Google
Play Store.
6. Select the items you want to sync with Google servers and touch Next.
Access Gmail
Your device allows you to access, read, and reply to all your Gmail messages.
1. Press Home and touch > Gmail.
42
Page 52

2. Do any of the following:
View more email messages: If the Inbox is full, swipe your finger up the screen to
view more messages and conversations.
Read a new email message: Touch the unread message or the conversation with an
unread message (just-arrived items display in bold).
Select messages and conversations: Touch the box before the email or
conversation.
View the Inbox of your other Gmail account. Touch Inbox at the top of the screen
and select the account you want to view its inbox.
Refresh the Inbox: Touch .
Send a Gmail Message
1. Press Home and touch > Gmail.
2. Touch .
3. Enter the message recipient’s email address in the To field. If you are sending the
email message to several recipients, separate the email addresses with a comma. As
you enter email addresses, any matching addresses from your People list are displayed.
Touch a match to enter that address directly.
Tip: You can enter a name saved in People to call up the email address. Touch a match
from an available list.
43
Page 53

Tip: If you want to send a CC or a BCC of the email to other recipients, press Menu
and touch Add Cc/Bcc.
4. Enter the subject, and then compose your message.
Note: If you want to attach a picture, press Menu and touch Attach picture. Locate
and then touch the picture you want to attach.
5. After composing your message, touch .
Note: While composing the message, press Menu and touch Save draft if you want to
send it later. To open a draft email, in the email account Inbox, touch Inbox (top of
the Gmail screen), and then touch Drafts.
Note: To view your sent messages in the Inbox, touch Inbox, and then touch Sent.
Read and Reply to Gmail Messages
1. Press Home and touch > Gmail.
2. Touch a message to display it.
Tip: You can also access new messages through the status bar. When a new Gmail message
arrives, you’ll see the icon in the status bar. Slide the bar down to display
notifications. Touch a message to display it.
3. To reply to or forward a message:
Touch to reply to the message.
Touch > Reply all to reply to all recipients.
Touch > Forward to forward the message.
4. After composing your message, touch .
Use the Email application to send and receive email from your webmail or other accounts,
using POP3 or IMAP. You can also access your corporate email and other features on your
device.
Add an Email Account (POP3 or IMAP)
You can add several types of personal email accounts, such as POP3 and IMAP accounts, on
your device.
44
Page 54

1. Press Home and touch > Email.
2. Enter the Email address and Password for the email account and then touch Next.
Important: If the account type you want to set up is not in the device database, you will
be asked to enter more details. You should get all pertinent information for the
email account, such as incoming and outgoing server settings, before you
proceed.
3. Confirm the Account settings and touch Next.
4. Enter the name to be displayed on your outgoing messages and touch Next. The inbox
of the account is displayed.
Add a Corporate Account
If you synchronize your device with your corporate account, you can read, manage, and send
email in the same easy way as with a POP3/IMAP account. However, you can also access some
powerful Exchange features.
Note: Before setting up a Microsoft® Exchange ActiveSync® account, contact your company's
Exchange Server administrator for required sign-in information.
1. Press Home > Menu and touch System settings > Accounts & sync.
2. Touch ADD ACCOUNT > Corporate.
3. Enter your Email address and Password information, and then touch Next. Consult
your network administrator for further details.
Email address: your corporate email address.
Password: typically your network access password (case-sensitive).
4. Enter Domain\Username, Password, and Server information and touch Next.
Domain\Username: enter your network domain\login username.
Password: typically your network access password (case-sensitive).
Server: your exchange server remote email address. Typically it is in the form
mail.XXX.com. Obtain this information from your company’s network administrator.
5. If your network requires SSL encryption, select the Use secure connection (SSL)
check box and activate this additional level of security. If your exchange server
requires this feature, leaving this field unselected can prevent connection.
6. If the onscreen activation disclaimer is displayed, touch Next.
45
Page 55

7. Configure your Inbox checking frequency, Days to sync (days to synchronize between
your device and server), and activate any other email settings, then touch Next.
Note: Signal interruptions or incorrect username or password information can cause
completion issues.
8. Identify your new account with a unique name and provide the outgoing name, then
touch Done.
Note: You can have multiple corporate email (Microsoft Exchange ActiveSync) accounts
active on your device.
Create Another Email Account
While you are viewing one email account, you can access the tool to create another email
account.
1. Press Home and touch > Email.
2. Press Menu and touch Settings > ADD ACCOUNT.
3. Enter the Email address and Password for the email account and then touch Next.
4. Confirm the Account settings and touch Next.
5. Enter the name to be displayed on your outgoing messages and touch Next. The inbox
of the account is displayed.
Compose and Send Email
Compose and send email using any account you have set up on your device. Increase your
productivity by attaching files such as pictures or videos to your email messages.
1. Press Home and touch > Email.
2. On the email account Inbox, touch .
Tip: Touch displayed email address to select a different email account.
3. Enter email addresses directly in the To field. If you’re sending the email to several
recipients, separate the email addresses with a comma. As you enter email addresses,
any matching addresses from your People list are displayed. Touch a match to enter
the address directly.
Tip: You can enter a name saved in People to call up the email address. Touch a match
from an available list.
Tip: If you want to send a CC or a BCC of the email to other recipients, press Menu
and touch Add Cc/Bcc.
46
Page 56

4. Enter the subject, and then compose your message.
5. To add an attachment, press Menu and touch Attach file, and choose from the
following options:
Pictures: Select photos from Gallery.
Videos: Select videos from Gallery.
Audio: Select sound files.
6. Touch to send the message immediately, or press Menu and touch Save
draft as draft if you want to send it later.
Note: To open a draft email, in the email account Inbox, touch Inbox (top of the Email
screen), and then touch Drafts.
View and Reply to Email
Reading and replying to email on your device is as simple as it is on your computer.
1. Press Home and touch > Email.
2. On the email account Inbox, touch the message you want to view.
3. Touch or > Reply all to reply to the message.
Manage Your Email Inbox
View Your Email Inbox
1. Press Home and touch > Email.
2. Touch the account whose mails you want to view.
Touch to search an email.
Touch to display folders.
Touch to refresh your email box.
Press Menu and touch Settings to display the Email settings. See Email
General Settings and Email Account Settings.
Refresh an Email Account
Whatever your automatic synchronization settings are, you can also synchronize your sent and
received email messages manually at any time.
47
Page 57

►
While in the account you want to synchronize, touch .
Delete an Email Message
1. On the email account Inbox, touch the message you want to delete (the message is
selected).
2. Touch .
Delete Multiple Email Messages
1. On the email account Inbox, touch the check box of the messages you want to delete.
2. Touch .
Email General Settings
You can edit the general settings of your email.
1. Press Home and touch > Email.
2. Press Menu and touch Settings > General.
Auto-advance: Choose which screen to show after you delete a message.
Message text size: Select the message text size.
Reply all: Select if you want to display “Reply all” option as default.
Ask to show pictures: Touch if you want to be asked before pictures in messages
to be displayed.
Email Account Settings
You can edit the settings of your individual email accounts, such as email address and
password, name display and signature, frequency of retrieval, and more.
1. Press Home and touch > Email.
2. Press Menu and touch Settings.
3. Select the account you want to edit the settings of.
4. Set the following options:
Account name: Edit your account name.
Your name: Edit your name displayed on your emails.
48
Page 58

Signature: Allows you to create an email signature for your outgoing emails.
Quick responses: Allows you to edit text you frequently insert when composing
emails.
Default account: Assign this account as the default email used for outgoing
messages.
Inbox check frequency: Touch to select the time interval used by your device to
check your new emails from Automatic (Push) (corporate only) Never, Every 5
minutes, Every 10 minutes, Every 15 minutes, Every 30 minutes, and Every
hour.
Days to sync: Sets a period of time to synchronize your account (corporate only).
Sync email: Select to synchronize your email (corporate account only).
Sync contacts: Select to synchronize your contacts (corporate account only).
Sync calendar: Select to synchronize your calendar (corporate account only).
Download attachments: Select if you want to automatically download
attachments via Wi-Fi.
Email notifications: Activates the email notification icon to appear within the
notifications area of the status bar when a new email is received.
•
Choose ringtone: Plays a selected ringtone once a new email message is
received.
•
Vibrate: Activates a vibration once a new email message is received.
Incoming settings: Adjusts the incoming email parameters, such as username,
password, and other incoming connection parameters (ex: IMAP server).
Outgoing settings: Adjusts the outgoing parameters, such as username, password,
and other outgoing connection parameters (ex: SMTP server, not for a corporate
account).
Out of office settings: Sets your current status and your message to reply
automatically when you leave your office (corporate account only).
Remove account: Touch to remove the account.
Delete an Email Account
If you no longer want an email account on your device, you can delete it through the mail
settings menu.
49
Page 59

1. Press Home and touch > Email.
2. Press Menu and touch Settings.
3. Select the account you want to delete.
4. Touch Remove account > OK.
Text Messaging and MMS
With Text Messaging (SMS), you can send and receive instant text messages between your
wireless device and another messaging-ready phone.
Multimedia messages, or MMS, can contain text and pictures, recorded voice, audio or video
files, or picture slideshows.
See your service plan for applicable charges for messaging.
Compose Text Messages
Quickly compose and send text messages on your device.
1. Press Home and touch > Messaging.
2. On the Messaging screen, touch . The compose screen opens.
3. Fill in one or more recipients.
Enter phone numbers or email addresses in the To field. If you’re sending the
message to several recipients, separate the phone numbers or email addresses
with commas. As you enter information, any matching phone numbers or addresses
from your People list are displayed. Touch a match to enter that number or
address.
Tip: You can call up a phone number or email address by entering a name saved in People.
Touch a match from an available list.
50
Page 60

4. Touch Type message and then start composing your message.
Tip: You can add a subject line by pressing Menu and then touching Add subject.
5. When done, touch to send the text message.
Send a Multimedia Message (MMS)
When you need to add a little more to a text message, you can send a multimedia message
(MMS) with pictures, recorded voices, or audio or video files, or slideshows.
1. Press Home and touch > Messaging.
2. On the Messaging screen, touch . The compose screen opens.
3. Fill in one or more recipients.
Enter phone numbers or email addresses in the To field. If you’re sending the
message to several recipients, separate the phone numbers or email addresses
with commas. As you enter information, any matching phone numbers or addresses
from your People list are displayed. Touch a match to enter that number or
address.
Tip: You can call up a phone number or email address by entering a name saved in People.
Touch a match from an available list.
4. Touch Type message and then start composing your message.
Tip: You can add a subject line by pressing Menu and then touching Add subject.
51
Page 61

5. Touch and select from the following file attachments.
Pictures: Open Gallery to attach a photo from your storage card.
Capture picture: Run the camera application to take a photo and attach it.
Videos: Open Gallery to attach a video from your storage card.
Capture video: Run the camcorder application to take a video and attach it.
Audio: Select a ringtone and attach it.
Record audio: Run the voice recorder application to create a recording and attach
it.
Slideshow: See Create a Slideshow for details.
6. To make changes to your attachment, touch Replace or Remove.
7. Touch to send the MMS message.
Create a Slideshow
In a multimedia message, you can add slides, each containing a photo, video, or audio.
1. In the multimedia message you’re composing, Touch > Slideshow.
2. To compose your slideshow, do any of the following.
Touch Add slide to create a new slide. (This is a placeholder for new images to be
added, similar to a playlist.)
Touch the created slide (example, Slide 1), touch Add picture, and then select the
picture you want to add to the slide.
Touch the text field below the image to enter a caption for the picture.
Touch Preview (to preview the slide), Replace picture (to delete the currently
selected picture), Remove slide, or press Menu and touch Add music, Add
slide, Duration, or Layout.
When finished, touch Done to attach the slideshow to your message.
3. When you have finished composing the multimedia message, touch Send.
Save and Resume a Draft Message
While composing a text or multimedia message, press Back and touch Yes to save your
message as a draft.
52
Page 62

To resume composing the message:
1. On the Messaging screen, touch the message to resume editing it. “Draft” in red
appears at the right of the message in the list.
2. When you finish editing the message, touch or if you add attachments to your
message, touch .
New Messages Notification
Depending on your notification settings, the device will play a ringtone, vibrate, or display
the message briefly in the status bar when you receive a new text or multimedia message. To
change the notification for new text and multimedia messages, see Text and MMS Options
for details.
A new message icon or also appears in the notifications area of the status bar to
notify you of a new text or multimedia message.
To open the message, slide the status bar down to open the Notifications panel. Touch the
new message to open and read it. For information on reading and replying to messages see
Managing Message Conversations.
Managing Message Conversations
Text and multimedia messages that are sent to and received from a contact (or a number) are
grouped into conversations or message threads in the Messaging screen. Threaded text or
multimedia messages let you see exchanged messages (similar to a chat program) with a
contact on the screen.
To read a text message:
►
Do one of the following:
On the Messaging screen, touch the text message or message thread to open and
read it.
If you have a new message notification, slide the status bar down to open the
Notifications panel. Touch the new message to open and read it.
To return to the Messaging screen from a text message thread, press Back .
Note: To view the details of a particular message, in the message thread, touch and hold the
message to open the options menu, and then touch View details.
Note: If a message contains a link to a Web page, touch the message and then touch the link
to open it in the Web browser.
53
Page 63

Note: If a message contains a phone number, touch the message to dial the number or touch
and hold the message to add it to your People list.
To view a multimedia message (MMS):
1. Press Home and touch > Messaging.
2. On the Messaging screen, touch a multimedia message or message thread to open it.
3. Touch the attachment to open it.
Tip: To save the attachment, touch and hold the message, and then touch Save
attachment on the options menu.
Note: When Auto-retrieve in MMS settings is disabled, only the message header is
downloaded. To download the entire message, touch the Download button. For details,
see Text and MMS Options.
To reply with a multimedia message (MMS):
1. Press Home and touch > Messaging.
2. On the Messaging screen, touch a text or multimedia message thread to open it.
3. Touch the text box at the bottom of the screen, enter your reply message, attach files
and then touch .
To delete a message thread:
1. Press Home and touch > Messaging.
2. On the Messaging screen, touch and hold the message thread that you want to delete.
3. Touch .
4. When prompted to confirm, touch Delete.
To delete a single message:
1. While viewing a message thread, touch and hold the message that you want to delete.
2. From the options menu, touch Delete.
3. When prompted to confirm, touch Delete.
When you have received a message from someone stored in your People, you can touch the
entry’s photo or icon in the message thread to open a menu of options. Depending on the
stored entry information, you can view the entry details, phone or send an email message to
the entry, and more.
54
Page 64

Text and MMS Options
The messages settings menu lets you control options for your text and MMS messages including
message limits, and notifications.
1. Press Home and touch > Messaging.
2. Press Menu and touch Settings. You can set the following options.
Storage Settings
●
Delete old messages: Automatically delete older messages, when the set limits are
reached.
●
Text message limit: Choose the maximum number of text messages to store in each
conversation thread.
●
Multimedia message limit: Choose the maximum number of MMS messages to store in
each conversation thread.
Text (SMS) Messages Settings
●
Delivery reports: Select this option to request a delivery report for each message you
send.
●
Emergency Alerts: Sets the federally supervised cell phone alert services to send out
SMS messages for public warning.
Presidential: Receives an emergency presidential alert. (Presidential is always
grayed out [not selectable] and cannot be excluded.)
Imminent Threat - Extreme: Select this option if you want to receive emergency
alerts of extreme emergency situations (extraordinary threats to life or property).
Imminent Threat - Severe: Select this option if you want to receive emergency
alerts of severe emergency situations (significant threats to life or property).
Amber: Select this option if you want to receive alerts related to missing or
endangered children.
Emergency Alerts Test: Select this option if you want to receive a test message to
make sure that the alert messages can be successfully received.
Help: Displays the help information for Emergency Alerts.
Multimedia (MMS) Messages Settings
●
Delivery reports: Select this option to request a delivery report for each message you
send.
55
Page 65

●
Read reports: Select this option to request a read report for each message you send.
●
Auto-retrieve: Select this option to automatically retrieve all your multimedia
messages completely. When selected, the multimedia message header plus the
message body and attachments will automatically download to your device. If you
clear this check box, only the multimedia message header will be retrieved and shown
in your Messaging screen.
Roaming auto-retrieve: Select this option to automatically retrieve all your
messages completely when roaming. This may incur significant phone charges.
Notifications Settings
●
Notifications: Select this option if you want to receive a notification in the status bar
when a new text or multimedia message arrives.
Choose ringtone: Select a ringtone that is specific to new text and multimedia
messages. Note that the ringtone briefly plays when selected.
Vibrate: Select when your device to vibrate when a new text or multimedia
message arrives.
Social Networking Accounts
Stay in touch on the go with all your social networking accounts.
YouTube
YouTube™ is a video sharing website on which users can upload and share videos. The site is
used to display a wide variety of user-generated video content, including movie clips, TV clips,
and music videos, as well as video content such as video blogging, informational shorts and
other original videos.
Opening YouTube
►
Press Home and touch > YouTube.
Note: If Terms of Service appears, touch Accept if you agree to the Terms of Service.
Watching YouTube Videos
1. On the YouTube screen, touch a video.
2. Touch the screen to show the progress bar at the bottom. Touch the screen while the
bar is displayed to pause/play the video. Move the slider on the bar to the left or
right to rewind or fast-forward the video.
56
Page 66

Searching for Videos
1. On the YouTube screen, touch at the upper right of the screen to open the
search box.
2. Enter the keyword to search. Search results appear below the status bar.
3. Touch one of the results, or touch or .
4. Scroll through the results and touch a video to watch it.
Google Talk
Google Talk is the instant messaging program provided by Google. Google Talk lets you chat
with other people that also have a Google Account. Your Google Talk account is based on the
Google Account set on your device.
Signing In and Chatting
You need to sign in to Google Talk before chatting.
►
Press Home and touch > Talk to open Google Talk.
Adding New Friends
You can only add people who have a Google Account.
1. On the friends list screen, touch .
2. Enter the Google Talk ID or the Gmail address of the person you want to add.
57
Page 67

3. Touch DONE.
Accepting or Declining Invitations
On the friends list screen, touch Chat invitation. When an invitation pop-up window appears,
touch Accept, Decline or Block.
Changing Your Online Status Message
1. On the friends list screen, touch your email address at the top of the list.
2. Touch the status and select the status you want from the menu.
3. Touch the text box below the online status, and then type your status message.
4. Press Back .
Starting a Chat
1. Touch a friend on the friends list.
2. Touch the text box, and then type your message.
3. Touch .
Switching Between Active Chats
You can conduct multiple chats at the same time and switch between active chats.
►
On the friends list, touch the friend you want to chat with.
Closing a Chat
To close the chat, do one of the followings.
►
On a chat screen, press Menu and touch End chat.
- or -
On the friends list screen, press Menu and touch End all chats. All the chats will
be closed.
Managing Your Friends
Friends on the friends list screen are sorted according to their online status and are listed
alphabetically.
Viewing the Friends List
You can sort your friends as you like.
58
Page 68

►
On the friends list screen, press Menu and touch Display option.
Availability to show friends that are available at the top of the list in order of how
frequently you chat with them.
Name to list your friends alphabetically.
Recency to show the friends that you have most recently chatted with first.
Blocking Friends
You can block friends from sending you messages.
1. On the friends list screen, touch the name of the friend you want to block.
2. Press Menu and touch Friend info > Block. That friend is removed from your
friends list and is added to the blocked friends list.
Unblocking Friends
1. On the friends list screen, press Menu and touch Settings and touch your
account.
2. Touch Blocked friends.
3. On the blocked friends list, touch the name of the friend you want to unblock.
4. Touch OK to confirm.
Mobile Indicators
Mobile indicators allow you to check your friend’s device.
Checking Friends’ Devices
You can see which devices your friends are using to chat in Google Talk.
●
If “On mobile device” appears below your friend’s name, it indicates that your friend
is using an Android phone.
●
If an email address is displayed, it indicates that your friend is using a computer.
Displaying a Mobile Indicator
You can choose to show a mobile indicator along with your name to let your friends know the
type of wireless device you are using.
1. On the friends list screen, press Menu and touch Settings.
2. Touch your account name and select the Mobile indicator check box.
59
Page 69

Signing Out
Follow the steps to sign out from the Google Talk.
►
On the friends list screen, press Menu and touch Sign out to sign out from Google
Talk.
Google Talk Settings
You can manage the Google Talk settings as you like.
1. On the friends list screen, press Menu and touch Settings.
2. Touch your account name and touch any of the following to change the settings.
Mobile indicator: Select to allow your friends to see the type of wireless device
you are using. See Mobile Indicators.
Away when screen off: Select to show your status as away when the screen is
turned off.
Invitation notifications: Select to show a notification in the status bar when
someone invites you to become a friend.
IM notifications: Select to show a new instant message icon on the status bar when
a new instant message is received.
Notification ringtone: Select if you want the device to ring when a new instant
message is received. On the ringtone menu, touch a ringtone to play the tone
briefly, and then touch OK to confirm selection. Select Silent if you do not want
the device to ring when a new instant message is received.
Vibrate: Select if you want the device to vibrate when a new instant message is
received.
Video chat notifications: Select if you want the device open a dialog or only to
show notification when a voice or video chat invitation arrives.
Video chat ringtone: Select if you want the device to ring when a new video chat
notification arrives. On the ringtone menu, touch a ringtone to play the tone
briefly, and then touch OK to confirm selection. Select Silent if you do not want
the device to ring when a new video chat notification arrives.
Vibrate: Select if you want the device to vibrate when a new video chat
notification arrives.
Blocked friends: Select to show your blocked friends list.
Clear search history: Select to delete the Google Talk search history.
60
Page 70

Manage account: Select to open the Accounts & sync settings menu.
Terms & privacy: Select to show the Google legal information.
61
Page 71

Applications and Entertainment
All of your device’s features are accessible through the Applications list. Touch the
applications launcher icon on the Home screen.
Google Play
Google Play™ is your digital content destination to discover Android apps, books, movies,
music and much more on your device and on the web.
To access the Google Play Store app, you must first connect to the Internet using your
device’s Wi-Fi or data connection and sign in to your Google Account. See Web and Data and
Sign In to Your Google Account for details.
Important: Cricket’s policies often do not apply to third-party applications. Third-party
applications may access your personal information or require Cricket to
disclose your customer information to the third-party application provider. To
find out how a third-party application will collect, access, use, or disclose your
personal information, check the application provider’s policies, which can
usually be found on their website. If you aren’t comfortable with the thirdparty application’s policies, don’t use the application.
Find and Install an App
When you install apps from the Google Play Store app and use them on your device, they may
require access to your personal information (such as your location, contact data, and more) or
access to certain functions or settings of your device. Download and install only apps that you
trust.
1. Press Home and touch > Play Store.
2. When you open the Google Play Store app for the first time, the Terms of Service
window will appear. Touch Accept to continue if you agree to the Terms of Service.
3. Find an app you want and touch it to open its details screen.
Note: The Google Play Store screen shots and options may vary depending on the version
installed on your device. Your Google Play Store app will update automatically when
available.
4. Touch an app to read a description about the app and user reviews.
5. Touch INSTALL (for free applications) or the price icon (for paid applications).
Note: You need a Google Wallet account to purchase items on Google Play. See Create a
Google Wallet Account to set up a Google Wallet account if you do not have one.
62
Page 72

6. The subsequent screen notifies you whether the app will require access to your
personal information or access to certain functions or settings of your device. If you
agree to the conditions, touch ACCEPT to begin downloading and installing the app.
If you selected a paid app, after touching ACCEPT, you’re redirected to the Google
Wallet screen to pay for the app before it’s downloaded to your device.
Warning: Read the notification carefully! Be especially cautious with apps that have
access to many functions or a significant amount of your data. Once you touch
OK on this screen, you are responsible for the results of using this item on your
device.
Create a Google Wallet Account
You must have a Google Wallet account associated with your Google Account to purchase
items from Google Play.
Do one of the following:
►
On your computer, go to wallet.google.com to create a Google Wallet account.
- or -
The first time you use your device to buy an item from Google Play, you’re prompted
to enter your billing information to set up a Google Wallet account.
Warning: When you’ve used Google Wallet once to purchase an app from the Google Play
Store app, the device remembers your password, so you don’t need to enter it
the next time. For this reason, you should secure your device to prevent others
from using it without your permission. (For more information, see Security.)
Request a Refund for a Paid App
If you are not satisfied with an app, you must ask for a refund within 15 minutes of purchase,
unless otherwise stated by the app developer. Your credit card is not charged and the app is
uninstalled from your device.
If you change your mind, you can install the app again, but you can’t request a refund a
second time.
1. Press Home and touch > Play Store.
2. Touch on the top left of the screen, or touch and hold the left end of the screen
and slide it to the right, and touch My apps.
3. Touch the application to uninstall for a refund. The details screen for the app opens.
4. Touch Refund. Your app is uninstalled and the charge is cancelled.
63
Page 73

Open an Installed App
There are several options for opening an installed app.
►
On the status bar, check if you see the icon. If you see the icon, open the
Notifications panel, and then touch the app to open it.
- or -
1. Press Home and touch .
2. On the All apps screen, locate the app, and then touch the icon.
Uninstall an App
You can uninstall any app that you have downloaded and installed from the Google Play Store
app.
1. Press Home and touch > Play Store.
2. Touch on the top left of the screen, or touch and hold the left end of the screen
and slide it to the right, and touch My apps.
3. On the INSTALLED screen, touch the app you want to uninstall, and then touch
UNINSTALL.
4. When prompted, touch OK to remove the app on your device.
- or -
1. Press Home > Menu and touch System settings > Apps.
2. Touch the DOWNLOADED tab and touch the app you want to uninstall, and then touch
Uninstall.
3. When prompted, touch OK to remove the app on your device.
4. Touch OK.
Get Help with Google Play
If you ever need help or have questions about Google Play, press Menu and touch Help.
The Web browser will take you to the Google Play Help Web page.
64
Page 74

Cricket Shop
Cricket Shop is where you may purchase games and applications. You must have Flex Bucket
funds available in order to make purchases from Cricket Shop. See
mycricket.com/support/topic/flex-bucket for details.
►
Press Home and touch > Cricket Shop.
Navigation
Your device offers a number of location-based navigation programs to help you figure out
where you are and get you where you’re going.
Note: You may be asked or redirected to enable your phone's location features for using
location-based apps, if you have not enabled them yet. See Location Services.
Google Maps
Use this application to find directions, location information, business addresses, etc., all right
from your device. Determine your current location with or without GPS, get driving and
transit directions, get phone numbers and addresses for local businesses.
Note: When you open the Google Maps apps for the first time, the Welcome to Google Maps
screen will appear. Touch Accept & continue if you agree to the Terms of Service and
Privacy Policy.
Opening Google Maps
►
Press Home and touch > Maps.
65
Page 75

Finding Your Current Location
Note: Don’t forget to set your location sources.
On the Google Maps screen, touch . A blue mark indicates your current location on the
map. This feature is available when Google’s location service or GPS satellites is enabled.
See Location Services.
Searching Maps
1. On the Google Maps screen, touch .
2. Type the place that you want to search. You can enter an address, a city, or type of
establishment.
Tip: Touch to search by speaking the location you are searching.
3. Touch a matching result on the drop-down list, or touch or on the
keyboard. A red marker appears on the map to indicate the location together with a
label at the bottom of the screen.
4. Touch the marker or the label to open the menu for the location.
Adding Map Layers
Layers allow you to view locations and additional information overlaid on the map. Some of
the layers are available in selected areas only.
►
On the Google Maps screen, press Menu :
Traffic: Provides real-time traffic information. The colors on the roads indicate the
traffic conditions.
Public Transit: Provides available transit information.
Bicycling: Provides possible cycling routes.
Satellite: Provides the hybrid view of road labels overlaid on a satellite image.
Google Earth: Launches the Google Earth app and displays your location in Google
Earth.
Note: Touch Settings, Help, Send feedback or Tips and Tricks for additional options.
Getting Directions
1. On the Google Maps screen, touch .
Touch to enter your home or work address.
66
Page 76

2. Specify the starting point and the destination:
The starting point is set to your current location as default. To change it, touch My
Location and type a new point in the Choose starting point... field or select a
point from the list.
Touch Choose destination… and type your destination or select a destination from
the list.
Touch to switch the starting point and the destination.
3. Select the way to get to the destination (by car, by train, or by foot).
You may touch or Options to configure available settings options.
4. Touch the result to see the details.
Cricket Navigator
Cricket Navigator gives you turn-by-turn directions onscreen and over speakerphone as well as
local search and maps.
►
Press Home and touch > Cricket Navigator.
Muve Music™
Muve Music™ offers unlimited music (full track downloads, ringtones and ringback tones) as
part of a new wireless rate plan. See Muve Reference Guide and visit mycricket.com/muve-
music for details.
►
Press Home and touch > MuveMusic.
Google Play Music
The Play Music app plays digital audio files saved on the storage card. You need to copy
music files to your storage card first to use the Music application. See Use the Device’s
microSD Card as a USB Drive for more details on copying files.
Note: If you have signed up for Google MusicTM, the first time you open the Play Music
application you will be prompted to select the account whose online music library you
want to access from the Google Play Music application. Follow the onscreen
instructions to continue.
Opening the Music Library
►
Press Home and touch > Play Music. The Listen Now screen appears.
67
Page 77

The Listen Now Screen
►
Touch I'm feeling lucky to play the music on your device in shuffle mode.
►
Touch an album image and then touch a song in the album to play it.
►
Press Menu on the device or touch on the screen for available options.
►
Touch to search for music.
The label of the currently played song appears at the bottom of the screen when you play
music. Simply touch or on the label or touch the label to display a screen with more
control menus to manage.
More Screens
You can play and manage music from other screens, too, in a similar way.
►
Touch on the top left of the screen, or touch and hold the left end of the screen
and slide it to the right, to display the screen options.
My Library: Your music is sorted by GENRES, ARTISTS, ALBUMS and SONGS.
Playlists: Your playlists are displayed.
Backing Up Your Downloaded Music Files
It is recommended that you back up your downloaded music files to your computer. Although
the downloaded files can only be played on your device and on your account, backing them up
to your computer lets you access the files in case your microSD card is lost or damaged, or if
you install a new microSD card. See microSD Card.
1. Connect your device to your computer using a USB cable.
2. Use your computer to navigate to the microSD card’s Music folder.
3. Select and copy the music files to a folder on your computer’s hard drive.
Mobile Web
Mobile Web allows you to access the many useful links on our Cricket Mobile Web deck, as
well as surf the mobile Internet. On-deck you will find quick and handy links to social
networking sites such as MySpace and Facebook, instant weather, horoscope and lottery links,
as well as many other sites including sports, news and shopping. See
mycricket.com/features-and-downloads/mobile-web for Cricket’s Mobile Web partners.
►
Press Home and touch > Mobile Web.
68
Page 78

Note: The Mobile Web service will not work in roaming coverage areas.
Note: Depending on your plan, you may be charged for using the Mobile Web service. Check
your plan at My Account.
Cricket411
Cricket411 is a Directory Assistance service where you can get useful information, including
residential, business, and government listings; movie listings or showtimes, and more.
Note: Depending on your plan, you may be charged for using the Cricket411 service. Check
your plan at My Account.
►
Press Home and touch > Cricket411.
My Account
My Account provides you with billing and account information from your device or online.
To access My Account from the application on your Cricket phone:
►
Press Home and touch > My Account.
To access My Account Online:
►
Launch a Web browser and navigate to account.mycricket.com.
Evolve Money
Evolve Money is the fast, easy, free way to pay all of your bills. You can access Evolve Money
directly from your phone.
►
Press Home and touch > Evolve Money.
69
Page 79

Web and Data
Your device’s data capabilities let you wirelessly access the Internet or your corporate
network through a variety of connections, including:
●
Wi-Fi
●
Data Services
This section addresses your device’s data connections and the built-in Web browser.
Additional data-related features can be found in Accounts and Messaging, Applications and
Entertainment, and Tools and Calendar.
Wi-Fi
Wi-Fi provides wireless Internet access over distances of up to 300 feet. To use your device’s
Wi-Fi, you need access to a wireless access point or “hotspot.”
The availability and range of the Wi-Fi signal depends on a number of factors, including
infrastructure and other objects through which the signal passes.
Turn Wi-Fi On and Connect to a Wireless Network
1. Press Home > Menu and touch System settings.
2. If is displayed at the right of Wi-Fi, Touch it to turn Wi-Fi on. is
displayed and the device will scan for available wireless networks.
3. Touch Wi-Fi. The network names and security settings (open network or secured with
WEP/WPA/WPA2 PSK) of detected Wi-Fi networks are displayed.
4. Touch a Wi-Fi network to connect. If you selected an open network, you will be
automatically connected to the network. If you selected a network that is secured,
enter the key, and then touch Connect.
Depending on the network type and its security settings, you may also need to enter more
information or choose a security certificate.
When your device is connected to a wireless network, the Wi-Fi icon ( ) appears in the
status bar and tells you the approximate signal strength. (The above icon indicates maximum
signal strength.)
If Network notification is enabled, this icon ( ) appears in the status bar whenever the
device detects an available open wireless network within range. Press Menu , touch
Advanced, and select the Network notification check box.
70
Page 80

Note: The next time your device connects to a previously accessed secured wireless network,
you will not be prompted to enter the security key again, unless you reset your device
to its factory default settings.
Note: Wi-Fi networks are self-discoverable, which means no additional steps are required for
your device to connect to a Wi-Fi network. It may be necessary to provide a username
and password for certain closed wireless networks.
Check the Wireless Network Status
1. Press Home > Menu and touch System settings > Wi-Fi.
2. Touch the wireless network that the device is currently connected to. You will see a
message box showing the Wi-Fi network name, status, speed, signal strength, and
other details.
Note: If you want to remove the wireless network settings, touch Forget on this window. You
need to enter the settings again if you want to connect to this wireless network.
Connect to a Different Wi-Fi Network
1. Press Home > Menu and touch System settings > Wi-Fi. Detected Wi-Fi
networks are displayed in the Wi-Fi networks section. To manually scan for available
Wi-Fi networks touch SCAN.
2. Touch another Wi-Fi network to connect to it.
Note: If the wireless network you want to connect to is not in the list of detected networks,
scroll down the screen, and touch ADD NETWORK. Enter the wireless network settings
and touch Save.
Data Services
With your service, you are ready to start enjoying the advantages of data services. This
section will help you learn the basics of using your data services, including managing your
username, launching a data connection, and navigating the Web with your device.
Important: Certain data services requests may require additional time to process. While
your device is loading the requested service, the touchscreen keyboard may
appear unresponsive when in fact they are functioning properly. Allow the
device some time to process your data usage request.
Launch a Web Connection
Launching a Web connection is as simple as opening the browser on your device.
►
Press Home and touch > Browser. (Your data connection starts and you see
the home page.)
71
Page 81

Icon
Description
Your device is connected to the 3G network and is transferring data (for
example, when you are opening a Web page).
Your device is connected to the 3G network but is not currently transferring data
(for example, when you are viewing a Web page that is completely open).
Your device is connected to the 1x network and is transferring data (for
example, when you are opening a Web page).
Your device is connected to the 1x network but is not currently transferring data
(for example, when you are viewing a Web page that is completely open).
Note: Internet connections can be made either through the data service or via Wi-Fi
(configured within the Settings > Wi-Fi).
Tip: To change the device’s default launch page to your current page, press Menu
and touch Settings > General > Set homepage > Current page.
Note: The Browser automatically launches when a Web link is touched from within either an
email or text message.
Data Connection Status and Indicators
Your device displays the current status of your data connection through indicators at the top
of the screen. The following symbols are used:
In any state, you can receive incoming calls.
If you do not see an indicator, your device does not have a current data connection. To
launch a connection, see Launch a Web Connection.
Browser
Your device’s Web browser gives you full access to both mobile and traditional websites on
the go, using data service, or Wi-Fi data connections.
Learn to Navigate the Browser
Navigating through menus and websites during a data session is easy once you have learned a
few basics.
Note: Before you access the home page, you may be asked to enter your 10-digit wireless
phone number and touch OK. Entering your phone number is not required for access to
other Web pages.
Scrolling
As with other parts of your device’s menu, you’ll have to drag up and down to see everything
on some websites.
72
Page 82

To scroll through a website’s page:
►
In a single motion, touch and drag across or up and down a page.
Selecting
To select onscreen items or links:
►
Drag across a page, and then touch an item or onscreen link.
Links, which are displayed as underlined text, allow you to jump to Web pages, select special
functions, or even place phone calls.
Go Back
To go back one page:
►
Press Back on your device. Repeat this process to keep going back through your
Web page history of recently visited pages.
Go to a Web Page
1. Touch the Address field (top of the browser window) and enter a new Web address.
As you enter the address, possible matches are displayed within an onscreen list.
Touch an entry to launch the desired website.
2. Touch Go to launch the new page.
Note: Not all websites are viewable on your device.
Browser Menu
The browser menu offers additional options to expand your use of the Web on your device.
Open the Browser Menu
The browser menu may be opened anytime you have an active data session, from any page
you are viewing.
1. Press Home and touch > Browser.
2. Press Menu . You will see the browser menu.
73
Page 83

Options available within the browser menu include:
●
Stop: Stops loading the current Web page.
●
Refresh: Reloads the current Web page.
●
Forward: Returns you to a previously viewed page.
●
Bookmarks: Allows you to access and manage your bookmarks.
●
Save to bookmarks: Adds the currently viewed page as a bookmark.
●
Share page: Allows you to send a URL via Gmail, SMS, Email, or Bluetooth.
●
Find on page: Searches the current Web page for a word.
●
Request desktop site: Displays the PC site of the current Web page.
●
Save for offline reading: Saves the current Web page in cache to read it offline.
●
Settings: Lets you configure and manage your browser settings.
Select Text on a Web Page
You can highlight text on a Web page and copy it, search for it, or share it.
1. Scroll to the area of the Web page containing the text you want to select.
2. Touch and hold the text you want to copy. Drag tabs to expand or reduce the range of
selected text. Any selected text will appear highlighted.
74
Page 84

Tip: Touch SELECT ALL to select all the text on the Web page.
3. Touch and select the following options:
Copy to copy the selected text.
Share to share the selected text via Bluetooth, Gmail, messaging, etc.
Find to find the selected text on the Web page.
Web Search to search the selected text on Internet.
Adjust Browser Settings
You can change the settings for your browser, including setting your home page, and more.
1. Press Home and touch > Browser.
2. Press Menu and touch Settings > General.
3. Select from one of the following browser general settings:
Set homepage: Sets the current home page for the Web browser.
Form auto-fill: Fills out web forms with a single touch.
Auto-fill text: Sets up text to auto-fill in web forms.
Adjust Browser Privacy and Security Settings
You can adjust your browser’s privacy and security settings such as whether or not to save
passwords, history, or cache.
1. Press Home and touch > Browser.
75
Page 85

2. Press Menu and touch Settings > Privacy & security.
3. Select from one of the following browser privacy and security settings:
Clear cache: Deletes all currently cached data. Touch OK to complete the process.
Clear history: Clears the browser navigation history. Touch OK to complete the
process.
Show security warnings: Notifies you if there is a security issue with the current
website. Clear the check mark to disable this function.
Accept cookies: Allows sites that require cookies to save and read cookies from
your device.
Clear all cookie data: Clears all current browser cookie files. Touch OK to
complete the process.
Remember form data: Allows the device to store data from any previously filledout forms. Clear the check mark to disable this function.
Clear form data: Deletes any stored data from previously filled out forms. Touch
OK to complete the process.
Enable location: Allows sites to request access to your current location (using the
built-in GPS function).
Clear location access: Clears location access for all websites. Touch OK to
complete the process.
Remember passwords: Stores usernames and passwords for visited sites. Clear the
check mark to disable this function.
Clear passwords: Deletes any previously stored usernames or passwords. Touch OK
to complete the process.
Adjust Browser Accessibility Settings
You can adjust your browser’s accessibility settings such as font size or screen inversion.
1. Press Home and touch > Browser.
2. Press Menu and touch Settings > Accessibility.
3. Select from one of the following browser accessibility settings:
Force enable zoom: Overrides a website’s request to control zoom behavior.
Text scaling: Changes text size as you see on its preview screen.
76
Page 86

Zoom on double-tap: Enables zoom function by double-tapping the screen.
Minimum font size: Sets the minimum font size on the Web as you see on its
preview screen.
Inverted rendering: Inverts the screen image. Black becomes white and vice versa.
•
Contrast: When Inverted rendering is enabled, you can set the contrast using
the slider.
Adjust Browser Advanced Settings
You can adjust your browser’s advanced settings such as setting search engine or default
zoom.
1. Press Home and touch > Browser.
2. Press Menu and touch Settings > Advanced.
3. Select from one of the following browser advanced settings:
Set search engine: Sets the search engine. See Set Search Engine.
Open in background: New pages are launched in a separate page and displayed
behind the current one. Clear the check mark to disable this function.
Enable JavaScript: Enables javascript for the current Web page. Without this
feature, some pages may not display properly. Clear the check mark to disable this
function.
Enable plug-ins: Allows you to determine the way your device handles program
enhancements. Select Always on, On demand, or Off.
Website settings: Allows you to configure advanced settings for individual websites.
Default zoom: Sets the default browser viewing size. Choose from: Far, Medium,
or Close.
Open pages in overview: Provides an overview of recently opened pages.
Auto-fit pages: Allows Web pages to be resized to fit as much of the screen as
possible.
Block pop-ups: Prevents pop-up advertisements or windows from appearing
onscreen. Clear the check mark to disable this function.
Text encoding: Adjusts the current text encoding.
Reset to default: Resets the browser settings to default.
77
Page 87

Adjust Browser Bandwidth Management Settings
You can adjust your browser’s bandwidth management settings.
1. Press Home and touch > Browser.
2. Press Menu and touch Settings > Bandwidth management.
3. Select from one of the following browser bandwidth management settings:
Search result preloading: Allows browser to preload high confidence search
results in the background.
Load images: Displays images on Web pages.
Adjust Browser Labs Settings
You can adjust your browser’s labs settings.
1. Press Home and touch > Browser.
2. Press Menu and touch Settings > Labs.
3. Select from one of the following browser labs settings:
Quick controls: Opens the Quick controls and hides application and URL bars.
Fullscreen: Enables the full screen mode and hides the status bar.
Set Search Engine
You can select the default search engine.
1. Press Home and touch > Browser.
2. Press Menu and touch Settings > Advanced.
3. Touch Set search engine and select a search engine you want to use.
Create Website Settings
You can create settings for individual websites.
1. Press Home and touch > Browser.
2. Press Menu and touch Settings > Advanced > Website settings.
3. Touch the website you want to create the settings of. These advanced settings can be
configured for individual sites.
78
Page 88

4. Touch the settings (for example, Clear location access) to complete the process.
Reset the Browser to Default
You always have the option to restore your browser to its default settings.
1. Press Home and touch > Browser.
2. Press Menu and touch Settings > Advanced > Reset to default.
3. Touch OK to complete the process.
Set the Browser Home Page
Customize your Web experience by setting your browser’s home page.
1. Press Home and touch > Browser.
2. Press Menu and touch Settings > General > Set homepage.
3. Select the page you want to set as a home page. Touch Current page to select the
current page as the home page.
Read Web Page Offline
You can save Web pages for offline reading.
1. Press Home and touch > Browser.
2. Press Menu and touch Save for offline reading. The Web page will be saved in
SAVED PAGES of the bookmark.
To view the saved pages:
1. Press Home and touch > Browser.
2. Press Menu and touch Bookmarks.
3. Touch the SAVED PAGES tab and select the page you want to view. If you want to
view the page online, press Menu and touch Go live.
Manage Bookmarks
Make browsing easier by setting up and using custom bookmarks.
Show Bookmarks
1. Press Home and touch > Browser.
79
Page 89

2. Press Menu and touch Bookmarks. Three tabs are revealed:
BOOKMARKS: Displays a list of your current Web bookmarks.
HISTORY: Displays a record of your browsing history. These records are organized
into folders such as: Today, Yesterday, Last 7 days, and Most visited.
SAVED PAGES: Displays a list of websites you saved for offline reading. Touch an
entry to launch the selected page.
Create Bookmarks
1. Press Home and touch > Browser.
2. Open the Web page you want to bookmark.
3. Press Menu and touch Save to bookmarks.
4. Enter a descriptive name for the new bookmark.
5. Select an account you want to add the bookmark to.
6. Select where to save the bookmark and touch OK.
Create Bookmarks From History Tab
1. Press Home and touch > Browser.
2. Press Menu and touch Bookmarks.
3. Touch the HISTORY tab.
4. Locate the Web page you want to bookmark and touch the star icon next to it.
5. Edit the necessary info and touch OK.
Portable Wi-Fi Hotspot
Portable Wi-Fi Hotspot allows you to turn your device into a Wi-Fi hotspot.
Set Up Portable Wi-Fi Hotspot
1. Press Home and touch > Portable Wi-Fi hotspot > OK.
2. Touch Portable Wi-Fi hotspot and place a check mark in the adjacent field to activate
the service.
Using both data service and hotspot drains your device’s battery at a much faster
rate than when using any other feature combination.
80
Page 90

Note: The best way to keep using the device as a hotspot is to have it connected to a power
supply.
Important: Write down the passkey (password) for this WEP/WPA/WPA2 PSK
communication (shown onscreen).
Connect to Portable Wi-Fi Hotspot
1. Enable Wi-Fi (wireless) functionality on your target device (laptop, media device,
etc.).
2. Scan for Wi-Fi networks from the device and select your device hotspot from the
network list.
Your device name can be changed by pressing Home and then touching >
Portable Wi-Fi hotspot > Network SSID.
3. Select this device and follow your onscreen instructions to enter the passkey
(provided on the Portable Wi-Fi hotspot page).
4. Launch your Web browser to confirm you have an Internet connection.
Configure Mobile Hotspot
1. Press Home and touch > Portable Wi-Fi hotspot.
2. Set the following options:
Network SSID: Sets your network name.
Security: Sets the security level.
Password: Sets a password if necessary.
Maximum Wi-Fi clients: Sets the maximum Wi-Fi clients that can connect to your
device.
Auto off: Sets the length of time to elapse when your hotspot feature is disabled if
there is no device connected.
Channel: Selects the channel you want to use.
Press Menu and touch Advanced: Sets the advanced settings, such as local
router IP settings or DHCP server settings.
When the portable Wi-Fi hotspot is active and is ready to share its connection, the hotspot
icon appears on the status bar.
81
Page 91

Phone As Modem
You can tether your device to your computer with a USB cable to share your device’s Internet
connection with your computer.
1. Press Home > Menu and touch System settings > More… > Tethering &
portable hotspot.
2. Select the Phone as modem check box to turn on the tethered mode.
When the tethered mode is active, the tethered mode icon appears on the Notifications
panel.
If you want to use your device in tethered mode whenever it is connected to a PC, select
Phone as modem in Default connection type of PC connection. See PC Connection.
82
Page 92

Camera and Video
You can use the camera or camcorder to take and share pictures and videos. Your device
comes with a 3.2 megapixel camera that lets you capture sharp pictures and videos.
Take Pictures
Important: Make sure the microSD card is installed before you use the camera or camcorder.
All pictures or videos that you capture using your device are stored on the
microSD card. For more information on how to install a microSD card on your
device, see Install a microSD Card.
Open the Camera
Follow the instructions below to open the camera in photo mode and take photos.
►
Press Home and touch > Camera.
Tip: You can open the camera from the slide lock screen. Flick .
Camera Viewfinder Screen
83
Page 93

1. Camera mode icons: Displays the current camera modes.
2. Available shot: Displays the number of shots left available (depending on the capacity
of the microSD card).
3. Zoom slider: Drag this slider to change the zoom settings. You can also change the
zoom settings by pressing the volume button up or down.
4. Settings button: Reveals the additional camera mode buttons (8-12).
5. Thumbnail: Thumbnail of the latest image you took. Touch to view and manage.
6. Shutter button: Touch to take a picture.
7. Switch button: Touch to select camera or camcorder.
8. Close button: Touch to close the camera mode buttons (9-12) and return to the zoom
slider.
9. Flash mode button: Touch to select the flash mode.
10. White balance button: Touch this button to change the white balance to enable the
camera to capture colors more accurately by adjusting to your current lighting.
11. Scene mode button: Touch to select a scene mode.
Note: If you select items other than Auto, you cannot select Auto Exposure, Flash mode,
and White balance.
12. Camera settings button: Opens the camera settings menu and lets you change the
camera settings. For more information, see Camera/Video Settings.
Review Screen
After capturing a photo or video, touch the thumbnail and the review screen is displayed. You
can instantly share your photos or videos. See Share Photos and Videos. Touch the Gallery
icon to edit your photos or videos. See View Pictures and Videos Using Gallery.
84
Page 94

1. Gallery: Opens the Gallery application to edit your photos or videos.
2. Share: Displays the available applications to share your photos or videos.
Take a Picture
You can take high-resolution pictures using your device’s camera.
1. Press Home and touch > Camera.
2. Change the settings if necessary.
3. Frame your subject on the screen.
Tip: Hold the device vertically when taking portrait shots or hold the device horizontally
when taking landscape shots. Then you will not need to rotate the photo after
capturing it.
4. Touch to take the photo.
5. Choose what you want to do with the photo you’ve just taken. See Review Screen for
details.
Close the Camera
►
On the camera screen, press Home or Back .
Record Videos
Record high-quality videos (up to WVGA resolution) using your device’s video camera.
Video Viewfinder Screen
You’ll find the following controls on the video viewfinder screen.
85
Page 95

1. Thumbnail: Thumbnail of the latest image you took. Touch to view and manage.
2. Recorder button: Touch to take a video. Touch again to stop.
3. Zoom slider: Drag this slider to change the zoom settings. You can also change the
zoom settings by pressing the volume button up or down.
4. Switch button: Touch to select camera or camcorder.
5. Settings button: Reveals the additional video mode buttons (6-10).
6. Close button: Touch to close the video mode buttons (7-10) and return to the zoom
slider.
7. Flash mode button: Touch to select the flash mode.
8. White balance button: Touch this button to change the white balance to enable the
video to record colors more accurately by adjusting to your current lighting.
9. Video quality button: Touch to select a video quality.
10. Video settings button: Touch this button to change the video settings. For more
information, see Camera/Video Settings.
Record a Video
1. Press Home and touch > Camera.
2. Touch and then touch to activate camcorder mode.
3. Select MMS or Long video.
MMS: Select this option to attach the captured video to your mail. The quality will
be automatically set to QCIF (176x144) and the maximum length of a video is 30
seconds.
Long video: Select this option to capture a long video. The quality can be selected.
86
Page 96

4. Frame your subject on the screen.
5. Touch to start capturing video.
6. Touch to stop capturing.
7. Choose what you want to do with the video you’ve just captured. See Review Screen
for details.
Camera/Video Settings
Follow the steps below to change the camera/video settings.
1. Press Home and touch > Camera.
2. Touch and then touch to show the camera/video settings menu.
Store location: Stores the location information of the picture/video.
Picture size: Selects from: 3.2M(2048x1536), 2.0M(1600x1200),
0.8M(1024x768), VGA(640x480), or HVGA(480x320) (camera only).
Picture quality: Selects the quality of the pictures from: Super fine, Fine, or
Normal (camera only).
Color effect: Adds a color effect to the picture. Choose from: None, Mono, Sepia,
Negative, or Aqua.
Auto exposure: Selects the exposure metering range from: Frame average,
Center weighted, or Spot metering.
Restore defaults: Restores all of the camera/video settings to their default values.
View Pictures and Videos Using Gallery
Using the Gallery application, you can view photos and watch videos that you’ve taken with
your device’s camera, downloaded, or copied onto your microSD card.
For photos that are on your microSD card, you can do editing. You can also easily make a
photo as your contact picture or wallpaper and share photos with your friends.
Open Gallery
The Gallery application opens in the Albums view where your photos and videos organized by
albums for easy viewing.
►
Press Home and touch > Gallery.
87
Page 97

Photos or videos you took with the internal camera are stored in Camera album.
Folders in your storage card that contain photos and videos will also be treated as albums and
will be listed below Camera. The actual folder names will be used as the album names. If you
have downloaded any photos and videos, these will be placed in the download album.
When viewing pictures in Gallery, scroll left or right the screen to view more albums. Simply
touch an album to view the photos or videos in that album.
Note: Depending on the number of pictures stored on the microSD card, it may take some
time for Gallery to load all your photos on the screen.
View Photos and Videos
After selecting an album, you can browse through the photos and videos of that album in grid
view. Touch a photo or video to view.
88
Page 98

1. Touch to go back to the Gallery screen.
2. Name of the album.
3. Touch to show the slideshow of pictures in this album.
►
Press Menu to select pictures or sort pictures.
Zoom In or Out on a Photo
There are two ways you can zoom in or out of a photo.
►
Touch the screen twice quickly to zoom in, then touch the screen twice quickly again
to zoom out.
- or -
Pinch the screen using your thumb and forefinger to zoom out or spread the screen to
zoom in.
Watch a Video
Use the onscreen controls to play, pause, or stop the video.
►
Touch to play the video.
►
Touch to pause the video.
89
Page 99

Close Gallery
►
While in the Gallery screen, press Home .
Working with Photos
You can manage your photos or videos.
Photo Options Menu
With the picture displayed, press Menu to show the following menu.
Delete: Deletes the selected picture/video.
Slideshow: Starts the slideshow of the pictures stored.
Edit: Edits the picture. See Edit a Photo.
Rotate left/Rotate right: Rotates the picture.
Crop: Crops the picture. See Crop a Photo.
Details: Shows the details of the picture.
Set picture as: Sets the picture as the contact photo or wallpaper.
Show on map: Shows the location where you took the picture in Google Maps if
Store location is set to ON. See Camera/Video Settings.
Edit a Photo
Your device has a built in editing tool and you can alter the picture you took easily.
1. Press Home and touch > Gallery.
2. Touch an album and then touch a picture.
3. Press Menu and touch Edit.
90
Page 100

4. Touch the following icon to edit the picture and scroll left and right to select your
favorite effect.
5. When finished, touch SAVE.
to add exposure effect.
to add artistic effect.
to add color effect.
to add additional effect.
to undo the action.
to redo the action.
Rotate and Save a Photo
1. Press Home and touch > Gallery.
2. Touch an album and then touch a picture.
3. Press Menu and touch Rotate left or Rotate right.
Crop a Photo
1. Press Home and touch > Gallery.
2. Touch an album, and then touch a picture.
3. Press Menu and touch Crop. A crop box then appears on the photo.
91
 Loading...