

Page 1
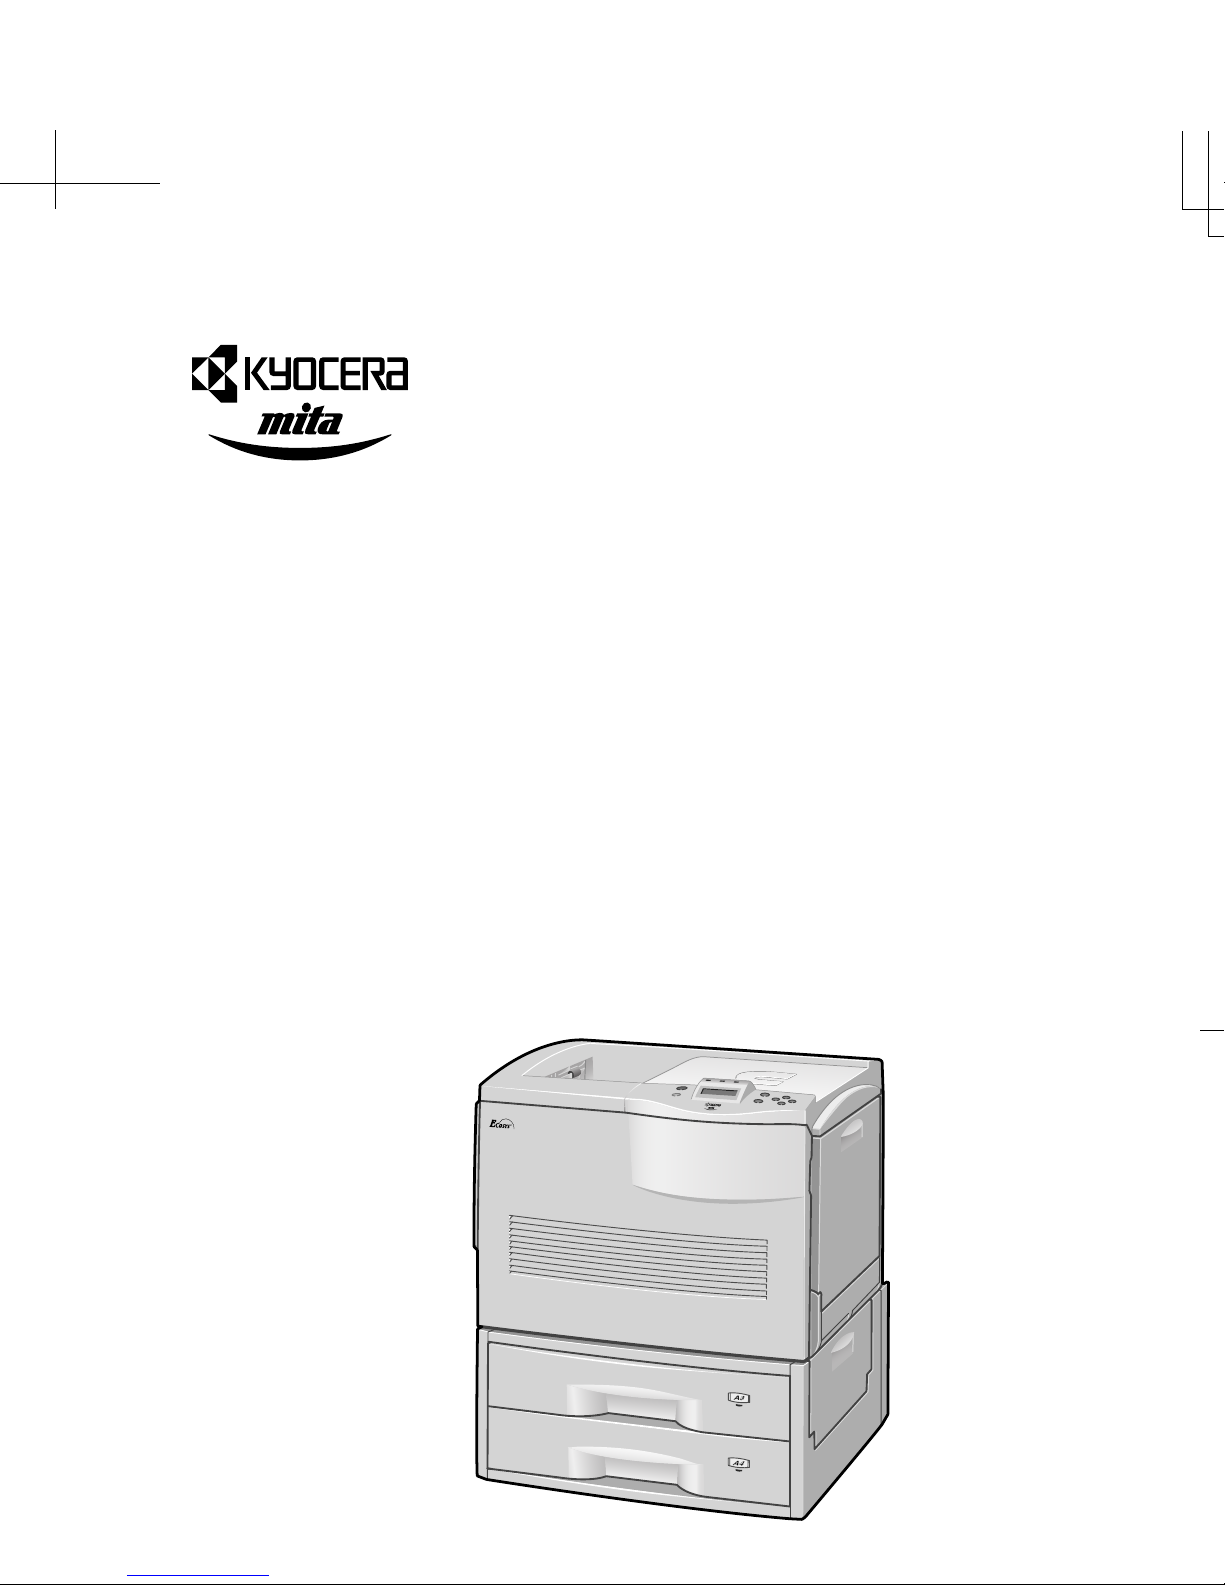
FS-C8008N
FS-C8008DN
Color Laser Printer
F
S
-C
8
0
0
8
N
FS-C8008N
F
S
-C
80
0
8
N
FS-C8008N
Page 2

Notice
NO LIABILITY IS ASSUMED FOR ANY DAMAGE CAUSED BY
IMPROPER INSTALLATION OF THE PRODUCT.
SOFTWARE USED WITH THIS PRINTER MUST SUPPORT THE
PRINTER’S NATIVE MODE OR ONE OF ITS EMULATION
MODES.
The information in this manual is subject to change without notification. Additional pages may be inserted in future editions. The
user is asked to excuse any technical inaccuracies or typographical errors in the present edition.
No responsibility is assumed if accidents occur while the user is
following the instructions in this manual. No responsibility is
assumed for defects in the printer’s firmware (contents of its readonly memory).
This manual, any copyrightable subject matter sold or provided
with or in connection with the sale of the page printer, are protected by copyright. All rights are reserved. Copying or other reproduction of all or part of this manual, any copyrightable subject
matter without the prior written consent of Kyocera Mita Corporation is prohibited. Any copies made of all or part of this manual,
any copyrightable subject must contain the same copyright notice
as the material from which the copying is done.
©2002 KYOCERA MITA CORPORATION. All rights reserved.
The names of actual companies and products mentioned herein
may be the trademarks of their respective owners.
Page 3

FS-C8008N
FS-C8008DN
Quick Reference
Guide
Page 4

Contents
Guide to the information about the printer .................................3
Understanding the Error Messages ...........................................4
Loading Paper .........................................................................14
Clearing Paper Jams ...............................................................18
[Paper Jam — Right Cover #] .....................................19
[Paper Jam — Cassette #] ..........................................19
[Paper Jam — MP Tray] .............................................20
[Paper Jam — Duplexer] .............................................20
[Paper Jam — Paper Transfer Unit] ............................21
[Paper Jam — Left Cover] ..........................................26
[Paper Jam — Option Stacker/Finisher/Sorter] ...........27
Toner Container Replacement ................................................28
Replacing the Toner Container ...................................29
Replacing the Waste Toner Box .................................31
Cleaning the Printer .................................................................33
Cleaning the Paper Transfer Unit ...............................33
Cleaning the Main Charger Unit ..................................35
2
Page 5

Guide to the information about the printer
The following documentation and CD-ROM are supplied:
Installation Guide This guide provides information on installing
the printer and other options before starting
to use.
Quick Reference
Guide (This brochure)
Operation Guide This guide is supplied as an online manual
KX Printer Drivers
Operation Guide
Software and Document CD-ROMs
This guide provides common information
about the printer such as loading paper,
understanding messages, etc. This guide can
be retained in the plastic pocket at the printer.
(PDF) in the CD-ROM. This guide fully details
the information on the printer features, hardware, troubleshooting, printer driver handling,
etc.
This guide is supplied as an online manual
(PDF) in the CD-ROM. This guide explains
how to install and configure the printer driver.
These CDs include the printer software for
Kyocera Mita printers such as printer drivers,
network printer monitors, and various software utilities. Also, these CDs include the
Operation Guides and other documents.
Web site The latest versions of printer drivers and utili-
ties are available for downloading at:
http://www.kyoceramita.com/download/
3
Page 6
Understanding the Error Messages
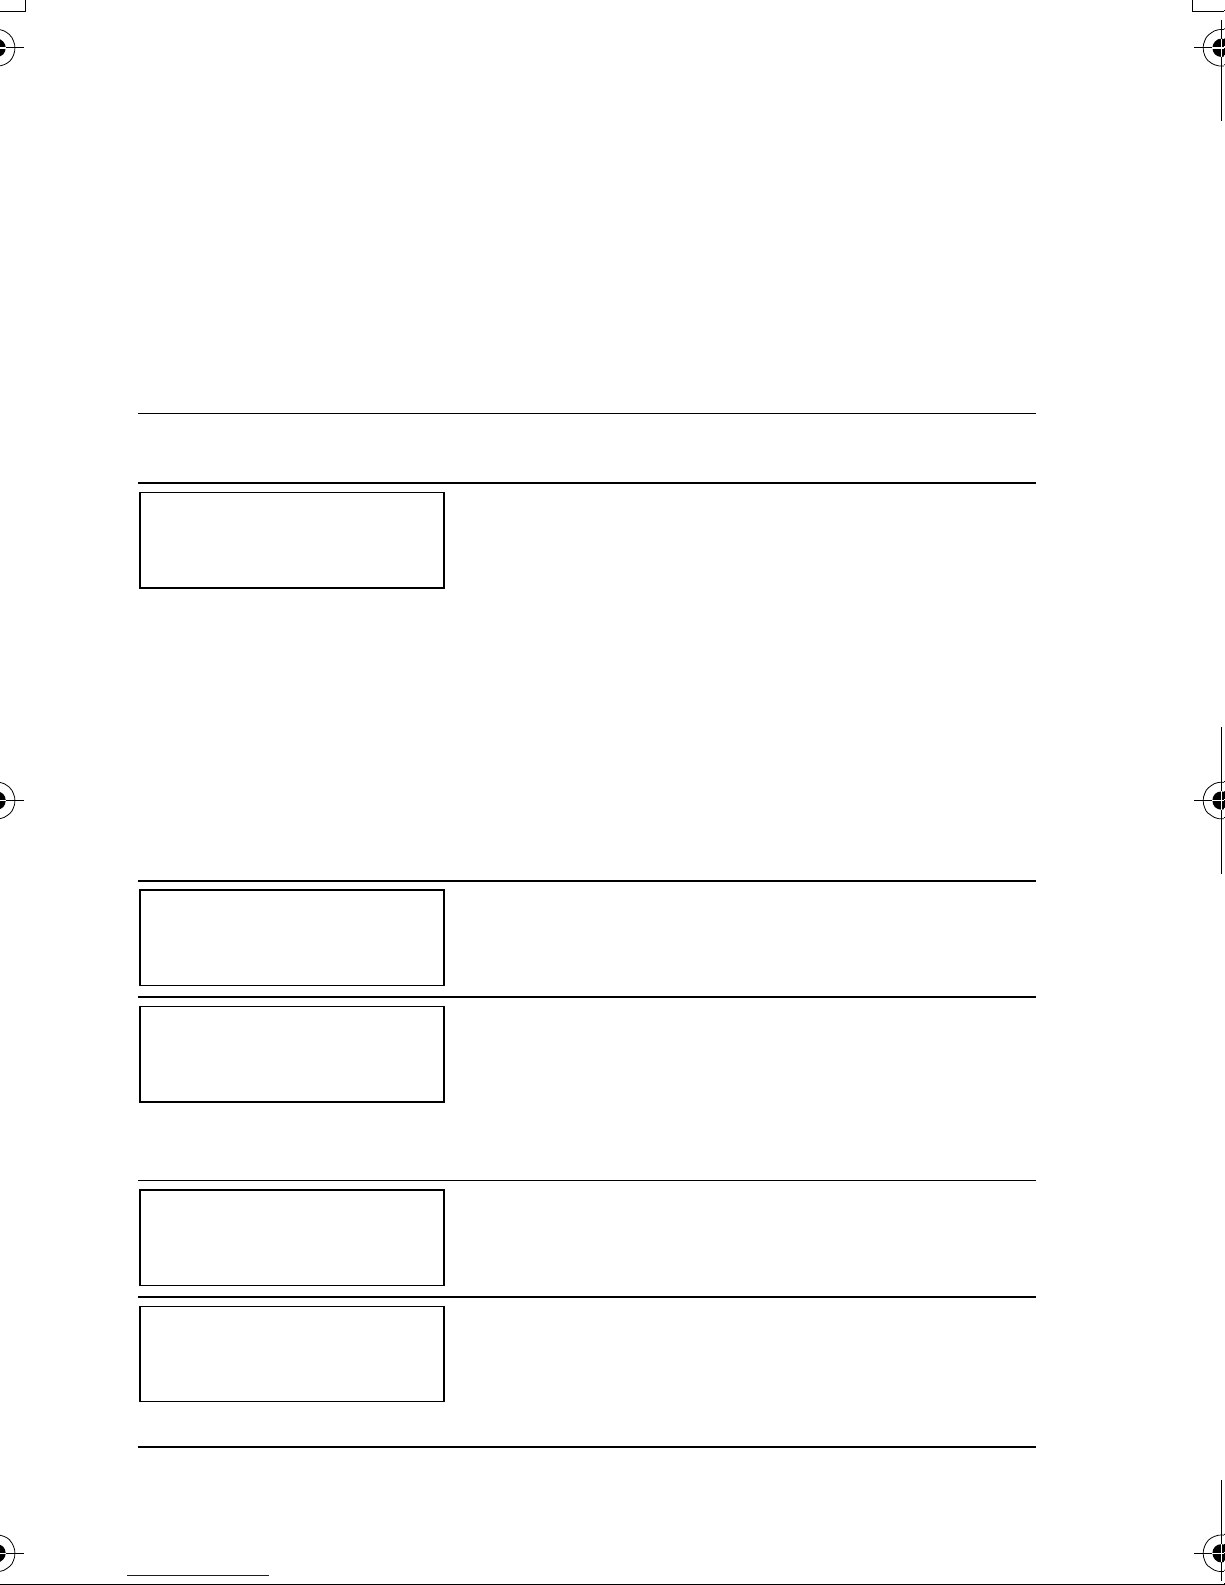
These messages appear on the printer’s message display when the printer needs the operator’s attention.
For more details, refer to chapter 4 of the Operation
Guide.
Message Corrective Action
Add paper MPTray
Add staples
Press GO
Call service
####:0123456
The paper has run out in the paper source
displayed. Supply paper according to the
paper source displayed (paper cassettes,
MP tray, or optional paper feeders).
This message is displayed alternately with
messages indicating the printer status,
such as, Ready, Please wait, Pro-
cessing, Waiting, and Form Feed
Time Out. If the number of copies to
print is 2 or more, only the Add paper
message is displayed.
The optional document finisher has run out
of staples. Replenish staples and press
the GO key.
#### represents a mechanical error (#=0,
1, 2, ...). Call a service. The printer does
not operate when this message is displayed. The total number of pages printed
is also indicated, e.g. 0123456.
Call service
F###:
Call service
Person F0
4
F### represents a controller error (#=0, 1,
2, ...). Call a service. The printer does not
operate when this message is displayed.
This message means an error in data
communications between the printer controller and the operator panel. Call a service.
Page 7
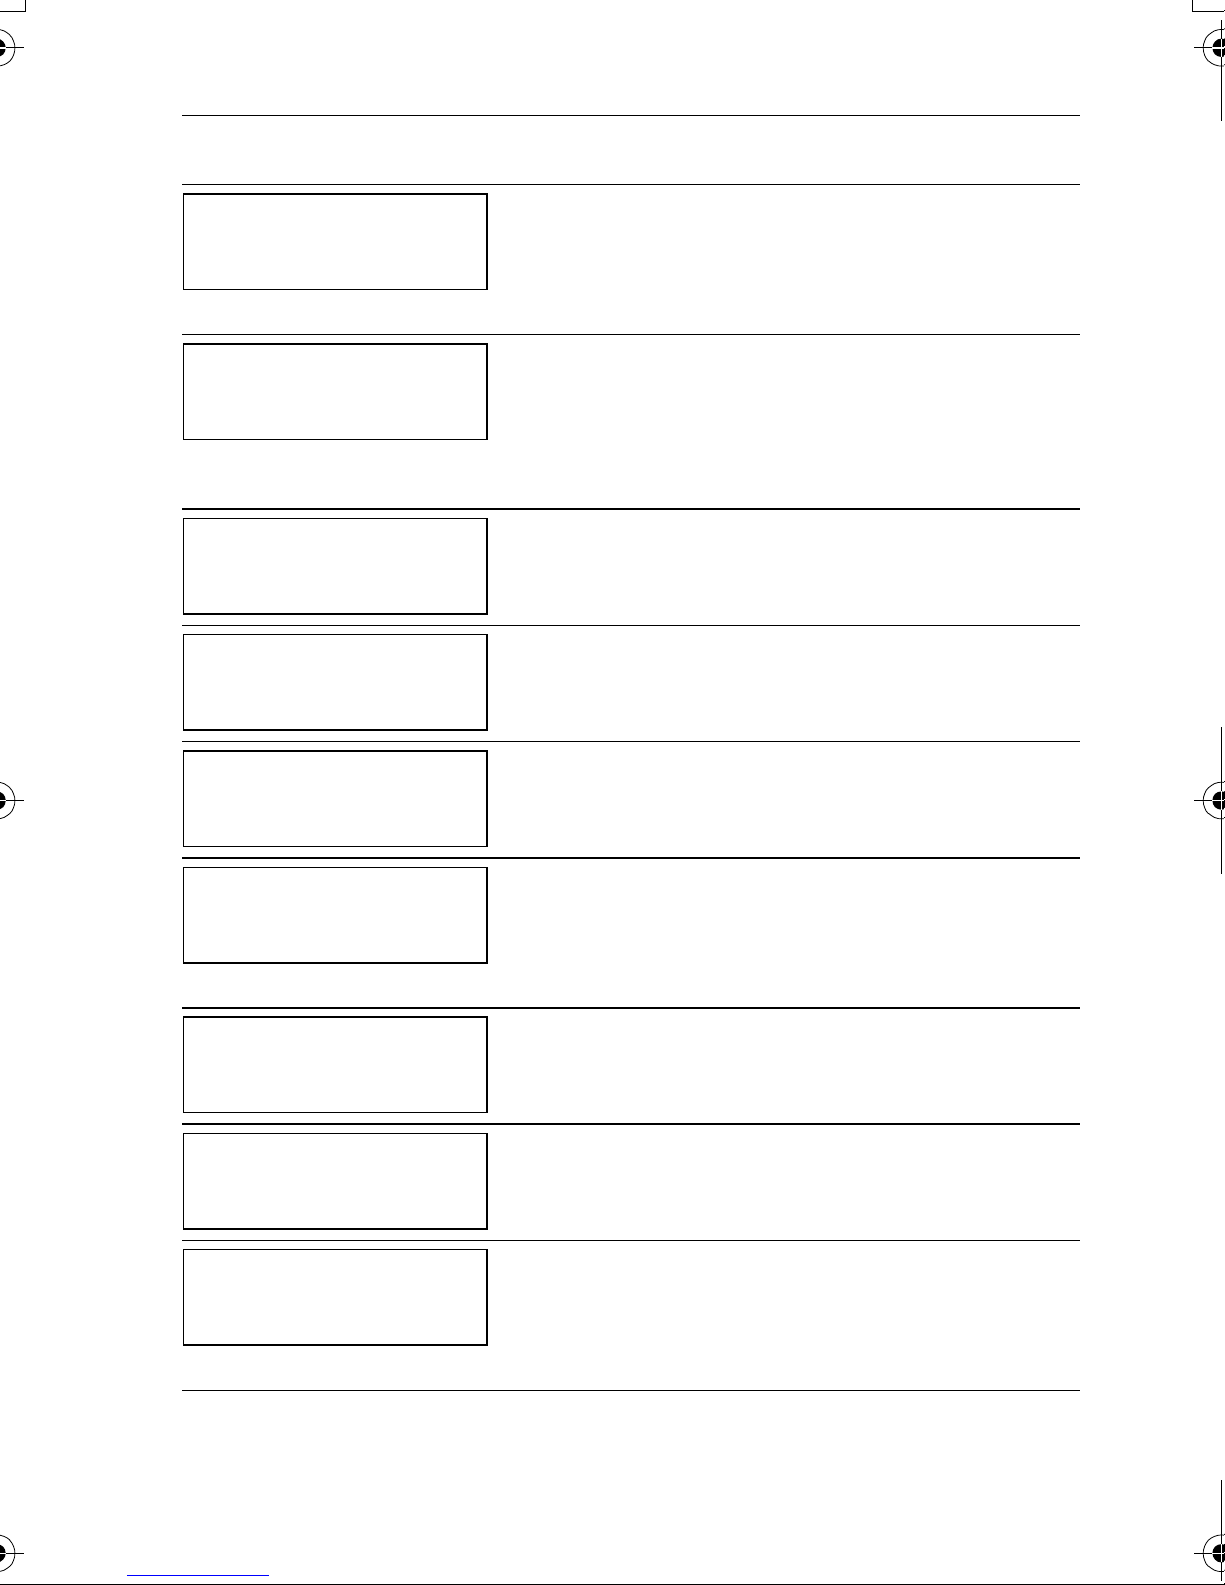
Message Corrective Action
Cassette #
not loaded
Check waste
toner box
Close
finisher cover
Close
front cover
Close
left cover
The corresponding paper cassette is not
installed. Install the cassette. The cassette
number can be 1 (topmost) to 6 (bottom);
and for the DN model, 2 to 6.
This message warns following two cases.
Install the new waste toner box.
• The waste toner box is not installed.
• The waste toner box is almost full.
The optional document finisher (DF-31)
cover is open. Close the cover.
The front cover is open. Close the front
cover.
The left cover of the printer is open. Close
the printer left cover.
Close
right cover #
Close
sorter cover
Close
stacker cover
Duplex disabled
Press GO
The right cover of paper feeder is open.
Close the cover of the paper feeder 1 (topmost) to 3 (bottom) as displayed in place
of #.
The optional sorter (SO-30) cover is open.
Close the cover.
The optional bulk stacker (ST-30) cover is
open. Close the cover.
You attempted to print with a paper size
and paper type that cannot be used for
duplex printing. Press the GO key to print
onto one-side of the paper only.
5
Page 8

Message Corrective Action
Duplex drawer
not loaded
Face-down tray
paper full
Face-up tray
path error
File not found
Press GO
The duplex drawer is not installed. Install
the duplex drawer. This message is applicable to the DN model.
The face-down tray has become full
(approx. 500 pages). You must remove all
printed pages from the face-down tray.
When the printer detects that the facedown tray is empty again, the printer will
continues printing into the face-down tray.
The face-up tray is not open although you
have attempted to print in the face-up tray.
Open the face-up tray.
You have attempted to print a job that is
not contained in the specified virtual mailbox, or the specified virtual mailbox is not
found.
Finisher tray ##
paper full
Finisher
path error
Format error
Memory Card
If Auto Continue is set to On, printing will
be automatically resumed after a preset
period of time. For details on Auto Continue, refer to chapter 3 of the Operation
Guide.
The optional document finisher (DF-31)
tray is full. Remove all printed pages from
the tray.
The optional document finisher (DF-31) is
not installed properly. Correct the installation by referring to the instructions supplied with the document finisher.
The memory card inserted in the printer is
not formatted, and therefore cannot be
read or written. To format a memory card,
follow the procedure in chapter 3 of the
Operation Guide.
6
Page 9
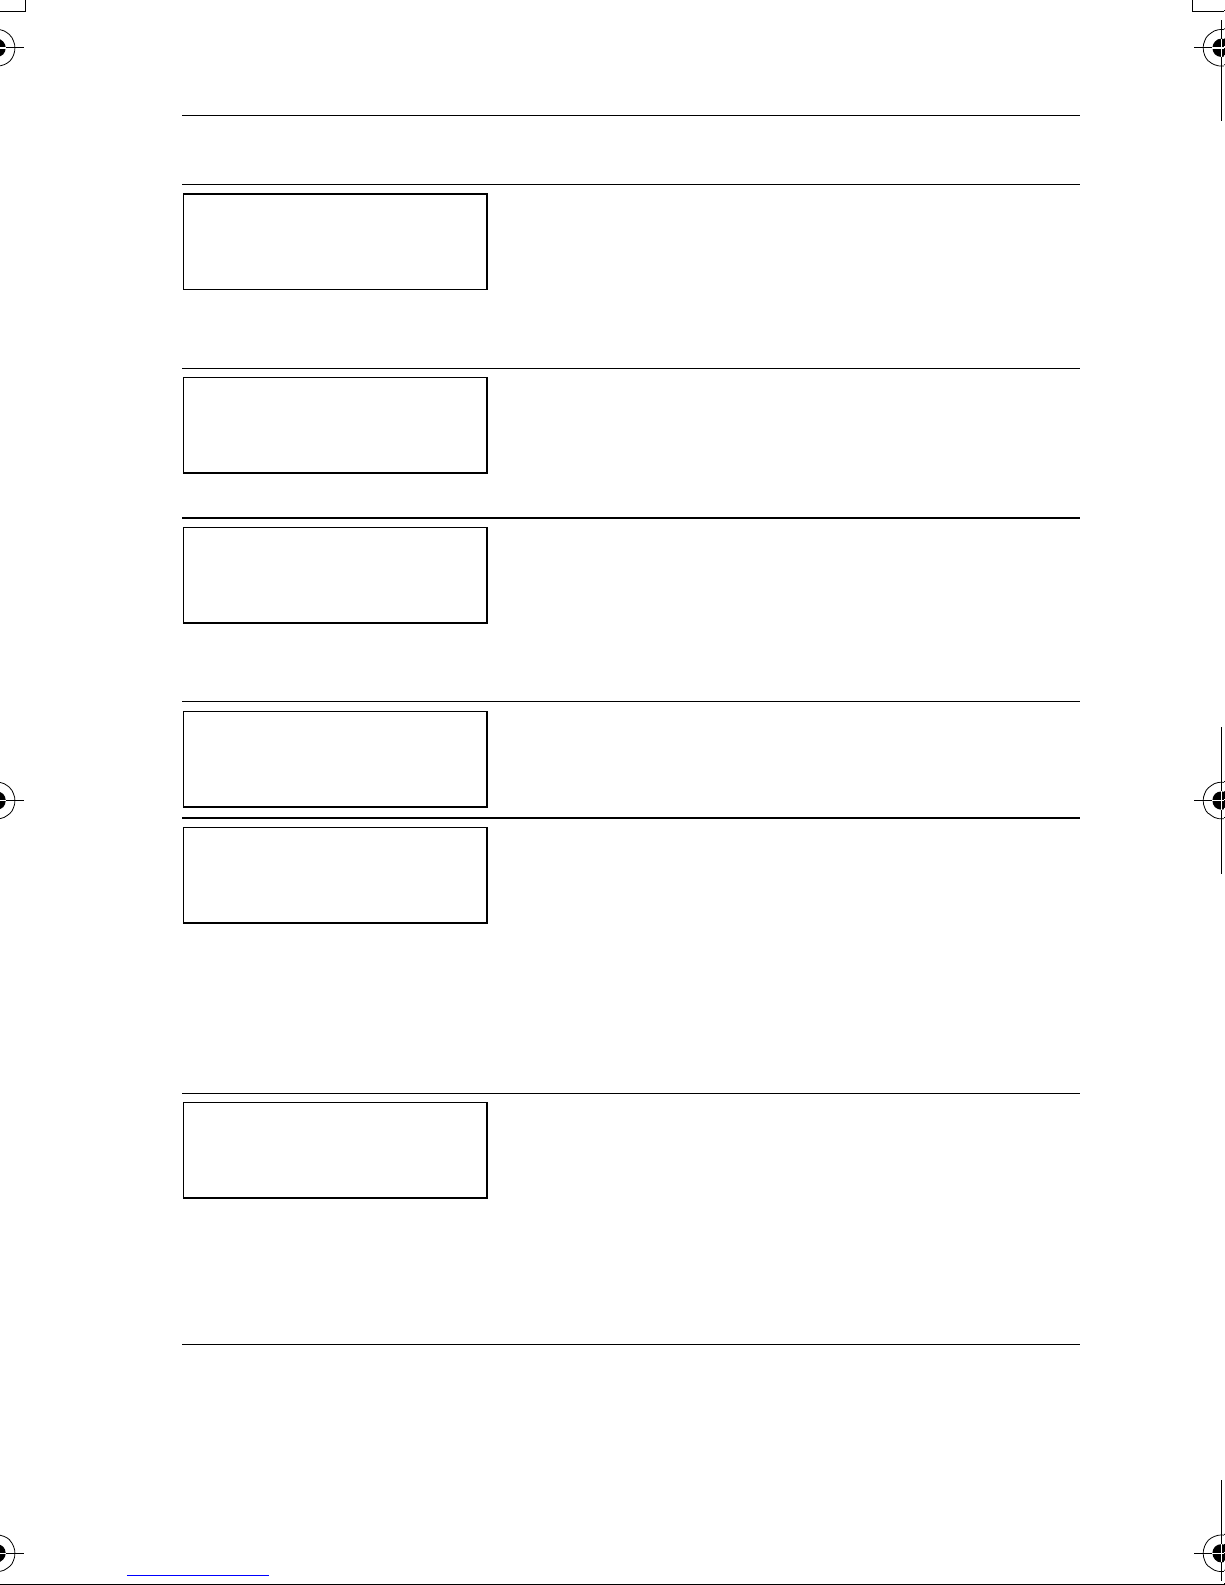
Message Corrective Action
Format error
Hard disk
Hard disk err ##
Press GO
I/F occupied
ID error
The hard disk installed in the printer is not
formatted, and therefore cannot be read or
written. To format the hard disk, follow the
procedure in the Installation Guide of the
hard disk.
A hard disk error has occurred. Look at the
error code given in place of ## and refer to
chapter 4 of the Operation Guide. To ignore
the hard disk error, press the GO key.
This message is displayed when you
attempt to use the printer’s operator panel
to change the environmental settings on
the interface from which data are presently
being received.
The user ID entered for a private job, or a
stored job is not correct. Check the user ID
that you specified on the printer driver.
Incorrect slot
Please reinstall
Insert the same
memory card
The optional hard disk is installed in the
network interface card slot (OPT) in the
printer.
The optional network interface card is
installed in the hard disk slot (HDD) in the
printer.
Install it in the appropriate slot.
You have inserted the wrong memory card
when the Insert again message was
displayed. Remove the wrong memory
card from the printer’s memory card slot
and insert the correct memory card. The
printer again reads it from the beginning of
the data.
7
Page 10
Message Corrective Action
Install MK
†
[A]
Install MK
†
[B]
Install MK
†
[C]
Replace Maintenance Kit A which is displayed on your printer message window.
Replacement of the maintenance kit is
necessary at every 600,000 images of
printing and requires professional servicing. Contact your Kyocera Mita dealer.
Replace Maintenance Kit B. Replacement
of the maintenance kit B is necessary at
every 300,000 pages of printing and
requires professional servicing. Contact
your Kyocera Mita dealer.
Replace Maintenance Kit C. Replacement
of the maintenance kit C is necessary at
every 300,000 images of printing and
requires professional servicing. Contact
your Kyocera Mita dealer.
KPDL error ##
Press GO
Current print processing cannot continue
because of occurrence of KPDL error
which is categorized by ##. To print out an
error report, display > Print KPDL
err(s) from the menu system, and select
On. Press the GO key to resume printing.
You can abandon printing by the CANCEL
key.
If Auto Continue is set to On, printing will
be automatically resumed after a preset
period of time.
8
Page 11
Message Corrective Action
Load Cassette #
(A4)/(
PLAIN
)
††
The paper cassette matching the paper
size and paper type of the print job is
empty. Load paper into the paper cassette
indicated by #. Press the GO key to
resume printing.
If you want to print from a different paper
source, press the V or U key to display
Use alternative and you can change
the source for paper feeding. After selecting a paper source and pressing the
MENU key, Paper Handling >
appears. By pressing the U key, the paper
type settings menu appears. After setting
the correct paper type, press the ENTER
key and printing starts.
If you want to print from a different paper
source, see chapter 3 of the Operation
Guide.
9
Page 12
Message Corrective Action
Load MP Tray
(A4)/(
PLAIN
)
††
There is no paper cassette installed in the
printer that matches the paper size and
paper type of the print job. Set paper in the
MP tray. Press the GO key to resume
printing. (Note that feeding the paper having a paper size which does not match the
current paper size from the MP tray can
cause paper jam.)
Or, if you want to print from a different
paper source, press the V or U key to display Use alternative and you can
change the source for paper feeding. After
selecting a paper source and pressing the
MENU key, Paper Handling >
appears. By pressing the U key, the paper
type settings menu appears. After setting
the correct paper type, press the ENTER
key and printing starts.
Memory card err
Insert again
If you want to print from a different paper
source, see chapter 3 of the Operation
Guide.
The memory card is accidentally removed
from the printer’s memory card slot during
reading. If you continue reading the memory card, insert the same memory card
into the slot again. The printer again reads
it from the beginning of the data.
Also see Insert the same memory
card.
10
Page 13
Message Corrective Action
Memory overflow
Press GO
MemoryCard err##
Press GO
Missing #
toner container
The total amount of data received by the
printer exceeds the printer’s internal memory. Try adding more memory. Press the
GO key to resume printing. You can abandon printing by the CANCEL key.
If Auto Continue is set to On, printing will
be automatically resumed after a preset
period of time.
A memory card error has occurred. Look
at the error code given in place of ## and
refer to chapter 4 of the Operation Guide.
To ignore the memory card error, press the
GO key.
Install the toner container using a toner kit
for the particular color. The printer does
not operate when this message is displayed.
Missing
duplex drawer
Missing
stapler unit
Paper jam
################
Paper loading
The duplex unit is not installed. Install the
duplex unit.
The stapler unit is not installed in the
optional document finisher. Install the stapler unit in the document finisher.
A paper jam has occurred. The location of
the paper jam is indicated in place of the
#’s. For details, see section Clearing
Paper Jams on page 18.
After the paper cassette is closed, paper
loading is in progress in the paper cassette.
11
Page 14
Message Corrective Action
Print overrun
Press GO
†††
RAM disk error##
Press GO
Remove paper
Finisher tray ##
The print job transferred to the printer was
too complex to print on a page. Press the
GO key to resume printing. (The page may
break in some pages.).
You can abandon printing by the CANCEL
key.
If Auto Continue is set to On, printing will
be automatically resumed after a preset
period of time.
A RAM disk error has occurred. Look at
the error code given in place of ## and
refer to chapter 4 of the Operation Guide.
To ignore the RAM disk error, press the
GO key.
Paper remains in an option document finisher as displayed in place of ##. Remove
printed pages.
Remove paper
sorter tray ##
Replace toner
C
, M, Y,
K
Set paper
Press GO
Paper remains in an option sorter tray as
displayed in place of ##. Remove printed
pages.
Toner has run out in the toner container(s).
Replace the toner container using a new
toner kit for the particular color. The printer
does not operate when this message is
displayed.
For example, if Replace toner C,K is
displayed, replace the cyan and the black
toner containers.
The MP tray is out of paper. Load paper
and press the GO key. (Note that feeding
the paper having a paper size which does
not match the current paper size from the
MP tray can cause paper jam.)
12
Page 15
Message Corrective Action
Sorter tray ##
paper full
Sorter
paper full
Sorter
path error
Stacker
paper full
Stacker
path error
A tray of the optional sorter (SO-30) is full.
Remove paper sheets in the corresponding tray as displayed in place of ##.
The optional sorter (SO-30) tray is full.
Remove printed pages.
The optional sorter (SO-30) is not installed
properly. Correct the installation.
The optional bulk stacker (ST-30) tray is
full. Remove printed pages.
The optional bulk stacker (ST-30) is not
installed properly. Correct the installation.
Toner low
C
, M, Y,
K
Unsupported
external device
Replace the toner container using a new toner
kit. Color of the toner container that needs to
be replaced is represented by C (Cyan), M
(Magenta), Y (Yellow), and K (Black).
A device not supported by the printer is
installed. Install an option unit supported
by the printer.
Virtual mail box
full
The storage area in the hard disk for the
virtual mailboxes is full. Print out accumulated jobs in the virtual mailboxes.
Warning
low memory
The printer’s internal memory is running
low due to too many numbers of fonts and
macros downloaded. Try deleting unnecessary fonts and macros.
† These messages may be displayed altogether such as Install MK
[A][B][C].
†† Messages separated by ‘( )/( )’ are displayed alternately.
††† After this error has happened, page protect mode will be automatically turned
on. To maintain optimum use of memory during printing, we recommend you
manually turn off page protect mode. See chapter 3 of the Operation Guide.
13
Page 16

Loading Paper
Fan the media (paper/transparencies), then tap it
on a level surface to avoid media jams or skewed
Caution
printing.
1
Loading paper
into the cassette
Pull out the paper
feed cassette until
it stops. Lift the
paper feed roller
located on the
right side of the
cassette upright.
14
Page 17

Adj
Paper Stopper
Paper Guide
2
ust the position of the paper
guides according
to the size of the
paper you will
use. To move the
paper guides,
press the greencolored knobs.
Align the paper stopper correctly with the markings in
the cassette that match the paper size:
15
Page 18
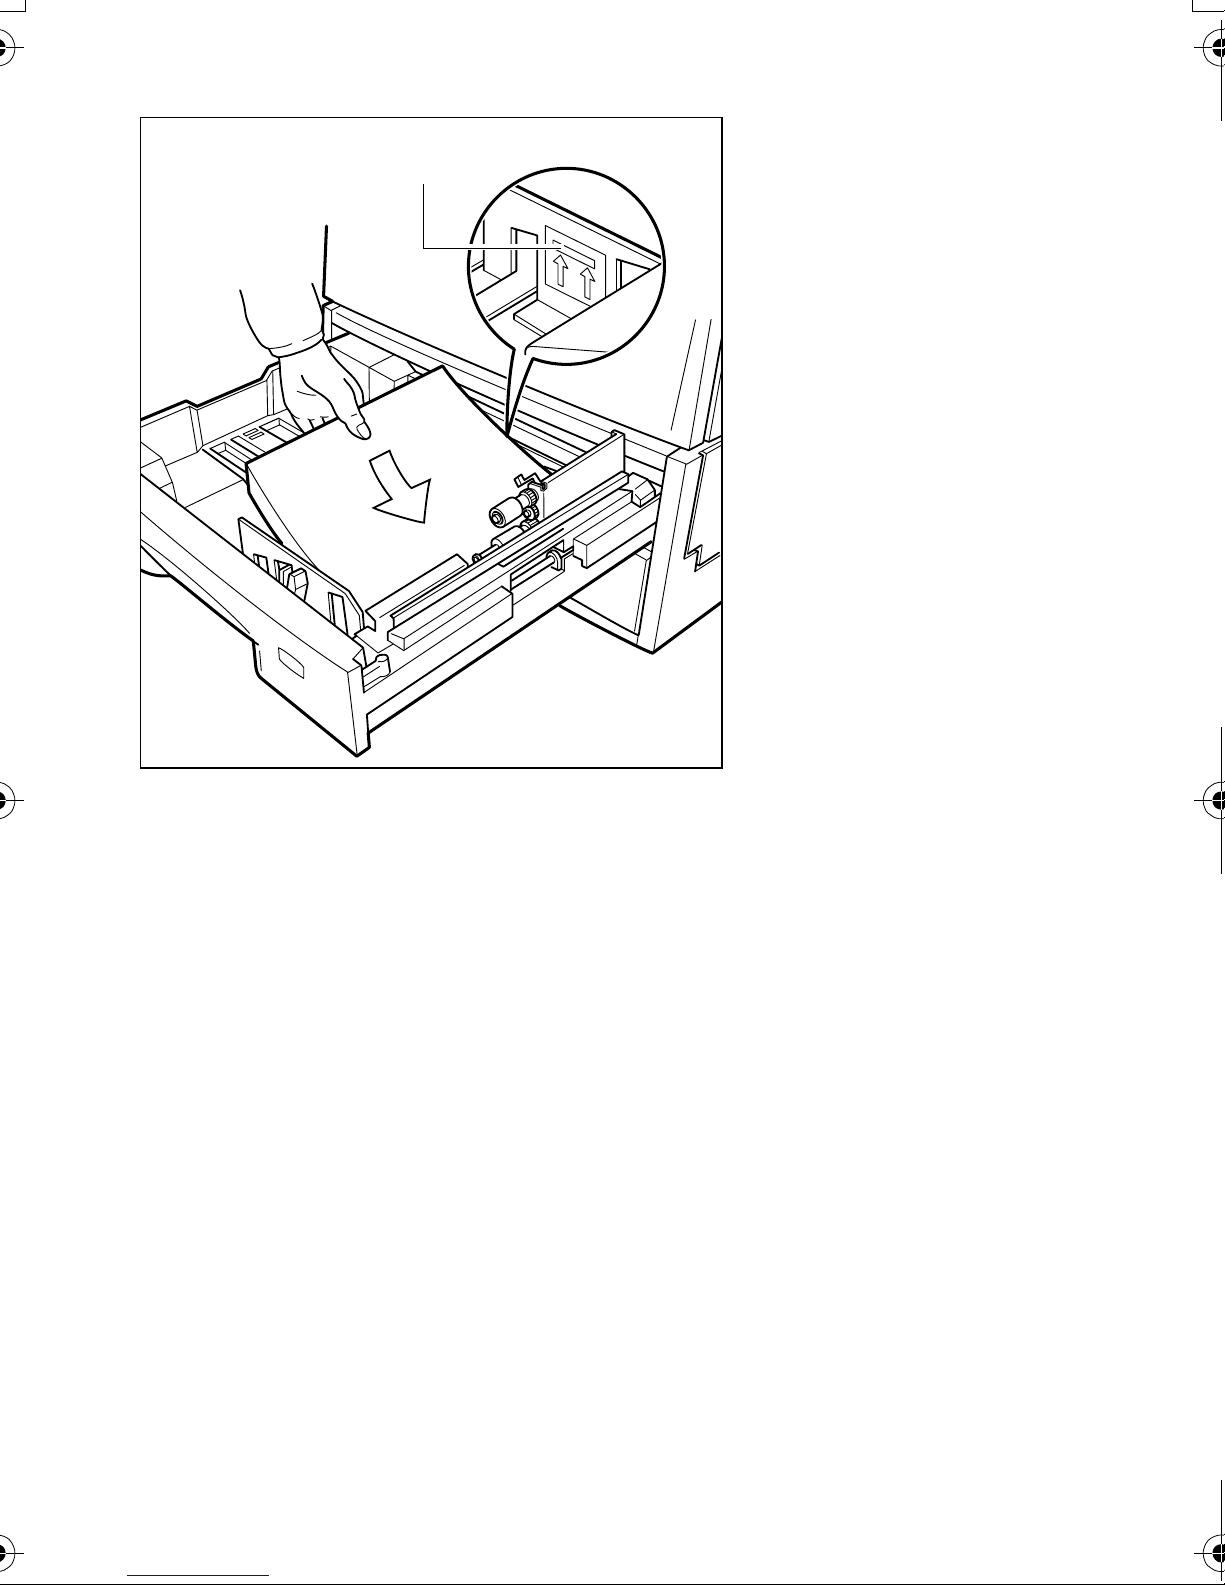
t
-
-
Paper Limit Indicator
3
Square the edges
Paper Size Indicators Position
of the paper and
insert into the
paper feed cassette. Be sure tha
the paper does
not exceed the
paper limit indica
Paper Guide
tors. The paper
feed cassette can
hold up to about
500 sheets. Print
ing is performed
on the underside
of the paper.
Lower the paper feed roller to its original position. Close
the paper feed cassette.
16
Page 19
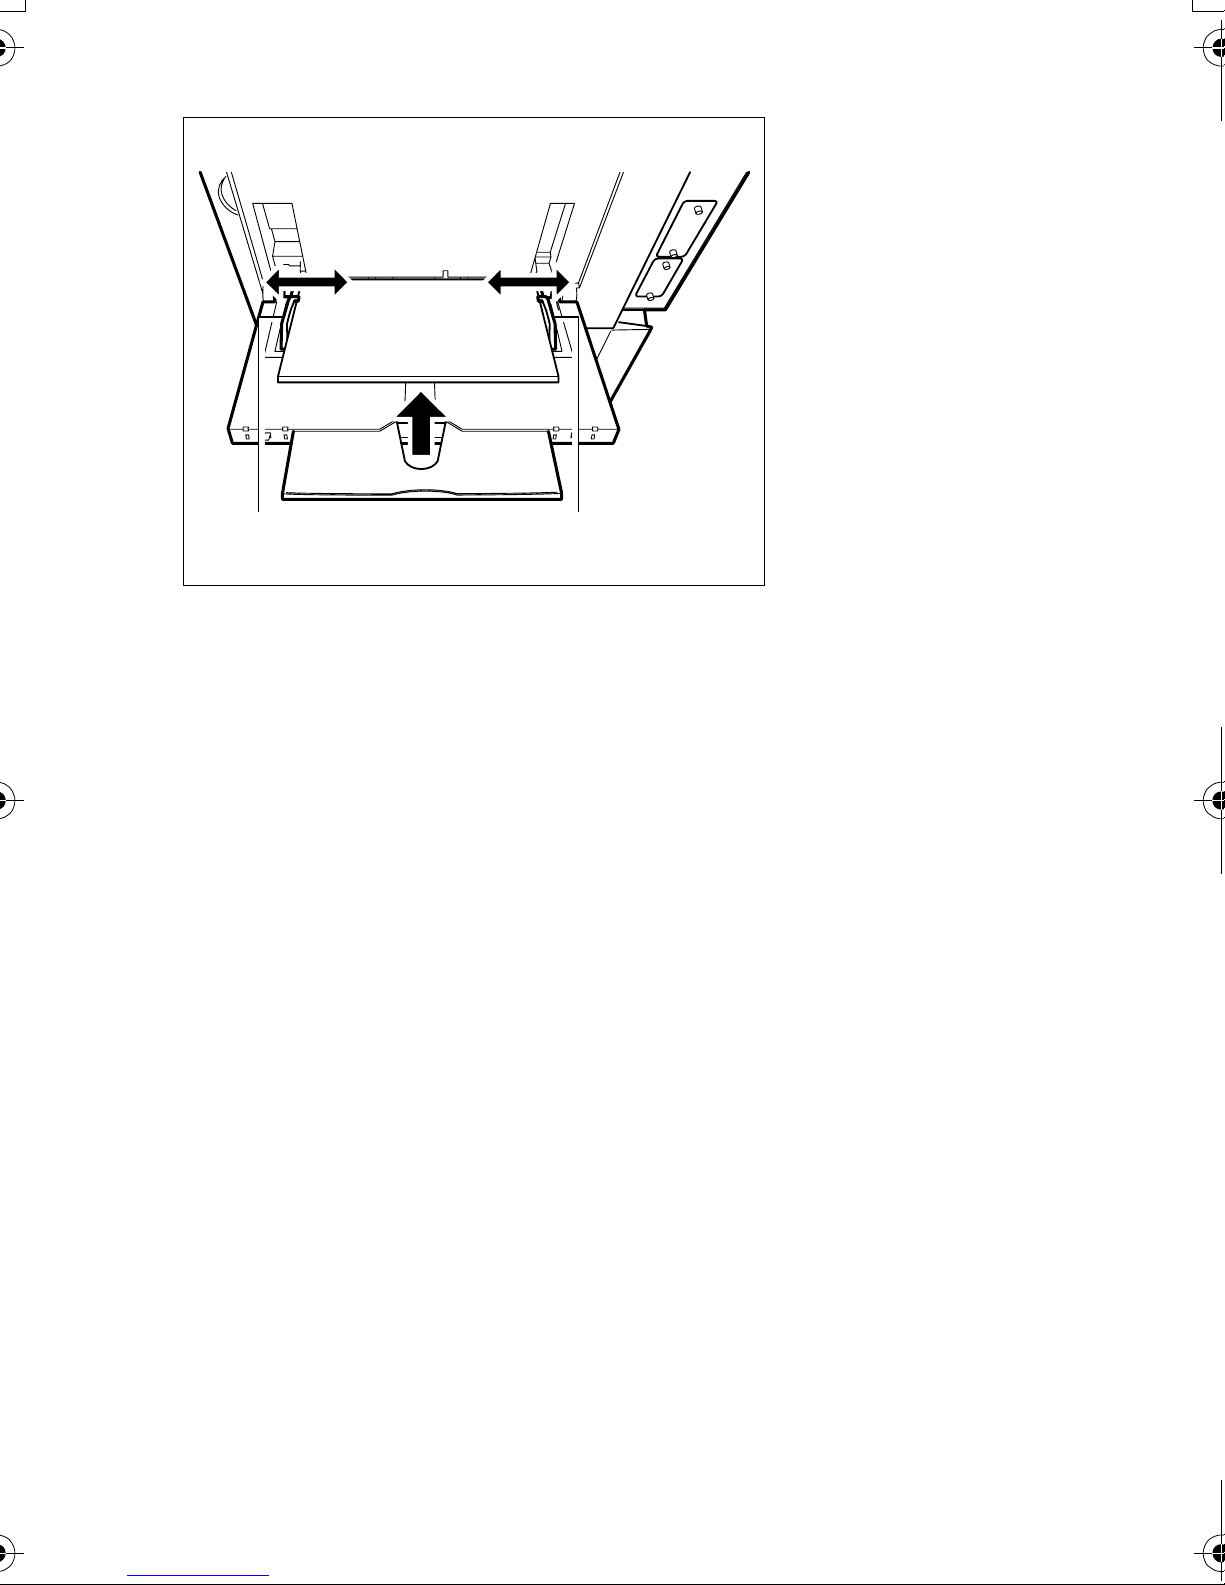
Loading paper
into the MP
(Multi-Purpose)
tray
Open the MP tray
located on the
right side of the
printer.
Paper Guide Paper Guide
Adjust the position of the paper guides according to the
size of the paper you will use.
Square the edges of the paper and insert into the MP
tray.
Set the MP tray paper size on the printer’s operator
panel. Refer to chapter 3 of the Operation Guide.
17
Page 20
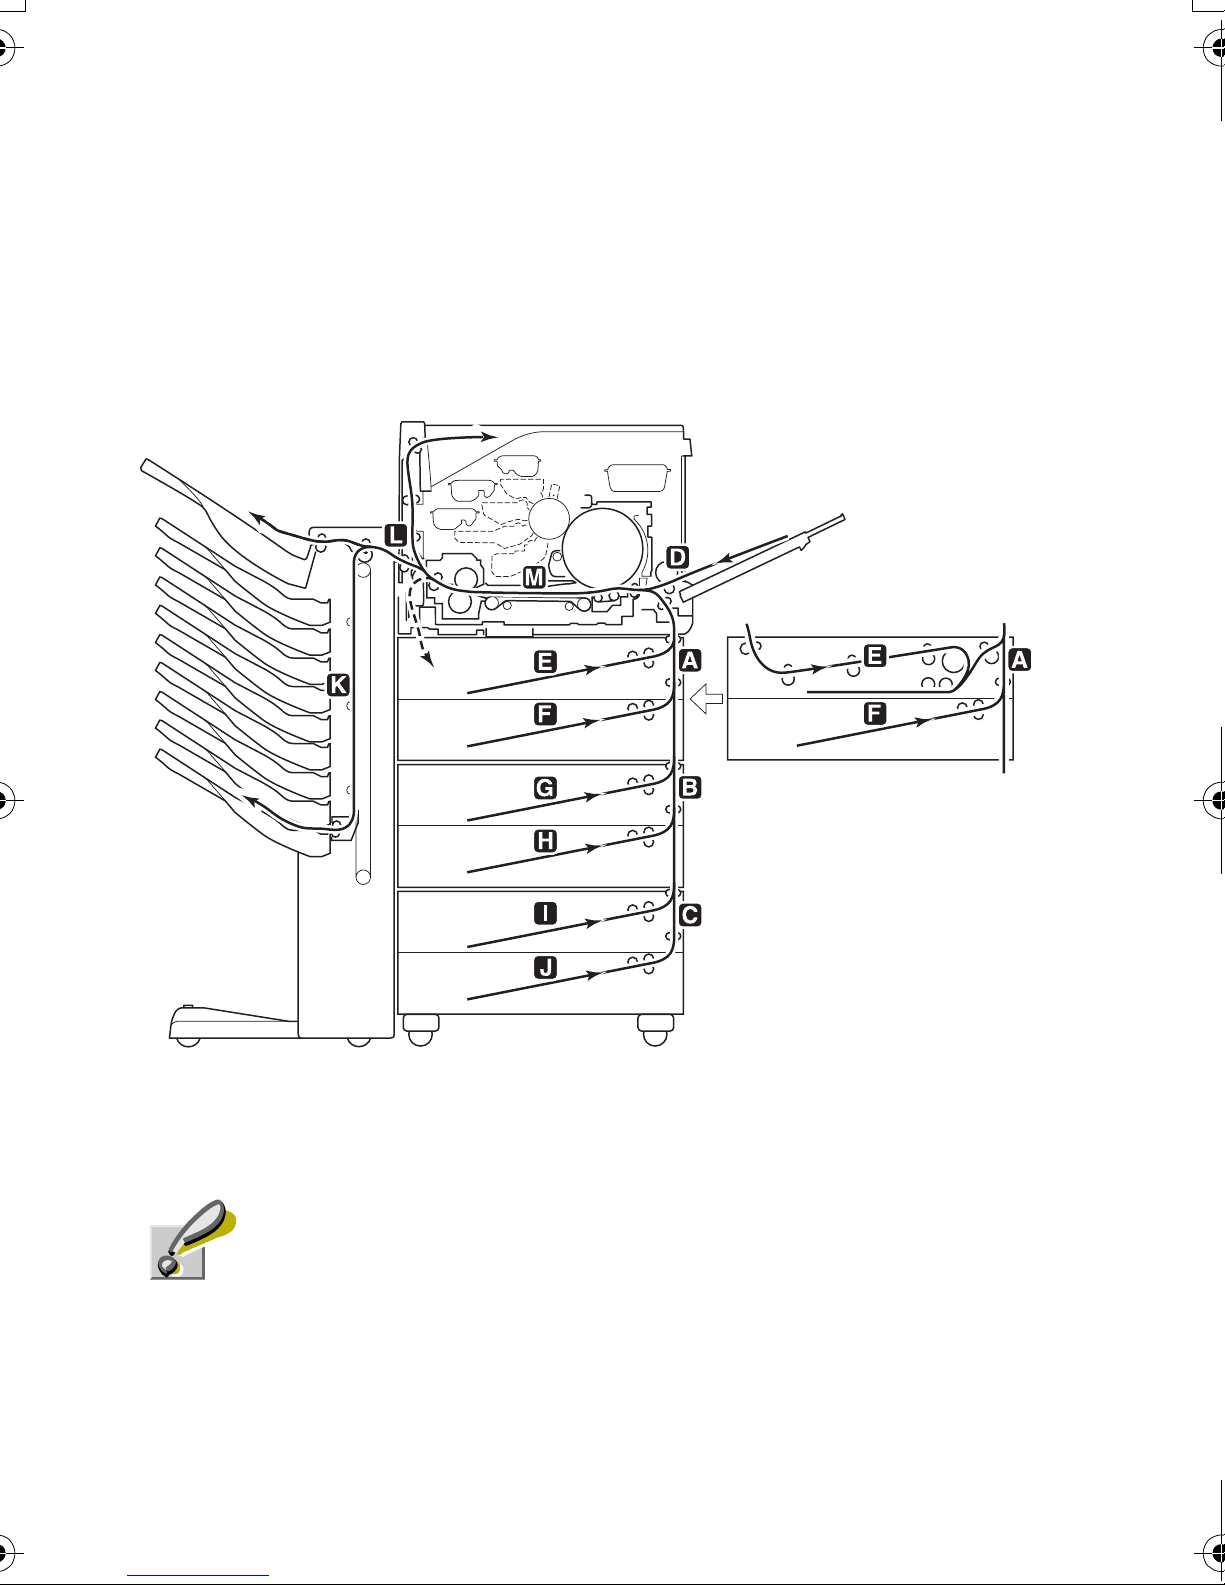
Clearing Paper Jams
The figure below is a simplified diagram showing the
paper paths in the print system. You can clear paper
jams easily and quickly if you become familiar with the
paper paths and locations of potential jams.
Depending on the indication on the message display,
proceed as follows:
When removing jammed paper, use extreme
care to leave no paper debris in the printer.
Caution
18
Page 21

[Paper Jam — Right Cover #]
[Paper Jam — Cassette #]
Open the paper
feeder right cover
according to the
number in place
of #, top (1) to
bottom (3). Pull
the paper outward. Close the
right cover.
Open the paper
cassette according to the number
in place of #, top
(1) to bottom (6).
Remove the
paper in the paper
cassette.
19
Page 22
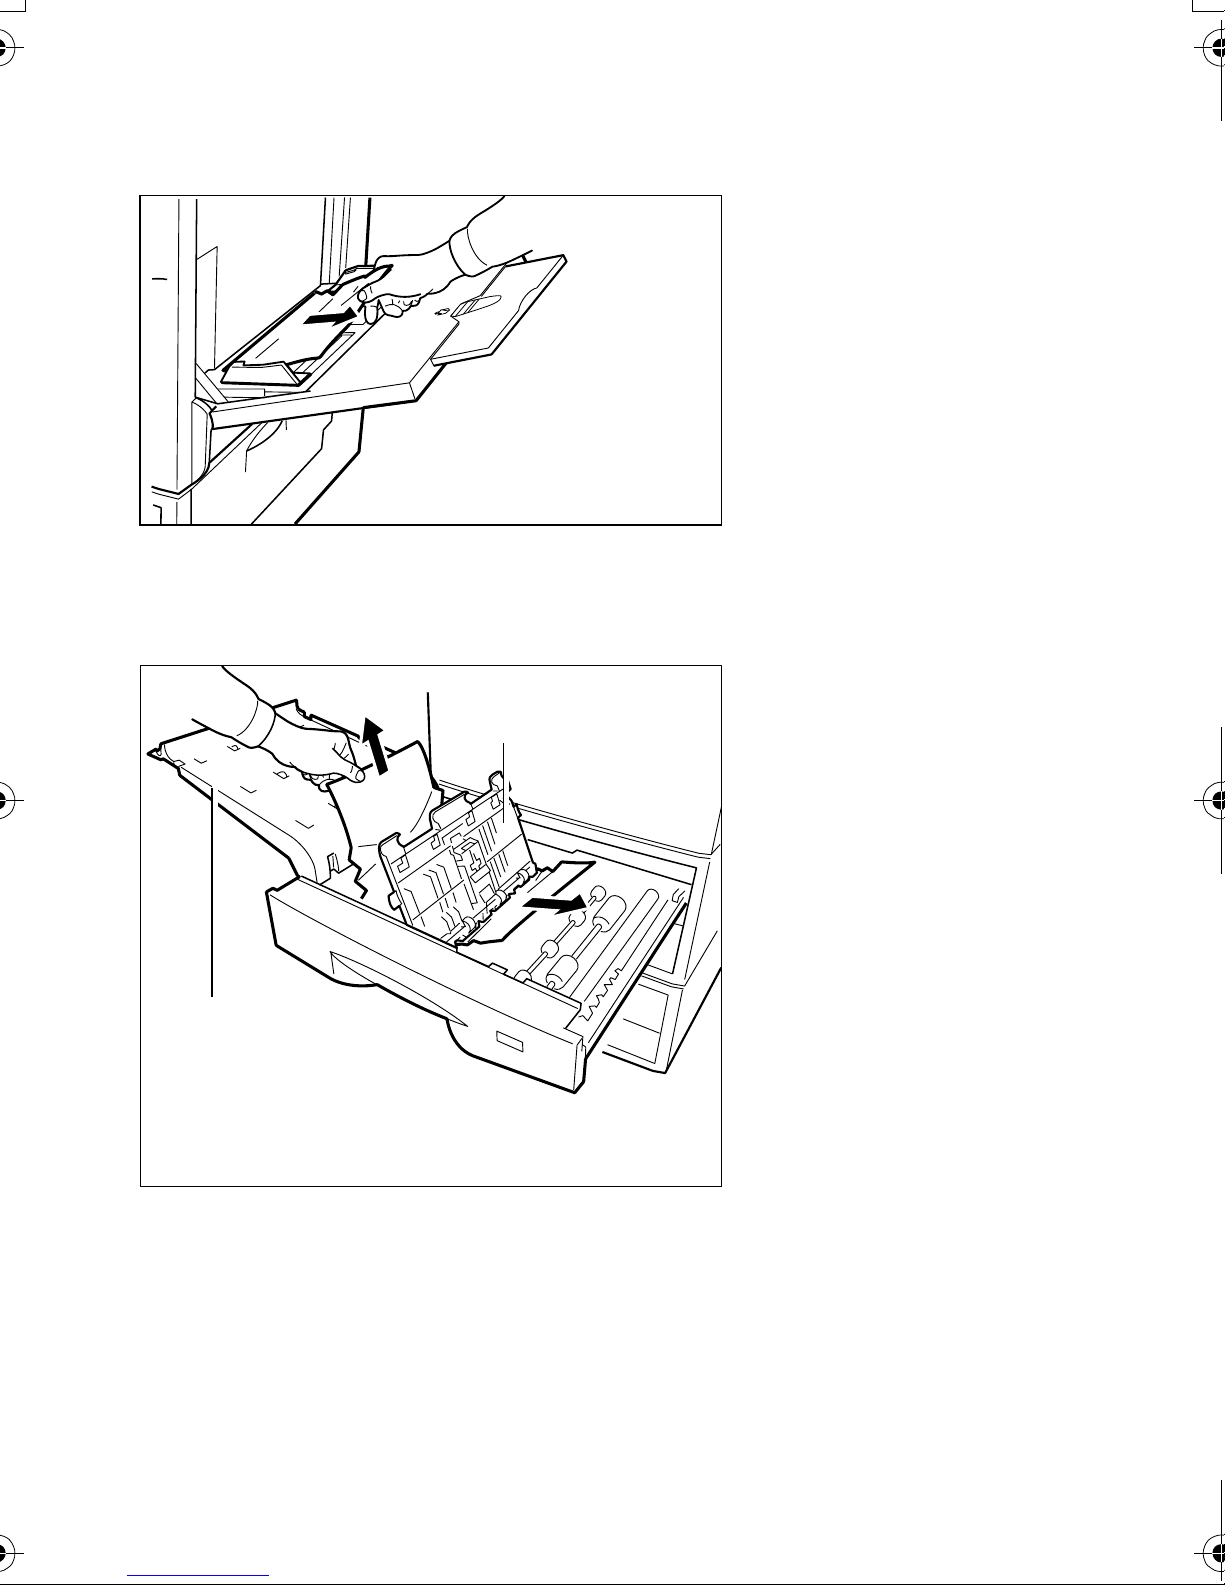
[Paper Jam — MP Tray]
[Paper Jam — Duplexer]
Remove the
jammed paper on
the MP tray up
and towards the
right.
Open the
Upper Cover
Lower Cover
duplexer drawer.
Open the upper
and lower plastic
covers and
remove paper
under the covers
and rollers.
20
Page 23
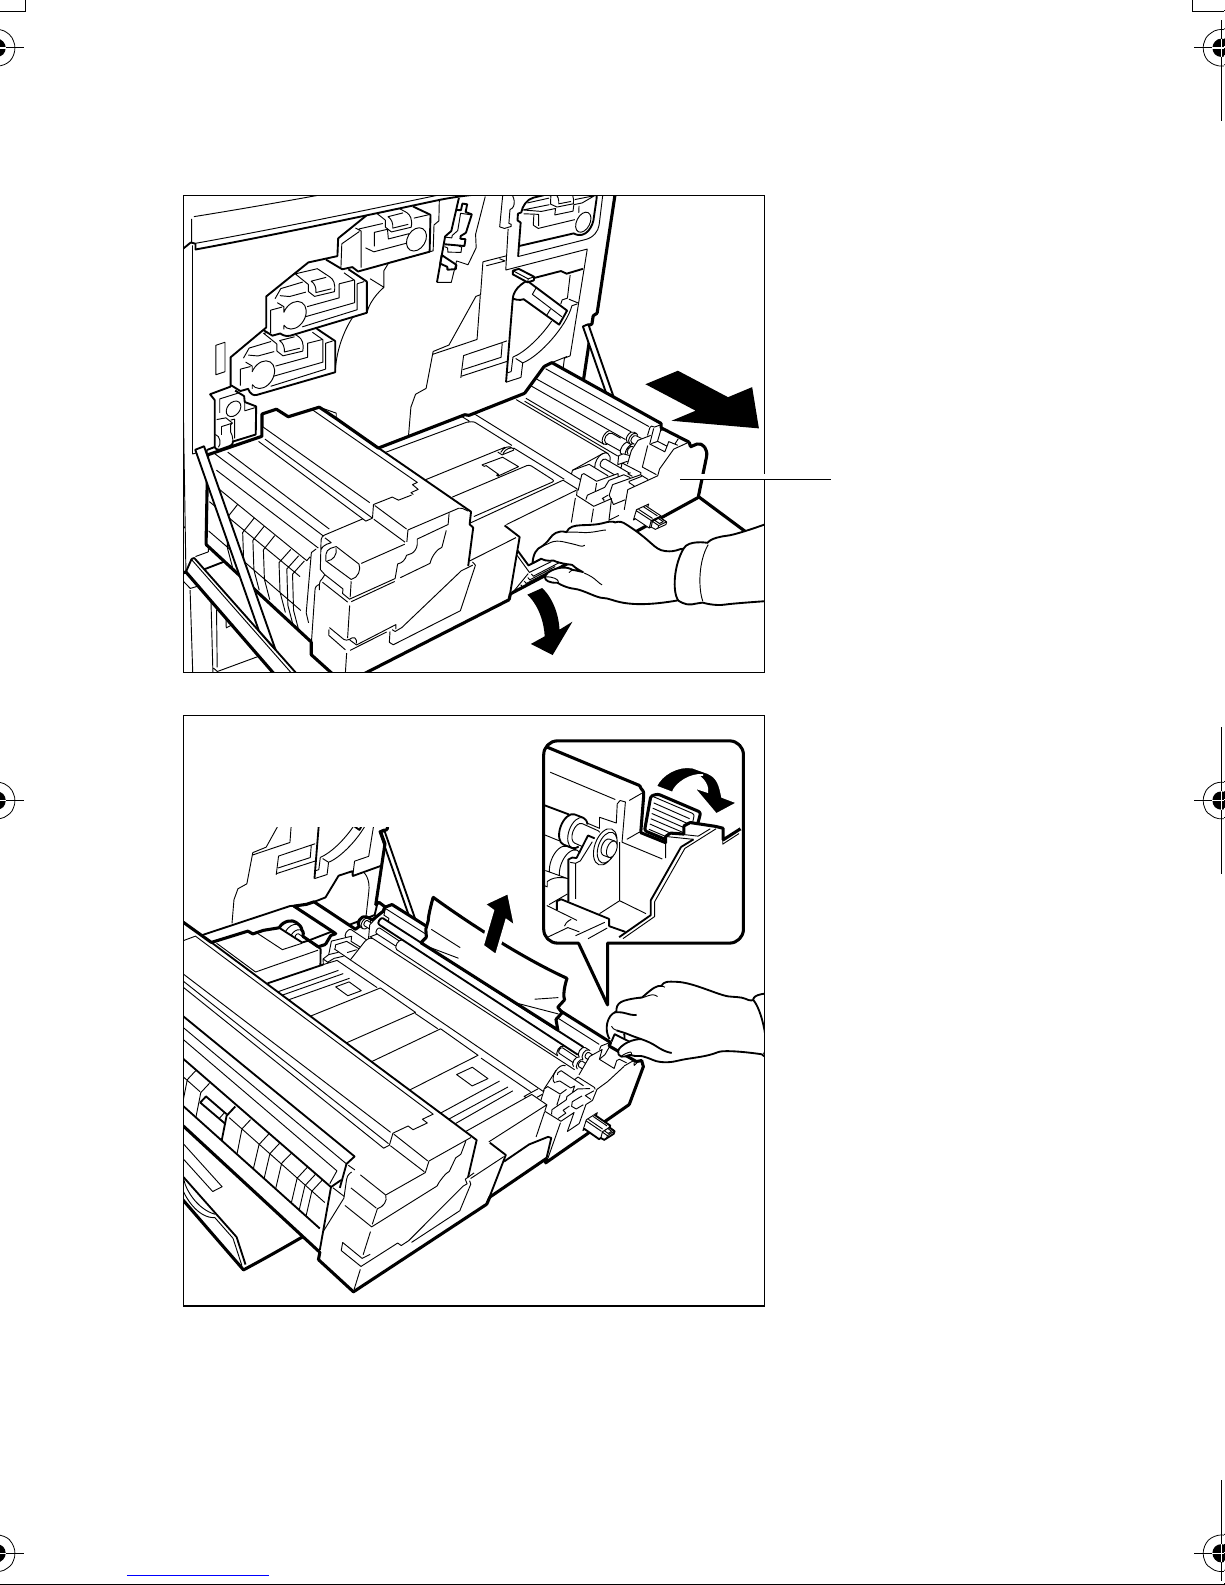
[Paper Jam — Paper Transfer Unit]
1
1
Open the front
cover. Pull the
paper transfer
unit out completely.
Paper Transfer Unit
Remove the
paper by swinging
2
the green-colored lever to the
right.
21
Page 24
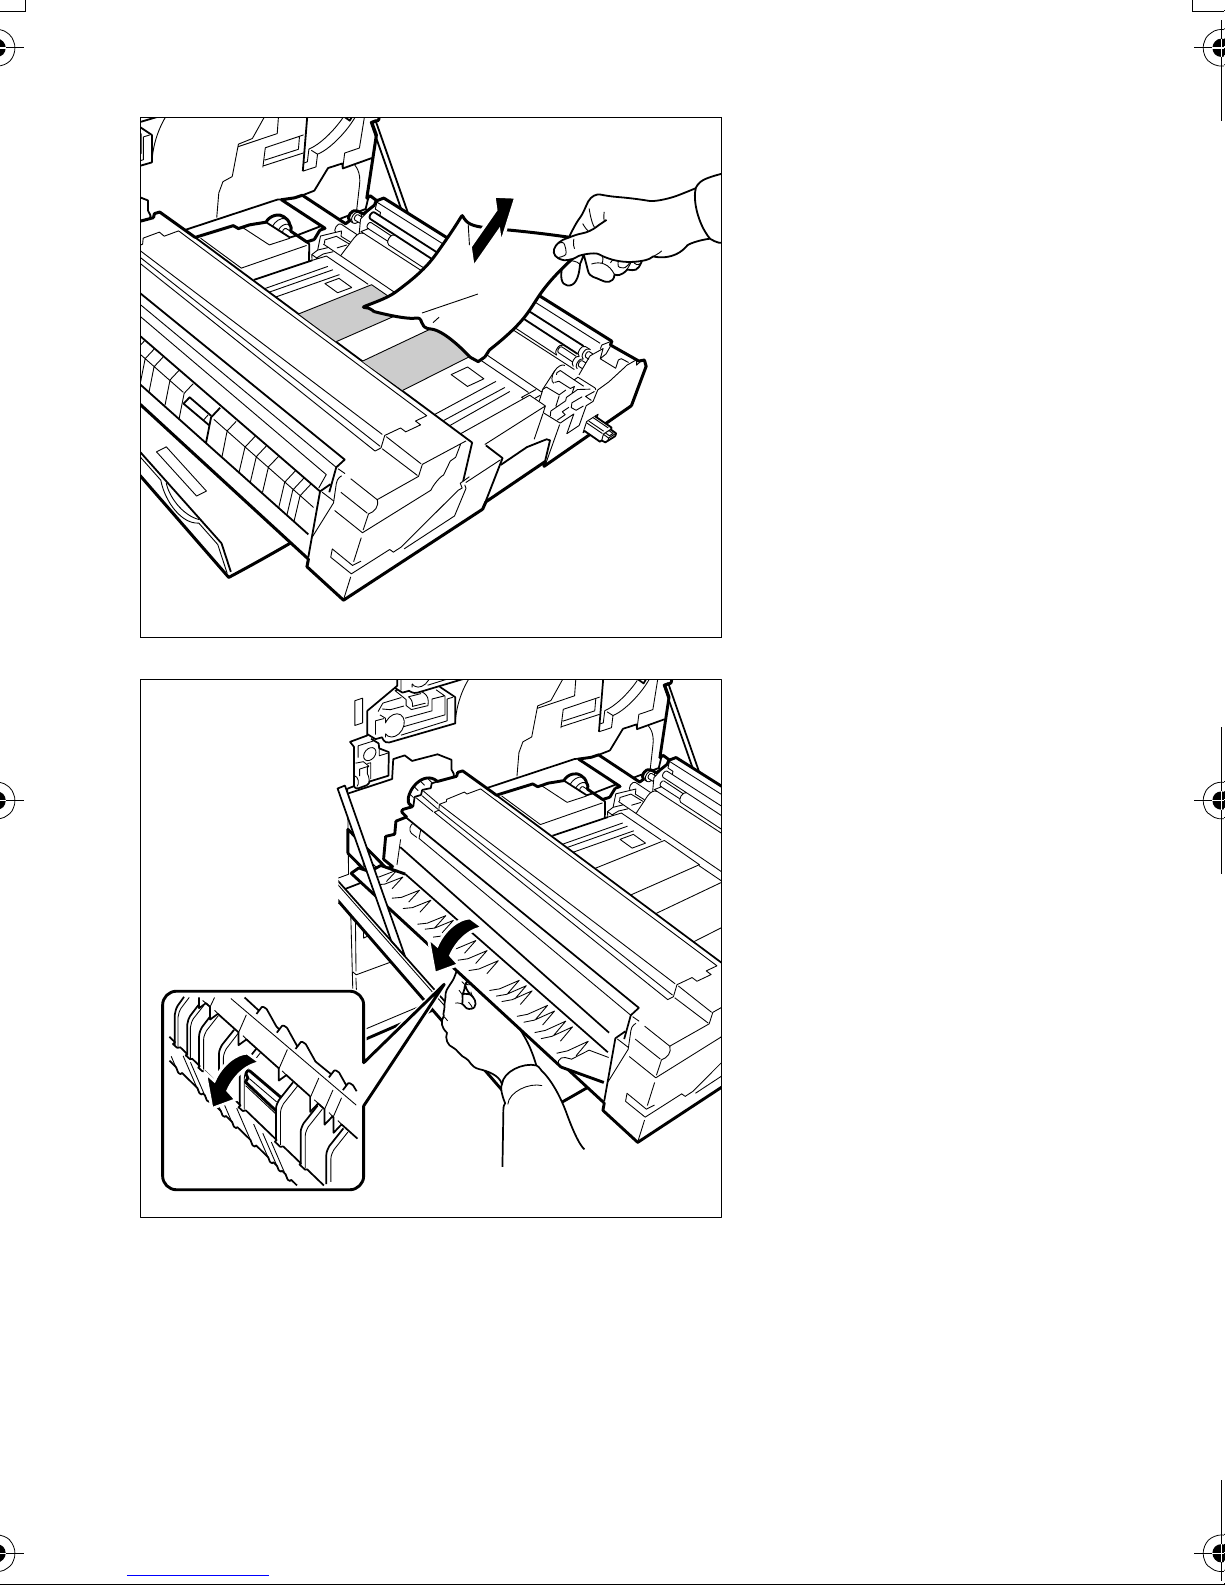
3
Remove the
paper on the rubber belts (black).
Open the fuser
4
access cover by
pressing the
green-colored
lock lever.
22
Page 25
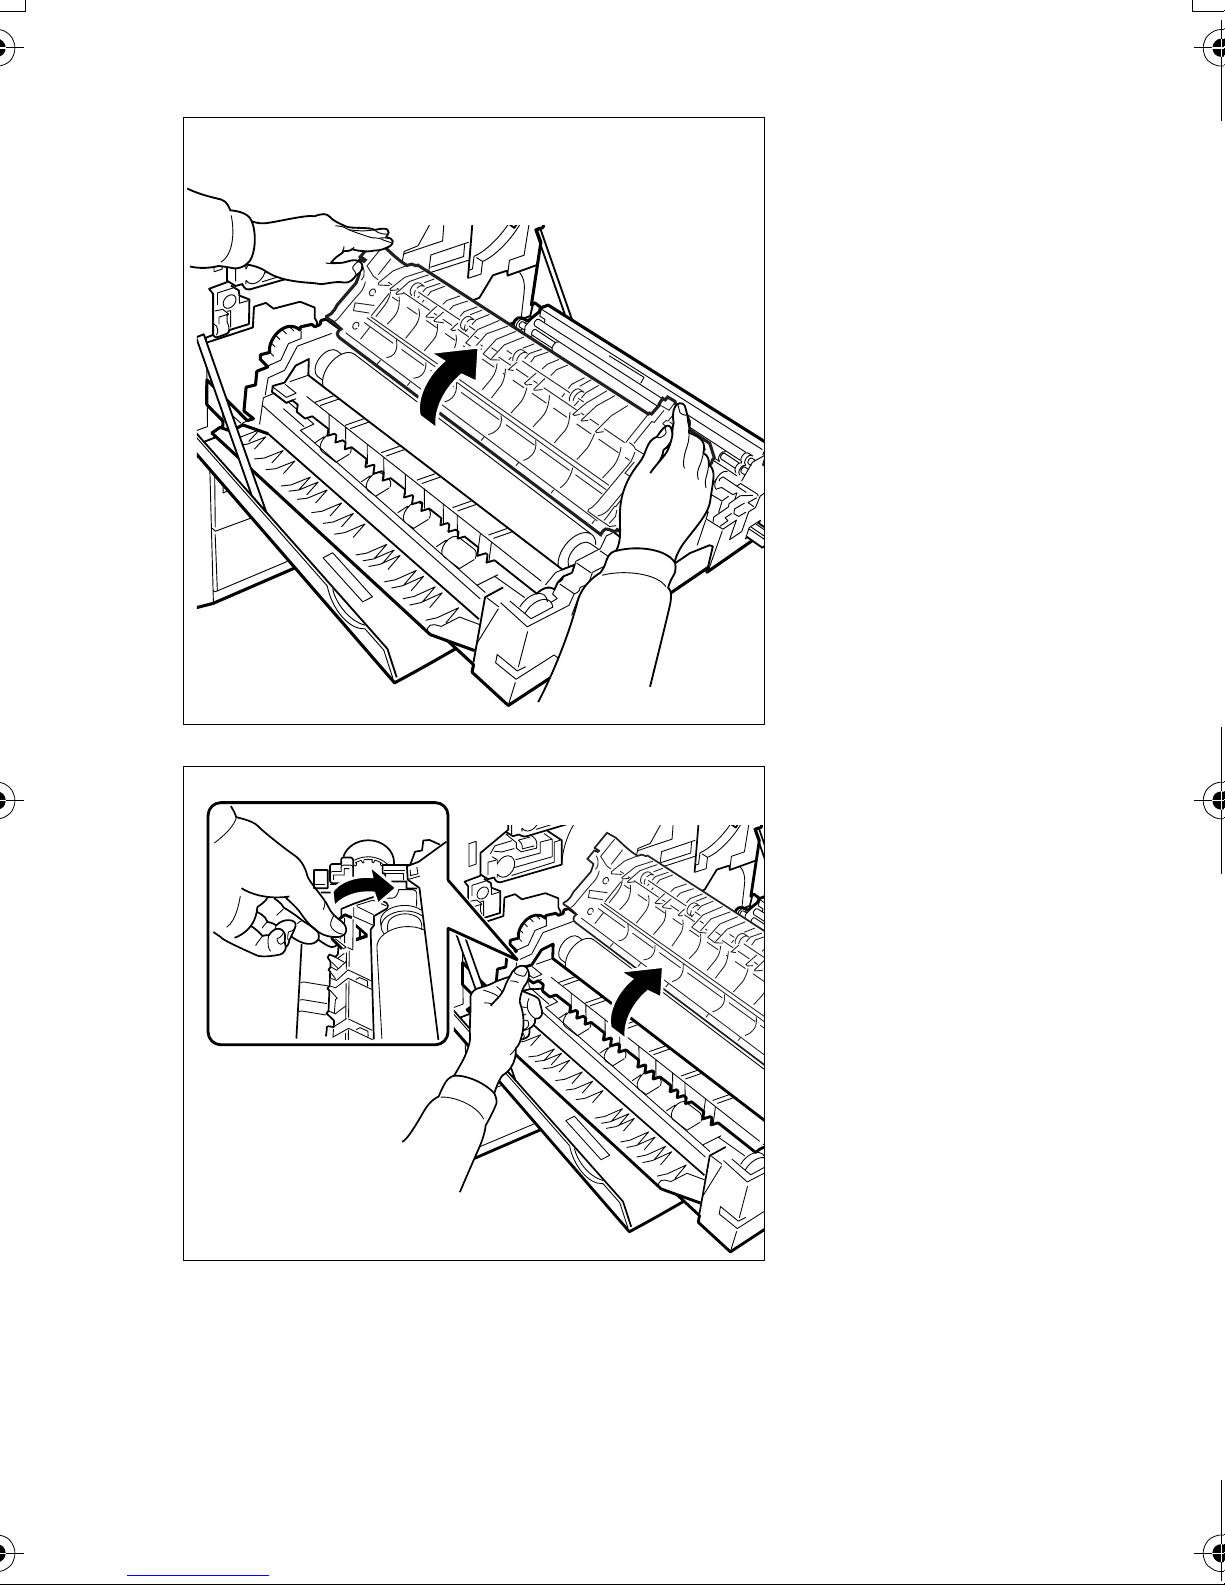
5
Open the fuser
top cover.
6
Raise the subcover by grasping the clip
marked as A on
the rear side while
removing the
paper.
23
Page 26
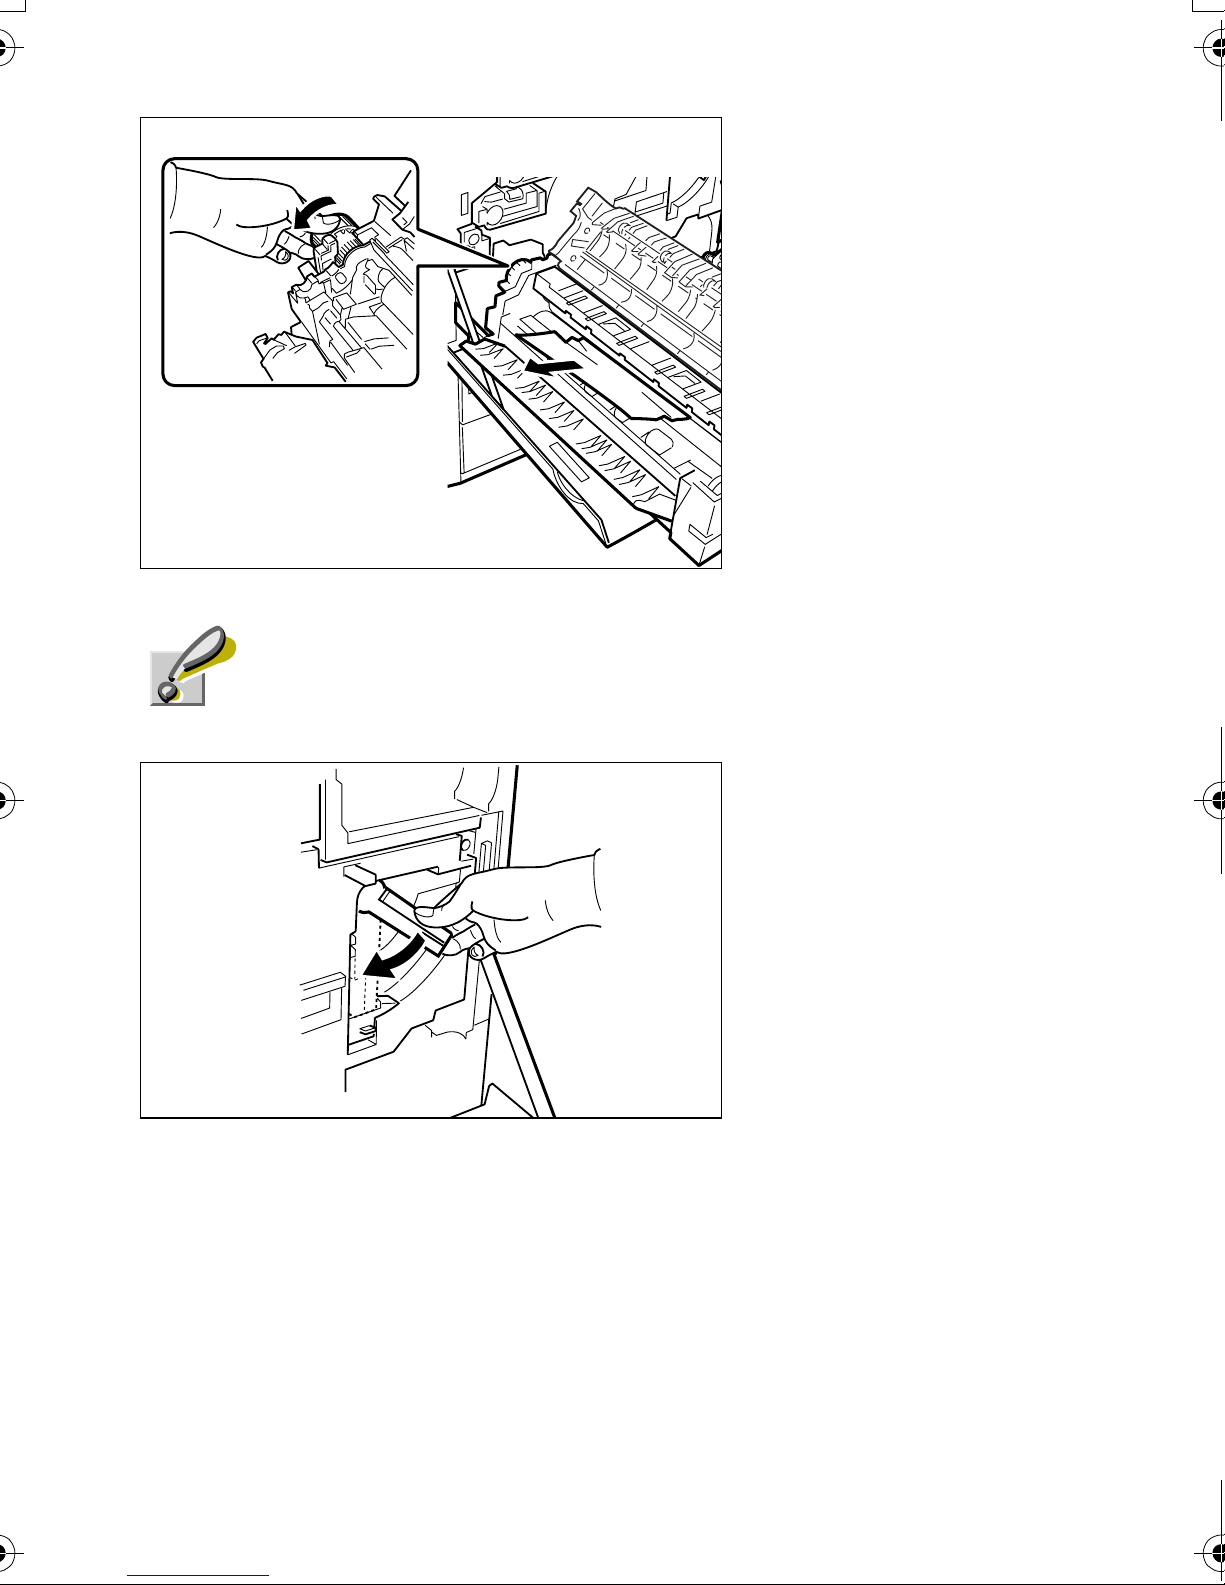
Caution
If th
7
e paper is
pinched between
the rollers, turn
the wheel.
Rotate the wheel only in the direction illustrated
in the diagram.
8
Turn the greencolored lever
down to the six
o’clock position.
This allows you to
draw out the primary transfer
roller.
24
Page 27
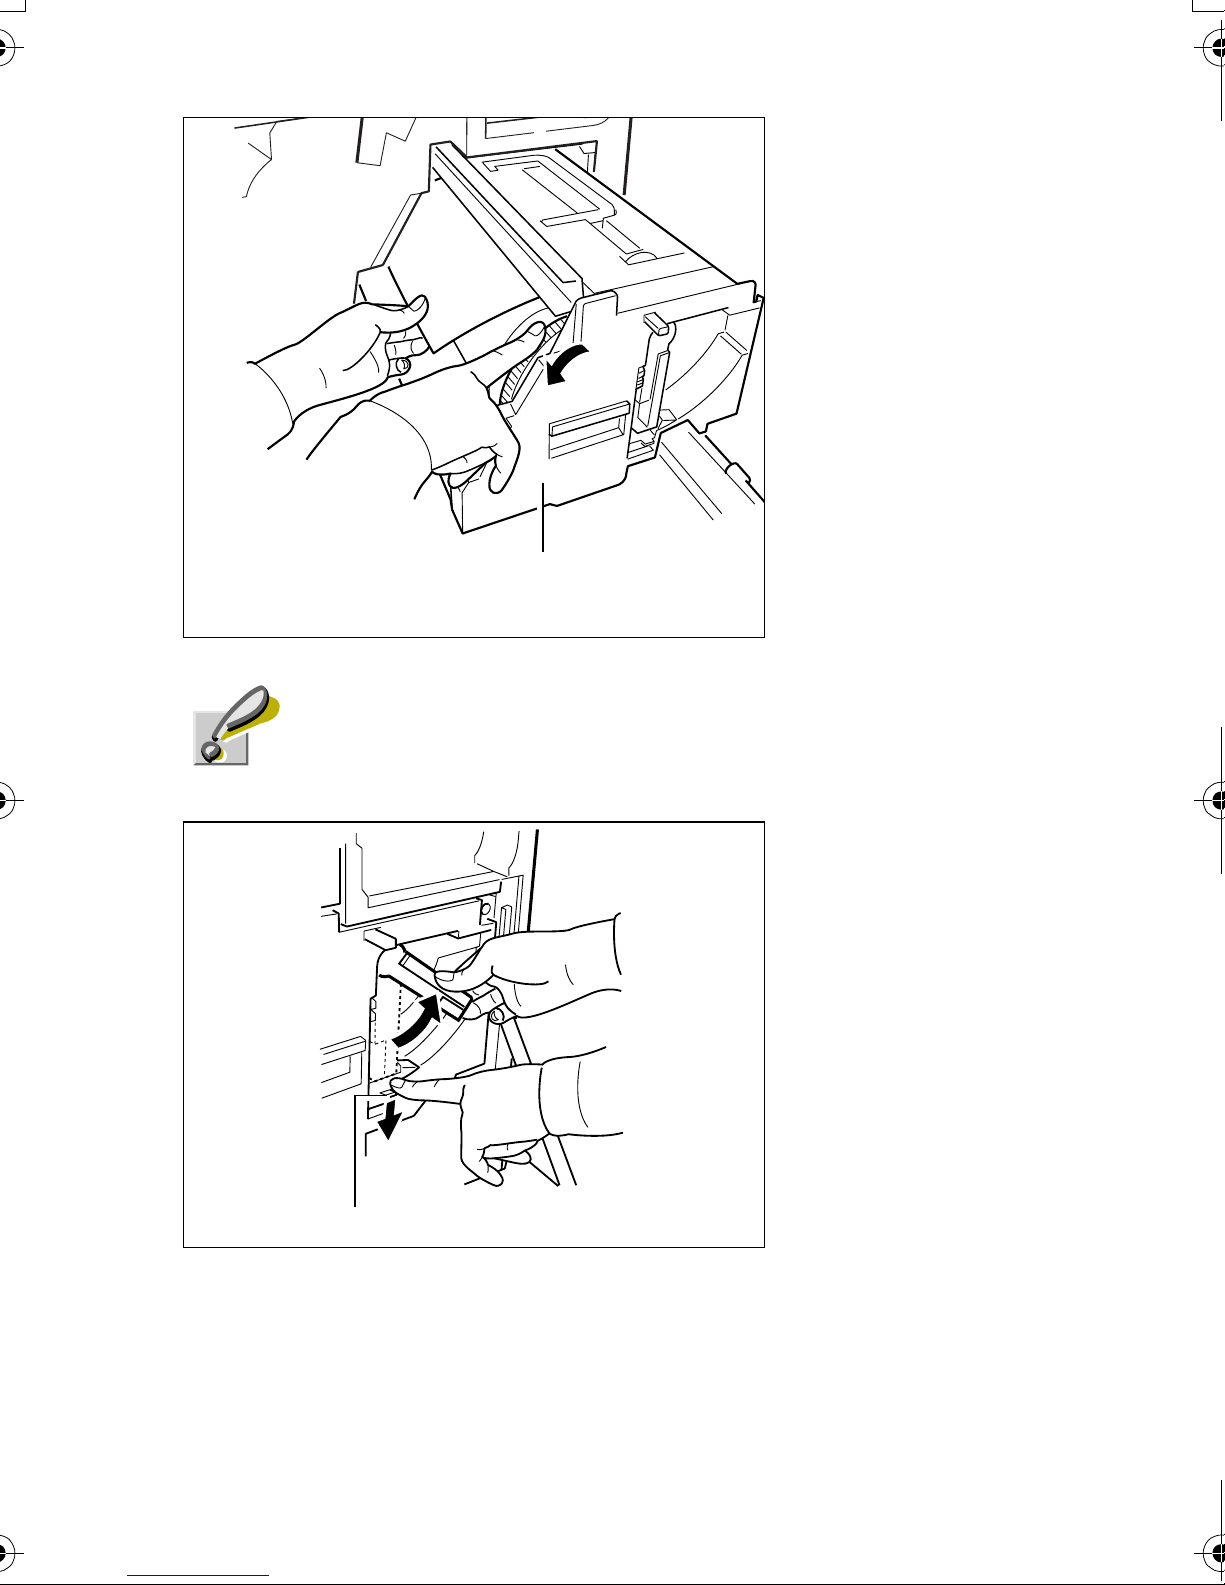
T
Primary Transfer
Unit
9
urn the wheel
(with gear teeth)
on the right-hand
side of the primary transfer unit.
Remove the
jammed paper.
Caution
Use care not to touch the drum component in the
primary transfer unit.
Push the primary
10
transfer unit back
in. While pressing down the lock
button, set the
lock lever back to
the original (four
o’clock) position.
Lock Button
Push the paper transfer unit back in completely and
close the front cover.
25
Page 28
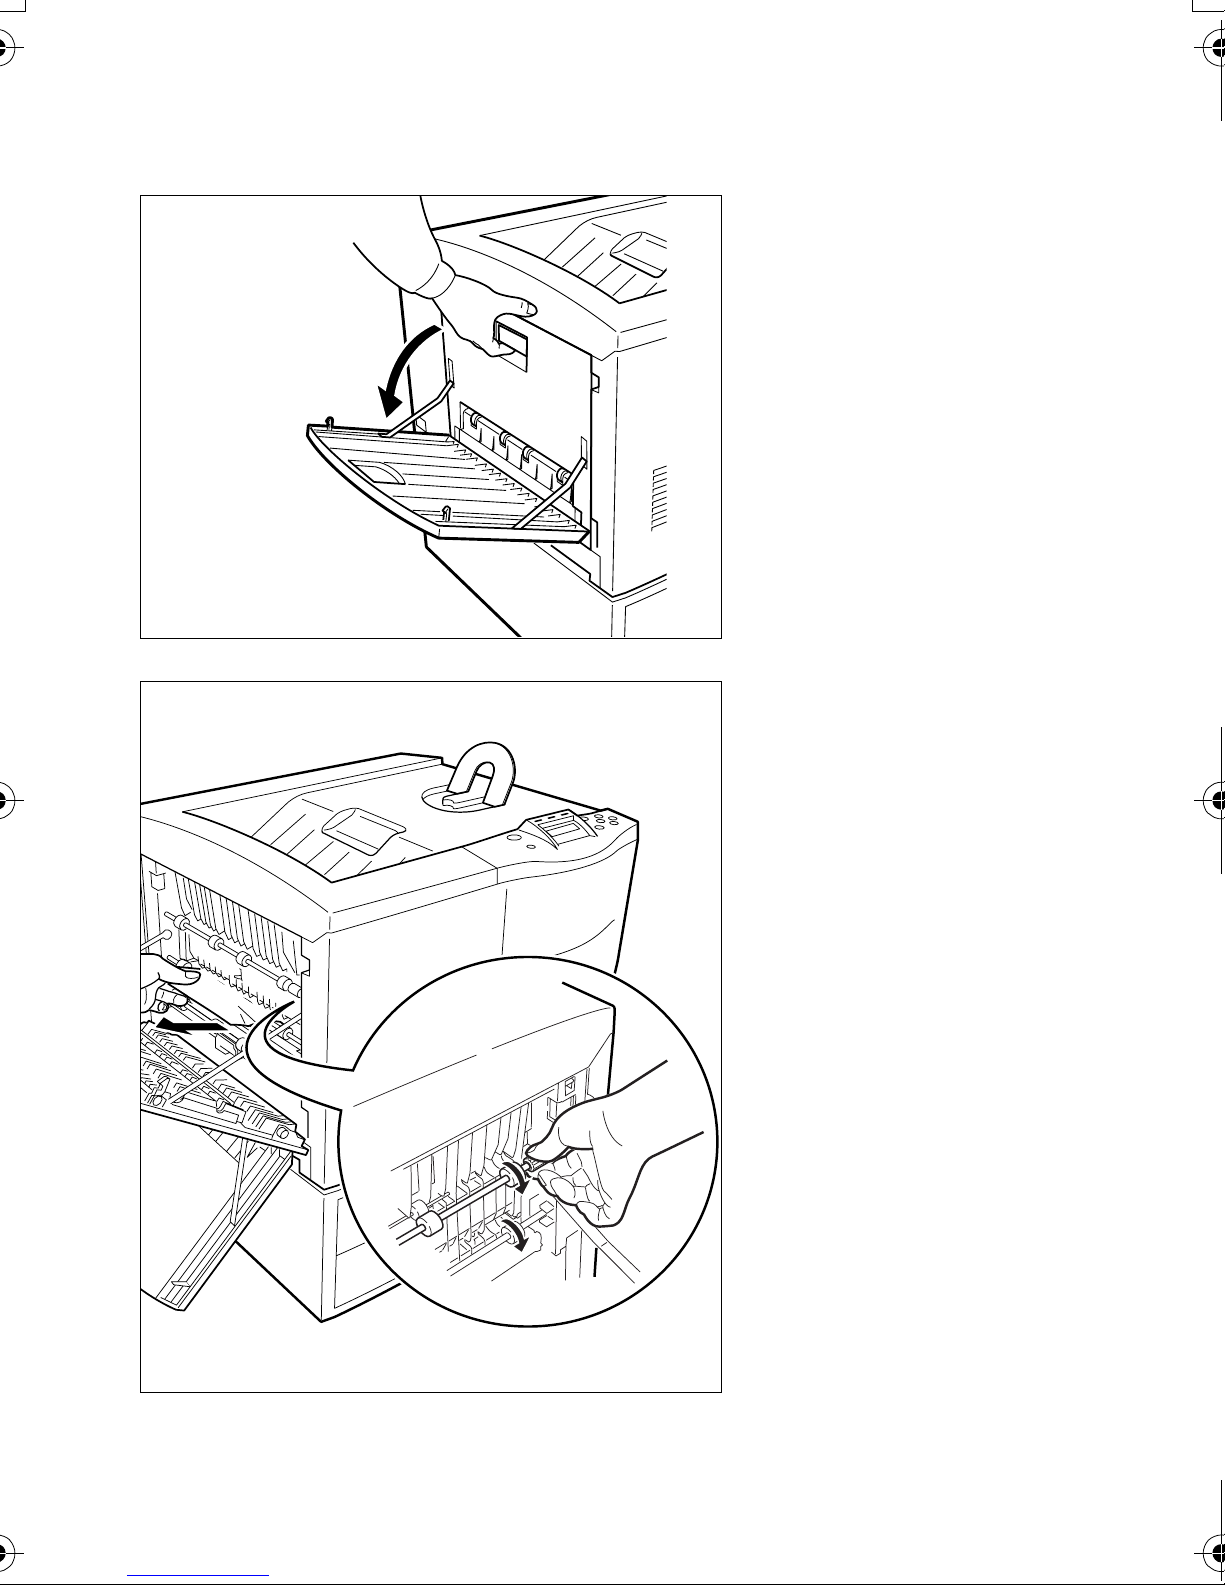
[Paper Jam — Left Cover]
1
2
Open the face-up
tray. Open the left
cover by pulling
the handle.
Remove the
jammed paper.
If the paper is
stuck under the
roller, grasp the
green-colored
knob and rotate
the roller in the
direction indicated
in the diagram so
that the paper is
driven out.
If the paper does
not go easily,
refer to section
[Paper Jam —
26
Paper Transfer
Unit] on page 21.
Page 29

[Paper Jam — Option Stacker/Finisher/Sorter]
Paper jam has occurred in the bulk stacker, document
finisher, or sorter which is an optional equipment.
Remove paper jam in the option unit.
27
Page 30
Toner Container Replacement
The life of the toner containers depends on the amount
of toner required to accomplish your printing jobs.
When 5 % coverage (a typical business document) of
individual toner colors is assumed for A4 or letter size,
the average life of each toner container is as follows†:
TK-800K Black 25,000 pages
TK-800C Cyan 10,000 images
TK-800M Magenta 10,000 images
TK-800Y Yellow 10,000 images
Replace the toner container when the printer displays,
for example:
Toner low
C
This is the first caution. Note the replacement is not
always necessary at this stage. Replace the toner container immediately when the printer displays:
Replace Toner
C
† These figures will be smaller when the starter toner containers are used.
28
Page 31
Replacing the Toner Container
You do not have to turn printer power off before
starting the replacement. Any data that may be
Note
under printing process will be deleted if you turn
printer power off.
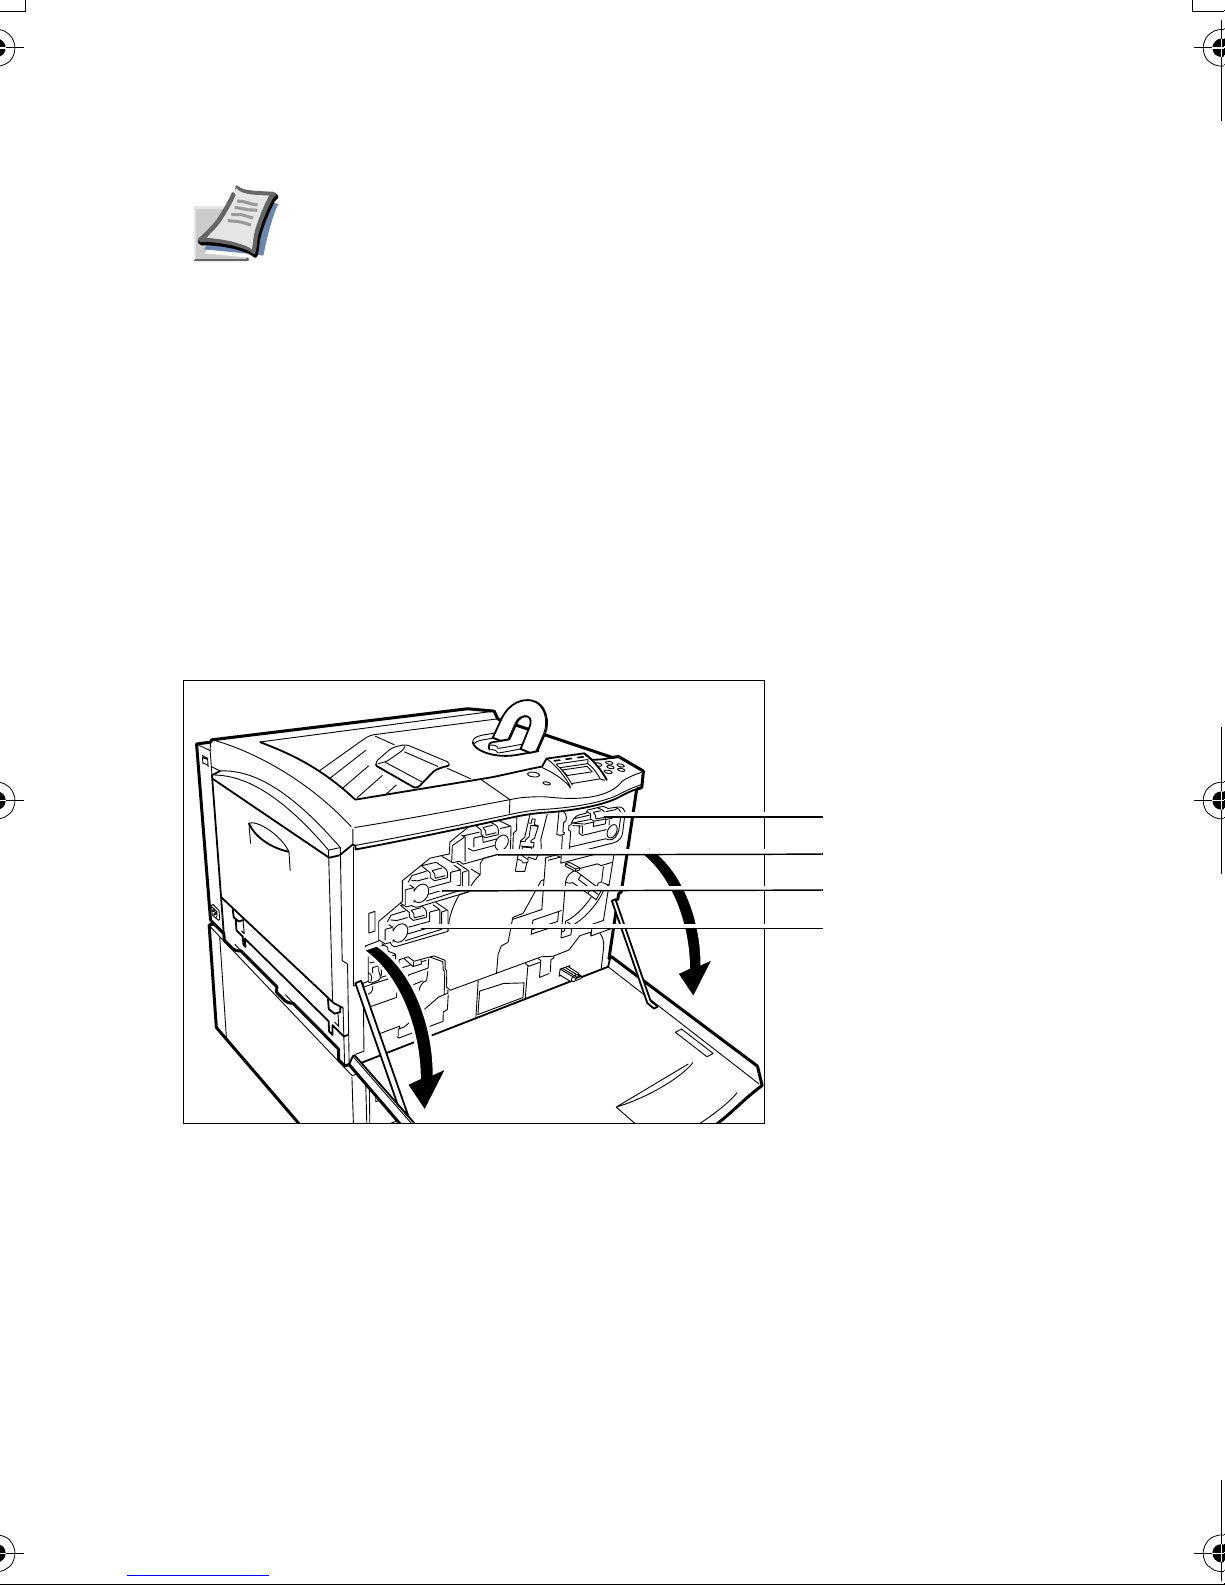
To replace the toner container, first make sure of the
color of the toner container requiring replacement
according to the message display. In this example, it is
assumed that you are replacing the black toner container. To replace the other color toner container, use
the same procedure.
Black (K)
Yellow (Y)
Magenta (M)
Cyan (C)
29
Page 32
-
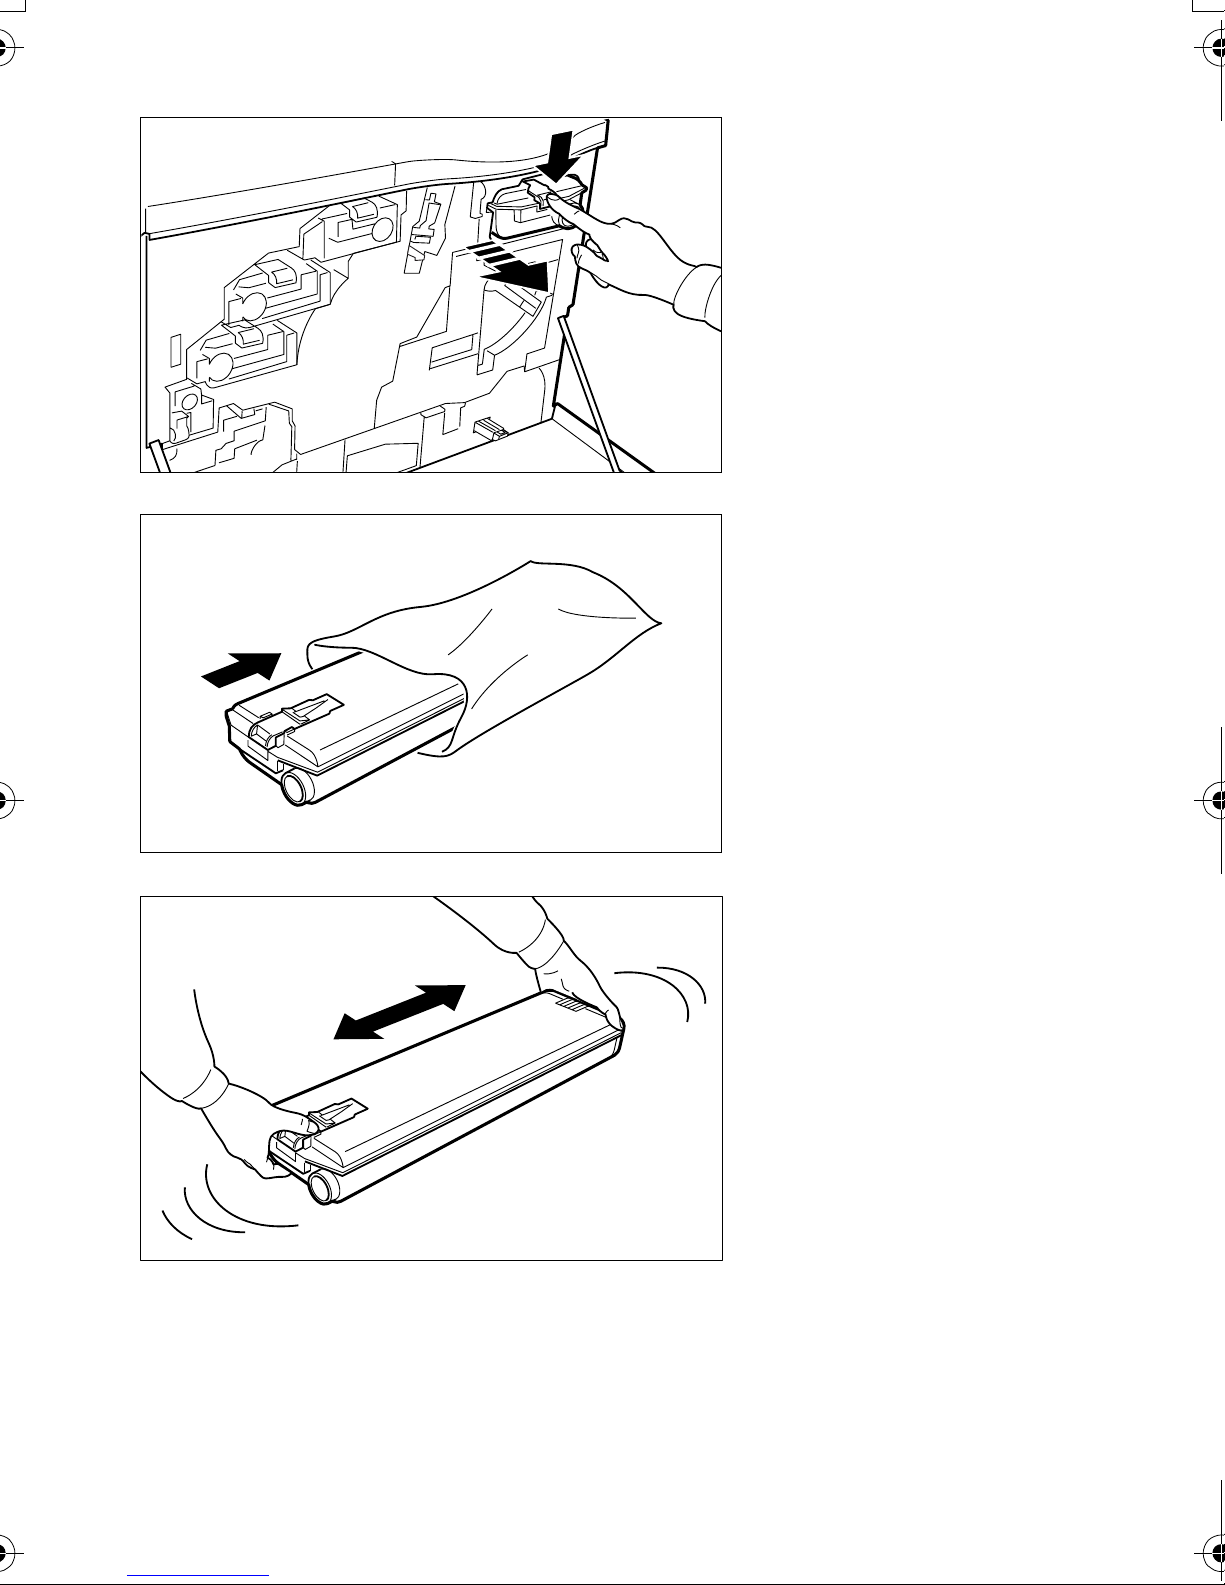
1
While pressing
down the bluecolored lever at
the end of the
toner container,
pull the toner con
tainer out.
2
3
Put the old toner
container in the
plastic waste bag
(contained in the
toner kit) and discard it.
Take the new
toner container
out of the toner
kit. Hold the container and shake
30
the container
back and forth at
least 5 times.
Page 33
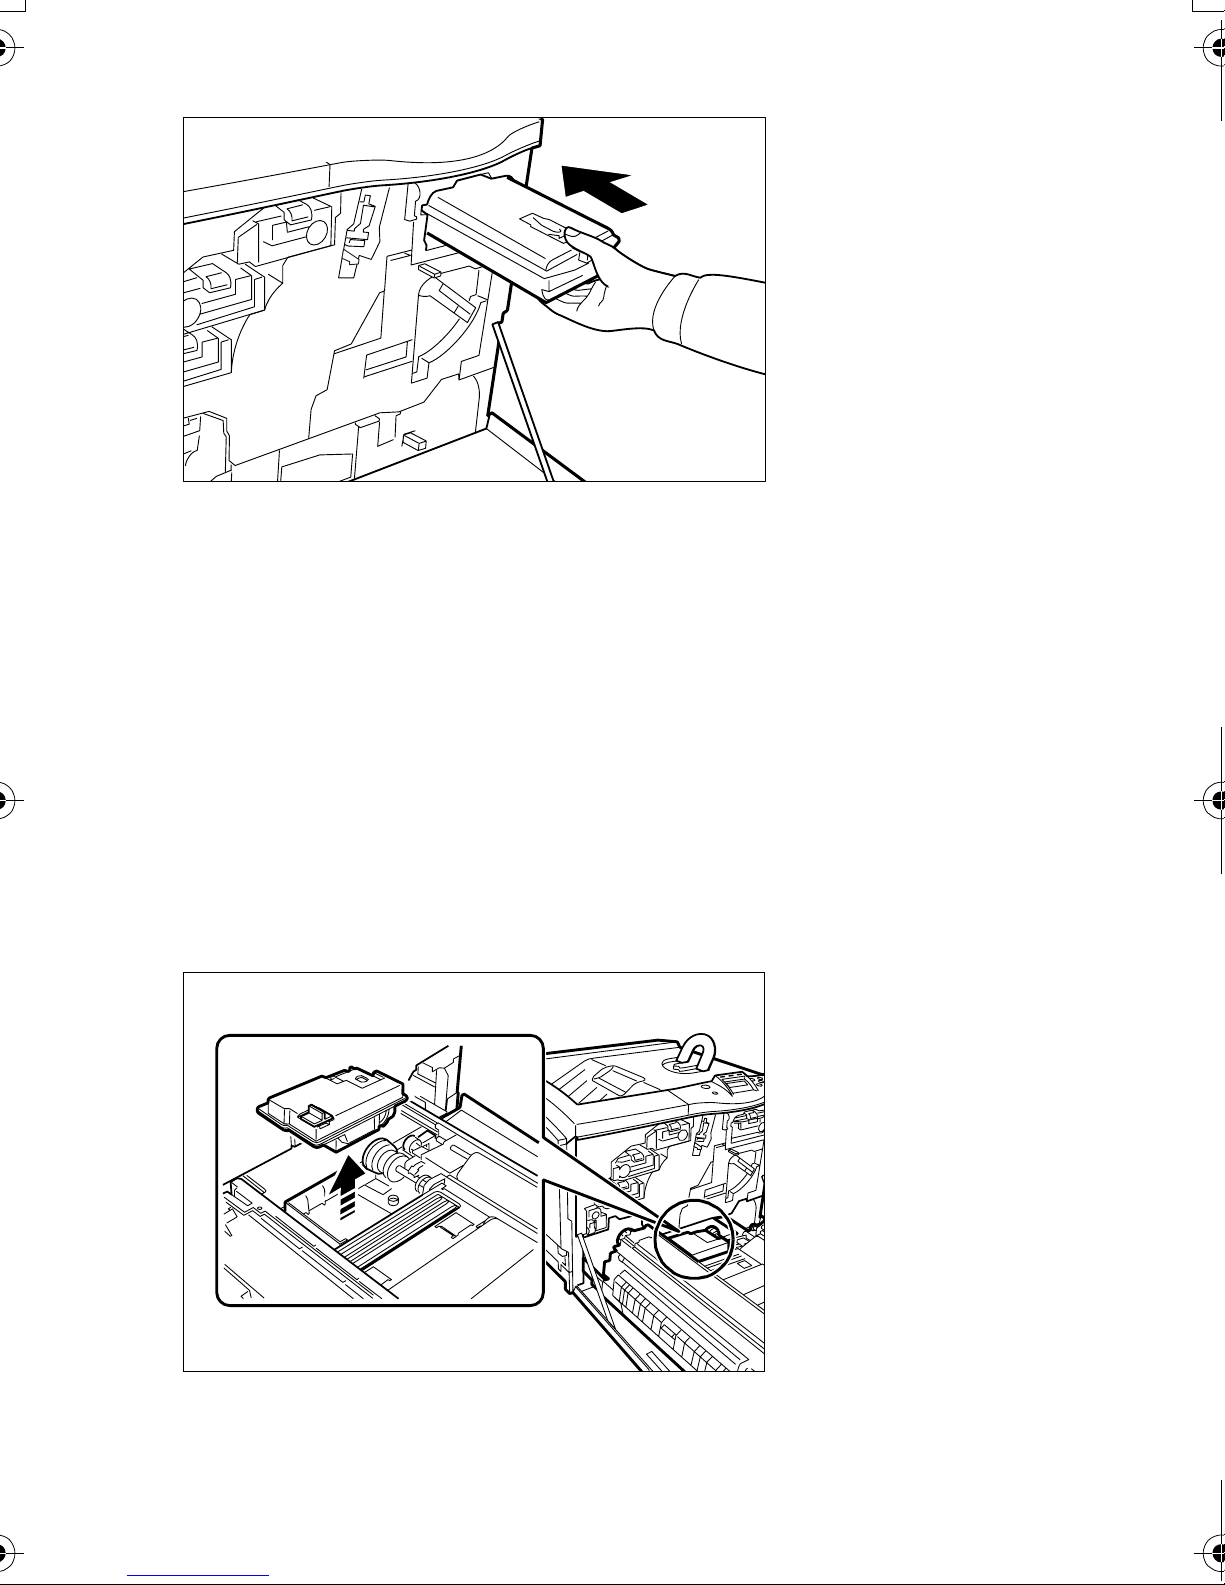
4
I
nsert the new
toner container all
the way in. The
container is
locked automatically when it is
properly seated.
When the toner container has been replaced, proceed
to the next section.
Replacing the Waste Toner Box
Replace the waste toner box each time you replace the
toner container. A new waste toner box is included with
the toner kit. The printer will not operate without replacing the waste toner box.
Pull the paper transfer unit all the way out.
Slowly remove
1
the waste toner
box. Do not place
the removed box
upside down.
31
Page 34
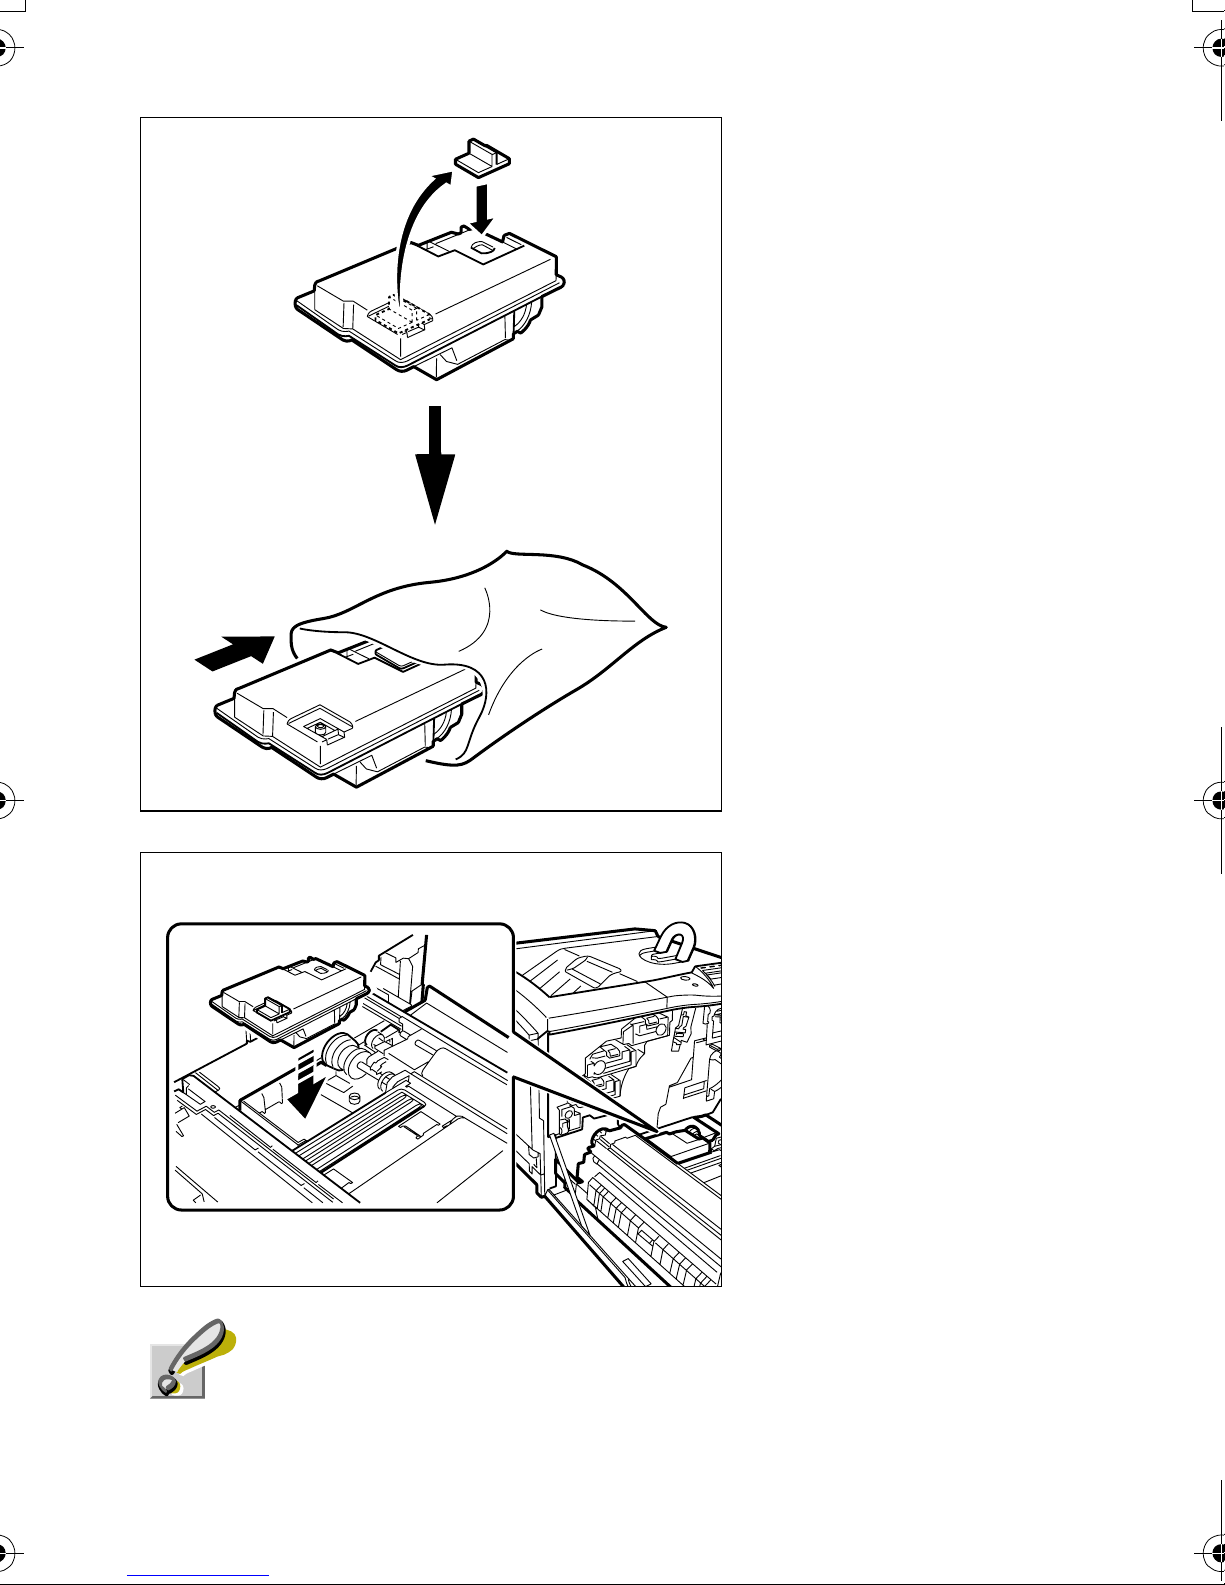
2
The old waste
toner box has a
cap. Remove the
cap (black) on the
top of the box and
put the cap onto
the opening. This
is to prevent the
toner from spilling.
Put the old waste
toner box in the
plastic waste bag
(contained in the
3
toner kit) and discard it.
Insert the new
waste toner box
(contained in the
toner kit) upright
until it snaps into
place.
Do not put the lid on the opening of a new waste
toner box. This could cause damage to the
Caution
printer.
32
Page 35
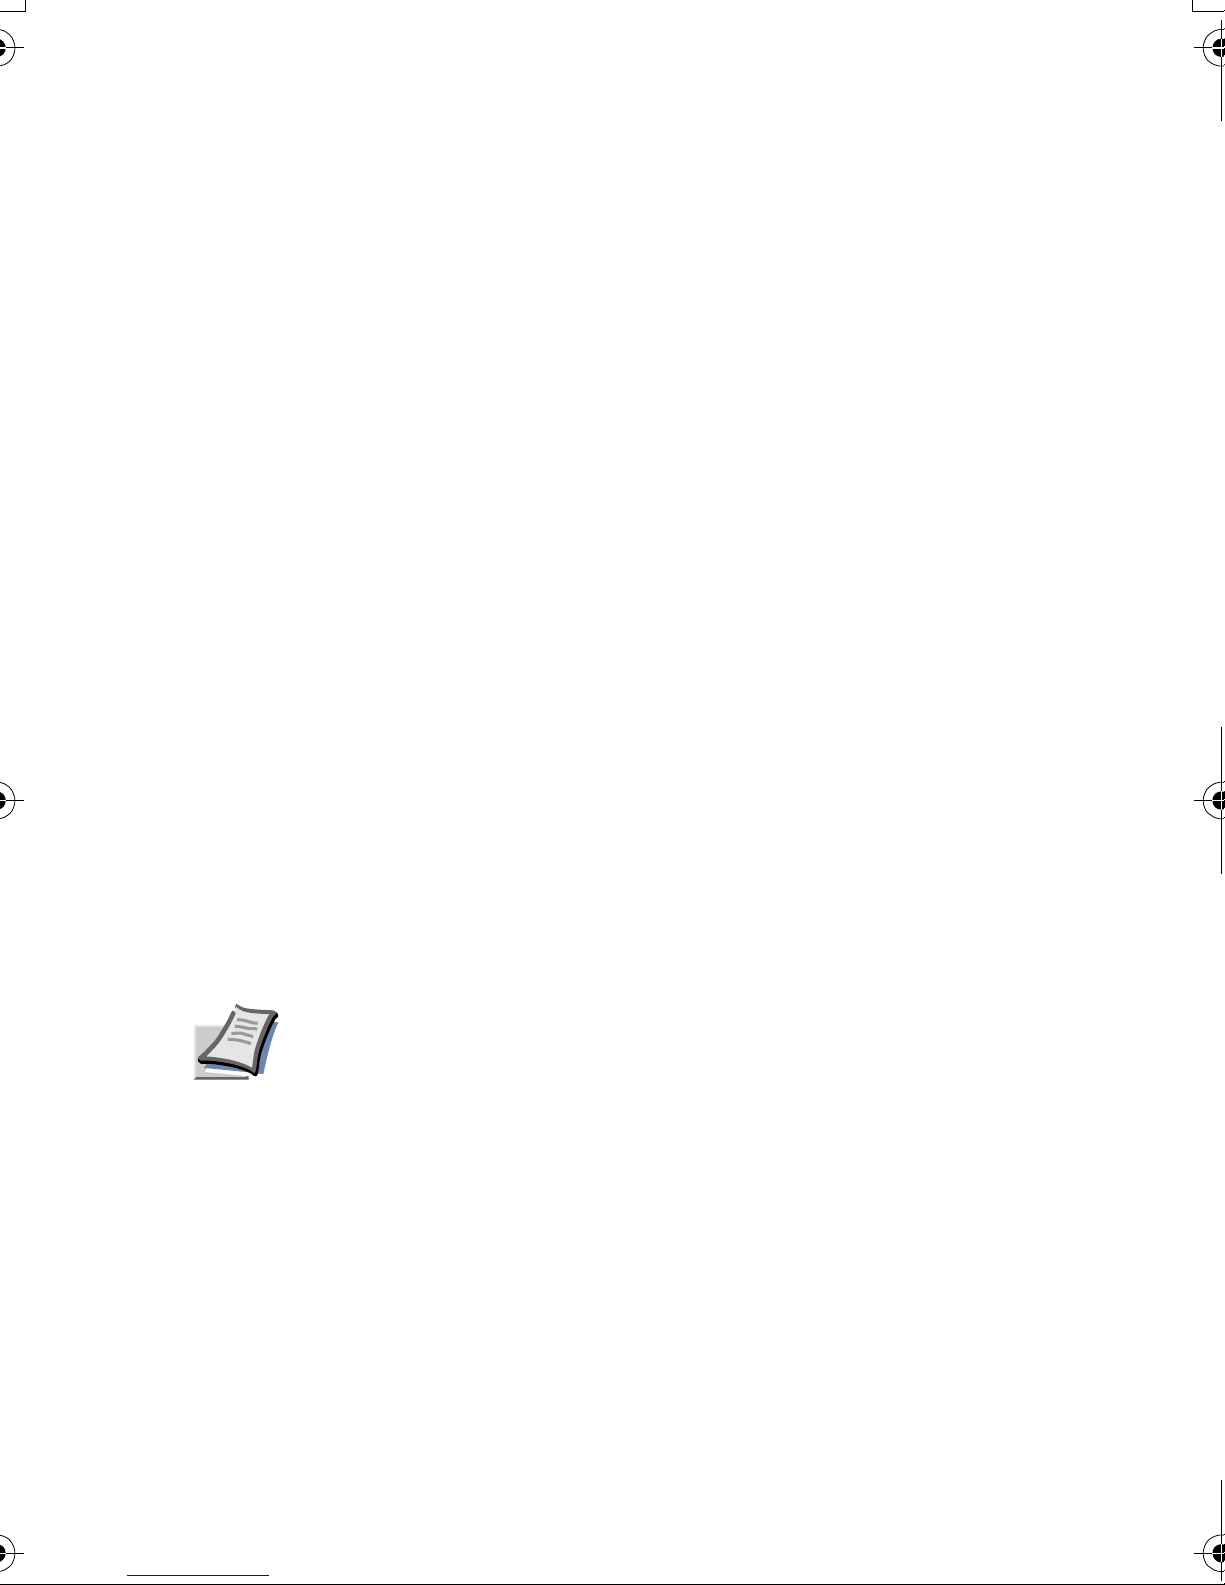
Cleaning the Printer
The following parts must be cleaned each time the
toner container is replaced:
• Registration roller
•Belts
• Main charger wire
• Main charger grid
These parts are explained in the following sections. In
addition to this, it is recommended that these parts are
cleaned periodically at least once a month.
Cleaning the Paper Transfer Unit
Print problems such as soiling of the reverse side of
printed pages may occur if the paper transfer unit
becomes dirty. To clean the paper transfer unit:
Open the front cover. Pull the paper transfer unit out by
its handle.
Be careful not to touch the transfer belt (brown)
during cleaning as this may adversely affect
Note
print quality.
33
Page 36
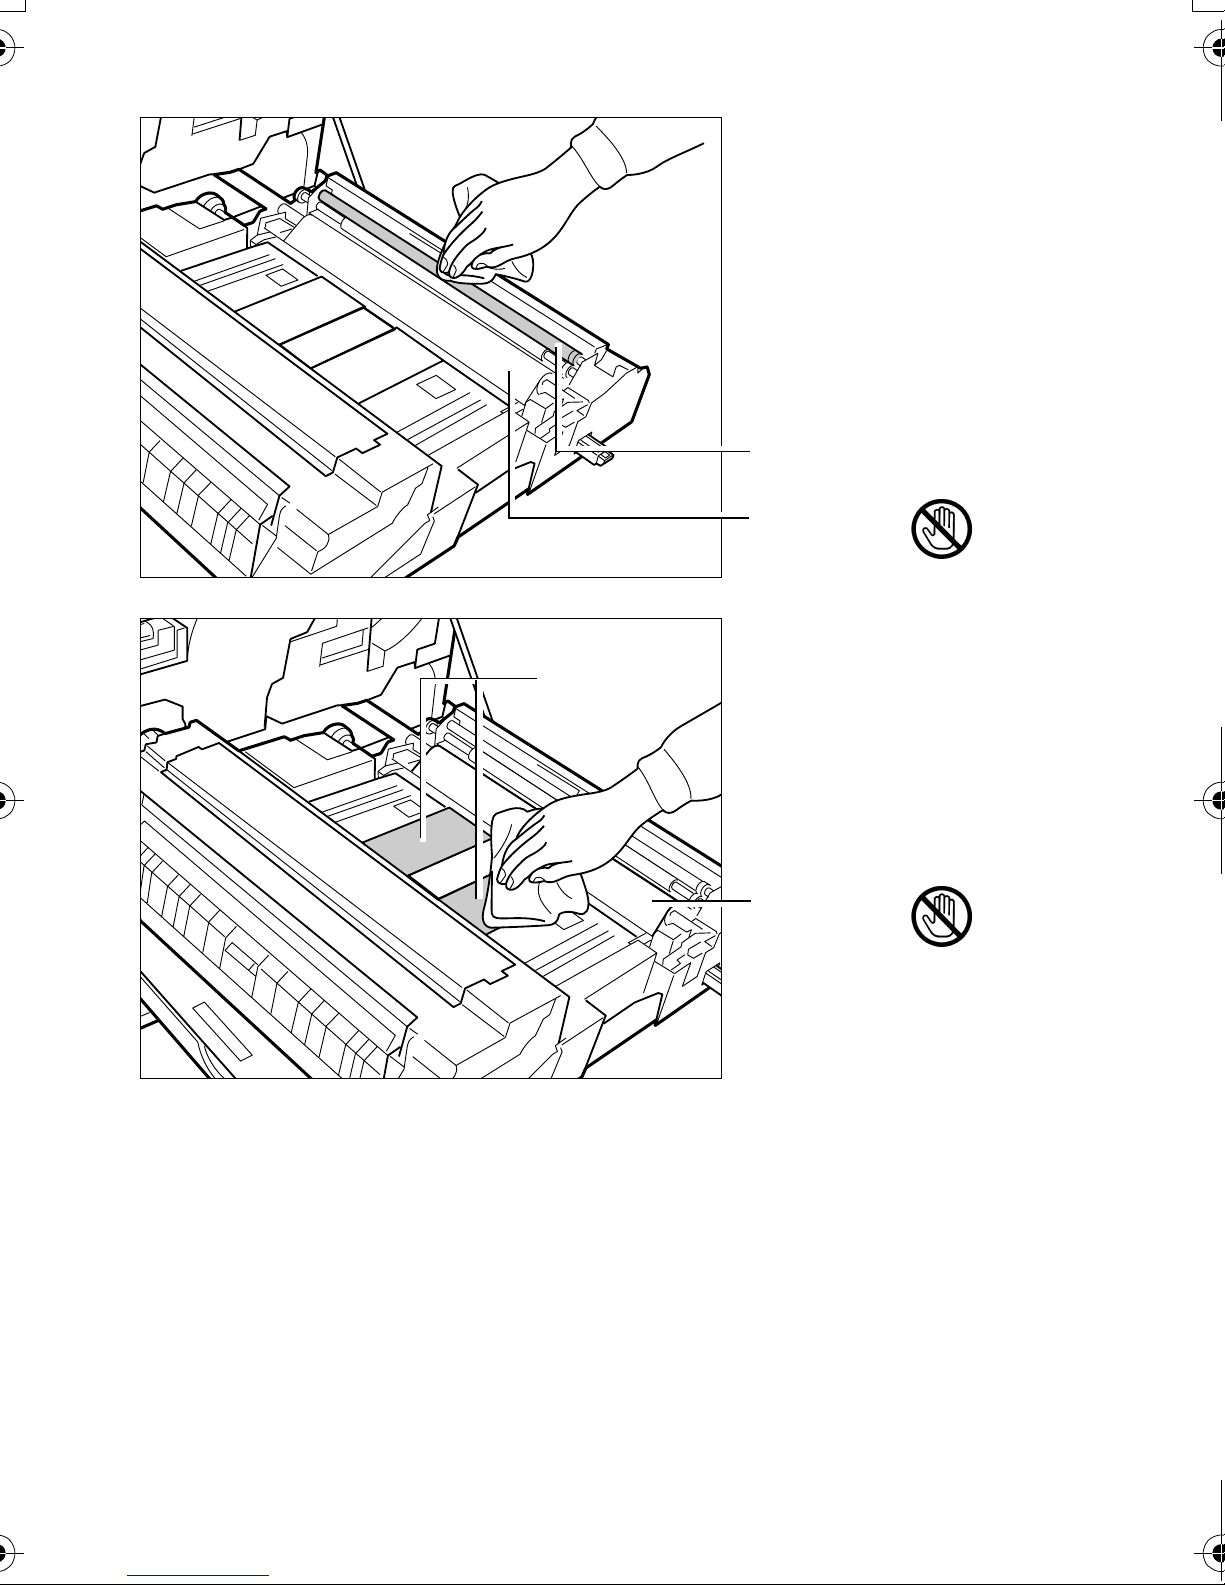
Cl
ean the metal
.
roller as shown
(the registration
roller) using the
Rubber Belts
1
cleaning cloth
(included in the
toner kit).
Registration Roller
(Metal)
Transfer Belt
(brown)
Clean the rubber
belts (black) using
the cleaning cloth
2
Transfer Belt
(brown)
34
Page 37

Cleaning the Main Charger Unit
The main charger unit needs to be cleaned periodically
as it gets contaminated with dioxide after a long usage,
causing black streaks, etc. on the paper. The main
charger is comprised of two main parts — the wire and
the grid — which should be cleaned separately as
instructed below:
1
Cleaning the
main charger
wire — Grasp the
tab of the cleaning knob (green)
and gently pull out
and push it back
in 3 to 5 times.
35
Page 38

2
Cl
.
eaning the
main charger
grid — Take the
grid cleaner
(included in the
toner kit) out of
Grid Cleaner
Lock Lever
the protective bag
and remove the
cap.
Attach the grid
cleaner to the
printer, with the
pad facing up.
Slightly lift the
3
main charger unit.
Main Charger
Unit
When finished, remove the grid cleaner from the printer
and discard it. The grid cleaner cannot be reused.
Close the front cover.
36
Gently pull the
main charger unit
out and push it
back in. Repeat
this 2 to 3 times.
These movements clean the
grid at the bottom
Page 39

Page 40

Kyocera Mita Corporation
2-28, 1-Chome, Tamatsukuri, Chuo-ku
Osaka 540-8585, Japan
Phone: (06) 6764-3555
 Loading...