

Page 1
Operation Guide
Please read the Operation Guide before using the copier.
Keep it close to the copier for easy reference.
4530/5530
Page 2

<IMPORTANT>
The instructions contained herein are based on the 45 cpm (copies-per-minute) 4530 copier and the 55 cpm 5530 copier.
NOTE:
This Operation Guide contains information that corresponds to using both the inch and metric versions of this copier.
Within the text we have generally indicated messages by listing that for the inch version followed, in brackets, by the
corresponding information for the metric version. However, when a message is essentially the same, or when the difference
is only one of upper- and lower-case spelling, we have listed the information specifically as it is displayed in the inch
version of this machine.
All rights reserved. No part of this material may be reproduced or transmitted in any form or by any means, electronic or
mechanical, including photocopying, recording or by any information storage and retrieval system, without permission in
writing from the Publisher.
Legal Restriction On Copying
• It may be prohibited to copy copyrighted material without permission of the copyright owner.
• It is prohibited under any circumstances to copy domestic or foreign currencies.
• Copying other items may be prohibited.
We have determined as a participating company in the International
Energy Star Program that this product is compliant with the standards
laid out in the International Energy Star Program.
About the International Energy Star Program
International Energy Star Program has as its basic goals the
promotion of efficient energy use and the reduction of the
environmental pollution that accompanies energy consumption by
promoting the manufacture and sale of products that fulfill program
standards.
International Energy Star Program standards require that copies
come equipped with a “Low Power Mode” where energy consumption
is reduced after a certain amount of time elapses since the device
was last used, as well as an “Off Mode” where the device
automatically turns itself off after there is no activity within a set
amount of time. When the copier includes printer and fax functions,
the printer and fax must enter a “Low Power Mode” where power
consumption is automatically reduced after a certain amount of time
elapses since they were last used, and they must also support a
“Sleep Mode” where power consumption is reduced to a minimum
when there is no activity within a set amount of time.
This product is equipped with the following features as a result of its
compliance with International Energy Star Program standards.
● Low Power Mode
The device automatically enters “Low Power Mode” when 15 minutes
have passed since the device was last used. The amount of time of
no activity that must pass before “Low Power Mode” is activated may
be lengthened. See “Energy-saving preheat function” for more
information.
● Off Mode
The device automatically enters “Off Mode” when 90 minutes have
passed since the device was last used. The amount of time of no
activity that must pass before “Off Mode” is activated may be
lengthened. For more information see “Auto shut-off function”.
● Sleep Mode (If the copier has printer and/or facsimile function)
The device automatically enters “Sleep Mode” when 90 minutes have
passed since the device was last used. The amount of time of no
activity that must pass before “Sleep Mode” is activated may be
lengthened. For more information see “Auto shut-off function”.
● Automatic 2-Sided Copy Function
The Energy Star Program encourages the use of 2-sided copying
which reduces the load on the environment and this device includes 2sided copying as a standard function. For example, by copying two 1sided originals onto a single sheet of paper as a 2-sided copy, it is
possible to lower the amount of paper used.
For more information see “Making 2-sided copies from various types
of originals [2-sided copy modes]”.
● Paper Recycling
The Energy Star Program encourages the use of environmentally
friendly recycled paper. Your sales or service representative can
provide information about recommended paper types.
Page 3
i
Please read this Operation Guide before using the copier. Keep it close to the copier
for easy reference.
The sections of this guide and parts of the copier marked with symbols are safety warnings meant
to protect the user, other individuals and surrounding objects, and ensure correct and safe usage
of the copier. The symbols and their meanings are indicated below.
DANGER: Indicates that serious injury or even death will very possibly result from
insufficient attention to or incorrect compliance with the related points.
WARNING: Indicates that serious injury or even death may result from insufficient attention
to or incorrect compliance with the related points.
CAUTION: Indicates that personal injury or mechanical damage may result from insufficient
attention to or incorrect compliance with the related points.
Symbols
The m symbol indicates that the related section includes safety warnings. Specific points of attention
are indicated inside the symbol.
................. [General warning]
................. [Warning of danger of electrical shock]
................. [Warning of high temperature]
The symbol indicates that the related section includes information on prohibited actions. Specifics
of the prohibited action are indicated inside the symbol.
.................. [Warning of prohibited action]
................... [Disassembly prohibited]
The ● symbol indicates that the related section includes information on actions which must be
performed. Specifics of the required action are indicated inside the symbol.
.................. [Alert of required action]
.................. [Remove the power plug from the outlet]
.................. [Always connect the copier to an outlet with a ground connection]
Please contact your service representative to order a replacement if the safety warnings in this
Operation Guide are illegible or if the guide itself is missing. (fee required)
<Note>
An original which resembles a bank note closely may not be copied properly in some rare cases
because this copier is equipped with a counterfeiting prevention function.
Page 4

ii
CONTENTS
Section 1
IMPORTANT! PLEASE READ FIRST. .. 1-1
CAUTION LABELS............................................................. 1-1
INSTALLATION PRECAUTIONS........................................ 1-2
PRECAUTIONS FOR USE ................................................ 1-3
Section 2
NAMES OF PARTS ............................... 2-1
1. Main body ........................................................................... 2-1
2. Operation panel .................................................................. 2-4
3. Touch panel ........................................................................ 2-6
Section 3
PREPARATIONS ................................... 3-1
1. Loading paper .................................................................... 3-1
(1) Note when adding paper ........................................... 3-1
(2) Loading paper into drawers[cassettes]
No.1 and No.2 ........................................................... 3-1
(3) Loading paper into drawers[cassettes]
No.3 and No.4 ........................................................... 3-3
(4) Setting paper on the multi-bypass tray ......................3-4
(5) Loading paper into the Side Feeder (an optional
drawer[cassette] only available for 55 cpm copiers) ..3-5
2. Setting originals .................................................................. 3-6
(1) Setting originals in the Document Processor ............ 3-6
(2) Setting originals on the platen ................................... 3-7
3. Adding toner ....................................................................... 3-8
Section 4
BASIC OPERATION .............................. 4-1
1. Basic copying procedure .................................................... 4-1
2. Enlarging/reducing the copy image .................................... 4-5
(1) Auto magnification selection mode............................ 4-5
(2) Zoom mode ............................................................... 4-6
(3) Preset zoom mode .................................................... 4-7
(4) XY zoom mode ..........................................................4-8
3. Interrupt copying................................................................. 4-9
4. Job reservation ................................................................. 4-10
5. Energy-saving preheat function........................................ 4-11
6. Auto shut-off function ....................................................... 4-11
Section 5
OTHER CONVENIENT FUNCTIONS .... 5-1
1. Making 2-sided copies from various types of originals
[2-sided copy modes] ......................................................... 5-1
(1) Making 2-sided copies from a 2-sided original .......... 5-1
(2) Making 2-sided copies from an
open-faced (books, etc.) original ............................... 5-1
(3) Making 2-sided copies from one-sided originals ......... 5-2
2. Copying two-page originals onto separate sheets
[Page separation/Split copy modes] ................................... 5-4
(1) Page separation/Split copy from book originals ........ 5-4
(2) Page separation/Split copy from 2-sided originals .... 5-4
3. Making a margin space on the copies [Margin mode] ........ 5-6
(1) Standard margin .......................................................... 5-6
(2) Separate front and back margin settings .....................5-6
4. Centering the copy image [Centering/Image shift mode] ... 5-8
5. Adding a space next to the copy images for making notes
[Memo mode] ..................................................................... 5-9
6. Making copies with clean edges [Border erase modes] ... 5-11
(1) Erasing blemishes from edges of copies
(Sheet erase mode)................................................. 5-11
(2) Erasing blemishes from the edges and middle
of copies made from books (Book erase mode)...... 5-11
7. Fitting the image of either two or four originals onto
a single copy page [Combine/Merge Copy modes].......... 5-13
(1) 2 in 1 ........................................................................ 5-13
(2) 4 in 1 ........................................................................ 5-13
8. Printing page numbers on copies
[Print page numbers mode] .............................................. 5-16
9. Overlaying one image over another
[Form overlay mode]......................................................... 5-20
10. Making booklets from sheet originals
[Booklet/Stitching mode] .................................................. 5-22
11. Making booklets from book originals
[Book to Booklet mode] .................................................... 5-25
12. Automatic sorting of copy sets without the
Document Finisher [Sort/Finished mode] ......................... 5-28
13. Auto rotation function ....................................................... 5-29
14. Auto selection/Filing mode ............................................... 5-30
15. Adding a front and/or back cover to your copy sets
[Cover mode] .................................................................... 5-32
16. Original size selection mode ............................................ 5-35
17. Feeding paper as a backing sheet for OHP transparencies
[Transparency + backing sheet mode].............................. 5-37
18. Inverting black and white [Invert mode] ............................ 5-39
19. Making mirror image copies [Mirror image mode] ............ 5-40
20. Making a test copy prior to large volume copying
[Proof mode] ..................................................................... 5-41
21. Making more of the same copies after a copy job is finished
[Repeat copy mode] ......................................................... 5-43
(1) Registering a copy job for repeat copying ............... 5-43
(2) Printing out with the repeat copy mode ................... 5-44
22. Copying a large volume of originals in one operation
[Batch scanning mode] ..................................................... 5-48
Page 5

iii
CONTENTS
23. Saving on toner use [Eco print mode] .............................. 5-49
24. Original set direction ........................................................ 5-50
25. Memorizing frequently used settings
[Program function] ............................................................ 5-51
(1) Registering a program .............................................5-51
(2) Using programmed settings to make copies ........... 5-52
(3) Changing a registered program name ..................... 5-52
(4) Deleting a registered program .................................5-53
26. Registration keys .............................................................. 5-54
(1) Registering a function or mode
under a function key ................................................ 5-54
(2) Deleting a registration key .......................................5-56
27. Easily add covers and insert sheets between various sets of
originals in one operation [Job build mode] ...................... 5-58
(1) Using the job build mode .........................................5-58
(2) Selecting the settings and functions ........................5-63
Section 6
DOCUMENT AND OUTPUT
MANAGEMENT FUNCTIONS ............... 6-1
1. Document management functions .................................... 6-1
(1) What are the “document management” functions? ... 6-1
(2) Form registration ....................................................... 6-1
(3) Shared data box ........................................................ 6-4
(4) Synergy print boxes ................................................... 6-9
2. Output management functions ......................................... 6-20
(1) What are the “output management” functions? ....... 6-20
(2) Display of the output management functions .......... 6-20
(3) The “Print status” screen ......................................... 6-21
(4) The “Job history” screen .......................................... 6-22
Section 7
COPIER MANAGEMENT
FUNCTIONS .......................................... 7-1
1. Copy management mode ................................................... 7-1
(1) What’s in the “copy management mode” screen? ..... 7-1
(2) Accessing the copy management mode settings ...... 7-3
(3) Making copy management settings ...........................7-4
(4) Making copies when copy management is
turned ON ................................................................7-13
2. Weekly timer..................................................................... 7-14
(1) Settings for the weekly timer ................................... 7-14
(2) Accessing the weekly timer settings ........................ 7-14
(3) Making weekly timer settings .................................. 7-15
3. Default settings................................................................. 7-18
(1) Machine default settings .......................................... 7-18
(2) Accessing the machine default settings .................. 7-21
(3) Making machine default settings ............................. 7-22
(4) Copy default settings ...............................................7-35
(5) Accessing the copy default settings ........................ 7-38
(6) Making copy default settings .................................. 7-39
4. Multi-bypass tray paper settings ...................................... 7-63
(1) Paper size and type................................................. 7-63
(2) Selecting other standard sizes ................................ 7-64
5. Box management default settings .................................... 7-66
(1) Box settings .............................................................7-66
(2) Accessing the box management default settings .... 7-66
(3) Making box management default settings ...............7-67
6. Hard disk management .................................................... 7-71
7. Report print out................................................................. 7-72
8. Changing the language used for messages ..................... 7-74
9. Entering characters .......................................................... 7-75
Section 8
OPTIONAL EQUIPMENT ...................... 8-1
(1) Side Feeder ...............................................................8-1
(2) Document Finisher (A) .............................................. 8-1
(3) Document Finisher (B) .............................................. 8-6
(4) Key Counter............................................................... 8-7
(5) Printer Kit................................................................... 8-7
(6) Network Scanner Kit.................................................. 8-7
(7) Tandem Copier Kit .....................................................8-8
Section 9
TROUBLESHOOTING ........................... 9-1
1. If one of the following messages is displayed .................... 9-1
2. If one of these indicators lights or flashes .......................... 9-5
3. If paper jams ...................................................................... 9-6
(1) Cautions .................................................................... 9-6
(2) Removal procedures ................................................. 9-6
4. If other trouble occurs ...................................................... 9-19
Section 10
MAINTENANCE AND OPERATION
INFORMATION .................................... 10-1
1. Cleaning the copier .......................................................... 10-1
2. Specifications ................................................................... 10-2
3. Installing the optional equipment ...................................... 10-4
Appendix: Functions and settings combination chart ............. 10-6
Page 6
iv
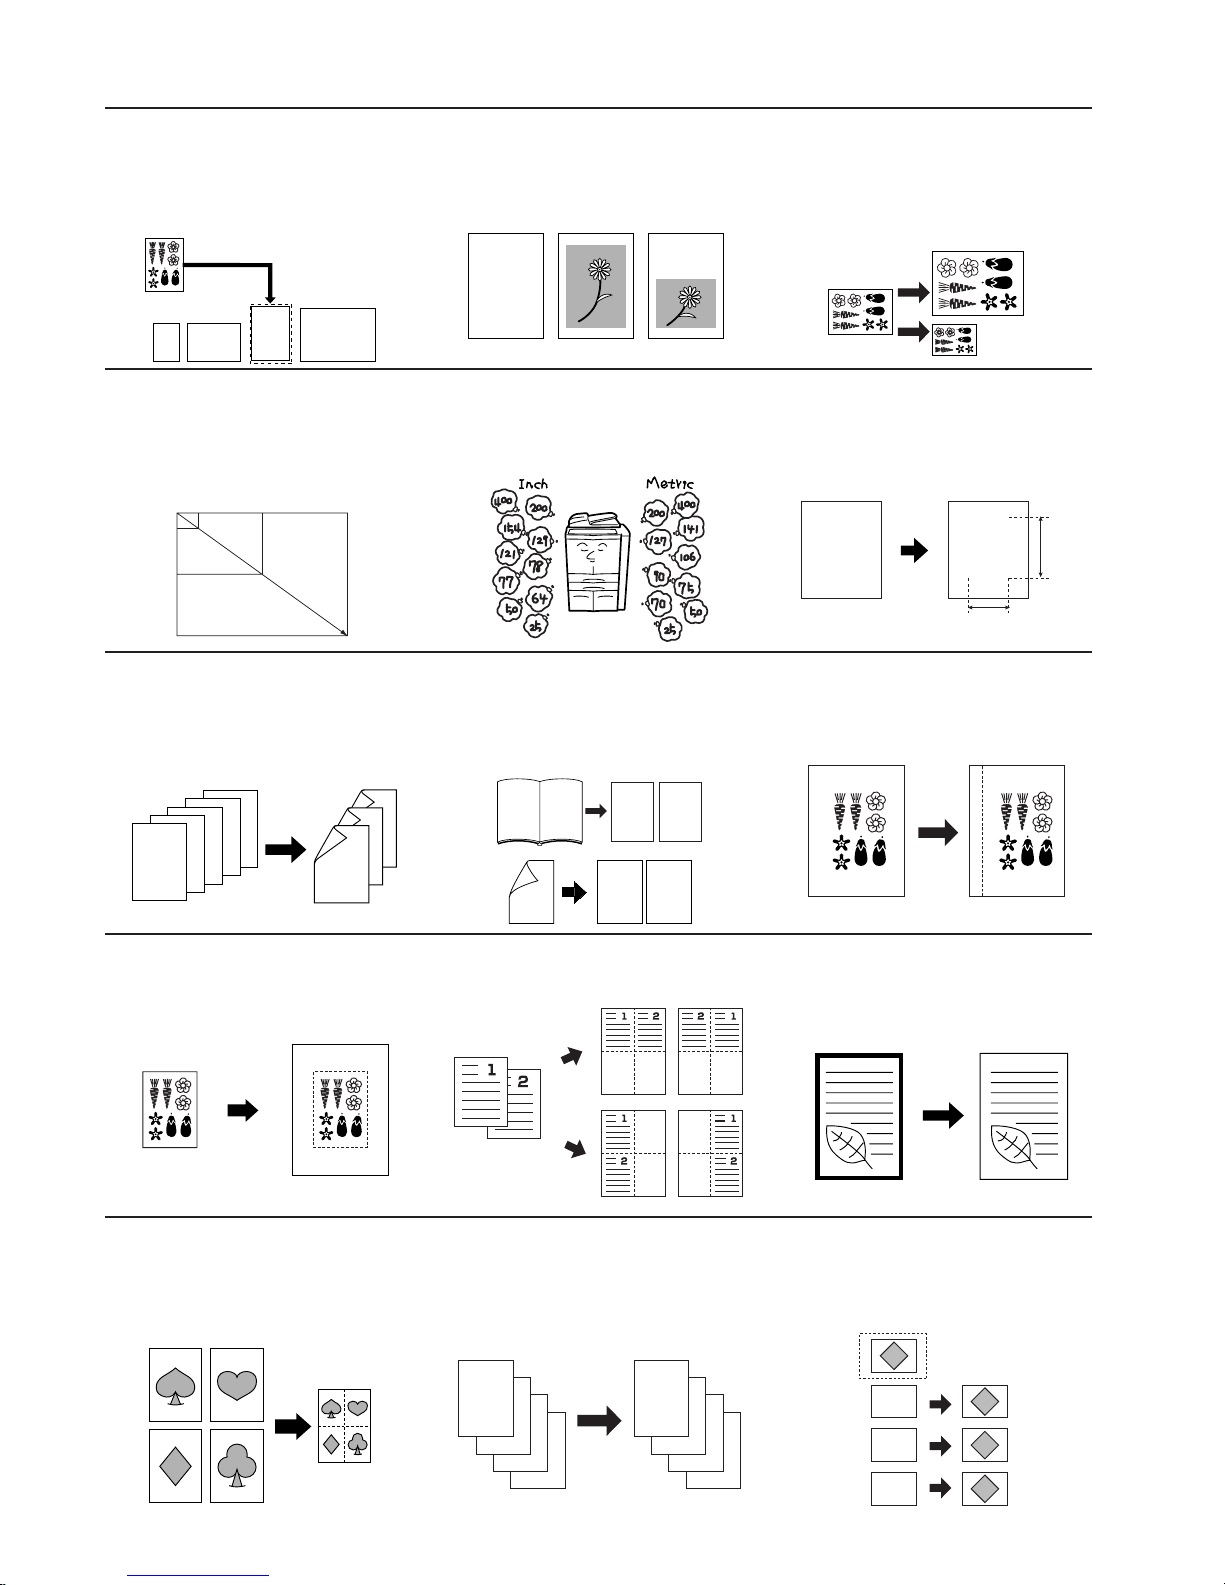
● MAKING FULL USE OF THE COPIER'S ADVANCED FUNCTIONS
1 Having the copier automatically select
copy paper of the same size as the
original
<Auto paper selection mode>
(Page 4-2)
2 Making clear reproductions of
photographs
<Image quality selection>
(Page 4-3)
3 Various functions for making enlarged
and reduced copies
■ Enlarging/reducing the copy image to fit the
size of paper in a specified drawer[cassette]
<Auto magnification selection mode>
(Page 4-5)
■ Enlarging/reducing the copy image to a
desired size between 25% and 400%
(between 50% and 200% when using the
Document Processor)
<Zoom mode> (Page 4-6)
■ One-touch selection of the copy
magnification ratio
<Preset zoom mode>
(Page 4-7)
■ Enlarging/reducing the length and width of
the image to separate magnification ratios
<XY zoom mode>
(Page 4-8)
4 Making 2-sided copies from various types
of originals
<2-sided copy modes>
(Page 5-1)
5 Copying each image of open-faced
(books, etc.) or 2-sided originals onto
separate sheets
<Page separation/Split copy modes>
(Page 5-4)
6 Creating a margin on the copies
<Margin mode>
(Page 5-6)
8 Adding a space next to the copy images
for making notes
<Memo mode>
(Page 5-9)
7 Centering the copy image
<Centering/Image shift mode>
(Page 5-8)
9 Making copies with clean edges
<Border erase modes>
(Page 5-11)
abcdefghijk
abcdefghijk
abcdefghijk
abcdefghijk
abcdefghijk
abcdefghijk
abcdefghijk
abcdefghijk
abcdefghijk
abc
defghi
jkmn
64% (70%)5 1/2"✕8 1/2" (A5)
8 1/2"✕11" (A4)
11"✕17" (A3)
129% (141%)
25%
400%
M
M
Y %
X %
5
4
3
2
1
1
2
3
4
5
12
12
1
2
12
10
Fitting the image of either two or four
originals onto a single copy page
<Combine/Merge Copy modes>
(Page 5-13)
11
Printing page numbers on the copies
<Print page numbers mode>
(Page 5-16)
12
Overlaying one image over another
<Form overlay mode>
(Page 5-20)
D
C
B
A
D
C
B
A
-4-
-3-
-2-
-1-
A
B
C
B
C
A
iv
Page 7
v
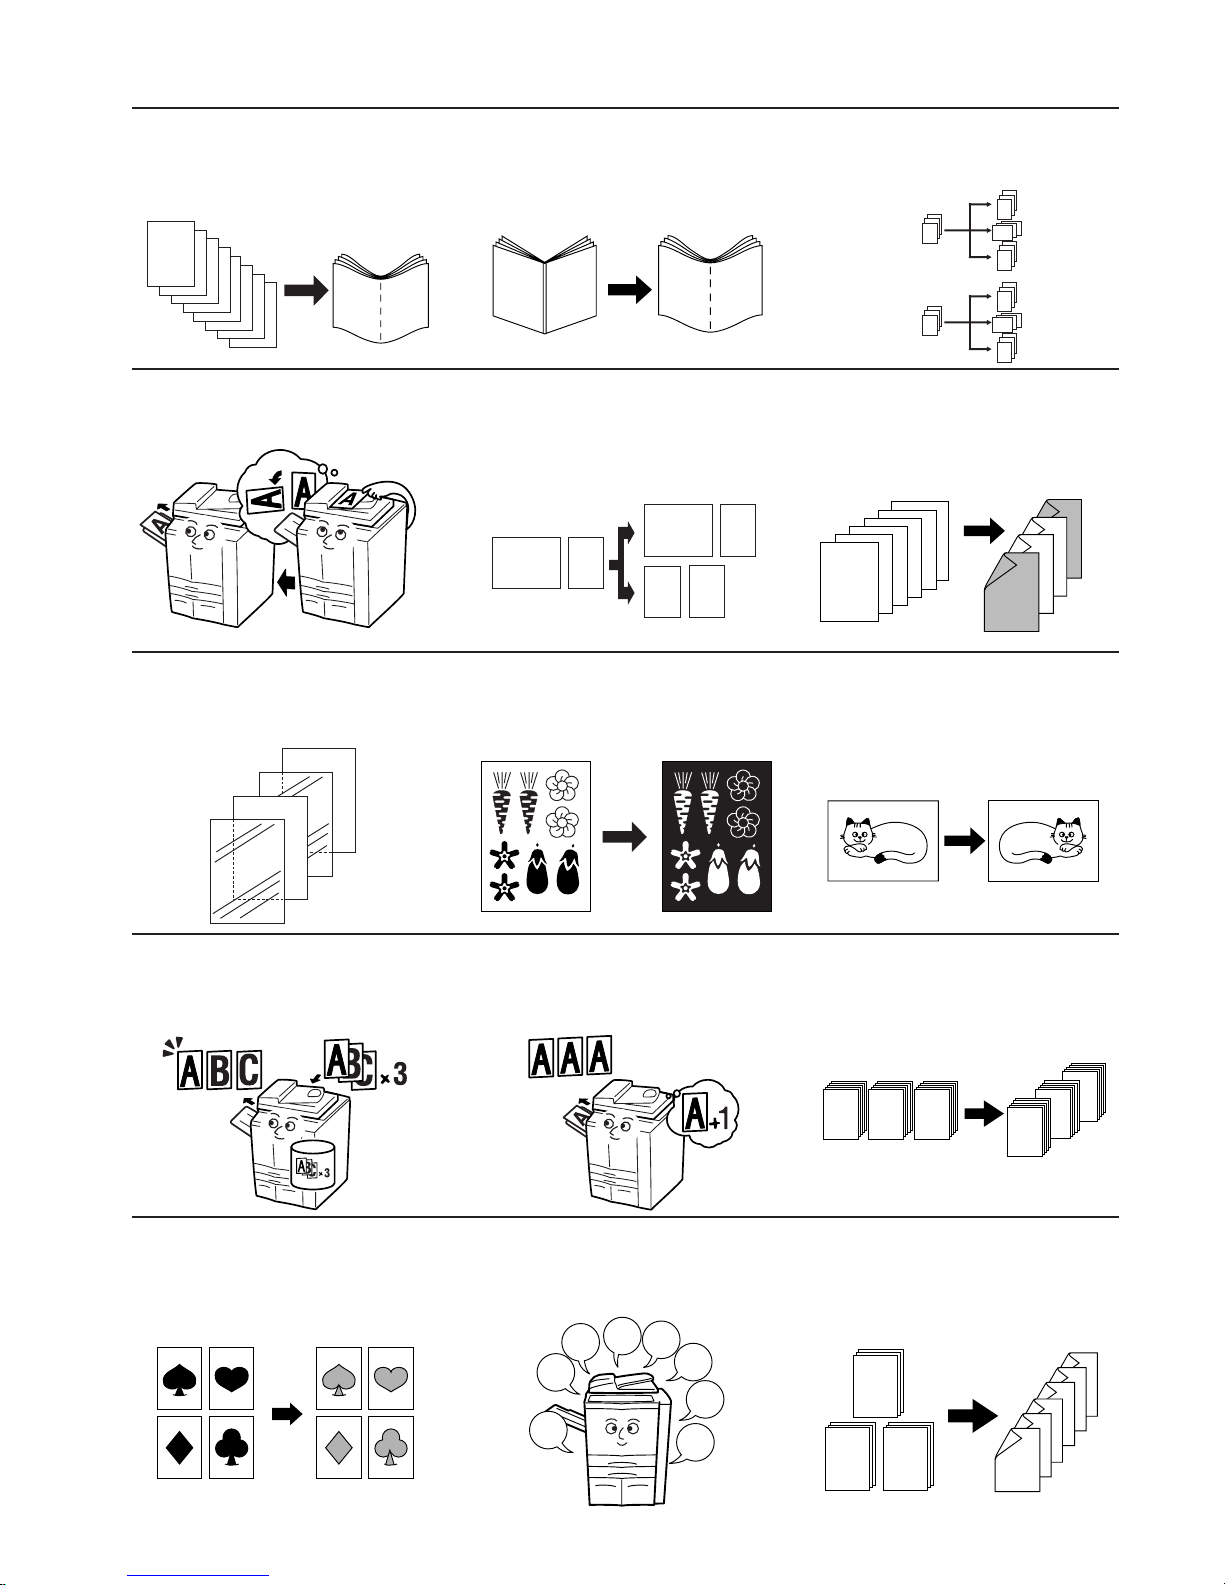
13
Making booklets from sheet originals
<Booklet/Stitching mode>
(Page 5-22)
14
Making booklets from books
<Book to Booklet mode>
(Page 5-25)
15
Automatic sorting of copy sets without the
Document Finisher
<Sort/Finished mode>
(Page 5-28)
16
Automatic rotation of the copy image
<Auto rotation function>
(Page 5-29)
17
Copying different sized originals at the
same time
<Auto Selection/Filing mode>
(Page 5-30)
18
Adding a front and/or back cover to your
copy sets
<Cover mode>
(Page 5-32)
19
Feeding paper as a backing sheet for
OHP transparencies
<Transparency + backing sheet mode>
(Page 5-37)
20
Inverting black and white
<Invert mode>
(Page 5-39)
21
Making mirror image copies
<Mirror image mode>
(Page 5-40)
22
Making a test copy prior to large volume
copying
<Proof mode>
(Page 5-41)
23
Making more of the same copies after a
copy job is finished
<Repeat copy mode>
(Page 5-43)
24
Copying a large volume of originals in
one operation
<Batch scanning mode>
(Page 5-48)
b
b
a
a
B
A
B
A
3
2
1
3
2
1
3
2
1
3
2
1
1
1
1
3
3
3
2
2
2
3
2
1
AB 1
AB 1
AB
1
6
1
5
3
4
6
1
2
5
4
3
2
1
B
A
A B C
C
B
A
1
2
3
4
5
6
7
8
B-1
2
B-3
1
3
C-2
A-1
B-1 C-1
A-3
2
A-1
v
25
Saving on toner use
<Eco print mode>
(Page 5-49)
26
Memorizing frequently used settings
<Program function>
(Page 5-51)
27
Easily add covers and insert sheets
between various sets of originals in one
operation
<Job build mode>
(Page 5-58)
Page 8
vi
28
Registering images to be used for form
overlay
<Form registration>
(Page 6-1)
29
Managing shared forms
<Shared data box>
(Page 6-4)
30
Printing out different stored originals in
one operation
<Synergy print boxes>
(Page 6-9)
ON
OFF
English
Español
vi
31
Using department ID-codes to manage
the number of copies made by each
department
<Copy management mode>
(Page 7-1)
32
Tu rning the power to the copier ON/OFF
automatically on a set schedule
<Weekly timer function>
(Page 7-14)
33
Changing the language used in the touch
panel
<Language selection function>
(Page 7-74)
34
A full range of optional equipment is
available
■ Side Feeder
(Page 8-1)
■ Document Finisher
(Page 8-1)
■ Document Finisher + Multi Job Tray +
Center-Folding Unit
(Page 8-1)
■ Document Finisher
(Page 8-6)
■ Key Counter
(Page 8-7)
■ Printer Kit
(Page 8-7)
■ Network Scanner Kit
(Page 8-7)
■ Tandem Copier Kit
(Page 8-8)
A
A
B
C
C
1
2
3
Page 9
1-1
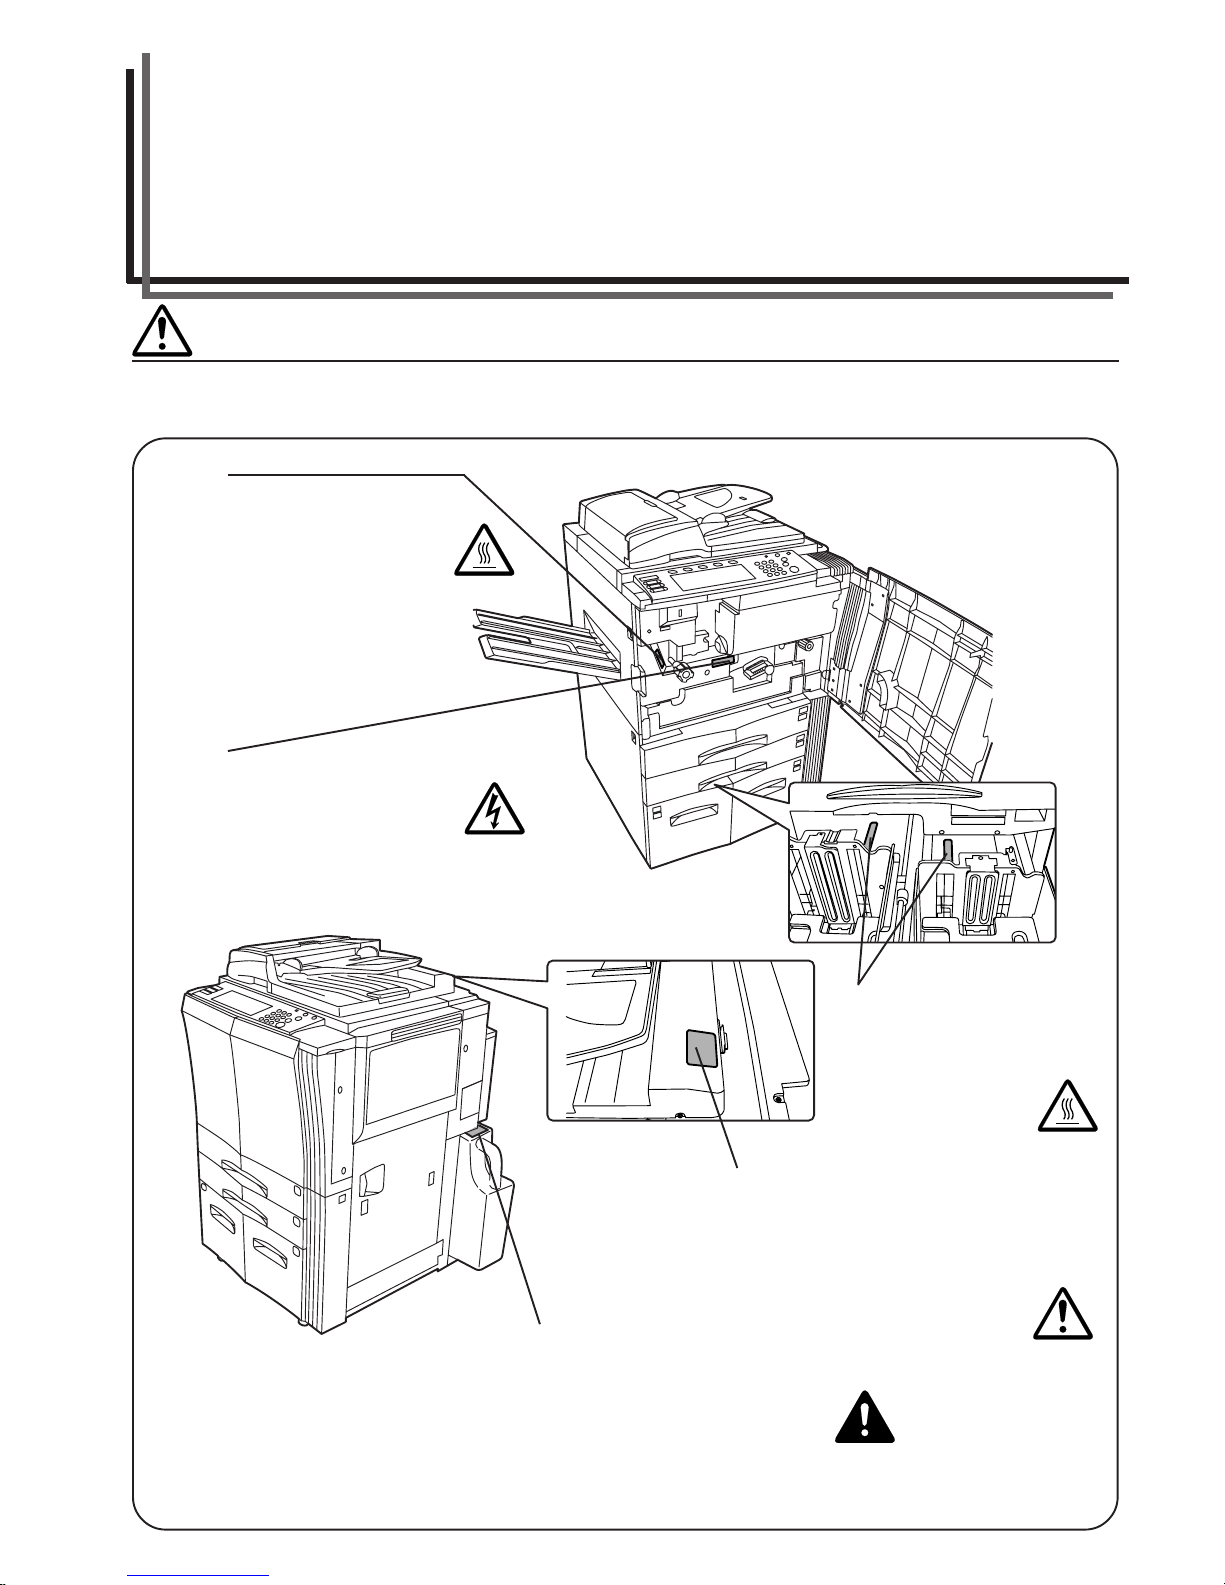
Caution labels have been attached to the copier at the following locations for safety purposes.
BE SUFFICIENTLY CAREFUL to avoid fire or electric shock when removing a paper jam or when replacing toner.
CAUTION LABELS
NOTE: DO NOT remove these labels.
Section 1 IMPORTANT! PLEASE READ FIRST.
Label 1
High temperature inside. Do not
touch parts in this area, because
there is a danger of getting
burned. ..........................................
Label 5
DO NOT touch the support area for
the Document Processor as there
is a danger that your fingers or
other objects may become caught
or pinched, and this can result in
injury. .............................................
Label 2
High voltage inside. NEVER touch
parts in this area, because there is
a danger of electric shock. ..............
Label 6
DO NOT attempt to incinerate the
toner bottle or the waste toner box.
Dangerous sparks may cause
burns. ............................................
Label 3, 4
High temperature inside.
Do not touch parts in
this area, because there
is a danger of getting
burned. ........................
Page 10
1-2
• During copying, some ozone is released, but the amount
does not cause any ill effect to one's health. If, however,
the copier is used over a long period of time in a poorly
ventilated room or when making an extremely large
number of copies, the smell may become unpleasant. To
maintain the appropriate environment for copy work, it is
suggested that the room be properly ventilated.
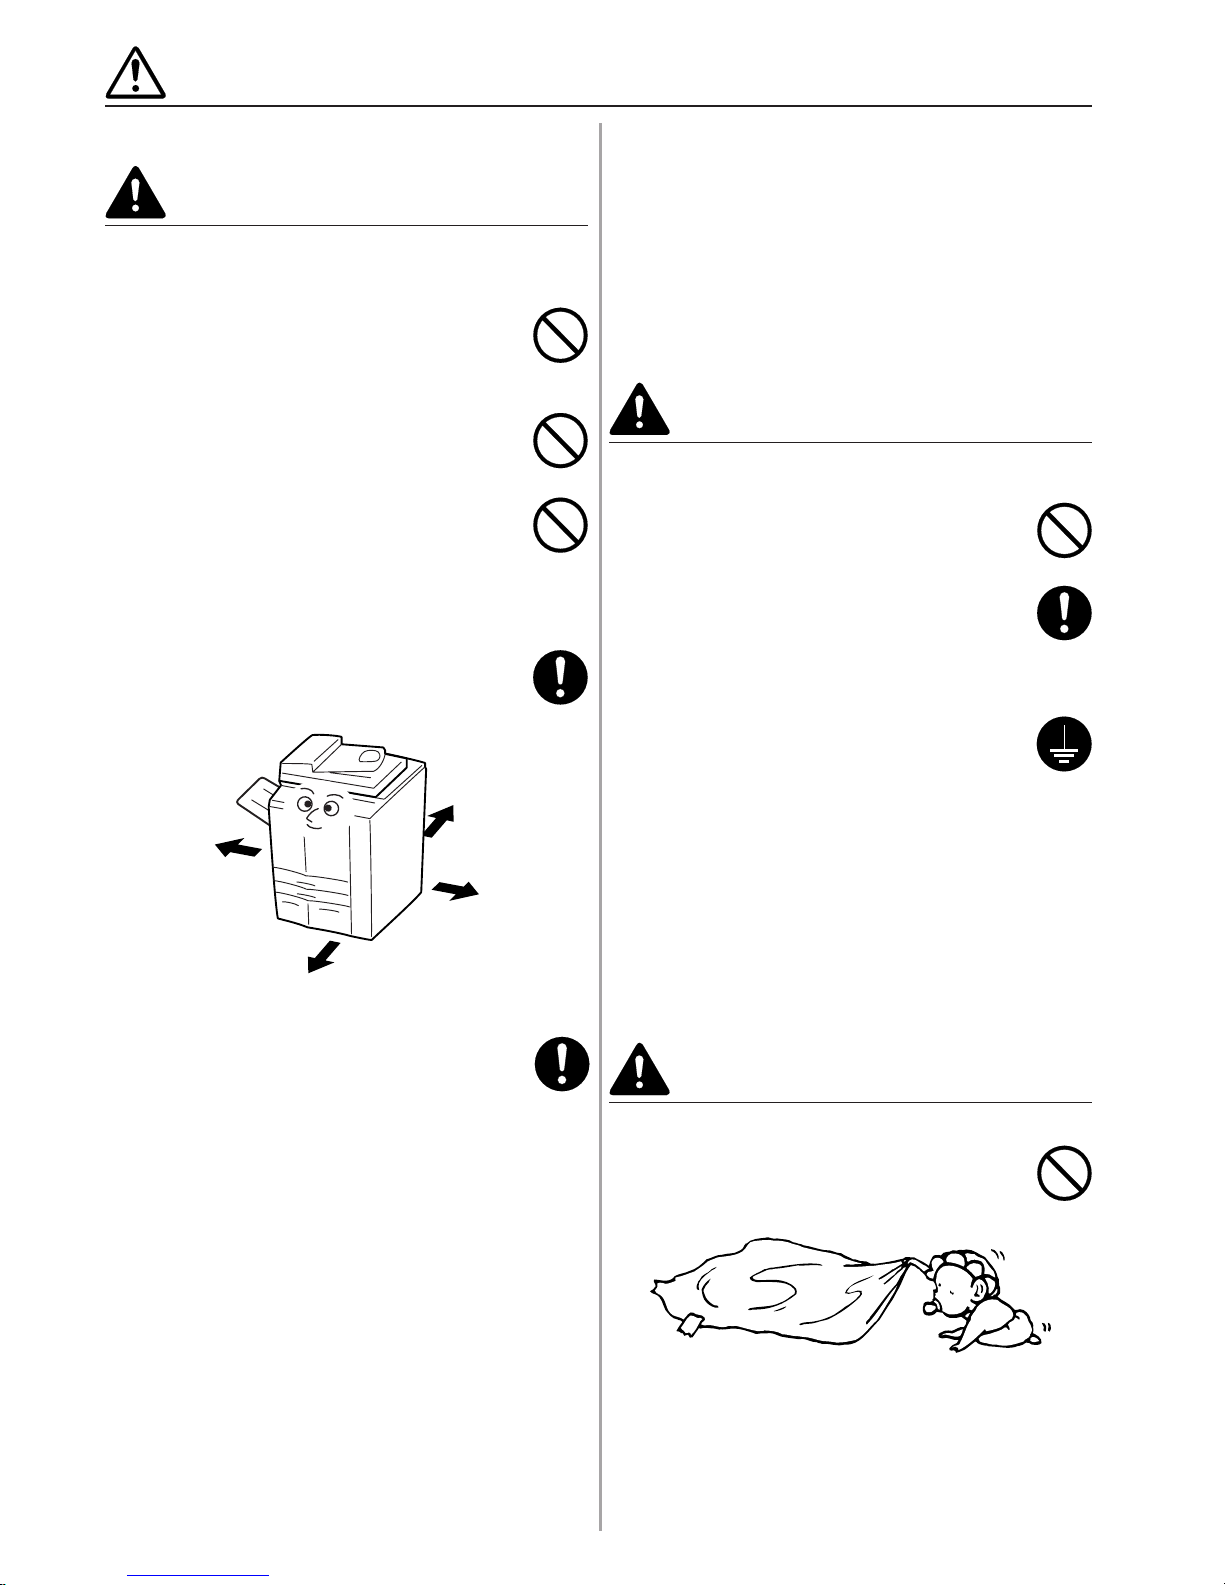
■ Power supply/Grounding the copier
WARNING
• DO NOT use a power supply with a voltage other
than that specified. Avoid multiple connections in
the same outlet. These types of situations
present a danger of fire or electrical shock. .........
• Plug the power cord securely into the outlet. If
metallic objects come in contact with the prongs
on the plug, it may cause a fire or electric shock.
• Always connect the copier to an outlet with a
ground connection to avoid the danger of fire or
electrical shock in case of an electric short. If an
earth connection is not possible, contact your
service representative. .........................................
Other precautions
• Connect the power plug to the closest outlet possible to
the copier.
• The power supply cord is used as the main disconnect
device. Ensure that the socket/outlet is located/installed
near the equipment and is easily accessible.
■ Handling of plastic bags
WARNING
• Keep the plastic bags that are used with the
copier away from children. The plastic may cling
to their nose and mouth causing suffocation........
INSTALLATION PRECAUTIONS
■ Environmment
CAUTION
•Avoid placing the copier on or in locations which
are unstable or not level. Such locations may
cause the copier to fall down or fall over. This
type of situation presents a danger of personal
injury or damage to the copier..............................
•Avoid locations with humidity or dust and dirt. If
dust or dirt become attached to the power plug,
clean the plug to avoid the danger of fire or
electrical shock.....................................................
•Avoid locations near radiators, heaters, or other
heat sources, or locations near flammable items,
to avoid the danger of fire. ...................................
•To keep the copier cool and facilitate changing of
parts and maintenance, allow access space as
shown below.
Leave adequate space, especially around the
rear cover, to allow air to be properly ventilated
out of the copier....................................................
• Always use the caster stoppers to stabilize the
copier once it is in place to keep it from moving
and/or falling over and causing injury. ..................
Other precautions
• Adverse environmental conditions may affect the safe
operation and performance of the copier. Install in an airconditioned room (recommended room temperature:
around 68°F (20°C), humidity: around 65%RH) and
avoid the following locations when selecting a site for
the copier.
.
Avoid locations near a window or with exposure to
direct sunlight.
.
Avoid locations with vibrations.
.
Avoid locations with drastic temperature fluctuations.
.
Avoid locations with direct exposure to hot or cold air.
.
Avoid poorly ventilated locations.
• If the floor is delicate against casters, when this product
is moved after installation, the floor material may be
damaged.
Rear:
>
3 15/16"
10 cm
=
Left:
>
23 5/8"
60 cm
=
Front:
>
39 3/8"
100 cm
=
Right:
>
27 9/16"
70 cm
=
Page 11
1-3
CAUTION
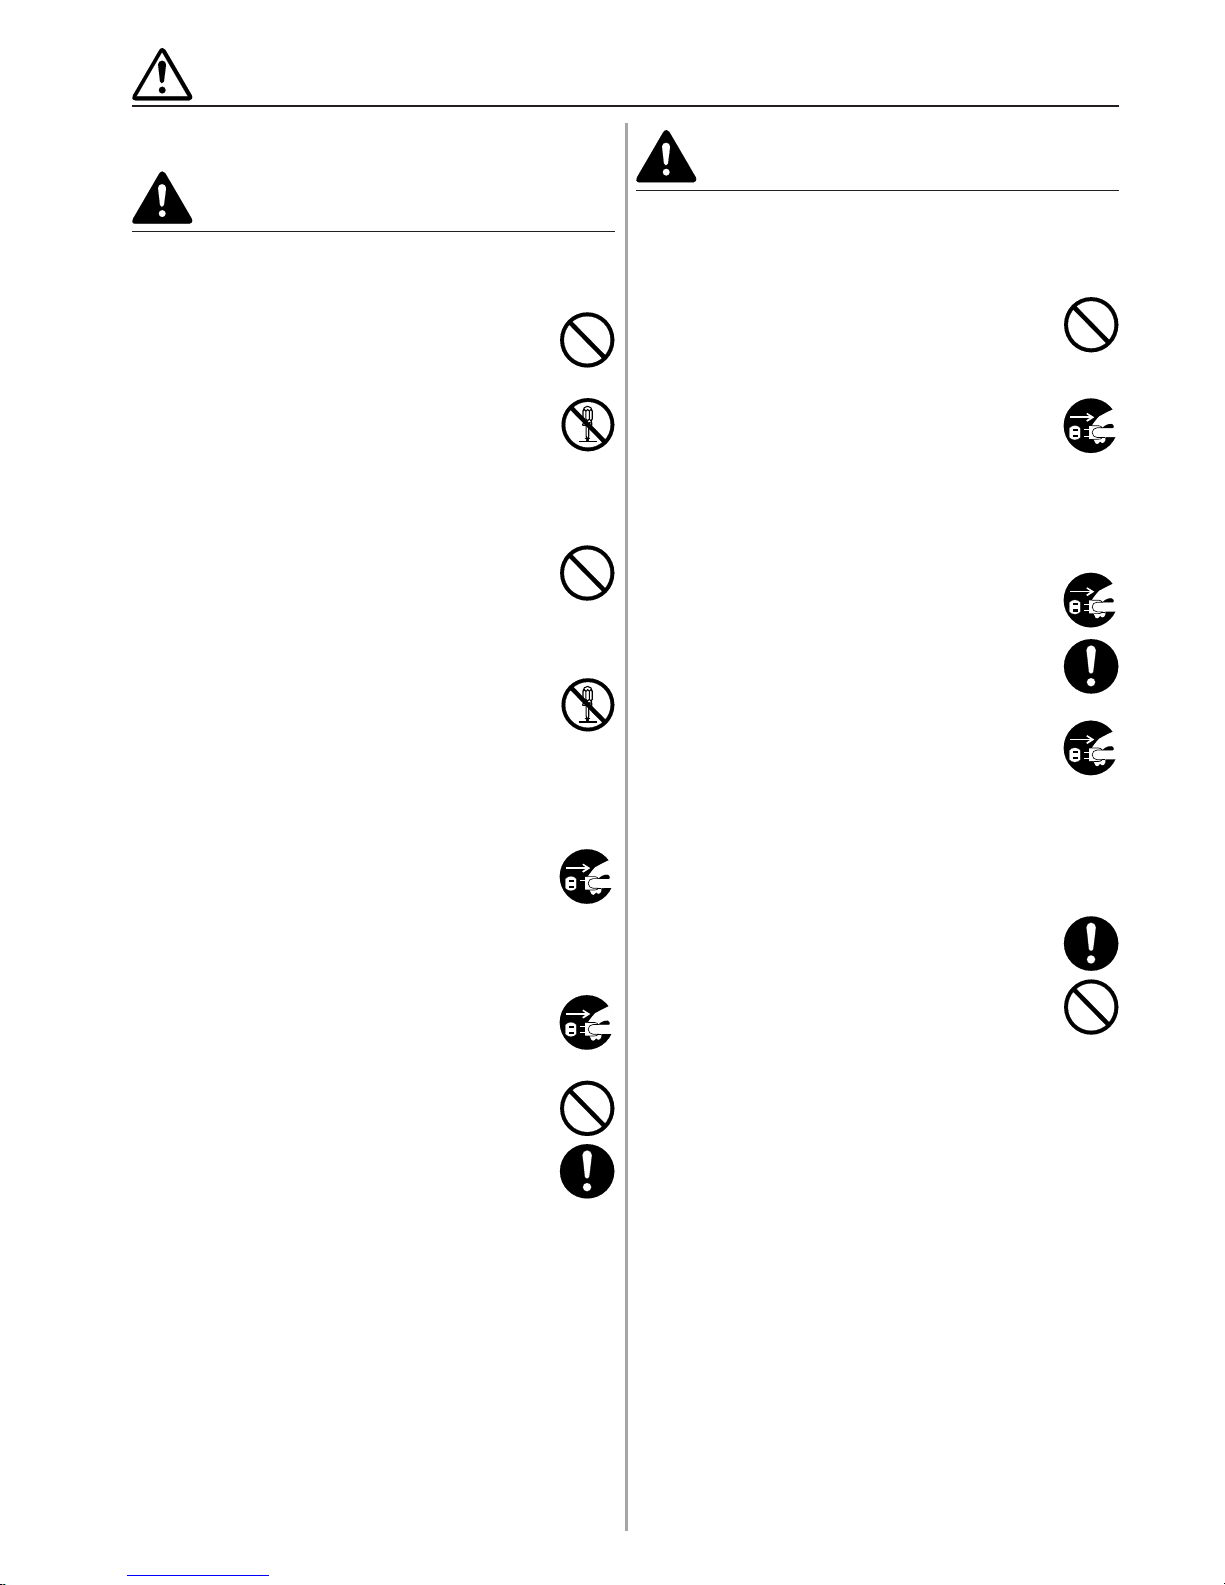
• DO NOT pull the power cord when removing it
from the outlet. If the power cord is pulled, the
wires may become broken and there is a danger
of fire or electrical shock. (ALWAYS grasp the
power plug when removing the power cord from
the outlet.) ............................................................
•ALWAYS remove the power plug from the outlet
when moving the copier. If the power cord is
damaged, there is a danger of fire or electrical
shock. ...................................................................
• If the copier will not be used for a short period of
time (overnight, etc.), turn the main switch OFF
(O).
If it will not be used for an extended period of
time (vacations, etc.), remove the power plug
from the outlet for safety purposes during the
time the copier is not in use. ................................
•ALWAYS hold the designated parts only when
lifting or moving the copier. ..................................
•For safety purposes, ALWAYS remove the power
plug from the outlet when performing cleaning
operations. ...........................................................
• If dust accumulates within the copier, there is a
danger of fire or other trouble. It is therefore
recommended that you consult with your service
representative in regard to cleaning of internal
parts. This is particularly effective if accomplished
prior to seasons of high humidity. Consult with
your service representative in regard to the cost
of cleaning the internal parts of the copier. ..........
• DO NOT leave the Document Processor open as
there is a danger of personal injury. .....................
■ Cautions when using the copier
WARNING
• DO NOT place metallic objects or containers with
water (flower vases, flower pots, cups, etc.) on or
near the copier. This of situation presents a
danger of fire or electrical shock should they fall
inside. ...................................................................
• DO NOT remove any of the covers from the
copier as there is a danger of electrical shock
from high voltage parts inside the copier. ............
• DO NOT damage, break or attempt to repair the
power cord. DO NOT place heavy objects on the
cord, pull it, bend it unnecessarily or cause any
other type of damage.
These types of situations present a danger of fire
or electrical shock. ...............................................
• NEVER attempt to repair or disassemble the
copier or its parts as there is a danger of fire,
electrical shock or damage to the laser. If the
laser beam escapes, there is a danger of it
causing blindness.................................................
• If the copier becomes excessively hot, smoke
appears from the copier, there is an odd smell, or
any other abnormal situation occurs, there is a
danger of fire or electrical shock. Turn the main
switch OFF (O) immediately, remove the power
plug from the outlet and contact your service
representative. .....................................................
• If anything harmful (paper clips, water, other
fluids, etc.) falls into the copier, turn the main
switch OFF (O) immediately. Next, remove the
power plug from the outlet to avoid the danger of
fire or electrical shock. Then contact your service
representative. .....................................................
• DO NOT remove or connect the power plug with
wet hands, as there is a danger of electrical
shock. ...................................................................
•ALWAYS contact your service representative for
maintenance or repair of internal parts. ...............
PRECAUTIONS FOR USE
Page 12
1-4
■ Cautions when handling
consumables
CAUTION
• DO NOT attempt to incinerate the toner bottle or
the waste toner box. Dangerous sparks may
cause burns..........................................................
•Keep the toner bottle and the waste toner box out
of the reach of children.........................................
• If toner happens to spill from the toner bottle or
the waste toner box, avoid inhalation and
ingestion, as well as contact with your eyes and
skin. ......................................................................
.
If you do happen to inhale toner, move to a place with
fresh air and gargle thoroughly with a large amount of
water. If coughing develops, contact a physician.
.
If you do happen to ingest toner, rinse your mouth out
with water and drink 1 or 2 cups of water to dilute the
contents of your stomach. If necessary, contact a
physician.
.
If you do happen to get toner in your eyes, flush them
thoroughly with water. If there is any remaining
tenderness, contact a physician.
.
If toner does happen to get on your skin, wash with
soap and water.
• DO NOT attempt to force open or destroy the
toner bottle or the waste toner box.......................
Other precautions
• After use, ALWAYS dispose of the toner bottle and the
waste toner box in accordance with Federal, State and
Local rules and regulations.
• Store all consumables in a cool, dark location.
• If the copier will not be used for an extended period of
time, remove the paper from the cassette, return it to its
original package and reseal it.
PRECAUTIONS FOR USE
Other precautions
• DO NOT place heavy objects on the copier or cause
other damage to the copier.
• DO NOT open the front cover, turn off the main switch,
or pull out the power plug during copying.
•When lifting or moving the copier, contact your service
representative.
• Do not touch electrical parts, such as connectors or
printed circuit boards. They could be damaged by static
electricity.
• DO NOT attempt to perform any operations not
explained in this handbook.
• CAUTION : Use of controls or adjustments or
performance of procedures other than those specified
herein may result in hazardous radiation exposure.
• Do not look directly at the light from the scanning lamp
as it may cause your eyes to feel tired or painful.
Page 13
2-1
Section 2 NAMES OF PARTS
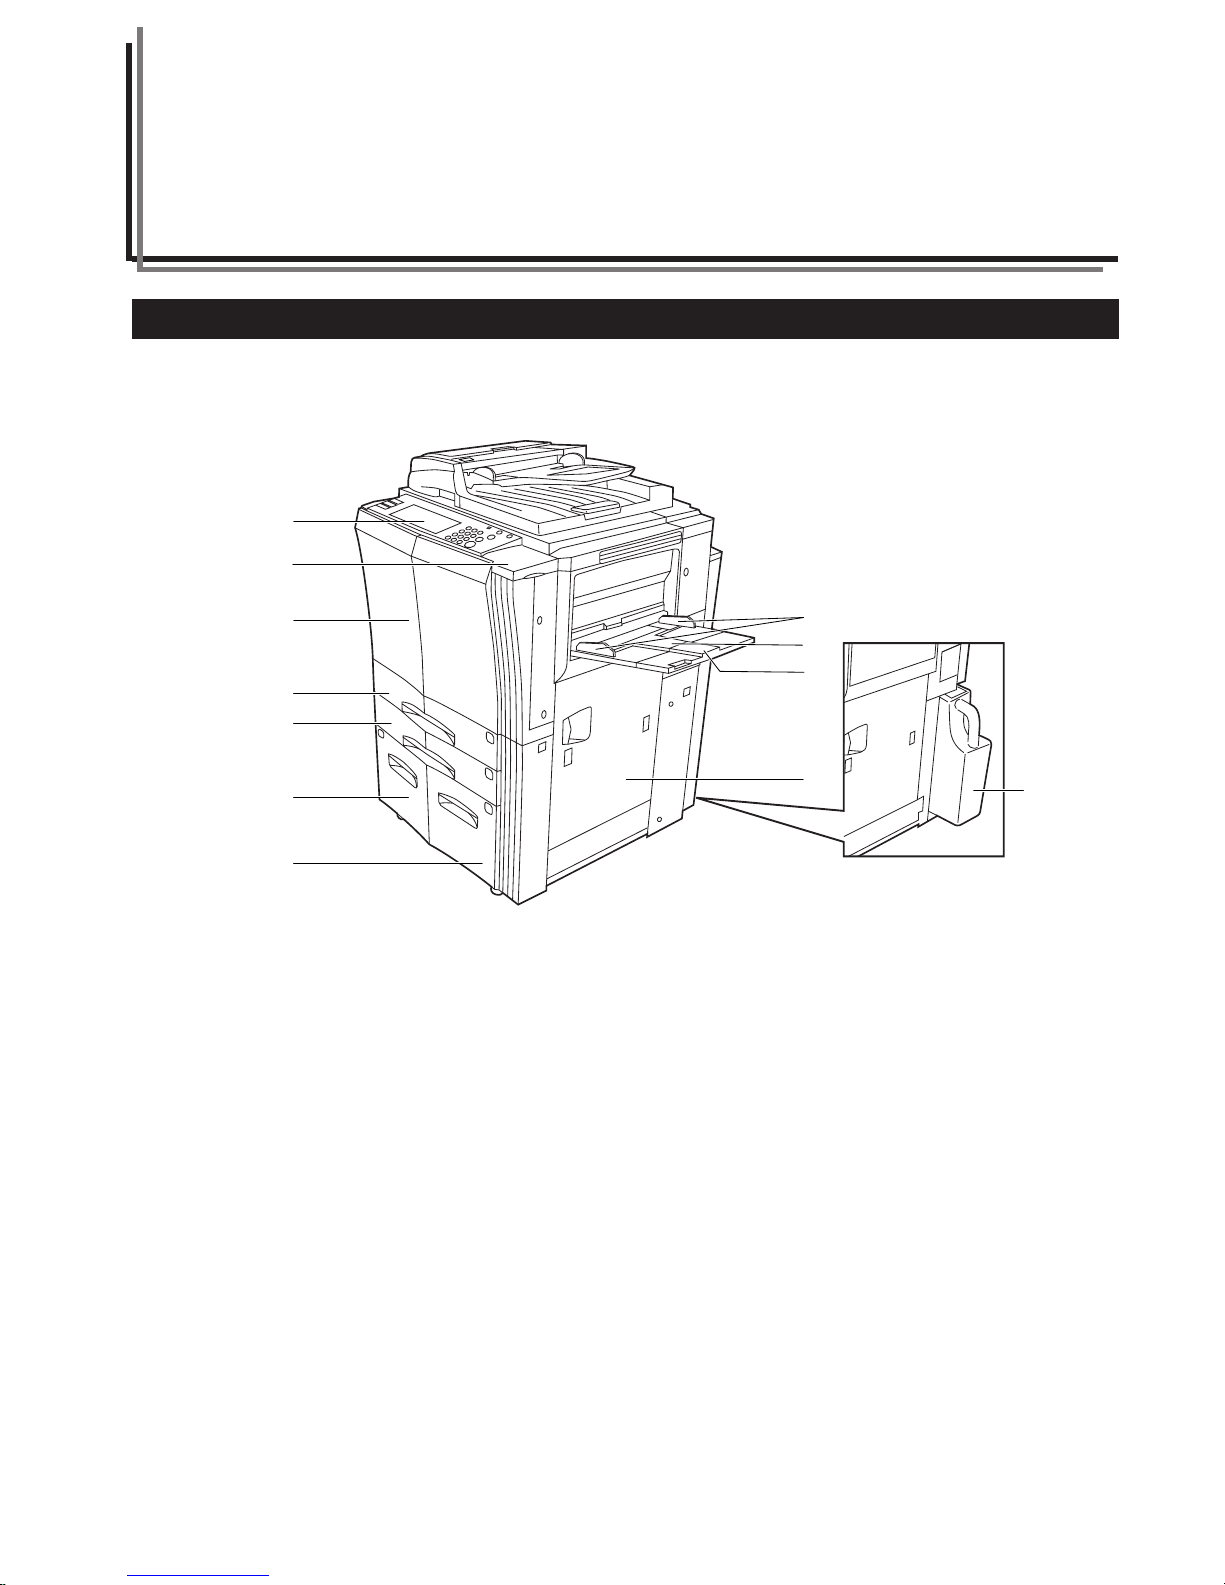
1. Main body
6
7
5
4
3
2
1
!
8
9
0
@
1 Operation panel
(Perform copy operations here.)
2 Cover on the right side of the operation panel
(Open this cover when you need to add toner.)
3 Front cover
(Open this cover if a paper misfeed occurs inside the copier.)
4 Drawer[Cassette] No.1
(This drawer[cassette] has a storage capacity of 500 sheets of
standard copy paper.)
5 Drawer[Cassette] No.2
(This drawer[cassette] has a storage capacity of 500 sheets of
standard copy paper.)
6 Drawer[Cassette] No.3
(This drawer[cassette] has a storage capacity of 1000 sheets of
standard copy paper.)
7 Drawer[Cassette] No.4
(This drawer[cassette] has a storage capacity of 1500 sheets of
standard copy paper.)
8 Multi-bypass tray
(Set copy paper on this tray when you want to copy onto small
paper sizes or onto special types of paper.)
9 Insert guides
(Align these guides to fit the width of the paper that is to be set on
the multi-bypass tray.)
0 Multi-bypass extension
(Pull out this extension when copying onto 8 1/2" x 11", 11" x 17",
B4 or A3 size paper.)
! Right cover
(Open this cover if a paper misfeed occurs inside the copier.)
@ Waste toner box
(The waste toner box should be replaced by your service
representative.)
Page 14
Section 2 NAMES OF PARTS
2-2
(
*
&
#
$
%^
)
⁄
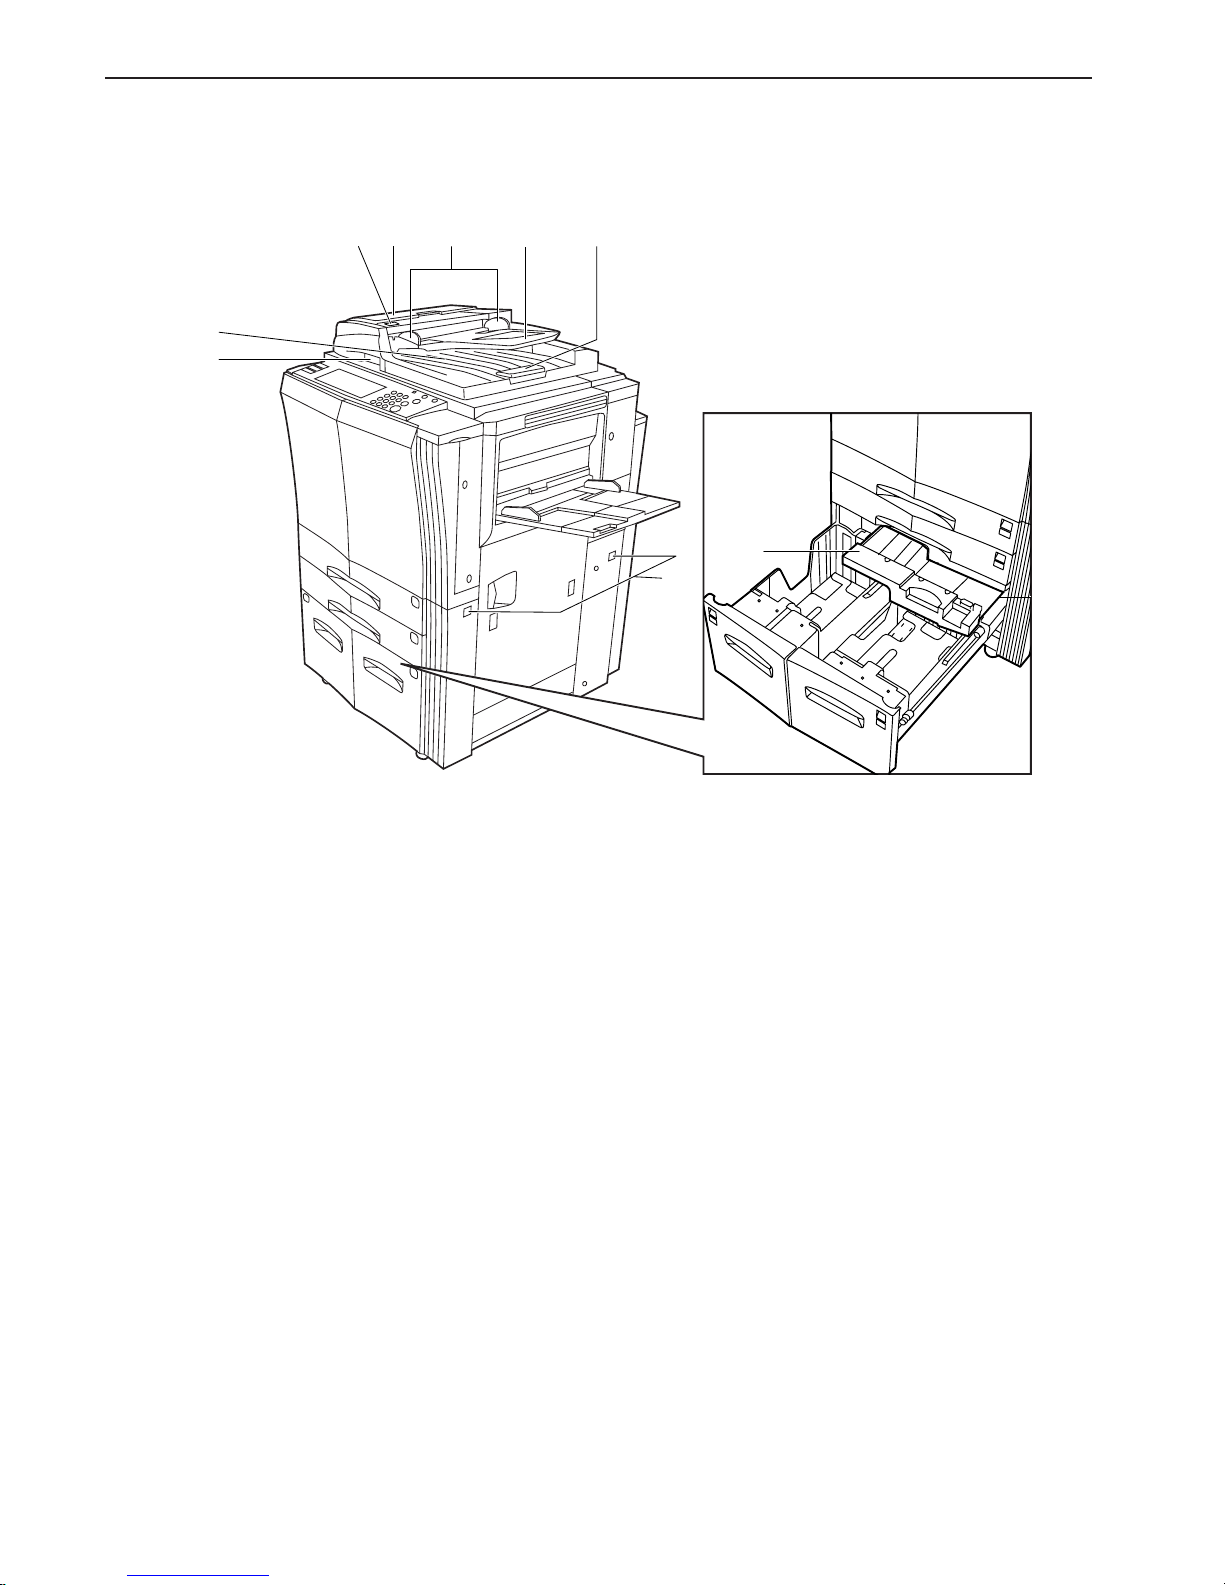
# Original table
(Set originals to be copied on this table.)
$ Original insert guides
(Align these guides to fit the width of the originals to be copied.)
% Document Processor cover
(Open this cover if an original misfeed occurs.)
^ Original set indicator
(This indicator lights when originals are set in the Document
Processor.)
& Original eject table
(Originals that have been copied are ejected and stored here.)
* Document Processor handle
(Hold this handle when you want to open the Document
Processor.)
( Ejection extension
(Open this extension when using larger sized originals such as
8 1/2" x 14", 11" x 17", B4 and A3.)
) Paper Feeder Unit
(Pull this unit out if a paper misfeed occurs inside the copier.)
⁄ Handles for transport
(Pull these bars out - two on both the left and right sides of the
copier - in order to use them as handles.)
Page 15
Section 2 NAMES OF PARTS
2-3
Œ
fl
fi
›
¤
⁄
‡
·
‚‹
„
´
—
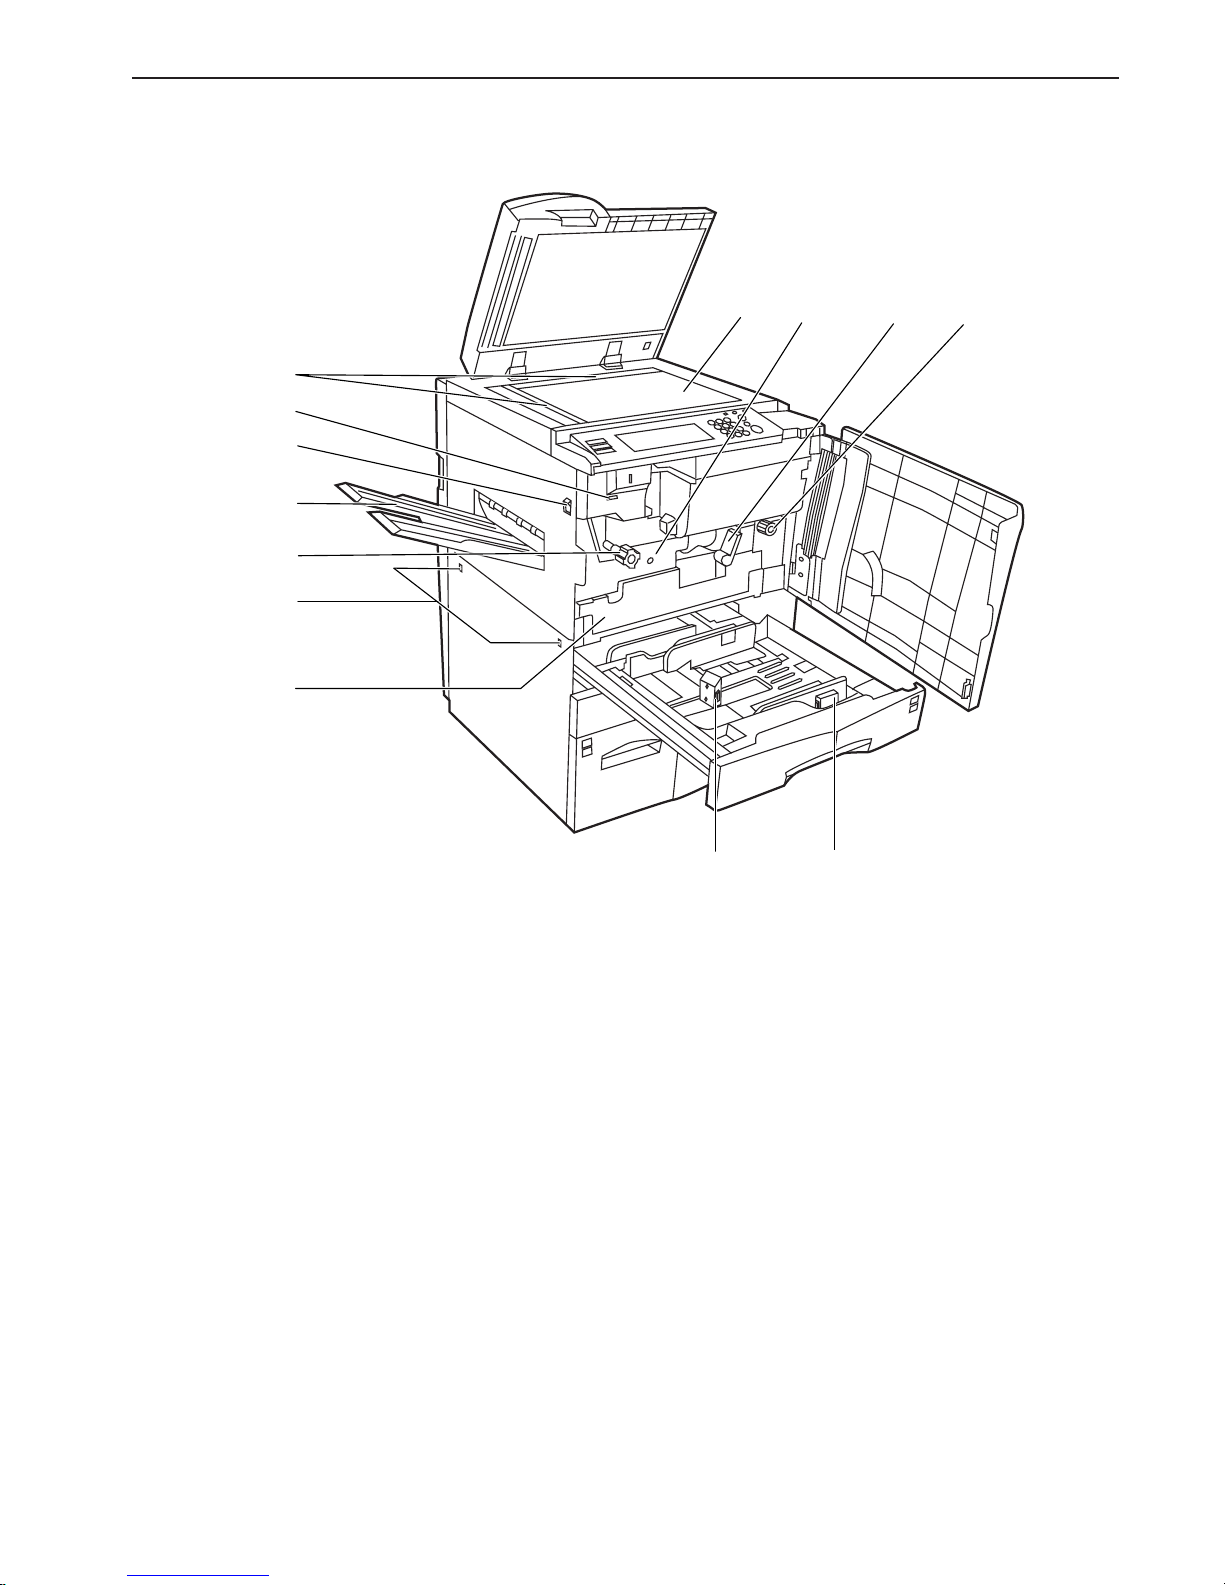
¤ Original size indicator lines
(Be sure to align the original with these lines whenever setting an
original on the platen.)
‹ Platen
(Set originals here for copying. Lay originals face-down and align
the edges with the size indicator lines located on the left and rear
sides of the platen.)
› Total counter
(This counter displays the total number of copies made on the
copier up to this point.)
fi Main switch
(Turn this switch ON ( | ) before copying.)
fl Copy eject tray
(Finished copies are ejected and stored on this tray. This tray may
be optional equipment in certain countries or regions of purchase.)
‡ Fixing unit handle A
(Operate this handle out if a paper misfeed occurs inside the
copier.)
— Transfer unit handle C
(Operate this handle out if a paper misfeed occurs inside the
copier.)
· Transfer unit release lever B
(Operate this lever when you need to pull out the transfer unit.)
‚ Transfer unit
(Pull this unit out if a paper misfeed occurs inside the copier.)
ΠDuplex Unit
(Pull this unit out if a paper misfeed occurs inside the copier.)
„ Paper length guide release levers
(Pinch these levers and adjust the guide plate to fit the length of
the paper that is to be loaded in that drawer[cassette].)
´ Paper width guide release levers
(Pinch these levers and adjust the guide plates to fit the width of
the paper that is to be loaded in that drawer[cassette].)
Page 16
Section 2 NAMES OF PARTS
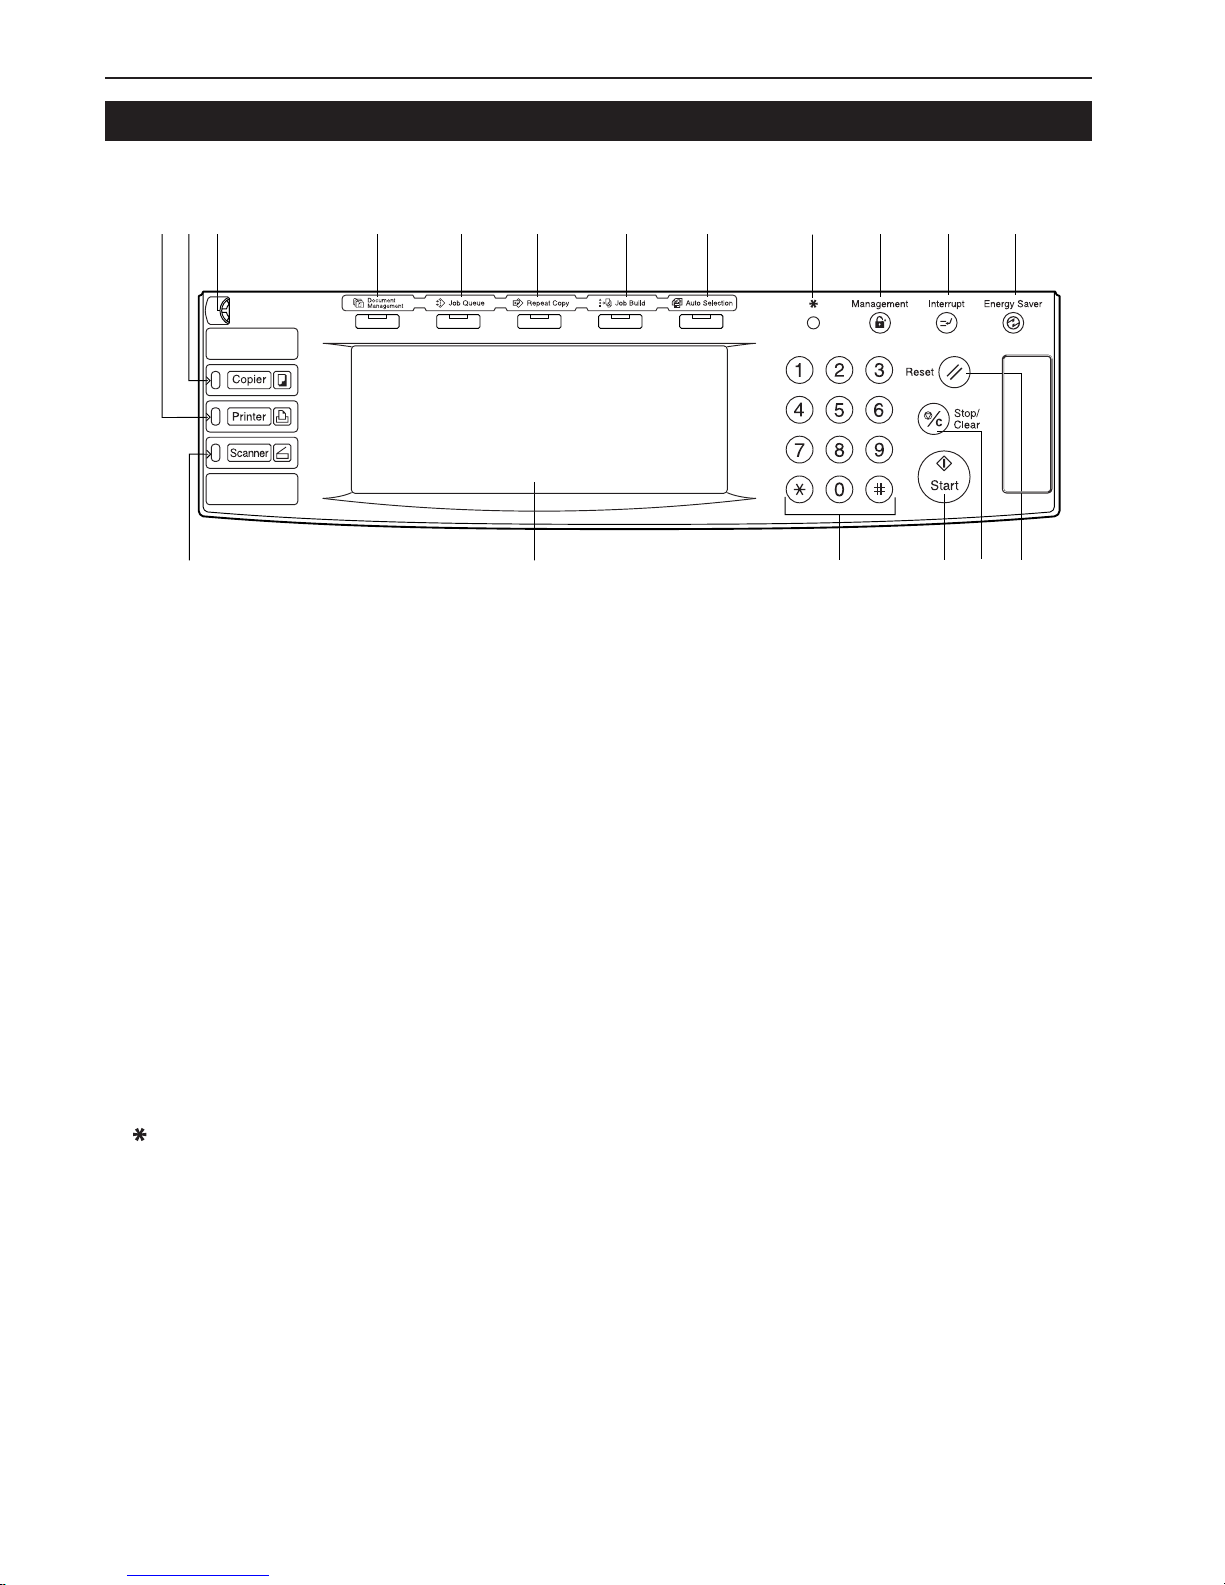
2-4
2. Operation panel
7
6 5 4
9
1
8 3
2
$%^&*0@ !
#
1 [Start] key & indicator lamp
(Press this key when the lamp in that key is lit green and you want
to start copying.)
2 [Stop/Clear] key
(Press this key when you want to stop copying or change the
number of copies to be made.)
3 [Reset] key
(See “Initial mode” on page 2-5.)
4 [Energy Saver] key & indicator lamp
(Press this key when you want to turn the energy-saving preheat
mode ON. Press the same key again to turn the preheat mode
OFF.)
5 [Interrupt] key & indicator lamp
(Press this key to light the lamp in that key when you want to
perform interrupt copying. See page 4-9.)
6 [Management] key
(When copy management is turned ON, press this key after
copying in order to return to the department ID-code entry display.)
7 [ ] (default setting) key
(Press this key when you want to perform default settings as well
as those related to copy management, etc.)
8 Keypad
(Use these keys when you want to set the number of copies to be
made or enter other values.)
9 Touch panel
(This panel displays such information as operation procedures,
machine status, and the various function keys.)
0 Brightness adjustment control dial
(Turn this dial when you want to adjust the brightness of the touch
panel.)
! [Copier] key & indicator lamp
(Press this key to light the lamp in that key when you want to use
the copier functions of this machine.)
@ [Printer] key & indicator lamp
(Press this key when you want to use the optional printer functions
of this machine. The lamp in that key will light when the machine is
in the printer operation mode. The indicator to the left of the key
will either light green or orange, or will flash, depending upon the
status of the machine.)
# [Scanner] key & indicator lamp
(Press this key when you want to use the optional scanner
functions of this machine. The lamp in that key will light when the
machine is in the scanner operation mode. The indicator to the left
of the key will either light green or orange, or will flash, depending
upon the status of the machine.)
$ [Auto Selection] key & indicator lamp
(Press this key to light the lamp in that key when you want to use
the auto selection mode. See page 5-30.)
% [Job Build] key & indicator lamp
(Press this key to light the lamp in that key when you want to use
the job build mode. See page 5-58.)
^ [Repeat Copy] key & indicator lamp
(Press this key to light the lamp in that key when you want to use
the repeat copy mode. See page 5-43.)
& [Job Queue] key & indicator lamp
(Press this key to light the lamp in that key when you want to use
the output management functions of the copier. See page 6-20.)
* [Document Management] key & indicator lamp
(Press this key to light the lamp in that key when you want to use
the document management functions of the copier.
See page 6-1.)
Page 17

Section 2 NAMES OF PARTS
2-5
● Initial mode (at the end of warm-up or when the [Reset] key is
pressed)
In the default settings prepared at the factory, paper of the same size
as the original is selected automatically and the copy magnification
ratio is set to “100%” [1:1] (under the auto paper selection mode), the
number of copies to be made is set to “1” and the image quality is set
to the text+photo mode.
NOTES
• The default settings for the initial mode can be changed using the
corresponding “copy default settings” procedure.
• It is possible for you to change the default setting for the copy
exposure in the initial mode from the “manual exposure mode” to the
“auto exposure mode”. (See “Exposure mode” on page 7-39.)
● Auto clear function
Once a designated amount of time has passed after copying stops
(between 10 and 270 seconds), the auto clear function will
automatically engage and the copier will return to the same settings
as those after warm up (initial mode settings). (However, the copy
exposure mode and the image quality mode will not change.) Copies
can continually be made using the same settings (copy mode,
number of copies and exposure mode) if the next batch of copying is
started before the auto clear function engages.
● Automatic drawer[cassette] switching function
If two drawers[cassettes] contain the same size of paper in the same
orientation and the paper in one drawer[cassette] runs out during
copying, the automatic drawer[cassette] switching function will switch
paper feed from the empty drawer[cassette] to the other
drawer[cassette] that still contains paper.
It is also possible to designate which drawers[cassettes] will hold the
same size and type of paper for automatic switching.
NOTE
The automatic drawer[cassette] switching function can be turned OFF.
(See “Auto drawer[cassette] switching ON/OFF” on page 7-22.)
Page 18

Section 2 NAMES OF PARTS
2-6
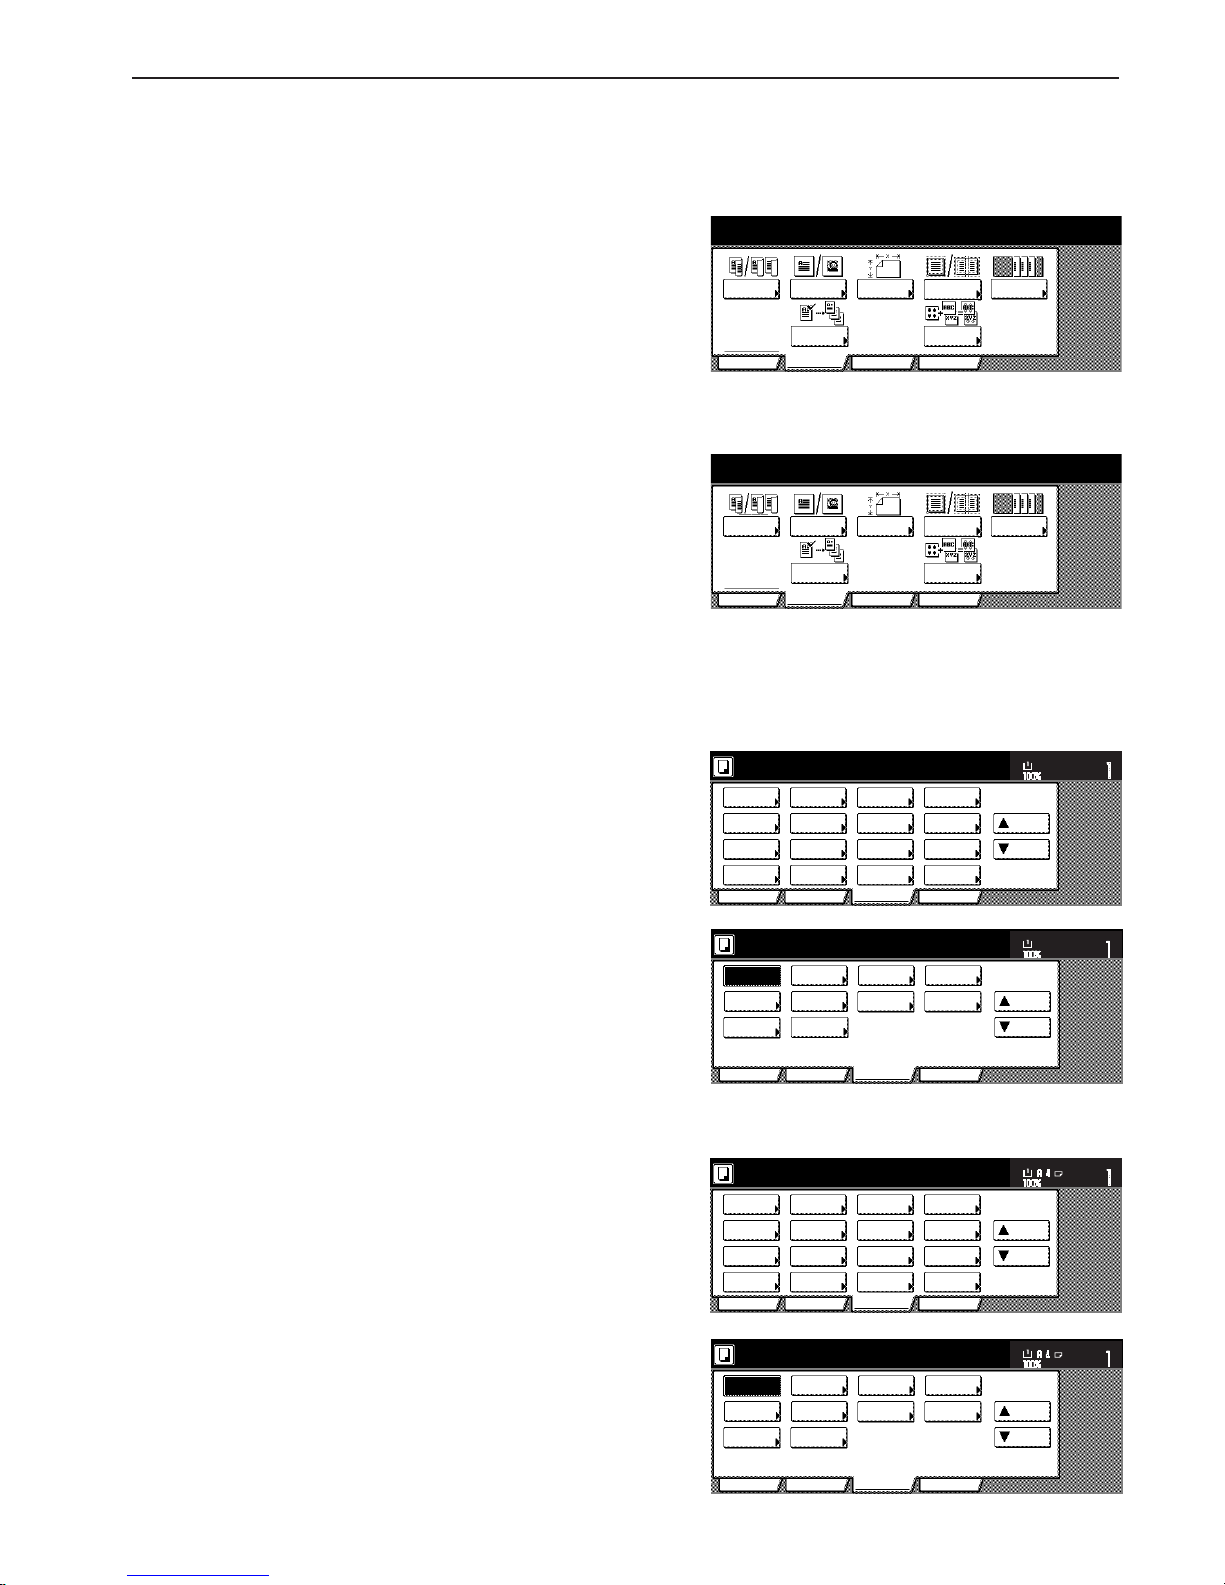
3. Touch panel
Combine
AMS
Reduce
/Enlarge
APS
Orig.image
quality
Reduce
/Enlarge
Exposure
mode
Auto
Exposure
Ready to copy.
Set
Paper Size
Bypass
Color
Recycled
Plain Plain
Plain
Sort/
Finished
Sort:Off
Sort:On
Basic User choice
Program
Function
11x8
1
/2"
8
1
/2x11"
11x8
1
/2"
11x8
1
/2"
11x81/2"
3
6
*
&
5
#
9
7
8 )( $
2
1
4
^
%
! @
0
Merge copy
AMS
Reduce/
Enlarge
APS
Image
quality
Reduce/
Enlarge
Exposure
mode
Auto
Exposure
Ready to copy.
Set
Paper Size
Bypass
Color
Recycled
Plain Plain
Plain
Sort/
Finished
Sort:Off
Sort:On
Basic User choice
Program
Function
3
6
*
&
5
#
9
7
8 )( $
2
1
4
^
%
! @
0
Inch specifications
Metric specifications
Page 19
Section 2 NAMES OF PARTS
2-7
1 This area displays messages on the machine's status and on
operational procedures.
2 This area displays information on the size of paper in the
drawer[cassette] and the current copy magnification ratio.
3 This area displays the current number of copies to be made.
4 Paper size keys (Remaining paper volume icons)
(Touch these keys when you want to change the currently selected
drawer[cassette] in order to change the size of paper that will be
used. The drawer[cassette] that holds the currently selected paper
size and type of paper will be highlighted.)
5 “APS” key
(Touch this key until it is highlighted when you want to have the
paper size selected automatically.)
6 “Bypass” key
(Touch this key when you want to copy onto paper that is set on
the multi-bypass tray. The type of paper registered for use on the
multi-bypass tray will be indicated in the key.)
7 “AMS” key
(Touch this key until it is highlighted when you want to have the
copy magnification ratio selected automatically.)
8 “Reduce/Enlarge” key
(Touch this key when you want to manually change the copy
magnification ratio.)
9 “100%” (same size) key
(Touch this key when you want to copy the original image at its
actual size “100%”.)
0 Copy exposure adjustment keys / Copy exposure scale
(Touch the appropriate key when you want to manually adjust the
copy exposure. The copy exposure scale will indicate the currently
selected setting.)
! “Exposure mode” key
(Touch this key when you want to access the “Exposure Mode”
screen.)
@ “Auto Exposure” key
(Touch this key until it is highlighted when you want to select the
auto exposure mode. In the auto exposure mode, the contrast of
the original will be detected and the most suitable exposure level
selected automatically.)
# “Sort:OFF” key
(Touch this key when you want to make copies without sorting
them.)
$ “Sort:ON” key
(Touch this key when you want to make copies in the sort mode.)
% “Sort/Finish” key
(Touch this key when you want to access the “Sort/Finish” screen.)
^ Registration keys
(Touch the appropriate key when you want to access the
corresponding function or mode. Any function or mode in the
“Function” tab can be registered to be displayed as one of the
registration key.)
& “Basic” tab
(Touch this tab when you want to return the display to the contents
of the “Basic” tab.)
* “User choice” tab
(Touch this tab when you want to display the contents of the “User
choice” tab.)
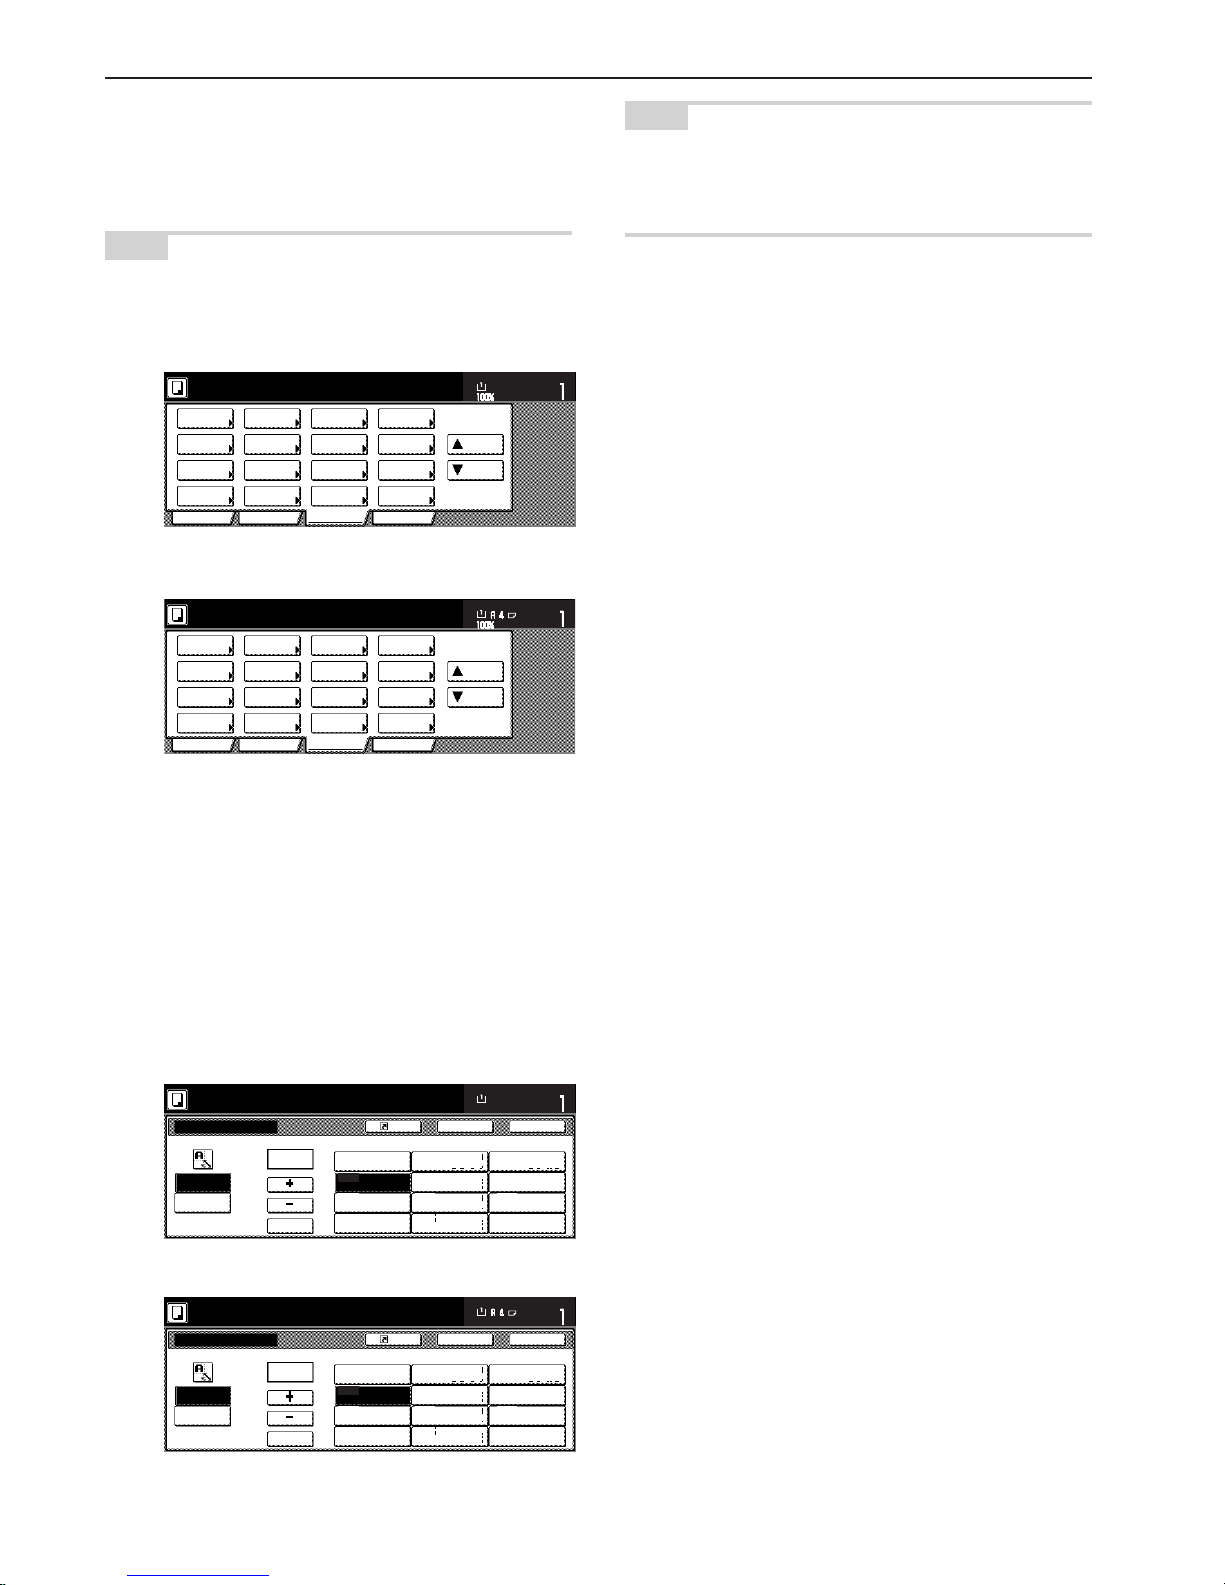
( “Function” tab
(Touch this tab when you want to display the contents of the
“Function” tab.)
2-sided /
Separation
User choice
Function
Program
Basic
Select
orig. size
Border
Erase
Cover
Proof Copy
Form
Overlay
Orig. image
quality
2-sided /
Split
User choice
Function
Program
Basic
Erase
Mode
Cover
Mode
Test copy
Form
overlay
Image
quality
Select
size orig.
Inch specifications
Metric specifications
2 sided/
Separation
Select
paper
Combine
Reduce
/Enlarge
Margin/
Centering
Forms
Overlay
Page #
Function
Basic User choice Program
Cover
Mode
Booklet
Sort/
Finished
Border
Erase
Exposure
mode
Orig.image
quality
Ready to copy.
Select
orig. size
Auto
Selection
Batch
scanning
Up
Down
Set
Paper size
11x81/2"
Invert Mirror
Modify
Copy
Proof Copy
Memo
pages
Orig. set
direction
Ready to copy.
Up
Down
Set
Paper size
Eco Print
Auto
Rotation
Function
Basic User choice Program
OHP
backing
11x81/2"
Select of
Output
Select
paper
2-sided/
Split
Merge copy
Reduce/
Enlarge
Margin/
Imag. shift
Page
numbering
Function
Basic User choice Program
Cover
Mode
Booklet
Erase
Mode
Exposure
mode
Image
quality
Sort/
Finished
Ready to copy.
Select
size orig.
Auto
selection
Large # of
originals
Form
overlay
Up
Down
Set
Paper size
Invert Mirror
Modify
copy
Select of
Output
Test copy
Memo
pages
Orig. set
direction
Ready to copy.
Up
Down
Set
Paper size
Eco Print
Auto
Rotation
Function
Basic User choice Program
OHP back
Inch specifications
Metric specifications
Page 20
Section 2 NAMES OF PARTS
2-8
) “Program” tab
(Touch this tab when you want to register the currently selected
settings as a program, or to delete a previously registered
program.)
NOTE
If you press any key that has an arrow (
PP
PP
P) in its bottom right corner,
the corresponding setting screen will be displayed.
2 sided/
Separation
Select
paper
Combine
Reduce
/Enlarge
Margin/
Centering
Forms
Overlay
Page #
Function
Basic User choice Program
Cover
Mode
Booklet
Sort/
Finished
Border
Erase
Exposure
mode
Orig.image
quality
Ready to copy.
Select
orig. size
Auto
Selection
Batch
scanning
Up
Down
Set
Paper size
11x81/2"
Select
paper
2-sided/
Split
Merge copy
Reduce/
Enlarge
Margin/
Imag. shift
Page
numbering
Function
Basic User choice Program
Cover
Mode
Booklet
Erase
Mode
Exposure
mode
Image
quality
Sort/
Finished
Ready to copy.
Select
size orig.
Auto
selection
Large # of
originals
Form
overlay
Up
Down
Set
Paper size
Inch specifications
Metric specifications
Reduce/Enlarge
Standard
Zoom
Ready to copy.
BackRegister
XY zoom
Close
# Keys
AMS
Set
Paper size
100%
(25~400)
100 %
100%
400%
200%
154%
129%
121%
78%
77%
64%
50%
25%
5
1
/2x81/2"➔11x17"
8
1
/2x11"➔11x17"
5
1
/2x81/2"➔81/2x14"
11x81/2"
8
1
/2x14"➔11x17"
11x17"➔8
1
/2x11"
11x17"➔8
1
/2x14"
11x17"➔5
1
/2x81/2"
8
1
/2x14"➔81/2x11"
Reduce/Enlarge
Standard
Zoom
Ready to copy.
BackRegister
XY zoom
Close
#-Keys
AMS
Set
Paper size
100%
(25~400)
100 %
100%
400%
200%
141%
127%
106%
90%
75%
70%
50%
25%
A 5➔A 3
Folio➔A3
A 5➔A4
A 4➔A3
11x15"➔A3
A 4➔B 4
Folio➔A3
11x15"➔A 4
A4➔A5
Inch specifications
Metric specifications
“Register” key
(Touch this key when you want to register the currently selected
function or mode under a registration key.)
“Back” key
(Touch this key when you want to return the settings for the currently
selected mode back to their previous values.)
“Close” key
(Touch this key when you want to return to the previous screen.)
NOTE
You can change or add new keys to those displayed in the “Basic”
and the “User choice” tabs by following the “Customize screen layout
(Main functions)” procedure on page 7-61 or the “Customize screen
layout (Add functions)” procedure on page 7-61, as appropriate.
Page 21
3-1
Section 3 PREPARATIONS
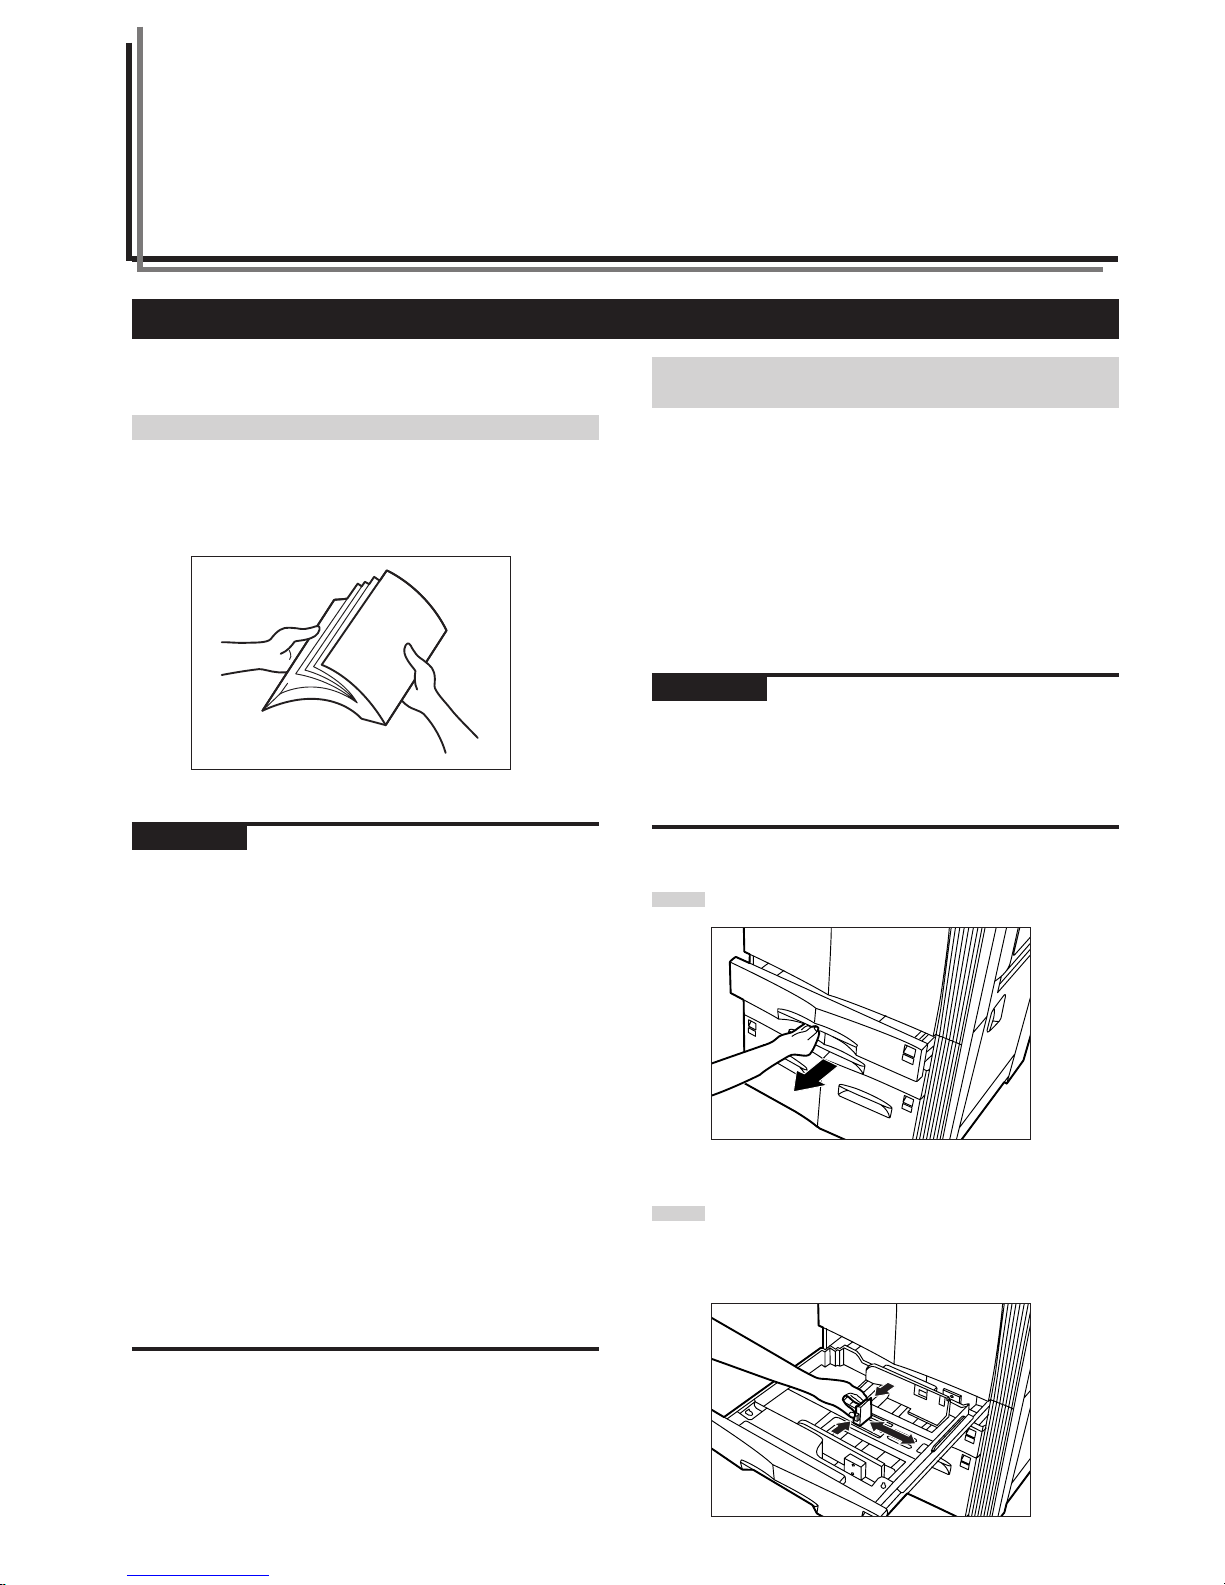
1. Loading paper
Paper can be loading into 5 locations in this copier: the 4
drawers[cassettes] and the multi-bypass tray.
(1) Note when adding paper
After taking new paper out of its packaging, be sure to fan through
them a few times to separate the sheets before loading the paper into
a drawer[cassette] or setting the paper on the multi-bypass tray.
IMPORTANT!
Using special paper
In this copier, the type of paper loaded in each drawer[cassette] and
on the multi-bypass tray can be specified under “Paper type
(drawer[cassette] No.1 - No. 5)” on page 7-24 and “(1) Paper size and
type” on page 7-62, respectively.
Among the special paper that can be use with this copier, there is a
wide range in paper quality and construction especially in those types
of paper noted below. For that reason, there is a greater possibility of
problems occurring during copying with these type of paper.
Whenever you do use such special paper as noted here, it is
recommended that you first make a test copy and verify the results.
<Special paper for which extra caution is recommended>
• Preprinted
• Label sheets*
1
• Prepunched
*1: When using label sheets, be absolutely certain that there is no
possibility that the backing glue will come into contact with any
part of the copier, and that none of the labels will come off the
sheet during copying. If glue does happen to come into contact
with the drum or rollers, or one of the labels comes off inside the
copier, it can be the cause of major damage.
(2) Loading paper into drawers[cassettes] No.1 and
No.2
Up to 500 sheets of standard copy paper (75 g/m2 – 90 g/m2) or color
paper can be loaded into each drawer[cassette].
Inch specifications
Each drawer[cassette] can hold paper of any size between
5 1/2" x 8 1/2" and 11" x 17".
Metric specifications
Each drawer[cassette] can hold paper of any size between A5R and
A3.
IMPORTANT!
• In metric specification copiers, the size of paper loaded in each
drawer[cassette] must be specified under “Paper size
(drawer[cassette] No.1 & No.2)” on page 7-23.
• The type of paper loaded in each drawer[cassette] must be specified
under “Paper type (drawer[cassette] No.1 - No.5)” on page 7-24.
1
Pull the drawer[cassette] out toward you as far as it will go.
2
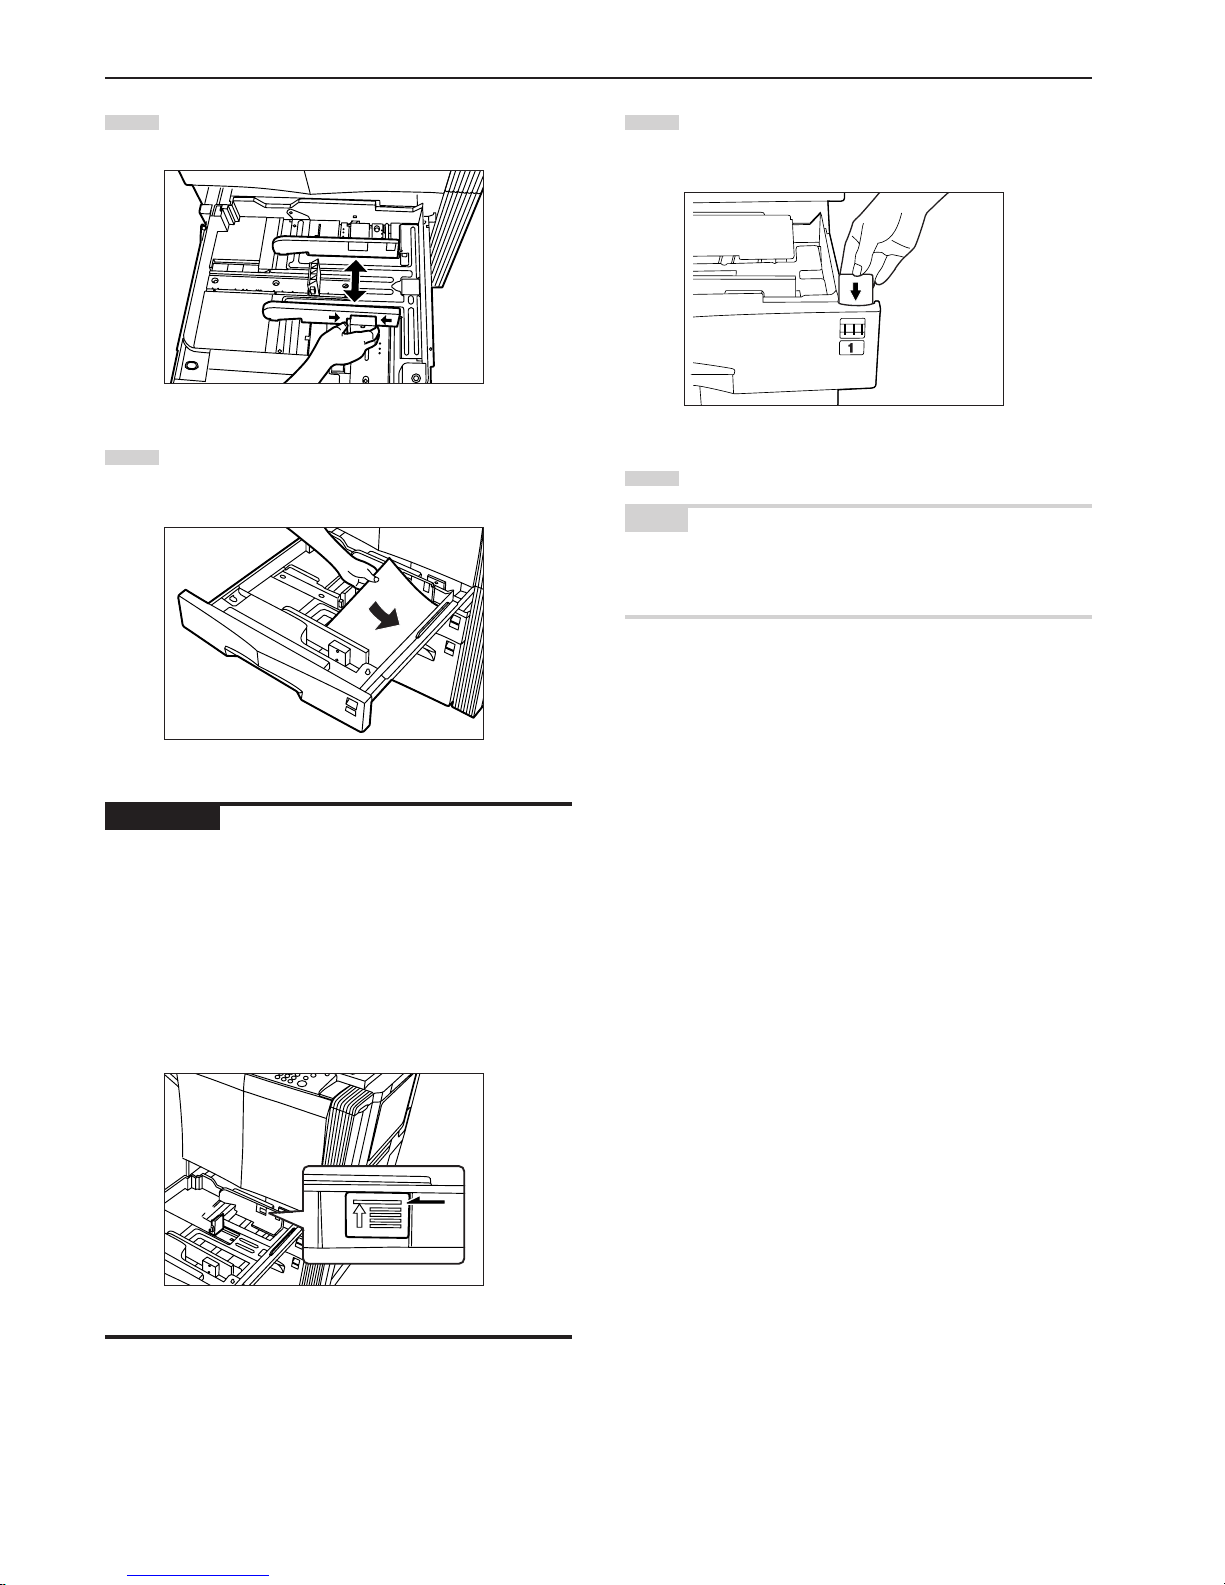
Move the paper length guide plates to fit the length of the
paper that is to be loaded in that drawer[cassette].
The paper sizes are marked on the bottom of the
drawer[cassette].
Page 22
Section 3 PREPARATIONS
3-2
3
Move the paper width guide plate to fit the width of the paper
that is to be loaded in that drawer[cassette].
4
Align the paper flush against the right side of the
drawer[cassette], and then set the paper in the
drawer[cassette].
IMPORTANT!
• Make sure there are no folds, etc., in the paper you load into the
drawers[cassettes]. Folds, etc., can cause paper jams.
• DO NOT load more paper than is indicated by the sticker located on
the inside of the drawer[cassette] (shown as 1 in the illustration).
• When you are loading paper into the drawer[cassette], make sure
that the side to be copied onto is facing downward. (The copy side is
the side facing upward when the package is opened.)
• Make sure that the paper is set securely against the paper length
and width guide plates. If there is a gap between the paper and any
guide plate, readjust the guide plates to fit the paper snugly.
1
5
Insert the appropriate paper size label into the front of the
drawer[cassette] to indicate the size of paper that is loaded
into that drawer[cassette].
6
Gently push the drawer[cassette] back in.
NOTE
If you will not be using the copier for a prolonged period of time,
remove all paper from the drawers[cassettes] and seal it in its original
packaging in order to protect it against moisture.
Page 23
Section 3 PREPARATIONS
3-3
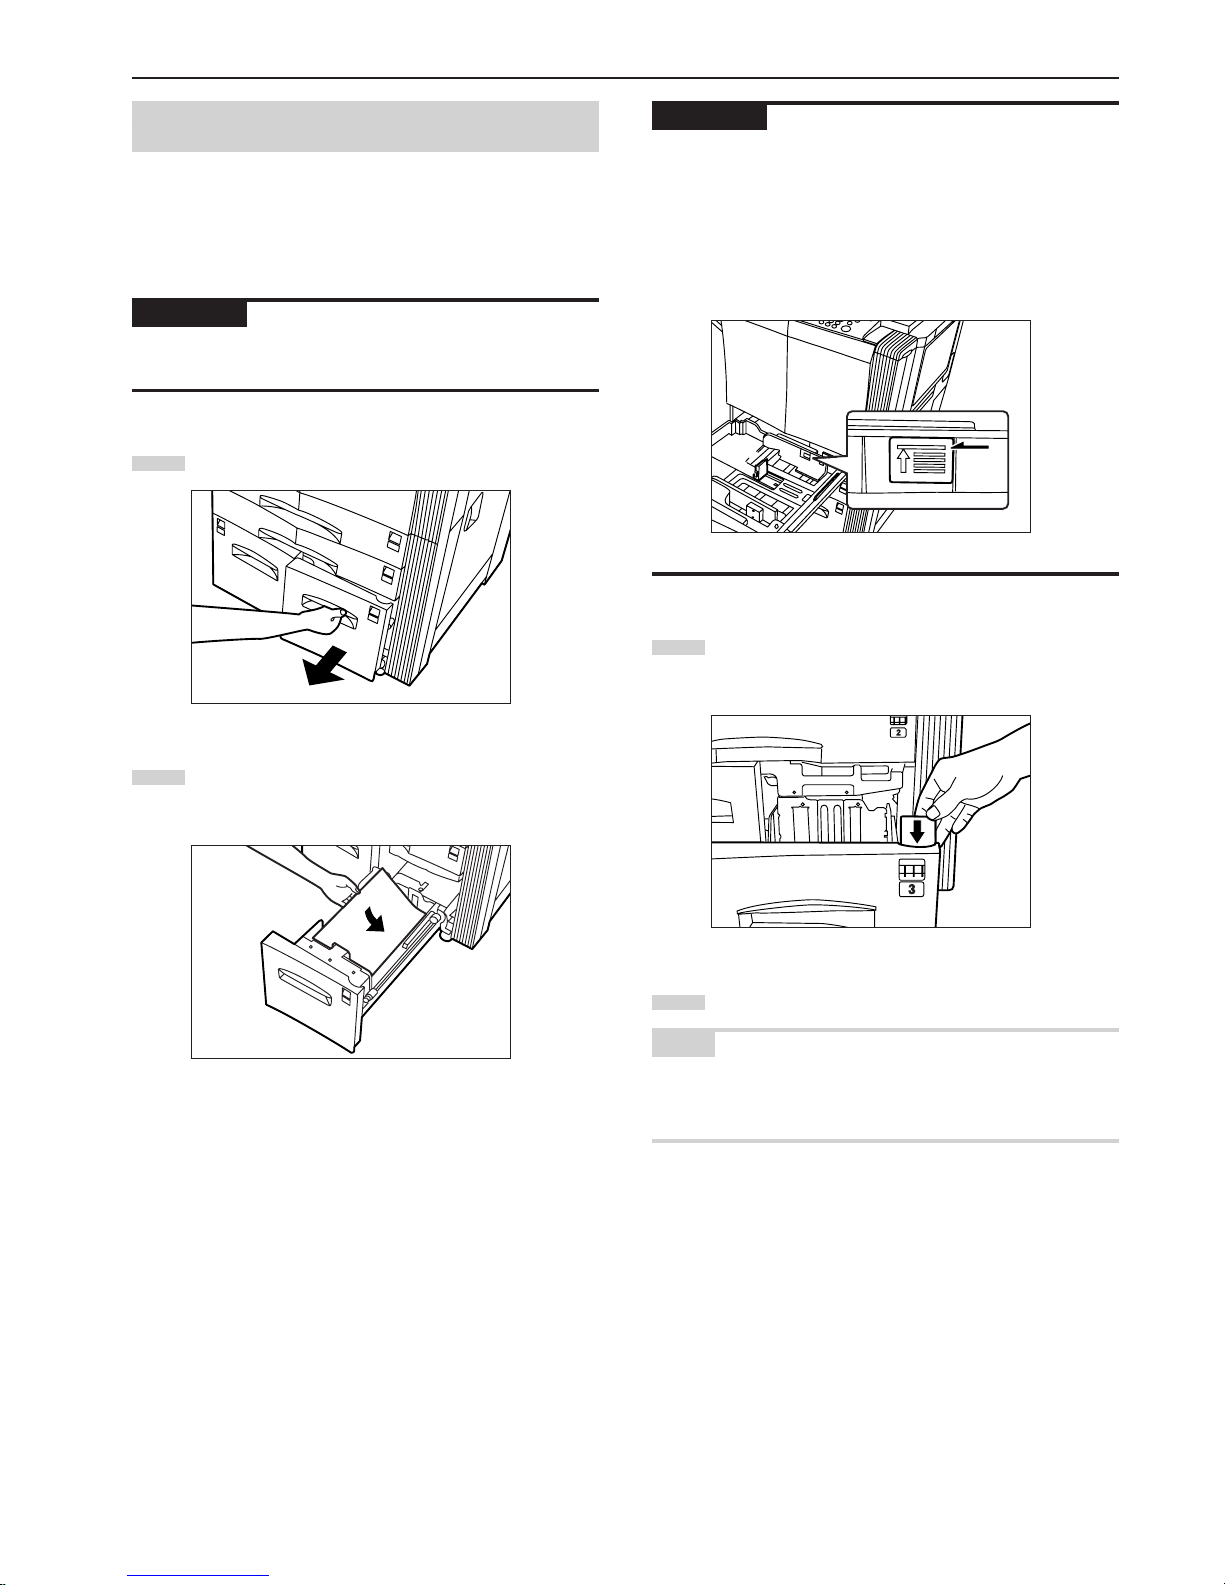
(3) Loading paper into drawers[cassettes] No.3 and
No.4
Up to 1000 sheets of 11" x 8 1/2" or A4 size standard copy paper
(75 g/m2 – 80 g/m2) or color paper can be loaded into
drawer[cassette] No.3 (right side drawer[cassette]). Drawer[Cassette]
No.4 (left side drawer[cassette]) can accept up to 1500 sheets of that
same size paper.
IMPORTANT!
The type of paper loaded in each drawer[cassette] must be specified
under “Paper type (drawer[cassette] No.1 - No.5)” on page 7-24.
1
Pull the drawer[cassette] out toward you as far as it will go.
2
Align the paper flush against the right side of the
drawer[cassette], and then set the paper in the
drawer[cassette].
IMPORTANT!
• Make sure there are no folds, etc., in the paper you load into the
drawers[cassettes]. Folds, etc., can cause paper jams.
• DO NOT load more paper than is indicated by the sticker located on
the inside of the drawer[cassette] (shown as 1 in the illustration).
• When you are loading paper into the drawer[cassette], make sure
that the side to be copied onto is facing downward. (The copy side is
the side facing upward when the package is opened.)
3
Insert the appropriate paper size label into the front of the
drawer[cassette] to indicate the size of paper that is loaded
into that drawer[cassette].
4
Gently push the drawer[cassette] back in.
NOTE
If you will not be using the copier for a prolonged period of time,
remove all paper from the drawers[cassettes] and seal it in its original
packaging in order to protect it against moisture.
1
Page 24
Section 3 PREPARATIONS
3-4
2
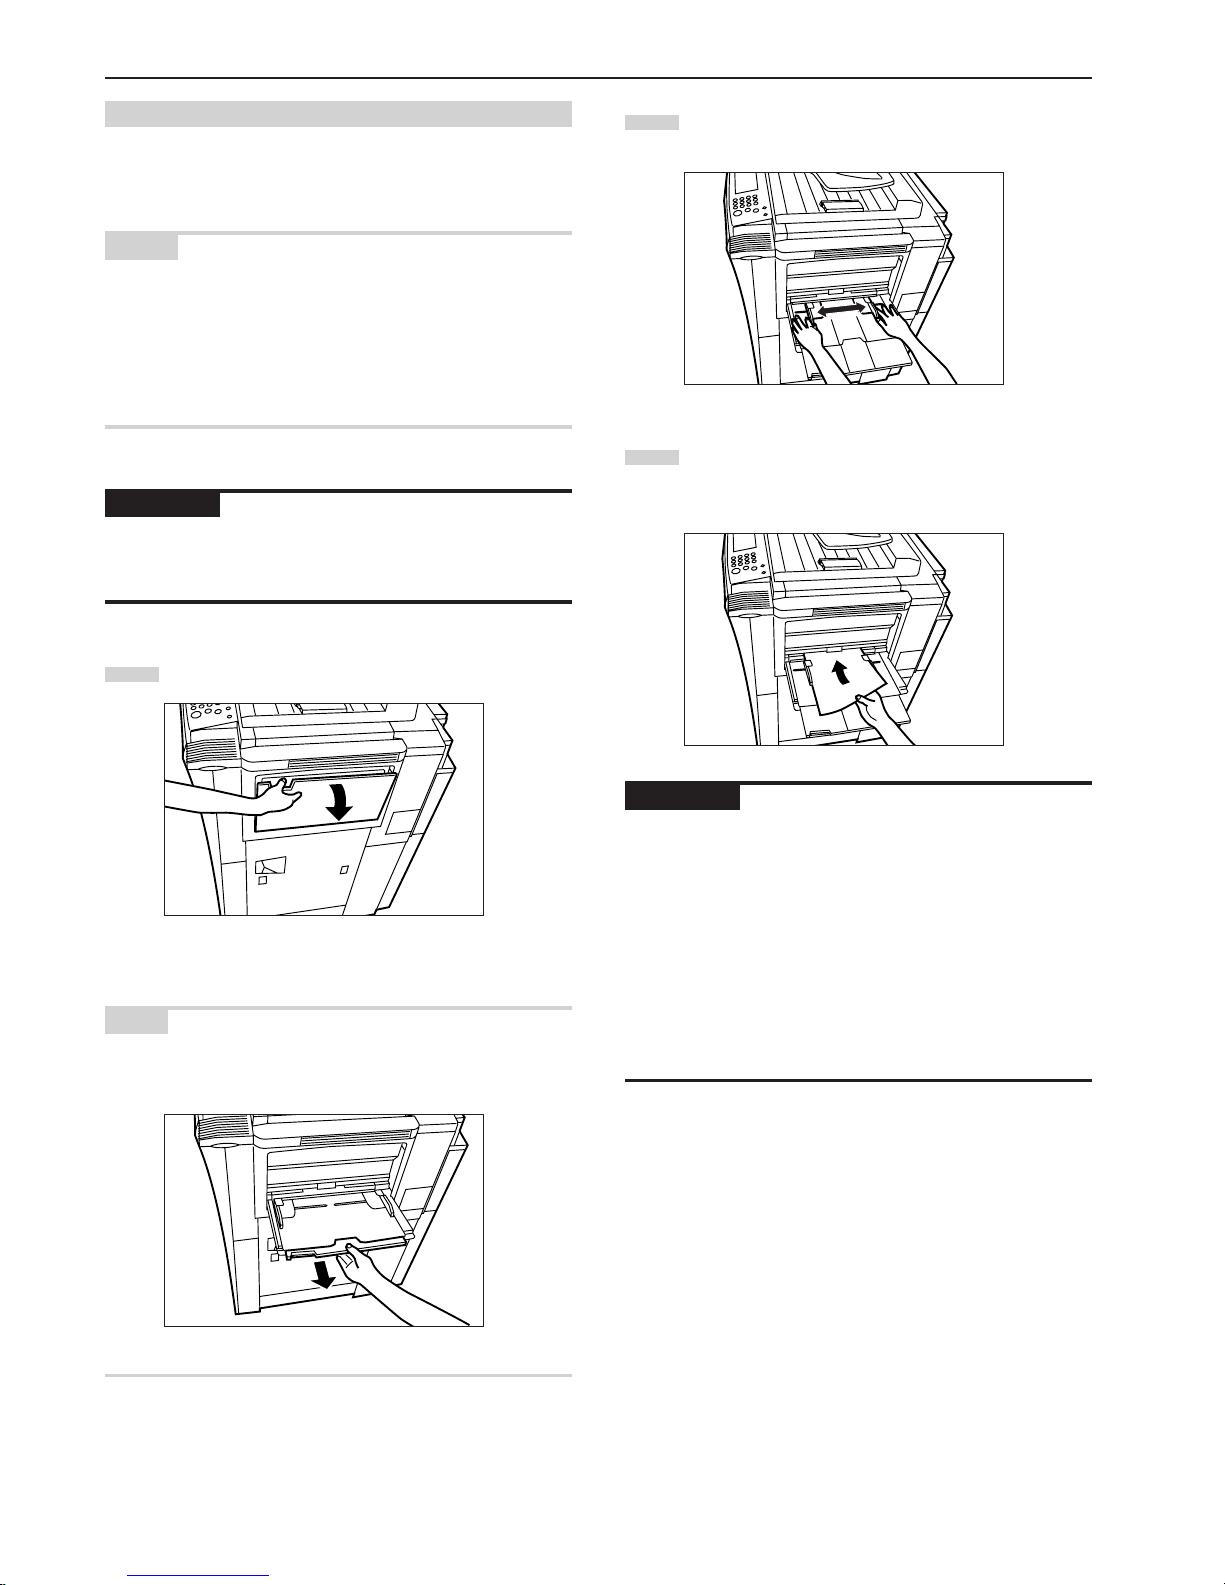
Adjust the insert guides to fit the width of the paper that is to
be set on the multi-bypass tray.
3
Slide the paper all the way in, along the insert guides, as far
as it will go.
IMPORTANT!
• Make sure there are no folds, etc., in the paper you set onto the
multi-bypass tray. Folds, etc., can cause paper jams.
• If the paper is curled at all, straighten it out before setting it on the
multi-bypass tray. (The amount of paper curl should be under 10
mm for standard paper and 5 mm for postcards.) Depending upon
the paper quality, paper might not be fed properly into the multibypass tray.
• When you are loading paper onto the multi-bypass tray, make sure
that the side to be copied onto is facing upward. (The copy side is
the side facing upward when the package is opened.) Especially if
the leading edge of the paper is curled at all, straighten it out before
setting it on the multi-bypass tray.
(4) Setting paper on the multi-bypass tray
Standard copy paper as well as special paper can be set on the multibypass tray. When copying onto special paper, be sure to use the
multi-bypass tray.
NOTES
• Up to 100 sheets of standard copy paper or special paper can be
set on the multi-bypass tray at one time.
• The types of special paper and the number of sheets that can be set
on the multi-bypass tray at one time are as follows:
OHP transparencies: 25 sheets
Thick paper (120 g/m2, 160 g/m2, 200 g/m2 and 110 lbs) : 25
sheets
IMPORTANT!
When setting special paper such as OHP transparencies and thick
paper on the multi-bypass tray, the type of paper must be specified
under “(1) Paper size and type” on page 7-63.
1
Open the multi-bypass tray.
NOTE
When copying onto 8 1/2" x 14", 11" x 17", B4 or A3 size paper, be
sure to pull out the multi-bypass extension.
Page 25
Section 3 PREPARATIONS
3-5
(5) Loading paper into the Side Feeder (an optional
drawer[cassette] only available for 55 cpm copiers)
Up to 4000 sheets of 11" x 8 1/2" or A4 size standard copy paper
(75 g/m2 – 80 g/m2) or color paper can be loaded into the optional
Side Feeder.
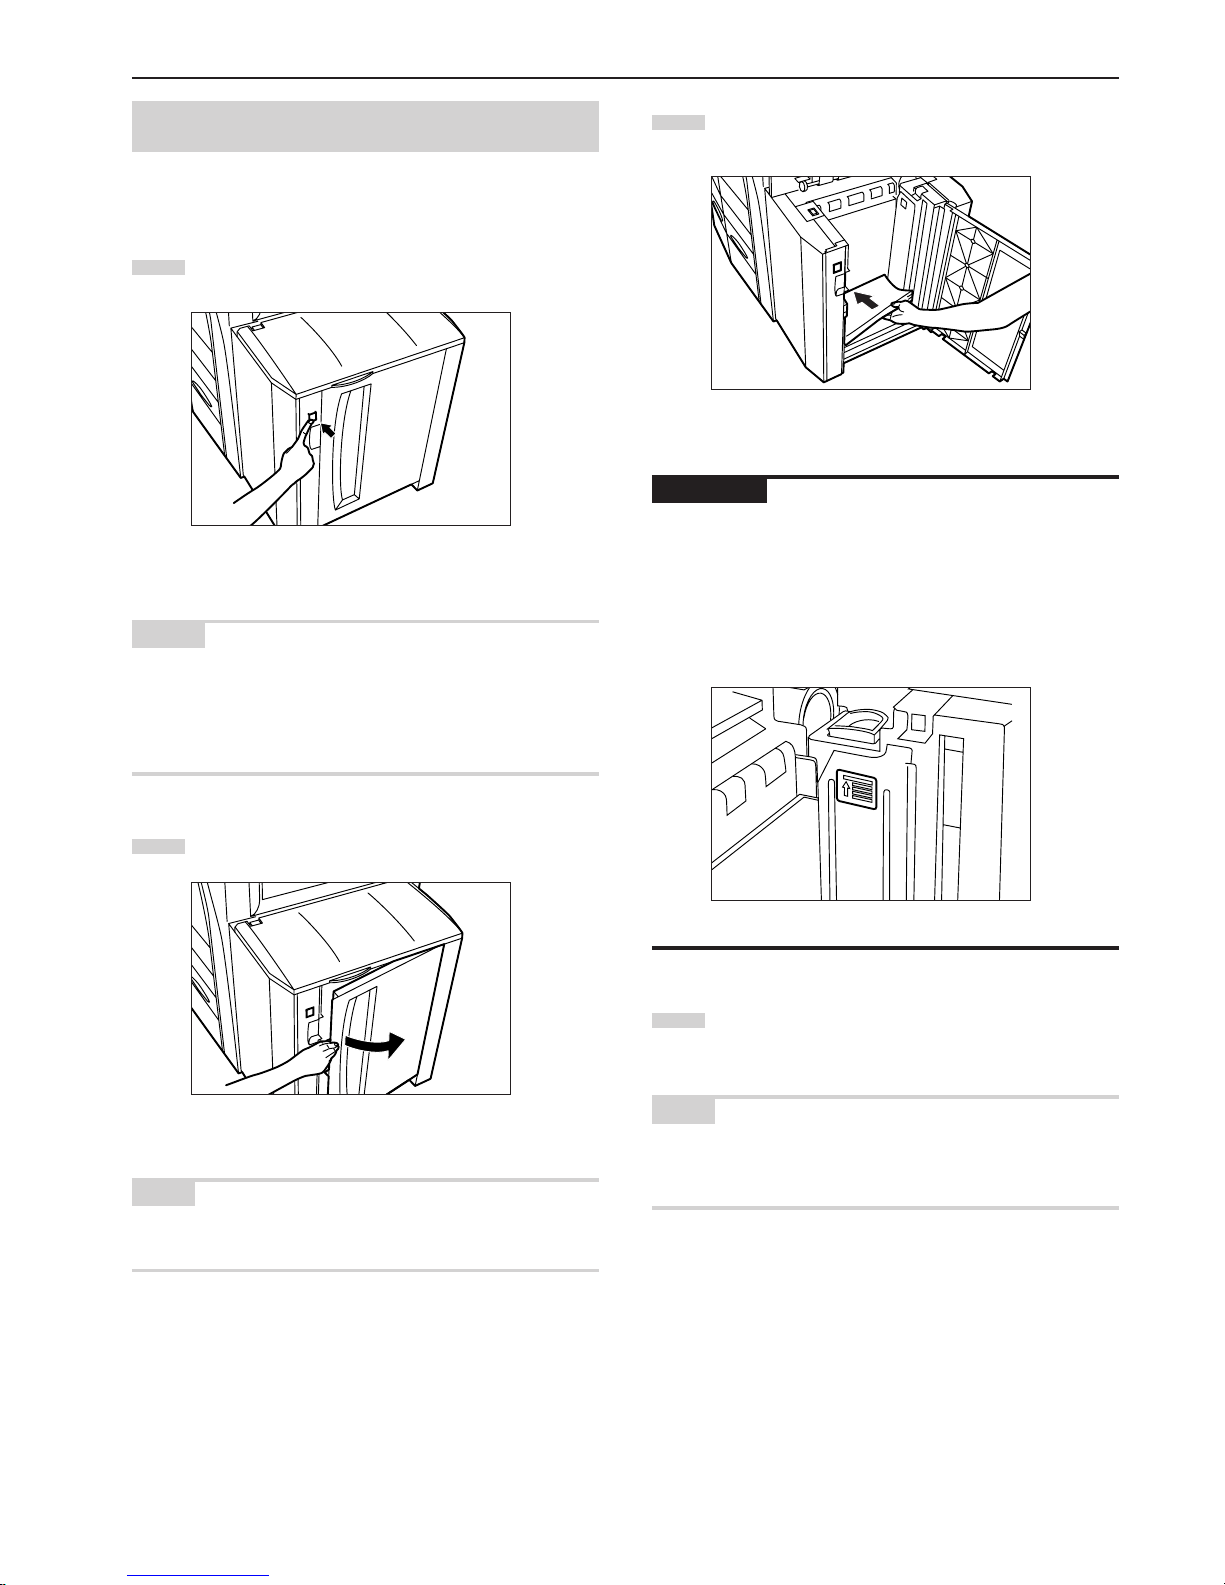
1
Hold down the paper plate up/down switch located on the
right side of the Side Feeder.
NOTES
• If there is no paper in the Side Feeder, the paper plate inside the
Side Feeder will already have been lowered automatically to its
lowermost position.
• If the right cover to the Side Feeder is open, the paper plate will not
move even if you press this switch.
2
Open the right cover to the Side Feeder.
NOTE
If you open the upper cover as well, it will be easier to load paper into
the Side Feeder.
3
Align the paper flush against the left side of the paper plate,
and then set the paper in the Side Feeder.
IMPORTANT!
• Make sure there are no folds, etc., in the paper you load into the
Side Feeder. Folds, etc., can cause paper jams.
• DO NOT load more paper than is indicated by the label located on
the inside of the Side Feeder (shown as 1 in the illustration).
• When you are loading paper into the Side Feeder, make sure that
the side to be copied onto is facing upward. (The copy side is the
side facing upward when the package is opened.)
4
Close the upper cover, if necessary, and then close the right
cover.
NOTE
If you will not be using the copier for a prolonged period of time,
remove all paper from the Side Feeder and seal it in its original
packaging in order to protect it against moisture.
1
Page 26
Section 3 PREPARATIONS
3-6
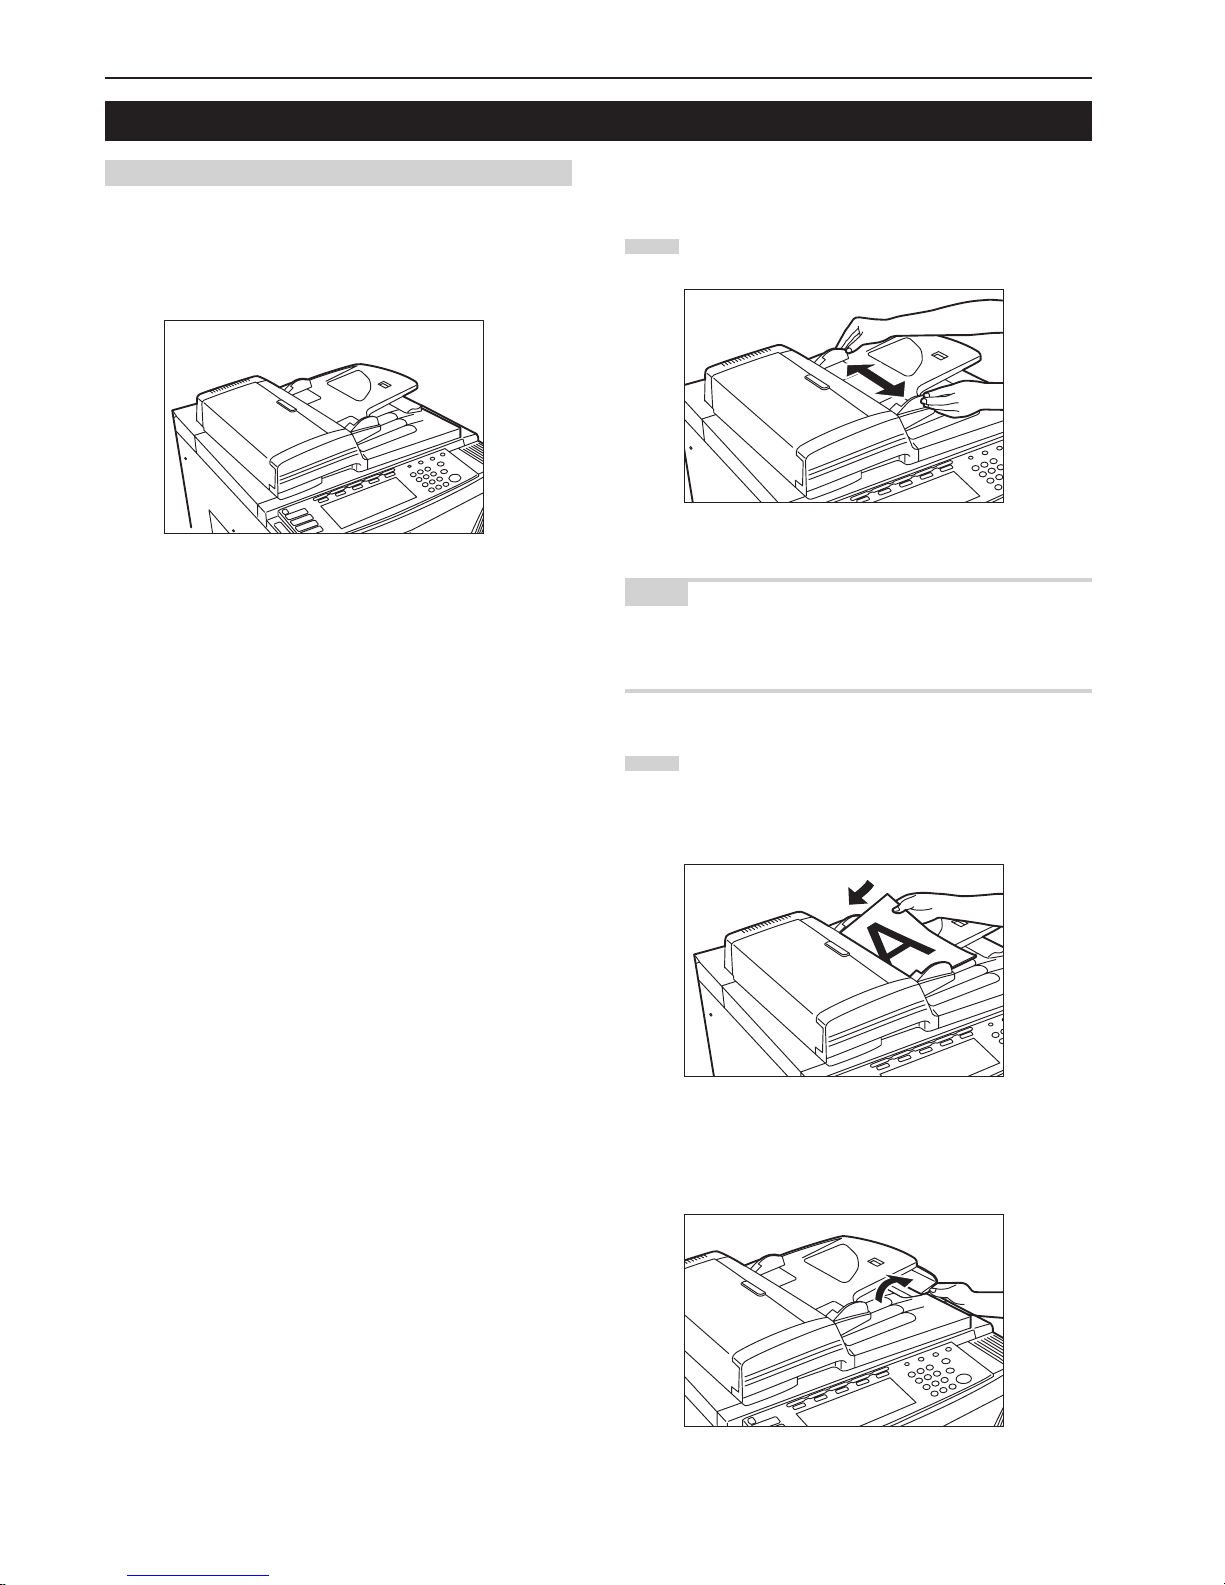
(1) Setting originals in the Document Processor
The Document Processor automatically feeds and scans each
original, one by one, for copying. You can also have two-sided
originals turned over automatically in order to make two-sided copies
or separate copies from each side.
1 Cautions when using the Document Processor
DO NOT set originals of the follow types in the Document Processor.
In addition, when using perforated sheets or originals with punch
holes, DO NOT insert the end with the perforations or holes first.
• OHP film and other transparencies
• Carbon paper, crumpled originals or originals with strong folds, and
soft originals such as vinyl
•Originals which are not rectangular, wet originals, and originals with
adhesive tape or glue
• Originals with clips or staples (In order to use such originals, remove
the clips or staples and straighten any crumples or folds before
using them. Failure to do so may cause originals to misfeed.)
• Clippings or originals with very slippery surfaces
• Originals with wet correction fluid
• Originals with folds (If you must use such originals, smooth out the
folded portions before setting them in the Document Processor.
Failure to do so may cause originals to misfeed.)
2 Originals that can be set in the Document Processor
• Sheet originals
• Paper weight:
One-sided originals: between 35 g/m2 - 160 g/m
2
Tw o-sided originals: between 50 g/m2 - 120 g/m
2
• Size: Max. 11" x 17" or A3 - Min. 5 1/2" x 8 1/2" or A5R
• Number of sheets:
100 sheets (under 11" x 8 1/2" or A4 size [75 g/m2 or 80 g/m2])
70 sheets (over 8 1/2" x 14" or B4 size [75 g/m2 or 80 g/m2])
30 sheets (when using the auto selection mode)
3 How to set originals in the Document Processor
1
Adjust the original insert guides to fit the size of the originals.
NOTE
Before setting any new originals, remove any originals that are
remaining on the original ejection table. If ejected originals are left on
the original eject table, they may cause other originals to misfeed.
2
Arrange the originals in order and set them face up (first
page face up for two-sided originals) onto the original table.
Slide the leading edge of the originals all the way into the
Document Processor, as far as they will go.
* When setting large size originals such as 8 1/2" x 14",
11" x 17", B4 or A3, be sure to open the ejection extension.
2. Setting originals
Page 27
Section 3 PREPARATIONS
3-7
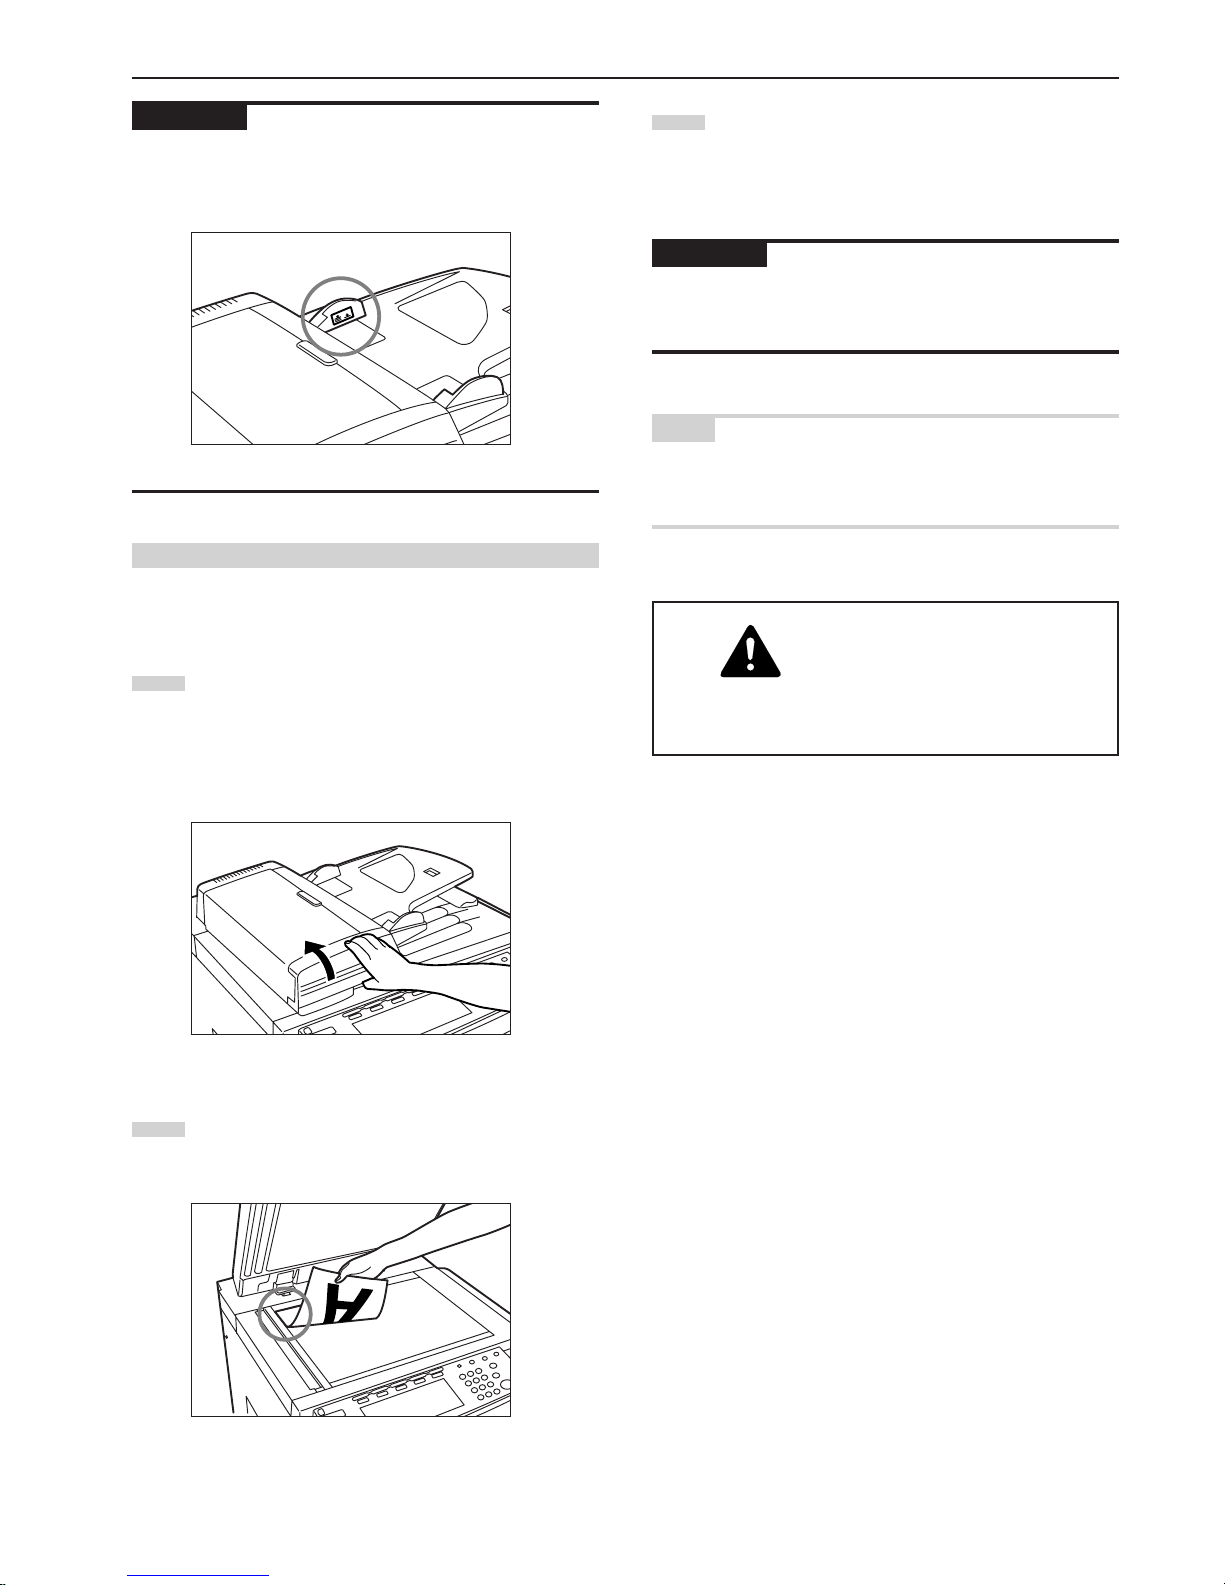
IMPORTANT!
DO NOT set more originals than indicated on the sticker that is
attached to the rear original insert guide. If more than the acceptable
number of originals is set, the originals may not feed properly.
(2) Setting originals on the platen
To make copies from originals that cannot be set in the Document
Processor (books, magazines, etc.), lift open the Document Processor
and set one original at a time on the platen.
1
Hold the Document Processor handle and lift the Document
Processor open.
* Before opening the Document Processor, remove any
originals that are on the original table and the original eject
table to prevent them from falling off the Document
Processor when it is opened.
2
Set the original face down on the platen and align it with the
appropriate original size indicator lines on the left side of the
platen.
3
Hold the Document Processor handle and close the
Document Processor.
* Leave the Document Processor open whenever you are
using an original that is over 4 cm thick.
IMPORTANT!
Avoid placing excessive pressure on the platen when closing the
Document Processor. Too much pressure on the platen may cause
the glass to break.
NOTE
When copying from open-faced originals (books, etc.), shadows may
appear around the outside edges of, or up the middle between, the
copy images.
CAUTION
DO NOT leave the document processor open as
there is a danger of personal injury.
Page 28
Section 3 PREPARATIONS
3-8
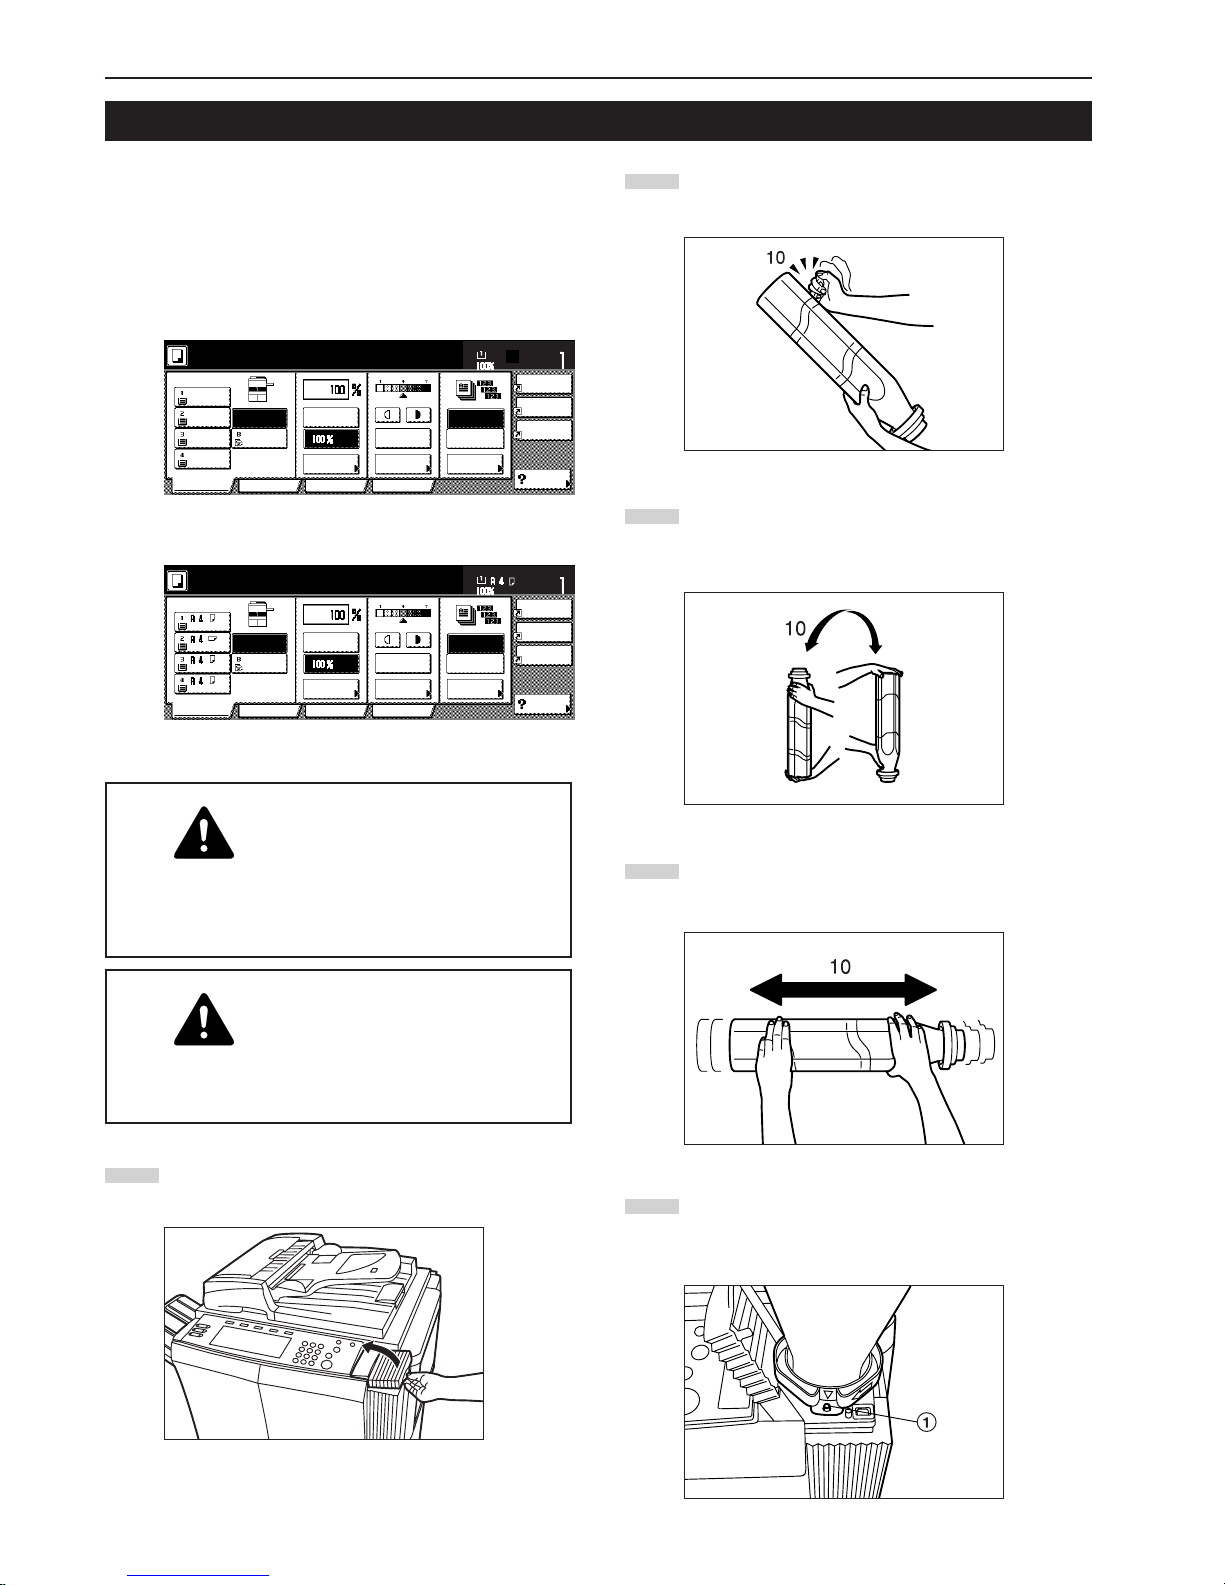
Add toner when “Add toner” is displayed. Although a few copies can
still be made once this message is displayed, you should add toner as
soon as possible.
* DO NOT add toner unless this message is displayed.
* Touch the “Adding toner” key to have the procedure for adding toner
displayed on the touch panel.
1
Open the cover on the right side of the operation panel.
3. Adding toner
Adding
toner
Combine
AMS
Reduce
/Enlarge
APS
Orig.image
quality
Reduce
/Enlarge
Exposure
mode
Auto
Exposure
Ready to copy.
Set
Paper Size
Bypass
Color
Recycled
Plain Plain
Plain
Sort/
Finished
Sort:Off
Sort:On
Basic User choice
Program
Function
Add toner.
11x8 1/2"
8
1
/2x11"
11x8
1
/2"
11x8
1
/2"
11x8 1/2"
Adding
toner
Merge copy
AMS
Reduce/
Enlarge
APS
Image
quality
Reduce/
Enlarge
Exposure
mode
Auto
Exposure
Set
Paper Size
Bypass
Color
Recycled
Plain Plain
Plain
Sort/
Finished
Sort:Off
Sort:On
Basic User choice
Program
Function
Ready to copy.
Add toner.
Inch specifications
Metric specifications
CAUTION
DO NOT attempt to incinerate the toner bottle or the
waste toner box. Dangerous sparks may cause
burns.
CAUTION
DO NOT attempt to force open or destroy the toner
bottle or the waste toner box.
2
Tu rn the new toner bottle upside down and tap the bottom
portion about 10 times or so.
3
Hold the bottle firmly and shake up the contents by turning it
upside down and then right-side up 10 or more times in the
manner shown in the illustration.
4
Next, hold the bottle horizontally and shake it back and forth
10 or more times.
5
Fit the hole in the toner bottle (located below the ▼) over the
metal pin (shown as 1 in the illustration) that is protruding
out of the toner supply slot.
Page 29
Section 3 PREPARATIONS
3-9
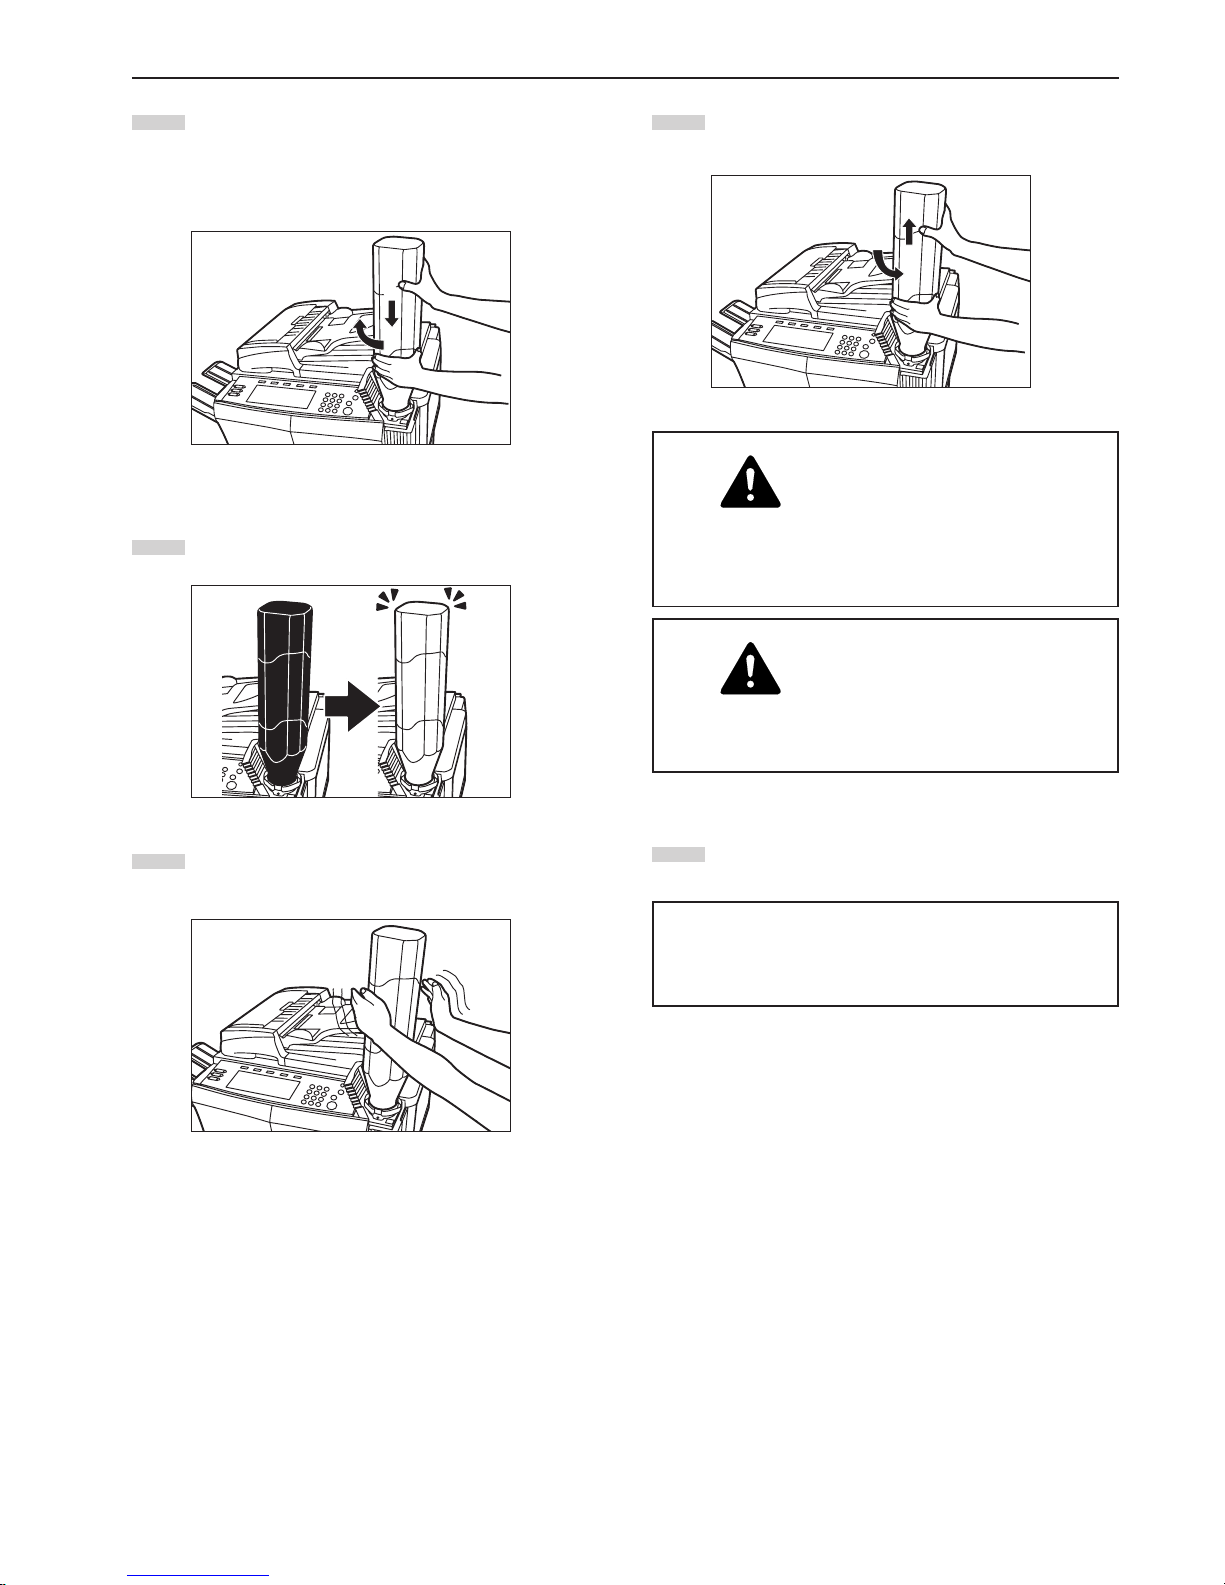
6
Tu rn the bottle clockwise 90 degrees and the toner in the
bottle will be emptied into the copier.
* Be sure to turn the bottle all the way until it stops, so that
the ■ on the bottle is aligned with the ▲ on the main body
of the copier.
7
Wait until all of the toner is out of the bottle.
8
Tap the sides of the bottle about 10 times or so in order to
get all of the remaining toner out.
9
Tu rn the toner bottle back counterclockwise to its original
position and slowly remove it from the toner supply slot.
CAUTION
DO NOT attempt to incinerate the toner bottle or the
waste toner box. Dangerous sparks may cause
burns.
CAUTION
DO NOT attempt to force open or destroy the toner
bottle or the waste toner box.
● After use, ALWAYS dispose of the toner bottle and
the waste toner box in accordance with Federal,
State and Local rules and regulations.
1
2
10
1
2
10
Close the cover on the right side of the operation panel.
Page 30

Section 3 PREPARATIONS
3-10
Page 31
4-1
Section 4 BASIC OPERATION
1. Basic copying procedure
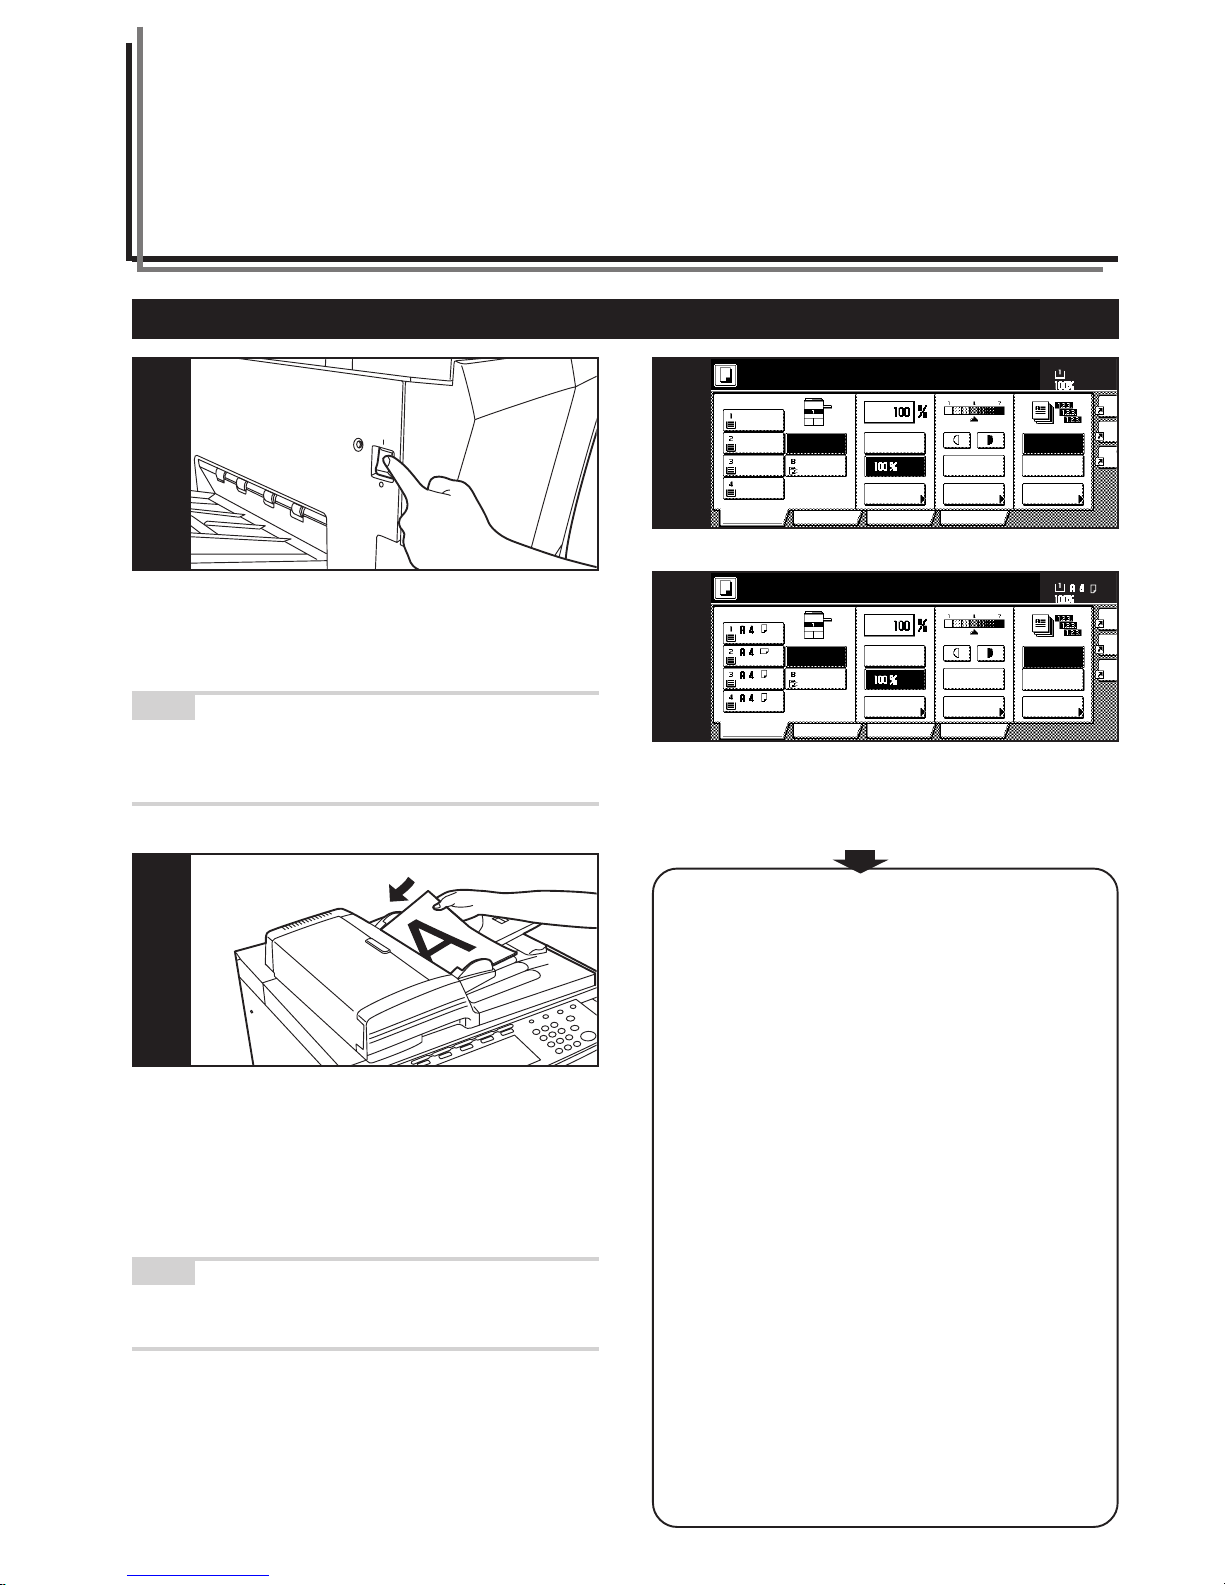
1. Warm-up
Tu rn the main switch ON ( | ). At the end of warm-up, “Ready to copy.”
will be displayed.
NOTE
If you set the originals that you want to copy and press the [Start] key
while the copier is still warming up, copying will begin as soon as
warm-up is finished.
2. Setting the originals
Set the original(s) that you want to copy in the Document Processor
or on the platen. If you set an original on the platen, place it at the leftrear corner of the platen and align it with the appropriate original size
indicator lines.
NOTE
Refer to “2. Setting originals” on page 3-6 for more detailed
information on setting originals.
1
2
AMS
Reduce
/Enlarge
APS
Exposure
mode
Auto
Exposure
Ready to copy.
Set
Paper Size
Bypass
Color
Recycled
Plain Plain
Plain
Sort/
Finished
Sort:Off
Sort:On
Basic User choice
Program
Function
Co
Ori
qua
Red
/En
11x8
1
/
2"
8
1
/
2x11"
11x8
1
/
2"
11x8
1
/
2"
11x81/2"
3
Me
AMS
Reduce/
Enlarge
APS
Im
qu
Re
En
Exposure
mode
Auto
Exposure
Ready to copy.
Set
Paper Size
Bypass
Color
Recycled
Plain Plain
Plain
Sort/
Finished
Sort:Off
Sort:On
Basic User choice
Program
Function
3
Inch specifications
Metric specifications
3. Selecting the desired functions
Select from among the copier's various modes and functions.
• Enlarging/reducing the copy image (Page 4-5.)
• Interrupt copying (Page 4-9.)
• Making 2-sided copies from various types of originals (Page 5-1.)
• Copying each image of open-faced (books, magazines, etc.) or
2-sided originals onto separate sheets (Page 5-4.)
• Creating a margin on the copies (Page 5-6.)
• Centering the copy image (Page 5-8.)
• Adding a space next to the copy images for making notes
(Page 5-9.)
• Making copies with clean edges (Page 5-11.)
• Fitting the image of either two or four originals onto a single copy
page (Page 5-13.)
• Printing page numbers on the copies (Page 5-16.)
• Overlaying one image over another (Page 5-20.)
• Making booklets from sheet originals (Page 5-22.)
• Making booklets from books (Page 5-25.)
• Automatic sorting of copy sets without the Document Finisher
(Page 5-28.)
• Automatic rotation of the copy image (Page 5-29.)
• Copying different sized originals at the same time (Page 5-30.)
• Adding a front and/or back cover to your copy sets (Page 5-32.)
• Feeding paper as a backing sheet for OHP transparencies
(Page 5-37.)
• Inverting black and white (Page 5-39.)
• Making mirror image copies (Page 5-40.)
• Making a test copy prior to large volume copying (Page 5-41.)
• Making more of the same copies after a copy job is finished
(Page 5-43.)
• Copying a large volume of originals in one operation (Page 5-48.)
• Easily add covers and insert sheets between various sets of
originals in one operation (Page 5-58.)
Page 32
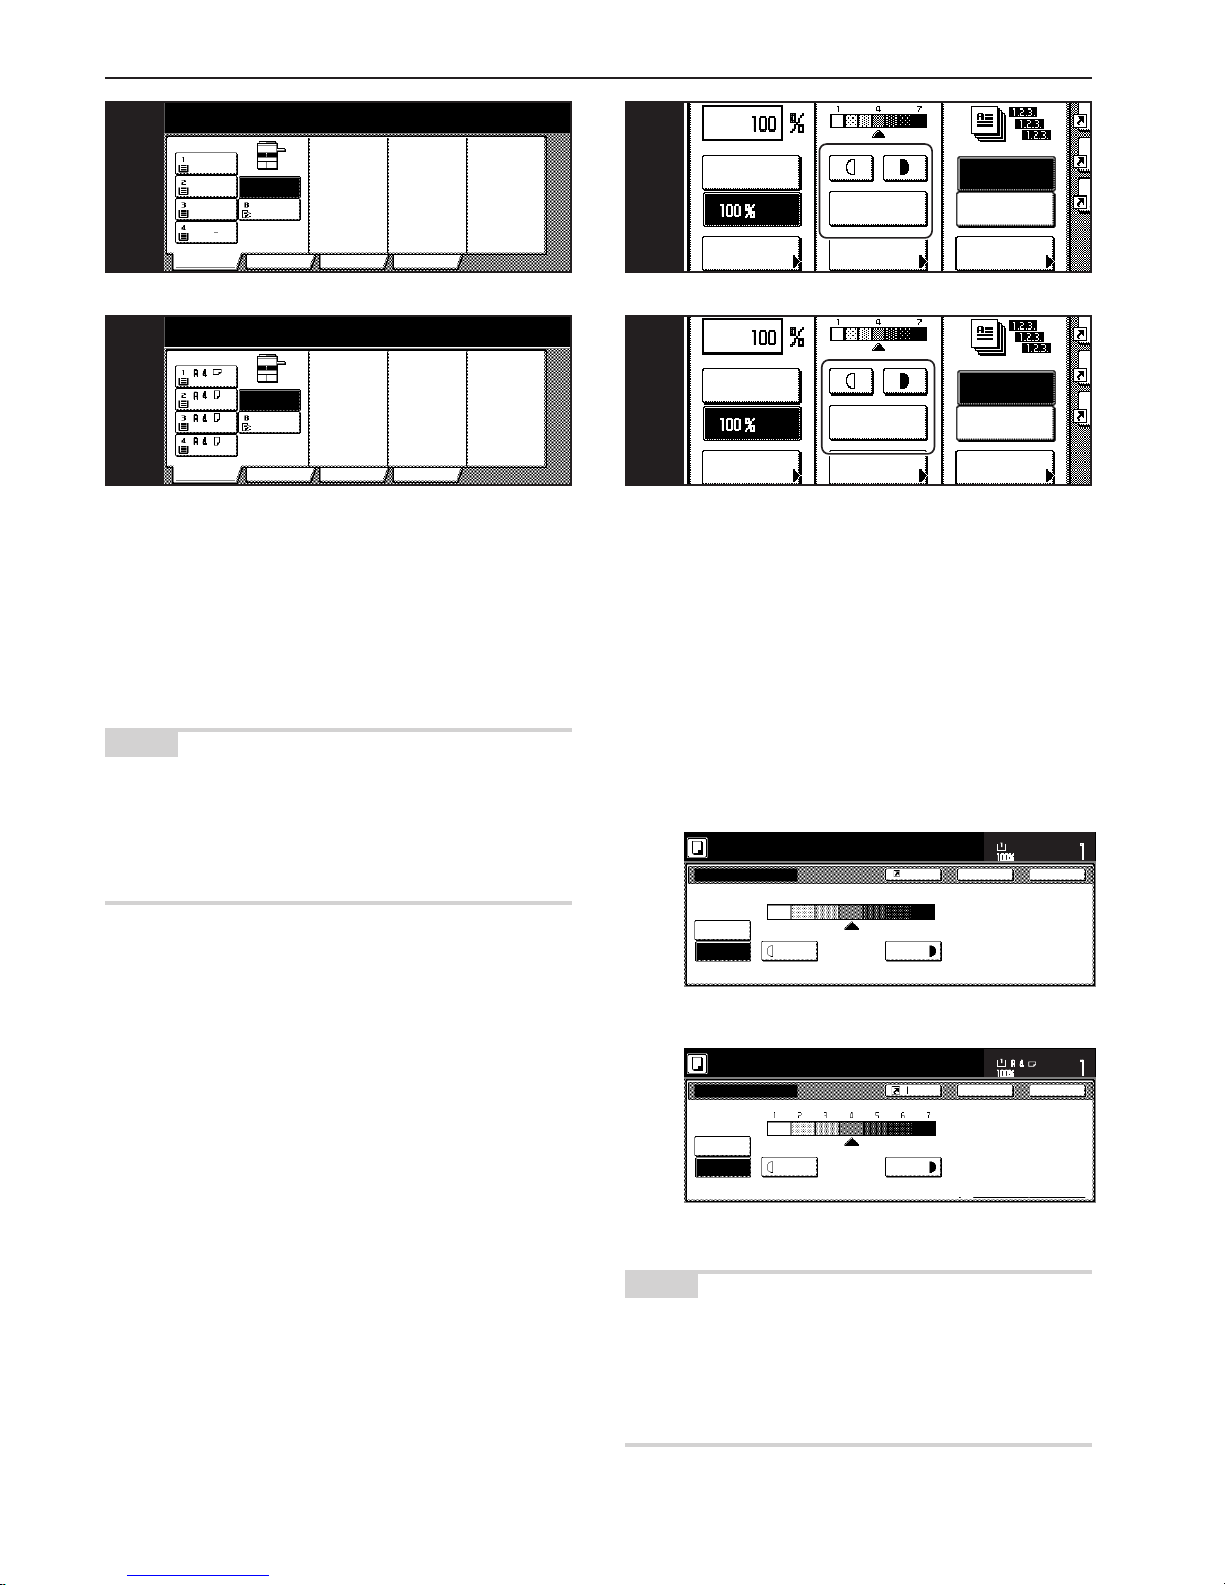
Section 4 BASIC OPERATION
4-2
4. Selecting the paper size
When the “APS” key is highlighted on the touch panel, copy paper of
the same size as the original will be automatically selected. In order to
copy the original onto a different size of paper without changing the
size of the image, touch the paper size key that corresponds to the
paper size that you want to use.
NOTES
•You can stop the copier from automatically selecting the paper size.
(See “Paper selection” on page 7-45.)
• It is also possible for you to specify one drawer[cassette] that will be
selected automatically regardless of the size of paper loaded in that
drawer.
(See “Default drawer[cassette]” on page 7-47.)
APS
Bypass
Color
Recycled
Plain Plain
Plain
8
1
/
2x11"
11x8
1
/
2"
11x8
1
/
2"
11x8
1
/
2"
4
APS
BYPASS
Colour
Recycled
Plain Plain
Plain
4
Inch specifications
Metric specifications
Inch specifications
Metric specifications
5. Adjusting the copy exposure
Adjustment of the copy exposure is generally accomplished manually.
If you want to make the exposure darker, touch the right exposure
adjustment key to move the arrow under the exposure scale to the
right; If you want to make the exposure lighter, touch the left exposure
adjustment key to move the arrow under the exposure scale to the
left.
If you want the copy exposure to be adjusted automatically, touch the
“Auto Exposure” key until it is highlighted. The contrast of the original
will be detected and the most suitable exposure level selected
automatically.
Ready to copy.
Set
Paper Size
Back Close
Exposure Mode
DarkerLighter
Manual
Auto
Register
11x8
1
/
2
"
123 4567
Ready to copy.
Back Close
Exposure mode
DarkerLighter
Manual
Auto
Register
Set
Paper size
Inch specifications
Metric specifications
NOTES
• It is possible for you to make adjustments to the auto exposure
mode if the overall copies come out too dark or too light.
(See “Auto exposure adjustment” on page 7-50.)
• It is also possible for you to change the default setting for the copy
exposure to the auto exposure mode.
(See “Exposure mode” on page 7-39.)
AMS
Reduce
/Enlarge
Exposure
mode
Auto
Exposure
ass
n
Sort/
Finished
Sort:Off
Sort:On
/
5
AMS
Reduce/
Enlarge
Exposure
mode
Auto
Exposure
ass
n
Sort/
Finished
Sort:Off
Sort:On
5
Page 33
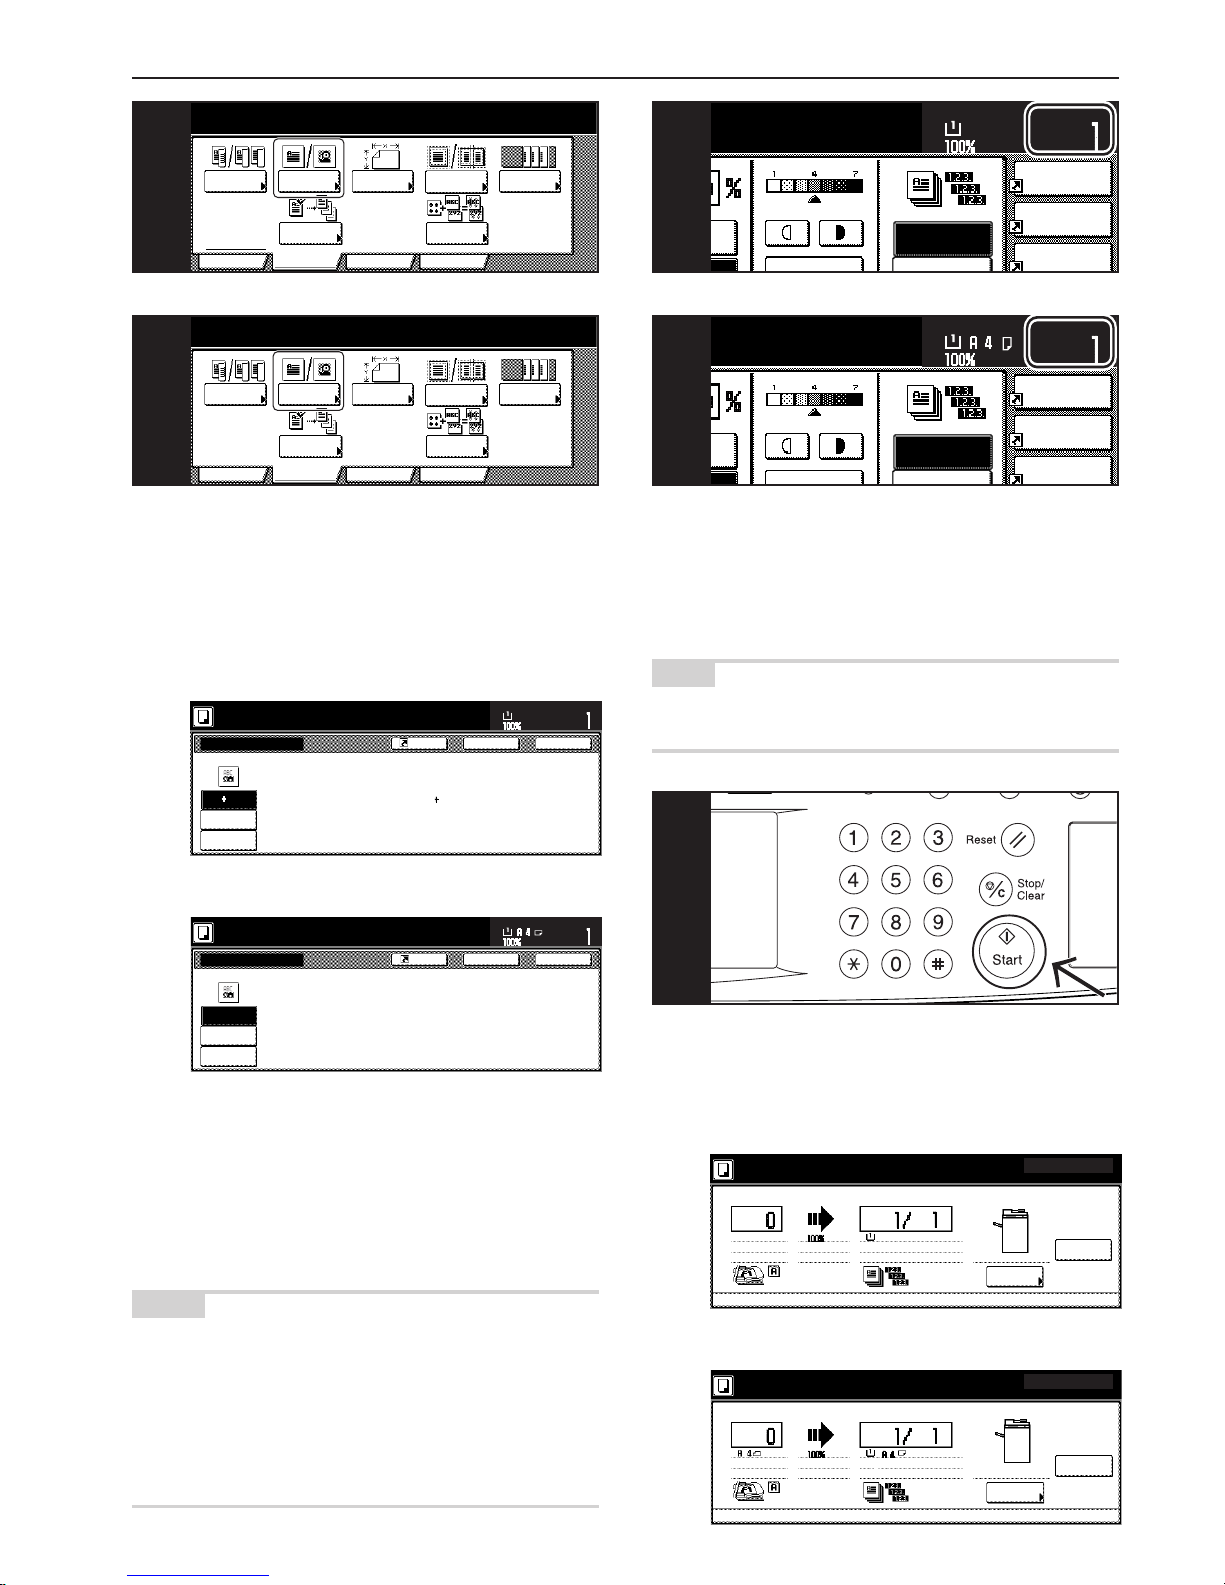
Section 4 BASIC OPERATION
4-3
6. Selecting the image quality
The image quality is selected according to the type of original.
Touch the “User choice” tab and then the resulting “Orig. image
quality” [“Image quality”] key that is displayed within that tab in order
to access the “Orig.image quality” [“Image quality orig.”] screen.
Text+photo mode: Touch the “Text+Photo” key until it is highlighted.
Select this mode when the original contains a
mixture of both text and photographs.
Photo mode: Touch the “Photo” key until it is highlighted. Select
this mode to bring out the depth in photographs.
Text mode: Touch the “Text” key until it is highlighted. Select
this mode especially to reproduce originals written
in pencil of which contain thin lines.
NOTES
• It is possible for you to select the image quality mode that will be
the default setting in the initial mode. (See “Original quality” on
page 7-41.)
• It is also possible for you to adjust the copy exposure in each of
the image quality modes. (See “Manual exposure adjustment
(text+photo mode)” on page 7-52, “Manual exposure adjustment
(text mode)” on page 7-53 and “Manual exposure adjustment
(photo mode)” on page 7-54.)
Inch specifications
Metric specifications
Text Photo
Photo
Tex t
Text Photo:Set this mode to copy orig.
with mixed text and photo
Photo:Add a dimensional effect of photo
Text :Copy a pencil or fine line.
Orig.image quality
Set
Paper Size
11x8
1
/
2
"
Back Close
Register
Ready to copy.
Register
Back Close
Set
Paper size
Text+Photo
Photo
Tex t
Text+Photo:Set this mode to copy
original mixed (text & photo).
Photo:Add a dimensional effect of photo.
Text :Copy pencil & fine line clearly.
Image quality orig.
Ready to copy.
Inch specifications
Metric specifications
7. Setting the number of copies to be made
Use the keypad to change the number of copies to be made that is
displayed on the touch panel to the actual number that you want to
make. Up to 999 copies can be made at one time.
NOTE
It is possible for you to limit the number of copies (or copy sets) that
can be made at a time. (See “Copy limit” on page 7-57.)
Merge copy
AMS
Image
quality
Reduce/
Auto
Set
Paper Size
Sort:Off
7
Inch specifications
Metric specifications
8. Start copying
Press the [Start] key. Once the lamp in the [Start] key is lit green and
“Ready to copy.” is displayed, copying is possible.
1-sided
Sort
Cancel
Orig. page
Count/Set
1-sided
Plain
Now copying.
Output
11x8
1
/
2
"11x8
1
/
2
"
Change
Exposure
R top / Rear
Original Count/set
1-sided
Now copying.
1-sided
Cancel
Change
Exposure
Sort
Output
R top / Rear
Plain
Inch specifications
Metric specifications
2-sided /
Separation
User choice
Function
Program
Basic
Select
orig. size
Border
Erase
Cover
Proof Copy
Form
Overlay
Orig. image
quality
6
2-sided /
Split
User choice
Function
Program
Basic
Erase
Mode
Cover
Mode
Test copy
Form
overlay
Image
quality
Select
size orig.
6
AMS
A
uto
Set
Paper Size
Sort:Off
Combine
Orig.image
quality
Reduce
11x81/2"
7
8
Page 34
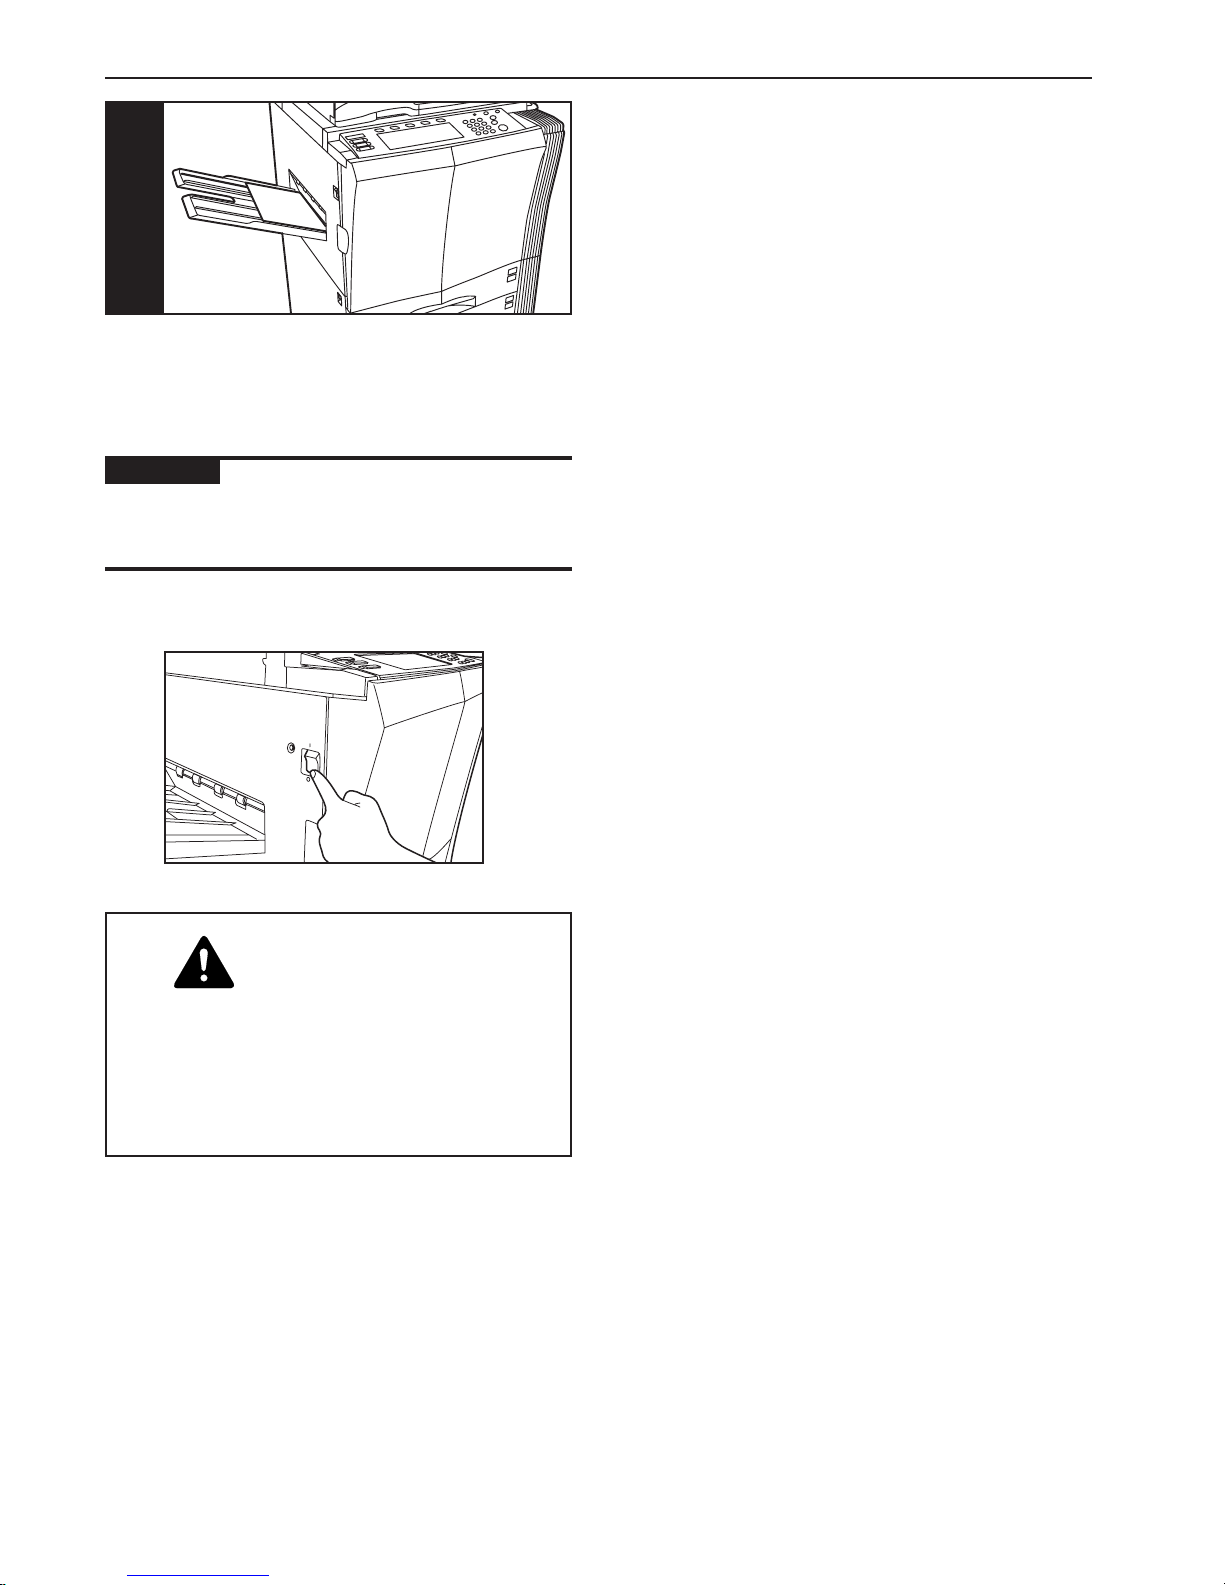
Section 4 BASIC OPERATION
4-4
9. At the end of copying
Finished copies will be ejected onto the copy eject tray.
IMPORTANT!
• Up to 250 copies can be stored on the copy eject tray.
• The copy eject tray may be optional equipment in certain countries
or regions of purchase.
9
CAUTION
If the copier will not be used for a short period of time
(overnight, etc.), turn the main switch OFF (O).
If it will not be used for an extended period of time
(vacations, etc.), remove the power plug from the
outlet for safety purposes during the time the copier
is not in use.
Page 35
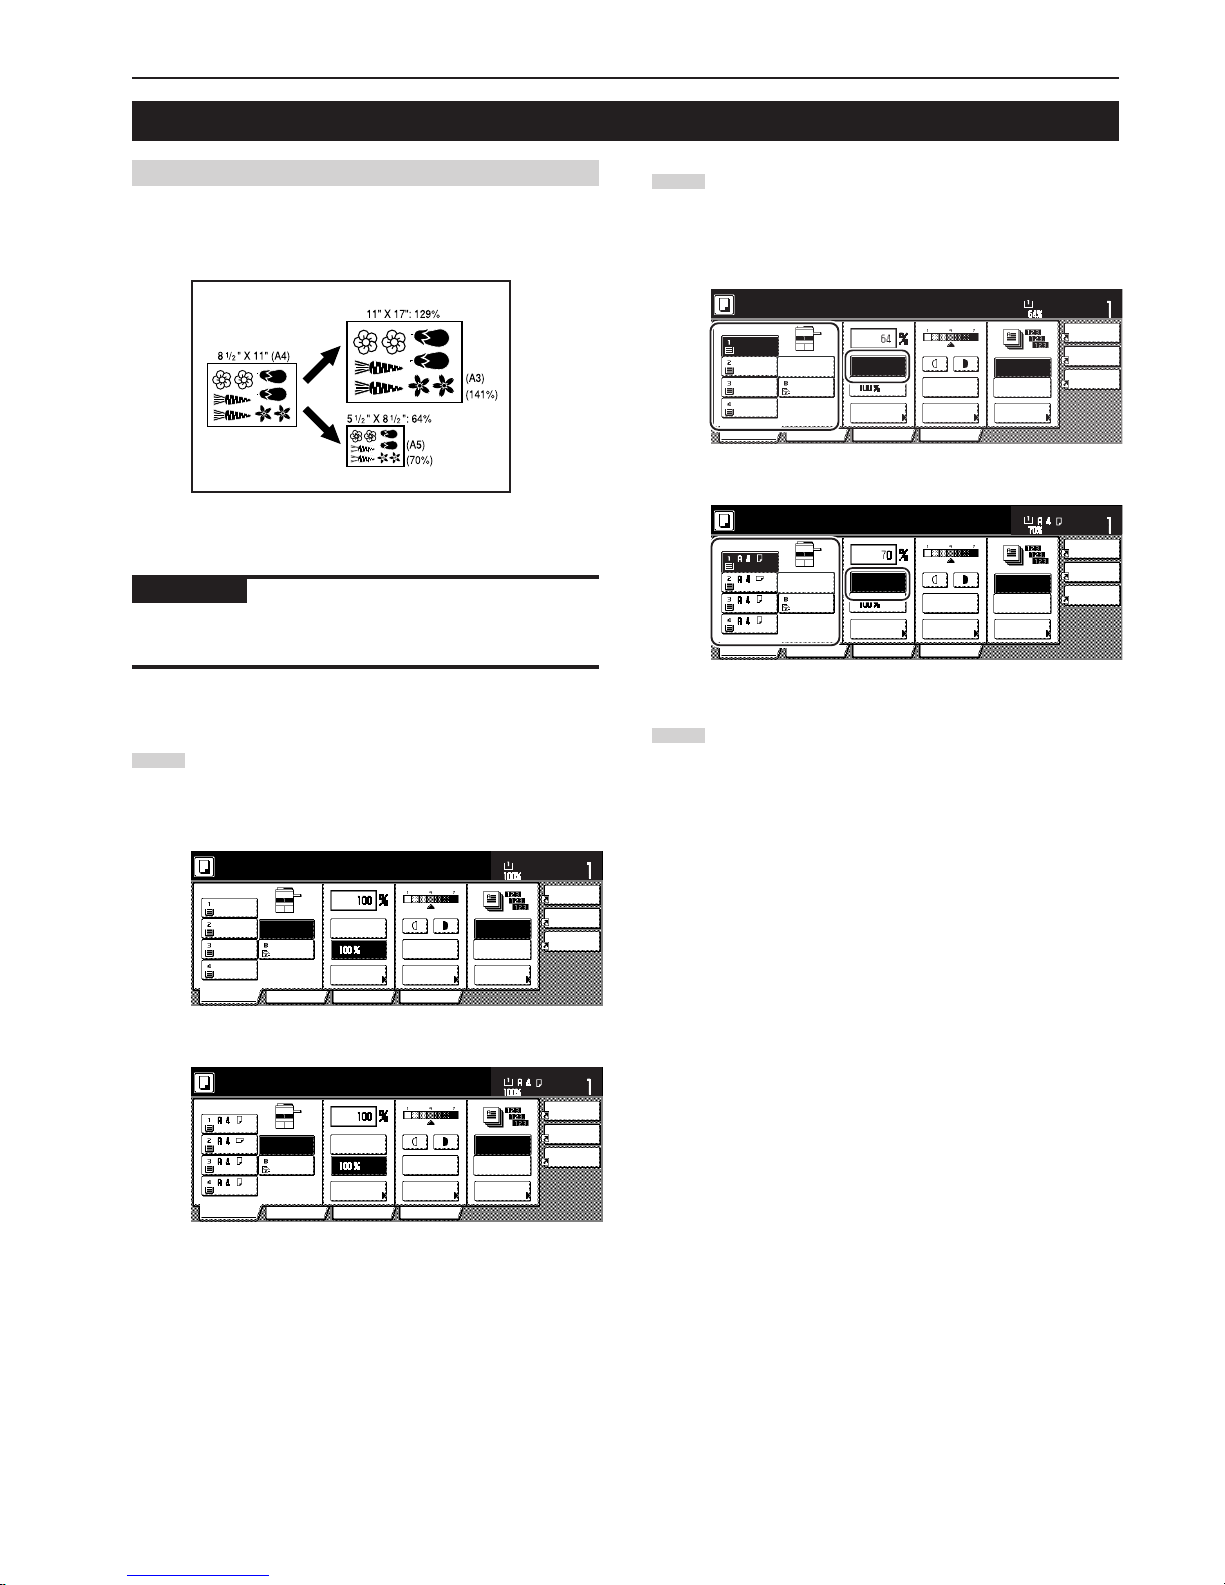
Section 4 BASIC OPERATION
4-5
2. Enlarging/reducing the copy image
(1) Auto magnification selection mode
With this mode, the original image is enlarged/reduced automatically
according to the selected paper size.
IMPORTANT!
If you use this mode most often, select “AMS” under “Default
magnification ratio” on page 7-49.
1
Set the original to be copied.
The copier will automatically detect the size of the originals
and select copy paper of that same size.
AMS
Reduce
/Enlarge
APS
Exposure
mode
Auto
Exposure
Ready to copy.
Set
Paper Size
Bypass
Color
Recycled
Plain Plain
Plain
Sort/
Finished
Sort:Off
Sort:On
Basic User choice
Program
Function
Combine
Orig.image
quality
Reduce
/Enlarge
11x8
1
/
2
"
8
1
/
2
x11"
11x8
1
/
2
"
11x8
1
/
2
"
11x81/2"
Merge copy
AMS
Reduce/
Enlarge
APS
Image
quality
Reduce/
Enlarge
Exposure
mode
Auto
Exposure
Ready to copy.
Set
Paper Size
Bypass
Color
Recycled
Plain Plain
Plain
Sort/
Finished
Sort:Off
Sort:On
Basic User choice
Program
Function
Inch specifications
Metric specifications
2
Select the size of paper that you want to copy onto by
touching the appropriate paper size key.
Touch the “AMS” key. The corresponding magnification ratio
will be displayed.
3
Press the [Start] key to begin the copying procedure.
Inch specifications
Metric specifications
AMS
Reduce
/Enlarge
APS
Exposure
mode
Auto
Exposure
Ready to copy.
Set
Paper Size
Bypass
Color
Recycled
Plain Plain
Plain
Sort/
Finished
Sort:Off
Sort:On
Basic User choice
Program
Function
Combine
Orig.image
quality
Reduce
/Enlarge
11x8
1
/
2
"
8
1
/
2
x11"
11x8
1
/
2
"
11x8
1
/
2
"
11x8
1
/
2
"
AMS
Merge copy
Reduce/
Enlarge
APS
Image
quality
Reduce/
Enlarge
Exposure
mode
Auto
Exposure
Ready to copy.
Set
Paper Size
Bypass
Color
Recycled
Plain Plain
Plain
Sort/
Finished
Sort:Off
Sort:On
Basic User choice
Program
Function
Page 36
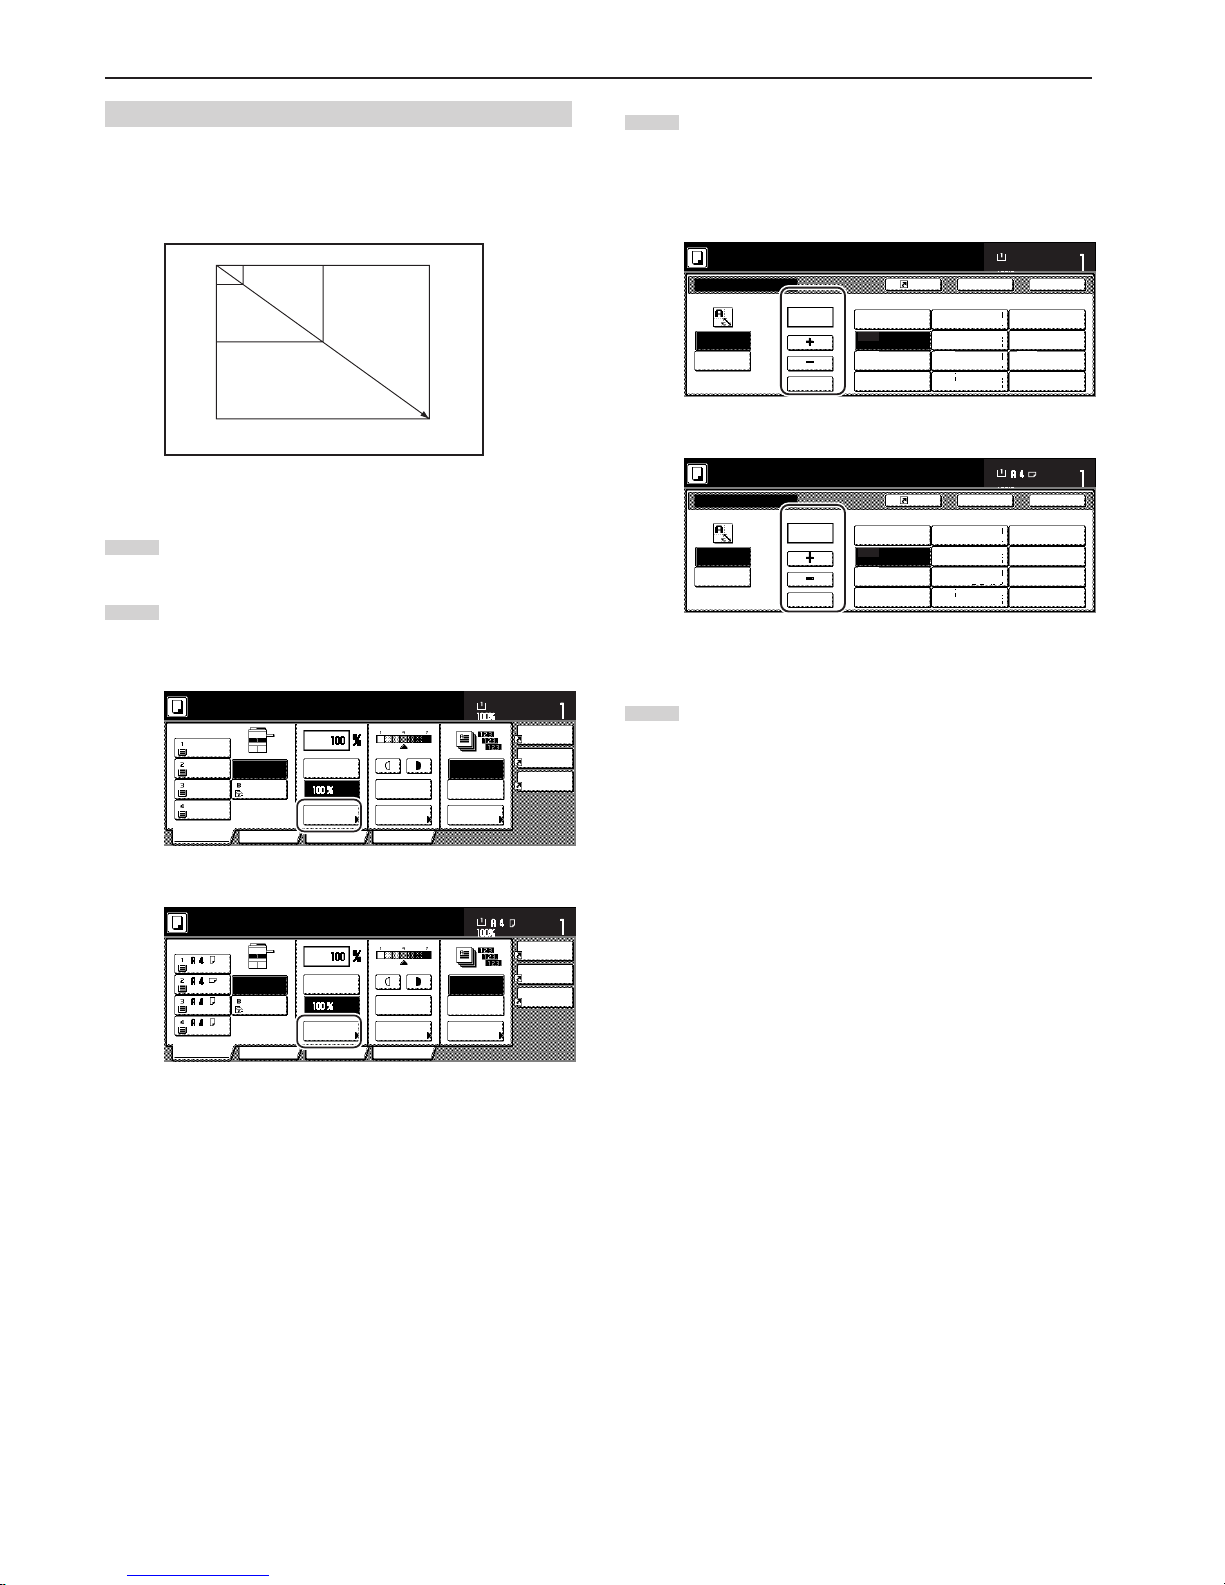
Section 4 BASIC OPERATION
4-6
(2) Zoom mode
With this mode, the magnification ratio can be set to any 1%
increment between 25% and 400% (between 25% and 200% when
using the Document Processor).
1
Set the original to be copied.
2
Touch the “Reduce/Enlarge” key. The “Reduce/Enlarge”
screen will be displayed.
25%
400%
3
Touch the “+” key or the “-” key to change the displayed
magnification ratio to the desired setting.
* The desired magnification ratio can also be entered directly
by touching the “#keys” key and then using the keypad.
Inch specifications
Metric specifications
4
Press the [Start] key to begin the copying procedure.
Reduce/Enlarge
Standard
Zoom
Ready to copy.
BackRegister
XY zoom
Close
#-Keys
AMS
Set
Paper size
100%
(25~400)
100 %
100%
400%
200%
141%
127%
106%
90%
75%
70%
50%
25%
A 5➔A 3
Folio➔A3
A 5➔A4
A 4➔A3
11x15"➔A3
A 4➔B 4
Folio➔A3
11x15"➔A 4
A4➔A5
Reduce/Enlarge
Standard
Zoom
Ready to copy.
BackRegister
XY zoom
Close
# Keys
AMS
Set
Paper size
100%
(25~400)
100 %
100%
400%
200%
154%
129%
121%
78%
77%
64%
50%
25%
5
1
/2x81/2"➔11x17"
8
1
/2x11"➔11x17"
5
1
/2x81/2"➔81/2x14"
11x81/2"
8
1
/2x14"➔11x17"
11x17"➔8
1
/2x11"
11x17"➔8
1
/2x14"
11x17"➔5
1
/2x81/2"
8
1
/2x14"➔81/2x11"
Inch specifications
Metric specifications
AMS
Reduce
/Enlarge
APS
Exposure
mode
Auto
Exposure
Ready to copy.
Set
Paper Size
Bypass
Color
Recycled
Plain Plain
Plain
Sort/
Finished
Sort:Off
Sort:On
Basic User choice
Program
Function
Combine
Orig.image
quality
Reduce
/Enlarge
11x8
1
/
2
"
8
1
/
2
x11"
11x8
1
/
2
"
11x8
1
/
2
"
11x81/2"
Merge copy
AMS
Reduce/
Enlarge
APS
Image
quality
Reduce/
Enlarge
Exposure
mode
Auto
Exposure
Ready to copy.
Set
Paper Size
Bypass
Color
Recycled
Plain Plain
Plain
Sort/
Finished
Sort:Off
Sort:On
Basic User choice
Program
Function
Page 37
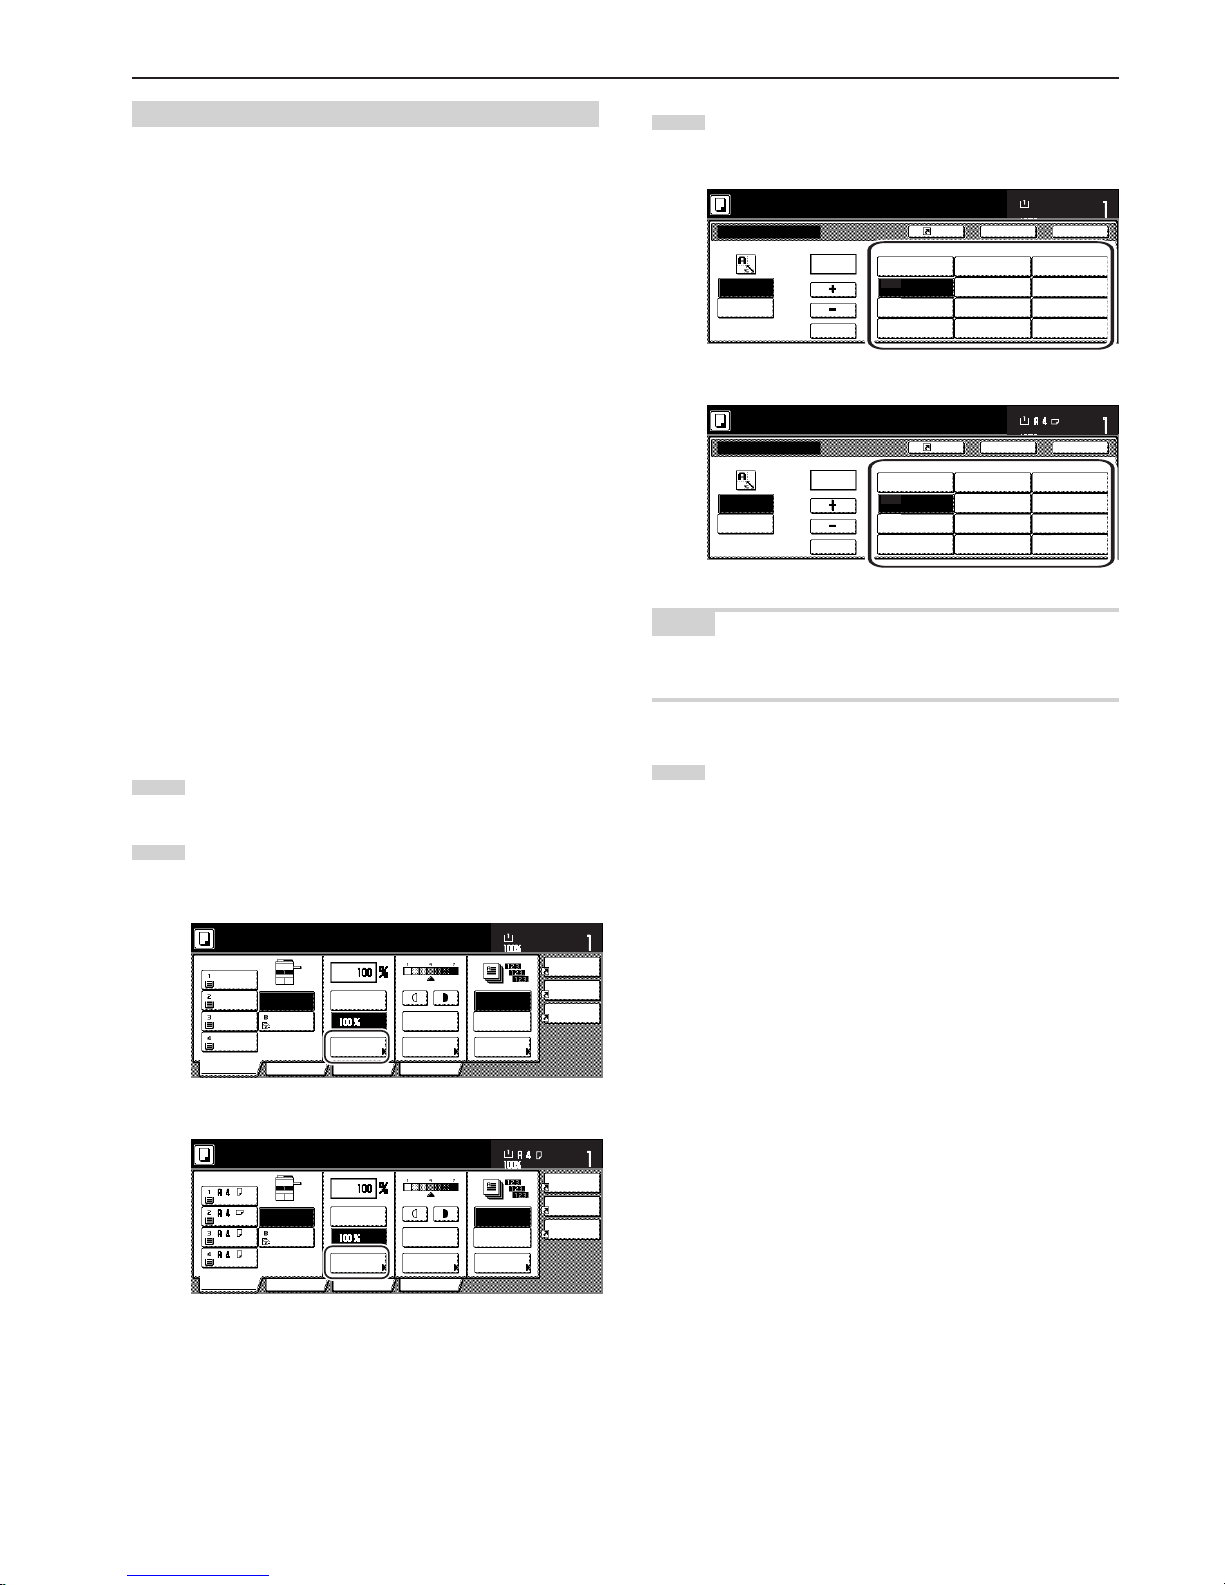
Section 4 BASIC OPERATION
4-7
(3) Preset zoom mode
With this mode, the magnification ratio can be set to one of the preset ratios:
[Available magnification ratios]
Inch specification
Reduction 25%
50% (11" x 17" R 5 1/2" x 8 1/2")
64% (11" x 17" R 8 1/2" x 11")
77% (11" x 17" R 8 1/2" x 14")
78% (8 1/2" x 14" R 8 1/2" x 11")
Enlargement 121% (8 1/2" x 14" R 11" x 17")
129% (8 1/2" x 11" R 11" x 17")
154% (5 1/2" x 8 1/2" R 8 1/2" x 14")
200% (5 1/2" x 8 1/2" R 11" x 17")
400%
Metric specification
Reduction 25%
50%
70% (A3 R A4, A4 R A5)
75% (11" x 15" R A4)
90% (Folio R A4)
Enlargement 106% (11" x 15" R A3)
127% (Folio R A3)
141% (A4 R A3, A5 R A4)
200% (A5 R A3)
400%
1
Set the original to be copied.
2
Touch the “Reduce/Enlarge” key.
The “Reduce/Enlarge” screen will be displayed.
3
Touch the preset zoom key that corresponds to the
magnification ratio that you want to use.
Inch specifications
Metric specifications
NOTE
You can also change the magnification ratio in 1% increments by
touching the “+” key or the “-” key, as appropriate.
4
Press the [Start] key to begin the copying procedure.
Reduce/Enlarge
Standard
Zoom
Ready to copy.
BackRegister
XY zoom
Close
# Keys
AMS
Set
Paper size
100%
(25~400)
100 %
100%
400%
200%
154%
129%
121%
78%
77%
64%
50%
25%
5
1
/2x81/2"➔11x17"
8
1
/2x11"➔11x17"
5
1
/2x81/2"➔81/2x14"
11x81/2"
8
1
/2x14"➔11x17"
11x17"➔8
1
/2x11"
11x17"➔8
1
/2x14"
11x17"➔5
1
/2x81/2"
8
1
/2x14"➔81/2x11"
Reduce/Enlarge
Standard
Zoom
Ready to copy.
BackRegister
XY zoom
Close
#-Keys
AMS
Set
Paper size
100%
(25~400)
100 %
100%
400%
200%
141%
127%
106%
90%
75%
70%
50%
25%
A 5➔A 3
Folio➔A3
A 5➔A4
A 4➔A3
11x15"➔A3
A 4➔B 4
Folio➔A3
11x15"➔A 4
A4➔A5
Inch specifications
Metric specifications
AMS
Reduce
/Enlarge
APS
Exposure
mode
Auto
Exposure
Ready to copy.
Set
Paper Size
Bypass
Color
Recycled
Plain Plain
Plain
Sort/
Finished
Sort:Off
Sort:On
Basic User choice
Program
Function
Combine
Orig.image
quality
Reduce
/Enlarge
11x8
1
/
2"
8
1
/
2x11"
11x8
1
/
2"
11x8
1
/
2"
11x81/2"
Merge copy
AMS
Reduce/
Enlarge
APS
Image
quality
Reduce/
Enlarge
Exposure
mode
Auto
Exposure
Ready to copy.
Set
Paper Size
Bypass
Color
Recycled
Plain Plain
Plain
Sort/
Finished
Sort:Off
Sort:On
Basic User choice
Program
Function
Page 38
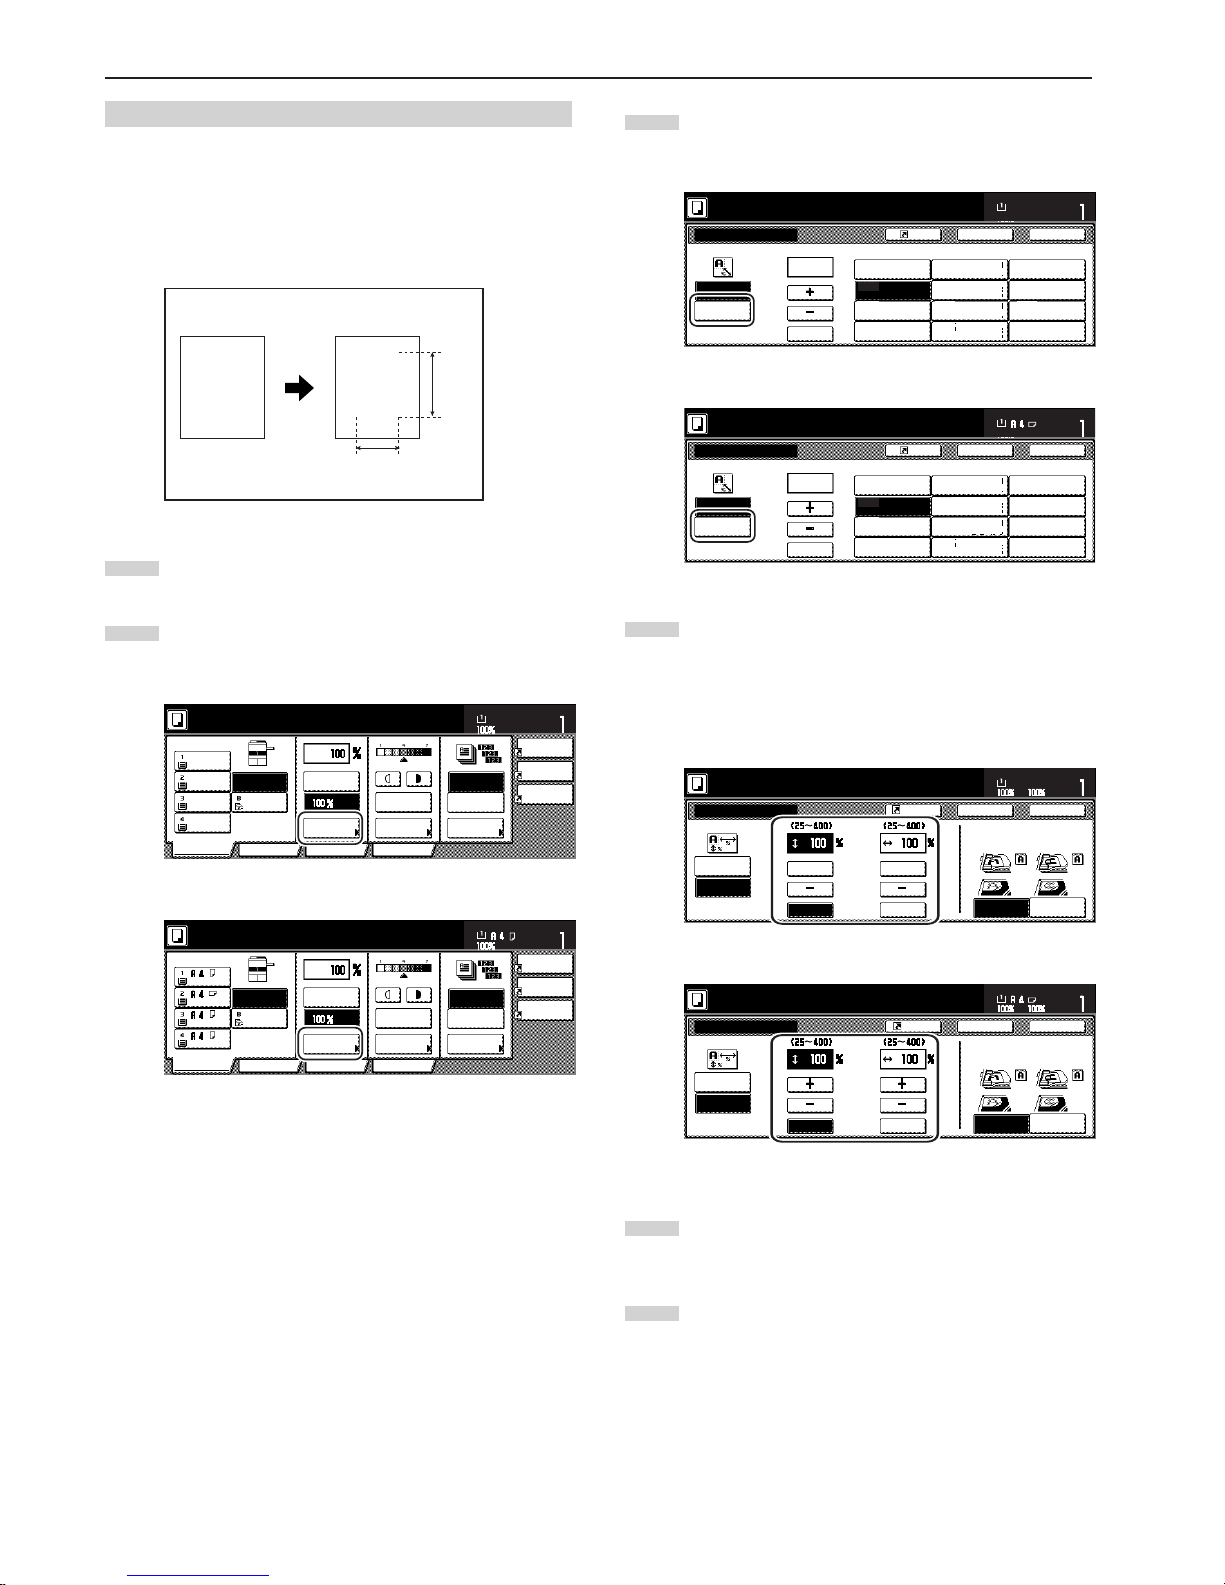
Section 4 BASIC OPERATION
4-8
(4) XY zoom mode
With this mode, it is possible for you to select the length and width of
the copy image separately. The magnification ratio can be set to any
1% increment between 25% and 400% (between 25% and 200%
when using the Document Processor).
1
Set the originals to be copied.
2
Touch the “Reduce/Enlarge” key.
The “Reduce/Enlarge” screen will be displayed.
M
M
Y %
X %
3
Touch the “XY zoom” key.
The screen to select the magnification ratio will be displayed.
4
Touch the “+” key or the “-” key, as appropriate, specify the
desired magnification ratio for the width and then the length
of the image. It is also possible for you to enter the desired
ratio directly by touching the corresponding “#keys” key and
then using the keypad.
5
Touch the appropriate key on the right side of the touch
panel to specify the direction in which the original was set.
6
Press the [Start] key to begin the copying procedure.
Inch specifications
Metric specifications
Inch specifications
Metric specifications
Reduce/Enlarge
Standard
Zoom
Ready to copy.
BackRegister
XY zoom
Close
# Keys
AMS
Set
Paper size
100%
(25~400)
100 %
100%
400%
200%
154%
129%
121%
78%
77%
64%
50%
25%
5
1
/2x81/2"➔11x17"
8
1
/2x11"➔11x17"
5
1
/2x81/2"➔81/2x14"
11x81/2"
8
1
/2x14"➔11x17"
11x17"➔8
1
/2x11"
11x17"➔8
1
/2x14"
11x17"➔5
1
/2x81/2"
8
1
/2x14"➔81/2x11"
Reduce/Enlarge
Standard
Zoom
Ready to copy.
BackRegister
XY zoom
Close
#-Keys
AMS
Set
Paper size
100%
(25~400)
100 %
100%
400%
200%
141%
127%
106%
90%
75%
70%
50%
25%
A 5➔A 3
Folio➔A3
A 5➔A4
A 4➔A3
11x15"➔A3
A 4➔B 4
Folio➔A3
11x15"➔A 4
A4➔A5
Standard
Zoom
y
# keys# keys
x
xy zoom
Reduce/Enlarge
Ready to copy.
Rear
Left top
corner
Check direction
Check direction of
original top side.
Y X
11x8
1
/
2
"
Set
Paper Size
Back Close
Register
++
Standard
Y
#-Keys#-Keys
X
XY zoom
Back Close
Reduce/Enlarge
Ready to copy.
Back Edge
Left top
corner
Check direction
Check direction of original.
Set
Y: X:X:
Paper size
Register
Inch specifications
Metric specifications
AMS
Reduce
/Enlarge
APS
Exposure
mode
Auto
Exposure
Ready to copy.
Set
Paper Size
Bypass
Color
Recycled
Plain Plain
Plain
Sort/
Finished
Sort:Off
Sort:On
Basic User choice
Program
Function
Combine
Orig.image
quality
Reduce
/Enlarge
11x8
1
/
2
"
8
1
/
2
x11"
11x8
1
/
2
"
11x8
1
/
2
"
11x81/2"
Merge copy
AMS
Reduce/
Enlarge
APS
Image
quality
Reduce/
Enlarge
Exposure
mode
Auto
Exposure
Ready to copy.
Set
Paper Size
Bypass
Color
Recycled
Plain Plain
Plain
Sort/
Finished
Sort:Off
Sort:On
Basic User choice
Program
Function
Page 39
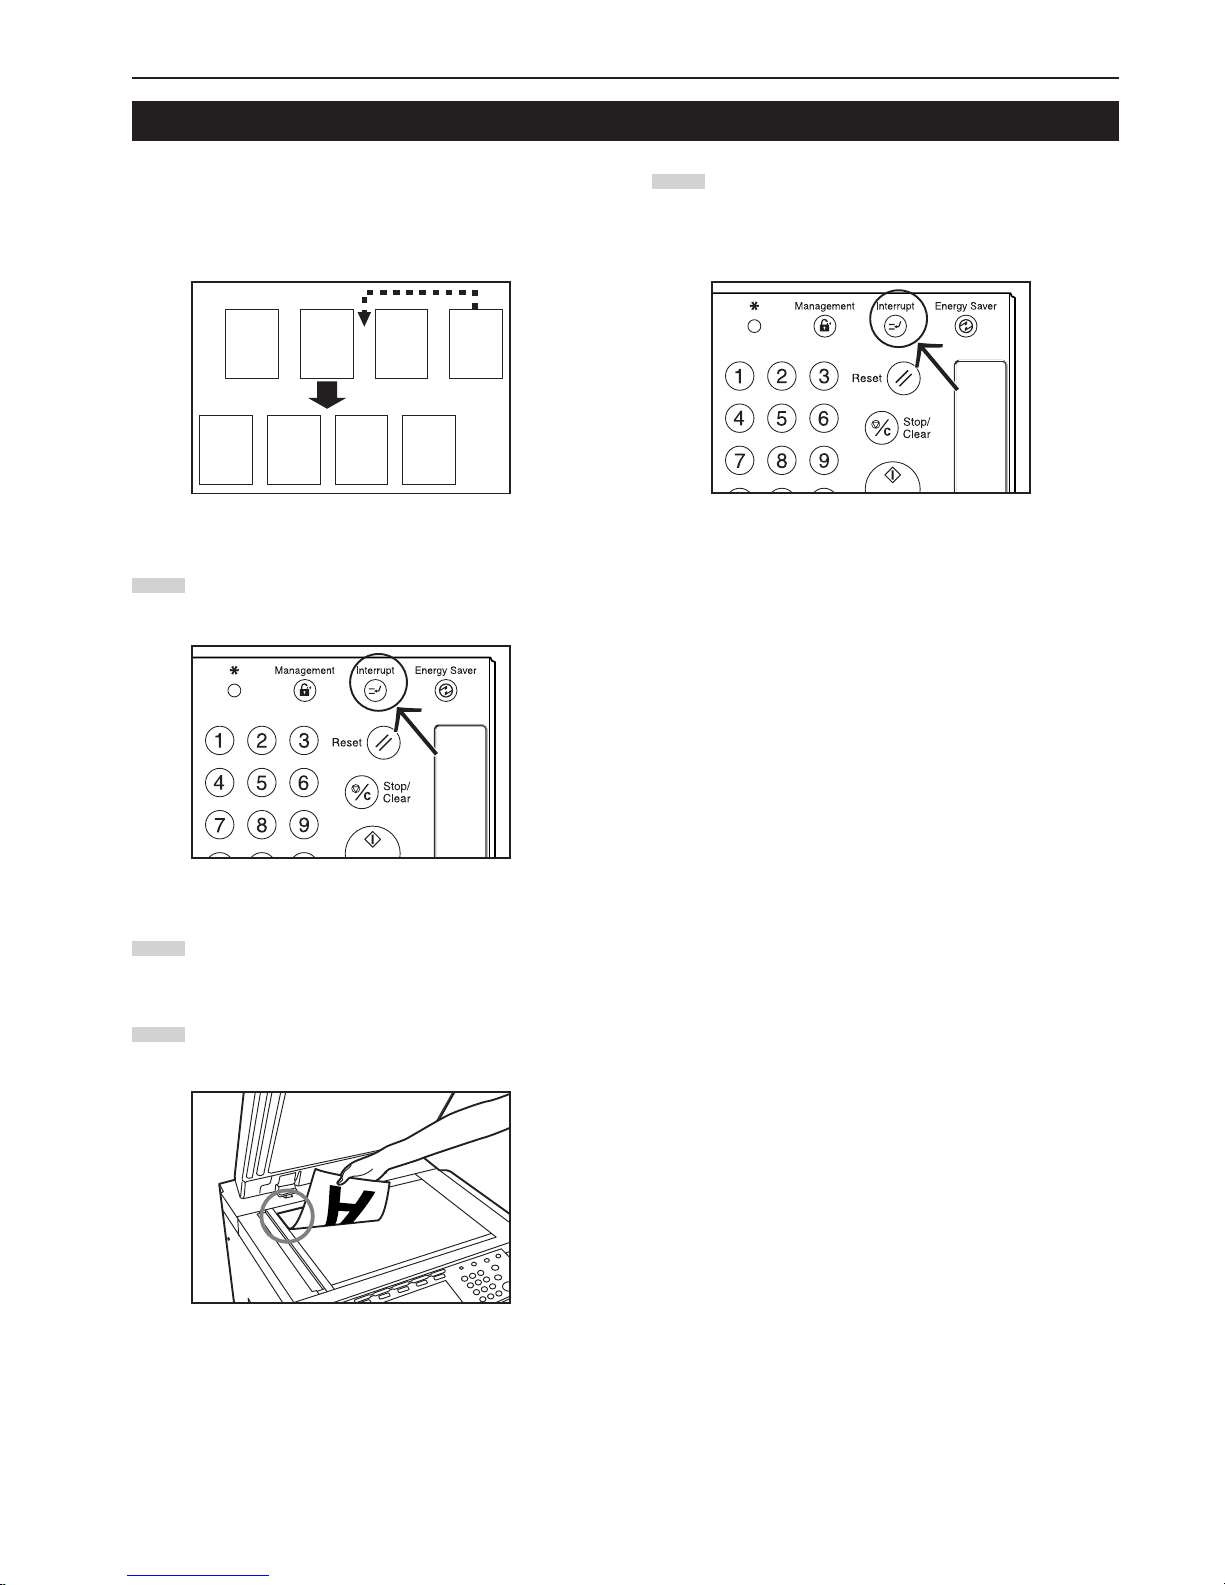
Section 4 BASIC OPERATION
4-9
3. Interrupt copying
Interrupt copying is useful if, during one copy job, you want to copy
other originals at different settings. Once the rush job is completed,
the interrupted copy job can be resumed at the same settings as
before.
1
Press the [Interrupt] key to light the lamp in the [Interrupt]
key. “Interrupt mode OK” will be displayed.
2
Remove the originals that were currently being copied and
put them aside.
3
Set the new originals and perform the desired copy
procedure.
A321
A 321
4
When copying is completed, press the [Interrupt] key once
again, and replace the newly copied originals with the ones
removed before. Then, press the [Start] key. The interrupted
copy job will be resumed.
Page 40
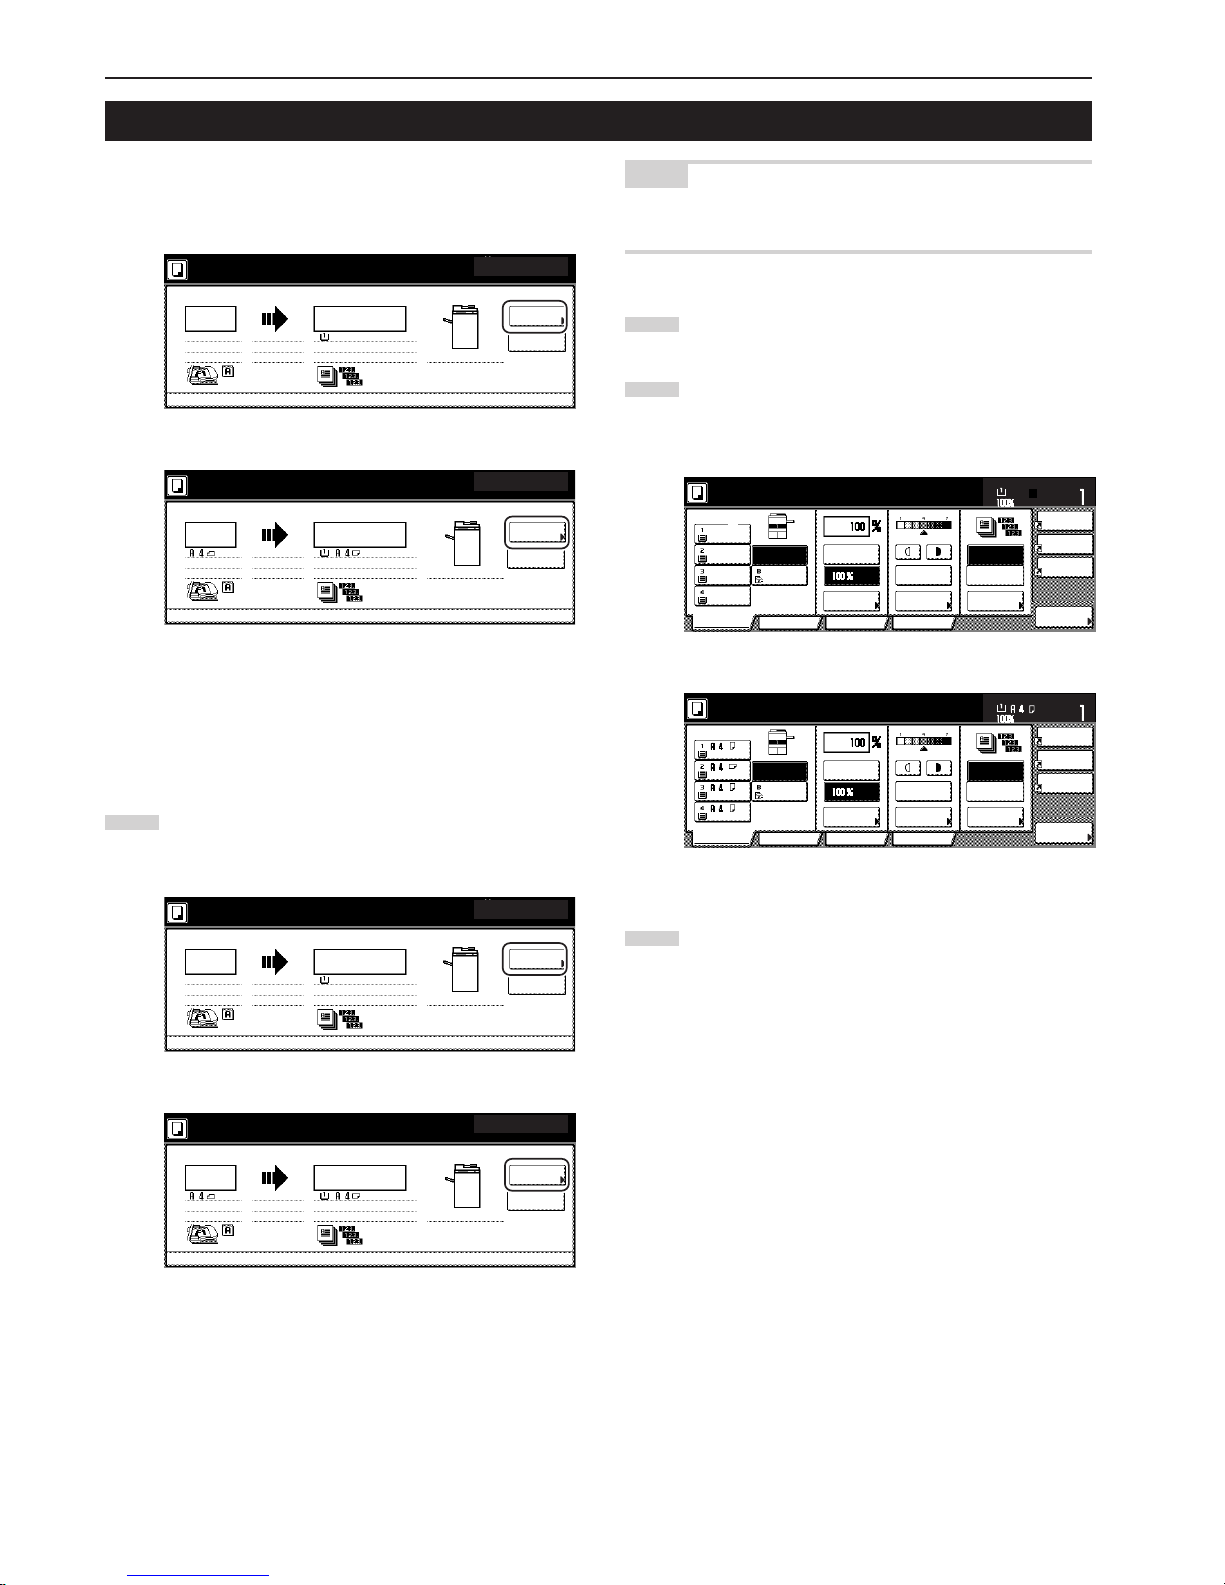
Section 4 BASIC OPERATION
4-10
Copy jobs can be scheduled even while another copy job is in
progress any time the “Reserve next copy” key is displayed.
4. Job reservation
You can enter the corresponding copy settings and scan in the
originals in preparation for your copy job even before the other job is
completed.
Once that job is finished and print out is possible, the operation for the
reserved job will begin automatically.
1
Touch the “Reserve next copy” key.
The “Ready to copy. (Job reservation)” screen will be
displayed.
Inch specifications
Metric specifications
Inch specifications
Metric specifications
NOTE
Job reservation is not available any time the “Reserve next copy” key
is grayed out or when it isn't displayed at all.
2
Set the originals to be copied.
3
Select the settings and functions that you want to use for that
copy job.
Combine
AMS
Reduce
/Enlarge
APS
Orig.image
quality
Reduce
/Enlarge
Exposure
mode
Auto
Exposure
Set
Paper Size
Bypass
Color
Recycled
Plain Plain
Plain
Sort/
Finished
Sort:Off
Sort:On
Basic User choice
Program
Function
11x8
1
/
2
"
8
1
/
2
x11"
11x8
1
/
2
"
11x8
1
/
2
"
11x81/2"
Readytocopy.(Job reservation)
Finish Job
res.
Inch specifications
Metric specifications
4
Press the [Start] key. Scanning of the originals will start.
Once all of the originals have been completely scanned,
the touch panel will return to the screen in step 1.
Memory usage
30%
1 sided APS 1 sided
Rear Sort
100%
Now copying.
Orig. page
Count/Set
11x8
1
/
2
" 11x8
1
/
2
"
Reserve
next copy
1/999
12
Pause
Output
Now copying.
1-sided APS
Sort
Reserve
next copy
100%
Original Count/set
1-sided
1/999
12
Stop
/Change
Output
Rear
Now copying.
1-sided APS
Sort
Reserve
next copy
100%
Original Count/set
1-sided
1/999
12
Stop
/Change
Output
Rear
Memory usage
30%
1 sided APS 1 sided
Rear Sort
100%
Now copying.
Orig. page
Count/Set
11x8
1
/
2
" 11x8
1
/
2
"
Reserve
next copy
1/999
12
Pause
Output
Merge copy
AMS
Reduce/
Enlarge
APS
Image
quality
Reduce/
Enlarge
Exposure
mode
Auto
Exposure
Set
Paper Size
Bypass
Color
Recycled
Plain Plain
Plain
Sort/
Finished
Sort:Off
Sort:On
Basic User choice
Program
Function
Readytocopy.(Jobreservation)
Job resrv.
finished
Page 41
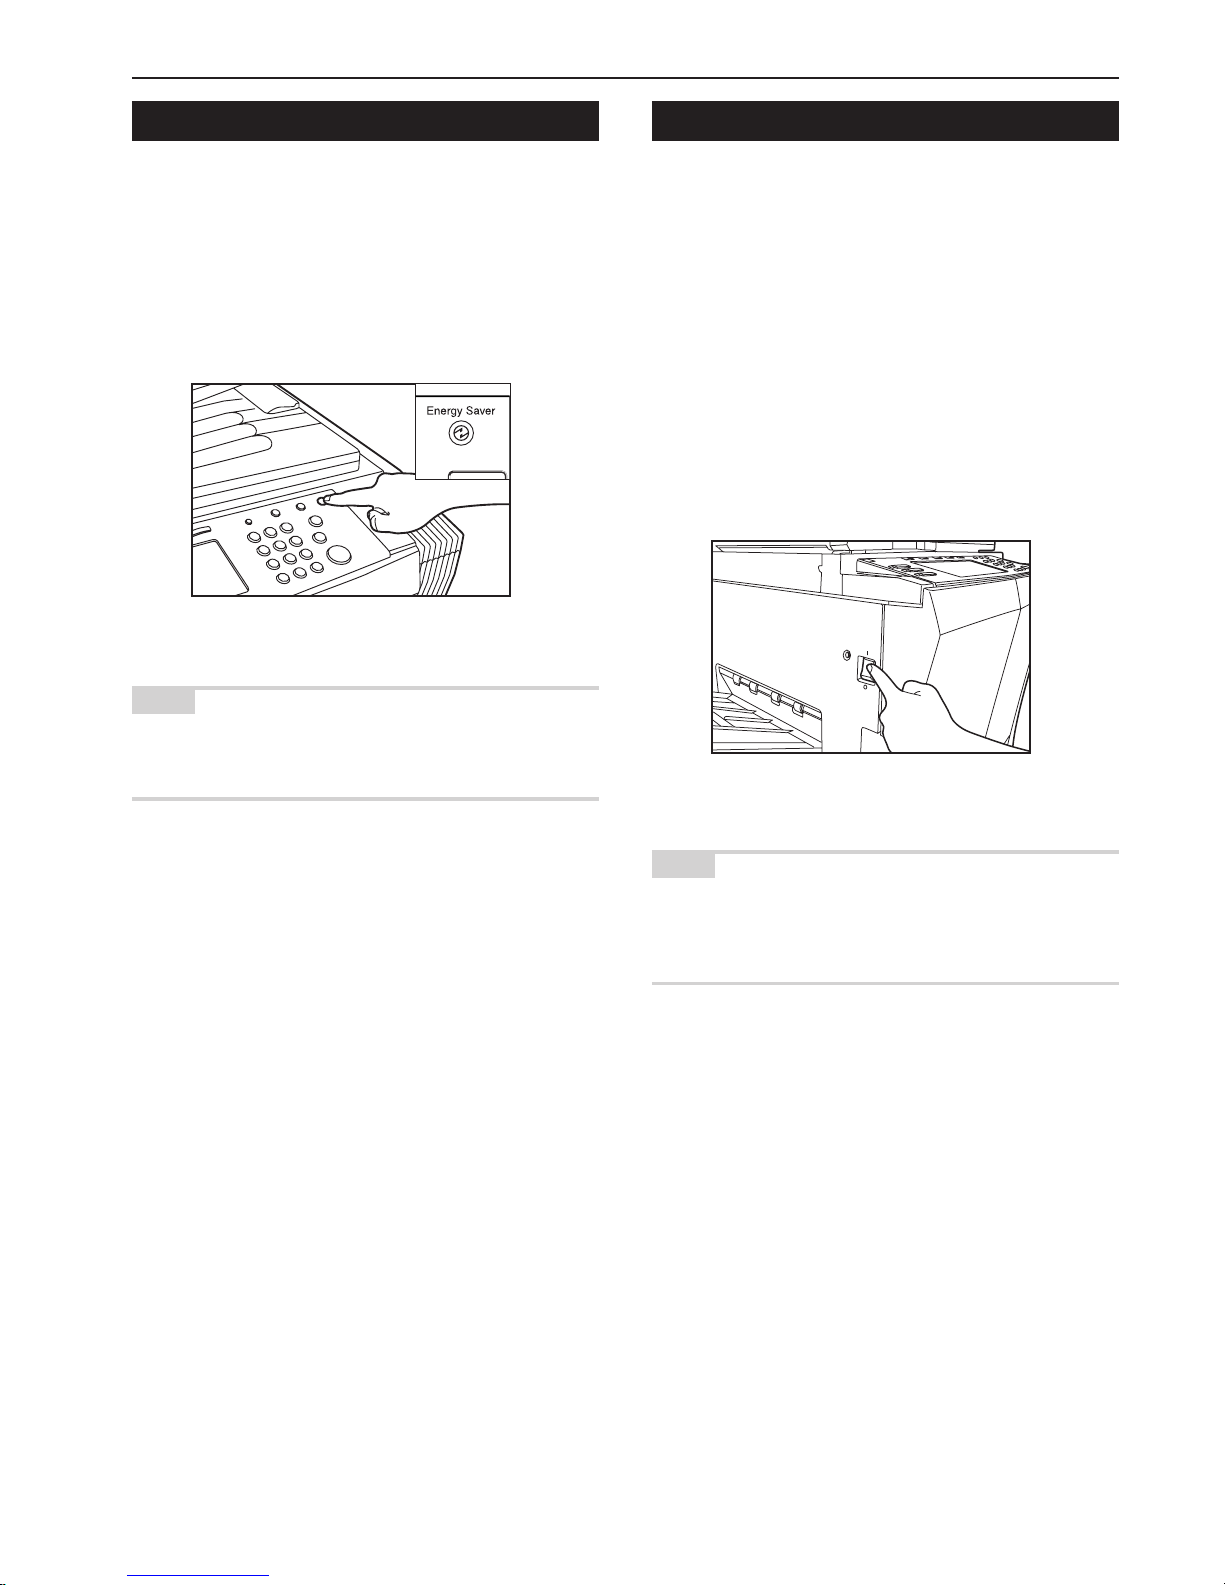
Section 4 BASIC OPERATION
4-11
If you press the [Energy Saver] key, even while the main switch is still
turned ON, the copier will enter the energy-saving preheat mode.
When the copier is in this preheat mode, the light the lamp in the
[Energy Saver] key will be the only lit indication on the operation
panel.
To resume copying after the preheat function has been activated,
press the [Energy Saver] key once again. It will take the copier about
30 seconds to return to a copy-ready state.
NOTE
The energy-saving preheat mode will also engage automatically in
this copier if no operation is performed for a predetermined period of
time. (See “Auto preheat time” on page 7-28.)
5. Energy-saving preheat function 6. Auto shut-off function
This function automatically turns the main switch OFF ( O ) if no
operation has been performed on the copier for a certain period of
time (15 to 240 minutes). When you want to make copies again,
simply turn the main switch back ON ( | ).
* The factory default setting is for the auto shut-off function to engage
after 90 minutes.
● More about the auto shut-off function
The auto shut-off function is a power-saving feature which
automatically turns the main switch to the copier OFF ( O ) when a
certain time elapses without any operation being performed.
Copiers are generally in a standby mode more than they are in actual
operation, so power consumption in the standby mode occupies a
large part of overall consumption. Having the copier turned OFF ( O )
automatically after a certain amount of time reduces unnecessary
power consumption in the standby mode or at night if the copier
happens to be left on accidentally. The result is a lower electricity bill.
NOTE
In order to change the amount of time that will elapse before the auto
shut-off function engages, see “Auto shut-off time” on page 7-27. In
order to disable the auto shut-off function, see “Auto shut-off ON/OFF”
on page 7-34.
Page 42

Section 4 BASIC OPERATION
4-12
Page 43
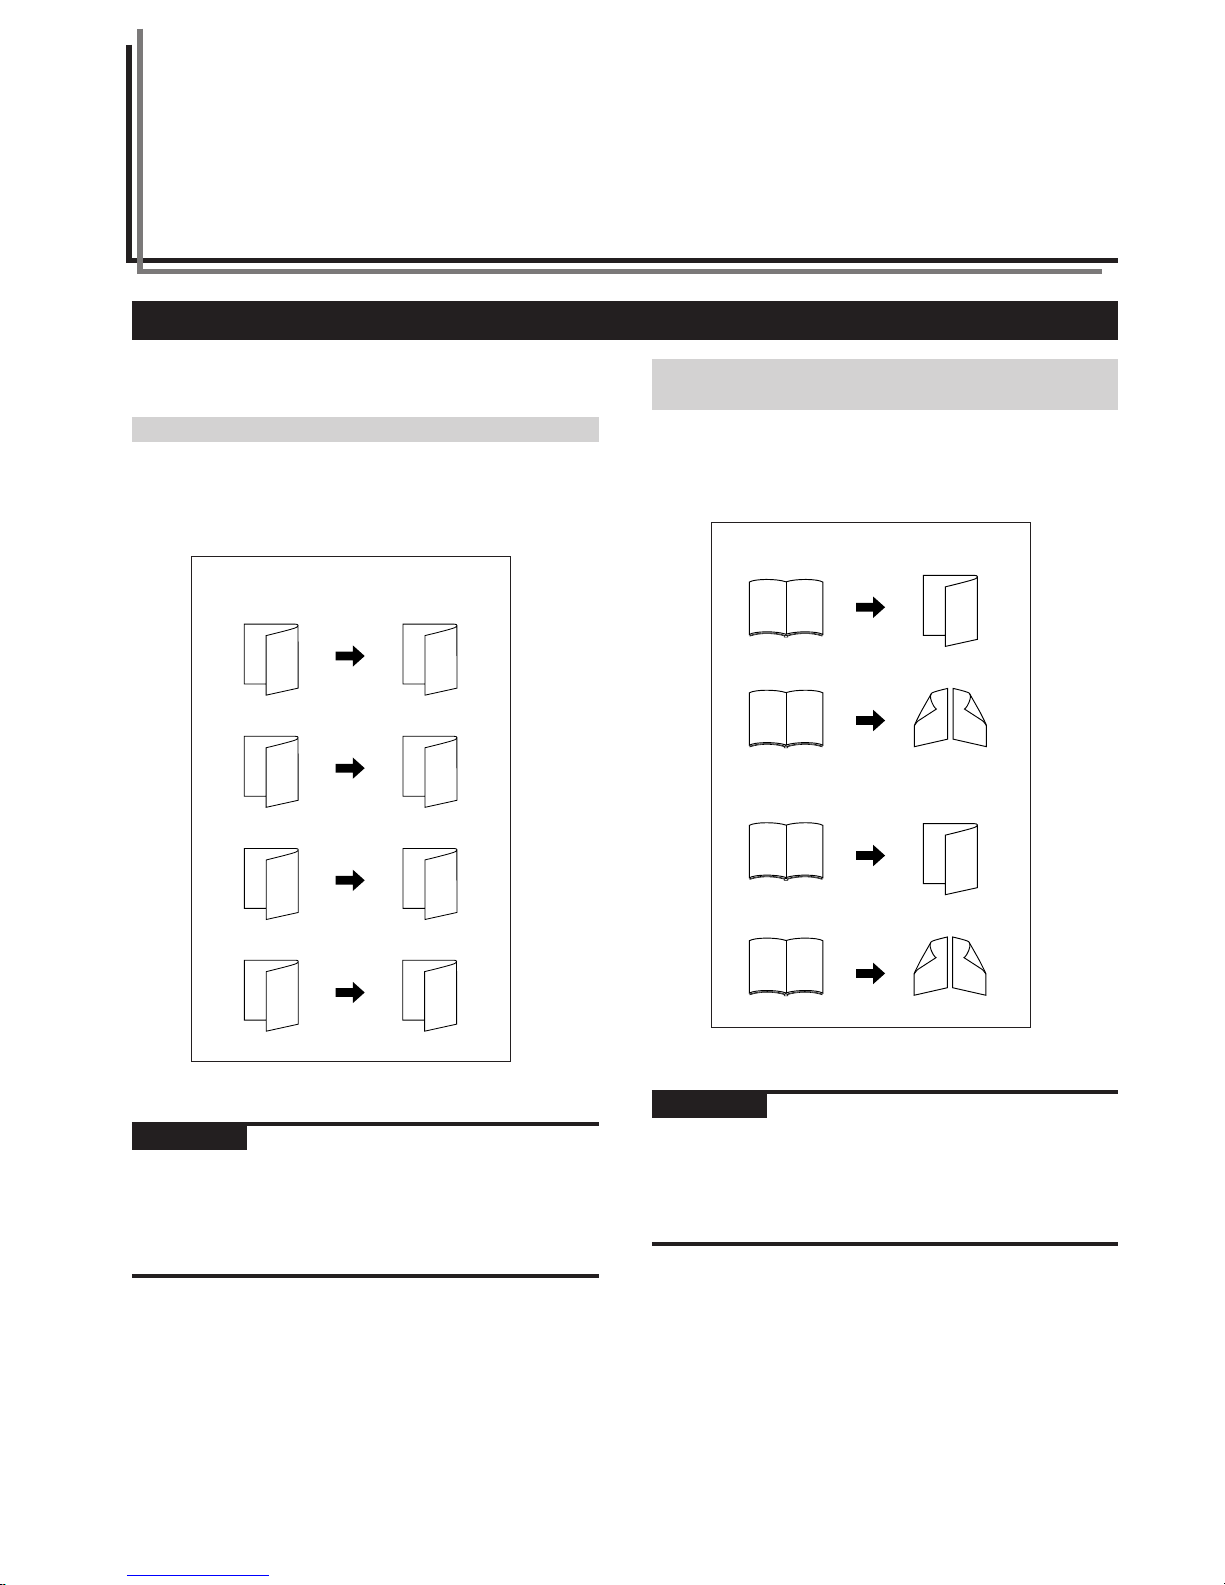
5-1
(2) Making 2-sided copies from an
open-faced (books, etc.) original
With this mode, the two facing pages of a book or magazine are
copied separately onto the front and back sides of the copy paper by
simply pressing the [Start] key.
IMPORTANT!
• Inch specifications
Only 11" x 17" and 8 1/2" x 11" size originals can be used in this
mode.
• Metric specifications
Only A5R, A4R and A3 size originals can be used in this mode.
Section 5 OTHER CONVENIENT FUNCTIONS
1.
Making 2-sided copies from various types of originals [2-sided copy modes]
With these modes, 2-sided copies can be made from a variety of
originals including open-faced (books, etc.) or 2-sided originals.
(1) Making 2-sided copies from a 2-sided original
With this mode, a 2-sided original is copied and the front and back
sides of the copy paper are used so that the copy looks just like the
original.
IMPORTANT!
• Inch specifications
Only paper sizes between 11" x 17" and 5 1/2" x 8 1/2" can be used in
this mode.
• Metric specifications
Only paper sizes between A5R and A3 can be used in this mode.
1
2
1
2
1
2
1
2
1
2
1
2
1
2
1
2
<Finished copy>
“Left/Right”
“Top”
“Left/Right”
“Top”
<Original>
“Left/Right”
“Left/Right”
“Top”
“Top”
<Finished copy>
“Book / Duplex”
“Book / Book”
“Book / Duplex”
“Book / Book”
1
2
1
2
0
3
3
0
12
12
1
2
2
1
21
21
<Original>
“Left”
“Left”
“Right”
“Right”
Page 44
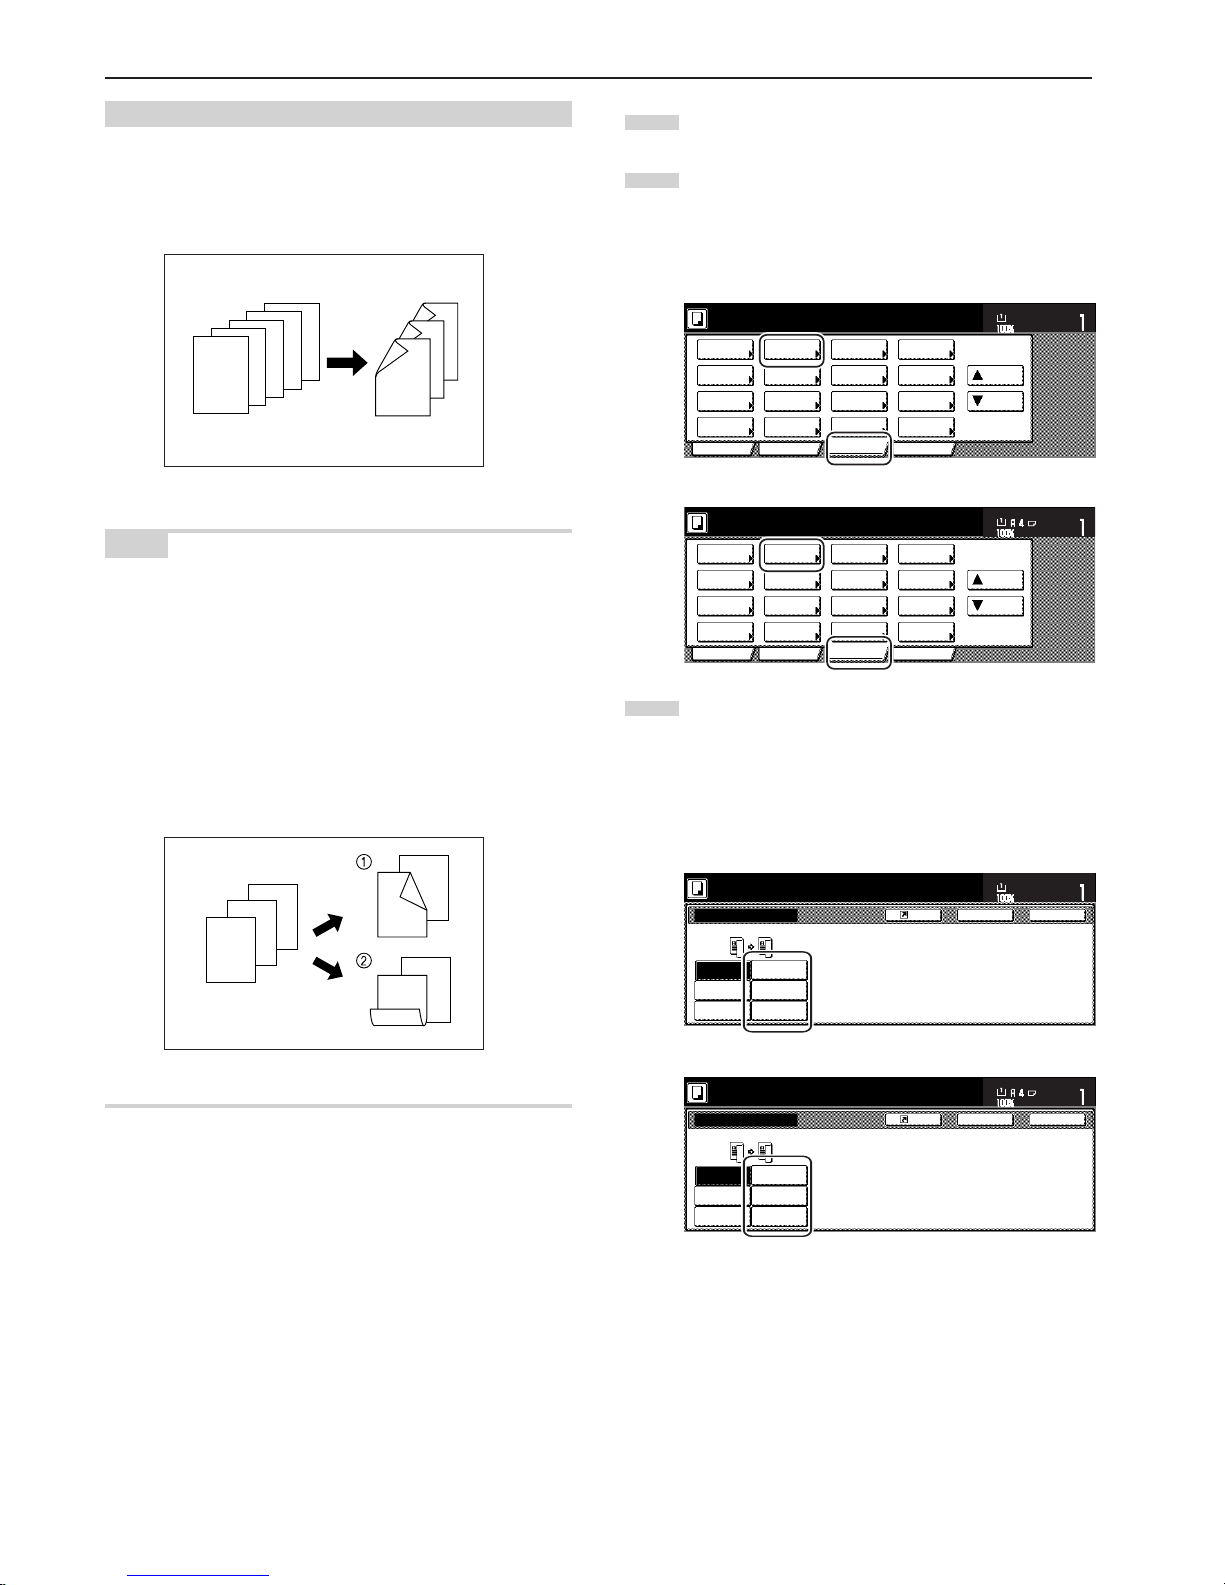
Section 5 OTHER CONVENIENT FUNCTIONS
5-2
(3) Making 2-sided copies from one-sided originals
With this mode, multiple one-sided originals are copied onto the front
and back sides of the copy paper. If you are copying an odd number
of originals, the back side of the last copy page will be blank.
NOTE
The image that is copied onto the back side of the copies can also be
rotated 180 degrees.
1 If you chose the “Left/Right” [“Left/Right binding”] setting for
finished copies:
The back side of the copies will be created with the same
orientation as the originals.
2 If you chose the “Top” [“Top binding”] setting for finished copies:
The image that is copied onto the back side of the copies will be
rotated 180 degrees. If you then bind the copy set at the top, the
images will be oriented in the same direction when flipped up like
a calendar, etc.
5
4
3
2
1
1
2
3
4
5
1
Set the originals to be copied.
2
Touch the “Function” tab. The content of the “Function” tab
will be displayed.
Touch the “2 sided/Separation” [“2-sided/Split”] key.
The “2 sided/Separation” [“2-sided/Split”] screen will be
displayed.
Inch specifications
2 sided/
Separation
Select
paper
Combine
Reduce
/Enlarge
Margin/
Centering
Forms
Overlay
Page #
Function
Basic User choice Program
Cover
Mode
Booklet
Sort/
Finished
Border
Erase
Exposure
mode
Orig.image
quality
Ready to copy.
Select
orig. size
Auto
Selection
Batch
scanning
Up
Down
Set
Paper size
11x81/2"
Metric specifications
Select
paper
2-sided/
Split
Merge copy
Reduce/
Enlarge
Margin/
Imag. shift
Page
numbering
Function
Basic User choice Program
Cover
Mode
Booklet
Erase
Mode
Exposure
mode
Image
quality
Sort/
Finished
Ready to copy.
Select
size orig.
Auto
selection
Large # of
originals
Form
overlay
Up
Down
Set
Paper size
3
If you are copying from 2-sided originals, touch the
“2 sided / 2 sided” key. If you are copying from open-faced
originals, touch the “Book / 2 sided” key. If you are copying
from 1-sided originals, touch the “1 sided / 2 sided” key.
If you selected “2 sided / 2 sided” or “Book / 2 sided”,
go to the next step. If you selected “1 sided / 2 sided”,
go directly to step 5.
Inch specifications
Register
1 sided
➔1 sided
1 sided
➔2 sided
2 sided
➔1 sided
2 sided
➔2 sided
Book
➔1 sided
Book
➔2 sided
Back Close
2 sided/Separation
Able to copy 1 sided (separate) or
2 sided copy using 1 sided original,
Book original or 2 sided original.
11x81/2"
Ready to copy.
Set
Paper size
Metric specifications
Register
1-sided
R1-sided
1-sided
R2-sided
2-sided
R1-sided
2-sided
R2-sided
Book
R
1-sided
Book
R
2-sided
Back Close
2-sided / Split
Ready to copy.
Able to copy 1-sided (separate) or
2-sided copy using 1-sided original,
book original or 2-sided original.
Set
Paper size
def
ghi
abc
ghi
ghi
abc
def
def
abc
Page 45
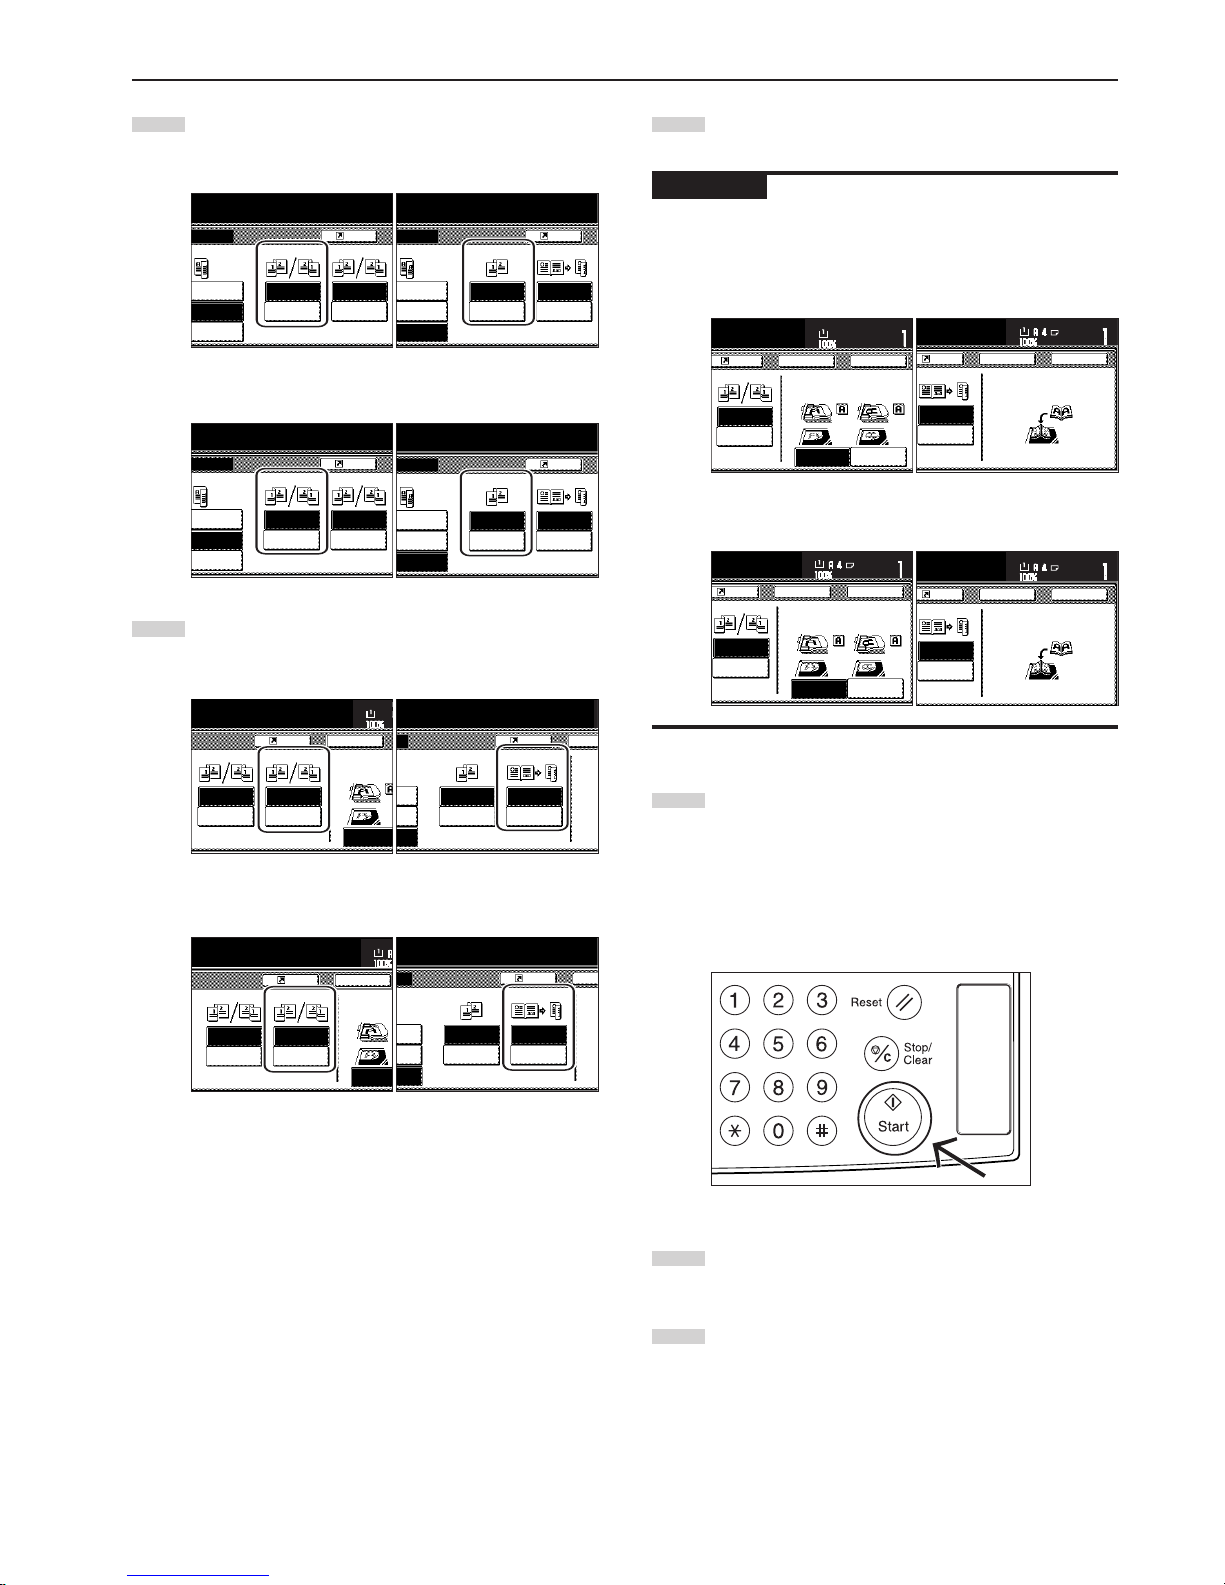
Section 5 OTHER CONVENIENT FUNCTIONS
5-3
6
Follow the instructions on the right side of the touch panel
and verify the direction in which the originals were set.
IMPORTANT!
If the designation for the direction that the originals are set is not
correct, copying may be accomplished incorrectly.
Inch specifications
<
for 1-sided or 2-sided originals
> <for open-faced originals>
Metric specifications
<
for 1-sided or 2-sided originals
> <for open-faced originals>
7
Press the [Start] key.
Scanning of the originals will start.
If you set the originals in the Document Processor, copying
will start automatically.
If you set an original on the platen, a message will appear
telling you to set the next original. In this case, go to the next
step.
8
Replace the first original with the next one and press the
[Start] key. Scanning of that next original will start.
9
Once you have finished scanning all of the originals, touch
the “Scanning finished” key. Copying will start.
Finished
Back Edg
e
Check direc
Check dir
e
original.
Register
Original
Left/Right
binding
Top
binding
Left/Right
binding
Top
binding
Back
Paper s
Register
Original Finished
Left
binding
Right
binding
BookR
Book
BookR
Duplex
d
B
a
Che
Se
si
d
opy.
Open from
left/right
Open from
top
Rear
Check direction
Register Back Close
11x81/2"
Set
Paper size
Left top
corner
Finished
Check direction of
original top side.
Register
Finished
BookR
Book
BookR
Duplex
Back Close
Check direction
Set book original top
sidedirectiontoback.
Set
Paper size
Finished
Back Edge
Left top
Corner
Check direction
Check direction of
original.
Register
Left/Right
binding
Top
binding
Back Close
S
et
P
aper size
Register
Finished
BookR
Book
BookR
Duplex
Back Close
Check direction
Set book original top
sidedirectiontoback.
Set
Paper size
Finished
to copy.
Register
Original
Left/Right
binding
Top
binding
Left/Right
binding
Top
binding
-sided
2-sided
-sided
2-sided
ook
2-sided
Register
Original Finished
Left
binding
Right
binding
-sided
2-sided
-sided
2-sided
BookR
Book
BookR
Duplex
ook
2-sided
to copy.
Open from
left/right
Open from
left/right
Open from
top
Open from
top
Rear
Check direction
Register Back
11
x
Paper si
z
Original
Finished
Check directio
n
original top sid
e
Book➔
Book
Book➔
Duplex
Open from
left
Open from
right
Chec
k
py.
Register
d
d
d
Ba
c
Original
Finished
Set
t
top
s
Open from
left/right
Open from
left/right
Open from
top
Open from
top
on
to copy.
Register
1 sided
➔2 sided
2 sided
➔2 sided
Book
➔2 sided
Original
Finished
Book➔
Book
Book➔
Duplex
Open from
left
Open from
right
on
to copy.
Register
1 sided
➔2 sided
2 sided
➔2 sided
Book
➔2 sided
Original
Finished
4
Specify the binding direction of the originals.
Inch specifications
<for 2-sided originals> <for open-faced originals>
Metric specifications
<for 2-sided originals> <for open-faced originals>
5
Select the binding direction you want for the finished copies.
Inch specifications
<
for 1-sided or 2-sided originals
> <for open-faced originals>
Metric specifications
<
for 1-sided or 2-sided originals
> <for open-faced originals>
Page 46
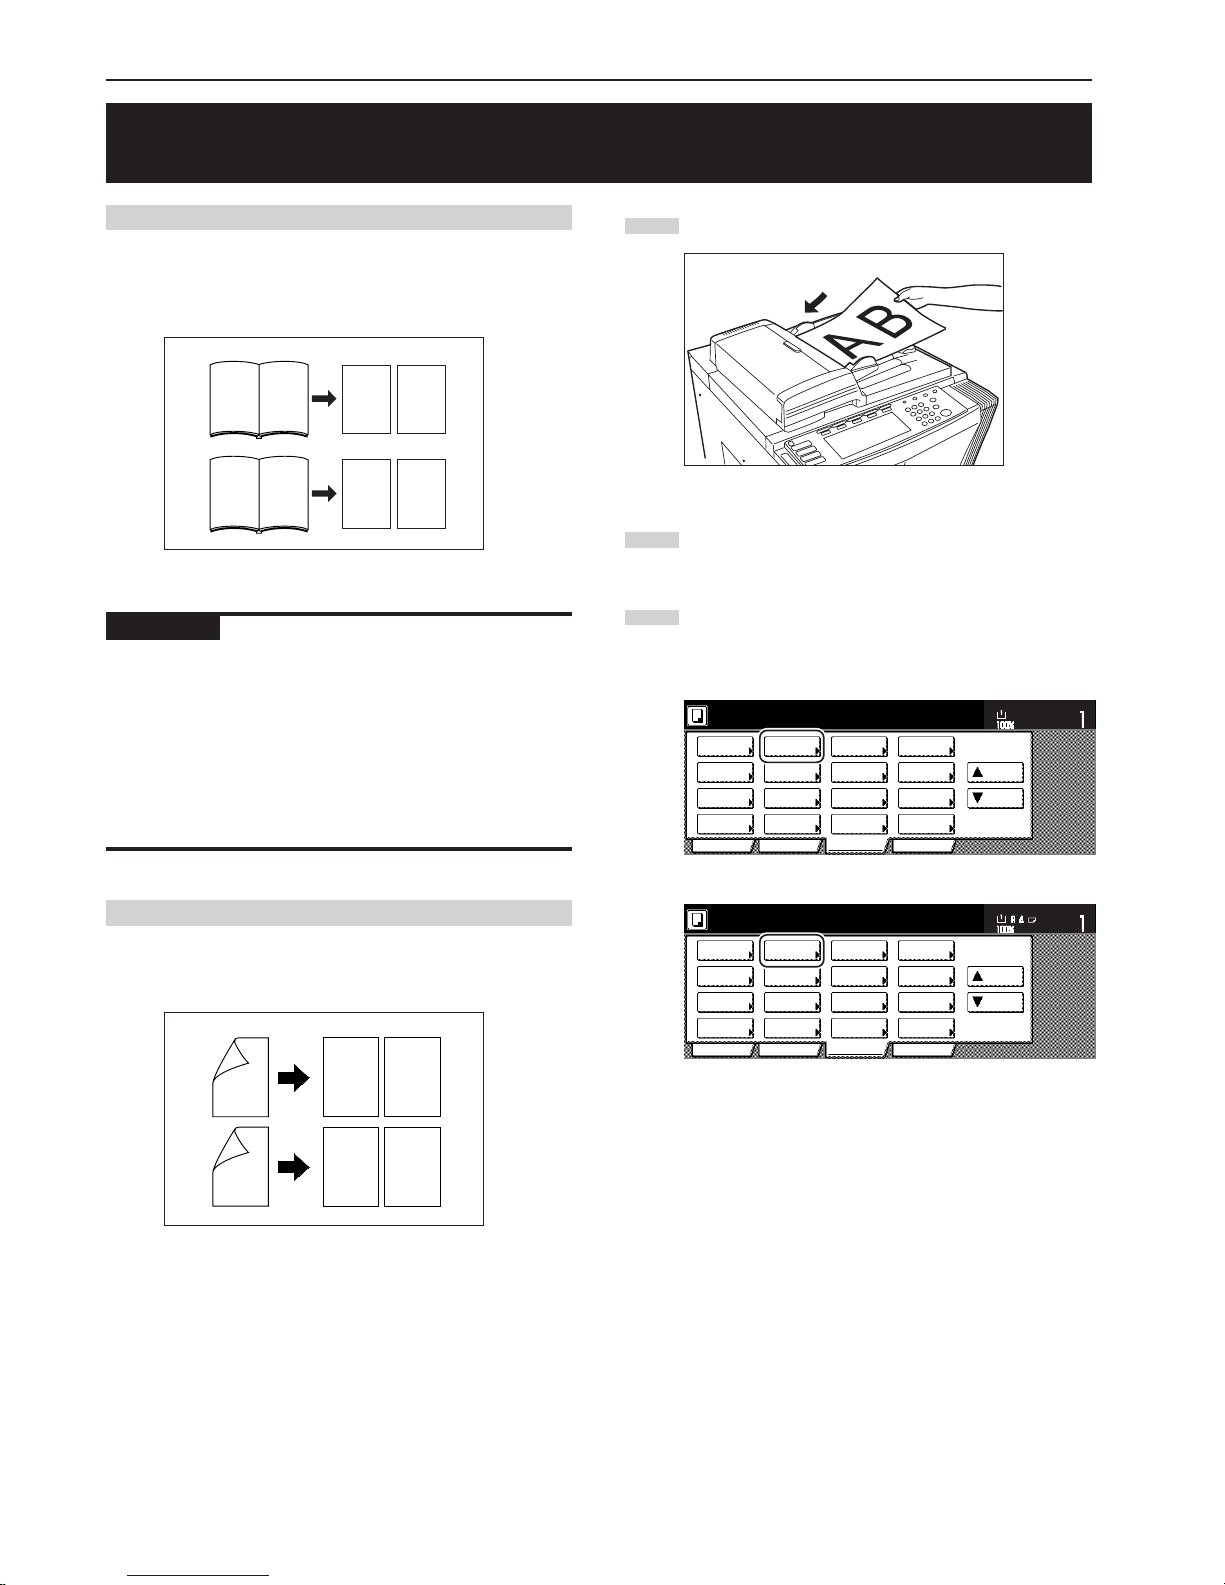
Section 5 OTHER CONVENIENT FUNCTIONS
5-4
2. Copying two-page originals onto separate sheets
[Page separation/Split copy modes]
(1) Page separation/Split copy from book originals
With this mode, the two facing pages of an open-faced original such
as a book, a magazine, and the like are each copied onto a separate
sheet of paper.
IMPORTANT!
Inch specifications
• Only 11" x 17" and 8 1/2" x 11" size originals and 11" x 8 1/2" size
copy paper can be used in this mode. Depending upon the size of
the originals, the image will be enlarged or reduced to fit the size of
the copy paper.
Metric specifications
• Only A3 size originals and A4 size copy paper can be used in this
mode.
(2) Page separation/Split copy from 2-sided originals
With this mode, the two sides of a 2-sided original are each copied
onto a separate sheet of paper.
1
Set the originals to be copied.
2
Touch the “Function” tab. The content of the “Function” tab
will be displayed.
3
Touch the “2 sided/Separation” [“2-sided/Split”] key.
The “2 sided/Separation” [“2-sided/Split”] screen will be
displayed.
Inch specifications
2 sided/
Separation
Select
paper
Combine
Reduce
/Enlarge
Margin/
Centering
Forms
Overlay
Page #
Function
Basic User choice Program
Cover
Mode
Booklet
Sort/
Finished
Border
Erase
Exposure
mode
Orig.image
quality
Ready to copy.
Select
orig. size
Auto
Selection
Batch
scanning
Up
Down
Set
Paper size
11x81/2"
Metric specifications
Select
paper
2-sided/
Split
Merge copy
Reduce/
Enlarge
Margin/
Imag. shift
Page
numbering
Function
Basic User choice Program
Cover
Mode
Booklet
Erase
Mode
Exposure
mode
Image
quality
Sort/
Finished
Ready to copy.
Select
size orig.
Auto
selection
Large # of
originals
Form
overlay
Up
Down
Set
Paper size
12
12
12
21
1
2
12
1
2
12
Page 47
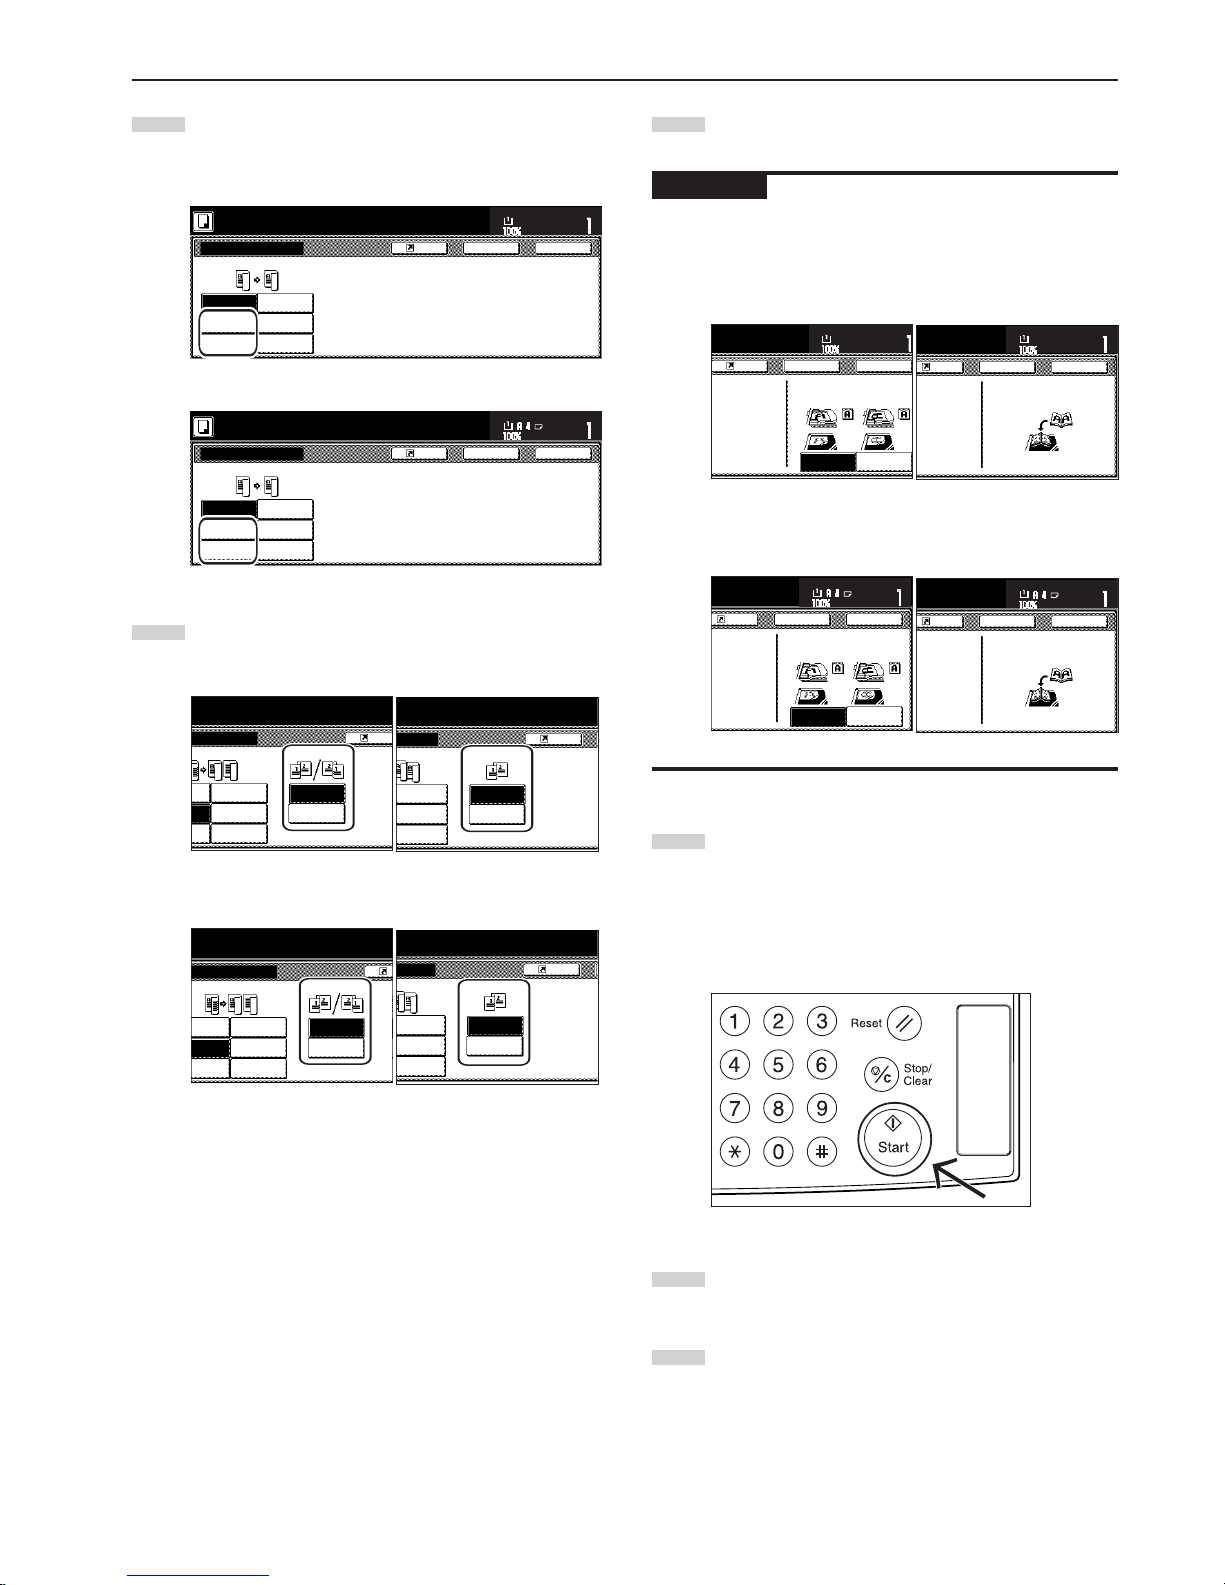
Section 5 OTHER CONVENIENT FUNCTIONS
5-5
4
Touch the “2 sided / 1 sided” key or the “Book / 2 sided”
key, as appropriate to the type of originals being copied and
the type of finished copies to be made.
Inch specifications
Register
1 sided
➔1 sided
1 sided
➔2 sided
2 sided
➔1 sided
2 sided
➔2 sided
Book
➔1 sided
Book
➔2 sided
Back Close
2 sided/Separation
Able to copy 1 sided (separate) or
2 sided copy using 1 sided original,
Book original or 2 sided original.
11x81/2"
Ready to copy.
Set
Paper size
Metric specifications
Register
1-sided
R1-sided
1-sided
R2-sided
2-sided
R1-sided
2-sided
R2-sided
Book
R
1-sided
Book
R
2-sided
Back Close
2-sided / Split
Ready to copy.
Able to copy 1-sided (separate) or
2-sided copy using 1-sided original,
book original or 2-sided original.
Set
Paper size
5
Specify the binding direction of the originals.
Inch specifications
<for 2-sided originals> <for open-faced originals>
Metric specifications
<for 2-sided originals> <for open-faced originals>
6
Follow the instructions on the right side of the touch panel
and verify the direction in which the originals were set.
IMPORTANT!
If the designation for the direction that the originals are set is not
correct, copying may be accomplished incorrectly.
Inch specifications
<
for 1-sided or 2-sided originals
> <for open-faced originals>
Metric specifications
<
for 1-sided or 2-sided originals
> <for open-faced originals>
7
Press the [Start] key. Scanning of the originals will start.
If you set the originals in the Document Processor, copying
will start automatically.
If you set an original on the platen, a message will appear
telling you to set the next original. In this case, go to the next
step.
8
Replace the first original with the next one and press the
[Start] key. Scanning of that next original will start.
9
Once you have finished scanning all of the originals, touch
the “Scanning finished” key. Copying will start.
Rear
Check direction
Register Back Close
11x81/2"
Set
Paper size
Left top
corner
Check direction of
original top side.
Check direction
Register Back Close
11x81/2"
Set
Paper size
Set the book original
top side direct to back.
Back Edge
Left top
corner
Check direction
Check direction of
original.
Register Back Close
Set
Paper size
Register Back Close
Check direction
Set book original top
sidedirectiontoback.
Set
Paper size
Open from
left/right
Open from
top
eparation
dy to copy.
Regist
e
1 sided
➔2 sided
2 sided
➔2 sided
Book
➔2 sided
Original
Open from
left
Open from
right
on
to copy.
Register
1 sided
➔2 sided
2 sided
➔2 sided
Book
➔2 sided
Original
R
Original
Left/Right
binding
Top
binding
ed
ided
1-sided
R2-sided
ed
ided
2-sided
R2-sided
ided
Book
R
2-sided
ided / Split
eady to copy.
Register
Original
Left
binding
Right
binding
sided
2-sided
sided
2-sided
ook
2-sided
o copy.
Page 48
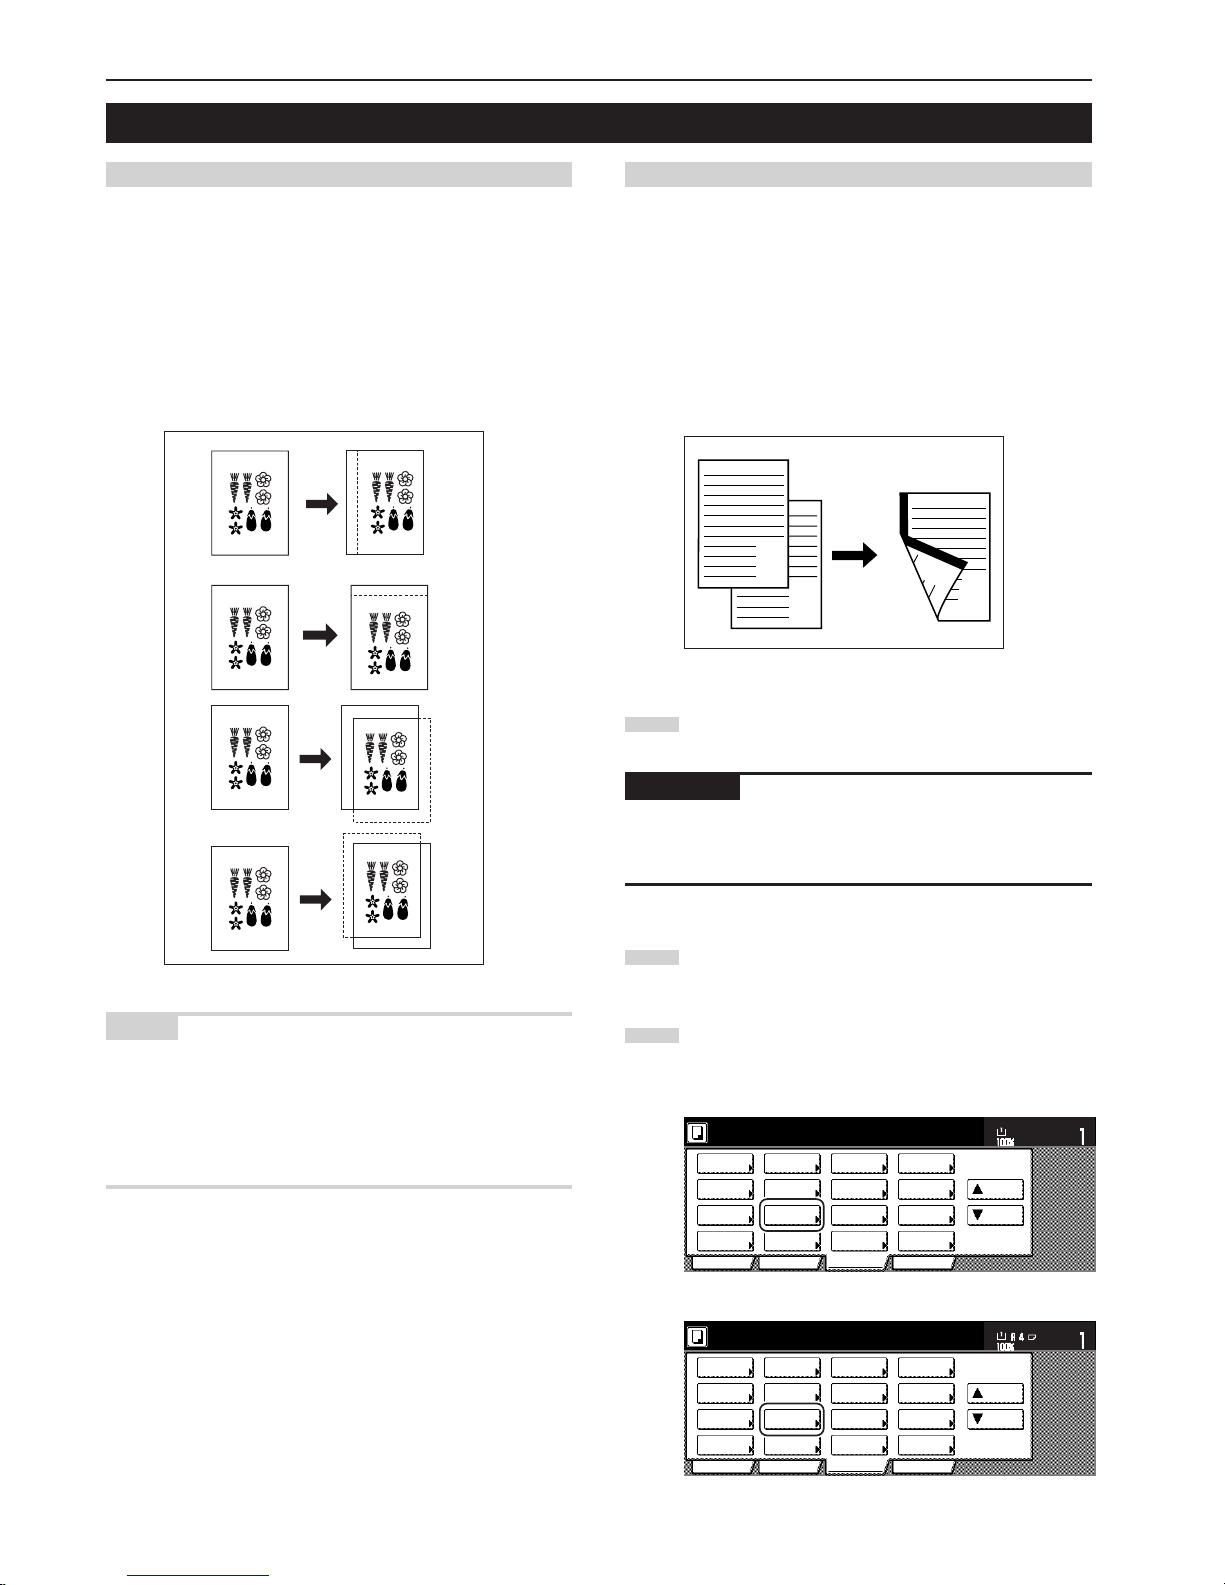
Section 5 OTHER CONVENIENT FUNCTIONS
5-6
3. Making a margin space on the copies [Margin mode]
(1) Standard margin
Inch specifications
The image of the original can be shifted to the left or right and up or
down to make a margin (blank) space on the copy. The width of each
margin can be set to any 1/8" increment between 1/8" and 3/4".
A setting of “0” will leave no margin space.
Metric specifications
The image of the original can be shifted to the left or right and up or
down to make a margin (blank) space on the copy. The width of each
margin can be set to any 1 mm increment between 1 mm and 18 mm.
A setting of “0” will leave no margin space.
NOTES
• It is also possible for you to select the default setting for the location
and width of the margins. (See “Margin width” on page 7-55.)
• If you select to have a left margin created during 2-sided copying
and the location for the back side margin is set to “Auto”, a right
margin that is the same width as the margin on the front side will be
automatically created on the back side of the copies.
(2) Separate front and back margin settings
Inch specifications
When you are making 2-sided copies, the margin positions and widths
can be selected separately for the front and back sides. The width of
each margin can be set to any 1/8" increment between 1/8" and 3/4".
A setting of “0” will leave no margin space.
Metric specifications
When you are making 2-sided copies, the margin positions and widths
can be selected separately for the front and back sides. The width of
each margin can be set to any 1 mm increment between 1 mm and 18
mm. A setting of “0” will leave no margin space.
1
Set the originals to be copied.
IMPORTANT!
Set originals so that the top edge is facing either the back or the left of
the copier. Setting them in the wrong direction may cause the margin
to be created in the incorrect position.
2
Touch the “Function” tab. The content of the “Function” tab
will be displayed.
3
Touch the “Margin/Centering” [“Margin/Imag.shift”] key.
The “Margin/Centering” [“Margin/Image shift”] screen will be
displayed.
Inch specifications
2 sided/
Separation
Select
paper
Combine
Reduce
/Enlarge
Margin/
Centering
Forms
Overlay
Page #
Function
Basic User choice Program
Cover
Mode
Booklet
Sort/
Finished
Border
Erase
Exposure
mode
Orig.image
quality
Ready to copy.
Select
orig. size
Auto
Selection
Batch
scanning
Up
Down
Set
Paper size
11x81/2"
Metric specifications
Select
paper
2-sided/
Split
Merge copy
Reduce/
Enlarge
Margin/
Imag. shift
Page
numbering
Function
Basic User choice Program
Cover
Mode
Booklet
Erase
Mode
Exposure
mode
Image
quality
Sort/
Finished
Ready to copy.
Select
size orig.
Auto
selection
Large # of
originals
Form
overlay
Up
Down
Set
Paper size
A
A
B
B
Page 49
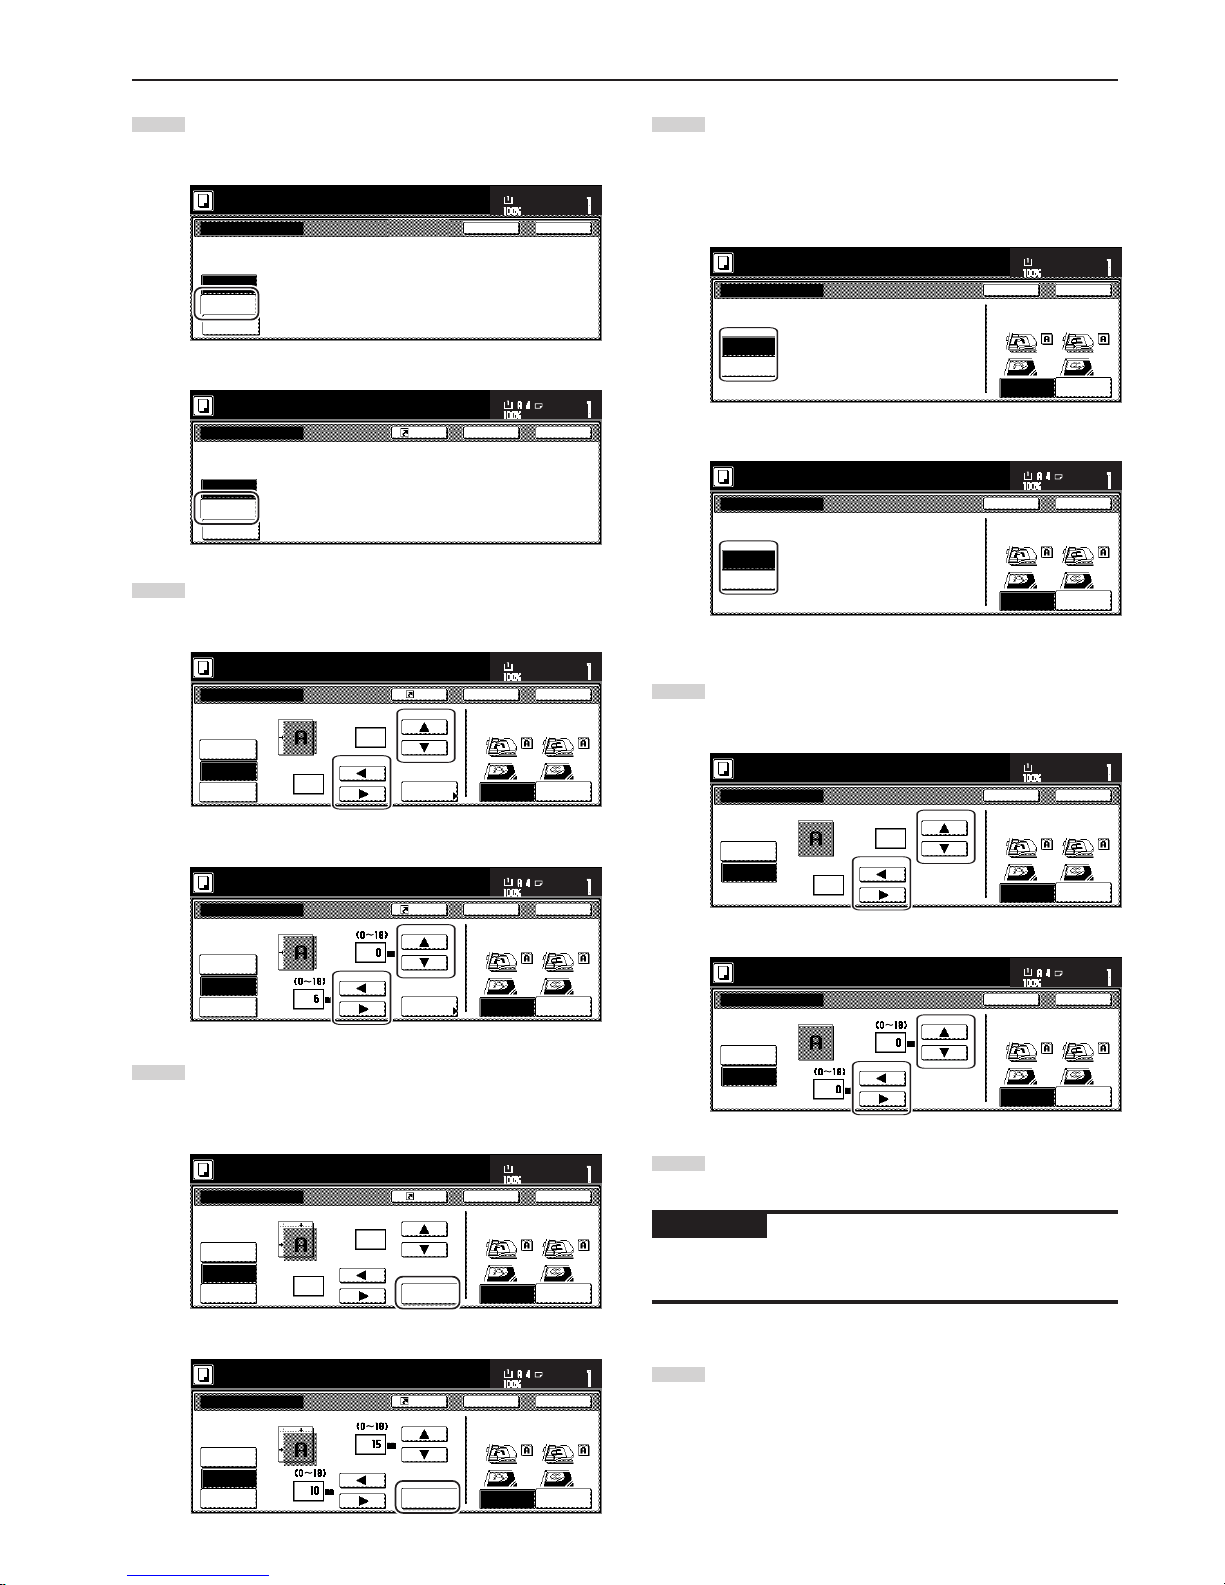
Section 5 OTHER CONVENIENT FUNCTIONS
5-7
4
Touch the “Margin” key. The screen to set the front side
margin will be displayed.
Inch specifications
Margin/Centering
Reposition image to left/right or
top/bottom, and also center image
on paper.
None
Margin
Centering
Ready to copy.
Register Back Close
11x81/2"
Set
Paper size
Metric specifications
None
Back Close
Ready to copy.
Register
Set
Paper size
Margin/Image shift
Reposition image to left/right or
top/bottom and center image on paper.
Margin
Image
shift
5
Use the up/down and left/right cursor keys to select the
desired location and width of each margin.
Inch specifications
Centering
Front page
Back page
margin
Auto
None
Margin
Margin/Centering
Ready to copy.
Register Back Close
11x81/2"
Set
Paper size
Rear
Check direction
Left top
corner
Check direction of
original top side.
Left
1
/
4
"
0
"
(0~
3
/4)
(0~
3
/4)
Metric specifications
Back Close
Ready to copy.
Register
Set
Paper size
Back Edge
Left top
corner
None
Margin
Image
shift
Margin/Image shift
Check direction
Check direction of
original.
Front page
Left
Back page
margin
Auto
6
If you are making 2-sided copies, touch the “Back page
margin” key. The “Back page margin” screen will be
displayed.
Inch specifications
Top
Centering
Front page
Back page
margin
Auto
None
Margin
Margin/Centering
Ready to copy.
Register Back Close
11x81/2"
Set
Paper size
Rear
Check direction
Left top
corner
Check direction of
original top side.
Left
1
/2
"
1
/4
"
(0~
3
/4)
(0~
3
/4)
Metric specifications
Back Close
Ready to copy.
Register
Set
Paper size
Back Edge
Left top
corner
Margin/Image shift
None
Margin
Image
shift
Front page
Left
Top
Back page
margin
Check direction
Check direction of
original.
Auto
7
If you want to create a margin on the back side of the copies
that lines up with that on the front side, touch the “Auto” key.
If you want to set the margins for the front and back sides
separately, touch the “Front/Back margin” key. The screen to
set the back side margin will be displayed.
Inch specifications
Back page margin
Auto
Front /Back
margin
If "AUTO" is selected for duplex
copying, back side will have same margin
setting as that for the front page.
Ready to copy.
Back Close
11x81/2"
Set
Paper size
Rear
Check direction
Left top
corner
Check direction of
original top side.
Metric specifications
Back page margin
Auto
Front /Back
margin
If "AUTO" is selected at the duplex
copying, back side will have same margin
setting as that for the front page.
Back Close
Ready to copy.
Set
Paper size
Back Edge
Left top
corner
Check direction
Check direction of
original.
8
Use the up/down and left/right cursor keys to select the
desired location and width of each margin.
Inch specifications
Back page margin
Auto
Front /Back
margin
Back page
Ready to copy.
Back Close
11x81/2"
Set
Paper size
Rear
Check direction
Left top
corner
Check direction of
original top side.
(0~3/4)
"
"
(0~
3
/4)
0
0
Metric specifications
Back page margin
Auto
Front /Back
margin
Back page
Back Close
Ready to copy.
Set
Paper size
Back Edge
Left top
corner
Check direction
Check direction of
original.
9
Follow the instructions on the right side of the touch panel
and verify the direction in which the originals were set.
IMPORTANT!
If the designation for the direction that the originals are set is not
correct, copying may be accomplished incorrectly.
10
Press the [Start] key.
Copying will start.
Page 50
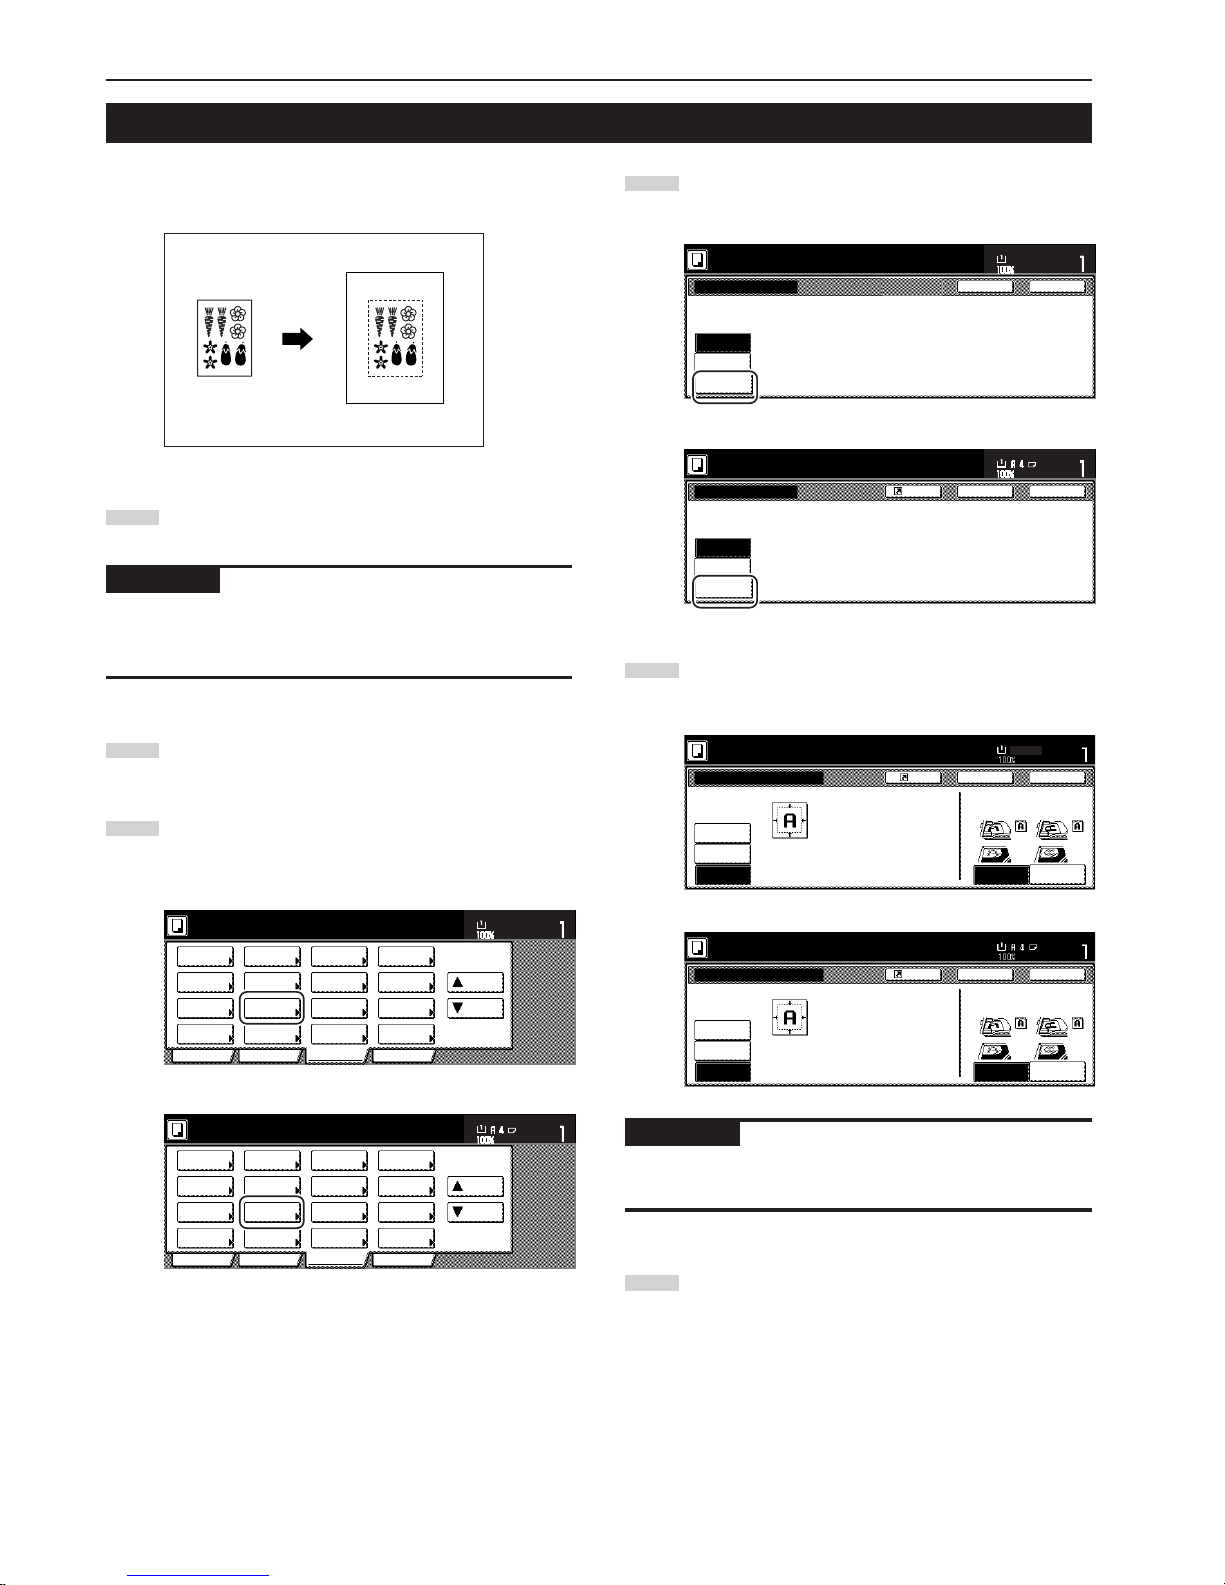
Section 5 OTHER CONVENIENT FUNCTIONS
5-8
4. Centering the copy image [Centering/Image shift mode]
With this mode you can center the image on the copy paper when you
copy onto a paper size that is larger than that of the original.
1
Set the originals to be copied.
IMPORTANT!
Set originals so that the top edge is facing either the back or the left of
the copier. Setting them in the wrong direction may cause the image
to be copied in the incorrect position.
2
Touch the “Function” tab. The content of the “Function” tab
will be displayed.
3
Touch the “Margin/Centering” [“Margin/Imag.shift”] key. The
“Margin/Centering” [“Margin/Image shift”] screen will be
displayed.
Inch specifications
2 sided/
Separation
Select
paper
Combine
Reduce
/Enlarge
Margin/
Centering
Forms
Overlay
Page #
Function
Basic User choice Program
Cover
Mode
Booklet
Sort/
Finished
Border
Erase
Exposure
mode
Orig.image
quality
Ready to copy.
Select
orig. size
Auto
Selection
Batch
scanning
Up
Down
Set
Paper size
11x81/2"
Metric specifications
Select
paper
2-sided/
Split
Merge copy
Reduce/
Enlarge
Margin/
Imag. shift
Page
numbering
Function
Basic User choice Program
Cover
Mode
Booklet
Erase
Mode
Exposure
mode
Image
quality
Sort/
Finished
Ready to copy.
Select
size orig.
Auto
selection
Large # of
originals
Form
overlay
Up
Down
Set
Paper size
4
Touch the “Centering” [“Imag.shift”] key. The “Centering”
[“Imag.shift”] screen will be displayed.
Inch specifications
Margin/Centering
Reposition image to left/right or
top/bottom, and also center image
on paper.
None
Margin
Centering
Ready to copy.
Register Back Close
11x81/2"
Set
Paper size
Metric specifications
None
Back Close
Ready to copy.
Register
Set
Paper size
Margin/Image shift
Reposition image to left/right or
top/bottom and center image on paper.
Margin
Image
shift
5
Follow the instructions on the right side of the touch panel
and verify the direction in which the originals were set.
Inch specifications
Able to center scanned image on paper.
Centering
None
Margin
Margin/Centering
Ready to copy.
Register Back Close
11x81/2"
Set
Paper size
Rear
Check direction
Left top
corner
Check direction of
original top side.
Metric specifications
Margin/Image shift
None
Margin
Image
shift
Check direction
Check direction of
original.
Able to center scanned image on paper.
Back Close
Ready to copy.
Register
Set
Paper size
Back Edge
Left top
corner
IMPORTANT!
If the designation for the direction that the originals are set is not
correct, copying may be accomplished incorrectly.
6
Press the [Start] key.
Copying will start.
Page 51
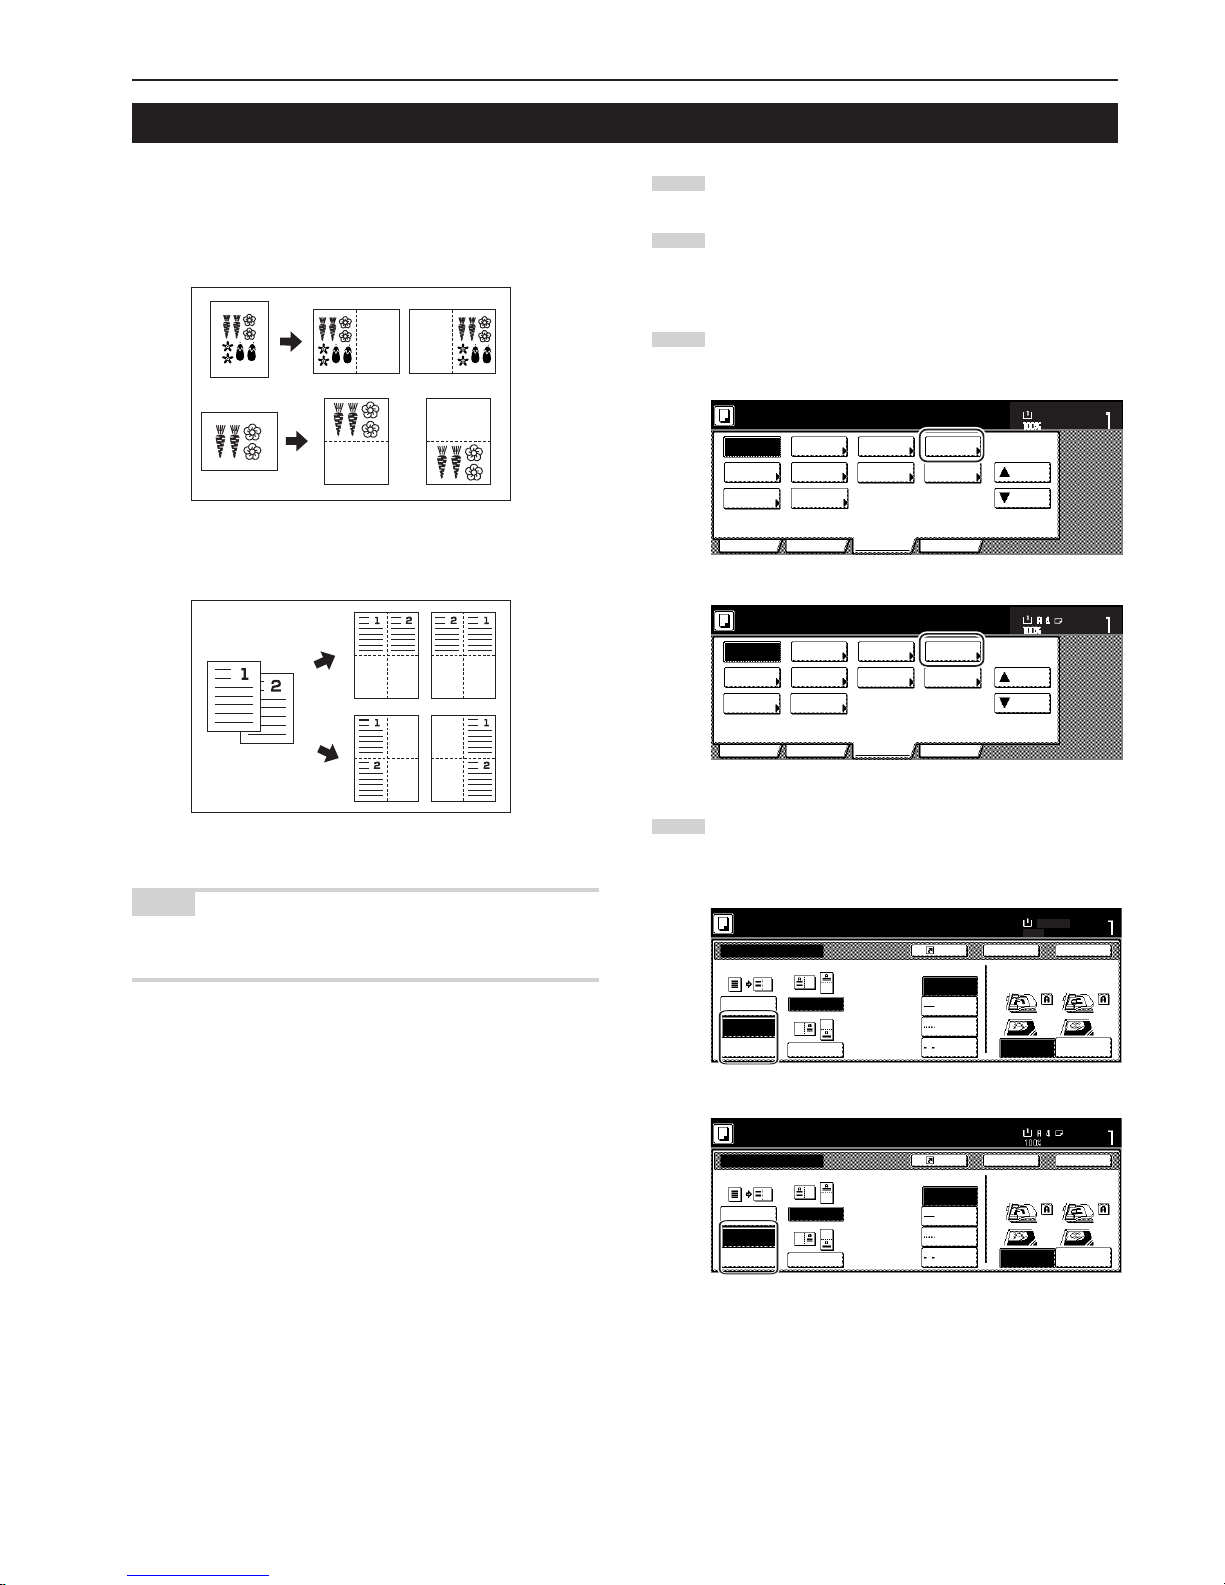
Section 5 OTHER CONVENIENT FUNCTIONS
5-9
5. Adding a space next to the copy images for making notes [Memo mode]
With this mode you can leave a space for adding notes next to the
copied image. It is also possible to fit the images of 2 originals onto
the same copy page along with a blank space for each.
● Copying one original onto one copy page (layout A)
● Copying two originals onto one copy page (layout B)
NOTE
Only originals and copy paper of standard sizes can be used in this
mode.
1
Set the originals to be copied.
2
Touch the “Function” tab and then the “N Down” key.
The content of the next portion of the “Function” tab will be
displayed.
3
Touch the “Memo pages” key. The “Memo pages” screen will
be displayed.
Inch specifications
Invert Mirror
Modify
Copy
Proof Copy
Memo
pages
Orig. set
direction
Ready to copy.
Up
Down
Set
Paper size
Eco Print
Auto
Rotation
Function
Basic User choice Program
OHP
backing
11x81/2"
Select of
Output
Metric specifications
Invert Mirror
Modify
copy
Select of
Output
Test copy
Memo
pages
Orig. set
direction
Ready to copy.
Up
Down
Set
Paper size
Eco print
Auto
Rotation
Function
Basic User choice Program
OHP back
4
Touch the “Layout A” key or the “Layout B” key, as
appropriate. The screen to make the layout settings will be
displayed.
Inch specifications
Memo pages
None
Layout A
Layout
None
Border line
Solid
Dotted
Borders
Layout B
Set
Paper size
Ready to copy.
Register Back Close
11x81/2"
Rear
Check direction
Left top
corner
Check direction of
original top side.
50%
Metric specifications
Check direction of
original.
Back
Register
Close
Memo pages
Ready to copy.
None
Layout A
Layout
None
Border line
Solid
Dotted
Cropmark
Layout B
Back Edge
Left top
corner
Check direction
Set
Paper size
Page 52
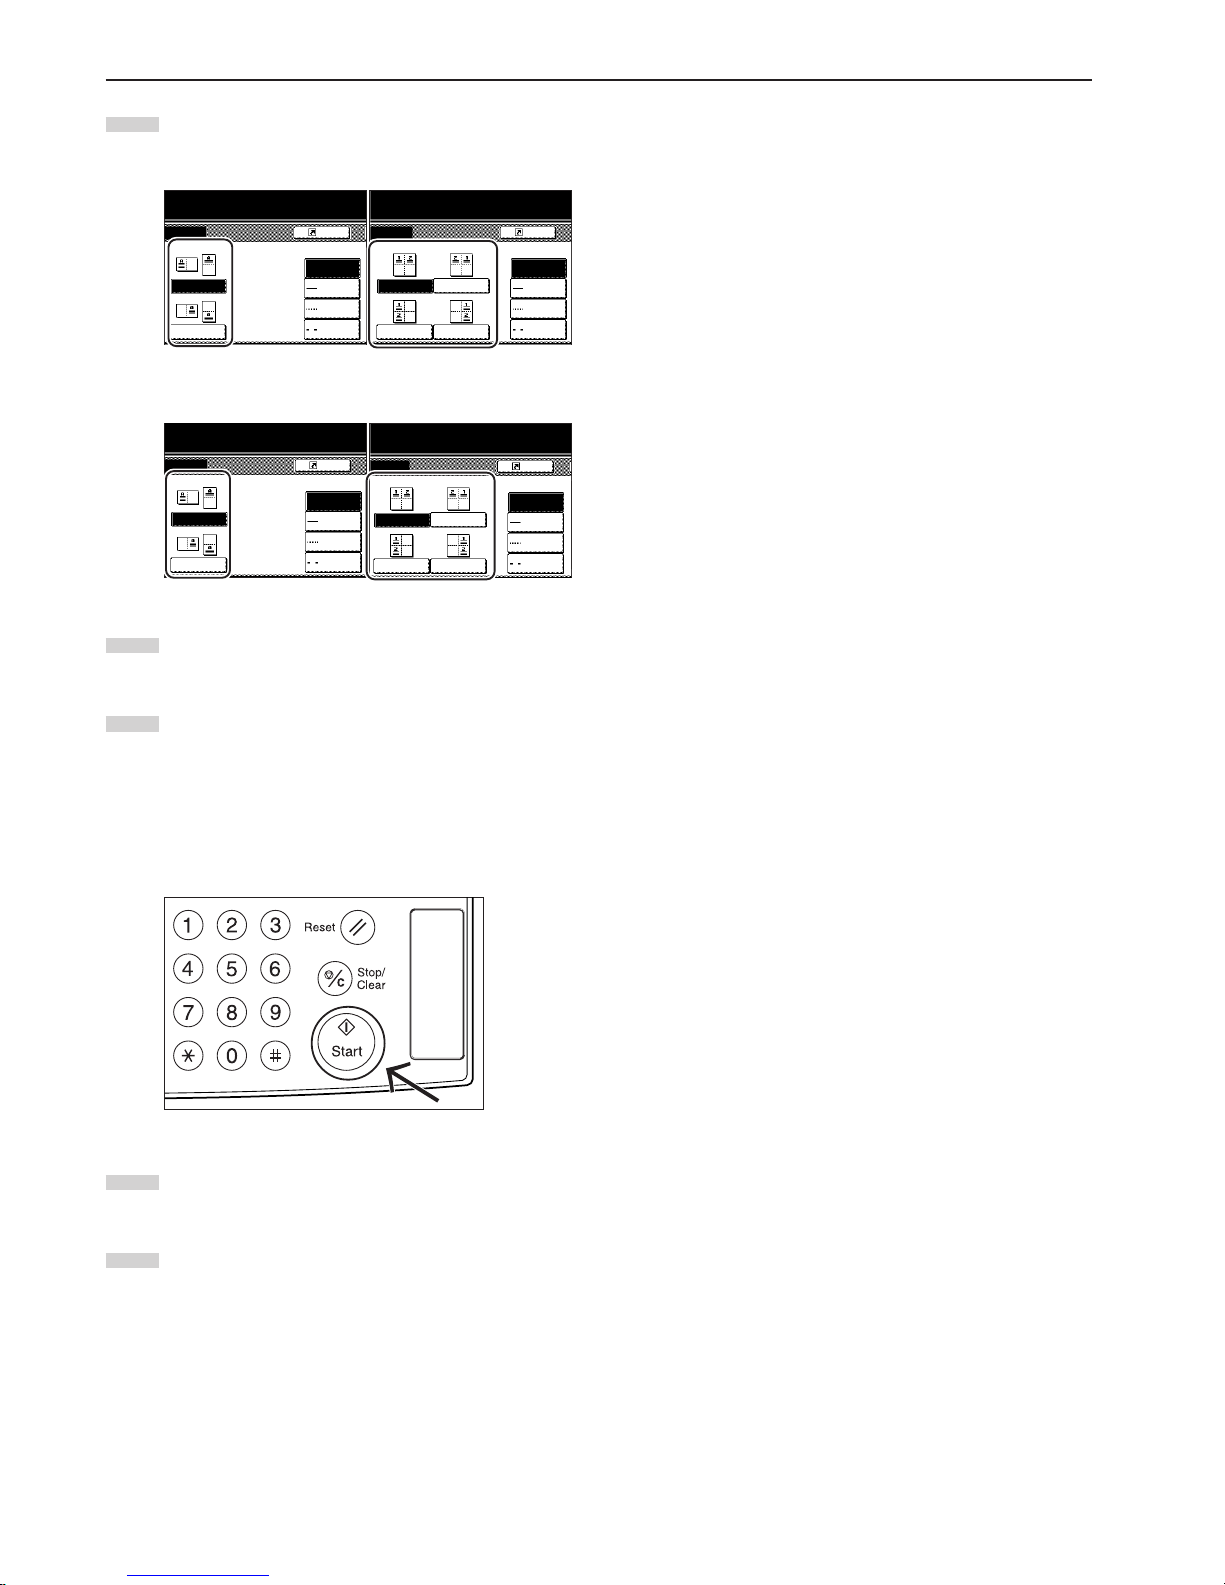
Section 5 OTHER CONVENIENT FUNCTIONS
5-10
5
Select the desired direction of the layout.
Inch specifications
<Layout A> <Layout B>
Metric specifications
<Layout A> <Layout B>
6
Select the type of the borderline that you want to use to
separate the different areas.
7
Press the [Start] key.
Scanning of the originals will start.
If you set the originals in the Document Processor, copying
will start automatically.
If you set an original on the platen, a message will appear
telling you to set the next original. In this case, go to the next
step.
8
Replace the first original with the next one and press the
[Start] key. Scanning of that next original will start.
9
Once you have finished scanning all of the originals, touch
the “Scanning finished” key. Copying will start.
Layout
None
Border line
Solid
Dotted
Borders
to copy.
Register
Layout
None
Border line
Solid
Dotted
Borders
to copy.
Register
Register
to copy.
Layout
None
Border line
Solid
Dotted
Cropmark
Register
to copy.
Layout
None
Border line
Solid
Dotted
Cropmark
Page 53
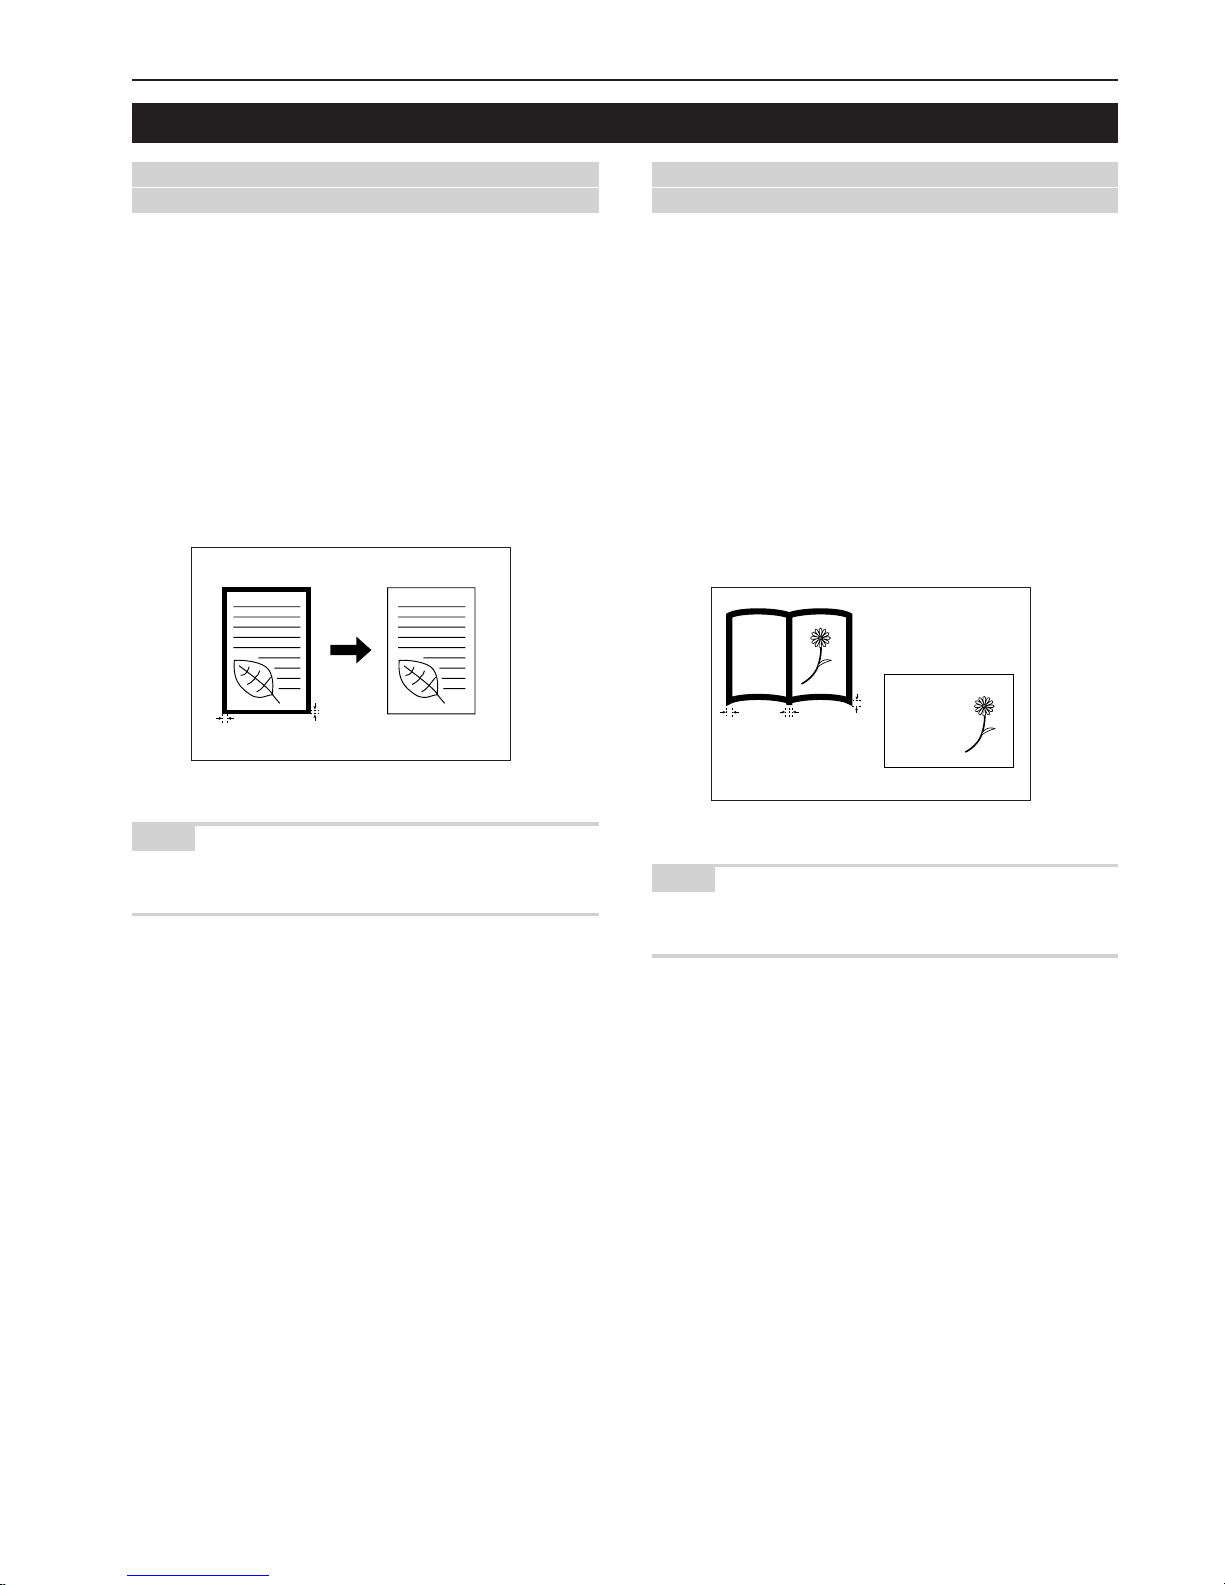
Section 5 OTHER CONVENIENT FUNCTIONS
5-11
6. Making copies with clean edges [Border erase modes]
(1) Erasing blemishes from edges of copies (Sheet
erase mode)
Inch specifications
With this mode, shadows, lines, etc., that occur around the edges of
copies made from sheet originals can be erased. The width of the
border to be erased can be set to any 1/8" increment between 1/8"
and 3/4". A setting of “0” will result in no border being erased.
(The width of the border that will be erased is shown as a in the
illustration.)
Metric specifications
With this mode, shadows, lines, etc., that occur around the edges of
copies made from sheet originals can be erased. The width of the
border to be erased can be set to any 1 mm increment between 1 mm
and 18 mm. A setting of “0” will result in no border being erased.
(The width of the border that will be erased is shown as a in the
illustration.)
NOTE
It is possible for you to change the default setting for the width of the
erased border. (See “Erased border width” on page 7-56.)
(2) Erasing blemishes from the edges and middle of
copies made from books (Book erase mode)
Inch specifications
With this mode, you can make clean copies, even from thick books.
The width of the outside border to be erased can be set to any 1/8"
increment between 1/8" and 3/4". The width of the center area to be
erased can be set to any 1/8" increment between 1/8" and 1 1/2".
A setting of “0” will result in no border being erased. (The width of the
outside border that will be erased is shown as a in the illustration,
while the width of the center area is shown as b.)
Metric specifications
With this mode, you can make clean copies, even from thick books.
The width of the outside border to be erased can be set to any 1 mm
increment between 1 mm and 18 mm. The width of the center area to
be erased can be set to any 1 mm increment between 1 mm and
36 mm. A setting of “0” will result in no border being erased.
(The width of the outside border that will be erased is shown as a in
the illustration, while the width of the center area is shown as b.)
NOTE
It is possible for you to change the default setting for the width of the
erased borders. (See “Erased border width” on page 7-56.)
abcdefghijk
abcdefghijk
abcdefghijk
abcdefghijk
abcdefghijk
abcdefghijk
abcdefghijk
abcdefghijk
abcdefghijk
abcdefghijk
abcdefghijk
abcdefghijk
abcdefghijk
abcdefghijk
abcdefghijk
abcdefghijk
abcdefghijk
a
ba
a
a
Page 54
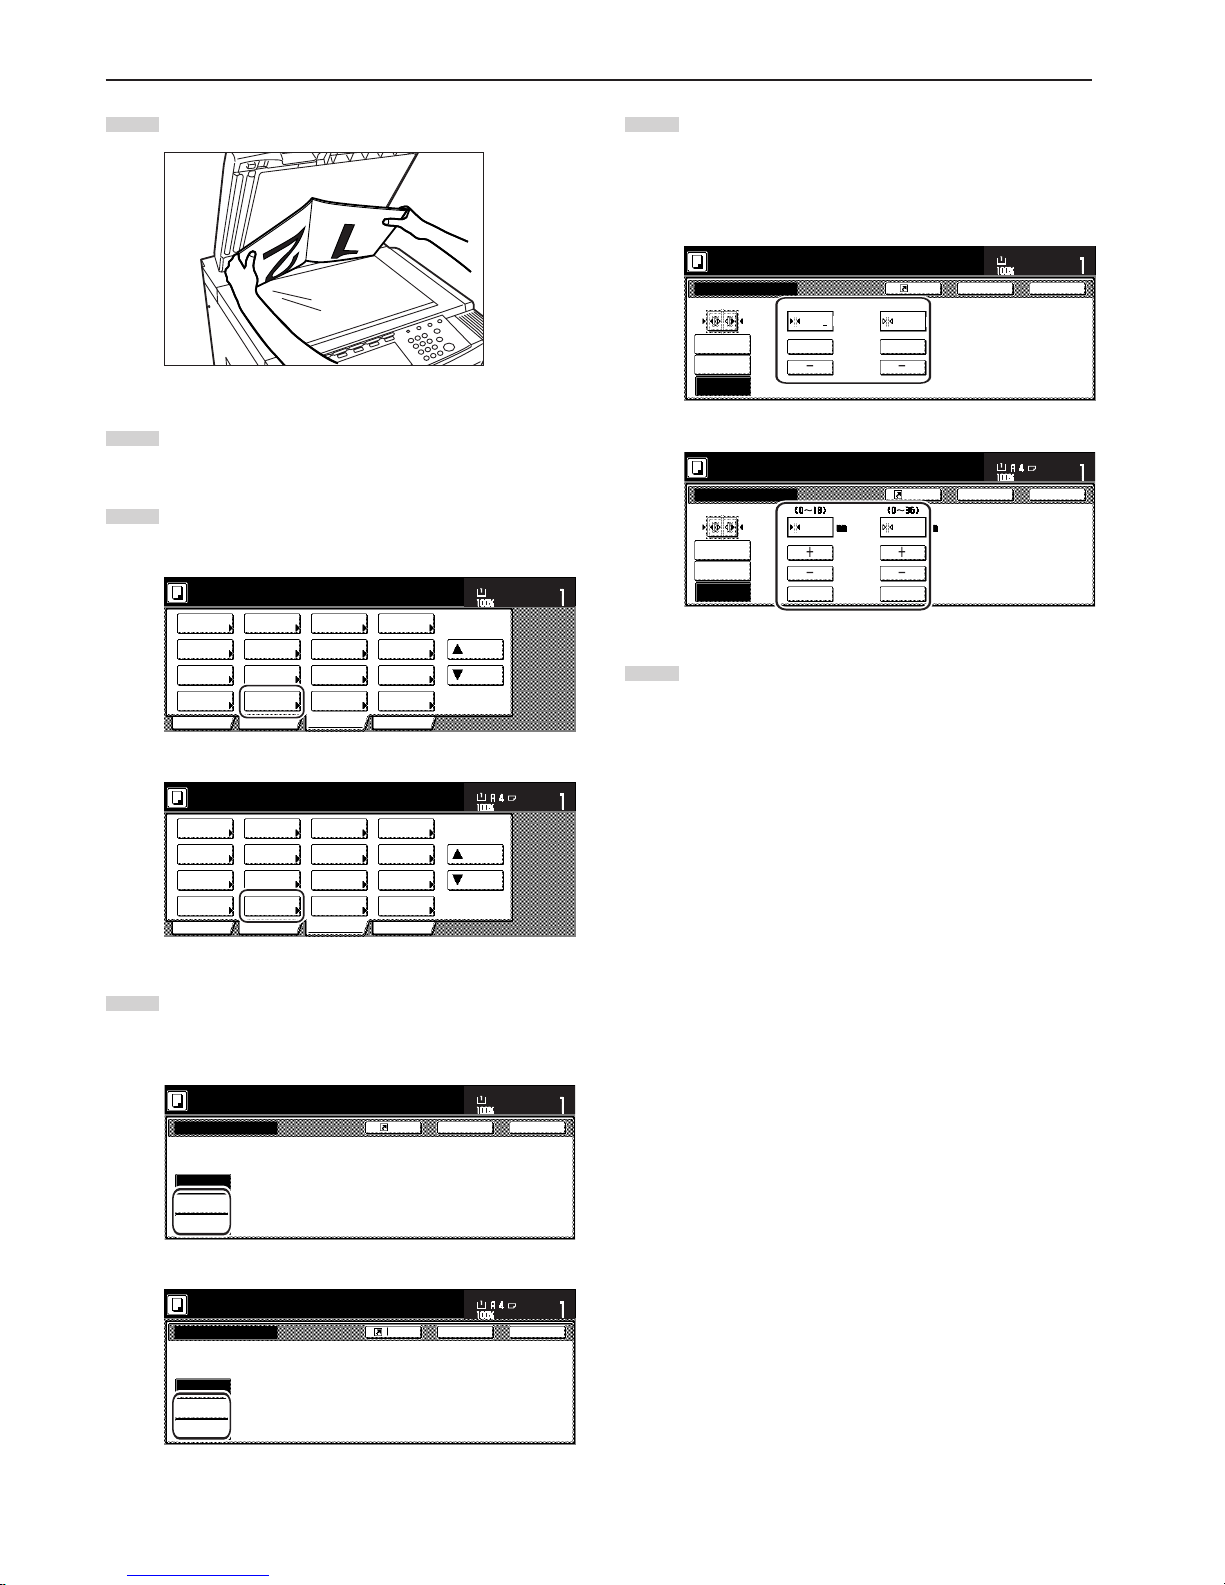
Section 5 OTHER CONVENIENT FUNCTIONS
5-12
1
Set the original to be copied.
2
Touch the “Function” tab. The content of the “Function” tab
will be displayed.
3
Touch the “Border Erase” [“Erase Mode”] key. The “Border
Erase” [“Erase Mode”] screen will be displayed.
Inch specifications
2 sided/
Separation
Select
paper
Combine
Reduce
/Enlarge
Margin/
Centering
Forms
Overlay
Page #
Function
Basic User choice Program
Cover
Mode
Booklet
Sort/
Finished
Border
Erase
Exposure
mode
Orig.image
quality
Ready to copy.
Select
orig. size
Auto
Selection
Batch
scanning
Up
Down
Set
Paper size
11x81/2"
Metric specifications
Select
paper
2-sided/
Split
Merge copy
Reduce/
Enlarge
Margin/
Imag. shift
Page
numbering
Function
Basic User choice Program
Cover
Mode
Booklet
Erase
Mode
Exposure
mode
Image
quality
Sort/
Finished
Ready to copy.
Select
size orig.
Auto
selection
Large # of
originals
Form
overlay
Up
Down
Set
Paper size
4
Touch the “Sheet Erase” [“Border erase”] key or the “Book
Erase” key, as appropriate. The screen to set the outside
border and the center area will be displayed.
Inch specifications
Border Erase
Erase the border shadow of original
or shadow from centor of book.
None
Sheet
Erase
Book
Erase
Set
Paper size
Ready to copy.
Register Back Close
11x81/2"
Metric specifications
Erase Mode
Border
erase
Book
erase
Erase edge of original or center of book
and copy.
None
Back Close
Ready to copy.
Register
Set
Paper size
5
Touch the “+” key or the “-” key to change the displayed
border width to that desired.
* In metric specification copiers, the desired border width can
also be entered directly by touching the “#keys” key and
then using the keypad.
Inch specifications
None
Border Center
Sheet
Erase
Book
Erase
Border Erase
Ready to copy.
Register Back Close
11x81/2"
Set
Paper size
1
/4
"
1
/2
"
(0~1
3
/4)
(0~1
1
/2)
++
Metric specifications
None
Border
#-Keys
Center
Border
erase
Book
erase
Erase Mode
6
12
Back Close
Ready to copy.
Register
Set
Paper size
#-Keys
6
Press the [Start] key.
Copying will start.
Page 55
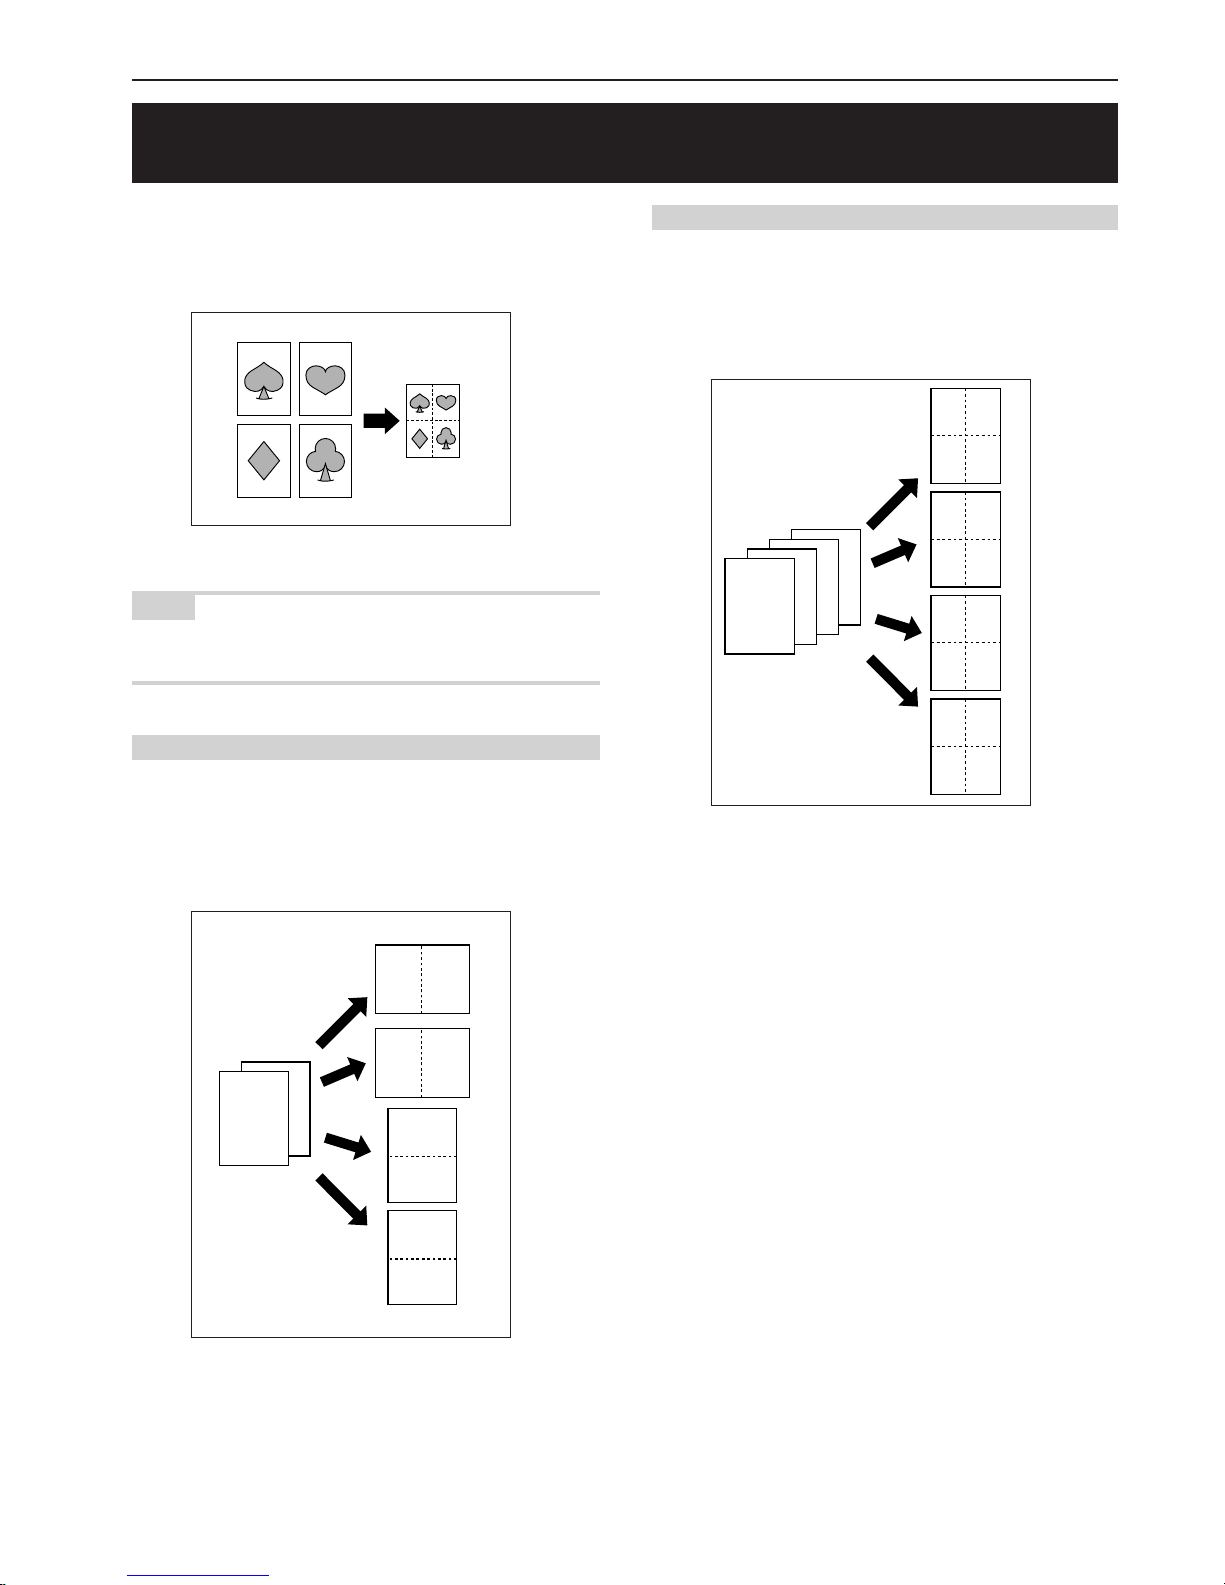
Section 5 OTHER CONVENIENT FUNCTIONS
5-13
7. Fitting the image of either two or four originals onto a single copy page
[Combine/Merge Copy modes]
With this mode, the images from either 2 or 4 originals can be
reduced and then combined onto a single copy. The borderline of
each original can also be marked with either a solid line or a dotted
line.
NOTE
Only originals and copy paper of standard sizes can be used in this
mode.
(1) 2 in 1
Use this mode when you want to copy two originals onto one sheet.
This mode can also be used in conjunction with the 2-sided copy
modes in order to copy four originals onto one sheet.
(When setting the originals on the platen, be sure to set the originals
in the correct order: 1 and then 2.)
(2) 4 in 1
Use this mode when you want to copy four originals onto one sheet.
This mode can also be used in conjunction with the 2-sided copy
modes in order to copy eight originals onto one sheet.
(When setting the originals on the platen, be sure to set the originals
in the correct order: 1, 2, 3 and then 4.)
4
3
2
1
132
4
241
3
123
4
341
2
2
1
12
21
1
2
2
1
Page 56
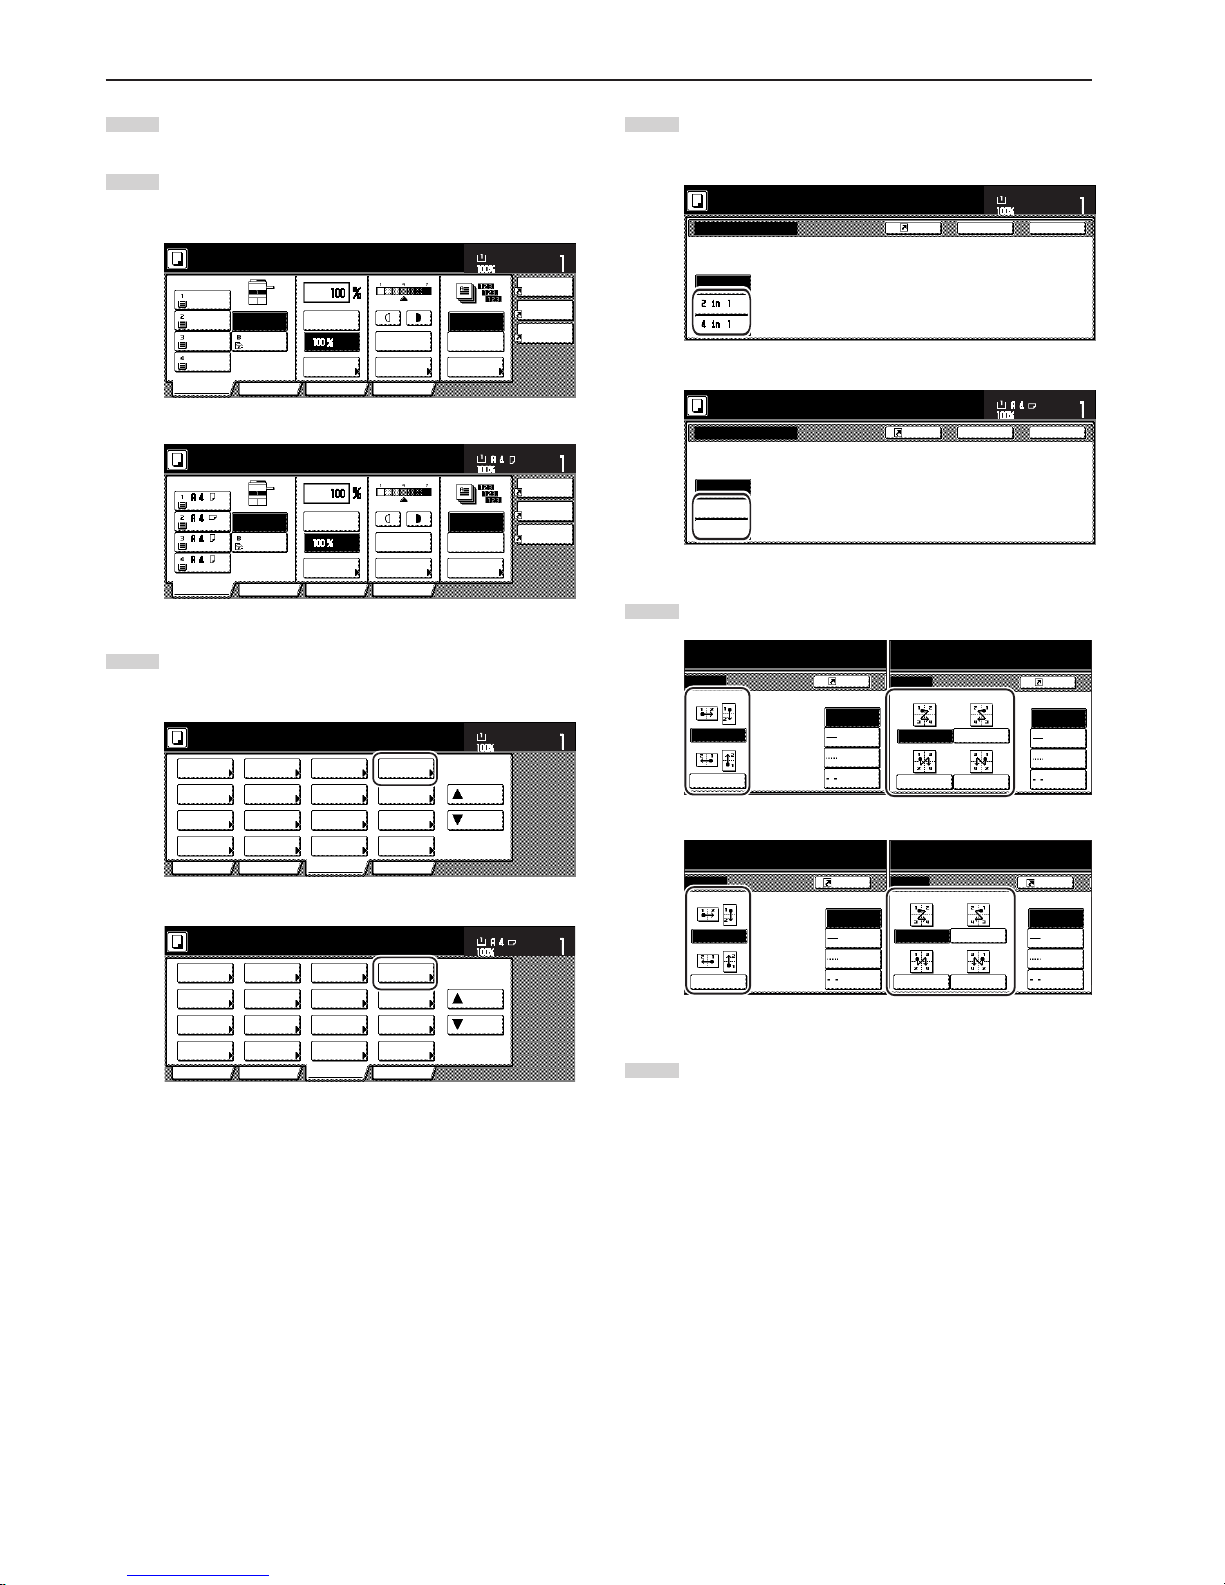
Section 5 OTHER CONVENIENT FUNCTIONS
5-14
1
Set the originals to be copied.
2
Touch the “Function” tab. The content of the “Function” tab
will be displayed.
Inch specifications
AMS
Reduce
/Enlarge
APS
Exposure
mode
Auto
Exposure
Ready to copy.
Set
Paper Size
Bypass
Color
Recycled
Plain Plain
Plain
Sort/
Finished
Sort:Off
Sort:On
Basic User choice
Program
Function
Combine
Orig.image
quality
Reduce
/Enlarge
11x8
1
/
2
"
8
1
/
2
x11"
11x8
1
/
2
"
11x8
1
/
2
"
11x81/2"
Metric specifications
Merge copy
AMS
Reduce/
Enlarge
APS
Image
quality
Reduce/
Enlarge
Exposure
mode
Auto
Exposure
Ready to copy.
Set
Paper Size
Bypass
Color
Recycled
Plain Plain
Plain
Sort/
Finished
Sort:Off
Sort:On
Basic User choice
Program
Function
3
Touch the “Combine” [“Merge copy”] key. The “Combine”
[“Merge copy”] screen will be displayed.
Inch specifications
2 sided/
Separation
Select
paper
Combine
Reduce
/Enlarge
Margin/
Centering
Forms
Overlay
Page #
Function
Basic User choice Program
Cover
Mode
Booklet
Sort/
Finished
Border
Erase
Exposure
mode
Orig.image
quality
Ready to copy.
Select
orig. size
Auto
Selection
Batch
scanning
Up
Down
Set
Paper size
11x81/2"
Metric specifications
Select
paper
2-sided/
Split
Merge copy
Reduce/
Enlarge
Margin/
Imag. shift
Page
numbering
Function
Basic User choice Program
Cover
Mode
Booklet
Erase
Mode
Exposure
mode
Image
quality
Sort/
Finished
Ready to copy.
Select
size orig.
Auto
selection
Large # of
originals
Form
overlay
Up
Down
Set
Paper size
4
Touch the “2 in 1” key or the “4 in 1” key, as appropriate.
The screen to make the layout settings will be displayed.
Inch specifications
None
Combine
2 or 4 original pages can combine on
one page.
Ready to copy.
Register Back Close
11x81/2"
Set
Paper size
Metric specifications
None
2-in-1
4-in-1
Back Close
Merge copy
Ready to copy.
2 or 4 originals can be printed
on one page.
Register
Set
Paper size
5
Select the desired direction of the layout.
Inch specifications
Metric specifications
6
Select the type of the borderline that you want to use to
separate the images.
Layout
None
Border line
Solid
Dotted
Borders
to copy.
Register
None
Solid
Dotted
Borders
Layout Border line
to copy.
Register
None
Layout
Solid
Dotted
Cropmark
Border line
to copy.
Register
Layout
None
Solid
Dotted
Cropmark
Border line
to copy.
Register
Page 57
Section 5 OTHER CONVENIENT FUNCTIONS
5-15
7
Press the [Start] key.
Scanning of the originals will start.
If you set the originals in the Document Processor, copying
will start automatically.
If you set an original on the platen, a message will appear
telling you to set the next original. In this case, go to the next
step.
8
Replace the first original with the next one and press the
[Start] key. Scanning of that next original will start.
9
Once you have finished scanning all of the originals, touch
the “Scanning finished” key. Copying will start.
Page 58
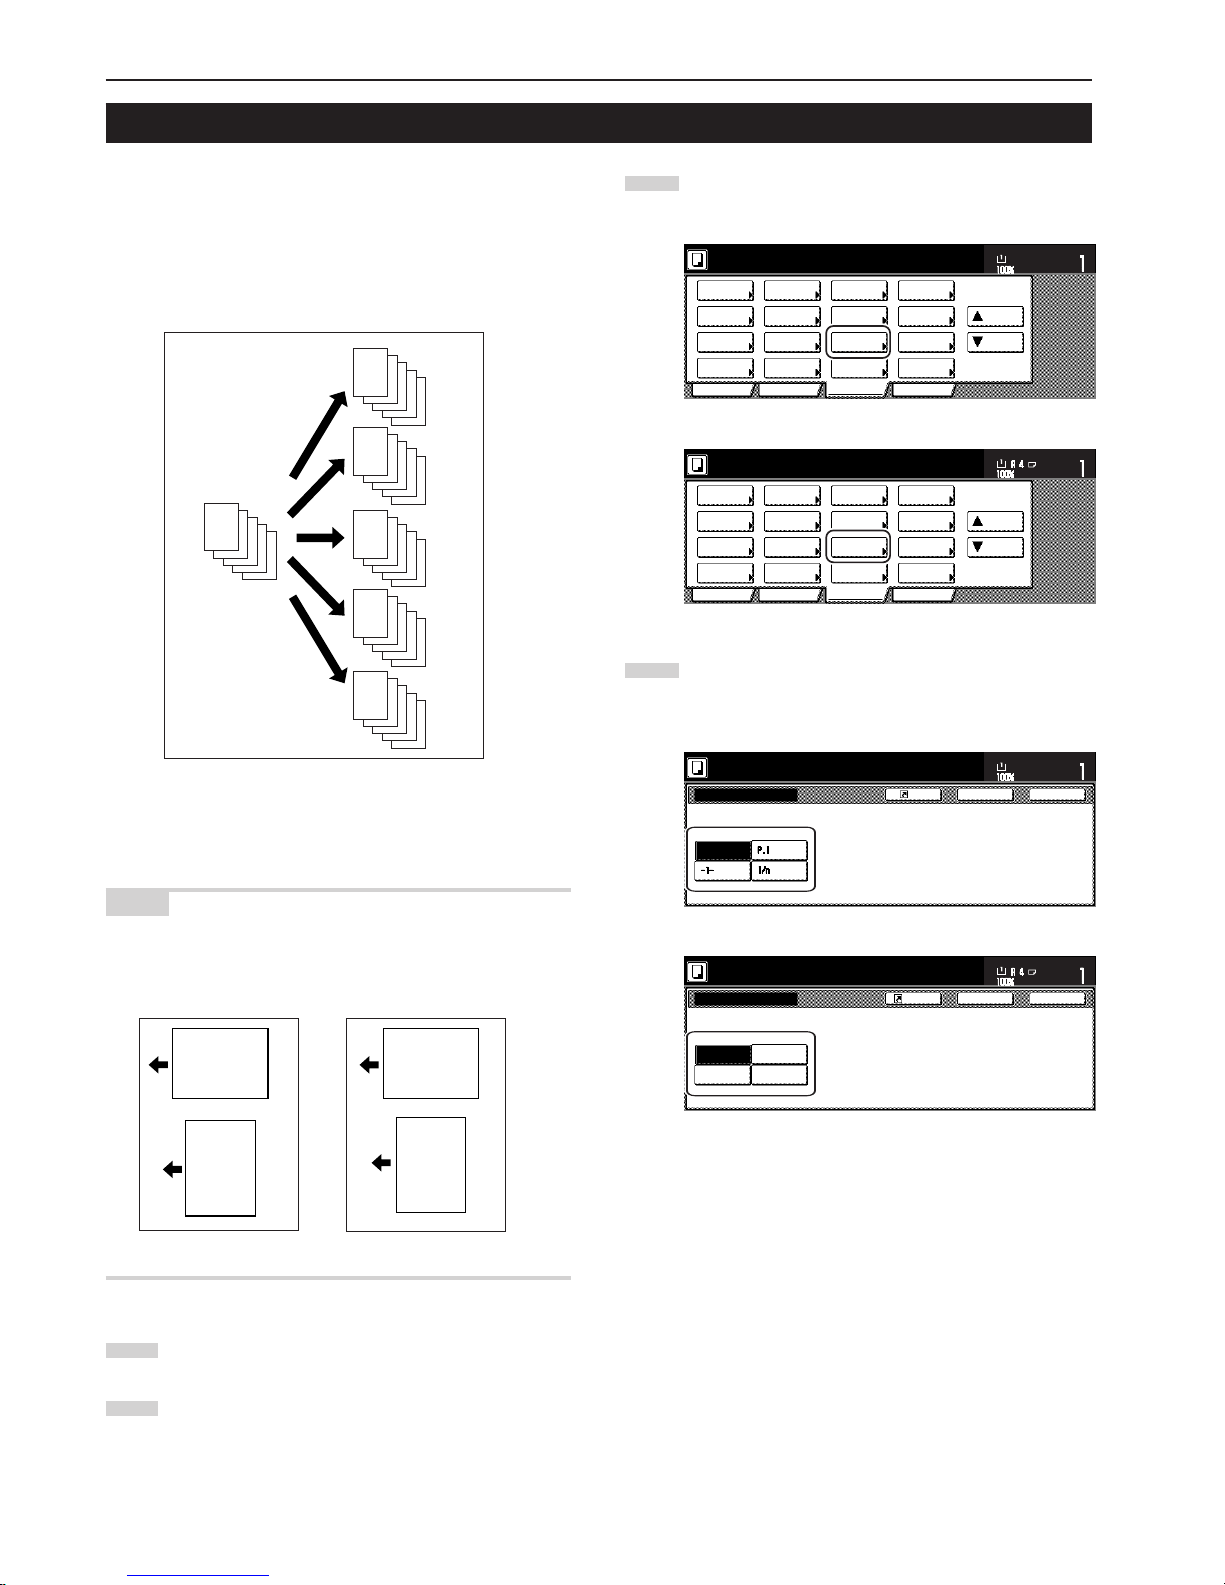
Section 5 OTHER CONVENIENT FUNCTIONS
5-16
8. Printing page numbers on copies [Print page numbers mode]
3
Touch the “Page #” [“Page numbering”] key. The “Page #”
[“Page numbering”] screen will be displayed.
Inch specifications
2 sided/
Separation
Select
paper
Combine
Reduce
/Enlarge
Margin/
Centering
Forms
Overlay
Page #
Function
Basic User choice Program
Cover
Mode
Booklet
Sort/
Finished
Border
Erase
Exposure
mode
Orig.image
quality
Ready to copy.
Select
orig. size
Auto
Selection
Batch
scanning
Up
Down
Set
Paper size
11x81/2"
Metric specifications
Select
paper
2-sided/
Split
Merge copy
Reduce/
Enlarge
Margin/
Imag. shift
Page
numbering
Function
Basic User choice Program
Cover
Mode
Booklet
Erase
Mode
Exposure
mode
Image
quality
Sort/
Finished
Ready to copy.
Select
size orig.
Auto
selection
Large # of
originals
Form
overlay
Up
Down
Set
Paper size
4
Touch the key that corresponds to the style of page numbers
that you want to use. The screen to make settings for that
style will be displayed.
Inch specifications
None
Page #
Register
Page # can be added on bottom of copy.
Ready to copy.
Set
Paper size
Back Close
11x81/2"
Metric specifications
None
-1-
P. 1
1/n
Page numbering
Page # can be added on bottom of copy.
Back Close
Ready to copy.
Register
Set
Paper size
E
-5-
D
-4-
C
-3-
B
-2-
A
-1-
E
-2-
D
-1-
C
B
A
E
D
C
-3-
B
-2-
A
-1-
E
P.5
D
P.4
C
P.3
B
P.2
A
P.1
E
5/5
D
4/5
C
3/5
B
2/5
A
1/5
E
D
C
B
A
When you make copies from multiple originals, you can have page
numbers printed on the corresponding copies in numerical order from
the first original. There are three styles of page numbers to choose
from: “-1-”, “P.1” and “1/n”.
* If you select “1/n” as the style of page numbers, the denominator will
indicate the total number of pages.
NOTE
Page numbers will be printed relative to the middle of the bottom of
the page. (The arrow in the illustration indicates the direction in which
the originals are set.)
1
Set the originals to be copied.
2
Touch the “Function” tab. The content of the “Function” tab
will be displayed.
Abcde
-1-
Abcde
-1-
Abcde
-1-
Abcde
-1-
Page 59
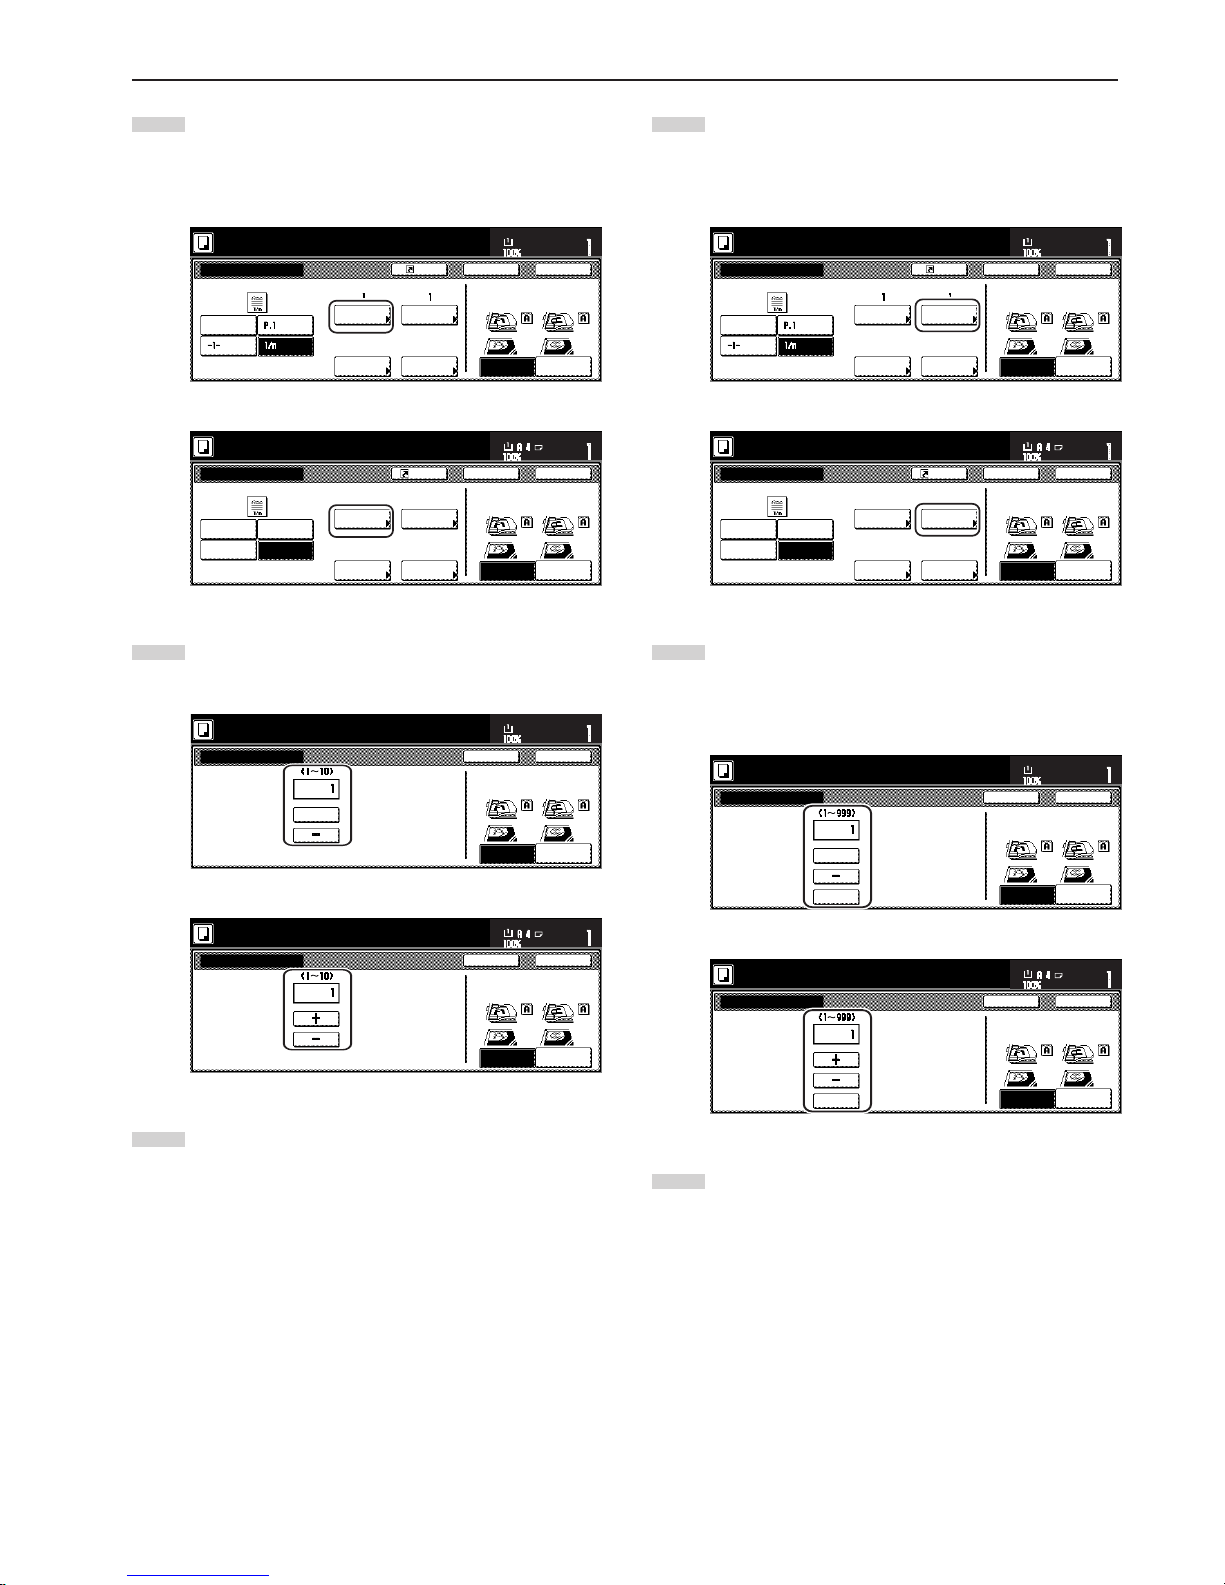
Section 5 OTHER CONVENIENT FUNCTIONS
5-17
5
If you want printing of the page numbers to be started from a
page other than the first page, touch the “Setting 1st page”
key.
The “Setting 1st page” screen will be displayed.
Inch specifications
None
Start page #
Finish Page #
Auto
Start #
Setting
1st page
Setting
start #
Setting
last page
Set denominator #
Denominator #
Page #
Register
Ready to copy.
Set
Paper size
Back Close
11x81/2"
Rear
Check direction
Left top
corner
Check direction of
original top side.
Last page
Metric specifications
Start page #
Last page #
Start #
Setting
1st page
Setting
start page
Setting
last page
Set
Denomin. #
Page numbering
Check direction
Check direction of
original.
Denominator #
Back Close
Ready to copy.
Register
Set
Paper size
Back Edge
Left top
corner
None
-1-
P. 1
1/n
Last page Auto
11
6
Touch the “+” key or the “-” key to select from which page
printing of the page numbers will start.
Inch specifications
Page
Setting 1st page
Ready to copy.
Set
Paper size
Back Close
11x81/2"
Rear
Check direction
Left top
corner
Check direction of
original top side.
+
Metric specifications
Page
Setting 1st page
Check direction
Check direction of
original.
Back Close
Ready to copy.
Set
Paper size
Back Edge
Left top
corner
7
Touch the “Close” key. The touch panel will return to the
screen in step 5.
8
If you want the first page number that is printed to be
something other than “1”, touch the “Setting start #” [“Setting
Start page”] key. The “Setting start #” screen will be
displayed.
Inch specifications
None
Start page #
Finish Page #
Auto
Start #
Setting
1st page
Setting
start #
Setting
last page
Set denominator #
Denominator #
Page #
Register
Ready to copy.
Set
Paper size
Back Close
11x81/2"
Rear
Check direction
Left top
corner
Check direction of
original top side.
Last page
Metric specifications
Start page #
Last page #
Start #
Setting
1st page
Setting
start page
Setting
last page
Set
Denomin. #
Page numbering
Check direction
Check direction of
original.
Denominator #
Back Close
Ready to copy.
Register
Set
Paper size
Back Edge
Left top
corner
None
-1-
P. 1
1/n
Last page Auto
11
9
Touch the “+” key or the “-” key to select the first page
number that will be printed.
* The desired page number can also be entered directly by
touching the “#keys” key and then using the keypad.
Inch specifications
# keys
Setting start #
Ready to copy.
Set
Paper size
Back Close
81/2x11"
Rear
Check direction
Left top
corner
Check direction of
original top side.
+
Metric specifications
#-Keys
Setting start #
Check direction
Check direction of
original.
Back Close
Ready to copy.
Set
Paper size
Back Edge
Left top
corner
10
Touch the “Close” key. The touch panel will return to the
screen in step 8.
Page 60
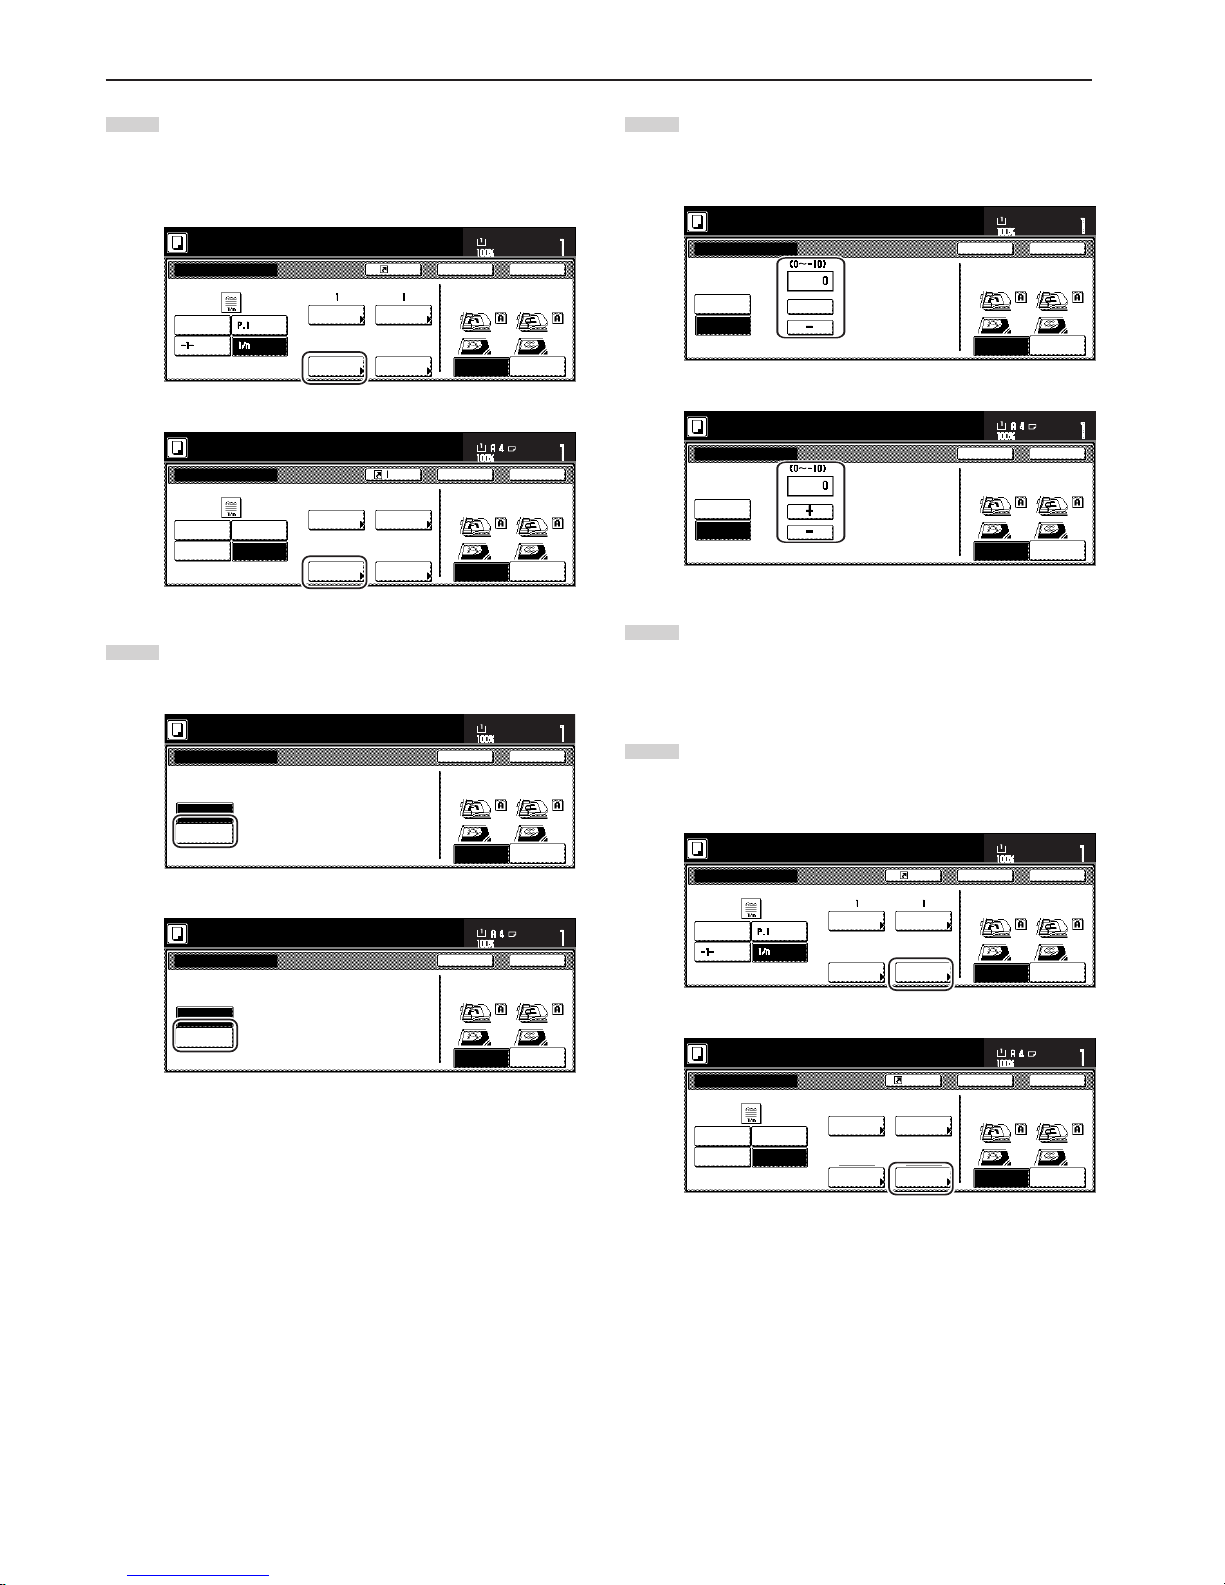
Section 5 OTHER CONVENIENT FUNCTIONS
5-18
11
If you want the last page number that is printed to be on a
copy other than that for the last original, touch the “Setting
last page” key. The “Setting last page” screen will be
displayed.
Inch specifications
None
Start page #
Finish Page #
Auto
Start #
Setting
1st page
Setting
start #
Setting
last page
Set denominator #
Denominator #
Page #
Register
Ready to copy.
Set
Paper size
Back Close
11x81/2"
Rear
Check direction
Left top
corner
Check direction of
original top side.
Last page
Metric specifications
Start page #
Last page #
Start #
Setting
1st page
Setting
start page
Setting
last page
Set
Denomin. #
Page numbering
Check direction
Check direction of
original.
Denominator #
Back Close
Ready to copy.
Register
Set
Paper size
Back Edge
Left top
corner
None
-1-
P. 1
1/n
Last page Auto
11
12
Touch the “Manual” key.
The screen to designate the last page will be displayed.
Inch specifications
Last page
Manual
Setting last page
Ready to copy.
Set
Paper size
Back Close
11x81/2"
Rear
Check direction
Left top
corner
Check direction of
original top side.
Metric specifications
Check direction
Check direction of
original.
Last page
Manual
Setting last page
Back Close
Ready to copy.
Set
Paper size
Back Edge
Left top
corner
13
Touch the “+” key or the “-” key to select, counting from the
final copy, how many pages you do NOT want to have page
numbers printed on.
Inch specifications
Last page
Manual
Page
Setting last page
Ready to copy.
Set
Paper size
Back Close
11x81/2"
Rear
Check direction
Left top
corner
Check direction of
original top side.
+
Metric specifications
Last page
Manual
Setting last page
Check direction
Check direction of
original.
Page
Back Close
Ready to copy.
Set
Paper size
Back Edge
Left top
corner
14
Touch the “Close” key. The touch panel will return to the
screen in step 11.
If you selected the “1/n” style, the “Set denominator #”
[“Set Denomin. #”] key will be displayed.
15
If you want to manually select the denominator for the page
numbers, touch the “Set denominator #” [“Set Denomin. #”]
key. The “Setting denominator #” screen will be displayed.
Inch specifications
None
Start page #
Finish Page #
Auto
Start #
Setting
1st page
Setting
start #
Setting
last page
Set denominator #
Denominator #
Page #
Register
Ready to copy.
Set
Paper size
Back Close
11x81/2"
Rear
Check direction
Left top
corner
Check direction of
original top side.
Last page
Metric specifications
Start page #
Last page #
Start #
Setting
1st page
Setting
start page
Setting
last page
Set
Denomin. #
Page numbering
Check direction
Check direction of
original.
Denominator #
Back Close
Ready to copy.
Register
Set
Paper size
Back Edge
Left top
corner
None
-1-
P. 1
1/n
Last page Auto
11
Page 61
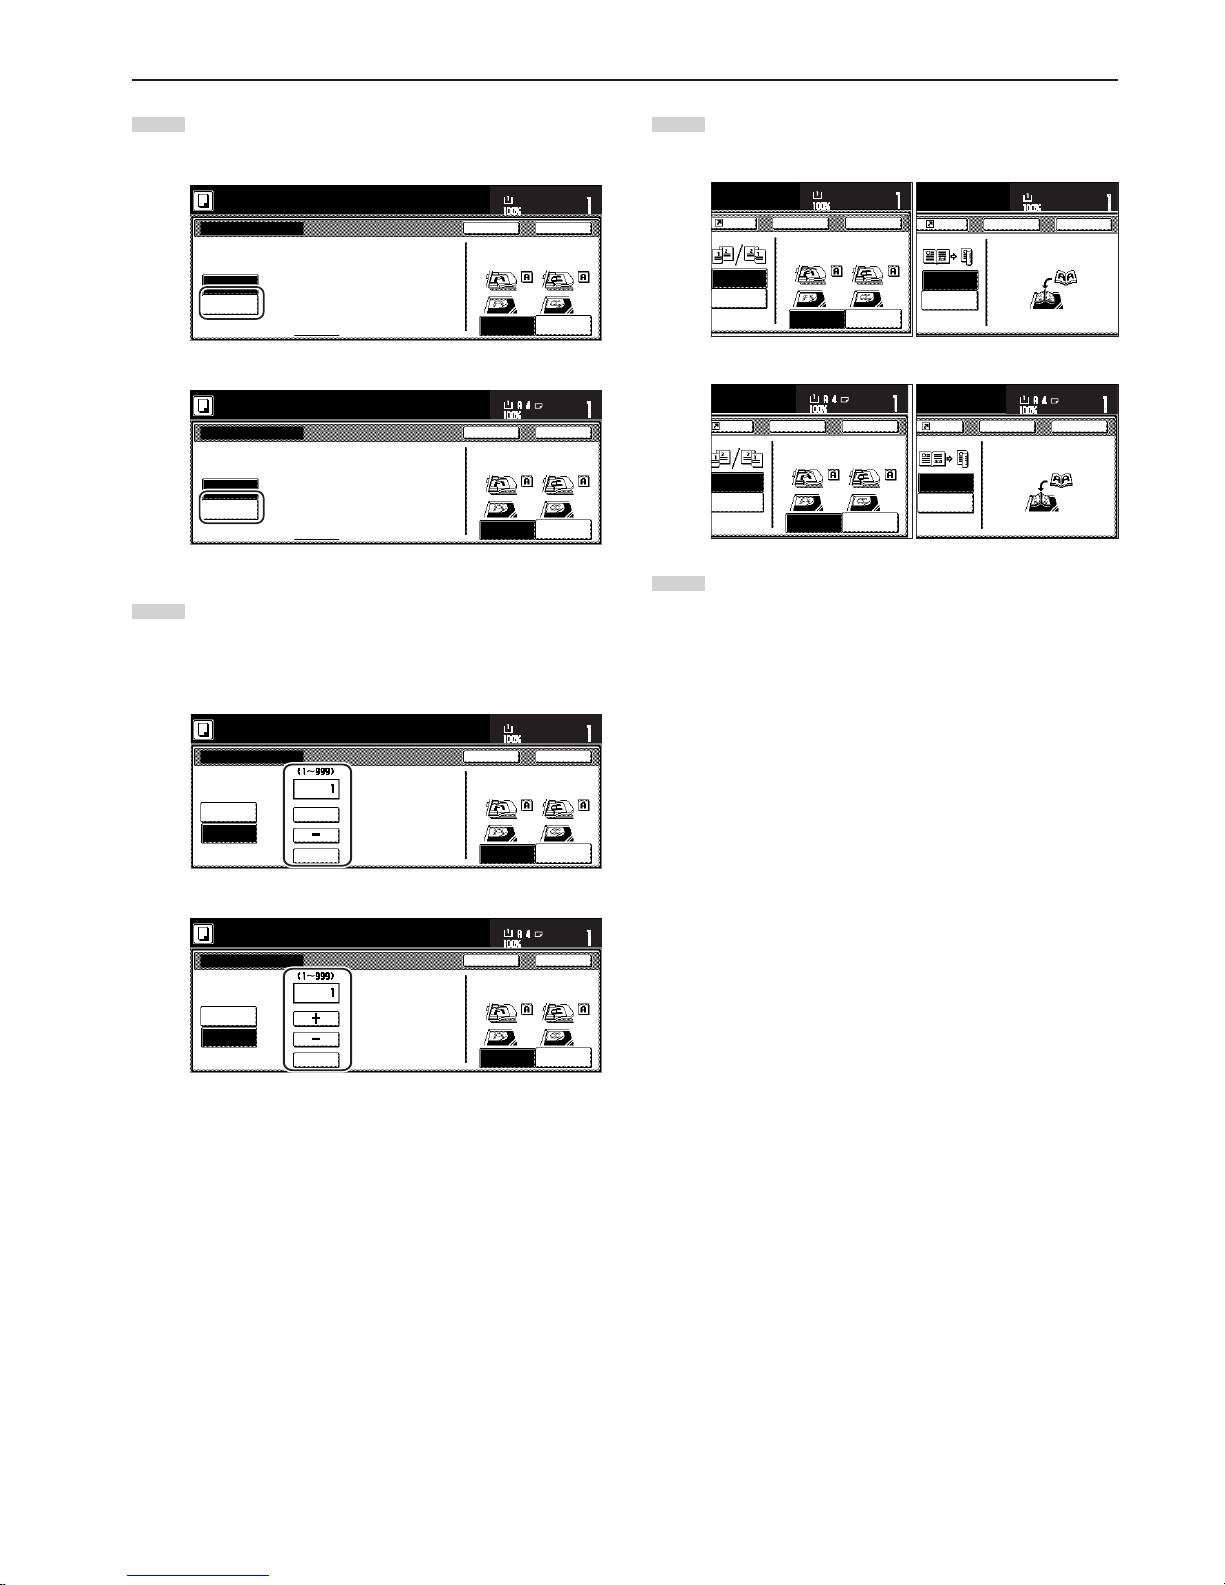
Section 5 OTHER CONVENIENT FUNCTIONS
5-19
16
Touch the “Manual” key.
The screen to designate the denominator will be displayed.
Inch specifications
Auto
Manual
Setting denominator #
Ready to copy.
Set
Paper size
Back Close
11x81/2"
Rear
Check direction
Left top
corner
Check direction of
original top side.
Metric specifications
Check direction
Check direction of
original.
Auto
Manual
Setting denominator #
Back Close
Ready to copy.
Set
Paper size
Back Edge
Left top
corner
17
Touch the “+” key or the “-” key to select the desired
denominator for the page numbers.
* The desired denominator can also be entered directly by
touching the “#keys” key and then using the keypad.
Inch specifications
Auto
Manual
Setting denominator #
Ready to copy.
Set
Paper size
Back Close
81/2x11"
Rear
Check direction
Left top
corner
Check direction of
original top side.
# keys
+
Metric specifications
Auto
Manual
Setting denominator #
Check direction
Check direction of
original.
Back Close
Ready to copy.
Set
Paper size
Back Edge
Left top
corner
#-Keys
18
Follow the instructions on the right side of the touch panel
and verify the direction in which the originals were set.
Inch specifications
Metric specifications
19
Press the [Start] key.
Copying will start.
Open from
left/right
Open from
top
Rear
Check direction
Register Back Close
11x81/2"
Set
Paper size
Left top
corner
Finished
Check direction of
original top side.
Book➔
Book
Book➔
Duplex
Check direction
Register Back Close
11x81/2"
Set
Paper size
Finished
Set the book original
top side direct to back.
Finished
Back Edge
Left top
Corner
Check direction
Check direction of
original.
Register
Left/Right
binding
Top
binding
Back Close
Set
Paper size
Register
Finished
BookR
Book
BookR
Duplex
Back Close
Check direction
Set book original top
sidedirectiontoback.
Set
Paper size
Page 62
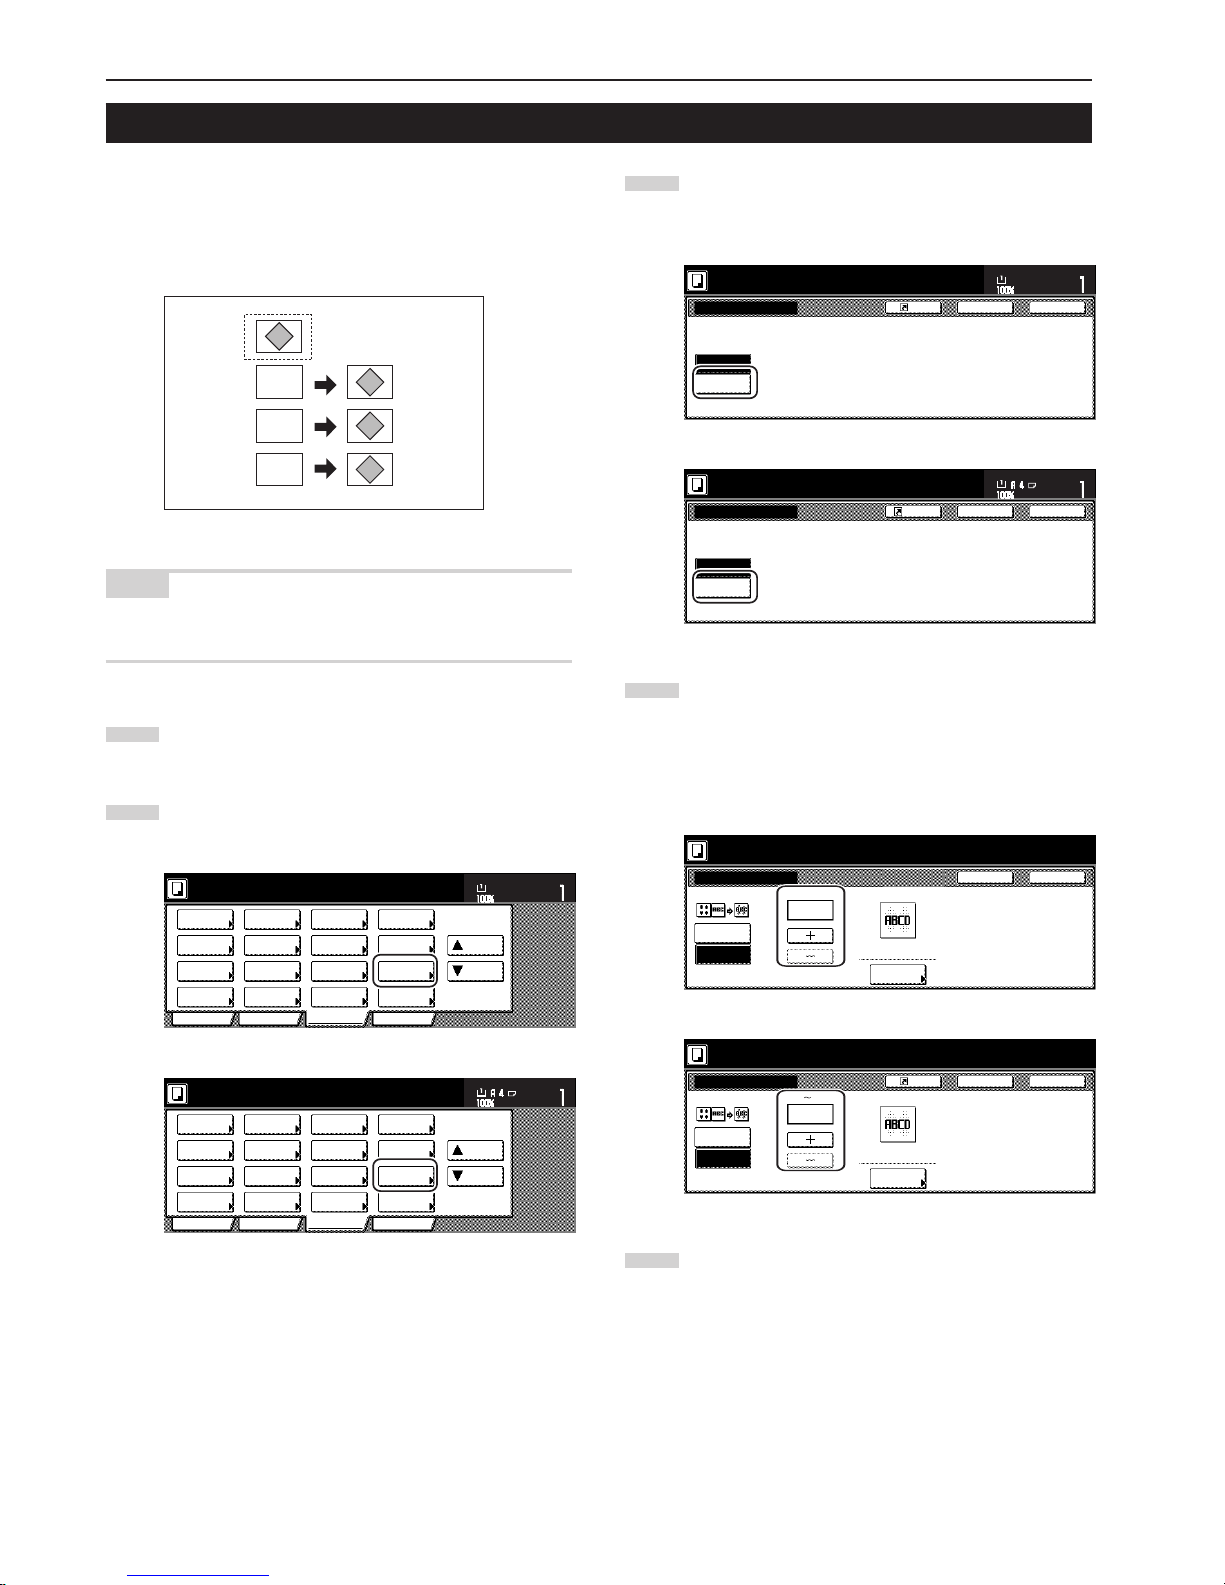
Section 5 OTHER CONVENIENT FUNCTIONS
5-20
9. Overlaying one image over another [Form overlay mode]
This mode can be used to scan the first original (the “form”) into
memory and have its image overlaid onto copies made from
subsequent originals. It is also possible to register and store in
memory, in advance, the images that you want to use as original
forms.
NOTE
Refer to “(2) Form registration” on page 6-1 for the procedure to
register images as forms.
1
Touch the “Function” tab. The content of the “Function” tab
will be displayed.
2
Touch the “Forms Overlay”[“Form overlay”] key. The “Forms
Overlay”[“Form overlay”] screen will be displayed.
Inch specifications
2 sided/
Separation
Select
paper
Combine
Reduce
/Enlarge
Margin/
Centering
Forms
Overlay
Page #
Function
Basic User choice Program
Cover
Mode
Booklet
Sort/
Finished
Border
Erase
Exposure
mode
Orig.image
quality
Ready to copy.
Select
orig. size
Auto
Selection
Batch
scanning
Up
Down
Set
Paper size
11x81/2"
Metric specifications
Select
paper
2-sided/
Split
Merge copy
Reduce/
Enlarge
Margin/
Imag. shift
Page
numbering
Function
Basic User choice Program
Cover
Mode
Booklet
Erase
Mode
Exposure
mode
Image
quality
Sort/
Finished
Ready to copy.
Select
size orig.
Auto
selection
Large # of
originals
Form
overlay
Up
Down
Set
Paper size
3
Touch the “On” key.
The screen to set the shading level of the form image will be
displayed.
Inch specifications
On
Off
Forms Overlay
Register
Use the first scanned image as a form
for copy after second original image.
Ready to copy.
Set
Paper size
Back Close
11x81/2"
Metric specifications
On
Form overlay
1st scanned image can be used as a form
for copy after second original image.
Of
Back Close
Ready to copy.
Register
Set
Paper size
4
Touch the “+” key or the “-” key to select the level of shading
that you want to use for the original form.
The desired shading level can be set to any 10% increment
between 10% and 100%.
*A sample of the effect that the selected shading level will
produce will be displayed to the right of the entry field.
Inch specifications
Place from first then press start.
Forms Overlay
%
(10~100)
Scan form once
On
Off
Register Back Close
Exposure
50
Form
Selected
Metric specifications
Set form.
Press Start Key.
Form overlay
Off
50 %
On
Register
Back Close
Scan form once
Form
selection
Exposure
(10 100)
5
If you want to use a previously registered image as the form,
touch the “Form Selected” [“Form selection”] key and go to
the next step.
If you want to scan in a new image, go directly to step 9.
A
B
C
B
C
A
Page 63
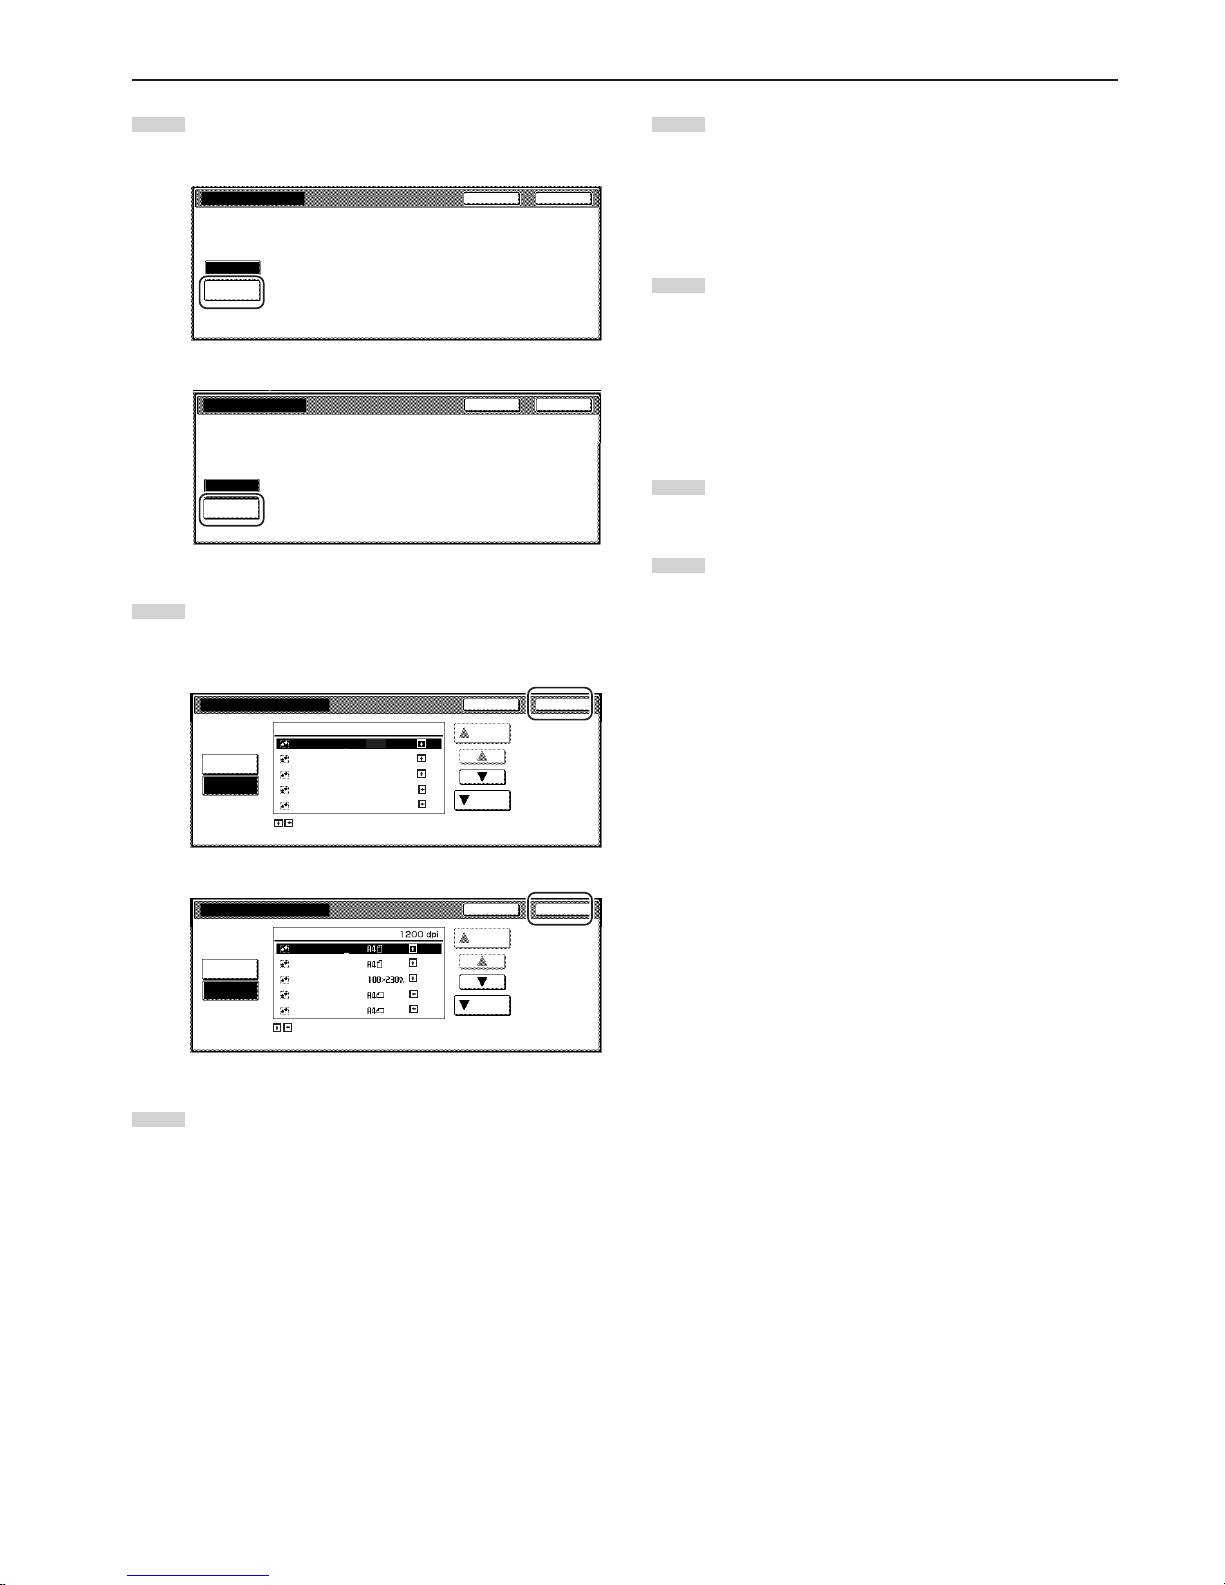
Section 5 OTHER CONVENIENT FUNCTIONS
5-21
6
Touch the “Loading Form” key.
A list of registered forms will be displayed.
Inch specifications
Overlay first scanned image onto
the scanned image or on registered from.
Scan form
once
Loading
Form
Select Form
Back Close
Metric specifications
Back Close
Form selection
Set form.
Press Start key.
Scan form
once
LOADING
FORM
Set
Paper size
Overlay 1st image on the scanned
image or on registered form.
Back Close
Form selection
y
7
Select from that list the image that you want to use and then
touch the “Close” key. The touch panel will return to the
screen in step 4.
Inch specifications
The arrow means direction of registered form.
Set original and form directions.
Form 1200dpi
Select Form
Scan form
once
Loading
Form
Form 005
Form 004
Form 003
Form 002
Form 001
Back
Close
Up
Down
11x81/2"
11x8
1
/2"
8
1
/2x11"
11x8
1
/2"
11x8
1
/2"
Metric specifications
Back Close
Form selection
Form
Scan form
once
The arrow means direction of registered form.
Set original and form directions.
Loading
Form
Down
Up
Form006
Form005
Form004
Form003
Form002
8
Set the originals that you want to copy and go directly to step
10.
9
If you are using the Document Processor, make sure that the
original that you want to use as the form is on top of the
originals that you want to copy.
If you are using the platen, set the original that you want to
use as the form.
10
Press the [Start] key.
Scanning of the originals will start.
If you set the originals in the Document Processor, copying
will start automatically.
If you set an original on the platen, a message will appear
telling you to set the next original. In this case, go to the next
step.
11
Replace the first original with the next one and press the
[Start] key. Scanning of that next original will start.
12
Once you have finished scanning all of the originals, touch
the “Scanning finished” key. Copying will start.
Page 64
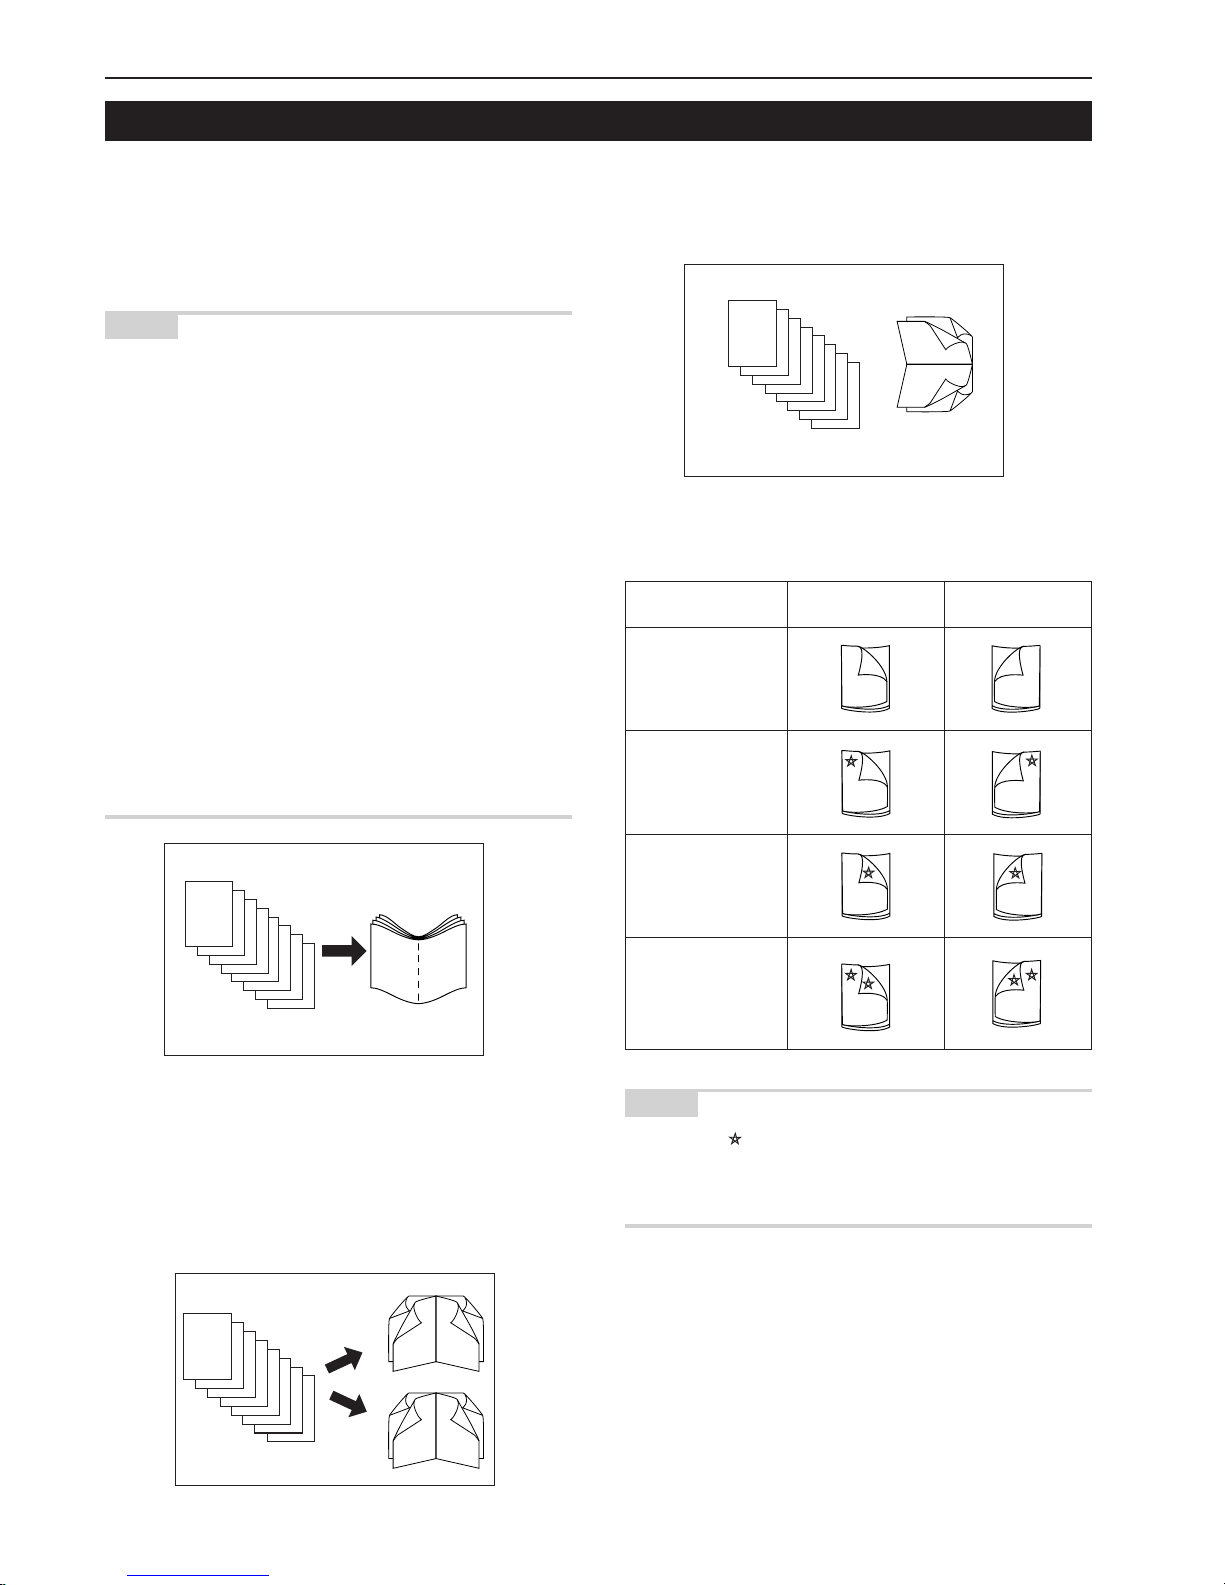
Section 5 OTHER CONVENIENT FUNCTIONS
5-22
10. Making booklets from sheet originals [Booklet/Stitching mode]
With this mode, you can use 1-sided or 2-sided originals to make
open-faced, two-sided copies in such a way that the finished copies
can be stacked and folded into a booklet format. You can also select
to have color paper or relatively thick paper fed as front and/or back
covers to the copy sets.
NOTES
Inch specifications
• Only 11" x 8 1/2", 8 1/2" x 11" and 11" x 17" size copy paper can be
used in this mode.
• If the optional Document Finisher is is installed on your copier, you
will be able to select center stapling. If the optional Center-Folding
Unit is installed as well, you will be able to center fold those stapled
sets. Only 11" x 17" and 8 1/2" x 11" size copy paper can be center
folded and stapled.
• It is possible for you to change the drawer[cassette] that will be used
to feed the cover sheets. (See “Cover drawer[cassette]” on
page 7-48.)
Metric specifications
• Only A3, B4, A4, and A4R size copy paper can be used in this
mode.
• If the optional Document Finisher is is installed on your copier, you
will be able to select center stapling. If the optional Center-Folding
Unit is installed as well, you will be able to center fold those stapled
sets. Only A3, B4, and A4R size copy paper can be center folded
and stapled.
• It is possible for you to change the drawer[cassette] that will be used
to feed the cover sheets. (See “Cover drawer[cassette]” on
page 7-48.)
1 If “Left” is selected as the binding direction...
Copying will be performed so that the stacked and folded pages of the
finished copies read from left to right.
2 If “Right” is selected as the binding direction...
Copying will be performed so that the stacked and folded pages of the
finished copies read from right to left.
3 If “Top” is selected as the binding direction...
Copying will be performed so that the stacked and folded pages of the
finished copies read from top to bottom.
4 It is possible for you to select whether or not to copy onto the
front and/or back cover sheets.
Front cover Back cover
Do NOT copy
Copy on outside
Copy on inside
Copy on both sides
NOTES
• The asterisk “ ” indicates the side of the cover on which copying
will be accomplished.
• The illustrations above are an example of when “Left” is selected as
the binding direction.
b
b
a
a
8
7
6
5
4
3
2
1
7
8
6
5
2
3
1
4
2
1
3
4
7
6
8
5
2
1
2
1
3
4
7
6
8
5
8
7
6
5
4
3
2
1
Page 65
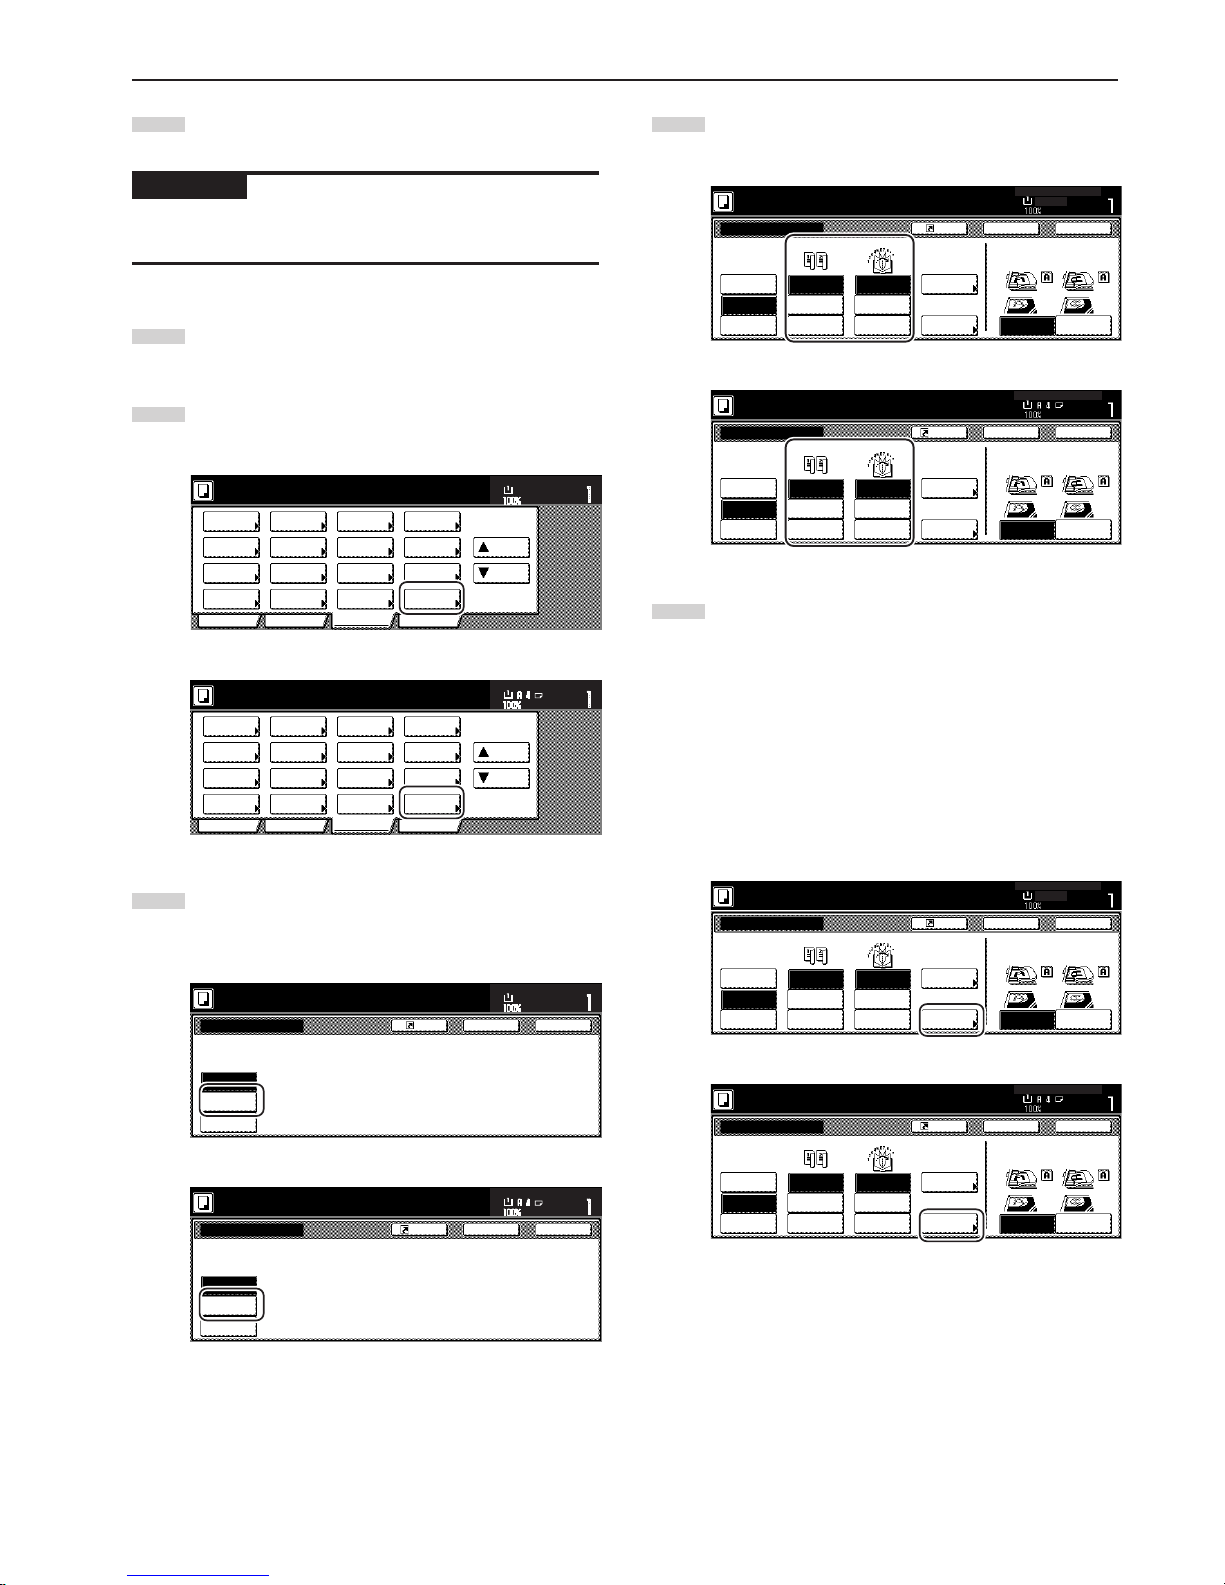
Section 5 OTHER CONVENIENT FUNCTIONS
5-23
1
Set the originals to be copied in the Document Processor.
IMPORTANT!
If you are using the platen, be absolutely certain to set the first original
first.
2
Touch the “Function” tab. The content of the “Function” tab
will be displayed.
3
Touch the “Booklet” key. The “Booklet” screen will be
displayed.
Inch specifications
2 sided/
Separation
Select
paper
Combine
Reduce
/Enlarge
Margin/
Centering
Forms
Overlay
Page #
Function
Basic User choice Program
Cover
Mode
Booklet
Sort/
Finished
Border
Erase
Exposure
mode
Orig.image
quality
Ready to copy.
Select
orig. size
Auto
Selection
Batch
scanning
Up
Down
Set
Paper size
11x81/2"
Metric specifications
Select
paper
2-sided/
Split
Merge copy
Reduce/
Enlarge
Margin/
Imag. shift
Page
numbering
Function
Basic User choice Program
Cover
Mode
Booklet
Erase
Mode
Exposure
mode
Image
quality
Sort/
Finished
Ready to copy.
Select
size orig.
Auto
selection
Large # of
originals
Form
overlay
Up
Down
Set
Paper size
4
Touch the “Booklet” key. The screen to specify the binding
direction of the originals and the finished copies will be
displayed.
Inch specifications
None
Booklet
Book
➔Booklet
Register
Edit one or two sided original pages
and out put a book.
Use Book-booklet for book original.
Booklet
Ready to copy.
Set
Paper size
Back Close
11x81/2"
Metric specifications
Booklet
Book
RBooklet
Booklet
Edit 1- and 2-sided originals
and output as book.
Use BookRbooklet for book
original.
None
Back Close
Ready to copy.
Register
Set
Paper size
5
Specify the binding direction of both the originals and the
finished copies.
Inch specifications
Booklet
2 sided mode.
Book
➔Booklet
Stitching
Off
Stitching
Front cvr
Saddle
Stitch
None
Booklet
1-sided
2-sided
Left/Right
2-sided
Top/Bottom
Open from
left
Open from
right
Open from
top
Register
Set
Paper size
Back Close
11x81/2"
Original Finishing
Rear
Check direction
Left top
corner
Check direction of
original top side.
Metric specifications
Duplex Mode.
Stitching
Off
Stitching
Front cov.
Center
Staple
Back Edge
Left top
corner
Check direction
Check direction of
original.
1-sided
2-sided
Left/Right
2-sided
Top/Bottom
Top
binding
Set
Paper size
Booklet
Book
RBooklet
None
Back Close
Register
Booklet
Left
binding
Right
binding
Original Finished
6
If the optional Document Finisher is installed on your copier,
the “Saddle Stitch” [“Center Staple”] key will be displayed
and you will be able to select center stapling.
If the optional Center-Folding Unit is installed as well, you will
be able to center fold those stapled sets.
In this case, if you DO want the center stapling operation, or
the center stapling and folding operation, to be performed,
touch the “Saddle Stitch” [“Center Staple”] key and go to the
next step.
If you do NOT want either operation to be performed, go
directly to step 8.
Inch specifications
Booklet
2 sided mode.
Book
➔Booklet
Stitching
Off
Stitching
Front cvr
Saddle
Stitch
None
Booklet
1-sided
2-sided
Left/Right
2-sided
Top/Bottom
Open from
left
Open from
right
Open from
top
Register
Set
Paper size
Back Close
11x81/2"
Original Finishing
Rear
Check direction
Left top
corner
Check direction of
original top side.
Metric specifications
Duplex Mode.
Stitching
Off
Stitching
Front cov.
Center
Staple
Back Edge
Left top
corner
Check direction
Check direction of
original.
1-sided
2-sided
Left/Right
2-sided
Top/Bottom
Top
binding
Set
Paper size
Booklet
Book
RBooklet
None
Back Close
Register
Booklet
Left
binding
Right
binding
Original Finished
Page 66
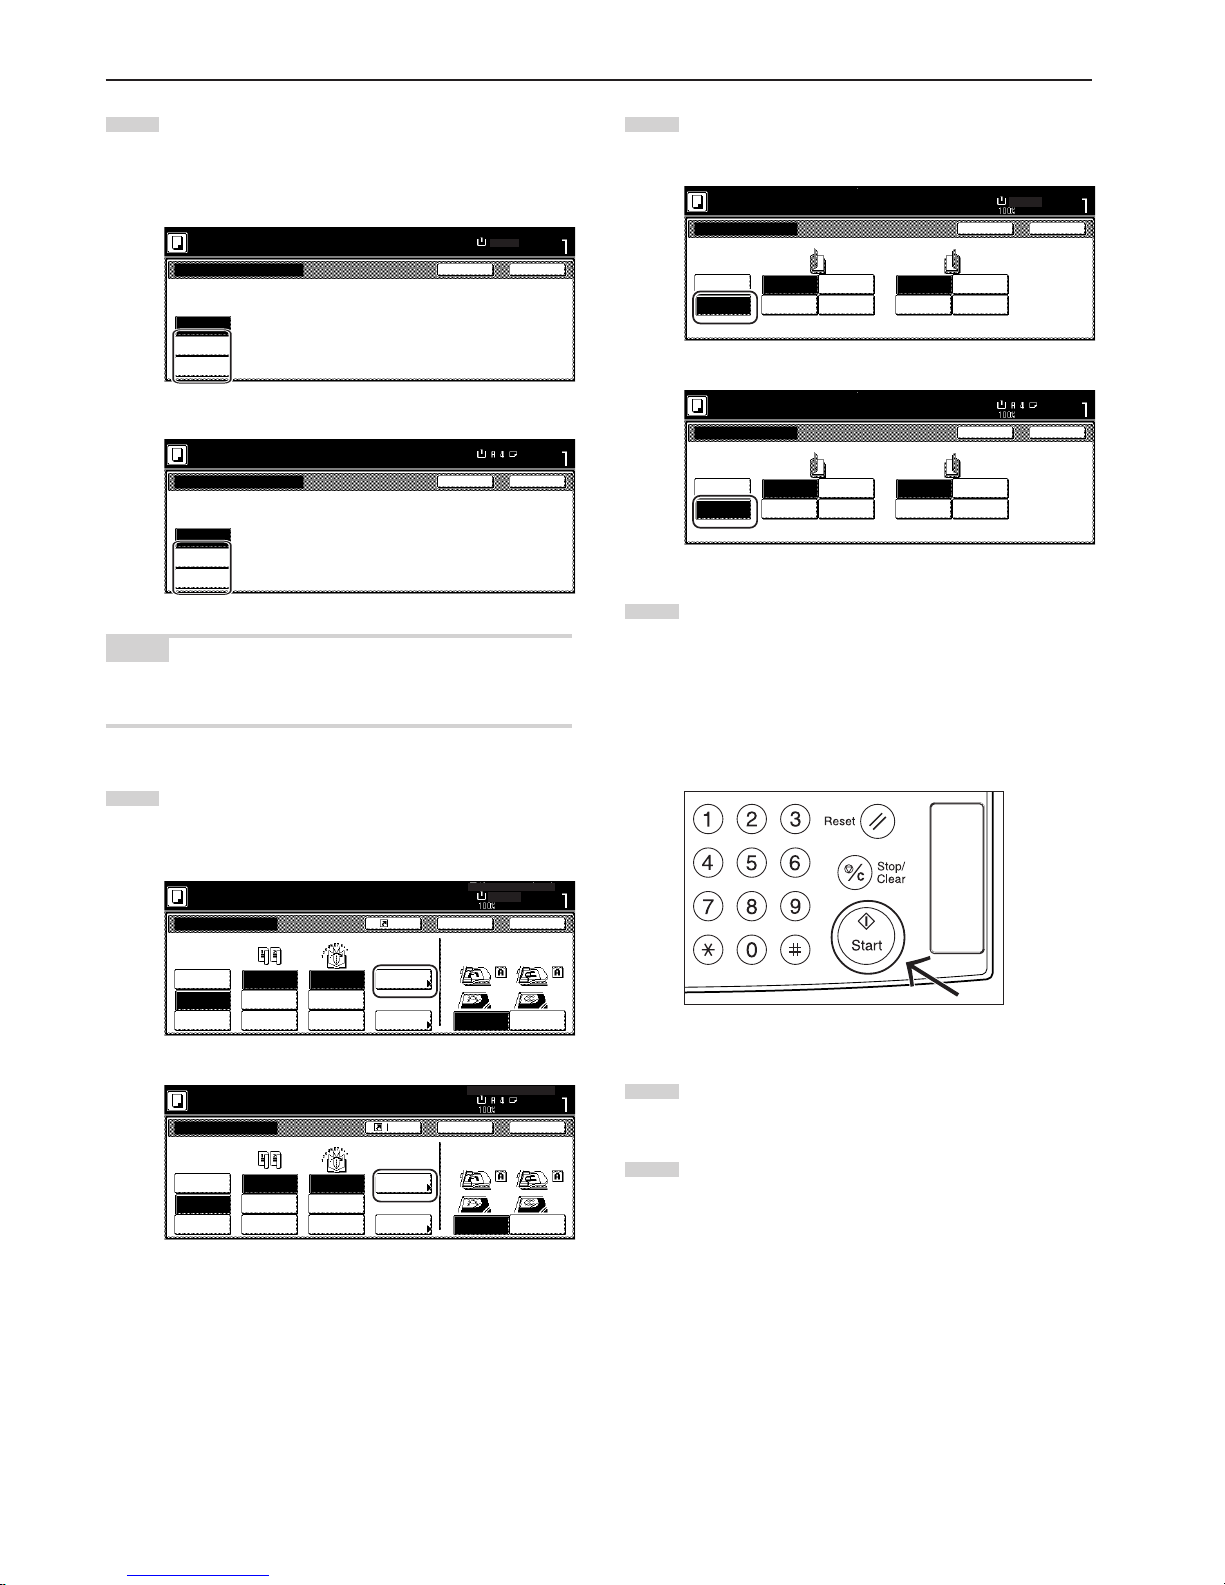
Section 5 OTHER CONVENIENT FUNCTIONS
5-24
7
Touch the “Saddle stitch” key or the “Bind & Fold” key, as
appropriate.
* It is possible for you to center staple, or center staple and
fold, up to 16 copy sheets (64 layout pages) at one time.
Inch specifications
Pape Set
100%
Saddle Stitch
Back Close
Off
Saddle
stitch
Bind &
Fold
8
1
/2x11"
Set first page.
Press "Start" key.
Metric specifications
Duplex Mode.
Saddle Stitch
Saddle
Stitch
Bind
& Fold
Back Close
Set
Paper size
Off
NOTE
The “Bind & Fold” key will only be displayed when the optional
Center-Folding Unit is installed on your copier.
8
If you want to add covers, touch the “Stitching Front cvr”
[“Stitching Front cov.”] key and go to the next step.
If you do NOT want to add covers, go directly to step 10.
Inch specifications
Booklet
2 sided mode.
Book
➔Booklet
Stitching
Off
Stitching
Front cvr
Saddle
Stitch
None
Booklet
1-sided
2-sided
Left/Right
2-sided
Top/Bottom
Open from
left
Open from
right
Open from
top
Register
Set
Paper size
Back Close
11x81/2"
Original Finishing
Rear
Check direction
Left top
corner
Check direction of
original top side.
Metric specifications
Duplex Mode.
Stitching
Off
Stitching
Front cov.
Center
Staple
Back Edge
Left top
corner
Check direction
Check direction of
original.
1-sided
2-sided
Left/Right
2-sided
Top/Bottom
Top
binding
Set
Paper size
Booklet
Book
RBooklet
None
Back Close
Register
Booklet
Left
binding
Right
binding
Original Finished
9
Touch the “Cover” key and select whether or not (and where)
to copy on each of the front and back covers.
Inch specifications
Front cover Rear cover
2 sided mode.
No cover
Cover
Blank
Front copy
2 sided
copy
Back copy
Blank
Front copy
2 sided
copy
Back copy
Front cover
Set
Paper size
Back Close
11x81/2"
Metric specifications
Back
Front cover
Back cover
Close
Stitching Front cover.
Duplex Mode.
No cover
Cover
Blank
Front copy
2-sided
copy
Back copy
Front copy
2-sided
copy
Back copy
Blank
Set
Paper size
10
Press the [Start] key.
Scanning of the originals will start.
If you set the originals in the Document Processor, copying
will start automatically.
If you set an original on the platen, a message will appear
telling you to set the next original. In this case, go to the next
step.
11
Replace the first original with the next one and press the
[Start] key. Scanning of that next original will start.
12
Once you have finished scanning all of the originals, touch
the “Scanning finished” key. Copying will start.
Page 67
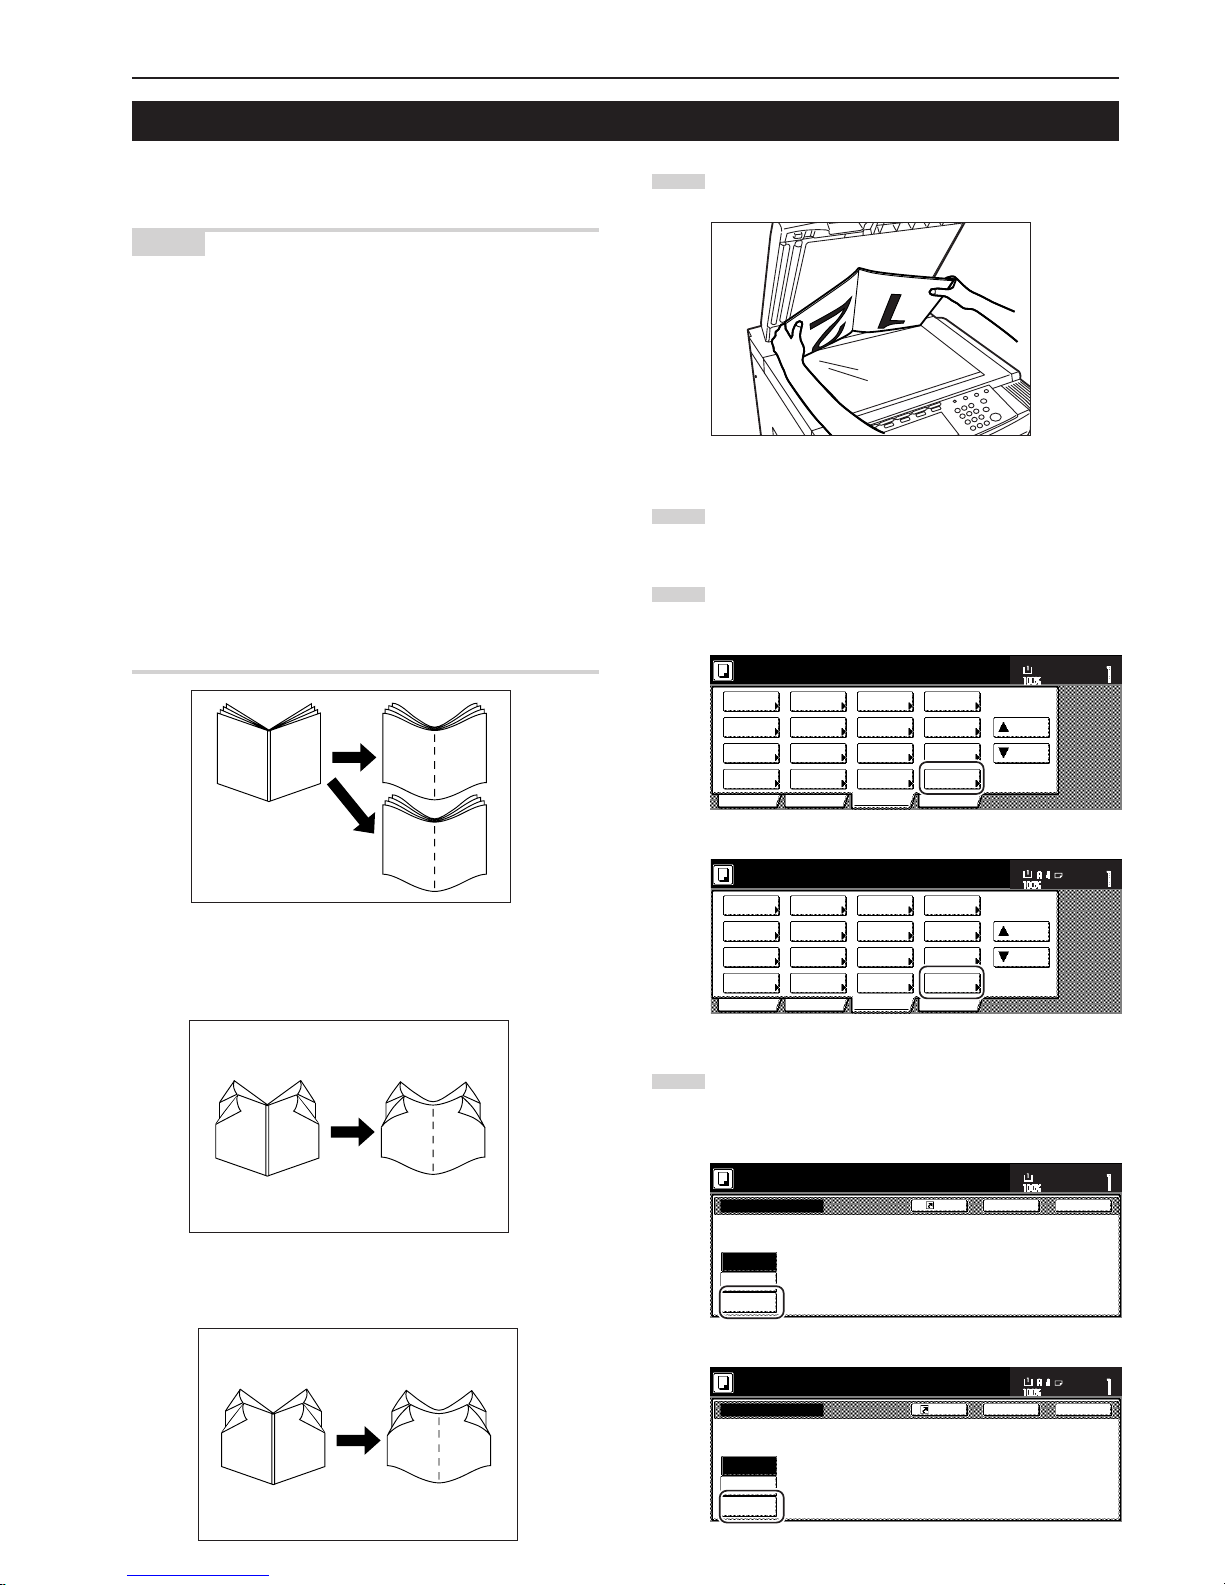
Section 5 OTHER CONVENIENT FUNCTIONS
5-25
11. Making booklets from book originals [Book to Booklet mode]
With this mode, you can add covers, and either copy onto them or
not, so that the finished copy sets will appear like a magazine, etc.
NOTES
Inch specifications
• Only 8 1/2"x 11" and 11" x 17" size originals and 11"x 8 1/2", 8 1/2"x 11",
and 11" x 17" size copy paper can be used in this mode.
• If the optional Document Finisher is is installed on your copier, you will
be able to select center stapling. If the optional Center-Folding Unit is
installed as well, you will be able to center fold those stapled sets. Only
11" x 17" and 8 1/2" x 11" size copy paper can be center folded and
stapled.
• It is possible for you to change the drawer[cassette] that will be used to
feed the cover sheets. (See “Cover drawer[cassette]” on page 7-48.)
Metric specifications
• Only A3, A4R, and A5R size originals and A3, A4, and A4R size copy
paper can be used in this mode.
• If the optional Document Finisher is is installed on your copier, you will
be able to select center stapling. If the optional Center-Folding Unit is
installed as well, you will be able to center fold those stapled sets. Only
A3, B4, and A4R size copy paper can be center folded and stapled.
• It is possible for you to change the drawer[cassette] that will be used to
feed the cover sheets. (See “Cover drawer[cassette]” on page 7-48.)
● With a cover
The original that will be used as the cover will be scanned first so that,
when the finished copies are folded, that page will act as the front and
back cover to the copy set.
● Without a cover
When the finished copies are folded, the front and back of the copy
set will be blank.
1
Set the open-faced (book, etc.) original to be copied.
2
Touch the “Function” tab. The content of the “Function” tab
will be displayed.
3
Touch the “Booklet” key. The “Booklet” screen will be
displayed.
Inch specifications
2 sided/
Separation
Select
paper
Combine
Reduce
/Enlarge
Margin/
Centering
Forms
Overlay
Page #
Function
Basic User choice Program
Cover
Mode
Booklet
Sort/
Finished
Border
Erase
Exposure
mode
Orig.image
quality
Ready to copy.
Select
orig. size
Auto
Selection
Batch
scanning
Up
Down
Set
Paper size
11x81/2"
Metric specifications
Select
paper
2-sided/
Split
Merge copy
Reduce/
Enlarge
Margin/
Imag. shift
Page
numbering
Function
Basic User choice Program
Cover
Mode
Booklet
Erase
Mode
Exposure
mode
Image
quality
Sort/
Finished
Ready to copy.
Select
size orig.
Auto
selection
Large # of
originals
Form
overlay
Up
Down
Set
Paper size
4
Touch the “Book / Booklet” key. The screen to specify the
binding direction of the originals and the finished copies will
be displayed.
Inch specifications
None
Booklet
Book
➔Booklet
Register
Edit one or two sided original pages
and out put a book.
Use Book-booklet for book original.
Booklet
Ready to copy.
Set
Paper size
Back Close
11x81/2"
Metric specifications
Booklet
Book
RBooklet
Booklet
Edit 1- and 2-sided originals
and output as book.
Use BookRbooklet for book
original.
None
Back Close
Ready to copy.
Register
Set
Paper size
B
A
B
A
B
A
2
B
A
3
1
5
4
6
6
1
2
3
5
4
2
3
1
5
4
6
1
2
3
5
4
A
B
6
Page 68
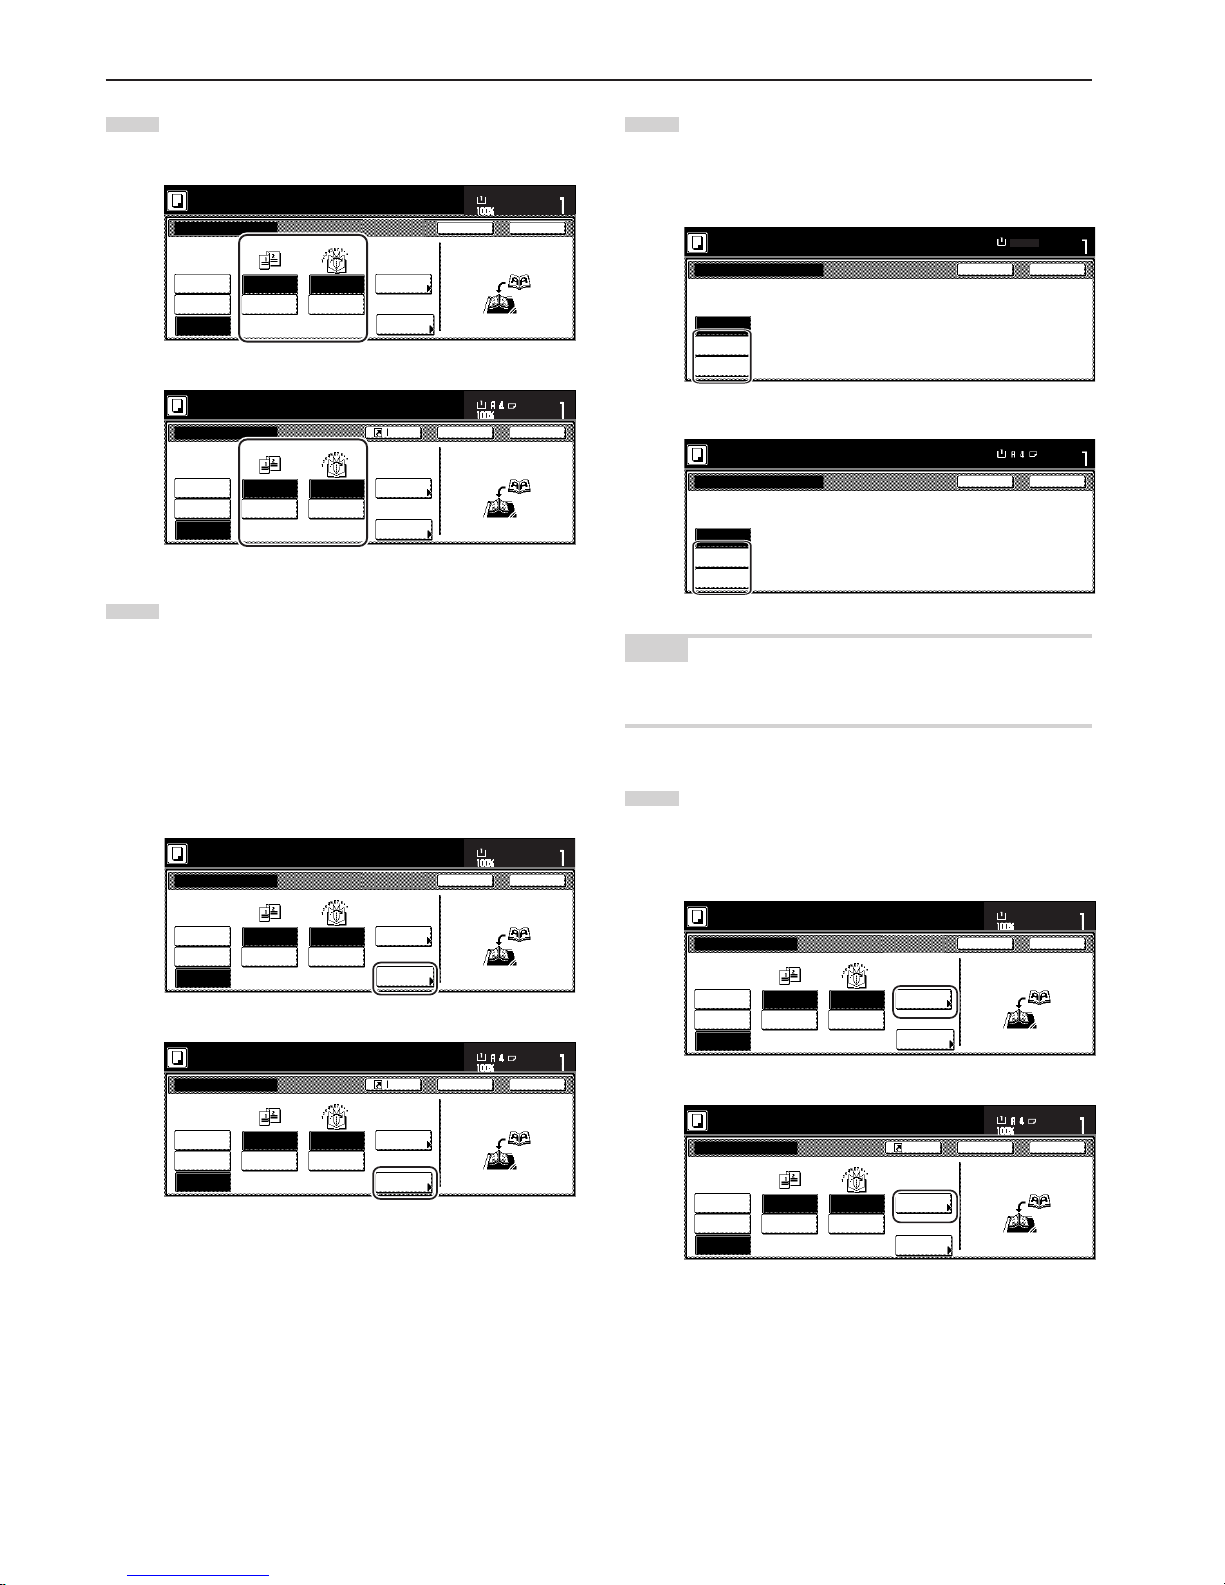
Section 5 OTHER CONVENIENT FUNCTIONS
5-26
5
Specify the binding direction of both the originals and the
finished copies.
Inch specifications
Copy on
front cvr
None
Booklet
Booklet
Book
➔Booklet
Set first page.
Press "Start" key.
Register
Set
Paper size
Back Close
11x81/2"
copy front
Off
Saddle
Stitch
Book
Right
Book
Left
Open from
right
Open from
left
Original Finishing
Check direction
Set the book original
top side direct to back.
Metric specifications
Back Close
Set
Paper size
Register
Booklet
Book
RBooklet
Booklet
None
Left
binding
Right
binding
Book
Left
Book
Right
Copy on
front cov.
Center
Staple
Check direction
Set book original top
sidedirectiontoback.
Original Finish Copy front
Off
Set first page.
Press "START" button.
6
If the optional Document Finisher is installed on your copier,
the “Saddle Stitch” [“Center Staple”] key will be displayed
and you will be able to select center stapling.
If the optional Center-Folding Unit is installed as well, you will
be able to center fold those stapled sets.
In this case, if you DO want the center stapling operation, or
the center stapling and folding operation, to be performed,
touch the “Saddle Stitch” [“Center Staple”] key and go to the
next step.
Inch specifications
Copy on
front cvr
None
Booklet
Booklet
Book
➔Booklet
Set first page.
Press "Start" key.
Register
Set
Paper size
Back Close
11x81/2"
copy front
Off
Saddle
Stitch
Book
Right
Book
Left
Open from
right
Open from
left
Original Finishing
Check direction
Set the book original
top side direct to back.
Metric specifications
Back Close
Set
Paper size
Register
Booklet
Book
RBooklet
Booklet
None
Left
binding
Right
binding
Book
Left
Book
Right
Copy on
front cov.
Center
Staple
Check direction
Set book original top
sidedirectiontoback.
Original Finish Copy front
Off
Set first page.
Press "START" button.
If you do NOT want either operation to be performed, go
directly to step 8.
7
Touch the “Saddle Stitch” key or the “Bind & Fold” key, as
appropriate.
* It is possible for you to center staple, or center staple and
fold, up to 16 copy sheets (64 layout pages) at one time.
Inch specifications
Pape Set
100%
Saddle Stitch
Back Close
Off
Saddle
stitch
Bind &
Fold
8
1
/2x11"
Set first page.
Press "Start" key.
Metric specifications
Duplex Mode.
Saddle Stitch
Saddle
Stitch
Bind
& Fold
Back Close
Set
Paper size
Off
NOTE
The “Bind & Fold” key will only be displayed when the optional
Center-Folding Unit is installed on your copier.
8
If you want to add covers, touch the “Copy on front cvr” key.
The “Copy on front cover” screen will be displayed.
At this point, if you do NOT want to copy onto the covers, go
directly to step 10.
Inch specifications
Copy on
front cvr
None
Booklet
Booklet
Book
➔Booklet
Set first page.
Press "Start" key.
Register
Set
Paper size
Back Close
11x81/2"
copy front
Off
Saddle
Stitch
Book
Right
Book
Left
Open from
right
Open from
left
Original Finishing
Check direction
Set the book original
top side direct to back.
Metric specifications
Back Close
Set
Paper size
Register
Booklet
Book
RBooklet
Booklet
None
Left
binding
Right
binding
Book
Left
Book
Right
Copy on
front cov.
Center
Staple
Check direction
Set book original top
sidedirectiontoback.
Original Finish Copy front
Off
Set first page.
Press "START" button.
Page 69
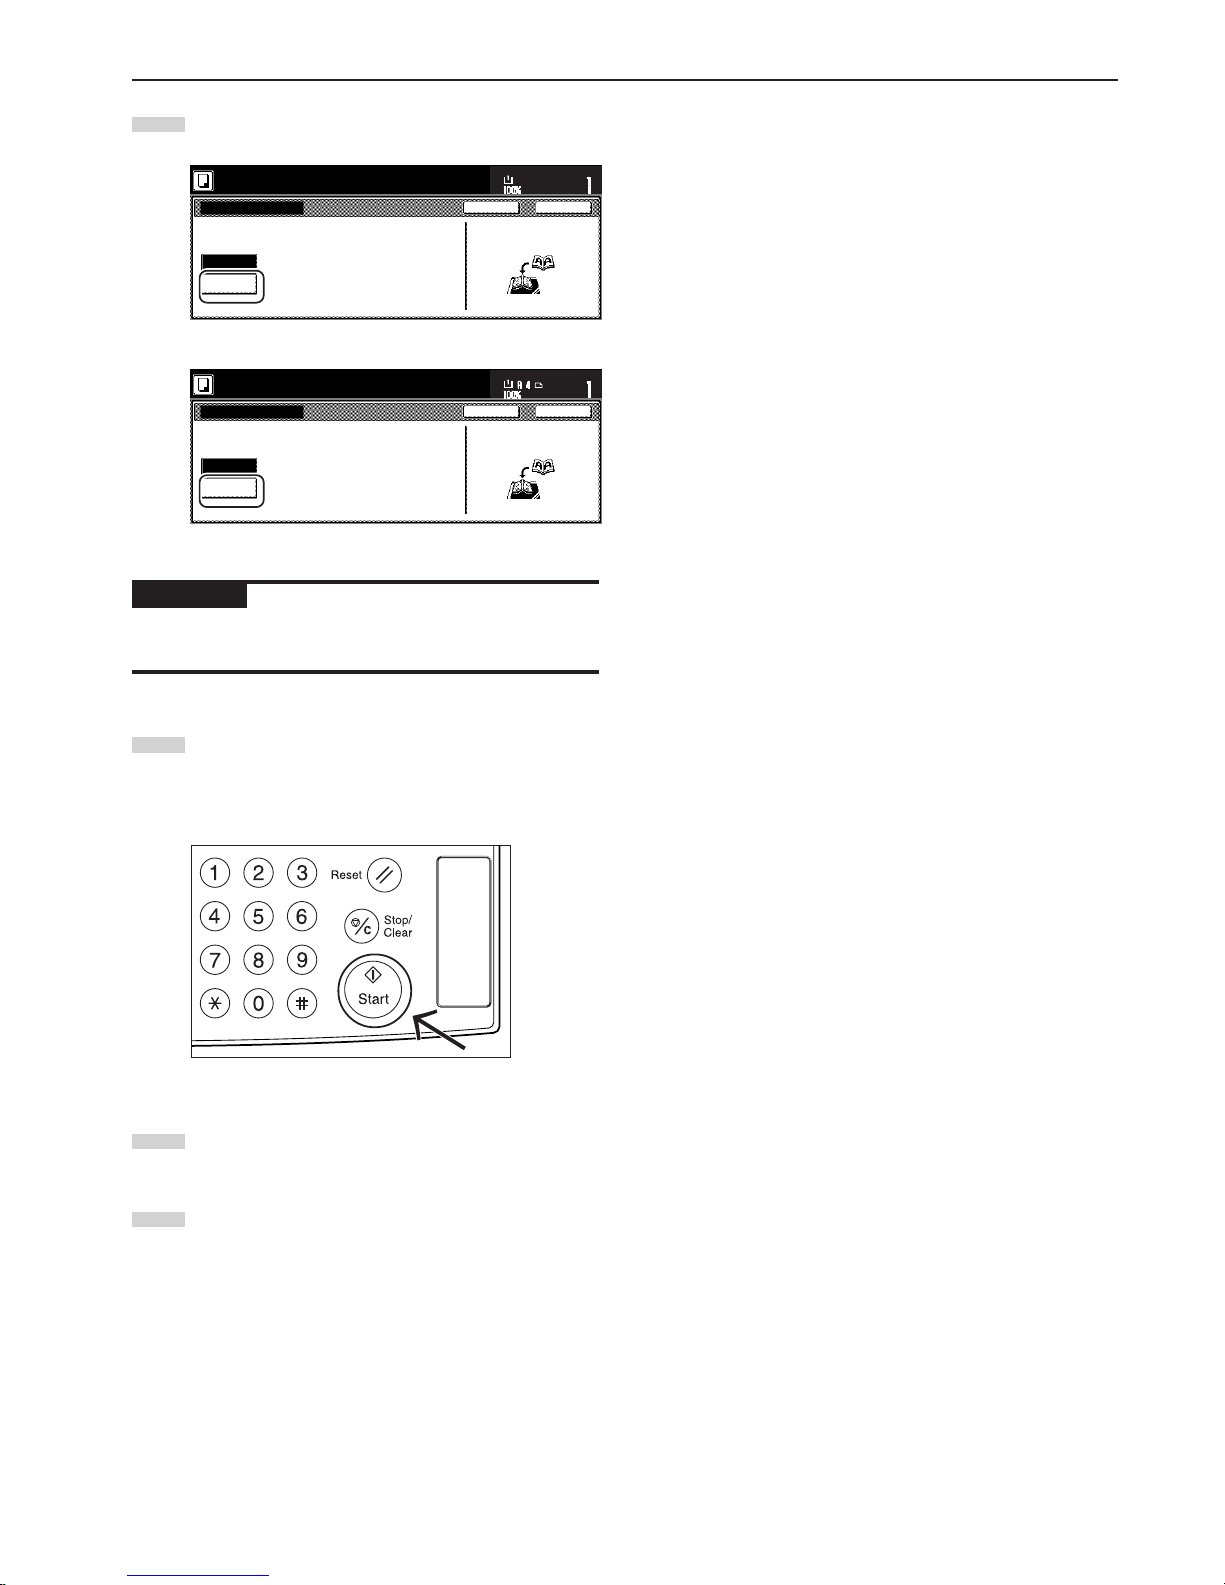
Section 5 OTHER CONVENIENT FUNCTIONS
5-27
9
Touch the “On” key.
Inch specifications
Off
On
Set first page.
Press "Start" key.
When selecting "ON" for copying on the
front cover, follow the instruction.
1. Scan front cover book original
2. Start scan book originals
Copy on front cover
Set
Paper size
Back Close
11x81/2"
Check direction
Set the book original
top side direct to back.
Metric specifications
Off
Set
Paper size
Back Close
On
Copy on front cover
Set first page.
Press "START" button.
When selecting "ON" for copying on the
front cover, follow the instruction.
1. Scan front cover book original.
2. Start scan book originals.
Check direction
Set book original top
sidedirectiontoback.
IMPORTANT!
If you DO want to copy onto the covers, be absolutely certain to set
the original that you want to have copied onto the cover first.
10
Press the [Start] key.
Scanning of the original will start.
When a message appears telling you to set the next original,
go to the next step.
11
Replace the first original with the next one and press the
[Start] key. Scanning of that next original will start.
12
Once you have finished scanning all of the originals, touch
the “Scanning finished” key. Copying will start.
Page 70
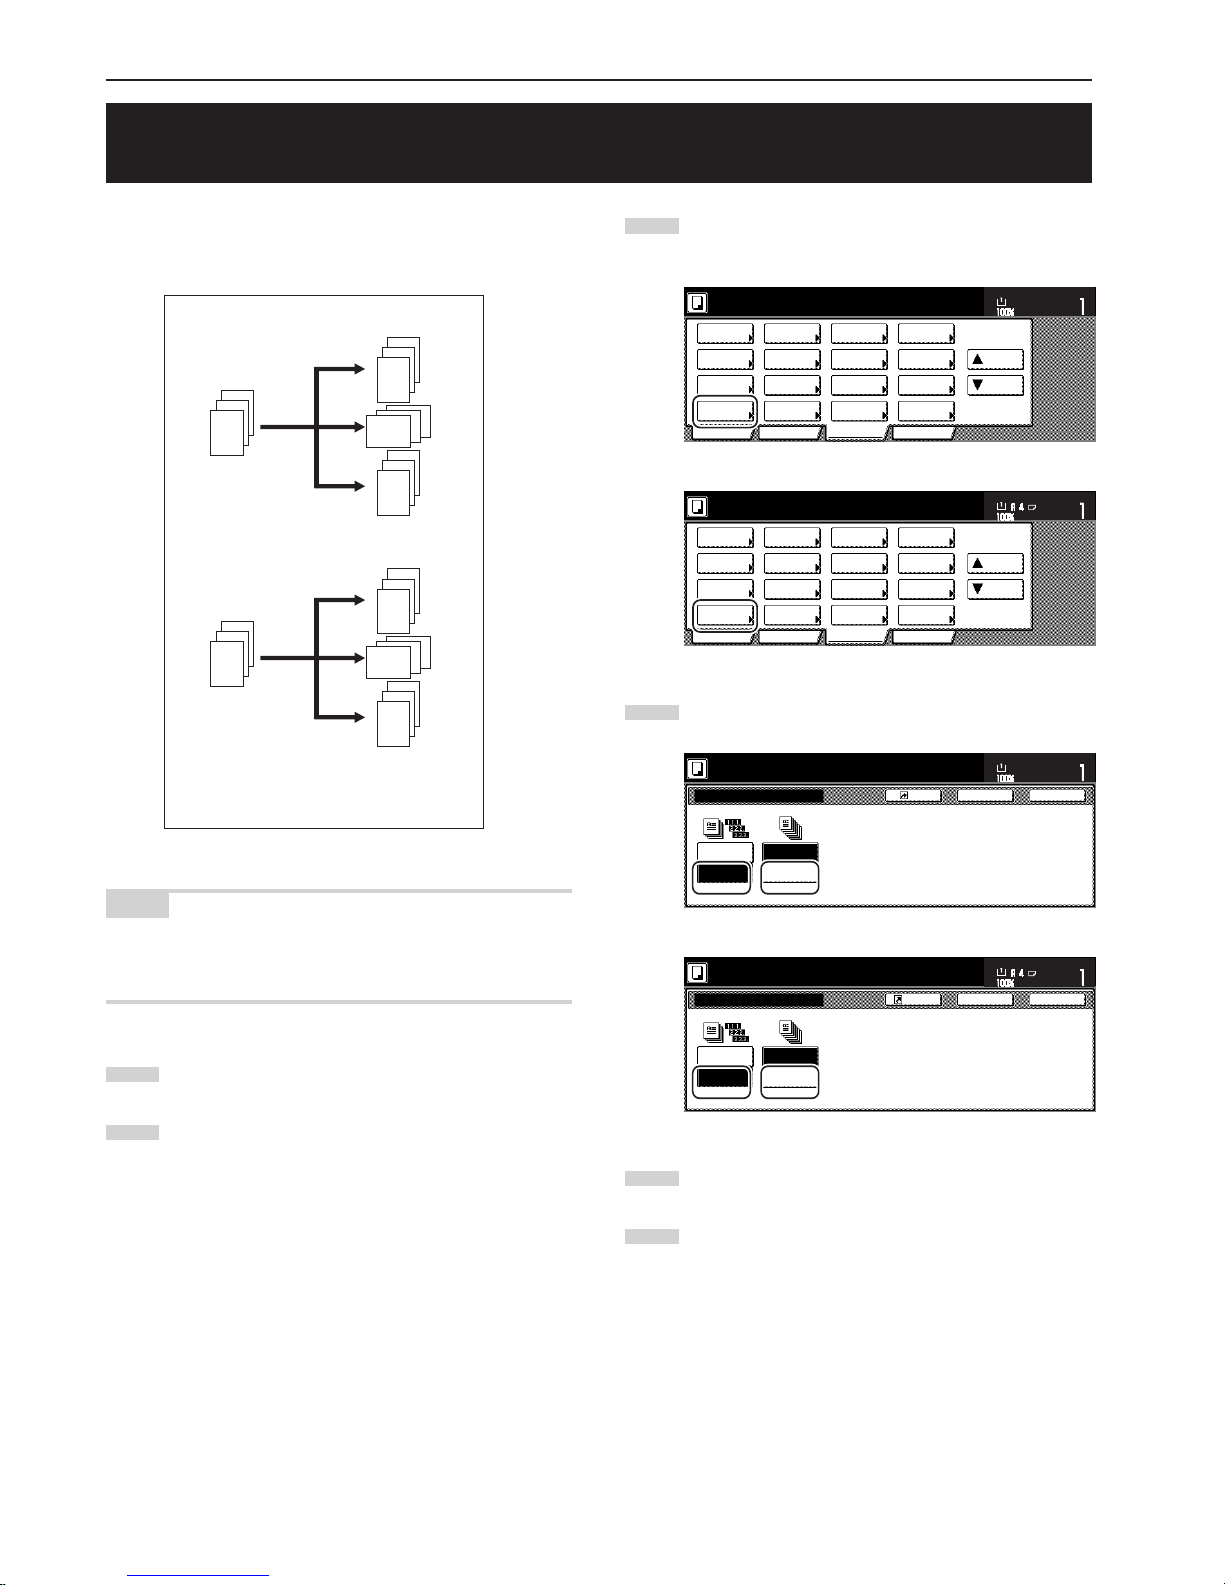
Section 5 OTHER CONVENIENT FUNCTIONS
5-28
12. Automatic sorting of copy sets without the Document Finisher
[Sort/Finished mode]
Since copying in this mode is performed after multiple originals are
scanned and memorized, copies can be sorted into the required
number of sets even without the optional Document Finisher.
NOTE
If you do not have paper of the same size but different orientations
available for paper feed, copies will be ejected without being “sorted”
in this way.)
1
Set the originals to be copied.
2
Touch the “Function” tab. The content of the “Function” tab
will be displayed.
3
2
1
3
2
1
3
2
1
3
2
1
1
1
1
3
3
3
2
2
2
3
2
1
3
Touch the “Sort/Finished” key. The “Sort/Finished” screen will
be displayed.
Inch specifications
2 sided/
Separation
Select
paper
Combine
Reduce
/Enlarge
Margin/
Centering
Forms
Overlay
Page #
Function
Basic User choice Program
Cover
Mode
Booklet
Sort/
Finished
Border
Erase
Exposure
mode
Orig.image
quality
Ready to copy.
Select
orig. size
Auto
Selection
Batch
scanning
Up
Down
Set
Paper size
11x81/2"
Metric specifications
Select
paper
2-sided/
Split
Merge copy
Reduce/
Enlarge
Margin/
Imag. shift
Page
numbering
Function
Basic User choice Program
Cover
Mode
Booklet
Erase
Mode
Exposure
mode
Image
quality
Sort/
Finished
Ready to copy.
Select
size orig.
Auto
selection
Large # of
originals
Form
overlay
Up
Down
Set
Paper size
4
Touch the “Sort:ON” key.
Inch specifications
SortingSort
Sort/Finished
None
1 set
Register
Ready to copy.
Set
Paper size
Back Close
11x81/2"
Sort:OFF
Sort:ON
Metric specifications
Sort:Off
Sort:On
GroupSort
Sort/Finished
None
1 set
Back Close
Ready to copy.
Register
Set
Paper size
5
Touch the “1 set” key.
6
Press the [Start] key.
Copying will start.
(when there is paper loaded of the same
size but different orientation)
When “Sort:ON” and “1 set” are selected
When “Sort:OFF” and “Output each page”
are selected
Page 71
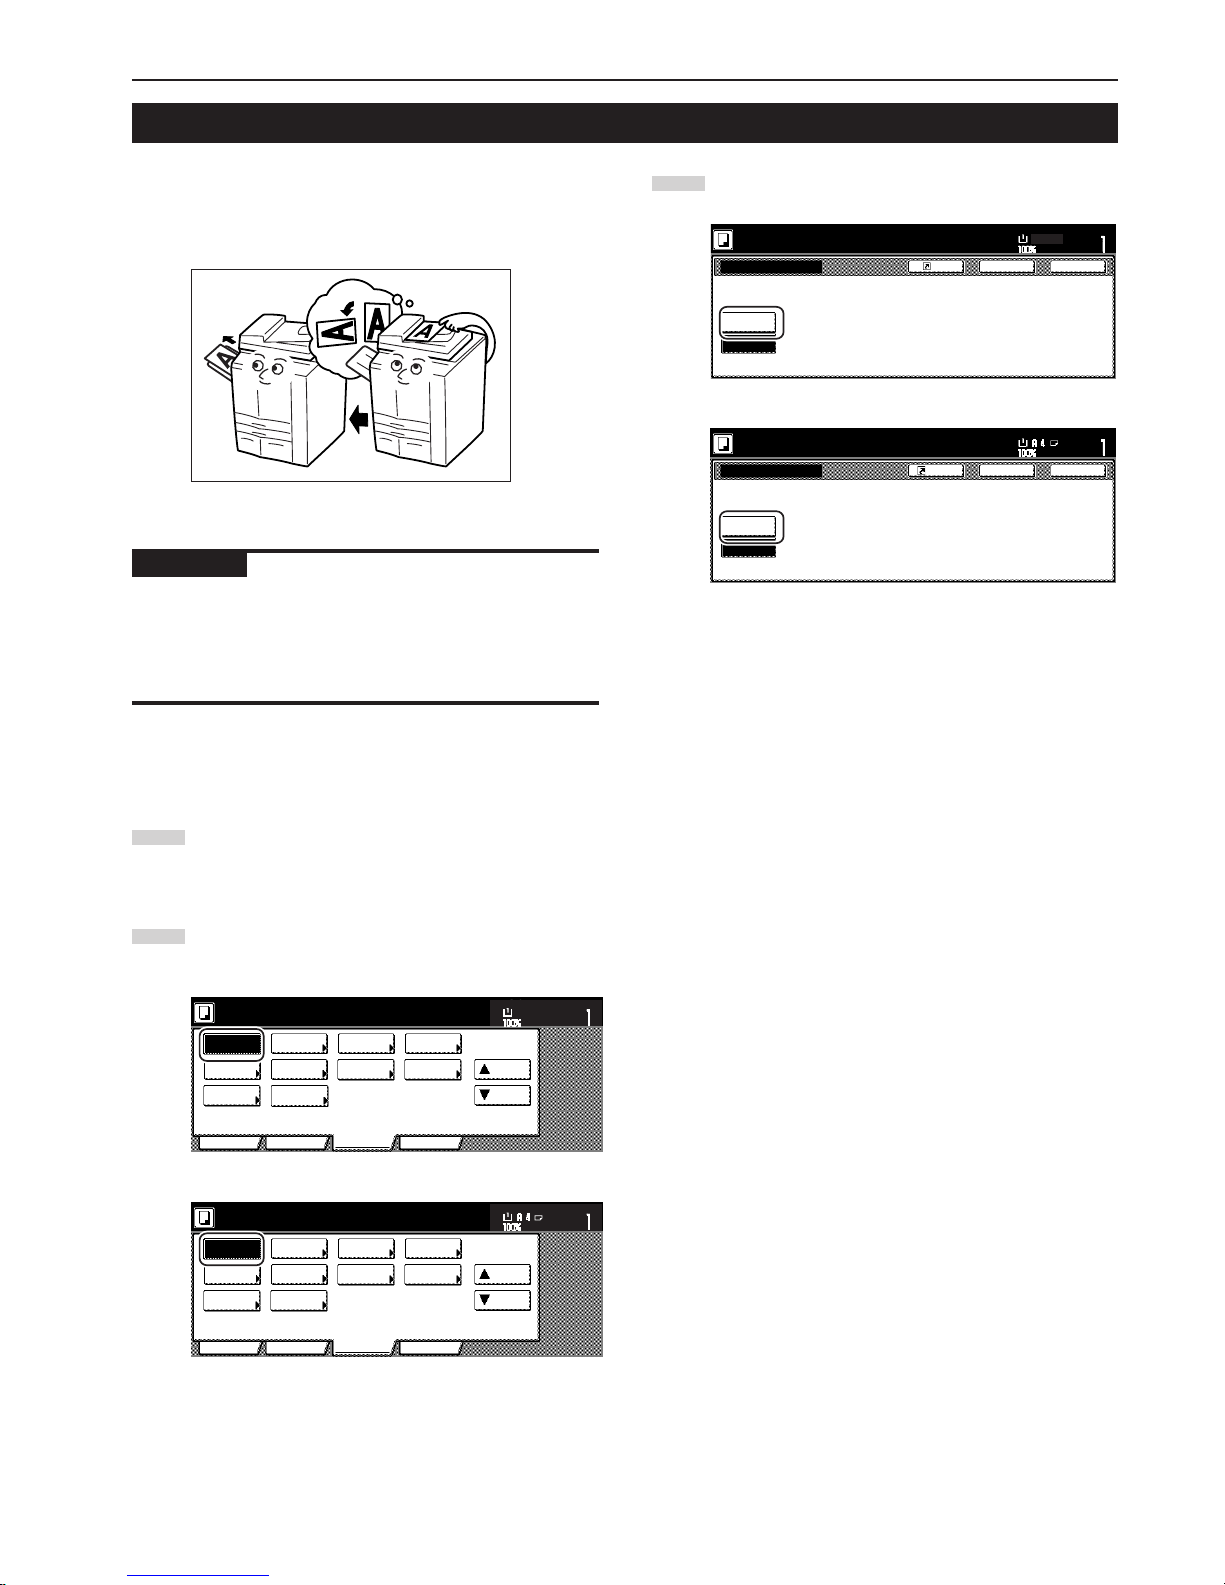
Section 5 OTHER CONVENIENT FUNCTIONS
5-29
13. Auto rotation function
If the orientation of the original is different from that of the paper
loaded in the drawers[cassettes], the image will be automatically
turned 90 degrees counter-clockwise for copying. No special setting is
required in order to use this function.
IMPORTANT!
• Inch specifications
This function will only work with 5 1/2" x 8 1/2" or 8 1/2" x 11" size copy
paper.
• Metric specifications
This function will only work with A5R or A4 size copy paper.
If you want to disengage the auto rotation function, perform the
following procedure.
1
Touch the “Function” tab and then the “▼ Down” key.
The content of the next portion of the “Function” tab will be
displayed.
2
Touch the “Auto Rotation” key. The “Auto Rotation” screen
will be displayed.
Inch specifications
Invert Mirror
Modify
Copy
Proof Copy
Memo
pages
Orig. set
direction
Ready to copy.
Up
Down
Set
Paper size
Eco Print
Auto
Rotation
Function
Basic User choice Program
OHP
backing
11x81/2"
Select of
Output
Metric specifications
Invert Mirror
Modify
copy
Select of
Output
Test copy
Memo
pages
Orig. set
direction
Ready to copy.
Up
Down
Set
Paper size
Eco print
Auto
Rotation
Function
Basic User choice Program
OHP back
3
Touch the “No rotate” key.
Inch specifications
When original and paper have different
direction, image will be rotated.
No rotate
Rotate
Auto Rotation
Register
Ready to copy.
Set
Paper size
Back Close
11x81/2"
Metric specifications
Auto Rotation
When original and paper have different
direction, image will be rotated
automatically.
No rotate
Rotate
Back Close
Ready to copy.
Register
Set
Paper size
Page 72
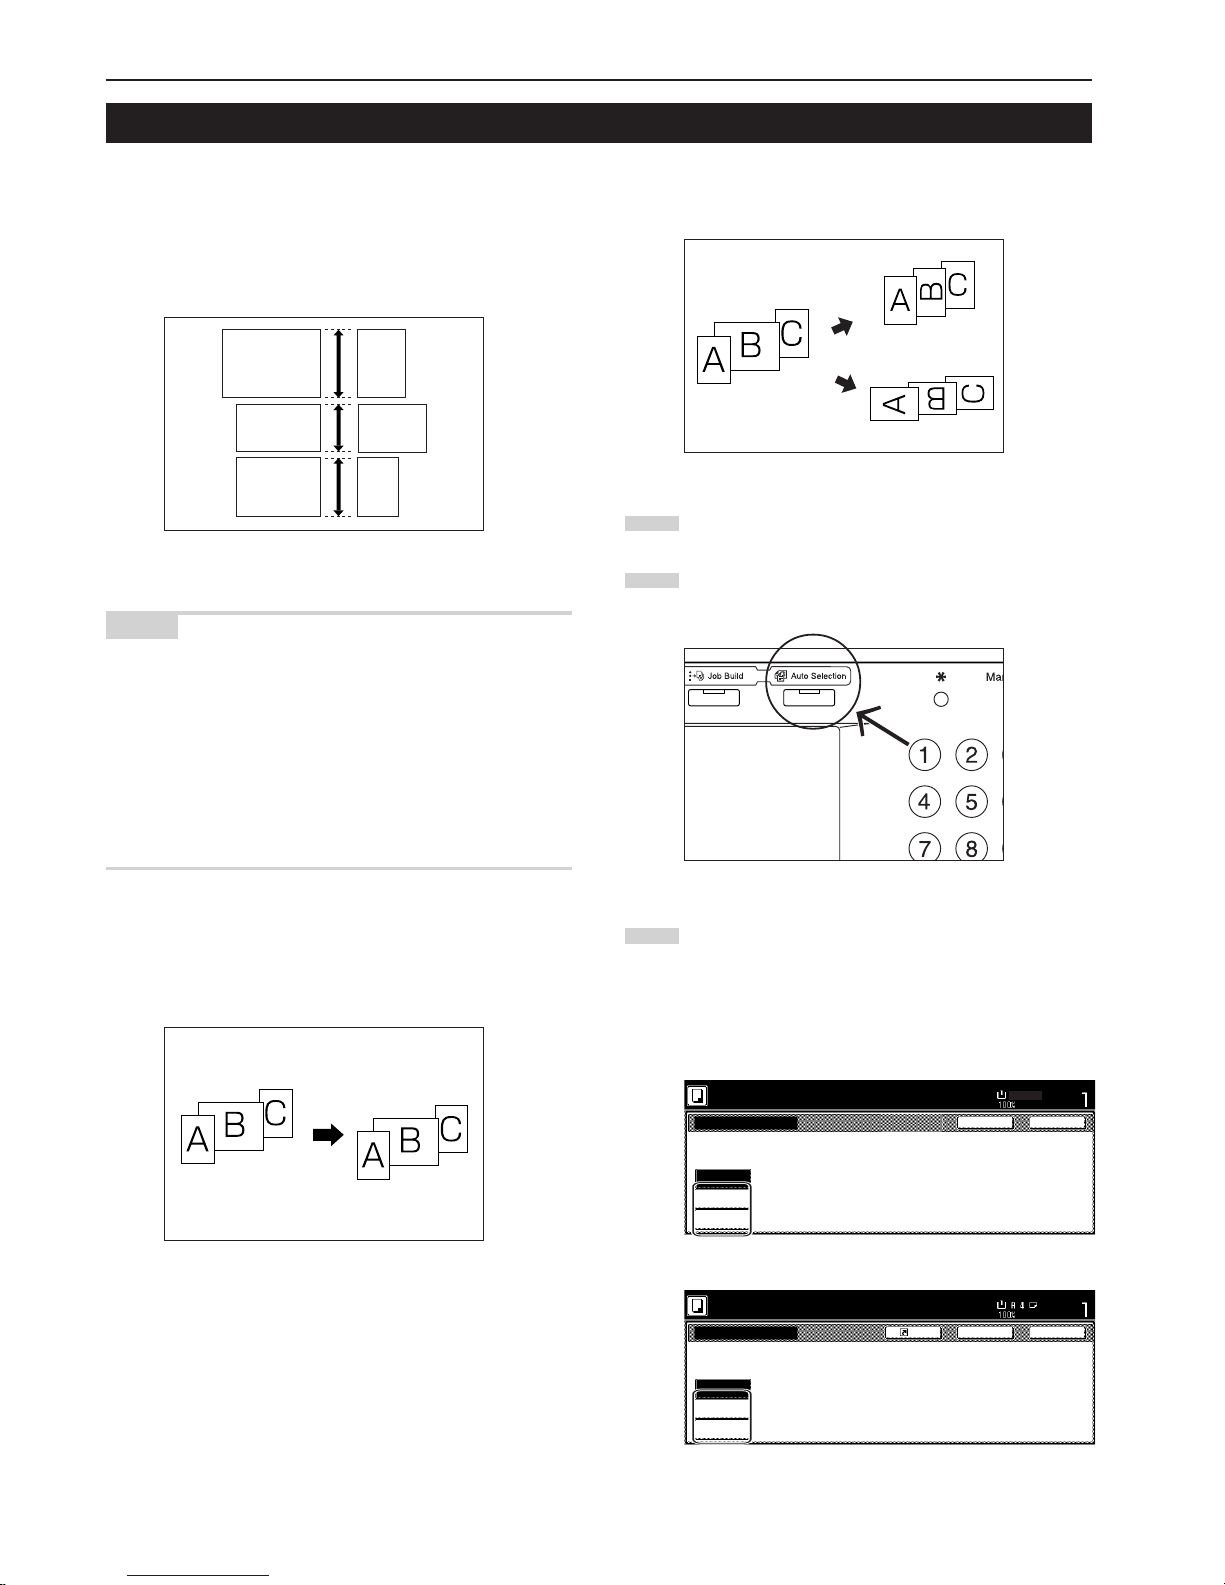
Section 5 OTHER CONVENIENT FUNCTIONS
5-30
14. Auto selection/Filing mode
With this mode, when you are using the Document Processor without
pressing one of the paper size keys, and thereby, specifying a desired
paper size, originals will be checked one by one for their size, and you
can select to either have paper of the same size as each original
selected automatically (auto selection) or to have the originals all
copied onto one single size of copy paper (filing).
NOTES
•You can set up to 30 originals in the Document Processor in this
mode.
Inch specifications
• Only 11" x 8 1/2" and 11" x 17", or 8 1/2" x 14" and 8 1/2" x 11", size
originals can be used together in this mode, and the originals must
be arranged together so that their widths coincide.
Metric specifications
• Only A4 and A3, B5 and B4, or A4R and Folio, size originals can be
used together in this mode, and the originals must be arranged
together so that their widths coincide.
● Differing finished sizes (Auto selection)
Each original will copied onto the same size copy paper as that
original.
● Matching finished sizes (Filing)
All originals will copied onto the same size copy paper.
1
Set the originals to be copied in the Document Processor.
2
Press the [Auto Selection] key.
The lamp in the [Auto Selection] key will light and the auto
selection/filing mode screen will be displayed.
3
Touch the “Auto selection” key or the “Electronic Filing” key,
as appropriate.
If you selected “Auto selection”, go directly to step 6.
If you selected “Electronic Filing”, go to the next step.
Inch specifications
Able to copy mix size originals at
one time using Document processor.
Ready to copy.
Off
Auto
selection
Electronic
Filing
Auto Selection
Register
Set
Paper size
Back Close
11x81/2"
Metric specifications
BackRegister Close
Auto Selection
Ready to copy.
Off
Auto
selection
Electronic
Filing
Set
Paper size
Able to copy mixed size originals at
one time using Document processor.
B4
B5
(A3)
(Folio)
(A4)
11"✕17"
8 1/2"✕14"
11"✕8 1/2"
(A4R)
8 1/2"✕11"
Page 73
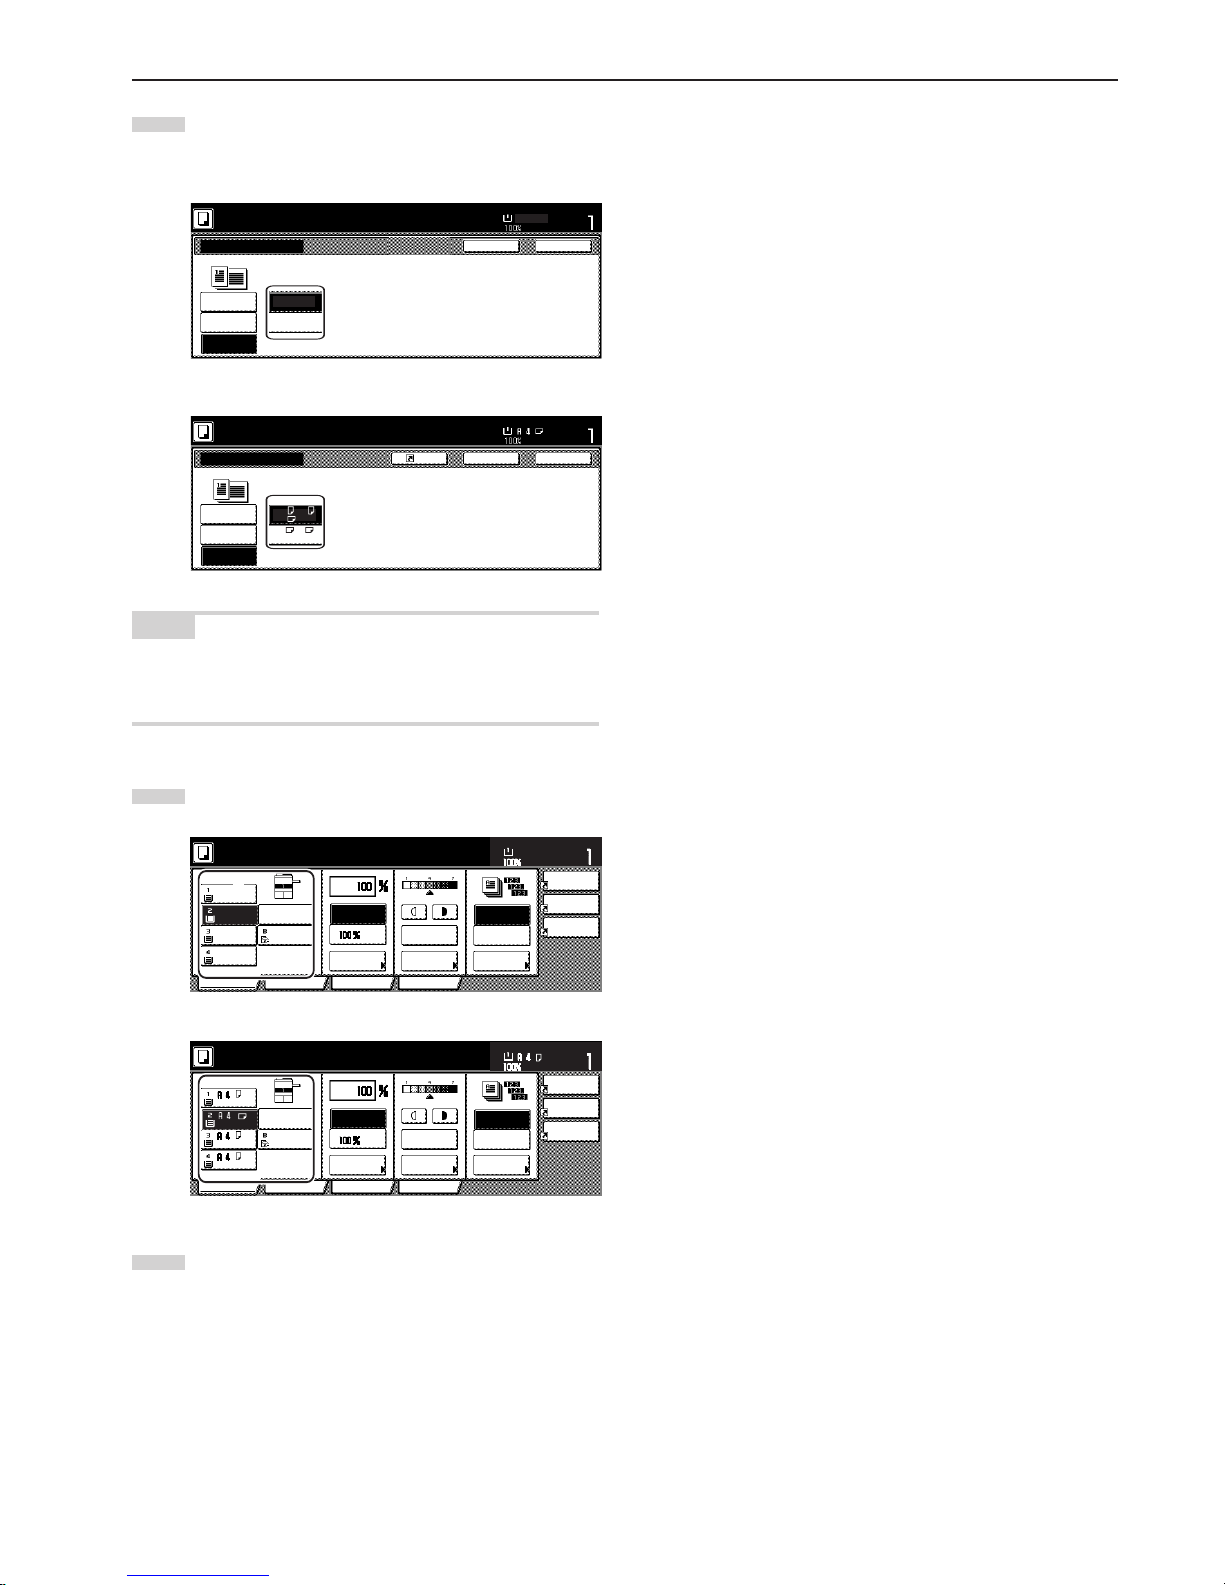
Section 5 OTHER CONVENIENT FUNCTIONS
5-31
4
Specify the size of the very first original to be copied and
then touch the “Close” key.
The touch panel will return to the contents of the “Basic” tab.
Inch specifications
Auto Selection
Place originals in Document processor.
Off
1st original
Able to scan mix size originals at
one time using Document processor,
and copy them in unified paper size.
Auto
selection
Electronic
Filing
Register
Set
Paper size
Back Close
11x81/2"
81/2x11"/
11x8
1
/2"
81/2x14"/
11x17"
Metric specifications
Back
Register
Close
Auto selection
Place originals in Document processor.
Off
Auto
selection
1st original
Able to scan different size originals at
one time using Document processor,
and copy unity size paper.
Electronic
Filing
Set
Paper size
A4 /B5 /
A4
A3 /B4 /
Folio
NOTE
In order to have the binding direction set properly for stapling or hole
punching, etc., finished copies, be sure to specify the size of the very
first original being copied.
5
Select the desired drawer[cassette].
Inch specifications
11x81/2"
APS
AMS
Reduce
/Enlarge
APS
Exposure
mode
Auto
Exposure
Ready to copy.
Set
Paper Size
Bypass
Color
Recycled
Plain Plain
Plain
Sort/
Finished
Sort:Off
Sort:On
Basic User choice
Program
Function
11x8
1
/
2"
Combine
Orig.image
quality
Reduce
/Enlarge
11x8
1
/
2"
11x8
1
/
2"
8
1
/
2x11"
Metric specifications
APS
Merge copy
AMS
Reduce/
Enlarge
APS
Image
quality
Reduce/
Enlarge
Exposure
mode
Auto
Exposure
Ready to copy.
Set
Paper Size
Bypass
Color
Recycled
Plain Plain
Plain
Sort/
Finished
Sort:Off
Sort:On
Basic User choice
Program
Function
6
Press the [Start] key.
Copying will start.
Page 74
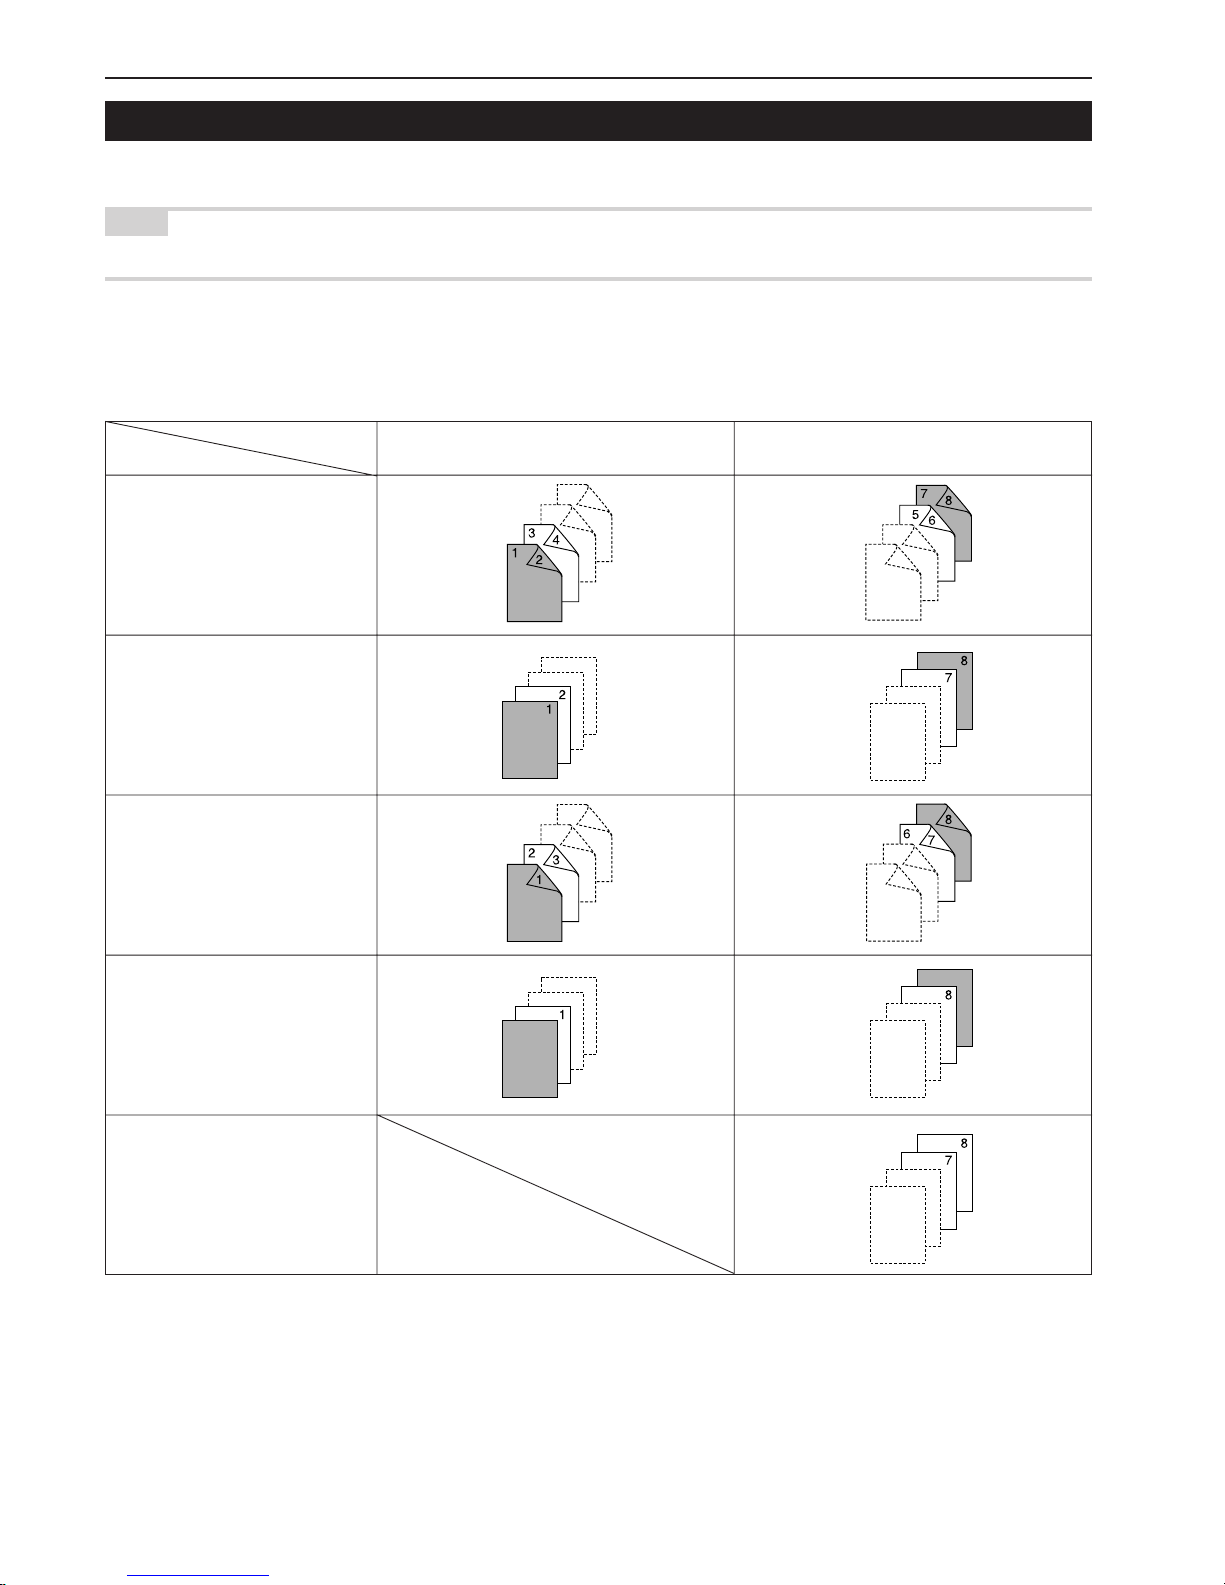
Section 5 OTHER CONVENIENT FUNCTIONS
5-32
15. Adding a front and/or back cover to your copy sets [Cover mode]
With this mode, you can select to have color paper or relatively thick paper fed as front and/or back covers to your copy sets.
NOTE
It is possible for you to change the drawer[cassette] that will be used to feed the cover sheets. (See “Cover drawer[cassette]” on page 7-48.)
You can select separately whether you want both sides or only one side of both the front and back covers to be copied onto, or to have either or
both of them left completely blank. Select also whether or not you even want to include a back cover at all.
* The illustrations above show the result when sets of 2-sided copies are being made.
Back cover
Front cover
2 sided copy[Duplex Copy]*
Front copy
Back copy*
Blank
No back cover
Page 75
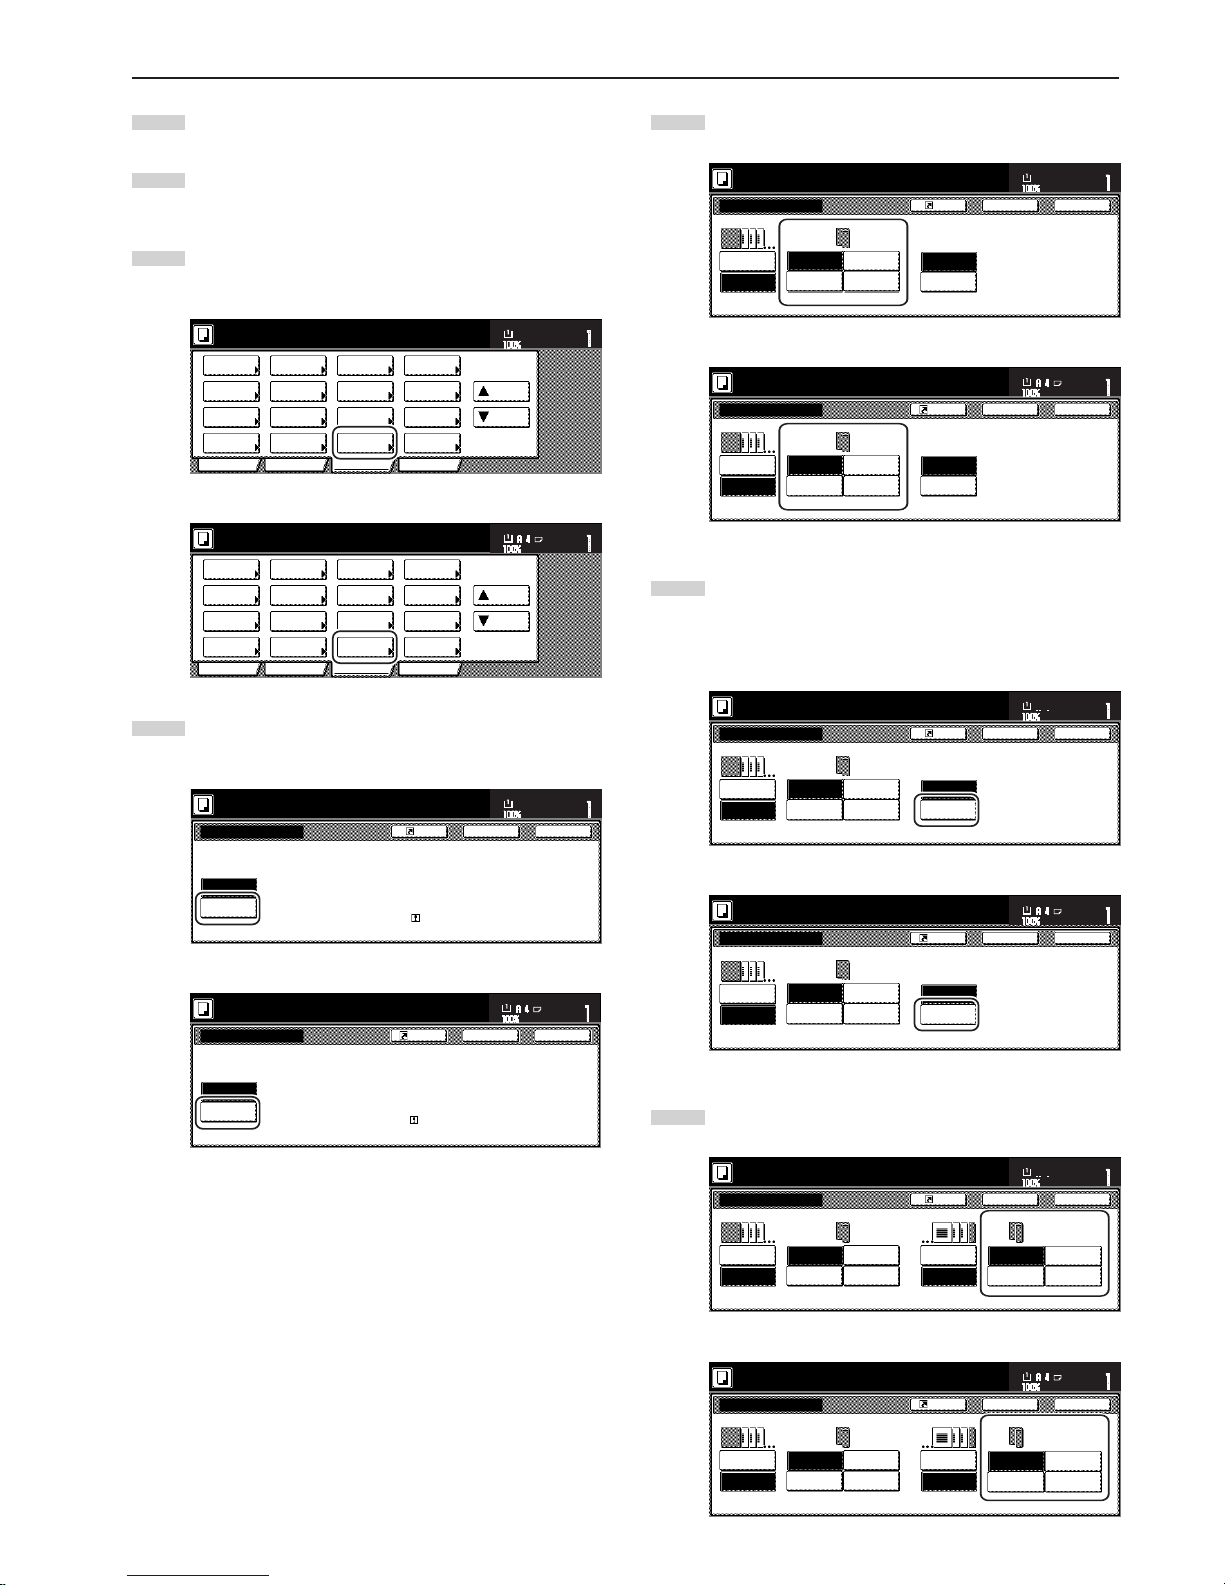
Section 5 OTHER CONVENIENT FUNCTIONS
5-33
1
Set the originals to be copied.
2
Touch the “Function” tab. The content of the “Function” tab
will be displayed.
3
Touch the “Cover Mode” key. The “Cover Mode” screen will be
displayed.
Inch specifications
2 sided/
Separation
Select
paper
Combine
Reduce
/Enlarge
Margin/
Centering
Forms
Overlay
Page #
Function
Basic User choice Program
Cover
Mode
Booklet
Sort/
Finished
Border
Erase
Exposure
mode
Orig.image
quality
Ready to copy.
Select
orig. size
Auto
Selection
Batch
scanning
Up
Down
Set
Paper size
11x81/2"
Metric specifications
Select
paper
2-sided/
Split
Merge copy
Reduce/
Enlarge
Margin/
Imag. shift
Page
numbering
Function
Basic User choice Program
Cover
Mode
Booklet
Erase
Mode
Exposure
mode
Image
quality
Sort/
Finished
Ready to copy.
Select
size orig.
Auto
selection
Large # of
originals
Form
overlay
Up
Down
Set
Paper size
4
Touch the “Cover” key. The screen to make the front cover
settings will be displayed.
Inch specifications
Ready to copy.
No cover
Cover
Front cover
Insert Color or Thick, etc paper
as a front/back cover.
Able to copy on same paper.
Set the cover paper for specify
drawer.
Cover Mode
Register
Set
Paper size
Back Close
11x81/2"
Metric specifications
Cover
Front cover
Cover Mode
Insert front & back cover paper (Colour/
Rough etc...) to head & end of copy.
Set cover paper in dedignated
paper cassette.
No cover
Back Close
Ready to copy.
Register
Set
Paper size
5
Select the desired settings for the front cover.
Inch specifications
Rear cover
No cover
Cover
Blank
Front copy
2 sided
copy
Back copy
Ready to copy.
No cover
Cover
Front cover
Cover Mode
Register
Set
Paper size
Back Close
11x81/2"
Metric specifications
Cover Mode
No cover
Cover
Front cover Back cover
No cover
Cover
Blank
Front copy
Duplex
Copy
Back copy
Back Close
Ready to copy.
Register
Set
Paper size
6
Touch the “Cover” key or the “No cover” key, as appropriate,
to select whether or not you want to include a back cover.
If you selected “Cover”, the screen to make the back cover
settings will be displayed.
Inch specifications
Rear cover
No cover
Cover
Blank
Front copy
2 sided
copy
Back copy
Ready to copy.
No cover
Cover
Front cover
Cover Mode
Register
Set
Paper size
Back Close
11x81/2"
Metric specifications
Cover Mode
No cover
Cover
Front cover Back cover
No cover
Cover
Blank
Front copy
Duplex
Copy
Back copy
Back Close
Ready to copy.
Register
Set
Paper size
7
Select the desired settings for the back cover.
Inch specifications
Rear cover
No cover
Cover
Blank
Front copy
2 sided
copy
Back copy
Ready to copy.
No cover
Blank
Front copy
2 sided
copy
Back copy
Cover
Front cover
Cover Mode
Register
Set
Paper size
Back Close
11x81/2"
Metric specifications
Cover Mode
No cover
Cover
Front cover Back cover
No cover
Cover
Blank
Front copy
Duplex
Copy
Back copy Blank
Front copy
Duplex
Copy
Back copy
Back Close
Ready to copy.
Register
Set
Paper size
Page 76
Section 5 OTHER CONVENIENT FUNCTIONS
5-34
8
Press the [Start] key.
Scanning of the originals will start.
If you set the originals in the Document Processor, copying
will start automatically.
If you set an original on the platen, a message will appear
telling you to set the next original. In this case, go to the next
step.
9
Replace the first original with the next one and press the
[Start] key. Scanning of that next original will start.
10
Once you have finished scanning all of the originals, touch
the “Scanning finished” key. Copying will start.
Page 77
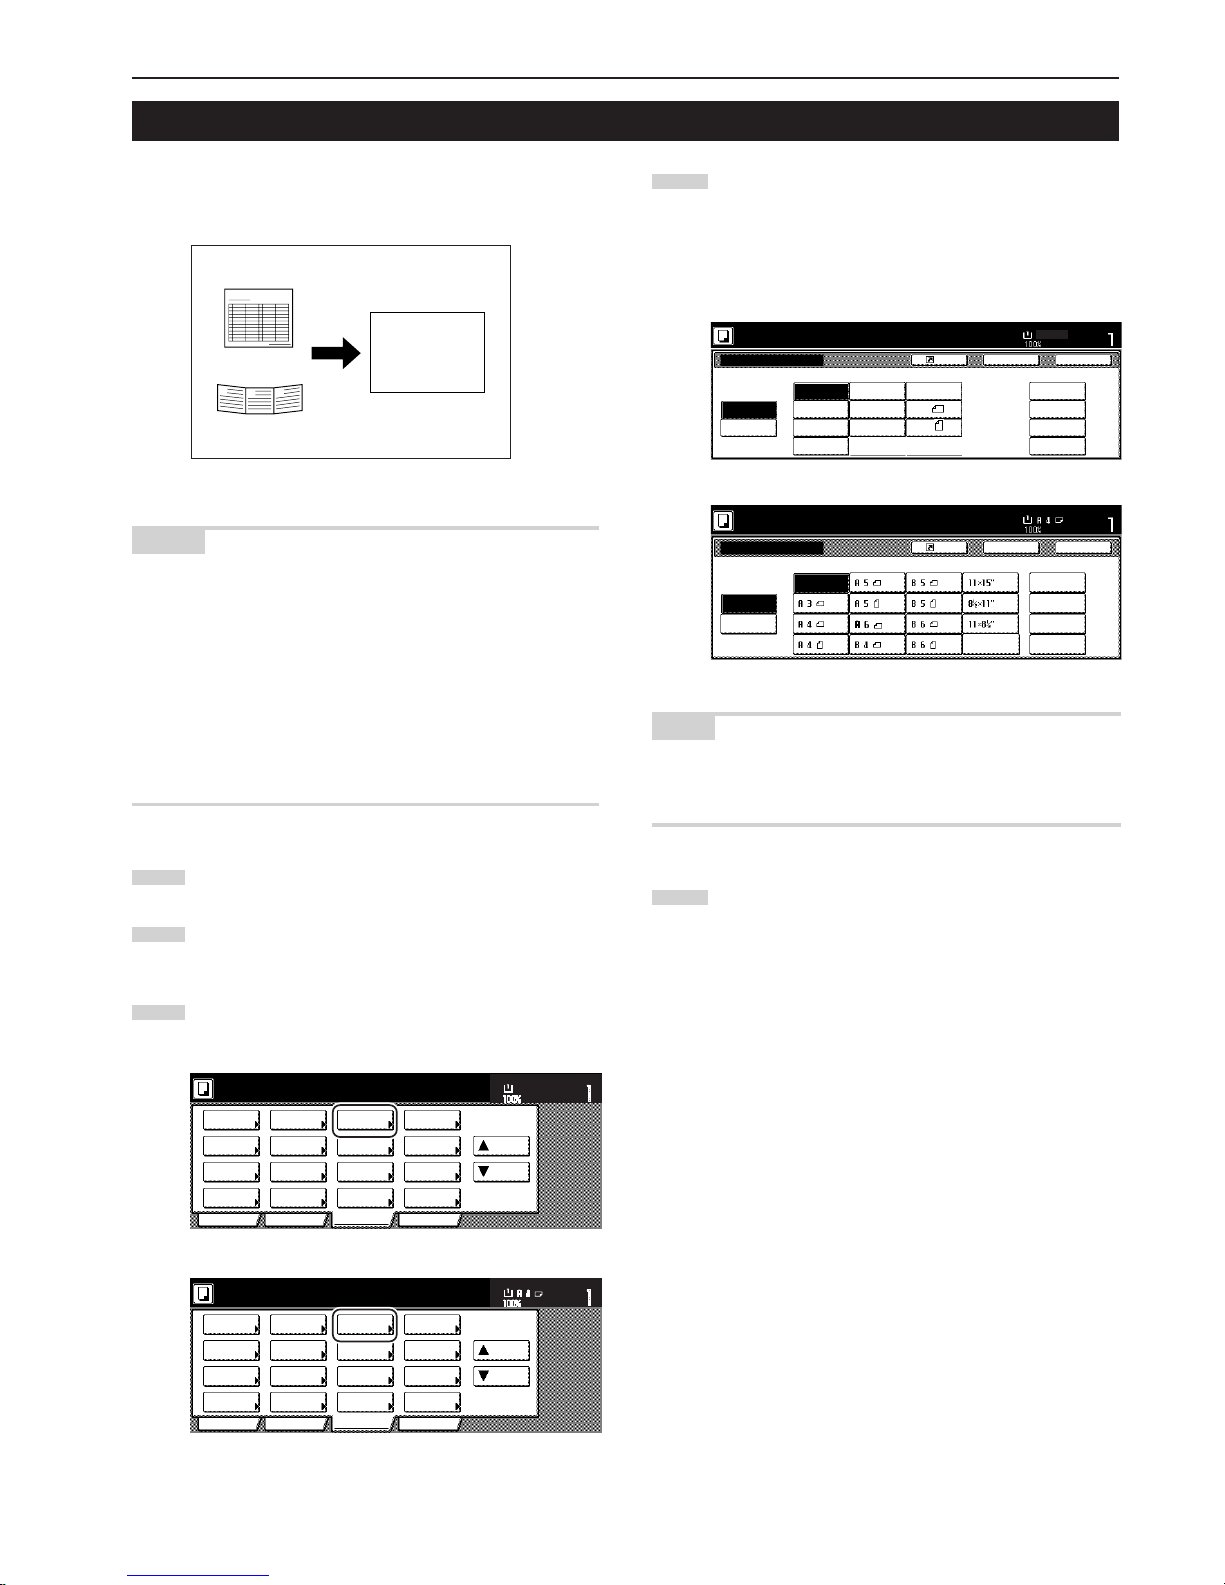
Section 5 OTHER CONVENIENT FUNCTIONS
5-35
16. Original size selection mode
With this mode, if you manually select a size for the original, only that
size image will be scanned for copying. Use this mode as well when
copying from originals of non-standard sizes.
NOTES
•You can register the size of non-standard originals that you often
use as a custom original size. (See “Custom original size” on
page 7-42.)
•ALWAYS set non-standard sized originals on the platen.
• Once you select the original size under this mode, you can copy
with originals set on the platen even with the Document
Processor open.
• If this mode is used in combination with the Centering/Image shift
mode, you can, for example, have the image of non-standard
sized originals centered on standard sized copy paper. (See
"Centering/Image shift mode" on page 5-8.)
1
Set the originals to be copied.
2
Touch the “Function” tab. The content of the “Function” tab
will be displayed.
3
Touch the “Select orig. size” [“Select size original”] key. The
“Select original size” screen will be displayed.
Inch specifications
2 sided/
Separation
Select
paper
Combine
Reduce
/Enlarge
Margin/
Centering
Forms
Overlay
Page #
Function
Basic User choice Program
Cover
Mode
Booklet
Sort/
Finished
Border
Erase
Exposure
mode
Orig.image
quality
Ready to copy.
Select
orig. size
Auto
Selection
Batch
scanning
Up
Down
Set
Paper size
11x81/2"
Metric specifications
Select
paper
2-sided/
Split
Merge copy
Reduce/
Enlarge
Margin/
Imag. shift
Page
numbering
Function
Basic User choice Program
Cover
Mode
Booklet
Erase
Mode
Exposure
mode
Image
quality
Sort/
Finished
Ready to copy.
Select
size orig.
Auto
selection
Large # of
originals
Form
overlay
Up
Down
Set
Paper size
8 1/2" x 11"
A4
B
C
A
4
If you want to select a standard scanning size, touch the key
that corresponds to the desired size and then go directly to
step 7.
If you want to select the dimensions of the scan area
manually, go to the next step.
Inch specifications
User regist.
Select
size
Input size
Cardstock
Auto
5
1
/2x51/2"
8
1
/2x81/2"
11x11"
9x9"
Ready to copy.
Select original size
Register
Set
Paper size
Back Close
11x81/2"
11x17"
8
1
/2x11"
11x8
1
/2"
8
1
/2x14"
5
1
/2x81/2"
8
1
/2x51/2"
11x15"
A4
A4
Metric specifications
Back
Register
Close
Use regist
Select size original
Ready to copy.
Select
size
Input size
Auto
Set
Paper size
100X100mm
150X150mm
200X200mm
120X120mm
Folio
NOTE
If you have registered a custom original size, you will be able to
select that size for use in this mode. (See “Custom original size” on
page 7-42.)
5
Touch the “Input size” key. The screen to set the dimensions
of the scan area will be displayed.
Page 78
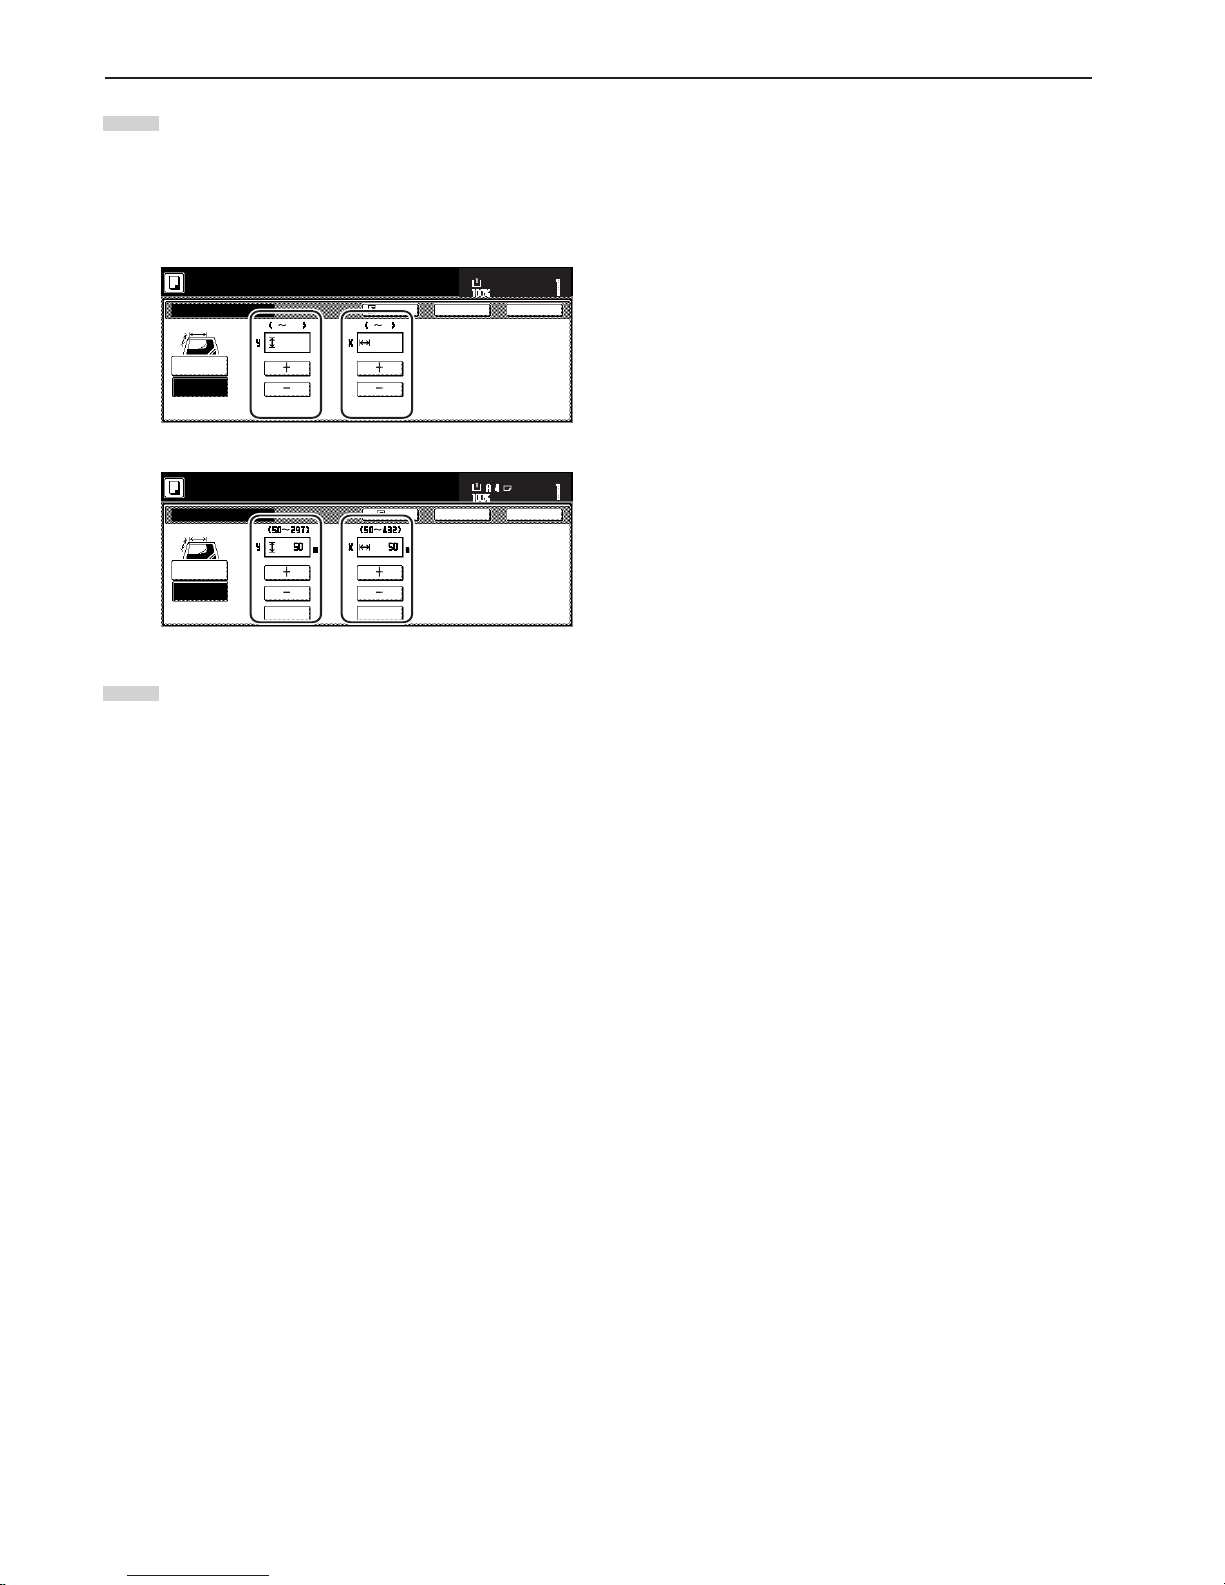
Section 5 OTHER CONVENIENT FUNCTIONS
5-36
6
Based on the left rear corner of the platen being a setting of
“0”, touch the “+” key or the “-” key to change the dimensions
of the scan area to the desired setting.
* In metric specification copiers, the dimensions can also be
entered directly by touching the “#keys” key and then using
the keypad.
Inch specifications
Back Close
Select original size
Ready to copy.
Select
size
2 11
5
/
8
22""
Input size
Set original on platen and input
scanning range. (Y side, X side)
Set
Paper Size
2 17
11x81/2"
Register
Metric specifications
Back Close
Select size original
Ready to copy.
Select size
Input size
#-Keys #-Keys
Register
Scanning range can be set with
X-Y direction when original is
placed at left rear corner.
Set
Paper size
7
Press the [Start] key.
Copying will start.
Page 79
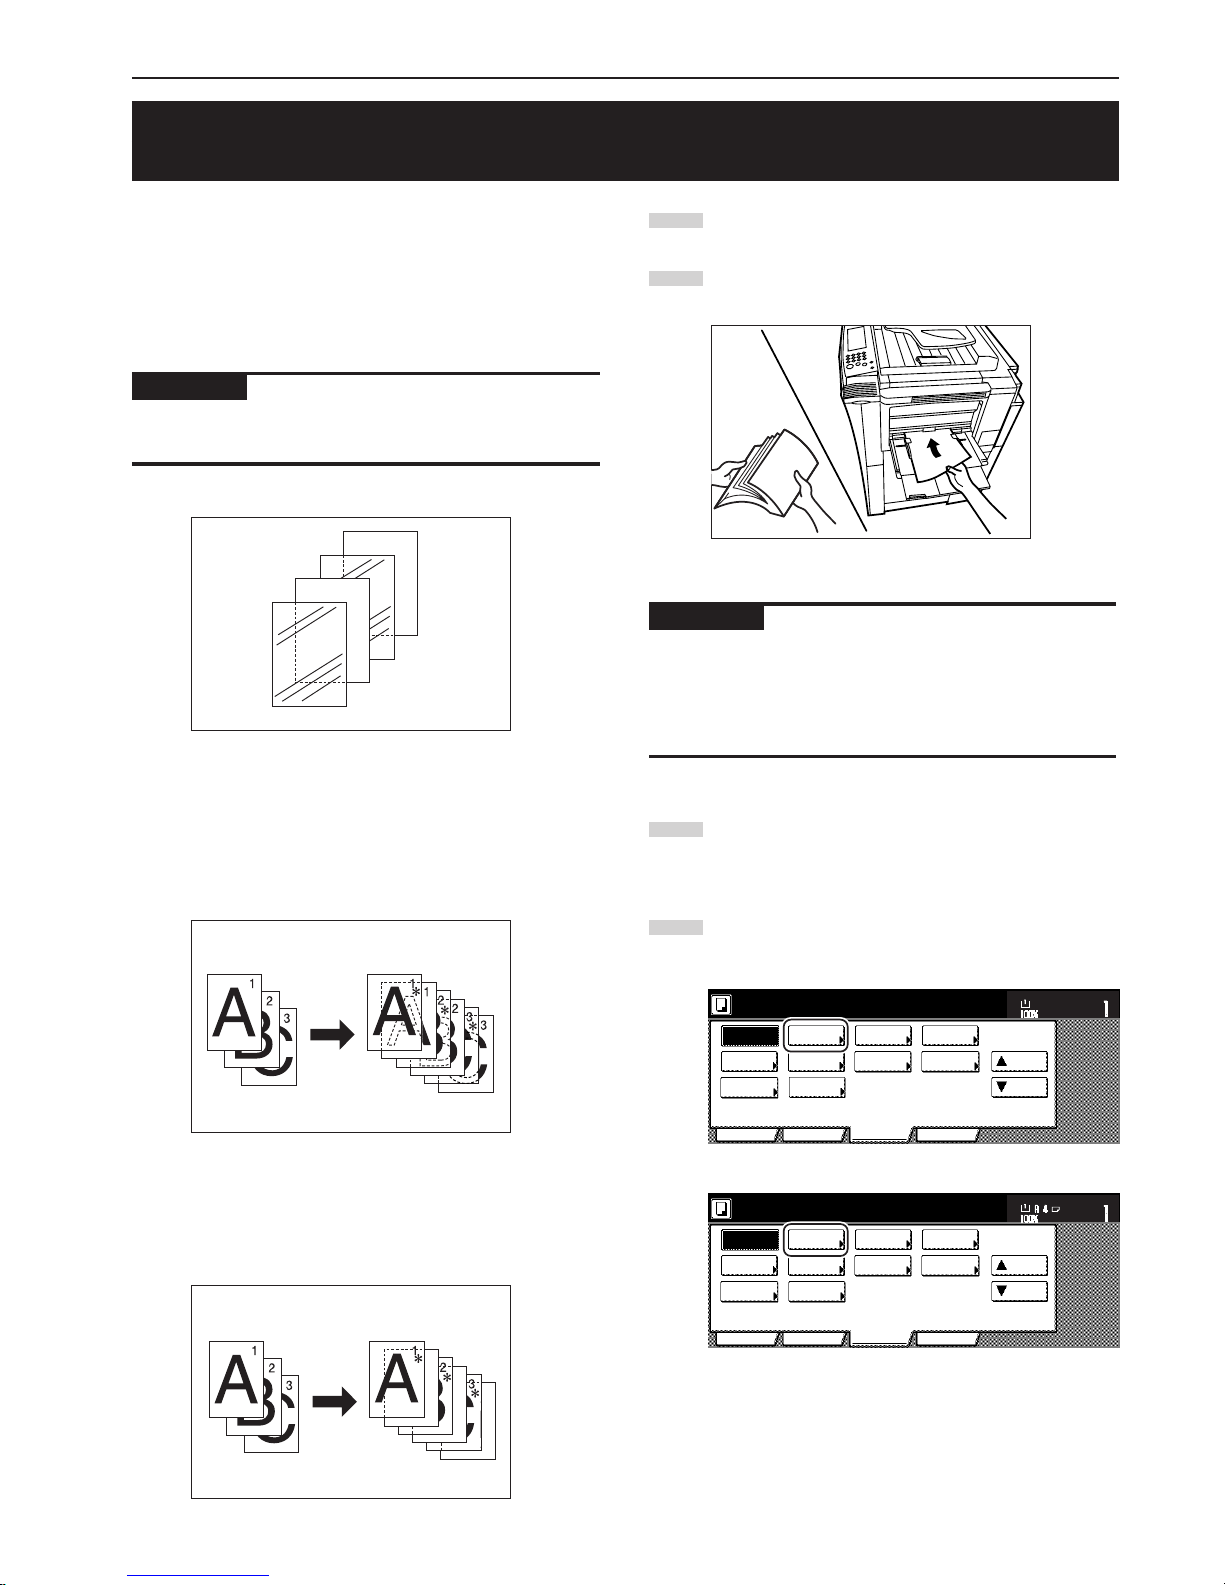
Section 5 OTHER CONVENIENT FUNCTIONS
5-37
17. Feeding paper as a backing sheet for OHP transparencies
[Transparency + backing sheet mode]
When 2 or 3 transparencies are piled on top of one another, static
electricity can cause problems. This mode automatically places a
backing sheet between the transparencies during copying for easy
handling. You can also select whether or not to have the image of the
original copied onto the backing sheet, or even make multiple
copies from the same original.
IMPORTANT!
When copying onto transparencies, ALWAYS use the multi-bypass
tray.
● Copying onto the backing sheet
With this setting, after the original is copied onto the transparency, the
same image will be copied onto the backing sheet as well. (The
asterisk “*” in the illustration indicates the transparencies.)
● Leaving the backing sheet blank
With this setting, the original will be copied onto the transparency but
the backing sheet will be left blank. (The asterisk “*” in the illustration
indicates the transparencies.)
1
Set the originals to be copied.
2
Set the transparency film on the multi-bypass tray.
IMPORTANT!
• Fan through the transparencies before setting them.
• Up to 25 transparencies can be set on the multi-bypass tray at
one time.
• Make sure that paper of the same size and orientation as the
transparencies has been loaded into a drawer[cassette].
3
Touch the “Function” tab and then the “▼ Down” key.
The content of the next portion of the “Function” tab will be
displayed.
4
Touch the “OHP backing” [“OHP back”] key. The “OHP back”
screen will be displayed.
Inch specifications
Invert Mirror
Modify
Copy
Proof Copy
Memo
pages
Orig. set
direction
Ready to copy.
Up
Down
Set
Paper size
Eco Print
Auto
Rotation
Function
Basic User choice Program
OHP
backing
11x81/2"
Select of
Output
Metric specifications
Invert Mirror
Modify
copy
Select of
Output
Test copy
Memo
pages
Orig. set
direction
Ready to copy.
Up
Down
Set
Paper size
Eco print
Auto
Rotation
Function
Basic User choice Program
OHP back
B
A
Page 80
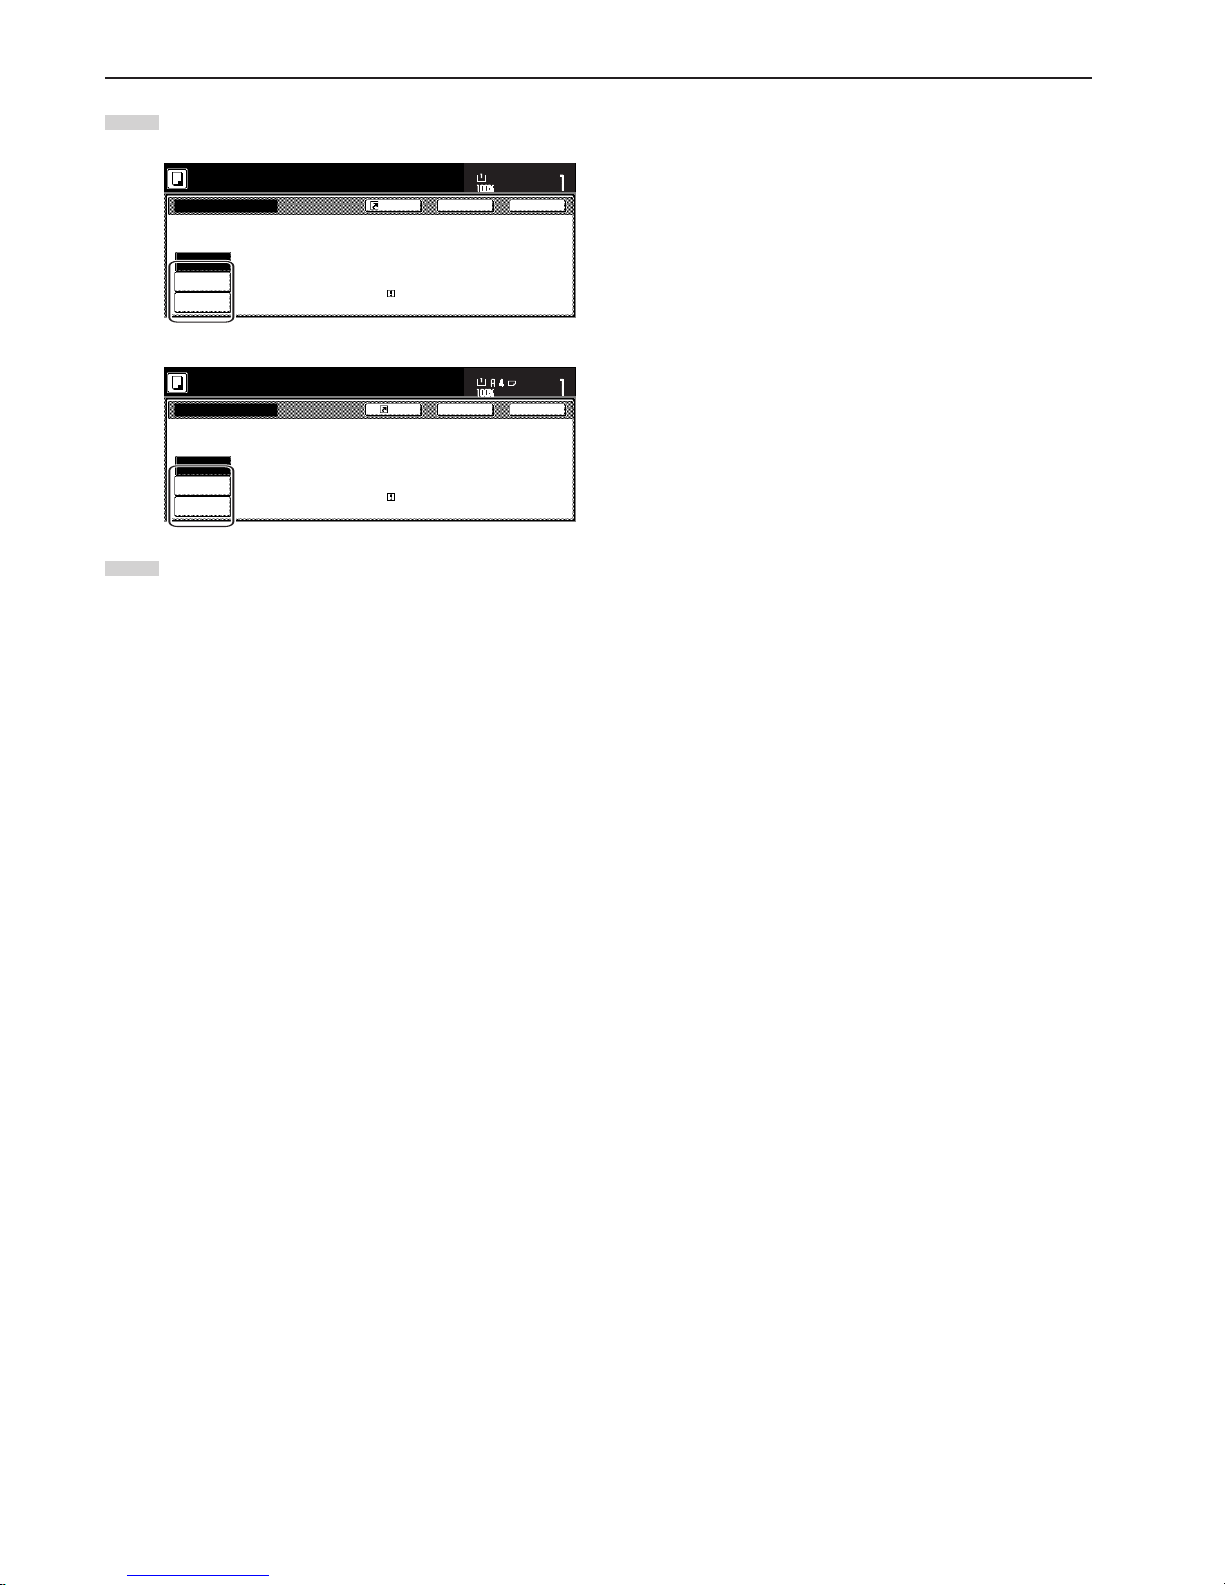
Section 5 OTHER CONVENIENT FUNCTIONS
5-38
5
Touch the “Copy” key or the “Blank” key, as appropriate.
Inch specifications
None
Copy
Back Close
Ready to copy.
Set
Paper Size
Blank
OHP back
Insert a blank paper between piece of
OHP film, or copy to a OHP back paper.
Place the OHP film in the bypass.
11x81/2"
Register
Metric specifications
None
Copy
BackRegister Close
Ready to copy.
Set
Paper size
Blank
OHP back
Insert blank paper between OHP films or
copy to OHP back paper.
Place transparency on bypass.
6
Press the [Start] key.
Copying will start.
Page 81
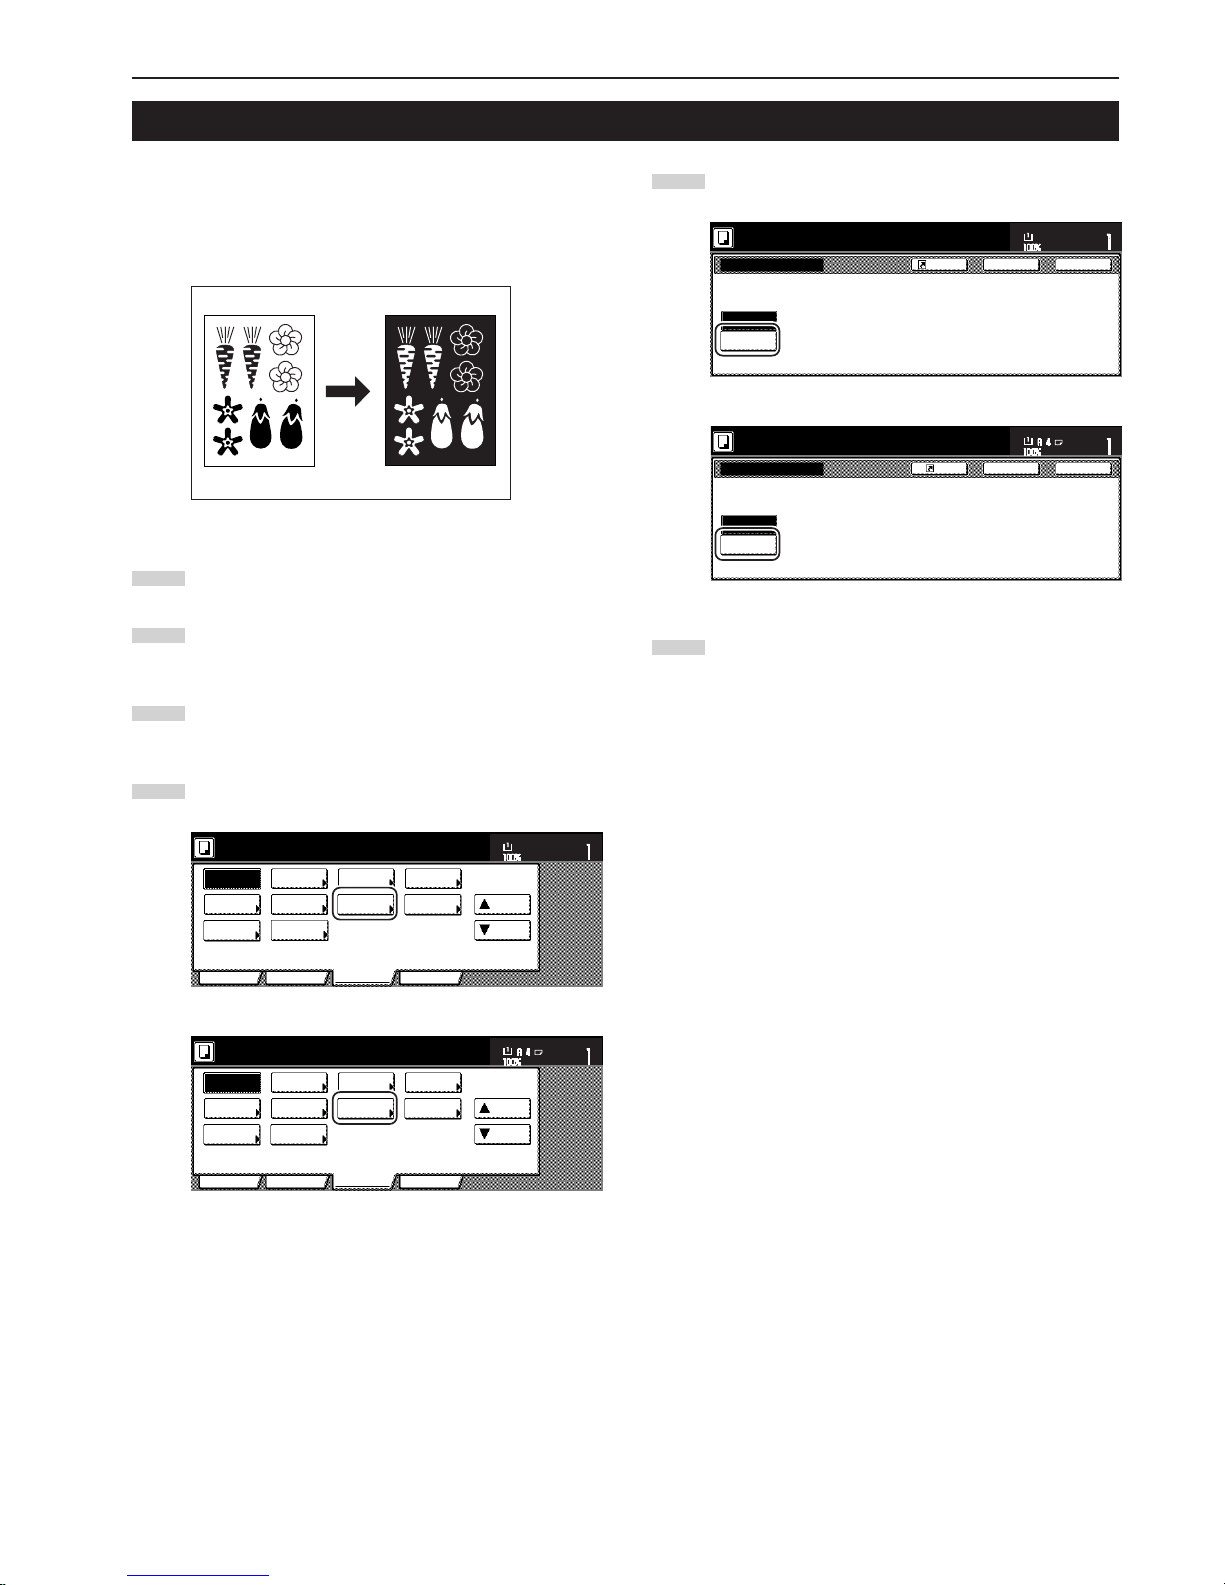
Section 5 OTHER CONVENIENT FUNCTIONS
5-39
18. Inverting black and white [Invert mode]
With this mode, you can make copies where the black and white
areas of the image are inverted (or reversed).
* If multiple inverted copies are being made, “Please wait Now
cleaning” may be displayed.
1
Set the originals to be copied.
2
Touch the “Function” tab. The content of the “Function” tab
will be displayed.
3
Touch the “▼ Down” key. The content of the next portion of
the “Function” tab will be displayed.
4
Touch the “Invert” key. The “Invert” screen will be displayed.
Inch specifications
Invert Mirror
Modify
Copy
Proof Copy
Memo
pages
Orig. set
direction
Ready to copy.
Up
Down
Set
Paper size
Eco Print
Auto
Rotation
Function
Basic User choice Program
OHP
backing
11x81/2"
Select of
Output
Metric specifications
Invert Mirror
Modify
copy
Select of
Output
Test copy
Memo
pages
Orig. set
direction
Ready to copy.
Up
Down
Set
Paper size
Eco print
Auto
Rotation
Function
Basic User choice Program
OHP back
5
Touch the “On” key.
Inch specifications
Off
On
Back Close
Invert
Ready to copy.
Set
Paper Size
Copy the scanned image with reversing
black and white parts.
11x81/2"
Register
Metric specifications
Off
On
Back Close
Invert
Register
Ready to copy.
Set
Paper size
Copy scanned image with
black and white parts reversed.
6
Press the [Start] key.
Copying will start.
Page 82
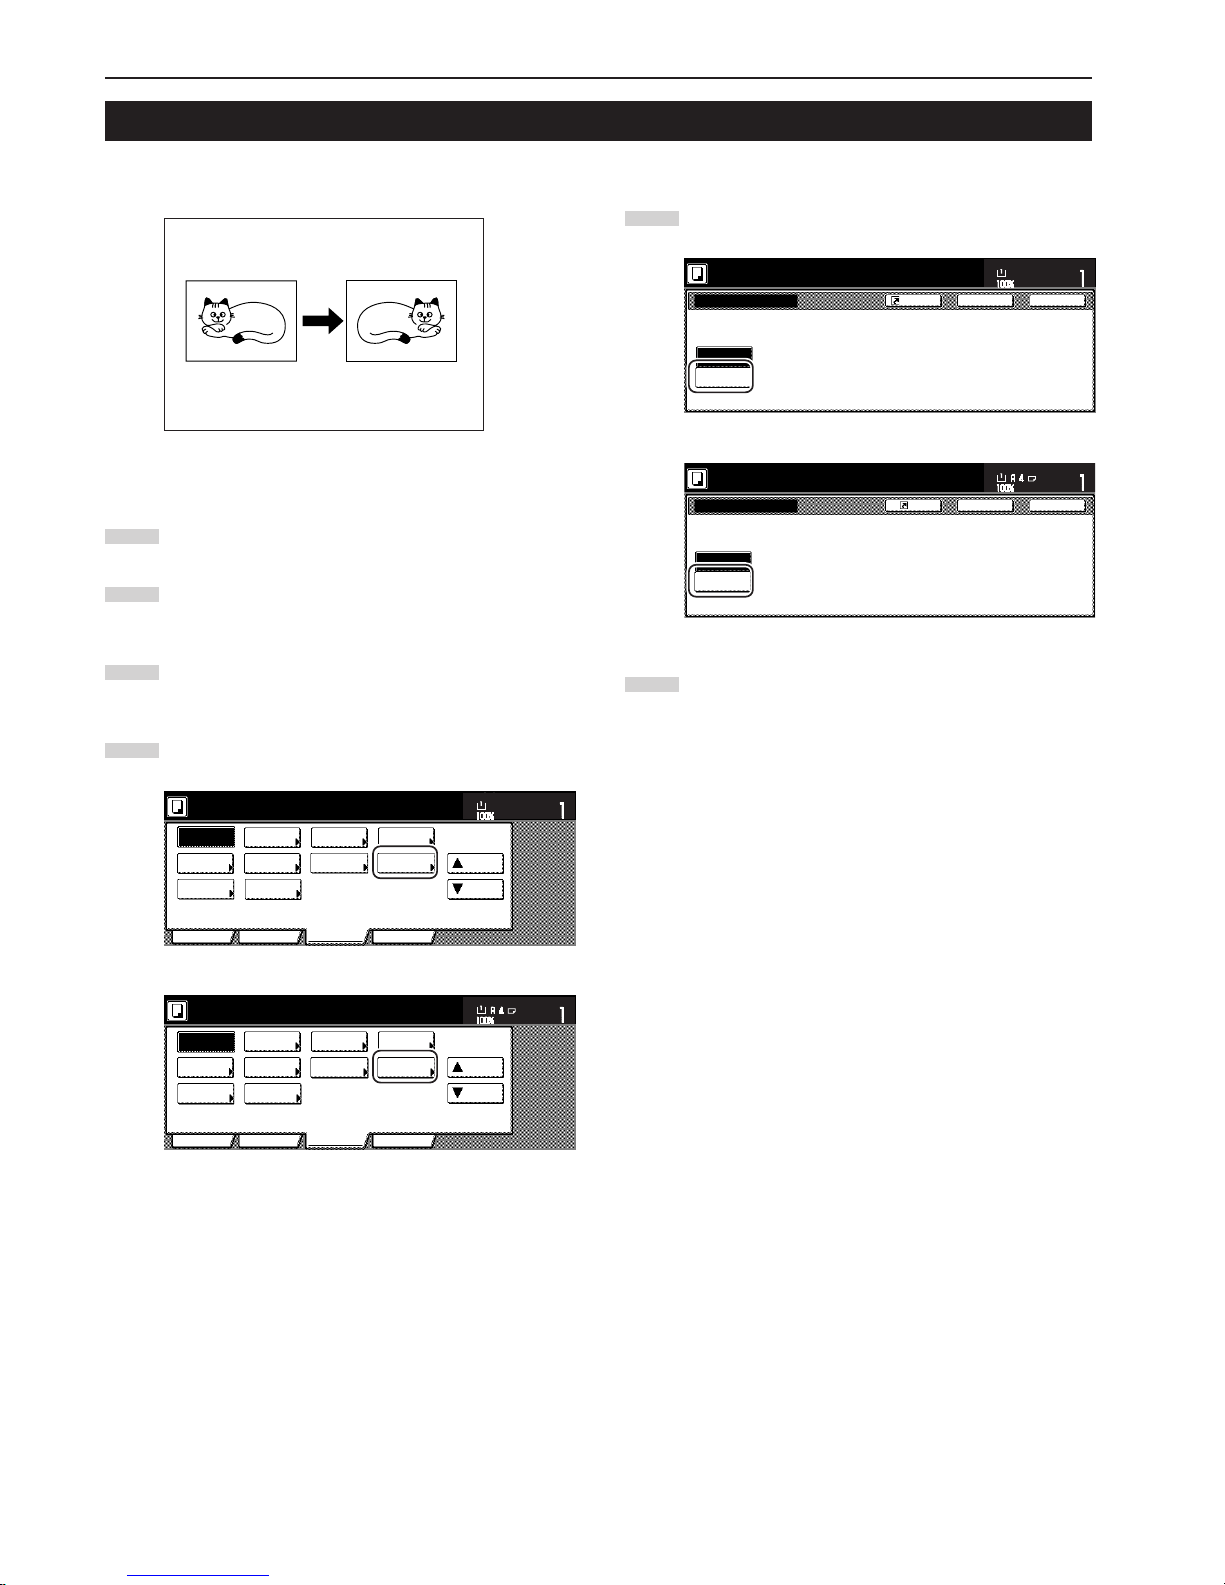
Section 5 OTHER CONVENIENT FUNCTIONS
5-40
19. Making mirror image copies [Mirror image mode]
With this mode, you can make mirror image copies.
1
Set the originals to be copied.
2
Touch the “Function” tab. The content of the “Function” tab
will be displayed.
3
Touch the “▼ Down” key. The content of the next portion of
the “Function” tab will be displayed.
4
Touch the “Mirror” key. The “Mirror” screen will be displayed.
Inch specifications
Invert Mirror
Modify
Copy
Proof Copy
Memo
pages
Orig. set
direction
Ready to copy.
Up
Down
Set
Paper size
Eco Print
Auto
Rotation
Function
Basic User choice Program
OHP
backing
11x81/2"
Select of
Output
Metric specifications
Invert Mirror
Modify
copy
Select of
Output
Test copy
Memo
pages
Orig. set
direction
Ready to copy.
Up
Down
Set
Paper size
Eco print
Auto
Rotation
Function
Basic User choice Program
OHP back
5
Touch the “On” key.
Inch specifications
Back Close
Mirror
Ready to copy.
Set
Paper Size
Reverse scanned image left to right,
mirror image.
11x81/2"
Register
Off
On
Metric specifications
Back Close
Mirror
Register
Ready to copy.
Set
Paper size
Reversed scanned image left to
right as a reflection in the mirror.
Off
On
6
Press the [Start] key.
Copying will start.
Page 83
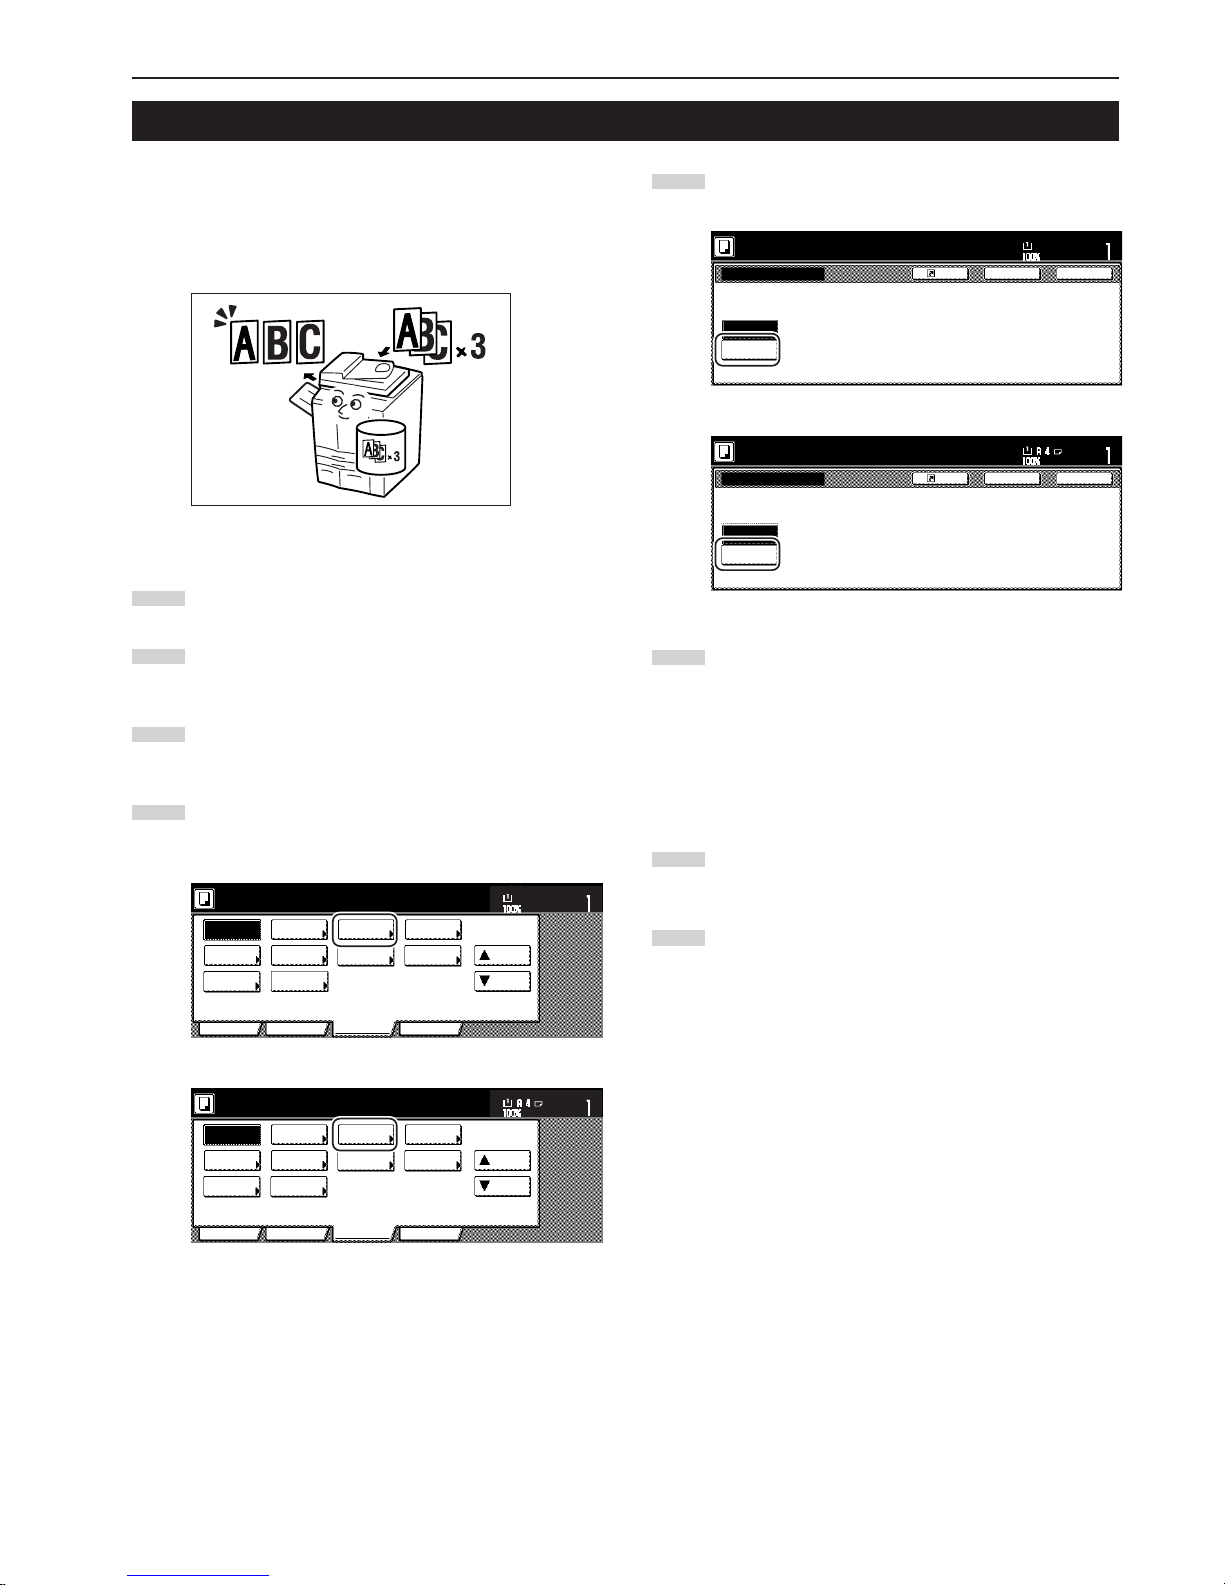
Section 5 OTHER CONVENIENT FUNCTIONS
5-41
With this mode, you can use the same settings to create a single set
of test copies in order to verify the results prior to actually starting to
make a large number of copies or copy sets. This way, if there is a
problem with the copies, you can cancel print out in order to change
the settings and eliminate a great majority of miss-copying.
1
Set the originals to be copied.
2
Touch the “Function” tab. The content of the “Function” tab
will be displayed.
3
Touch the “▼ Down” key. The content of the next portion of
the “Function” tab will be displayed.
4
Touch the “Proof Copy” [“Test copy”] key. The “Proof Copy”
[“Test copy”] screen will be displayed.
Inch specifications
Invert Mirror
Modify
Copy
Proof Copy
Memo
pages
Orig. set
direction
Ready to copy.
Up
Down
Set
Paper size
Eco Print
Auto
Rotation
Function
Basic User choice Program
OHP
backing
11x81/2"
Select of
Output
Metric specifications
Invert Mirror
Modify
copy
Select of
Output
Test copy
Memo
pages
Orig. set
direction
Ready to copy.
Up
Down
Set
Paper size
Eco print
Auto
Rotation
Function
Basic User choice Program
OHP back
20. Making a test copy prior to large volume copying [Proof mode]
5
Touch the “On” key.
Inch specifications
Back
Register
Close
Proof Copy
Ready to copy.
When "On" is selected, copying stops
after one set is ejected.
This is useful for checking finishing.
Set
Paper
81/2x11
Off
On
Metric specifications
Back
Register
Close
Test Copy
Ready to copy.
On
Off
If "On" is selected, copying stops after
one set is ejected. Finishing
result can then be checked.
Set
Paper size
6
Press the [Start] key.
Scanning of the originals will start.
If you set the originals in the Document Processor, creation
of the test copy set will start automatically.
If you set an original on the platen, a message will appear
telling you to set the next original. In this case, go to the next
step.
7
Replace the first original with the next one and press the
[Start] key. Scanning of that next original will start.
8
Once you have finished scanning all of the originals, touch
the “Scanning finished” key. Copying of the test copy set will
start.
Page 84
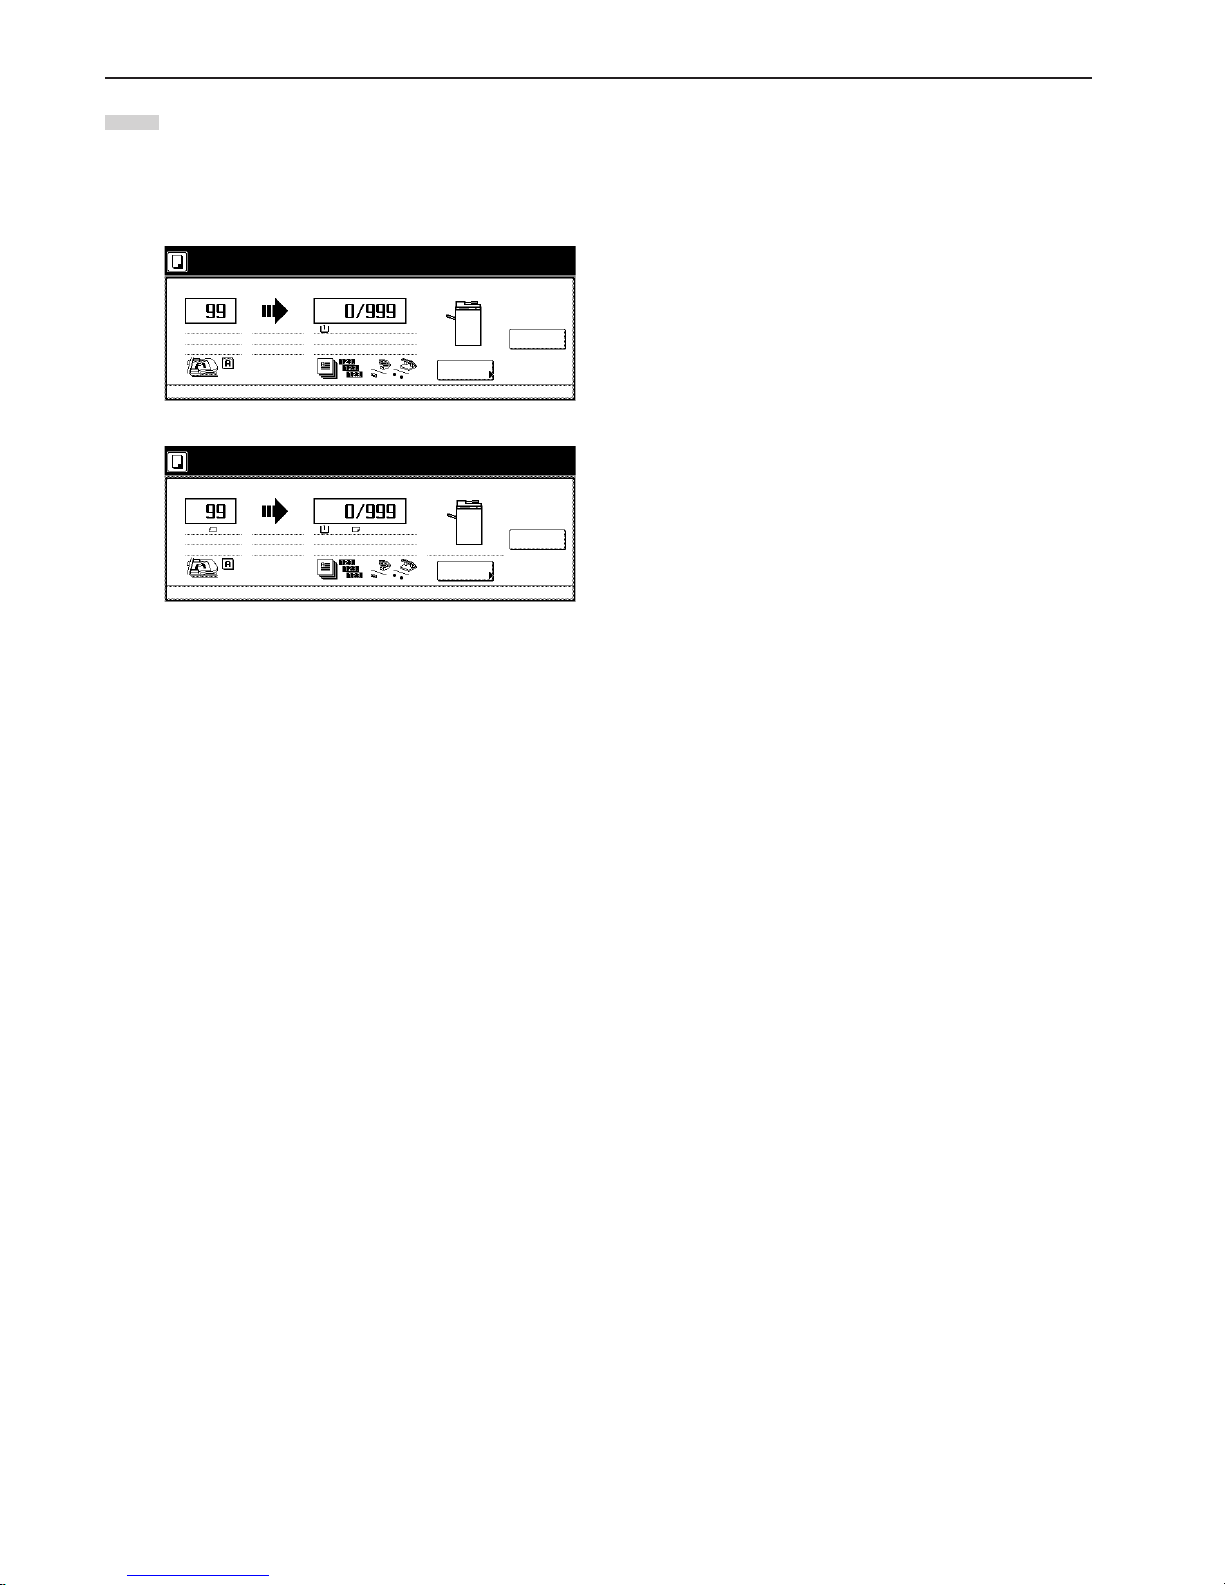
Section 5 OTHER CONVENIENT FUNCTIONS
5-42
9
Once the test copy set is complete, a screen will be
displayed in order to verify whether or not you want to make
the initially designated number of copy sets at the present
settings, and the copier will enter a waiting-to-copy state.
Check the test copies.
Inch specifications
Change
Preset
Cancel
Orig. page
Count/Set
Check proof copy.
When stopping and retry press "Cancel" key.
When continue to print, press "Start" key.
2 sided
Sort/Staple/Punch
100%
APS
Output
Rear
1 sided
Job130
11x81/2"
11x8
1
/2"
Metric specifications
Change
Preset
Cancel
Original
Count / set
Check test copy.
To stop and retry , press "Cancel" key.
To continue to print, press "Start" key.
2-sided
Sort/Staple/Punch
100%
APS
Output
Rtop/Rear
1-sided
JOB130
A4
A4
● If there is no problem with the copies…
Press the [Start] key and copying of the initially designated
number of copy sets will start.
If you want to change the number of copies to be made,
press the [Change Preset] key and enter the actual number
of copies you do want to make.
● If there is some problem with the copies…
Touch the “Cancel” key to cancel the copy job and start the
procedure from the beginning.
Page 85
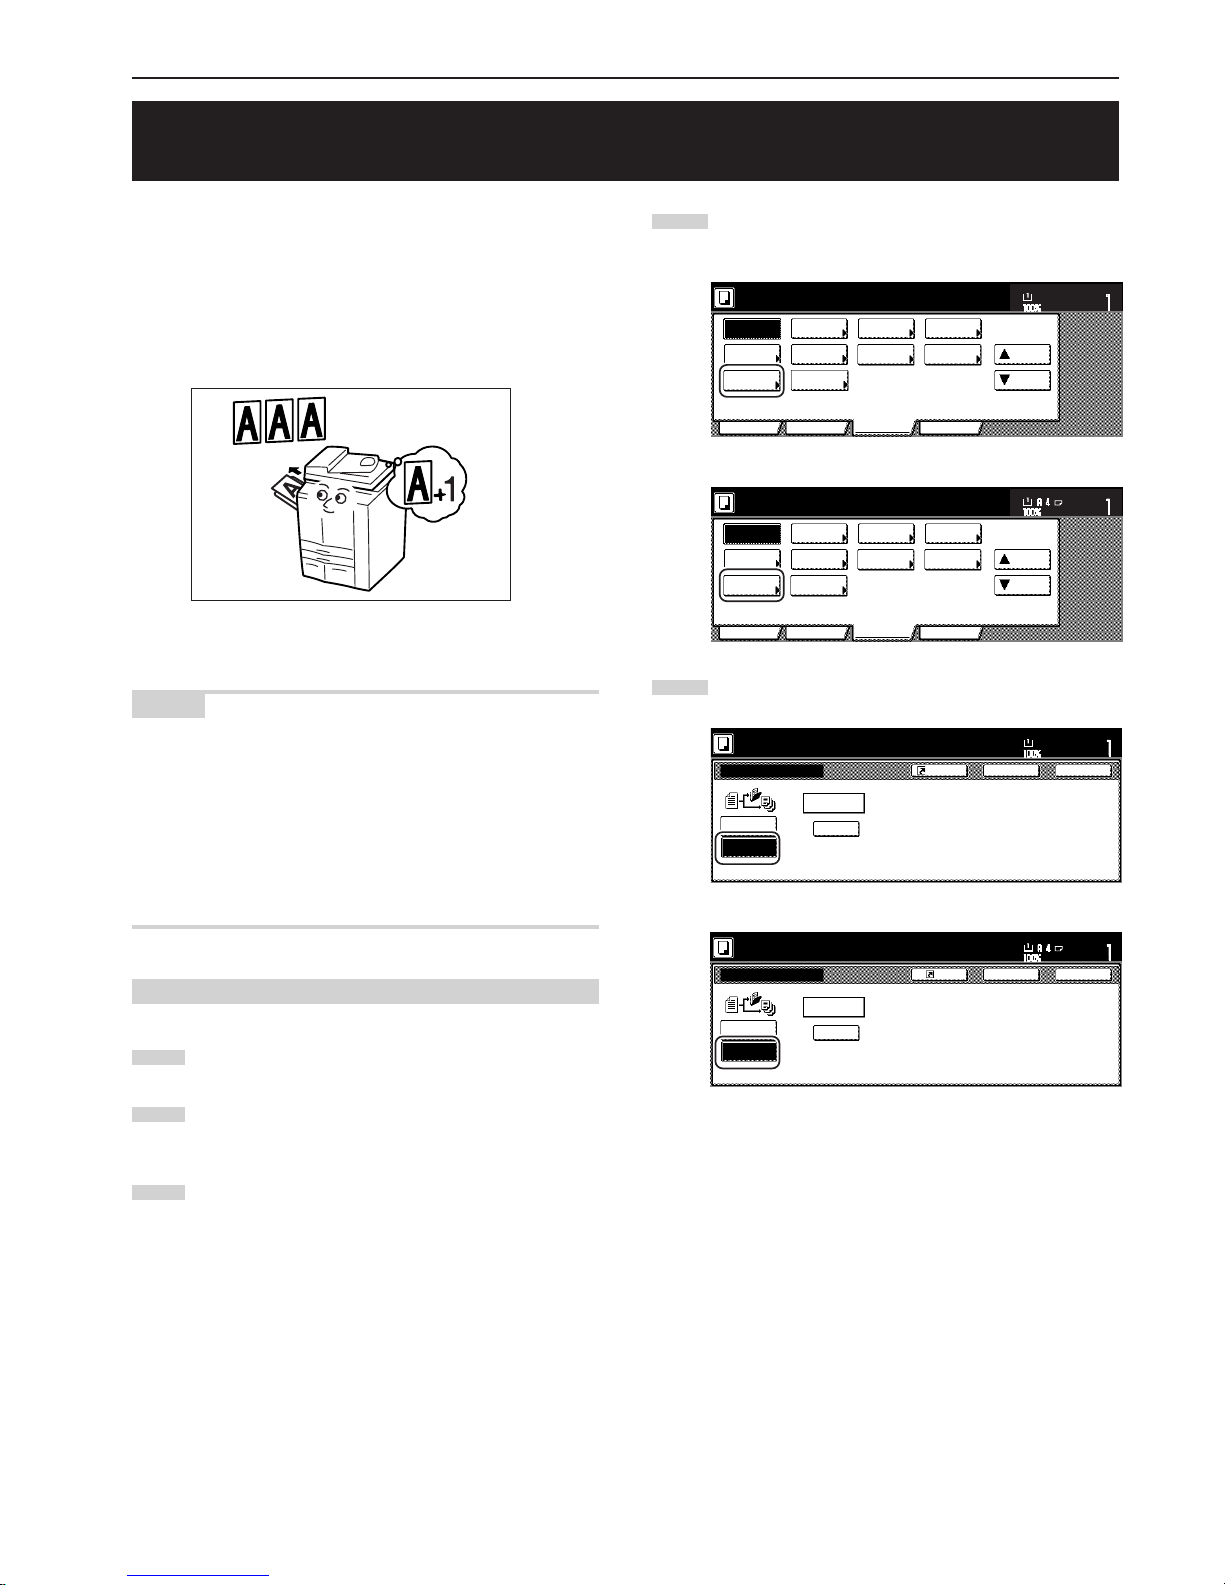
Section 5 OTHER CONVENIENT FUNCTIONS
5-43
21. Making more of the same copies after a copy job is finished
[Repeat copy mode]
With this mode, if you think you might want to make another set of the
same copies even after the initial copy job is finished, simply turn the
repeat copy mode ON and you can make the necessary number of
additional copies later. In order to maintain privacy, you can make it
necessary to enter a security code in order to use the repeat copy
mode so that, if the entered code doesn’t match the registered
security code, it will not be possible to use the repeat copy mode.
NOTES
• All data for repeat copying will be deleted when the main switch
is turned OFF.
• Repeat copying registration is not available for print out under
document management or with the form overlay mode.
• Repeat copying registration and print out are not available with
interrupt copying.
• You can prohibit repeat copying as well as make repeat copying
the default setting in the initial mode. (See “Repeat copying ON/
OFF” on page 7-58.)
(1) Registering a copy job for repeat copying
1
Set the originals to be copied.
2
Touch the “Function” tab. The content of the “Function” tab
will be displayed.
3
Touch the “▼ Down” key. The content of the next portion of
the “Function” tab will be displayed.
4
Touch the “Modify Copy” key. The “Modify Copy” screen will
be displayed.
Inch specifications
Invert Mirror
Modify
Copy
Proof Copy
Memo
pages
Orig. set
direction
Ready to copy.
Up
Down
Set
Paper size
Eco Print
Auto
Rotation
Function
Basic User choice Program
OHP
backing
11x81/2"
Select of
Output
Metric specifications
Invert Mirror
Modify
copy
Select of
Output
Test copy
Memo
pages
Orig. set
direction
Ready to copy.
Up
Down
Set
Paper size
Eco print
Auto
Rotation
Function
Basic User choice Program
OHP back
5
Touch the “On” key.
Inch specifications
Back
Close
Modify Copy
Ready to copy.
On
# keys
Security
Off
When select [On], data can be saved.
You can recall and re-print at anytime.
You can set the password to secure
saved document.
Set
Paper Size
11x81/2"
Register
Metric specifications
Back
Register
Close
Modify copy
Ready to copy.
On
#-Keys
Security
Off
When select [On], job can be saved.
You can recall and re-print at anytime.
You can set a password to secure saved
document.
Set
Paper size
If you want to register a security code, go to the next step.
If you do NOT want to register a security code, go directly to
step 7.
Page 86
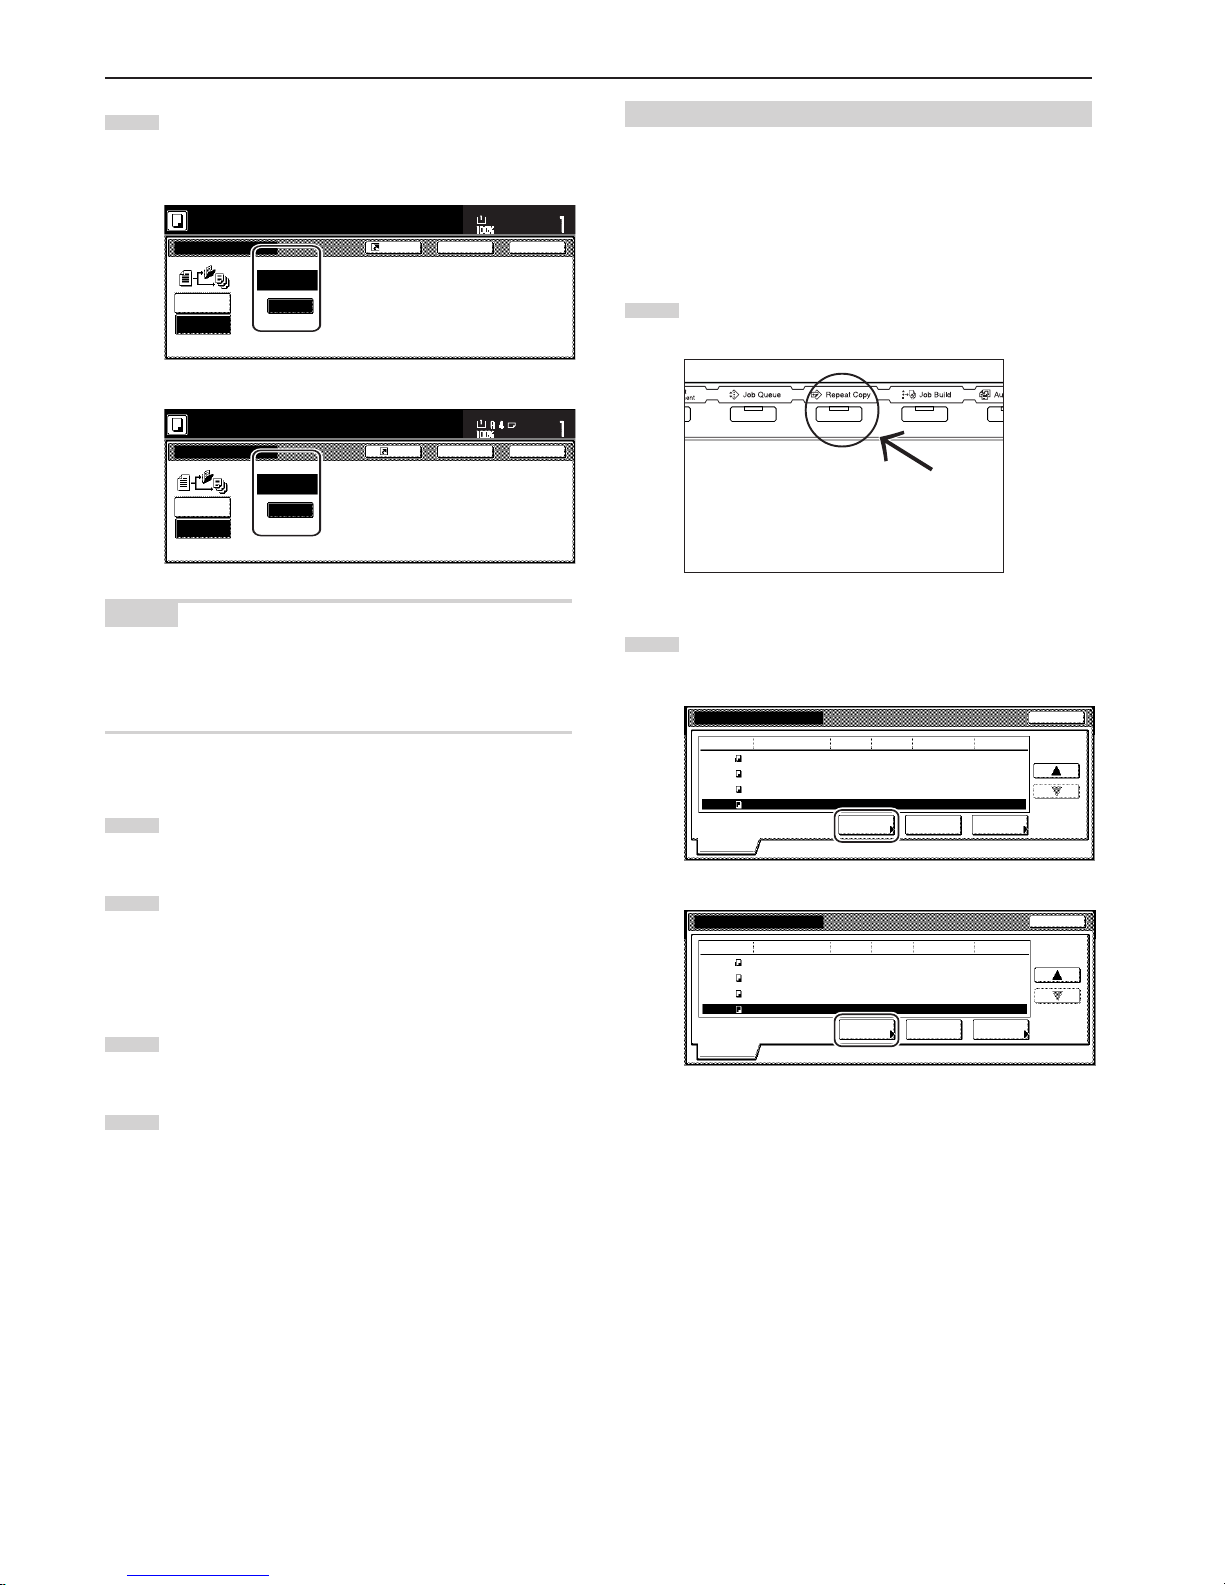
Section 5 OTHER CONVENIENT FUNCTIONS
5-44
6
Touch the “#keys” key to highlight that key and then enter the
security code that will enable repeat copying for these
originals.
Inch specifications
Back
Close
Modify Copy
Ready to copy.
On
# keys
Security
Off
When select [On], data can be saved.
You can recall and re-print at anytime.
You can set the password to secure
saved document.
Set
Paper Size
11x81/2"
Register
Metric specifications
Back
Register
Close
Modify copy
Ready to copy.
On
#-Keys
Security
Off
Set
Paper size
When select [On], job can be saved.
You can recall and re-print at anytime.
You can set a password to secure saved
document.
NOTES
• The security code can be between 1 and 8 digits long.
• If you forget the security code that you enter here, repeat copying
will not be possible for these originals. Be sure to keep some sort
of record of the security code.
7
Press the [Start] key.
Scanning of the originals will start.
8
If you set the originals in the Document Processor, copying
will start automatically.
If you set an original on the platen, a message will appear
telling you to set the next original. In this case, go to the next
step.
9
Replace the first original with the next one and press the
[Start] key. Scanning of that next original will start.
10
Once you have finished scanning all of the originals, touch
the “Scanning finished” key. Copying will start.
(2) Printing out with the repeat copy mode
Once you press the [Repeat Copy] key, the “Modify copy” list will be
displayed so that you can verify the copy jobs that are registered for
repeat copying. It is possible to reprint, check the contents of, and
delete the copy jobs that are registered in this list.
1 Reprinting a registered copy job
1
Press the [Repeat Copy] key. The “Modify copy” list will be
displayed.
2
Select the copy job that you want to reprint and touch the
“Reprint” key.
Inch specifications
Job
User
Original
Reprint Delete
Check
details
Modify Copy
Set Registration Type
Normal
10/10 22:371
5
2
6
119
120
121
122
7
3
10
1
10/10 22:40
10/10 22:45
10/10 22:50
10/10 22:50
Normal
Normal
Normal
–––––––––––
–––––––––––
–––––––––––
–––––––––––
End
Modify copy
Metric specifications
JOB
User
Original
Reprint Delete
Check
details
Modify copy
Set
Registration
Type
10/10 22:371
5
2
6
119
120
121
122
7
3
10
1
10/10 22:40
10/10 22:45
10/10 22:50
10/10 22:50
Norm copy
Norm copy
Norm copy
Norm copy
––––––––––
––––––––––
––––––––––
––––––––––
End
Modify copy
If you designated a security code when you registered the
copy job for repeat copying, the code input screen will be
displayed. In this case, go to the next step.
If you did NOT designate a security code when you
registered the copy job for repeat copying, the screen to
select the number of copies or copy sets to be made will be
displayed. In this case, go directly to step 4.
Page 87
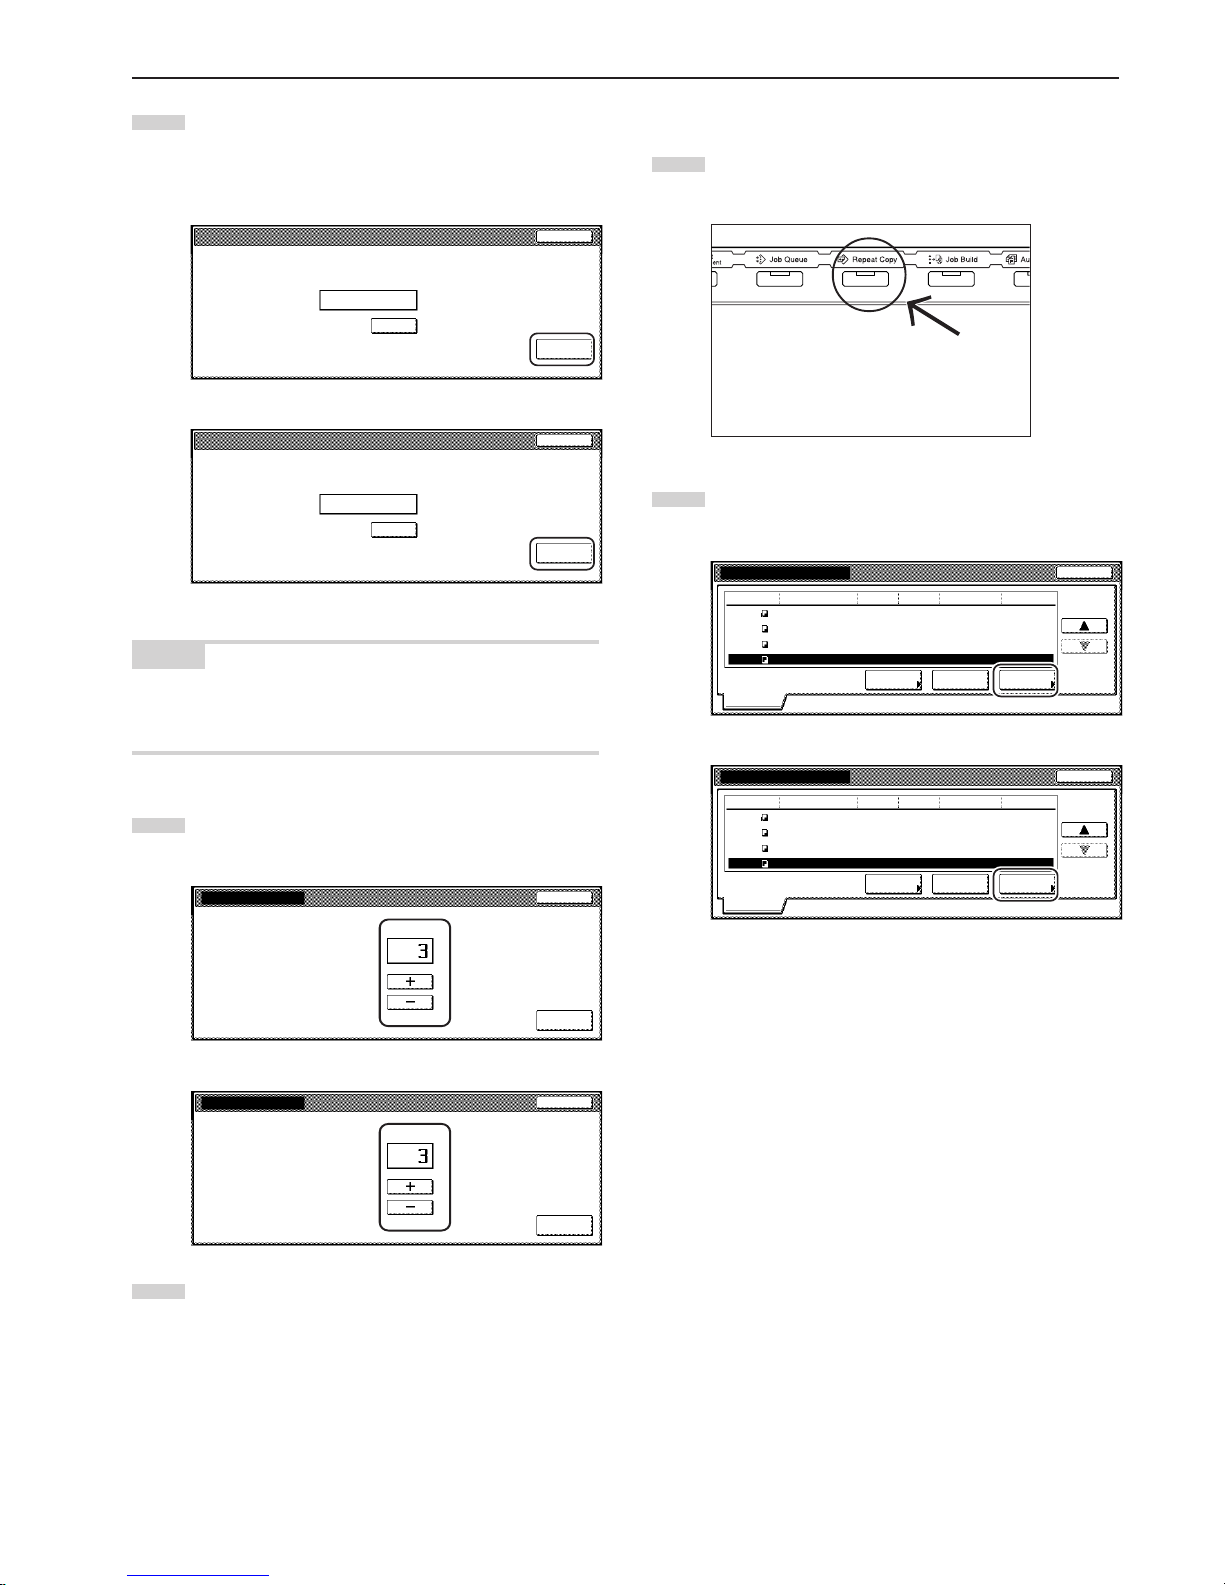
Section 5 OTHER CONVENIENT FUNCTIONS
5-45
2 Checking the contents of registered copy jobs
1
Press the [Repeat Copy] key. The “Modify copy” list will be
displayed.
2
Select the copy job that you want to check the content of and
touch the “Check detail” key.
Inch specifications
Job
User
Original
Reprint Delete
Check
details
Modify Copy
Set Registration Type
Normal
10/10 22:371
5
2
6
119
120
121
122
7
3
10
1
10/10 22:40
10/10 22:45
10/10 22:50
10/10 22:50
Normal
Normal
Normal
–––––––––––
–––––––––––
–––––––––––
–––––––––––
End
Modify copy
Metric specifications
JOB
User
Original
Reprint Delete
Check
details
Modify copy
Set
Registration
Type
10/10 22:371
5
2
6
119
120
121
122
7
3
10
1
10/10 22:40
10/10 22:45
10/10 22:50
10/10 22:50
Norm copy
Norm copy
Norm copy
Norm copy
––––––––––
––––––––––
––––––––––
––––––––––
End
Modify copy
If you designated a security code when you registered the
copy job for repeat copying, the code input screen will be
displayed. In this case, go to the next step.
If you did NOT designate a security code when you
registered the copy job for repeat copying, the “Check
details / Reprint” screen will be displayed. In this case,
go directly to step 4.
3
Use the keypad to enter the appropriate security code and
the touch the “Enter” key. If the entered code matches the
registered one, the screen to select the number of copies or
copy sets to be made will be displayed.
Inch specifications
Enter
(Enter by #key)
Clear
Enter the re-print code.
Stop
Metric specifications
Enter
(Enter #-key)
Clear
Enter the re-print code.
Stop
NOTES
• To reenter a mistaken security code, touch the “Clear” key.
• If you touch the “Stop” key, the touch panel will return to the
screen in step 2.
4
Touch the “+” key or the “-” key to set the number of copies
or copy sets to be made.
Inch specifications
Printing
Set
Stop
Reprint
Metric specifications
Printing
Set
Stop
Reprint
5
Touch the “Printing” key.
Print out will start.
Page 88
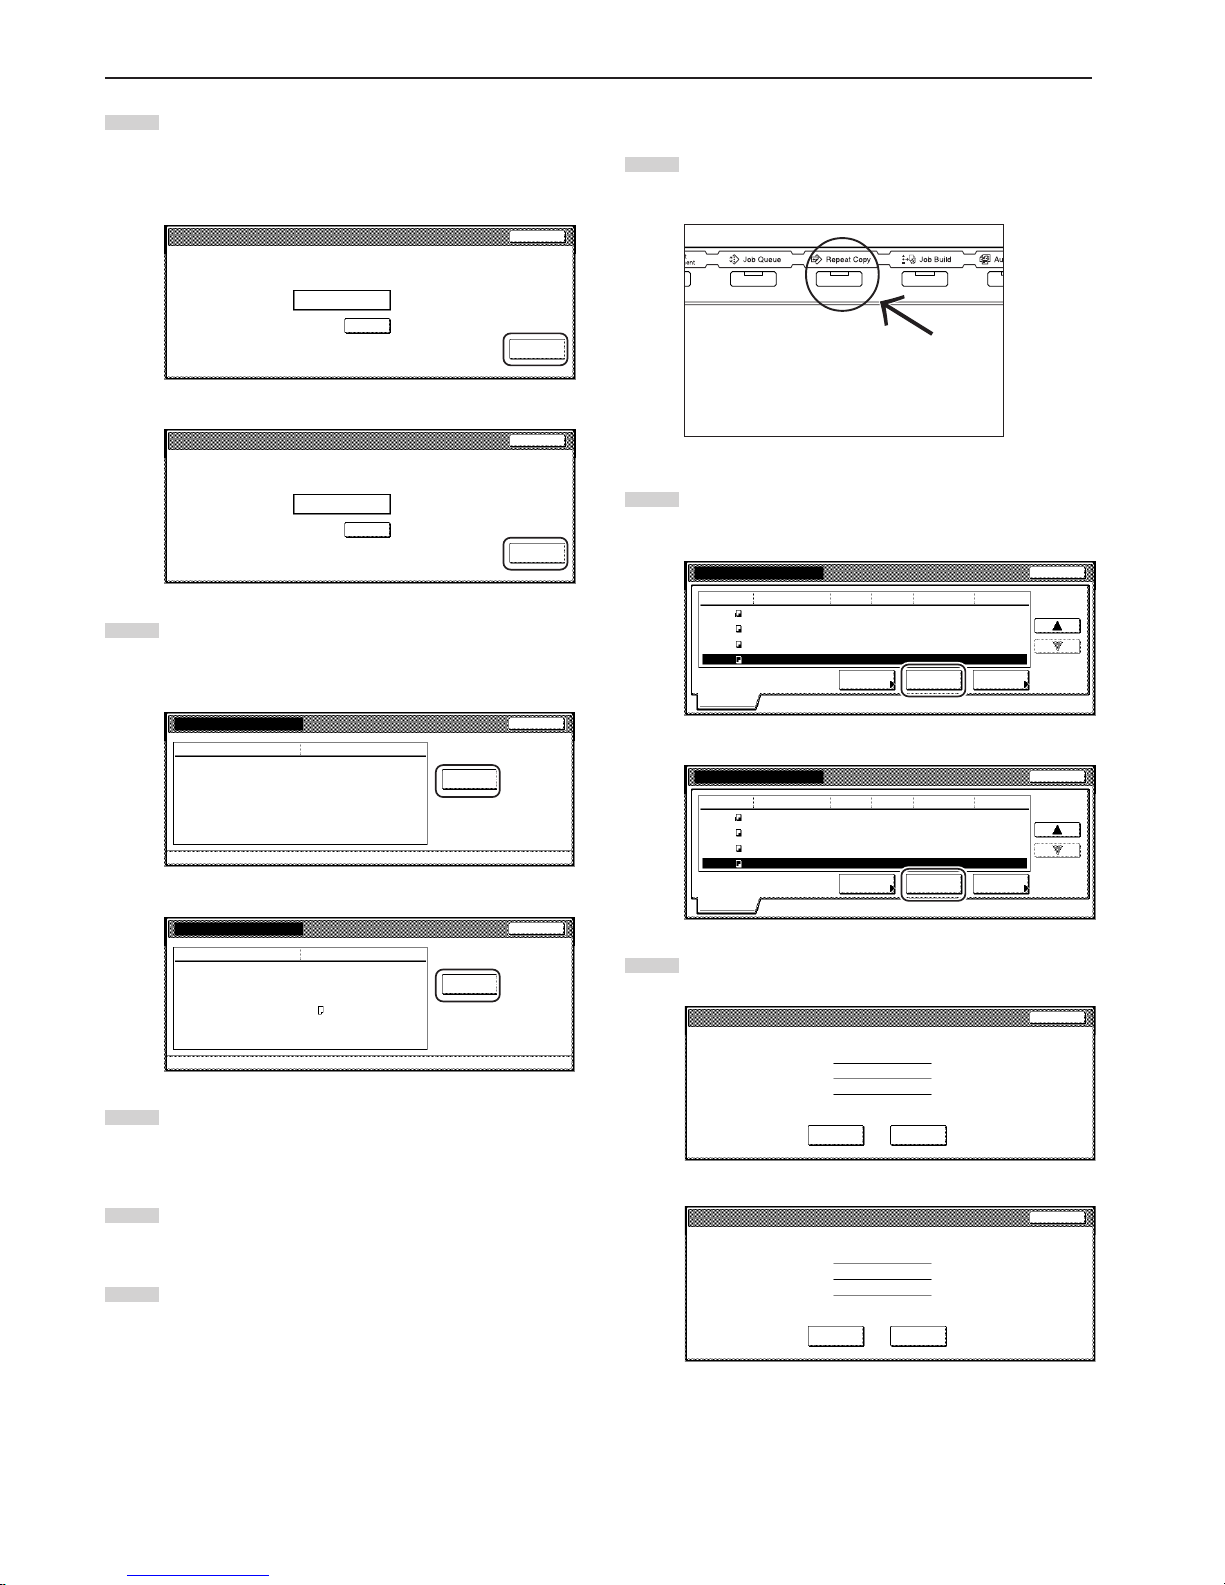
Section 5 OTHER CONVENIENT FUNCTIONS
5-46
3
Use the keypad to enter the appropriate security code and
the touch the “Enter” key. If the entered code matches the
registered one, the “Check details / Reprint” screen will be
displayed.
Inch specifications
Enter
(Enter by #key)
Clear
Enter the re-print code.
Stop
Metric specifications
Enter
(Enter #-key)
Clear
Enter the re-print code.
Stop
4
Check the contents of the selected job. You can also check
the content of the first page of the copy job by touching the
“Print from 1st” [“Head print”] key.
Inch specifications
Print
from 1st
DetailsItem
User name
Job name
Orig. page 3
– – – – – – – –
– – – – – – – –
5
11 x 8
1
/2"
copy
Output tray
Set
Print size
Input source
Registration date
Output
Job120
Close
Check details / Reprint
10/10 22:40
Metric specifications
Head
print
DetailsItem
User name
Job name
Original 3
– – – – – – – – –
– – – – – – – – –
5
A4
Copy
Set
Print size
Input source
Registration date
Output
Job120
Close
Check details / Reprint
10/10 22:40
Output tray
5
Once you have finished checking the content of the copy job,
touch the “Close” key. The touch panel will return to the
screen in step 2.
6
If you want to check the contents of another registered copy
job, repeat steps 2 through 5.
7
Touch the “Close” key. The touch panel will return to the
contents of the “Basic” tab.
3 Deleting a registered copy jobs
1
Press the [Repeat Copy] key. The “Modify copy” list will be
displayed.
2
Select the copy job that you want to delete and touch the
“Delete” key. A verification screen will be displayed.
Inch specifications
Job
User
Original
Reprint Delete
Check
details
Modify Copy
Set Registration Type
Normal
10/10 22:371
5
2
6
119
120
121
122
7
3
10
1
10/10 22:40
10/10 22:45
10/10 22:50
10/10 22:50
Normal
Normal
Normal
–––––––––––
–––––––––––
–––––––––––
–––––––––––
End
Modify copy
Metric specifications
JOB
User
Original
Reprint Delete
Check
details
Modify copy
Set
Registration
Type
10/10 22:371
5
2
6
119
120
121
122
7
3
10
1
10/10 22:40
10/10 22:45
10/10 22:50
10/10 22:50
Norm copy
Norm copy
Norm copy
Norm copy
––––––––––
––––––––––
––––––––––
––––––––––
End
Modify copy
3
Touch the “Yes” key or the “No” key, as appropriate.
Inch specifications
Job # :
User name :
Job name :
Delete this job. Are you sure?
Yes No
Stop
117
-----------------------
-----------------------
Metric specifications
Job # :
User name :
Job name :
Delete this job. Do you really want to delete?
Yes No
Stop
117
-----------------------
-----------------------
If you selected “Yes”, the selected copy job will be canceled
and the touch panel will return to the screen in step 2.
If you selected “No”, the touch panel will return to the screen
in step 2 without canceling the selected job.
Page 89

Section 5 OTHER CONVENIENT FUNCTIONS
5-47
4
If you want to cancel another registered copy job, repeat
steps 2 through 3.
5
Touch the “Close” key. The touch panel will return to the
contents of the “Basic” tab.
Page 90
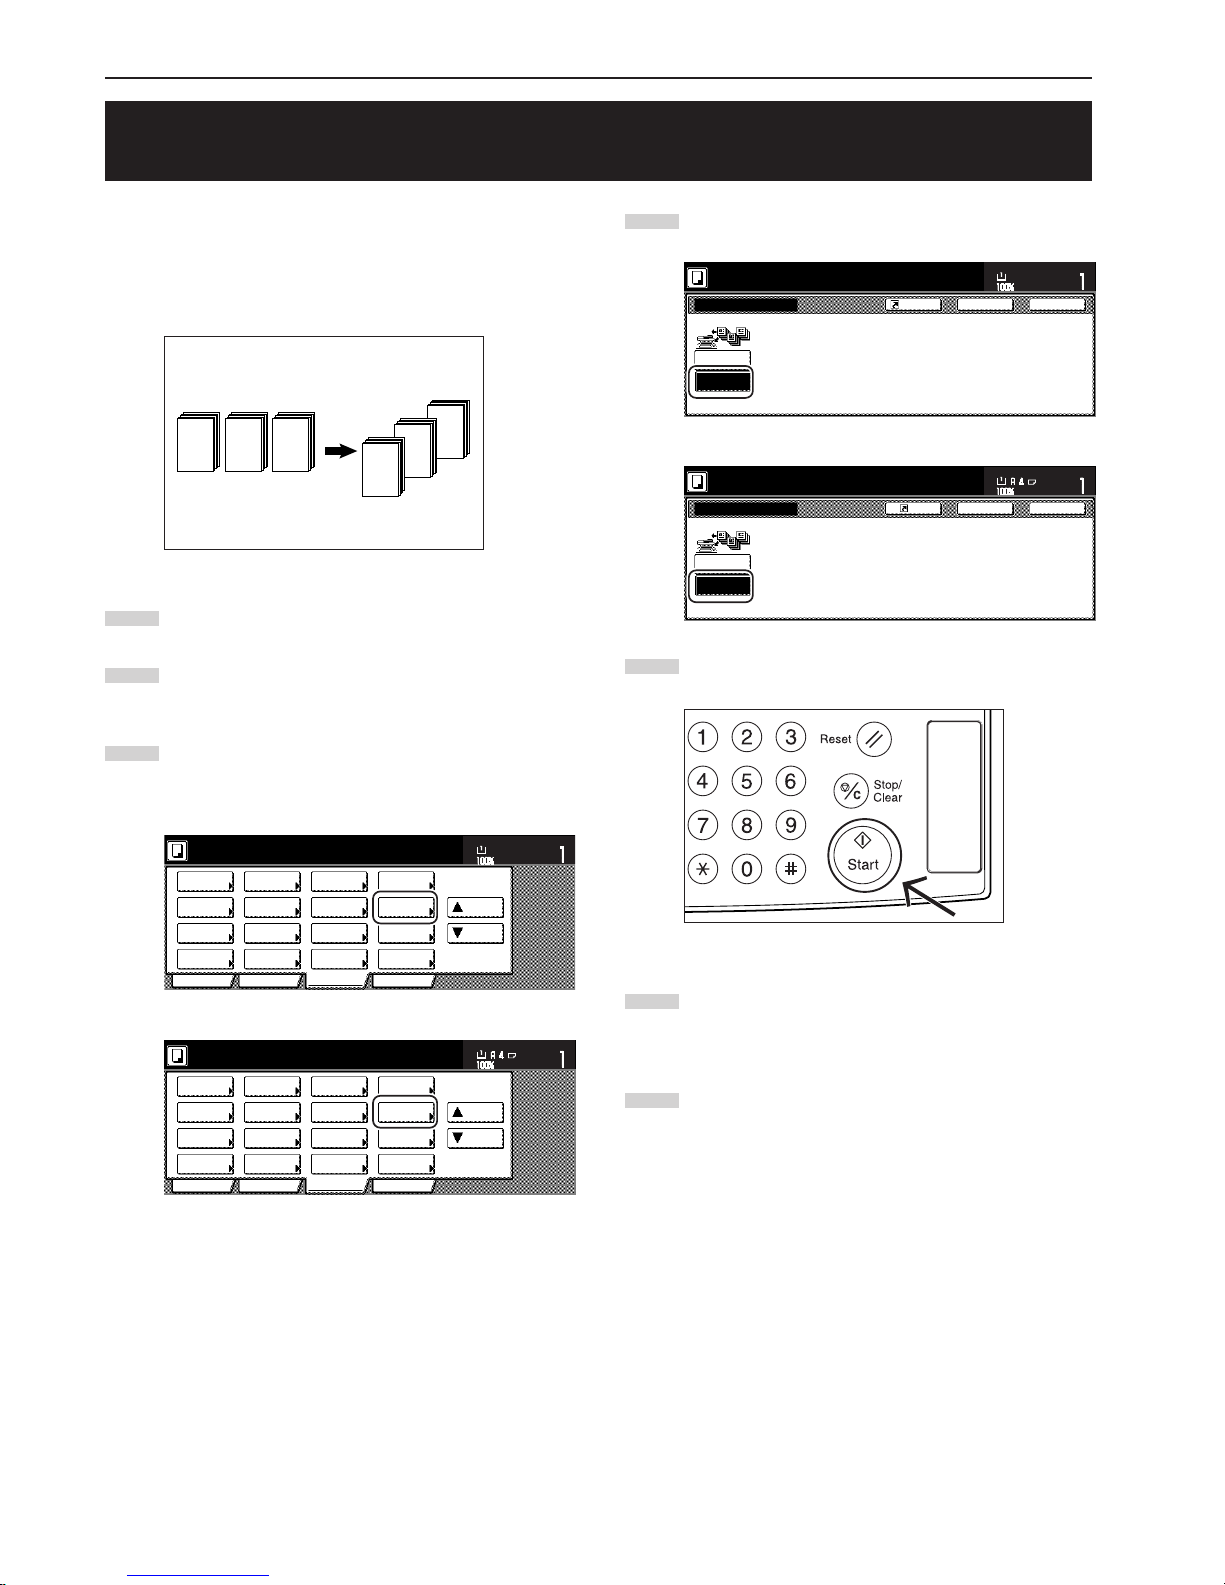
Section 5 OTHER CONVENIENT FUNCTIONS
5-48
With this mode, you can scan multiple sets of originals and then have
them all copied at the same time. Scan one set of originals of the
same type and size and then register that as a single step in the copy
job, and you can copy an extremely large volume of originals in one
batch.
1
Set the originals to be copied.
2
Touch the “Function” tab. The content of the “Function” tab
will be displayed.
3
Touch the “Batch scanning” [“Large # of originals”] key.
The “Continuous scanning” [“Multiple scanning”] screen will
be displayed.
Inch specifications
2 sided/
Separation
Select
paper
Combine
Reduce
/Enlarge
Margin/
Centering
Forms
Overlay
Page #
Function
Basic User choice Program
Cover
Mode
Booklet
Sort/
Finished
Border
Erase
Exposure
mode
Orig.image
quality
Ready to copy.
Select
orig. size
Auto
Selection
Batch
scanning
Up
Down
Set
Paper size
11x81/2"
Metric specifications
Select
paper
2-sided/
Split
Merge copy
Reduce/
Enlarge
Margin/
Imag. shift
Page
numbering
Function
Basic User choice Program
Cover
Mode
Booklet
Erase
Mode
Exposure
mode
Image
quality
Sort/
Finished
Ready to copy.
Select
size orig.
Auto
selection
Large # of
originals
Form
overlay
Up
Down
Set
Paper size
22. Copying a large volume of originals in one operation
[Batch scanning mode]
4
Touch the “On” key.
Inch specifications
Off
On
Back Close
Continuous scanning
Place originals then press Start key.
Set
Paper Size
Copy scanned images off.
Platen as one job or scanned originals
using document processor.
11x81/2"
Register
Metric specifications
Off
On
Back Close
Multiple scanning
Set original.
Press Start key.
Register
Set
Paper size
Originals scanned through the platen
and Document Processor can be
processed as one copy job.
5
Press the [Start] key.
Scanning of the originals will start.
6
Replace the first originals with the next set and press the
[Start] key. Scanning of those next originals (the next step in
the copy job) will start.
7
Once you have finished scanning all of the originals, touch
the “Scanning finished” key. Copying will start.
A B C
C
B
A
Page 91
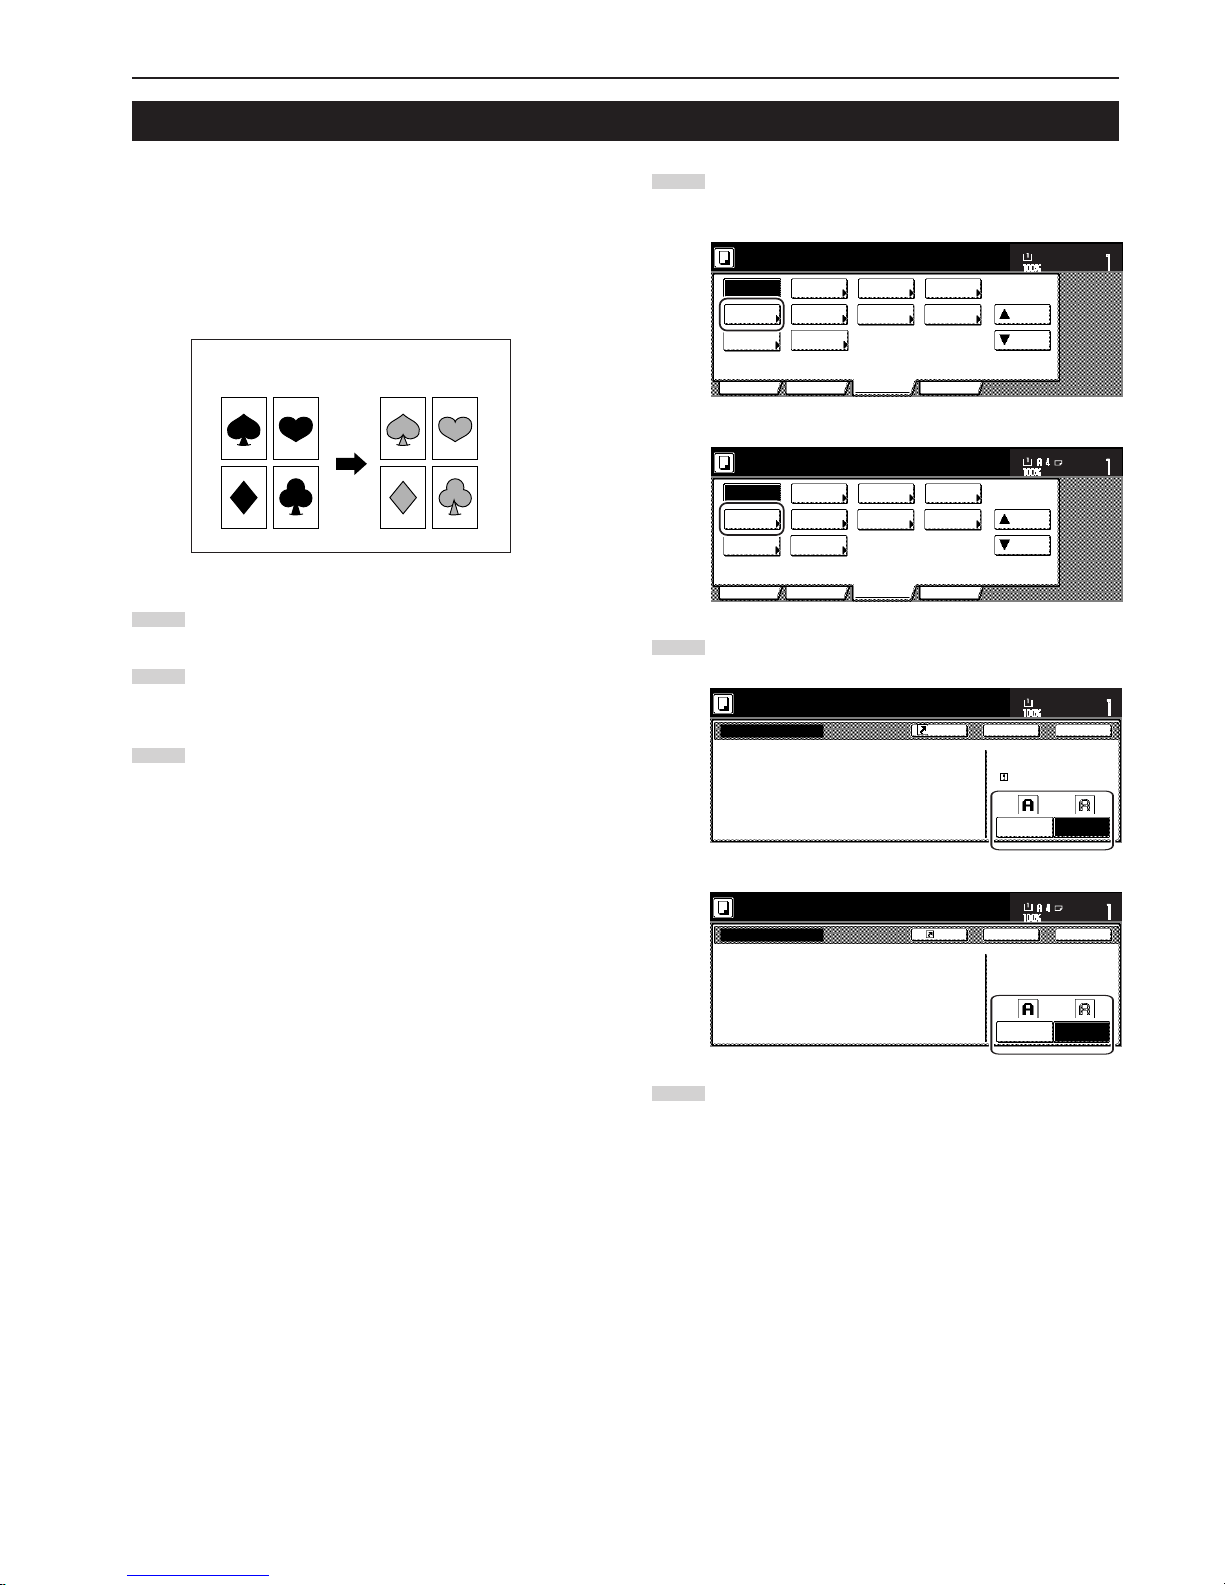
Section 5 OTHER CONVENIENT FUNCTIONS
5-49
With this mode, you can reduce the amount of toner that is used to
make the copies.
Use this mode with, for example making test copies, when you do not
especially need to print out high quality copies. You can also make
the eco print mode the default setting in the initial mode. (See “Eco
print mode ON/OFF” on page 7-43.)
* Images will be printed out relatively lighter than normal.
1
Set the originals to be copied.
2
Touch the “Function” tab. The content of the “Function” tab
will be displayed.
3
Touch the “▼ Down” key. The content of the next portion of
the “Function” tab will be displayed.
23. Saving on toner use [Eco print mode]
With the eco print
mode turned ON
With the eco print
mode turned OFF
4
Touch the “Eco print” key. The “Eco print” screen will be
displayed.
Inch specifications
Invert Mirror
Modify
Copy
Proof Copy
Memo
pages
Orig. set
direction
Ready to copy.
Up
Down
Set
Paper size
Eco Print
Auto
Rotation
Function
Basic User choice Program
OHP
backing
11x81/2"
Select of
Output
Metric specifications
Invert Mirror
Modify
copy
Select of
Output
Test copy
Memo
pages
Orig. set
direction
Ready to copy.
Up
Down
Set
Paper size
Eco print
Auto
Rotation
Function
Basic User choice Program
OHP back
5
Touch the “Off” key or the “On” key, as appropriate.
Inch specifications
Back Close
It is possible to reduce
toner consumption.
Image is light.
Eco Print
Ready to copy.
Register
Eco print is saving toner consumption,
and it is economically.
Set
11 x 8
1
/
2
"
Paper Size
Eco Print
OnOff
Metric specifications
Back Close
Toner consumption
can be reduced.
Eco print
Ready to copy.
Register
Eco Print enables toner consumption
reduction.
Set
Paper size
Eco Print
OnOff
Image resolution reduced.
6
Press the [Start] key.
Copying will start.
Page 92
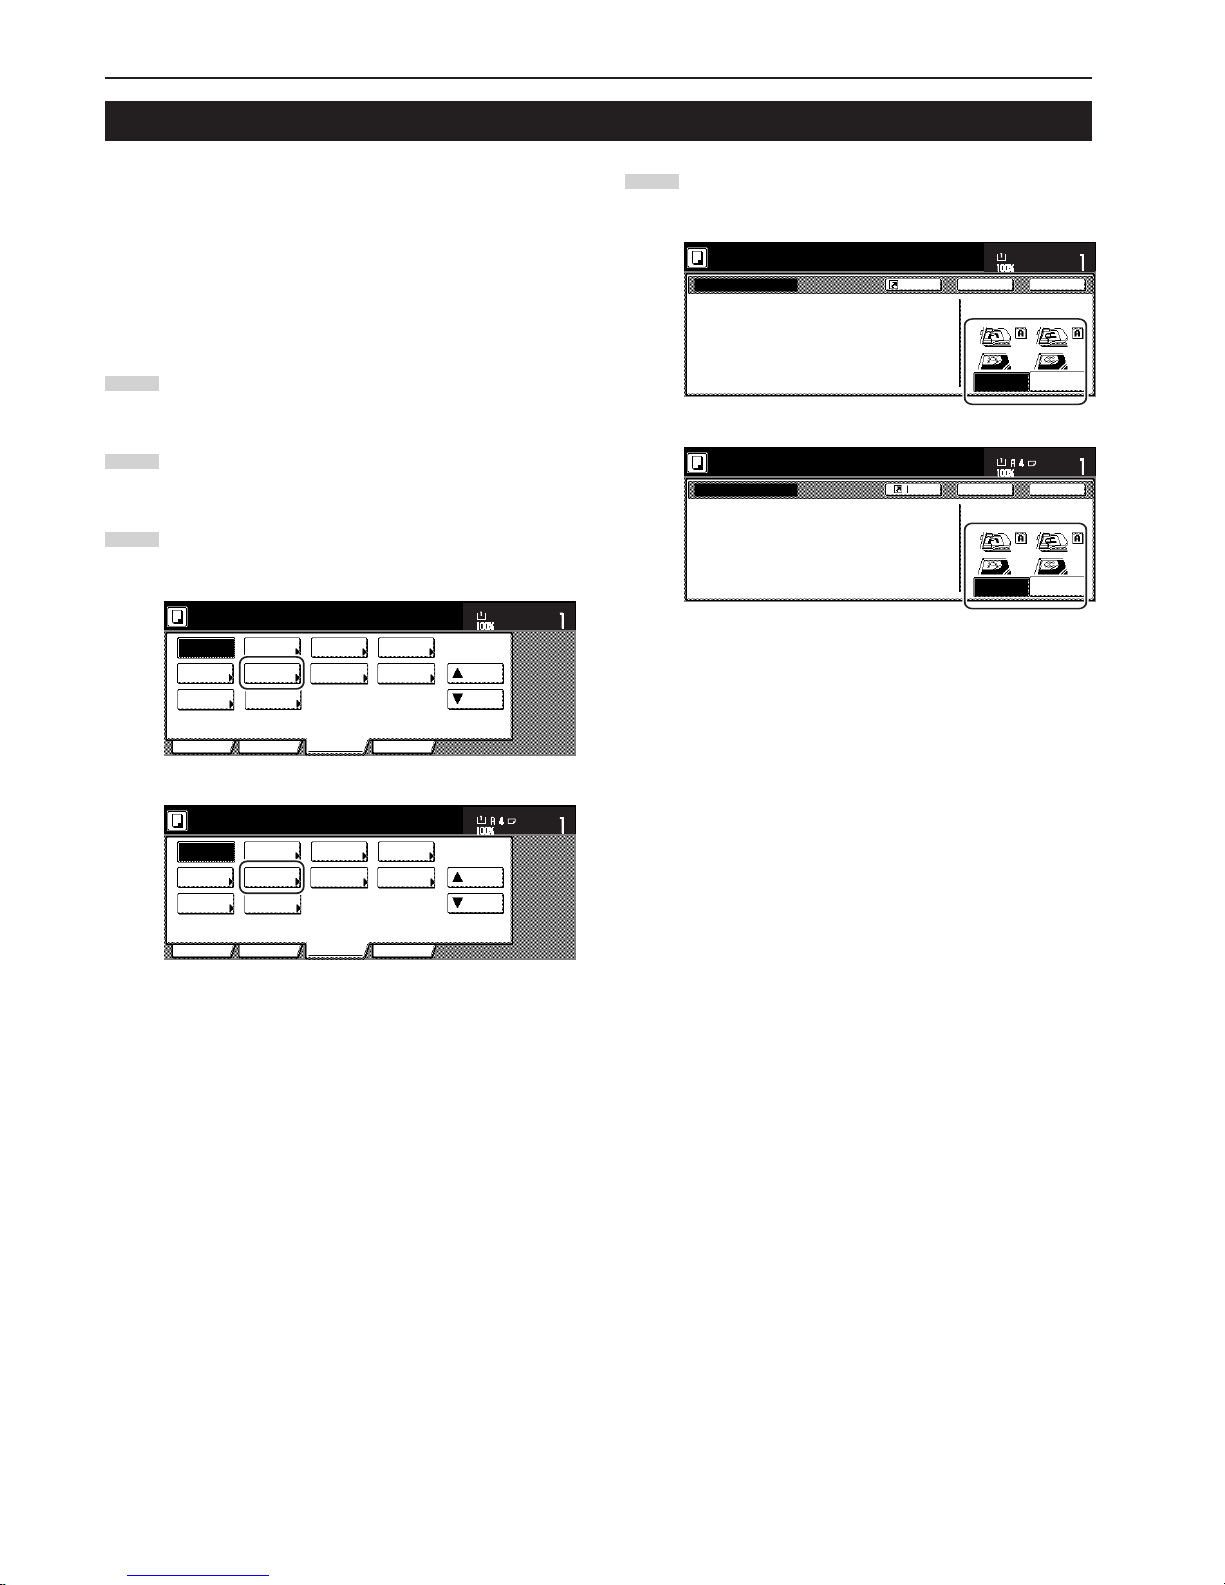
Section 5 OTHER CONVENIENT FUNCTIONS
5-50
24. Original set direction
It is necessary to specify the direction in which the originals were set
whenever you use the 2-sided copy modes, the page separation/split
copy modes, the margin mode, the centering/image shift mode, the
memo mode, the border erase modes, the combine/merge copy
modes, the print page numbers mode, the booklet/stitching mode, the
auto selection/filing mode, the staple mode (optional) and the punch
mode (optional). You can also use the following procedure to perform
the setting as well.
1
Touch the “Function” tab. The content of the “Function” tab
will be displayed.
2
Touch the “▼ Down” key. The content of the next portion of
the “Function” tab will be displayed.
3
Touch the “Orig.set direction” key. The “Orig.set direction”
screen will be displayed.
Inch specifications
Invert Mirror
Modify
Copy
Proof Copy
Memo
pages
Orig. set
direction
Ready to copy.
Up
Down
Set
Paper size
Eco Print
Auto
Rotation
Function
Basic User choice Program
OHP
backing
11x81/2"
Select of
Output
Metric specifications
Invert Mirror
Modify
copy
Select of
Output
Test copy
Memo
pages
Orig. set
direction
Ready to copy.
Up
Down
Set
Paper size
Eco print
Auto
Rotation
Function
Basic User choice Program
OHP back
4
Touch the “Rear” [“Back Edge”] key or the “Left top corner”
key, as appropriate.
Inch specifications
Orig. set direction
Ready to copy.
"Check direction original" can be shown
at right side of display.
Follow the steps. If setting mode is
wrong, incorrect copy will result.
Check direction
Check direction of
original top side.
Rear
Left top
corner
Back Close
Register
Set
11 x 8
1
/
2
"
Paper Size
Metric specifications
Orig. set direction
"Check direction original" can be shown
at right side of display.
Follow the steps. If setting mode is
wrong, incorrect copy will result.
Back Close
Ready to copy.
Register
Set
Paper size
Back Edge
Left top
corner
Check direction
Check direction of
original.
Page 93
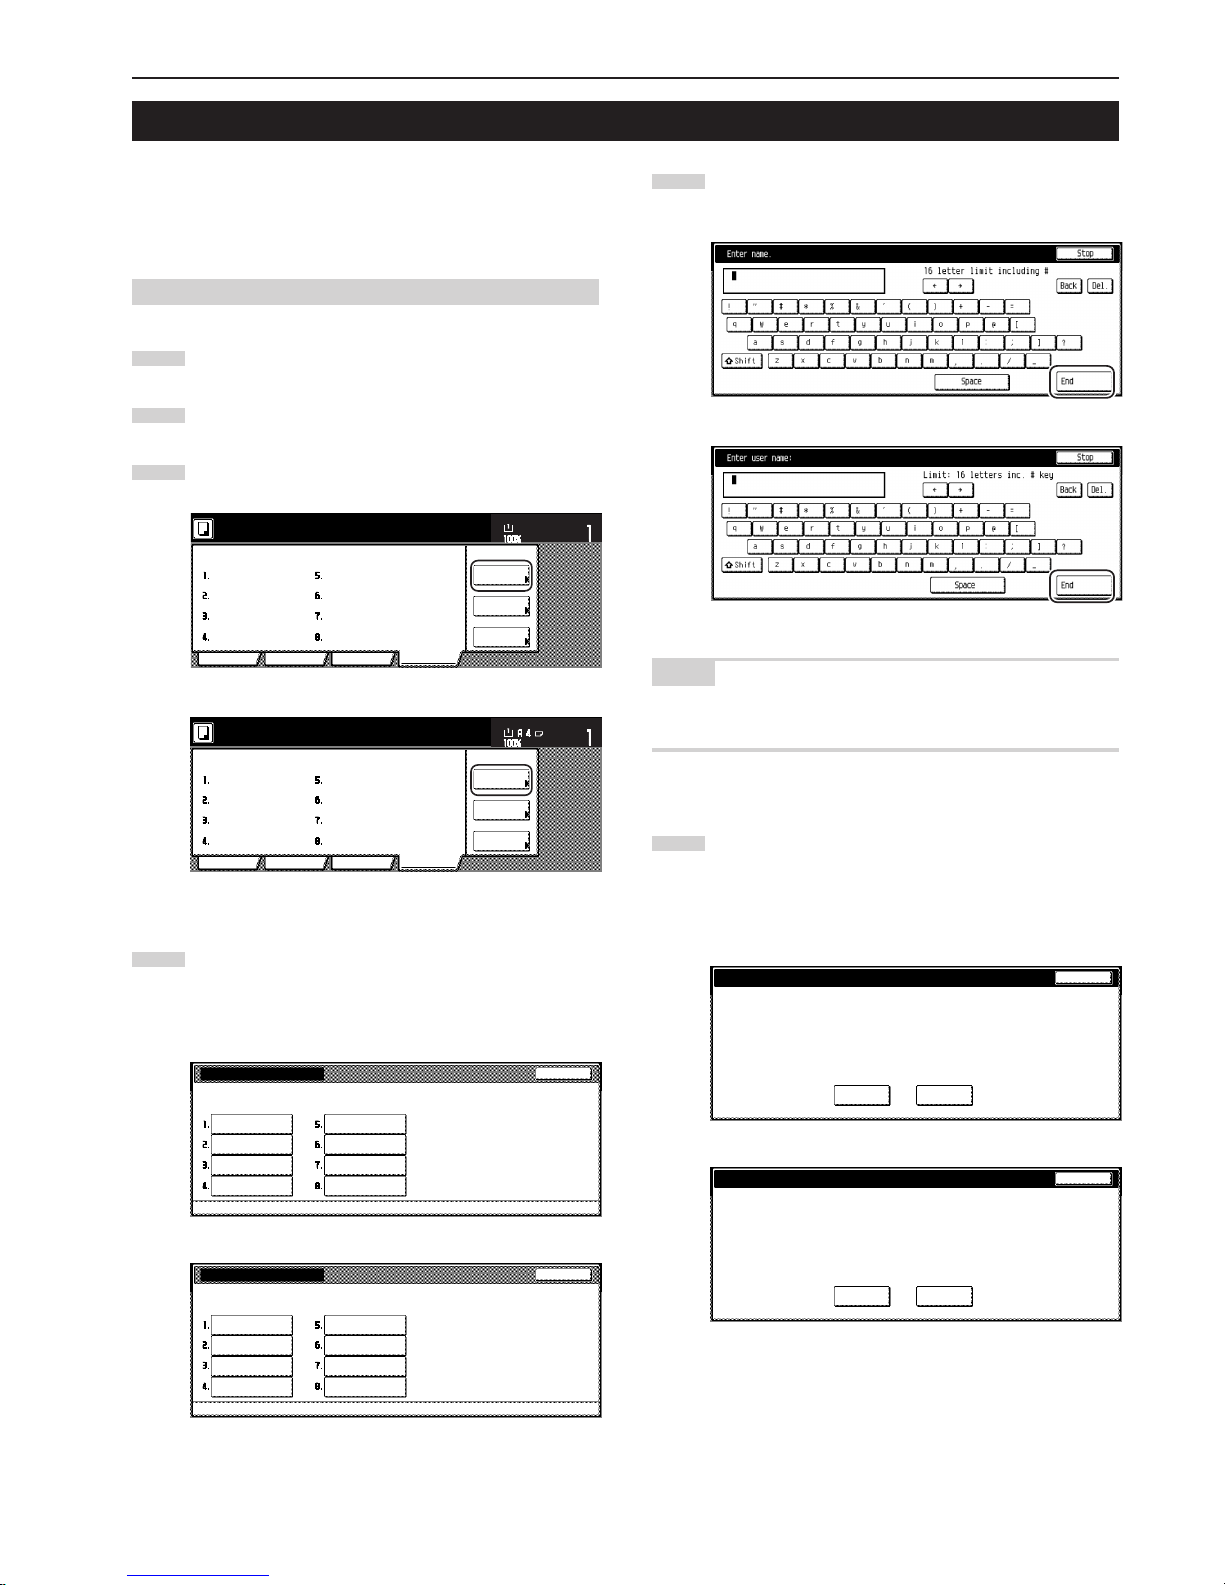
Section 5 OTHER CONVENIENT FUNCTIONS
5-51
25. Memorizing frequently used settings [Program function]
Up to eight combinations of copy modes and other functions
displayed on the operation panel can be registered as a single
program using this function. You can also register a name for each
registered program.
(1) Registering a program
1
Set the desired copy modes, etc., to be registered.
2
Touch the “Program” tab. The content of the “Program” tab
will be displayed.
3
Touch the “Register” key.
Inch specifications
Recall
Ready to copy.
Program
Function
Reg./delete
Register
Change
name
Delete
User choiceBasic
Set
11 x 8
1
/
2
"
Paper Size
Metric specifications
Reg./delete
Register
Recall
Delete
Change
name
Basic
User choice Function Program
Ready to copy.
Set
Paper size
4
Touch any key that is marked “No registration” and that
corresponds to the program key (1 – 8) under which you
want to register the settings. The screen to register a name
for that program will be displayed.
Inch specifications
Select program number.
No registration
No registration
No registration
No registration
No registration
No registration
No registration
Register present setting
End
No registration
Metric specifications
Select program number.
No registration
No registration
No registration
No registration
No registration
No registration
No registration
Register present setting
End
No registration
5
Use the displayed keyboard to enter the desired name and
then touch the “End” key.
Inch specifications
Metric specifications
NOTE
Refer to “Entering characters” on page 7-75 for information on
entering characters.
6
Touch the “Yes” key or the “No” key, as appropriate.
If you selected “Yes”, the selected program will be registered
and the touch panel will return to the screen in step 3.
Copying is now possible using the settings that were
registered under that program.
Inch specifications
Program # : 1
The set program is registered. Is it correct?
Yes No
Program name :Catalog A
Register program.
Stop
Metric specifications
Program # : 1
The set program is registered. Is it correct?
Yes No
Program name : Catalog A
Register program.
Stop
Page 94
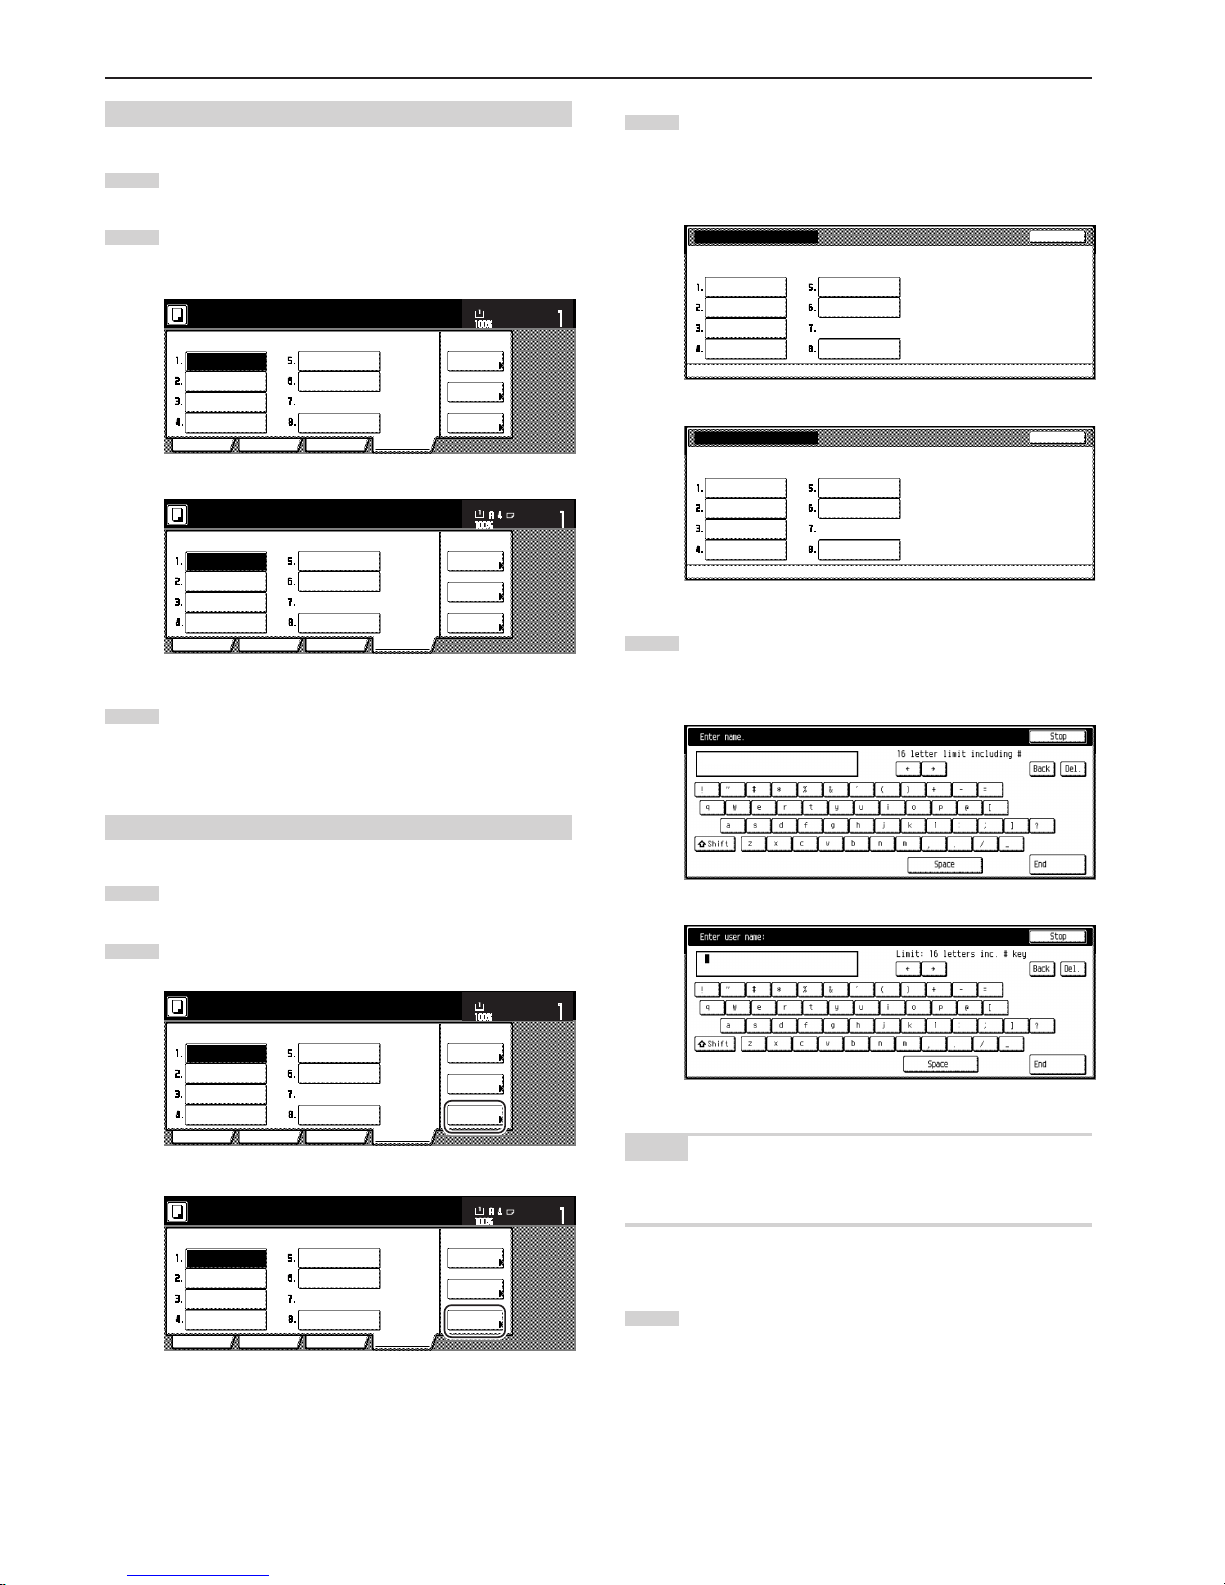
Section 5 OTHER CONVENIENT FUNCTIONS
5-52
(2) Using programmed settings to make copies
1
Touch the “Program” tab. The content of the “Program” tab
will be displayed.
2
Touch the program key under which the settings that you
want to use are registered.
Inch specifications
Reg./delete
Register
Recall
Ready to copy.
Delete
Change
name
Basic
User choice Function Program
Set
11 x 8
1
/
2
"
Paper Size
File A
File B
List A
Catalog B
Catalog C
Catalog D
Catalog A
Metric specifications
Reg./delete
Register
Recall
Delete
Change
name
File A
File B
List A
Catalog B
Catalog C
Catalog D
Basic
User choice Function Program
Catalog A
Ready to copy.
Set
Paper size
3
Set the originals to be copied and press the [Start] key.
Copying will start using the settings that were registered
under that program.
(3) Changing a registered program name
1
Touch the “Program” tab. The content of the “Program” tab
will be displayed.
2
Touch the “Change name” key.
Inch specifications
Reg./delete
Register
Recall
Ready to copy.
Delete
Change
name
Basic
User choice Function Program
Set
11 x 8
1
/
2
"
Paper Size
File A
File B
List A
Catalog B
Catalog C
Catalog D
Catalog A
Metric specifications
Reg./delete
Register
Recall
Delete
Change
name
File A
File B
List A
Catalog B
Catalog C
Catalog D
Basic
User choice Function Program
Catalog A
Ready to copy.
Set
Paper size
3
Touch the program key (1 – 8) for which you want to change
the registered name.
The screen to register a name for that program will be
displayed.
Inch specifications
End
No registration
File A
File B
List A
Catalog B
Catalog C
Catalog D
Catalog A
Select the number for changing name.
Registration name change
Metric specifications
Select the number for changing name.
Registration name change
End
File A
File B
List A
Catalog B
Catalog C
Catalog D
Catalog A
No registration
4
Touch the “r”, “R”, “Back” and/or “Del.” keys to delete the
currently registered name and, once you enter the desired
name for that program, touch the “End” key.
Inch specifications
Catalog
Metric specifications
NOTE
Refer to “Entering characters” on page 7-75 for information on
entering characters.
5
Once “The set program is registered. Is it correct?” is
displayed, check the entered name and, if it is correct, touch
the “Yes” key.
The touch panel will return to the screen in step 2.
Page 95
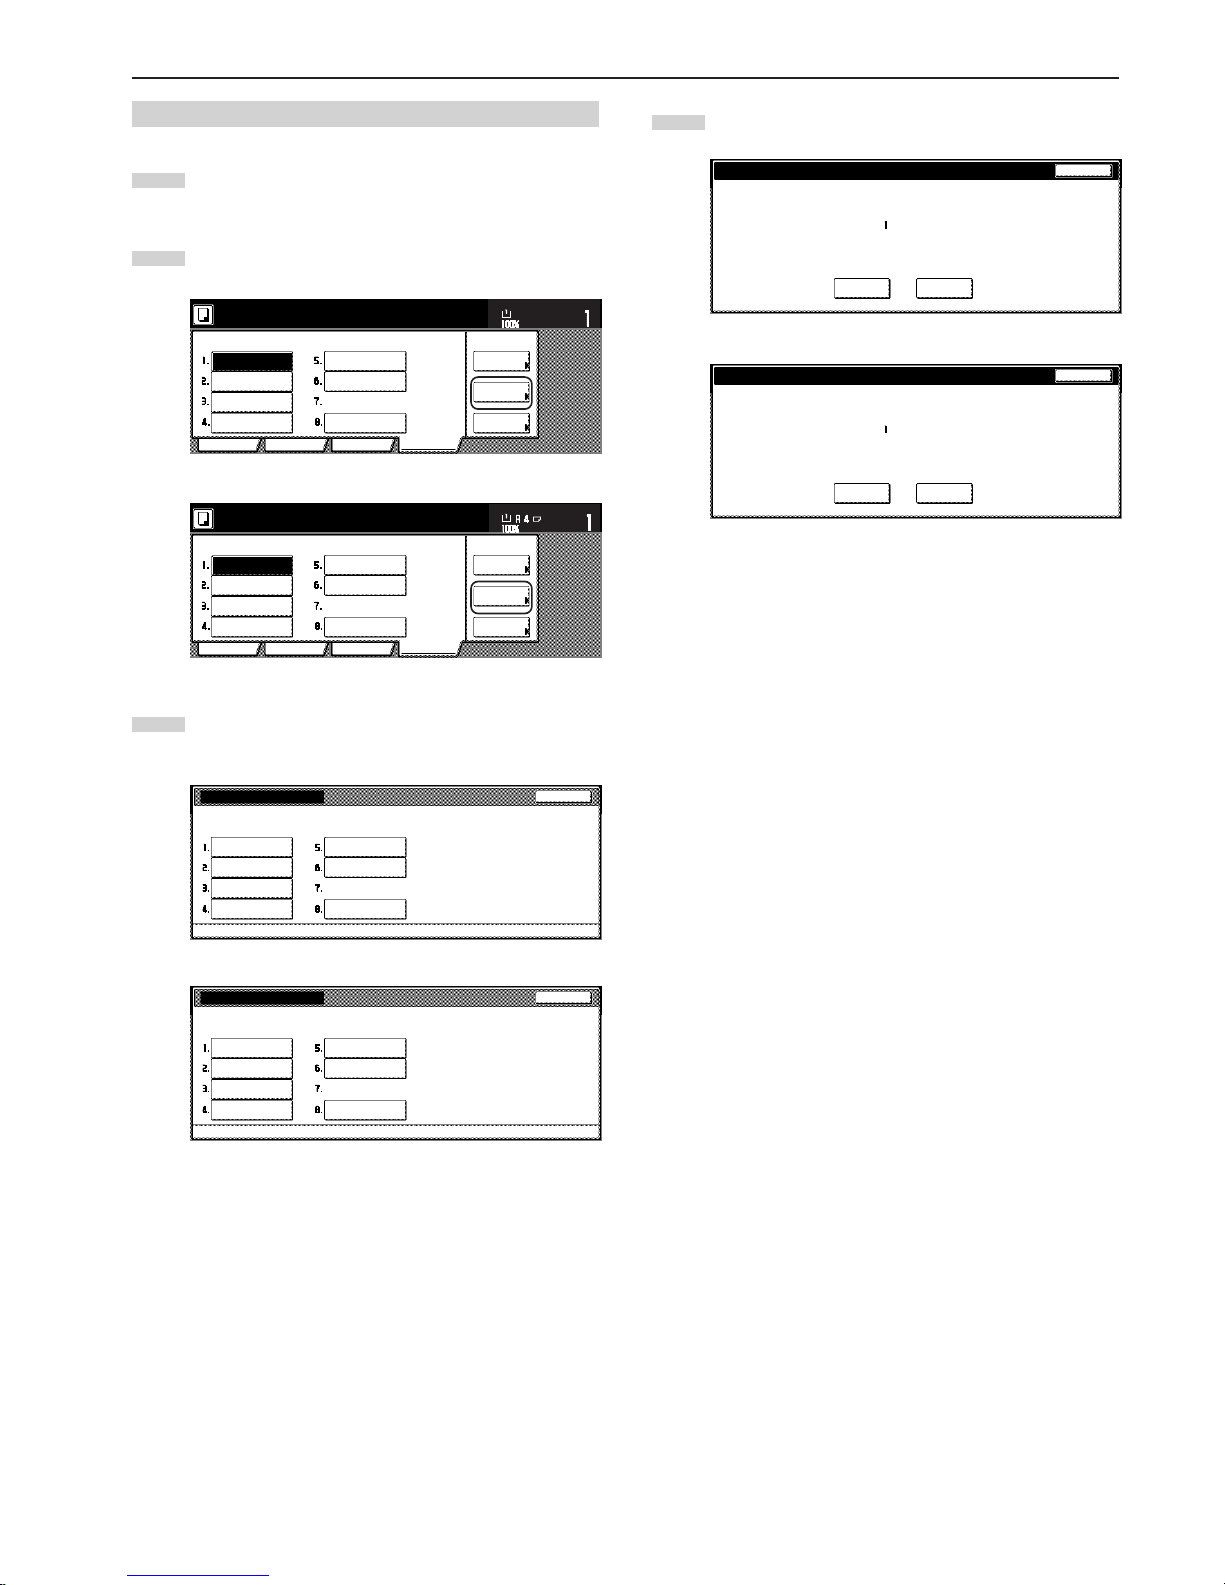
Section 5 OTHER CONVENIENT FUNCTIONS
5-53
(4) Deleting a registered program
1
Touch the “Program” tab. The content of the “Program” tab
will be displayed.
2
Touch the “Delete” key.
Inch specifications
Reg./delete
Register
Recall
Ready to copy.
Delete
Change
name
Basic
User choice Function Program
Set
11 x 8
1
/
2"
Paper Size
File A
File B
List A
Catalog B
Catalog C
Catalog D
Catalog A
Metric specifications
Reg./delete
Register
Recall
Delete
Change
name
File A
File B
List A
Catalog B
Catalog C
Catalog D
Basic
User choice Function Program
Catalog A
Ready to copy.
Set
Paper size
3
Touch the program key (1 – 8) that corresponds to the
program that you want to delete.
lnch specifications
Select the number of program to delete.
No registration
Delete registration
End
File A
File B
List A
Catalog B
Catalog C
Catalog D
Catalog A
Metric specifications
Select the number of program to delete.
No registration
Delete registration
End
File A
File B
List A
Catalog B
Catalog C
Catalog D
Catalog A
4
Touch the “Yes” key or the “No” key, as appropriate.
Inch specifications
Program #
This program will be deleted. Are you sure?
Yes No
Delete program.
Stop
Program name Catalog A
Metric specifications
Program #
This program will be deleted. Are you sure?
Delete program.
Program name Catalog A
YES NO
Stop
If you selected “Yes”, the selected program will be deleted and the
touch panel will return to the screen in step 2.
If you selected “No”, the touch panel will return to the screen in step 2
without deleting the selected program.
Page 96
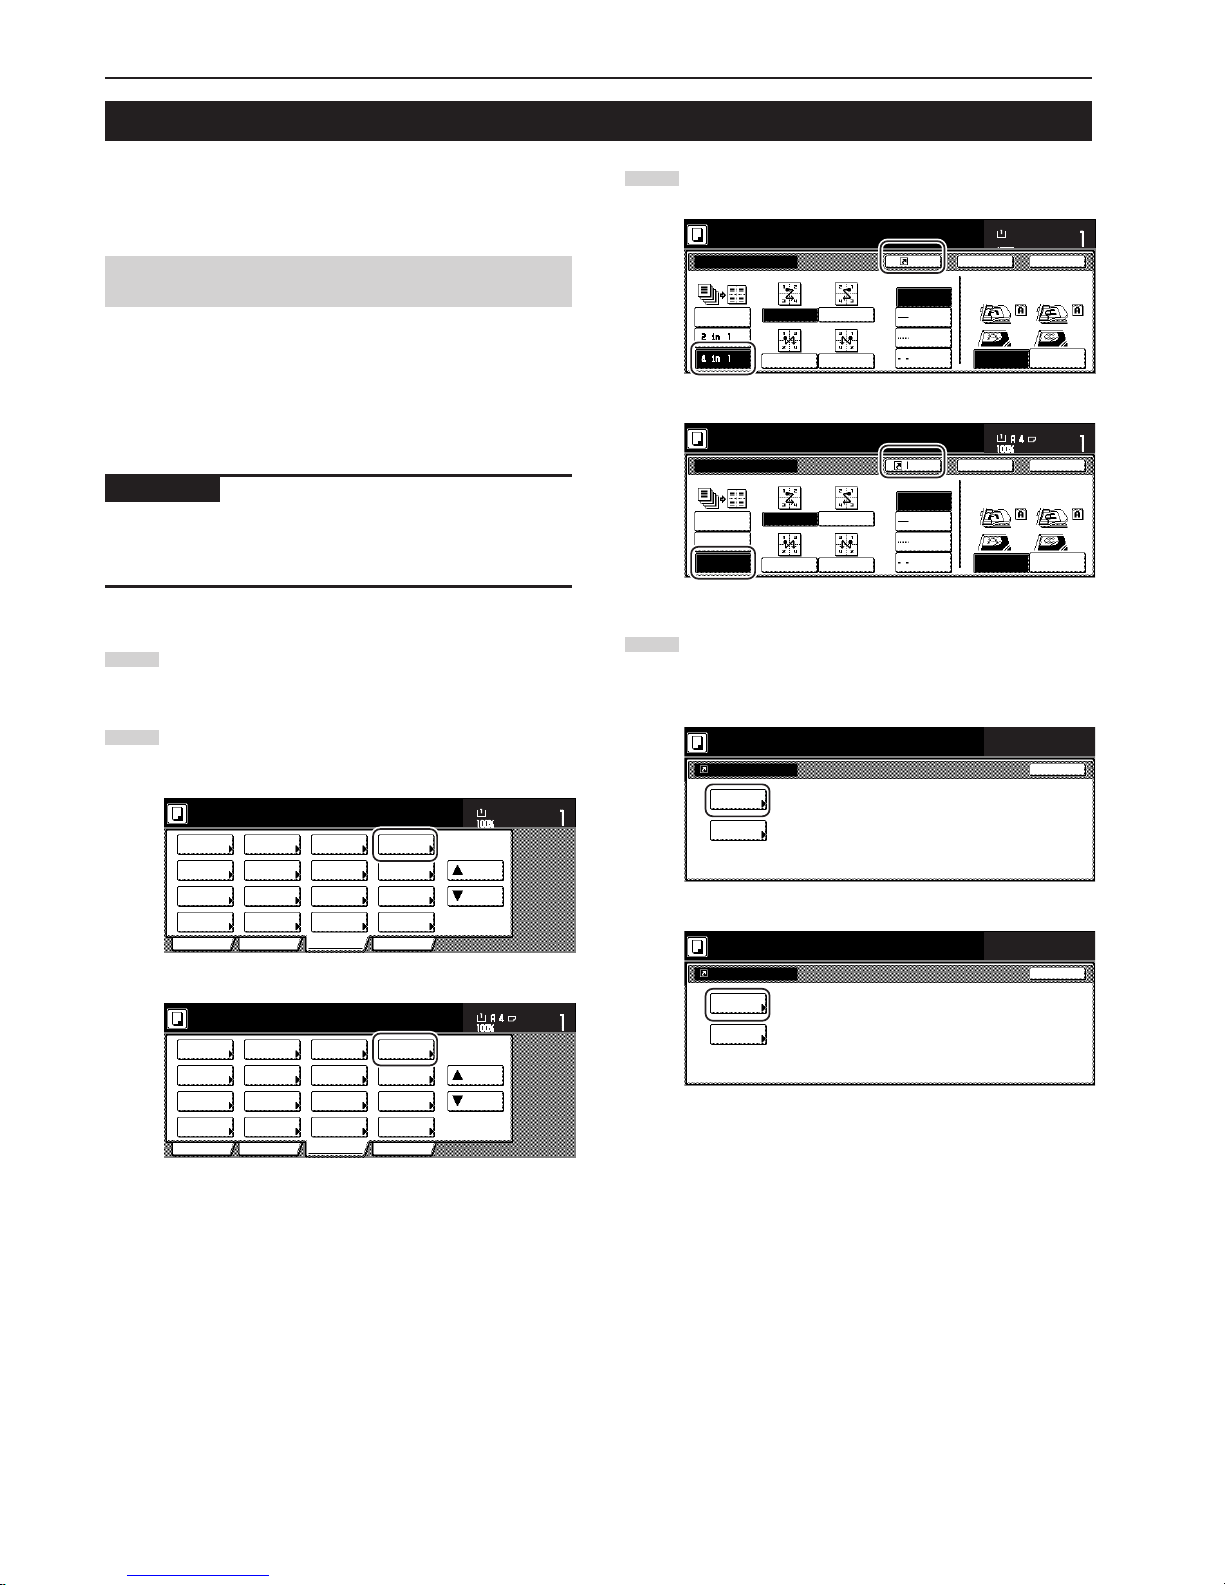
Section 5 OTHER CONVENIENT FUNCTIONS
5-54
You can register up to 3 functions and/or modes, from among those
displayed in the “Function” tab, under the registration keys. The
functions and modes in the “Basic” tab and the “User choice” tab can
be registered under registration keys as well.
(1) Registering a function or mode under a function
key
Perform the following procedure when you want to register a function
or mode under a registration key.
To register a function or mode under a registration key, refer to the
following sample procedure (which shows how to register the “4 in 1”
combine/merge copy mode under a registration key).
IMPORTANT!
In order to register functions and/or modes under registration keys,
you must first turn the setting ON under “Registration keys ON/
OFF” on page 7-60.
1
Touch the “Function” tab. The content of the “Function” tab
will be displayed.
2
Touch the “Combine” [“Merge copy”] key. The “Combine”
[“Merge copy”] screen will be displayed.
lnch specifications
2 sided/
Separation
Select
paper
Combine
Reduce
/Enlarge
Margin/
Centering
Forms
Overlay
Page #
Function
Basic User choice Program
Cover
Mode
Booklet
Sort/
Finished
Border
Erase
Exposure
mode
Orig.image
quality
Ready to copy.
Select
orig. size
Auto
Selection
Batch
scanning
Up
Down
Set
Paper size
11x81/2"
Metric specifications
Select
paper
2-sided/
Split
Merge copy
Reduce/
Enlarge
Margin/
Imag. shift
Page
numbering
Function
Basic User choice Program
Cover
Mode
Booklet
Erase
Mode
Exposure
mode
Image
quality
Sort/
Finished
Ready to copy.
Select
size orig.
Auto
selection
Large # of
originals
Form
overlay
Up
Down
Set
Paper size
26. Registration keys
3
Touch the “4 in 1” key and then the “Register” key.
Inch specifications
None
Solid
Dotted
Borders
Combine
None
Layout Border line
Set
Paper size
Ready to copy.
Register Back Close
11x81/2"
Rear
Check direction
Left top
corner
Check direction of
original top side.
50%
Metric specifications
Layout
Check direction
Check direction of
original.
None
4-in-1
2-in-1
None
Merge copy
Solid
Dotted
Cropmark
Border line
Back Close
Ready to copy.
Register
Set
Paper size
Back Edge
Left top
corner
4
In the “Register” screen, touch the “Register” key once again.
The screen to register functions and/or modes under
registration keys will be displayed.
Inch specifications
Register
Register
Delete
End
Select item
Metric specifications
Register
Register
Delete
End
Select item
Page 97
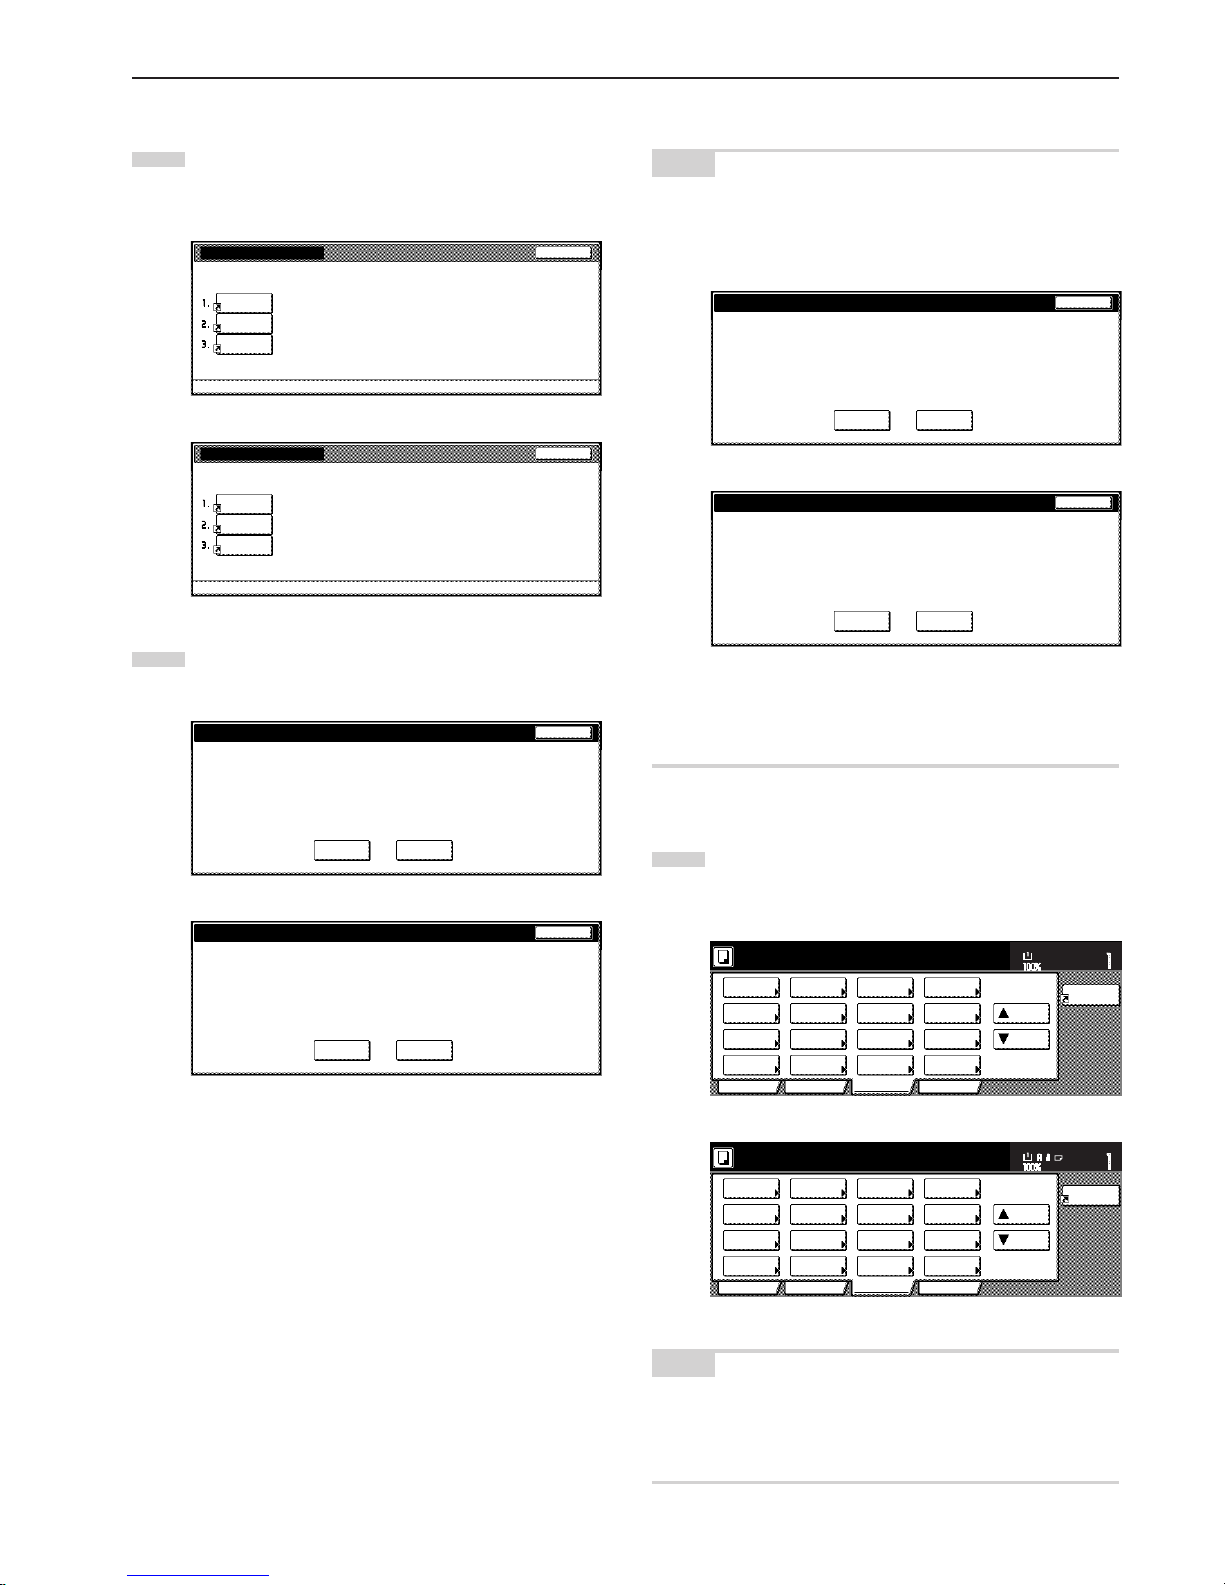
Section 5 OTHER CONVENIENT FUNCTIONS
5-55
5
Touch the registration key under which you want to register
the function. “Register this selecting mode. OK?” will be
displayed.
Inch specifications
No
registration
No
registration
No
registration
Select the number of program to registered.
Register present setting
End
Metric specifications
No
registration
No
registration
Select the number of program to registered.
Register present setting
No
registration
End
6
Touch the “Yes” key. The “Combine” [“Merge copy”] screen
will be displayed again.
Inch specifications
Register No. 1
Register this selecting mode. OK?
Yes N o
Register this function.
Stop
Metric specifications
Register No. 1
Register this selecting mode. OK?
YES NO
Register this function.
Stop
NOTE
If, in the screen to register functions and/or modes under
registration keys, you select a previously registered key, the
following screen will be displayed.
Inch specifications
Register No. 1
This number is already registered.
Yes N o
Register this function.
Stop
Register this selecting mode. OK?
Metric specifications
This number is already registered
Register this function.
Stop
Register No. 1
Register this selecting mode. OK?
YES NO
If you selected “Yes”, the selected function will be registered under
the registration key.
If you selected “No”, the touch panel will return to the screen in
step 5 without registering the selected function.
7
Touch the “Close” key. The “Combine” [“Merge copy”] key will
now appear on the right side of the touch panel as a
registration key.
Inch specifications
Function
Basic User choice Program
Ready to copy.
Up
Down
Set
Paper size
Combine
8
1
/2x11"
2 sided/
Separation
Combine
Page #
Cover
Mode
Orig.image
quality
Select
orig. size
Auto
Selection
Batch
scanning
Select
paper
Reduce
/Enlarge
Margin/
Centering
Forms
Overlay
Booklet
Sort/
Finished
Border
Erase
Exposure
mode
Metric specifications
Set
Paper size
Merge Copy
Select
paper
2-sided/
Split
Merge copy
Reduce/
Enlarge
Margin/
Imag. shift
Page
numbering
Function
Basic User choice Program
Cover
Mode
Booklet
Erase
Mode
Exposure
mode
Image
quality orig.
Sort/
Finished
Ready to copy.
Select
size original
Auto
selection
Large # of
originals
Form
overlay
Up
Down
NOTE
The functions and modes in the “Basic” tab and the “User choice”
tab can be registered under registration keys as well. A “Register”
key will be displayed in the screen for those function and modes
which can be registered under the registration keys.
Page 98
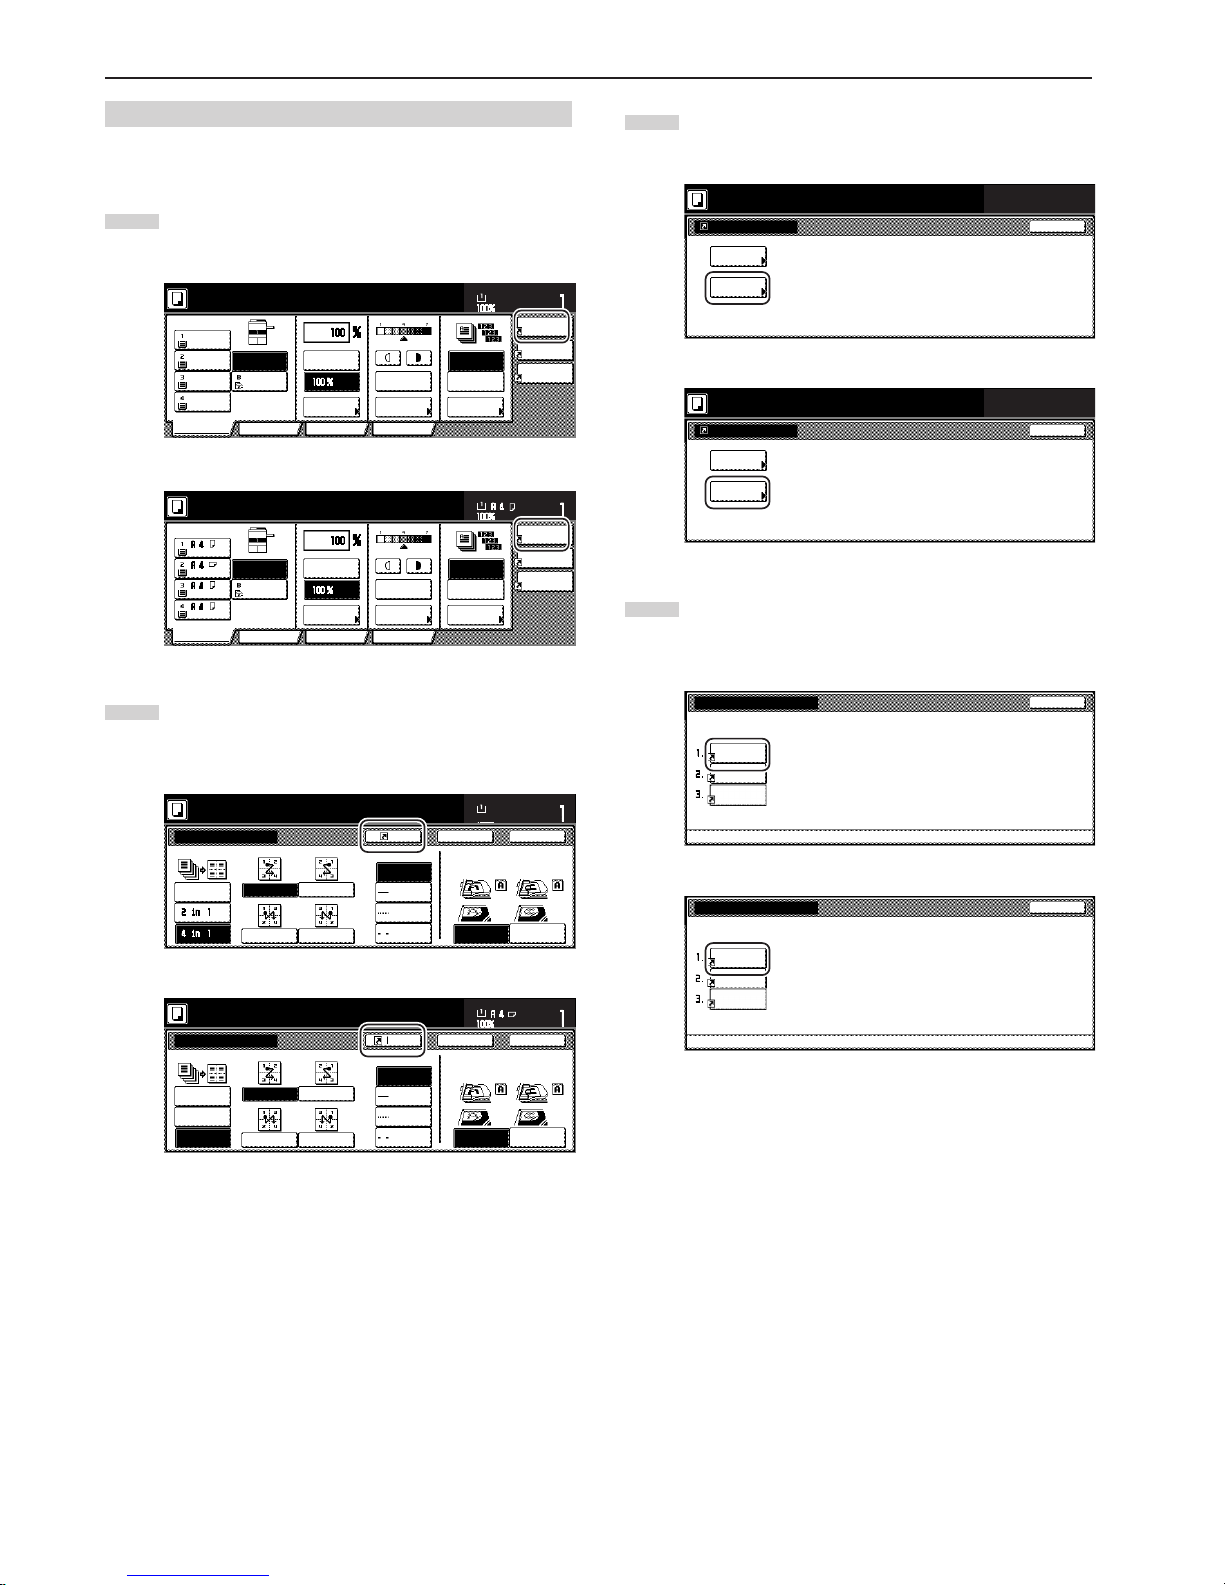
Section 5 OTHER CONVENIENT FUNCTIONS
5-56
(2) Deleting a registration key
Perform the following procedure when you want to delete a
registration key.
1
Touch the registration (to the right of the “Basic” tab) that you
want to delete. (Example: “Combine” [“Merge copy”])
lnch specifications
AMS
Reduce
/Enlarge
APS
Exposure
mode
Auto
Exposure
Ready to copy.
Set
Paper Size
Bypass
Color
Recycled
Plain Plain
Plain
Sort/
Finished
Sort:Off
Sort:On
Basic User choice
Program
Function
Combine
Orig.image
quality
Reduce
/Enlarge
11x8
1
/
2
"
8
1
/
2
x11"
11x8
1
/
2
"
11x8
1
/
2
"
11x81/2"
Metric specifications
Merge copy
AMS
Reduce/
Enlarge
APS
Image
quality
Reduce/
Enlarge
Exposure
mode
Auto
Exposure
Ready to copy.
Set
Paper Size
Bypass
Color
Recycled
Plain Plain
Plain
Sort/
Finished
Sort:Off
Sort:On
Basic User choice
Program
Function
2
In the resulting screen for that function or mode (example:
the “Combine” [“Merge copy”] screen), touch the “Register”
key. The “Register” screen will be displayed.
lnch specifications
None
Solid
Dotted
Borders
Combine
None
Layout Border line
Set
Paper size
Ready to copy.
Register Back Close
11x81/2"
Rear
Check direction
Left top
corner
Check direction of
original top side.
50%
Metric specifications
Layout
Check direction
Check direction of
original.
None
4-in-1
2-in-1
None
Merge copy
Solid
Dotted
Cropmark
Border line
Back Close
Ready to copy.
Register
Set
Paper size
Back Edge
Left top
corner
3
In the “Register” screen, touch the “Delete” key once again.
The screen to delete registration keys will be displayed.
Inch specifications
Register
Register
Delete
End
Select item
Metric specifications
Register
Register
Delete
End
Select item
4
Touch the registration key (1 – 3) that corresponds to the
program that you want to delete. “Are you sure you want to
delete?” will be displayed.
Inch specifications
Combine
Orig. Image
quality
Select the number of program to delete.
Delete registration
Reduce
/Enlarge
End
Metric specifications
Merge Copy
Image
quality
Select the number of program to delete.
Delete registration
Reduce/
Enlarge
End
Page 99
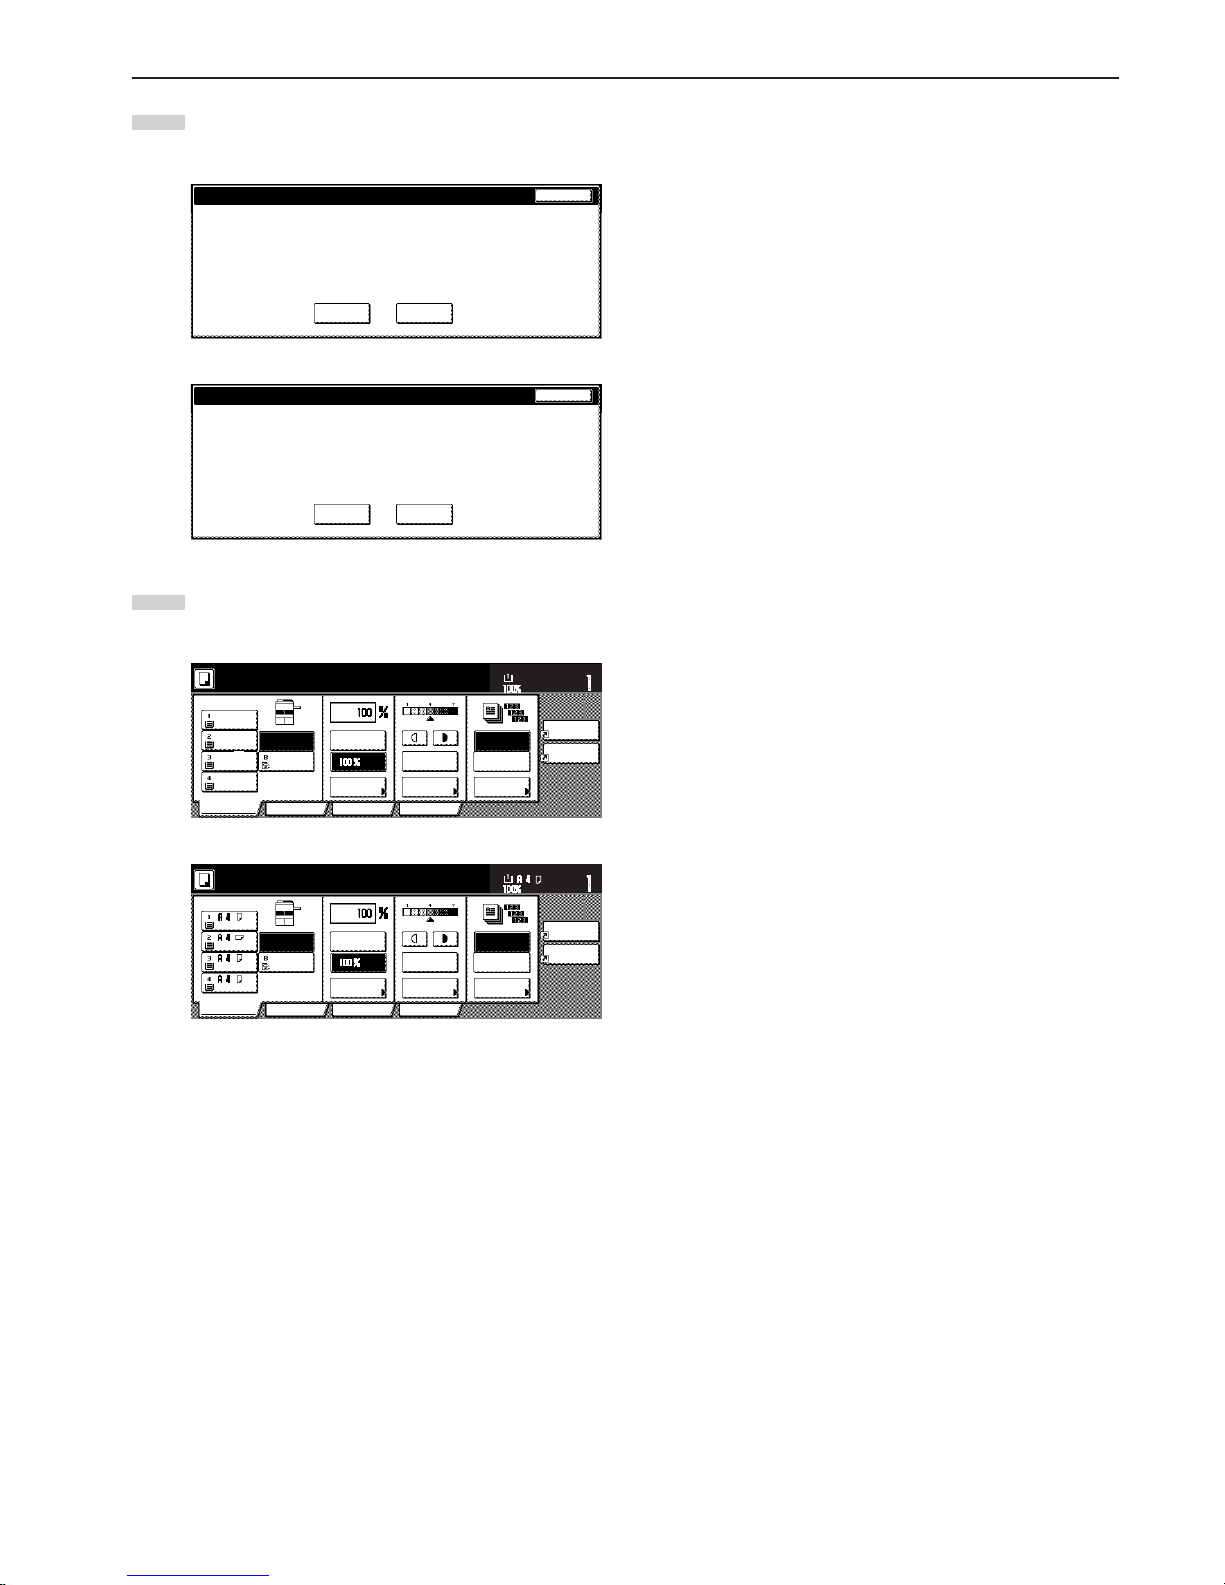
Section 5 OTHER CONVENIENT FUNCTIONS
5-57
5
Touch the “Yes” key. The “Combine” [“Merge copy”] screen
will be displayed again.
Inch specifications
Register No. 1
Are you sure you want to delete?
Yes No
Delete registration.
Stop
Metric specifications
Are you sure you want to delete?
Delete registration.
Register No. 1
YES NO
Stop
6
Touch the “Close” key. The “Combine” [“Merge copy”] key will
be deleted from on the right side of the touch panel.
Inch specifications
Merge
Kopie
AMS
Reduce
/Enlarge
APS
Exposure
mode
Auto
Exposure
Ready to copy.
Set
Paper Size
Bypass
Color
Recycled
Plain Plain
Plain
Sort/
Finished
Sort:Off
Sort:On
Basic User choice
Program
Function
11x81/2"
Orig.image
quality
Reduce
/Enlarge
11x8
1
/
2
"
8
1
/
2
x11"
11x8
1
/
2
"
11x8
1
/
2
"
Metric specifications
Merge
Kopie
AMS
Reduce/
Enlarge
APS
Image
quality
Reduce/
Enlarge
Exposure
mode
Auto
Exposure
Ready to copy.
Set
Paper Size
Bypass
Color
Recycled
Plain Plain
Plain
Sort/
Finished
Sort:Off
Sort:On
Basic User choice
Program
Function
Page 100
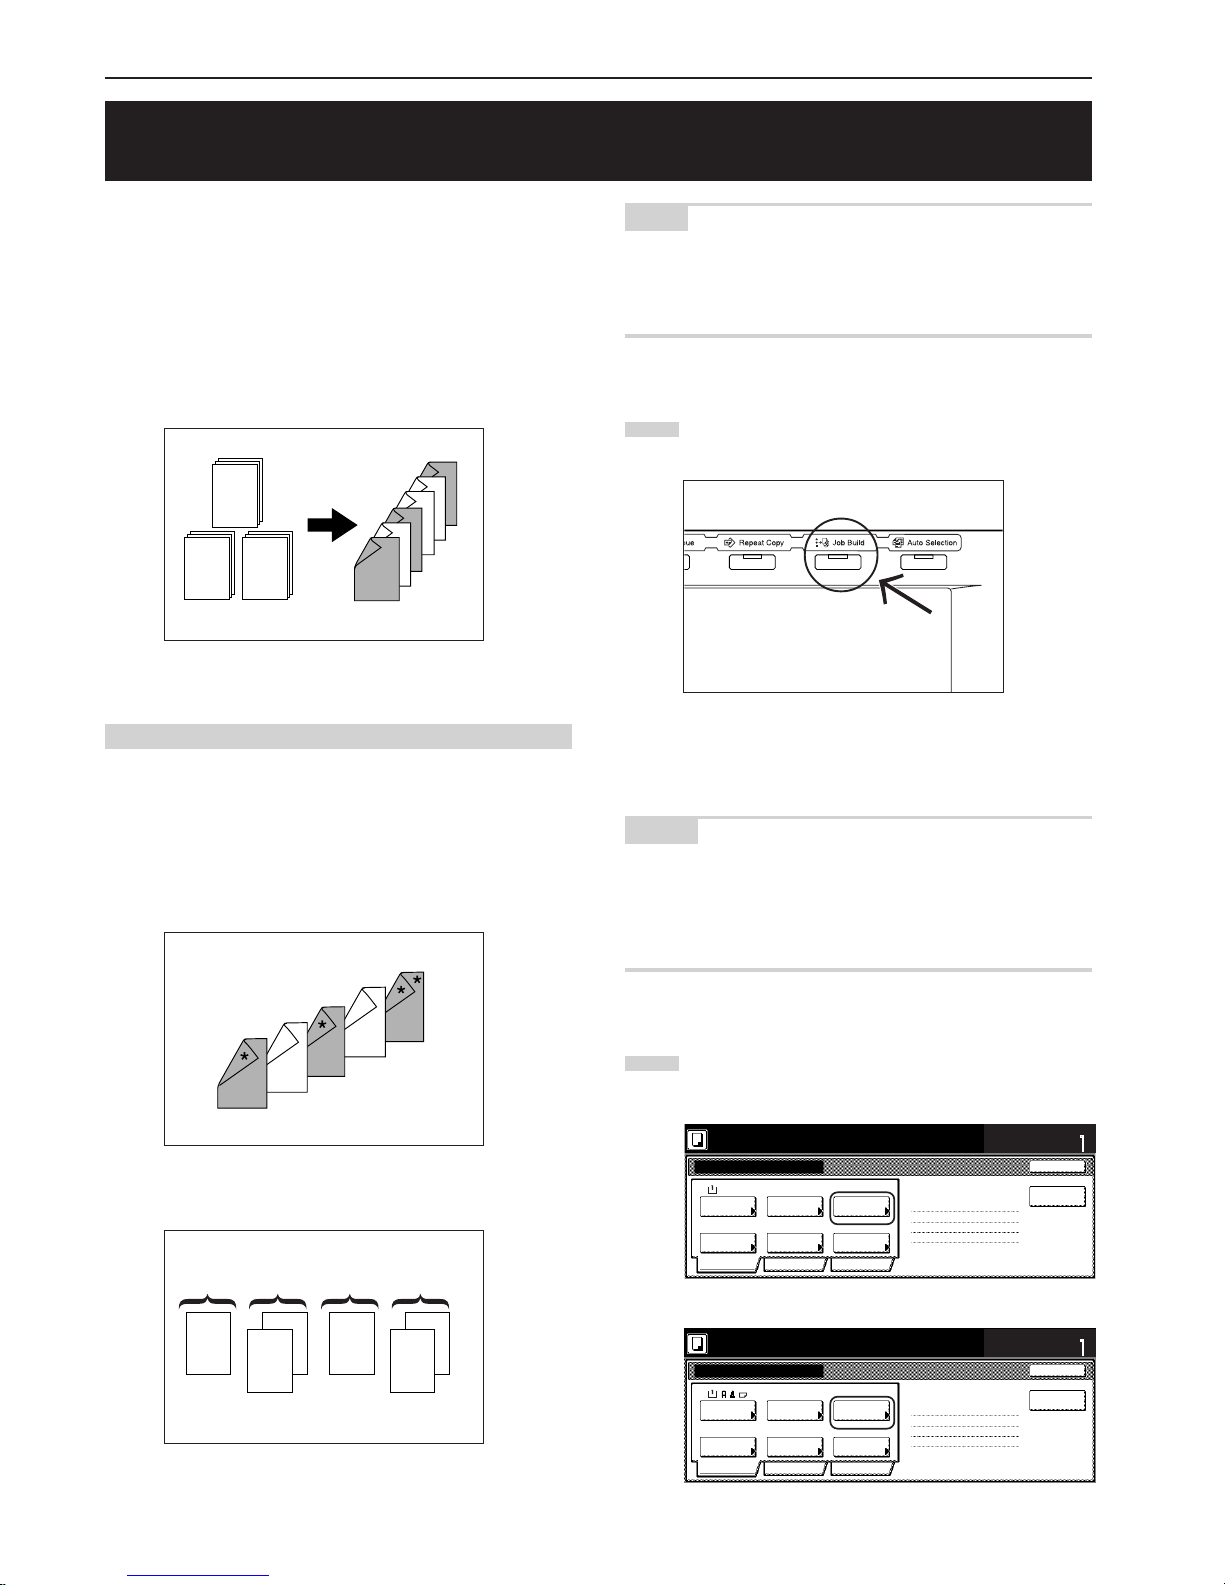
Section 5 OTHER CONVENIENT FUNCTIONS
5-58
27. Easily add covers and insert sheets between various sets of originals in
one operation [Job build mode]
The job build function enables you to scan different sets of originals
into memory in separate steps and then copy them all at one time.
Each set of scanned originals is then seen as one step in the copy
process and you can select different copy modes for each step
(enlarge/reduce, border erase, original type [2-sided originals, 1-sided
originals or open-faced book originals]). You can choose to have a
blank sheet of paper fed in between each set of originals, as well as
have front and rear covers included for the full set, AND do this all
during 2-sided copying!
(1) Using the job build mode
The following procedure shows one way of using the job build mode
and explains how to perform that operation under the situation
indicated in the examples below.
[Example]
<Finished copies>
(The asterisk “*” in the illustration indicates the blank sheets.)
<Originals>
A-1
B-1 C-1
B-3
1
3
C-2
B-1
2
A-3
2
A-1
A-1
2-1
2-2
2
1-2
1-1
1
2-2
1 2
2-1
1-2
1-1
B
A C D
NOTE
This procedure will assume that the color paper to be used as the
front cover and the middle insert (originals “A” and “C”), as well as for
the back cover, will be set on the multi-bypass, and that there is plain
copy paper loaded in drawer[cassette]No.1.
● Step 1: Accessing the “Job build” screen
1
Press the [Job build] key.
The “Job build” screen will be displayed.
● Making the settings that apply to all steps
First, the settings for the 2-sided copy modes and the repeat copy
mode must be made.
NOTES
• The repeat copy mode is used to enable you to make an
additional number of copy sets later.
• It is also possible to select other settings and functions, as
desired, besides those given in the example procedure. (See “(2)
Selecting the settings and functions” on page 5-63.)
2
Touch the “1 sided/2 sided” key.
The “1 sided/2 sided” screen will be displayed.
Inch specifications
Ready to Job build.
Place originals then press Start key.
1-sided 1 sided copy
Back Edge
1 sided/
2 sided
1 sided copy-Left
Finished page #:0
Orig. set
direction
Original
type
AMS
Reduce
/Enlarge
Finished
Basic Quality Edit
None
Job Build - Step1
End
Insert
page
Set
Select
paper
11x8
1
/2”
Metric specifications
Ready to Job build.
Set original. Press Start key.
1-sided 1-sided Copy
Back Edge
1-sided/
2-sided
1-sided Copy-Left
Finished page #: 0
Orig. set
direction
Original
type
AMS
Reduce/
Enlarge
Finished
Basic Quality Edit
None
Job Build
-Step 1
End
Set
Select
paper
Insert
blank page
 Loading...