

Page 1
ENGLISH
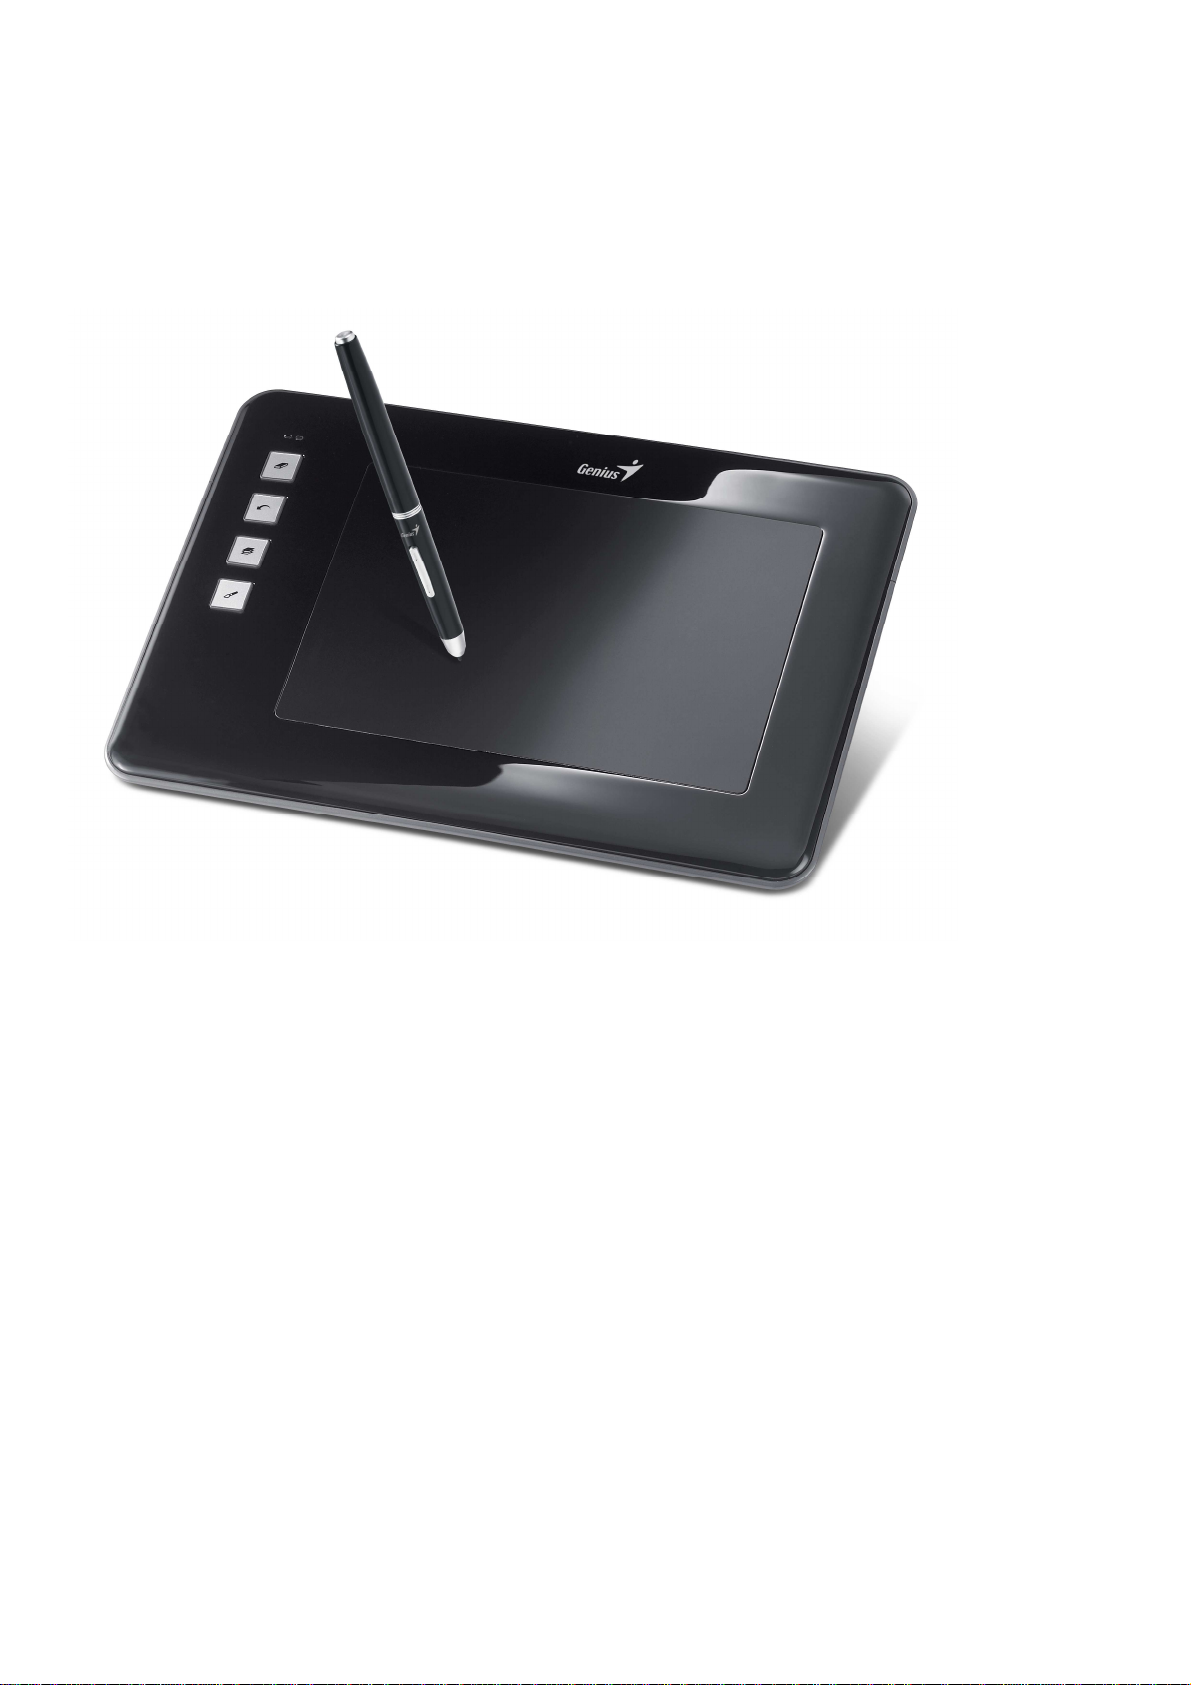
EasyPen M406W
User Manual
For Windows 7/Vista/XP
Page 2

ENGLISH
*The driver may already be updated to a newer version before/after packaging. If your installation
*The driver may already be updated to a newer version before/after packaging. If your installation
*The driver may already be updated to a newer version before/after packaging. If your installation *The driver may already be updated to a newer version before/after packaging. If your installation
screen does not match the contents of this manual, you may need to download the driver, just
screen does not match the contents of this manual, you may need to download the driver, just refer
screen does not match the contents of this manual, you may need to download the driver, justscreen does not match the contents of this manual, you may need to download the driver, just
to your software screen after installation.
to your software screen after installation.
to your software screen after installation.to your software screen after installation.
I. General Information
I. General Information
I. General InformationI. General Information
1.
1.
Overview
Overview
1.1.
OverviewOverview
Welcome to the world of tablet and digital pen! You are able to discover how easy to control your personal
computer by using a wireless digital pen to instead of a mouse:
The function of the digital pen is able to draw a line very thin, thick, light or dark (called pressure sensitivity).
You also can write, sign, annotate documents, and draw, sketch or paint as easily as you would on normal
paper and simulate the functions like pencil, mark pen, brush, or watercolor pen by using the commercial
software packages such as Adobe® PhotoShop™, Corel® Painter™ and Paint Shop™. If MSN Messenger
8.5 or newer is installed, you create and send digital handwritings and hand drawn pictures, making
communication much more fun and entertaining.
Note: If you cannot enable the handwriting mode in MSN Messenger, download the relevant handwriting
Note: If you cannot enable the handwriting mode in MSN Messenger, download the relevant handwriting
Note: If you cannot enable the handwriting mode in MSN Messenger, download the relevant handwriting Note: If you cannot enable the handwriting mode in MSN Messenger, download the relevant handwriting
refer
refer refer
component from Microsoft's website.
component from Microsoft's website.
component from Microsoft's website.component from Microsoft's website.
2.
2.
Pen Tablet Functions
Pen Tablet Functions
2.2.
Pen Tablet FunctionsPen Tablet Functions
After installing the device driver, your pen tablet features has the following functions:
2.1. Direct pointing – You can move the cursor to any location on the screen by hovering the digital pen tip
over the tablet’ s surface.
2.2, Three-buttons mouse commands - Your pen tablet provides all functions of a three- buttons’ mouse by
using its pen tip and two buttons.
2.3. Pen scrolling – You can scroll documents and Web pages by pressing the middle button of the digital
pen over the tablet’ s working area.
2.4. Pressure sensitivity – This feature allows you to emulate various brushes and pencils and you can press
down the pen tip harder, lighter, stronger or thicker, and subtle pencil lines you will receive.
System Requirements
System Requirements
3.
3.
System RequirementsSystem Requirements
3.3.
• Windows
Windows 7/
Windows Windows
• USB port
USB port
USB portUSB port
7/XP/Vista
7/7/
XP/Vista
XP/VistaXP/Vista
• DVD
DVD----ROM drive
ROM drive
DVDDVD
ROM driveROM drive
4.
4.
Driver
Driver Installations
4. 4.
Driver Driver
For Microsoft Windows7, XP and Vista operating systems:
4.1. Insert the Driver CD into the CD-ROM drive, and wait for the main installation screen to appear.
4.2. The main installation screen should appear automatically, or you can manually start the installation by
4.3. When installing the driver, follow the installation instructions on screen and press the “ Enter” key.
Installations
InstallationsInstallations
opening 【【【【My Computer
My Computer】】】】 ► 【【【【CCCCD/DVD Rom
My ComputerMy Computer
D/DVD Rom】】】】► then click on the【【【【Setup
D/DVD RomD/DVD Rom
Setup】】】】program.
SetupSetup
Page 3
After the installation has completed, reboot the computer.
then connect your dongle
driver
tallation error or delay while the system is
5.
5.
Hardware Installation
Hardware Installationssss
5.5.
Hardware InstallationHardware Installation
ENGLISH
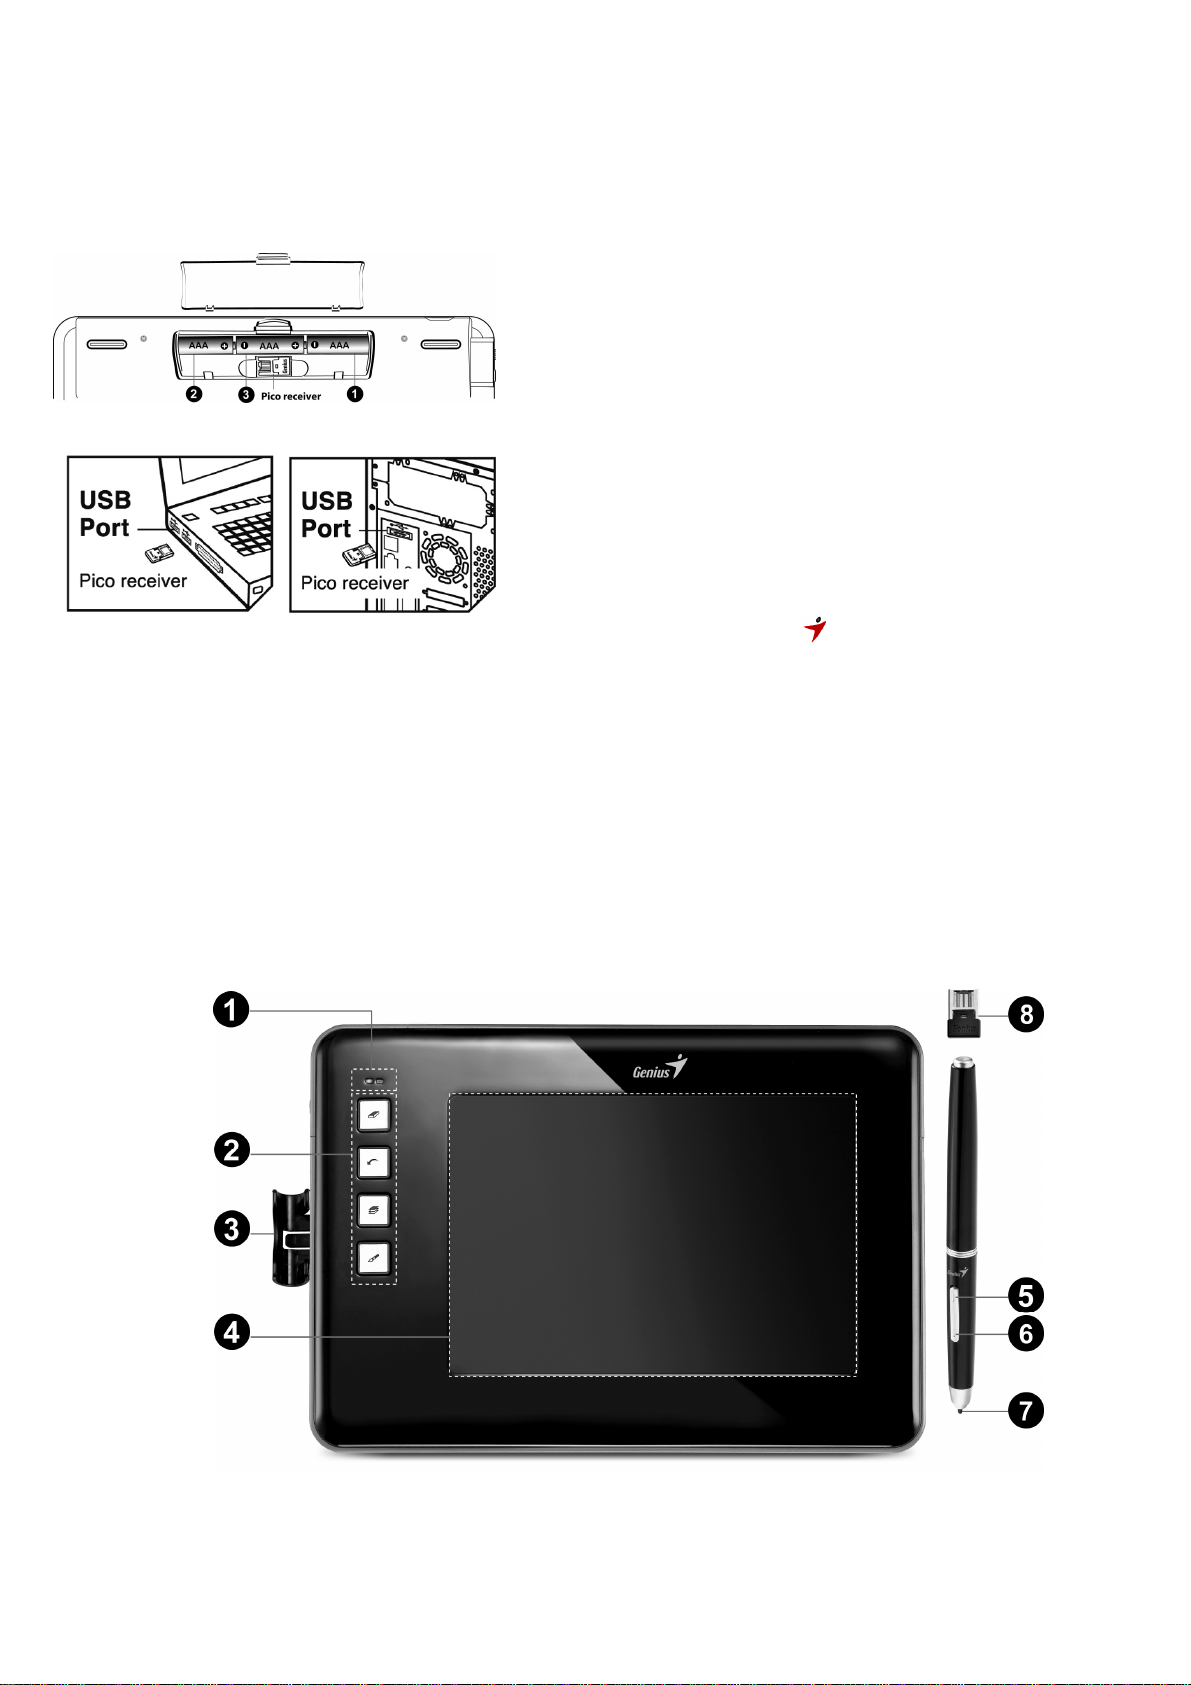
5.1. Put the batteries into the back of the wireless
tablet:
5.1.1. Put two batteries on each side of the battery
slot.
5.1.2. Put the third battery into the middle..
★★★★ DDDDo not mix or use different types of batteries at
o not mix or use different types of batteries at
o not mix or use different types of batteries at o not mix or use different types of batteries at
the same time
the same time suc
the same timethe same time
such as
h as LI
sucsuc
h as h as
LI----Ion, Alkaline, etc
Ion, Alkaline, etc; and
LILI
Ion, Alkaline, etcIon, Alkaline, etc
; and
; and ; and
rrrremember do not put the batteries in the wrong
emember do not put the batteries in the wrong
emember do not put the batteries in the wrong emember do not put the batteries in the wrong
direction
direction....
directiondirection
5.2. Connect the dongle to your USB port (as shown).
5.3. Turn on the wireless tablet.
5.4. After you connect a pen tablet into the PC, you will
see a small tablet icon ( ) appear in the system
tray, which is normally at the lower right corner of
the screen.
★★★★
Install your driver first,
to the USB port. This will avoid any
ins
detecting new hardware
6666....
Verifying Hardware and Driver Functions
Verifying Hardware and Driver Functions
Verifying Hardware and Driver FunctionsVerifying Hardware and Driver Functions
Follow these steps to verify if the wireless tablet is installed properly:
Page 4
ENGLISH
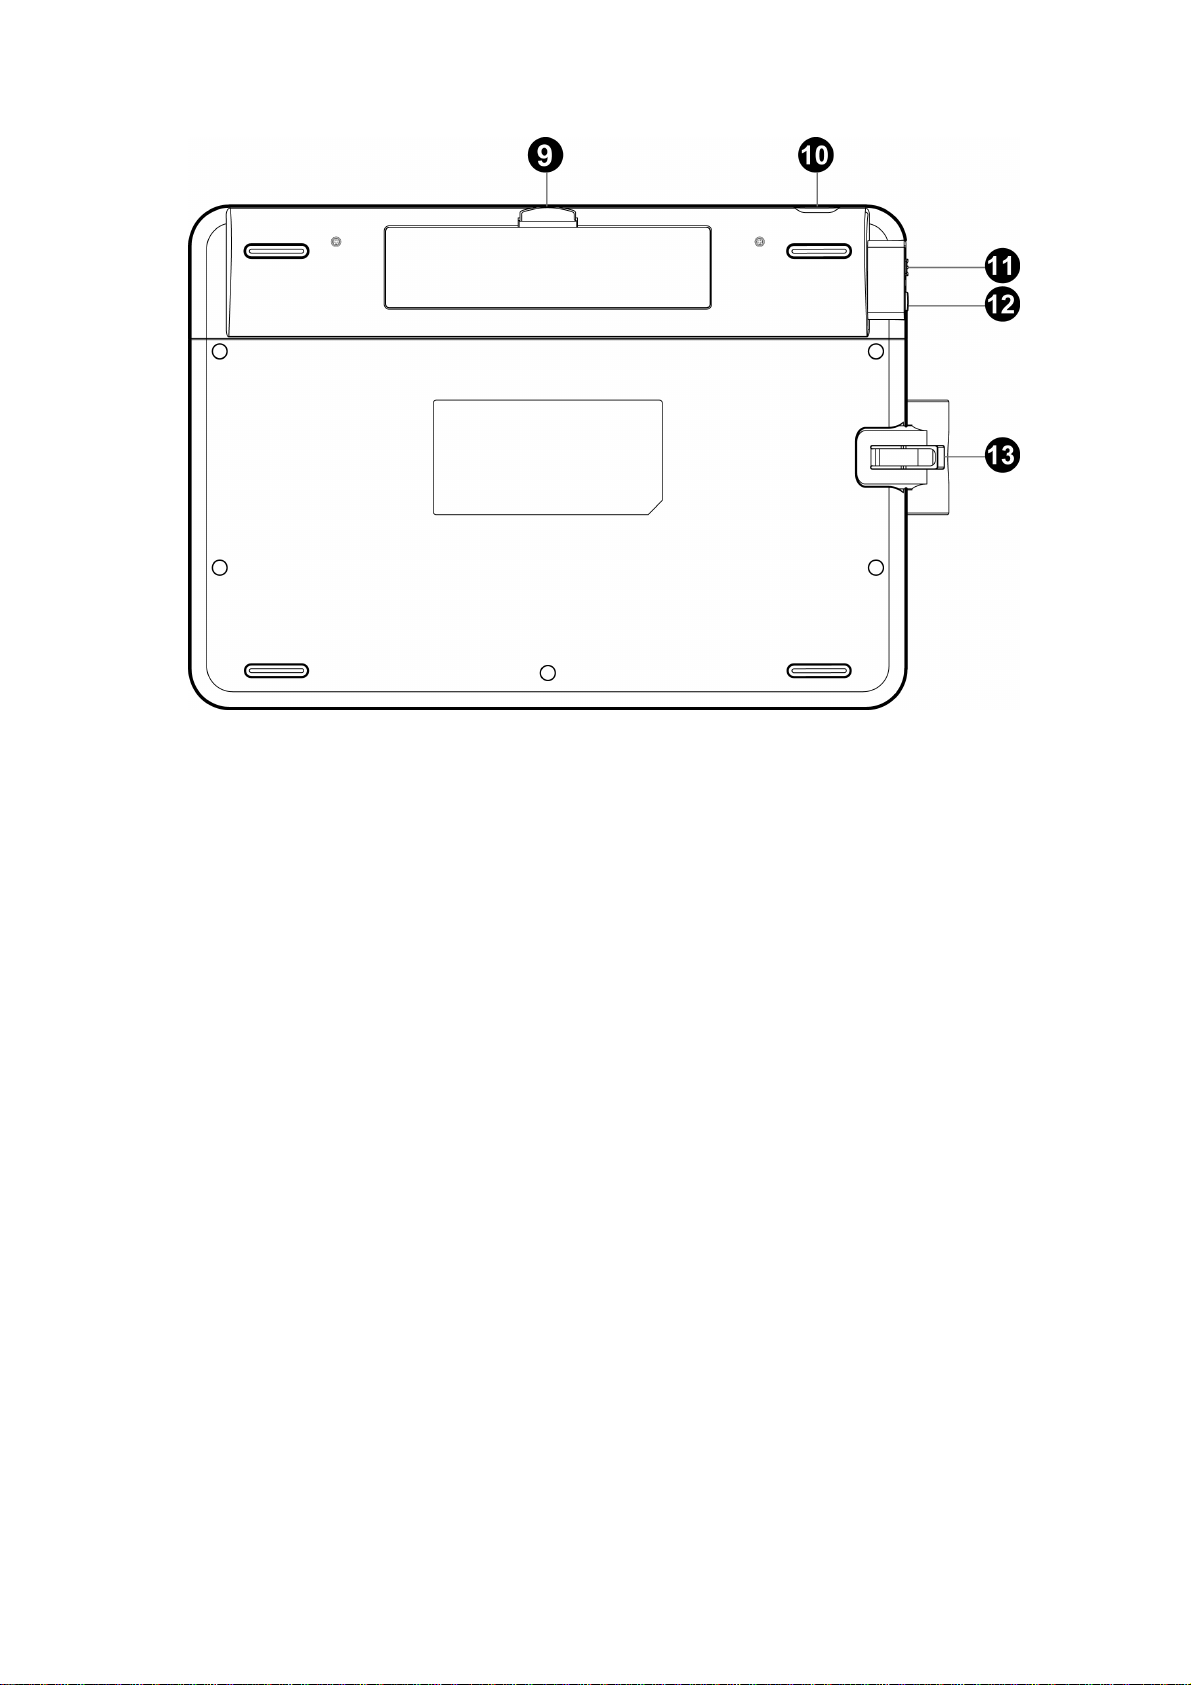
1111 ———— LED Indicator
LED Indicator
LED IndicatorLED Indicator
2222 ———— Express Key
Express Key
Express KeyExpress Key
3333 ———— Digital
Digital Pen clip
Digital Digital
4444 ———— Working Area
Working Area
Working AreaWorking Area
5555 ———— Button 2
Button 2
Button 2Button 2
6666 ———— Button 1
Button 1
Button 1Button 1
7777 ———— Pen
Pen ttttip
Pen Pen
8888 ———— Dongl
Dongleeee
DonglDongl
9999 ————
Dongle and battery slot
10
10 ———— USB
USB Port (
1010
USB USB
11
11 ———— Power
Power switch
1111
PowerPower
12
12 ———— Resume
Resume bbbbutton
12 12
Resume Resume
13
13 ———— Pen clip
Pen clip slot
13 13
Pen clipPen clip
Pen clip
Pen clipPen clip
ip
ipip
Port (ffffor
Port (Port (
or charging
or or
switch
switchswitch
utton
uttonutton
slot
slot slot
charging only)
charging charging
only)
only)only)
6.1.
6.1.
After you reboot your computer, move the cordless pen to make sure the cursor shown on the
6.1. 6.1.
screen is moving.
6.2.
6.2. The green LED light on the wireless tablet is the main indicator for hardware operation and
6.2. 6.2.
depending on your pen wireless tablet model may be located at a different place that shown in the
above diagram. This LED normally stays off, and will only turn on or off in response to various
conditions. Watch the state of the LED on the wireless tablet as you go through these test steps:
6.2.1. Tap on any surface with the tip of the pen to start working if it has gone into standby mode. A built-in
power saving function may have forced the pen into standby mode if it is not used within five
minutes..
Page 5

ENGLISH
6.2.2. Press any express key on the tablet to “ wake it up” if it has gone into sleep mode. A built-in
power saving function may have forced the pen into sleep mode if it is not used after five minutes.
6.2.3. Turn the power on the wireless tablet, the LED will be lit briefly for three seconds, then will stay off,
now the wireless tablet is in work mode.
6.2.4. When the wireless tablet detects the presence of the digital pen, the LED will stay on. This happens
either when pen tip is hovering or within the working area which above the wireless tablet.
6.2.5. When you press a button on the pen barrel, the LED will light up.
6.2.6. Hovering and moving the pen in the working area will cause the cursor on the screen to move
accordingly.
6.2.7. Press the Resume button for three seconds to put the wireless tablet in sleep mode. You can press
the Resume button or any express key on the tablet to “wake it up” from sleep mode to work mode.
★★★★ Note
Note
: After the Wireless tablet’s device driver has been properly installed, a small tablet
Note Note
icon (
) will appear in the system tray, which is normally at the lower right corner of the screen
) will appear in the system tray, which is normally at the lower right corner of the screen....
) will appear in the system tray, which is normally at the lower right corner of the screen) will appear in the system tray, which is normally at the lower right corner of the screen
7. Usage Tips
7. Usage Tips
7. Usage Tips7. Usage Tips
7.
7.1111 Tapping before you use the digital pen
Tapping before you use the digital pen
7.7.
Tapping before you use the digital pen Tapping before you use the digital pen
Before you use the digital pen, tap the pen on any surface of the tablet to start working from standby
mode.
7.
7.2222 Pressing
Pressing resume button or
7.7.
Pressing Pressing
resume button or express key
resume button or resume button or
express key before you use the digital pen
express keyexpress key
before you use the digital pen
before you use the digital pen before you use the digital pen
If you have not used the digital pen for five minutes, press the Resume button or any express key on the
tablet to “wake” it up from the sleep mode to work mode.
7.
7.3 Double tapping
3 Double tapping
7.7.
3 Double tapping 3 Double tapping
When you double tap with the digital pen (equivalent to a double click with a mouse), try to keep the pen
tip away from the tablet’ s surface, or at least try to lift the pen tip as fast as possible before the second
tap.
7.
7.4 Storing the digital pen
4 Storing the digital pen
7.7.
4 Storing the digital pen 4 Storing the digital pen
To store the pen, make sure the pen tip does not touch anything, and especially do not let the pen stand in
a cup or penholder with the tip down. Place the pen in a penholder, or turn the pen tip pointing upward or
horizontally with the pen tip free of any pressure by other objects.
7.
7.5555 Scrolling function of digital pen
Scrolling function of digital pen
7.7.
Scrolling function of digital pen Scrolling function of digital pen
The digital pen has the same function as a normal mouse when scrolling pages. Press the first button of
the digital pen (same function as the mouse middle button) over the tablet’ s working area.
7.
7.6666 Using a pen without a mouse
Using a pen without a mouse
7.7.
Using a pen without a mouseUsing a pen without a mouse
You may install the digital pen, digital mouse, and a regular mouse in your computer at the same time and
you can also remove them to a different computer as well. However, only one device is able to work at a
time.
★★★★ Note:
Note: Do not use more than two devices at the same time in case the screen cursor is jittering or not
Note: Note:
moving.
moving.
moving.moving.
Do not use more than two devices at the same time in case the screen cursor is jittering or not
Do not use more than two devices at the same time in case the screen cursor is jittering or not Do not use more than two devices at the same time in case the screen cursor is jittering or not
Page 6
ENGLISH
II. Pen tablet configuration
II. Pen tablet configuration
II. Pen tablet configurationII. Pen tablet configuration
You may configure the pen tablet by modifying the functions of the pen tip and the two barrel buttons.
Tap [Start] > [All programs] > [io Tablet], and double-tap the [io Tablet ] icon, or tap on the tablet
icon ( ) in the system tray, usually located at the lower right corner of the screen. You may also
adjust the pressure sensitivity of the pen by determining the scope of the tablet’s working area, or
(re-) program the hot-cells of your pen tablet by modifying device driver.
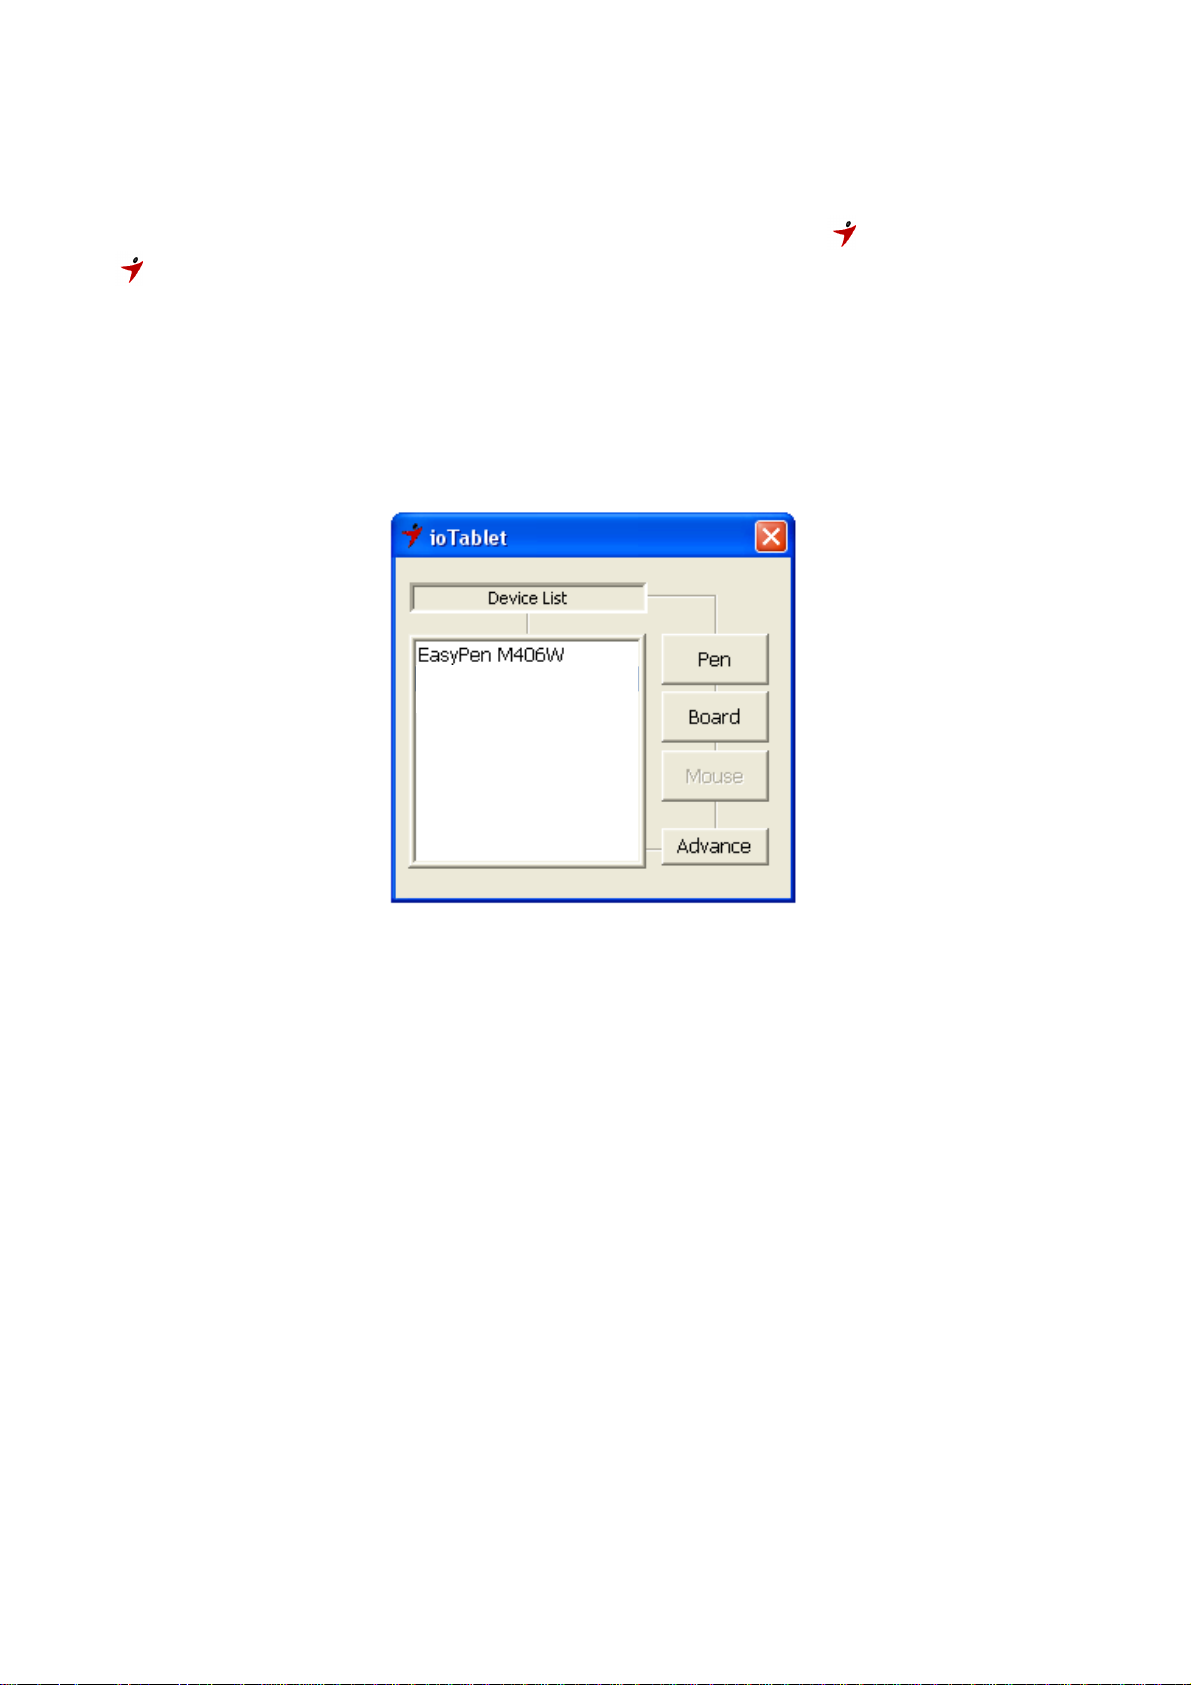
1. The Info Tab: The Info tab displays the devices you can choose to operate your tablet, including
the pen, the tablet itself and any interface language.
● After the tablet driver is installed in Windows, the Tablet PC function setting will support
pressure in MS Journal, OneNote (2003 - 007), etc.
2. Cordless Pen
2.1 Button Name:
Page 7

ENGLISH
You may re-program the functions of the pen tip and the two-barrel buttons by selecting the button
name from the drop down menu and assign a command of a traditional three-button mouse to it. The
programmable group includes:
- Click Group: Click, Scroll, Lock, etc.
- Office Group: Copy, Save, Undo, etc.
- System Group: My Computer, My pictures, Media Player, etc.
- Browser Group: Back, Forward, Refresh, etc.
- Audio Group: Play, Stop, Mute, etc.
Simply chose the function you require and press “Apply” to activate it.
2.2 Mode Setting:
The tablet offers Pen and Mouse mode according to your design demands.
Page 8

2.2.1. Pen Mode (Absolute mode): Use the pen to draw, point, click and sign as you wish.
ENGLISH
2.2.2. Mouse Mode (Relative mode): Use the pen as a traditional mouse.
2.2.2.1 Cursor Speed Adjustment:
In Mouse mode, you may move the cursor speed between slow and fast to adjust the speed.
Page 9

2.3 Pen Sensitivity Adjustment:
The pen has
1024 pressure levels sensitivity for all kinds of shapes and thickness. Under either Pen
ENGLISH
Mode or Mouse Mode you can adjust pressure sensitivity. Move the slider in the sensitivity bar to
adjust the levels. There is a test area to draw a line by pressing the pen tip on the tablet pad.
Simply chose the function you require and press “Apply” to activate it.
2.4 Default:
Tap on the Default button to return to the manufacturer settings.
3. Tablet
3.1 Re-define Express keys:
Page 10

ENGLISH
All the available express keys are shown on the left side of the menu. Click on any of them to find out
the icon and location. You may re-program any express key from the drop down menu below the
tablet picture.
3.2 For Tablet express keys definition:
You may choose any:
- Click Group: Click Scroll, Lock, etc.
- Office Group: Copy, Save, Undo, etc.
- System Group: My Computer, My pictures, Media Player, etc.
- Browser Group: Back, Forward, Refresh, etc.
- Audio Group: Play, Stop, Mute, etc.
Simply chose the function you require and press “Apply” to activate it.
3.3 Default
Return the Express Keys to the default settings.
Page 11

3.4 Tablet working area:
ENGLISH
There are two modes available to define the working area, click “Apply” to activate it.
3.4.1. AlI (Full Area): Select the largest possible working area depends on the tablet size.
3.4.2. Part (Programmable Area): Allows you to define the dimensions for top, bottom, left and right.
Define the size by inputting any numbers in the blank bars.
3.5 Change Screen Ratio:
This tablet can be adjusted according to your LCD display.
Page 12

A. Set the tablet working area the same as the screen size by clicking “Auto Adjust”.
B. Switch the screen ratio by selecting 4:3 (Standard) or 16:9 (Wide).
Simply chose the function you require and press “Apply” to activate it.
3.6 Default:
Tap on the Default button to return to the manufacturer settings.
3.7 Change the length of sleep time:
ENGLISH
Move the slider in the Sleep Time bar to adjust the length of time, click “Apply” to activate it.
3.8 Default:
Tap on the Default button to return to the manufacturer settings.
3.9
Watch the battery capacity status in the info tab:
3.9.1. Full power
Page 13

ENGLISH
3.9.2. 50% power
3.9.3. Battery low
Page 14

ENGLISH
3.9.4. Charging the rechargeable batteries
3.10. Wireless tablet is not connected to your PC:
Page 15

ENGLISH
4. Advance
4.1 Change interface language:
You can click any column for the language of your preference. Click “Apply” to activate it.
Page 16

4.2 Disable OSD String:
ENGLISH
You can click on the column not showing the OSD string, click “Apply” to activate it.
The OSD string shows the function of any express key or button on the pen barrel, which is normally
at the lower middle of the screen.
Page 17

ENGLISH
III. Charging the rechargeable batteries
1111. Charging the Wireless Tablet rechargeable batteries
. Charging the Wireless Tablet rechargeable batteries
. Charging the Wireless Tablet rechargeable batteries. Charging the Wireless Tablet rechargeable batteries
Test your wireless stylus pen in the tablet working area, if it doesn't work, use new batteries or charge the
rechargeable batteries of the wireless tablet using the micro USB cable and plug it into your PC.
When the green LED of the wireless tablet LED is blinking when the pen tip is hovering or in the working area
above the tablet, the tablet will be out of power within 30 minutes.
To charge the rechargeable batteries inside the tablet, plug the micro USB cable into your PC.
When charging the batteries, the red LED of the tablet will be blinking, it will stay on when the batteries are
completed charged. You can remove the micro USB cable from your PC and the tablet.
★ Note: DO NOT charge your tablet if you are not using rechargeable batteries, it may cause fire,
explosion or burst.
★ Do not mix or use different types of batteries at the same time such as LI-Ion, Alkaline, etc;
and remember do not put the batteries in the wrong direction.
IV. Storing the Digital pen and changing the Pen Battery & Tip
1.
1. Storing the digital pen properly
Storing the digital pen properly
1. 1.
Storing the digital pen properlyStoring the digital pen properly
To store the digital pen, make sure that the tip does not touch anything, especially, do not let the pen stand in
a cup or penholder with the tip down. It is recommended to place the pen in a pen holder or store it with the
pen tip pointing upward, or place it horizontally with the pen tip free of any other objects.
2222.
. Changi
Changing the wireless stylus pen tip
. .
ChangiChangi
A: Pull out the pen tip from the digital pen by using the Pen Clip..
ng the wireless stylus pen tip
ng the wireless stylus pen tipng the wireless stylus pen tip
B: Push the pen tip into the digital pen.
Page 18

ENGLISH
V.
V. Notes on Battery Usage
Notes on Battery Usage
V. V.
Notes on Battery UsageNotes on Battery Usage
When you use the battery, carefully read and strictly observe the Safety Instructions and the notes described
below:
Different battery types and surrounding temperatures may affect the battery performance.
Avoid using batteries in extremely cold environments as low temperatures can shorten the battery life and
reduce wireless device performance.
If you are using a new rechargeable battery or rechargeable battery that has not been used for an extended
period of time (batteries that pass the expiry date are exceptions) it might affect the period of time you can
use this device. Therefore, to maximize their performance and lifetime, we recommend that you fully charge
the batteries and discharge them for at least one complete cycle before use.
The battery may feel warm when using the wireless device for an extended period of time or using the flash
continuously. This is normal and not a malfunction.
The wireless device may feel warm when being used continuously or for an extended period of time. This is
normal and not a malfunction.
If you will not be using the batteries for an extended period of time, remove them from the wireless device to
prevent leakage or corrosion.
Always keep the terminals in a clean state.
Never use manganese batteries.
Risk of explosion if battery is replaced by an incorrect type.
Dispose of used batteries according to the instructions.
VVVVIIII.
. Question & Answer
Question & Answer
. .
Question & AnswerQuestion & Answer
Question 1: How can I get the latest updat
Question 1: How can I get the latest updateeee or
Question 1: How can I get the latest updatQuestion 1: How can I get the latest updat
Answer: You can download the new driver from our website.
1. Before uninstalling the driver, remove your dongle from the USB port. It will avoid any driver
installation error when you install a new driver.
2. Uninstall your old driver: Click
3. Download the latest version of driver in the download section and save it into your hard disk.
4. Unzip the file in a folder on your hard disk (with Windows built-in unzip utility or a program like Winzip
Click [Start] ► [All Programs] ►
[Start] ► [All Programs] ►
ClickClick
[Start] ► [All Programs] ►[Start] ► [All Programs] ►
or uninstall
uninstall the software
or or
uninstall uninstall
the software????
the softwarethe software
[io Tablet]
► [Uninstall]
► [Uninstall]....
► [Uninstall] ► [Uninstall]
for
instance).
5. Double-click the Setup.exe in the folder where you unzipped the file.
Question 2: The tablet cannot work. What can I do?
Question 2: The tablet cannot work. What can I do?
Question 2: The tablet cannot work. What can I do?Question 2: The tablet cannot work. What can I do?
Answer: Check if the following is okay.
1. Remove the tablet's USB dongle from the computer.
2. Uninstall the tablet driver from the system.
3. Re-connect the tablet's USB dongle to the computer.
3.1 Test your wireless stylus pen in the tablet working area, if it can work as a mouse, that means the
Page 19

ENGLISH
hardware is OK. If it doesn't work, you need to change the batteries or charge your rechargeable
batteries using the micro USB cable and plug it into your PC.
3.2 After you changed new batteries for the tablet or charged your rechargeable batteries of the wireless
tablet, if it is still not working, that means the hardware is at fault.
★ Note: DO NOT charge your tablet if you are not using rechargeable batteries, it may cause fire,
explosion or burst.
★ Do not mix or use different types of batteries at the same time such as LI-Ion, Alkaline,
etc; and remember do not put the batteries in the wrong direction.
4. You can download for free the latest version of driver directly from our website www.geniusnet.com
5. Setup the new version of driver; and you need to restart your computer.
6. After you restart your computer, on bottom right of the screen, you can find the tablet icon (
6.1 If you can't find the tablet icon ( ) on the bottom right of the screen, it means the driver failed in
startup, and there could be an incompatible issue.
6.2 Check [My Computer] ► [Properties] ► [Hardware] ► [Device Manager], if you see an exclamation
mark, it means the installed driver of the tablet is incompatible with the Windows system.
7. By clicking the tablet icon (
see whether the pen pressure function works or not. (Check the Pen tablet configuration section for more
details).
☆ If you do not have pen pressure, it means the pen might be faulty.
Question
Question 3333︰
QuestionQuestion
Answer: This is a low battery reminder, so you need to change the batteries or charge the rechargeable
★ Note: DO NOT charge your tablet if you are not using rechargeable batteries, it may cause fire,
explosion or burst.
︰Why does the green LED blink when the pen tip is hovering or within the working area of
︰︰
the tablet?
batteries using the micro USB cable and plug it into your PC.
) on the bottom right of the screen, you can test the pressure sensitivity to
.
).
★ Do not mix or use different types of batteries at the same time such as LI-Ion, Alkaline, etc;
and remember do not put the batteries in the wrong direction.
Page 20

FCC ID: FSUGMZJM
FCC Compliance and Advisory Statement
This device complies with Part 15 of the FCC rules. Operation is subject to the following two
conditions:(1) this device may not cause harmful interference, and (2) this device must accept
any interference received, including interference that may cause undesired operation.
This equipment has been tested and found to comply with the limits for a Class B digital
device,
according to Part 15 of the FCC rules. These limits are designed to provide reasonable
protection against harmful interference in a residential installation. This equipment generates,
uses and can radiate radio frequency energy and if not installed and used in accordance with
the instructions, may cause harmful interference to radio communications. However, there is
no guarantee that interference will not occur in a particular installation. If this equipment does
cause harmful interference to radio or television recept ion, which can be determined by turning
the equipment off and on, the user is encouraged to try correct the interference by one or more
of the following measures:
1.Reorient the receiving antenna.
2.Increase the separation between the equipment and receiver.
3.Connect the equipment into and outlet on a circuit different from that to which the receiver is
connected.
4.Consult the dealer or an experienced radio/TV technician for help.
Any special accessories needed for compliance must be specified in the instruction manual.
Warning: A shielded-type power cord is required in order to meet FCC emission limits and
also to prevent interference to the nearby radio and television reception. It is essential that
only the supplied power cord be used. Use only shielded cables to connect I/O devices to this
equipment.
CAUSION: Any changes or modifications not expressly approved by the party responsible for
compliance could void your authority to operate the equipment.
ICstatementThisClassBdigitalapparatuscomplieswithCanadianICES‐003.Cetappareil
numériquedelaclasseBestconformeàlanormeNMB‐003duCanada.
 Loading...