

Page 1

FCC ID: FSUGMZHH
FCC Compliance and Advisory Statement
This device complies with Part 15 of the FCC rules. Operation is subject to the following two
conditions:(1) this device may not cause harmful interference, and (2) this device must accept
any interference received, including interference that may cause undesired operation.
This equipment has been tested and found to comply with the limits for a Class B digital device,
according to Part 15 of the FCC rules. These limits are designed to provide reasonable
protection against harmful interference in a residential installation. This equipment generates,
uses and can radiate radio frequency energy and if not installed and used in accordance with
the instructions, may cause harmful interference to radio communications. However, there is
no guarantee that interference will not occur in a particular inst allation. If this equipment does
cause harmful interference to radio or television recept ion, which can be determined by turning
the equipment off and on, the user is encouraged to try correct the interference by one or mo re
of the following measures:
1.Reorient the receiving antenna.
2.Increase the separation between the equipment and receiver.
3.Connect the equipment into and outlet on a circuit different from that to which the receiver is
connected.
4.Consult the dealer or an experienced radio/TV technician for help.
Any special accessories needed for compliance must be specified in the instruction manual.
Warning: A shielded-type power cord is required in order to meet FCC emission limits and
also to prevent interference to the nearby radio and television reception. It is essential that
only the supplied power cord be used. Use only shielded cables to connect I/O devices to this
equipment.
CAUSION: Any changes or modifications not expressly approved by the party re sponsible for
compliance could void your authority to operate the equipment.
Page 2
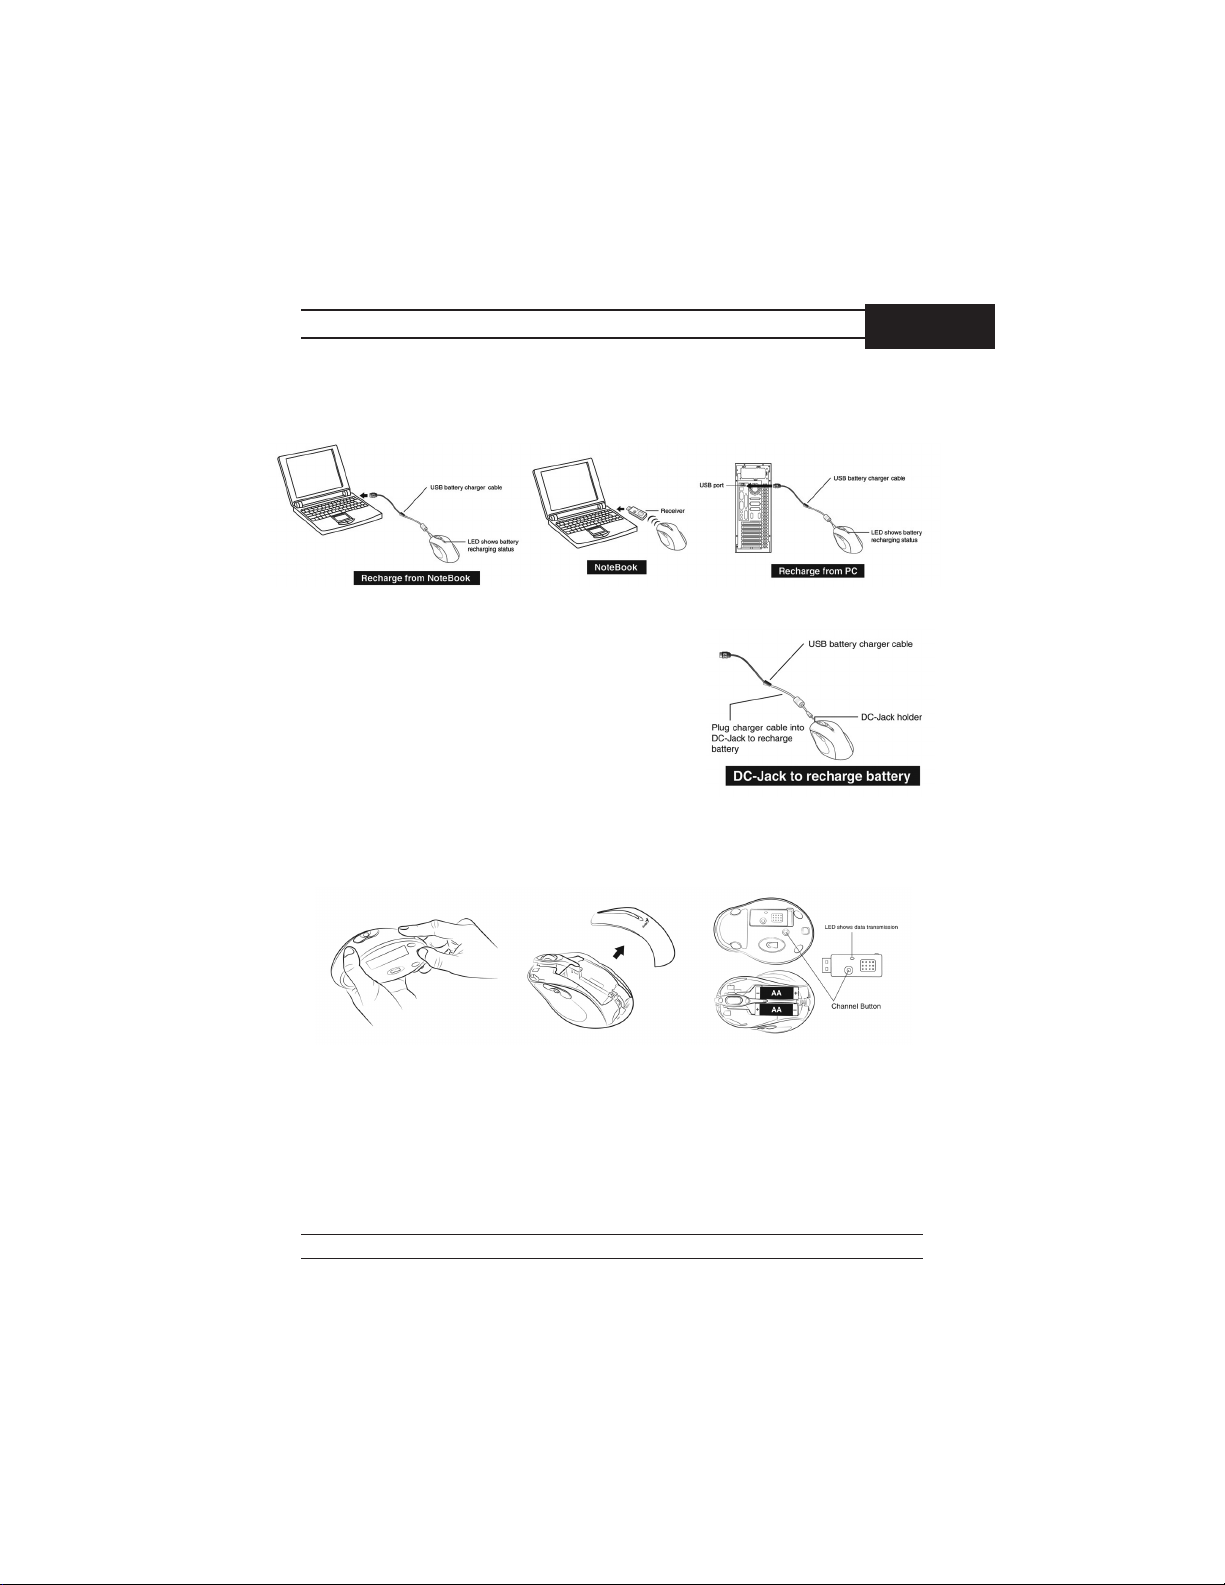
Hardware Installation
1. You can connect the receiver to a USB port of a PC or Notebook.
2. If you want to connect the receiver to a PC or
recharge the batteries, please use the USB bat
tery charger cable. (Please do not connect the
receiver directly to a PC that is placed under
a table, or the RF performance will decrease
dramatically.)
3. Install two AA rechargeable batteries in the
mouse. (Use only rechargeable batteries. Using any other type of battery could cause serious damage to your mouse or mainboard). Do
not charge batteries unless there are other
batteries in the mouse. Otherwise, you cannot use the mouse if you are
charging the batteries.
-
ENGLISH
4. Turn on your computer.
5. After you open Windows, press the button on the receiver first, then press the
button under the mouse for channel setting.
1
Page 3

Important: When you use this product for the first time, the mouse may seem to be
sluggish because it takes between 12 to 16 hours of use for the batteries to be
recharged to obtain full performance. The other alternative is to recharge the bat
teries before you use the Wireless laser mouse device. Please remove the batteries
if you do not use this device for at least two weeks.
Warning: (Troubleshooting)
1. Please do not use the Wireless laser mouse on a desk which is made of glass or
mirror.
2. Before the first installation is completed (channel setting ready), the mouse will
not work.
3. The Wireless laser mouse channel provides 256 ID-codes, and it automatically
selects the ID # for your mouse. You can only set up one Wireless laser mouse
at a time. But if you have additional Wireless laser mouse sets in an area of 10
square meters, more interference will occur between the receiver and your
mouse.
4. If you feel the mouse does not move as smooth as usual, then the batteries have
lost their charge, so you need to replace them or use the USB battery charger
cable to recharge the batteries. The LED on the mouse shows the
battery-recharging status: it will shine when empty and be clear when the
batteries are recharged. You should set up the channel every time you replace
the batteries.
5. If you need to buy new batteries, please choose Ni-MH (Nickel-Metal-Hydride)
AA batteries, 1300 to 1500 mAH, 1.2 V. Please do not mix or use other types
of batteries (Li-ion, Ni-Cd, Alkaline, etc.). Recycle your batteries according
to local law.
6. The Wireless laser mouse with radio frequency gives you free movement and an
enjoyable experience. For optimal performance, place the receiver at least 8
inches (about 20 cm) away from the mouse and other electrical devices, such as
the computer, monitor, and etc.
Software Installation
1. Make sure the mouse is connected to the computer.
2. Put the Setup disk (or CD) into the disk drive.
3. Follow the instructions on the screen to finish the software installation.
-
2
Page 4

Factory Setting
Button Assignments
1.
Left Button: Provides traditional
mouse functions such as click, double click and drag.
2. Right Button: You can assign this
button frequently used keyboard and
mouse functions in addition to features like EasyJump, Auto-Panning,
Zoom, etc.
3. Magic-Roller: Press the “MagicRoller” to surf the Internet and Windows documents.
Horizontal Scroll: Press the roller
to the left and the cursor scrolls to the left; press the roller to the right
and the cursor scrolls to the right.
4.
Previous: See previous song when viewing the media Player.
5. Next: Go to next song when viewing the media player.
6. Vol. +: Increase volume
7. Vol. -: Decrease volume
8.
Sensitivity: Sensitivity Adjustment (This button only for sensitivity ad
justment, it is not programmable).
ENGLISH
-
3
 Loading...