

Page 1
ENGLISH
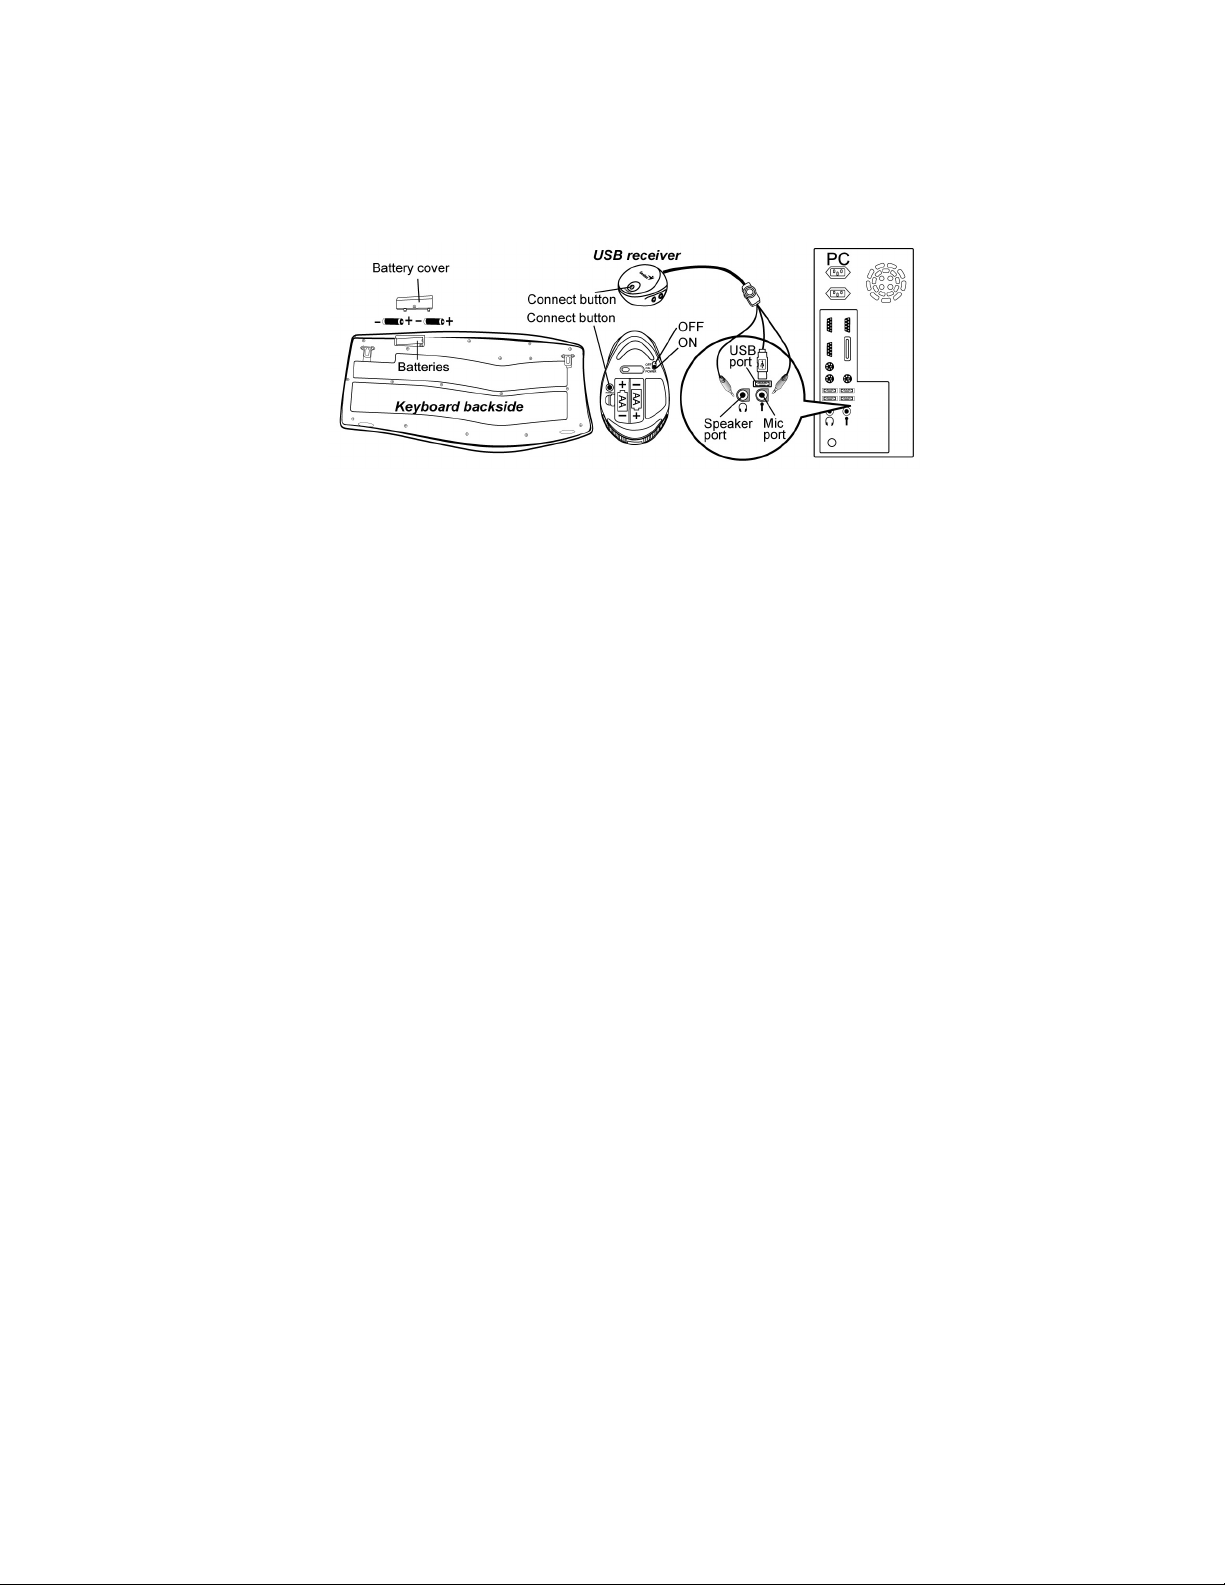
Hardware Installation
1. Install two AA batteries each into the mouse and keyboard.
2. Plug in the USB receiver to a USB port of your PC.
3. Plug the Mic in & Speaker out connector to your PC.
4. Turn on your PC.
Software Installation
1. Place your CD driver in your PC drive for software installation.
2. Follow the instruction on the screen to finish the software installation.
3. For “HELP with the Genius driver, click on the icon found on the right
hand side of the screen.
Replace Batteries
1. If the keyboard does not work properly, then the batteries have lost their
charge, so please replace them.
2. If the mouse’s battery power is low, the power indicator will brighten
when you are moving the mouse.
Warning: Do not mix or use different types of batteries at the same time.
ID Channel Setting
The channel ID is factory preset. The green LED (data transmission indicator)
will be lit constantly when the wireless device is in normal operation. In case
your wireless devices do not work, please reset the ID channel by:
1
Page 2

ENGLISH
1. Press the connect button on the receiver and the LED will be blinking for
connection first; then, press the connect button of the wireless mouse.
2. Because wireless keyboard and mouse use different RF protocol, after
your mouse is connected, you need to press the receiver connect button
again, then press the keyboard connect button to finish the wireless
keyboard and mouse connect procedure.
Warning (Trouble shooting)
1. In case the wireless device was not connected when you set the ID
channel setting, check if you have installed the batteries with the positive
(+) and negative (-) ends in the correct position, then repeat the ID
channel setting again.
2. For optimum performance, make sure that the distance between the
wireless device and the dongle receiver does not exceed 10M.
3. For Windows Media Player Ver 11.0, you need to click on “play” to start
playing music first after the software installation due to Microsoft system
presets.
Programming and selection
1. Only Word/ Excel/ Power Point/ Photo Gallery/ File
Search/Messenger/Messenger Status/Web cam/Internet/Internet
Search/Refresh/Stop/Blog/Add to my favorite/My Favorite/Mail/
My computer/Zoom in & out/Scrolling buttons are capable of being
programmable.
2. To re-program for other media programs, software installation is
required.
3. Media Player key allows you to choose from various playing programs.
4. Messenger key allows you to choose from Windows Messenger/MSN
Messenger/Skype/ICQ when installed.
2
Page 3
ENGLISH
Remark
1. These buttons will not work unless the driver has been installed:
Scrolling buttons/ left and right scrolling function/Zoom in &
out/Messenger/Messenger status/Web cam/Photo Gallery/File
Search/Blog/Add to my favorite/Word/Excel/Power Point.
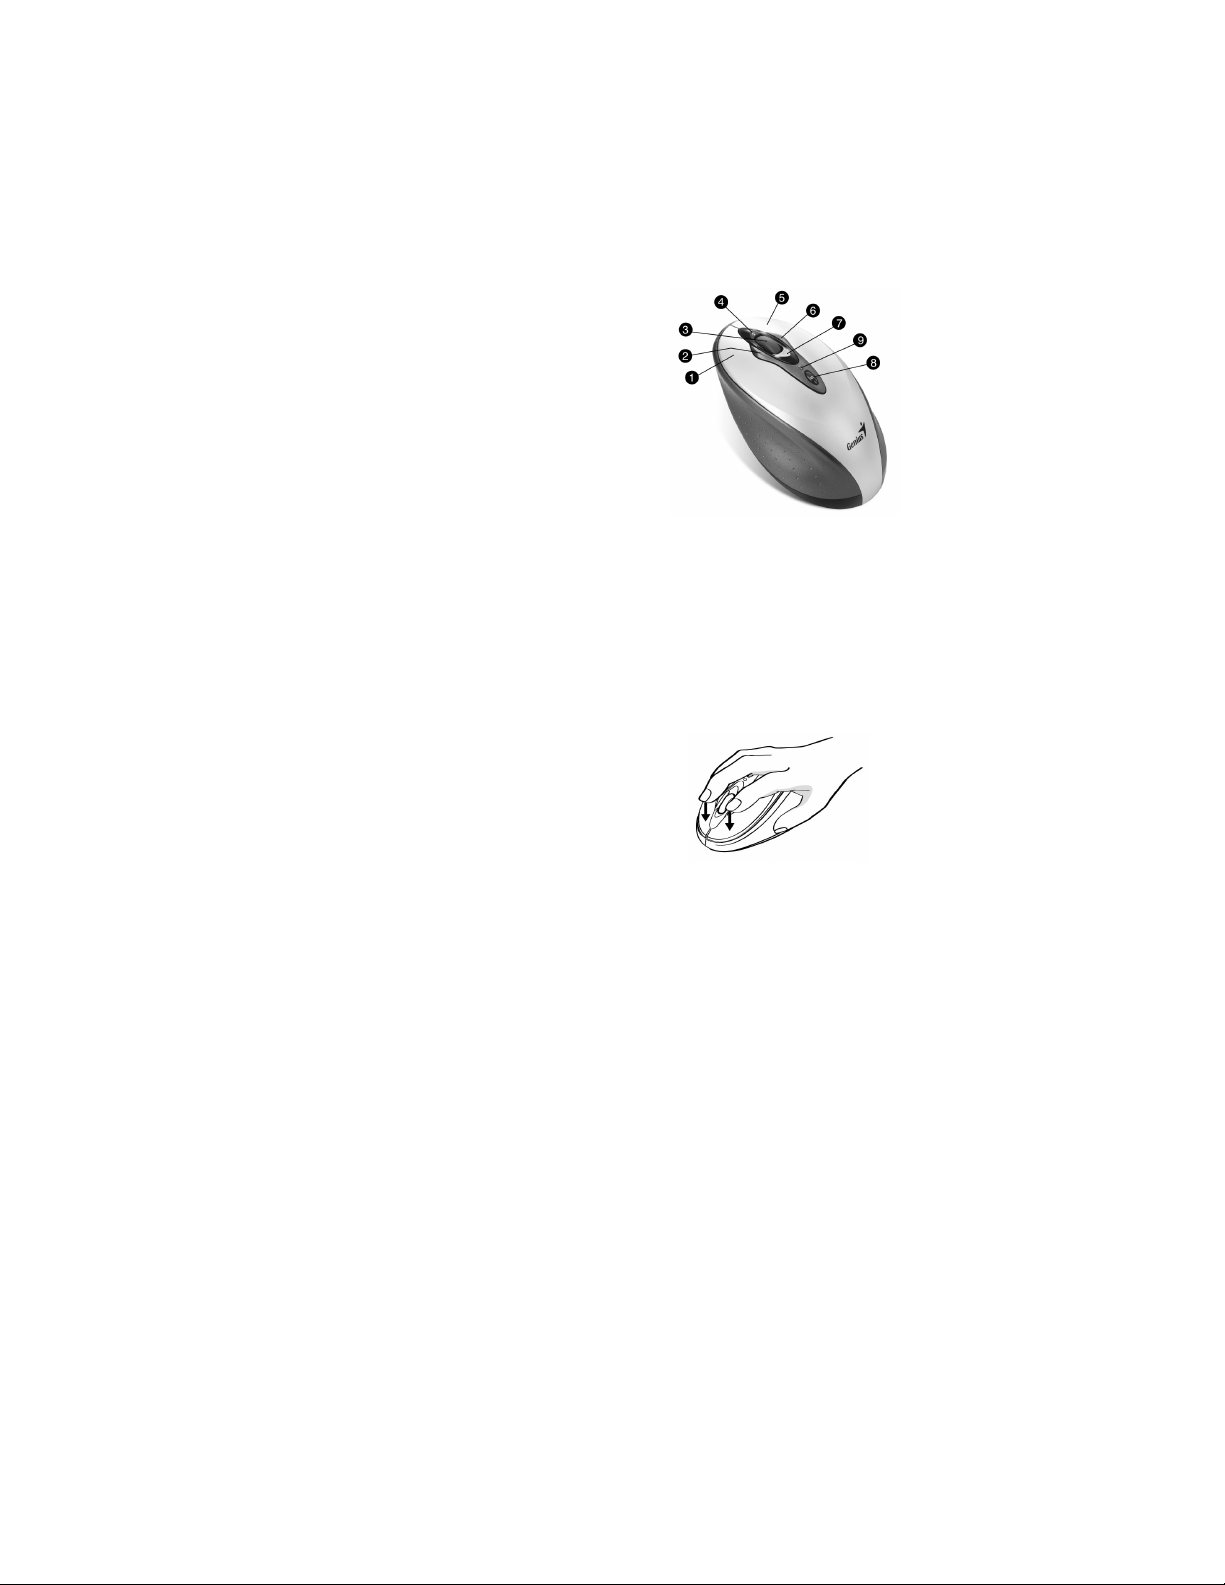
Mouse Factory Setting
1. Left Button: Provides traditional
mouse functions such as click, double
click and drag.
2. 4D Horizontal browsing to the left
3. Magic Roller/Middle button: Scroll
the button to surf the Internet and
Windows documents.
4. Turbo roller button: Provides quick
roller up.
5. Right button: Provides traditional mouse click function
6. 4D Horizontal browsing to the right
7. Turbo roller button: Provides quick roller down.
8. Flip 3D button: Provides fast access to all opened windows in one easy
view.
9. Power indicator: If your battery power is low, the LED will brighten
when you are moving the mouse.
Adjust dpi resolution
Press left and right button together for three
seconds, the resolution will switch from 1600
to 800 dpi. Press both buttons again for three
seconds and it will revert to 1600 dpi. The
LED flash is shorter for 800 dpi.
(The default resolution is 1600 dpi).
3
Page 4

ENGLISH
Keyboard hot key definition
NO Hot Key Description
01 Copy Activate copy function
02 Cut Activate cut function
03 Save Activate save function
04 Print Activate print function
05 Word Access to Word file
06 Excel Access to Excel file
07 Power Point Access to Power Point file
Access to Media Center Start menu (MCE
08 MCE
09 Photo gallery Open Photo Gallery folder
10 File search Search for a file or folder
11 Media Player Activate Media Player
12 Play/Pause Play/Pause music or video sources
13 Previous Track Back to Previous track
14 Volume Up Increase volume
15 Volume Down Decrease volume
16 Next Track Go to next track
17 Mute Toggle off /on
18 Stop Stop play of audio/video sources
19 Messenger Open Messenger icon
20 Messenger Status Go to Messenger’s status
21 Webcam Connect Messenger’s Internet Webcam
22 Internet Open browser in Netscape or IE
23 Search Open Internet Explorer search panel
24 Refresh
function works in Windows XP MCE
Edition/ Vista Home Premium/ Vista
Ultimate ONLY)
Update the information on an active
Internet page
4
Page 5

ENGLISH
25 Stop Stop loading or refresh a web page
26 My Blog
27 Add to my favorite
28 My Favorite Open Internet Explorer favorite panel
29 Mail Active a default email program
30 My computer Open My computer path
31 Lock Activate the security lock function
32 Page up Rolling up the activated page
33 Scrolling Button Open activated applications
34 Page Down Rolling down the activated page
35 Zoom In
36 Zoom Out
Activate MSN space or setup blog web site
by users
Add a web site to Internet Explorer favorite
panel
Enlarge the ratio of office document or
pictures
Decrease the ratio of office document or
pictures
5
Page 6

ENGLISH
Notes on Battery Usage
When you use the battery, carefully read and strictly observe the Safety
Instructions and the notes described below:
Different battery types and surrounding temperatures may affect the
battery performance.
Avoid using batteries in extremely cold environments as low
temperatures can shorten the battery life and reduce wireless device
performance.
If you are using a new rechargeable battery or rechargeable battery
that has not been used for an extended period of time (batteries that
pass the expiry date are exceptions) it might affect the period of time
you can use this device. Therefore, to maximize their performance
and lifetime, we recommend that you fully charge the batteries and
discharge them for at least one complete cycle before use.
The battery may feel warm when using the wireless device for an
extended period of time or using the flash continuously. This is
normal and not a malfunction.
The wireless device may feel warm when being used continuously or
for an extended period of time. This is normal and not a malfunction.
If you will not be using the batteries for an extended period of time,
remove them from the wireless device to prevent leakage or
corrosion.
Always keep the terminals in a clean state.
Never use manganese batteries.
Risk of explosion if battery is replaced by an incorrect type.
Dispose of used batteries according to the instructions.
6
Page 7

FEDERAL COMMUNICATIONS COMMISSION INTERFERENCE STATEMENT
This equipment has been tested and found to comply with the limits for a Class B digital
device, pursuant to part 15 of the FCC Rules. These limits are designed to provide
reasonable protection against harmful interference in a residential installation. This
equipment generates, uses and can radiate radio frequency energy and, if not installed
and used in accordance with the instructions, may cause harmful interference to radio
communications. However, there is no guarantee that interference will not occur in a
particular installation. If this equipment does cause harmful interference to radio or
television reception, which can be determined by turning the equipment off and on, the
user is encouraged to try to correct the interference by one or more of the following
measures:
-Reorient or relocate the receiving antenna.
-Increase the separation between the equipment and receiver.
-Connect the equipment into an outlet on a circuit different from that to which the receiver
is connected.
-Consult the dealer or an experienced radio/ TV technician for help.
CAUTION:
Any changes or modifications not expressly approved by the grantee of this device could
void the user's authority to operate the equipment.
RF exposure warning
This equipment must be installed and operated in accordance with provided instructions
and the antenna(s) used for this transmitter must be installed to provide a separation
distance of at least 20 cm from all persons and must not be co-located or operating in
conjunction with any other antenna or transmitter. End-users and installers must be
provide with antenna installation instructions and transmitter operating conditions for
satisfying RF exposure compliance.
This device complies with Part 15 of the FCC Rules. Operation is subject to the following
two conditions: (1) this device may not cause harmful interference, and (2) this device
must accept any interference received, including interference that may cause undesired
operation.
 Loading...