

Page 1

DVD MAKER PCI Installation Manual
Contents
V1.0
Chapter 1 : DVD MAKER PCI Hardware Installation......................................................................................2
1.1 Package Contents.................................................................................................................................2
1.2 System Requirements...........................................................................................................................2
1.3 Hardware Installation...........................................................................................................................2
Chapter 2 : DVD MAKER PCI Quick Installation............................................................................................3
2.1 The Driver Installation of DVD MAKER PCI ....................................................................................3
Chapter 3 : FAQ.................................................................................................................................................4
1.How to check if the driver has been installed successfully or not? ........................................................4
2.How to uninstall all of device driver and software utility?.....................................................................4
3.Why can’t my Audio system work under Vista operating system? How to make sure if the Sound
device is in <Turn On> mode?...................................................................................................................4
Note: For multi language installation manual, please install Adobe Acr obat Reader from autorun after
inserting the CD into the CD ROM. Click “Browse” and open Document file where multi language
installation manuals are in.
1
Page 2
Chapter 1 : DVD MAKER PCI Hardware Installation
1.1 Package Contents
Unpack your DVD MAKER PCI package and make sure that all items are intact. The following items
should be included in your package:
DVD MAKER PCI
Quick Start Guide
CD-ROM with driver, utilities and multi-language user manuals
CD-ROM with Cyberlink PowerDirector 5 and PowerProducer 4 software
1.2 System Requirements
Intel Pentium 4 2.0GHz or equivalent AMD Athlon
256MB RAM of system memory or above
1 available USB 2.0 port
Graphics Card with 64 MB memory or above (Must Support DirectX 9.0)
Sound Card (AC97 Compatible Sound Card)
2GB Free HD Space
CD-ROM Drive (For software installation)
Microsoft Windows ® XP SP2 / Windows Vista
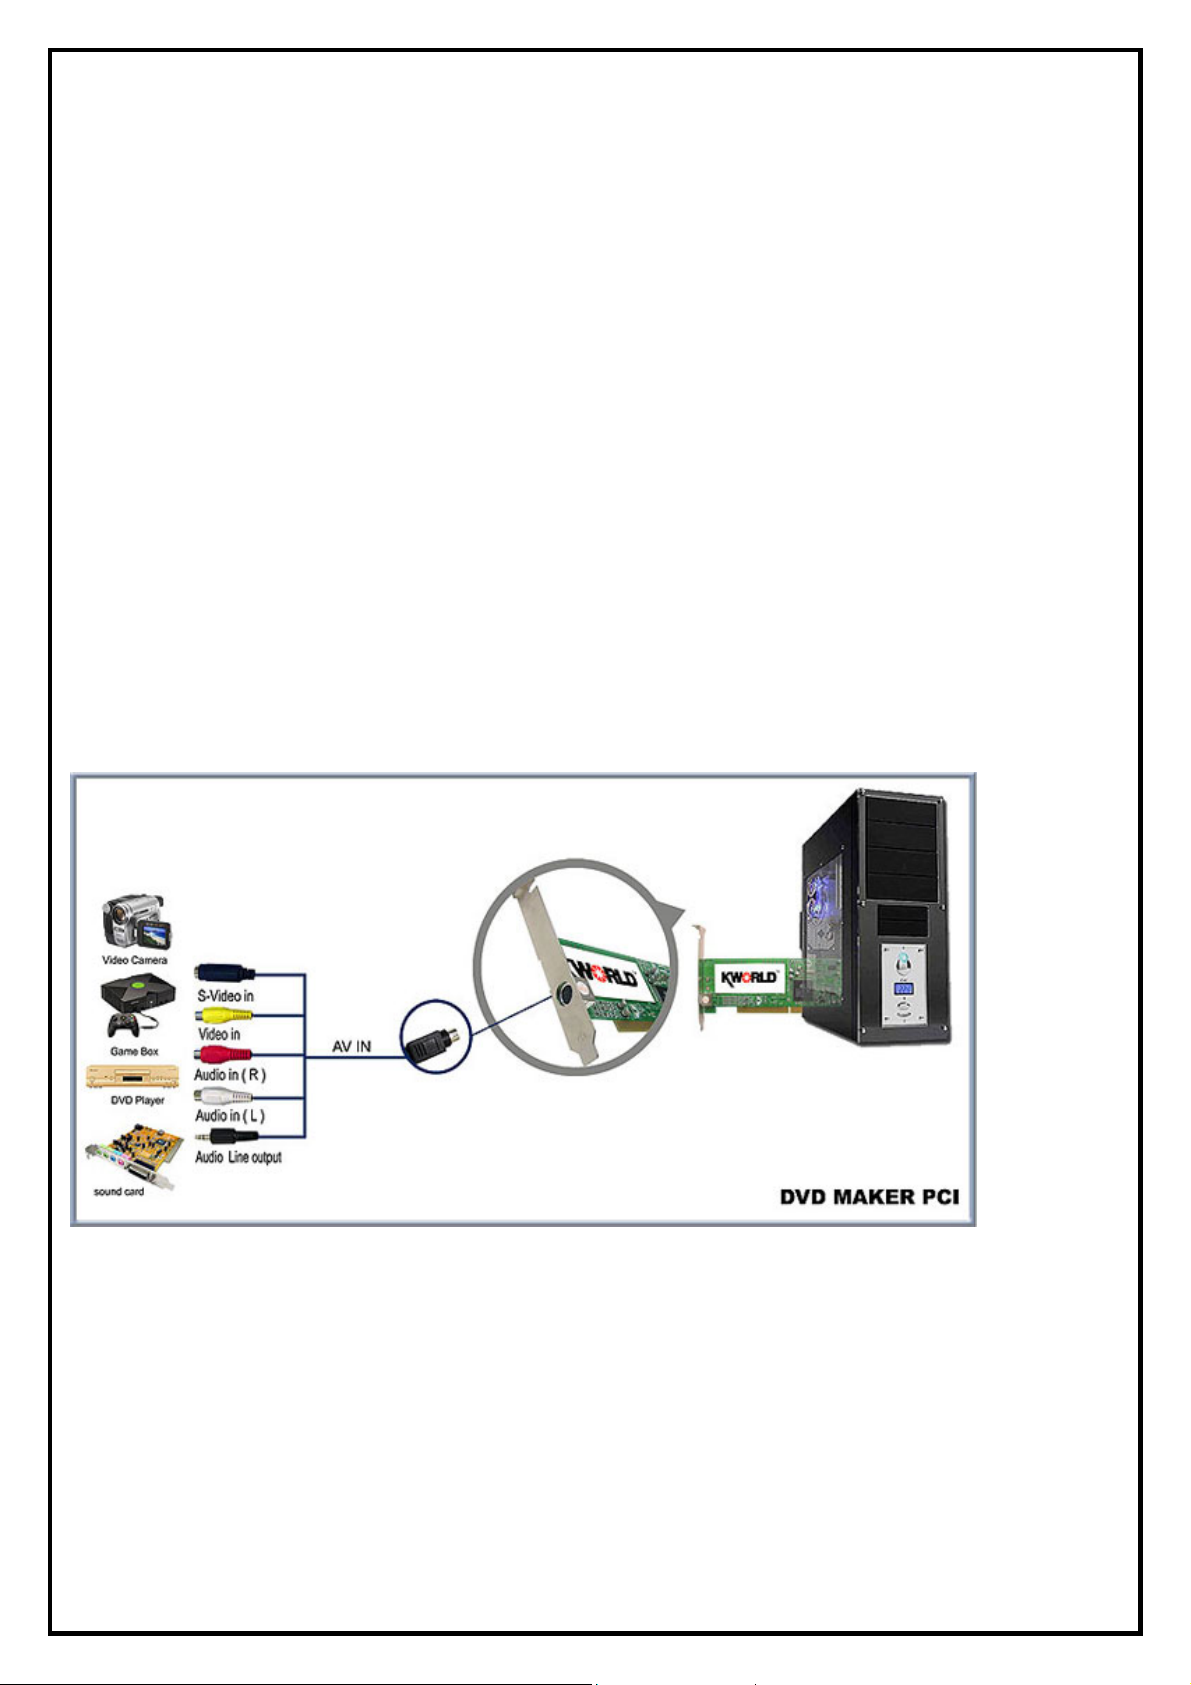
1.3 Hardware Installation
Please follow the steps shown below for installation of your DVD MAKER PCI and follow the pictorial
guide below for peripheral connections.
1. Turn off your computer power and any peripherals.
2. Select an available PCI slot and remove the slot cover, screw, etc.
3. Push the DVD MAKER PCI card firmly into the slot until it snaps in place and secure the card by
replacing the screw you remove from step 2.
4. Place the PC lid cover back then power on.
2
Page 3

Chapter 2 : DVD MAKER PCI Quick Installation
The DVD MAKER PCI package comes with complete Windows software utilities. These utilities can be
found on the CD-ROM in this package. During installation, it is highly recommended to disable any
sub-programs. These include applications such as antivirus software and system monitoring applications.
When you finish the hardware setup, the “Found New Hardware Wizard” window will pop up. Please click
“Cancel” and you can make use of DVD MAKER PCI Quick Installation for proper installation.
1. Insert the installation CD into the CD ROM device. The
autorun page will appear as the left image. Please
choose “Driver Installation”.
2. Click “Start” to install the DVD MAKER PCI driver.
Please wait, while the installation is in process
2.1 The Driver Installation of DVD MAKER USB2.0
3. Now the driver has been installed successfully on your
computer and click “OK” to finish driver installation
and go to next step.
4. Now the driver has been installed successfully on your
computer and click “OK” to finish driver installation
and go to next step.
3
Page 4

Chapter 3 : FAQ
1.How to check if the driver has been installed successfully or not?
Ans :Right click on “My Computer” on the desktop and choose “Properties”. Once in “Properties”
window, click on “Device Manager” in Hardware panel. Click on the plus icon of “Sound, video and
game controllers” to open the device list. See Fig
.1 below.
ig.1
F
.How to uninstall all of device driver and software utility?
2
Ans:Right click on “My Computer” on the desktop and choose “Propert
click on “Device Manager” in Hardware panel. Click on the plus icon of “Sound, video and game
controllers” then click right button to uninstall the devi
ce.
ies”. Once in “Properties” window,
ig.2
F
.Why can’t my Audio system work under Vista operating system? How to make sure if
3
the So
und device is in <Turn On> mode?
1. Click “Control Panel”, and choose “Sound” for setti
ng
4
Page 5

2
. Click “Playback” = = => click “Speakers” = = => click
Properties” for setting
“
3.Click “Levels”, and check if “Rear Blue In” is in <Turn
On> mode. If the setting is ‘’0’’ the audio input can not
output, please adjust it to valid numbers
. IF the option “Level” does not show up in “Playback”, please update Vista supported Audio card driver
4
5. Check if the ‘’Line Volume’’ in Recording page is
in<Turn On> mode, please click’’ Recording’’ = =
=>Click“Line Volume” = = => click “Propertie
s” for
setting
6. Clic
k “Levels”, and check if “Line Volume” is in <Turn
On> mode. If the setting is ‘’0’’ the audio out put can
not be heard , please adjust it to valid numbers
. When you open computer, please press "Del" to
7
IOS. If your bios has below option "HD Audio mode",
B
lease select to "Vista".
p
5
 Loading...