

Page 1

HyperMedia User Manual
Contents
V3.3
Chapter 1 : HyperMedia Software Functions...................................................................... 2
1.1 HyperMedia Introduction.............................................................................................2
1.2 Main Panel.................................................................................................................... 2
1.2.1 Input source....................................................................................................... 3
1.2.2 Information Window........................................................................................3
1.2.3 Keypad............................................................................................................... 4
1.2.4 Channel Index................................................................................................... 4
1.2.5 Volume ............................................................................................................... 4
1.2.6 Basic tool: .......................................................................................................... 5
1.3 Basic Functions ............................................................................................................ 5
1.3.1 Record, Playback and TimeShifting...............................................................6
Chapter 2 : DTVR................................................................................................................... 8
2.1 Scanning Terrestrial TV signal.....................................................................................8
2.1.1 Two options to choose for setting up the frequency table.............................8
2.2 Setup Utility for DTVR................................................................................................ 9
2.2.1 Channel Setup................................................................................................... 9
2.2.2 Capture Setup...................................................................................................9
2.2.3 Video Setup...................................................................................................... 10
2.2.4 Other Setup.....................................................................................................10
2.3 Scheduled Recording.................................................................................................. 11
2.3.1 Capture............................................................................................................ 11
2.3.2 Time option...................................................................................................... 11
2.3.3 Scheduled Recording Agent Setting..............................................................12
2.3.4 Today To-do List ............................................................................................. 12
2.3.5 Log.................................................................................................................... 12
2.3.6 Setup ................................................................................................................ 13
2.4 Preview.......................................................................................................................13
2.5 Snapshot ..................................................................................................................... 13
2.6 Sleep Timer.................................................................................................................14
2.7 Pop-Up Menu ............................................................................................................. 14
Chapter 3 : FAQ .................................................................................................................... 15
FAQ 1 : How do I use the “Schedule Record in Power-Off mode (SRPO)” function?...15
1
Page 2
Chapter 1 : HyperMedia Software Functions
1.1 HyperMedia Introduction
HyperMedia is a multi-function application including watching TV, editing film and burning DVD function.
When using it, there are two main accesses to choose, one is “Input Source” for selecting TV and another is
“Extra application” for film function. Picture below is an example of how the interface looks like and a
short description of each function.
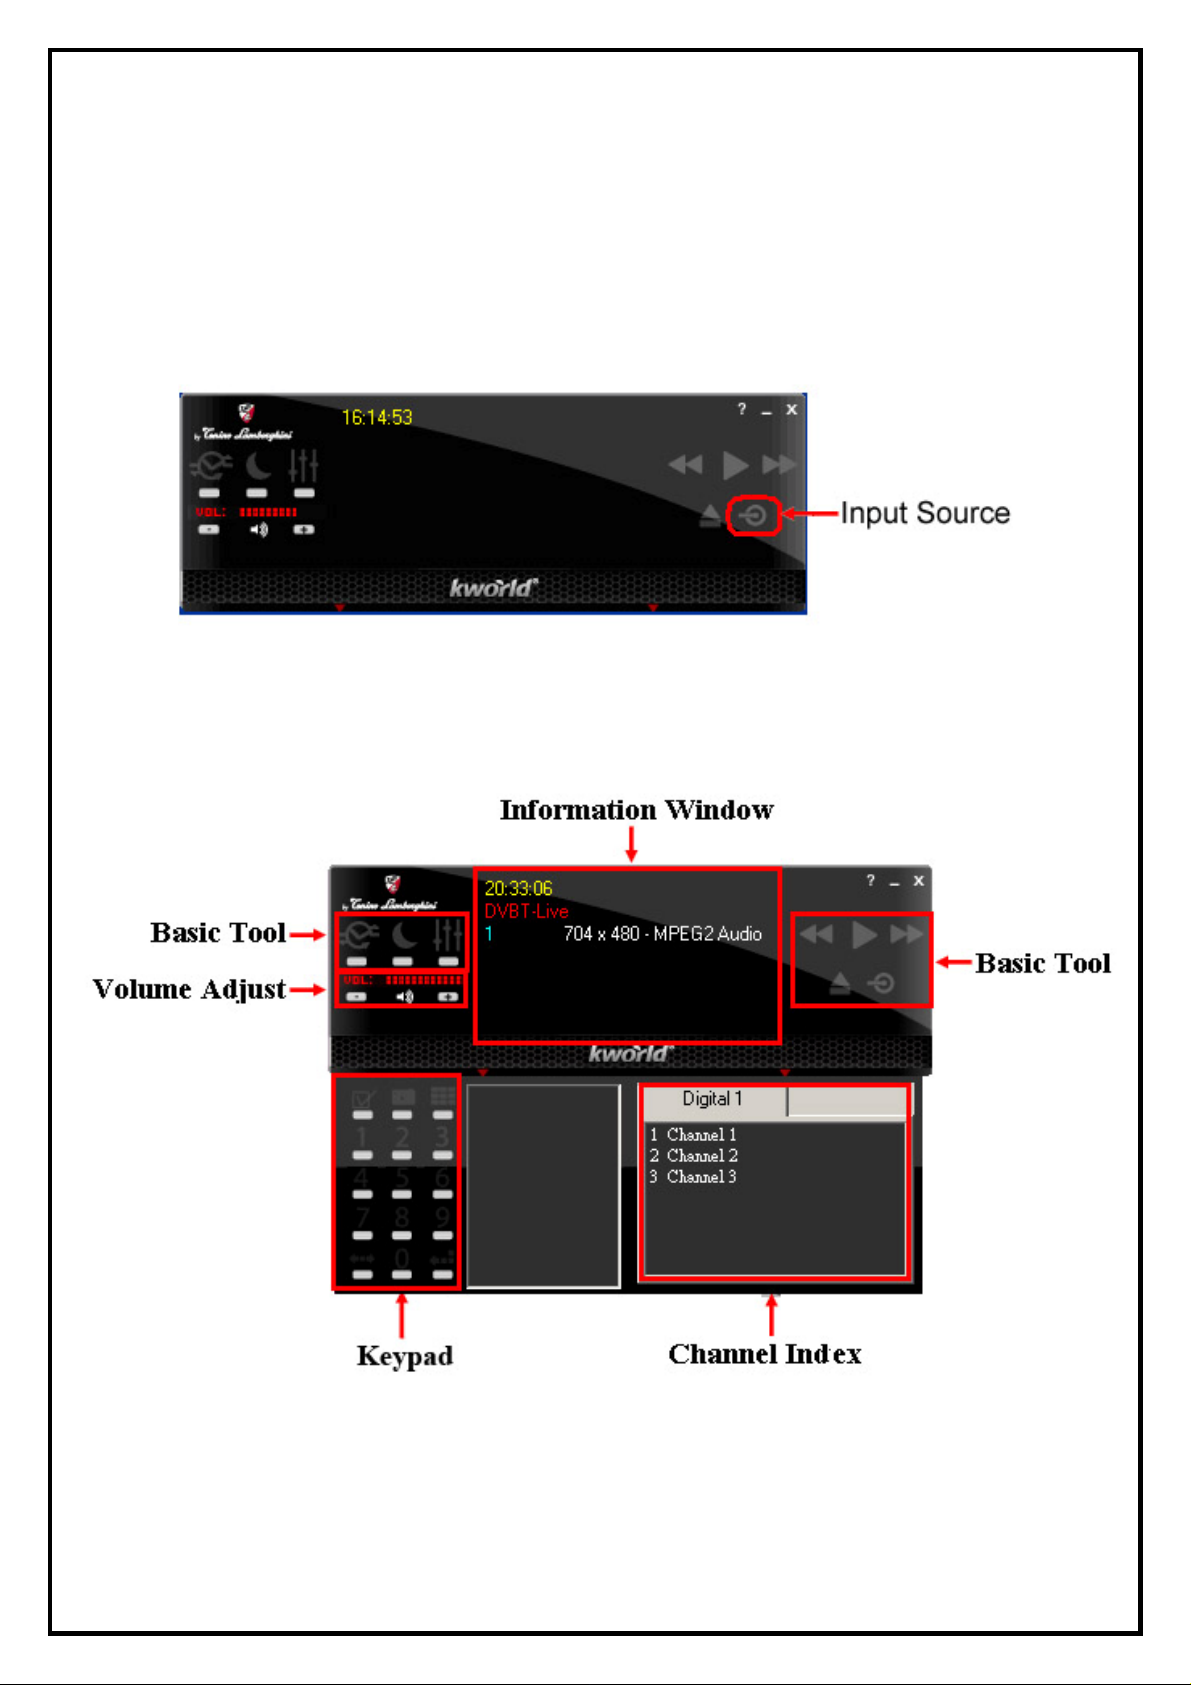
1.2 Main Panel
Main panel provides a user friendly interface which allows users to use the TVR functions. For detailed
instructions, please refer to the guide below.
2
Page 3
1.2.1 Input source
「Input Source
Option 1: Select country : Select the country location where you are situated.
Option 2: User define : Maximum frequency, minimum frequency and bandwidth are needed to be set
」:Two options to choose for setting up the frequency table.
manually. If you are not sure about the frequency range and bandwidth, please
choose “Select country” to use the default settings.
After finishing setting up, click “Next” to continue.
In this step, it shows the scan range and signal strength. The frequency range depends on the country where
you are situated or user defined setting. The signal strength shows the terrestrial signal receiving status.
When all the settings are checked, click “Start” to scan channels.
Note: Sometimes the signal strength affects the channel scan result. If it could not detect all of the channels,
please check the terrestrial TV signal.
1.2.2 Information Window
Displays current state (Live, REC, Playback, and Time Shifting), TV sound state (Mono, Stereo or SAP),
channel number, recording time, recording file size and current time.
3
Page 4
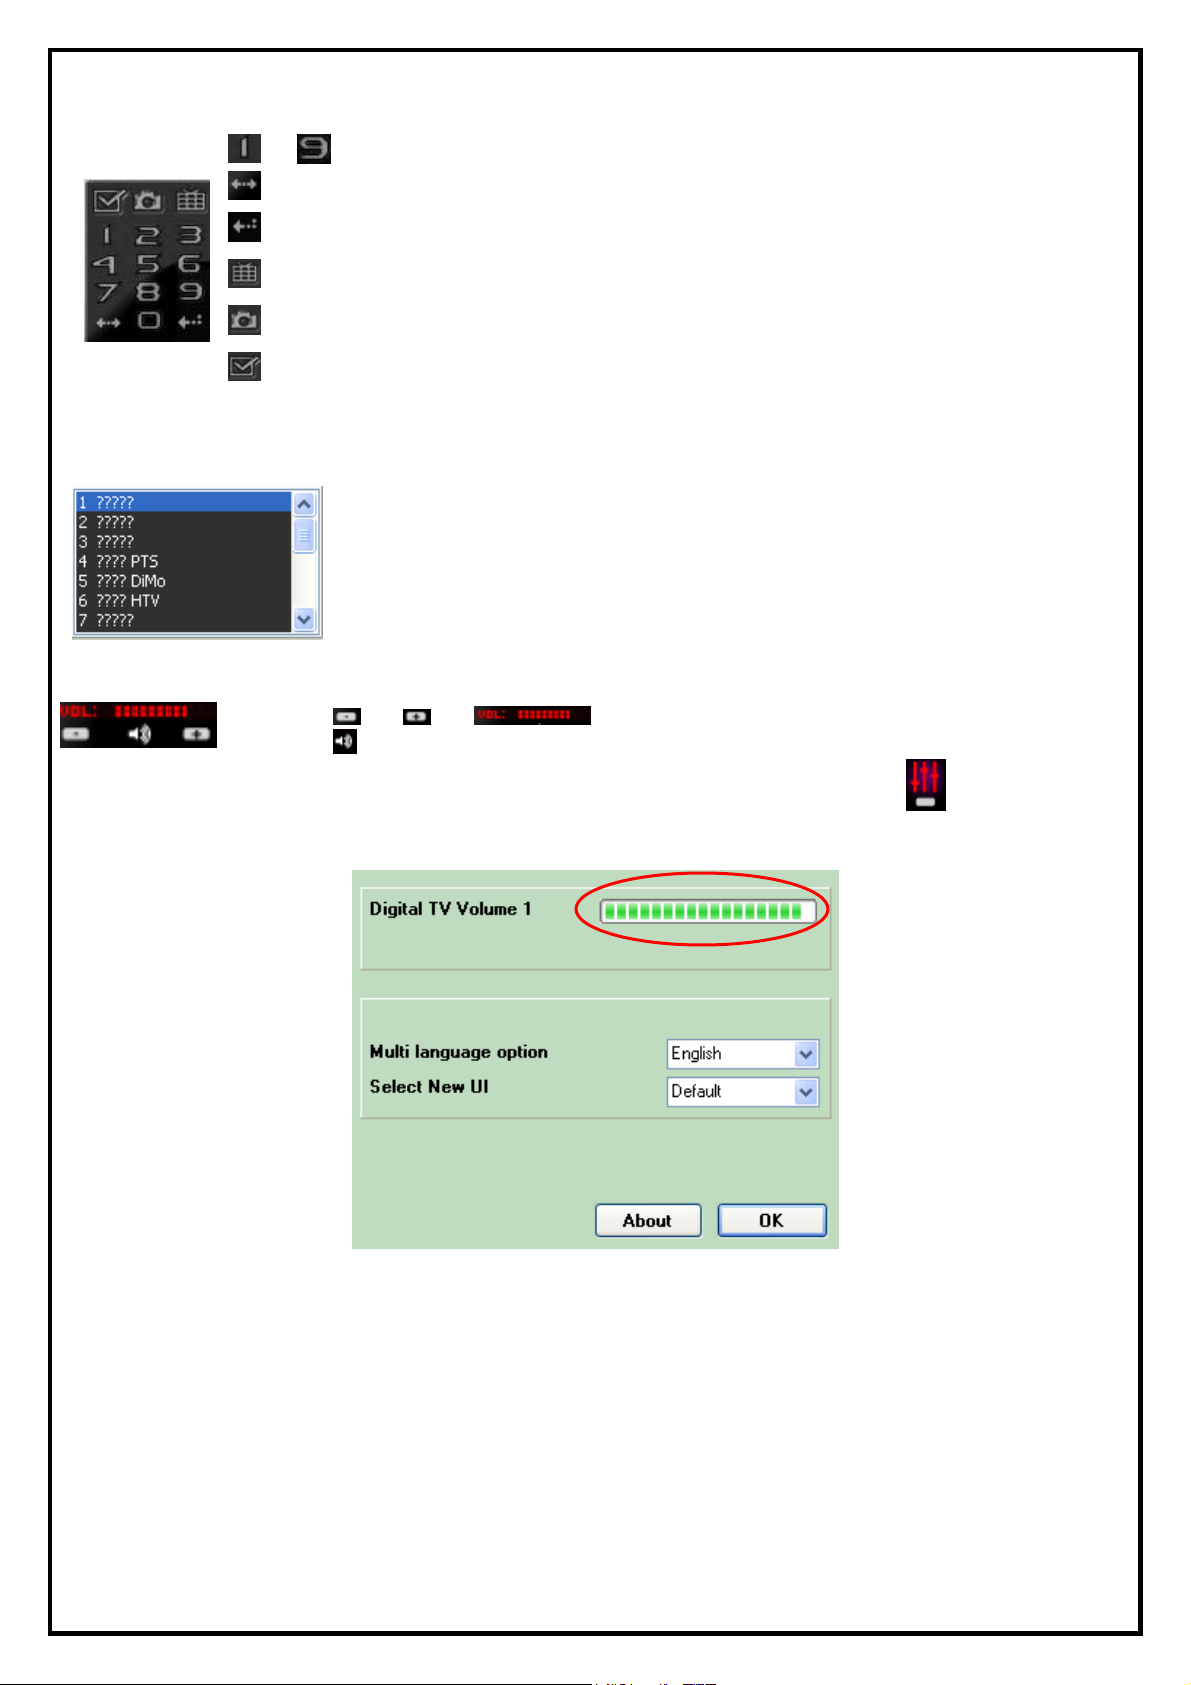
1.2.3 Keypad
Channel can be selected by clicking the number key on the control panel or keyboard.
~ :Numeric keypad
:Go to last selected channel
:Enter input number
:Image preview
:Film preview
:Set the storage path of image & film
1.2.4 Channel Index
The index table on the left shows the channel list for which users could scroll up and down to choose the
desired channel by double clicking.
1.2.5 Volume
1. Click & or to adjust the volume.
2. Click icon to turn off all audio, click again to restore.
There is another way to adjust the volume. Please click “Audio & Language” button of Basic tool.
and adjust volume by mouse.
4
Page 5
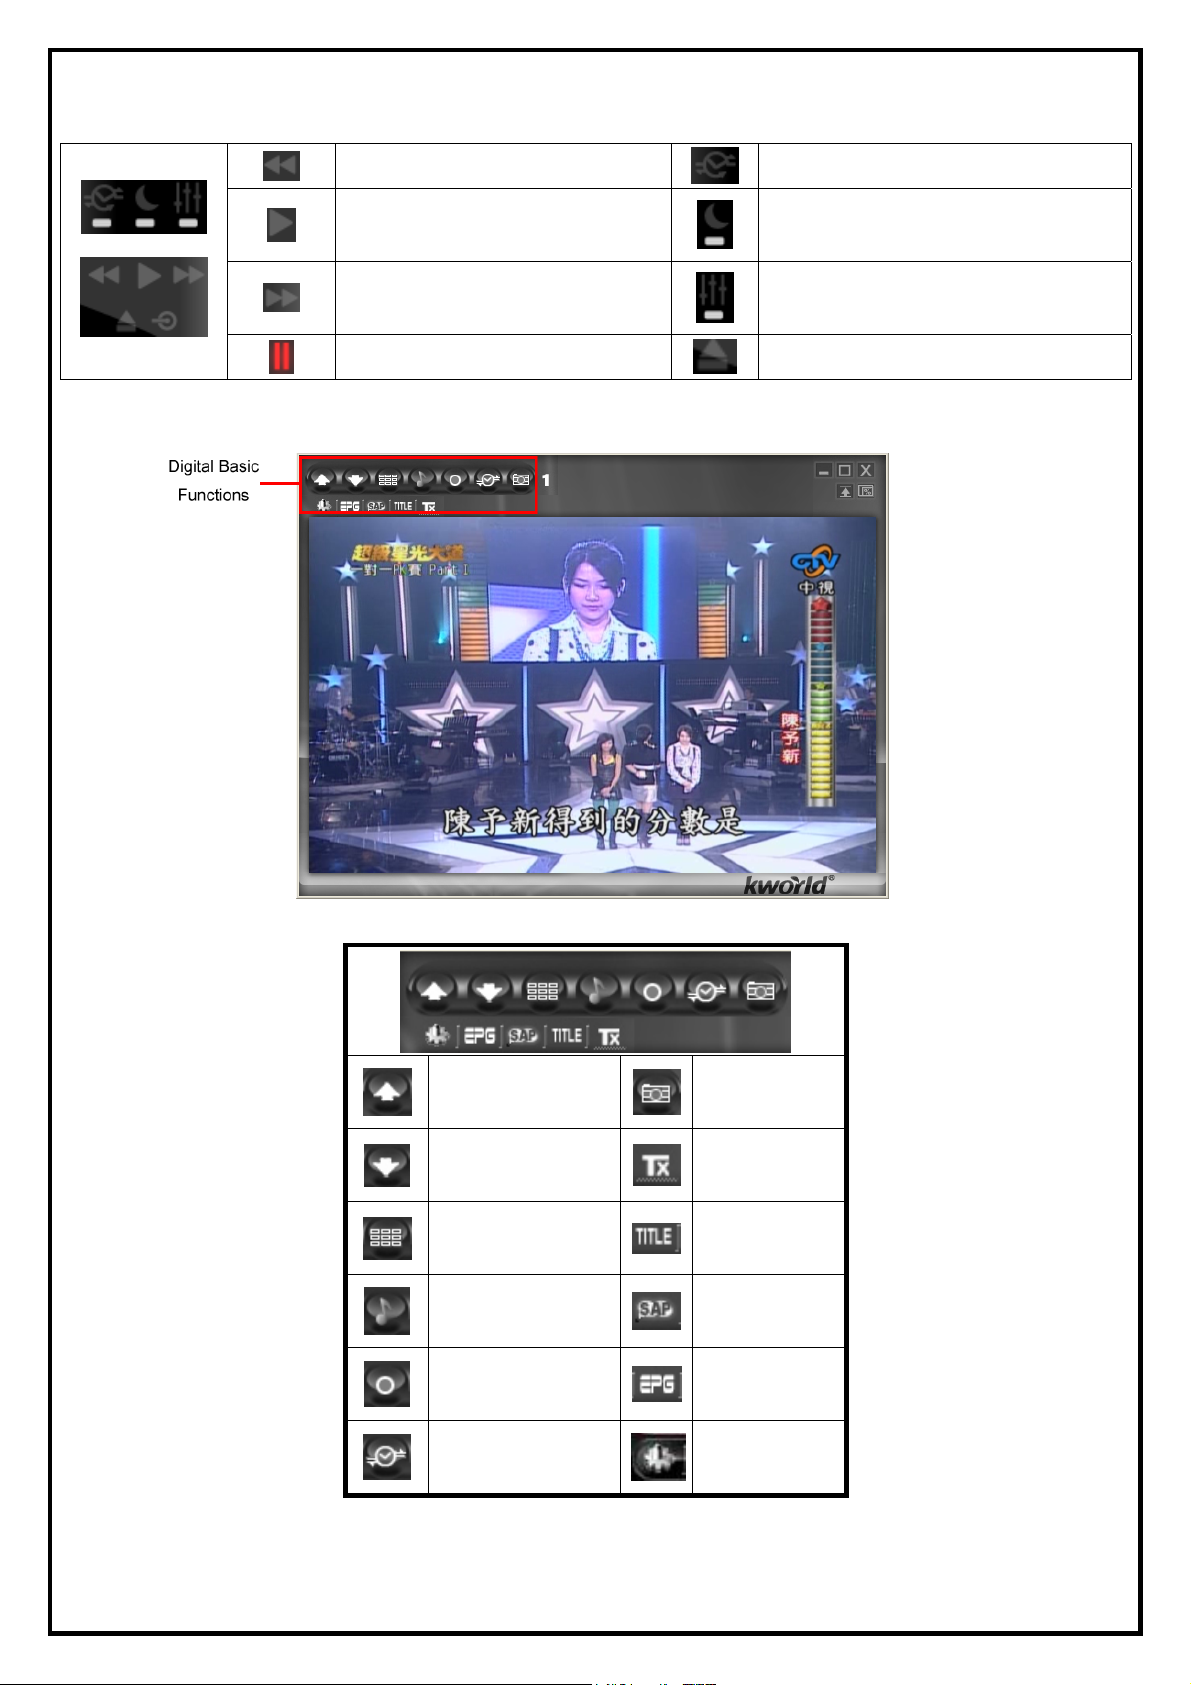
1.2.6 Basic tool:
1.3 Basic Functions
Backward
Play
Forward
Stop
Scheduled Recording
Sleeping Timer
Audio and Language setup
Open Media File
Digital Basic Function
Next Channel Snapshot
Previous Channel Teletext
Channel Preview Subtitle
Mute Audio SAP
Record
Time Shifting
EPG
Setup
5
Page 6

1.3.1 Record, Playback and TimeShifting
A. Record Function
TV programs can be recorded live when clicking the record button on main panel or choose
"Capture" on pop-up menu.
During capture mode, click the stop button on control panel to stop recording or choose "Stop" on
pop-up menu. Recorded files can be reviewed from the playback list after recording.
B. Media Player Control
Video files can be reviewed by clicking the play button on the main panel. The playback windows will
pop up and show all captured files that have been recorded previously and recently played files. More than
one video files can be selected to playback. TVR then shows the selected files in the play list.
:Rewind
:Pause
:Fast forward
:Stop
:Snapshot
There is another way to play video file. Please click the “Open Media File” button of Basic Tool.
z Add: Add selected item to play list.
Double click the selected item to add to
play list.
z Delete: Delete selected item.
z Delete All: Delete all items.
z Rename: Rename selected item.
z Import: Import file(s) to play list.
z Clear: Clear all items on play list.
6
Page 7

C. Time Shifting Function
During live mode, choose “Time shifting” function by clicking on main panel or choose "Time
Shifting" on pop-up menu. When in time-shifting mode, you need to wait for a few seconds before starting
playing. While in “Time Shifting” mode, current video and time-shifting video window can be switched by
clicking "Real Screen" button on pop-up menu.
:Pause
:Backward
:Forward
:Stop
7
Page 8

Chapter 2 : DTVR
DTVR is a powerful and easy-to-use digital TV application that provides the most feature-rich video/audio
entertainment. With DTVR, users can access free-to-air digital terrestrial TV programs. DTVR
provides a convenient way to watch and record Digital TV on your PC and allows users to playback the
recorded TV programs.
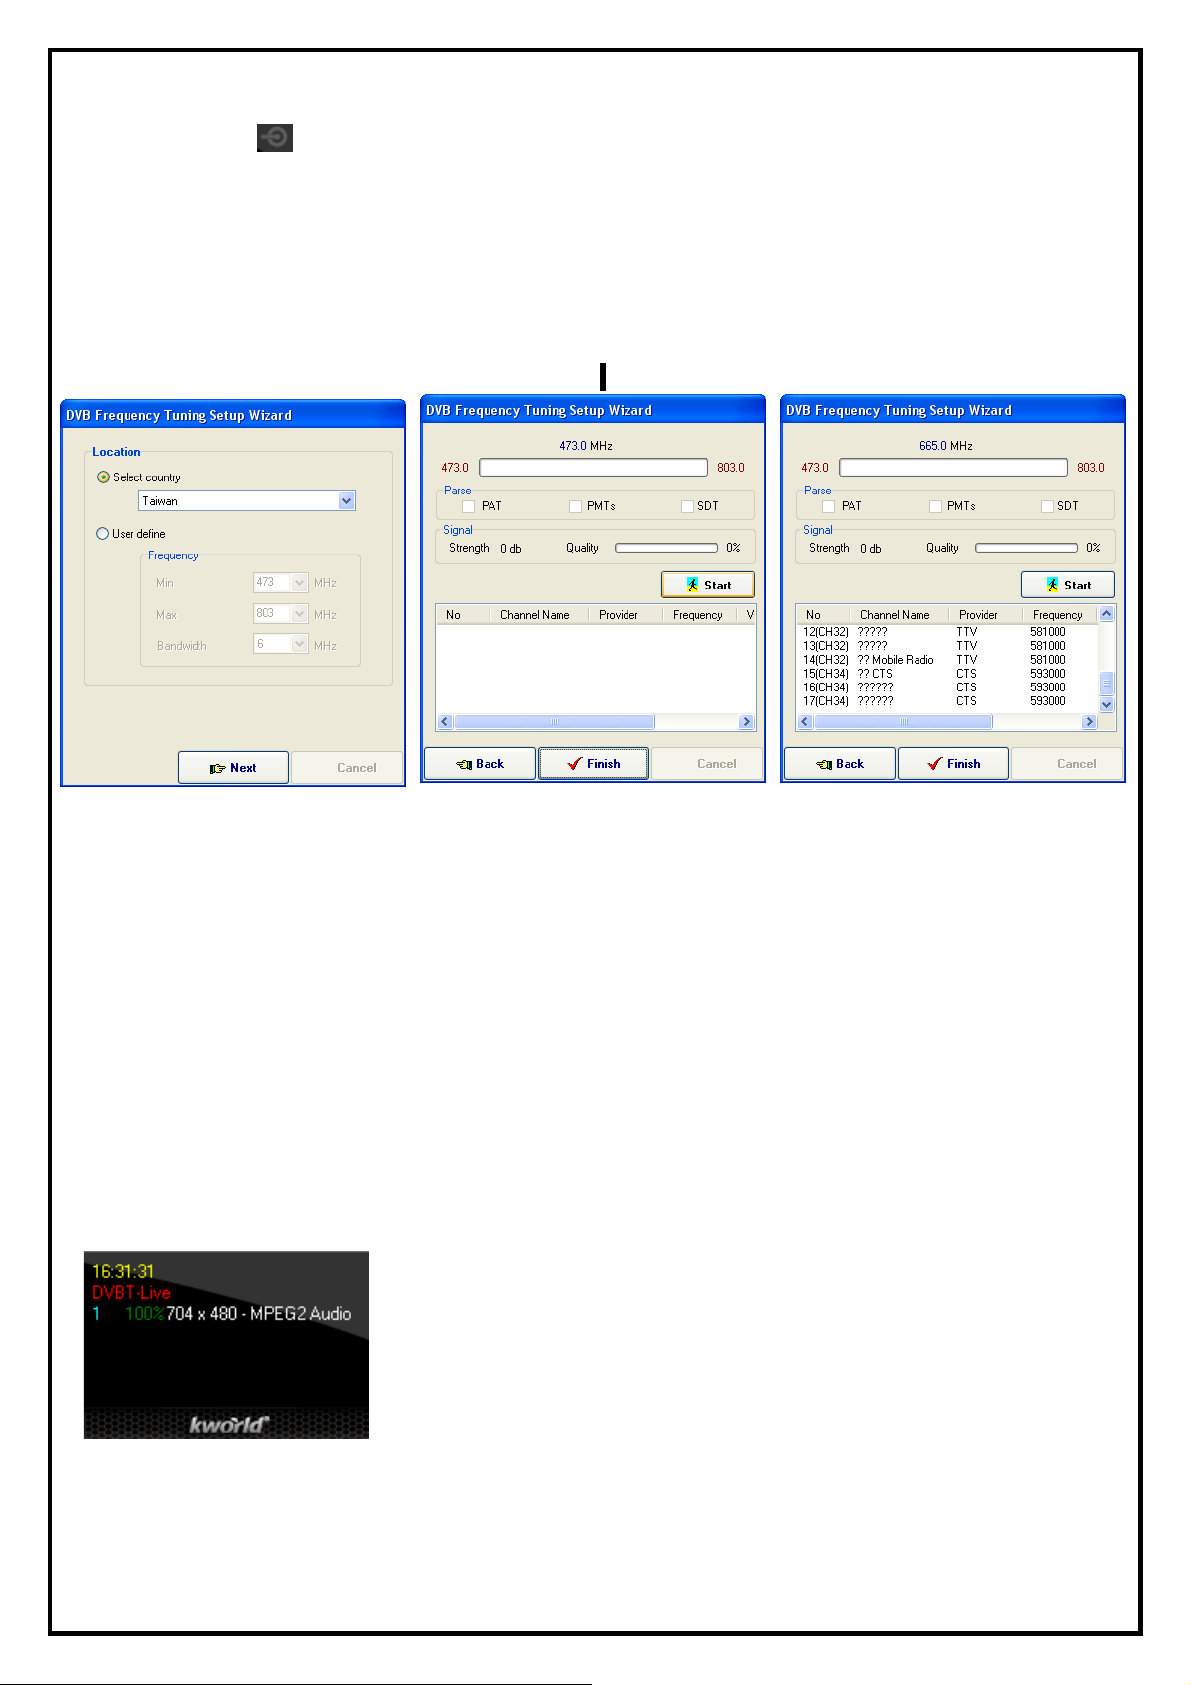
2.1 Scanning Terrestrial TV signal
When running DTVR for the first time, the “DVB Frequency Tuning Setup Wizard” will guide you
through the setting of the correct frequency and then helps you to scan all the free-to-air digital terrestrial TV
channels.
2.1.1 Two options to choose for setting up the frequency table.
Option 1: Select country : Select the country location where you are situated.
Option 2: User define : Maximum frequency, minimum frequency and bandwidth are needed to be set
manually. If you are not sure about the frequency range and bandwidth, please
choose “Select country” to use the default settings.
After finishing setting up, click “Next” to continue.
In this step, it shows the scan range and signal strength. The frequency range depends on the country where
you are situated or user defined setting. The signal strength shows the terrestrial signal receiving status.
When all the settings are checked, click “Start” to scan channels.
Note: Sometimes the signal strength affects the channel scan result. If it could not detect all of the channels,
please check the terrestrial TV signal.
8
Page 9

2.2 Setup Utility for DTVR
2.2.1 Channel Setup
When clicking “Setting” button of Digital Basic Function, “Setup” windows will pop up.
z Add: Add TV channel manually.
z Delete: Delete TV channel from list
z Update Channel: Please select the channel you want to
see and click “Update Channel”.
z Auto Scan: Click the button to start Auto-scan function.
2.2.2 Capture Setup
z Capture format (profile): The capture format of DVBT
is MPEG2.
z Capture location: Setup your capture folder.
z Capture filename: Setup capture file name. Choose
“ date/time ” as default filename, otherwise define
manually.
z Enable time limit: Limit recording time.
9
Page 10

2.2.3 Video Setup
z Color : Adjust the brightness, contrast, hue and
saturation. Each scroll can be changed independently to
view the effect.
z Default : Click to return to the default settings
2.2.4 Other Setup
z Display Aspect Ratio: Set the aspect ratio of the display
window (Free, 4:3 or 16:9)
z Enable DXVA: DXVA (DirectX VA) is the new
Microsoft standard API for accelerating video rendering
under DirectShow. If your VGA card supports hardware
that can accelerate MPEG2 video playback, please
enable this function for better video playback
performance, and reduce the amount of CPU usage.
Your display window will be smoother when you enable
this function.
z Enable VMR: If your VGA card supports VMR, please
use it as the display mode. If your VGA card doesn’t
support VMR, please disable this function.
OSD
z Enable OSD: Enables OSD function.
z Set OSD display color: Set the On Screen Display’s font color.
Preview
z Preview time interval: Setting the interval time. The minimized value is 8 seconds.
z Preview dimension: To select the Preview dimension as 2x2, 3x3, 4x4 or 5x5.
10
Page 11

Continuous shooting
z Total pictures: Setting the total pictures.
z Time interval: Setting the interval time. The minimized value is 200 m seconds.
Teletext
z Country: Setting the country.
2.3 Scheduled Recording
When clicking , users can start setting up the schedule properties.
2.3.1 Capture
z TV Source: Please select DVBT
z Capture Source: Capture source from DVBT
z Channel: Select the channel which you want to record.
z Capture format (profile): For the DVB-T capture
format, MPEG2 can be used as the capture format.
z Capture Audio Option: Select from "Capture audio",
"Capture audio only, No Video" or no audio. When
"Capture audio only, No Video", are selected, audio
files can be saved in WAV or MP3 format.
z File name option: Use the date/time as capture file name
or define manually.
2.3.2 Time option
z Current time: Shows the current time.
z Starting time: Enter the date and time for the programs you decide to record.
z Duration: Enter the length to limit the recording schedule.
z Recording rule: Enter the recording rule you want to use. The default value is “Once only”.
11
Page 12

2.3.3 Scheduled Recording Agent Setting
Recording schedule will be added into the Scheduled
Recording Agent after inputting a recording schedule.
Open
z Insert: Insert a new recording schedule.
z Edit: Edit the selected recording schedule.
z Delete: Delete selected recording schedule.
z Delete All: Delete all recording schedule.
z Start Power-off Schedule: System turns off immediately
after clicking this button. Before the scheduled recording
time, PC will turn on automatically and start recording
TV programs as scheduled.
Note: To enable this function, please enable the “-” function in the windows power management
configuration in advance.
2.3.4 Today To-do List
2.3.5 Log
Shows all of the recording schedule items of the day.
If recording schedule fails, users can check the error message
in the Log description.
12
Page 13

2.3.6 Setup
2.4 Preview
z Output folder: Users can change the different capture
folder to save the recorded files.
z Auto-execute at start up: Enabling this option makes
schedule agent always execute at start-up, otherwise, the
default is enabled.
z Enable Power-off schedule recording mode: Enabling
this option makes system shutdown automatically when
schedule recording finishes.
Multiple channel preview can be chosen by clicking
on control panel or choose “Channel Preview” from the
pop-up menu. While doing channel previewing, users can
select any sub-window by using the arrow keys on the
keyboard or clicking on the picture directly. To stop channel
preview, you can double click on the mouse or press “Enter”
key to watch the chosen sub-window channel.
2.5 Snapshot
Snapshots (still image capture) can be taken from current viewing window by clicking from
control panel or choose “Snapshot” from the pop-up menu. The Snapshot window will pop up when a
snapshot is taken. Here, users can view, save or delete images taken.
Note: The captured images can be saved in either bitmap or JPEG file format when saving the file.
13
Page 14

2.6 Sleep Timer
If is selected, you can use “Sleep Timer” function.
After you select the button, you would see the dialog box as below
You can use slide bar or left and right key to adjust the timer
value. Click “OK” to start or “Cancel” to exit.
2.7 Pop-Up Menu
When running DTVR, right-click the mouse while the cursor is on the display window or control panel to
see the pop-up text menu. The commands on this menu are the same as those on the DTVR control panel,
along with some extra options added. The menu’s function is as described below
z Always On Top : Set main window to topmost
z Display Aspect Ratio - Set the aspect ratio of the display window
(Free, 4:3 or 16:9)
z Full Screen : Switch to full screen or restore to normal window
z Previous Channel : Goes to previous available channel
z Next Channel : Goes to next available channel
z Recall Channel : Goes back to the last selected channel
z Channel Preview : Browse available channels as sub-window
z Capture : Start recording video
z Time shifting : Start time shifting
z Snapshot : Capture still images of current picture
z Setup : Open DTVR setup window
z Teletext
z EPG : Use the EPG function to preset record programs from internet
14
Page 15

Chapter 3 : FAQ
FAQ 1 : How do I use the “Schedule Record in Power-Off mode (SRPO)” function?
ANS: Before you use the power-off schedule recording function, please make sure your system can support
hibernate function.
Click the “Power” button and enter the “Hibernate”
function. You would see the option “Enable hibernate
support”. Check the box to
Click on to start setting the Schedule Recording
Properties. After you finish the setting, please click the
“OK” to the next step.
Then you would see your setting in the schedule. If you
want to use power-off schedule recording now, click on
the “Start Power-off Schedule” button. A confirmation
message will pop up to confirm if you want to shutdown
system. If you click “YES”, the system will shutdown
immediately. PC will be turned back on automatically
few minutes prior to the recording schedule.
15
 Loading...