

Page 1
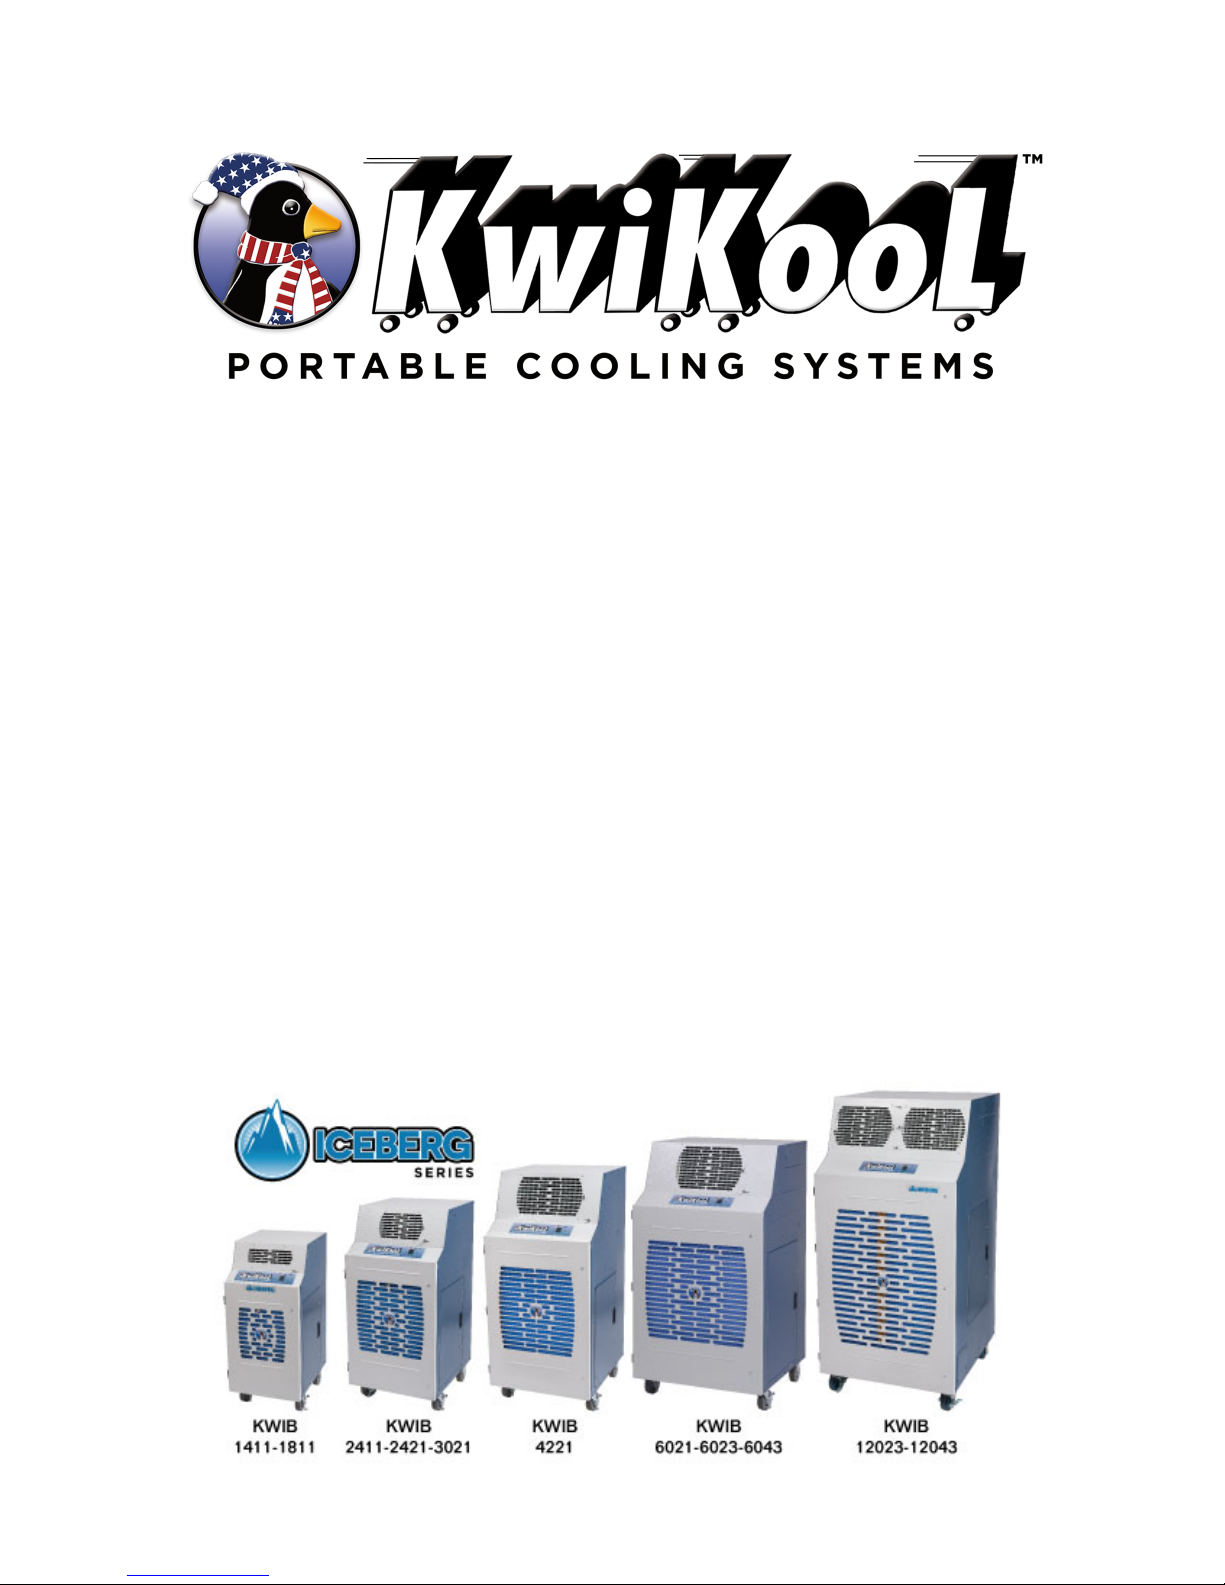
KWIB
Operation Manual
Page 2

Page 3

KwiKool KWIB Iceberg Series
Operation Manual
Table of Contents
Before installing and using your KwiKool Portable Cooling
System, read this manual carefully for instructions and
proper usage and all safeguards.
This manual should be retained for future reference.
Section I / Unit Components - Page: 3
Section II / Assembly and Installation - Page: 4-5
Section III / Operational Safeguards - Page: 5-6
Section IV / System Operation - Page: 6-8
Section V / Built In Safeguards - Page: 8-9
Section VI / Application Requirements - Page: 10
Section VII / Maintenance - Page: 10
Section VIII / Utilizing Your KwiKool System - Page: 11
Section IX / Fault Codes - Page 11
Section X / KWIB Troubleshooting Guide - Page: 12-14
Appendix:
Part A: Systems Equipped with a Phase Monitor - Page: 16-17
Part B: Special Section for KWIB120 Systems - Page: 18
Page 4

Page 5
Page 3
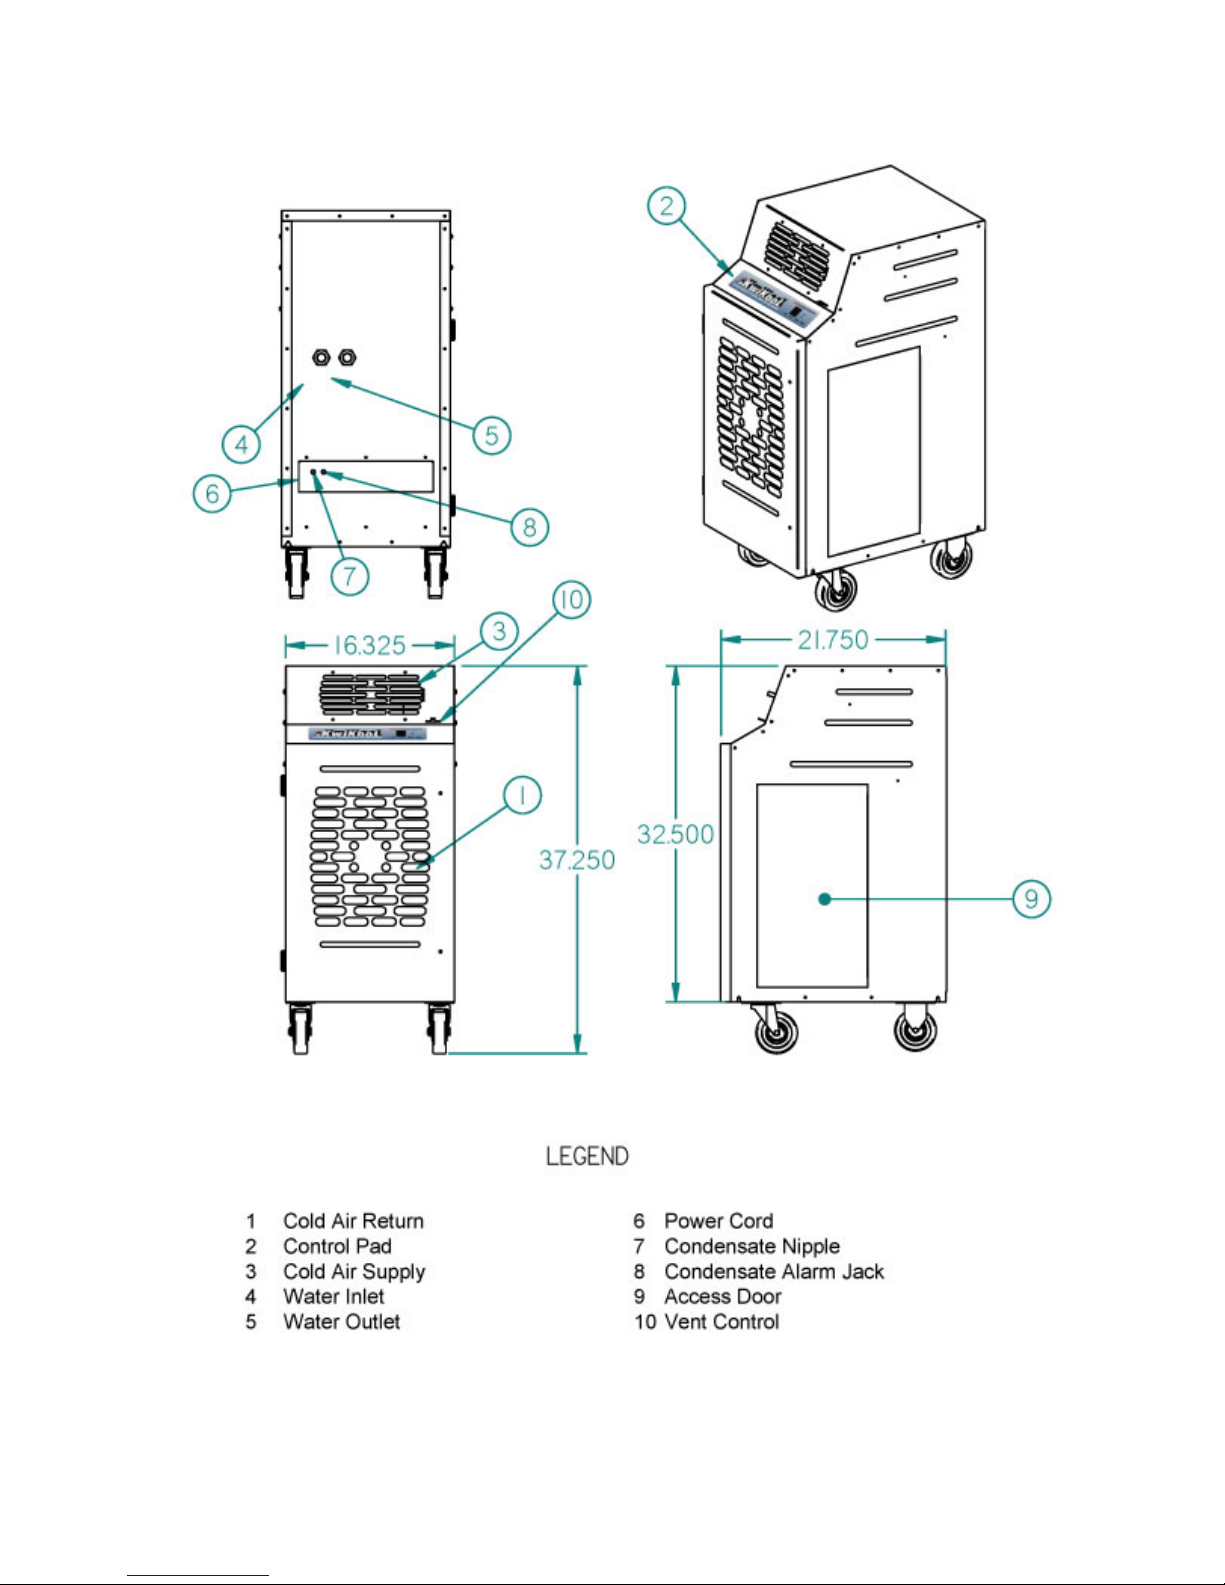
I / Unit Components
Page 6
Page 4
II / Assembly and Installation
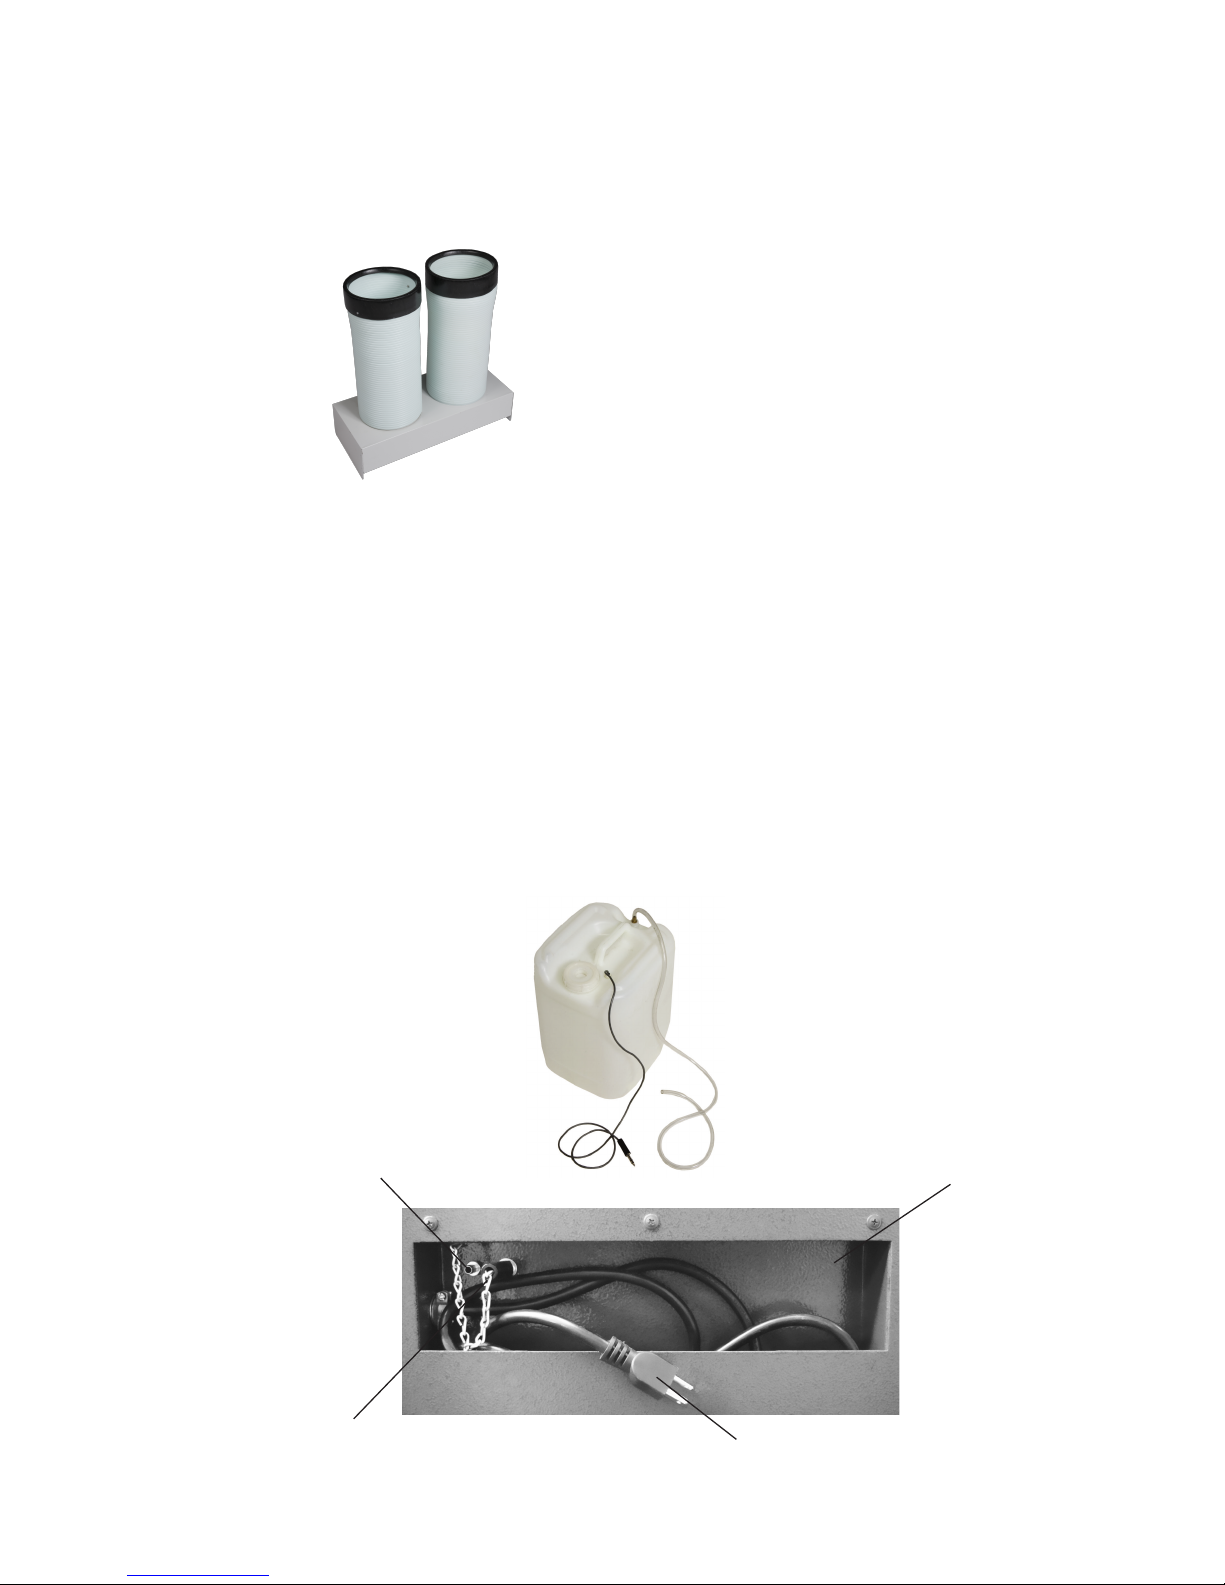
Air Chutes (If equipped or as an optional accessory) - Install supply air flanges to the
front of your KwiKool unit above the control panel. (See instructions in the air chute kit
for specific procedures).
A.
B.
Air Chutes - Conditioned air supply,
if equipped or as an optional accessory.
Condensate Tank - 5-gal Condensate
Tank with float assembly for automatic
cutoff.
Condensate Water Outlet 1/4” OD barbed fitting
Condensate Float Switch Jack Connects to the condensate tank or is bypassed by
the factory installed male bypass switch plug pictured
Power cord with plug available on 1.1-ton thru 2.5-ton models
Condensate Tank - KwiKool systems come standard with an external 5-gallon
condensate tank. The external condensate tank is equipped with a float switch that
shuts your KwiKool down and alerts operators with an alarm and display CF
(“Condensate Full”) when the condensate tank is full. This prevents accidental water
overflow on the floor. The alarm will clear automatically upon emptying the 5 gallon tank
and reconnecting it. If connecting to a permanent drain, do NOT connect or use the
equipped tank. To use the external condensate tank, remove the factory installed
condensate float switch bypass plug on your KwiKool unit and install the male connector
jack supplied on the condensate tank. Next connect the factory supplied ¼” ID condensate tubing to the ¼” OD barbed condensate water outlet on the back of your KwiKool
and connect the discharge end of the tube to the ¼” barbed connector on the condensate tank. The condensate float jack must be inserted into the female condensate jack
to operate your KwiKool. CF displays if the jack is not connected or the bypass plug is
not inserted properly.
Cord Compartment
Page 7

III / Operational Safeguards
D.
Read the following safeguards carefully before installing your KwiKool:
Page 5
Water Connection for Water-Cooled (KWIB) Models - KWIBXX KwiKool
systems do not require a ceiling kit or duct to operate in your conditioned space, a
chilled water loop or cooling tower supplies and returns water to cool the condenser on
your KwiKool. Contact a building engineer or HVAC contractor to verify the viability of
connecting to a re-circulation system. Tap water is generally no used for operating your
KWIB due to the potential large volume of water needed. A constant flow of water is
needed between 35 psi and 150 psi, not to exceed 85 degrees F and above 40
degrees F. Connect supply water to the 1/2” or 3/4” NPT female connector labeled
Water Inlet on the back of your KWIB, and connect the return water line to the 1/2” or
3/4”, NPT female connector labeled Water Outlet. KWIB120 systems have 2 water
inlets and 2 water outlets. Use a back up wrench on the female connectors supplied on
your KWIB when connecting the water lines to prevent the internal copper tube from
twisting, apply Telfon tape to the threads of the male connectors. KWIB must have a
supply of water to operate or the system will shut down, sound an alarm, and display
the HP alarm on the control panel. This will protect the mechanical system from
damage. The manual reset is located in the filter compartment, labeled “HP reset”,
Push in to reset after the water supply is restored.
**Note: if during operation of your unit you notice a loud clanging or hammering should,
this is known as water hammer and has nothing to do with the unit itself but the location
of the water source. Installation or a water hammer suppressor such as a Watts or
Sioux Chief water hammer arrester will solve this issue.
Visit www.KwiKool.com for more information and a complete set up guide.
Power Connection - Verify that the source power, phase and breaker size is
compatible with your KwiKool serial plate information and that the electrical circuit is
dedicated only for the use of your KwiKool Unit. If you aren’t sure about your power,
contact a licensed electrician. KwiKool systems are factory equipped with 8 feet of
power cable sized to meet the power requirement of your system. Extension power
cable is allowed but cannot exceed 25’ and must be rated to operate your KwiKool.
KwiKool units that come supplied with a factory installed plug require the exact
receptacle to match the plug and exact circuit size and power. Cutting the power plug
on your KwiKool unit will void its warranty. All other KwiKool systems over 3-tons are
not equipped with a male plug and must be hard wired by a qualified personal.
**Note: 208/230 volt systems require voltage to be selected to the proper voltage
before operating your unit. This is controlled by a rocker switch located on the top of
the control box in the service door. The factory default selection is 208 volts for
KwiKool systems purchased after June 2016 and 230 volts for equipment purchased
before this date. Always set the voltage incoming to the correct setting to avoid
potential operational issues. Read the Operational Safeguard section before applying
electrical power.
C.
Do not operate or install your KwiKool unit in a potentially explosive, combustible, or
corrosive gas atmosphere.
Keep your KwiKool system away from flammable materials and open flame.
B.
A.
Page 8
Page 6
To avoid electrical shock keep your KwiKool system away from direct contacts with
water and any liquids and do not touch your system with wet hands.
To insure your KwiKool system is stable, the floor on which the system is to be place
should be level, free of vibration and strong enough to support the weight of your
KwiKool model.
Do not move the system while it is operating. Before moving the system, first turn
system to OFF then unplug the system from the power source. Then unlock casters.
Do not tilt or overturn your unit, since this could damage the compressor.
Do not place objects on top of your unit.
Do not insert your hand or any other object into the cold air supply chutes.
Do not operate your KwiKool system with its service doors open.
If your KwiKool system makes abnormal noises or vibrations, call KwiKool at
1-800-594-5665.
D.
F.
E.
G.
H.
I.
J.
IV / System Operation
Apply Electrical Power - Once power is engaged by plugging in your system
and/or switching the breaker to the on position, your KwiKool display will come alive
and show the current room temperature. The unit is set to OFF and the fan is set to the
default position. A 2 minute time delay starts, indicated by a flashing F on the display. If
you are not seeing anything on the display, refer to the Troubleshooting Guide section
of this manual.
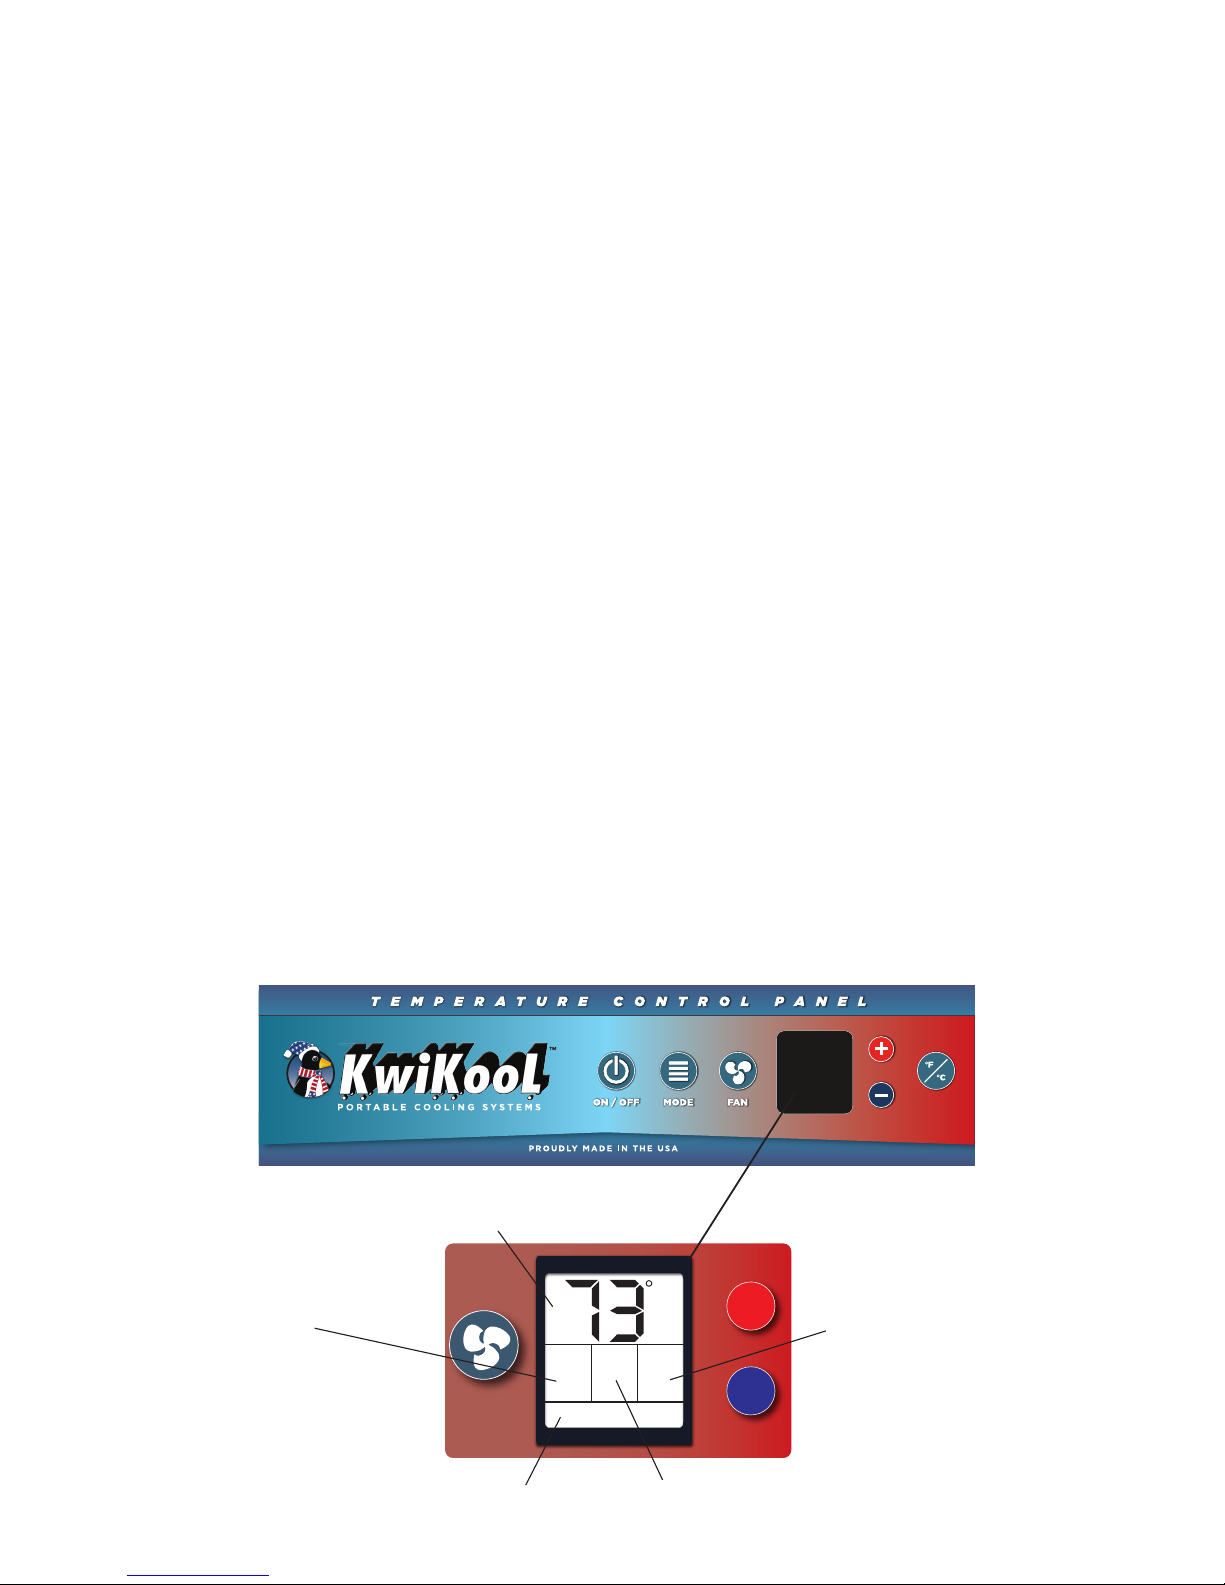
Control Panel - The control panel display shows the current operational status of the
unit.
B.
A.
+
-
FAN
F
Cool
OFF
Fan
Display Shows - Current Temperature,
Set Temperature, or Alarm Codes
Display Shows - Unit Mode
Cool / Fan
Display Shows - Fan Speed (except single speed)
Display Shows - On / Off
Display Shows - Fan Mode
C.
Page 9

Page 7
ON/OFF Button - Pressing this button on your control panel engages or shuts
down your KwiKool system. All settings selected are stored in the microprocessor
board even if the power is lost including the ON/OFF selection. Refer to the
Troubleshooting Guide section of this manual if your KwiKool is alerting an alarm
after selecting ON.
MODE Button - Depressing the MODE button selects your choice of operations.
Cool, for cooling with compressor operation. “Cool” will flash when the compressor is running. “Cool“ will not flash when the room temperature is equal to or lower
than the set temperature or the system is timing out. Fan, for air circulation without
compressor operation.
F/C - Selects the way that room temperature and set point are displayed on the
control panel. Choices are Fahrenheit or Celsius. F is the factory default. This
indicator will flash when the system is in “time out” to prevent compressor short
cycling.
1.
2.
3.
Single Speed Models - KWIB 2411, KWIB6023, KWIB6043, **KWIB12023,
**KWIB12043. On the single speed models, pressing the fan key cycles the
supply air fan between auto fan and fan on. When the system is in auto fan,
the supply air fan only operates when the compressor is running. When the fan
is set to on, the fan runs continuously as long as the unit is in the ON position.
The fan speed window will be blank on these models.
Three Speed Models – (All other models NOT listed above.) The supply air fan
control button has several functions. First pressing the fan key will cycle
through the fan speeds. Each press cycles from low, med, high, and
multispeed. Multispeed will display all three speeds and flash only the speed
currently in use. The fan speed is automatically adjusted based on demand.
The second function is to change from auto fan to fan (constant fan). To
change this function, press and hold the fan key until the indicator changes
from fan (constant fan) to auto fan. When in FAN MODE, auto fan is not
available. If the unit was set to auto fan before changing the mode to fan, auto
fan will return when the unit is set back to COOL. Factory default is fan
(constant fan) and is the best choice for electronic equipment.
**KWIB12023 and KWIB12043 - These models are 2 stage systems and have
a fan speed for each stage. This feature is not user settable. This system
always starts in first stage fan speed (low) in COOL or FAN MODE, second
stage fan speed (high) only operates in COOL MODE when the second stage
compressor is running.
a.
Up (+) and Down (-) Arrow Buttons - Raises or lowers the desired set tempera-
ture. When changing the set point, pressing the + or – key, the word SET will
appear on the display and the current set point flashes ON and OFF. The value of
the set point is changed 1 degree each time the + or – is pressed. The adjusted set
point flashes on and off 12 times after the last change and then returns to display
the room temperature.
b.
c.
5.
Fan - Pressing the fan button has different operations depending on the model.
4.
Page 10

C.
Turn On Your KwiKool System - Pressing the ON/OFF button once on your control
panel will put your unit in the ON position and “ON” will be displayed on the right
side of your display as well as the previously chosen mode.
COOL - If the unit was previously set to the cooling mode (cool) then “cool” will be
displayed. If the compressor is running, the ”cool” on the display will be flashing. If
your unit has been sitting for over 2 minutes, this should happen immediately upon
turning the unit on, unless your set point is lower than the current room temperature. In this case your unit is ready to automatically turn on once the temperature
rises above the set point. If the unit was recently turned off or the unit turned itself
off because it reached the set point, the compressor will not turn on until the
system waits for approximately 2 minutes. This prevents the compressor from
being damaged do to a condition called short cycling. The indicator that the unit is in
the “time out” condition is that the F (or C) in the display will be flashing. When the
compressor starts, the F will stop flashing and the “COOL” will begin flashing.
**Note: the condenser water supply will not start to flow immediately but is
controlled by head pressure. If the display flashes 99, this indicates the ambient
temperature is 99 degrees F or higher. This is normal and will stop flashing when
the ambient temperature falls below 99 degrees F.
FAN - If the unit was previously set to the fan mode then “FAN” will be displayed
and the fan will start to run.
System Operation -
1.
Page 8
a.
b.
Lowering or raising the set point will not change the temperature of the
supply air. For best results always adjust the set point to a temperature your
KwiKool can cycle on and off at to avoid operational issues such as freezing or
rapid discharge fan cycling, KwiKool systems are designed to maintain the set
point when sized properly and constant operation without achieving the set
point may shorten the expected operational life of your system.
The lowest set point temperature available for your KwiKool is 60 degrees F,
and the highest setting is 95 degrees F. The control will not allow adjustments
beyond these ranges.
NOTES:
V / Built in Safeguards
KwiKool is proud to provide its customers with high quality features and safety devices
that are not found in most other brands.
2.
3.
Time Delay - Protects your KwiKool from potential damage by delaying the compressor from starting before the pressures in the mechanical system equalize. This always
activates when your KwiKool cycles off, is turned off, power is lost and then restored or
the operational mode is changed. Display flashes C or F if the time delay is activated.
Condenser Water Control Valve - Part of your KwiKool limited freeze protection
and works by regulating the discharge water flow to keep the refrigerant pressures at
the optimum range.
B.
A.
Page 11

Page 9
High-Pressure Switch and Alarm - Protects your Iceberg Series unit from
potential damage to the mechanical system by shutting down, sounding an audible alarm
and displaying a fault code (HP) when the system pressure exceeds safe operating
conditions. The high pressure switch is a manual reset switch and must be reset after
the switch is activated and the condition causing the trip is corrected.
Low Pressure Switch and Alarm - Protects your KwiKool from potential damage
to the mechanical system by shutting down the system, sounding an audible alarm and
displaying a fault code (LP) when the low side pressure is too low. This is normally
caused by low refrigerant charge. This switch is an automatic reset.
Automatic Restart - In the event of a power loss your KwiKool Iceberg resumes
operation when the power is restored. All operational functions are preserved in the
memory of the Microprocessor Board including the ON/OFF selection.
Condensate Pump & High Level Alarm - All KWIB Iceberg models are factory
equipped with an internal high lift condensate pump. KwiKool condensate pumps are
able to pump the condensation either to the factory supplied condensate bottle, or to a
drain or other location as required by the application. The internal pump is rated at 20
foot of head pressure. This means it can pump water to a maximum of 20 feet vertically.
Each pump is equipped with an overflow safety cut-off that automatically shuts your
Iceberg unit down, sounds an audible alarm and displays a fault code (CP). This prevents
accidental flooding of the conditioned space.
Condensate Tank & High Level Alarm - All KWIB Iceberg models come standard
with an external condensate tank. The tank is equipped with an overflow safety cut-off.
When the tank is full, the safety will automatically shut down your Iceberg unit, sound an
audible alarm and display a fault code (CF). This prevents accidental flooding of the
conditioned space. If you are using the supplied bypass plug and not using the tank this
alarm is nonfunctional.
Power/Phase Monitor (Optional) - The KwiKool Phase Monitor is available as an
option on all 3 phase KwiKool models. The phase monitor samples the power supply for
low or high voltage, out of phase and loss of phase. If any of these power conditions
arise, the Phase Monitor will automatically shut down your Iceberg unit, sound an
audible alarm and display a fault code (A1). This alarm will reset automatically when the
power is restored to normal.
Service Ports - Located in the filter access compartment in the front of your KwiKool
below the control panel. This gives service personal a connection point for service
gauges to monitor the operating pressures of your Icebergs refrigeration system.
Sight Glass/Moisture Indicator - Located in the service access compartment.
This feature allows operators and service personal to view the condition of the refrigerant returning to the evaporator coil. Used as a diagnostic tool by qualified personal.
C.
D.
E.
G.
F.
H.
I.
J.
Page 12

Page 10
VI / Application Requirements
Water Supply Temperature Requirements - The supply water temperature to
your KwiKool unit at the installation site should be from 40 to 85 degrees F to the
condenser supply water inlet located on the back of your KWIB Iceberg. If the water
supply is above 85 degrees F the high pressure switch may trip, stopping the unit’s
compressor. You also may notice diminished performance. The High Pressure Switch
type is a manual reset. The reset switch is located in the Return Air grill filter compartment Reset the unit by pressing the button labeled HP Reset. Standard water-cooled
KwiKool models are not designed to operate with supply water temperatures below 40
degrees F. Low-ambient temperature controls must be special ordered at an additional
cost. Temperatures below 40 degrees F will cause low performance and/or freezing and
operating in this condition can shorten the expected operational life of your system and
void your warranty.
Water Supply Pressure - KWIB systems are equipped with a Water Control Valve,
the water control valve requires water pressure of at least 35 psi and not to exceed 150
psi. Pressures below 35 psi may cause a High Pressure trip. This requires a manual
reset (see paragraph above). And pressures above 150 psi can cause the control valve
to fail and leak supply water in your conditioned space.
Capacity & Temperature Settings - Sizing of our units is based on matching
capacity to a specific heat load while maintaining a 72 degree F temperature. In order
to reach temperatures below 72 degrees F, the unit must have extra capacity. There-
fore, we recommend that you do not set the temperature set point below 72 degrees
F, unless you have excess cooling capacity beyond your heat load, since this may
cause the unit’s evaporator coil to freeze up.
Positioning of Unit - Do not place your KwiKool unit in direct sunlight, The unit
should be positioned so that the output of the unit can be focused as close to the heat
generating equipment as possible with the front grill fully exposed. Do not block the
front of the unit, since this will cause a restriction in the airflow and can cause low
performance and/or evaporator coil freezing.
B.
A.
VII / Maintenance
Air Filters - Your KwiKool unit comes from the factory with filters installed on the
evaporator inlet to prevent dust and debris from entering the system and circulating in
the conditioned space, factory installed filters are a disposable type and must be
periodically checked and replaced based on the air quality of your conditioned space.
Failure to maintain the filters will cause restricted air flow and low overall unit
performance. The air filter is located on the front of your KwiKool unit below the
control, release the 2 slotted fasteners on the access door to open.
Conditioned Air Supply Drive Belts - Your KwiKool KWIB120 models moves air
over the evaporator coil to remove heat and moisture from the conditioned space by
way of a motor attached to a blower wheel, this wheel turns by way of a pulley and belt
system. Inspect/adjust these belts every 60 days of operation, replace as needed.
Failure to maintain the drive belts will cause low performance, coil freezing or in
extreme cases damage to the blower/motor in the event of a belt breaking. Located in
the left side evaporator access door as you face the control panel. When adjusting the
belts, adjust them from the base of the motor. Do NOT adjust the sheave (pulley).
B.
A.
C.
D.
Page 13

Page 11
VIII / Utilizing your KwiKool System
In contrast to conventional air conditioners, which circulate air conditioning capacity evenly
to an entire floor, KwiKool systems are designed for cooling an area with a high concentration of heat load, usually from electrical or computer equipment. Understanding the capabilities of your KwiKool can help you avoid problems. For example, if you add heat-generating
equipment to the room after purchasing a KwiKool system, you may be short of the
necessary cooling capacity. Your KwiKool system offers an effective affordable solution for
many applications. It can also provide spot cooling for workers or process cooling within a
large space without the use of condenser ducting, such as a warehouse factory, or production areas. If the system is used in this manner, the cold air supply must be within 5 feet of
the person or equipment being cooled, since the hot ambient air will mix with the cool air
very quickly. Your KwiKool system is specifically designed to adapt to today’s high tech
environments such as telecommunication or computer rooms and is equipped with the
necessary controls to maintain those special environments. Call your nearest KwiKool
Distributor or 1-800-594-5665 for help or for questions about other applications.
IX / Fault Codes
Your KwiKool Iceberg System incorporates a self-diagnostic system that sounds an audible
alarm, stops your system and displays a fault code to indicate the nature of the problem on
the display panel. See the troubleshooting guide later in this manual for further information.
CF = Condensate Tank Full
CP = Condensate Pump Fault
HP = High Pressure Switch Tripped
LP = Low Pressure Switch tripped or tripping
A1 = Phase Monitor Senses power problem (if equipped)
FP = Freeze Protection
Page 14
Page 12
X / KIB Troubleshooting Guide
Fault Possible Cause Possible Solution
Unit displays CF, Audio
alarm fails to clear on start
up or while operating
External Condensate Tank is
full. Condensate bypass jack
or condensate float switch
jack is not installed or not
positioned correctly. Water
level switch is engaged
Empty External Tank (if
using). Make sure thank is
upright and level. Unplug
bypass plug or tank plug and
reinstall to assure good
connections. System
automatically resets when
fault condition is corrected.
Unit Displays CP and Audio
alarm is sounding during
start up or while operating.
Microprocessor board has
detected high water level in
the condensate pump.
Inspect condensate pump for
over flow and proper
operation, check condensate
line for a clog or crimping.
Resets automatically upon
fault correction, or call
1-800-KwiKool if the problem
persist.
Unit Displays LP, Audio
alarm is sounding during
start up or while operating.
Microprocessor board has
detected low pressure. This
alarm might cycle on and
off.
Check air filter and replace
if dirty. Make sure nothing is
blocking the filter inlet.
Check for icing on coil.
Resets automatically when
fault condition is corrected.
Call 1-800-KwiKool if
condition continues.
Unit Displays HP, Audio
alarm is sounding during
start up or while operating.
Microprocessor board has
detected high pressure. The
High Pressure switch is
tripped.
High pressure is normally
caused by reduced
condenser water flow.
Check for restriction in the
supply water line. Check for
condenser supply water flow
of at least 35 psi and
temperature not exceeding
85 degrees F. (See Section
VI, A & B4). High pressure is
a manual reset type. To
reset, open filter door and
the button is located above
the filter. Press button to
reset (you should feel a
click).
Page 15
Page 13
Audio alarm fails to clear on
start up or while operating,
unit displays FP.
Microprocessor has
detected freezing on the
evaporator coil if the system
has a factory installed freeze
sensor. (Special order)
Check for freezing on the
evaporator coil and turn the
system off to let it thaw out,
call 1-800-KwiKool if your
system is not equipped with
a freeze sensor. Auto resets
upon correction.
System is ON and display is
showing ON but unit is not
supplying conditioned air.
System is in time out (F or
C is flashing), control is set
above room temperature or
control is adjusted out of
operating parameters or not
in the correct operational
MODE.
Wait 2 minutes, review
System Operations guide.
Unit Displays A1, Audio
alarm is sounding during
start up.
Phase Monitor (if equipped)
has detected incoming
power issue on equipped
systems.
See Troubleshooting Guide
for systems equipped with a
phase monitor (Appendix Part B).
Fault Possible Cause Possible Solution
System is ON but the
microprocessor board
resets the time delay
(flashing F or C) when the
compressor attempts to
start.
Microprocessor board
detects voltage drop below
operating parameters.
Confirm the integrity of
your source power, check
for proper wire size and
length of power extension
cable. Be sure the circuit is
dedicated to only the
operation of your KwiKool.
Power is supplied but
control is blank
Low voltage circuit is not
engaged
Check source power
breaker and verify incoming
power to connector, reset
switch on low voltage
transformer in KWIB120XX
and KWIB6043 systems.
Call 1-800-KwiKool for
assistance.
System trips breaker on
start up
Incoming power is incorrect,
breaker is undersized or
faulty, and or power cable is
too long and or undersized.
Verify the circuit and power
cable is within the systems
specifications, consult with
your electrician or call
1-800-KwiKool for
guidance.
Display flashes 32 (or 0 if in
Celsius setting and unit will
not turn on cooling.
No connection of temperature sensor to Microprocessor. Temperature
Sensor malfunction.
Call 1-800-KwiKool for
instructions.
Page 16
Page 14
Supply air flow is limited, and
or water is dripping from the
front of the system
Supply or return air is
blocked or restricted, and or
the evaporator coil is
freezing.
Verify that supply and
return air are not blocked
and duct work (if used) is
installed to specification,
remove or add duct as
needed, check air filter for
blockage. KWIB120xx
users check supply air fan
for correct rotation, refer to
Appendix B.
Fault Possible Cause Possible Solution
Condensate is not pumping. Water is below pumping
level, external line
restricted, line installed with
too high of lift.
Reservoir fills, and then
pumps. Check for line
crimping or restrictions and
proper line run height. Refer
to the user guide Section 5:
Built in Safeguards.
Evaporator coil is freezing Low or restricted air flow.
Undersized capacity, unit
constantly on, unable to
achieve set point. Low
return air temperature out
of factory specifications.
Evaporator door open,
mechanical system
malfunction.
Direct supply return air to
area of highest heat load,
check for blocked air flow
from the supply air, replace
air filters, adjust set point to
allow the unit to cycle, add
another KwiKool system or
larger capacity model, close
evaporator compartment
door, check for correct
rotation and inspect drive
belts on KWIB120XX
supply air blower for worn
condition or breaking, Install
service gauges to view
pressures.
Call 1-800-KwiKool.
Chatter or hum is heard
from the control box while
the system is operating.
Incoming source power is
poor or low voltage component is faulty.
Check for proper voltage
selection on 208/230 volt
units, remove excess or
undersized power cable, and
check incoming power.
Call 1-800-KwiKool.
99 Flashes on display Ambient room temperature
over 99 degrees F.
Unit is working properly.
Lowering of room temperature will rectify the flashing.
59 degrees or lower
temperature flashes on the
room temperature display
and the system will not
operate.
Ambient room temperature
under 60 degrees F.
Limits of unit have been
reached. Operating temperatures are 65 - 105 degrees F.
Page 17

Appendix
Part A: Systems Equipped with a Phase Monitor - Page: 16-17
Part B: Special Section for KWIB120 Systems - Page: 18-19
Page 15
Page 18

Unit displays A1 Audio
alarm sounding during start
up, phase monitor displays,
lock out “Front Fault” red
light
Phase monitor detects
reverse phasing, lost phase
or improper power incoming.
Exchange any line voltage
wire with the other, verify
incoming power. Auto reset
upon correction.
Unit displays A1, Audio
alarm is sounding during
start up, phase monitor
displays, lock out “Front
Fault” low volt red light.
Phase monitor detects
voltage lower than factory
setting.
Verify incoming power,
slowly raise voltage adjust
knob on the phase monitor
to match incoming power.
Auto reset upon correction.
Unit displays A1, Audio
alarm is sounding during
start up, phase monitor
displays, lock out “Front
Fault” high volt red light.
Phase monitor detects
voltage higher than factory
setting.
Verify incoming power,
Slowly lower voltage adjust
knob on the phase monitor to
match incoming power.
System starts up but goes
into visual and audible alarm
A1 when the compressor
starts.
Phase monitor detects
voltage drop.
Observe the phase monitor
on start for fault lights and
adjust the monitor accordingly, verify incoming power.
Auto reset upon correction.
Check wire size and voltage
drop.
Unit displays A1, Alarm is
sounding during start up or
during operation, phase
monitor displays “Back
Fault” red light.
A fault has been detected
from one of the unit’s
condenser motors.
Inspect motor components
for faulty or loose connections and proper operation,
Call 1-800-KwiKool for
guidance.
A: Systems Equipped with a Standard Phase Monitor
Fault Possible Cause
Possible Solution
Page 16
Page 19
Page 17
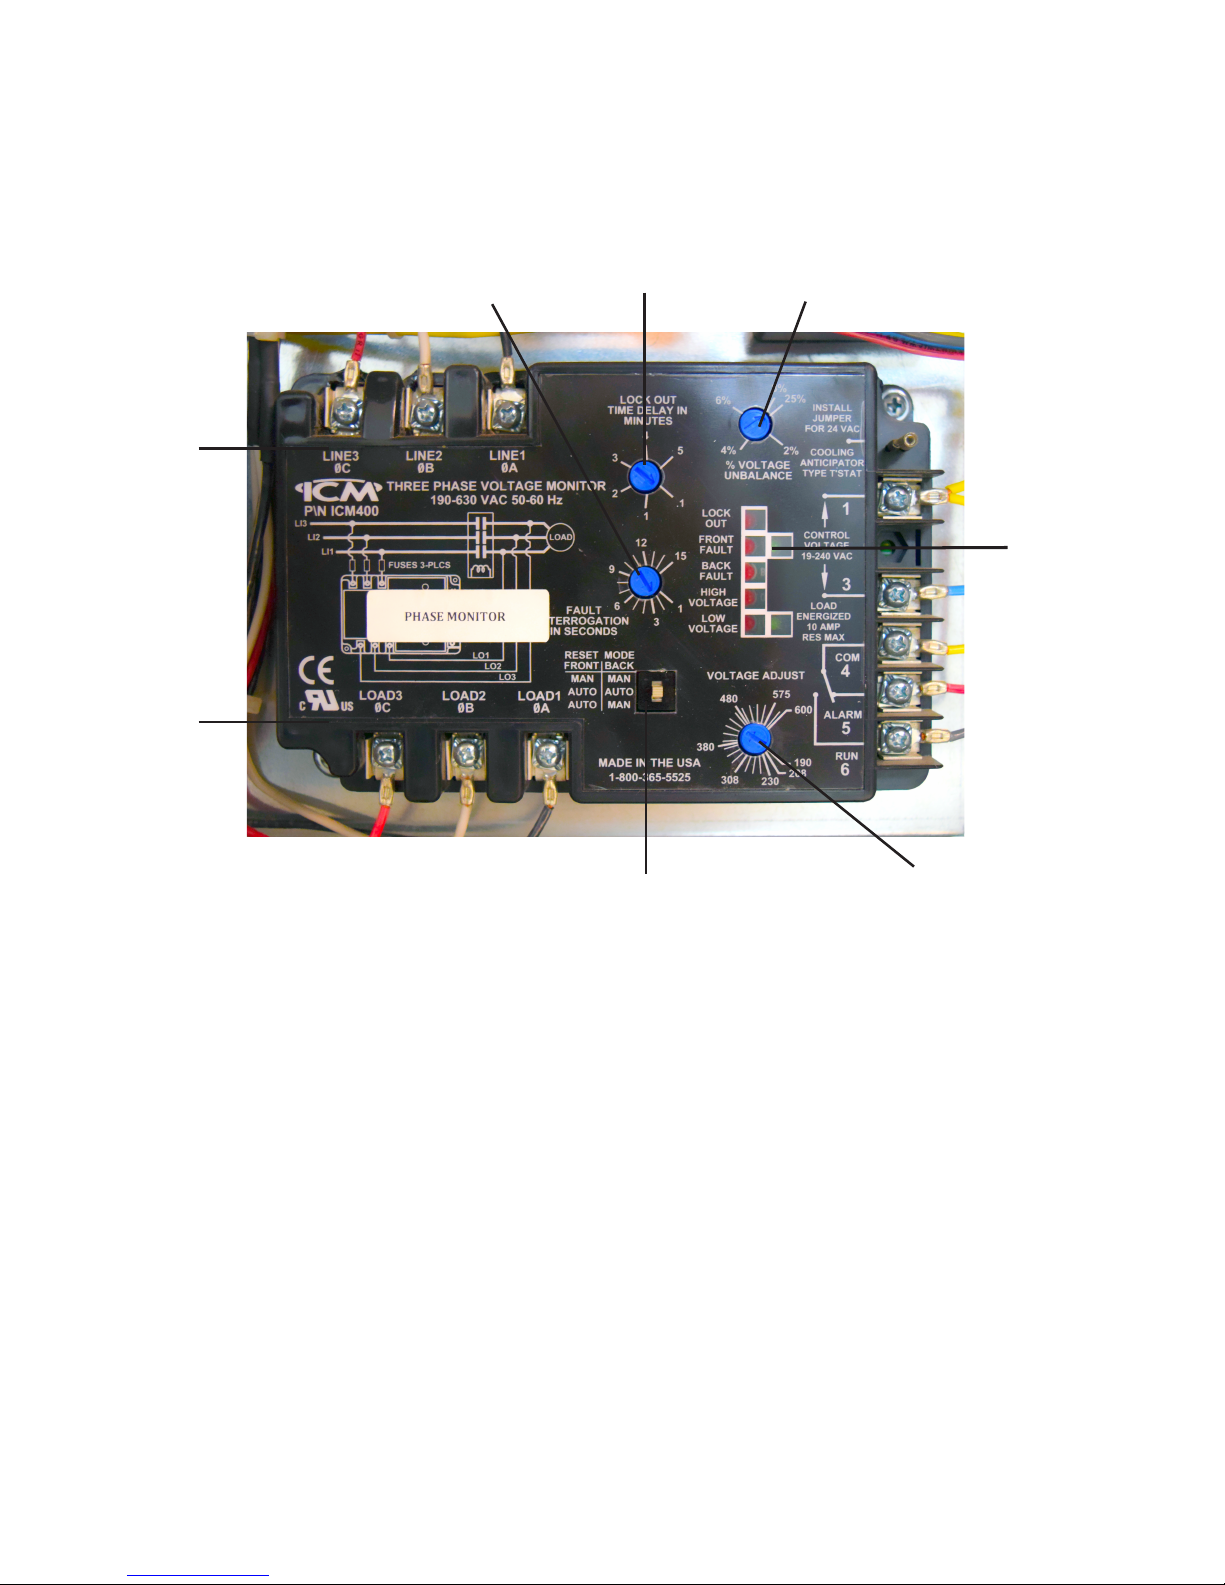
LED Lights -
Used to indicate failure cause.
Voltage Adjustment Knob -
Set knob to match correct unit voltage.
Fault Interrogation Knob - Never Adjusted.
Factory set to 8 seconds for the time it takes
for non-critical fault to be analyzed & before
de-energizing load.
Lock-out Time Delay Knob - Never Adjusted.
Used for time between de-energizing and
re-energizing the load with a factory setting
of 1 minute.
Line Side -
Incoming voltage from the contractor.
Load Side -
Outgoing voltage from the contractor
b.
a.
c.
d.
e.
f.
% Voltage Unbalanced Knob -
This is the allowable voltage unbalanced
between the 3 phases with a factory
setting of 10%.
Reset Switches -
Position 1: Full Manual Reset (MAN-MAN).
Manual control reset used for highly critical
loads. The system will not reset until the fault
is corrected and then manually reset by
personnel.
Position 2: Leave In Full Automatic Reset
(AUTO-AUTO). Auto Front/Manual Back
Reset (AUTO-MAN). Automatic reset is used
on the front line side only (Power coming into
the unit). Back load side requires manual
reset. This setting is typically used with a
reliable power source (Power to condenser
& evaporator motors, and compressor).
g.
h.
b.
a.
c.
d.
e.
f.
g.
h.
The KwiKool Phase Monitor is factory installed and is located
inside the Control Box. The Phase Monitor can be accessed
through the right side service door as you face the unit and
removing the cover to the control box.
Page 20

Page 18
B: Special Section for KWIB120 Systems
Compressor Priority Switch - For KWIB12023 and KWIB12043. These KwiKool
models have 2 compressors and refrigerant circuits that operate independently of each
other and are staged to come on at different intervals as needed for cooling. Your
KwiKool KWIB120 is equipped with a Compressor Priority Switch located on the top of
the control box in the evaporator access compartment. The rocker switch is factory set
to use compressor 1 as the first stage compressor or lead compressor on start up, and
compressor 2 as the second stage or lag compressor. The lag compressor comes on
when the demand requires it. The rocker switch when moved to the compressor 2
position reverses the order of the lead and lag compressors. This allows for rotation of
the compressors for even wear. Change this switch position at regular intervals. Factory
recommendation is approximately every 6 months. Turn off the power to the unit
before changing this switch position.
Evaporator Fan Rotation - On KWIB120 models without the optional factory
installed phase monitor, you will have to visually confirm the rotation direction of the
cold air supply fan and correct if needed. As you face the front control panel of the
KwiKool unit, open the left side evaporator access door with the system in the OFF
position. Secure the door from closing and keep clear any objects from the moving or
rotating parts. Select FAN mode on your control pad and turn the system ON briefly
and then OFF. The supply air fan should be rotating in a clockwise direction from this
view. If rotating counterclockwise, qualified personal should disconnect power at the
source and exchange any incoming line voltage wire with any other line voltage wire and
repeat the previous instructions. Operating your KwiKool unit with the supply air fan
rotating incorrectly will cause low performance and evaporator coil freezing.
Note: KwiKool units with a factory installed phase monitor have already been set for
rotation. Users will be notified of incorrect rotation by an audio and visual alarm that will
clear automatically when the phase issue is corrected by exchanging the line voltage
wire as described above in this section.
Supply Air Fan Speed - KWIB120 models are 2 stage systems and have a fan
speed for each stage. This is not user settable. This system always start on 1st stage
fan speed (low) in COOL or FAN MODE, second stage fan speed (high) only operates
in COOL MODE when the second stage compressor is running.
Conditioned Air Supply Drive Belts - Your KwiKool KWIB120 models moves air
over the evaporator coil to remove heat and moisture from the conditioned space by
way of a motor attached to a blower wheel, this wheel turns by way of a pulley and belt
system. Inspect/adjust these belts every 60 days of operation, replace as needed.
Failure to maintain the drive belts will cause low performance, coil freezing or in extreme
cases damage to the blower/motor in the event of a belt breaking. The belts are located
in the left side evaporator access door as you face the control panel. When adjusting
the belts, adjust the tension using the base adjustment screw. Never adjust the sheave
(pulley) as it can cause damage to your system and/or make the system have poor
performance.
B.
A.
C.
D.
Page 21

Revision 062016
 Loading...