

Page 1

!
! !
NORTESCO INC.
151 Carlingview Drive, Unit 12
Rexdale, Ontario M9W 5S4
Toronto
Phone: 416 - 675 - 3434
Fax: 416 - 675 - 0167
KWC FAUCETS INC.
1770 Corporate Drive # 580
Norcross, GA 30093
Phone: 678- 334- 2121
Fax: 678- 334- 2128
NORTESCO INC.
61 Lindsay Avenue
Dorval, Que. 119P 2W3
Montreal
Phone: 514 - 636 - 6116
Fax: 514 - 636 - 5491
Kitchen faucet
Mitigeur de cuisine
Mezclador de cocina
KWC STAR
KWC DORADO
KWC TRISTAR
Installation and service instructions
Instructions de montage et d'entretien
Instrucciones de montaje y servicio
Datos de servicio
Presión ideal de servicio : 3 bar (45 PSI)
Presión máxima de servicio : 5 bar (70 PSI)
Diferencia máxima de presión
fría / caliente : 2 bar (25 PSI)
Se recomienda la igualdad de las presiones.
Temperatura ideal del agua : 60 °C (140°F)
Temperatura máxima del agua : 90 °C (194°F)
Atención:
Enjuagar escrupulosamente las tuberías antes del
montaje!
Caractéristiques de fonctionnement
Pression de service idéale : 3 bar (45 PSI)
Pression de service max. : 5 bar (70 PSI)
Différence de pression
E.F/E.C. max. : 2 bar (25 PSI)
Egalité de pression recommandée.
Température idéale de l'eau : 60 °C (140°F)
Température max. de l'eau : 90 °C (194°F)
Attention:
Rincer à fond la tuyauterie avant le montage!
FSP
Operating data
Ideal operating pressure : 3 bar (45 PSI)
Max. operating pressure : 5 bar (70 PSI)
Max. pressure difference
cold/hot : 2 bar (25 PSI)
Equal pressures are recommended.
Ideal water temperature :60 °C (140°F)
Max. water temperature :90 °C (194°F)
Attention:
Before installation flush pipes thoroughly!
E
A
KWC STAR KWC DORADO KWC STAR KWC DORADO
K.10.41.22 A=185mm/7" K.10.X1.22 A=185mm/7" K.10.41.82 A=185mm/7" K.10.X1.82 A=185mm/7"
K.10.41.23 A=225mm/9" K.10.X1.23 A=225mm/9"
KWC STAR KWC DORADO KWC TRISTAR
K.10.41.02 A=180mm K.10.X1.02 A=180mm K.10.R1.81 A=135mm/5 1/4"
K.10.41.03 A=225mm K.10.X1.03 A=225mm
802 135
05/02
A
RMATUREN
ROBINETTERIE
RUBINETTERIA
GRIFERIA
FAUCETS
A
RMATUREN
ROBINETTERIE
RUBINETTERIA
GRIFERIA
FAUCETS
Page 2
1
Installation / Taking into service
Montage / Mise en Service
Montaje / Puesta en servicio
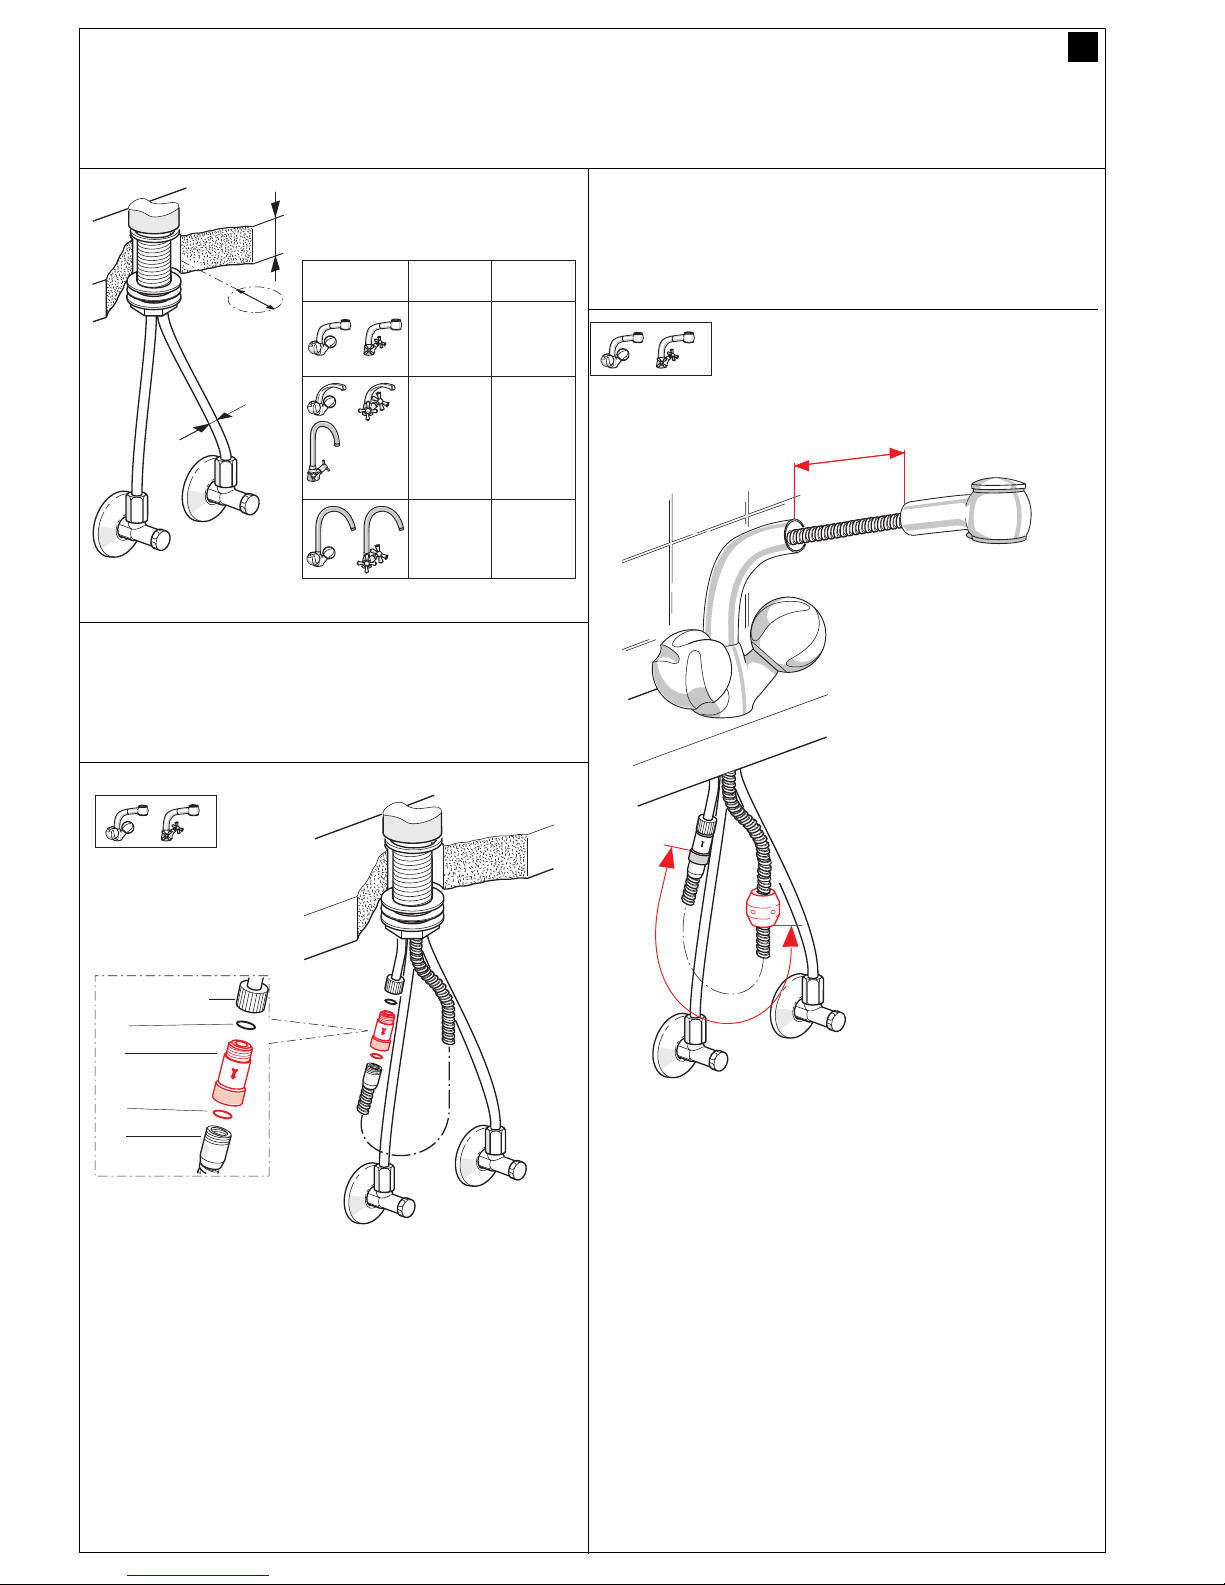
- Insert shower hose through swivel spout.
- Mount the backflow preventer device (1) to the shower hose (2). Seal (3) is
premounted in (1).
- Connect the backflow preventer to the mixer outlet pipe (4). Don't forget seal (5).
- Introduir le flexible de douche à travers le bec pivotant.
- Monter le clapet antirefouleur (1) au flexible de douche (2). Le joint (3) est
prémonté dans (1).
- Relier le clapet antirefouleur au tube de sortie du mitigeur (4). Ne pas oublier le
joint (5).
- Introducir el tubo flexible de la ducha a través de la boquilla orientable.
- Montar la válvula antirretorno (1) en el tubo flexible de la ducha (2). La junta (3)
está premontada en (1).
- Empalmar la válvula antirretorno en el tubo de salida del mezclador (4). No olvidar
la junta (5).
F
SP
E
Installation of limit stop weight
Montage du contre-poids
Montaje del contrapeso
Installation of second backflow preventer
Montage du deuxième clapet antirefouleur
Montaje de la segunda válvula antirretorno
Thickness
3/8"
ø 35mm
ø 1 3/8"
max 60mm
max 2 3/8"
ø 28mm
ø 3/4"
max 31mm
max 1 1/4"
Diameter
of hole
Thickness
Diameter
of hole
ø 35mm
ø 1 3/8"
max 45mm
max 1 3/4"
d
d = 500mm / 19 3/4"
4
(M 16x1)
5
1
3
2
c = 750mm / 29 1/2"
Page 3

!
!
2
3
Taking in service
Mise en service
Puesta en servicio
Flush faucet
(first remove spray aerator and Neoperl)
Rincer le mitigeur
(demonter d'abord le tamis de la douche et le Neoperl)
Enjuagar el mezclador
(desmontar primero el camiz de la ducha y el Neoperl)
F
Sp
E
Flush faucet (first remove Neoperl aerator)
Rincer le robinet (demonter d'abord le Neoperl aerateur)
Enjuague el grifo (primero desmonte el Neoperl)
E
F
SP
Spare parts
Pièces de rechange
Repuestos
KWC DORADO
KWC STAR
*Z.501.928
*Z.501.929
*Z.504.805
*Z.504.804
K.32.40.00
* Please specify the color when placing your order.
* Lors de la commande, veuillez indiquer la couleur, s.v.p.
* Rogamos indique el color al hacer el pedido.
E
F
Sp
Z.600.025
*Z.501.928
*Z.501.929
*Z.504.805
*Z.504.804
K.32.40.00
KWC DORADO
KWC STAR
KWC TRISTAR
Z.600.515
Z.200.176
Z.504.723
*Z.505.018
*Z.505.023
*Z.505.032
*Z.504.798
Z.200.176
*Z.503.811 *Z.503.809
M22 x 1
Z.600.025
Z.200.176
*K.31.90.01
M24 x 1
*K.33.41.12
A=180 / 7"
*K.33.41.13
A=225 / 9"
Z.503.315
- Extension nut
- Ecrou de rallonge
- Tuerca de prolongación
Page 4

K.32.40.00
Z.503.610
Z.602.305
Z.500.014
Z.200.223
Z.501.997
KWC DORADO
KWC STAR
* Please specify the color when placing your order.
* Lors de la commande, veuillez indiquer la couleur, s.v.p.
* Rogamos indique el color al hacer el pedido.
E
F
Sp
A = 180mm : *Z.504.308
A = 225mm : *Z.504.310
Z.602.306
*Z.504.214
*Z.200.013
Z.200.260
*Z.501.928
*Z.501.929
*Z.504.805
*Z.504.804
Z.600.025
Z.503.315
- Extension nut
- Ecrou de rallonge
- Tuerca de prolongación
Z.501.997
Spare parts
Pièces de rechange
Repuestos
4
 Loading...