

KWC PURESTREAM, PURESTREAM PLUS, Faucets PURESTREAM Filtration System Installation And Instruction Manual
Page 1
KWC Faucets PURESTREAM Filtration System
INSTR2083 0202
Installation and Instruction Manual
KWC AMERICA
1770 Corporate Drive # 580
Norcross, GA 30093
Phone 888 592 3287
Fax 678 334 2128
www.kwc.us.com
Page 2
2
KWC PURESTREAM Filter Systems
Installation and Operating Instructions, Models KWC PURESTREAM & KWC PURESTREAM PLUS
Specifications
Inlet Size: 3/8” NPT
Outlet Size: 8mm NPT
Flow Rate: 1.05 gpm (4 lpm)
Temperature Range: 40-100°F (4.4-38°C)
Pressure Range: 30-125 psi (206-862 kPa)
Dimensions: 11” x 4” x 4” (28 cm x 10 cm x 10 cm)
Capacity: 500 gallons (1,893 liters)
Parts Included
KWC PURESTREAM, KWC PURESTREAM PLUS:
KWC PURESTREAM or KWC PURESTREAM PLUS
Replacement Filter Cartridge, Quick Connect Fittings,
System Head, Bracket Assembly & Screws
Installation Precautions
Warning: Do not use with water that is microbiologically
unsafe or of unknown quality without adequate disinfection
before or after the system.
Caution: System must be protected from freezing. Drain
filter when room temperature drops below 40°F (4.4°C).
Caution: Do not install on hot water line. Maximum
temperature allow is 100°F (38°C).
• Do not use torch or other high temperature sources
near filter or plastic cartridge.
• Do not install near electric wires or water pipes that
will be in the path of the drill when selecting the
position to mount bracket.
• Do not install in direct sunlight.
• Allow minimum of 2” (5 cm) clear space under filter
to facilitate cartridge change.
• Mount filter in such a position as to prevent it from
being struck by other items such as waste baskets, etc.
• Installation must comply with existing state or local
plumbing codes.
System Installation
1. Mount System
Determine undersink mounting location
Warning: Before drilling holes underneath your sink, locate hidden electrical wires or plumbing behind the
mounting surface. Note adjacent appliances (dishwasher, refrigerator, trash compactor, over) which may
interfere with system fastening screws.
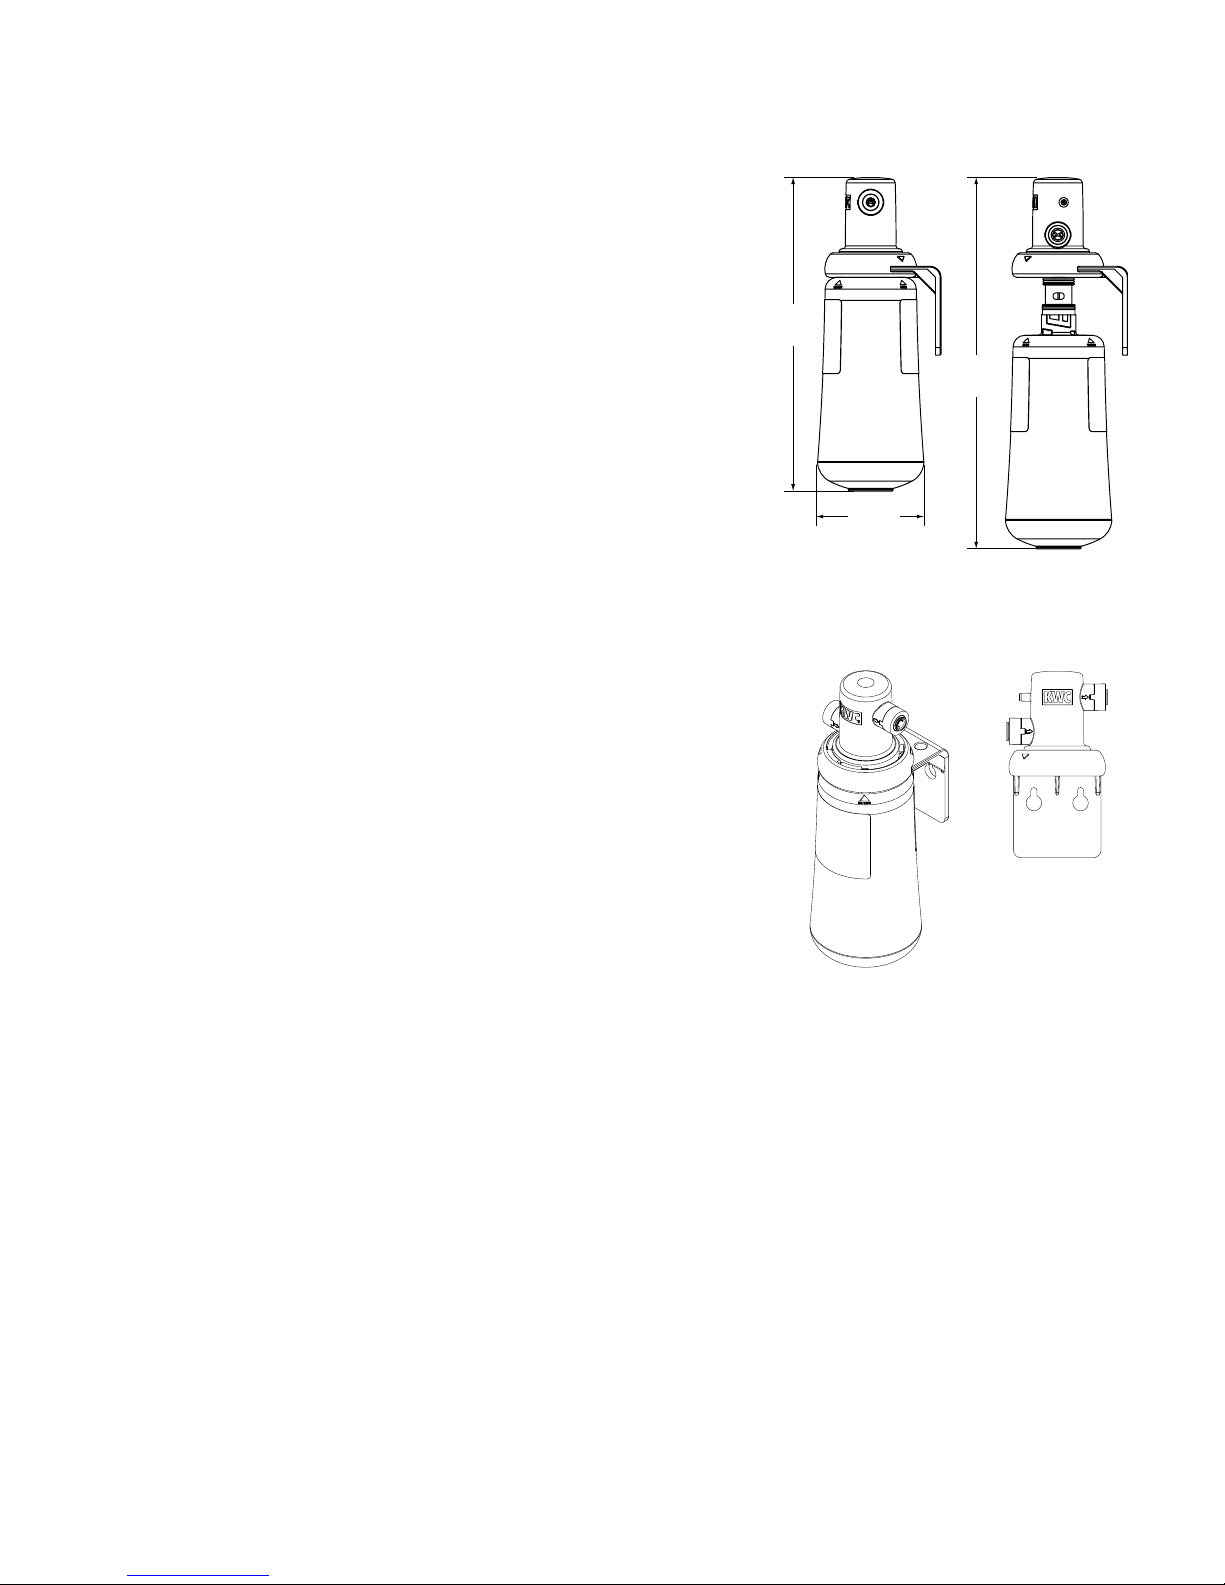
A. Fasten mounting bracket to cabinet wall (screws not included). Note: 2” (5 cm) free space underneath
system required to change filter.
B. Remove the cap from cartridge. Inspect the cartridge for any damage.
10 5/8"
(27 cm)
3 9/16"
(9 cm)
Cartridge
Installed
12 9/16"
(32 cm)
Cartridge
Removed
Page 3

C. Make sure the o-rings are present and positioned correctly in grooves. Moisten the o-rings with
water. DO NOT USE PETROLEUM PRODUCTS TO LUBRICATE.
D. Connect KWC PURESTREAM or KWC PURESTREAM PLUS cartridge to head/bracket assembly. Align tabs
with head/bracket assembly and push up until cartridge stops, then rotate 1/4 turn to the right to secure.
2. Cold Water Supply
Note: Water must be diverted from the main cold water supply line to the 3/8” inlet of your KWC PURE-
STREAM filter system. Installation must comply with existing state or local plumbing codes.
Note: Tubing runs should follow the contour of the cabinet rather than interfere with the cabinet storage
area. Arrange tubing so that there are no sharp bends. Leave some “play” in the tubing for ease of servicing, then cut tubing to the desired length. Shorter tubing lengths ensure better flow rates.
A. The filter systems inlet connection is equipped with user-friendly “quick connect” push-in fittings,
compatible with 3/8” plastic or copper tubing. Illustration 2.A shows how to use the quick connect fittings.
3. Connect System to Faucet
Inlet
A. Your PURESTREAM filter system connects
directly to the KWC faucets factory preinstalled 8mm plastic tubing. The filter
systems outlet connection is equipped with
a user-friendly 8mm “quick connect”
push-in fitting.
4. Test System
A. Open cold valve under the sink.
B. The system will pressurize. Check for leaks. If
any leaks are present, refer to troubleshooting
section.
5. Flush Filter
A. Make sure cold water supply is turned on.
B. Flush for 3 minutes (approx. 2 gallons) to remove any trapped air and carbon fines.
C. The system installation is now complete and ready to serve purified water. Enjoy!
Outlet to
Faucet
3
Page 4

4
Troubleshooting Guide
Water leaks at quick connect fittings
Push tubing in as far as it will go. If leaking continues, shut off cold water supply and remove water line
by pushing in on the connector white collar while pulling the tubing away. Inpect tubing for cracks. If tubing is cracked, simply cut that portion away and re-insert tubing into quick connect fitting.
Water does not flow from the filter faucet
Check to see if the original water line valve is open, allowing water to flow to the filter. If water still does
not flow, make sure the filter cartridge is turned to the right as far as it will go. Also, check for crimps or
sharp bends in tubing.
Water appears cloudy or air comes out of filter faucet
Flush filter for a full 5 minutes to remove any carbon fines or trapped air in the filter and water lines.
This product is outfitted with user friendly ‘Push In’ connectors. Proper use of the connectors is shown in
the diagrams.
It is most important that the tubing selected for use with these connectors be of high quality, exact size and
roundness, and with no surface nicks or scratches. If it is necessary to cut the tubing, use a plastic tubing
cutter or sharp razor knife. Make a clean square cut.
Should a leak occur at a ‘Push-In’ connector, the cause is usually defective tubing.
To Fix: •
Relieve pressure
• Release tubing
• Cut off at least 1/4” from end
• Reattach tubing
• Confirm connection is leak free
 Loading...