

KVM gruppen DSIP-1000 User Manual

DSIP-1000
Video/Audio over IP
Extender Kit
User’s Guide
Rev 1.7 KVM groupe

KVM GRUPPEN APS
Version 1.07
www.kvm-groupe.fr
Kvm groupe
http://www.kvmshop.dk
2

Kvm groupe
http://www.kvmshop.dk
3

Table of Contents
INTRODUCTION ................................................................................... 5
UNPACKING CHECKLIST .................................................................. 6
CONNECTION SETUP .......................................................................... 7
DSIP-1000T TRANSMITTER (PC ADAPTOR) CONNECTION ........................... 7
DSIP-1000R RECEIVER (DISPLAY ADAPTOR) CONNECTION .......................... 9
DSIP-1000 CONNECTION ....................................................................... 11
DSIP-1000T PANEL ............................................................................. 12
FRONT PANEL AND REAR PANEL ............................................................... 12
LED DISPLAY AND SWITCHES ................................................................... 13
4. 1.IR BLASTER .................................................................................... 14
DSIP-1000R RECEIVER (DISPLAY ADAPTOR) ............................ 15
FRONT PANEL AND REAR PANEL ............................................................... 15
LED DISPLAY ........................................................................................ 16
IR RECEIVER .......................................................................................... 16
SELECTING THE PC SOURCE ........................................................ 17
ADVANCED SETUP ............................................................................ 19
7.1 SETUP THE DSIP-1000T OR THE DSIP-1000R .............................. 19
7.2 FIRMWARE UPGRADE ...................................................................... 23
DSIP-1000 SPECIFICATIONS ............................................................ 26
DSIP-1000 WEB MANAGER SOFTWARE ...................................... 27
9.1 EDIT DSIP-1000R OR DSIP-1000T NAME ...................................... 28
9.2 ASSIGN DSIP-1000T TO DSIP-1000R ............................................ 29
9.3 HOW TO INSTALL IIS? ...................................................................... 29
Kvm groupe
http://www.kvmshop.dk
4

Introduction
The DSIP-1000 has three essential elements: DSIP-1000T
transmitter, DSIP-1000R receiver, and the LAN in between. It is
an Ethernet IP based extension for VGA/DVI, keyboard, mouse,
speaker, microphone, and Infrared signals. For the digital signage
applications, the DSIP-1000T can be connected to the source
equipments (PC, DVD, Set-top box, …) to transmit the
Audio/Visual signals while the DSIP-1000R is connected to the
display equipments (LCD, TV, Plasma, projector, …) for receiving.
You can also attach a keyboard, mouse in the DSIP-1000R
receiver to remote control the PC at the DSIP-1000T through the
LAN for the KVM applications.
1.1 Features
Just simply attach the VGA/DVI and audio to the DSIP-
1000T transmitter, it starts to encode audio/visual to the
Ethernet based IP packets.
Just simply attach the DSIP-1000R receiver to the monitor
and speaker; it starts to decode the IP packets to the
audio/visual signals.
Support one Transmitter and multiple Receivers mode.
There is no delay in between each receiver.
Support multiple Transmitters and multiple Receivers mode
for grouping broadcast if the switching HUB has the IGMP
function.
Built in the source selection button on the DSIP-1000R
receiver for selecting DSIP-1000T transmitters.
Support keyboard/mouse in the DSIP-1000R receiver to
remote control the transmitter PC for KVM control.
Kvm groupe
http://www.kvmshop.dk
5

Support IR bridge function, you can use the IR remote
controller at DSIP-1000R site to control the set-top box at
the DSIP-1000T site.
Depending on the requirement, a Windows based
management program can be developed for the specific
application.
Support HD video and stereo audio.
Pure hardware design, plug-and-play, no additional software
installation is required.
Unpacking Checklist
After you unpack the package, make sure that the following
devices and accessories are available.
1. One DSIP-1000T Transmitter (PC adaptor) to connect
with PC. Cables for DSIP-1000T are:
One VGA to DVI cable
Two audio cables
One USB cable
One IR blaster cable
2. One DSIP-1000R Receiver (Display adaptor) to connect
with display. Cables for DSIP-1000R are:
One VGA to DVI cable
One Audio cable
One IR receiver cable
3. Two power adapters
4. One user’s guide
Kvm groupe
http://www.kvmshop.dk
6

Connection Setup
This section describes how to connect the cables and how to
connect the DSIP-1000T and the DSIP-1000R.
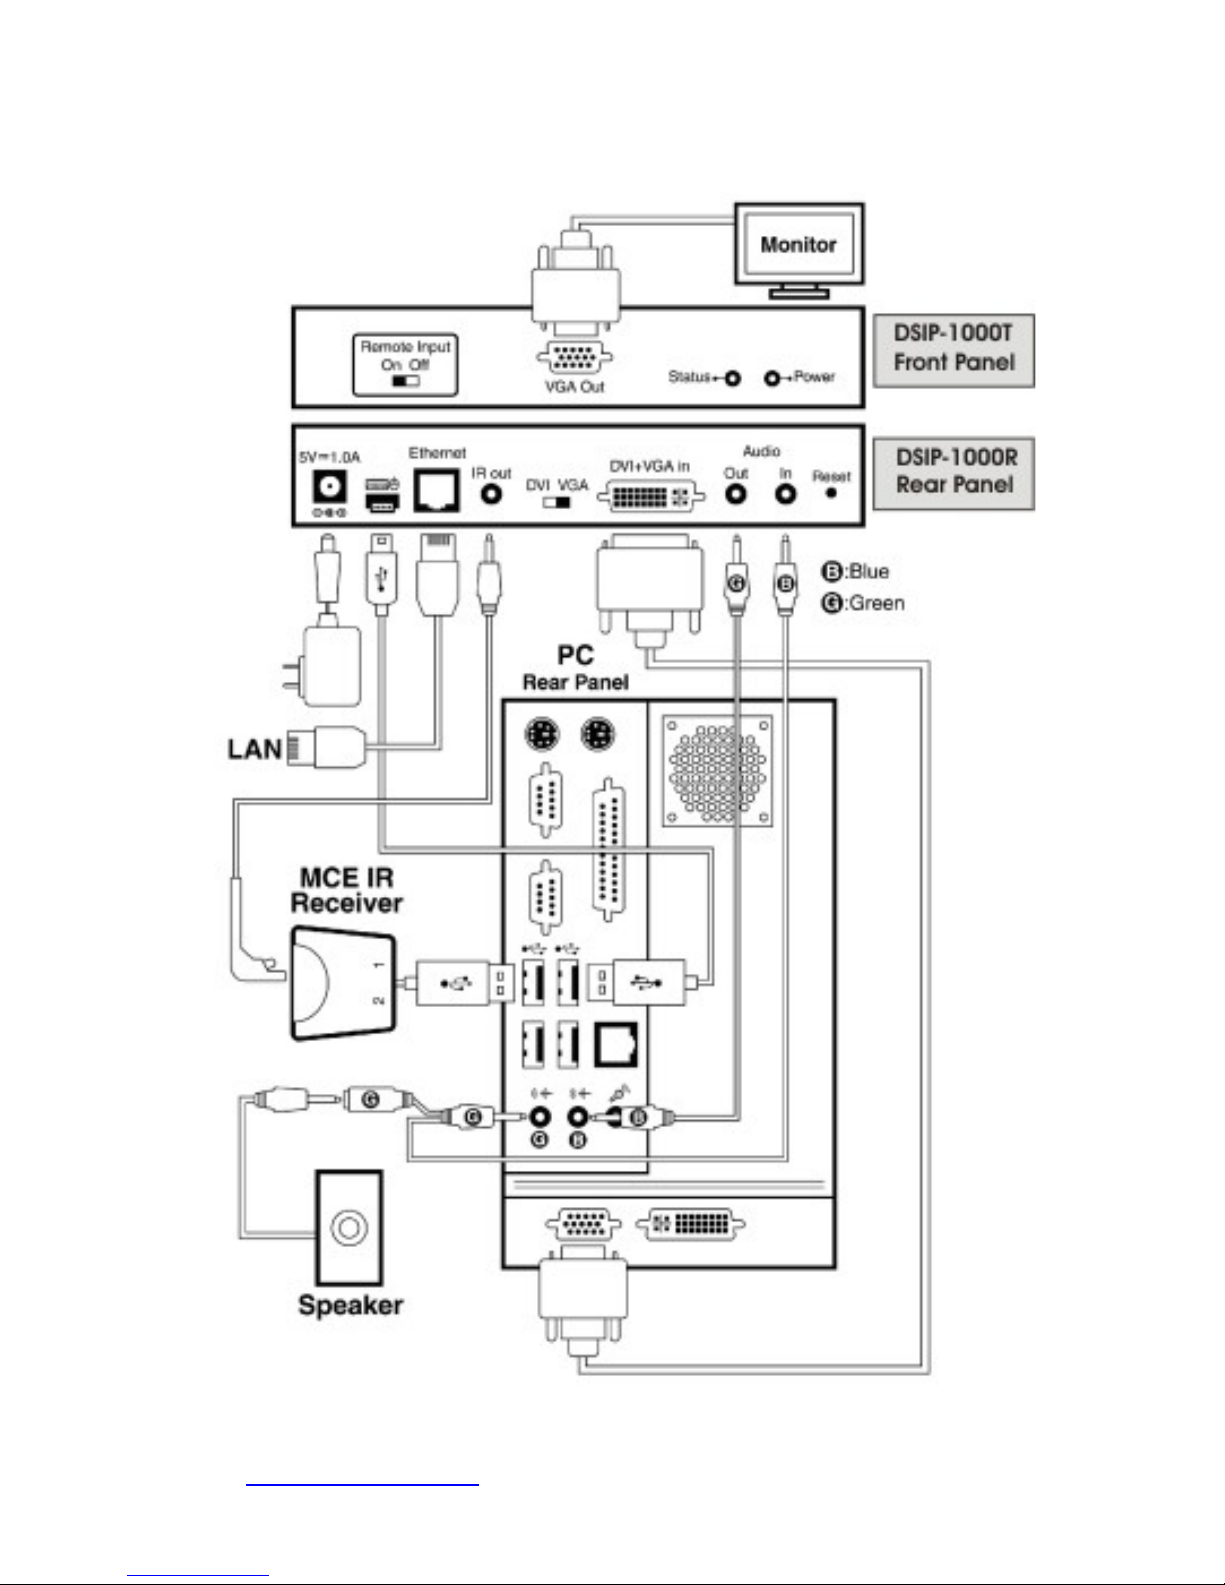
DSIP-1000T Transmitter (PC Adaptor) Connection
The DSIP-1000T is connected to your PC. The connection
method is shown below. Using the USB cable, VGA-to-DVI cable
and two audio cables, connect rear panel connectors on the
DSIP-1000T to the connectors on PC. Your local monitor may be
connected to the VGA connector on the front panel. The IR
blaster cable is connected to the IR connector on rear panel and
the IR blaster LED must be facing the IR receiver of your Media
Center PC, TV tuner card or DVD player. Connect the included
power adapter to the DC power socket and plug the power supply
to wall. To avoid damage of the DSIP-1000T, please use the
power adapter in the package only. The RJ-45 connecter is for
connection to any Ethernet CAT-5 device or directly to the DSIP1000R RJ-45 socket. A switching HUB can be placed between
DSIP-1000T and DSIP-1000R but both DSIP-1000T and DSIP1000R must be put in the same class C network.
Kvm groupe
http://www.kvmshop.dk
7
Kvm groupe
http://www.kvmshop.dk
8
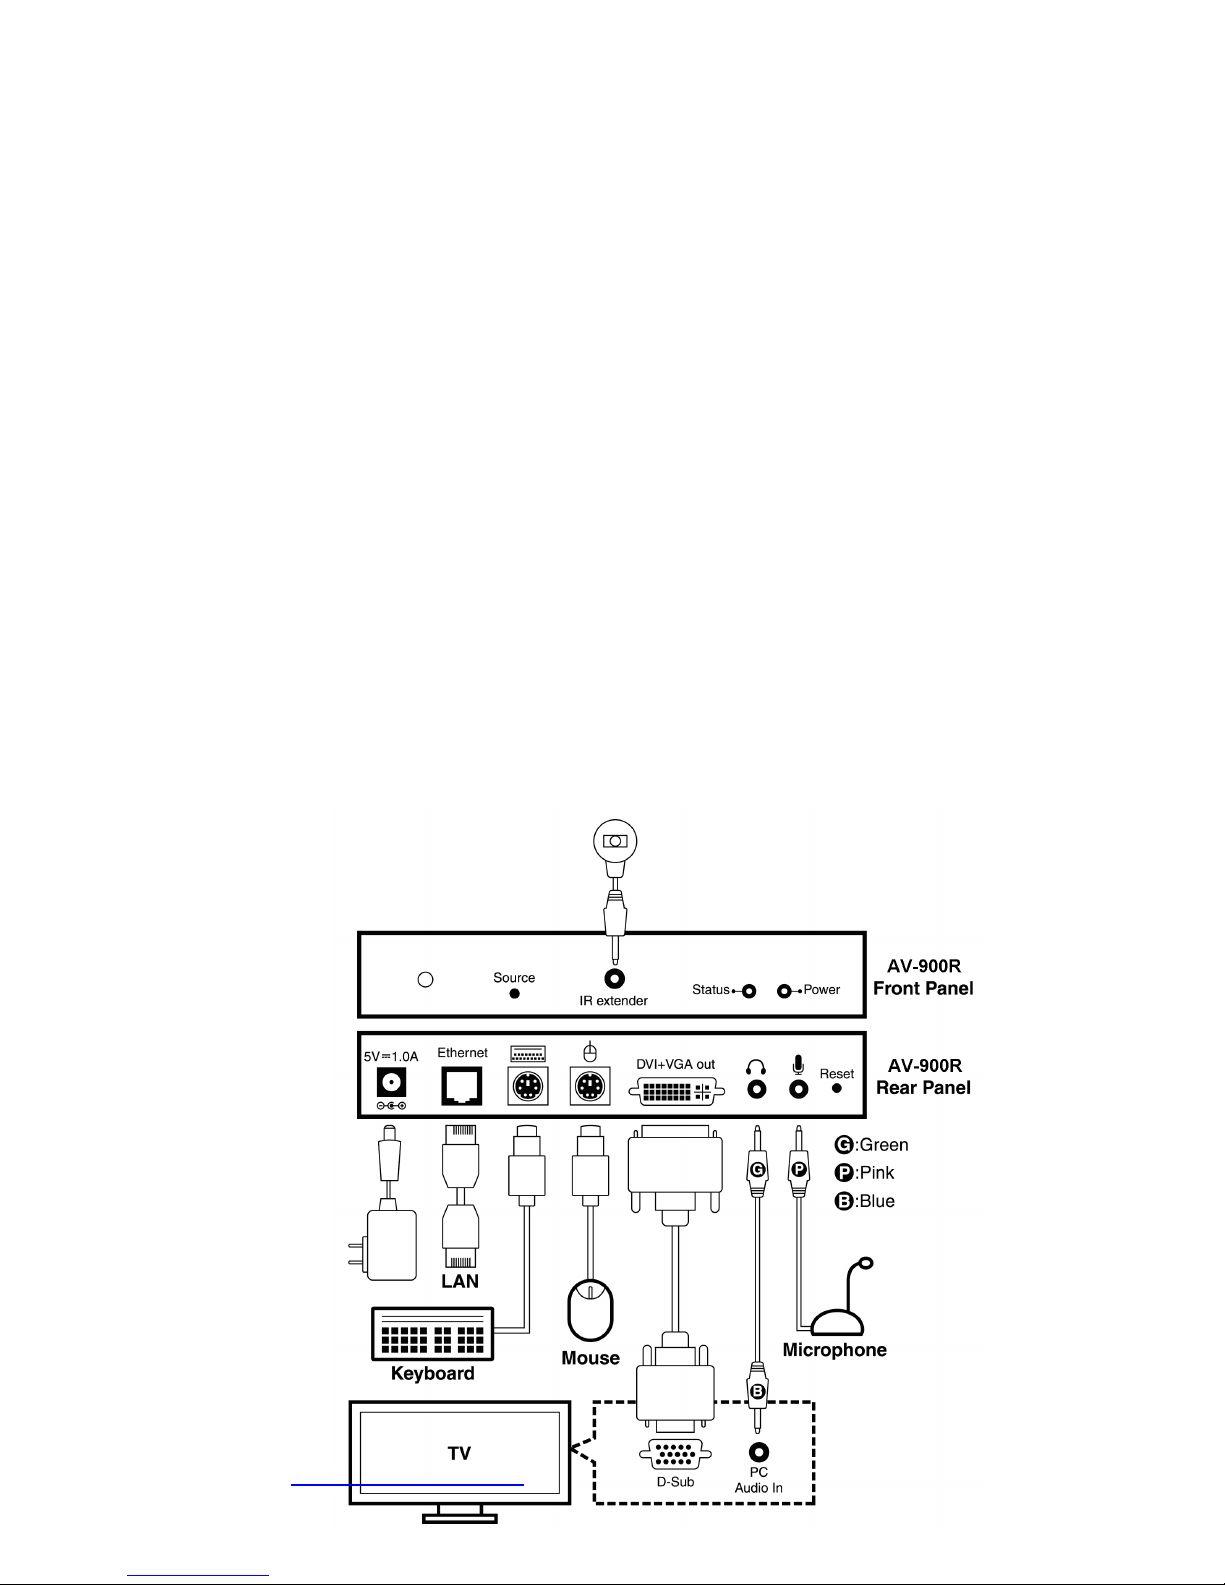
DSIP-1000R Receiver (Display Adaptor) Connection
The DVI and audio out ports on the DSIP-1000R are connected to
the Display using the included VGA-to-DVI and audio cables. The
other connectors are connected to peripherals such as a
keyboard, mouse and microphone. There is an IR receiver
connector at the rear panel of DSIP-1000R. The IR receiver cable
is connected to it and the receiver should be positioned to be
visible from the front of the Display. A switching HUB or router can
be placed between DSIP-1000R and DSIP-1000T but both of
them must be put in the same class C network. Connect the
included power adapter to the DC power socket and plug the
power supply to wall. To avoid damage to the DSIP-1000R,
please use power adapter in the package. Turn on your Display
and change the input source to D-sub, PC or VGA.
Kvm groupe
http://www.kvmshop.dk
9
 Loading...