

KVM ZET101-RU21, ZET101-RU22 Quick Start Manual
Quick Start Guide
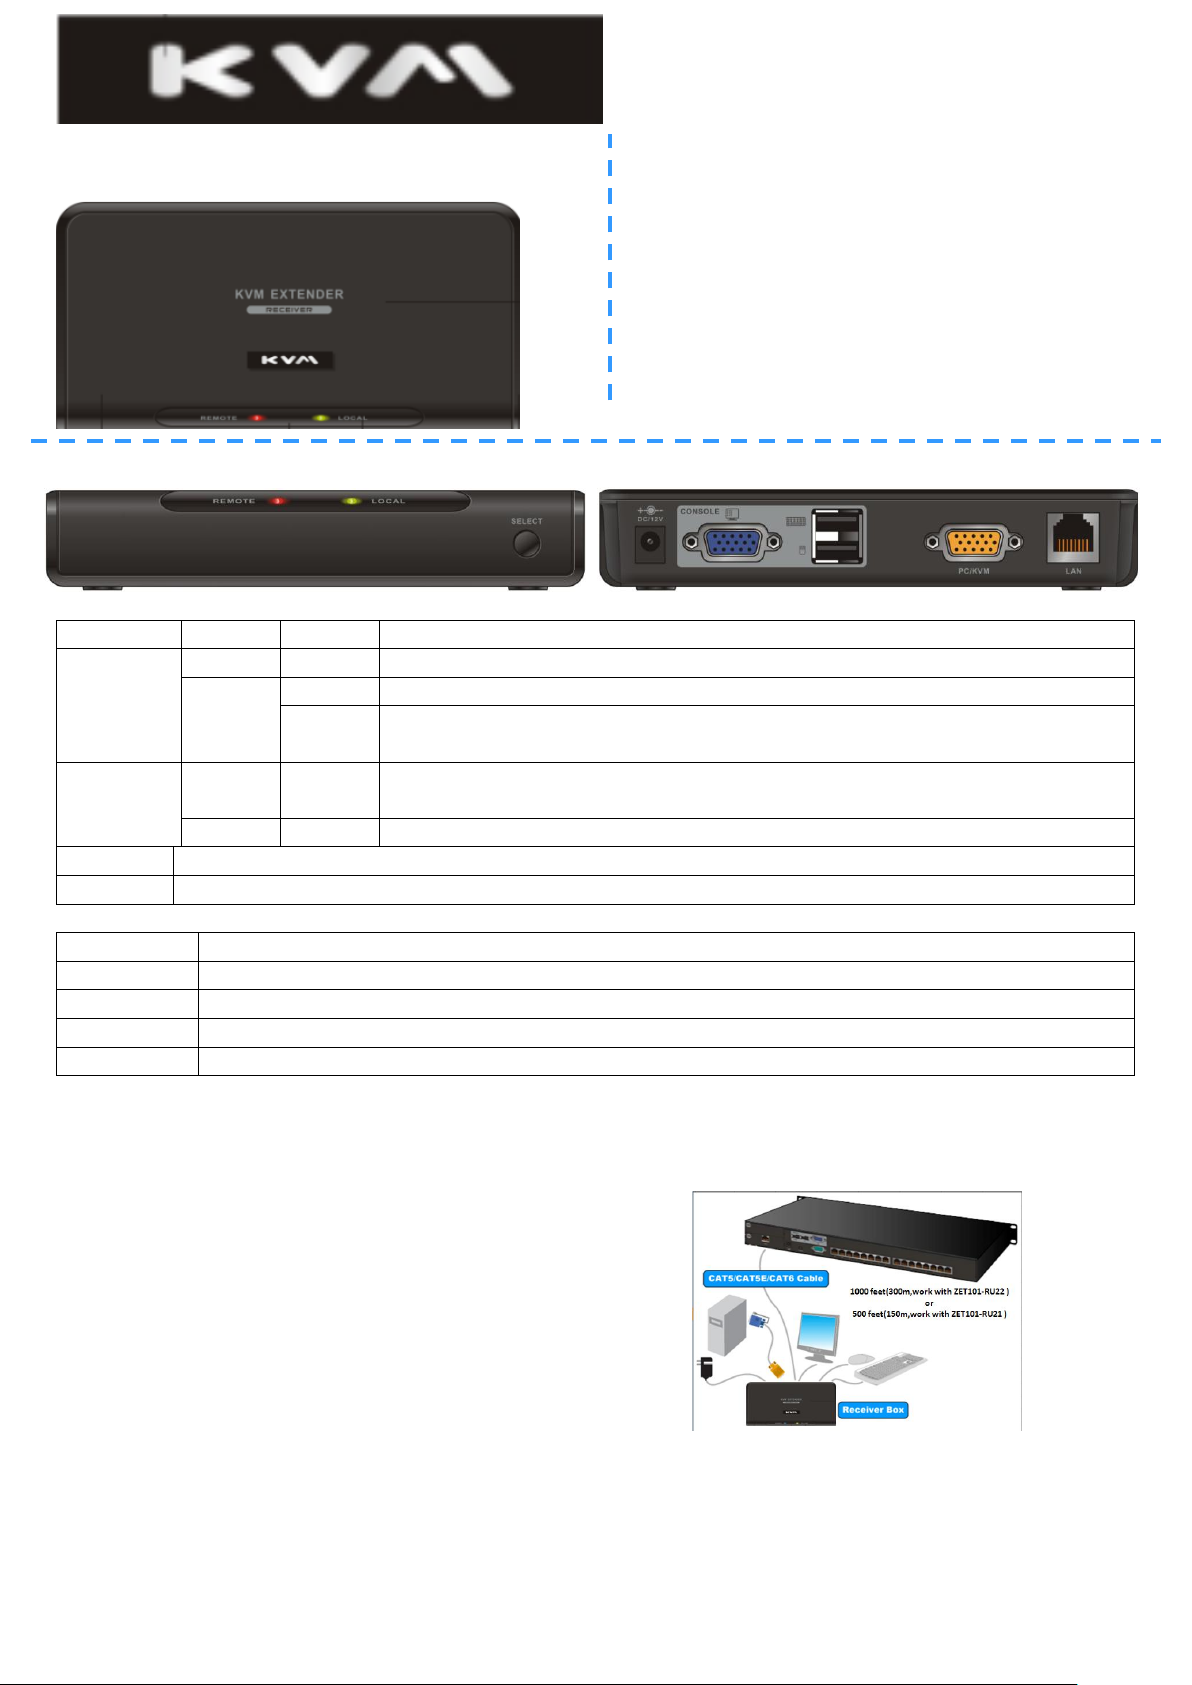
LED
Color
Status
Description
REMOTE
Yellow
On
Indicating the Transmitter is connected to the Receiver.
Red
On
Indicating the Transmitter is selected.
Flash
Indicating the Transmitter is selected, but the Transmitter is not
connected to the Receiver.
LOCAL
Yellow
On
Indicating the local computer is connected to the Receiver (PC/KVM
port).
Red
On
Indicating the local computer (PC/KVM port) is selected.
Button
Description
SELECT
Press this button to switch between REMOTE (Transmitter) and LOCAL (Receiver) site.
Port
Description
DC/12V
for connecting to the power adapter
CONSOLE
for connecting to monitor, USB type keyboard and mouse
PC/KVM
for connecting to the local host PC or KVM switch via the 2-in-1 VGA cable
LAN
for connecting to a CAT5 cable
Package Contents
1 x KVM Extender-Receiver
1 x CD (QSG)
1 x DC12V/1A AC to DC Power Adapter
1 x Desiccant
CAT5 Extender Receiver
ZET101-RU21 /ZET101-RU22
LEDs / Button / Ports
Hardware Connections
Refer to the diagram below to connect the Receiver to the Transmitter Module. It is recommended to
power off all the computers and server before the installation.
1. Connect the Transmitter Module and Receiver with a Cat 5 cable (not included in the package).
The cable can be up to 150 meters (500 feet, ZET101-RU21) or 300 meters (1000feet,
ZET101-RU22) long.
2. Connect the local console device (keyboard, monitor and mouse) to the Console ports on the
rear panel of the Receiver.
3. Plug the power adapter into an AC outlet and plug the adapter's power cable into the Receiver’s
Power jack.
Command
Function
F1
To show Help OSD window (ZET101-RU22 only)
F2
To select hotkey type (ZET101-RU22 only)
C
To switch between REMOTE (Transmitter) and LOCAL (Receiver) site
Q
To turn the beep sound on or off
S
To activate the Auto-Scan function. Auto-scan Remote and Local port every 8 seconds.
A
For auto-adjust video signal of remote port to optimum
U
To turn the password function on or off (default is on)
S E C U R I T Y
U S E R N A M E
P A S S W O R D
= + +
Caps
Lock
Caps
Lock
C
Switch between Local and Remote Site
Keyboard Hotkey Commands
You can switch the Receiver between “PC/KVM” port and “LAN” port through simple key sequences.
To send commands to the Receiver, you must press the hotkey (default is Caps Lock) twice within 2
seconds.
Example:
OSD Operations (ZET101-RU22 Only)
To login to the OSD, please enter the user name and password.
Login User Name: 00000000
Login Password: 00000000
Troubleshooting
1. Receiver Box’s LED is not ON.
Make sure the computer connected to Receiver Box is power on.
Make sure the cable connected to Receiver Box is well seated.
2. No video signal is displayed on the monitor.
Make sure the power adapter is connected to the Receiver Box.
Make sure the VGA cable and CAT5 cable are properly connected to the connectors.
Make sure the VGA cable is attached to computer before the boot-up process.
3. The computer has started up, but keyboard or mouse doesn’t work.
Make sure your keyboard and mouse work fine if directly plugged into the computer.
Unplug and plug in the USB connector, wait few seconds for USB bus emulations and start-up
process to complete.
Do not press any keys on keyboard while the selected computer is booting up. Otherwise it
might cause keyboard error or keyboard is not detected by the Host side.
Try a different keyboard, but use only 101/102/104-key keyboard.
4. The hotkey I changed is not on the keyboard. How can I modify the hotkey?
Login to the OSD, press and hold mouse’s right button and press Esc key on the keyboard to
bring out the Hotkey List window. You can then re-configure the hotkey.
 Loading...