

Kuzma Stabi User Manual

S T A B I T U R N T A B L E
instruction manual
KAT d. o. o. Kuzma Audio Trade Hotemaže 17 a
4205 PREDDVOR
SLOVENIA tel. 386 4 2535450 fax 386 4 2535454

CONTENTS
I. GENERAL DESCRIPTION 3
SPECIFICATIONS 4
ACCESSORIES 4
II. UNPACKING 6
III. ASSEMBLY 7
1. Oil in Suspension Reservoirs 7
2. Oil in Bearing and Insertion of Subplatter 9
3. Belt 9
4. Platter 10
5. Connecting Power Supply Unit 12
6. Testing 13
7. Mounting of Tonearm 14
IV. ADJUSTMENT 17
1. Positioning Turntable and Power Supply 17
2. Connections 18
3. Levelling Turntable 18
4. Levelling Platter 18
5. Testing 18
6. Fine Speed Adjustment 20
V. USE OF CLAMP 22
VI. GENERAL MAINTAINANCE 23
1. Cleaning of Woodwork 23
2. Cleaning Pulley and Belt 23
3. Tightening Screws on Armboard 23
4. Check Oil in Bearing 24
VII. MINOR PROBLEMS 25
A. Immobile Subchassis 25
B. Platter does not Rotate 25
C. Noisy Belt 25
D. Cleaning of mat 25
E. Slow Start 26
F. Movement of Subchassis while Platter is Rotating 27
G. Sensitivity to Mechanical Feedback and Shock 28
VIII. TRANSPORT AND PACKING 29
_________________________________________________________________
S T A B I T U R N T A B L E 2 KUZMA

I. GENERAL DESCRIPTION
Stabi is a suspended subchassis turntable. The lid, sides and main plinth are
constructed of solid oak and the lid is topped with a sheet of smoled glass. The medite
subchassis is suspended from four springs which are damped in four oil reservoirs.
This suspension is simply adjusted by four black knobs on the top plate.
The turntable is additionally fitted with adjustable legs for levelling the plinth ending
in spiked feet which can, if desired, be covered with the protective cups also supplied.
The shaft is highly polished and is supported in the bearing at five points ensuring no
movement, low constant friction and minimum vibration. The shaft is fixed in the
supplatter which is turned by a belt.
The motor is fixed on a metal plate, decoupled from the turntable via rubber inserts.
The platter is of painted aluminium and weighs 3 Kg and has a rubber ring inserted
for extra damping. The turntable also comes equipped with a mat and a record clamp.
Stabi has its own optional power supply which enables the motor to rotate with the
minimum of vibration and constant torque. It is quartz controlled, split phase with
internal + 0.4 % speed adjustment. The siglas is amplified by two 20 W amplifiers.
Each Stabi turntable is individually built and tested and made of the best available
materials to ensure it gives the highest possible standard of musical performance. We
wish you many happy and trouble free listening years.
_________________________________________________________________
S T A B I T U R N T A B L E 3 KUZMA

SPECIFICATIONS
Mass 21 Kg
External Dimensions (Lid Closed) 510 mm x 411 mm x 200 mm
(Lid Open) 510 mm x 500 mm x 500 mm
Weight of platter and subplatter 4 Kg
Resonance of subchassis 3.5 Hz
Speeds 33 rpm and 45 rpm
Mat special rubber & textile compound
Motor 24 pole synchronous
110 v, 50 Hz
Mains Supply 110 v, 220 v, 240 v - 50/60 Hz
ACCESSORIES
The following are supplied with the turntable and will be found in the accessories box.
1. Clamp with washer.
2. Alan key 5 mm for tonearm board.
3. Alan key 2.5 mm for fixing legs.
4. One small plastic bottle with oil for bearing.
5. One large plastic bottle with oil for suspension reservoirs Silicon
Oil 5000.
6. Belt.
_________________________________________________________________
S T A B I T U R N T A B L E 4 KUZMA
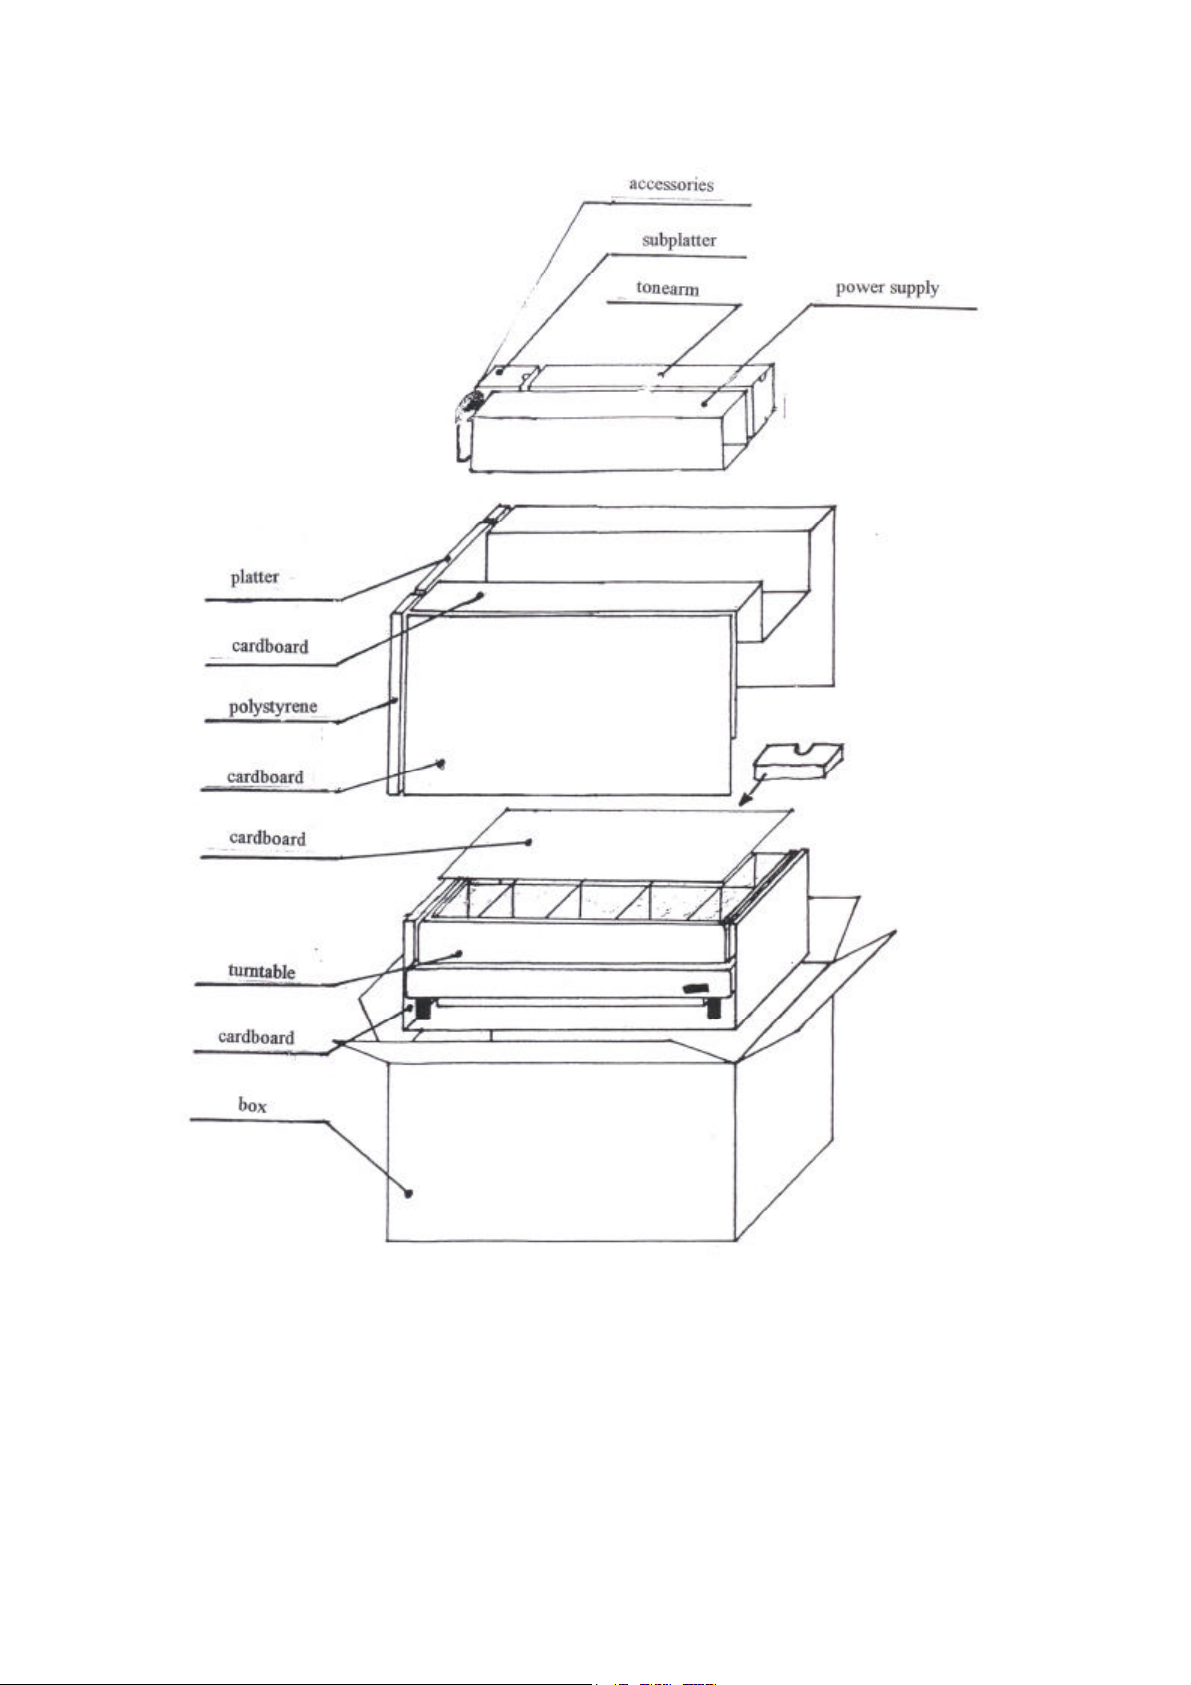
Fig.1
_________________________________________________________________
S T A B I T U R N T A B L E 5 KUZMA
II. UNPACKING
(Fig. 1)
1. Remove box on top containing tonearm*, power supply*, subplatter and
accessories.
2. Lift and remove shaped cardboard layer.
3. Remove glass protection cardboard layer.4. At side remove polystyrene inserts and
remove platter in box.
5. Remove internal u shaped cardboard containing turntable.
6. Open lid and remove cardboard cross.
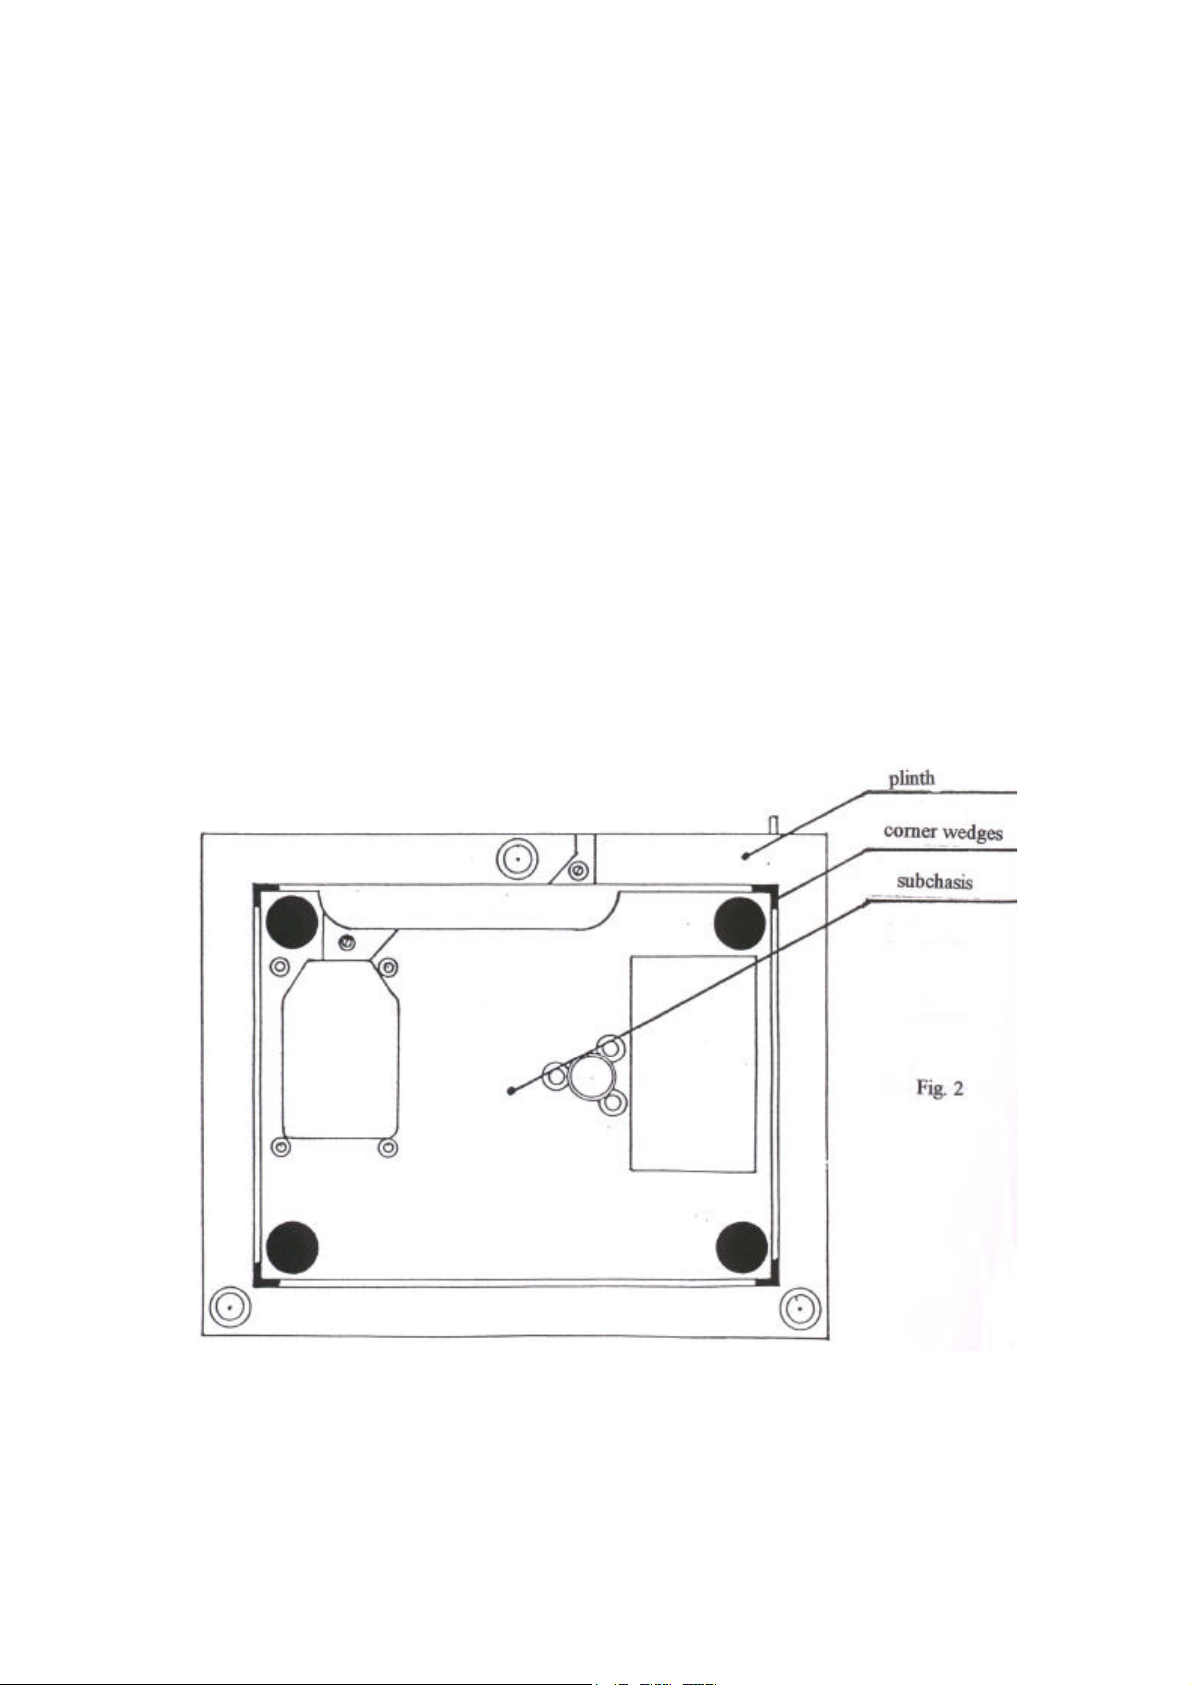
7. On the underside of turntable between subchassis and plinth are four cardboard
corner wedges which should be removed by pulling down. (Fig. 2)
8. Replace packing materials in box for possible future use.
Fig. 2
_________________________________________________________________
S T A B I T U R N T A B L E 6 KUZMA

III. ASSEMBLY
Place turntable on convenient worktable.
1. Oil in Suspension Reservoirs
You will need larger oil bottle, tissue, scissors.
a) Unscrew top of oil bottle and snip of 5 mm off nozzle.
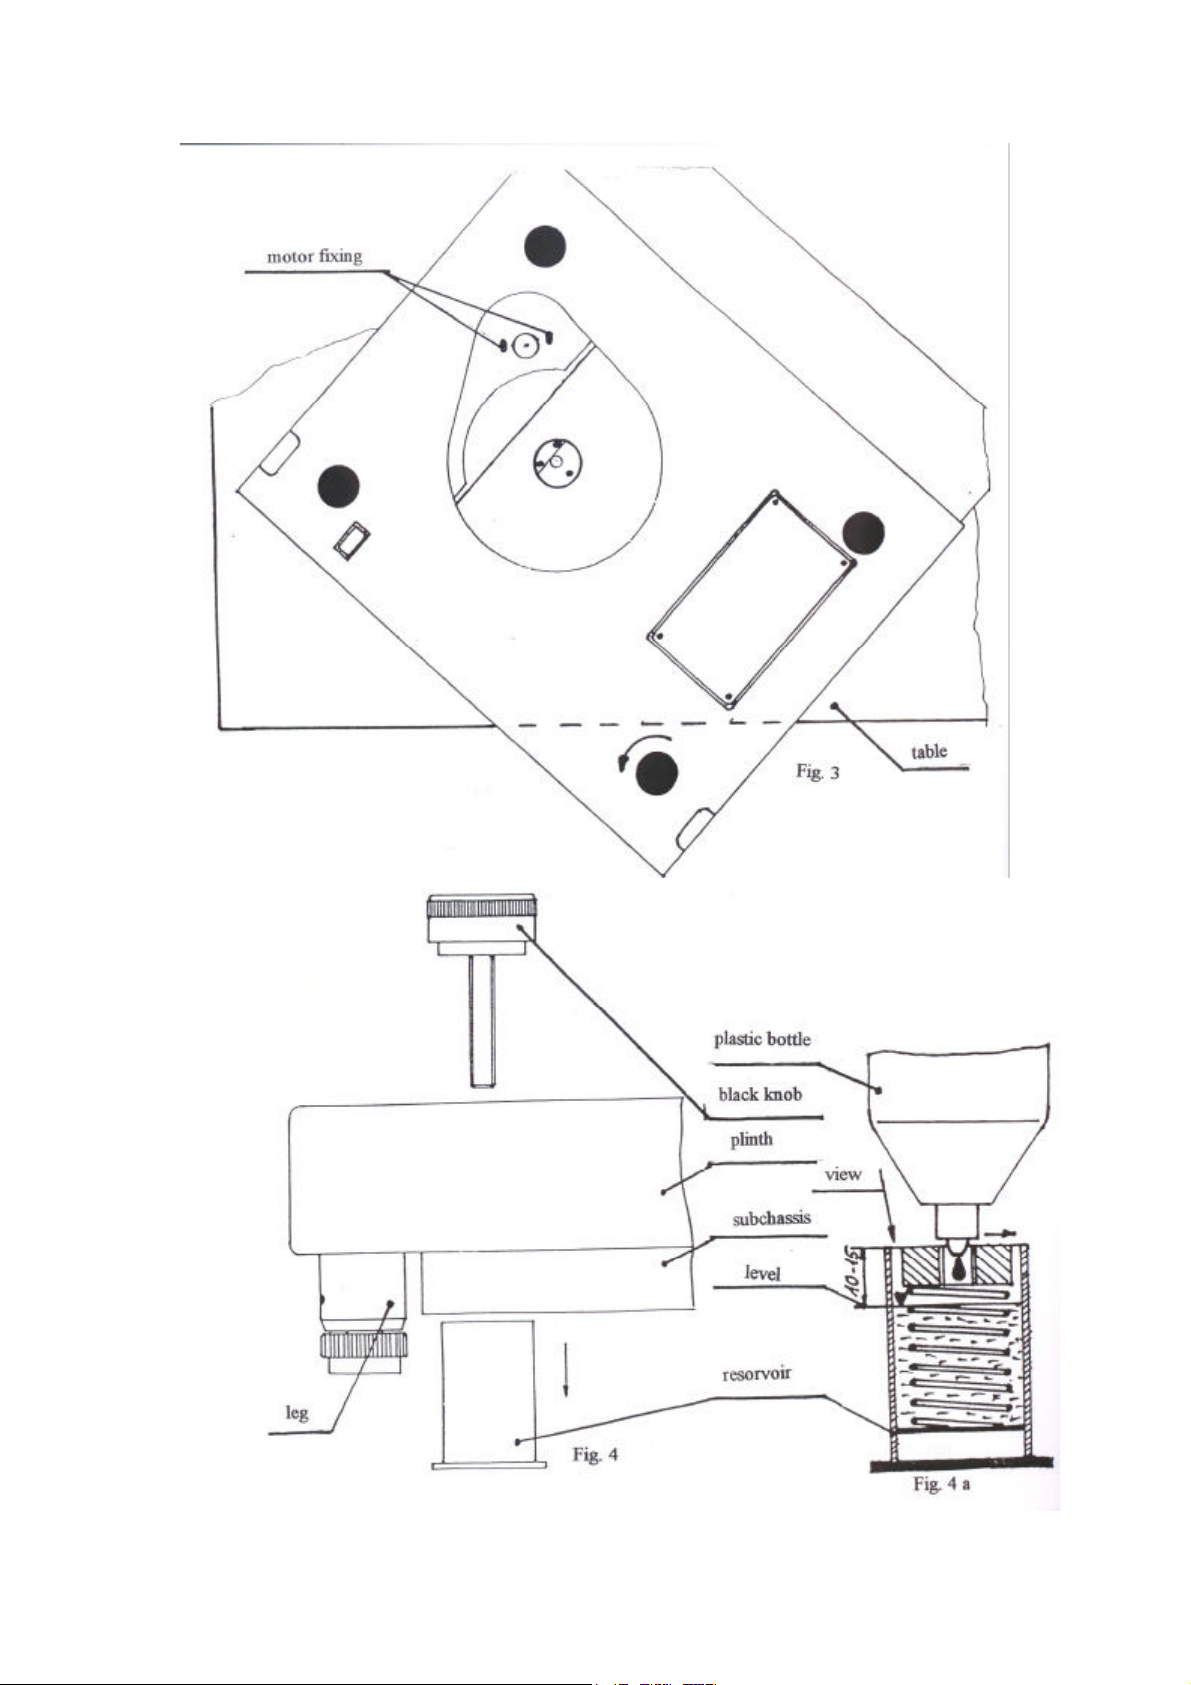
b) Position turntable so that one corner extends over edge of table. From underneath
you will see around black plate which is the bottom of reservoir (Fig. 3)
c) Open lid. With one hand unscrew black knob (anticlockwise) on turntable top that
lies immediately above reservoir, supporting reservoir with fingers to revent
turning. Continue unscrewing until knob is released and can be removed. At this
point reservoir will drop into your hand. (Fig. 4)
d) In centre of reservoir is a hole in the inner ring through which the thick silicon oil
should be slowly poured, squeezing the bottle, until surface of the oil shows
approximately 10 - 15 mm below the top edge of reservoir (ie quarter of bottle).
Allow oil to settle and check level by pushing ring sideways with nozzle of bottle
(Fig. 4a)
e) Wipe clean any spillt oil.
f) Wipe dust on top edge of surface of plinth.
g) You will notice that the inner ring is not central. It is recommended that the side
closest to the edge should be directed towards the centre of turntable. Firmly
reinsert reservoir back into the turntable from underneath and support while you
rescrew (clockwise) the black knob until reservoir is fixed.
NOTE: Knob should be tightened until slight counter pressure can be felt.
NOTE: When moving turntable to reposition, always close lid.
h) Repeat procedure for remaining three reservoirs.
NOTE: Oil used is silicon oil 5000 or oil of a similar viscosity.
_________________________________________________________________
S T A B I T U R N T A B L E 7 KUZMA
_________________________________________________________________
S T A B I T U R N T A B L E 8 KUZMA
2. Oil in Bearing and Insertion of Subplatter
a) Remove tape sealing bearing.
b) Take smaller oil bottle and squeeze 20 drops into the bearing in centre of
turntable. The insertion of the shaft will cause the oil level to rise.
c) Remove protective plastic tube from subplatter shaft. Handle carefully and
ensure no dust adheres to shaft.
NOTE: Should any dirt become attached, wipe with cotton cloth and alcohol.
d) Slowly insert flat ended shaft into bearing.
e) Rotate subplatter to ensure smooth movement.
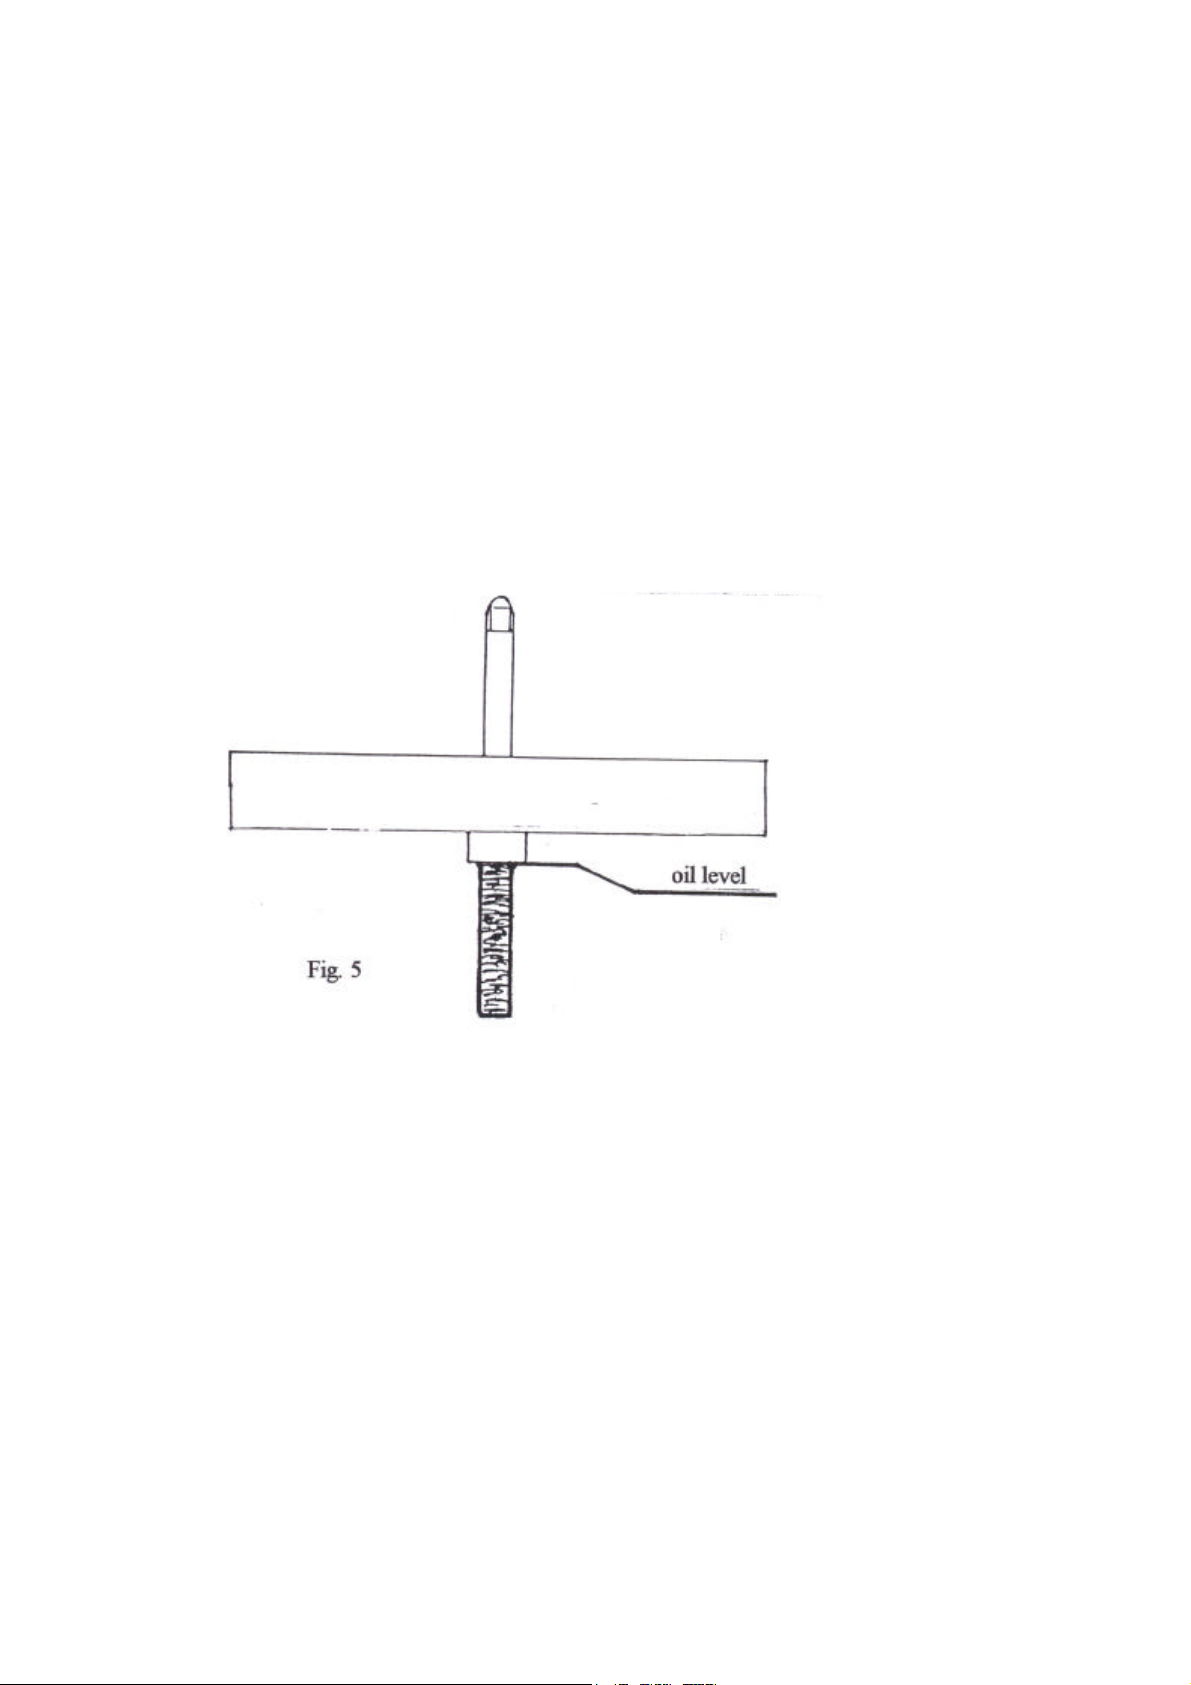
f) Lift out subplatter and check that level of oil on shaft reaches the top. If level
is lower add oil drops, approximately one drop to increase level for one mm.
Oil should bathe shaft completely. To check this see Fig. 5.
Fig. 5
NOTE: The shaft is not tight in bearing and will rock slightly if pressed.
3. Belt
This can be found with subplatter.
a) Ensure hands are clean and dry and remove belt from plastic bag.
b) Place belt around subplatter and then around top groove of motor pulley.
NOTE: Subplatter is higher than motor pulley as weight of platter has yet to be
added.
NOTE: When putting belt around subplatter it may slip and drop under subplatter.
If so it is important to check that no oil has adhered to belt and if necessary
to clean belt with cotton cloth and alcohol.
_________________________________________________________________
S T A B I T U R N T A B L E 9 KUZMA
 Loading...