

Kuzma 100401 User Manual
Instruction manual
KUZMA AIR LINE AIR BEARING TONEARM (on Stabi XL turntable)
With silver filters Serial Number: ……….
2010-4
1
KUZMA LTD
S
mall ring
INSTRUCTION MANUAL FOR AIR LINE tonearm
The Air line tonearm is a very precisely engineered piece of equipment. However the
construction is robust and requires minimal maintenance for optimal performance.
CONTENTS: Page
1.0. General description 3
2.0. Unpacking 4
3.0. Setup description 5
4.0. Air supply Setup 6-9
5.0. Tonearm Setup 10-14
5.1. Basic Setup 10
5.3. Adjustment of tracking force 10
5.4. Adjustment of tangential geometry 11-12
5.5. Fine horizontal levelling 13
5.6. Adjustment of VTA 13
5.7. Adjustment of azimuth 14
5.8. Adjustment of cueing device 14
6.0. Operation of the tonearm 14
7.0. Damping 15
8.0. Zero switch kit 16
9.0. Maintenance 16
10.0. Troubleshooting 18-19
2
1.0. General description:
Main outer box contains two inner boxes. One box contains the compressor with oil, PVC
double drain bottles and the second box contains the tonearm with all spare parts: Allen keys,
armbase, geometry protractor and PVC tubing.
Oil lubricated electric compressors, which are the quietest on the market supply the air. The
compressor has a cylinder (head) where air is compressed and then is stored in a reservoir. On
the outlet of the reservoir is an automatic sensor system which measures the pressure inside
the reservoir. When the air pressure drops below a certain level (6bar), the system
automatically starts the compressor head and fills the reservoir to a higher pressure, at which
point the system automatically switches off ( 8-8.5 bar- 2 minutes working & 2 minutes
cooling ).
On the outlet of the reservoir there is an air filter and pressure regulator, which keep the air
output pressure on the chosen level of 4.2- 4.5 bar (60 psi).
Due to compression, moisture in the air is collected in the system. This is automatically
drained by an electronic device system (timer & solenoid) and mechanically with automatic
drain systems. Water (with a little brown oil) is collected into plastic bottles from the
reservoir, filter and the automatic sensor system (three black tubes into bottles).
Silver filters are positioned separately nearby the tonearm and they dry the air further and
remove any oil mist from the compressed air. This is automatically drained into holder
stands. The compressor is equipped with a safety valve and switches off in case of
overheating. The whole system is easily maintained and simple to use.
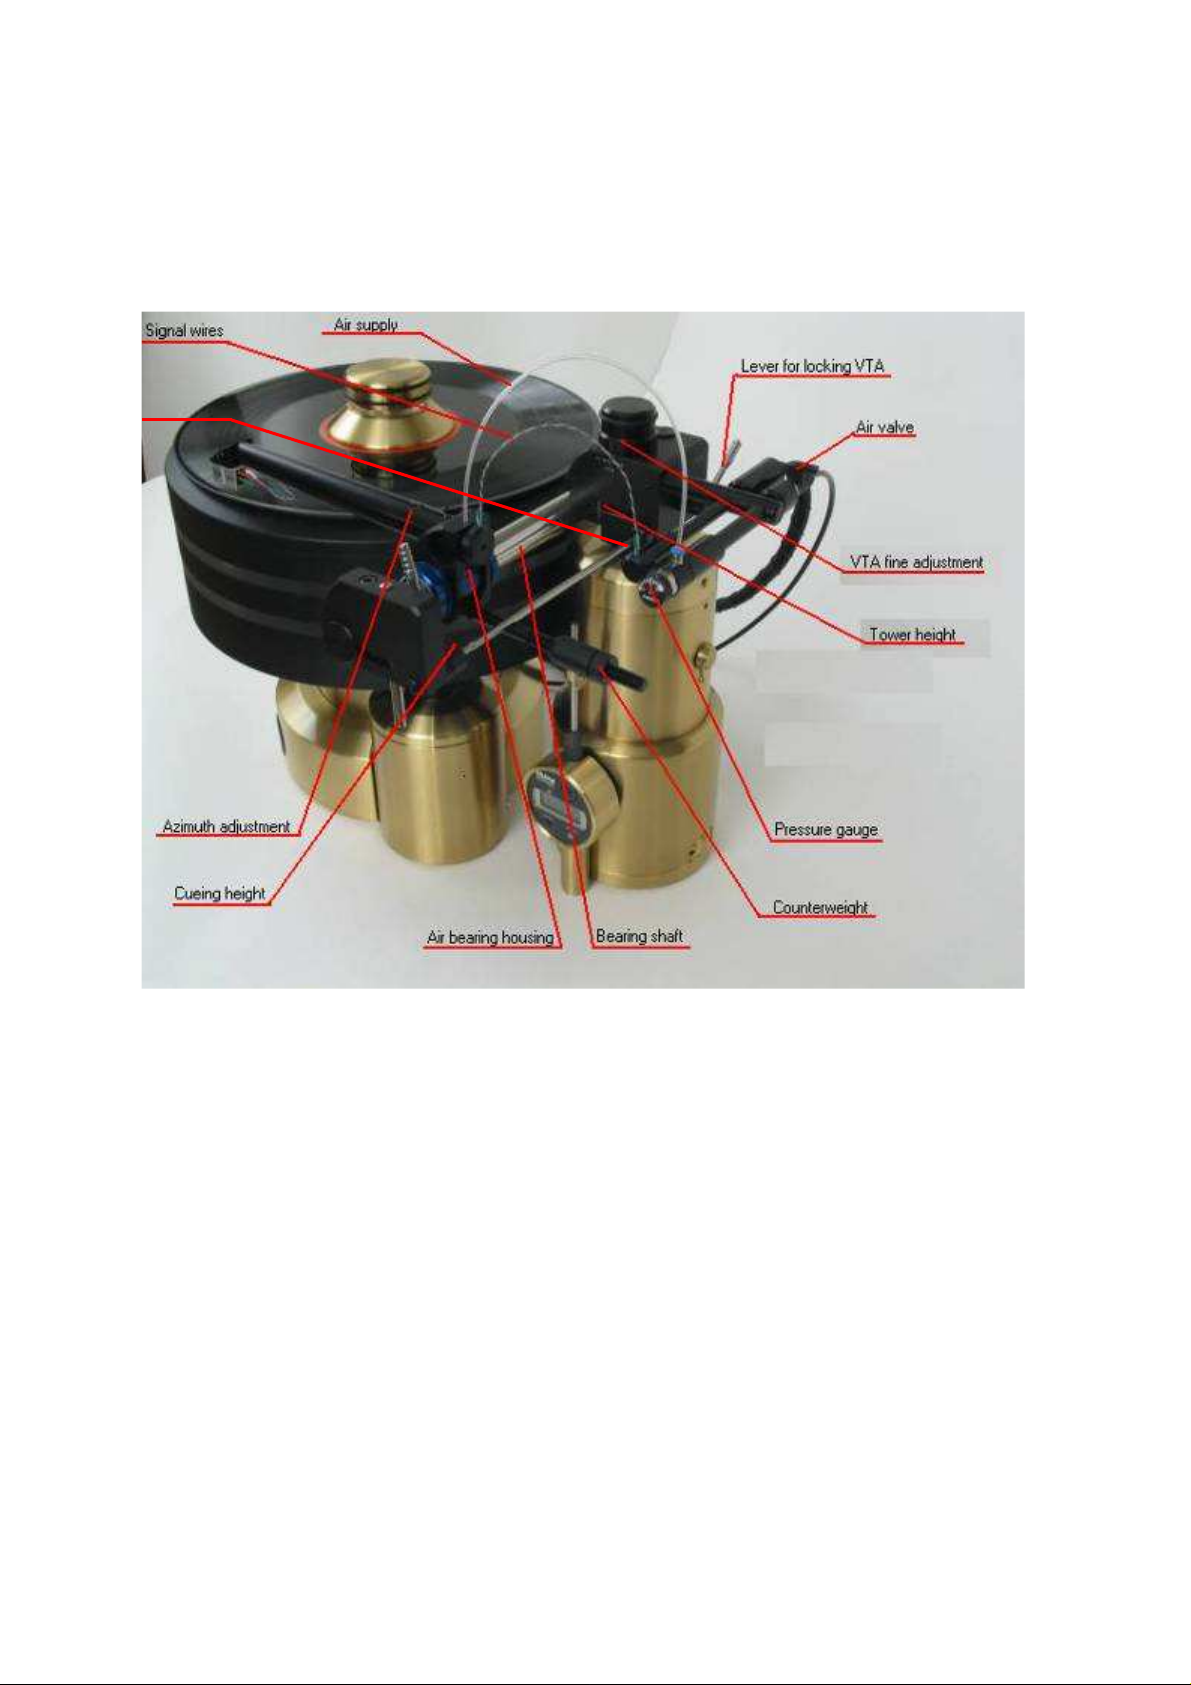
KUZMA AIR LINE-Linear tracking air bearing tonearm:
Effective length 184 mm
Fixing distance 212 mm-Kuzma cutout
Effective mass 13 gr vertical
Recommended cartridge compliance Below 25 cu
Minimum clearance below platter 30 mm
Height adjustment Yes
VTA fine adjustment 10 mm
Azimuth fine adjustment Yes
Air bearing Diameter 20mm x 50 mm
Load axial or radial 30 N (aprox 3 kg)
Air pressure 4 bar ( 60 psi )
Air consumption 4 L/min
Mass 2 Kg
Safety Precautions:
Electrical connection to the mains comes from the compressor via the cable. Please keep the
compressor away from moisture and be careful not to damage the mains cable.
Important Note:
The turntable or turntable support must be capable of very fine horizontal adjustment levelling
to give the Air Line the desired horizontal level. The correct level is achieved with the
tonearm acting itself as the most precise spirit level. See 5.5.
3
2.0. Unpacking:
Compressor with “double drain bottle system.”
2.1. Compressor box:
Open the box and lift up the compressor by the handle. It is a heavy item. Remove the plastic
bag. Inside the box is the instruction manual for the compressor, a bottle with oil, and a
plastic drainage bottle. In a small bag inside the compressor housing are the air filter and
black PVC nozzle for pouring oil into the compressor. Remove the two pieces of cardboard
wedged between compressor head and housing for transport. The compressor should not be
transported with oil inside unless you can guarantee that it will be in a vertical position at all
times. Position the compressor on a hard surface with plenty of air for ventilation!!! Do not
position it in a closed space, sun or in temperatures below freezing. The compressor will be
connected to the mains voltage.
2.2. Tonearm box:
On top of the box you will find this instruction manual. After lifting the top cover and second
layer of foam, remove the black armbase, one double silver filters with supporting stands, the
set of Allen keys and black PVC tubing. Lift filters out carefully because the filter stands are
not fixed onto the filters and they can slide down. Do not remove tonearm until you have
fixed the armbase onto the turntable.
4

3.0. Setup description:
Mount the armbase onto armboard. The dimension and position is the same as for Stogi
Do not slide the tonearm bearing unnecessarily without compressed air!
Do not tilt the compressor while it contains oil! For transport check page 15!
Do not rotate VTA knob when the lever is in the lock position!
Check working cycle of the compressor!
3.1. Tonearm:
tonearms but the main cutout hole is bigger. It is called the Kuzma cutout- that means that
central hole has 40 mm in diameter. Three screws will fix the armbase from the top through
the armboard into the black metal ring. On Stabi XL it is fixed directly on to the XL’s brass
arm base.
With the Allen key, firmly secure armbase. Position it in such way, that the hole for fixing
tonearm height (rough VTA) is easily accessible during mounting. The usual direction is
away from the platter.
Lift the tonearm from box, taking care of wires and tube loop, as well as tonearm cable.
Then fix the tonearm gently into the armbase with Allen key 2mm. The tonearm should be
rotated in such a position that the headshell is outside of the platter, i.e. as in the rest position
off the record. The height of the tonearm in the armbase should be such that the centre of the
main stainless steel bearing shaft is at the approximate height of an LP.
Unscrew the small black ring under the tonearm. It will slide down to the armbase. Fix it
gently. If you now unlock the tonearm in the armbase, this ring will hold the tonearm at the
same height but it can still be rotated horizontally. This is important when adjusting tonearm
geometry.
Check that the scale for VTA, in front of the main base, is in the middle position with the
edge in line with the thicker mark. This means that the actual VTA can be precisely adjusted
plus/minus 5 mm. If this is not the case, move the locking rod lever away from the lock
position, in a similar way to lowering a cueing device. Now by rotating the VTA knob bring
the position of the base to the middle part of the scale. Lock back gently.
3.2. Air supply description:
The compressor is factory set for working pressure. Position it in a suitable place with mains
outlet.
Position silver filters vertically on the floor or other suitable place near the tonearm. Check
the arrows for air flow, which should be from the compressor to silver filters and then to
tonearm.
Choose the shorter piece of PVC tube that runs from the tonearm to the silver filters( see
silver arrows marked F. Connect PVC tube. All connections are 'quick fit'. Simply push in the
tube at the filter and at the tonearm. It seals automatically.
When removing the tube, you must first push in the blue (or black) plastic collar and at the
same time pull out the tube. This is much easier done when there is no compressed air inside
the tube.
The longer piece of tubing connects the compressor output and silver filters input. It is a hard
but flexible tube and it can be hidden behind your skirting board. Permanent walking or
placement of furniture on top of it, however, will break it.
5
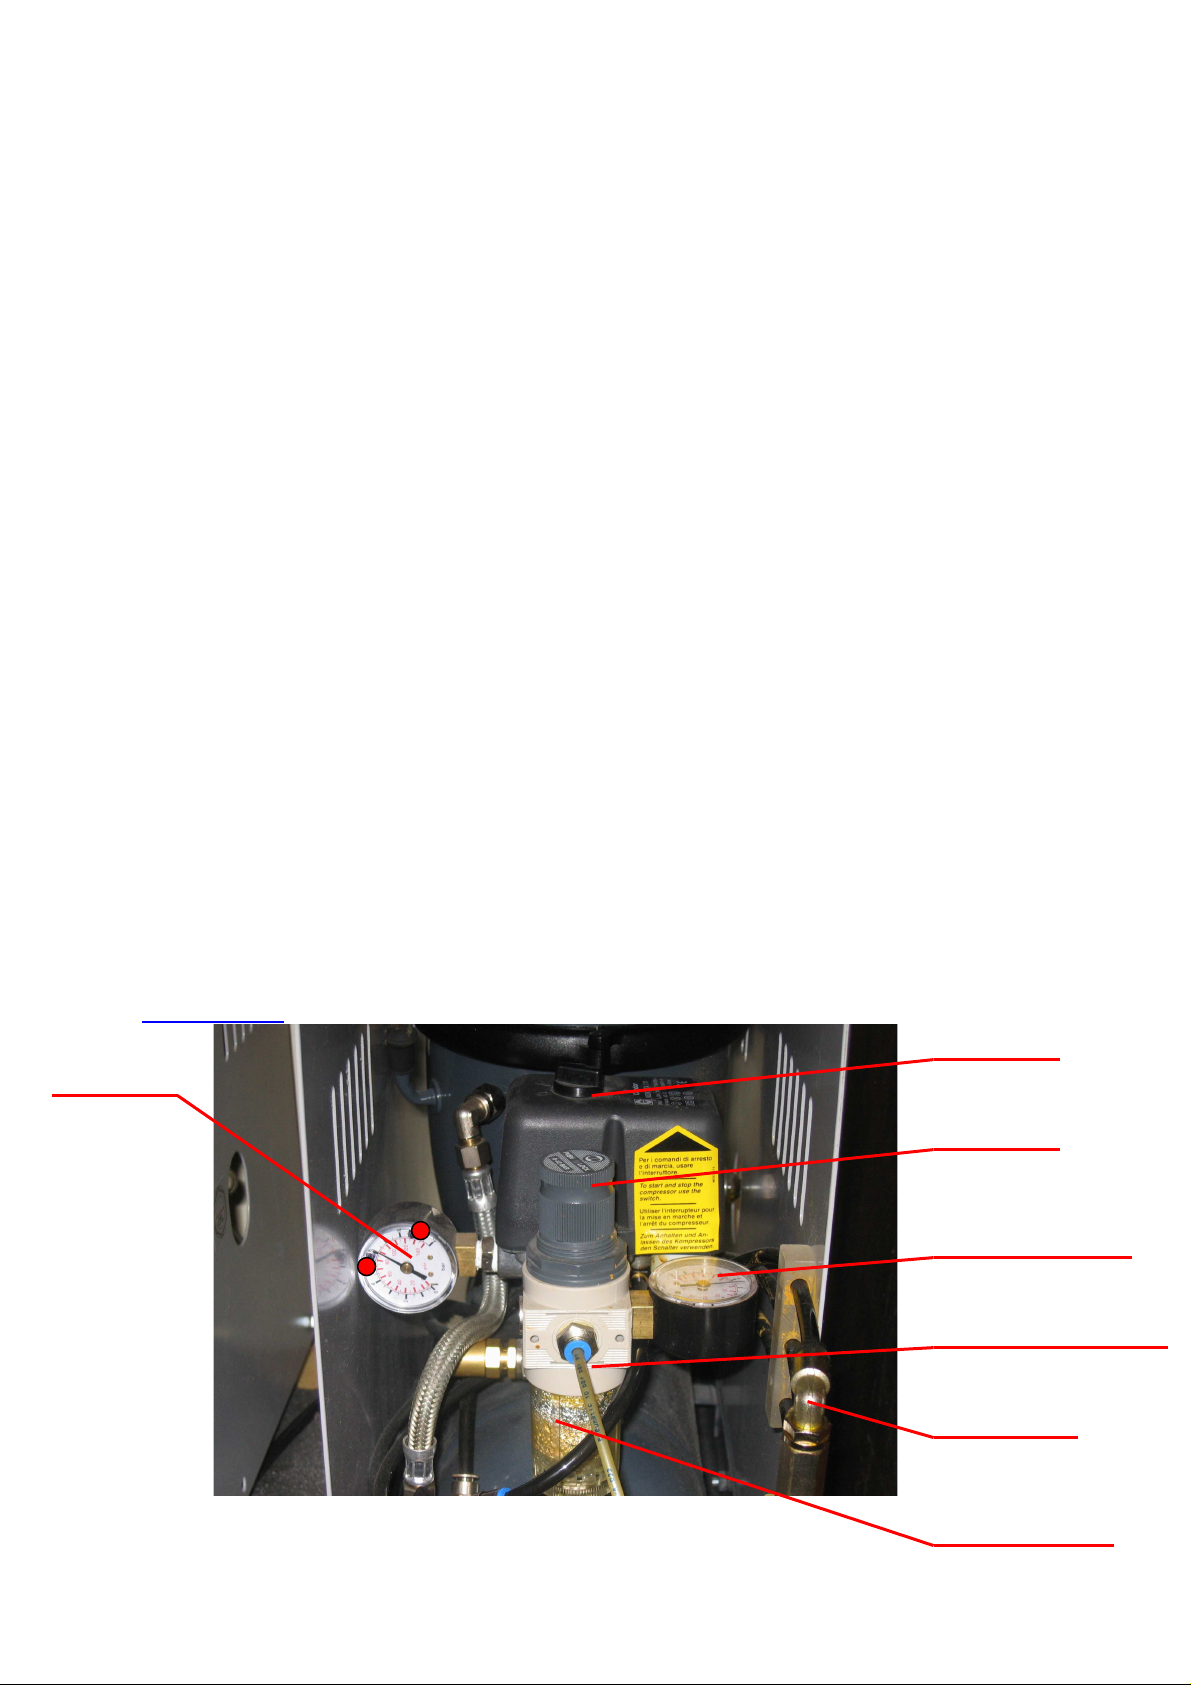
If necessary the PVC tube can be cut to length with a sharp knife. Position the tube on a hard
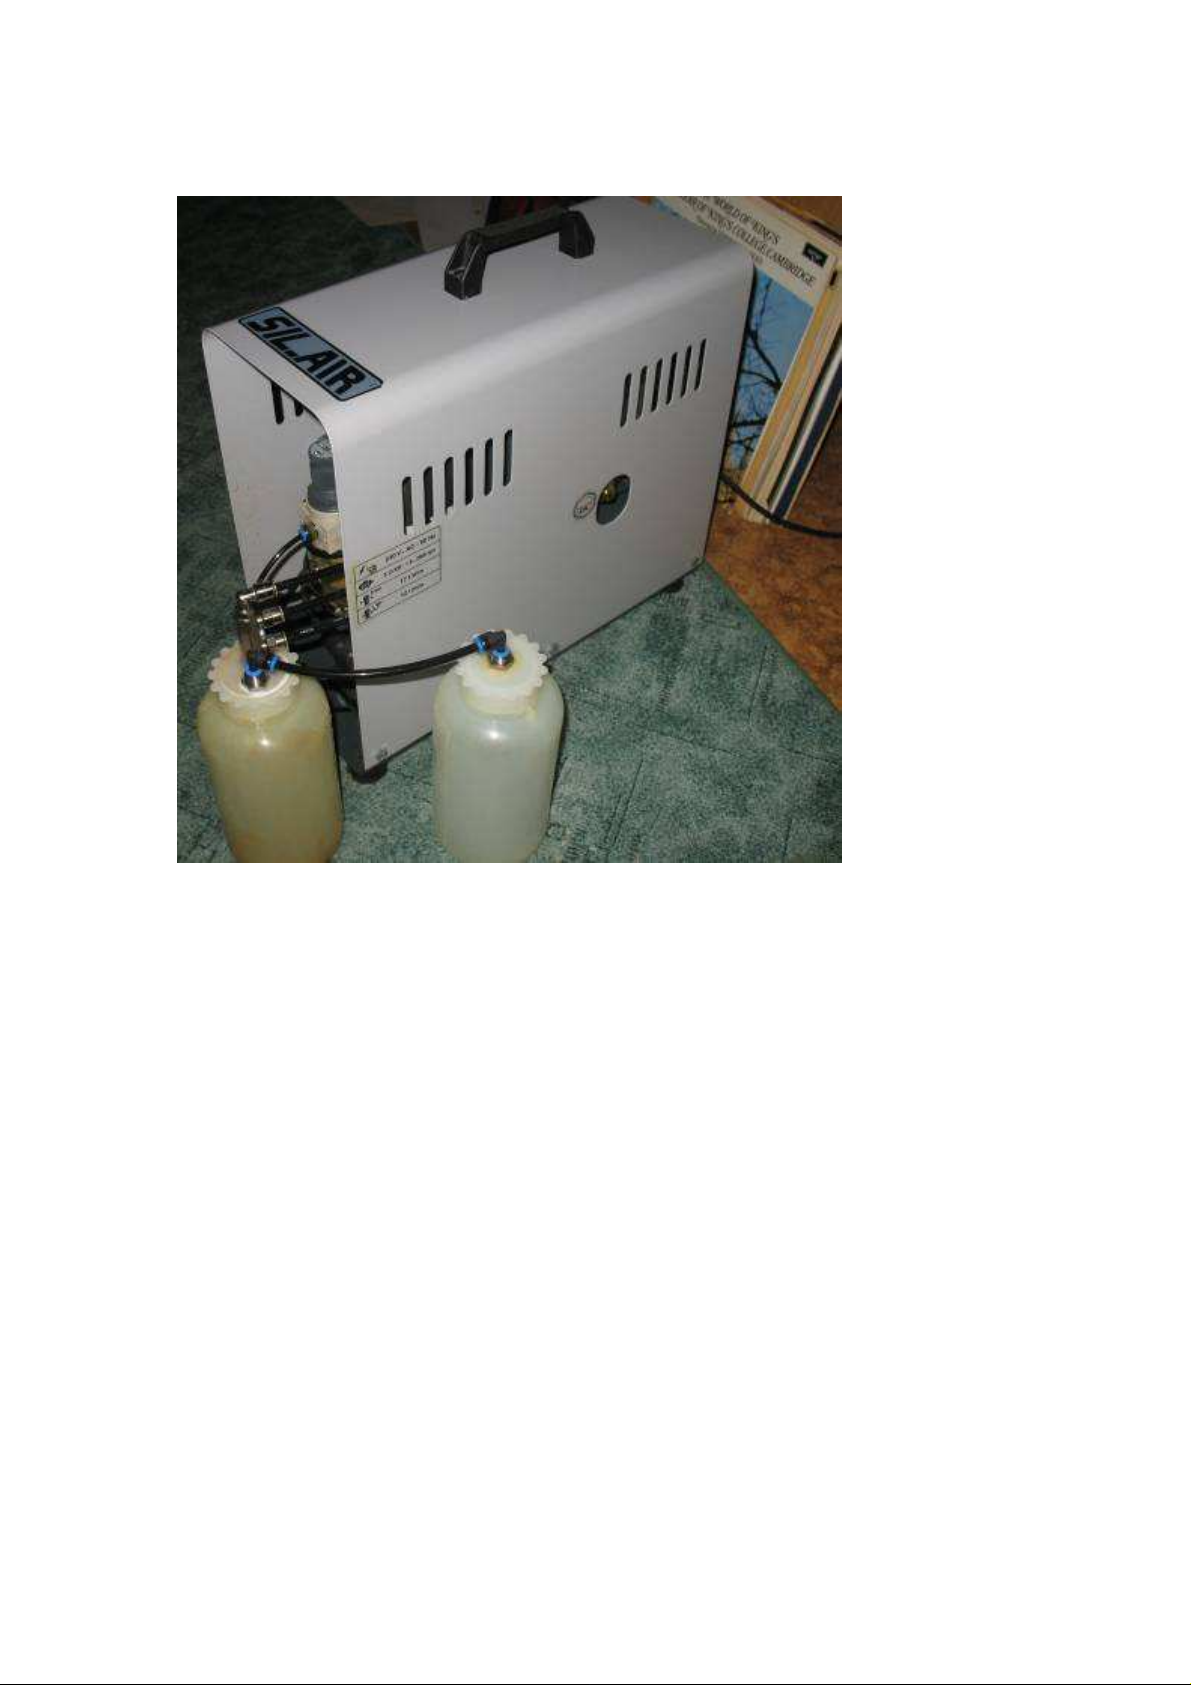
Main
s switch
Output pressure indicator
Output tube
-
quick fit conn.
Drai
n bottles
Dust & moisture
filters
surface and cut down at 90 degrees.
4.0. Air supply Setup:
4.1. Compressor:
Note: The working cycle of the compressor takes around 2 minutes building up pressure
from 6 to 8 bars and then cooling down for 2 minutes (not working). It is necessary to
monitor this cycle occasionally!
Everything is set and checked by Kuzma Ltd. The only item to be added is oil inside the
compressor and air intake filter, which must be fitted after transport.
If the compressor is in an upright position, it can be moved safely.
For more details see instructions with the compressor.
If the working cycle is longer then 4-5 minutes (heating the compressor), and stand by
(cooling) shorter then 1 minute, stop using the compressor and check maintenance, FAQ (
web) or “troubleshooting“ pages.!!!
When you first turn ON compressor it will take a bit longer time (3-5 minutes) to fill the
reservoir from zero to 8 bars. But the compressor must be connected to the air supply tube.
Note: The compressor has a safety valve and overheating protection!
Note: Do not position it in a small non ventilated space!
Note: The compressor is factory adjusted to a higher pressure (8 bar-120 psi) than quoted in
the Compressor Instruction Manual. (See label at the side of the cover!)
Note: Do not switch on the compressor before filling with oil and connecting the air intake
filter. Also insure that all air supply tubes are connected.
Note: Oil should last for at least 5 years of normal use and should be replaced when it is
very dark - almost black in colour.
Note: Check water condensation occasionally, 1-3 months approx.
If you have any questions, check our web site for FAQ or just drop us an E mail:
kuzma@s5.net
Compressor pressure
indicator-reservoir
Compressor - front view
Pressure regulator
6
 Loading...