

Page 1
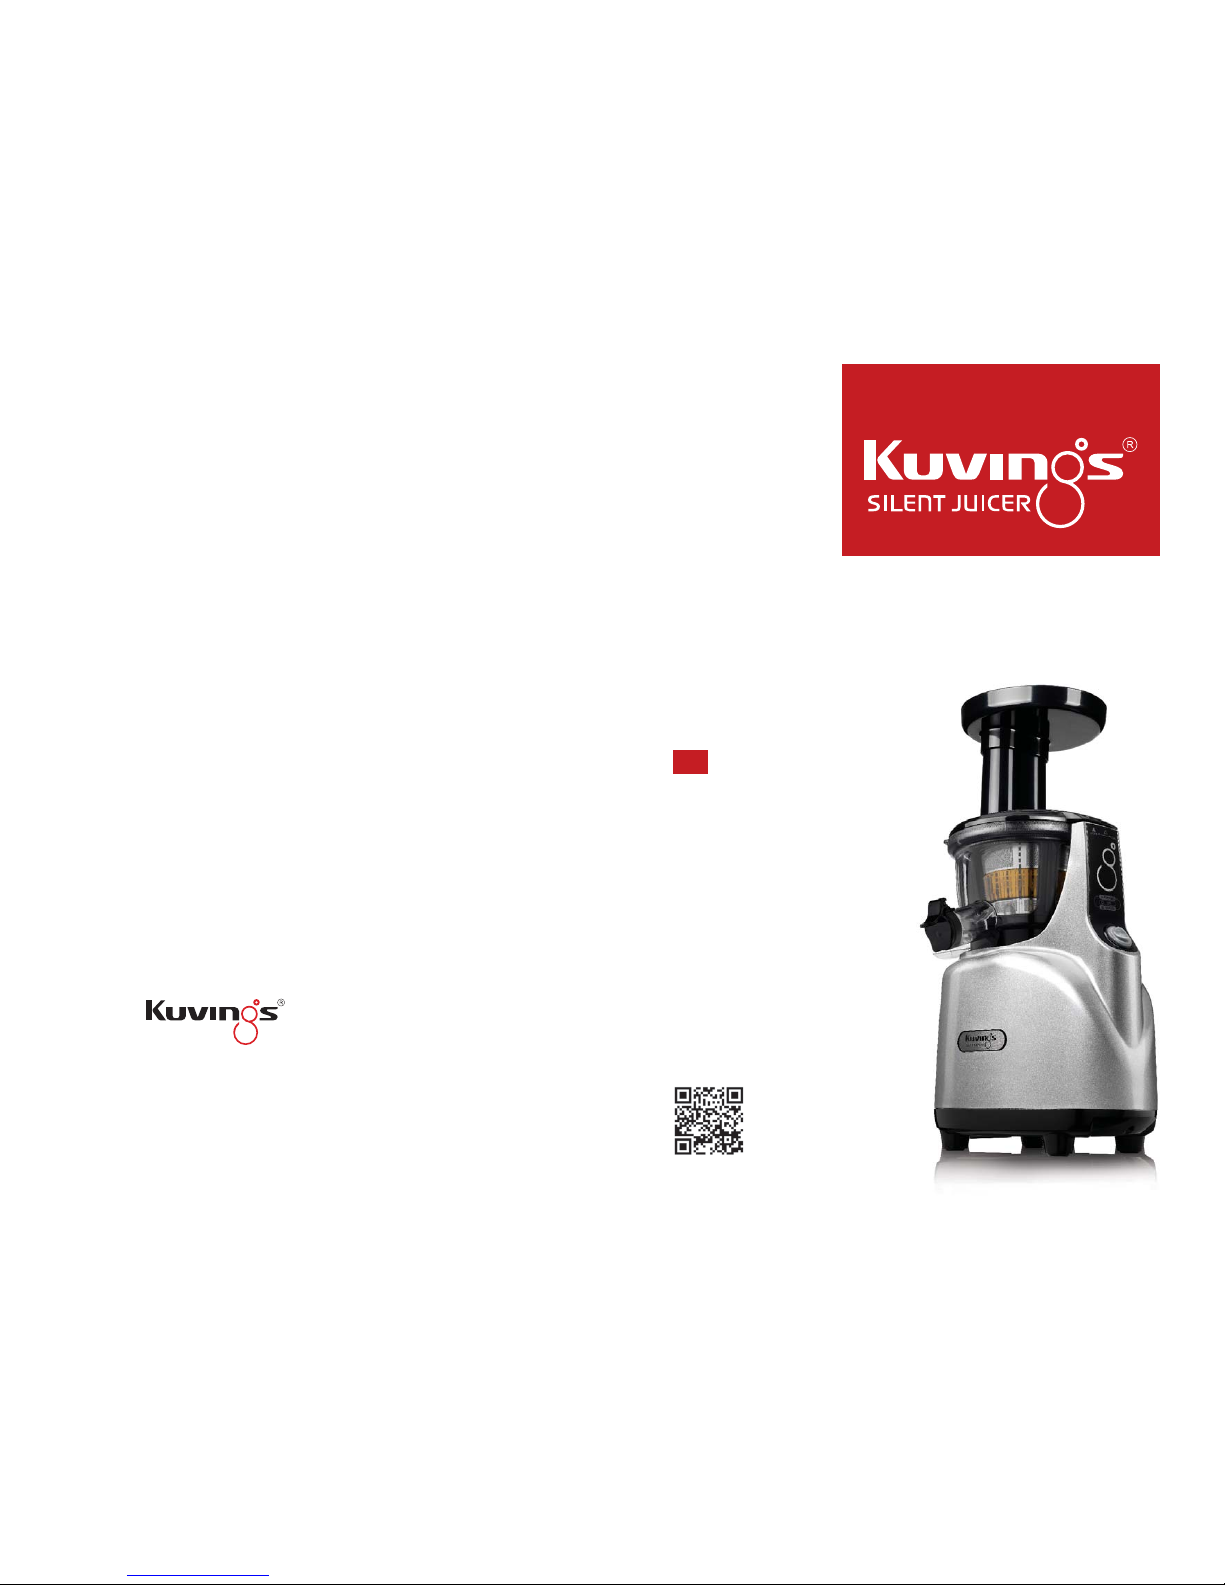
'LIFE TASTES GOOD'
A GLOBAL COMPANY
Before returning product
to store please contact customer
support for any questions or assistan ce.
Web: www.kuvings.com
Toll Free: (888) 682-5559
© Kuvings® 2013
M1
MANUAL
KUVINGS
•
After you read this manual,
keep in the place you can reach easily.
•
The color of product may vary.
•
Household use only.
Page 2

3
Important Safeguards
Safety Warning
Part s
How to Assemble
How to Operate
Tips on Operation
Tips on Ingredient
Ingredients Preparation
How to Disassemble and Clean
How to Clean Silicone Parts
How to Use the Cleaning Tool
Troubleshooting Q&A
Speci cations
04
05
06
08
10
12
13
14
16
18
19
20
22
CONTENTS
Read all Instructions Before Use
EN
Page 3
5
4
• This appliance is for household use onl y. Please follow the ins tructions in the manual carefully.
(The appliance cannot be covered unde r the manufacturer’s warranty if the product is used in a
way not intended by the manufacturer o r comm ercially.)
• Save the instruction manual for future reference.
• If the appliance is given as a gift, pleas e include the manual with the product.
The following precautions are prov ided to ensure the safety of the user. Please carefully read
through the precautions and exercise care when usin g the appliance.
Warning: This label warns of the risk of death or severe injuries.
Caution: This label warns of the risk of injuries or appliance damage.
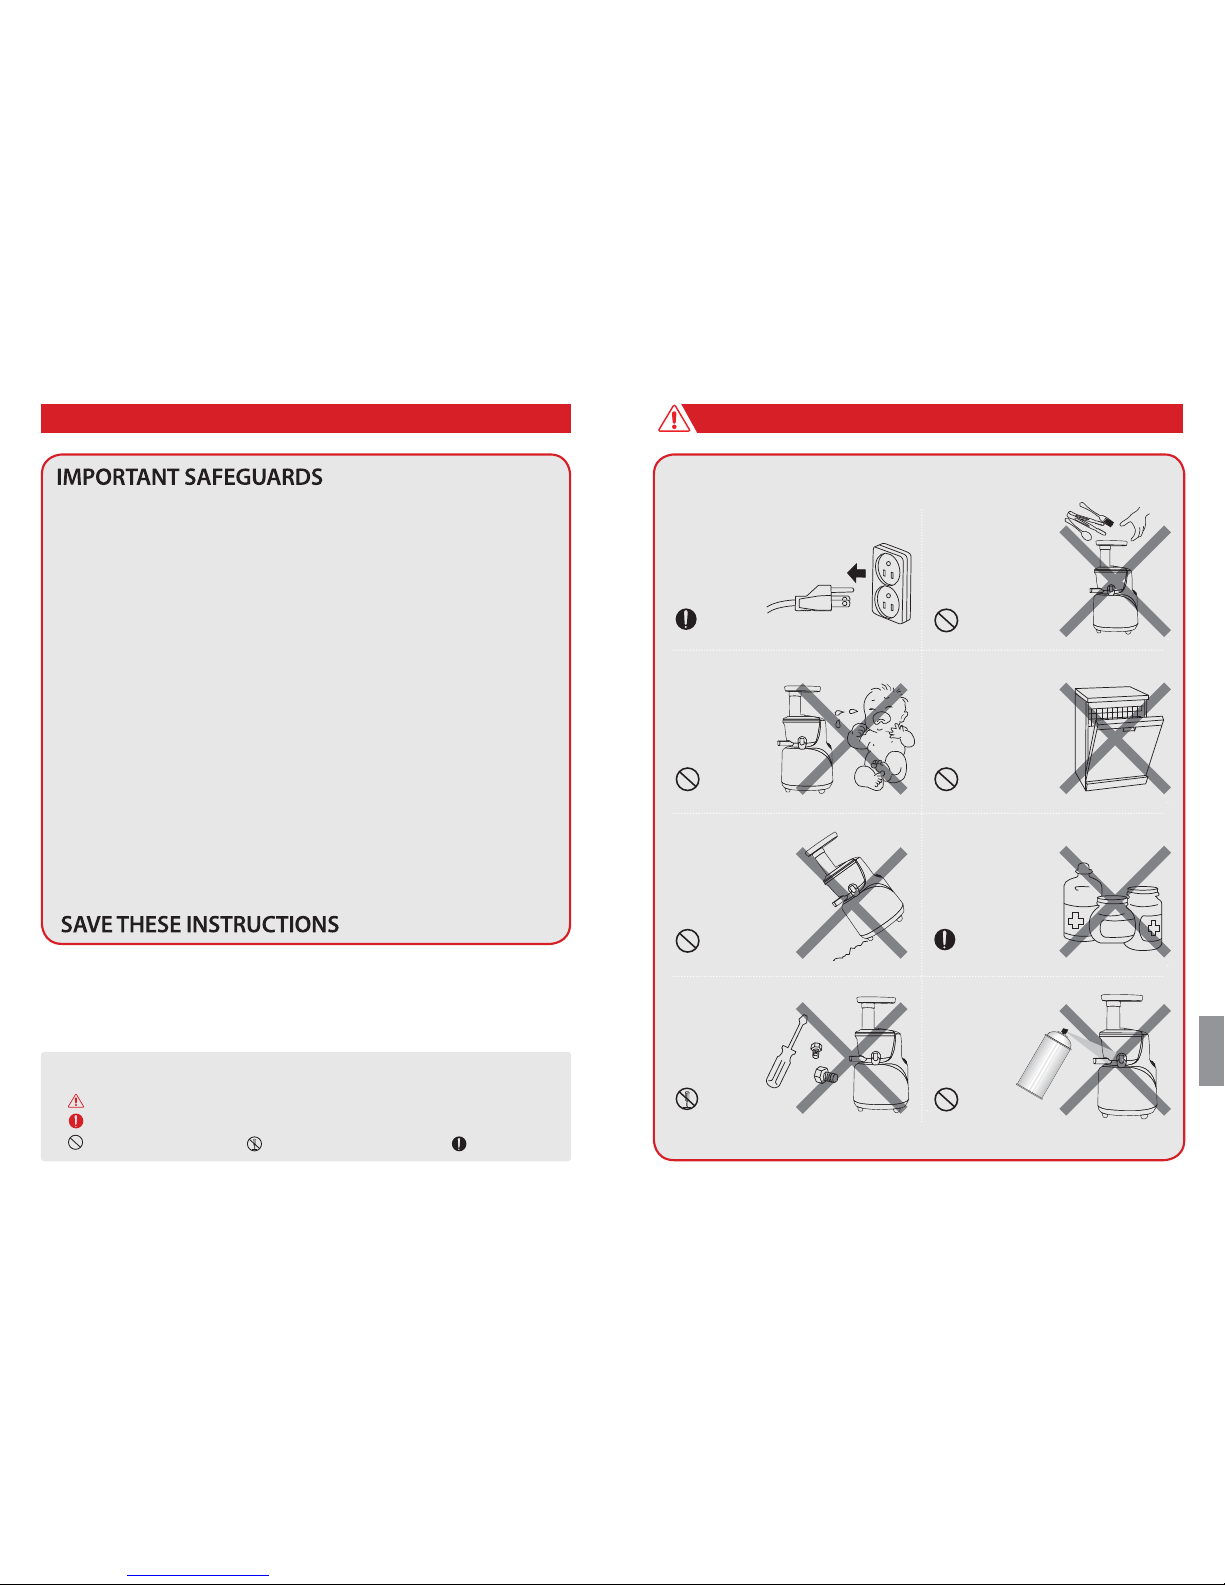
Prohibited
Do not disass emble Must take ac tion
IMPORTANT SAFEGARDS SAFETY WARNING
Do not use any
hazardous chemicals
to clean the appliance;
* It may change the
color of the appliance
or result in a re.
Do not repair, disassemble
the base, or customize
the appliance;
* The appliance may
not operate properly
causing re, electric
shock, or injury.
Do not use the appliance on
an uneven surface;
* It may cause a
malfunction if the
appliance tips over.
Do not keep or
operate the appliance
near infants or
toddlers;
*It may injure them.
Do not spray water or
ammable sprays near
the appliance;
* It may cause
an explosion or
electrical shock.
Unplug the power
cord when not in use.
Do not put the juicer
parts in the dishwasher
or extremely hot water ;
*The parts may wear
faster.
Do not put ngers or
other objects in to the
feeding tube while it is
in operation;
*It may cause injury.
When using electrical app liances, basic safety precautions should always be followed
1. Read all instructions.
2. To protect against risk of electrical sho ck do not put motor base in water or other liquid.
3. Close supervision is ne cessary when any appliance is used by or near children.
4. Unplug from outlet when not in us e before putting on or taking o par ts and before cleaning.
5. Avoid contacting moving parts.
6. Do not operate any appliance with a damaged cord o r plug or after the appliance malfunctions
or damaged in any manner. Return appliance to the customer suppor t for examination and/or
repair.
7. The use of attachments n ot recommended or sold by the manufacturer may cause re, electric
shock or injury.
8. Do not use outdoors.
9. Do not let cord hang over edge of t able or counter.
10. Always make sure drum lid is closed securely in place bef ore motor is turned on. Do not open the
drum lid while juicer is in operation.
11. Be sure to turn switch to OFF position after ea ch use of your juicer. Make sure the m otor stops
completely before disassembling.
12. Do not put ngers or othe r objects into the feeding tube during operatio n. If food becomes
lodged, use pusher or anoth er piece of fruit or vegetable to push it down. When this meth od does
not work, turn the motor o and disassemble juicer to remove the remaining food.
13. Do not use the appliance if the rotation wip er is damaged.
14. Do not operate without the p ulp cup in place.
15. Do not alter or modify the ap pliance in anyway.
16. Do not use the appliance for anything oth er than its intended purpose as described in the manual.
17. The appliance should be used for limite d period of time.
EN
Page 4

7
6
PAR TS
2. Drum Lid
4. Pulp Cup
3. Juicing Bowl
6. Juice Cup
5. Smart Cap
7. Base
1. Hopper
10. Juicing Screw
9. Strainer
11. Pusher
8. Rotation Wiper
12. Cleaning Brush
Align the red dots ⷅ on each part and
assemble in the order shown. Once
assembled, turn the drum lid clock wise to
close.
STEP 1
Top-set Assembly
STEP 2
Top-set and Base Assembly
Detachable
+
+
+
+
+
* The produc ts illustrate d/photograph ed in this bookl et may vary sligh tly from the act ual product.
Place the drum lid on the juicing bowl.
Align the down arrow
ⶼ
on the drum lid
with the OPEN mark on the base and
turn to the CLOSE position.
EN
Page 5
9
88
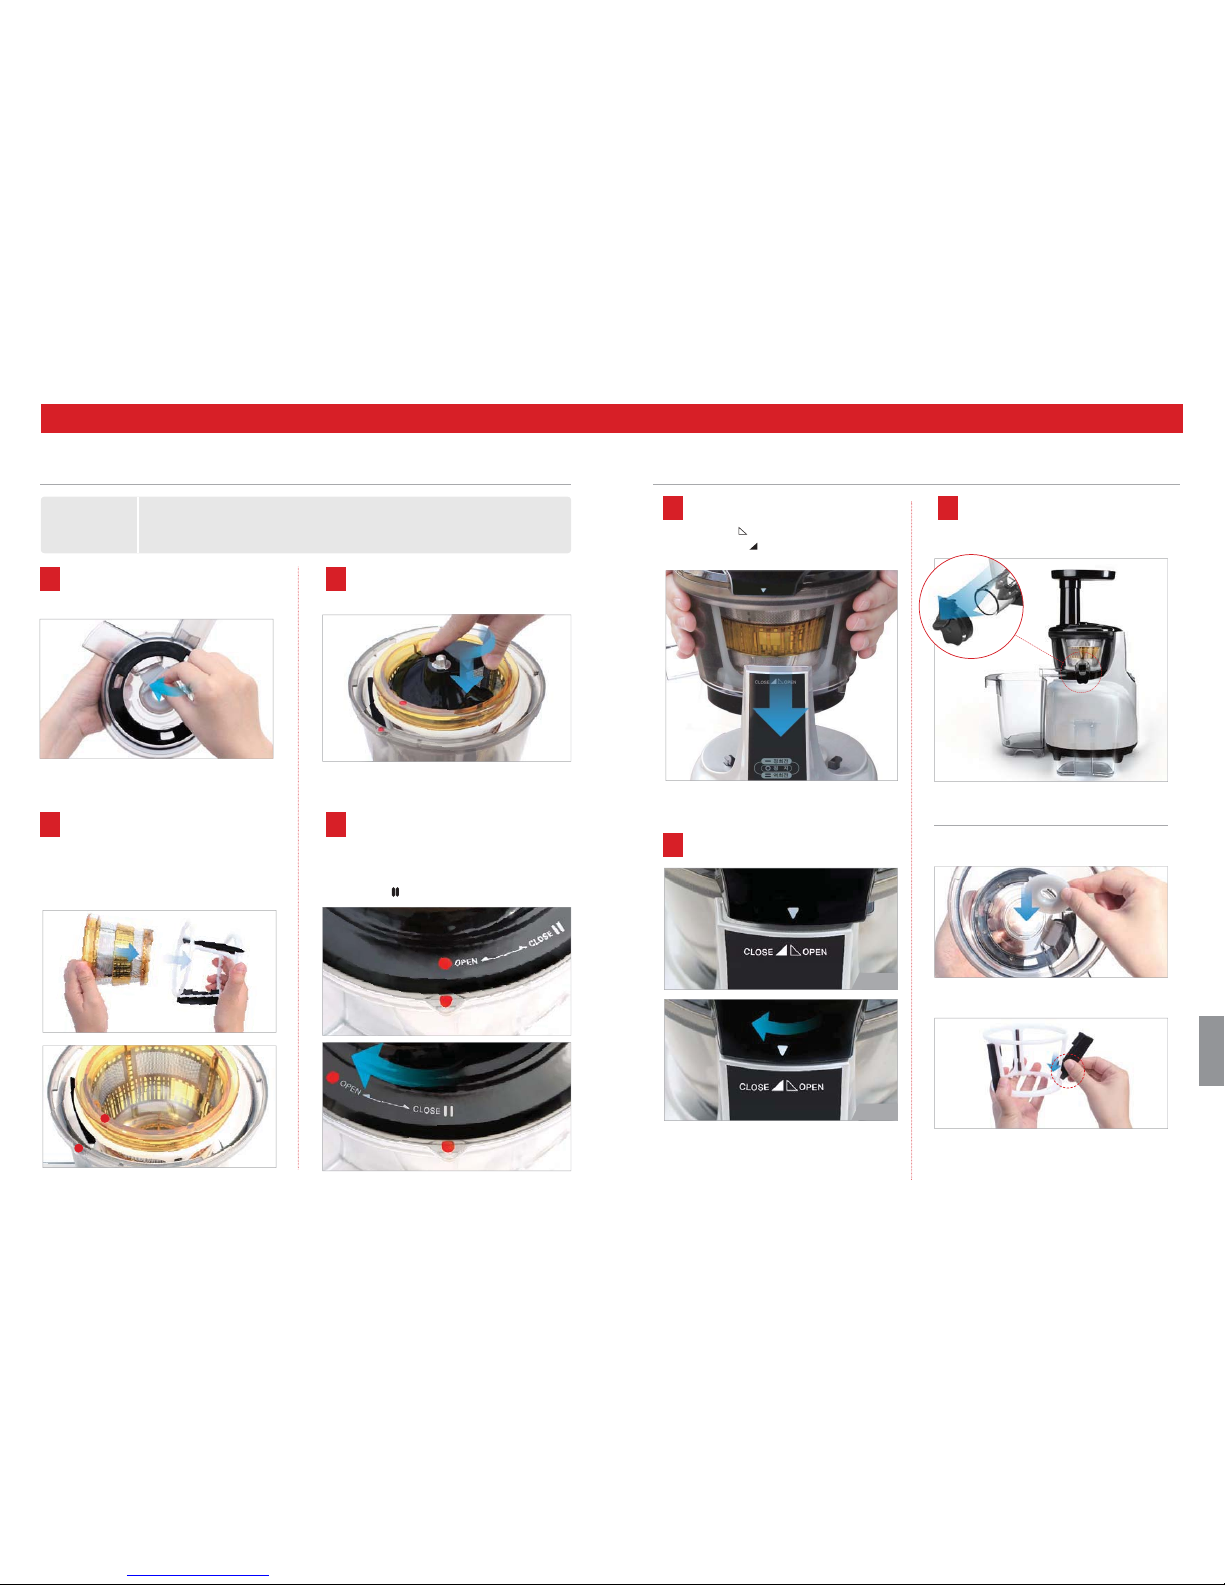
HOW TO ASSEMBLE
Firmly insert the compression silicone
into the slot below the pulp spout.
The Juicer may leak if not asse mbled
properly.
Note |
The juicing screw nee ds to be locked in
place in order to close the drum lid.
Note |
Juicer will not operate i f parts are not
assembled properly.
Note |
STEP 1
Top-set Assembly
STEP 2
Top-set and Base Assembly
Assemble the strainer into the rot ation
wiper then place this assembly in to the
juicing bowl ensuring the red dot
ⷅ
on
the strainer is aligned with the red dot
ⷅ
on the juicing bowl.
Place the juicing screw into the strainer.
Turn and press down on it until it clicks
into place.
Place the drum lid on to the juicing bowl
aligning the red dot
ⷅ
on the drum lid
with the red dot
ⷅ
on the juicing bowl.
Turn clockwise to close, aligning the red
dot
ⷅ
on the drum lid with the close
mark
.
Silicone Parts
Silicone parts are washable. Properl y
assemble after washing.
• Push in the silicone ring with the smaller
surface facing down.
• Insert into the slot with the tail p ointing
down as shown in the illustration.
Tai l
Check Before
Operating
• Wash the parts before rst use.
• Ensure that the compression silicone and silicone ring are assembled prop erly.
1
2
3
4
Place the pulp cup under the pulp spout
and place the juice cup under the juice
spout as shown in the illustration.
.
7
Detachable
Open/Close mark on the top-set.
6
Open
Close
5
Place the drum lid on the juicing bowl.
Align the down arrow
ⶼ
on the drum lid
with the OPEN mark on the base and
turn to the CLOSE position.
EN
Page 6
11
10
Use the smart cap to make mixed juices,
stop juice from dripping, or rinse between
di erent juices.
After juice and pulp are completely extracted, switch the unit OFF.
HOW TO OPERATE
After preparing the ingredients, plug the power cord into a wall outlet.
Press the FORWARD button to operate.
Insert the prepared ingredients one piece at a time.
• Do not touch the power cord with wet hands. It may cause el ectrical shock,
short-circuit, or re.
• Check the safety of the wall o utlet.
• Forward: Pulls down and slowly masticates the in gredients.
• Reverse: Pushes the ingredients back up to dislo dge them.
• Prepare ingredients for optimal extrac tion.
» Tough and brous ingredients: Cut to 1/2-1 inch wide and 2 inches long.
» Fibrous leaf y vegetables (celery, kale, etc.): Cut the stems into 2 inch pieces
and bundle up the leafy par t as you insert them into the juicer.
» Remove hard see ds or pits in fruits.
» When juicing froze n fruits, completely thaw before juicing.
• If large quantities of ingredients are put into the feeding tube, it can c ause the
juicer to stop.
• Insert the ingredients o ne piece at a time.
• If the remaining ingredients in the juicing bowl have not bee n extracted
completely, the drum lid may not open easily. After each extrac tion, run the juicer
for an additional 30 seconds to let the juicer ex tract the remaining pulp.
• When the drum lid is stuck, press th e REVERSE - OFF - FORWARD button in this
order; switching back and for th 2 or 3 times to dislodge the ingredients. Then
place hands on top of the drum lid and rmly press down while simultan eously
turning the drum lid counter clockwis e to open.
» Depen ding on the ingredients, pour water down the feeding tube to rinse ou t
the interior of the juicing bowl and then at tempt to remove the drum lid.
• Juicing with the smart cap closed creates vari ous mixed juice creations when
di erent fruits and vegetables, milk, banana, beans etc. are s elected.
• After juicing, close the smart c ap to stop the juice from dripping, especially when
disassembling the juicing bowl o the base.
• When making di erent juices quickly rinse away any leftover avors by running a
glass of water in the juicer with the smart cap closed .
• Leave the smart cap open when juicing ingredient s that create excessive foam
during extraction, (e.g. apples, celer y).
• Pay close attention when operating w ith the smart cap closed. Juice may over ow
if the juice collected in the juicing bowl excee ds its capacity marked on the bowl.
• REVERSE: Pushes the ingredients ba ck up to dislodge them.
The REVERSE butto n only works while holding down the switch.
• Switch OFF ensuring that the juicer comes to a complete stop. Then press REV ERSE.
Hold the REVERSE but ton for 2-3 seconds and release. Repeat as needed. Let the
juicer stop completely before using the RE VERSE button to prevent malfunction.
• If the juicer does not work after thes e steps, disassemble and clean the parts
before operating the juicer again.
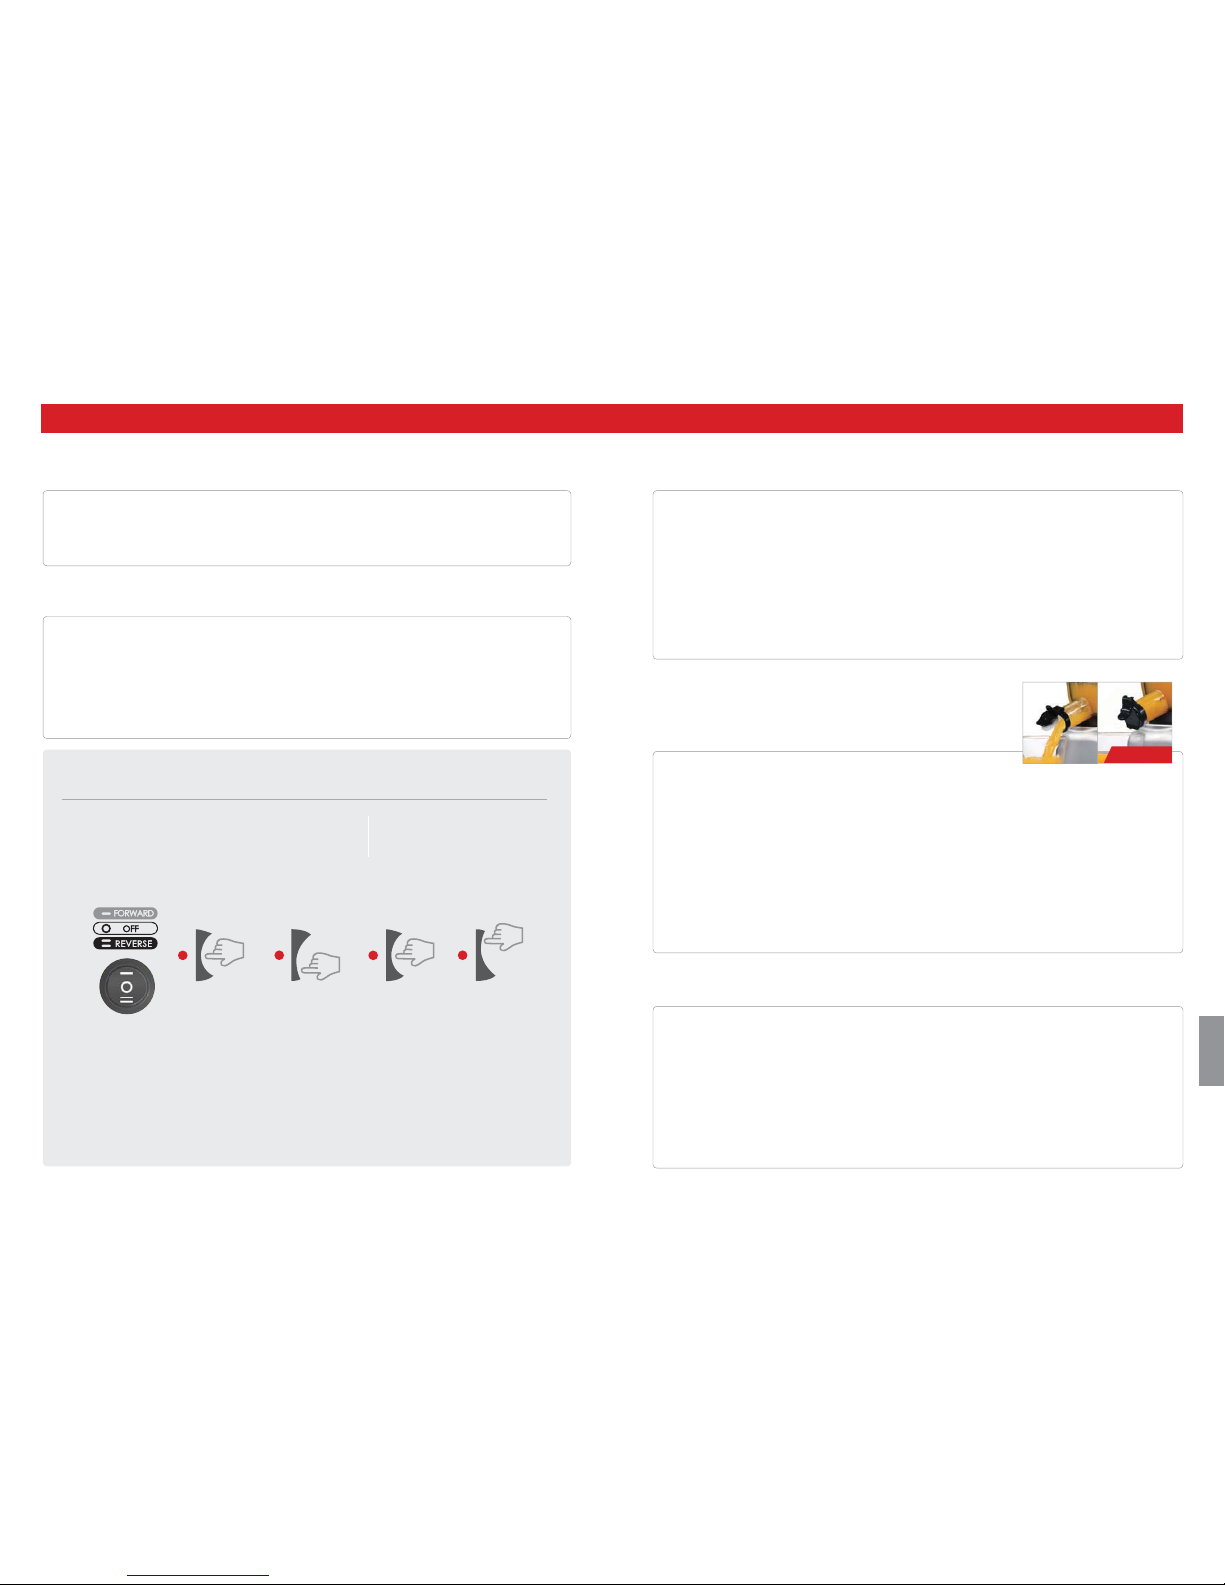
If the juicer stops during operation:
Switch the button to OFF position then press and
hold the REVERSE but ton until the ingredients
become dislodged.
Repeat REVERSE - OFF - FORWARD as nee ded.
FORWARD : Pulls down the food
OFF : Stops the operation
REVERSE : Pushes the foo d back up
ⶺⶺⶺ
4
1 3
2
OFF OFFREVERSE FORWARD
Note |
Note |
Note |
Note |
Note |
Tip |
Note |
If the ingredients become jammed in th e screw and the drum lid does not open, press the OFF
button. Then press and hol d the REVERSE button until the ingredients become dislodg ed.
Repeat REVERSE - OFF - FORWARD as often as n eeded to achieve the desired result.
Smart cap
STEP 1
STEP 3
STEP 4
STEP 5
STEP 2
EN
Page 7
13
12
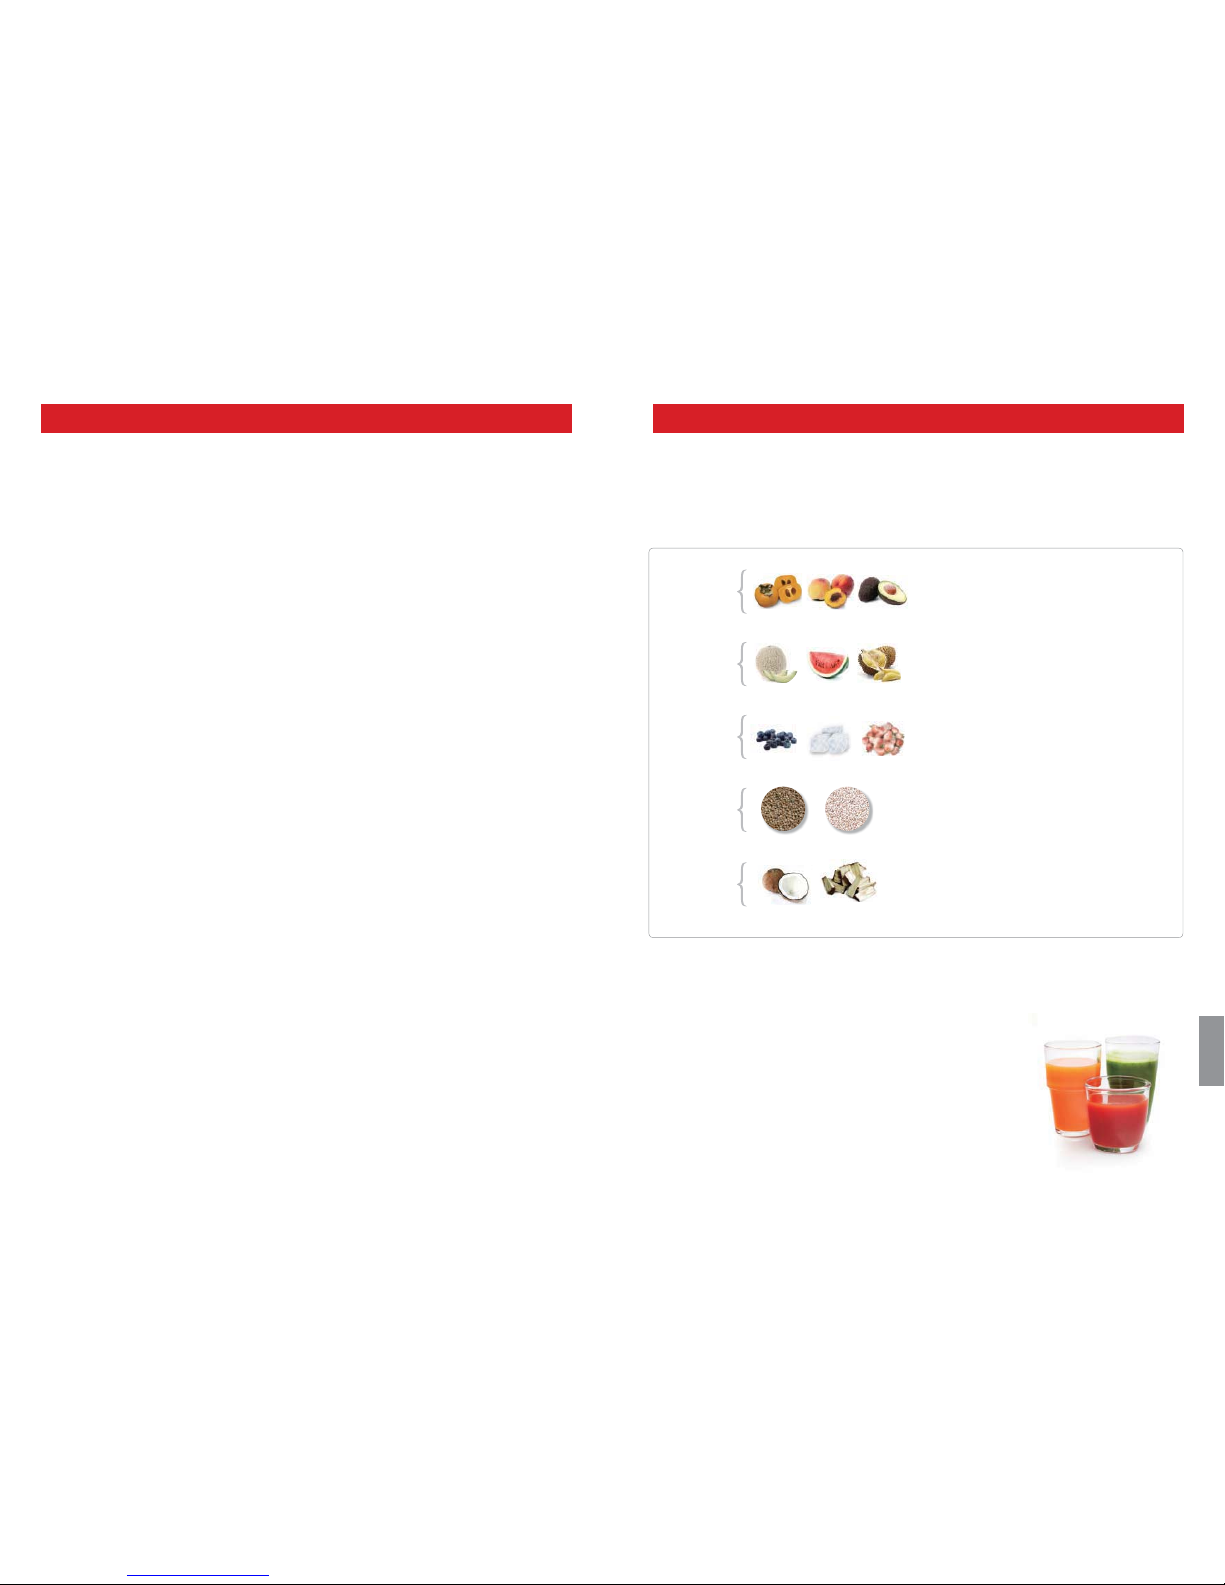
TIPS ON OPERATION TIPS ON INGREDIENTS
Peach, nectarines, apricot, plum, mango, etc.
Remove hard seeds from the ingredient s
before juicing.
Hard seeds
Pineapple, melon, mango, orange, etc.
Peel the skins from the ingredients be fore juicing.
Hard or
inedible
skins
Frozen strawberry, blueberry, raspberry, etc.
Completely thaw frozen fruits before juicing .
Do not use ice.
Frozen
fruits or ice
Sesame seed, butter, margarine, etc.
Do not extract ingre dients containing vegetable
or animal oil. This can reduce perfor mance and
even damage the juicer.
Vege tabl e/
animal oil
Coconut, sugarcane, whole grains, etc.
Do not extract ingre dients with no water
content.
Others
Kuvings Gentle Slow Juicer is an innovative product that uses a
patented slow-speed masticating technology to e ciently extract the
juice from ingredients. The juicer is designed to obtain the best result
from ingredients with rm composition and with high water content.
For best result, each ingredient should be prepared and extracted
depending on its characteristics and properties.
Experience the best quality juice by understanding each ingredient’s characteristics
and knowing the optimal way of handling the ingredients.
1. Operating the juicer without ingredients can cause damage to the screw.
2. Do not continuously operate the juicer for more than 30 minutes.
This can damage the motor from overheating .
After continuous use, let the juicer rest fo r 30 minutes to coo l down before starting another
session.
3. Do not put ngers or other objects into the feeding tube. Always use provided
pusher when needed.
If other objects are inser ted into the feeding tube during operation, such materials can ge t stuck
and damage the juicer parts and/or cause injury.
4. Do not put dried or hard ingredients like whole grains, fruits with hard seeds or ice
into the juicer.
These may damage the juicer parts (e.g. juicing bowl, juicing screw, and strainer).
• Beans or grains can be used if soaked over night or boiled.
• Fruits with pits and hard seeds (e.g. nectarines, p eaches, mangoes and cherries) must be pitted
before juicing.
• When using frozen fruits with small se eds such as grapes, completely thaw before inserting
them into the juicer.
5. Do not use ingredients containing excessive amounts of vegetable oil or animal fat.
Do not use the juicer to extract vegetable oil from ingredients.
If vegetable/animal oil gets on the juicing screw, it may reduce performance and even damage
the part.
6. Do not reinsert the extracted pulp into the juicer. This can cause the juicer to stop or
cause the drum lid not to open.
7. After juicing ingredients with seeds like grapes, thoroughly clean all the crevices on
the bottom of the juicing screw.
DO NOT
put the following ingredients into the juicer:
Juicer damage due to owner negligen ce or from not following the instructions in the owner ’s manual will void
the warranty ser vice.
EN
Page 8

15
14
INGREDIENTS PREPARATION
Hard fruits and
vegetables may pu t
excess strain onto the
motor and cause it to
stall.
Soak in cold water
prior to juicing and
cut to appropriate
sizes.
To increase the juice
yield, juice fruits a nd
vegetables wit h high
water content.
PREPARATION TIPS:
• Slice the ingredients 1 inch thick or cut 1 inch wide and 2- 6 inches long.
• Soak hard ingredient like carrots and ginger in cold w ater prior to juicing.
EXTRACTION TIP:
• Slowly insert the ingredie nts one at a time.
• Pace the juicing speed ensuring each ingredient is thoroughl y extracted.
• To maximize the juice yield, juice with ingredients with high water content.
PREPARATION TIPS:
• Cut 8-12 we dges.
EXTRACTION TIP:
• Slowly insert the ingredie nts one piece at a time.
• Use the pusher to push the ingredients down the f eeding tube. (The pusher also helps prevent juice
from spraying out of the feeding tub e when extracting ingredients with high water content)
• Leave the smart cap open when juicing ingredient s that create excessive foam during extraction.
Foam can accumulate if operated with the smart c ap closed. If there is an excessive amount of foam,
use a mesh strainer to separate it from th e juice.
Fruits with seeds must be pit ted before extraction .
Cut 8-12 wedges then slowly insert the ingredients
down the feeding tube.
8-12 Wedges:
1 inch
6 inch
| (E.g. apples, oranges & tomatoes)
Before
Operating:
How to Use
the Smart
Cap:
Juice Yield:
Adjusting
the amount
of pulp in
the juice:
• Before Operating: If the juicer is jammed o r if the drum lid does not open,
press the REVERSE button and h old until it becomes dislodged.
Repeat REVERSE-OFF-FORWARD as needed.
• Continue operating the juicer until all the ingredients in the juicing b owl are
extracted. T he drum lid may not open easily if there is a lot of pulp remaining
in the juicer.
• Every ingredient yields di e rent amounts of juice.
• Juicing with the smart cap closed allows mixed juice creations w ith di erent
fruits, vegetables and liquids.
• After juicing, close the smart c ap to block excess juice from dripping,
especially when disassembling the juicing b owl o the base.
• When making di erent juices quickly rinse away any leftover avors by
running a glass of water in the juicer with the smart cap close d.
• Leave the smart cap open when juicing ingredi ents that create excessive
foam during extraction (e.g. apples, celer y).
• Pay close attention when operating th e juicer w ith the smart cap closed. Juice
may over ow if the juice collected in the juicing bowl exceeds its capacit y
marked on the juicing bowl.
• For the optimal extraction and ma ximum juice yield, cut the ingredients
following the guidelines given in this sec tion.
• Insert ingredients slowl y monitoring how the ingredients are extracted.
The juice yield may vary depen ding on the juicing speed.
• Depending on the ingredient, yo u may get e xtra pulp in the juice when
juicing continuously.
• To reduce the amount of pulp, disassemble the top-set and wash f requently.
Soft fruits and vegetables
(e.g. oranges, tomatoes):
It is recommended that the extr acted juice be consumed within 48 hours after extrac ting.
Depending on the densit y of the ingredients the extracted juice can gradually show layers over
time.
Tip |
Hard fruits and vegetables
(e.g. carrots, potato):
Slice hard fruits and vegetables in to thin pieces and then e xtract slowly.
Tip |
EN
Page 9

17
16
HOW TO DISASSEMBLE AND CLEAN
Note |
Place the juicing bowl under running
water and unplug the compression
silicone to clean the pulp spout.
• Soak the juicing bowl in a solution of
warm water with baking soda or little bit
of bleach to clean the excess build u p.
Tip |
• It is not nece ssary to completely
clean the juicer in between m aking
multiple juices during a single juicing
session.
• When nishe d with juicing, always
disassemble and clean thoroughly
between juicing se ssions to prevent
residue buildup.
Tip |
Clean the base with a soft damp towel
and dry.
Note |
Remove the juicing screw, strainer and
rotation wiper unit from the juicing bowl.
Clean with provided brush.
Note |
Note |
Tip |
Note |
Under running water, clean the outside
of the juicing screw with a dish scrub. Use
the tip of the cleaning brush to push out
any residue in the crevices on the bottom
of the juicing screw.
With the smart cap closed, ll the
juicing bowl with water and turn on
the juicer.
Let it run for a moment. Open th e
smart cap and let the water run out
of the juicing bowl.
• If the towel is dripping wet, make sure
to squeeze out the excess liquid before
using it on the juicer.
• After juic ing ingredients with seeds, make
sure to thoroughly clean the botto m
crevice of the juicing screw. If this area
isn’t properly cleane d, it can a ect the
balance between th e juicing screw and
the strainer and damage the par ts.
• Extract all the remaining pulp in the
juicing bowl before stopping th e juicer.
• For easier clean up, ope rate the juicer for
an additional 30 seconds af ter the juice is
extracted.
• When the drum lid is stuck , press the
REVERSE – OFF – FORWARD button in
this order, switching back and forth 2 to
3 times to dislodge. Then place hands
on top of the drum lid and firmly press
down simultaneously turning the drum
lid counter clockwis e to open.
• Thoroughl y clean the juicing screw
ensuring that the juicing screw is clean
without any residue.
• Complete ly dry before using.
• Immediately clean the juicer after each
use. If remaining residue in the juicer dries
up, it can make disassembling and cleanup di cult . The excess build up can cause
poor performance in future uses.
• For easier disassembly, place the topset in the sink and run the water through
from the top of the top- set.
• Thoroughly dry the bottom of the juicing
screw where it connec ts to the metal
cylinder shaft on th e base.
Switch OFF and unplug the power cord
from the wall outlet.
1
1 4 6
75
1
2
* The produc ts illustrate d/photograph ed in this bookl et may vary sligh tly from the act ual product.
Quick Rinsing
Turn the drum lid counter clockwise to
open.
Turn the top-set counter clockwise and lift
o the base.
When moving the appliance, do not lift by
grabbing the feeding tube. Always lift the
appliance by grabbing the base or handle.
2
3
EN
Page 10

19
18
HOW TO USE THE CLEANING TOOL
Hold the cleaning tool with one hand and ins ert
the strainer into the cleaning tool.
Under running water, rotate the cleaning
tool and the strainer in opposite dire ctions to
clean.
Thoroughly rinse the inside and out side of
the strainer under running water.
After cleaning, remove the strainer f rom the
cleaning tool. Dry be fore storing.
HOW TO CLEAN SILICONE PARTS
Silicone Brush
Pull out the silicone brush from
the rotation wiper to clean.
After cleaning, insert into th e slot
with the tail pointing down as
shown in the illustration.
Compression Silicone
Unplug to clean.
After cleaning, rmly inser t into
the slot below the pulp spout.
Silicone Ring
Remove the silicone ring from the
juicing bowl to clean.
After cleaning, push in the silicone
ring with the smaller surface facing
down.
Smart Cap
Remove from the juice spout
to clean.
After cleaning, attach th e smart
cap to the smart cap silicone on
the juice spout.
Clean the rotation wiper under running w ater.
Thoroughly dry af ter cleaning. Before assembling the top-set, ensure that the compression
silicone and silicone ring are rmly inserted.
The cleaning tool makes clean-up quick and eas y.
Completely dry af ter cleaning.
If the compression silicone and silicone ring are not rmly inser ted, juice may leak from the
bottom of the juicing bowl.
Use the included cleaning brush to remove hard to reach bits af ter using the cleaning tool.
Tip | Tip |
Note |
Note |
* The produc ts illustrate d/photograph ed in this bookl et may vary sligh tly from the act ual product.
1
1
4
2
3
Note |
Insert the straine r until you hear a click.
EN
Page 11

21
20
TROUBLESHOOTING Q&A
When there is no power to the juicer:
• Check if the power cord is properly plugged in.
• Check if the drum lid and the juicing bowl are
properly assembled.
• Check if the top-set and th e base are properly
assembled.
• Juicer will not operate if part s are not
assembled properly.
Low juice yield:
• Di erent ingredients hold di erent amounts of
uid that will yield di erent amounts of juice.
• If the ingredients are not fresh, they may
contain reduced amounts of uid, which will
yield less juice.
• Check if the compression silicone is rmly
inserted.
• If the ingredient itself has low water conte nt, it
may help to soak it in water before juicing.
• If juicing ingredients with small seeds , after a
few servings, it may reduce the juice yield . For
best result, disassemble and wash the top -set
in between juicing.
• If there is seed residue on the bot tom of the
strainer, this can a ect juicer performance and
the overall juice yield.
There is too much pulp in the juice:
• When continuously juicing, and depending on
the ingredient, the juice may contain a lot of
ne pulp.
• To reduce the ne pulp, clean the top-set
frequently and extrac t the pulp.
• Use a mesh strainer and put the juice through
it to collect the unwanted pulp.
• If the strainer and the screw are damaged
and a ecting the juicer’s performance, it is
recommended the parts b e replaced.
*The lifetime of each part may vary dep ending
on length and method of use and ingredient s
extracted.
• If too many ingredients are inserte d at the
same time, it may cause the juicer to stop
frequently. This can lead to pulpy juice. Insert
the ingredients slowly and few at a time.
The drum lid will not close:
• Make sure the juicing screw is pushed all the
way in to the strainer in order for the drum lid
to close properly.
• If the juicing screw is not properly in position,
the drum lid may not close.
Odd noise from the juicer:
• Check if the parts are assemb led correctly.
Try reassembling the parts and listen for th e
odd noise.
• Do not start the juicer unless there are
ingredients and/or liquid in it.
• Operating the juicer without ingredient s can
cause damage to the screw.
• If the juicer is operated without ingre dients or
liquid, the noise level can increase and also can
lead to damage.
• The friction noise from th e juicing screw and
the strainer will disappear when ingre dients
are inserted into the juicer.
• If the noise occurs when ingredient s are
inserted into the juicer, check the size of the
ingredients. Do not inser t anything over 1 inch
in thickness.
• Depending on the ty pe of ingredients, the
dimensions can be smaller.
• The noise can occur if the juicer is operate d on
an uneven or slanted surface. Place the juicer
on a horizontally at surface wh en operating.
The extracted pulp is very moist:
• During the very beginning of ex traction, the
pulp can be more moist.
• Depending on the ingredient ’s condition, the
extracted pulp c an be a ected; especially
when the ingredient is not fresh, the juice can
be extracted w ith the pulp.
During operation, the juicing bowl shakes.
• The juicing screw and the strainer are set up to
crush and squeeze the ingredients . It is normal
for the juicing screw and the strainer to vibr ate.
• If the ingredient contains strong ber, the
vibration from the top- set may be stronger.
During juicing, the juicer stopped:
• Check the power cord and make sure it is
plugged in correctly.
• Check that all the part s are correctly assembled.
• If too many ingredients are inserte d at one
time, this can cause the juicer to stop.
• When the juicer stops because there are to o
many ingredients inserted in it, press th e
REVERSE - OFF - FORWARD button in this order,
switching back and forth 2 to 3 times.
• The reverse setting will push th e ingredients
up, and the forward setting will p ull the
ingredients down.
• If the juicer stops due to the overload
protection, let the juicer cool for 30 minutes to
2 hours before juicing again.
• If there are hard seeds within the ingredient s,
remove them before juicing. Hard seeds can
damage the juicer.
Layers of separation in the juice:
• Depending on the densit y of the ingredients,
the extracted juice may show layers of di erent
juices. It is di erent from separation due to
oxidation caused by juicing with a high-spe ed
juicer.
The drum lid is stuck:
• After juicing, let the juicer operate f or another
30 seconds to extract th e remaining pulp.
• If there is too much pulp in the top -set, this
can cause the drum lid to not open. In this
situation, press the REVERSE OFF - FORWARD
button in this order, switching back and forth 2
to 3 times.
• Pour water down the feeding tube to rinse ou t
the insides and then try openin g the drum lid.
Juice dripping down the body of the base:
• If the compression silicone on the bottom of
the juicing bowl is not plugged in correctly, the
juice may seep out on to the juicer base. Before
assembling the parts, ch eck and make sure the
compression silicone is plugged in correctly.
Is it possible to juice ingredients with
tough ber?
• Ingredients like celery or ginge r contain long
bers that may wrap around the juicing screw
and a ect the juicer’s performance. When
juicing brous ingredients, do not collect more
than 1 lb. of juice. After collecting this quantit y
or less, clean the top-set comp letely before
juicing again.
Discoloration of the plastic parts:
• After juicing, if the juicer is not cleaned right
away, the remaining pulp inside the top-set
can dry up which can make disassembling and
cleaning hard. This can also a ect the juicer ’s
performance and color.
• Ingredients that are rich in carotenoids such
as carrots and spinach may dye plastic part s.
When the parts are dye d with carotenoids, rub
vegetable oil in to the dyed areas and use mild
detergent to clean.
• Vegetable oil should only be used during
clean-up for parts that are dis colored. Do not
use vegetable oil on the juicing screw or the
strainer. If vegetable oil or oil from animal fat
gets on the juicing screw or the strainer, this
can a ect the juicer’s performance and may
result in damaged parts.
• The silicone pieces on the top- set can be
detached to be thoroughly cleaned.
Using for purposes other than juicing:
• This juicer is designed to juice ingredients like
fruits and vegetables.
• Do not use the juicer for extrac ting vegetable oil.
• Do not juice ingredients with high contents of
vegetable / animal oil.
• If vegetable/animal oil gets on the juicing
screw or the strainer, this can a ect the
performance of the juicer and could result in
damaged parts.
EN
Page 12

22
SPECIFICATIONS
Voltage
Power Consumption
Maximum Use
Weight
Dimension
Manufacturer
Type
AC120V, 60Hz
240W
Less than 30 min
14.3 lbs (6.5kg)
9 x 8.2 x 16.3 inch (228 x 208x 414 mm)
NUC Electronics Co., Ltd.
Low Speed
Product
Model
Juicer
NS-995UL, NS-996UL, NS-997UL, NS-998UL,
UL-100, UL-110, UL-100B, ULC-112NB, ULC-121NB, ULC-122NB,
UL-100M, UL-110M, UL-100MB, UL-110MB, ULC-112YB,
ULD-111NB, ULD-112NB, ULD-115NB,
ULD-111YB, ULD-112YB, ULD-115YB
M1
MANUEL
KUVINGS
Après avoir lu ce manuel,
conservez-le à portée de main.
• La couleur du produit peut varier.
• À usage domestique uniquement.
FR
Page 13

25
24
Recommandations importantes
Consignes de sécurité
Pièces
Assemblage
Mode d’emploi
Conseils d’utilisation
Conseils relatifs aux ingrédients
Préparation des ingrédients
Comment démonter et nettoyer l’appareil
Comment nettoyer les pièces en silicone
Comment utiliser le matériel de nettoyage
Q&R pour résolution des problèmes
Caractéristiques
26
27
28
30
32
34
35
36
38
40
41
42
44
TABLE DES MATIERES
Lire toutes les instructions avant d’utiliser l’appareil
FR
Page 14

27
26
• Cet appareil es t exclusivement destiné à un usage domestique. Veuillez suiv re attentivement les instructions
contenues dans le manuel. (L’appareil ne peut bén é cier de la garantie du fabricant s'il est utilisé d’une
manière non prévue pa r le fabricant ou à but commercial.)
• Conser vez le manuel d’utilisation pour une consultation u ltérieure.
• Si l’appareil est o ert comme cadeau, n’oubliez pas d’y join dre le manuel.
Les précautions suivantes so nt fournies a n d’assurer la sécurité de l’utilisateur. Veuillez lire attentivement toutes
les consignes et faire attentio n lorsque vous utilisez l’appareil.
Avertissement : Ce symb ole signale le risqué de mort ou de blessu res graves.
Attention : Ce symbole signale le risque de blessures ou d’endommagement de l’appareil.
Interdit
Ne pas démont er Il faut prend re une mesure
RECOMMANDATIONS IMPORTANTES CONSIGNES DE SECURITE
Ne pas utiliser de produit
chimique pour nettoyer
l’appareil;
*Cela pourrait alté rer la
couleur de l’appareil ou
causer un incendie.
Ne pas réparer ou
démonter la base et ne p as
personnaliser l’appareil;
* L’app areil risque de
ne pas fonctionne r
normalement et de
causer un incendie,
une électrocution ou
des blessures.
Ne pas utiliser l’appareil sur
une surface pen chée;
* Cela peut endommager le
fonctionnement de l’appareil
si celui-ci se renverse.
Ne pas laisser ou utiliser
l’appareil à proximité
d’enfants ou de bébé s;
*Il peut les bless er.
Ne pas asperger de l’eau
ou utiliser des produits
in ammables à proxi mité
de l’appareil ;
* Ils peuvent
provoquer une
explosion ou une
électrocution.
Débranchez le câble
d’alimentation lorsque
l’appareil n’est pas utilisé.
Ne pas placer les piè ces
de l’appareil dans le lavevaisselle ni dans de l’eau
très chaude;
*Les pièces pourraient
s’user rapidement.
Ne pas mettre le s doigts ou
d’autres objets dans le tube
d’alimentation pendant que
le moteur est en marche;
*Il peut causer des ble ssures.
Respectez toujou rs les consignes de sécurité de base lorsqu e vous utilisez des appareils électrique s
1. Lisez toutes l es instructions.
2. Pour éviter tout r isqué d’électrocution, ne pas placer l e bloc moteur dans l’eau ou dans un autre liquide.
3. Une super vision étroite est nécessaire si l’appareil est utilise p ar ou près d'un enfant.
4. Débran chez l’appareil de la prise de courant lorsqu’il n’est pas utilis é avant de monter ou de démonter
des pièces et avant de le n ettoyer.
5. Évitez tou t contact avec des pièces en mouvem ent.
6. N’utilisez aucun appareil do nt le câble d’alimentation ou la che sont endommagés, qui présente un
défaut de fonctionnement ou qui est endommagé de quelque façon que ce soit. Retournez l’appareil au
centre de service clie ntèle pour le faire examiner et/ou réparer.
7. L’utilisation d’accessoires non recommandés o u non vendus par le fabricant peut cause r un incendie,
une électroc ution ou des blessures.
8. Ne pas utilise r à l’extérieur.
9. Ne pas laisser p endre le câble d’alimentation de la table ou du pl an de travail.
10. Assu rez-vous toujours que le couvercle est bien fe rmé avant de mettre le moteur en marche. Ne p as
ouvrir le couvercle pen dant que l’extracteur de jus est en marche.
11. Assure z-vous d’appuyer sur le bouton OFF après chaque utilisation de votre ex tracteur de jus. Assurezvous que le moteur est comp lètement à l’arrêt avant le démontage.
12. Ne pa s mettre les doigts ou d’autres objets da ns le tube d’alimentation pendant que le moteur est e n
marche. Si des aliments sont bl oqués, utilisez le poussoir ou un autre morce au de fruit pour pousser vers
le bas. Si cette métho de ne marche pas, arrêtez le moteur puis démonte z l’extracteur de jus pour retirer
les aliments restants.
13. N’utilisez pas l’appareil si le balai de rotation est endommagé.
14. N’utilisez p as l’appareil si le collecteur de pulpe n'est pas en place.
15. N’altérez/ne modi ez pas l ’ap pareil de quelque manière que ce soit .
16. N’utilisez pas l ’appareil à des ns autres que celles indiquées dans le manuel.
17. L’appareil doit être utilisé pour une durée limitée.
CONSERVEZ CEZ INSTRUCTIONS
RECOMMANDATIONS IMPORTANTES
FR
Page 15

29
28
PIECES
2. Couvercle
4. Collecteur de pulpe
3. Bol d’extraction
6. Carafe à jus
5. Bouchon intelligent
7. Base
1. Trémie
10. Vis de pressage
9. Tamis
11. Poussoir
8. Balai de rotation
12.
Brosse de nettoyage
Alignez les points rouges ⷅ gurant de
chaque côté et assemblez dans l’ordre
indiqué. Une fois assemblé, faites tourne r
le couvercle dans le sens des aiguilles
d’une montre pour fermer.
ÉTAPE 1
Assemblage du bloc supéri eur
ÉTAPE 2
Assemblage du bloc supéri eur avec la base
Détachable
+
+
+
+
+
* Les produit s illustrés/pho tographiés dan s le présent manue l peuvent varie r légèrement du p roduit réel.
Placez le couvercle sur le bol d’extraction.
Alignez le èche vers le bas
ⶼ
qui se
trouve sur le couvercle avec la marque
OPEN (OUVRIR) sur la base et tournez
vers la position
CLOSE (FERMER).
FR
Page 16

31
3030
ASSEMBLAGE
Insérez fermement le silicone de
compression. dans la fente en dessous du
bec verseur à pulpe.
Il pourrait y avoir des fu ites si l’extracteur
de jus n’est pas assemblé correc tement.
Note |
La vis de pressage doit être verrouillée pour
fermer le couvercle.
Note |
L’ex tracteur de jus ne fonctionnera p as s’il
n’est pas correctement asse mblé.
Note |
ÉTAPE 1
Assemblage du bloc supérie ur
ÉTAPE 2
Assemblage du bloc supéri eur avec la base
Montez le tamis sur le balai de rotation
ensuite placez cet ensemble dans le bol
d’extraction en vous assurant que le point
rouge ⷅ sur le tamis soit aligné avec le
point rouge ⷅ sur le bol d’extraction.
Placez la vis de pressage sur le tamis.
Tournez et appuyez jusqu’à ce que qu’elle
s’enclenche en place.
Placez le couvercle sur le bol d’extraction en
vous assurant d’aligner le point rouge ⷅ sur
le couvercle avec le point rouge ⷅ sur le bol
d’extraction. Pour fermer, tournez dans le
sens des aiguilles d’une montre, en alignant
le point rouge ⷅ sur le couvercle avec la
marque de fermeture.
Pièces en silicone
Les pièces en silicone peuvent être lavées.
Remontez-les correc tement après lavage.
• Enfoncez l’anneau en silicone, avec la surface
plus petite vers le bas.
• Insérez dans la fente avec la queue vers le
bas, comme l’indique l’illustration.
Queue
1
2
3
4
placez le collecteur de pulpe sous le
bec verseur à pulpe et placez la carafe
à jus sous le bec verseur à jus, comme
l’indique l’illustration.
7
Détachable
Marques d’ouverture et de fermeture sur le
bloc supérieur.
6
OPEN (OUVRIR)
CLOSE (FERMER)
5
Placez le couvercle sur le bol d’extraction.
Alignez le èche vers le bas
ⶼ
qui se
trouve sur le couvercle avec la marque
OPEN (OUVRIR) sur la base et tournez vers
la position
CLOSE (FERMER).
Véri ez l’assemblage
avant la première
utilisation
• Lavez les pi èces avant leur première utilisation.
• Veillez à ce que le silicone d e compression et l’anneau de silicone soient
assemblés correctem ent.
FR
Page 17

33
32
Servez-vous du bouchon intelligent pour réalis er des
jus mélangés, arrêtez l’écoulement du jus ou rincez
l’appareil entre deux jus di érents.
Après avoir complètement extrait le jus et la pulp e, arrêtez l’appareil en plaçant le
bouton sur OFF.
MODE D’EMPLOI
Après avoir préparé vos aliments, branchez le câble d’alimentation à une prise murale.
Appuyez sur le bouton MARCHE AVANT [FORWARD] pour mettre en mar che.
Introduisez les aliments apprêtés les uns ap rès les autres, un à la fois.
• Ne touche z pas au câble avec les mains humides. Cela pou rrait provoquer un choc
électrique, un court-circuit ou un incendie.
• Assurez-vous d e la sécurité de la prise murale.
• Marche avant [FORWARD] : Tire l es aliments vers le bas et les broie lentem ent.
• Marche arri ère [REVERSE] : Pousse les aliments vers l ’le haut pour les dégager.
• Préparez les a liments pour une extraction op timale.
» Aliments durs et breux : Coupez des morceau x d’environ 1 à 2,5 cm de largeur et de 5 cm de
longueur.
»Légumes breux à feuilles (céleri, choux f risé, etc.) : Coupez la racine en des morceaux
d’environ 5 cm et empaquetez les feu illes avant de les mettre dans l’extracte ur de jus.
» Retirez les grains et noyaux durs des fruits.
• Avant de presse r des fruits congelés, décon gelez-les entièrement.
• Si vous introduise z de larges quantités de fruits dans le tube d’alimenta tion, l’extracteur de jus
risque de s’arrêter.Insert the ingre dients one piece at a time.
• Introduise z les aliments les uns après les autres, un à la fo is.
• Si vous ne retirez pas co mplètement le reste d’aliments du bol d’extrac tion, il est possible que
le couvercle ne s’ouvre pas facil ement. Après chaque extraction, laiss ez tourner l’extracteur de
jus pendant 30 secondes pour extraire la pulpe restante.
• Si le couvercle e st bloqué, appuyez sur les boutons m arche arrière - arrêt - marche avant
[REVERSE - OFF - FORWARD] dans cet ordre ; ref aites-le 2 ou 3 fois pour extrair e les ingrédients
bloqués. Ensuite place z vos mains au-dessus du couvercle et pressez fe rmement vers le bas en
tournant simultanément le cou vercle dans le sens des aiguilles d’une montre pour ouvrir.
» Selon la nature des aliments, versez de l ’eau da ns le tube d’alimentation pour rincer l’intérieur
du bol d’extrac tion et essayer à nouveau d’enlever le couvercle.
• La fabr ication de jus avec le bouchon intelligent fermé pe rmet de créer des mélanges selon que
vous choisissez divers fruits et l égumes : lait, banane, haricot, etc.
• Après avoir fabr iqué des jus, fermez le bouchon intelligent p our arrêter l’écoulement du jus,
surtout lorsque vo us démontez le bol d’extraction .
• Lorsque vo us commencez à fabriquer un nouveau jus , rincez rapidement l’appareil pour enlever
les saveurs restantes e n passant un verre d’eau sur le bol avec le bouchon int elligent fermé.
» Laissez le bouchon intelligent ouver t lorsque vous pressez des aliments qui pro duisent
beaucoup de mousse (pa r ex. : pommes, céleri).
• Soyez très at tentifs lorsque vous faites fonc tionner l’appareil avec le bouchon intelligent o uvert. Du
jus pourrait déborde r du bol d’extraction si le jus pressé dépasse la c apacité marquée sur le bol.
• Marche arr ière [REVERSE] : Pousse les aliments ver s l’le haut pour les dégager.
Le bouton marche arrière [RE VERSE] ne fonctionne que lor sque vous le maintenez enfoncé.
• Placez l’appare il sur OFF et assurez-vous qu’il est complètement arr êté. Ensuite appuyez sur
marche arrière [RE VERSE].
Maintenez enfoncé le bouton marche arrière [REVERSE] pendant 2-3 secondes puis relâchez. Répétez
autant de fois que nécessaire. A ssurez-vous que l’appareil soit complètement à l’arrêt avant d’utiliser le
bouton marche arrière [RE VERSE] a n de prévenir des dysfonctionnements.
• Si l’ext racteur de jus ne fonctionne pa s après avoir suivi ces étapes, démontez l ’appareil et nettoyez
les pièces avant de le réutiliser.
Si l’extracteur de jus cesse de fonctionner en cours d’utilisation :
Mettez le bouton de ré glage en position OFF, ensuite
appuyez et maintenez le b outon marche arrière [REVERSE]
jusqu’à ce que les aliments soient dé gagés.
Répétez les opér ations marche arrière - arrêt - marche avant
[REVERSE - OFF - FORWARD] autant de fois que né cessaire.
Marche avant [FORWARD] : Tire les aliments
vers le bas
OFF : Arrête l’appareil.
Marche arrière [REV ERSE] : Renvoie les
aliments vers le hau t.
ⶺⶺⶺ
4
1 3
2
OFF OFFREVERSE FORWARD
Note |
Note |
Note |
Note |
Note |
CONSEIL |
Note |
Si les aliments obstruent la vis de pressage et que le couvercle ne s’ouvre pas, appuyez sur le bouton OFF.
Ensuite, pressez et maintenez le b outon marche arrière [REVERSE] jusqu’à ce que l es aliments soient dégagés.
Répétez les opérations marche arrière - arrêt - marche avant [REVERSE - OFF - FORWARD] autant de fois que
nécessaire pour atteindre le résultat souhaité
Smart cap
ETAPE 1
ETAPE 3
ETAPE 4
ETAPE 5
ETAPE 2
FR
Page 18

35
34
CONSIGNES D’UTILISATION CONSEILS RELATIFS AUX INGRÉDIENTS
Pêches, nectarines, abricots, prunes , mangues, etc.
Retirez les pépins durs des aliment s avant
lepressage.
Pépins durs
Ananas, melon, mangue, orange, etc.
Décongeler complètement l es fruits avant de les
presser. Ne pas utiliser de glace.
Peaux dures
ou non
comestibles
Fraises, myrtilles, framboises congelées, etc.
Décongeler complètement l es fruits avant de les
presser. Ne pas utiliser de glace.
Fruit s
congelés ou
glace
Graines de sésame, beurre, margarine, etc.
Ne pressez pas des aliments contenant des
huiles végétales ou animales. Elles pourraient
a ecter les performances de l’appareil ou même
l’endommager.
Huiles
végétal es
ou animales
Noix de coco, canne à sucre, grains entiers, etc.
Ne pressez pas des aliments sec s.
Autres
Extracteur de jus lent et doux Kuvings est un produit innovant qui
utilise une technologie brevetée de broyage lent et efficace pour
extraire le jus des aliments. L’extracteur de jus est conçu pour obtenir
les meilleurs résultats à partir d’aliments de composition solide et
à haute teneur en eau. Pour de meilleurs résultats, pressez chaque
aliment séparément selon ses carac téristiques et propriétés.
Produisez les meilleurs jus en apprenant les caractéristiques de chaque aliment et la
manière optimale de les allier
1. Faire tourner l’extracteur de jus à vide sans ingrédient peut endommager la vis de
pressage.
2. Ne faites pas fonctionner l’extracteur de jus en continu pendant plus de 30 minutes.
TLe moteur pourrait surchau er et s’endommager. Après une utilisation continue, laisser
l’extracteur de jus refroidir pend ant 30 minutes avant de la réutilis er.
3. Ne pas met tre les doigts ou d’autres objets dans le tube d’alimentation. Utilisez
toujours le poussoir fourni en cas de besoin.
L’introduc tion d’objets dans le tube d’alimentation pendant le fonctionnement de l’extracteur de
jus pourrait le bloquer, endommager les pièces de l’appareil et/ou causer des blessures.
4. N’introduisez pas des aliments secs ou durs tels que des graines entières, des fruits
avec des pépins durs ou de la glace dans l’extracteur de jus.
Vous pourriez endommager les pièces de l’extracteur de jus (par ex. : bol d’extraction, vis de
pressage et tamis).
• Les graines et les fèves peuvent être utilisées après avoir été préalableme nt trempées pendant
toute une nuit ou bouillies.
• Les fruits avec noyaux et pépins durs (par e x. : nectarines, pèches, mangues et cerises) doivent
être épépinés et dénoyautés avant pressage.
• Lors du pressage de fruits congel és avec p etits pépins tels que les raisins, dégelez-les
complètement avant de les introduire dans l’extrac teur de jus.
5. Ne pressez pas des aliments contenant trop de graisses végétales ou animales. Ne
pas utiliser l’extracteur de jus pour extraire de l’huile végétale des aliments.
Si des huiles végétales ou animales touchent la vis de p ressage, elles pourraient a ecter les
performances de l’appareil et même endommager la pièce.
6. Ne réintroduisez pas la pulpe extraite dans l’extracteur. Elle pourrait faire fuir
l’extracteur de jus ou bloquer le couvercle.
7. Après avoir pressé des aliments avec pépins tels que des raisins, faites un rinçage
complet à l’eau sur le dessous de la vis de pressage.
N’INTRODUISEZ PAS
les aliments suivants dans l’extracteur de jus :
Tout dommage à l’extracteur de jus dû à la négligence du p ropriétaire ou au non respect des instructio ns du
présent manuel annulent la garantie de ser vice.
FR
Page 19

37
36
PREPARATION DES ALIMENTS
Les fruits et lég umes
durs peuvent ralentir
considérablement le
moteur au point de le
bloquer.
Plongez-les dans de
l’eau froide avant le
pressage et coupezle en des tailles
appropriées.
Pour maximiser
la quantité de jus
extrait, utilisez les
fruits et légum es à
forte teneur en eau .
CONSEILS D E PRÉPARATION :
• Découp ez les ingrédients en des tranches d’environ 2, 5 cm d’épaisseur ou en des morceaux de 2,5 cm de largeu r
sur 5 à 15 cm de long.
• Trempez les ingrédi ents durs tels que les carottes et le gingem bre dans l’eau froide avant le pressage.
CONSEIL D’EXTRACTION :
• Insérez l es ingrédients doucement, un à un.
• Réglez la v itesse d’extraction en vous assurant que chaque ing rédient a été entièrement pressé.
• Pour maximis er la quantité de jus obtenu, utilisez les fruits à for te teneur en eau.
CONSEILS D E PRÉPARATION :
• Coupez 8 -12 tranches.
CONSEIL D’EXTRACTION :
• lentement l es aliments les uns après les autres, un à la fois.
• Utilisez le po ussoir pour pousser les aliments dans le tube d'alime ntation. (Le poussoir permet égaleme nt d'éviter
que le jus ne jaillisse sur le tube d’alimentation lo rs du pressage des ingrédients à haute teneur en eau)
• Laissez l e bouchon intelligent ouvert lorsqu e vous pressez des aliments qui produisent be aucoup de mousse. La
mousse pourrait s’accumuler si vous laisse z le bouchon fermé. S’il y a trop de mousse, utilisez un tami s en toile pour
séparer la mousse du jus.
Les fruits doivent ê tre dénoyautés avant pressage.
Coupez 8-12 tranches puis insérez-les lentem ent
dans le tube d’alimentation.
8 - 12 tranches :
1 inch
6 inch
| (E.g. apples, oranges & tomatoes)
Avant
utilisation:
Utilisation
du bouchon
intelligent:
Production de
jus:
Ajustement de
la quantité de
pulpe dans le
jus:
• Avant utilisation : Si l ’e xtracteur de jus est coincé ou si le couvercl e ne s’ouvre pas,
appuyez sur le bouton march e arrière [REVERSE] et maintenez- le enfoncé jusqu'à ce
que l’appareil se débloque. R épétez les opérations marche arrière - ar rêt - marche
avant [REVERSE - OFF - FORWARD] autant que nécess aire.
• Continuez à faire fo nctionner l’extracteur de jus jusqu ’à ce que tous les aliments dans
le bol d’extracti on soient retirés. Le couvercle pourrait ne pas s’ouvrir f acilement s’il
reste trop de pulpe dans l’ext racteur de jus.
• Chaque aliment p roduit des quantités di érentes de jus. Production de jus :
• L’extraction du jus avec le bouchon inte lligent fermé permet de créer des méla nges
avec di ére nts fruits, légumes et liquides.
• Après l’extr action du jus, fermez le bouchon intellige nt pour éviter que l’excès de jus
ne suinte, surtout lors de l a séparation du bol d’extraction d e la base.
• Lorsque vous co mmencez à fabriquer un nouveau jus, rin cez rapidement l’appareil
pour enlever les saveu rs restantes en passant un verre d’eau sur le bol ave c le bouchon
intelligent fermé.
• Laissez l e bouchon intelligent ouvert lorsqu e vous pressez des ingrédients qui créent
beaucoup de mousse pe ndant l’extraction (par ex. : p ommes, céleri).
• Faites très attention l orsque vous utilisez l’extracteur de jus ave c le bouchon intelligent
fermé. Le jus peut débord er si le jus collecté dans le bol d’extrac tion dépasse la
capacité marquée dessus.
• Pour une ex traction maximale de jus, décou per les aliments selon les instruc tions
suivantes.
• Insérez lente ment les aliments tout en surveillant l’ext raction de jus. Le jus produit
pourrait varier s elon la vitesse de pressage.
• Selon l ’ingrédient, il est possible que vous receviez d avantage de pulpe lors d’un
pressage continu.
• Pour réduire la quantité de pulp e, démontez et nettoyez régulièrement le bl oc
supérieur.
Fruits et légumes mous
(par ex. : oranges, tomates):
Il est recommandé de consommer le jus ex trait dans les 48 heures suivant son extraction. Selon
la densité des aliments, le jus extr ait peut progressivement se strati er.
Tip |
Fruits durs et légumes
(par ex. : carottes, po mmes de terre):
Découpez les fruits et lé gumes durs en petits morceaux puis pressez lentement.
Tip |
FR
Page 20

39
38
COMMENT DÉMONTER ET NETTOYER L’APPAREIL
Note |
Placez le bol d’extraction sous de l’eau
courante et débranchez le silicone de
compression pour
nettoyer le bec verseur à
pulpe
• Plongez le bol d’extraction dans une solution
d’eau tiède contenant du bi carbonate de soude
ou un peu d'eau de javel pour nettoyer l'excès
de dépôt.
Tip |
• Il n’est p as nécessaire de nettoyer
complètement l’ex tracteur de jus entre
la réalisation de p lusieurs jus lors d’une
même session.
• Q uand vous avez ni l’extraction, démontez
et nettoyez toujours entièrement après
chaque session d ’extraction, a n d’éviter
l’amas de résidus.
Tip |
Enlevez la vis de pressage, le tamis et le balai
de rotation du bol d’extraction. Nettoyez avec
la brosse fournie.
Note |
Note |
Tip |
Note |
À l’eau courante, nettoyez l’extérieur de la
vis de pressage avec une éponge à vaisselle.
Utilisez le bout de la brosse de nettoyage
pour extraire les résidus des rainures de la
vis de pressage.
Avec le bouchon intelligent fermé,
remplissez le bol d’extraction d ’eau et
faites fonctionner l’extrac teur de jus.
Laissez-le en marche un moment .
Ouvrez le bouchon intellige nt et laissez
s’écouler l’eau du bol d’extraction.
• Si le co uvercle est bloqué, appu yez sur les
boutons marche a rrière - arrêt - marche avant
[REVERSE - OFF - FORWARD] dans ce t ordre ;
refaites-le 2 o u
• 3 fo is pour le débloquer. Ensuite placez
vos mains au-des sus du couvercle et
pressez ferme ment vers le bas en tournant
simultanéme nt le couvercle dans le sens des
aiguilles d’une mont re pour ouvrir
• Enlever le reste de pulpe dans le bol
d’extracti on avant d’arrêter l’extrac teur de jus.
• Pour un nettoyage facile, faites fonctionner
l’extracteur de jus pendant 30 secondes
supplémentaires après l’extraction du jus.
• Whe n the drum lid is stuck, press t he REVERSE
– OFF – FORWARD button in this order,
switching back and forth 2 to 3 times to
dislodge. The n place hands on top of the drum
lid and firmly press down simultaneously
turning the drum lid counter clockwis e to
open.
• Enl ever le reste de pulpe dans le bo l d’extraction
avant d’arrêter l’ext racteur de jus.
• Pou r un nettoyage facile, fa ites fonctionner
l’extracteur de jus pendant 30 secondes
supplémentaire s après l’extraction du ju s.
• Nettoyez l’extracteur de jus immédiatement
après chaque utilisation. Si des résidus
d’aliments sèchent dans l’extracteur de jus,
le démontage et le nettoyage seront plus
di ciles . Des amas excessifs peuvent entr aîner
de mauvaises pe rformances à l’avenir.
• Pour un démontage facile, placez le bloc
supérieur dans un évier et faites couler de l’eau
au-dessus.
• Séchez complètement le bas de la vis de
pressage à l’endroit où elle est relié e au vérin
métallique de la base.
Éteignez l’appareil en le plaçant sur OFF
(arrêt) et débranchez le câble d’alimentation
de la prise murale.
1
1 4 6
Nettoyez la base avec une ser viette douce
et humide puis séchez.
Note |
• Si la serviette est trempée, assurez-vous de
l’essorer avant de l ’utiliser.
7
5
1
2
* The produc ts illustrate d/photograph ed in this bookl et may vary sligh tly from the act ual product.
Rinçage rapide
Tournez le couvercle dans le sens inverse
des aiguilles d’une montre pour l’ouvrir.
Tournez le bloc supérieur dans le sens
inverse des aiguilles d’une montre et
détachez-le de la base.
Lorsque vous déplacez l’appareil, ne le levez-pas en
le prenant par le tube d’alimentation. Levez toujours
l’appareil en le tenant par la base ou par la poignée.
2
3
FR
Page 21

41
40
UTILISATION DE L’OUTIL DE NETTOYAGE
Tenez l’outil de nettoyage d’une main puis
insérez le tamis dans l’outil de nettoyage.
Sous de l’eau courante, faites tourner l’outil
de nettoyage et le tamis en se ns opposés
pour nettoyer.
Rincez abondamment l’intérieu r et l’ex térieur du
tamis à l’eau courante.
Après avoir nettoyé, enlevez le tamis de l’outil
de nettoyage. Séchez avant d e ranger.
NETTOYAGE DES PIECES EN SILICONE
Brosse en silicone
Enlevez la brosse en silicone du
balai de rotation pour net toyer.
Après avoir nettoyé, insérez-la
dans la fente la queue vers le bas,
comme indiqué dans l’illustration.
Silicone de compression
Débrancher pour nettoyer.
Après avoir nettoyé, insérez-le
fermement dans la fente sous le
bec verseur à pulpe.
Anneau de silicone
Enlevez l’anneau de silicone du bol
d’extraction pour nettoyer.
Après avoir nettoyé, remettez
l’anneau de silicone en place avec
la plus petite surface vers le bas.
Bouchon intelligent
Retirez-le du bec verseur à jus po ur
nettoyer.
Après avoir nettoyé, xez le
bouchon intelligent sur le silicone
du bec verseur à jus.
Nettoyez le balai de rotation à l ’eau courante.
Séchez complètement après avoir net toyé. Avant d’assembler l e bloc supérieur, assurez-vous
que le silicone de compression et l'anneau de silicone sont correc tement insérés.
L’outil de net toyage permet de nettoyer rapidement et plus f acilement.
Séchez complètement après avoir net toyé.
Si le silicone de compression et l’anneau de silicone ne sont pas insérés corre ctement, le jus
pourrait suinter à la base du bol d’extrac tion.
Utilisez la brosse de nettoyage incluse p our enlever les résidus di ciles d’accès après avoir
utilisé l’outil de nettoyage.
Tip | Tip |
Note |
Note |
* The produc ts illustrate d/photograph ed in this bookl et may vary sligh tly from the act ual product.
1
1
4
2
3
Note |
Insérez le tamis jusqu’à ce que vous ente ndiez
un clic.
FR
Page 22

43
42
Q&R RESOLUTION DE PROBLEMES
Si l’extracteur de jus n’est pas alimenté:
• Véri ez que le câble d’alimentation est branché
correctement .
• Véri ez que le couvercle et le bol d’extra ction sont
assemblés correctem ent.
• Véri ez que le bloc supérieur et la b ase sont
assemblés correctem ent.
• L’extracteur de jus ne fonc tionnera pas si des pièces
ne sont pas assemblée s correctement.
Faible quantité de jus extrait:
• La teneur des ingrédie nts en uide varie et
détermine la quantité de jus pouvant être
extraite.
• Si les ingrédients ne so nt pas frais, ils auront une
faible teneur en uide, donc produiront moins de
jus.
• Véri ez si le silicone de compression est inséré
correcteme nt.
• Si l’ingrédient a une faib le teneur en eau, il peut
être utile de le faire tremper avant de le presse r.
• Si vous pressez des ingrédie nts à petits pépins,
la quantité de jus produite peut baisser après
quelques services. Pour obtenir les m eilleurs
résultats, démontez et net toyer le bloc supérieur
après chaque extraction.
• S’il y a des résidus de pépins au fond du tamis,
la performance de l’extr acteur de jus peut être
a ectée, ainsi que la quantité de jus recueillie.
Il y a trop de pulpe dans le jus:
• En extrac tion continue, et en fonction de
l’ingrédient, le jus peut contenir b eaucoup de
débris de pulpe.
• Pour réduire ces débris, net toyez régulièrement
le bloc supérieur po ur enlever la pulpe.
• Utilisez un tamis en toile pour ltrer l’excès de
pulpe.
• Si le tamis et la vis de pressage sont endommagés
et a ectent la performance de l’ex tracteur de jus,
il est recommandé de remplacer ces pièces.
*La durée de vie de chaque piè ce peut varier en
fonction de la durée et de la méth ode d’utilisation
ainsi que de la nature des ingrédients pressés
• Si vous introduisez trop d’ingré dients à la fois,
l’extracteur de jus peut s ouvent se bloquer. Ceci
peut causer un jus plus pulpeux . Introduisez les
ingrédients lentement, et p eu à la fois.
Le couvercle ne se ferme pa:
• Assurez-vous que la vis de press age est bien
xée au tamis pour pouvoir fermer le couvercl e
correcteme nt.
• Si la vis de pressage n’est pas positionné e
correctement, le cou vercle ne peut pas se fermer.
L’extracteur de jus fait un bruit bizarre:
• Véri ez que les pièces sont assemblées
correctement. E ssayez de les assembler à
nouveau et véri ez si le bruit bizarre persiste.
• Ne mettez pas l ’ex tracteur de jus en marche à
vide, sans ingrédient ni liquide.
• Faire tourner l’extracteur de jus à vide sans
ingrédient peut endommager la vis de
pressage.
• Si vous faites foncti onner l’extracteur de jus sans
ingrédients ni liquide, le bruit peu t s’intensi er et
même causer une panne.
• Le bruit de friction d e la vis de pressage et du
tamis cessera une fois les ingrédients intro duits
dans l’extracteur de jus.
• Si le bruit se produit même l orsque des
ingrédients sont introduits dans l’appareil,
véri ez la taille des ingrédients. N’introduisez p as
d’ingrédients de plus de 2,5 cm d ’épaiss eur.
• Selon le ty pe d’ingrédients, cette taille peut être
plus petite.
• Le bruit peut se produire si l ’ex tracteur de jus est
exploité sur une surfa ce bosselée ou inclinée.
Avant utilisation, placez l’extrac teur de jus sur
une surface horizontale plan e.
Le jus extrait est très humide:
• La pulpe peut ê tre plus humide au tout début de
l’extraction.
• Selon l’état de l’ingrédient , la pulpe extraite peut
être a ectée ; notamment si l’ingrédient n’est pas
frais, le jus peut contenir des débr is de pulpe.
Le bol d’extraction vibre pendant
l’extraction.
• La vis de pressage e t le tamis sont montés de
manière à écraser et presser les ingré dients. Il est
normal que la vis de pressage et le t amis vibrent.
• Si l’ingrédient contient des bres dures, la
vibration du bloc supéri eur peut être plus forte.
Pendant le pressage, l’extracteur de jus
s’est arrêté de fonctionner:
• Véri ez le câble d’alimentation et assurez-vous
qu’il est branché correctem ent.
• Véri ez que toutes les pièces sont assemblées
correcteme nt.
• • Si trop d’ingrédients so nt introduits au même
moment, l’extrac teur de jus peut se bloquer.
• Si l’extracteur de jus s’arrête à cause d ’une
trop grande quantité d’ingrédients introduite,
appuyez sur les boutons marche arriè re - arrêt marche avant [REVERSE - OFF - FORWARD] dans
cet ordre ;refaites-le 2 ou 3 fois.
• Le réglage marche arrière [RE VERSE] fera
remonter les ingrédients et le ré glage marche
avant [FORWARD] les ramènera vers le bas.
• Si l’extracteur de jus s’arrête suite à une
surcharge, laissez-le refroidir pour une p ériode
de 30 minutes à 2 heures avant toute nouvelle
utilisation.
• Si les ingrédients contienn ent des pépins durs,
• enlevez-les avant le press age. Des pépins durs
peuvent endommager l’extracteur de jus.
Strates distinctes dans le jus:
• Selon la densité des in grédients, le jus extrait peut
présenter di érentes strates de jus distinctes. Cette
strati cation di ère de celle due à l’oxydation, qui,
elle, est liée à une extrac tion à grande vitesse.
Le couvercle est bloqué:
• Après l’extraction, laisse z l’ex tracteur de
jus fonctionner pendant 30 secondes
supplémentaires pour extr aire le reste de pulpe.
• S’il y beaucoup de pulpe dans le bloc sup érieur,
cela peut empêcher l ’ouver ture du couvercle.
Dans ce cas, appuyez les boutons marche ar rière arrêt - marche avant [REVERSE - OFF - FORWARD]
dans cet ordre ; refaites-le 2 à 3 fois.
• Versez de l’eau dans le tube d’alimentation pour
rincer l’intérieur puis essayez d’ouvrir le couvercle.
Le jus s’écoule sur la coque de la base:
• Si le silicone de comp ression à la base du bol
d’extraction n’est pas branché orrec tement, le jus
peut suinter sur la base de la extr acteur de jus. Avant
d’assembler les pièces, véri ez et assure z-vous que
le silicone de compression est xé correctement.
Est-ce possible de presser des ingrédients
à bres dures?
• Des ingrédients tels qu e le céleri ou le gingembre
contiennent de longues bres qui p euvent
s’enrouler autour de la vis de pressage et a ecter
la performance de l’ex tracteur de jus. Quand vous
extrayez des ingrédients breux, ne collecter
pas plus de 500 g de jus. Après avoir recueilli
cette quantité ou moins, nettoyez entièrement
le bloc supérieur avant de pro céder à une autre
extraction.
Décoloration des pièces plastiques:
• Après l’extraction, si l ’ex tracteur de jus n’est
pas immédiatement nettoyé, l e reste de pulpe
contenu dans le bloc supérieur p eut sécher et
compliquer le démontage et l e nettoyage. Cela
peut également a ecter la performance et la
couleur de l’extracteur de jus.
• Les ingrédients riches en ca roténoïdes tels que les
carottes et les épinards peuvent te inter les pièces
plastiques. Lorsque les pi èces sont teintées par
les caroténoïdes, appliquez de l ’huile végétale sur
les zones teintées et utilisez un déte rgent doux
pour nettoyer.
• végétale doit ê tre utilisée seulement lors du
nettoyage sur les pièces dé colorées. Ne pas
utiliser d’huile végétale sur la v is de pressage ou
le sur le tamis. Si de l’huile végét ale ou de l’huile
à base de matières grasses animales rentre en
contact avec la vis de pressage, la p erformance
de l’extracteur de jus peu t en être a ectée et
entraîner des dommages aux pièces.
• Les pièces en silicone du bloc sup érieur euvent
être détachées pour un ne ttoyage complet.
Utilisation à des ns autres que l’extraction
de jus:
• Cette extra cteur de jus est conçu pour extraire du
jus d’aliments tells que les fruits et légumes.
• Ne pas utiliser l ’ex tracteur de jus pour extraire de
l’huile végétale.
• Ne pas presser d’ingré dients à forte teneur en
huile végétale/animale.
• Si la vis de pressage ou le t amis rentre en contact
avec de l’huile végétale/animale, cela po urrait
a ecter les performances de l ’appare il et
endommager des pièces.
FR
Page 23

45
44
CARACTERISTIQUES
Tension
Consommation
d’énergie
Utilisation maximale
Poids
Dimension
Fabricant
Type
AC120V, 60Hz
240W
Moins de 30 min.
6,5 kg (14.3 lb))
228 x 208 x 414 mm (9 x 8.2 x 16.3 po)
NUC Electronics Co., Ltd.
Faible vitesse
Produit
Modèle
Extracteur de jus
NS-995UL, NS-996UL, NS-997UL, NS-998UL,
UL-100, UL-110, UL-100B, ULC-112NB, ULC-121NB, ULC-122NB,
UL-100M, UL-110M, UL-100MB, UL-110MB, ULC-112YB,
ULD-111NB, ULD-112NB, ULD-115NB,
ULD-111YB, ULD-112YB, ULD-115YB
 Loading...