

Page 1
SV.ⓐ.1-170504M
The First Quiet High Power
VACUUM BLENDER
User Guide
for vacuum blender
that makes natural juice
※Malfunction of vacuum sensor can be caused over 500 Meters of altitude above sea level.
※The product should not be used in countries using dierent voltage.
*HOUSEHOLD USE ONLY
Page 2
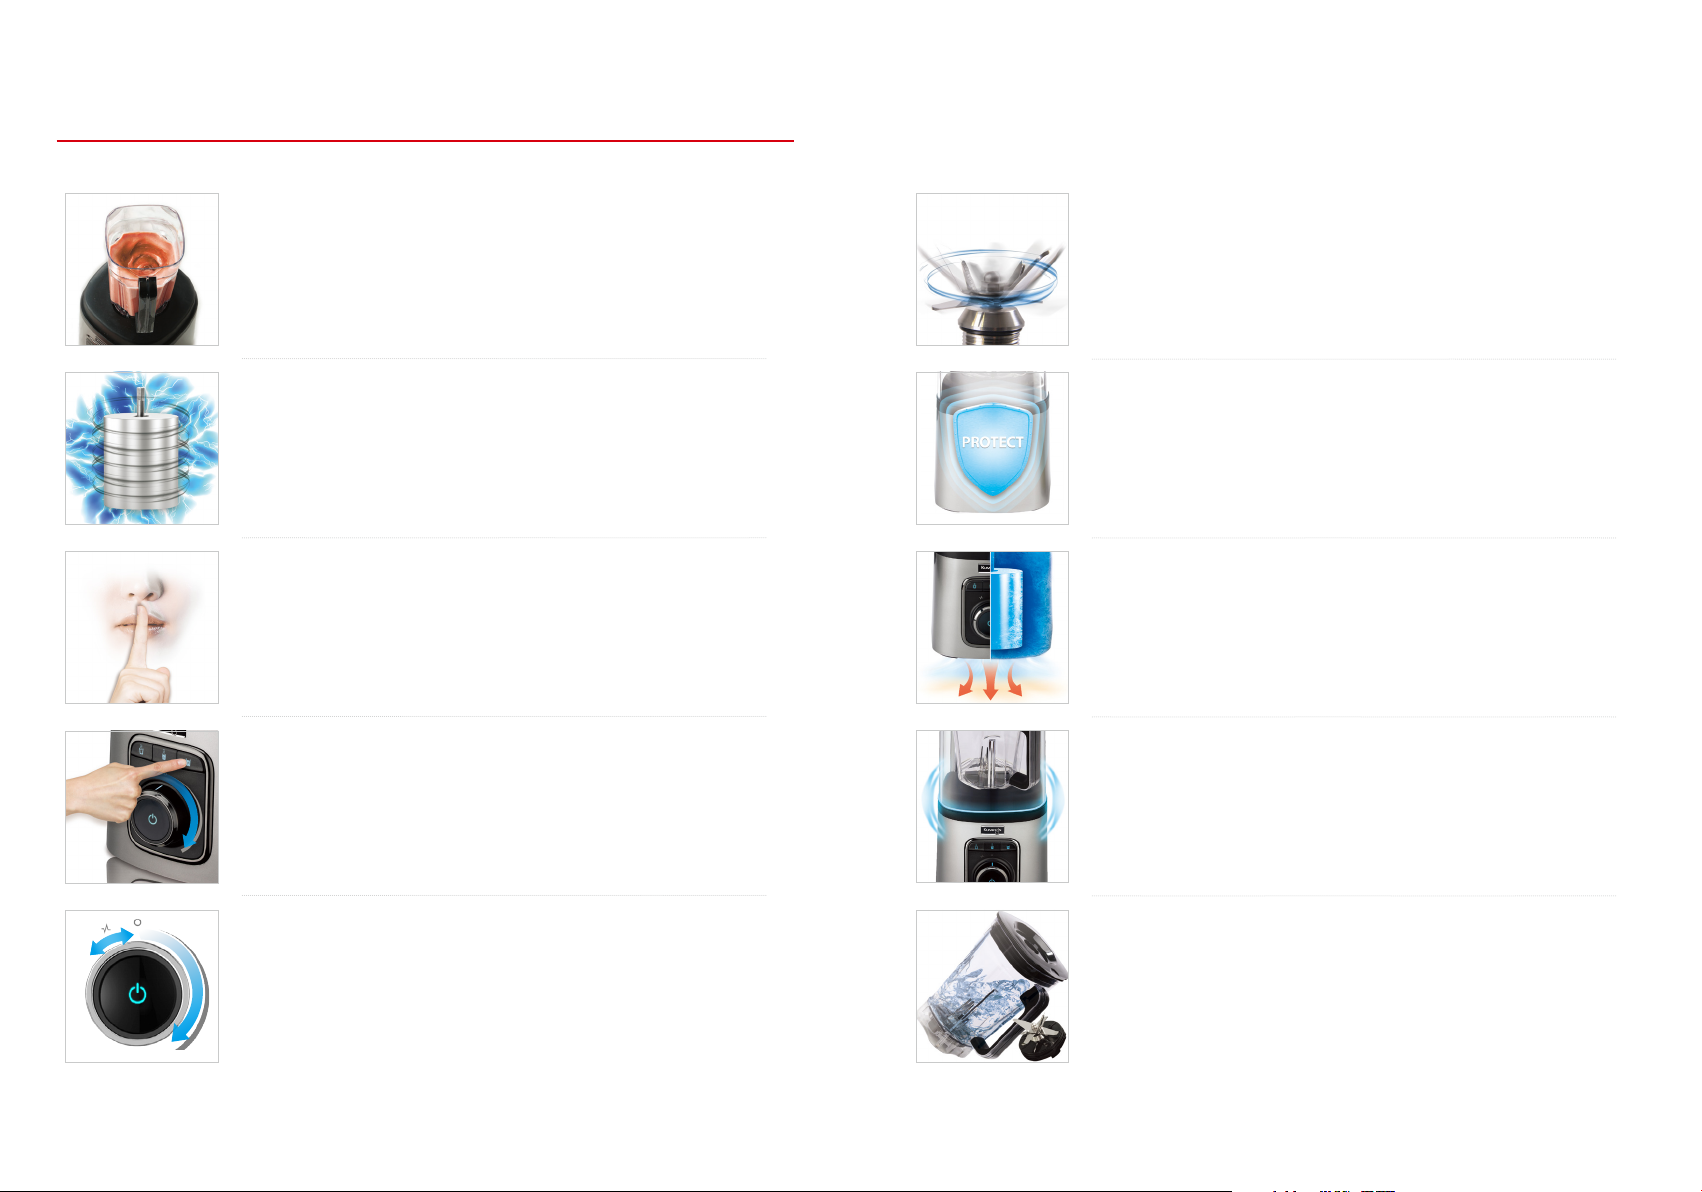
Special Features
Vacuum Blending
In optimal vacuum conditions with pressure of -80kPa,
it preserves color and nutrients by preventing ingredients from
contacting air and enriches the natural taste of fresh ingredients.
Super-Strong Power Motor [Maximum about 3.5H.P]
The Strong Motor rotating Blades 32,000 times per minute
blend ingredients nely to enhance taste.
Noise Reduction Cover
It minimizes noise caused by High-Power and Speed Blending
By introducing an Noise Reduction Cover.
Auto-Blending Function
Even a beginer can make all kinds of juice and smoothies with
the Auto-Blending Function.
Triple 3D Moving Blades [Deep Blending Function]
3D-Moving System with specially-heat treated 6 Blades
rotating tridimensionally enables deep blending.
Motor Protection Sensor
With a motor protection sensor preventing overheating of the motor,
it automatically prevents overload of ingredients and provides a safer
feature.
Air Cooling System
The heat discharging structure emits heat caused when blending
outside the Body, enabling consecutive use.
Safety Combine Structure
The product operates safely only when the Container is perfectly
combined with the Body.
Make Personalized Recipes
By using the variable speed dial(setting of 1 - 10), manually set the
speed from 2,000RPM to 20,000RPM to make desired recipes.
Replacement Blade Assembly
It has a separable Container and Blade Assembly so that you can
keep Container and Blade Assembly clean after washing them
separately.
0302
Page 3

CONTENTS
02
Special Features
04
Important Safeguards
06
Safety Warning
08
Tips on Operating
09
Parts
10
Maximum capacity of container by ingredients
11
How to Use Each Function
12
How to Operate
14
Cleaning and Care /
How to use (Optional) Blade wrench
15
16 Specication
Before requesting service
Important Safeguards.
* Be sure to read before use.
Please read this User Guide before using the product
1.
(Refer to Safety Warning, P. 06~07).
2.
Check for power plug, electric wire, parts, etc.
Use the product in a dry indoor area.
3.
Pull the power plug from the outlet before assembling
4.
or separating parts.
At rst use, a bit of smoke and smell may occur due to the motor
5.
drying process (This will disappear in the early period of use).
6.
Please comply with capacity in the User Guide. Use of excessive
capacity can cause failure and a bit of smoke
and smell due to the motor overheating.
Check for the assembly of parts before use, and never combine
7.
or separate while operating.
Do not use the product outside its intended purposes
11.
(Vacuum, Auto, Auto-blending).
Do not dismantle, assemble or change the product or parts,
12.
and be sure to repair any failure at service centers.
When cleaning the Blade Assembly, be sure to use "Blade wrench"
13.
(Do not wash the Blade Assembly in water but with running
water; store them after naturally drying.)
Users who lack physical sense and psychological ability or
14.
experience and knowledge (including children) should not use
the product alone; get guidance and help from a person who has
fully understood the precautions for safety.
15.
Keep away from children or infants’ reach, and guide children not
to play with the product.
16.
In the case of a damaged power cord, have the manufacturer,
its dealer, or an eligible technician exchange the power cord to
prevent risks.
17.
When transferring or lending the product to others,
send the User Guide along.
18.
This product is for domestic use; comply with the User Guide.
(In case of failure due to commercial or abnormal use,
warranty and manufacturer responsibility cannot be applied.)
8.
Do not move the product or impose shock while using,
and use only provided parts.
Do not open or move Noise Reduction cover while operating the
9.
product. Turn o the power after use, and open Anti-noise
cover after the blades have completely stopped.
After use, stop the product, pull the power plug from the outlet,
10.
wash it, and keep it clean.
04 05
※ The contents are for user safety and preventing property damage.
Read the details on the next page and use the product correctly.
Warning :
Caution: Failure to comply with the Guide may result in injury or product damage.
This indicates prohibition.
This indicates that you
should comply.
Failure to comply with the Guide may result in death or injury.
This indicates that you should separate
the power plug from the outlet.
This indicates that you should not separate.
This indicates that you
should perform.
Page 4

Safety Warning
Do not touch the power plug with wet hands.
ㆍ
Otherwise, it might cause electric shock.
Do not pull the plug by holding the cable.
ㆍ
Otherwise, it might cause damage in the cable,
resulting in electric shock or re.
Do not plug multiple cords into one outlet at the same time.
ㆍ
Otherwise, it might cause heat or re.
Do not use on a slope or unstable place.
ㆍ
If the product falls, it may result in damage or safety accidents.
Do not put other parts or tools aside from components
in the container before using the product.
ㆍ
It may cause safety accidents.
When not in use, pull the power plug from the outlet.
ㆍ
Otherwise, a short circuit may cause re due to insulation aging.
Do not use or store near heat or open ame.
ㆍ
It might cause deformation or discoloration of the product.
Never dismantle, repair or remodel Body.
ㆍ
Fire or injury might occur due to abnormal operation.
Do not bend the power cord excessively or put a heavy object
on it to prevent damage.
ㆍ
It might cause a short circuit or re.
Do not clean with inammable materials or chemicals.
ㆍ
It might cause electric shock, re or explosion.
Do not clean dust or water on the contact part of the power plug
and pin with a wet cloth.
ㆍ
It might cause electric shock or re.
When cleaning and repairing the product, be sure to pull the power
plug from the outlet and wipe with a dry cloth.
ㆍ
Do not clean using benzene or alcohol.
It might cause discoloration of the product.
ㆍ
Do not put Body in water.
Store away from children or infants’ reach.
ㆍ
Otherwise, safety accidents might occur involving injury.
Do not hold blades with hands when using
or cleaning the product.
ㆍ
Otherwise, the blades might injure your hands.
Do not wash each part using a dishwasher,
and do not clean the Container with hot water.
ㆍ
Otherwise, it may shorten the lifespan or degrade functions.
ㆍ
Do not put parts in the dishwasher to clean and dry.
Do not put water hotter than 40°C or ingredients in the Container.
ㆍ
Otherwise, it may cause deformation of the container.
40°C
0706
Page 5

Tips on Operating
Parts
Before use
1. Check if the Container and Container lid are perfectly combined into the Body.
(If the Container is not perfectly combined to the Body, the product will not work).
2. The Vacuum function works only when the Noise Reduction cover is perfectly combined to the Body.
3. For safe use of the product, keep it away from children or infants’ reach.
4. Do not blend other ingredients except Coee beans, Almonds, Nuts etc. (Do not vacuum when blending.)
While in use
1. Do not idle-run the product without ingredients (It might cause product damage and shortening of lifespan).
2. Use on a dry and at surface, and do not shake or move while operating.
(The product works on a ow vibration technology method, not a motor xed method; motor vibration
in the Body is not product failure).
3. Do not put in other objects aside from ingredients (Spoon, Fork, Chopsticks, etc.).
4. Do not shake or move while operating (It might cause safety accidents or shortening of lifespan).
5. Ingredients with water may not be grinded well.
Especially for dry ingredients (Coee beans, etc.),
Grind them after completely drying ingredients and the Container.
6. Blending performance can dier according to ingredients’ type and amount.
- Cut ingredients below 3cm before putting them in the Container. For ice, use cubed ice at home.
- Order of inserting ingredients: liquid (Drinks, Water, etc.) ➞ ingredients with a lot of juice (Tomatoes, Fruits, etc.)
➞ soft ingredients (Leaf vegetables) ➞ hard ingredients (Carrots, Ice, etc.) P.11
- If ingredients do not mix properly while blending, stop, stir the mixture and restart the machine.
7. If the motor protection sensor does not work (motor does not stop) due to noncompliance of standard
amounts, cool o the motor for more than 30 minutes and restart the machine.
A
B
returns to white after completion of vacuum.
Noise Reduction Cover
B
blending, with a vacuum function equipped in.
C Vacuum Valve
A Vacuum Display
condition (It can be separated and washed).
D Container Lid
E Backow Preventer
C
D
E
F Container
it is a BPA-free and Eco-friendly Container harmless to human health
(Put ingredients below the Maximum capacity).
G Blade Assembly
treated 6-layer blades optimize blending of ingredients
F
G
H
I
J
(It can be separated and washed).
H Vacuum Port
it connects the Body and the Noise Reduction cover.
I
Safety Sensor
the Container is perfectly combined to the Body.
It is equipped with a motor
J Body
with Maximum 32,000 RPM and a Control Panel.
K Control Panel
K
L
dialing manually, and automatically control by pressing
the 3 menu buttons (Vacuum/Auto/Auto-Blending) accordingly.
L Rubber Feet It reduces product noise and prevents shaking.
It changes to blue during vacuum and
It minimizes noise when
It is used for keeping/clearing the vacuum
It blends ingredients in a vacuum.
It can be separated and washed.
Made with TRITAN and a maximum capacity of 1.3L,
Made with stainless steel, specially heat
When using the Vacuum function,
It is designed to operate only when
You can control the blending speed by
After use
1. After use, clean the Container immediately.
(Fill the Container half full with water, combine it to the Body and operate
for about 15-20 seconds to clean inside remainders easily.)
2. Do not wash the Body and Noise Reduction Cover with water but wipe it with soft cotton or cloth.
<Extra components>
Vacuum Valve
It is used for keeping/clearing the
Vacuum condition of the Tumbler
(It can be separated and washed).
Tumbler Lid
It keeps blended juice in a Vacuum.
Backow Preventer
It can be separated and washed.
3. As the Blade Assembly can be separated/washed in the Container, naturally dry it after cleaning.
(‘Putting’ the Blade Assembly in water may cause failure; this can be repaired by paid service).
08 09
Tumbler
It keeps blended juice or smoothies
in a vacuum for a long time.
(Maximum Capacity: 800ml)
(Optional) Blade Wrench
Refer to p. 13 for use.
Page 6

Maximum Capacity of Container by ingredients
800
500
MAX 1300
1000
800
600
400
200
How to Use Each Function
- Add liquids (Water, Milk, Juice, etc) because the blades may be going around or the blending particles
may become rough when the ingredients are thick.
- Please make sure to put ingredients below the maximum capacity.
Container
1
- Maximum capacity to put common ingredients
MAX 1300
1000
800
600
400
200
(Fruits, Vegetables, Water, etc) (1,300ml)
- Maximum capacity to put ingredients are included daily products
(Milk, Soy Milk, Dry Milk, etc) (800ml)
- Maximum capacity to put daily products
(Milk, Soy Milk, Dry Milk, etc) (600ml)
- Minimum liquid capacity at blending
(300ml)
* If the capacity below the minimum, it may not be normal.
Control part How to useFunction
Dial button
Power standby
Standby
Stop function
Dial
: Pulse
Manual mode
Vacuum
button
Container Vacuum
Tumbler Vacuum
Auto
button
Blending after
Vacuum
* When the power is turned on and the Container is perfectly combined.
* When the Dial button is pressed on power standby.
* When the Dial button is pressed while another function is being performed.
* Put ingredients (Coee beans, Vegetables, Fruit, Ice etc.) and turn the Dial to
to perform (Turn Dial to and unhand it; it will return to ).
- Maximum capacity of ingredients: Below 1,300g /Dairy products: Below 600ml
* Put ingredients (Vegetables, Fruit, Ice etc.)
and blend them by controlling manual speed. (Min 2,000 ~ Max 20,000)
- Coee beans / Ice: Below 400g, Rice grains : 500g
- Maximum capacity of ingredients: Below 1,300g /Dairy products: Below 600ml
* Press the Vacuum button to operate the Vacuum function.
- Maximum capacity of ingredients: Below 1,300g /Dairy products: Below 600ml
* Press the Vacuum button to operate the Vacuum function.
- Maximum capacity of ingredients: 800g/ Dairy products: Below 500ml
* Put ingredients (Vegetables, Fruit, Ice, etc.)
and press the Auto button to operate "Vacuum + Auto Blending."
- Maximum capacity of ingredients: Below 1,300g / Dairy products: Below 600ml
Tumbler
2
- Maximum capacity to keep blended ingredients
(800ml)
- Maximum capacity to keep dairy products
(500ml)
Auto-blending
button
Auto-blending
(juice/smoothie)
* Put ingredients (Vegetables, Fruit, Ice, etc.)
and press the Auto-Blending button to operate the function.
- Maximum capacity of ingredients: Below 1,300g / Dairy products: Below 600ml
Precautions
Minimum water amount Recommended ice Grinding dry ingredients Order of putting ingredients
When blending ingredients with
little water, a minimum amount of
liquid is required.
300ml
Cubed ice sized less than 3cm
for home.
3cm
Grind dry ingredients (
etc.) after completely drying
ingredients and Container.
Do not vacuum when blending.
coee beans
liquid → ingredients with lots of
juice → soft ingredients → hard
ingredients (ice as the last).
10 11
Page 7

How to operate
- After purchasing the product, clean the Container and Blade Assembly with dish detergent before using.
- At the initial use, Body may generate a little amount of smoke and smell.
(This is caused during the motor drying process and will disappear after a few times of use).
- Each function has a Smart Auto-Control function, which automatically stops operation when ingredients
become the optimal condition.
Put ingredients in the Container and close the Container Lid.
1
- Ingredients should be cut to less 3cm and put
under maximum capacity.
- Check if the Container, Container lid
and Vacuum Valve are perfectly combined.
- Do not blend other ingredients except coee
beans, almonds, nuts etc.
(Do not vacuum when blending.)
①
Turn the Power on.
3
- LED of the Dial button is turned to and the buzzer goes on.
②
Press the Dial button once to enter stand by ,
and select a menu button to operate the product.
4
- When in Vacuum mode, the LED on the Dial button turns .
- The LED turns once Vacuuming has nished.
- Vacuum Error: LED on the Dial Button ashes to
on the menu ashes with a beep.
or The Button
Bee~
Check if the Container, Container Lid and Vacuum Valve are perfectly combined.
2
- Place the handle of the Container forward.
(Place the magnetic part at the bottom of the Tumbler forward and operate the "Vacuum" function.)
- Check if the Vacuum Port part of the Body is perfectly combined with the Noise Reduction Cover.
- Noise Reduction Cover is equipped with the Vacuum function.
A. Container
①
_
①
_
B. Tumbler
Side view
<
>
②
When it is complete, turn the Power o
and separate the power plug.
5
- Press the Dial button to stop.
- Function stop: Press on the Dial Button or the Dial is turned to
while in operation, the function stops.
- Turn o the power, and Dial to when using the product again.
Open the Noise Reduction Cover and lift up the Vacuum Valve to clear the
6
vacuum.
- The vacuum should be cleared with the
Vacuum Valve to open the Container Lid.
- After performing instant operation, manual
operation and Auto-Blending, clear the Vacuum
with the Vacuum Valve to open the
Container easily.
1312
Page 8

Cleaning and Care / How to use (Optional) Blade wrench
Before requesting service
- Putting the Noise Reduction Cover in water may
cause failure; this can be repaired by paid service.
- Clean the Body and Noise Reduction Cover with
dry cloth.
- When cleaning the Container,
do not put the Blade Assembly in water.
(It may cause malfunction and rust. )
- Do not wash the container into the dishwasher.
- Putting the Blade Assembly in water may cause
failure; this can be repaired by paid service.
- Do not wash the container in hot water over
temperature 40℃(100
℉)
Blade
Assembly
When abnormality occurs during operation
1) If hearing abnormal noise
- Check rotating condition (bearing) of the Container.
- After stopping the product, check if the Container and Noise Reduction Cover are properly combined.
- Check size and amount of an ingredient (Below 3cm).
2) If the motor does not rotate
- Check if the power cord is plugged into the outlet properly.
- Check if the Container and the Body are perfectly combined
3) If the motor stops during operation (it is for safety of motor, not failure or malfunction).
Corrective measuresSymptoms
- Pull out the power plug.
Bee~
- Re-operate the product by complying
with the standard amount by ingredient.
- Pull out the power plug.
- Cool o the Body for 30 minutes
before reusing.
* If water permeate inside handle, remove rubber
pad to dry water, and then reassemble it.
How to use (Optional) Blade wrench
1) Separating Blade Assembly
- Put the "Blade Wrench" on the bottom part of the Container where the Blade Assembly is combined.
- Turn the Handle counterclockwise and remove the blade set by inserting a knife wrench vertically
into the container as shown in Figure 3.
①
②
③
If the motor power sensor detects
excessive ingredients for protect
ing the motor.
If the motor temperature sensor
detects motor temperature rise.
-
Dial button(red) LED Flash/Buzz
4) If the Body moves a bit during operation
- Wipe any water, oil or dust on the Rubber Feet at the bottom of the Body or water on the table.
5) If the motor makes a smell during initial use
-
During initial use, any products using motors may generate a little amount of smoke and smell due to the motor drying process.
- This will disappear naturally after a few times of use
6) If air continues to come up from inside the Container when performed in a Vacuum
- Stop the product, move ingredients to a plate, re-combine the Blade Assembly and operate the product again.
7) Vacuum Containers and Blade Sets are consumable parts, so please use them once every 6 months or
a year depending on the number of times you use.
Before requesting service
Corrective measuresChecklistSymptoms
If the product
does not operate
(common).
2) Combining Blade Assembly
- Place the Blade Assembly on the bottom part of the Container.
- Put the "Blade Wrench" on the Blade Assembly and turn it clockwise.
(If the Blade Assembly is not perfectly combined, it does not become the Vacuum condition.)
①
14 15
②
③
If ingredients are
not blended well.
If vacuuming
system does not
work properly.
Is the power cord plugged into
the outlet properly?
Are the Container and Noise Reduction
Cover perfectly combined to the Body?
Did you choose a menu item properly
according to the function of each
ingredient?
Did you put the proper amount of
ingredients specied in the manual?
Vacuum Error:
LED on the Dial Button ashes to
or The Button on the menu ashes
with a beep.
- Plug the power cord into the outlet properly.
-
Use after combining the Container and Anti-Noise
Cover to the Body perfectly.
-
Use the right menu item according to the function
of each ingredient.
-
Comply with the amounts of ingredients in the manual.
- After separating the Noise Reduction Cover, open
the Container Lid to mix ingredients thoroughly.
-
Separate the Container from the Body and
mix ingredients well before re-operating.
- Assemble Vacuum Valve and Container Lid properly.
- Put Noise Reduction Cover on properly place.
Page 9

Specication
Product name
Model name
Rating voltage
Power consumption
Product size
Rating time
Weight
Container capacity
Manufacturer
*Do not use in other countries using dierent electric voltage.
Vacuum blender
SV-500E, SV-510E, SV-520E, SV-530E, SV-500B, SV-510B, SV-520B, SV-530B, SV-500
AC220~240V / 50~60Hz
1500W
216mm x 240mm x 443mm
Auto control.
6.2kg
Maximum capacity of blend: 1300ml / maximum capacity of grinding: 500ml
NUC Electronics Co., Ltd.
16 17
Page 10

18
 Loading...