

Page 1

Extractor. E120511
INSTRUCTION MANUAL
Manuel d’utilisation
Carefully read and save these instructions
Household use only / US&CANADA use only (110/120V)
MASTICATING JUICER
Kuvings US Customer Service:
Phone 1 (888) 682-5559
Email support@nuc.kr
Headquarters:
NUC Electronics CO., Ltd
679, Chimsan-3Dong, Buk-gu, Daegu, 702-053, Korea
©2012 Kuvings All rights reserved
Page 2

32
When using electrical appliances, basic safety precautions should always be followed including the following:
1. Read all instruc tions.
2. To protect against risk of electric shock, do not put the parts, such as the motor base, in water or other liquid.
3. Close super vision is necessary when juice extractor is used near children.
4. Unplug from outlet when not in use, before assembling or disassembling and before cleaning.
5. Avoid contact with moving parts.
6. Do not operate the juice extrac tor with a damaged cord or plug, after the juice extractor malfunctions or is
dropped or damaged in any manner.
Retum the juice extractor to the nearest authorized service facility for examination, repair, or electrical or
mechanical adjustment.
7. The use of attachments not recommended may cause re, electric shock, or injury.
8. Do not use outdoors.
9. Do not let the cord hang over the edge of the table or counter.
10. Always make sure the juice extractor cover is clamped securely in place before motor is timed on.
Do not unfasten clamps while juice extractor is in operation.
11. Be sure to tum switch to o position after each use of your juice extractor.
Make sure the motor stops completely before disassembling.
12. Do not put your nger or the objects into the juice extractor opening while it Is in operation.
If food becomes lodged in opening, use food pusher or other piece of fruit or vegetable to remove the
remaining food.
13. Do not modify the plug in any way.
14. Do not place on or near a hot gas or electric bumer or in a heated oven.
15. Do not use appliance for other than intended use.
NEVER SUBMERGE THE MOTOR BASE IN WATER OR OTHER LIQUID
FOR HOUSEHOLD USE ONLY
Table of contentsImportant safeguards
02 Important safeguards
03 Table of contents
04 Features
05 Parts
06 How to assemble
07 How to use the juicer
08 How to care
10 Multi-purpose parts
11 Recipes
16 Troubleshooting
17 Product speci cations
Page 3
54
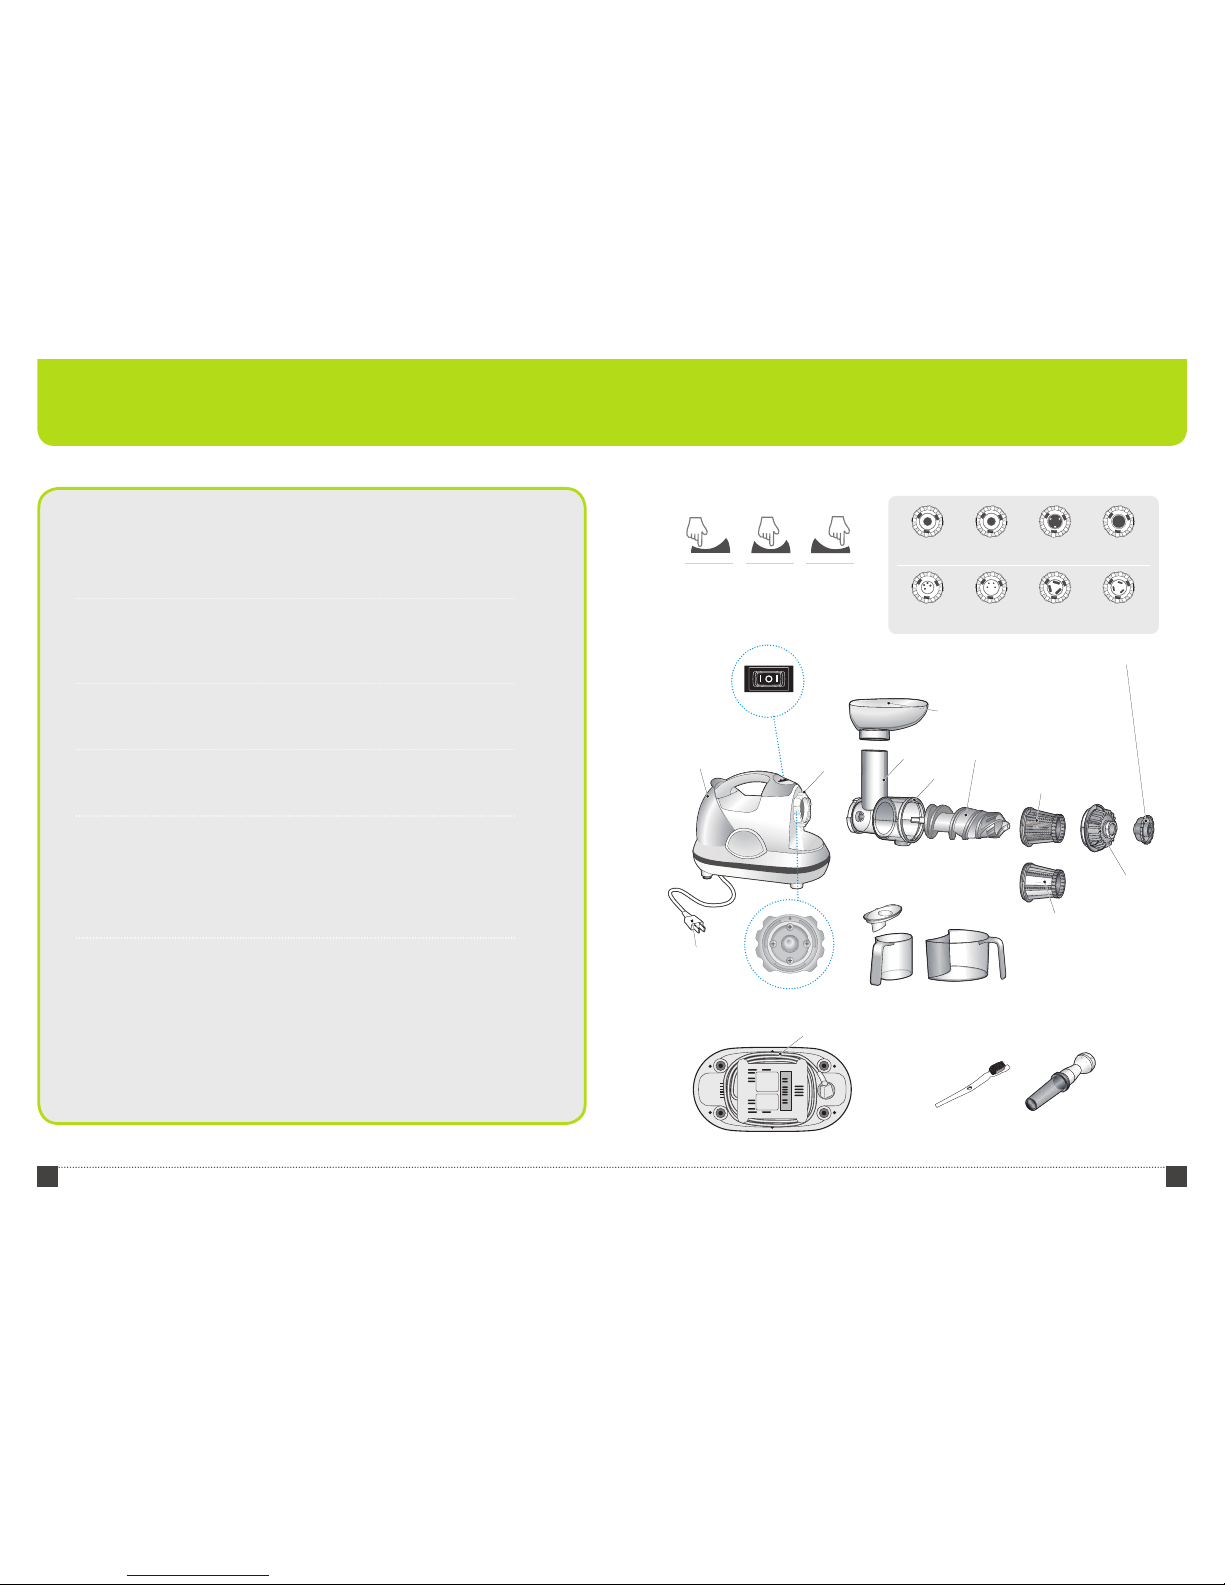
PartsFeatures
Cleaning Brush Pusher
<SWITCH>
FORWARD
STOP REVERSE
Cap
Juice Cup Pulp Cup
Plug
Locking Clip
Base
Blank Screen
Strainer
Drum Cap
Hopper
Drum
Chute
Auger
Power Cord
<NOZZLE>
Juicing Nozzle
Pasta Nozzle
(Round Large)
Juicing Nozzle
(Extra)
Pasta Nozzle
(Round Small)
Mincing Nozzle
Pasta Nozzle
(Flat Large)
Rice Cake Nozzle
Pasta Nozzle
(Flat Small)
Durable Masticating Type Design
The spiral auger, made with durable plastic materials, helps extract vitamins,
enzymes, and minerals from fruits and vegetables.
A Low Speed Gear
A low speed gear is utilized to reduce noise and vibration during operation so that
the machine can be used quietly at home.
Heavy-Duty Motor
Heavy-duty motor makes it possible to juice brous vegetables or fruits at low speed.
Easy to Use
Designed for easy assembly, disassembly and operation. Easy to clean after use.
Multi-Purpose
Juices vegetables including carrots, beets, celery, and peppers.
More juice options include leafy greens such as wheatgrass, cabbage, kale and fruits
such as apples, pears, etc.
Grinds co ee beans and make homemade pasta in just minutes.
8 di erent nozzles
Includes 8 di erent nozzles for juicing, mincing, pasta, noodles, etc.
Page 4

76
How to assemble How to use the juicer
2
Drum Cap and Nozzle
1. Attach the nozzle to the drum cap.
2. Turn the nozzle counterclockwise
to lock position.
3. Place the drum cap and turn
counterclockwise to lock position.
1
Auger & Strainer Assembly
Make sure that the strainer’s “UP”
position is assembled pointing up
.
3
Base Assembly
Secure the drum and drum cap
assembly onto the base by
turning the locking clip to ‘OPEN’
position attaching the drum case
to the base unit and turning the
locking clip to ‘close’ position.
FORWARD STOP REVERSE
Place the juice cup and pulp cup securely under the
drum. Plug the power cord into the wall outlet and
trun on the start switch to ‘Forward’.
Feed thoroughly cleaned and prepared juicing
ingredients into the chute opening at a steady pace.
Cut the ingredients to 4 to 6 inches long and 0.5
inches wide.
For leafy vegetables, such as celery, trim the stalks and
stems before juicing.
For best results, feed the ingredients one at a time at a
steady pace and do not force large amounts of ingredients into the chute with the pusher.
WARNING! Do not put n-
gers, chopsticks, spoons, or other
foreign objects into the feeding
chute while the juicer is operating.
Use pusher as needed instead.
First press ‘STOP’ and then press ‘REVERSE’ to cleare out the
clogged ingredients inside the auger assembly and press
‘FORWARD. (Repeat approximately 3 times to completely
clean out the clogged ingredients.)
If clogging persists, disassemble the unit and thoroughly clean the components.
(Reverse switch must be held pressed for continuous operation.)
ATTENTION! When switching operation mode from ‘FORWARD’ to ‘REVERSE’, be sure to
press ‘STOP’ before switching to ‘REVERSE’. If the mode is switched directly to ‘REVERSE’
while operating in ‘FORWARD’ mode the machine could be damaged.
2
1
Page 5

98
Make sure the machine is turned o
and unplugged before beginning
disassembly. Empty out the drum of all
the ingredients by keeping the machine
running for few extra seconds before
stopping.
Scrub the strainer with the soft brush
angled at a 45 degree angle.
Wipe the base unit with a soft, damp cloth.
Separate the drum and chute from
the base unit by turning the clip
counterclockwise.
Remove the nozzle and disassemble the
drum and auger as shown next.
Wash drum and auger with mild
detergent, using the soft brush.
Rinse with water and dry thoroughly.
1
5
6
2
3
4
TIP
When cleaning the drum cap, detach the rubber ring
and place it back on with its protruding part facing the
the front of the drum cap when nished cleaning.
.
Most juicer parts are top shelf dishwasher safe, low temperature recommended.
For best results hand wash with a soft cloth using mild detergent and towel dry.
The juicing strainer is hand wash only (included cleaning brush or similar plastic
bristled dish brush is recommended).
.
Do not wash any juicer parts with harsh or abrasive cleaners.
.
Please wipe the exterior clean using a damp soft cloth. Do not wash or submerge the base.
For Cleaning
How to care
Disassembly / Cleaning / Maintenance
ATTENTION! If the cloth is too wet water
may migrate into the machine causing
re, electric shock, or permanent damage.
Page 6

1110
Using as a juicer
Juice Recipes
(make 2 servings)
To process Strainer Nozzle
Juicing apple, orange, grape,
strawberry,tomato, kiwifruit,
pineapple,melon, aloe, carrot, celery,
spinach, broccoli, wheat & other
grasses, yam, pine tree needles,
sprouts, olive leaves, ginger etc
Strainer Jucing Nozzle
Mincing frozen fruits, nuts, seeds,
dried & fresh fruits, sprouted grains,
herbs & seasonings
Blank
Screen
Mincing Nozzle
Pasta
Blank
Screen
Round (Small, Large) Pasta / Flat (Small, Large) Pasta
Rice cake
Blank
Screen
Jucing Nozzle,
Rice Cake Nozzle
Slush, crushing ice, grinding
Blank
Screen
No nozzle
When juicer is making weird noises
-Turn o the juicer and check that the juicer parts are correctly assembled.
-Check the size of the food in the juicer.
When juicer does not turn on
-Check that it is plugged in correctly.
-Check that the juicer is assembled properly.
-Check than your household circuit or GFI outlet is not tripped.
- Turn o the juicer and wait 30 minutes to cool down the motor if the juicer will not turn on after
extended use. The juicer has built-in protection to prevent damage due to overheating.
FRESH JUICES
Used as a juicer the Masticating Juicer makes fresh juice out of any fruit, vegetable, or grass.
The collected pulp can be used for making soup, salad, or compost. We recommend using fresh
organic fruits and vegetables.
1. Assemble the juicer following the instructions using the juicing strainer and juicing nozzle.
2. Place the juice cup under the pulp discharging outlet.
3. Cut the food into an appropriate size so that it can easily t into the hopper.
4. Plug the power cord into the wall outlet and start the juicer before inputting food.
When juicing large amount of fruits and vegetables, occasionally disassemble and clean
the strainer to prevent clogging.
TIP
Sweet Grass Juice
Ingredients
3 carrots, 2 apples, 1 bunch wheatgrass
1 celery stalk, 1 thin slice of fresh ginger(optional)
Method
Attach the juicing nozzle and feed the wheatgrass into
the hopper. Alternate with the carrots, apple and celery.
Digester's Delight
Ingredients
½ pineapple , 2 oranges (peeled), 1 celery stalk
Method
Attach the juicing nozzle and feed the pineapple, oranges
and celery into the hopper alternating between each.
Detoxi er
Ingredients
3 carrots, ½ beet , ½ parsley, 2 celery stalks
Method
Attach the juicing nozzle and feed the carrot, beet, celery
and parsley into the hopper alternating between each.
Melon Punch
Ingredients
1/2 small watermelon or 1, rockmelon,
1 punnet strawberries
Method
Use the juicing nozzle and start machine. Juice melon and strawberries.
Grape nectar
Ingredients
2 bunches of grapes, 2apples
Method
Use the juicing nozzle and start machine. Juice grapes
including wines alternating with apple.
Pina Colada
Ingredients
1 cup of coconut milk, ½ pineapple
Method
Attach the juicing nozzle and feed the pineapple slowly.
Combine the pineapple juice with coconut milk and serve chilled.
How to use the multi-purpose parts
Juicer problems
Multi-purpose parts Recipes
Page 7

1312
ICE CREAMS & DESSERTS
Using as a mincer
Used as a mincer the Masticating Juicer makes ice cream with frozen fruits. Always freeze the fruits without the
skins or seeds. Cut fruits into smaller pieces so they t into the hopper.
1. Assemble the juicer following the instructions using the blank strainer and mincing nozzle or juicing nozzle
depending on the consistency desired.
2. Place the chilled juice bowl under the pulp discharging outlet.
Remove the frozen fruits from freezer just before use.
Mixing in frozen bananas gives a creamy consistency to the ice cream.
TIP
Ice Cream Recipes
Berry Ice Cream
Ingredients
1 container of frozen berries, 3 bananas
Method
Attach the juicing or mincing nozzle and feed the berries
and bananas alternating between each a creamy ice cream.
Sweet Carob Ice Cream
Ingredients
3 frozen bananas sliced, 2 tbsp carob power
1 tbsp honey, 2 tbsp water
Method
Mix honey, carob and water and pour over frozen
banana slices. Attach the juicing or mincing nozzle
and feed the mixture into the hopper.
Pineapple Sorbet
Ingredients
1 frozen pineapple
Method
Attach the juicing or mincing nozzle and feed the pine-
apple into the hopper.
Coco Mango Ice Cream
Ingredients
2 frozen mangoes, 2 frozen bananas
½ cup cubed fresh coconut , ½ cup frozen dates
Method
Attach the juicing or mincing nozzle and feed the man-
goes, bananas, coconut and dates alternating between
each. Mix well.
Maco Fruits Ice Cream
Ingredients
2 cup diced frozen fruits
3 bananas
½ cup macadamia nuts (soaked for 8 hours, rinsed, and
drained well)
1 tsp vanilla extract
Method
Attach the juicing or mincing nozzle and feed the fruits
and macadamia nuts alternating between each. Quickly
stir in vanilla extract.
(make 2 servings)
MINCING & PUREE
Using as a mincer
Used as a mincer the Masticating Juicer makes baby food, purees, sauces, grinds meat, and minces dried fruits,
garlic, onion, or ginger.
1. Assemble the juicer following the instructions using the blank screen and mincing nozzle or juicing nozzle
depending on the thickness desired.
Mincing & Puree Recipes
Bliss Balls
Ingredients
2 cups almonds
(soaked for 8 hours, rinsed, and drained well)
1 cup unsulphured dried fruits
(e.g. fi gs, dates, raisins and apricots)
½ cup coconut fl akes
Method
Attach the juicing or mincing nozzle and feed the
almonds alternating with dried fruits. Form into
small balls and roll in coconut fl akes.
Sun ower Hummus
Ingredients
1 ½ cups sunfl ower kernels
(soaked for 8 hours, rinsed, and drained well)
½ cup chopped scallion
1 cup chopped parsley
¼ cup lemon juice, ¼ cup orange juice
2 tbsp hulled tahini
1 tbsp honey or maple syrup
2 tbsp Braggs liquid aminos
Pinch of cayenne pepper(optional)
grated ginger(optional)
Method
Combine sunfl ower kernels, parsley and onion. Attach
the mincing nozzle and feed the mixture into the hopper. Add liquid ingredients and seasonings. Mix well.
Sweet Grain Cookies
Ingredients
2 cups grain
(soaked for 8 hours, rinsed, and drained well)
1 cup seeded grapes
Cinnamon to taste
Method
Combine ingredients in a bowl. Attach the juicing nozzle
and spoon the mixture into the hopper. Turn off the juicer
when the cookies are at desired size and repeat the process until all cookies are made.
Salsa
Ingredients
4 ripe tomatoes
½ red or green pepper
½ celery stalk
1 small onion
1 clove garlic
1-2 tbsp fresh coriander
1/3 tsp cumin
Braggs liquid aminos
Cayenne pepper or fresh chilli(optional)
Method
Attach the mincing nozzle and feed the vegetables
into the hopper. Add dry ingredients and seasonings
to minced vegetables and serve.
Recipes
Page 8

1514
PASTA
Using as a pasta maker
Used as a pasta maker the Masticating Juicer makes homemade angel pasta, spaghetti, fettuccine and
other variety of noodles.
1. Assemble the juicer following the instruction using the blank strainer. Attach at or round nozzle
depending on the thickness and type of pasta desired.
Pasta Recipes
Egg Free Pasta
Ingredients
2 cups semolina fl our
½ cup warm water
½ tsp sea salt(optional)
Method
In a large bowl mix the dry ingredients with warm
water until the dough forms a ball. Transfer on
to a fl oured surface and knead until the dough
is smooth. Divide the dough into an appropriate size to fi t in the hopper. Attach your choice of
pasta nozzle and feed the dough into the hopper.
Turn off the juicer when the noodles are at desired
length and cut with scissors. Repeat the process until all noodles are made.
Use tomato juice(or paste), spinach juice or
carrot juice to make colored pasta. Sprinkle a
little our on the pasta as it piles up to prevent
the noodles from sticking together.
TIP
Recipes
Page 9

1716
PROBLEM SOLUTION
When motor does not work
Check that the unit is plugged in correctly and your
outlet has power.
When the auger stops during use
Unplug and disassemble juicer to check to see anything is clogged in the auger.
The auger is grinding/wearing Avoid running the juicer for long periods empty.
The strainer does not separate the juice
Adding ingredients too fast into the chute may clog
the strainer. Use the reverse button to unclog the food
and disassemble the unit to clean the strainer before
further use.
Amount of juice is less than normal
Juice production depends on how fresh the produce
is. Older produce tends to dry out and will yield less
juice. Increase yield with older produce by soaking it
water before juicing.
Juicer is yielding wet pulp
Combine produce with low fi ber, like carrot, with high
fi ber, like kale, to decrease the moisture content of the
pulp and increase juice yield. Try to avoid using the
pusher
Part of the drum cap is blocked during juicing
This means that pulp is clogged in the drum cap. To
solve this, juice food with high fi ber to unclog the pulp.
When juicing grapes, the skin is not ejected
Use the mincing nozzle for better results. The grape
skin may clog the strainer, so insert one or two pieces
of carrot to unclog during operation.
Juice is not being produced and pulp is backing up
Adding too much ingredients at once can cause this
problem. Stop adding produce and cycle the operation between 'FORWARD', 'STOP', and 'REVERSE' several
times to unclog. Add food more slowly to prevent this
problem.
Poor results when making noodles
Make sure the dough is not too watery. Also try oiling
the auger.
Rice is not grinding well
There should be no moisture in the rice and it has to be
completely dry in order to work well. For best results
use a blender instead like our Kuvings Hybrid Blender
Product Juice Extractor
Model No.
NJE-3520U, NJE-3530U, NJE-3540U
NJE-3570U, NJE-3580U, NJE-3590U
Voltage
AC120V, 60Hz
Power Consumption
170W
Screw Speed
80RPM
Motor
Single Phase Induction
Continuous Running Time
30min MAX
Product Size
(L) 308mm X (H) 240mm X (W ) 164mm
*Speci cations or features subject to change at any time without notice.
Troubleshooting Product speci cations
 Loading...