

Page 1

JUICE EXTRACTOR. E120511
CAREFULLY READ AND SAVE THESE INSTRUCTIONS
US/CANADA USE ONLY (110/120V)
HOUSEHOLD USE ONLY
JUICE EXTRACTOR
Kuvings US Customer Service:
Phone: 1 (888) 682-5559
Email: support@nuc.kr
Headquarters:
NUC Electronics CO., Ltd
679, Chimsan-3Dong, Buk-gu, Daegu, 702-053, Korea
©2012 Kuvings All rights reserved
INSTRUCTION MANUAL
Manual de Instrucciones
Page 2
2 3
Notice Before Use
.
Be careful of knives for they are very sharp.
.
Do not push small/large feed tube pusher too strongly to protect knife.
.
When you hear noise of vibration, stop machine and take out the remnants from knife and start again
.
Please use small feed tube pusher only in large feed tube pusher.
General Notice Before Use
.
Make sure to use appropriate voltage.
.
Make sure of assembling status for main body, stainless juicing bowl, juicer cover, safety locking arm.
When using electrical appliances, basic safety precautions should always be followed
including the following:
1. Read all instructions.
2. To protect against risk of electrical shock do not put main body in water or other liquid.
3. Close supervision is necessary when any appliance is used by or near children.
4. Unplug from outlet when not in use, before putting on or taking o parts, and before cleaning.
5. Avoid contacting moving parts.
6. Do not operate any appliance with a damaged cord or plug or after the appliance malfunctions, or is dropped
or damaged in any manner. Return appliance to the nearest authorized service facility for examination, repair
or electrical or mechanical adjustment.
7. The use of attachments not recommended or sold by the manufacturer may cause re, electric shock or injury.
8. Do not use outdoors .
9. Do not let cord hang over edge of table or counter.
10. Always make sure juicer cover is clamped securely in place before motor is turned on. Do not unfasten clamps
while juicer is in operation.
11. Be sure to turn switch to OFF position after each use of your juicer. Make sure the motor stops completely
before disassembling.
12. Do not put your ngers or other objects into the juicer opening while it is in operation. If food becomes lodged
in opening, use food pusher or another piece of fruit or vegetable to push it down. When this method is not
possible turn the motor o and disassemble juicer to remove the remaining food.
13. Do not use the appliance if the rotating sieve is damaged.
14. When a separable pulp container is provided, Do not operate without the pulp container in place does not t,
contact a quali ed electrician. Do not modify the plug in any way.
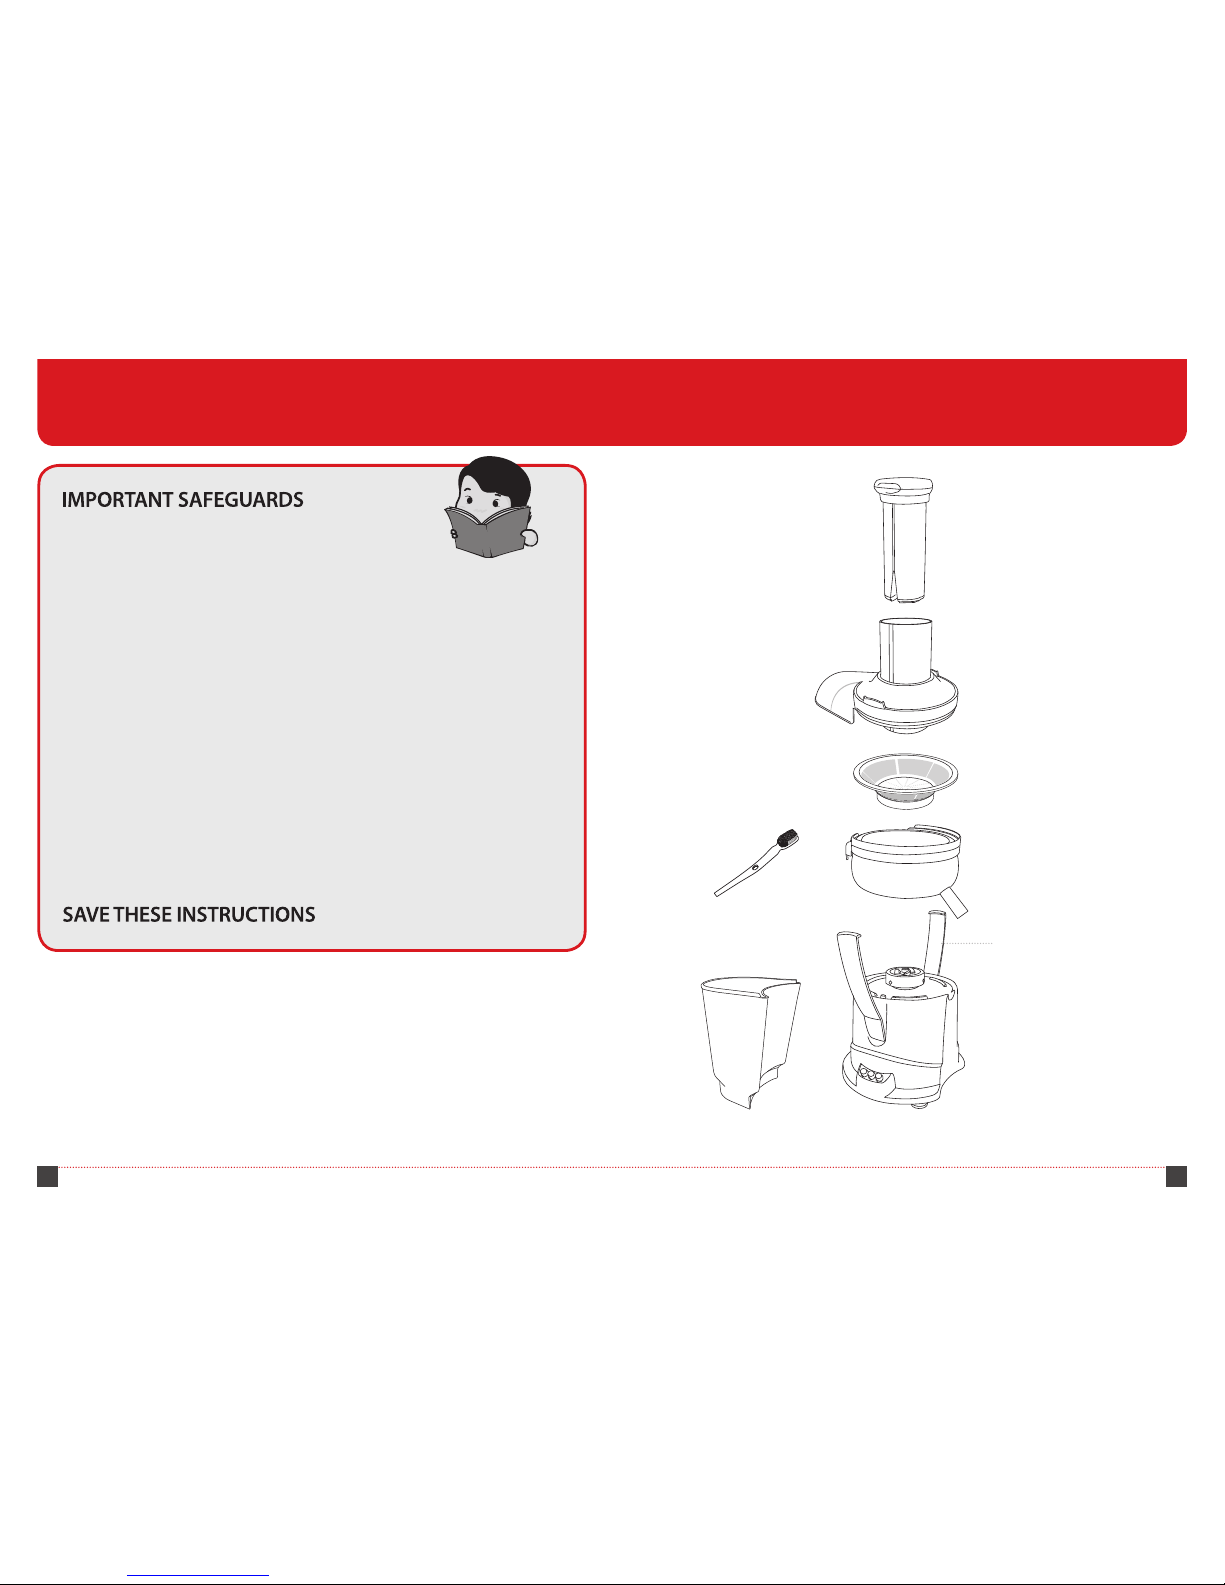
PartsImportant notes
Pusher
Juicer Cover
Juicing Screen
Stainless Juicing Bowl
Pulp Container Base
Cleaning Brush
Safety Locking Arm
Page 3
4 5
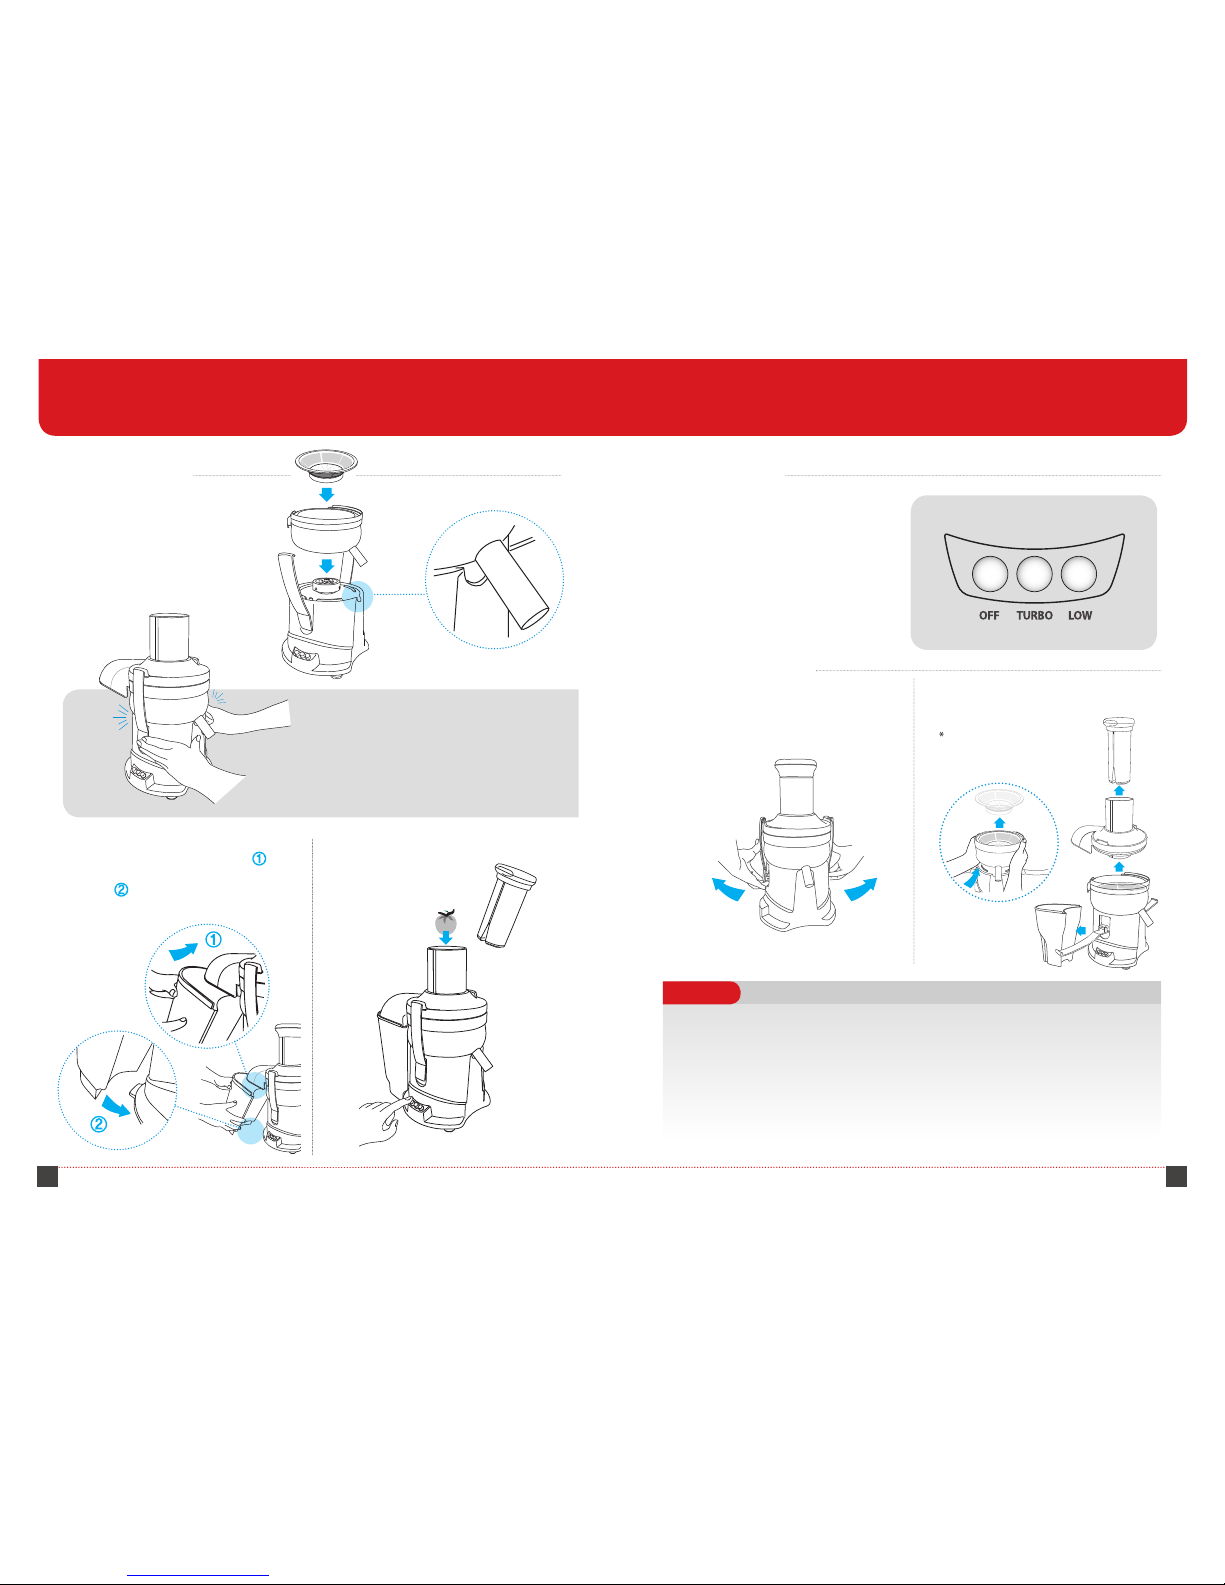
How to use the juicer
Assembly / Operation / Disassembly
3
Put pulp container into the juicer cover
outlet as shown in the drawing and
then push it until it locks into the juicer
base . Juice may leak out or excessive
vibration may occur when it’s not
tted properly.
1
Put juicing bowl on the base and
insert juicing screen rmly into the
base as shown below.
2
Put juicer cover on the juicing bowl
and push safety locking arm rmly
inward on both sides of the base
until you hear them ‘click’ as
shown below.
4
Please wait 3-5 seconds af ter
turning the unit on before
inserting produce.
Push LOW button
to make natural juice with soft fruits like
watermelon, peeled oranges, etc.
Push TURBO botton
to make natural juice with hard fruits and
vegetables like apples, carrots, celery, etc.
How to assemble How to operate
How to disassemble
.
For safety, always make sure the unit is unplugged before assembly or disassembly.
.
When assembling the juicer, the parts must be in alignment or the arms will not lock.
.
Check that the parts are aligned before locking the arms. If the parts are not aligned as
shown in the manual, forcing the arms shut may cause damage!
.
For best results slowly feed large or hard ingredients with the pusher in 2-3 stages,
alternating between pushing and pausing. This technique ensures the maximum
amount of juice extraction and also prevents malfunction.
1
Turn the machine o and unplug the
power cord from the wall outlet. Pull out
the safety locking arm to disassemble.
Tips
2
Follow the assembly steps in reverse
to disassemble.
Remove the juicing screen
after disassembling the
juicing bowl from the base.
Page 4

6 7
PROBLEM SOLUTION
Safety locking arms will
not lock
When assembling the juicer the parts must be in alignment or
the arms will not lock. Check that the parts are aligned before
locking the arms. The parts will only t in the orientation
shown in the manual – do not force the locking arms shut if
parts are misaligned.
Juicer vibrates excessively Stop the juicer and reassemble the juicer properly. In particu-
lar, make sure the juicing screen is properly seated and no
parts are broken.
Juice is leaking from
juice cover outlet during
juicing
Juice may leak out if the pulp container is not tted properly.
Please make sure the pulp container is locked into place.
Motor has slowed down Too much produce is being fed into the juicer at once. Let the
juicer nish processing the produce and be sure to feed more
slowly and/or smaller pieces. Also be sure to use the turbo
setting for hard fruits and vegetables. Stop the juicer and
check that the juicing screen does not have excess pulp build
up – if it does clean juicing screen and be sure to slow the rate
at which you feed produce. Alternating ingredients between
soft and hard produce items can also help.
Motor has jammed Stop the juicer immediately and dissemble and clean the juic-
ing screen. Feed less produce at once to prevent jamming.
Motor stops while juicing
or won't turn back on
after extended juicing
Allow the unit to cool down for 2 hours before resuming
operation.
Pulp is wetter than usual Stop the juicer and check that the juicing screen is not
clogged. Try juicing at a slower rate.
TroubleshootingCare
1
Wash with warm water and a gentle dish
detergent and wipe dry with a dishtowel.
Clean juicing screen with the supplied
brush, do not use a sponge. (Be careful
when you clean the knives)
2
Wipe body clean with a damp towel
and be careful not to get the body wet.
Water in the body can cause
a malfunction or electric shock!
3
When you wash the juicer, do not use
harsh chemicals. These chemicals may
react with and discolor the juicer.
4
Do not store the juicer in direct
sunlight or high humidit y
.
Most juicer parts are top shelf dishwasher safe, low temperature cycle recommended.
.
For best results hand wash with a soft cloth using mild detergent and towel dry.
.
The juicing screen is hand wash only using the included cleaning brush or similar plastic
bristled dish brush).
.
When cleaning with plastic brushes please note that occasionally bristles get caught in
the strainer - make sure none are left behind before next use.
.
Do not wash any juicer parts with harsh or abrasive cleaners.
.
Please wipe the exterior clean using a damp soft cloth.
.
Do not wash or submerge the juicer body.
Tips
Page 5

MANUAL DE
INSTRUCCIONES
JUGUERA
Notes
Electrical Speci cation
Product
Juicer
Model Number
NJ-9300U, NJ-9500U, NJ-9600U NJ-9700U
Warranty
3 Year
Voltage/Hertz
AC 120V, 60Hz
Power Consumption
350W
Continuous Maximum Use
Less than 30 Minutes
Especi caciones Técnicas
Producto
Juguera
Modelo
NJ-9300U, NJ-9500U, NJ-9600U NJ-9700U
Garantía
3 año
Voltaje/Hertz
AC 120V, 60 Hz
Consumo de Energía
350 W
Tiempo Máximo de Uso Continuo
menos de 30 minutos
Page 6

10 11
Antes de Usar
.
Manipule las cuchillas con cuidado, ya que están a ladas.
.
No use el cilindro de empuje pequeño/grande por la tapa con demasiado vigor a n de proteger
las cuchillas.
.
Cuando escuche una vibración, apague la juguera y limpie los restos de la cuchilla. Luego
enciéndala otra vez.
.
Utilice solamente el cilindro de empuje pequeño en el grande.
Antes de Usar
.
Veri que que el dispositivo funcionará con el voltaje indicado.
.
Revise si la parte central, el recipiente para jugo de acero inoxidable, la tapa y los sujetadores se
encuentran ensamblados correctamente.
Cuando utilice electrodomésticos, debe respetar ciertas precauciones básicas como
las siguientes:
1. Lea las instrucciones.
2. No sumerja en agua la parte central del dispositivo a n de evitar una descarga eléctrica.
3. Si va a utilizarlo un niño o se utilizará cerca de él, mantenga una supervisión de cerca.
4. Desenchúfelo cuando no lo use, antes de agregar o sacar piezas, y antes de limpiarlo.
5. Evite el contacto con las piezas en funcionamiento.
6. No lo utilice cuando un cable o enchufe estén deteriorados, cuando funcione mal, o si se le cae o daña de
cualquier manera. Llévelo al servicio de reparaciones autorizado más cercano para que lo revisen, reparen o le
realicen un ajuste eléctrico o mecánico.
7. No utilice accesorios que el fabricante no recomienda o vende. Su uso puede ocasionar incendio, descargas
eléctricas o daños.
8. No lo use al aire libre.
9. El cable no debe colgar fuera de la mesa o mesada.
10. Siempre asegúrese de que la tapa esté bien sujeta y segura antes de encender la juguera. No retire los sujetadores
mientras esté encendida.
11. Coloque el interruptor en OFF (apagado) cuando no esté en uso. Antes de retirar las piezas, espere a que se haya
detenido por completo.
12. No introduzca los dedos ni ningún objeto en la juguera en movimiento. Si un trozo de comida se quedara
atascado en la tapa, utilice el cilindro de empuje o un trozo de fruta o verdura para deslizarlo. Si esto no fuera
su ciente, apague el motor y desarme la juguera.
13. No use la juguera con la cuchilla dañada.
14. Cuando el modelo traiga un recipiente para pulpa, no la encienda sin esa pieza en su lugar. Si no encajara,
comuníquese con un electricista. No modi que el enchufe en ningún caso.
PartesImportante
GUARDE ESTAS INSTRUCCIONES
PRECAUCIONES
Cilindro de empuje
Tapa
Filtro
Recipiente para Jugo de
Acero Inoxidable
Recipiente para Pulpa Base
Cepillo de Limpieza
Sujetador
Page 7

12 13
Cómo usar la juguera
Armado / Funcionamiento / Desarmado
3
Coloque el recipiente para pulpa en la
tapa, como se muestra en el dibujo 1, y
luego presiónelo hasta ajustarlo en la
base, como se muestra en el dibujo 2.
Si no se ajusta en forma apropiada,
puede ltrarse jugo o vibrar en exceso.
1
Coloque el recipiente para jugo
con el ltro rmemente dentro de
la base, como se muestra.
2
Coloque la tapa sobre el recipiente
para jugo y presione los sujetadores
laterales hacia adentro hasta escuchar
un “clic”.
4
Espere entre 3 y 5 segundos después
de encender el dis positivo
para introducir alimentos.
Presione el botón LOW (abajo)
para exprimir jugo natural de frutas blandas,
por ejemplo, sandía, naranjas peladas, etc.
Presione el botón TURBO
para hacer jugo natural de frutas y verduras
más duras como manzanas, zanahorias, apio,
etc.
Armado Funcionamiento
Desarmado
.
Para armar o desarmar la juguera, asegúrese de que esté desenchufada.
.
Para armarla, las partes deben encastrar correctamente. De lo contrario, los sujetadores
no se trabarán.
.
Las piezas solo se podrán colocar en la orientación que muestra el manual. No
las fuerce.
.
Para un mejor resultado, vaya introduciendo los alimentos grandes o duros lentamente
y alterne empujar y esperar.
1
Apague la juguera y desenchúfela. Retire
los sujetadores..
Recomendaciones
2
Siga los pasos de armado en el orden
inverso.
Retire el recipiente para
jugo de la base y saque el
ltro
Page 8

14 15
PROBLEMA SOLUCIÓN
Los sujetadores no
ajustan
Cuando arme la juguera, las piezas deben coincidir. De lo
contrario, los sujetadores no se trabarán. Revise que las piezas
estén alineadas antes de ajustar los sujetadores. Las piezas
solo se podrán colocar en la orientación descrita en el manual:
no las fuerce.
Exceso de vibración Apague la juguera y vuelva a armarla. Preste especial atención
a la posición del ltro y a que ninguna pieza esté rota.
El jugo se ltra por la tapa. Puede ltrarse jugo por el recipiente para pulpa si no está
bien colocado. Ajústelo correctamente.
El motor funciona más
lento.
Colocó demasiados alimentos en la juguera al mismo tiempo.
Una vez que termine el proceso, vuelva a colocar menos
cantidad o trozos más pequeños. Recuerde usar la posición
TURBO para frutas y verduras más duras. Apague la juguera
y revise el ltro: si tuviera exceso de pulpa, límpielo y reduzca
la velocidad con la que introduce alimentos. Alterne entre
alimentos duros y blandos.
El motor se ha trabado. Apague la juguera inmediatamente y desármela. Limpie el
ltro. Introduzca menos alimentos.
El motor se detiene o
no vuelve a encender
después del uso.
Mantenga apagada la juguera por 2 horas para que se
enfríe.w
La pulpa es más líquida. Apague la juguera y revise que el ltro no esté tapado.
Reduzca la velocidad con la que introduce alimentos.
Recomendaciones
Resolución de problemasCuidados
1
Lave la juguera con agua caliente y
detergente suave para vajilla: luego
séquela. Limpie la pantalla con el cepillo:
no use esponja. Tenga cuidado al limpiar
las cuchillas.
2
Limpie la par te central de la juguera con
un paño húmedo y asegúrese de no
sumergirla en agua, debido a que esto
podría causar mal funcionamiento e
incluso una descarga eléctrica.
3
Cuando lave la juguera, no utilice productos químicos fuertes: podrían ocasio-
nar un cambio de color en el dispositivo.
4
No exponga la juguera al sol ni al agua.
.
Casi todas las piezas se pueden lavar en el estante superior de la lavadora de vajilla,
a temperatura baja.
.
Para obtener mejores resultados, limpie con un paño y detergente suaves; seque con toalla.
.
El ltro solo se puede lavar a mano con el cepillo provisto o alguno similar con cerdas plásticas.
.
Si lo limpia con un cepillo plástico, tenga en cuenta que pueden soltarse algunas cerdas:
retírelas antes de volverlo a usar.
.
No lave con limpiadores fuertes o abrasivos.
. Limpie la parte exterior con un paño suave y húmedo.
. No sumerja en agua la parte central de la juguera.
 Loading...