

Page 1
CH4612 & CH4624
Automatic Battery Charger user manual
Power Input
Protection
Voltage 100 277 Vac
Constant output voltage, limited charge current
Reverse polarity & short circuit protections.
Frequency 47 63 Hz
Environment
DC Output
Operation Temperature -20 to +60 ˚C
CH4612 Voltage 13.8 Vdc / Current 5A Max.
Storage Temperature -30 to +80 ˚C
CH4624 Voltage 27.6 Vdc / Current 3A Max.
Relative Humidity Max. 90%
DC Voltage Regulation
Vibration 5.0Gs @ 60 Hz
< +/- 1%
Mounting Type
Charge Mode
Panel or DIN Rail Mount
Float
Dimensions
Efficiency
175.0 (L) x 115.0 (W) x 60.0 (H) mm
> 80% @ Full load
7” (L) x 4.5” (W) x 2.4” (H)
Low Battery Voltage Alarm Output Capacity
Weight
Solid State 0.5A @ 40 Vdc
0.52Kg (1.15Lbs) +/- 2%
Suitable Battery Type
UL Listed
Gel, Lead Acid & AGM
File No. E471849
DANGER!
High Voltage may result in a risk of fire, electric
shock, injury or death
WARNING!
Batteries may generate explosive gases during
normal operation and charging. Never smoke,
light a flame, or generate any sparks near the
battery.
GENERAL INFORMATION
A visual inspection of this product for damage during
shipping is recommended before installation. Please
contact your local supplier with any questions.
SECTION 1: IMPORTANT SAFETY
INSTRUCTIONS
This manual contains important safety and operating
instructions for battery charger Models CH4612 and
CH4624. Read the manual carefully and follow the
instructions before using your charger.
1.1 This is not a power supply. Use only as a battery
charger.
1.2 Built-in AC power fuses protected input. No
external fuses are needed. Do not attempt to
replace internal fuse, if it burns out.
1.3 Do not expose the battery charger to rain, snow
or wet environments.
1.4 Do not disassemble the charger. Return to
supplier when service and repair is needed..
1.5 Be very careful not to drop any metal tool on to
the battery or charger. It may spark or short-circuit
the battery or other electrical part, which in turn
may cause an explosion.
1.6 To reduce the risk of damage to the electric plug
and cord, pull using the plug rather than the cord
when disconnecting the charger.
1.7 If battery acid or chemicals contact skin or
clothing, wash immediately with soap and water.
1.8 If battery acid or chemicals comes into contact
with your eye, immediately begin washing your
eye with cold water before taking any other action
and continue for at least 10 minutes. Get
immediate medical attention.
SECTION 2: SPECIFICATIONS
___________________________________________________________________________________________
CH46 1
Page 2
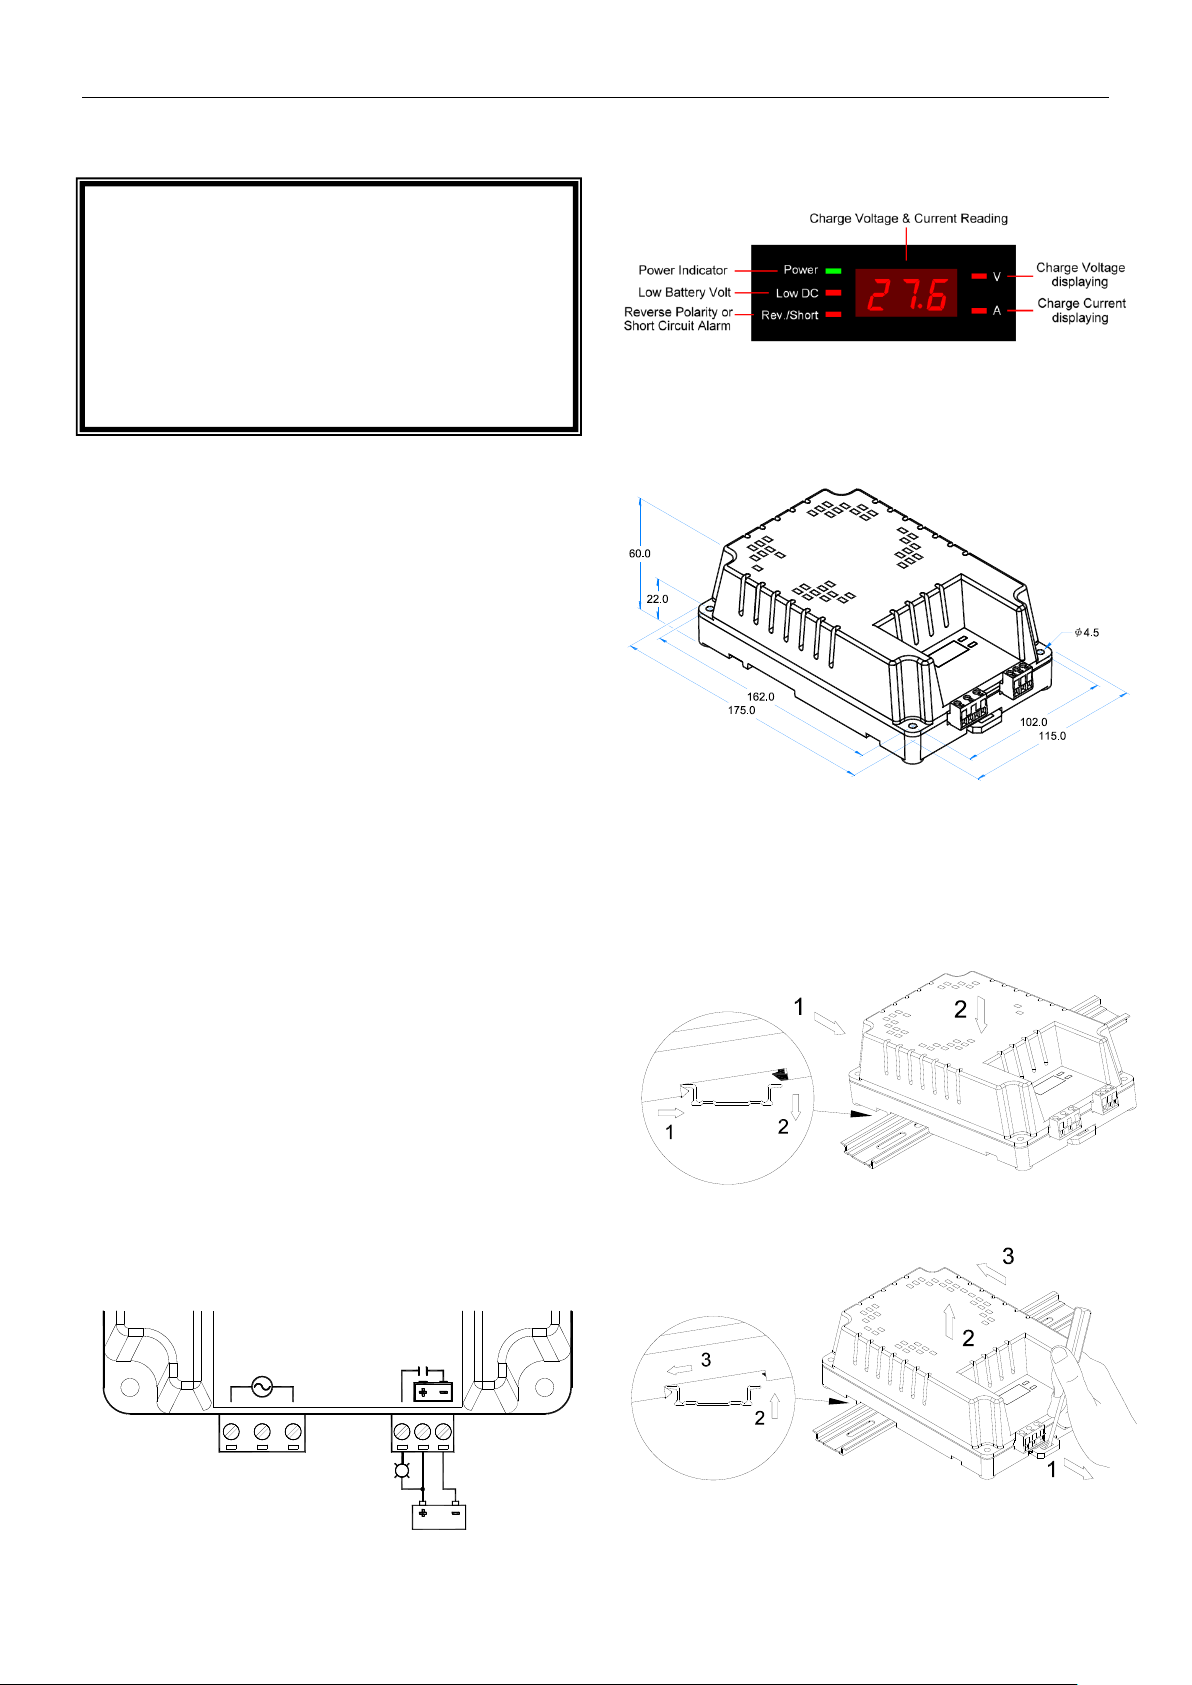
Unit : mm
Low DC
Low DC Alarm Indicator
( Relay or buzzer can also be used )
Battery
CAUTION!
Before beginning installation of this charger:
Disconnect electrical power to the charger
Read and follow all installation instructions
Make sure charger cannot operate during
installation
Crimp and property secure terminal lugs on
to power wires to avoid shorts.
SECTION 3: INSTALLATION AND OPERATION
3.1 Check that the correct model charger is selected
for your battery.
3.2 Verify your line voltage is correct.
3.3 Connect line voltage to the charger, then the
“power indicator” should light up and the display
show the output voltage and current.
3.4 Disconnect AC power before connecting the
charger to the battery.
3.5 Turn AC power ON. The unit will automatically
charge the battery with an adjusted current related
to battery condition and cyclically show charging
voltage and current on screen.
3.6 The charger is automatic and can always stay
connected even during engine cranking and
running.
3.7 For the model CH4612 to work the minimum
battery voltage must be higher than 6 Vdc or the
charger will automatically shut-down and all the
indicators on the panel will turn off. (For model
CH4624, the minimum battery voltage is 12 Vdc).
3.8 Voltage sensing circuit automatically stops
charging when the battery is fully charged.
3.9 Input and output connection cable size ≧ 1.25mm²
(AWG 16).
SECTION 4: LOW DC VOLTAGE ALARM
For CH4612 when battery volt less than 10 Vdc
For CH4624 when battery volt less than 20 Vdc
“Low DC indicator alarm output.” uses a solid state
relay 0.5A connected to battery negative
___________________________________________________________________________________________
2 CH46
SECTION 5: DISPLAY & ALARM INDICATORS
SECTION 6: OUTLINE / SIZE
SECTION 7: DIN-RAIL ASSEMBLY
INSTRUCTIONS
7.1 Charger Installation
7.2 Dismount Charger
 Loading...