

Page 1

Page 2

Table of Contents
Safety Information.............................................2
Front Control Panel........................................6
Rhythm Channel Controls..................................8
Lead Channel I Controls...............................10
Lead Channel II Controls.................................12
Mastering the Cross........................................14
Rear Control Panel..........................................16
Amp Specifications.........................................20
Signal Flow Diagram......................................21
Kustom Amplification
3015 Kustom Drive
Hebron, KY U.S.A. 41048
www.kustom.com
1.888.4KUSTOM
1.888.458.7866
© Kustom Amplification. All specifications are subject to change without prior notice.
1
Page 3

FCC Statements
1. Caution: Changes or modifications to this unit not expressly approved by the party responsible for
compliance could void the user’s authority to operate the equipment.
2. Note: This equipment has been tested and found to comply with the limits for a Class B digital device, pursuant to Part 15 of the FCC Rules. These limits are designed to provide reasonable protection
against harmful interference in a residential installation. This equipment generates, uses, and can radiate radio frequency energy and, if not installed and used in accordance with the instructions, may cause
harmful interference to radio communications. However, there is no guarantee that interference will not
occur in a particular installation. If this equipment does cause harmful interference to radio or television
reception, which can be determined by turning the equipment off and on, the user is encouraged to try
to correct the interference by one or more of the following measures:
• Reorient or relocate the receiving antenna.
• Increase the separation between the equipment and receiver.
• Connect the equipment into an outlet on a circuit different from that to which the receiver is con-
nected.
• Consult the dealer or an experienced radio/TV technician for help.
2
Page 4

Congratulations. You are now the owner of a world-class, all-tube,
3-channel guitar head. The Double Cross represents countless
hours of development in pursuit of tone and performance intended
to elevate the art of high-gain amplification to the next level. Learn
its controls and capabilities and be sure to experiment, as that’s the
best way to understand the amplifier and develop your own signature sounds. All of us at Kustom say “Thank You” for your purchase.
Welcome to the Kustom family!
3
Page 5
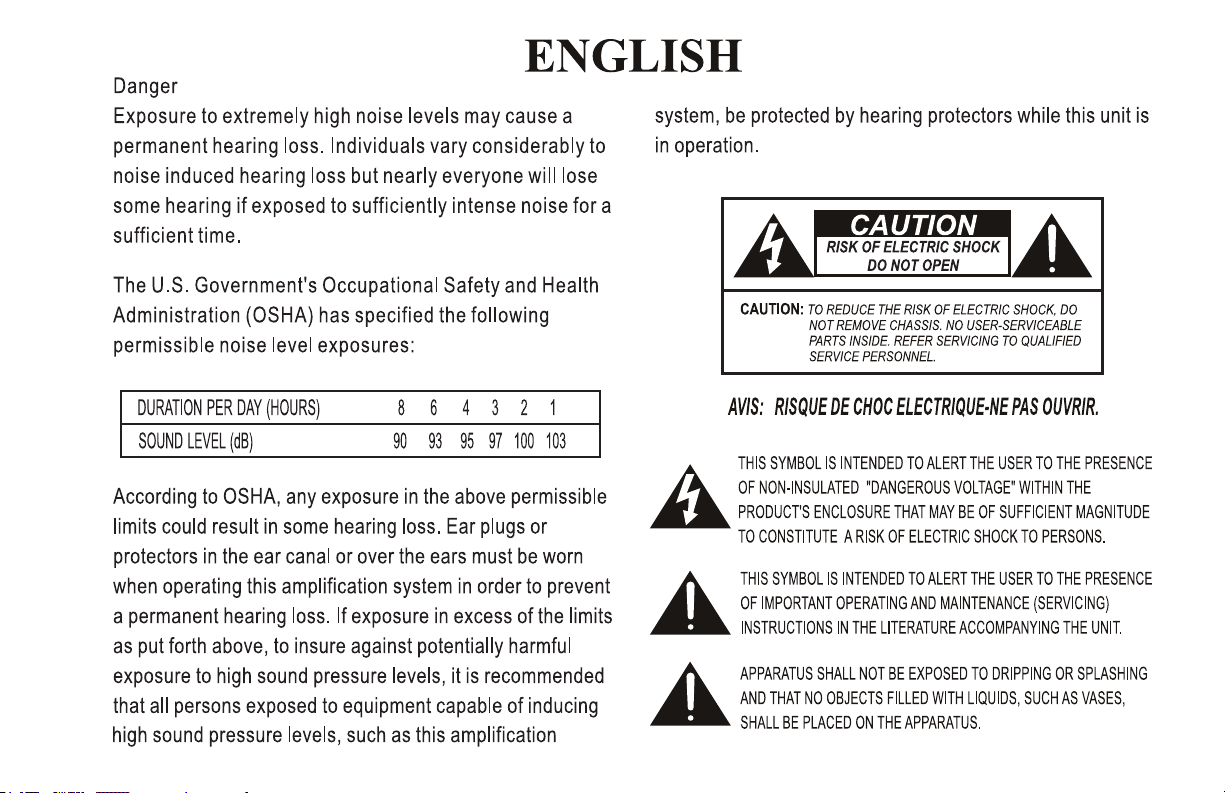
Safety Information
4
Page 6
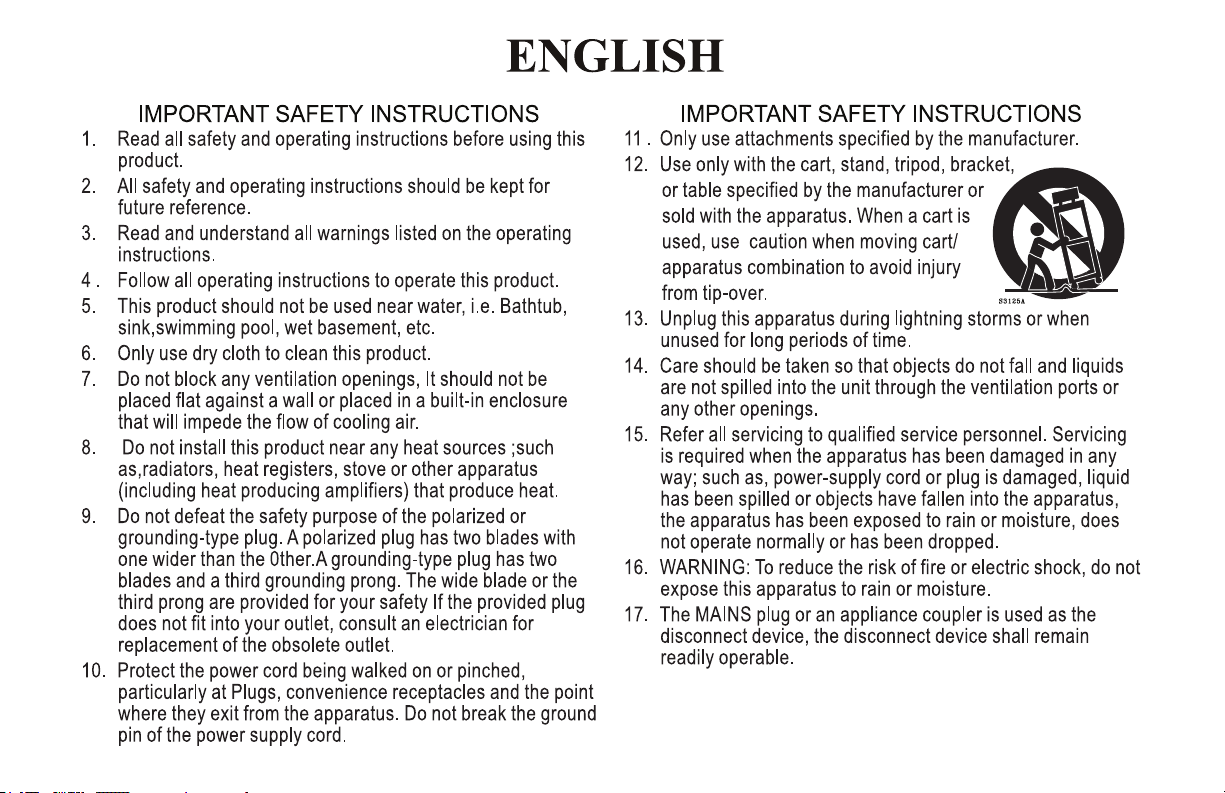
Safety Information
5
Page 7

Safety Information
6
Page 8
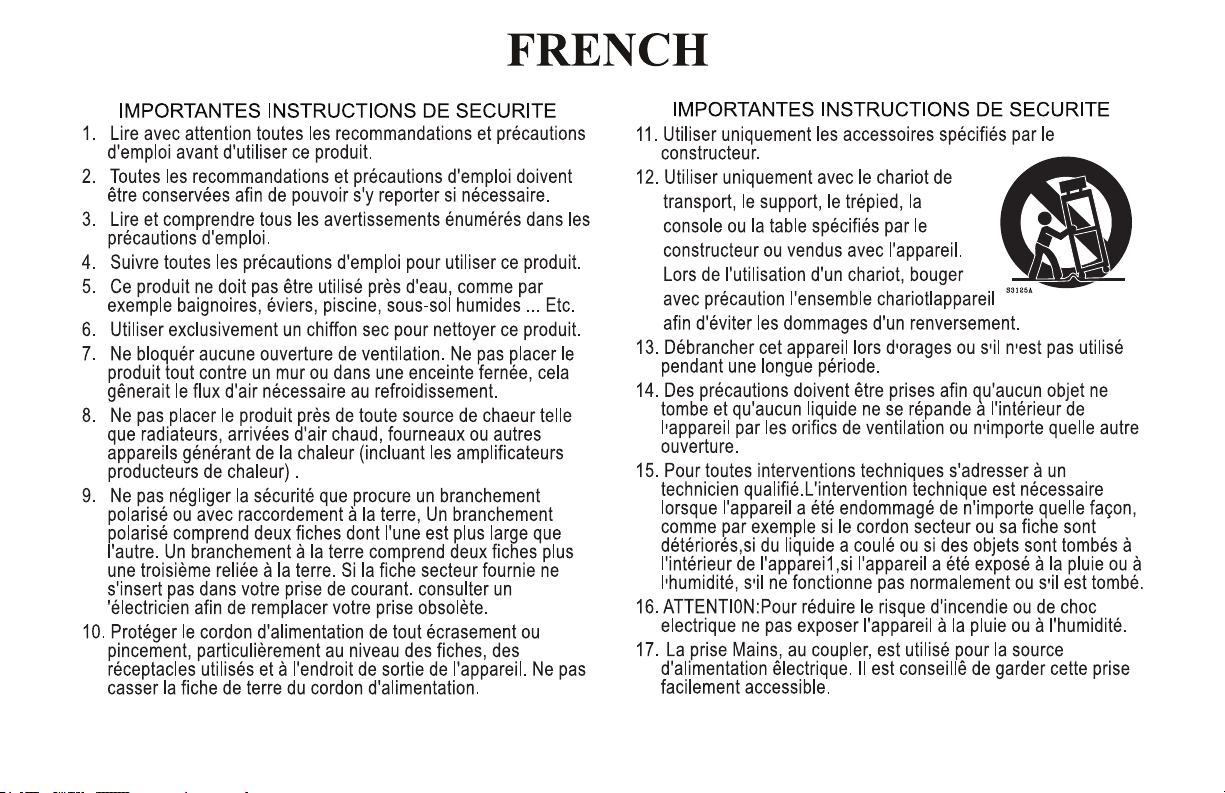
Safety Information
7
Page 9

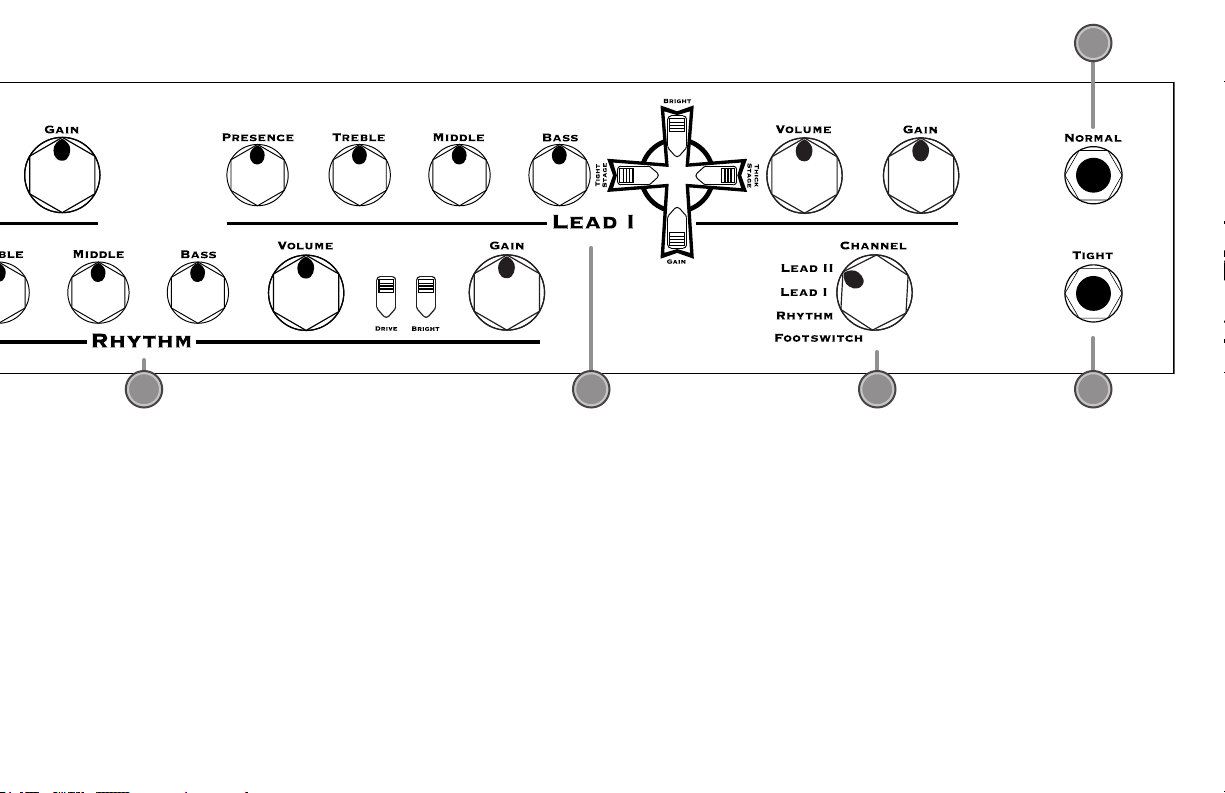
Front Control Panel
12
13
611
910 78
1) NORMAL This 1/4-inch input provides full tonal response and
offers the same amount of gain as the Tight input.
2) TIGHT This 1/4-inch input “tightens” the attack response of
the entire amplifier to provide the chunkiest tone possible. It offers the same amount of gain as the Normal input.
3) CHANNEL SELECTOR SWITCH This switch allows the user to
manually select the Rhythm, Lead I or Lead II channels. If the
Footswitch is plugged in, this front panel switch overrides the
Footswitch (Boost and Effects remain controllable by Footswitch).
When using the footswitch, set Channel Selector to “Footswitch”
position.
8
4) LEAD I These six controls plus the Cross and its four switches pro-
vide complete control over the tone, gain and attack characteristics
as well as the overall loudness of the Lead I channel.
5) RHYTHM These six controls and two switches control the tone,
gain and attack characteristics as well as the overall loudness of the
Rhythm Channel.
6) LEAD II These six controls plus the Cross and its four switches
provide complete control over the tone, gain and attack characteris-
tics as well as the overall loudness of the Lead II channel.
7) EFFECTS INDICATOR When lit, this indicates that the Effects Loop
is active.
Page 10
1
5
8) BOOST INDICATOR When lit, this indicates that the Boost func-
tion is active.
9) BOOST CONTROL This adjusts the amount of footswitchable
boost and is particularly useful for solos. It provides up to 10dB
of “Master Volume” boost, regardless of which channel is active.
The boost is active if the footswitch is unplugged. The Boost occurs after the effects loop, so no adjustment of your effects will be
neccessary.
4
10) MASTER This is a global master volume control which sets the
overall loudness of the entire amplifier. The Master is also after the
effects loop.
3
2
11) JEWELED PILOT LIGHT Indicates that the amplifier’s power
switch is in the “On” position.
12) STANDBY This allows the amplifier to be powered up, but with
the tubes in a non-operational mode. The Standby can be used in-
stead of the power switch between performance sets, since it allows
the amp to “shut down” while keeping the tubes warm and ready to
go. It’s also best to power the amp up with this switch set to the
left/off position until the tubes have had a few minutes to warm up,
although modern tubes are more tolerant of this.
13) POWER Provides AC power to the amplifier when in the “On”
position—switched to the right.
9
Page 11

Rhythm Channel
1 2 3 54 6 7 8 9
The Rhythm channel of the Double Cross is far more flexible than
you might expect. It is NOT simply a clean channel. It takes you from
sparkling Country tones to classic crunch in the blink of an eye. In
particular, experiment with settings of the Gain and Volume controls in
tandem with the Drive and Bright switches. Try the sample settings to
hear the wide range of the Rhythm channel.
1) PRESENCE This controls the upper treble frequencies and can be
used to accentuate “percussive” tones such as your picking attack.
Alternately, by lowering this control, it can help soften biting tones
when desired.
2) TREBLE This passive EQ adjusts the high frequency equalization of
the amplifier, but also interacts with the Bass and Middle controls as
follows: As the Treble is increased, the Bass automatically decreases
and the Middle slides down in frequency. Conversely, if the Treble is
decreased, the Bass automatically increases and the Middle slides up
in frequency. This interaction is typical of vintage-style passive EQ,
and is responsible for the increased efficiency of such a simple system.
10
3) MIDDLE This passive EQ adjusts the midrange equalization of the
amplifier. It interacts with the Bass and Treble as described in the
Treble EQ section. For a heavier, more distorted sound, set the Middle lower. For more of a vintage-style, cleaner sound, set the Middle
higher.
4) RHYTHM INDICATOR The word “RHYTHM” lights up when this channel is active.
5) BASS This passive EQ adjusts the low frequency equalization of
the amplifier. It interacts with the Middle and Treble as described in
the Treble EQ section. For a tighter low end, use the Bass EQ set in
its lower range. This is particularly helpful when using the amp at very
loud settings.
6) VOLUME The Volume control sets the overall level of the Rhythm
channel and can be used to balance the volume between it and the
Lead channels. The inclusion of individual Volume controls for each
channel means that the Rhythm channel of the Double Cross can be
Page 12
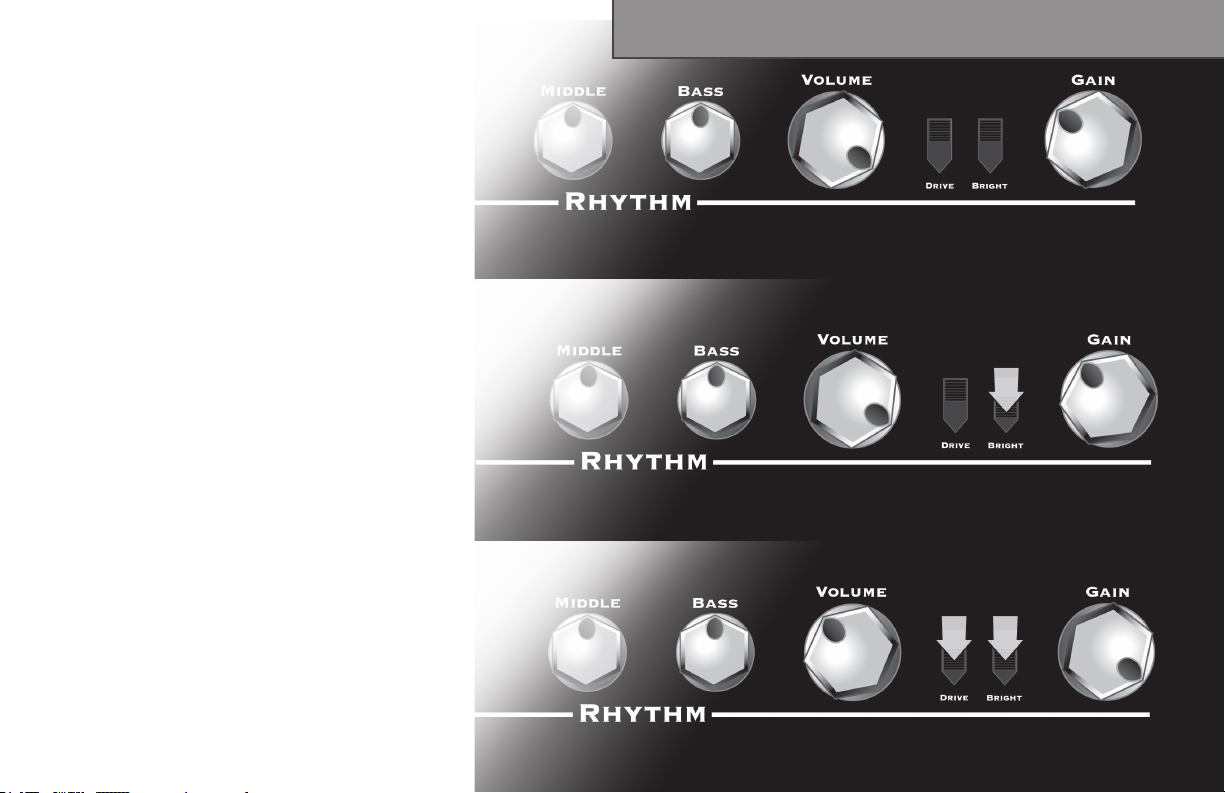
used for moderately distorted
sounds, rather than strictly being
a clean channel.
7) DRIVE When more gain is
desired, activate this switch by
pressing it downward. This will
maximize the amount of crunch
and overdrive in this channel, but
it can also be used for a fatter
clean sound when the gain is set
lower.
8) BRIGHT Activating this switch
will increase the high frequencies
of the signal, while also reducing low frequencies for a chunkier,
tighter attack.
9) GAIN The Gain control adjusts
the gain at the input of the amplifier and is used in conjunction
with the Volume control to adjust
the amount of distortion and volume for this channel. For cleaner
sounds, the Gain control should be
set in its lower range and the Volume set higher. For some break-
up, the Gain and Volume controls
should be set in their middle
ranges. For more overdrive, set
the Gain higher and the Volume
lower.
Rhythm Channel Settings
American CleanClassic ChimeBlack Angus
11
Page 13
Lead I Channel
6
1 2 3
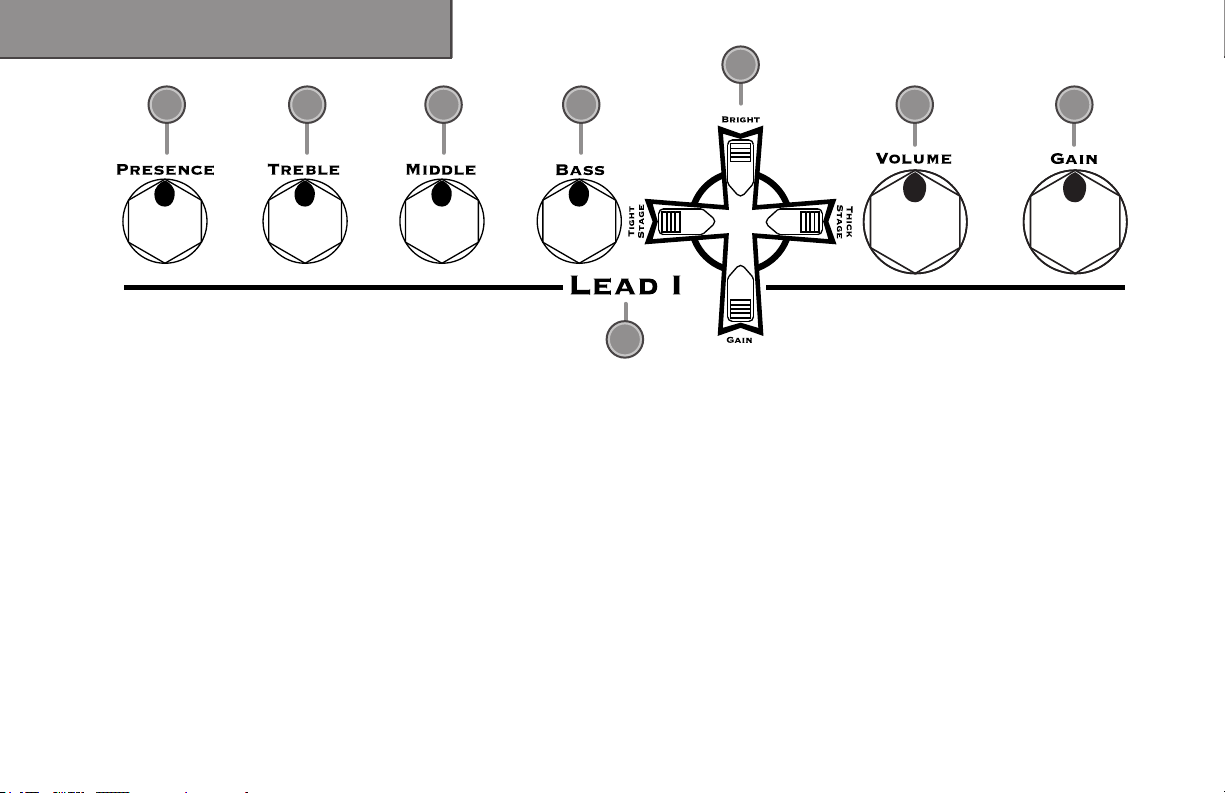
Strap yourself down, because here’s where things get intense. The
Lead I channel of the Double Cross offers a breathtaking array of
crushing modern tones that can be sculpted with stunning precision.
The key to unlocking its secrets lies in its Cross, a deceptively simple
but ultimately sophisticated tool that blends additional 12AX7 tube
stages, letting players actually modify the Gain, EQ and attack parameters of their amplifier. Master the Cross and you will master a
firestorm of tonal power. (For more information, see the “Cross” section of this manual.)
1) PRESENCE This controls the upper treble frequencies and can be
used to accentuate “percussive” tones such as your picking attack.
Alternately, by lowering this control, it can help soften biting tones
when desired.
2) TREBLE This passive EQ adjusts the high frequency equalization of
the amplifier, but also interacts with the Bass and Middle controls as
follows: As the Treble is increased, the Bass automatically decreases
12
4
7 8
5
and the Middle slides down in frequency. Conversely, if the Treble is
decreased, the Bass automatically increases and the Middle slides up
in frequency.
3) MIDDLE This passive EQ adjusts the midrange equalization of the
amplifier. It interacts with the Bass and Treble as described in the
Treble EQ section. For a heavier, more distorted sound, set the Middle lower. For more of a vintage-style, cleaner sound, set the Middle
higher.
4) BASS This passive EQ adjusts the low frequency equalization of
the amplifier. It interacts with the Middle and Treble as described in
the Treble EQ section. For a tighter low end, use the Bass EQ set in
its lower range. This is particularly helpful when using the amp at very
loud settings.
5) LEAD I INDICATOR The word LEAD I lights up when the Lead I
channel is active.
Page 14

6) THE CROSS The Cross offers
these functions: (1) Bright:This
enhances high-end response and
tightens the low end. (2) Gain:
This boosts preamp gain. (3) Tight
Stage: Adds an extra 12AX7 stage
that provides a chunky, vintagestyle gain like a classic amp when
fully cranked. (4) Thick Stage:
Adds an additional 12AX7 stage
that generates rich, aggressive
tonal qualities with complex harmonics. Each switch may be ac-
tivated by sliding it towards the
center of the Cross. (For more information, see the “Cross” section
of this manual.)
7) VOLUME The Volume control
sets the overall level of the Lead
I channel and can be used to balance the volume between it and
the other channels.
8) GAIN The Gain control adjusts
the gain at the input of the amplifier and is used in conjunction
with the Volume control to adjust
the amount of distortion and volume for this channel. For cleaner
sounds, the Gain control should be
set in its lower range and the Volume set higher. To increase distortion, set the Gain higher and the
Volume lower.
Lead I Channel Settings
Cranked VintageThick ModernHeavy Dynamic
13
Page 15

Lead II Channel
1 2 3
6
4
7
8
5
The Lead II channel is voiced differently from the Lead I channel, providing a classic high-gain “cranked amp” tone and a powerful contrast
to the Lead I channel. Although both Lead channels provide a duplicate set of controls, you’ll notice they each have their own personality
and tonal characteristics. Experiment with both to nail the sounds in
your head.
1) PRESENCE This controls the upper treble frequencies and can be
used to accentuate “percussive” tones such as your picking attack.
Alternately, by lowering this control, it can help soften biting tones
when desired.
2) TREBLE This passive EQ adjusts the high frequency equalization of
the amplifier, but also interacts with the Bass and Middle controls as
follows: As the Treble is increased, the Bass automatically decreases
and the Middle slides down in frequency. Conversely, if the Treble is
decreased, the Bass automatically increases and the Middle slides up
14
in frequency.
3) MIDDLE This passive EQ adjusts the midrange equalization of the
amplifier. It interacts with the Bass and Treble as described in the
Treble EQ section. For a heavier, more distorted sound, set the Middle lower. For more of a vintage-style, cleaner sound, set the Middle
higher.
4) BASS This passive EQ adjusts the low frequency equalization of
the amplifier. It interacts with the Middle and Treble as described in
the Treble EQ section. For a tighter low end, use the Bass EQ set in
its lower range. This is particularly helpful when using the amp at very
loud settings.
5) LEAD II INDICATOR The word LEAD II lights up when the Lead II
channel is active.
6) THE CROSS The Cross offers these functions: (1) Bright: This enhances high-end response and tightens the low end. (2) Gain: This
Page 16

boosts preamp gain. (3) Tight
Stage: Adds an extra 12AX7
stage that provides a chunky,
vintage-style gain like a classic
amp when fully cranked. (4)
Thick Stage: Adds an additional 12AX7 stage that generates
rich, aggressive tonal qualities
with complex harmonics. Each
stage may be activated by
sliding its switch towards the
center of the Cross. (For more
information, see the “Cross”
section of this manual.)
7) VOLUME The Volume con-
trol sets the overall level of
the Lead II channel and can
be used to balance the volume
between it and the other channels.
8) GAIN The Gain control adjusts the gain at the input of
the amplifier and is used in
conjunction with the Volume
control to adjust the amount of
distortion and volume for this
channel. For cleaner sounds,
the Gain control should be
set in its lower range and the
Volume set higher. To increase
distortion, set the Gain higher
and the Volume lower.
Lead II Channel Settings
Tight AggressionFluid Legato Unleashed Monster
15
Page 17

THE CROSS
USER-MODIFIED PREAMP STAGES
Try the following sequence to gain a
basic understanding of the Cross
functions. Keep in mind that all
switches may be added or omitted
in any combination -- there is no
"right way" to set them. Experiment to find the sounds that work
for your specific application.
Keep in mind that your EQ
controls (Bass, Middle, Treble,
Presence) will play a powerful
role in determining your overall
tone, so be sure to adjust them
accordingly.
For the tightest response possible,
don't forget about the TIGHT input
– it maximizes the chunkiness of
your guitar tone.
2
1
3
Bright
Press switch down toward center of
Cross. Listen to the enhanced Highs
and tighter Bass response.
Bright + Gain
Everything gets heavier with a good dose of
Gain. Slide GAIN switch toward the center
of the Cross to add distortion and more
compression, similar to a traditional gain
boost.
Bright + Tight
Turn off GAIN and slide TIGHT switch toward center of
Cross to activate. This activates an additional tube
stage, providing maximum amount of "chunk" and "cut" on
the attack without compression, which is especially good
for palm muting and fast articulate playing.
16
Page 18
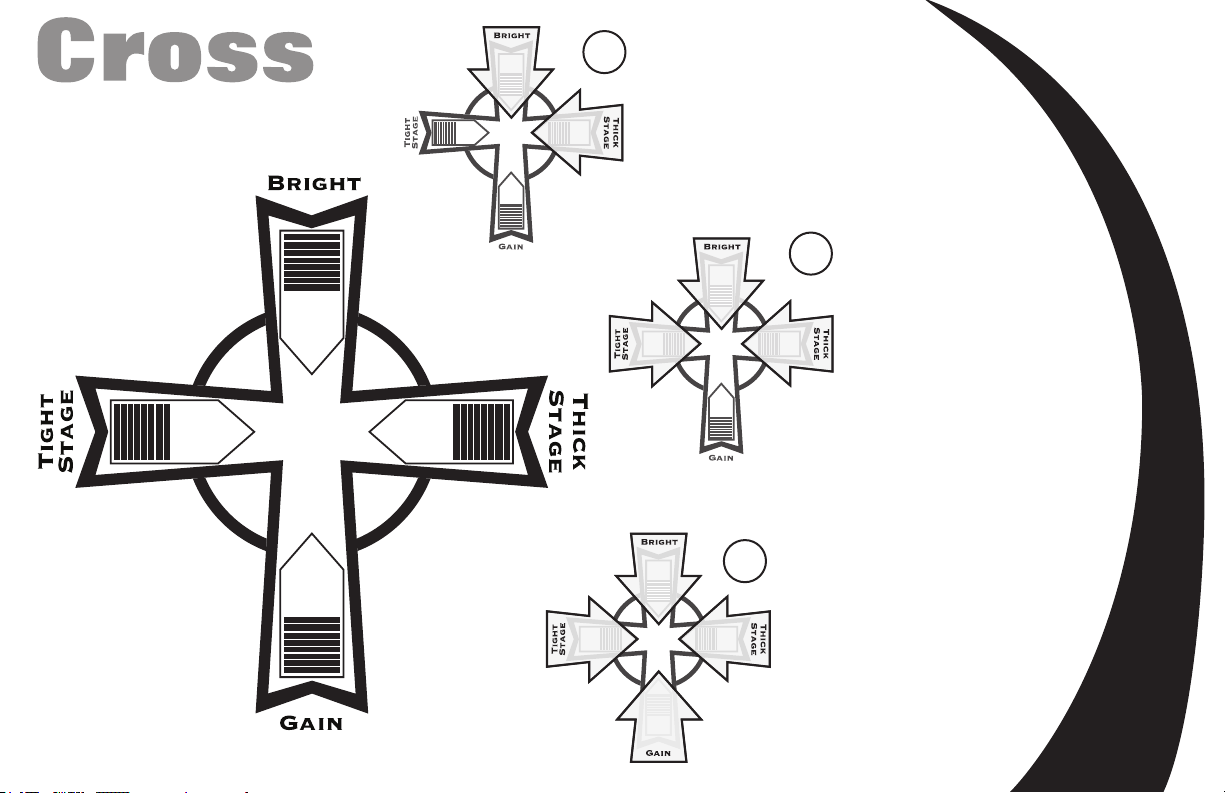
Bright + Thick
Bright +
Thick + Tight
Bright + Gain +
Tight + Thick
Add GAIN back into your mix. This
setting blends the maximum
amount of … well, everything!
Yet another color for your
"Tone Palette."
Add TIGHT back into the mix.
This setting provides richness
for Rhythm playing, but keeps a
chunky, punchy tone to cut
through the mix. Notice how well
the amp responds to the
dynamics of your playing.
Turn off TIGHT and slide THICK switch
toward center of Cross. This activates an
additional tube stage, adding a deep, rich
quality to the tone, without sacrificing definition.
This is great for power chords.
4
5
6
17
Page 19

Rear Control Panel
1
5
6
2
1) IMPEDANCE SELECTOR This switch is used to select the appropri-
ate impedance and is important in achieving the desired results from
the Double Cross. The correct impedance should be selected using
the Impedance Selector switch as in the following impedance settings
chart. Note: Incorrectly “mismatching” the amp head to a speaker
cabinet should not damage the amplifier, but would result in lower
output power and could result in shorter output tube life. Also, the
Double Cross should never be operated without a speaker plugged
into a speaker jack, even when using the Direct Out.
18
3
4
2) SPEAKER OUTPUTS These paralleled 1/4-inch jacks are pro-
vided to connect the Double Cross head to external speaker
cabinets.
3) GROUND LIFT This switch is used to eliminate a “ground
loop” hum when using the Direct Out. A ground loop can exist when the Double Cross and the mixer it is plugged into are
connected to grounded outlets that are in physically different
locations and/or on different circuits, and should only be used
if there is an audible hum. Pressing the ground lift does not disc o n n e c t t h e g r o u n d c o n n e c t i o n f r o m t h e a m p ’ s c h a s s i s .
4) DIRECT OUT The XLR Direct Out is designed to connect the
Double Cross to a recording or live mixer. The output is speaker-
emulated to generate the tone of a Celestion Vintage 30-loaded
Straight-front or Slant-front 4x12 speaker cabinet. Either tonality may be activated using the DI Cabinet Select switch. Make
sure that a speaker is connected to the amp even when using
the Direct Out.
Page 20

7 8 9 10
14
11
12
13
5) DI CABINET SELECT When pressed IN, this switch provides a
signal to the Direct Out that emulates the tonality of a Celestion
Vintage 30-loaded Straight-front 4x12 speaker cabinet. When
the switch is OUT, it emulates the same speakers in a Slantfront 412 cabinet. Kustom went to great lengths to make sure
that this signal sounded like the actual amp head and speaker
cabinet combinations. This was accomplished in a studio environment using condenser microphones to analyze the tonality
of the Double Cross when heard at “head level” versus “close
mic’d” directly in front of the speaker. The result is a signal that
reflects the true characteristics of these cabinets as heard by
a player. If you haven’t tried the Double Cross’ Direct Out yet,
we urge you to experiment with it for both live and studio applications.
6) DIRECT VOLUME This control sets the level of the speakeremulated Direct Out, and should be set as high as possible for
the best signal-to-noise ratio.
3084354
7) SEND LEVEL This control adjusts the amount of signal that
will be sent out the Effects Send jack, nominally ranging from
-10dBV(0.3VRMS) to about 0dBV(1VRMS). This control should
be adjusted as high as possible to minimize the amount of noise
caused by the inserted effect, but not so high as to distort the
effect used. Since the Effects Loop is a series connected loop,
this control will adjust the overall volume any time the Effects
Loop is active. The Send jack can also be used to send a signal
to a tuner or an auxiliary amplifier when footswitched. For ex-
ample, to A/B between this amp and a second amp (or tuner),
simply insert a shorted 1/4” plug into the Return jack. Then the
Send can switch over to another amp while disengaging this
amp’s output.
19
Page 21

0 dBV (1v) Rack Eects Optimal
-10 dBV (0.3v) Pedal Eects Optimal
11) FOOTSWITCH Before powering up the amplifier, connect the provided 5-button footswitch here using a 1/4” TRS stereo cable. The Channel
Selector knob on the front panel should be set to Footswitch when the Footswitch is being used. If it is not, the footswitch will blink when channel selecting, but the channels won’t change. The footswitch selects between Rhythm, Lead I and Lead II channels; enables the power amp Boost; enables
the Effects Loop. To select the appropriate channel, simply press the switch you want to activate. After doing so, the footswitch remembers the last
channel, so you can toggle back by hitting this same switch again. This allows the user to jump to and from a channel quickly without having to look
down at the footswitch. Any changes on the footswitch will be mirrored on the front panel of the amplifier.
8) SEND JACK This 1/4-inch jack delivers a tube-driven preamp signal to external effects
devices. It can also be used to send the signal to another amplifier to run multiple amps.
Connecting a 1/4-inch plug does NOT break the flow of the amplifier signal.
9) RETURN JACK When the effects loop is active, this 1/4-inch jack breaks the flow of ampli-
fier signal to allow an external effects device to “return” to the amp. The Return jack can
also be used for a power amp input when using an external preamp. This all-tube effects
loop is known as a “series” loop, since it breaks the path of the amplifier and “inserts” the
effect in series.
10) RETURN LEVEL This control adjusts the gain after the Effects Return jack, to adjust for an
Effects Loop level nominally ranging from 0dBV(1VRMS) to -10dBV(0.3VRMS). This control
should be set to the lowest level that provides unity gain when using your effects, when compared to the level if the Effects Loop is disabled via the footswitch. However, using the Send
and Return Levels, you can easily get up to 10dB boost when using effects. This can be very
helpful when using effects like delay or tremolo where the level appears to be lower due to
the nature of the effect. Because the Effects Loop is a series connected loop, this control will
adjust the overall volume any time the Effects Loop is active.
20
Page 22

12) MIDI IN This jack is used to receive MIDI data from other MIDI enabled
products, such as MIDI Preset Footswitches or Effects Processors. MIDI
is a great way to allow different products to communicate together. Many
guitarists have found that the ability to hit one switch and have multiple
devices instantly respond can help create a more seamless on-stage performance. While using this MIDI In system, you can still use the amp’s regular
footswitch to channel select, boost or bypass the effects loop.
13) SAVE This switch is used to program the MIDI preset as follows: First,
send the desired MIDI preset to the Double Cross. Then, footswitch the
Double Cross to whichever channel you want, and set the Boost and Effects
appropriately. Lastly, press and hold the Save button until the LEDs on the
amp and footswitch begin blinking (in about 2-3 seconds). When they stop
blinking, the preset is stored. From now on the amp will “footswitch” to this
setting whenever that MIDI preset number is received.
MIDI “Channel”: Note that the amp responds to MIDI channel 1 by default. To change the MIDI channel that is globally recognized, simply send
a preset change to the Double Cross on whichever MIDI channel you want
to use, set the amp’s footswitch appropriately, and press and hold the Save
button to set the amp’s MIDI channel to that number (1 through 16).
14) POWER CORD RECEPTACLE/FUSE HOLDER Insert the AC cord (provided) firmly into the AC connector. Replace the AC power cord if protective
jacket is damaged or ground pin is damaged or removed. The fuse is located in a housing just below the receptacle. To remove the fuse, remove AC
cord and pull out on the tab above the fuse symbol, located on the fuse
carriage. Place the new fuse in the carriage clip and re-insert. Replace
only with the same type and size. NOTE: To prevent an electrical hazard,
DO NOT replace fuse without using the fuse carriage. Replace the fuse
carriage if lost or damaged before re-inserting the AC power cord.
Eects Loop Syncing
This hidden feature allows the user to synchronize the Effects
Loop with any or all channels and/or the Boost function, so that
it will always be activated when a particular channel or the Boost
is selected.(The Effects Loop can always be turned off, even
when synced with a channel, simply by pressing the switch.)
1) To enable this feature, you first must enter into Effects Loop
Sync Program Mode by turning on the amp while first pressing
and holding down the Save button on the back of the amp.
2) When the amp comes on, the Effects Loop LEDs on the amp
and footswitch will begin blinking, indicating that you are in Effects Loop Sync Program Mode.
3) Press the channel(s) and/or Boost buttons one at a time that
you want effects with.
4) Note that the channels you select will begin blinking along with
the Effects Loop LED. When you select a channel that has the
effects loop Sync’d to it, the Effects Loop LED will blink.
5) When finished selecting your channel(s) and/or boost status,
press and hold the Save button on the amp; after a few seconds
it will blink faster indicating that it’s storing your choices. Effects
syncing can be changed at any later time by going into Effects
Loop Sync Program Mode and turning off the channels that you
DON’T want effects synced with. If you turn all three channels
AND the Boost off, then the Effects Loop will no longer track or
be synced.
When operating in Effects Sync Mode, “Effects” will blink. Solid
illumination indicates manual override. (Manually selected effects will remain on until deselected.)
Note: MIDI programming is separately handled so it isn’t affected by
programming the Effects Loop Sync. Effects Loop Sync only works with
the amp’s normal footswitch.
21
Page 23

Amp Specifications
t
All Tube 3 channel guitar amp head
6-6L6GC or EL34 power tubes using AUTOKRUISE TM biasing scheme
5-12AX7 preamp tubes & 1-12AT7 buffer tube for power amp
16, 8, or 4 Ohms @ 5% THD using 6L6s, 110W w/EL34s
Inputs
Rhythm Channel Nominal gain, Normal Input, Gain @ 5
Rhythm Channel Maximum gain, Normal Input, Gain @ 10
Rhythm Channel extra gain when Drive is activated
Gain increase at 1 kHz when Bright is activated
Lead I or II Channels Maximum gain, Normal Input, Gain @ 10
Lead I or II Channels Nominal gain, Normal Input, Gain @ 5
Broadband gain increase with only Lead Gain switch activated
Gain increase with only either Tight or Thick stage activated
Gain increase with all switches engaged
Rhythm Channel, with Volume half and Master Maximum, Boost on 10
Levels w/Boost, Send & Master @ 10 to reach full power output
Levels w/Boost & Master @ 10, but with Send @ 0 to reach full power
Tube driven, Nominal load >10k ohms
Tube driven, >100K ohm input impedance
Adjustable from 0 to +10 dB boost AFTER the Effects Loop
After power amp w/speaker emulation of 412 Straight & Slant cabs
Adjustable from 0 to +6 dBV, nominal -3 dBV
cts Rhythm, Lead I or Lead II Channel, Boost, and Effects Loop On/Off
hielded cable, and should be plugged in before turning on amp
120VAC/60Hz, 450W nominal
230VAC/50Hz, 450W nominal
240VAC/50Hz, 450W nominal
100VAC/50-60Hz, 450W nominal
304 mm (Height) x 686 mm(Width) x 276 mm(Depth), 21.3kg
12" (Height) x 27" (Width) x 10.875" (Depth), 47 lbs
t
c
Model Double Cross
Tubes
Power Amp Tubes
Preamp Tubes
Output Power
100 W RMS
Input Impedance 1M ohms Normal or Tigh
S
y
stem Gain
50 dB
All measurements taken with 1 KHz
input signal, Tone controls flat, Gain
Halfway and Volume Maximum, Boost
@ 10, Effects OFF, overall Master @
10. All Bright, Drive & cross switches
off. Measured at speaker jack at 16
ohms unless noted.
64 dB
10 dB
+3 dB
90 dB
75 dB
8 dB
5 dB
10 dB
Nominal Si
g
nal to Noise
64 dB
Effects Loop
0.15 VRMS (-16 dBV)
0.45 VRMS (-6 dBV)
Effects Send
Effects Return
Footswitchable Boos
t
Master Volume Boost
XLR Direct Output
Output level
Footswitch
Supplied Footswitch sele
Uses a standard stereo s
Power Requirements
USA/Canada
Europe/UK
Australia
Japan
Dimensions/Weight
mm/kg
Inches/Pounds
22
Page 24

POWER AMP
6L6 6L6 6L6
6L6 6L6 6L6
6L6
EL34
XLR
PHASE
INVERTER
MASTER
VOLUME
BOOST
16
8
4
OUTPUT
TRANSFORMER
SELECTOR
NORMAL
SPEAKERS
SPEAKER
EMULATED
DIRECT OUT
SLANT
STRAIGHT
SEND
LEAD I GAIN
TIGHT
LEAD I I GAI N
RHYTHM
GAIN STAGES
THICK STAGE
TIGHT STAGE
BASS MID TREBLE PRESENCE VOLUME
BASS MID TREBLE P RESENCE VOLUME
BASS MID TREBLE PRESENCE VOLUME
RHYTHM
LEAD I
L
EAD I I
RETURN
RETURN
BUFFER
LEV EL
SEND
LEV EL
EFFECTS
EFFECTS
BUFFER
EFFECTS
BYPASS
TRUE
FOOTSWITCH
FOOTSWITCH AND MIDI
SYSTEM
1/4" STEREO F OOTSWITCH
MIDI IN
MIDI
BRIGHT
BRIGHT
BRIGHT
GAIN (PER CHANNEL)
THICK (PER LEAD CHANNEL)
TIGHT(PER LEAD CHANNEL )
STORE
GROUND L IFT
SPEAKER
EMULATION
BIAS
IMPEDANCE
CHANNEL
CHANNEL
12AT712AX7
12AX7
12AX7
12AX7
12AX7
12AX7
12AX7 12AX7
Signal Flow Diagram
23
Page 25

24
Page 26

 Loading...