

INSTALLATION
LED WINDSHIELD TRIM FOR FLTR — CHROME
THANK YOU FOR CHOOSING KϋRYAKYN!
PROTECT YOURSELF AND OTHERS FROM POSSIBLE INJURY AND/OR PROPERTY
DAMAGE OR LOSS. PAY CLOSE ATTENTION TO ALL INSTRUCTIONS, WARNINGS,
CAUTIONS, AND NOTICES REGARDING THE INSTALLATION, USE, AND CARE OF
THIS PRODUCT.
THIS INDICATION ALERTS YOU TO THE FACT THAT
IGNORING THE CONTENTS DESCRIBED HEREIN CAN
RESULT IN POTENTIAL DEATH OR SERIOUS INJURY.
This indication alerts you to the fact that ignoring
the contents described herein can result in minor or
moderate potential injury.
NOTICE
MAKE SURE THE FOLLOWING PARTS HAVE BEEN INCLUDED IN THE KIT:
1 Right Windshield Trim — Chrome
1 Middle Windshield Trim — Chrome
1 Left Windshield Trim — Chrome
1 Windshield Hardware Kit containing:
4 Windshield trim standoffs
4 #6 lock washers
4 #6 flat washers
4 #6-32 X 3/8” button socket head screws
1 Turn Signal Hardware Kit containing:
1 6-pin adapter
2 Y-connectors
1 Dielectric grease pack
1 Installation Instructions
TOOLS SUGGESTED
Phillips-head screwdriver, set of hex wrenches, socket set and ratchet, combination wrenches, Torx
drivers, in/lbs and ft/lbs torque wrench
STEP 1 Read and understand all steps in the instructions before starting the installation.
1338-21HD-1213
This indication alerts you to the fact that ignoring the
contents described herein may negatively affect product
performance and functionality or damage the product itself
or the product to which it is being attached.
This copy of installation instructions contains important information. Ensure that the end user receives this copy and is
aware of its importance for future reference.
Park the motorcycle on a hard, level surface and turn off the ignition.
A factory service manual may be helpful in performing this
installation. Do not attempt this installation and consult a
trained technician if you are not confident in your ability to
complete all of the steps in these instructions.
Avoid damage to the motorcycle. Protect painted surfaces with
a soft cloth, blanket, or service cover.
-cont.-
1338
CUSTOMER SERVICE
877.370.3604 (toll free)
INSTALLATION QUESTIONS
Küryakyn warrants that any Küryakyn products
sold hereunder, shall be free of defects in
materials and workmanship for a period of one
(1) year from the date of purchase by the
consumer excepting the following provisions:
● Küryakyn shall have no obligation in the event
the customer is unable to provide a receipt
showing the date the customer purchased the
●The product must be properly installed,
maintained and operated under
●Küryakyn makes no warranty, expressed or
implied, with respect to any gold plated
consequential and incidental damages, including
labor and paint, resulting from failure of a
Küryakyn product, failure to deliver, delay in
delivery, delivery in nonconforming condition, or
for any breech of contract or duty between
●Küryakyn products are often intended for use in
specific applications. Küryakyn makes no
warranty if a Küryakyn product is used in
●Küryakyn electrical products are warranted for
one (1) year from the date of purchase by the
consumer. L.E.D.’S contained in components of
Küryakyn products will be warranted for defects
in materials and workmanship for 3 years from
the date of purchase where as all other
components shall be warranted for one(1) year.
This includes, but is not limited to; control
modules, wiring, chrome & other components.
●Küryakyn makes no warranty of any kind in
regard to other manufacturer¹s products
distributed by Küryakyn. Küryakyn will pass on
all warranties made by the manufacturer and
where possible, will expedite the claim on behalf
of the customer, but ultimately, responsibility for
disposition of the warranty claim lies
For purchasing Küryakyn® products, you
can receive a complete catalog free of charge.
Send the Proof-of-Purchase below with
Please indicate either Accessories Catalog for
Harley-Davidson® or GL & Metric Cruisers.
Be sure to ask your local dealer about other
Küryakyn® products, the motorcycle parts and
accessories designed for riders by riders.
©2005 Küryakyn USA® All Rights
techsupport@kuryakyn.com
or call 715.247.2983
LIMITED WARRANTY
normal conditions.
●Küryakyn shall not be liable for any
Küryakyn and a customer.
applications other than intended.
with the manufacturer.
ABOUT OUR CATALOG
your address to: Küryakyn
454 County Road V V
Somerset, WI 54025-9031
reserved.
product(s).
products.
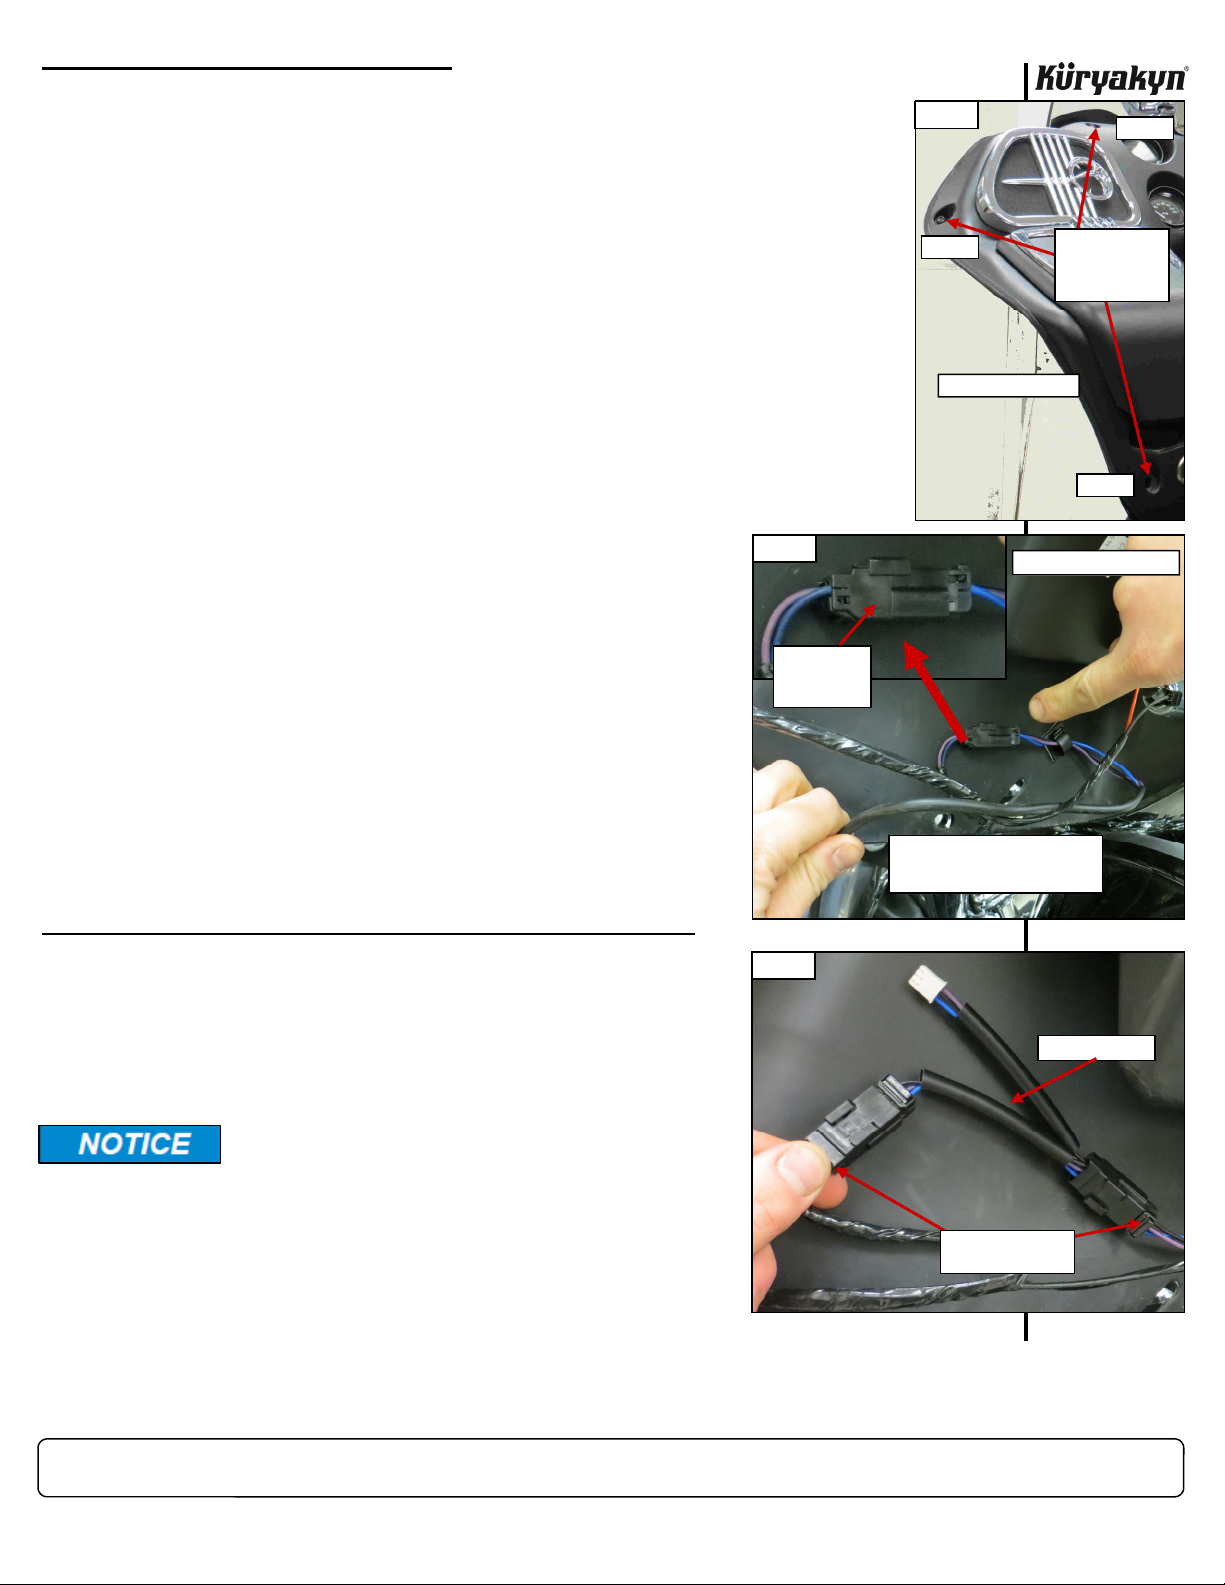
REMOVE THE OUTER FAIRING:
STEP 2 Remove the screws and washers securing the windshield to the fairing; set the screws
and windshield aside for now. One screw and all five washers will be reused.
STEP 3 Remove the rubber well-nuts and rubber washers from the fairing; set them aside, they
will be re-used.
STEP 4 Remove the acorn nuts and flat washers securing the turn signal assemblies to the fair-
ing; set the nuts and washers aside they will be re-used later. Pull the turn signal assemblies away from the fairing. Older models require removal of a stud plate from the inner
fairing support.
NOTE: Secure the turn signal assemblies to the engine guard with zip ties
or masking tape to keep them from falling once the fairing is removed.
STEP 5 Refer to PIC 1. Remove the Torx screws (1) and (2) from both sides; set them aside
they will be re-used later. Note that the lower screws (
(
2) are short.
NOTE: Assistance is recommended when removing the
outer fairing to minimize the possibility of damage.
1) are long and the middle screws
PIC 2
STEP 6 Refer to PIC 1. Remove the upper Torx screws (3) from both sides;
set them aside for now.
STEP 7 Lift up on the front of the fairing to disengage it from the bike.
OEM TURN
SIGNAL
CONNECTOR
STEP 8 Squeeze the two tabs on one of the headlight connectors and CARE-
FULLY disconnect it from the bulb. Repeat for the other bulb.
STEP 9 Remove the outer fairing from the bike; set it on a soft blanket on a
sturdy surface.
INSTALL THE TURN SIGNAL WIRING ADAPTERS:
STEP 10 Refer to PIC 2. Disconnect the OEM turn signal connectors.
NOTE: ‘98-’03 MODELS: have a 6-pin connector located
on the clutch-side (left) of the fairing. The black
6-pin connector is usually taped to a wiring harness. Disconnect the 6-pin connector.
Kuryakyn recommends the use of the included
dielectric grease on ALL electrical connections.
STEP 11 Locate the included “Y” connectors. Apply some of the included di-
electric grease to the open ends of ALL the connectors.
STEP 12 Refer to PIC 3. Connect the “Y” connectors to the turn signal con-
nectors.
NOTE: ‘98-’03 MODELS: locate the included 6-pin adapter; apply dielectric grease to
the open ends, then connect the it inline with the OEM turn signal wiring.
PIC 3
PIC 1
3
2
SHORT
CLUTCH-SIDE (LEFT)
LOCATE THE TURN SIGNAL
CONNECTORS ON THE INSIDE
OF THE INNER FAIRING
OEM TURN SIGNAL
CONNECTORS
REMOVE THE
UPPER, MIDDLE,
AND LOWER
TORX SCREWS
2004-UP MODEL SHOWN
“Y” CONNECTOR
PAGE
SHORT
1
LONG
-cont.-
LED WINDSHIELD TRIM FOR FLTR — CHROME
2
INSTALLATION

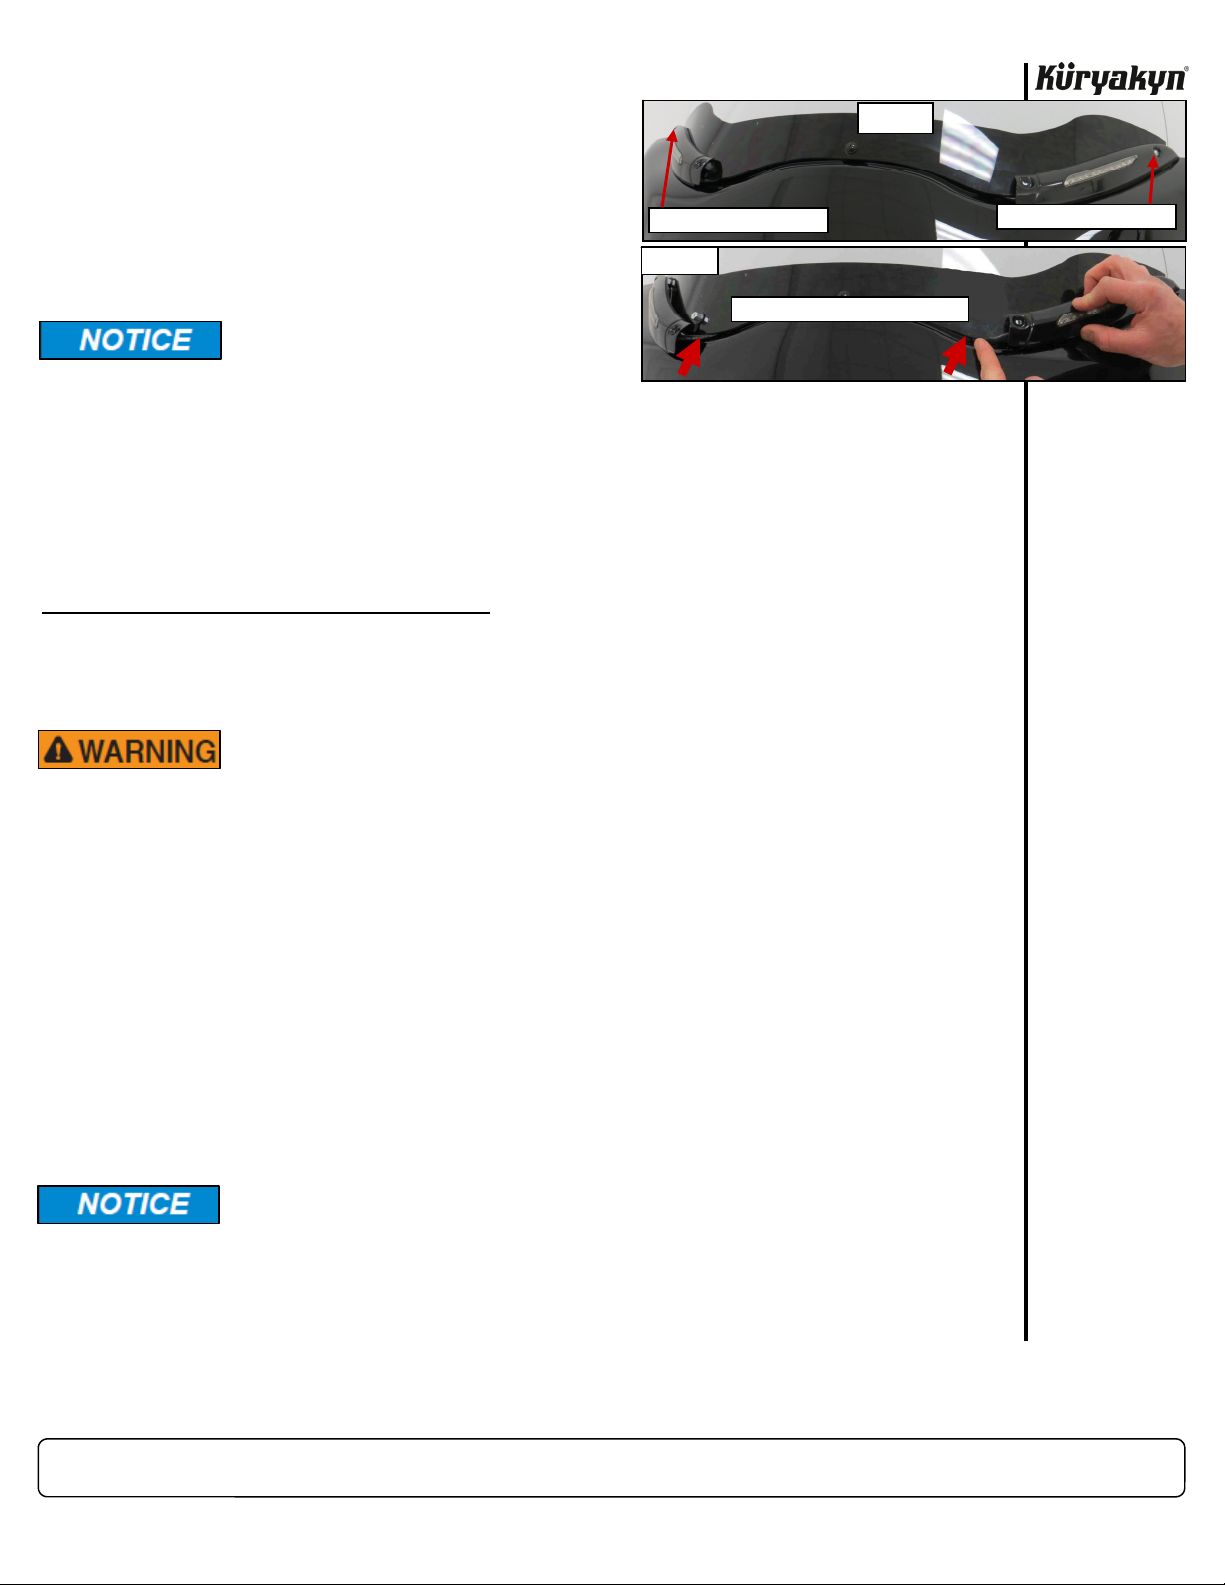
INSTALL THE LED WINDSHIELD TRIM:
STEP 13 Refer to PIC 4. Carefully mark and drill a 7/16” hole 1 1/2” from the holes towards the center and
3/4” up from the ledge as shown in PIC 4.
PIC 4
1 1/2”
BRAKE-SIDE (RIGHT)
STEP 14
Refer to PIC 5. Determine the left Trim from the right.
BRAKE-SIDE (RIGHT)
STEP 15 Refer to PIC 6. Insert the left side Trim wire through the left side hole
drilled in the
STEP 16 Refer to PIC 7. Insert the well nuts with rubber wash-
ers in their holes.
STEP 17 Remove four (4) of the plastic washers from the OEM
windshield screws and place them on the included
windshield trim stand offs; set them within arms reach
of the work area. Leave one OEM screw with plastic
washer for use in the next step
STEP 18 Hold the windshield in place; insert the OEM screw with
plastic washer through the center windshield hole and
into the well nut, then snug the screw.
NOTE: Refer to PIC 8. Ensure that there is
STEP 19
Refer to PIC 9. Insert the windshield trim stand offs
through the remaining holes in the windshield and well nuts. Alternately tighten the OEM screw
and stand offs.
MEASURE TWICE – DRILL ONCE. Double check all reference marks made on
the fairing BEFORE drilling. Kuryakyn will not be responsible for incidental or
consequential damages resulting from this installation.
DRILL A 7/16”
HOLE HERE
3/4”
FRONT OF FAIRING
PIC 5
CLUTCH-SIDE (LEFT)
STEP 13. Repeat for the other side.
some slack in the wiring before fully
securing the windshield to the fairing.
DRILL A 7/16”
HOLE HERE
3/4”
PIC 7
PIC 8
WHILE WINDSHIELD IS
STILL LOOSE, ENSURE
THAT THERE IS SOME
SLACK IN THE WIRING
PIC 9
1 1/2”
PIC 6
7/16”
HOLE
FRONT OF FAIRING
CLUTCH-SIDE (LEFT)
INSERT WELL NUTS AND RUBBER
WASHERS THROUGH HOLES
WINDSHIELD STAND-OFFS
PAGE
-cont.-
LED WINDSHIELD TRIM FOR FLTR — CHROME
3
INSTALLATION
STEP 20
Place an included #6 lock washer and flat washer on each of the included #6 screws; set them
within arms reach of the work area for now.
PIC 10
STEP 21 Refer to PIC 10. Secure the two side trim pieces to the
rear standoffs with the #6 screws and washers; leave
both the screws finger tight for now.
#6 SCREW AND WASHERS
NOTE: Refer to PIC 11. Tuck the extra wiring
under the windshield before installing the center Trim piece.
Secure all wiring away from any
moving parts, pinch points or extreme heat. Kuryakyn WILL NOT
warranty any electrical component
that fails due to pinched, crimped,
broken, abraded, melted or frayed
wires.
PIC 11
TUCK WIRING UNDER WINDSHIELD
STEP 22 Align the center trim piece over the side trim pieces and front standoffs; secure it with the two
remaining #6 screws and washers. Alternately tighten all four screws.
REINSTALL THE OUTER FAIRING:
STEP 23 Reconnect the headlights.
STEP 24 Connect the Trim wiring to the “Y” connectors; test for the proper function of ALL lights.
NOTE: ‘98-’03 MODELS: The longer wiring lead will connect to the brake-side
STEP 25 Reinstall the fairing. Care should be taken not to over tighten and strip the Torx screws. Torque
STEP 26 Reinstall the turn signal assemblies. Torque the fasteners to the factory service manual re-
VISIBILITY IS A MAJOR CONCERN FOR MOTORCYCLISTS. A LIGHT
MALFUNCTION COULD RESULT IN DEATH OR SERIOUS INJURY. ENSURE PROPER LIGHT OPERATION BEFORE RIDING THE MOTORCYCLE.
(right) Trim connector. The short lead connects to the clutch-side (left) Trim
connector.
the fasteners to the factory service manual requirements.
quirements.
#6 SCREW AND WASHERS
It is the end user’s responsibility to ensure that all of the fasteners (including
pre-assembled) are tightened before operation of the motorcycle. Küryakyn
will not provide warranty coverage on products or components lost due to improper installation or lack of maintenance. Periodic inspection and maintenance are required on all fasteners.
Ride On!
LED WINDSHIELD TRIM FOR FLTR — CHROME
PAGE
4
INSTALLATION
 Loading...