

Page 1
Installation
and care
Become a fan of Kurgo on
Facebook and receive all the latest
updates, giveaways and contests.
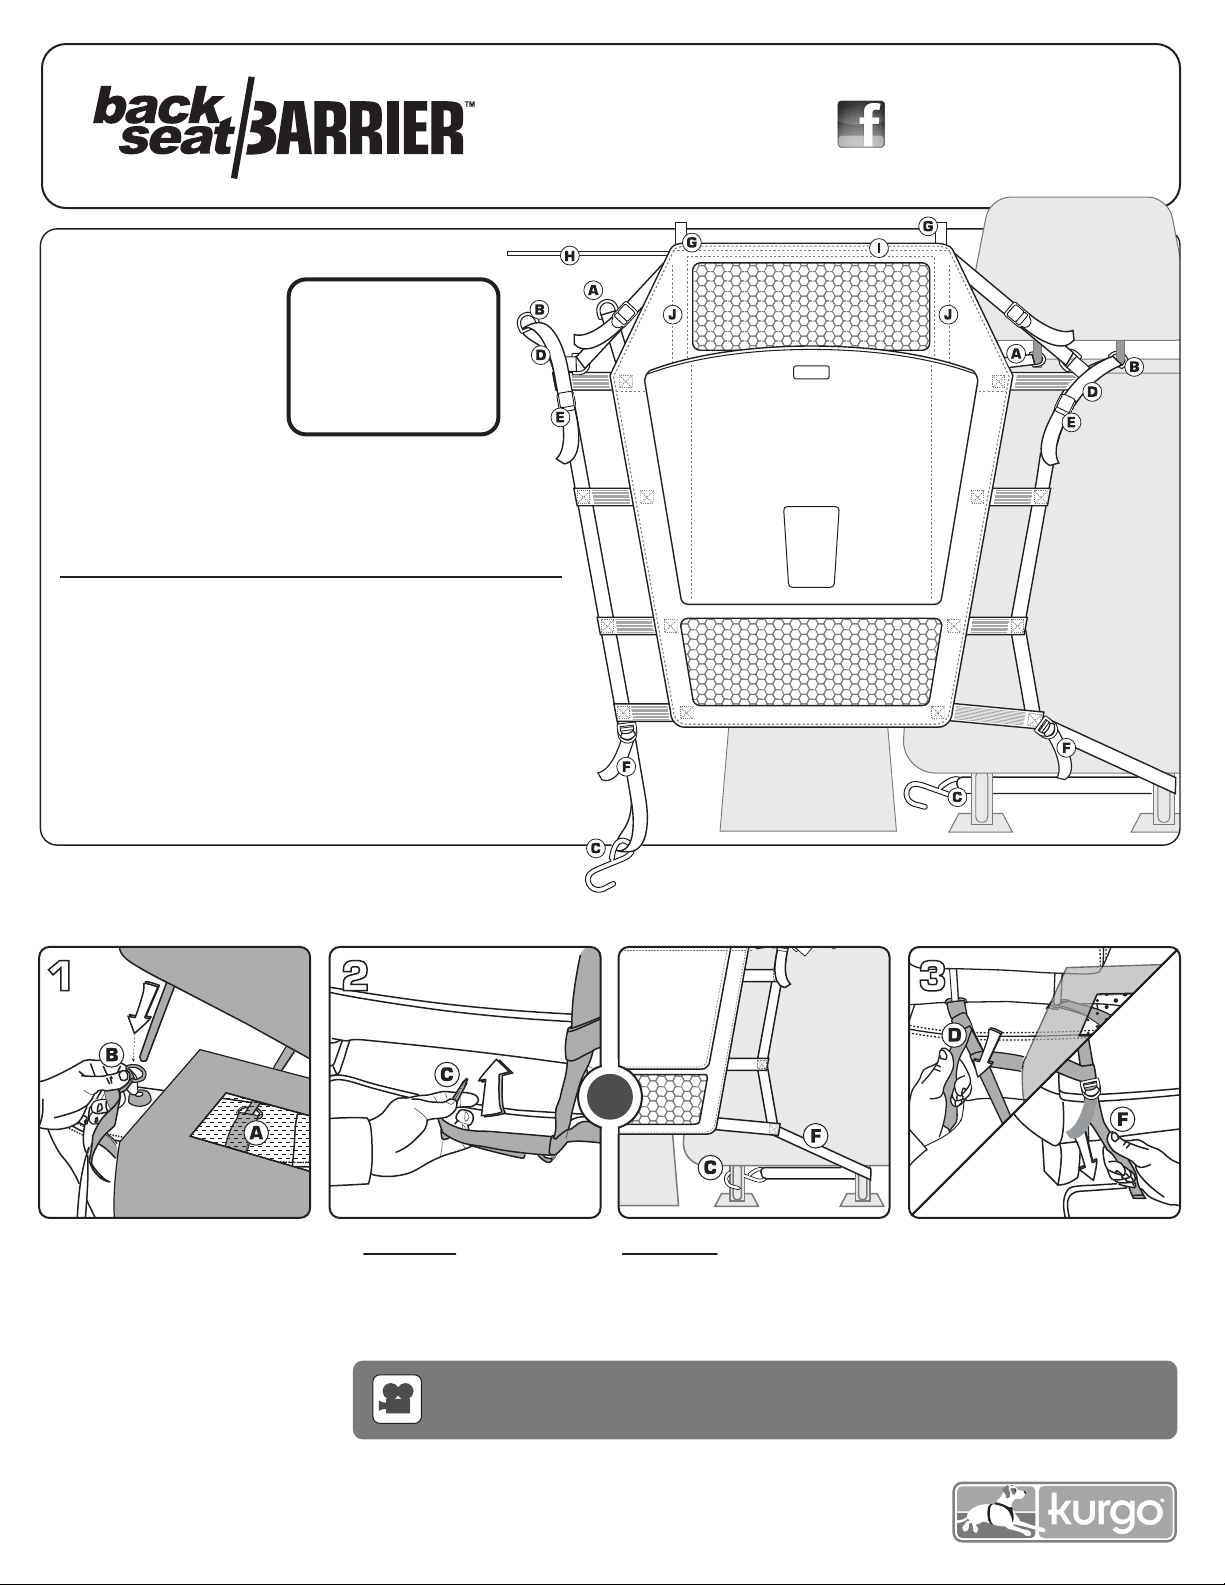
Parts List & Key:
A inner D-ring
B outer D-ring
C under seat hook
D top headrest strap
E top tension buckle
F under seat strap
G steel support velcro closure
H horizontal steel support rod
I steel support rod pocket
J vertical steel support bar pocket
Optional extra support for barrier extension:
Flip up orange Velcro (G) and slide metal rod (H) through
slot (I) that runs across the top of the barrier between
the vertical bar pockets (J). Close and secure Velcro (G).
To lower barrier extension:
1) Open velcro (G) on the left and right side, and remove
the metal bar found in each slot (J), also remove metal rod (H).
2) Roll mesh top from bar slot (I) down and tuck fabric
into large black pocket
NOTE: The horizontal steel
support rod (H) is stored in
the vertical support rod
pocket (J) for packaging.
Please locate and insert
into the horizontal support
rod pocket (I)
INSTALLED VIEW
Pockets
View from backseat
Cup Holder
Passenger Seat
Center Console
Attaching the barrier: Detachable Headrests
OR
1. Orient the barrier so the
Kurgo logo is facing the
back of the car. Remove the
driver’s seat headrest. Slide
the inner headrest column
through the large D-ring
attached to strap (A). Slide
outer D-ring (B)
outer headrest post.
through
Repeat
on passenger side.
2. OPTION A - Clip hook (C)
to the underside of the front
seat base plate or springs.
For an online video demonstration of how to install the Backseat
Barrier visit us at: www.kurgostore.com/pages/instructions.html
OPTION B - Run strap (F)
around the outside footing
of each seat and secure
hook (C).
3. Pull top straps (D) tight
on both sides; pull both
bottom straps (F) tight.
7.14 For more information: 877.847.3868 :: www.kurgo.com :: info@kurgo.com
Page 2

Parts List & Key:
A inner D-ring
B outer D-ring
C under seat hook
D top headrest strap
E top tension buckle
F under seat strap
G steel support velcro closure
H horizontal steel support rod
I steel support rod pocket
J vertical steel support bar pocket
NOTE: The horizontal steel
support rod (H) is stored in
the vertical support rod
pocket (J) for packaging.
Please locate and insert
into the horizontal support
rod pocket (I)
TRAINING:
1) Get your dog familiar with riding in the car, focusing
on the back seats and not the front. Before setting out
on a long road trip with this new product, take some
shorter trips to help Fido become adjusted to the barrier.
2) Most importantly, the understanding of basic
obedience really makes the difference for any car ride.
Make sure your pup has a grasp of sit, stay and come to
help create easy going excursions.
INSTALLED VIEW
Pockets
View from backseat
Cup Holder
Passenger Seat
Center Console
Fixed Headrests
CONTINUE FROM STEP TWO
OF THE DETACHABLE
HEADREST INSTRUCTIONS
1. Pull top headrest strap
(D) out of its buckle (E).
2. Wrap strap (D) around the headrest. Insert strap
through the large D-ring (A) attached to the inner elastic
strap. Bring the strap back around the headrest and
run through (E). Repeat on opposite headrest.
Washing instructions
• Brush off loose dirt with a dry brush.
• As needed, wipe off with a damp sponge and mild soap.
• Rinse only, if possible. Use cold water and a sponge or rinse in a tub without soap.
• Machine wash in front-loading unit (DO NOT use machine with agitator, agitator could cause damage not
covered under warranty) Remove metal bars before washing. Use cold water and mild soap (Ivory Flakes,
Woolite, Sport Wash, Etc.) no t detergents.
• Rinse thoroughly to eliminate soap residue.
• Lay flat to dry.
7.14 For more information: 877.847.3868 :: www.kurgo.com :: info@kurgo.com
 Loading...