

Kuppersbusch KEH 650.0 Instructions For Use And Installation Instructions
BEDIENUNGSANWEISUNG
mit Montageanweisungen
Instructions for use and installation instructions
Instructions d’ utilisation et avis de montage
Gebruiksaanwijzing en montagehandleiding
KEH 650.0
07 22 53 G41

For your information
Please read the information in this leaflet carefully. It contains important instructions for the safety, installation, use and maintenance of your appliance.
The appliance is only intended for the preparation of food in the home.
Please keep the operating instructions in a safe place.
The appliance belongs to appliance category 3.
If any changes are made to the appliance and its connection, this will
impair the appliance’s safety and proper functioning in all other countries.
Conditions of guarantee
The conditions of guarantee applicable for this product are those published
by our representative in the relevant country.
Details regarding these terms of guarantee may be obtained from the dealer
from whom the appliance was purchased. The sales receipt must be
produced when making claims under guarantee.
Contents
Your cooker at a glance . . . . . . . . . . . . . . . . . . . . . . . 22
Safety instructions. . . . . . . . . . . . . . . . . . . . . . . . . . . 23
for connection and functions
for the gas hob
for the oven
Before first use. . . . . . . . . . . . . . . . . . . . . . . . . . . . . 23
Disposing of the packaging and the old appliance
Initial cleaning
Setting the time
Using the rings . . . . . . . . . . . . . . . . . . . . . . . . . . . . . 24
Setting the burners
Notes on the right types of saucepan
The oven. . . . . . . . . . . . . . . . . . . . . . . . . . . . . . . . . 25
Selecting the heating mode and temperature
Switch symbols and heating modes
Shelf levels
Slide-in accessories
Timer . . . . . . . . . . . . . . . . . . . . . . . . . . . . . . . . . 26
Setting the time
Minute minder
Switching the oven off automatically
Switching the oven off and on automatically
Applications . . . . . . . . . . . . . . . . . . . . . . . . . . . . . . . 27
Roasting
Baking
Thawing
Baking pizza
Preserving
Grilling
backmobil (special accessory no. 600) . . . . . . . . . . . . . . . . 29
Cleaning and caring . . . . . . . . . . . . . . . . . . . . . . . . . 30
Rings
Regenerating the ökotherm
®
backmobil
Oven
Troubleshooting . . . . . . . . . . . . . . . . . . . . . . . . . . . . 31
Nameplate
Installation instructions for fitter . . . . . . . . . . . . . . . . . . 31
Planning the supply lines
Installing the cooker into your fitted kitchen
Installing the glass ceramic gas hob
Installation into the hob
Checking the supply lines
Checking the ring burners
Factory setting / conversion possibilities . . . . . . . . . . . . . . . 35
Table of permissible types of gas and pressures
Table of injector sets
Conversion injector sets
Table of heat input
Gross calorific values according to EN 437
Resetting the ring burners
Final assembly
KEH 650.0 21
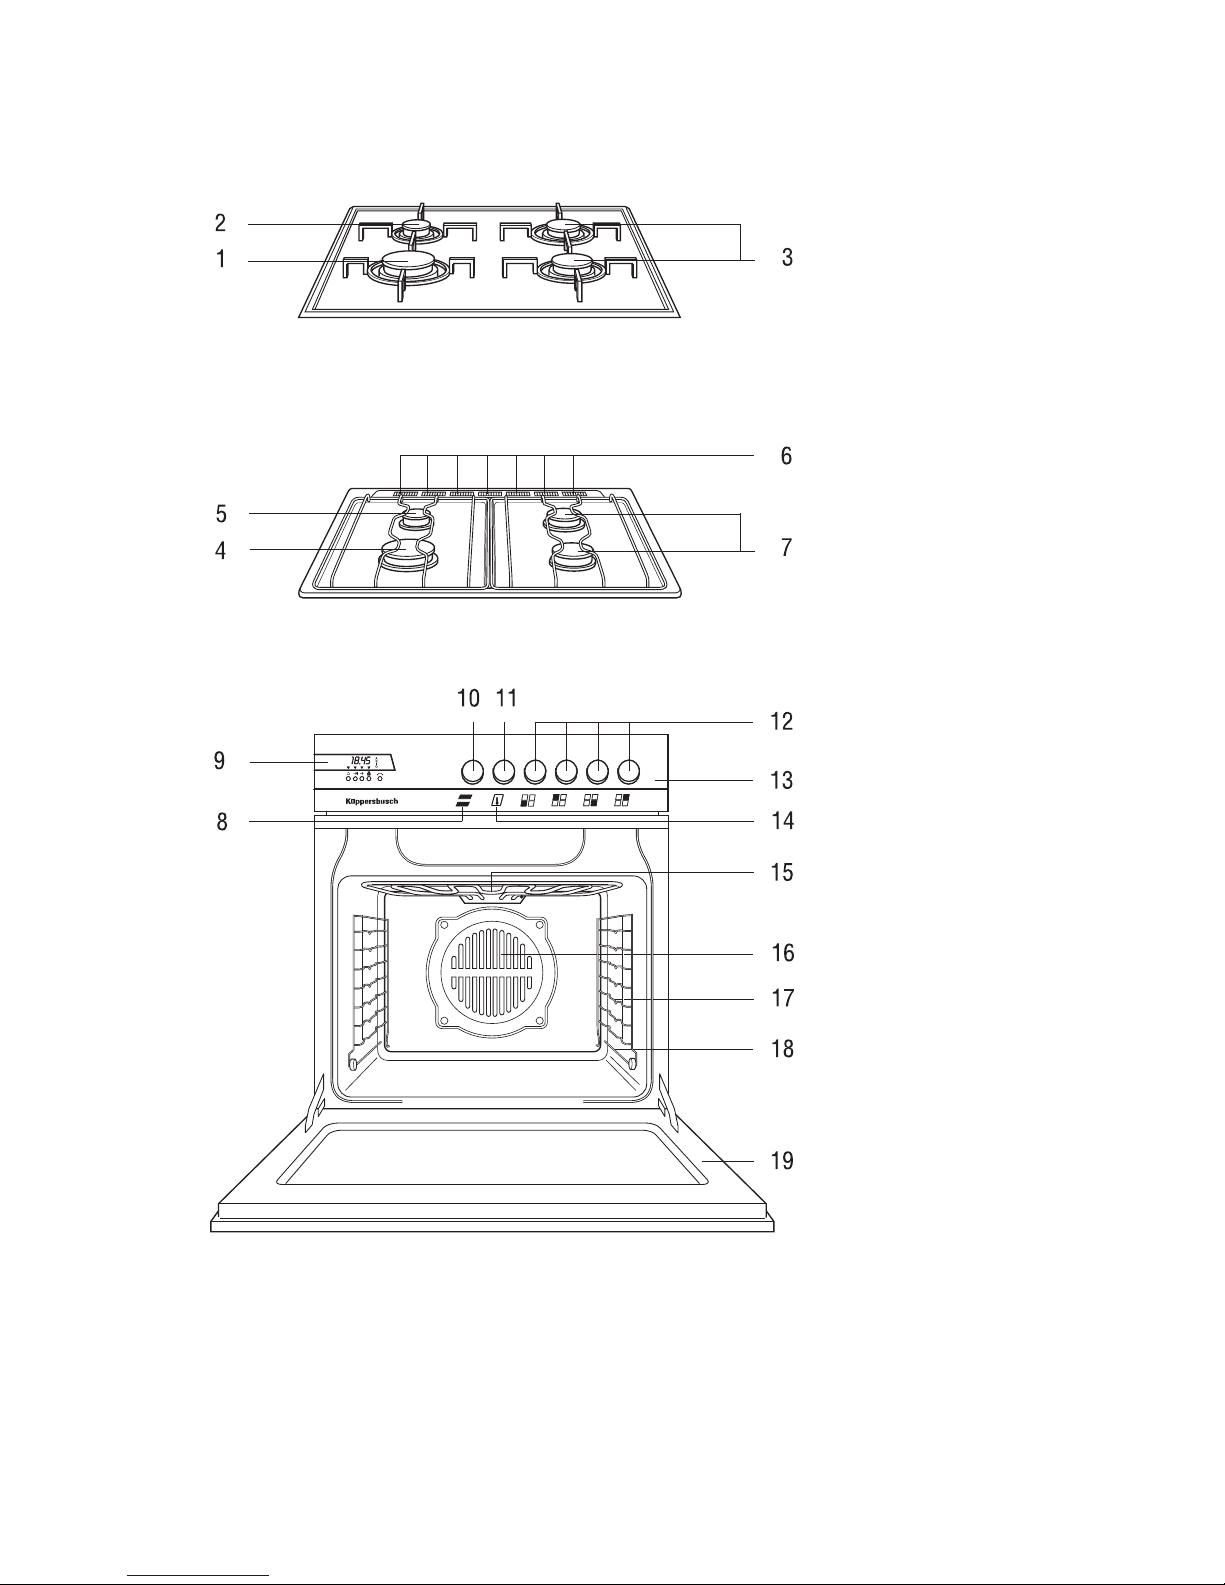
Your cooker at a glance
1 High speed ring
2 Simmering ring
3 Standard ring
4 High speed ring
5 Simmering ring
6 Ventilation slits
7 Standard ring
8 Oven function indicator
9Timer
10 Oven function switch
11 Oven temperature switch
12 Hob controls
13 Control panel
14 Heating indicator
15 Fold-down grill (top heat/grill)
16 Hot air fan
17 Side grids
18 Frame
19 Oven door
Available accessories:
Grilling rack with lifter acc.-no. 125
Pizza slab acc.-no. 126
Ring for small pots acc. no. 160
Roasting grid acc.-no. 440
Roasting tray acc.-no. 441
Infrared grill acc.-no. 540
Baking tray, enamel acc.-no. 541
Drip pan acc.-no. 543
backmobil
acc.-no. 600
22 KEH 650.0
Safety instructions
for connection and functions
Before the appliance is installed, it must be checked whether the local
supply conditions (type of gas and gas pressure) and the settings of the
appliance correspond. All settings for the appliance are stated in this
user guide. This appliance should not be connected to a pipe for extracting
combustion products. It must be fitted and connected in accordance with
the applicable conditions of installation. Particular attention should be
paid to suitable ventilation measures. The use of a gas cooker causes
heat and humidity to build up in the room where the cooker is installed. For this reason it should always be ensured that the kitchen is
well ventilated; keep the ventilation slits open or provide for a mechanical ventilation facility (e.g. a cooker hood). If the appliance is subject to
particularly intensive use or use over a long period of time, it might be
necessary to provide for additional ventilation, e.g. by opening a window or operating a cooker hood at a high power level.
Küppersbusch cookers are made according to the applicable safety
regulations. Only Küpperbusch ovens may be connected to Küpperbusch hobs.
The appliance should only be connected to the gas mains by a qualified
gas fitter. The same applies for all adjustments and conversions. Attention
must be paid to the statutory regulations at all times. It is also
necessary to observe the instructions of the relevant gas board for
connecting up the appliance.
The cooker should only be installed in a well ventilated area.
Do not use the cooker for heating rooms.
If problems occur during operation the gas supply should be turned off
immediately.
The appliance should only be serviced and repaired by a qualified
technician in accordance with the applicable safety regulations. When
repair jobs are being carried out on any equipment running on gas, it is
always important to turn off the gas supply. Work carried out incorrectly
places your safety at risk.
If the cooker is run on liquefied petroleum gas (propane/ butane) it is vital to
ensure that all joints between the gas bottle and the cooker are secure and tight.
External flexible supply hoses should not be wedged into tight positions
or laid cross hot surfaces.
The surfaces of the oven, oven door and hob are very hot when in
operation. Always keep children away!
Connection leads of electrical appliances should not be placed on the
hot hob or be allowed to become jammed in the hot oven door.
Do not lift the appliance by the handle of the oven door.
We recommend that you have the appliance serviced at regular intervals.
WARNING! This appliance must be earthed!
for the oven
When repairs are being carried out or oven light bulbs are being
replaced, the cooker must be disconnected from the mains (switch off
the fuse).
Never store any objects in your oven which could cause a hazard if the
oven is unintentionally switched on.
Take special care when working with a hot oven. Use a dish cloth, oven
gloves or similar.
The oven door must close well. In the event of damage to the door
sealing, hinges, sealing surfaces or to the glass pane, do not use your
cooker until it has been repaired and checked by a qualified and
authorised installer.
Caution! When opening and closing the oven door, do not reach into the
hinge. Risk of injury!
Always close the oven door completely when food is being cooked in
the oven.
Keep at least 5 cm away from the grill and top heat.
for the hob
Cooker hoods above the hob must be fitted at a minimum distance of 650 mm.
The rings should not be ignited unless you are cooking something.
Always ensure that the plug-on rings and burner tops are in the correct
position.
Attention: The electronic automatic spark ignition will not work if there is
a power failure! In such cases please use matches.
Overheated fats and oils may spontaneously ignite. Food cooked in fat or
oil, e.g. chipped potatoes, should only be cooked under supervision.
Never extinguish ignited fats and oils with water! Put the lid on the pan,
switch off the ring and remove the pan from the hot hob.
Pressure cookers should be constantly supervised until the correct
pressure has been reached. First turn the burners of the rings up to
maximum flame and then (following the instructions of the manufacturer
of the pressure cooker) turn the heat down in good time.
The ventilation slits in the hob should not be covered over.
Food which is placed in the oven to be heated later may have gone off
by that time.
High surface temperatures may occur during the regeneration of the
ököthermâ catalyst. Keep children away.
If the oven temperature deviates too much from the preset value, have
the temperature controller repaired.
If the cooling fan (cross-flow fan) fails, switch the oven off and call the
customer service.
Before first use
Disposing of the packaging and the old appliance
Dispose of the transport packaging in such a way that is not harmful to the
environment.
If the appliance is purchased in Germany the dealer who sold you the appliance will dispose of the transport packaging for you. Recycling the packaging saves raw materials and reduces the amount of waste disposed
appliances still contain useful materials. Dispose of your old appliance at a
collection point for recycling useful materials.
Before disposing of your old appliance ensure that it cannot be used any
longer. This will prevent misuse.
Initial cleaning
Remove foreign objects and the packaging.
Before preparing meals for the first time clean the inside of the oven and all
accessories thoroughly.
Clean the glass ceramic hob, baking sheets, drip pan, gridiron, core temperature probe etc. with a damp cloth and a little washing-up liquid
Heating up the oven: Shut the oven door. Heat up the oven by switching
on the top and bottom heat at maximum temperature for 60 minutes.
Air the kitchen well while you are doing this.
KEH 650.0 23
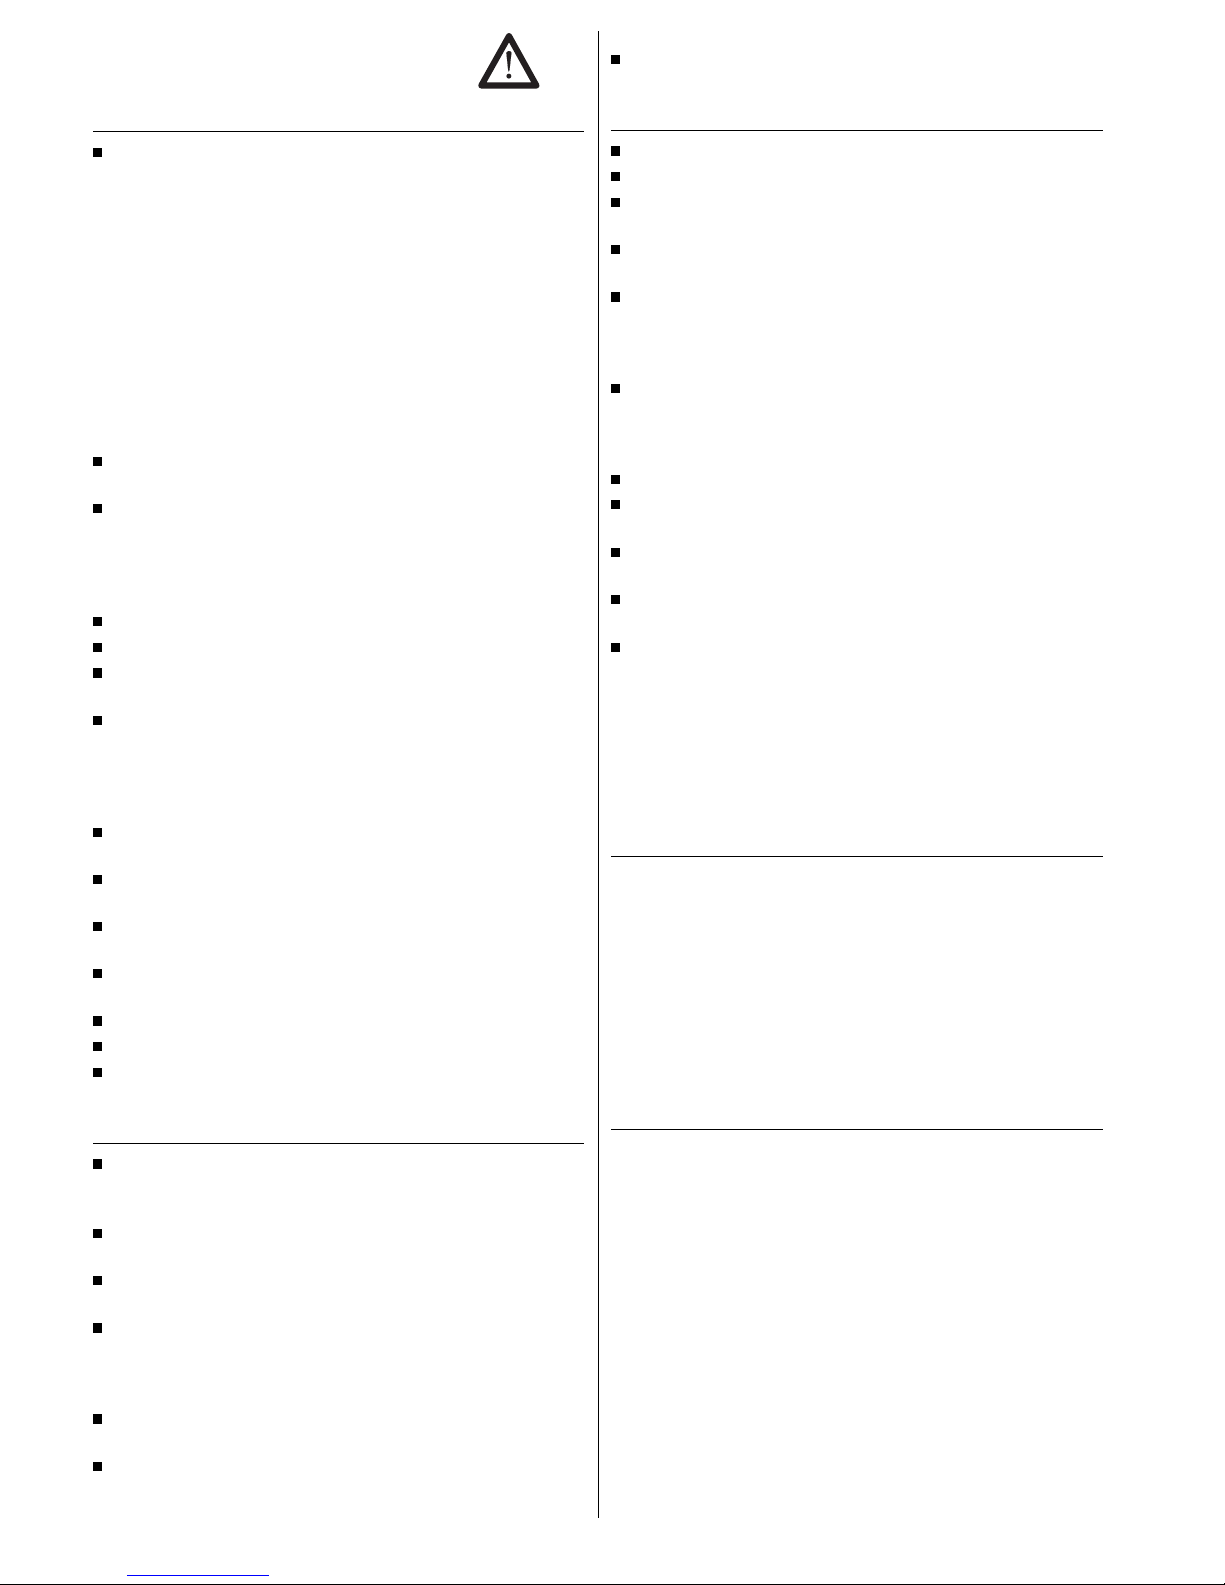
Setting the time
If the timer flashes, this means that the time has not been set. Proceed as
follows:
hold and
pressed set the time.
Using the rings
Take note of the safety instructions on page 23!
Switching the cooking zones on and off
Each cooking zone has its own regulator, which can be pushed down.
The symbols on the control panel indicate which regulator operates which
cooking zone.
The cooking zone burners are ignited by an electric spark.
They can also be lit with matches or something similar (e. g. in the event of
power failure).
Igniting the cooking zone burners:
- Release the depressed cooking zone
regulator by pressing down.
- Turn the regulator anti-clockwise to
the high position and press in
halfway, until a resistance can be
felt. The flame has been ignited.
- Keep the cooking zone regulator
down for another 5-10 seconds and
press in firmly once more, before releasing. The flame is now burning.
If at any time the flame does not light successfully, allow about two seconds and repeat the procedure. Press the control knob in slightly longer
and possibly a little bit more firmly.
Adjusting the setting:
The maximum and minimum settings are marked on the cooking zone regulators. The flame can be regulated directly.
- Bring to the boil at a high setting if
possible and continue simmering at
a low setting.
Switching off the cooking zone burners:
- Turn the cooking zone regulator clockwise to zero setting.
All cooking zone burners are protected thermoelectrically. If at any time the
flame is extinguished unintentionally (e. g. due to pans boiling over or due
to a strong draught), the gas supply switches off automatically.
Notes on the right types of saucepan
Using the right types of saucepan will help you to save energy and cut
down on cooking times.
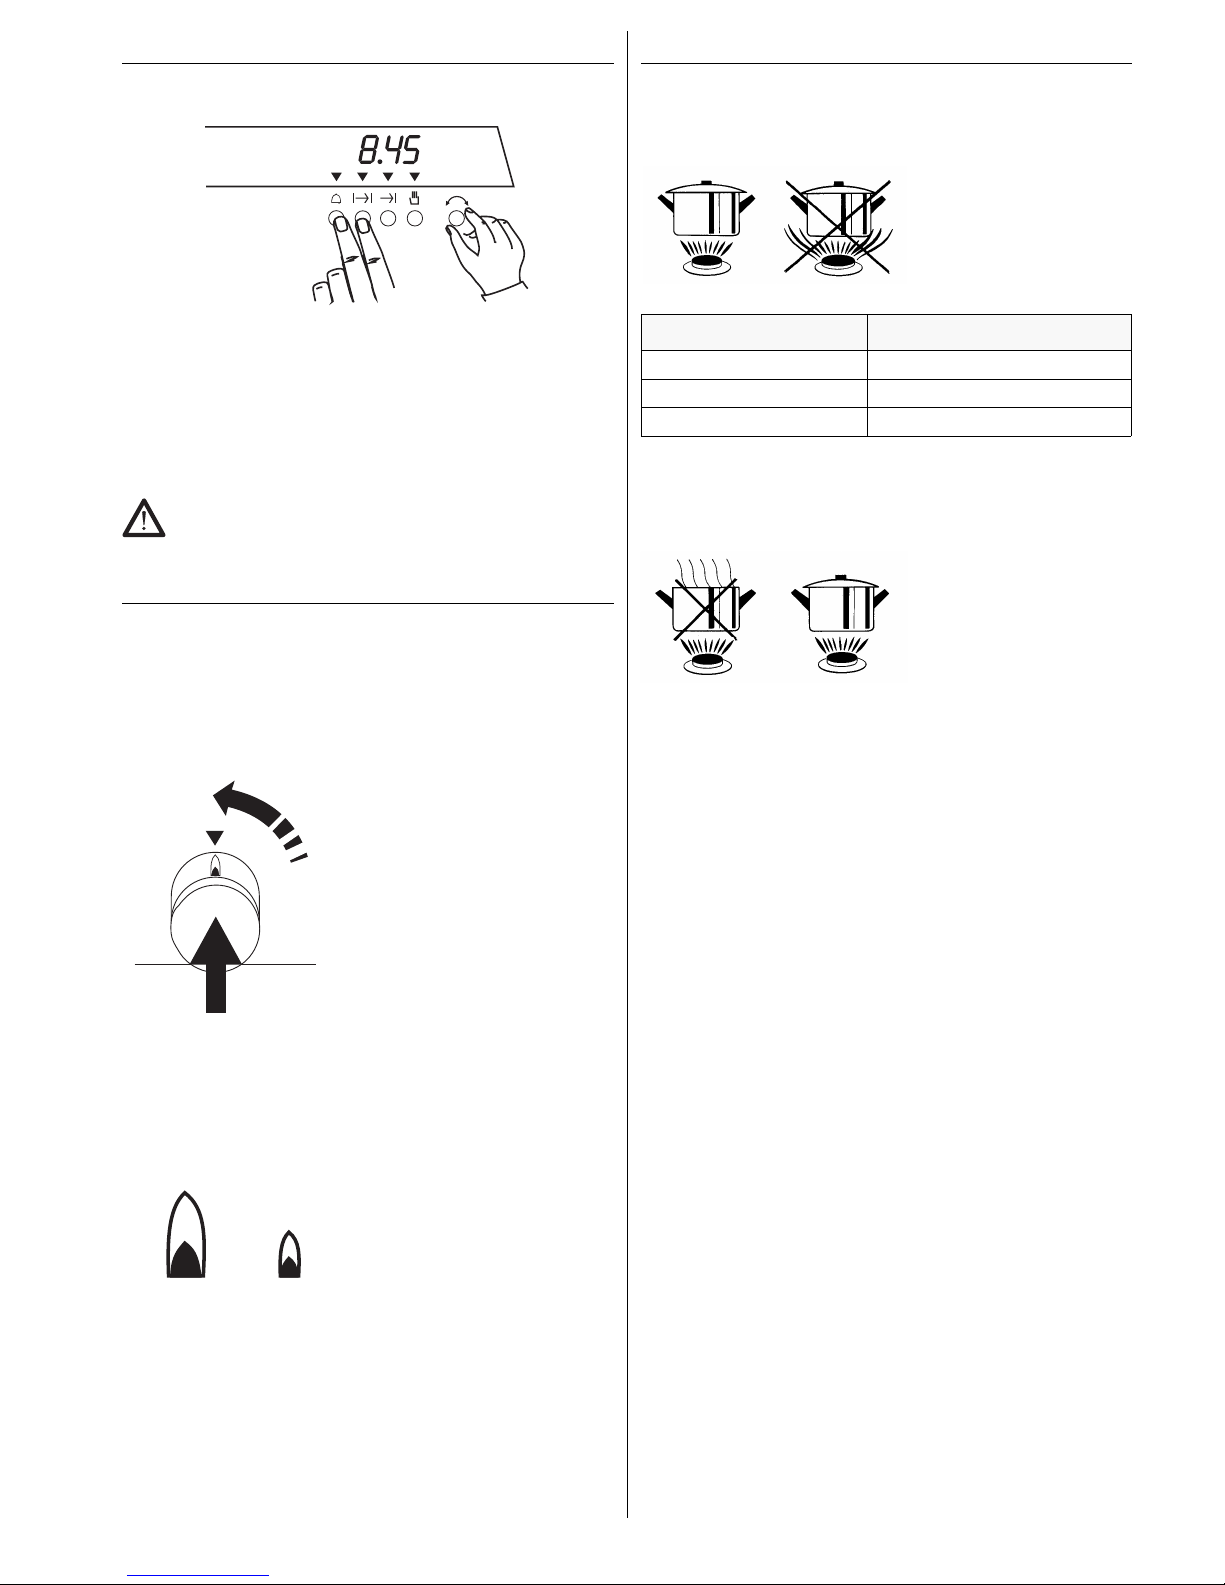
Make sure that the diameter of the saucepan base fits the ring.
Place the saucepan onto the
ring so that the two fit correctly.
The flame should completely
cover the area at the bottom of
the saucepan, but should not
burn round it at the sides.
Ring Diameter of saucepan base
High-speed ring (2.8 kW) 240 - 260 mm
Standard ring (1.9 kW) 200 - 220 mm
Simmering ring* (1.1 kW) approx. 160 mm
*Small pots can also be used using the small pot ring only on the highspeed ring (acc. No. 160).
Always make sure that the lid is on the saucepan.
The food will only boil over if the
flame is set too high. With a
little practice you will learn to
set the flame to just the right
heat so that the food will not
boil over, even when the lid is
on the saucepan.
24 KEH 650.0
The oven
Please note the safety instructions on page 23!
The oven becomes very hot when in use. If the oven temperature exceeds
95°C the cooling fan will switch on, even if the oven has been switched off.
The oven offers you eight operation modes.
Selecting the operation mode and the temperature
Selecting the operation mode:
Turn the oven selection switch (the
switch on the left) to the right.
Setting the temperature:
Turn the temperature selection switch
(the 2nd switch from the left) to the right.
The heating up indicator on the operation fascia will light up while the appliance is heating up and will go out as soon as the set temperature has
been reached.
The controls are of the pop-out type and can be countersunk in every setting. They pop out at a slight press of the finger. No settings can be made
while the controls are countersunk. If the oven selection switch is countersunk the oven lighting will switch off.
Symbols and operation modes
0
OFF
! Oven lighting
# Hot air convection Roasting, baking and cooking on several le-
vels.
# Cold air convection without temperature setting, for gently tha-
wing and cooling food.
$
Top heat/bottom heat Preheating,
Baking sponges and moist cakes.
- Bottom heat Prebaking very moist cake, preserving.
. Top heat Browning
*
Grilling Grilling small portions. Position the pieces of
meat at the centre of the roasting rack.
+
Large-area grill For grilling larger portions such as steak,
fish and sausages, but also for browning
toast dishes and gratins.
0 Intensive hot air
convection
For baking large flat cakes with a dry topping, such as a crumble topping, for intensive roasting of large joints and large birds
such as goose or turkey.
Pizza mode For baking bread, pizza and moist cakes,
also for preserving
The oven offers five heating modes.
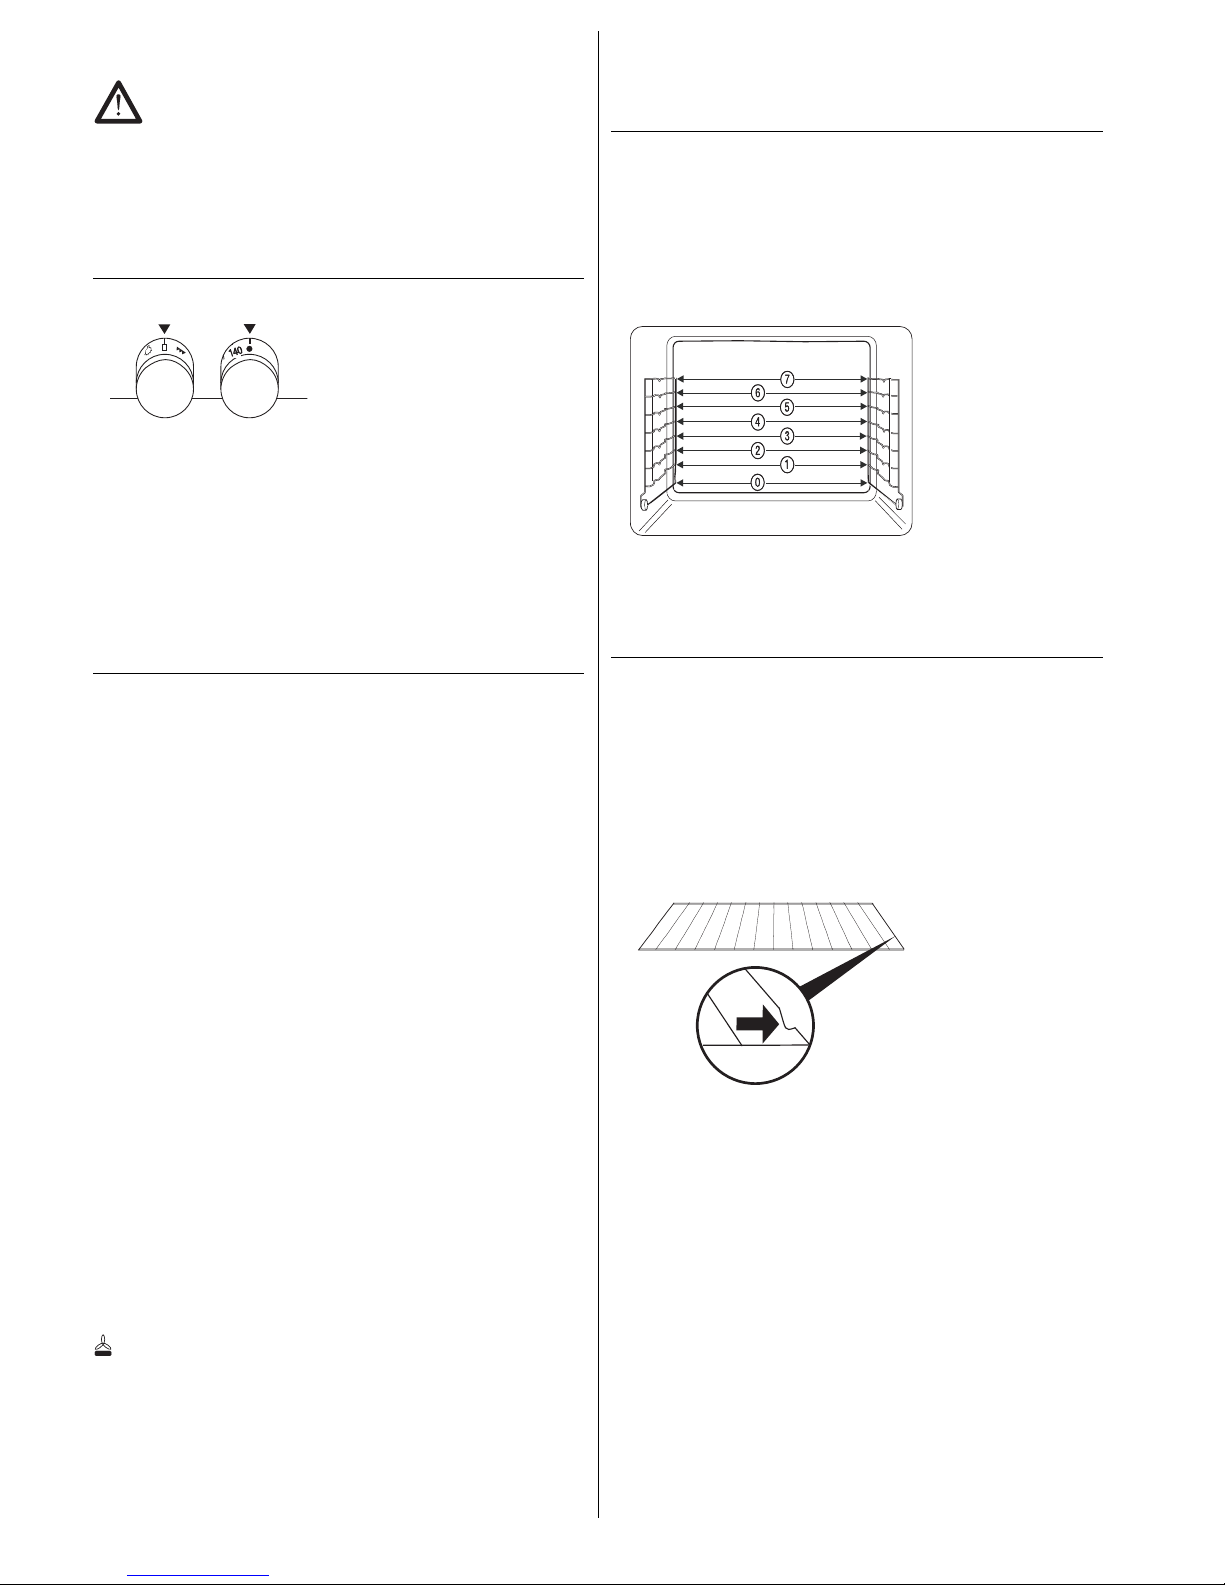
Shelf levels
The oven has grids on both sides each with 8 shelf levels. They form the levels 0 to 7.
The level heights are counted from the bottom upwards (see diagram).
For example, the drip tray when roasting, baking tray with a pizza or the
grid with the pizza stone can be inserted in level 0.
The grid and/or baking trays can be inserted into levels 1 to 7 depending
on the food being cooked.
Instructions on which shelf to use can be found in the baking and roasting
table.
Slide-in accessories
Do not cover the bottom of the oven with aluminium foil!
Baking sheets:
When removing the baking sheet lift it slightly.
When the baking sheet is slid back into the oven the slanted edge must
face the oven door.
Push the fat pan and baking tray with the two slots right into the rear of
the oven.
Gridirons:
Please make sure that the lock-in position of the gridirons
always faces the front (towards you).
KEH 650.0 25
 Loading...