

Page 1
BEDIENUNGSANWEISUNG
mit Montageanweisungen
Instructions for use and installation instructions
Instructions d'utilisation et avis de montage
Gebruiksaanwijzing en montagehandleiding
Istruzioni di uso e di montaggio
Instrucciones de uso y de montaje
Instruções de uso e de montagem
Ο∆ΗΓΙΕΣ ΧΡΗΣΗΣ ΚΑΙ ΣΥΝΑΡΜΟΛΟΓΗΣΗΣ
EKI 607.2 / 807.2 / 848.0
225681 N91
Page 2

GB
Disposing of the packaging
Please ensure the environmentally-friendly disposal of the
packaging that came with your appliance. Recycling the
packaging material saves on resources and cuts down on waste.
Disposing of old appliances
The symbol on the product or on its packaging
indicates that this product may not be treated as
household waste. Instead it must be handed
over to a collection point for the recycling of
electrical and electronic equipment.
By ensuring that this product is disposed of cor-
rectly you will help to protect the environment
and human health, which could otherwise be harmed through the
inappropriate disposal of this product. For more detailed information about recycling this product, please contact your local city
office, your household waste disposal service or the shop where
you purchased the product.
Appropriate use
The hob is to be used solely for preparing food in the home. It
may not be used for any other purpose.
For your information...
Please read this manual carefully before using your appliance. It
contains important information on safety and on how to use and
look after your appliance so that it will provide you with many
years of reliable service.
Should your appliance develop a fault, please first consult the
section on “What to do if trouble occurs?” You can often rectify
minor problems yourself, without having to call in a service
engineer.
Please keep this manual in a safe place and pass it on to new
owners for their information and safety.
Safety instructions................................................................. 20
Connection and operation..................................................... 20
Concerning the hob .............................................................. 20
Concerning persons.............................................................. 20
Appliance description ........................................................... 21
Operating the hob with the sensor keys ............................... 21
Operation................................................................................ 22
The hob................................................................................. 22
Pan recognition..................................................................... 22
Operating time limit............................................................... 22
Other functions ..................................................................... 22
Protection against overheating (induction) ........................... 22
Cookware for induction hobs ................................................ 23
How to cut power consumption............................................. 23
Power settings...................................................................... 23
Residual heat display............................................................ 23
Operating the keys................................................................ 24
Switching on the hob and cooking zones ............................. 24
Switching off a cooking zone................................................ 24
Switching off the hob ............................................................ 24
STOP function ...................................................................... 24
Locking ................................................................................. 25
Childproof lock...................................................................... 25
Automatic switch-off (timer) .................................................. 26
Minute minder (egg timer)..................................................... 26
Automatic boost function ...................................................... 27
Keeping warm function ......................................................... 27
Power boost setting (cooking zones marked with a P) ......... 28
Power management.............................................................. 28
Cleaning and Care ................................................................. 29
Glass ceramic hob................................................................ 29
Specific soiling...................................................................... 29
What to do if trouble occurs................................................. 30
Instructions for assembly ..................................................... 31
Note ...................................................................................... 31
Safety instructions for kitchen unit fitters .............................. 31
Ventilation............................................................................. 31
Installation............................................................................. 31
Electrical connection............................................................. 33
Technical data ...................................................................... 33
Start of operation.................................................................. 33
19
Page 3

Safety instructions
GB
Safety instructions
Connection and operation
• The appliances are constructed in accordance with the
relevant safety regulations.
• Connecting the appliance to the mains and repairing and
servicing the appliance may only be carried out by a qualified
electrician according to currently-valid safety regulations. For
your own safety, do not allow anyone other than a qualified
service technician to install, service or repair this appliance.
Concerning the hob
• Never allow the induction hob to operate unattended, as
the high power setting (power max.) results in extremely
fast reactions.
• When cooking, pay attention to the heat-up speed of the
cooking zones. Avoiding boiling the pots dry as there is a risk
of the pots overheating!
• Do not place empty pots and pans on cooking zones which
have been switched on.
• Take care when using simmering pans as simmering water
may dry up unnoticed, resulting in damage to the pot and to
the hob for which no liability will be assumed.
• It is essential that after using a cooking zone you switch it off
with the respective minus key and not just with the pan recognition device.
• Overheated fats and oils may spontaneously ignite. Always
supervise the preparation of food with fats and oils. Never
extinguish ignited fats and oils with water! Put the lid on the
pan and switch off the cooking zone.
• The glass ceramic surface of the hob is extremely robust. You
should, however, avoid dropping hard objects onto the glass
ceramic hob. Sharp objects which fall onto your hob might
break it.
• If cracks, fractures or any other defects appear in your glass
ceramic hob, immediately switch off the appliance. Disconnect
the fuse immediately and call Customer Service.
• If the hob cannot be switched off due to a defect in the sensor
control immediately disconnect your appliance and call
Customer Service.
• Take care when working with home appliances! Connecting
cables must not come into contact with hot cooking zones.
• The glass ceramic hob should not be used as a storage area.
• Do not put aluminium foil or plastic onto the cooking zones.
Keep everything which could melt, such as plastics, foil and in
particular sugar and sugary foods away from hot cooking
zones. Use a special glass scraper to immediately remove any
sugar from the ceramic hob (when it is still hot) in order to
avoid damaging the hob.
• Metal items (pots and pans, cutlery, etc.) must never be put
down on the induction hob since they may become hot. Risk of
burning!
• Do not place combustible, inflammable or heat deformable
objects directly underneath the hob.
• Metal items worn on your body may become hot in the
immediate vicinity of the induction hob. Caution! Risk of burns!
Non-magnetisable objects (e.g. gold or silver rings) will not be
affected.
• Never use the cooking zones to heat up unopened tins of food
or packaging made of material compounds. The power supply
may cause them to burst!
• Keep the sensor keys clean since the appliance may consider
dirt to be finger contact. Never put anything (pans, tea towels
etc.) onto the sensor keys!
If food boils over onto the sensor keys, we advise you to
activate the OFF key.
• Hot pans should not cover the sensor keys, since this will
cause the appliance to switch off automatically.
• Activate the childproof lock if there are any pets in the home
which could make contact with the hob.
• The induction hob may not be used when pyrolysis operation
is taking place in a built-in oven.
Concerning persons
•Caution!
People who are not familiar with the built-in hob must only be
allowed to operate it under supervision. Small children must
always be kept away from the hob. Never allow them to play
with the appliance.
• Attention!
The surfaces of the heating and cooking zones become hot
during use. Keep small children away at all times.
• Persons with cardiac pacemakers or implanted insulin pumps
must make sure that their implants are not affected by the
induction hob (the frequency range of the induction hob is 20 50 kHz).
20
Page 4
Appliance description
GB
A
p
p
l
i
a
n
c
e
d
e
s
c
r
i
p
t
i
o
n
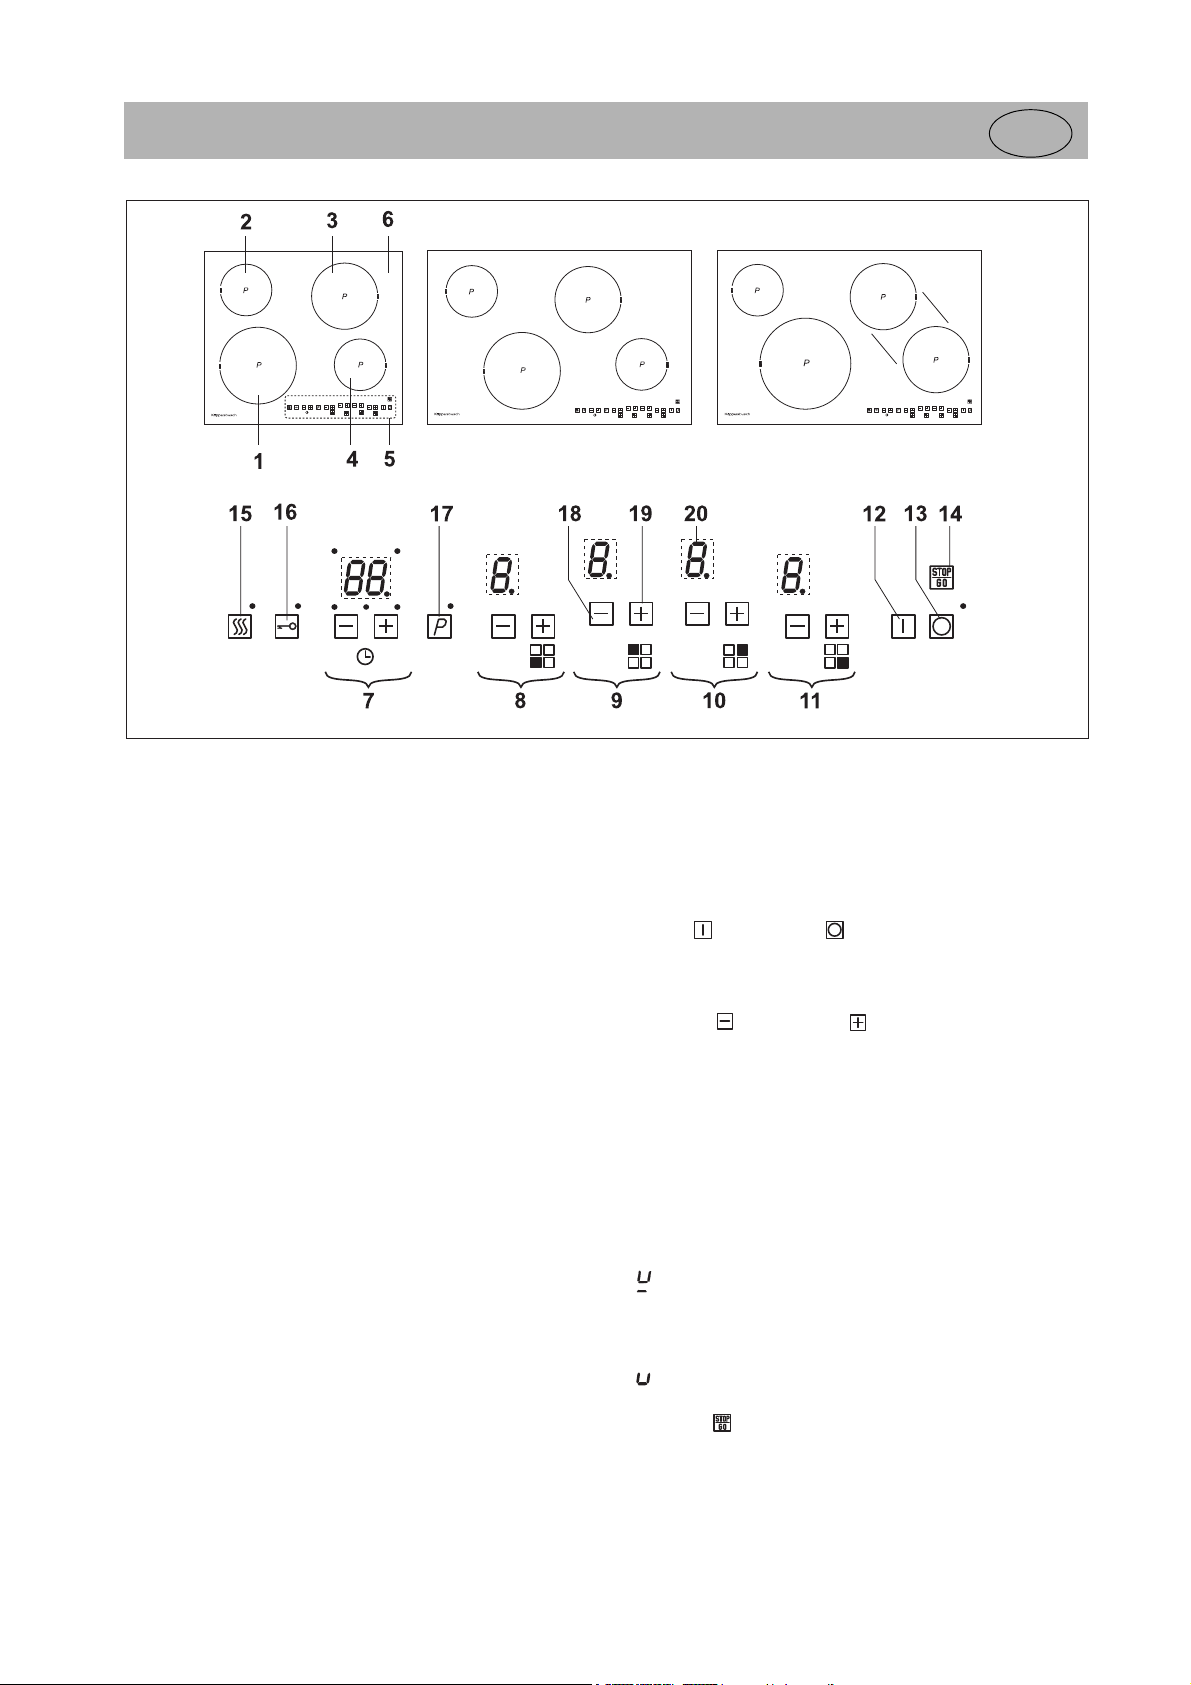
1. Induction cooking zone front left
2. Induction cooking zone back left
3. Induction cooking zone back right
4. Induction cooking zone front right
5. Touch-control operating panel
6. Glass ceramic hob
7. Control keys timer
8. Control keys, front left cooking zone
9. Control keys, back left cooking zone
10. Control keys, back right cooking zone
11. Control keys, front right cooking zone
12. ON key
13. OFF key
14. Stop key
15. Warming key
16. Lock key
17. Power key
18. Minus key (lower)
19. Plus key (raise)
20. Power setting display
Operating the hob with the sensor keys
The ceramic glass hob is operated with touch control sensor
keys. The sensor keys are operated as follows: lightly touch a
symbol on the surface of the ceramic glass plate. A buzzer will
indicate when the controls have been operated correctly. The
touch control sensor key will then be indicated as “key”.
ON key (12) / OFF key (13)
This keys are used to switch the entire hob on and off (main
switch).
Minus key (18) / Plus key (19)
These keys are used to set the cooking levels, the automatic
switch-off device and the minute minder. The Minus key reduces
the setting and the Plus key raises it.
The setting can be deleted by pressing both keys simultaneously.
Power setting display (20)
The power setting display shows the power setting which has
been selected, or:
H ............... Residual heat
P................ Power boost setting
.............. Pan recognition
A................ Automatic boost function
STOP ........ Stop function
L ............... Childproof lock.
.............. Keeping warm function
STOP key (14)
The STOP function can be used to briefly stop the cooking
process.
21
Page 5

Operation
Operation
The hob
The hob is equipped with an induction cooking mode. An
induction coil underneath the glass ceramic hob generates an
electromagnetic alternating field which penetrates the glass
ceramic and induces the heat-generating current in the pot base.
With an induction cooking zone the heat is no longer transferred
from a heating element through the cooking pot into the food
being cooked; instead the necessary heat is generated directly in
the container by means of induction currents.
Advantages of the induction hob
– Energy-saving cooking through the direct transfer of energy to
the pot (suitable pots/pans made of magnetisable material are
required).
– Increased safety as the energy is only transferred when a pot
is placed on the hob.
– Highly effective energy transfer between an induction cooking
zone and the base of a pot.
– Rapid heat-up.
– The risk of burns is low as the cooking area is only heated
through the pan base; food which boils over does not stick to
the surface.
– Rapid, sensitive control of the energy supply.
Pan recognition
If a cooking zone is switched on and there is no pan on the zone
or if the pan is too small, there will be no transmission of power. A
blinking in the cooking level display points this out.
If a suitable pot or pan is placed on the cooking zone, the power
setting will switch on and the power setting display will light up.
The power supply will be cut off when the pan is removed and the
power setting display will indicate a blinking .
If the pots and pans placed on the cooking zone are of smaller
dimension, and the pan recognition still switches on, less power
will be supplied.
Pan recognition limits
GB
Operating time limit
The induction hob has an automatic time limit function.
The duration of continuous use of each cooking zone depends on
the cooking level selected (see chart), provided that the setting of
a respective cooking zone is not adjusted during use.
If the operation time limit has been activated, the cooking zone
will switch off, a short signal will sound and an H will appear in
the display.
The automatic switch-off function overrules the operation time
limit, i.e. the cooking zone is only switched off when the period of
time of the automatic switch-off device has expired (e.g. automatic switch-off after 99 minutes and cooking level 9 is possible).
Cooking level
set
1
2
3
4
5
6
7
8
9
P
Other functions
If two or more sensor keys are pressed at the same time (e.g.
when a pan is mistakenly put onto a sensor key) no function will
be activated.
The symbol will blink and a time-limited continuous signal will
sound. After a few seconds the appliance will switch off. Please
remove the item located in front of the sensor keys.
To delete the symbol press the same key or switch the hob off
and on.
Operating time limit
in minutes
120
520
402
318
260
212
170
139
113
90
10
Cooking zone diameter
(mm)
145
180
210
260
22
Minimum diameter of the
base of a pot (mm)
90
120
135
170
Protection against overheating
(induction)
If the hob is used at full power for a longer period, it will not be
possible to cool down the electronics system as required at a
high room temperature.
In order to ensure that no excessive temperatures occur in the
electronics system the power of the cooking zones may be
reduced automatically.
Should E2 be displayed frequently during normal use of the hob
and at normal room temperature, it is likely that cooling is not
sufficient.
The reason may be that there are no openings for cooling
purposes in the kitchen units or that there is no insulation. It may
be necessary to check the installation of the hob.
Page 6
Operation
GB
Cookware for induction hobs
Cookware for induction cooking zones must be made of metal
and have magnetic properties. The base must be sufficiently
large.
Only use pots with a base suitable for induction.
Suitable cookware Unsuitable cookware
Enamelled steel pots with a thick
base
Cast iron pots with an enamelled
base
Pots made of multi-layer
stainless steel, rustproof
ferrite steel or aluminium with a
special base
This is how to establish the suitability of a pot:
Conduct the magnet test described below or make sure that the
pot bears the symbol for suitability for cooking with induction
current.
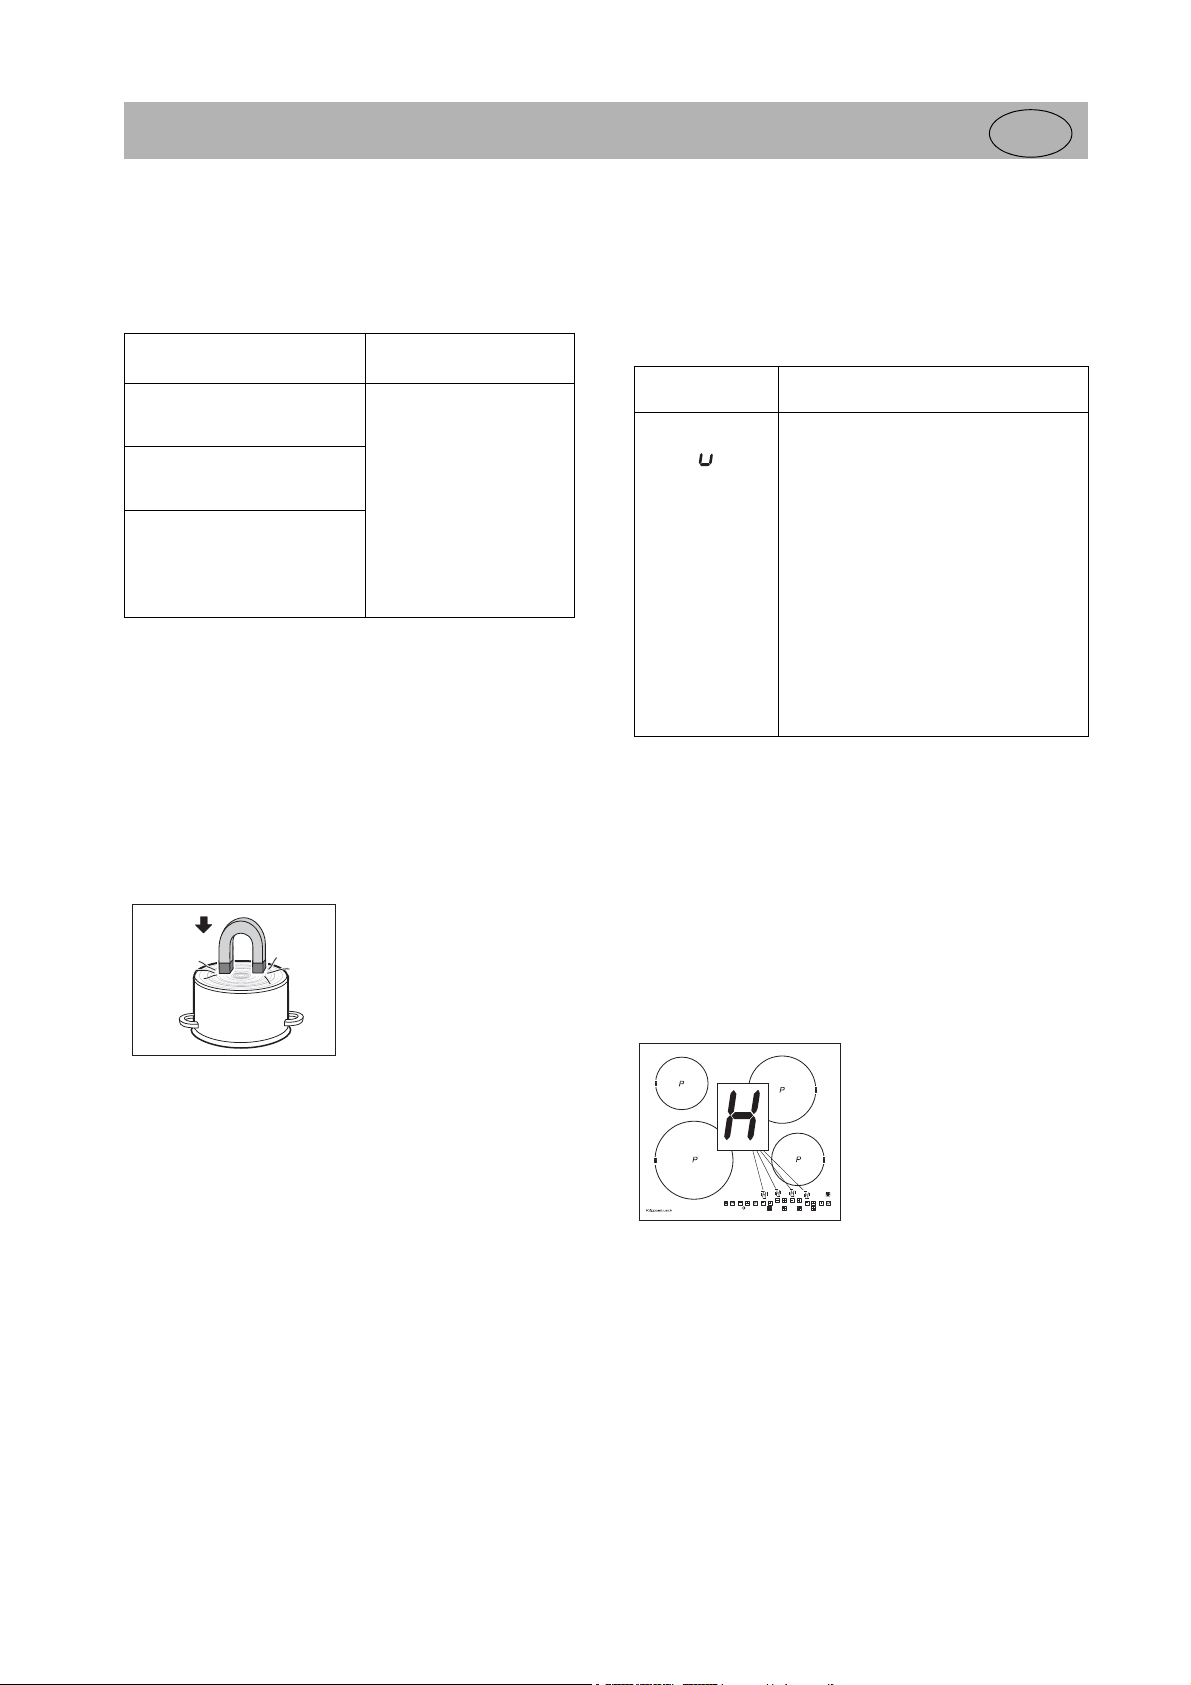
Magnet test:
Move a magnet towards the base of your cookware. If it is
attracted, you can use the cookware on the induction hob.
Note:
When using pans suitable for induction from certain
manufacturers, noises may occur which are attributable to the
design of these pans.
Pots made of copper,
stainless steel, aluminium,
oven-proof glass, wood,
ceramic and terracotta
• Use the right pot for the quantity of food you are cooking. A
large pot which is hardly filled will use up a lot of energy.
Power settings
The heating power of the cooking zones can be set at various
power levels. In the chart you will find examples of how to use
each setting.
Setting Suitable for
0
1-2
3
4-5
6
7-8
9
P
Off, using remaining heat
Keeping warm function
Simmering small portions.
(lowest setting)
Simmering
Simmering larger quantities or roasting
larger pieces of meat until they are
cooked through.
Roasting, getting juices
Roasting
Bringing to the boil, browning, roasting
Power setting
(highest power output)
Residual heat display
The glass ceramic hob is equipped with an H as a residual heat
display.
As long as the H lights up after the cooking zone has been
switched off, the residual heat can be used for melting food or for
keeping food warm.
The cooking zone may still be hot when the letter H no longer
lights up. Risk of burns!
The ceramic hob is not directly heated in the case of an induction
cooking zone; it only heats up due to the effect of heat reflected
by the pan.
Take care when using simmering pans as simmering water may
dry up unnoticed, resulting in damage to the pot and to the hob
for which no liability will be assumed.
How to cut power consumption
The following are a few useful hints to help you cut your
consumption of energy and use your new induction hob and the
cookware efficiently.
• The base of your cooking pots should be the same size as the
cooking zone.
• When buying cooking pots, note that it is frequently the
diameter of the top of the pot that it indicated. This is usually
larger than the base of a pot.
• Pressure cookers are particularly low on energy and time
required thanks to the pressure and the fact that they are
tightly closed. Short cooking times mean that vitamins are
preserved.
• Always make sure that there is sufficient fluid in your pressure
cooker since the cooking zone and the cooker may be
damaged as a result of overheating if the pressure cooker
boils dry.
• Always close cooking pots with a suitable lid.
23
Page 7
Operation
Suitable for induction cooking
GB
Operating the keys
The controls described here expect the pressing of a (selection) key
followed
The next key will need to be pressed
selection will be deleted.
The plus / minus keys can be touched individually or be permanently
pressed.
by the pressing of a subsequent key.
within 10 seconds
, otherwise the
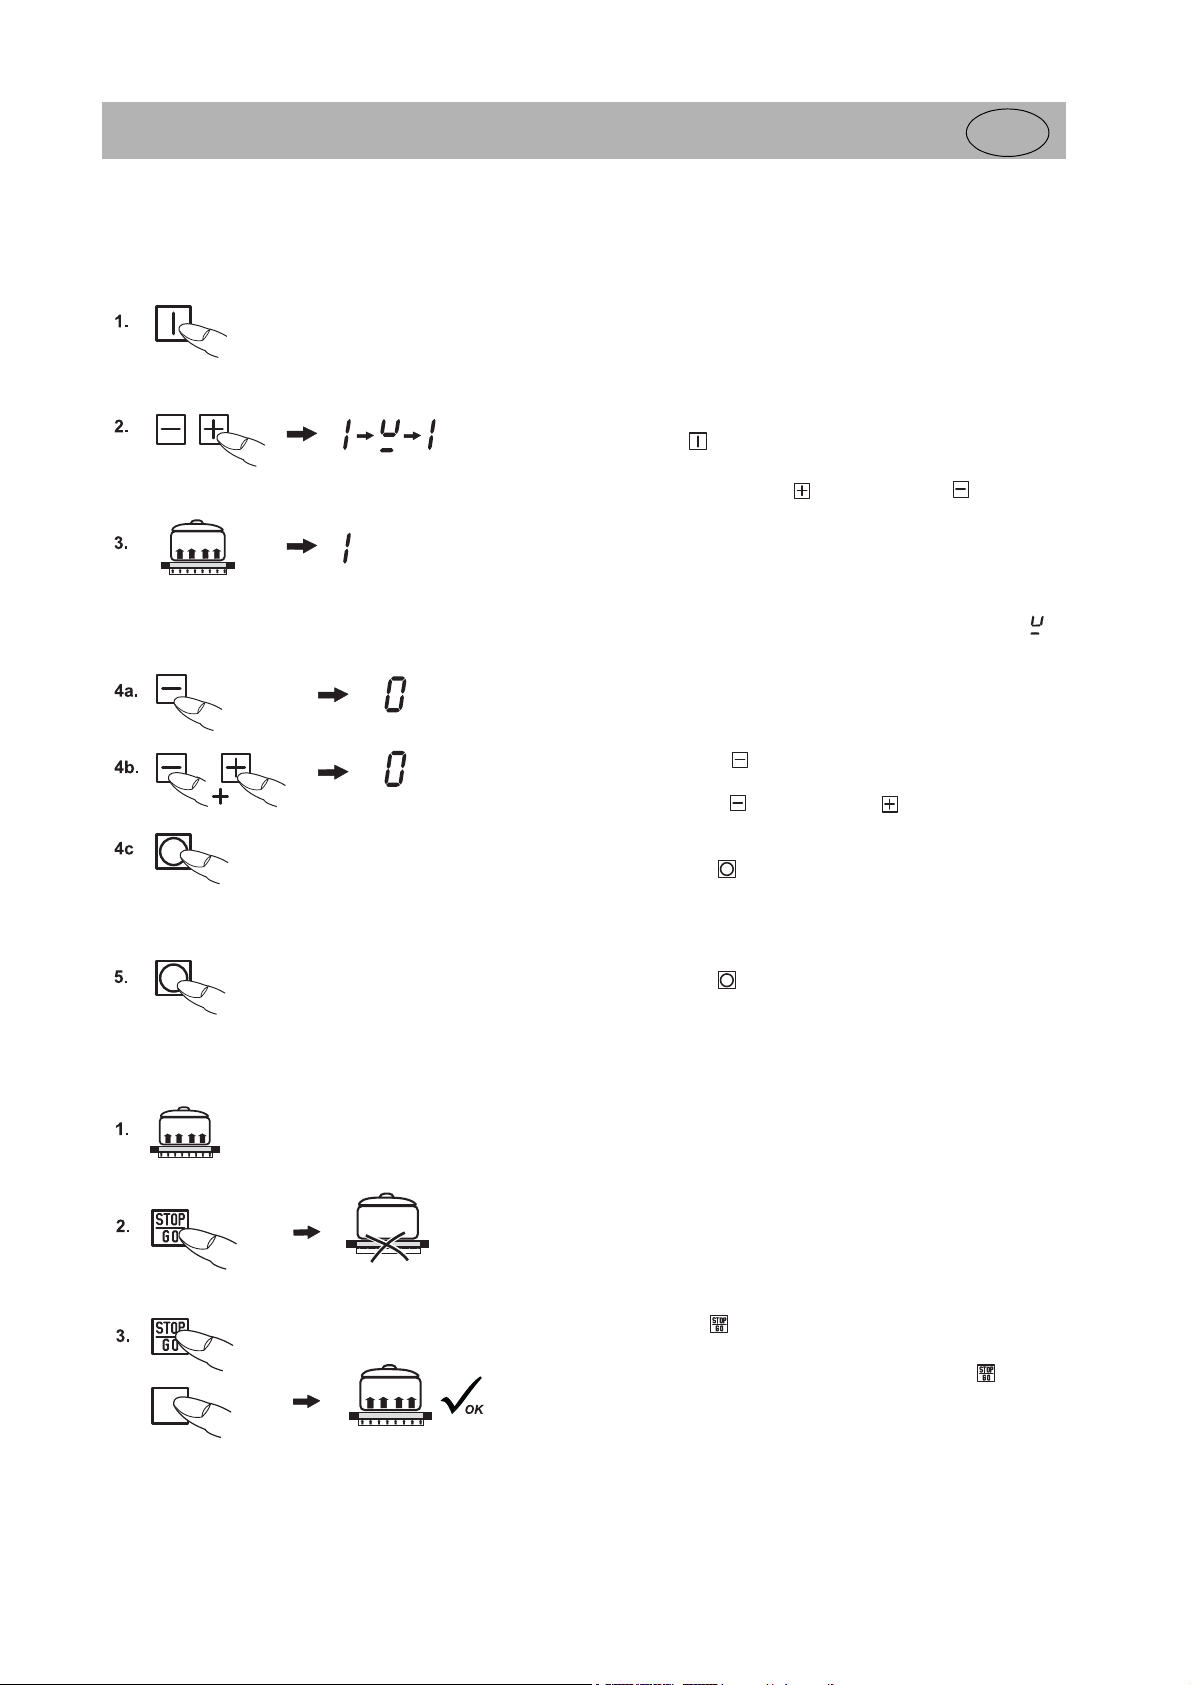
Switching on the hob and cooking zones
1. Press the
signal will sound. The controls are ready for operation.
2. Immediately use the
zone to select a cooking level. The Plus key will activate power setting 1
and the Minus key power setting 9.
3. Place a
device will activate the induction coil.
As long as no metal cooking pot is placed onto the cooking zone, the
display will alternate between the power level set and the symbol . If
no pot is placed on the cooking zone it will switch off after 10 minutes for
reasons of safety. Please refer to the Section on “pan recognition”.
ON key
metal cooking pot
until the power setting displays indicate 0. A short
Plus key
or the
onto the cooking zone. The pan recognition
Minus key
of a cooking
to be
Switching off a cooking zone
4. a) Press the
shows 0, or
b) Press the
The cooking zone is switched off direct irrespective of the power setting
or
c) Press the
cooking zones are switched off).
Minus key
Minus key
OFF key
. The entire hob will be switched off (all of the
several times until the power setting display
and the
Plus key
once at the same time.
Switching off the hob
5. Press the
irrespective of any settings.
OFF key
. The hob will be completely switched off,
STOP function
The cooking process can be briefly interrupted with the STOP function, e.g. if
the doorbell rings. The STOP function must be released in order to continue
cooking at the same power level. If a timer has been set it will pause and will
then continue.
This function is only available for 10 minutes for reasons of safety. The hob
will then be switched off.
1. Pots and pans are on the cooking zones and the required power levels
have been set.
2. Press the
another instead of the cooking levels previously selected.
3. The interruption is ended by firstly pressing the
pressing any
The second key must be pressed within 10 seconds, otherwise the hob
will switch off.
Stop key
other key
. The letters S-T-O-P will be shown one after
Stop key
(except the on/off key).
and then
24
Page 8
Operation
GB
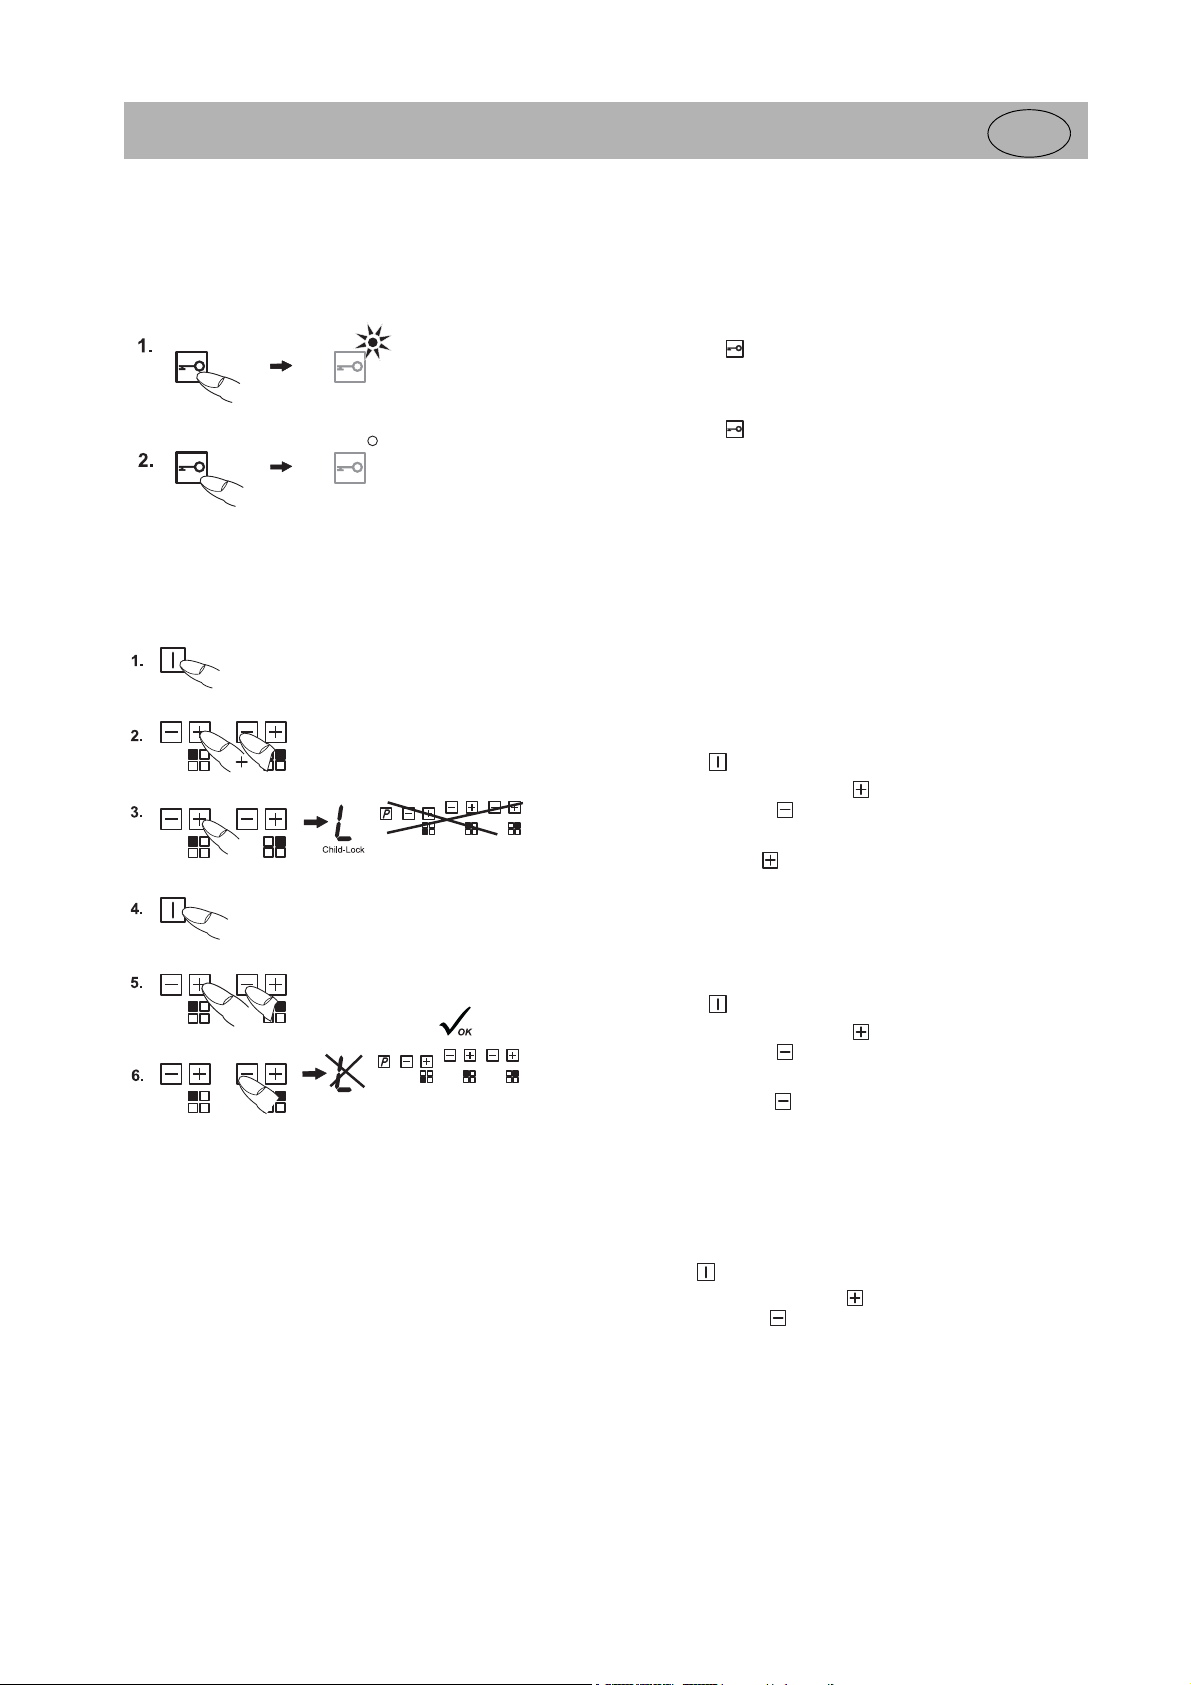
Locking
The lock can be used to lock key operation and cooking level settings. Only
the off key can be used to switch the hob off.
Activating the lock (while cooking):
1. Press the
lock key will light up. The controls are locked.
Switching off the lock
2. Press the
lock key will go off.
Instructions
• An activated lock will remain activated even if the hob is switched off. It
must therefore be de-activated when cooking is re-commenced.
• In the event of a power cut the lock will be cancelled, i.e. deactivated.
Childproof lock
The childproof lock serves the purpose of preventing children from switching
on the hob either accidentally or intentionally. The controls are blocked.
Lock key
Lock key
to activate function. The control lamp above the
to activate function. The control lamp above the
Switching on the child-safety lock
1. Press the
2. Then immediately press the
back and the
simultaneously.
3. Then press the
power setting displays will indicate an L for child lock, the controls will be
inaccessible and the hob will switch off.
Switching off the childproof lock
4. Press the
5. Then immediately press the
back and the
simultaneously.
6. Then press the
The L will go off.
De-activating the childproof lock for one cooking procedure only
This is only possible if the childproof lock has been switched on in accordance with items 1-3.
• Press the
• Then immediately press the
back and the
simultaneously.
Now the user will be able to switch on a cooking zone. When the hob is
switched off the childproof lock will be activated again (switched on).
ON key
Minus key
Plus key
ON key
Minus key
ON key
Minus key
in order to switch on the childproof lock.
.
Minus key
.
Plus key
of the cooking zone at the right back
in order to activate the childproof lock. The
Plus key
of the cooking zone at the right back
in order to deactivate the childproof lock.
Plus key
of the cooking zone at the right back
of the cooking zone at the left
of the cooking zone at the left
of the cooking zone at the left
Note
In the event of a power cut the childproof lock will be cancelled, i.e.
deactivated.
25
Page 9
Operation
GB
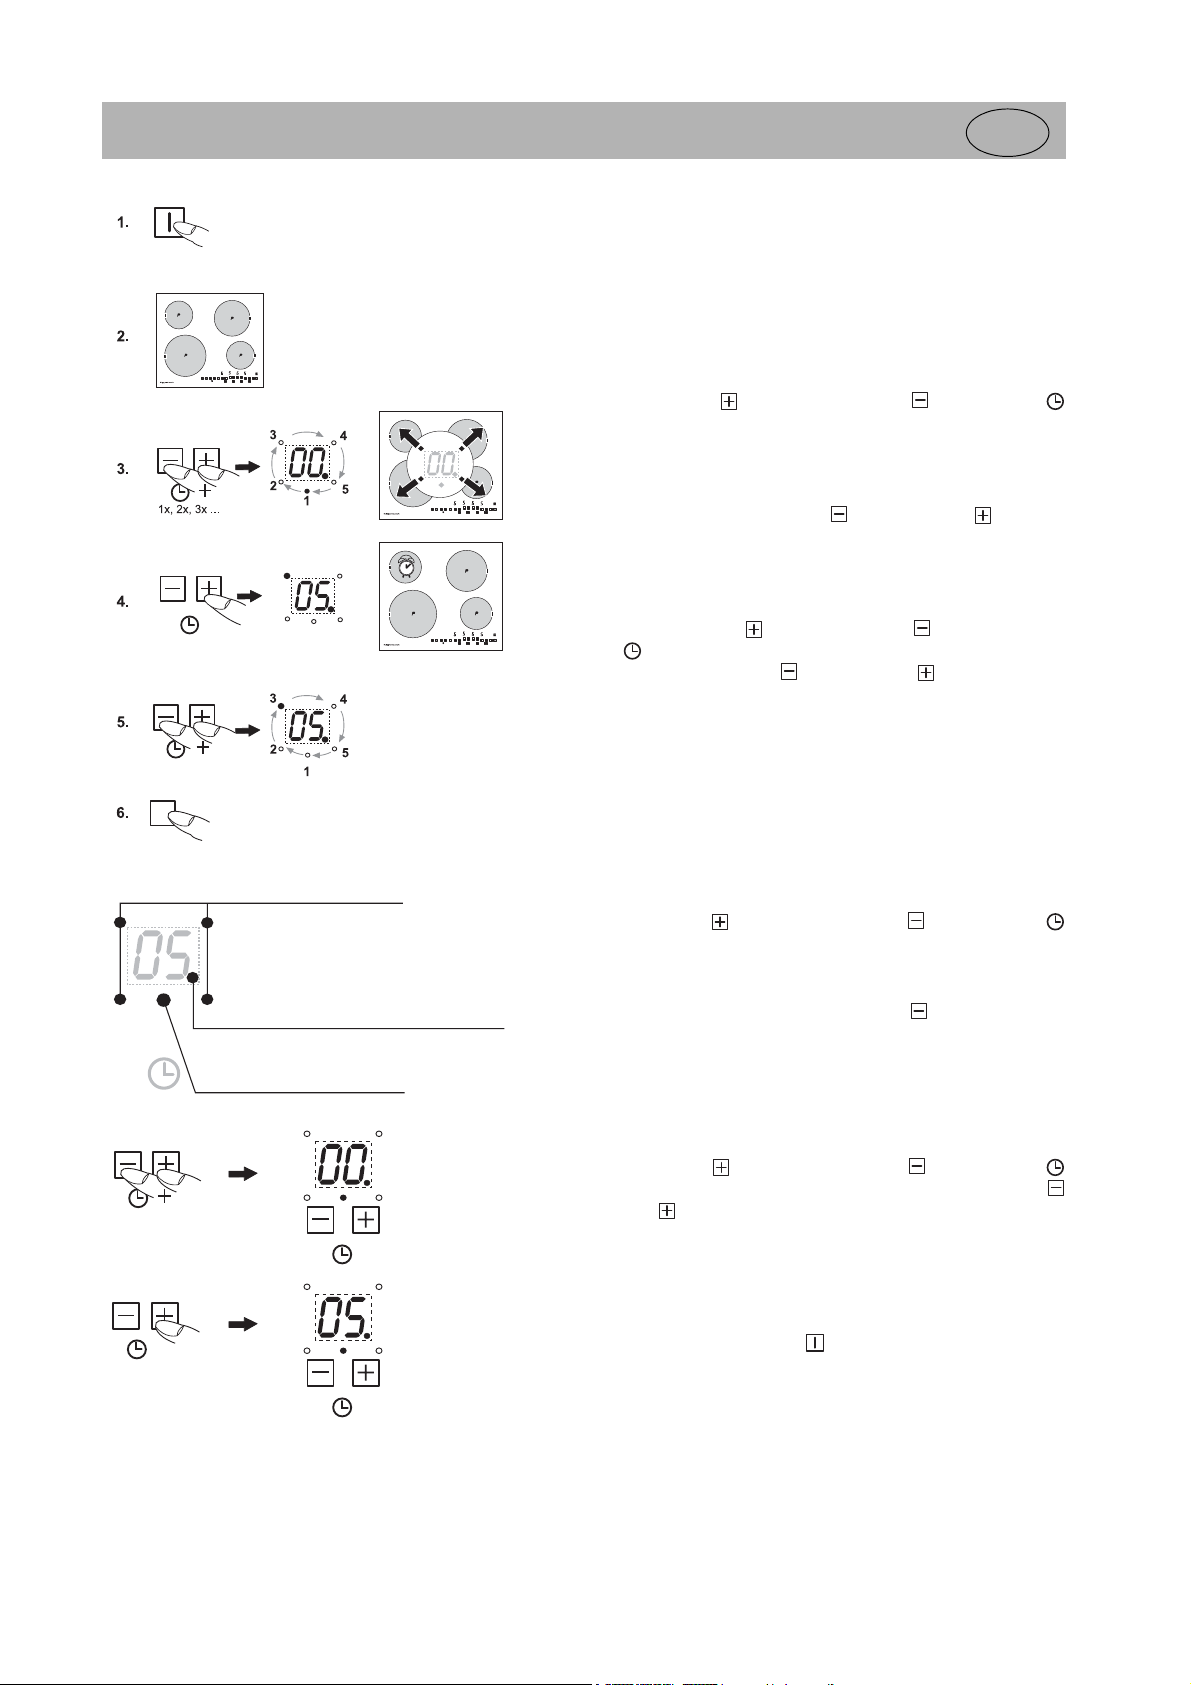
Automatic switch-off (timer)
The automatic switch-off device is used to automatically switch off any
cooking zone after a stipulated period of time. Cooking times ranging from 1
minute to 99 minutes can be set.
1. Switch on the hob.
2. Switch on one or more cooking zones and set the required power
settings.
3. Press the
simultaneously. The standby dot of the timer will light up. Press the keys
again until the timer indicator lamp of the required cooking zone blinks.
Important! Timer indicator lamps can only blink if the cooking zones have
already been switched on (power setting higher than 0).
4. Then immediately use the
cooking time at between 1 and 99 minutes.
With the Plus key the display will commence at 01, and with the Minus
key it will commence at 30.
5. In order to program the automatic-switch-off device for another cooking
zone, press the
the timer until the timer indicator lamp for the required cooking zone
blinks. Then use the
time.
6. The cooking zone will be switched off when the time has lapsed. A signal
will sound for a while and can be switched off by pressing any key (except
for the off key).
Plus key
Plus key
and the
Minus key
and the
Minus key
or
Minus key
or the
Minus key
the Plus key
on the timer
Plus key
simultaneously on
to set the
to set the required
Timer indicator lamp
Stand-by dot for the automatic
switch-off device
Minute minder lamp
Instructions
• In order to check the time that has lapsed (automatic-switch-off device),
press the
simultaneously until the timer indicator lamp for the required cooking zone
blinks. The setting displayed can be read and changed.
• Terminating the function of the timer: Select the respective cooking zone
(timer indicator lamp blinks) and use the
Plus key
and the
Minus key
Minus key
on the timer
to set 00.
Minute minder (egg timer)
• Press the
simultaneously until the minute minder lamp blinks. Use the
or the
• Once the time has lapsed a signal will sound for a while and can be
switched off by pressing any key (except for the OFF key).
Note:
The minute minder remains in operation when the induction hob is switched
off. Switch the hob on with the
Plus key
Plus key
and the
to set the time in minutes.
Minus key
ON key
to adjust the time.
on the timer
Minus key
26
Page 10
Operation
GB
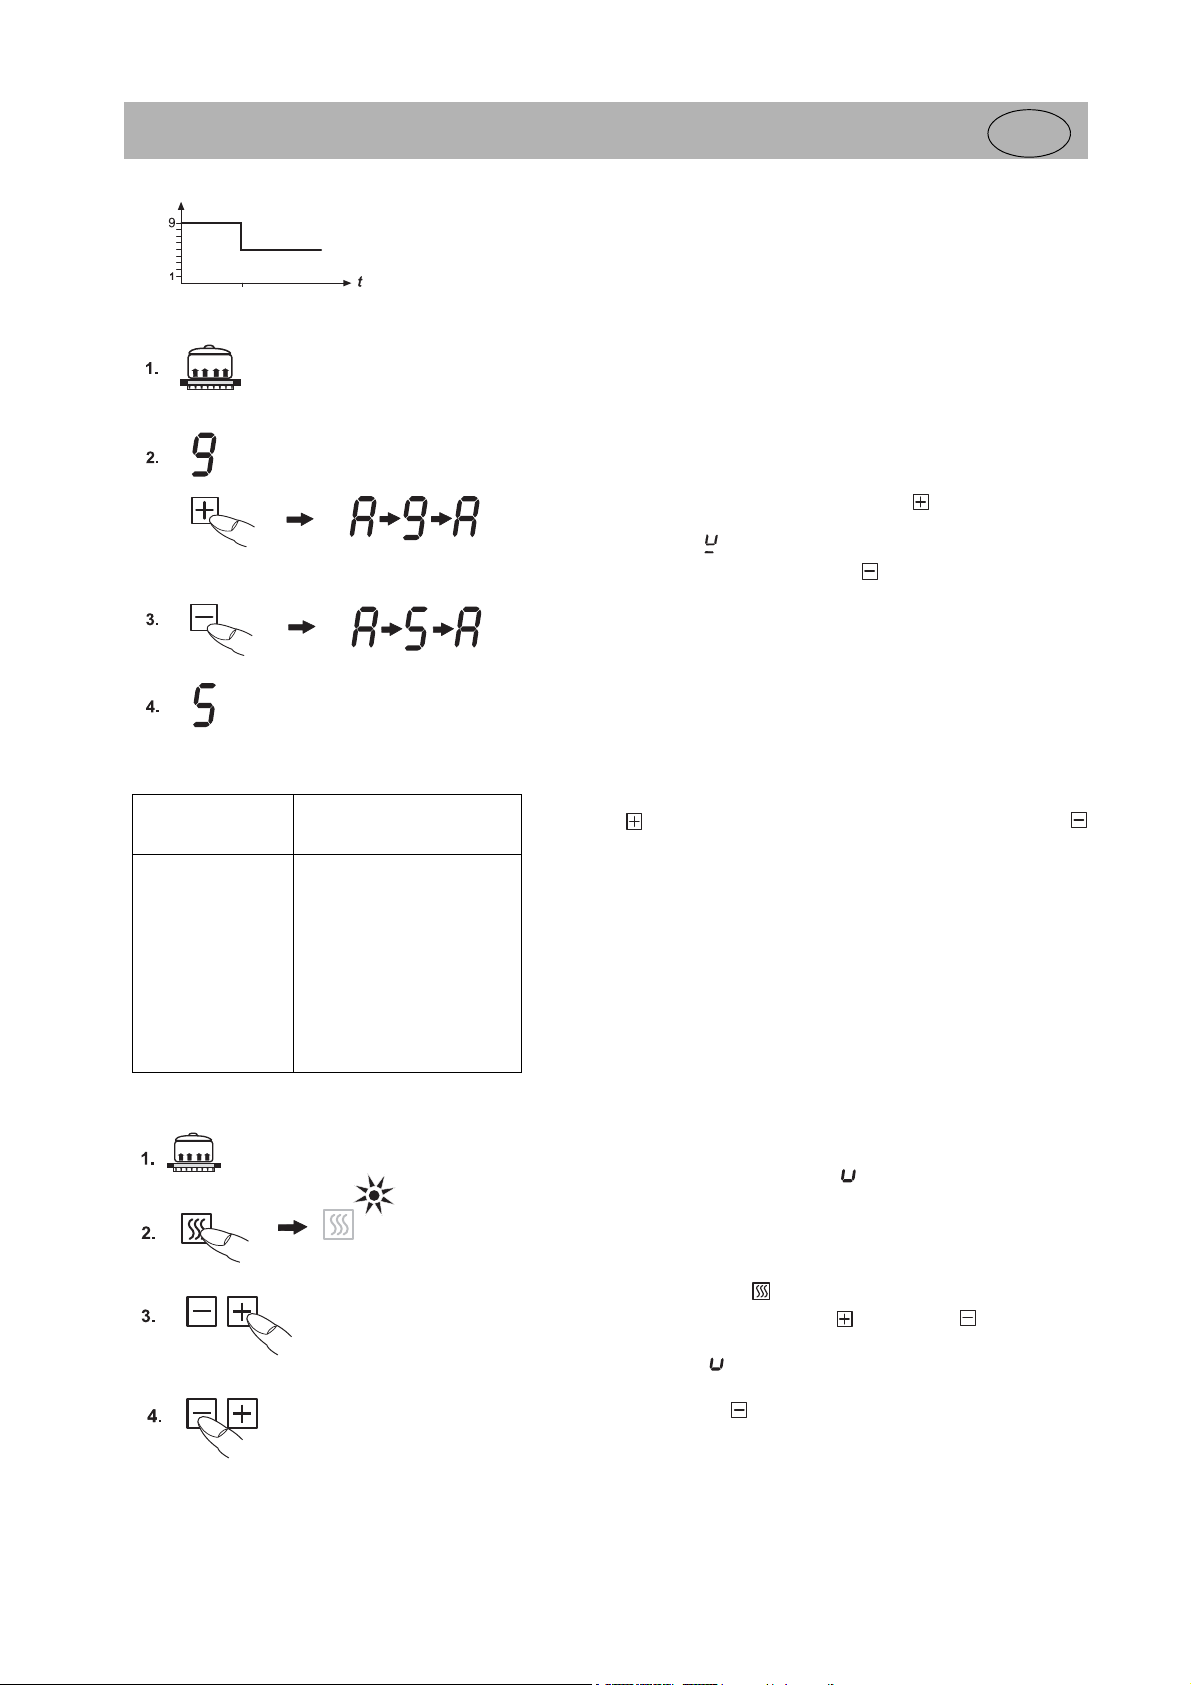
Automatic boost function
Parboiling takes place at power level 9 with the automatic boost function.
After a certain time the power level will switch down automatically to a lower
simmering setting (1 to 8).
When using the automatic boost function only the simmering setting with
which the food is to be cooked through needs to be selected since the
electronic unit switches down automatically.
The automatic boost function is suitable for dishes which are cold initially and
are then heated up at high power. These dishes do not need to be constantly
monitored when simmering (e.g. boiling meat for soups).
1. Switch a cooking zone on.
2. Select power setting 9. Pressing the
automatic boost function. The power level setting will indicate alternately
A and 9 or A and if no pot has been put on the hob.
3. Then immediately use the
setting from 1 to 8. A and the selected simmering setting will blink alternately.
4. The automatic boost function will operate as programmed. After a certain
time (see chart) the cooking process will be continued with the simmering
setting.
Minus key
Plus key
to select a lower simmering
again will activate the
Cooking level
Setting
1
2
3
4
5
6
7
8
9
Automatic boost function
Time (min:sec)
0:40
1:12
2:00
2:56
4:16
7:12
2:00
3:12
-
Instructions
• While the automatic boost function is in operation, the plus key can be
used to raise the simmering power setting. Pressing the Minus key
will switch the automatic boost function off.
• If, after activating the automatic boost function, the power level is left at
level 9 and no lower simmering setting is selected, the automatic boost
function will be switched off automatically after 10 seconds and the cooking
level will remain at 9.
• If a higher cooking setting or the power boost setting is activated, the
automatic boost function may switch off if the maximum power level is
exceeded (see power management).
Keeping warm function
With the function for keeping food warm you can use one of the cooking
zones to keep food warm. The respective cooking zone is operated at a low
power level.
1. Cookware is placed on a cooking zone and a power level (e.g. 3) is selected.
2. Press the
3. Then press the respective
cate the function to a specific cooking zone. The cooking level display
shows the symbol .
The control lamp above the key will go off.
4. Press the
Warming key
Minus key
once to de-activate the function (0).
, the control lamp above the key will blink.
Plus key
or
Minus key
in order to allo-
The function for keeping food warm is available for 120 minutes, after which
the hob will be switched off.
27
Page 11
Operation
GB
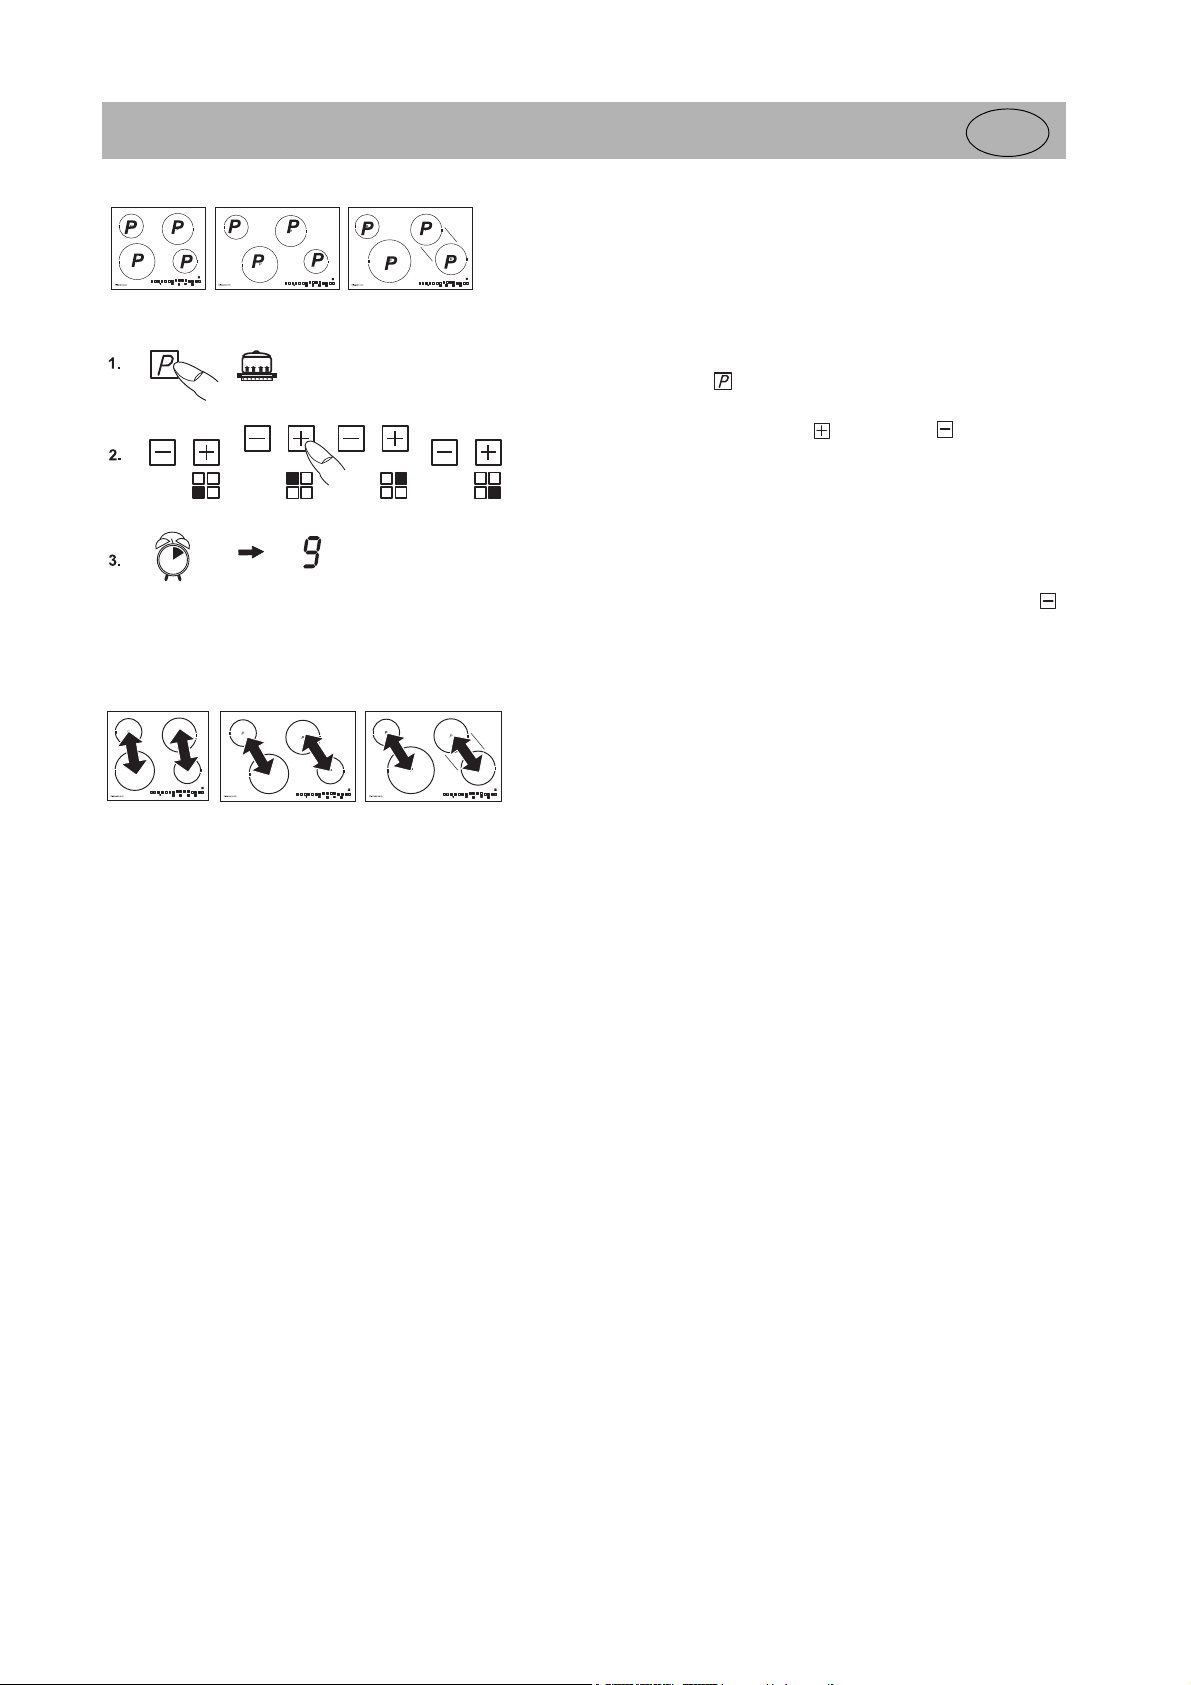
Power boost setting (cooking zones marked with a P)
The power boost setting makes additional power available for induction
cooking zones. A large quantity of water can be brought to the boil very
quickly.
The power boost setting operates for 10 minutes, after which the power level
is automatically reduced to cooking level 9.
Modules (power management)
1. Press the
ting. The control lamp above the key will blink.
2. Then press the respective
cate the function to a specific cooking zone. The power display will show
a P. The control lamp above the key will go off.
3. After 10 minutes the power boost setting will switch off automatically. The
P will go off and the power level will switch down to 9.
Note:
In order to prematurely de-activate the power setting, press the
power key
once in order to activate the power boost set-
Plus key
or
Minus key
in order to allo-
Minus key
.
Power management
For technical reasons two cooking zones always comprise a module and
have a maximum power level.
If this power range is exceeded when a higher power setting level or the
power boost function is switched on the power management system will
reduce the power setting of the corresponding cooking zone of the module.
The display for this cooking zone will initially blink, after which the highestpossible power setting will be consistently displayed.
28
Page 12
Cleaning and Care
GB
Cleaning and Care
• Before cleaning, switch off the hob and let it cool down.
• Never clean the glass ceramic hob with a steam cleaner or
• When cleaning make sure that you only wipe lightly over the
similar appliance!
ON and the OFF key
switched on!
. The hob may otherwise be accidentally
Glass ceramic hob
Important!
scouring agents, abrasive saucepan cleaners, rust and stain
removers etc.
Cleaning after use
Always clean the entire hob when it has become soiled. It is
1.
recommended that you do so every time the hob is used. Use a
damp cloth and a little washing up liquid for cleaning. Then dry
the hob with a clean dry cloth to ensure that there is no detergent
left on the surface of the hob.
Weekly clean
2.
Clean the entire hob thoroughly once a week with commercial
glass ceramic cleaning agents.
Please follow the manufacturer's instructions carefully.
When applied, the cleaning agent will coat the hob in a protective
film which is resistant to water and dirt. All dirt remains on the film
and can be removed easily. Then rub the hob dry with a clean
cloth. Make sure that no cleaning agent remains on the surface
of the hob since this will react aggressively when the hob is
heated up and will change the surface.
Never use aggressive cleaning agents such as rough
Specific soiling
Heavy soiling
pearl-type stains) can best be removed when the hob is still
slightly warm. Use commercial cleaning agents to clean the hob.
Proceed as outlined under Item 2.
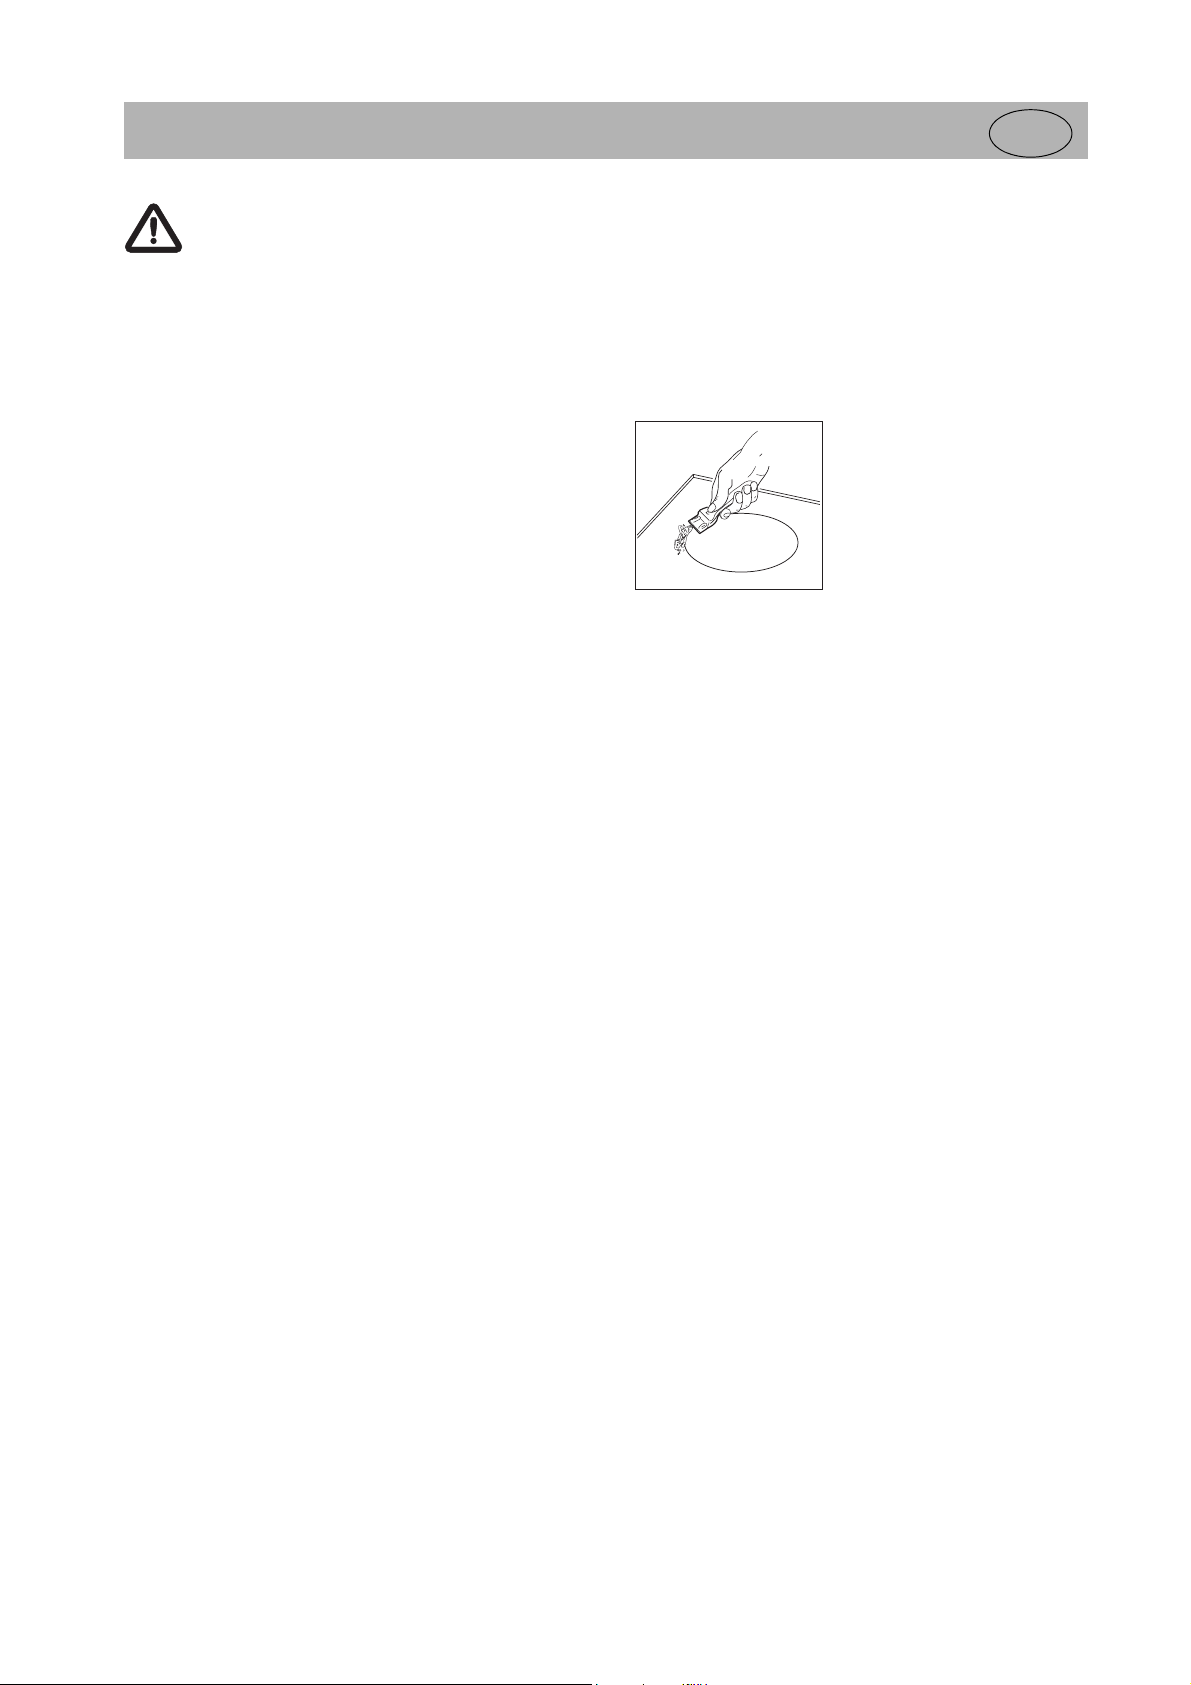
First soak food which has boiled over
then remove remaining soiling with a special glass scraper for
glass ceramic hobs. Then clean the hob again as described
under Item 2.
Burnt sugar
when they are still hot, with a glass scraper. Then clean the hob
again as described under Item 2.
Grains of sand
potatoes or clean lettuce may scratch the surface of the hob
when you move pots around. Make sure that no grains of sand
are left on the hob.
Changes in the colour
the stability of the glass ceramic material. These colour changes
are not changes in the material but food residues which were not
removed and which have burnt into the surface.
Shiny spots
surface of the hob, particularly when cookware with an aluminium
base or unsuitable cleaning agents are used. They are difficult to
remove with standard cleaning agents. You may need to repeat
the cleaning process several times. In time, the decoration will
wear off and dark stains will appear as a result of using
aggressive cleaning agents and faulty pan bases.
and stains (limescaling and shiny, mother-of-
with a wet cloth and
and melted plastic must be removed immediately,
which may get onto the hob when you peel
of the hob will not affect the function and
result when the base of the cookware rubs on the
29
Page 13

What to do if trouble occurs
GB
What to do if trouble occurs
Interference with and repairs to the appliance by unqualified
persons are dangerous as they can result in an electric shock, or
short circuit. Do no interfere with or try to repair the appliance;
this could cause injury to persons and damage to the appliance.
Therefore always have such work done by an expert, e.g. the
technical Customer Service.
Please note
If your appliance is faulty, please check whether you can rectify
the problem yourself by consulting these instructions for use.
You may be able to rectify some problems yourself. They are
described below.
The fuses blow regularly?
Contact a technical customer service or an electrician!
You can't switch your induction hob on?
• Has the wiring system (fuse box) in the house blown a fuse?
• Has the hob been connected to the mains?
• Have the sensor keys been locked (child safety device), i.e. an
• Are the sensor keys partly covered by a damp cloth, fluid or a
• Are you using unsuitable cookware? See the section on
The symbol will blink and a time-limited continuous signal will sound.
Food which has boiled over, cookware or other items are causing
the touch control sensor keys to be consistently operated.
Remedy: clean the surface or remove the item.
To delete the symbol press the same key or switch the hob off
and on.
L is shown in the display?
metallic object? Please rectify.
“Cookware for induction hobs”.
Error code E2 is indicated?
The electronic unit is too hot. Check the installation of the hob.
Make sure that there is sufficient ventilation.
See the section on thermal cut-off.
Error code U400 is indicated?
The hob has been incorrectly connected. The controls will switch
off after one second and a continuous signal will sound. Connect
the appliance to the appropriate power supply.
An error code (ERxx or Ex) is indicated?
The appliance has developed a technical defect. Please call
Customer Service.
The pot sign appears?
A cooking zone has been switched on and the hob is expecting a
suitable pot or pan to be placed on the cooking zone (pan
recognition). Only when a pot has been placed on the cooking
zone will power be supplied.
The pot sign still appears, even though a pot or pan was
placed on the hob?
The cookware is unsuitable for induction cooking or the pot or
pan is too small.
Is the cookware you are using making noises?
This is due to technical reasons; the induction hob and the pot
are not at risk.
Does the cooling fan still operate after it has been switched
off?
This is normal since the electronic unit is being cooled down.
Is the hob making noises (clicking or cracking sounds)?
This is for technical reasons and cannot be avoided.
Does the hob have tears or cracks?
If cracks, fractures or any other defects appear in your glass
ceramic hob, immediately switch off the appliance. Disconnect
the fuse immediately and call Customer Service.
30
Page 14
Instructions for assembly
Instructions for assemb ly
Note
The KÜPPERSBUSCH induction hob may only be built-in in
accordance to the instructions included in this manual. In
the case of failure to observe these instructions,
KÜPPERSBUSCH shall decline any liability and the
approved marks of conformity will become invalid!
Safety instructions for kitchen unit fitters
• Veneers, adhesives and plastic surfaces of surrounding
furniture must be temperature resistant (>75°C). If the veneers
and surfaces are not sufficiently heat resistant they can
become deformed.
• Ensure that all live connections are safely insulated when
installing the hob.
• Cover strips between the wall and the worktop behind the hob
which are made of solid wood are permissible as long as
minimum clearances in accordance with the installation
diagrams are maintained.
• Minimum clearances of the hob cut-out towards the rear are to
be maintained in accordance with the installation diagram.
• For installation directly next to a tall cupboard, a safety
distance of at least 40 mm must be ensured. The side surface
of the tall cupboard should be fitted with heat resistant
material. Due to working requirements, however, the distance
should be at least 300 mm.
• The clearance between the hob and an extraction hood must
be at least as large as that stipulated in the assembly
instructions for the cooker hood.
• The packaging materials (plastic foil, polystyrene, nails etc.)
must be kept out of reach of children as these parts are
potentially dangerous. Small parts can be swallowed and there
is a danger of plastic sheeting causing suffocation.
Venilation
• Clearance between the induction hob and kitchen furniture or
built-in units must provide for sufficient ventilation of the induction hob.
• If the power level of a cooking zone is automatically raised or
lowered (see section on thermal cut-off device) it is likely that
the cooling system does not cool sufficiently.
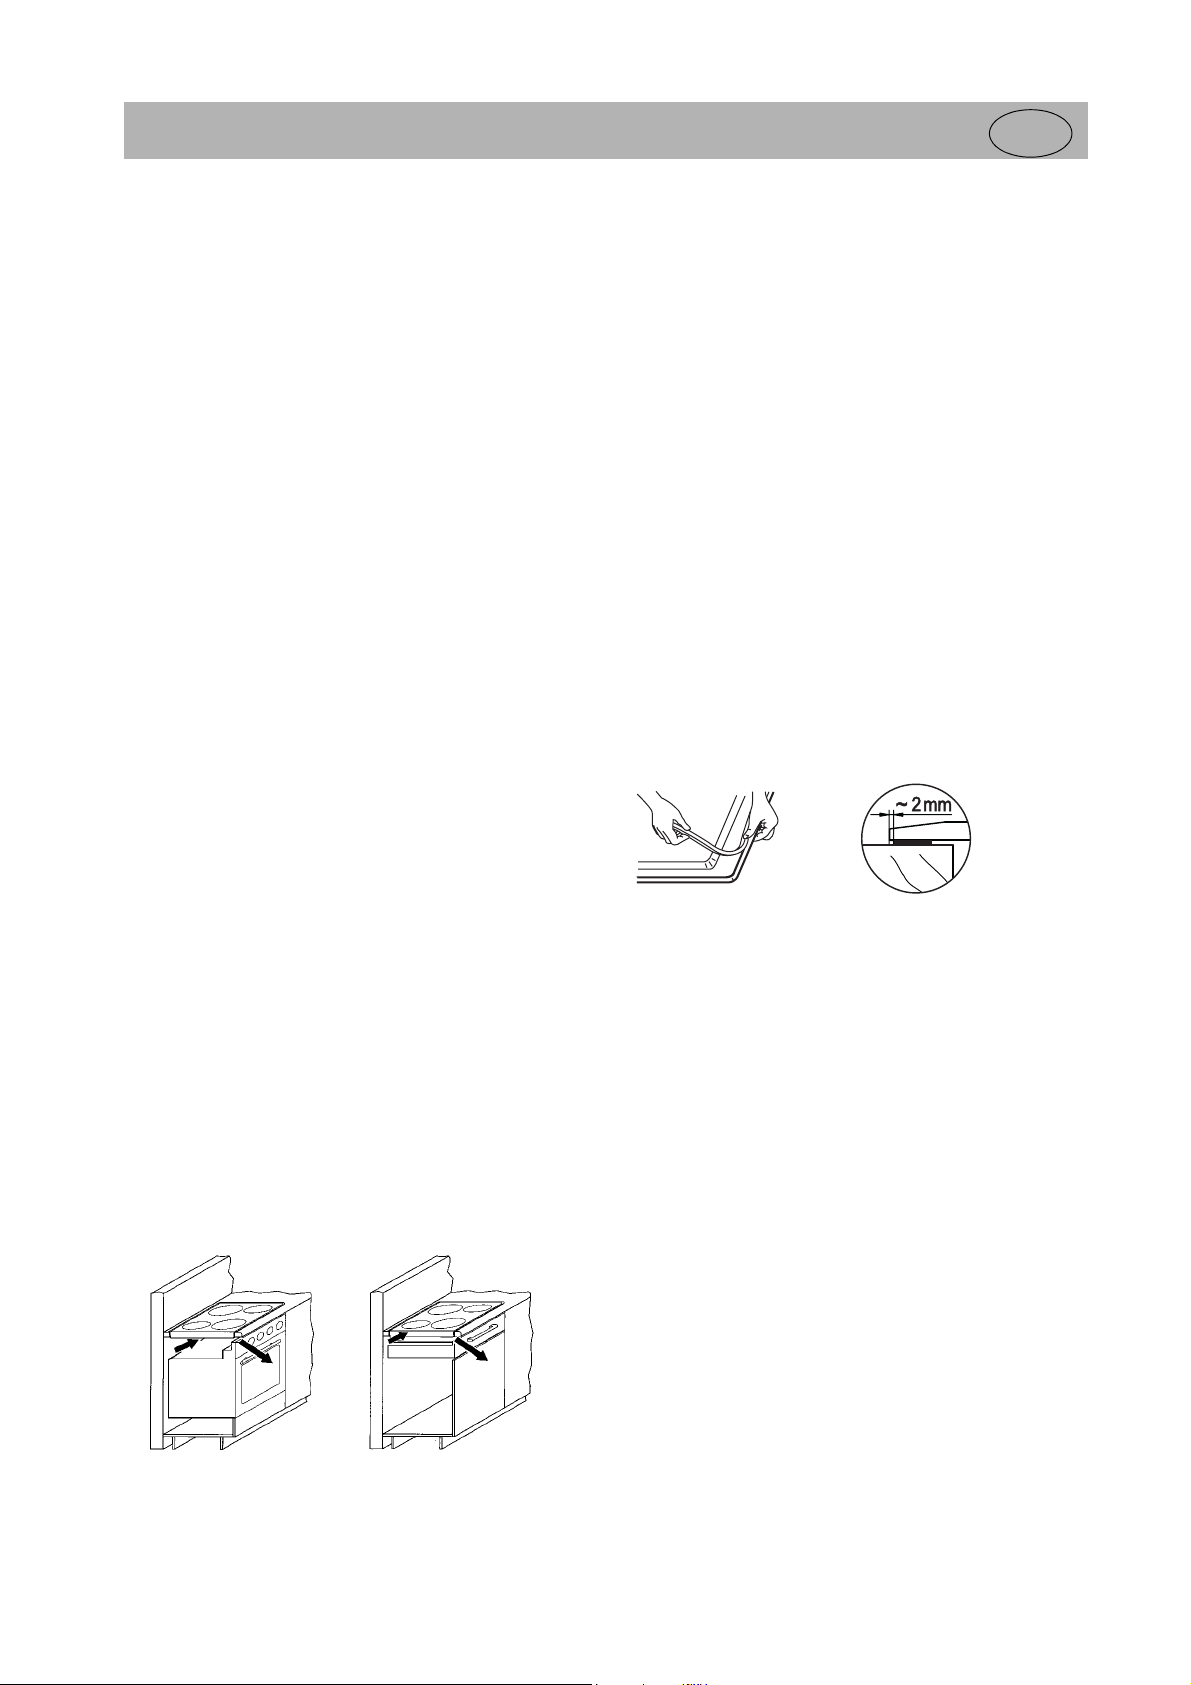
In this case we recommend that the back wall of the bottom
kitchen unit in the area of the worktop cut-out be opened and
that the front transverse strip of the unit be removed over the
entire width of the appliance in order to promote the circulation
of air.
GB
Installation
Important
• Remove any transverse strips underneath the worktop at least
in the area of the worktop cut-out.
• Avoid excessive thermal development from below e.g. from a
baking oven without a cross flow cooling device.
• The induction hob may not be used when pyrolysis operation
is taking place in a built-in oven.
• When installing the appliance on top of a drawer it is essential
to ensure that no sharp items are stored in the drawer since
these could become bent on the underside of the hob and
prevent the drawer from being opened and closed.
• If a shelf has been inserted underneath the hob, there must be
a clearance of at least 20 mm to the underside of the hob in
order to ensure that the hob is sufficiently ventilated.
• The hob may not be installed above refrigerators, freezers,
dishwashers, washing machines or dryers.
• To avoid danger of fire, make sure that no combustible objects
which could easily catch fire or become deformed on exposure
to heat are directly next to or under the surface.
Sealing of the hob
Before installation, correctly insert the sealing unit delivered with
the hob.
• No liquids may penetrate between the edge of the hob and the
worktop or between the hob and the wall and come into contact with any electrical appliances.
• When installing a hob into an uneven worktop, e.g. with a
ceramic or similar covering (tiles etc.), the seal on the hob is to
be removed and the seal between the hob and worktop made
with plastic sealing materials (putty).
• The hob must under no circumstances be sealed with
silicone sealant!
hob at a later date without damaging it.
Working surface cut-out
Cut out the worktop recess accurately with a good, straight saw
blade or recessing machine. The cut edges should then be
sealed so that no moisture can penetrate.
The area is cut out as illustrated.
The glass ceramic hob must have a level and flush bearing. Any
distortion may lead to fracture of the glass panel.
Make sure that the sealing of the hob is properly seated.
This would make it impossible to remove the
The glass ceramic hob is fastened with clips or with brackets.
31
Page 15
Instructions for assembly
GB
Clips
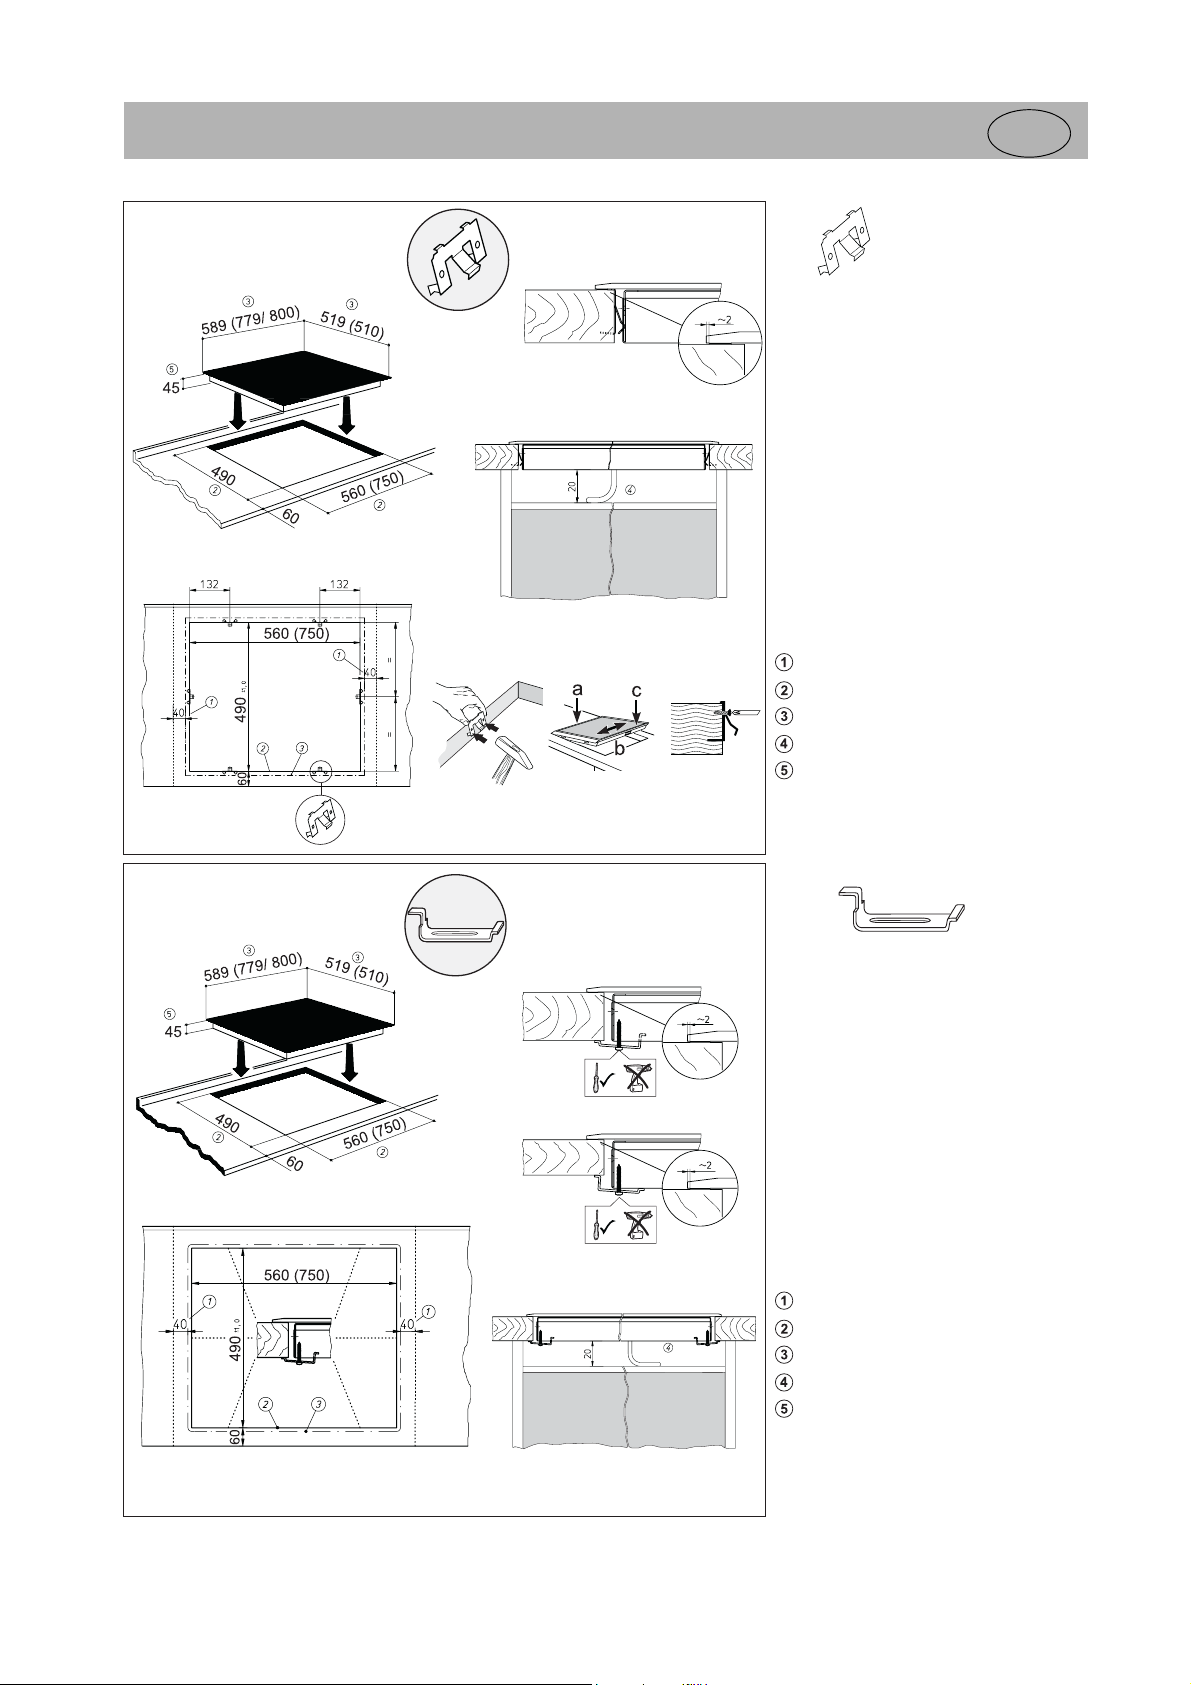
• Drive the clips into the worktop cut-out at
the intervals indicated. It is not necessary
to adjust the height due to the horizontal
stop.
• Important! The horizontal drive of the clips
must be flush with the worktop (avoid the
risk of fractures).
• Position the hob according to the
illustration on the left side (a), align it (b)
and insert the clips (c).
• Screws may be used to fasten the clips.
Important!
There is a risk of breakage if the hob is
canted or subjected to stress during
installation!
Minimum distance to adjacent walls
Cut-out dimension
Outer dimensions of the hob
Cable routing in rear wall
Installation height
Bracket
• Insert the hob and align it.
• From the bottom, insert the brackets with
screws in the holes provided for fastening
the brackets, align the brackets and screw
them tight.
• Tighten the screws with a hand screw
driver only; do not use a battery-operated
screw driver.
• In the case of thin worktops make sure
that the brackets are correctly positioned.
Important!
There is a risk of breakage if the hob is
canted or subjected to stress during
installation!
Minimum distance to adjacent walls
Cut-out dimension
Outer dimensions of the hob
Cable routing in rear wall
Installation height
32
Page 16
Instructions for assembly
GB
Electrical connection
• The electrical connection must be carried out by a qualified electrician who is authorised to carry out such work!
• Statutory regulations and the connection specifications issued
by the local power supply company must be strictly observed.
• When connecting the appliance it must be ensured that there
is a device which makes it possible to disconnect it from the
mains at all poles with a contact opening width of at least
3 mm. Line-protecting switches, fuses or contactors are suitable cut-out devices.
• When connecting and repairing the appliance disconnect it
from the electricity supply with one of these devices.
• The earth wire must be sufficiently long so that if the strain
relief fails, the live wires of the connecting cable are subjected
to tension before the earth wire.
• Any superfluous cable must be removed from the installation
area beneath the appliance.
• Make sure that the local mains voltage is the same as the
voltage on the rating label.
• To connect the appliance, unscrew the switchbox cover on the
underside of the appliance to access the terminal block. After
connecting the appliance, replace the cover and secure the
connection cable with the strain relief clamp.
• The connection cable must be at least H05 RR-F.
• If the excess cable of this appliance is damaged, it has to be
replaced by the manufacturer, the Customer Service of the
manufacturer or by another qualified person
putting persons at risk.
• Full protection against accidental contact must be ensured on
installation.
• Attention! Incorrect connection may result in the power
electronics unit being destroyed.
Power supply
Mains voltage: 400-415V 2N~, 50-60 Hz
Component rated voltage: 230 - 240V
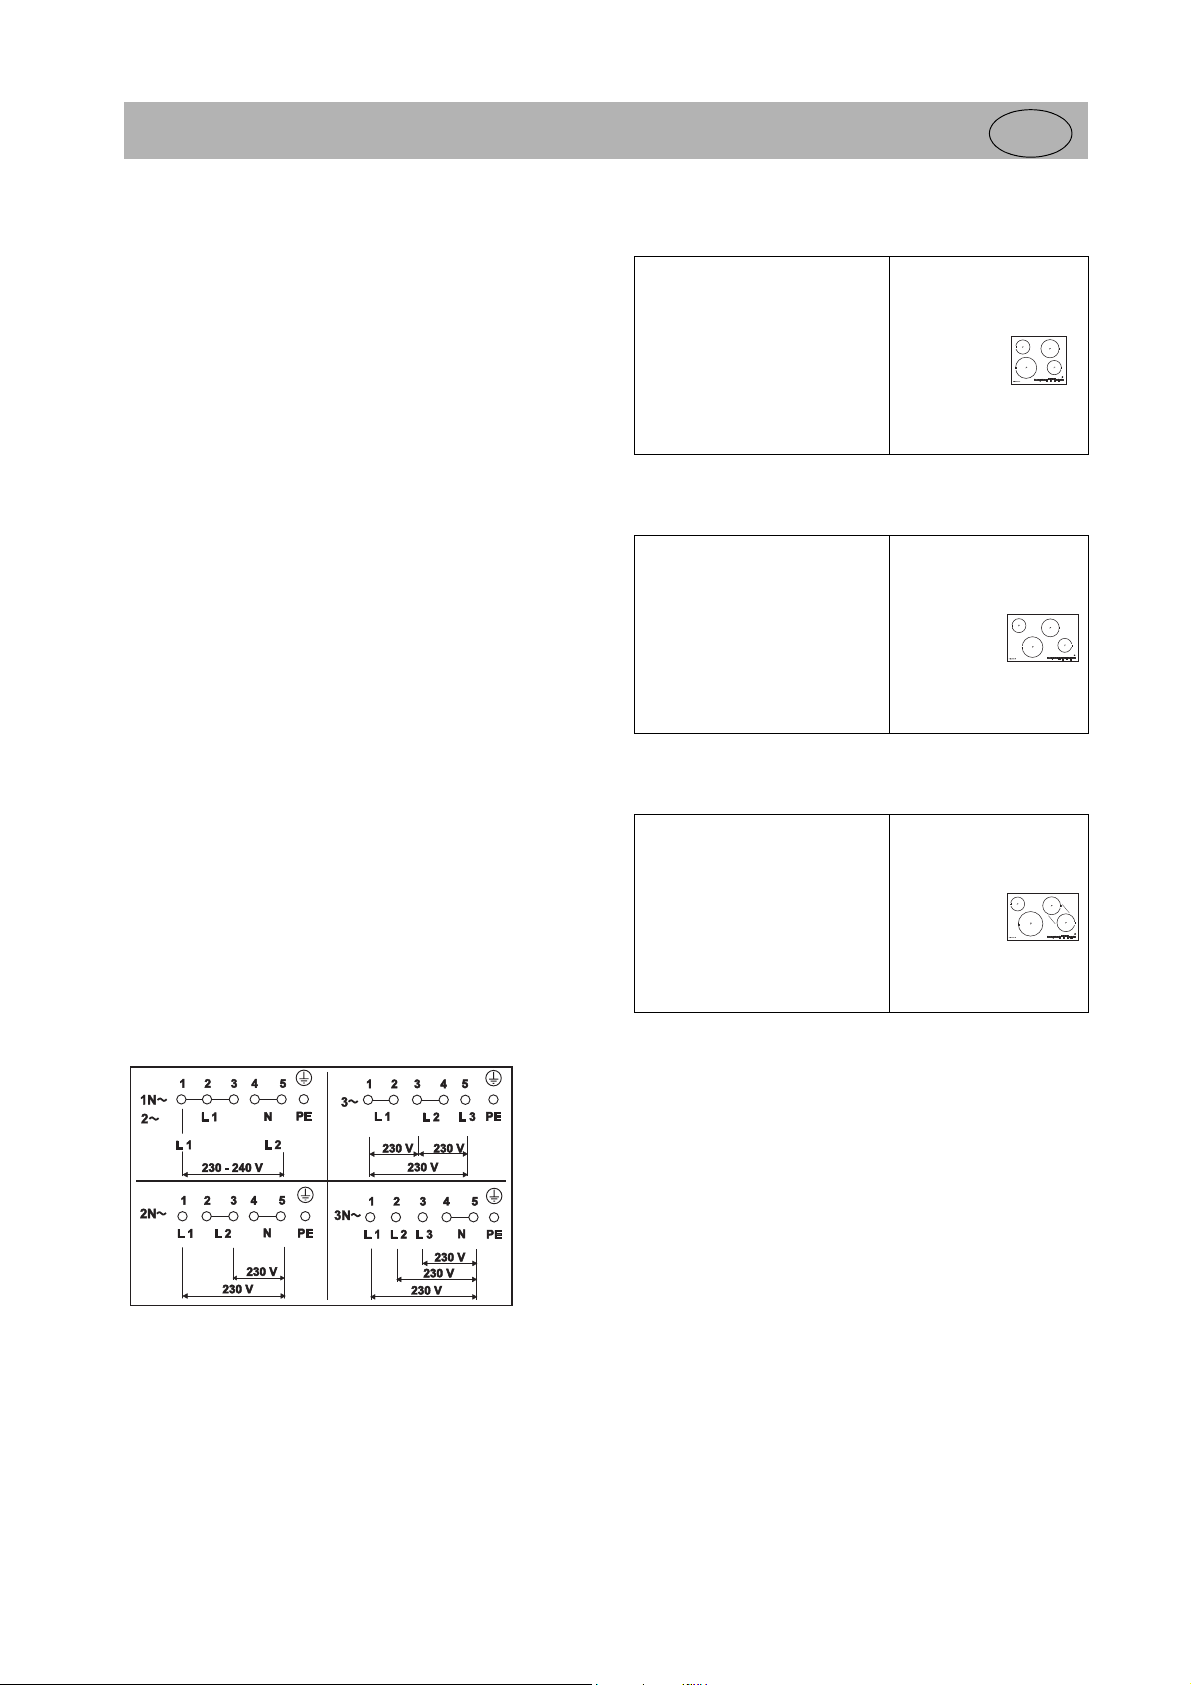
Electrical connections
in order to avoid
Technical data
EKI 607
Dimensions
Hob Height/ Width/ Depth mm 45 x 589 x 519
Cooking zone
Front left Ø cm / kW
Back left Ø cm / kW
Back right Ø cm / kW
Front right Ø cm / kW
Hob, total kW 7.4
* Power when the power boost function is activated
EKI 807
Dimensions
Hob Height/ Width/ Depth mm 45 x 779 x 519
Cooking zone
Front left Ø cm / kW
Back left Ø cm / kW
Back right Ø cm / kW
Front right Ø cm / kW
Hob, total kW 7.4
* Power when the power boost function is activated
EKI 848
Dimensions
Hob Height/ Width/ Depth mm 45 x 779 x 519
Cooking zone
Front left Ø cm / kW
Back left Ø cm / kW
Back right Ø cm / kW
Front right Ø cm / kW
Hob, total kW 7.4
* Power when the power boost function is activated
21/ 2,3 (3,2)*
14.5/ 1.4 (1.8)*
18/ 1.85 (2,5)*
14.5/ 1.4 (1.8)*
26/ 2,4 (3,2)*
14.5/ 1.4 (1.8)*
18/ 1.85 (2.5)*
18/ 1.85 (2.5)*
26/ 2.4 (3.2)*
14.5/ 1.4 (1.8)*
18/ 1.85 (2.5)*
18/ 1.85 (2.5)*
Start of operation
Once the hob has been installed and the power supply has been
provided (mains connected) an automatic test of the controls will
be carried out and information for Customer Service will be
indicated.
Briefly wipe over the surface of the hob with a sponge and soapy
water and then dry with a clean cloth.
33
Page 17

Kuppersbusch USA
1883 Massaro Blvd. Tampa, FL 33619
Toll: (800) 459-0844 P: 813-288-8890 F: 813-288-8604
 Loading...