

Page 1
BEDIENUNGSANWEISUNG
mit Montageanweisungen
INSTRUCTIONS FOR USE
and installation
EN
DE
Lesen Sie unbedingt die Gebrauchsanleitung
und den Montageplan vor Aufstellung,
Installation sowie Inbetriebnahme.
Please read the users and installation
instructions carefully before installation
of the appliance and before starting to use it.
Service und Kundendienst
Telefon: 0209 – 401 631
Email: kundendienst@kueppersbusch.de
FR
NL
CSV6800.0
Page 2

Contents
Safety Information ................................ 3
Children and Vulnerable People Safety
............................................................ 3
General Safety ..................................... 3
Safety Instructions ................................ 4
Installation ........................................... 4
Electrical connection ........................... 4
Use ................................ ...................... 4
Cleaning and maintenance .................. 5
Disposal............................................... 5
APPLIANCE DESCRIPTION .................. 6
Main Components ............................... 6
Control panel ....................................... 7
USE OF THE VACCUM DRAWER......... 7
Before using for the first time .............. 7
Use ................................ ...................... 7
Phases of the Standard Packaging cycle
............................................................. 7
PROGRAMS ........................................... 8
Program selection ............................... 8
Standard program ............................... 8
Special Maturation program ................ 8
Special Marination program ................ 9
Special Liquids program ...................... 9
ADJUSTING OPTIONS .......................... 10
Adjusting vacuum level ........................ 10
Adjusting sealing time .......................... 10
ADDITIONAL FUNCTIONS .................... 11
CLEANING AND MAINTENANCE ......... 12
TROUBLESHOOTING ............................ 12
Alarm messages .................................. 13
ENVIRONMENTAL PROTECTION ........ 13
Page 3

english
Safety Information
Carefully read the instructions before installing and using the
equipment. The manufacturer is not liable for improper
installation and use of the equipment that may cause injuries and
damage. Always keep the instructions at hand, so they can be
easily referred to during use.
This appliance complies with current safety standards. Improper
use of the appliance may put the user at risk.
Children and Vulnerable People Safety
Warning! Risk of suffocation, injury or permanent disability.
This appliance can be used by children aged 8 years and
above and persons with reduced physical, sensory or mental
capabilities or lack of experience and knowledge if they are
given supervision or instructions concerning how to use the
appliance in a safe way and understand the hazards involved.
Children should not play with the appliance.
Keep packaging materials away from children.
Cleaning and maintenance should not be done by children
without supervision.
General Safety
This appliance is intended to be used in household
applications and not in hotels, shops, offices and other
similar environments.
Internally the appliance becomes hot when in operation. Do
not touch the heating elements that are in the appliance.
Do not sit or hang on the drawer. The telescopic runners will
be damaged. The maximum load capacity of the drawer is 25
kg.
Page 4

Safety Instructions
Installation
WARNING! Installation must be carried
out by qualified personnel only
Remove the packaging material.
Do not install or use the appliance if
damaged.
Comply with the instructions supplied
with the appliance.
Always pay attention when moving the
appliance and wear safety gloves.
Do not turn the appliance upside down or
tilt it! This may cause oil to leak from the
pump and damage the equipment.
Respect the minimum distance from
other appliances.
Make sure the appliance is installed and
secured to a fixed structure.
The sides of the appliance must be
adjacent to other equipment or units
having the same height.
Electrical connection
WARNING! Risk of fire and electric
shock.
All the electrical connections must be
made by a qualified electrician.
The appliance must be earthed.
Make sure that all the electrical data
shown in the data plate of the model
correspond to those of the system.
Otherwise, contact an electrician.
Always use a correctly installed
shockproof socket.
Do not use multi-plug adapters or
extension cables.
Make sure not to damage the mains plug
and the mains cable. Contact the
Assistance Service or an electrician to
change any damaged mains cable.
Shock protection devices must be
fastened in such a way that they cannot
be removed without tools.
Connect the mains plug to the mains
socket only once installation has been
completed. Make sure that the mains
plug can be accessed after installation.
Do not connect the mains plug if the
mains socket is loose.
Do not pull the mains cable to
disconnect the appliance. Pull only the
mains plug.
Use only suitable isolation devices:
circuit breakers, fuses (screw type fuses
must be removed from the fuse holder),
earth fault current releases and relays.
The electric system must be equipped
with a means for disconnection, with a
contact separation in all poles that
provide full disconnection under
overvoltage category III.
Use
WARNING! Risk of injury, burns, electric
shock or explosion
Use this appliance in a household
environment.
Do not modify the specifications of this
appliance.
Do not leave the appliance unattended
during operation.
Switch off the appliance after use.
Do not use the appliance with wet hands
or when it could come into contact with
water.
Do not apply pressure on the drawer.
Do not use the appliance as a work
surface or as a support surface.
Avoid the presence of sparks or open
flames near the appliance when you
open the drawer.
Page 5

english
Do not place or keep flammable liquids,
materials or objects on the appliance, or
inside or close to it.
WARNING! You may damage the
appliance
Pay attention when you remove or insert
the accessories.
Do not touch the sealing bar (5)
immediately after sealing.
You may get burnt due to the residual
heat.
In the event of a power failure during a
work cycle with closed cover (3), do not
force the cover with a tool to open it, wait
until power is restored.
Do not place any weight on the cover (3)!
Prevent any object from falling on the
cover! This can compromise the integrity,
causing cracks or damage. Do not
proceed with packaging if the cover has
cracks or is broken.
Contact the Technical Assistance Service
to replace it.
Cleaning and maintenance
WARNING! There is a risk of injury, fire
or damage.
Before carrying out any maintenance
operation, switch off the appliance and
disconnect the plug from the mains
socket
Check that the appliance is cold.
Clean the appliance on a regular basis to
prevent the surface materials from
wearing.
Clean the appliance using a damp and
soft cloth Use neutral detergents only. Do
not use abrasive products, alcohol-based
detergents, abrasive sponges, solvents
or metal objects.
Follow the safety instructions indicated
on the packaging, in the event you use
sprays.
Disposal
WARNING! Risk of injury and choking.
Disconnect the plug from the power
supply.
Remove the mains cable and dispose of
it.
Page 6
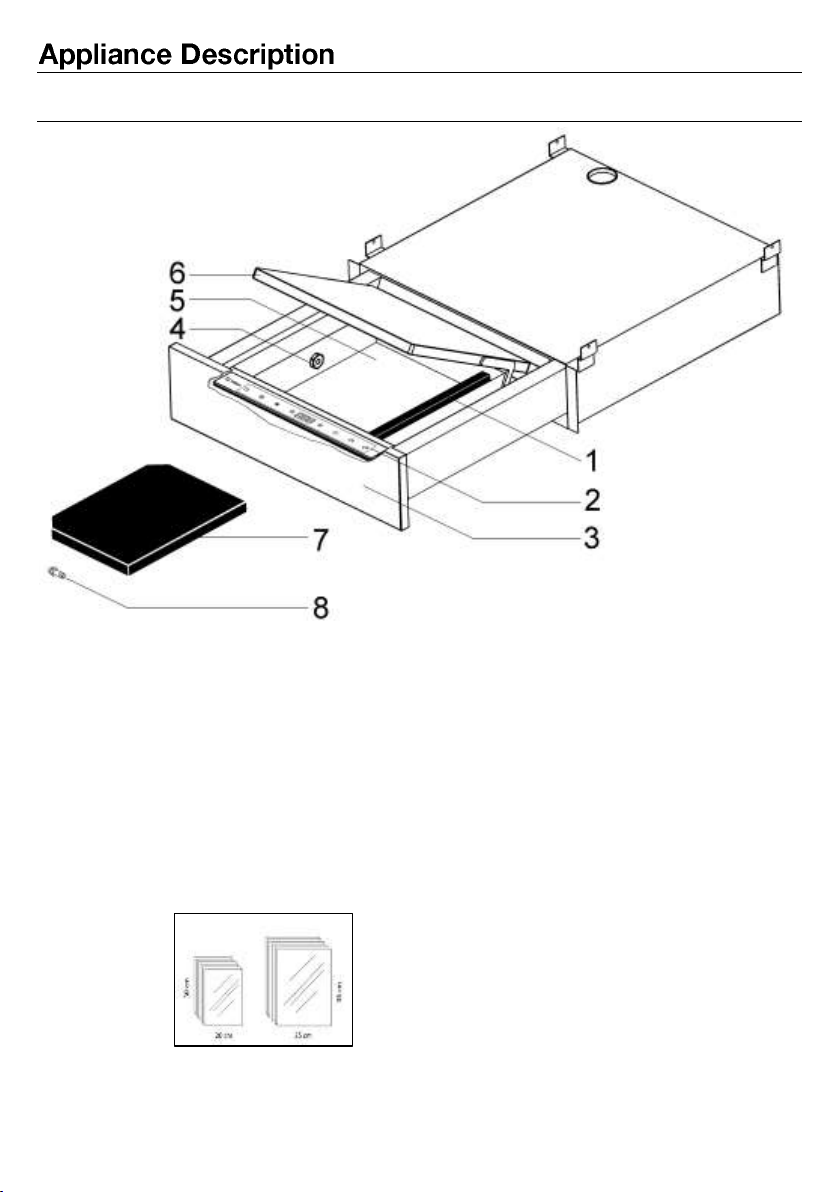
MAIN COMPONENTS
1. Sealing bar
5. Tank
2. Control Panel
6. Cover
3. Front Panel
7. Filling table
4. Suction nozzle / fitting connection
for external vacuum
8. External vacuum fitting
With these pouches, food can be
stored and cooked at a temperature
ranging between 0°C and 120°C
(max. 30min at 120ºC)
Page 7
english
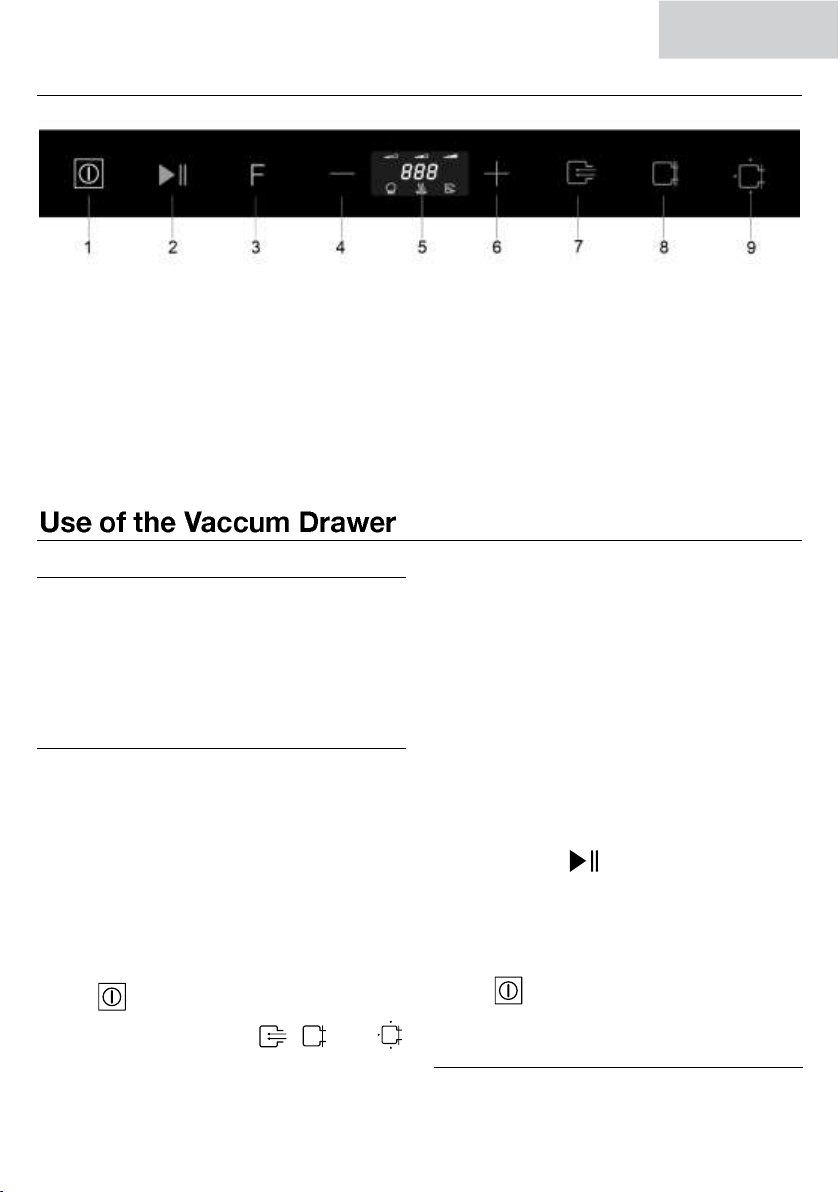
1. On/Off button
6. Increase button
2. Start/ Stop button
7. Vacuum function symbol
3. Selection button
8. Sealing function symbol
4. Decrease button
9. Air return function symbol
5.Display
CONTROL PANEL
BEFORE USING FOR THE FIRST TIME
Before using the machine for the first time,
clean the drawer:
Remove all accessories from the drawer.
Clean the machine with a damp and soft
cloth.
USE
The machine is intended for the preparation
of food in a household environment.
This machine allows you to package most
food items, including: vegetables, fruit, fish
products, dairy products, meat, salami,
baked products, cooking products, dry
products, etc.
Open the vacuum drawer.
Turn the machine on while holding down
the button.
When the 3 symbols , and
switch off, the machine is ready to use.
Open the cover.
Insert the product in the pouch.
For smaller products we recommend
using the table as shimming the product
facilitates positioning the pouch in
relation to the sealing bar.
Position the pouch inside the tank and on
the sealing bar as evenly as possible,
trying to avoid wrinkles that may be the
cause of a bad sealing. The pouches
must go approximately 2 cm beyond the
sealing bar.
Close the cover with light pressure and
press the button to start the
packaging cycle.
At the end of the cycle, open the cover
and remove the pouch.
Turn the machine off while holding down
the button.
PHASES OF THE STANDARD PACKAGING
CYCLE
The standard packaging cycle is divided into
3 phases:
Page 8
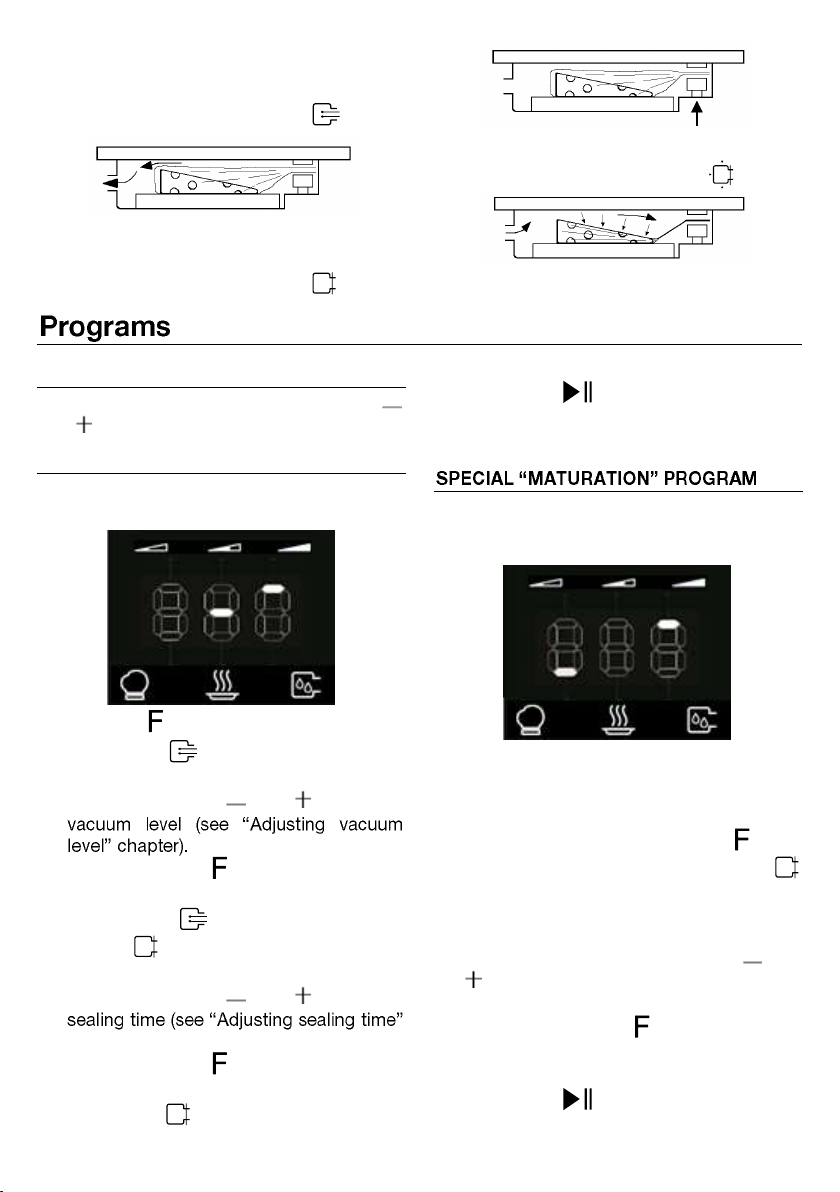
1. Vacuum phase during which all the air
contained in the tank and in the pouch is
extracted.
During this phase, the symbol is on.
2. Sealing phase during which the pouch is
sealed.
During this phase, the symbol is on.
3. Stage of air inlet back into the tank.
During this phase, the symbol is on.
PROGRAM SELECTION
To select a program, press the buttons
and .
STANDARD PROGRAM
This program allows you to set the vacuum
level and sealing time as follows:
1. Press the button.
2. The symbol flashes. This means you
can change the vacuum level.
3. Press the buttons and to set the
4. Press the button again to confirm the
selection.
5. The symbol switches off and the
symbol flashes. This means that the
sealing time can be changed.
6. Press the buttons and to set the
chapter).
7. Press the button again to confirm the
selection.
8. The symbol switches off.
9. The packaging cycle can now be started
by pressing .
This program allows you to set the vacuum
level, the sealing time and the number of
repetitions of the vacuum cycles as follows:
1. Set the vacuum level according to the
standard program
2. Set the sealing time according to the
standard program
3. At this point, pressing the button again
to confirm the selection, the symbol
switches off
4. The display shows the number of
repetitions of the standard packaging
cycle (5). By pressing the buttons and
you may change the number of
repetitions from 2 to 15
5. Press the button to confirm the
selection
6. The maturation cycle can now be started
by pressing .
Page 9
english
Intervention sensitivity
Food temperature
1
~ 40÷45°C
2
~ 45÷55°C
3
~ 55÷70°C
4
~ 70÷80°C
5
~ 80÷85°C
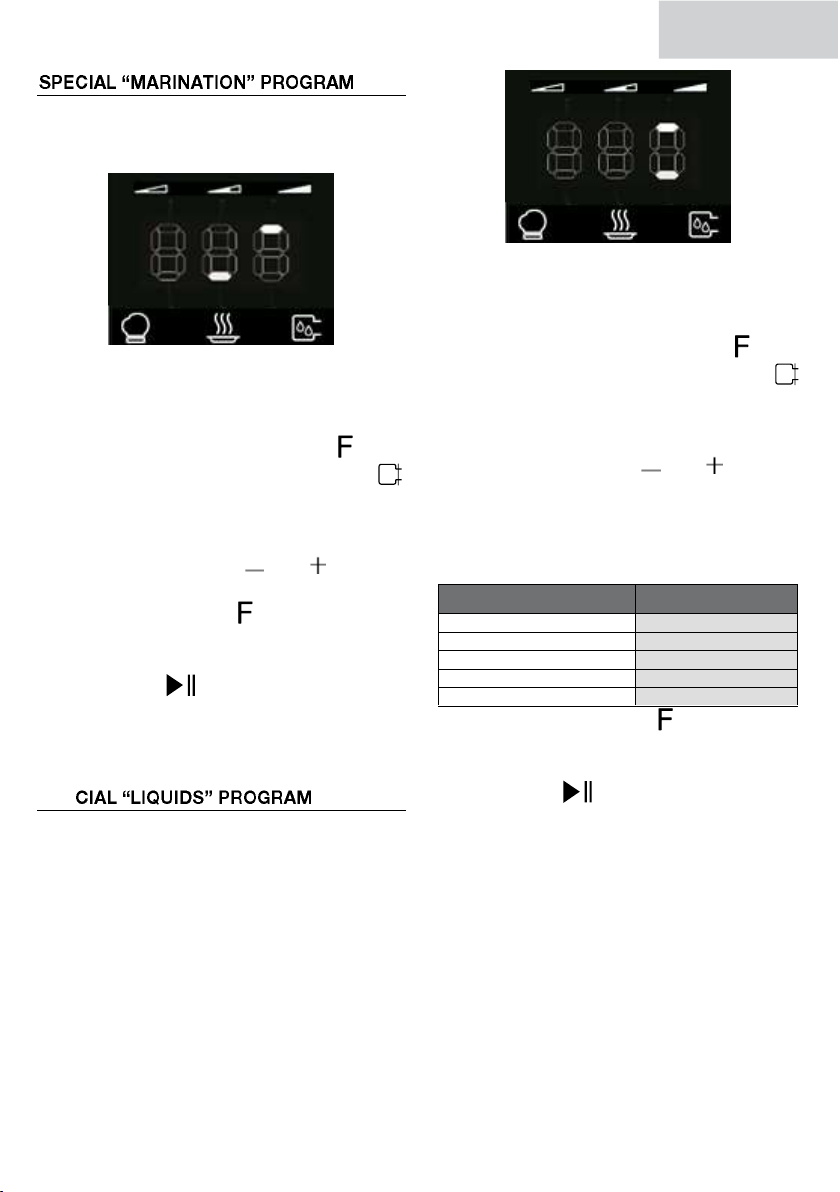
This program allows you to set the vacuum
level, the sealing time and the duration of
marinading/infusion as follows:
1. Set the vacuum level according to the
standard program
2. Set the sealing time according to the
standard program
3. At this point, pressing the button again
to confirm the selection, the symbol
switches off
4. The display shows the standard duration
of the marination cycle (5 minutes). By
pressing the buttons and you may
change the duration from 1 to 15 minutes
5. Press the button to confirm the
selection
6. The marination cycle can now be started
by pressing .
Note: we recommend you to use a very low
percentage of flavors, since the air absence
in the product increases their intensity.
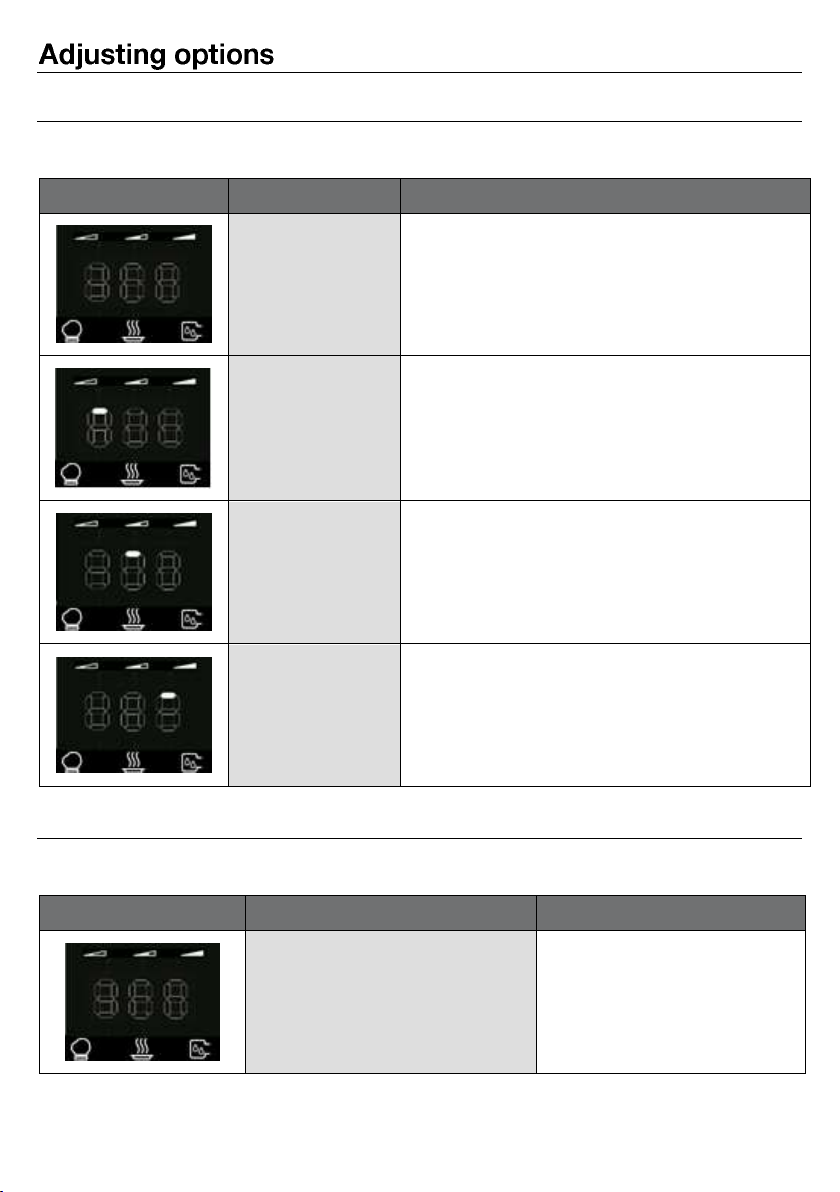
SPE
This program allows you to set the vacuum
level, the sealing time and the intervention
sensitivity by acting as follows:
1. Set the vacuum level according to the
standard program
2. Set the sealing time according to the
standard program
3. At this point, pressing the button again
to confirm the selection, the symbol
switches off
4. The display shows the standard
intervention sensitivity value (5). By
pressing the buttons and you may
change the value from 1 to 5. Modify this
value according to the temperature of the
product to be packed in the pouch. The
set value determines execution of
sealing.
5. Then press the button to confirm the
selection
6. The packaging cycle can now be started
by pressing .
Note: we recommend that you use this
program in the presence of any liquid.
Page 10
Display
Vacuum level
Food
Only sealing
(about 40%)
Package and divide food very sensitive to pressure into
portions.
PS: only sealing, without vacuum packing, although
with a minimum amount of vacuum in the pouch)
Minimum
(about 70%)
Package and divide delicate food into portions (e.g.
lettuce, tomatoes,...).
Medium
(about 93%)
Package and divide delicate food into portions (e.g.
cooked vegetables, fruit, tender meat, pasta,...) and
liquid foods (e.g. soup, cream, sauces, ...)
Cook vacuum packed delicate food (e.g. fish)
Marinate in the pouch
Maximum
(about 100%)
- Package and divide solid food into portions (e.g. raw
vegetables, hard cheese, cold cuts)
- Cook vacuum packed solid food (e.g. meat, potatoes,
carrots, ...)
Display
Sealing level
Sealing time
Disabled
-
ADJUSTING VACUUM LEVEL
4 vacuum levels can be set
The higher the vacuum level selected, the greater will be vacuum in the pouch.
ADJUSTING SEALING TIME
There are 4 levels available for sealing the pouches.
The thicker the pouch, the longer the set time.
Page 11
english
Display
Sealing level
Sealing time
Minimum
1.5 seconds
Medium
(suggested if you use the pouches
supplied with the machine)
2.5 seconds
Maximum
(to be selected with pouches having a
higher thickness, for example 150-
200my)
4 seconds
This program must be used to eliminate the
air inside special air-tight containers (not
supplied with this product).
Screw the supplied fitting (8) into the
suction nozzle (4).
Connect the container pipe to the fitting
(8).
Set the maximum vacuum level in the
and disable sealing.
With the cover open press the button
to start the packaging cycle.
Page 12
The cycle ends when the symbol
Problem
Cause
Solution
The pouch is not
sealed correctly
The sealing time is not correct.
Change the sealing time.
The cover gasket is dirty or worn.
Clean or replace the cover gasket (contact the
Technical Assistance Service for a
replacement).
The pouch is not placed correctly
on the sealing bar.
Position the pouch correctly.
The sealing bar is worn (the Teflon
coating is burnt).
Replace the sealing bar (contact the Technical
Assistance Service for a replacement).
switches off.
CONDITIONING PROGRAM
This program must be used in the following
situations:
Before using the machine for the first
time.
After a long stop period.
After having sealed products with high
humidity content (e.g. soups).
When you notice a decrease in
performance of the machine (e.g.: time to
reach vacuum is increased or it does not
reach it at all).
This program lasts about 15 minutes and
ensures a complete cleaning of the pump,
removing any liquid emulsion that might be
found in the oil. Do not seal any product
while this program is running.
This program has no set variables.
Follow the indications below to start the
program:
Hold down the button until all the
buttons flash.
Close the cover with light pressure.
Press the button to start the
conditioning cycle.
At the end of the cycle (15 minutes) the
machine will be ready for use.
Note: The Conditioning Program should be
used at least once per month.
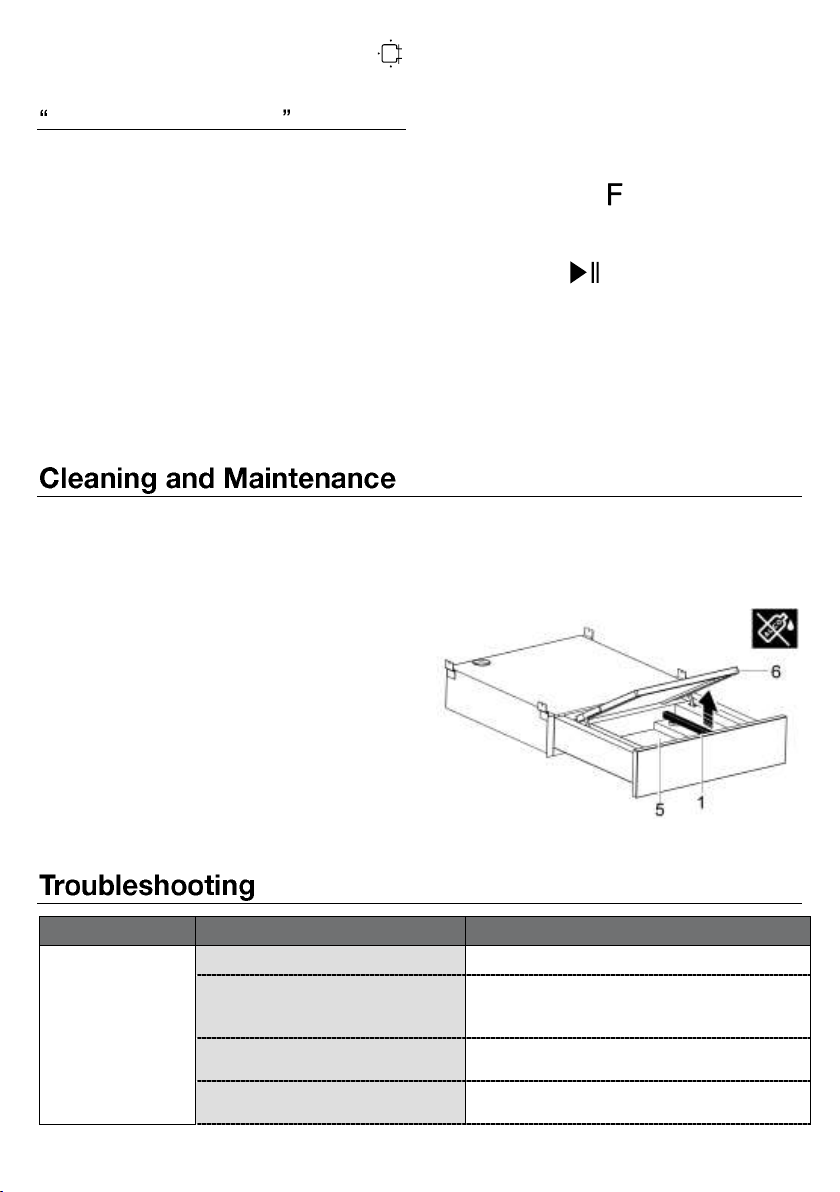
Clean the appliance after use.
Clean the Plexiglas cover (6) inside and
out using only neutral detergents (water
and soap).
Do not use abrasive products, alcohol-
based detergents, abrasive sponges,
solvents or metal objects. Follow the
safety instructions indicated on the
packaging, in the event you use sprays.
Clean the sealing bar (1) using a dry
cloth. Remove any film residue that
deposits on the bar.
Before cleaning the tank (5), especially
when liquid remains are in, it is
recommended to remove the sealing bar
(1).
Clean the metal surfaces using normal
detergents suitable for stainless steel.
Page 13
english
Problem
Cause
Solution
The blade placed under the Teflon
of the sealing bar is broken.
Replace the blade (contact the Technical
Assistance Service for a replacement).
Final vacuum is
poor
The set vacuum percentage is
incorrect.
Change the vacuum percentage.
The cover gasket is dirty or worn.
Clean or replace the cover gasket (contact the
Technical Assistance Service for a
replacement).
The cover is not closed correctly.
Close the cover correctly.
Make sure that objects or dirt are not found
between the cover and tank.
The cover does not
open
No power supply.
Wait until the power supply is restored.
Error
Solution
E0
Eprom Error.
The main board is faulty.
Contact the technical assistance service.
ER1
Data configuration error.
Contact the technical assistance service.
ER2
Calibration error.
Re-adjust the control board through a suitable vacuum gauge.
Contact the technical assistance service.
ER3
Cycle counter error.
Contact the technical assistance service.
ER4
Faulty sealing relay.
Contact the technical assistance service.
ER5
Vacuum Timeout: overtime.
Ensure the set vacuum percentage is correct.
Ensure the cover gasket is not dirty or worn.
Make sure the cover closes correctly.
ER7
Oil maintenance.
The machine has exceeded the number of cycles beyond which oil replacement is
required.
Contact the technical assistance service.
If the machine does not work properly after
the above-mentioned checks, contact the
assistance service describing the detected
defect.
ALARM MESSAGES
The circuit board detects some alarms,
which are displayed with the following
messages:
Disposal of the packaging
The packaging bears the Green Point mark.
Dispose of all the packaging materials such
as cardboard, expanded polystyrene and
plastic wrapping in the appropriate bins. In
this way you can be sure that the packaging
materials will be re-used.
Disposal of equipment no longer used
According to European Directive 2012/19/EU
on the management of waste electrical and
electronic equipment (WEEE), home
electrical appliances should not be put into
the normal systems for disposal of solid
urban waste.
Page 14

Outdated appliances should be collected
separately to optimise component material
recovery and re-cycling rates and to prevent
potential harm to human health and the
environment. The symbol of a rubbish
container superimposed by a diagonal cross
should be put on all such products to remind
people of their obligation to have such items
collected separately.
Consumers should contact their local
authorities or point of sale and request
information on the appropriate places to
leave their old home electrical appliances.
Before disposing of your appliance, render it
non-usable by pulling out the power cable,
cutting this and disposing of it.
14
Page 15

deutsch
Inhaltsverzeichnis
Sicherheitsinformationen ..................... 16
Sicherheit von Kindern und
Schutzbedürftigen Personen ............... 16
Allgemeine Sicherheit .......................... 16
Sicherheitshinweise .............................. 17
Installierung ......................................... 17
Elektrischer Anschluss ........................ 17
Benutzung ........................................... 17
Reinigung und Pflege .......................... 18
Entsorgung .......................................... 18
GERÄTEBESCHREIBUNG .................... 19
Hauptkomponenten............................. 19
Bedienfeld ........................................... 20
VERWENDUNG DER
VAKUUMSCHUBLADE .......................... 20
Vor dem ersten gebrauch .................... 20
Benutzen ............................................. 20
Verfahren des vakumierens ................. 21
PROGRAMME ........................................ 21
Programmauswahl ............................... 21
Standard programm ............................ 21
SPEZIAL REIFUNGSPROGRAMM ...... 21
Spezial ................................................. 22
Spezial ................................................. 22
EINSTELLUNGSOPTIONEN .................. 23
Vakuumlevel einstellen ........................ 23
Vakumierdauert einstellen ................... 23
ZUSATZFUNKTIONEN .......................... 24
REINIGUNG UND PFLEGE .................... 25
FEHLERBEHEBUNG.............................. 26
Fehlermeldungen ................................. 26
Hinweise zum Umweltschutz ............... 27
15
Page 16

Sicherheitsinformationen
Lesen Sie vor der Montage und Verwendung des Geräts
sorgfältig die mitgelieferte Anleitung. Der Hersteller haftet nicht
für Verletzungen oder Schäden, die durch eine fehlerhafte
Montage entstehen. Bewahren Sie die Anleitung zum
Nachschlagen auf.
Sicherheit von Kindern und Schutzbedürftigen Personen
WARNUNG! Es besteht Erstickungsgefahr, das Risiko von
Verletzungen oder permanenten Behinderungen.
Dieses Gerät kann dann von Kindern ab 8 Jahren, von
Personen mit eingeschränkten körperlichen, sensorischen
oder geistigen Fähigkeiten sowie von Personen ohne
bisherige Erfahrung im Umgang mit solchen Geräten bedient
werden, wenn sie dabei von einer Person, die für ihre
Sicherheit verantwortlich ist, beaufsichtigt werden.
Kinder sollten während der Benutzung beaufsichtigt sein, um
sicher zu gehen, dass sie nicht mit dem Gerät spielen.
Halten Sie das Verpackungsmaterial von Kindern fern.
Reinigung und Wartung des Geräts darf nicht von Kindern
ohne Aufsicht erfolgen.
Allgemeine Sicherheit
Dieses Gerät ist für den Haushaltsbedarf und nicht für die
Nutzung in Hotels, Geschäften, Büros oder anderen,
ähnlichen Einrichtungen, bestimmt.
Der Geräteinnenraum wird während des Betriebs heiß.
Berühren Sie nicht die Heizelemente im Geräteinnern.
Verwenden Sie zum anfassen des zubehörs und der Töpfe
wärmeisolierende Handschuhe.
Stellen oder setzen Sie sich nicht auf die geöffnete Geschirr-
schublade. Der Teleskopauszug wird beschädigt. Die
Belastbarkeit der Geschirrschublade beträgt max. 25kg.
16
Page 17

deutsch
Sicherheitshinweise
Installierung
Achtung! Die Installation darf nur durch
qualifiziertem Personal durchgeführt
werden
Entfernen Sie das Verpackungsmaterial.
Das Gerät nicht installieren oder
benutzen falls dieser Beschädigt ist.
Beachten Sie die Anweisungen, die mit
dem Gerät mitgeliefert werden.
Bitte seien Sie vorsichtig wenn Sie das
Gerät Transportiren und tragen Sie
immer Schutzhandschuhe.
Bitte das Gerät nicht das Gerät auf den
Kopf stellen oder kippen! Dies kann dazu
führen, das Öl aus der Pumpe ausläuft
und das Gerät beschädigt wird.
Respektieren Sie den Mindestabstand zu
anderen Geräten.
Achten Sie darauf, dass das Gerät
installiert und an einer festen Struktur
befestigt ist.
Die Seiten des Gerätes müssen neben
anderen Geräten mit der gleichen Höhe
eingebaut werden.
Elektrischer Anschluss
Achtung! Alle elektrischen Anschlüsse
müssen von einem qualifizierten
Elektriker vorgenommen werden.
Das Gerät muss geerdet werden.
Stellen Sie sicher, dass alle elektrischen
Daten auf dem Typenschild des Modells
angezeigt sind und mit dem Gerät
Übereinstimmen. Andernfalls wenden Sie
sich an einen Elektriker.
Verwenden Sie immer eine
vorschriftsmäßig installierte Steckdose
mit Schutzkontakt.
Verwenden Sie keine Multi-Stecker-
Adapter oder Verlängerungskabel.
Achten Sie darauf, den Netzstecker und
das Netzkabel nicht zu beschädigen.
Kontaktieren Sie den Kundendienst oder
einen Elektriker, um alle beschädigten
Netzkabel auszutauschen.
Stromschlag Schutzeinrichtungen
müssen so befestigt werden das diese
nur mit dem Werkzeug entfernt werden
können.
Stecken Sie den Stecker erst in die
Steckdose wenn die Installation
Erfolgreich abgeschlossen worden ist.
Stellen Sie sicher, dass der Stecker nach
der Installation griff nah ist.
Schließen Sie den Stecker nicht an der
Steckdose an, wenn diese lose ist.
Ziehen Sie nicht am Netzkabel, um das
Gerät von der Steckdose auszuschalten.
Ziehen Sie nur den Stecker.
Verwenden Sie nur geeignetes Isolier
Material: Leistungsschalter, Sicherungen
(Schraub-Sicherungen müssen aus dem
Sicherungshalter entfernt werden),
aktuelle Erdschluss Anschlüsse und
Relais.
Die Elektronik muss mit einer Einrichtung
zur Abschaltung ausgestattet sein, womit
das Gerät sich von jedem Pol vom Netz
ausschalten lässt und die vollständige
Trennung unter der
Überspannungskategorie III bietet.
Benutzung
Achtung! Verletzung, Verbrennung,
Stromschlag-oder Explosionsgefahr
Dieses Gerät nur im Haushalt benutzen.
Ändern Sie nicht die Spezifikationen
dieses Geräts.
Lassen Sie das Gerät während des
Betriebs nicht unbeaufsichtigt.
17
Page 18

Schalten Sie das Gerät nach dem
Gebrauch aus.
Das Gerät nicht mit nassen Händen oder
wenn mit Wasser in Berührung, in Betrieb
nehmen.
Üben Sie keinen Druck auf die
Schublade
Benutzen Sie das Gerät nicht als Arbeits-
oder als Auflagefläche.
Meiden Sie Funken oder Flammen in der
Nähe der Schublade, wenn Sie diese
öffnen.
Legen Sie keine brennbaren
Flüssigkeiten in der Nähe des Gerätes,
Bewahren Sie keine Materialien oder
Gegenstände im inneren des Gerätes.
Achtung! Sie können das Gerät
beschädigen
Achten Sie beim Entfernen oder
Einsetzen des Zubehörs darauf, dass
dies auch sorgfältig durchgeführt wird.
Berühren Sie nicht die Abdichtung (5)
unmittelbar nach der Versiegelung.
Sie können aufgrund der Restwärme
verbrennen.
Im Falle eines Stromausfalls während
eines Arbeitszyklus mit geschlossenem
Deckel, nicht versuchen, die Abdeckung
mit einem Werkzeug zu öffnen, warten
Sie, bis die Stromversorgung
wiederhergestellt ist.
Legen Sie kein Gewicht auf dem Deckel!
Vermeiden Sie das fallen von
Gegenstände auf dem Deckel des
Gerätes.
Dies kann zu Rissen oder
Beschädigungen am Gerät führen.
Nicht mit der Versiegelung fortfahren,
wenn der Deckel Risse aufweist oder
gebrochen ist.
Kontaktieren Sie den Kundendienst, um
das Teil zu ersetzen.
Reinigung und Pflege
Warnung! Es besteht die Gefahr von
Verletzungen, Feuer oder Schaden.
Vor der Durchführung von
Wartungsarbeiten (Reinigung und Pflege),
schalten Sie das Gerät aus und ziehen
Sie den Stecker aus der Steckdose.
Vergewissern Sie sich das das Gerät
abgekühlt ist.
Reinigen Sie das Gerät regelmäßig, um
die Oberfläche von Schadstoffen zu
schützen und so die Lebens Dauer des
Gerätes und dessen Teile zu erhalten.
Reinigen Sie das Gerät mit einem
feuchten, weichen Tuch. Verwenden Sie
nur neutrale Reinigungsmittel.
Verwenden Sie keine Scheuermittel,
Alkohol-enthaltende Reinigungsmittel,
kratzende Schwämme, Lösungsmittel
oder metallischen Gegenständen um das
Gerät zu Reinigen.
Beachten Sie die angegebenen
Sicherheitshinweise auf der Verpackung,
Falls Sie Reinigung Sprays benutzen.
Entsorgung
ACHTUNG! Verletzungs-und
Erstickungsgefahr.
Ziehen Sie den Stecker aus der
Steckdose.
Entfernen Sie das Netzkabel und
entsorgen Sie es.
18
Page 19

deutsch
1. Siegelbalken
5. Wanne
2. Bedienfeld
6. Deckel
3. Frontpaneel
7. Einlegeplatte
4. Absaugdüse / Externer Vakuumadapter
Beschlag
8. Verbindungsstück für externes
Vakuum
Mit diesen Beutel können
Lebensmittel gelagert und bei einer
Temperatur zwischen 0 ° C und 120 °
C * gekocht werden (max. 30min bei
120ºC).
HAUPTKOMPONENTEN
19
Page 20

BEDIENFELD
1. Taste Ein/Aus
6. Erhöhen Taste
2. Taste Start/Stopp
7. Vakuum Funktion Symbol
3. Auswahltaste
8. Siegel Funktion Symbol
4. Verringern Taste
9. Rücklufft Funktion Symbol
5.Display (Anzeige)
VOR DEM ERSTEN GEBRAUCH
Die Erste Reinigung:
Entfernen Sie alle Teile aus dem Gerät.
Vor der ersten Verwendung alle Teile mit
einem feuchten Tuch reinigen.
BENUTZEN
Das Gerät ist für den häuslichen Gebrauch
bestimmt.
Dieses Gerät ermöglicht Ihnen Lebensmittel
Luftdicht in einem Beutel zu verschließen,
einschließlich Gemüse, Früchte,
Fischprodukte, Milchprodukte, Fleisch,
Backwaren, gekochte Produkte, trockene
Produkte etc.
Die Lade bis zur maximalen Öffnung
herausziehen.
Das Gerät einschalten und die Taste
gedrückt halten.
Wenn die 3 Symbole , , und
ausschalten, ist das Gerät betriebsbereit.
20
Öffnen Sie die Deckel.
Stecken Sie das Produkt in den Beutel.
Für kleinere Lebensmittel, verwenden Sie
die mitgelieferte Abdeckplatte, da diese
ihnen dabei hilft, den Beutel korrekt zur
Siegeleinheit zu positionieren.
Legen Sie den Beutel mit der Nahrung in
den Behälter. Der Beutel muss so
mindestens um 2 cm nach der
Siegeleinheit überstehen.
Schließen Sie die Abdeckung , dabei
einen leichten Druck ausüben,
anschließend die Taste drücken, die
zu blinken beginnt. Nun wird der
Verpackungszyklus gestartet.
Den Deckel öffnen und den Beutel
entnehmen.
Schalten Sie das Gerät aus, während Sie
die Taste gedrückt halten.
Page 21

deutsch
VERFAHREN DES VAKUMIERENS
Das Verfahren des Vakumierens lässt sich in
3 Schritte einteilen:
1. Während dieser Vakuumierphase wird die
Luft, die sich im Gehäuse und im
Vakuumbeutel befindet, entzogen.
Während dieser Phase wird folgendes
Symbol angezeigt.
2. Während der Versiegelungsphase wird
der Beutel luftdicht verschlossen.
Während dieser Phase wird folgendes
Symbol angezeigt.
3. Nach Ablauf der ersten beiden Phasen
wird wieder Luft ins Gehäuse geführt.
Während dieser Phase wird folgendes
Symbol angezeigt.
PROGRAMMAUSWAHL
Um ein Programm auszuwählen, drücken Sie
die Tasten und .
STANDARD PROGRAMM
Dieses Programm ermöglicht Ihenen das
Vakuumlevel und die Vakumierdauer wie
folgt einzustellen:
1. Drücken Sie die Taste.
2. Mit diesem Symbol können Sie das
Vakuumlevel verändern.
3. Drücken Sie das Symbol und , um
das Vakuumlevel einzustellen (Kapitel
Vakuumlevel einstellen).
4. Drücken Sie das Symbol erneut, um
die Einstellungen zu bestätigen.
5. Das Symbol erlischt und das Symbol
erscheint. Diess bedeutet, dass die
Vakumierdauer verändert werden kann.
6. Drücken Sie das Symbol und , um
die Vakumierdauer einzustellen (Kapitel
Vakumierdauer einstellen).
7. Drücken Sie das Symbol erneut, um
die Einstellungen zu bestätigen.
8. Das Symbol erlischt.
9. Der Vorgang kann nun durch drücken
des Symbols gestartet werden.
SPEZIAL REIFUNGSPROGRAMM
Dieses Programm ermöglicht Ihnen das
Vakuumlevel, die Vakumierdauer und die
Anzahl der Wiederholungen des Vorgangs
wie folgt einzustellen:
21
Page 22

1. Stellen Sie das Vakuumlevel nach dem
Sensibilität des
Vorgangs
Lebensmittel
Temperatur
1
~ 40÷45°C
2
~ 45÷55°C
3
~ 55÷70°C
4
~ 70÷80°C
5
~ 80÷85°C
Standard Programm ein.
2. Stellen Sie die Zeit nach dem Standard
Programm ein.
3. Drücken Sie das Symbol erneut, um
die Einstellungen zu bestätigen, das
Symbol schaltet ab.
4. Im Display wird Ihnen die Anzahl der
Wiederholungen des Standard
Programms angezeigt (5). Mit drücken
dieser Symbole und können Sie die
Wiederholungen von 2 15 manuell
verändern.
5. Drücken Sie das Symbol , um die
Einstellungen zu bestätigen.
6. Der Vorgang kann nun durch drücken
dieses Symbols gestartet werden.
Dieses Programm ermöglicht Ihnen das
Vakuumlevel und die Vakumierdauer wie
folgt einzustellen:
1. Stellen Sie das Vakuumlevel nach dem
Standard Programm ein.
2. Stellen Sie die Dauer nach dem Standard
Programm ein.
3. Drücken Sie das Symbol erneut, um
die Einstellungen zu bestätigen. Das
Symbol erlischt.
4. Im Display wird Ihnen die Standard Dauer
des Marinierprogramms (5 Minuten)
angezeigt. Durch drücken der Symbole
und haben Sie die Möglichkeit die
Dauer von 1-15 Minuten zu verändern.
5. Drücken Sie das Symbol , um die
Einstellungen zu bestätigen.
22
Hinweis: Wir empfehlen Ihnen einen
geringen Anteil von Aromen zu benutzen, da
durch den Vorgang das Produkt seine
Intensität steigert.
Dieses Programm ermöglicht Ihnen das
Vakuumlevel und die Vakumierdauer wie
folgt einzustellen
1. Stellen Sie das Vakuumlevel nach dem
Standard Programm ein.
2. Stellen Sie die Dauer nach dem Standard
Programm ein.
3. Drücken Sie das Symbol erneut, um
die Einstellungen zu bestätigen. Das
Symbol erlischt.
4. Im Display wird Ihnen die Anzahl der
Wiederholungen des Vorgangs angezeigt
(5). Mit drücken dieser Symbole und
können Sie die Wiederholungen von 1
5 manuell verändern. Ändern Sie die
Temperatur gemäß des im Beutel
gepackten Produktes. Der eingestellte
Wert bestimmt die Ausführung des
vakumierens.
5. Anschließend drücken Sie das Symbol
, um die Einstellungen zu bestätigen.
6. Der Vorgang kann nun durch drücken
dieses Symbols gestartet werden.
Hinweis: Wir empfehlen, dieses Programm
in Gegenwart von Flüssigkeiten zu
verwenden.
Page 23

deutsch
Display
Vakuumstufe
Gebrauch
Nur Abdichtung
(etwa 40%)
Verpacken, in Portionen aufteilen ohne
Vakuumerzeugung.
Hinweis: Mit dieser Funktion wird in jedem Fall ein
minimaler Unterdruck im Beutel erzeugt.
Minimum
(etwa 70%)
Verpacken, in Portionen aufteilen von besonders
empfindlichen Lebensmitteln (Salat, Tomaten, etc.)
Medium
(etwa 93%)
- Verpacken, in Portionen aufteilen von empfindlichen
Lebensmitteln (gegartes Gemüse, Obst, zartes Fleisch,
Teigwaren) und flüssigen Lebensmitteln (Suppen, Cremes,
Saucen).
- Vakuumgaren von empfindlichen Lebensmitteln (z.B.
Fisch)
- Marinieren im Beutel.
Maximum
(etwa 100%)
- Verpacken, in Portionen aufteilen von festen
Lebensmitteln (rohes Gemüse, Hartkäse, Wurstaufschnitt).
- Vakuumgaren von festen Lebensmitteln (z.B. Fleisch,
Kartoffeln, Karotten)
Display
Sealing level
Versiegelungszeit
Deaktiviert
-
VAKUUMLEVEL EINSTELLEN
4 Vakuumniveaus können eingestellt warden.
Je höher das Vakuumlevel, desto besser wird das Vakuum im Beutel.
VAKUMIERDAUERT EINSTELLEN
Es stehen 4 Level zur Versiegelung des Beutels zur Verfügung.
23
Page 24

Display
Sealing level
Versiegelungszeit
Minimum
1.5 sekunden
Medium
(Wir empfehlen die Nutzung der
Beutel, die dem Gerät beigelegt sind)
2.5 sekunden
Maximum
(Falls Sie Beutel nutzen, die dicker
sind, beispielsweise 150-200my)
4 sekunden
EXTERN VAKUUM
Dieses Programm muss verwendet werden,
um die Luft im Inneren von speziellen
luftdichten Behältern (nicht mit diesem
Produkt mitgeliefert) zu entfernen).
Für das externe Vakuum, das
mitgelieferte Verbindungsstück (8) in der
Wanne anschrauben.
Die Leitung des Behälters an das
Verbindungsstück (8) anschließen.
24
Die maximale Vakuumstufe einstellen in
dem "Standardprogramm" und die
Versiegelung deaktivieren.
Den Deckel des Geräts geöffnet lassen
und die Taste des
Verpackungszyklus drücken. Die Taste
beginnt zu blinken.
Page 25

deutsch
Nach Abschluss des Zyklus hört die
auf zu blinken
EINSTELLUNGSPROGRAMM
Dieses Programm muss in den folgenden
Situationen verwendet werden:
Bevor Sie das Gerät zum ersten mal
benutzen
Nach einer langen Ausschaltzeit.
Nachdem versiegeln von Lebensmitteln
mit hohem Feuchtigkeitsgehalt (zB
Suppen).
Wenn Sie einen Leistungsabfall des
Geräts bemerken (zB: Zeit, um den
eingestellten Vakuumwert zu erreichen
oder dieser überhaupt nicht erreicht
wird).
Diese Programmauswahl dauert etwa 15
Minuten und sorgt für eine vollständige
Reinigung der Pumpe, um jegliche
Flüssigkeitsemulsion im Öl zu entfernen.
Während des Programmablaufes können
kein Lebensmittel vakuumiert werden.
Dieses Programm hat keine weiteren
Einstellungen.
Folgen Sie die unteren Hinweise, um das
Programm zu starten:
Die Taste gedrückt halten bis alle
Leuchttasten zu blinken beginnen.
Den Deckel schließen, dabei einen
leichten Druck ausüben.
Drücken Sie Taste um den
Konditionierungszyklus zu starten.
Nach Abschluss des Zyklus (15 Minuten)
hört die Taste zu blinken auf und das
Gerät ist zur Verwendung bereit.
Hinweis: Das Einstellungsprogramm sollte
mindestens einmal im Monat verwendet
werden.
Reinigen Sie das Gerät nach jedem
Gebrauch.
Reinigen Sie die Plexiglasabdeckung (6)
innen und außen mit nur neutrale
Reinigungsmittel (Wasser und Seife).
Verwenden Sie keine Scheuermittel,
Alkohol-basierte Reinigungsmittel,
kratzende Schwämme, Lösungsmittel
oder metallische Gegenstände. Beachten
Sie die Sicherheitshinweise die auf der
Verpackung angegeben sind, in dem Fall,
dass Sie Reinigungs Sprays benutzen.
Reinigen Sie die Versiegelungsleiste (1)
mit einem trockenen Tuch. Entfernen Sie
alle Folienreste an der
Versiegelungsleiste (1).
Vor der Reinigung des Behälters (5),
insbesondere, wenn Restflüssigkeit
vorhanden ist, ist es empfehlenswert, die
Versiegelungseinheit (1) zu entfernen.
Reinigen Sie die Metalloberflächen mit
normalen Reinigungsmitteln, die für
Edelstahl geeignet sind.
25
Page 26

Problem
Ursache
Lösung
Der Beutel ist nicht
richtig versiegelt
Die Versieglungszeit ist nicht
richtig.
Ändern Sie die Versiegelungszeit.
Die Dichtung ist verschmutzt oder
abgenutzt.
Reinigen oder ersetzen Sie die Dichtung
(kontaktieren Sie den Technischen
Kundendienst für Ersatz).
Der Beutel ist nicht korrekt auf die
Abdichtungs Leiste platziert.
Positionieren Sie den Beutel richtig.
Die Abdichtung Leiste ist
abgenutzt (die Teflon
Beschichtung ist verbrannt).
Ersetzen Sie die Dichtleiste (kontaktieren Sie
den Technischen Kundendienst für Ersatz).
Die Klinge unter dem Teflon der
Dichtleiste ist gebrochen.
Ersetzen Sie die Klinge (kontaktieren Sie den
Technischen Kundendienst für Ersatz).
Endvakuum ist
schlecht
Der definierte Vakuum Prozentsatz
ist falsch.
Ändern Sie den Vakuum Prozentsatz
Die Dichtung ist verschmutzt oder
abgenutzt.
Reinigen oder ersetzen Sie die Dichtung
(kontaktieren Sie den Technischen
Kundendienst für Ersatz).
Die Abdeckung ist nicht richtig
geschlossen.
Schließen Sie den Deckel richtig.
Stellen Sie sicher, dass keine Objekte oder
Schmutz zwischen Deckel und Behälter ist.
Der Deckel lässt
sich nicht öffnen
Keine Stromversorgung.
Warten Sie, bis die Stromversorgung
wiederhergestellt ist.
Error
Lösung
E0
Eprom Error.
Die Hauptplatine ist fehlerhaft.
Kontaktieren Sie den technischen Kundendienst.
ER1
Datenkonfigurationsfehler.
Kontaktieren Sie den technischen Kundendienst.
ER2
Kalibrierungsfehler.
Stellen Sie die Steuerplatine durch ein geeignetes Vakuummessgerät neu ein.
Kontaktieren Sie den technischen Kundendienst.
ER3
Zykluszählerfehler.
Kontaktieren Sie den technischen Kundendienst.
ER4
Fehlerhaftes Abdichtungsrelais.
Kontaktieren Sie den technischen Kundendienst.
ER5
Vacuum Timeout: Überstunden.
Stellen Sie sicher, dass der eingestellte Vakuumprozentsatz korrekt ist.
Vergewissern Sie sich, dass die Abdeckungsdichtung nicht verschmutzt oder
verschlissen ist.
Vergewissern Sie sich, dass die Abdeckung richtig schließt.
ER7
Ölwartung.
Die Maschine hat die Anzahl der Zyklen überschritten, nach denen ein Ölwechsel
Wenn das Gerät nicht richtig funktioniert,
nachdem die oben genannten Punkte das
Problem nicht gelöst haben oder der Defekt
FEHLERMELDUNGEN
Das Gerät erkennt einige Fehler, die
angezeigt werden mit folgenden Meldungen:
nicht aufgelistet ist, kontaktieren Sie den
Kundendienst und beschreiben Sie den
Fehler.
26
Page 27

deutsch
Error
Lösung
erforderlich ist.
Kontaktieren Sie den technischen Kundendienst.
Entsorgung der Verpackung
Die Verpackung ist mit einem Grünen Punkt
gekennzeichnet.
Benutzen Sie geeignete Behältnisse, um alle
Verpackungsmaterialien, wie Pappe,
Styropor und Folien, zu entsorgen. Auf diese
Weise wird die Wiederverwertung der
Verpackungs-materialien gewährleistet.
Entsorgung von stillgelegten Geräten
Die europäische Richtlinie 2012/19/EU über
Elektro- und Elektronik-Altgeräte (WEEE)
sieht vor, dass die elektrischen
Haushaltgeräte nicht im normalen Abfallfluss
des festen Stadtmülls entsorgt werden
dürfen.
Die außer Betrieb gesetzten Geräte müssen
getrennt abgeholt werden, um den Anteil der
Rückgewinnung und Wiederverwendung der
Werkstoffe, aus denen sie bestehen, zu
optimieren und um potentielle Schäden für
die Gesundheit der Menschen und die
Umwelt zu vermeiden. Das Symbol, welches
aus einem mit einem Kreuz
durchgestrichenen Müllcontainer besteht, ist
auf sämtlichen Erzeugnissen anzubringen,
um so an die Verpflichtung der separaten
Abholung zu erinnern.
Die Verbraucher haben sich mit den lokalen
Behörden bzw. den Verkaufsstellen in
Verbindung zu setzen, um Informationen
über den Ort einzuholen, der zur Lagerung
der alten elektrischen Haushaltsgeräte
geeignet ist.
Machen Sie Ihr Gerät unbrauchbar, bevor
Sie es entsorgen. Ziehen Sie das Netzkabel
heraus, schneiden Sie es ab und entsorgen
Sie es.
27
Page 28

Sommaire
Consignes de sécurité .......................... 29
Sécurité des enfants et des personnes
vulnérables .......................................... 29
Sécurité générale ................................ 29
Instructions de sécurité ....................... 30
Installation ........................................... 30
Branchement électrique ...................... 30
Utilisation............................................. 30
Mise au rebut ...................................... 31
DESCRIPTION DE L'APPAREIL ........... 32
Composants principaux ...................... 32
Tableau de commandes ...................... 33
UTILISATION DE LA MACHINE ............ 33
Avant la première utilisation ................ 33
Utilisation............................................. 33
Phases du cycl
............................................................. 34
PROGRAMMES ..................................... 34
Sélection du programme ..................... 34
Programme standard ........................... 34
PROGRAMME SPÉCIAL DE ................ 34
PROGRAMME SPÉCIAL DE ................ 35
PROGRAMME SPÉCIAL DE ................ 35
RÉGLAGE DES OPTIONS ..................... 36
Réglage du niveau de vide .................. 36
Réglage du temps de scellage ............. 37
FONCTIONS SUPPLÉMENTAIRES ...... 37
NETTOYAGE ET ENTRETIEN ............... 38
DÉPANNAGE ......................................... 39
Messages d'alerte ............................... 39
Protection de l'environnement............. 40
28
Page 29

français
Consignes de sécurité
Avant d'installer et d'utiliser cet appareil, lisez
soigneusement les instructions fournies. Le fabricant ne peut être
tenu pour responsable des dommages et blessures liés à une
mauvaise installation ou utilisation. Conservez toujours cette
notice avec votre appareil pour vous y référer ultérieurement.
Sécurité des enfants et des personnes vulnérables
Advertissement! Risque d'asphyxie, de blessure ou d'invalidité
permanente.
Cet appareil peut être utilisé par des enfants de plus de 8
ans, ainsi que des personnes dont les capacités physiques,
sensorielles et mentales sont réduites ou dont les
connaissances et l'expérience sont insuffisantes, à condition
d'être surveillés par une personne responsable de leur
sécurité.
Ne laissez pas les enfants jouer avec l'appareil.
Ne laissez pas les emballages à la portée des enfants.
Les enfants ne doivent pas nettoyer ni entreprendre une
opération de maintenance sur l'appareil sans surveillance.
Sécurité générale
Cet appareil est destiné à un usage domestique, et n'est pas
adapté aux hôtels, magasins, bureaux ou autres
environnements similaires.
L'intérieur de l'appareil devient chaud lorsqu'il est en
fonctionnement. Ne touchez pas les éléments chauffants se
trouvant dans l'appareil
Le tiroir peut supporter un poids maximum de 25 kg. Prenez
garde de ne pas le surcharger, cela endommagerait les rails
télescopiques.
29
Page 30

Instructions de sécurité
Installation
AVERTISSEMENT! L'installation doit
uniquement être effectuée par un
personnel qualifié.
Enlevez le matériel d'emballage.
Il est interdit d'installer ou d'utiliser
l'appareil lorsqu'il est endommagé.
Veuillez respecter les instructions
fournies avec l'appareil.
Lorsque vous déplacez l'appareil, faites
attention et portez systématiquement les
gants de sécurité.
Il est interdit de placer l'appareil à
l'envers ou de l'incliner ! Cela pourrait
faire couler l'huile de la pompe et
endommager l'appareil.
Veuillez respecter la distance minimale
avec les autres appareils.
Assurez-vous que l'appareil est installé et
sécurisé sur une structure fixe.
Les bords de l'appareil doivent être
adjacents à d'autres équipements ou
dispositifs de même hauteur.
Branchement électrique
AVERTISSEMENT! Risque d'incendie et
d'électrocution.
Tous les branchements électriques
doivent être effectués par un électricien
qualifié.
L'appareil doit être mis à la terre.
Assurez-vous que toutes les données
électriques figurant sur la plaque de
données du modèle sont conformes au
système. Dans le cas contraire, veuillez
contacter un électricien.
Il faut toujours utiliser une fiche de
contact de sûreté correctement installée.
N'utilisez pas d'adaptateurs multi prises
ou des rallonges.
30
Assurez-vous de ne pas endommager la
prise secteur et le câble d'alimentation.
Contactez le service d'assistance ou un
électricien pour remplacer toute fiche
secteur endommagée.
Les matériels de protection contre
l'électrocution doivent être bien vissés
afin qu'ils ne puissent pas être enlevés
sans outils.
Branchez la fiche secteur à la fiche
d'alimentation uniquement au terme de
l'installation. Assurez-vous que la fiche
secteur est facilement accessible après
l'installation.
Ne branchez pas la fiche secteur si la
fiche d'alimentation est desserrée.
Ne tirez pas le câble d'alimentation lors
du débranchement de l'appareil. Tirez
uniquement la fiche secteur.
Utilisez uniquement les matériels
d'isolation appropriés : disjoncteurs,
fusibles (les fusibles à vis doivent être
retirés du porte-fusible), courant de
défaut à la terre et relais.
Le système électrique doit être équipé
d'un dispositif de débranchement avec
une séparation de contact sur tous les
pôles assurant une coupure complète
dans la catégorie de surtension III.
Utilisation
AVERTISSEMENT! Risque de blessures,
de brûlures, d'électrocution et
d'explosion.
Cet appareil est destiné à un usage
domestique.
Ne modifiez pas les spécifications de cet
appareil.
Ne laissez pas l'appareil sans
surveillance pendant le fonctionnement.
Veuillez éteindre l'appareil après
l'utilisation.
Page 31

français
N'utilisez pas l'appareil avec les mains
mouillées ou lorsqu'il se trouve en
contact avec de l'eau.
N'exercez pas de pression sur le tiroir.
N'utilisez pas l'appareil comme surface
de travail ou de support.
Éloignez l'appareil des étincelles ou des
flammes nues à l'ouverture du tiroir.
Évitez de placer ou de garder des
liquides, matériaux ou objets
inflammables sur l'appareil, à l'intérieur
ou à proximité du dispositif.
AVERTISSEMENT! Vous pourrez
endommager l'appareil !
Soyez prudent lorsque vous enlevez ou
insérez les accessoires.
Ne touchez pas la barre de soudure
immédiatement après le scellement.Vous
pourrez être brûlés par la chaleur
résiduelle
En cas de coupure de courant pendant
un cycle de travail avec couvercle fermé,
évitez de forcer l'ouverture du couvercle
avec un outil, attendez que le courant
soit rétabli.
Ne posez aucun objet lourd sur le
couvercle!
Évitez la chute de tout objet sur le
couvercle! Cela pourrait compromettre
l'intégrité de l'appareil et causer des
rayures ou dommages.
N'emballez pas l'appareil si le couvercle
présente des fissures ou s'il est cassé.
Contactez le service d'assistance
technique pour effectuer le
remplacement.
Nettoyage et entretien
AVERTISSEMENT! Il y a un risque de
blessure, d'incendie ou de dommage.
Avant d'effectuer toute opération
d'entretien, il est conseillé d'éteindre
l'appareil et de le débrancher.
Vérifiez que l'appareil est froid.
Nettoyez l'appareil sur une base régulière
pour empêcher l'usure de sa surface.
Nettoyez l'appareil à l'aide d'un chiffon
doux et humide. Utilisez uniquement des
détergents neutres. N'utilisez pas de
produits abrasifs, de détergents à base
d'alcool, d'éponges abrasives, de
solvants ou d'objets métalliques.
Respectez les instructions de sécurité
mentionnées sur l'emballage lorsque
vous utilisez des vaporisateurs.
Mise au rebut
AVERTISSEMENT! Risque de blessure
et d'électrocution.
Débranchez la fiche de la source
d'alimentation.
Enlevez le câble d'alimentation et
mettez-le au rebut.
31
Page 32

COMPOSANTS PRINCIPAUX
1. Barre de soudure
5. Réservoir
2. Tableau de commande
6. Couvercle
3. Panneau avant
7. Plaques haute densité
4. Buse d'aspiration/ Raccord pour
aspirateur externe
8. Raccord de vide externe
Avec ces sachets, les aliments
peuvent être stockés et cuits à une
température comprise entre 0°C et
120°C*. Une fois ouverts, ils
peuvent être utilisés dans un four à
micro-ondes *à 120° C. Nous vous
recommandons de les utiliser au
maximum pendant 30 minutes).
32
Page 33

français
1. Bouton ON/OFF (marche/arrêt)
6. Bouton «Augmentation»
2. Bouton Start/ Stop
7. Fonction sous vide symbole
3. Bouton de sélection
8. Fonction de scellement symbole
4. Bouton «Réduction»
9. Fonction de retour d'air symbole
5.Display
Tableau de commandes
AVANT LA PREMIÈRE UTILISATION
Nettoyez le tiroir avant d'utiliser la machine
pour la première foi:
Enlevez toutes les pièces de l'appareil.
Nettoyez l'appareil avant la première
utilisation.
UTILISATION
La machine est destinée à la préparation de
nourriture dans un environnement
domestique.
plupart des produits alimentaires, y compris
les légumes, les fruits, le poisson, les
produits laitiers, la viande, le salami, les
produits de boulangerie, les produits de
cuisson, les produits secs, etc.
Ouvrez le tiroir sous vide.
Allumez la machine en maintenant le
bouton enfoncé.
Lorsque les 3 symboles , et
Ouvrez le couvercle.
IInsérez le produit dans le sachet.
Pour les produits de plus petite taille,
comme moyen de calage, le produit
facilite le positionnement du sachet
rapport à la barre de scellage.
Placez le sachet à
et sur la barre de scellage de manière
aussi équilibrée que possible, en
provoquer un mauvais scellage. Les
cm plus
relevées que la barre de scellage.
Fermez délicatement le couvercle et
appuyez sur le bouton pour lancer le
33
Page 34

À la fin du cycle, ouvrez le couvercle et
retirez le sachet.
Éteignez la machine en maintenant le
bouton enfoncé.
STANDARD
2. Phase de scellage pendant laquelle le
sachet est scellé.
Lors de cette phase, le symbole est
allumé.
3 phases:
1.
contenu dans le réservoir et dans le
sachet est extrait.
Lors de cette phase, le symbole est
allumé.
SÉLECTION DU PROGRAMME
Pour sélectionner un programme, appuyez
sur les boutons et .
PROGRAMME STANDARD
Ce programme vous permet de régler le
niveau de vide et le temps de scellage en
procédant de la manière suivante:
1. Appuyez sur le bouton .
2. Le symbole clignote. Cela signifie
que vous pouvez modifier le niveau de
vide.
3. Appuyez sur les touches et pour
régler le niveau de vide (voir chapitre
« Réglage du niveau de vide »).
3.
Lors de cette phase, le symbole est
allumé.
4. Appuyez à nouveau sur le bouton pour
confirmer la sélection.
5. Le symbole clignote.
Cela signifie que le temps de scellage
peut être modifié.
6. Appuyez sur les boutons et pour
régler le temps de scellage (voir chapitre
« Réglage du temps de scellage »).
7. Appuyez à nouveau sur le bouton pour
confirmer la sélection.
8. Le symbole
9. Vous pouvez à présent lancer le cycle
.
PROGRAMME SPÉCIAL DE
«MATURATION»
Ce programme vous permet de régler le
niveau de vide, le temps de scellage et le
nombre de répétitions des cycles de vide en
procédant de la manière suivante:
34
Page 35

français
1. Réglez le niveau de vide conformément
au programme standard
2. Réglez le temps de scellage
conformément au programme standard
3. A ce stade, appuyez de nouveau sur le
bouton pour confirmer la sélection, le
symbole
4.
3. A ce stade, appuyez de nouveau sur le
bouton pour confirmer la sélection, le
symbole
4.
cycle de marinage (5 minutes). En
appuyant sur les boutons et vous
pouvez modifier la durée de 1 à
15 minutes.
5. Appuyez sur le bouton pour confirmer
la sélection.
6. Vous pouvez à présent commencer le
cycle de marinage en appuyant sur le
bouton .
Remarque: nous vous recommandons
appuyant sur les boutons et vous
pouvez modifier le nombre de répétitions
de 2 à 15.
5. Appuyez sur le bouton pour confirmer
la sélection.
6. Vous pouvez à présent commencer le
cycle de maturation en appuyant sur le
bouton .
PROGRAMME SPÉCIAL DE
« MARINAGE »
Ce programme vous permet de régler le
niveau de vide, le temps de scellage et la
de la manière suivante:
1. Réglez le niveau de vide conformément
au programme standard
2. Réglez le temps de scellage
conformément au programme standard
leur intensité.
PROGRAMME SPÉCIAL DE « LIQUIDES »
Ce programme vous permet de régler le
niveau de vide, le temps de scellage et le
procédant de la manière suivante:
1. Réglez le niveau de vide conformément
au programme standard
2. Réglez le temps de scellage
conformément au programme standard
3. A ce stade, appuyez de nouveau sur le
bouton pour confirmer la sélection, le
symbole
4.
sur les boutons et vous pouvez
modifier la valeur de 1 à 5. Modifiez cette
valeur en fonction de la température du
produit à emballer dans le sachet. La
35
Page 36

valeur réglée détermine le niveau de
Sensibilité de
Température de
1
~ 40÷45°C
2
~ 45÷55°C
3
~ 55÷70°C
4
~ 70÷80°C
5
~ 80÷85°C
Affichage
Niveau de vide
Aliment
Scellage
uniquement
(environ 40 %)
Emballez et divisez les aliments très sensibles à la
pression en portions.
PS : scellage uniquement, sans emballage sous vide,
mais avec un minimum de vide dans le sachet)
Minimum
(environ 70 %)
Emballez et divisez les aliments délicats en portions
(par ex. la laitue, la tomate,...).
Moyen
(environ 93%)
Emballez et divisez les aliments délicats en portions
(par ex. les légumes cuits, les fruits, la viande tendre,
les pâtes,...) ainsi que les aliments liquides (par ex. la
soupe, la crème, les sauces,...)
Cuisinez des aliments délicats emballés sous vide (p.
ex. le poisson)
Laissez mariner dans le sachet
Maximum
(environ 100%)
- Emballez et divisez les aliments solides en portions
(p. ex. les légumes crus, le fromage à pâte dure, la
charcuterie)
Faites cuire des aliments solides emballés sous vide
(par ex. la viande, les pommes de terre, les carottes,...)
scellage.
5. Appuyez ensuite sur le bouton pour
confirmer la sélection.
6. Vous pouvez à présent lancer le cycle
.
Remarque : nous vous recommandons
liquide.
RÉGLAGE DU NIVEAU DE VIDE
Il existe 4 niveaux de vide réglables
Plus le niveau de vide sélectionné est élevé, plus le vide dans le sachet sera important.
36
Page 37

français
Affichage
Niveau de scellage
Temps de scellage
Désactivé
-
Minimum
1,5 secondes
Moyen
(suggéré si vous utilisez les sachets
fournis avec la machine)
2,5 secondes
Maximum
(à sélectionner pour des sachets
ayant une plus grande épaisseur, par
exemple 150-200 my)
4 secondes
RÉGLAGE DU TEMPS DE SCELLAGE
Il existe 4 niveaux de scellage des sachets.
Plus le sachet est épais, plus le temps de scellage est long.
«VIDE EXTÉRIEUR»
Ce programme doit être utilisé pour évacuer
hermétiques spéciaux (non fournis avec ce
produit).
Vissez le raccord fourni (8) dans la buse
37
Page 38

Connectez le tuyau du récipient au
raccord (8).
Réglez le niveau de vide maximal dans le
« Programme standard » du panneau de
commande et désactivez le scellage.
Lorsque le couvercle est ouvert, appuyez
sur le bouton pour lancer le cycle
«PROGRAMME DE CONDITIONNEMENT»
Ce programme doit être utilisé dans les
situations suivantes:
Avant la première utilisation de la
machine.
Après une longue période d'arrêt.
Après avoir scellé des produits ayant une
teneur en humidité élevée (soupes).
Lorsque vous remarquez une diminution
des performances de la machine (par
exemple: augmentation de la durée
d'atteinte du vide, ou lorsque le vide
n'est pas atteint).
Ce programme dure environ 15 minutes et
assure un nettoyage complet de la pompe,
en supprimant toute émulsion liquide qui
pourrait se trouver dans l'huile. Ne sceller
aucun produit pendant l'exécution de ce
programme.
Ce programme n'a aucunes variables
établies.
Suivez les indications ci-dessous pour
démarrer le programme:
Maintenez le bouton enfonc
ce que tous les boutons clignotent.
Fermez délicatement le couvercle.
Appuyez sur le bouton pour lancer le
cycle de conditionnement.
À la fin de ce cycle (qui dure 15 minutes),
Remarque: Le programme de
conditionnement doit être utilisé au moins
une fois par mois.
Nettoyez l'appareil après utilisation.
Nettoyez l'intérieur et l'extérieur du
couvercle en plexiglas (6) en utilisant
uniquement des détergents neutres (eau
et savon).
N'utilisez pas les produits abrasifs, les
détergents à base d'alcool, les éponges
abrasives, les solvants ou les objets
métalliques. Respectez les instructions
38
de sécurité mentionnées sur l'emballage
lorsque vous utilisez les pulvérisateurs.
Nettoyez la barre de soudure (1) à l'aide
d'un chiffon sec. Enlevez tout résidu de
film déposé sur la barre.
Il est recommandé d'enlever la barre de
soudure (5) avant de nettoyer le reservoir
(1), notamment lorsqu'il contient des
liquides.
Page 39

français
Problème
Cause
Solution
Le sachet n'est pas
correctement scellé
correct.
Changez le temps de soudure.
Le joint du couvercle est sale ou
usé.
Nettoyez ou remplacez le joint du couvercle
(contactez le service après-vente pour un
remplacement).
placé sur la barre de soudure.
Placez le sachet correctement.
La barre de soudure est usée (le
revêtement Teflon est brûlé).
Remplacez la barre de soudure (contactez le
service après-vente pour un remplacement).
La lame placée sous le Teflon de la
barre de soudure est cassée.
Remplacez la barre (contactez le service
après-vente pour un remplacement).
L'emballage sous
vide final est
mauvais
Le réglage du pourcentage sous
vide est incorrect.
Changez le pourcentage de sous vide.
Le joint de couvercle est sale ou
usé.
Nettoyez ou remplacez le joint de couvercle
(contactez le service après-vente pour un
remplacement).
correctement fermé.
Fermez correctement le couvercle.
Assurez-
trouve entre le couvercle et la cuve.
Le couvercle ne
y a pas de courant.
Attendez que le courant revienne.
Erreur
Solution
E0
Eprom Error.
Le tableau principal est défectueux.
Contactez le service après-vente.
ER1
Erreur de configuration de données.
Contactez le service après-vente.
ER2
Erreur d'étalonnage.
Réajuster le tableau de commande à l'aide d'une jauge à vide appropriée.
Contactez le service après-vente.
Nettoyez les surfaces métalliques à l'aide
de détergents normaux adaptés à l'acier
inoxydable.
Si la machine ne fonctionne pas
correctement après les vérifications
mentionnées ci-dessus, contactez le service
après-vente en décrivant le défaut détecté:
MESSAGES D'ALERTE
L'appareil détecte certaines alertes qui sont
affichées avec les messages suivants:
39
Page 40

Erreur
Solution
ER3
Erreur de compteur de cycle.
Contactez le service après-vente.
ER4
Relais de scellage défectueux.
Contactez le service après-vente.
ER5
Délai d'expiration du vide: heures supplémentaires.
Assurez-vous que le pourcentage de vide défini est correct.
Assurez-vous que le joint du couvercle n'est pas sale ou usé.
Assurez-vous que le couvercle se ferme correctement.
ER7
Entretien du huile.
La machine a dépassé le nombre de cycles au-delà duquel le remplacement de l'huile
est requis.
Contactez le service après-vente.
Élimination de l'emballage
L'emballage est signalé par Point vert.
Veuillez utiliser les conteneurs adéquats
pour vous débarrasser de tous les matériaux
de l'emballage comme carton, polystyrène
expansé et film plastique. Ils seront réutilisés
pour d'autres emballages.
Élimination des appareils hors d'usage
La directive européenne 2012/19/UE,
concernant la gestion des Résidus
d'équipements électriques et électroniques
(REEE), prévoit que les appareils
électroménagers ne doivent pas être
éliminés de la même façon que les résidus
urbains solides.
Les appareils usés d oivent être recueillis
séparément afin d'optimiser le recyclage des
matériaux qui les composent et pour
prévenir d'éventuelles atteintes à la santé
publique et à l'environnement. Le symbole
représentant une grande poubelle barrée
d'une croix doit être apposé sur tous les
produits de façon à rappeler l'obligation
d'une collecte à part.
Les consommateurs doivent entrer en
contact avec les autorités locales ou les
points de vente pour se renseigner sur le
local approprié où ils peuvent jeter les
appareils hors d'usage.
Avant de vous défaire de votre appareil, tirez
le câble d'alimentation, coupez-le et
éliminez-le.
40
Page 41

nederlands
Inhoud
Veiligheidsinformatie ............................ 42
Veiligheid van kinderen en kwetsbare
mensen ................................................ 42
Algemene veiligheid ............................ 42
Veiligheidsvoorschriften ....................... 43
Installatie ............................................. 43
Elektriciteitsaansluiting ........................ 43
Gebruik ................................................ 43
Reiniging en onderhoud ...................... 44
Verwijdering ......................................... 44
PRODUCTBESCHRIJVING ................... 45
Hoofdonderdelen ................................ 45
CONTROLEPANEEL ........................... 46
GEBRUIK VAN DE VACUÜMLADE ....... 46
Voorafgaand aan eerste gebruik ......... 46
Gebruik ................................................ 46
Fasen van de standaard
verpakkingscyclus ............................... 47
PROGRAMMA'S .................................... 47
Programmaselectie .............................. 47
STANDAARDPROGRAMMA ................ 47
Speciaal ............................................... 47
Speciaal ............................................... 48
Speciaal ............................................... 48
AANPASSING OPTIES .......................... 49
Vacuümniveau aanpassen ................... 49
Afdichtinsduur aanpassen.................... 50
AANVULLENDE FUNCTIONALITEITEN 50
REINIGING EN ONDERHOUD .............. 51
PROBLEMEN OPLOSSEN .................... 52
Alarmboodschappen ........................... 52
Milieubescherming................................ 53
41
Page 42

Veiligheidsinformatie
Lees zorgvuldig de meegeleverde instructies voor installatie
en gebruik van het apparaat. De fabrikant is niet verantwoordelijk
voor letsel en schade veroorzaakt door een foutieve installatie.
Bewaar de instructies van het apparaat voor toekomstig gebruik.
Dit apparaat voldoet aan de van kracht zijnde veiligheidsnormen.
Onjuist gebruik kan de gebruiker in gevaar brengen.
Veiligheid van kinderen en kwetsbare mensen
Waarschuwing! Gevaar voor verstikking, letsel of
permanente invaliditeit.
Dit apparaat kan worden gebruikt door kinderen van 8 jaar en
ouder en door mensen met beperkte lichamelijke, zintuiglijke
of verstandelijke vermogens of een gebrek aan ervaring en
kennis, indien zij onder toezicht staan van een volwassene of
van iemand die verantwoordelijk is voor hun veiligheid.
Let op kinderen zodat zij niet met het apparaat spelen.
Houd alle verpakkingsmaterialen uit de buurt van kinderen.
Reiniging en onderhoud mag niet worden uitgevoerd door
kinderen zonder toezicht.
Algemene veiligheid
Dit apparaat is bedoeld voor huishoudelijke toepassingen en
niet voor hotels, winkels, kantoren en andere soortgelijke
omgevingen.
Van binnen wordt het apparaat heet als het in werking is.
Raak de verwarmingselementen in het apparaat niet aan.
Gebruik altijd ovenhandschoenen om accessoires of
kookgerei te plaatsen of verwijderen.
Leun of zit niet op de lade. Dit beschadigt de
telescoopgeleiders. De lade kan een maximaal gewicht van
25 kg dragen.
42
Page 43

nederlands
Veiligheidsvoorschriften
Installatie
WAARSCHUWING! Installatie mag enkel
uitgevoerd worden door gekwalificeerd
personeel.
Verwijder het verpakkingsmateriaal.
Installeer of gebruik het toestel niet
indien beschadigd.
Volg de instructies op die geleverd zijn bij
het toestel.
Wees altijd voorzichtig wanneer u het
toestel verplaatst en draag
veiligheidshandschoenen.
Houd het toestel niet ondersteboven of
kantel het niet! Dit kan een olielek vanuit
de pomp veroorzaken en het toestel
beschadigen.
Respecteer de minimumafstand ten
opzichte van andere toestellen.
Zorg ervoor dat het toestel geïnstalleerd
en bevestigd is op een vaste structuur.
De zijkanten van het toestel moeten
grenzen aan andere installaties of
apparaten met eenzelfde hoogte.
Elektriciteitsaansluiting
WAARSCHUWING! Gevaar voor brand
en elektrische shock.
Alle elektrische aansluitingen dienen te
gebeuren door een gekwalificeerde
elektricien.
Het toestel moet geaard zijn.
Zorg ervoor dat de elektrische gegevens
zoals vermeld op de gegevensplaat van
het model overeenkomen met deze van
het systeem. Indien niet, contacteer een
elektricien.
Gebruik altijd een correct geïnstalleerde
schokbestendige contactdoos.
Gebruik geen meervoudige contactdozen
of verlengkabels.
Zorg ervoor dat de stekker en de
elektriciteitskabel niet beschadigd
worden. Contacteer de Hulpdienst of een
elektricien om eventueel beschadigde
kabels te vervangen.
Beschermingsmiddelen tegen shock
moeten zodanig vastgemaakt worden dat
ze niet kunnen weggenomen worden
zonder gereedschap.
Steek de stekker in het stopcontact enkel
en alleen wanneer de installatie volledig
is. Zorg ervoor dat de stekker bereikbaar
is na installatie.
Steek de stekker niet in het stopcontact
als deze laatste los is.
Trek niet aan de elektriciteitskabel om
het toestel uit te schakelen. Trek enkel
aan de stekker.
Gebruik enkel geschikte isolatiemiddelen:
installatieautomaten, zekeringen
(zekeringen met schroefkop moeten uit
de zekeringenkast verwijderd worden),
aardsluiting stroomlosser en relais.
Het elektrische systeem moet voorzien
zijn van een isolatietoestel dat het
mogelijk maakt om het toestel van het
net los te koppelen aan elke pool. Het
isolatietoestel moet een contactopening
hebben met een breedte van minimum 3
mm.
Gebruik
WAARSCHUWING! Gevaar voor letsel,
brandwonden, elektrische shock of
ontploffing.
Gebruik dit toestel in een
huishoudomgeving.
Wijzig de specificaties van dit toestel
niet.
43
Page 44

Laat het toestel niet onbeheerd achter
wanneer in werking.
Schakel het toestel uit na gebruik.
Gebruik het toestel niet met natte handen
of wanneer het in contact zou kunnen
komen met water.
Oefen geen druk uit op de lade.
Gebruik het toestel niet als een werkblad
of als ondersteuning.
Vermijd de aanwezigheid van vonken of
open vlammen in de buurt van het toestel
als u de lade opent.
Plaats geen ontvlambare vloeistoffen,
materialen of objecten op, in of in de
buurt van het toestel.
WAARSCHUWING! U kunt het toestel
mogelijks beschadigen.
Let goed op wanneer u de accessoires
wegneemt of inzet.
Raak de afdichtstaaf niet onmiddellijk na
het afdichten aan.
U zou zich kunnen verbranden door
restwarmte.
In geval van stroomonderbreking tijdens
een werkcyclus met gesloten deksel,
forceer het deksel niet met een of ander
gereedschap om het te openen; wacht
totdat de stroom hersteld is.
Plaats geen enkel gewicht op het deksel!
Voorkom dat een object op het deksel
zou kunnen vallen!
Dit kan de integriteit compromitteren,
barsten of schade veroorzaken.
Ga niet verder met verpakken als het
deksel barsten vertoont of gebroken is.
Contacteer de Technische Hulpdienst om
het te vervangen.
Reiniging en onderhoud
WAARSCHUWING! Risico voor letsel,
brand of schade.
Vooraleer enig onderhoud uit te voeren,
schakel het toestel uit en haal de stekker
uit het stopcontact.
Controleer of het toestel koud is.
Maak het toestel regelmatig schoon om
slijtage van het oppervlaktemateriaal te
voorkomen.
Reinig het toestel met een vochtige,
zachte doek. Gebruik enkel neutrale
detergenten. Gebruik geen schurende
producten, detergenten met alcohol,
schuursponsen, solventen of metalen
voorwerpen.
Bij gebruik van spuitbussen, volg de
veiligheidsinstructies op de verpakking
op.
Verwijdering
WAARSCHUWING! Gevaar voor letsel
en verstikking.
Haal de stekker uit het stopcontact.
Verwijder de elektriciteitskabel en ruim
deze op.
44
Page 45

nederlands
1. Afdichtstaaf
5. Reservoir
2. Controlepaneel
6. Deksel
3. Frontpaneel
7. Hoge dichtheid platen
4. Zuigmond/ aansluiting voor extern
vacuüm
8.
Met deze zakken kan voedsel
bewaard en gekookt worden op
temperaturen van 0°C tot 120°C (op
120°C raden we aan ze maximum
30 minuten te gebruiken).
HOOFDONDERDELEN
45
Page 46

CONTROLEPANEEL
1. AAN/UIT knop
6.
2. Start/ Stop -knop
7. Vacuümfunctie symbool
3. Selectieknop
8. Afdichtfunctie symbool
4.
9. Luchtretour functie symbool
5. Display
VOORAFGAAND AAN EERSTE GEBRUIK
Voordat u de machine voor het eerst
gebruikt, reinigt u de lade:
Verwijder alle onderdelen van het toestel.
Reinig het toestel vooraleer u het voor de
eerste keer gebruikt.
GEBRUIK
De machine is bedoeld voor het bereiden
van voedsel in een huishoudelijke omgeving.
Deze machine biedt u de mogelijkheid de
meeste etenswaren te verpakken, inclusief:
groenten, fruit, visproducten,
zuivelproducten, vlees, salami, gebakken
producten, kook producten, droge
producten, etc.
Open de vauümlade.
Schakel de machine in terwijl u de knop
ingedrukt houdt.
46
Met de 3 symbolen , en
uitgeschakeld is de machine klaar voor
gebruik.
Open het deksel.
Voer het product in de buidel.
Voor kleinere producten raden we aan de
tafel te gebruiken aangezien het
shimmen van het product het
eenvoudiger maakt de buidel te
positioneren in verhouding met de
afdichtingsbalk.
Positioneer de buidel zo gelijkmatig
mogelijk in het reservoir en probeer
kreuken te vermijden die kunnen
resulteren in een slechte afdichting. De
buidels moeten ca. 2 cm voorbij de
afdichtingsbalk steken.
Sluit het deksel met een zekere druk en
druk op de knop om de
verpakkingscyclus te starten.
Page 47

nederlands
Aan het einde van de cyclus opent u het
deksel en verwijdert u de buidel.
Schakel de machine uit terwijl u de knop
ingedrukt houdt.
FASEN VAN DE STANDAARD
VERPAKKINGSCYCLUS
De standaard verpakkingscyclus is verdeeld
in 3 fasen:
1. Vacuümfase tijdens de welke alle lucht in
het reservoir en de buidel wordt
verwijderd.
Tijdens deze fase is het symbool
ingeschakeld.
2. Afdichtingsfase tijdens de welke de
buidel wordt afgedicht.
Tijdens deze fase is het symbool
ingeschakeld.
3. Fase tijdens dewelke lucht opnieuw in
het reservoir wordt gelaten.
Tijdens deze fase is het symbool
ingeschakeld.
PROGRAMMASELECTIE
Om een programma te selecteren, drukt u op
de knoppen en .
STANDAARDPROGRAMMA
Dit programma biedt de mogelijkheid het
vacuümniveau en de afdichtingsduur in te
stellen als volgt:
1. Druk op de knop .
2. Het symbool knippert. Dit betekent
dat u het vacuümniveau kunt wijzigen.
3. Druk op de knoppen en om het
vacuümniveau in te stellen (zie het
hoofdstuk "Vacuümniveau aanpassen").
4. Druk opnieuw op de knop om de
selectie te bevestigen.
5. Het symbool schakelt uit en het
symbool knippert. Dit betekent dat de
afdichtingsduur kan worden gewijzigd.
6. Druk op de knoppen en om de
afdichtingsduur in te stellen (zie het
hoofdstuk "Afdichtingsduur aanpassen").
7. Druk opnieuw op de knop om de
selectie te bevestigen.
8. Het symbool schakelt uit.
9. De verpakkingscyclus kan nu worden
gestart door te drukken op .
Dit programma biedt u de mogelijkheid het
vacuümniveau, de afdichtingsduur en het
aantal herhalingen van de vacuümcycli als
volgt in te stellen
47
Page 48

1. Stel het vacuümniveau in zoals het
Interventie
gevoeligheid
Voedseltemperatuur
1
~ 40÷45°C
2
~ 45÷55°C
3
~ 55÷70°C
4
~ 70÷80°C
5
~ 80÷85°C
standaardprogramma
2. Stel de afdichtingsduur in zoals het
standaardprogramma
3. Op dit punt drukt u opnieuw op de knop
om de selectie te bevestigen. Het
symbool schakelt uit.
4. Het scherm geeft het aantal herhalingen
van de standaard verpakkingscyclus (5)
in. Door te drukken op de knoppen en
kunt u het aantal herhalingen wijzigen
van 2 tot 15
5. Druk op de knop om de selectie te
bevestigen.
6. De maturatiecyclus kan nu worden
gestart door te drukken op .
te drukken op de knoppen en kunt
u de duur wijzigen van 1 tot 15
5. Druk op de knop om de selectie te
bevestigen.
6. De marinadecyclus kan nu worden
gestart door te drukken op .
Opmerking: we raden u aan een laag
percentage van smaken te gebruiken
aangezien de afwezigheid van lucht hun
intensiteit verhoogt.
PROGRAMMA
Dit programma biedt u de mogelijkheid het
vacuümniveau, de afdichtingsduur en de
gevoeligheid van de interventie als volgt in te
stellen:
Dit programma biedt u de mogelijkheid het
vacuümniveau, de afdichtingsduur en de
duur van de marinade/infusie als volgt in te
stellen:
1. Stel het vacuümniveau in zoals het
standaardprogramma
2. Stel de afdichtingsduur in zoals het
standaardprogramma
3. Op dit punt drukt u opnieuw op de knop
om de selectie te bevestigen. Het
Het scherm geeft de standaardduur weer
van de marinadecyclus (5 minuten). Door
48
1. Stel het vacuümniveau in zoals het
standaardprogramma
2. Stel de afdichtingsduur in zoals het
standaardprogramma
3. Op dit punt drukt u opnieuw op de knop
om de selectie te bevestigen. Het
symbool schakelt uit.
4. Het scherm geeft de standaard
interventie gevoeligheidsstatuswaarde
(5). Door te drukken op de knoppen
en kunt u de waarde wijzigen van 1 tot
5. Wijzig deze waarde volgens de
temperatuur van het product die u in de
buidel wilt verpakken. De instelwaarde
bepaalt de uitvoering van de afdichting.
Page 49

nederlands
Scherm
Vacuümniveau
Etenswaren
Enkel afdichten
(ca. 40%)
Verpak en verdeel etenswaren die gevoelig zijn aan
druk in porties.
PS: enkel afdichten, zonder vacuüm verpakking,
hoewel met een minimum aan etenswaren in de buidel)
Minimum
(ca. 70%)
Verpak en verdeel delicate etenswaren in porties (bijv.
salade, tomaten, ...).
Gemiddeld
(ca. 93%)
Verpak en verdeel delicate etenswaren in porties (bijv.
bereide groeten, fruit, zacht vlees, pasta, ...) en
vloeistoffen (bijv. soep, room, sauzen, ...)
Bereid vacuüm verpakte delicate etenswaren (bijv. vis)
Marineren in de buidel
Maximum
(ca. 100%)
- Verpak en verdeel vaste etenswaren in porties (bijv.
rauwe groenten, harde kaas, vleeswaren)
- Bereid vacuüm verpakte vaste etenswaren (bijv.
vlees, aardappelen, wortelen, ...)
5. Druk daarna op de knop om de
selectie te bevestigen.
6. De verpakkingscyclus kan nu worden
Opmerking: we raden u aan dit programma
te gebruiken in de aanwezigheid van een
vloeistof.
gestart door te drukken op .
VACUÜMNIVEAU AANPASSEN
Er kunnen 4 vacuümniveaus worden ingesteld
Hoe hoger het geselecteerde vacuümniveau, hoe groter het vacuüm in de buidel.
49
Page 50

AFDICHTINSDUUR AANPASSEN
Scherm
Afdichtingsniveau
Afdichtingsduur
Uitgeschakeld
-
Minimum
1,5 seconden
Gemiddeld
(aanbevolen als u de buidels gebruikt
die worden geleverd met de machine)
2,5 seconden
Maximum
(te selecteren voor dikkere buidels,
bijvoorbeeld 150-200my)
4 seconden
Er zijn 4 niveaus beschikbaar voor de afdichting van de buidels.
Hoe dikker de buidel, hoe langer de duur.
Dit programma moet worden gebruikt om de
lucht in speciale luchtdichte containers te
verwijderen (niet geleverd met dit product).
Schroef de geleverde fitting (8) in het
zuigmondstuk (4).
50
Verbind de container op de fitting (8).
Page 51

nederlands
Stel het maximum vacuümniveau in op
het "standaardprogramma" op het
bedieningspaneel en schakel de
afdichting uit.
Met het deksel open drukt u op de knop
om de verpakkingscyclus te starten.
De cyclus eindigt als het symbool
uitschakelt.
HET CONDITIONERING PROGRAMMA
Dit programma dient gebruikt te worden in
de volgende situaties:
Voorafgaand aan het eerste gebruik van
het toestel.
Na een lange periode van niet-gebruik.
Na het verzegelen van producten met
hoge vochtigheidsgraad (bv. soepen).
Wanneer u verminderde prestaties van
de machine vaststelt (bv.: er is meer tijd
nodig tot het vacuüm bereikt is of het
vacuüm wordt totaal niet bereikt).
Dit programma duurt ongeveer 3 minuten en
zorgt voor een volledige reiniging van de
pomp en verwijdert alle vloeistofemulsie die
in de olie kan zitten. Verzegel geen enkel
product terwijl dit programma loopt.
Dit programma heeft geen ingestelde
variabelen.
Volg de stappen hieronder om het
programma te starten:
Houd de knop ingedrukt tot alle
knoppen flikkeren.
Sluit het deksel met een hoge druk.
Druk op de knop om de
conditioneringscyclus te starten.
Aan het einde van de cyclus (15 minuten)
is de machine klaar voor gebruik.
Opmerking: Het Conditioneren programma
moet minimum 1 maal per maand worden
gebruikt.
Reinig het toestel na gebruik.
Reinig het Plexiglas deksel (6) van binnen
en van buiten met enkel neutrale
detergenten (water en zeep). Gebruik
geen schurende producten, detergenten
op basis van alcohol, schuursponsen,
solventen of metalen voorwerpen.
Bij gebruik van spuitbussen, volg de
veiligheidsinstructies op de verpakking
op.
Reinig de afdichtstaaf (1) met een droge
doek. Verwijder het residu van de staaf.
Voor reiniging van het reservoir (5), vooral
wanneer er vloeistofresten zijn, is het
aanbevolen om de afdichtstaaf te
verwijderen (1).
Reinig de metalen oppervlakte met
normale detergenten geschikt voor
roestvrij staal.
51
Page 52

Probleem
Oorzaak
Oplossing
De zak is niet
correct gedicht
De afdichttijd is niet juist.
Wijzig de afdichttijd.
De dekselpakking is vuil of
versleten.
Reinig of vervang de dekselpakking
(contacteer de Technische Hulpdienst voor
vervanging).
De zak is niet juist geplaatst t.o.v.
de afdichtstaaf.
Plaats de zak op de juiste manier.
De afdichtstaaf is versleten (de
Teflonlaag is verbrand).
Vervang de afdichtstaaf (contacteer de
Technische Hulpdienst voor vervanging).
Het blad onder het Teflon van de
afdichtstaaf is gebroken
Vervang het blad (contacteer de Technische
Hulpdienst voor vervanging).
Het
vacuümresultaat is
niet goed
De instelling van het
vacuümpercentage is niet juist.
Wijzig het vacuümpercentage.
De dekselpakking is vuil of
versleten.
Reinig of vervang de dekselpakking
(contacteer de Technische Hulpdienst voor
vervanging).
Het deksel is niet goed gesloten
Sluit het deksel op de juiste manier.
Zorg ervoor dat er geen objecten of vuil
tussen het deksel en het reservoir zijn.
Het deksel gaat niet
open
Geen stroomtoevoer.
Wacht totdat de stroomtoevoer hersteld is.
Fout
Oplossing
E0
Eprom Error.
Het moederbord is defect.
Contacteer de Technische Hulpdienst.
ER1
Gegevensconfiguratiefout.
Contacteer de Technische Hulpdienst.
ER2
Kalibratiefout.
Stel de besturingskaart opnieuw af via een geschikte vacuümmeter.
Contacteer de Technische Hulpdienst.
ER3
Cyclustelfout.
Contacteer de Technische Hulpdienst.
ER4
Defect lasrelais.
Contacteer de Technische Hulpdienst.
ER5
Vacuum Timeout: overuren.
Zorg ervoor dat het ingestelde vacuümpercentage correct is.
Zorg ervoor dat de dekselpakking niet vuil of versleten is.
Zorg dat de klep goed sluit.
ER7
Olie onderhoud.
De machine heeft het aantal cycli overschreden waarboven olie moet worden vervangen.
Contacteer de Technische Hulpdienst.
Indien de machine nog niet goed werkt na
de hierboven beschreven controles,
contacteer dan de hulpdienst en beschrijf
het defect.
52
ALARMBOODSCHAPPEN
Het toestel spoort enkele alarmen op die met
de volgende boodschappen op het scherm
getoond worden:
Page 53

nederlands
Verwijdering van de verpakking
De verpakking draagt het Groene Puntteken.
Om alle verpakkingsmaterialen te
verwijderen, zoals karton, piepschuim en
beschermfolie, gelieve de geschikte
containers te gebruiken. Zo wordt de
recyclage van de verpakkingsmaterialen
gegarandeerd. Houd alle verpakkingen
buiten bereik van kinderen. Zij kunnen
verstikkingsgevaar opleveren.
Verwijdering van afgedankte apparaten
De Europese richtlijn 2012/19/EU
betreffende afgedankte elektrische en
elektronische apparatuur (AEEA), voorziet
dat huishoudapparaten niet mogen worden
afgevoerd via het gewone circuit van het
vaste stedelijke afval.
Verouderde apparaten dienen afzonderlijk te
worden opgehaald om zo het terugwinningsen recyclagepercentage van het materiaal
waaruit ze zijn gemaakt, optimaal ten goede
te komen en mogelijke schade voor de
gezondheid en het milieu te voorkomen. Het
symbool van de container met een kruis
erover dient op elk product te worden
aangebracht om eraan te herinneren dat het
afzonderlijk moet worden opgehaald.
Voor informatie over de juiste plaats waar
men oude huishoudapparaten kan
deponeren, dient de consument contact op
te nemen met de plaatselijke autoriteiten of
de verkooppunten.
Maak uw apparaat onbruikbaar alvorens het
te verwijderen. Trek het snoer los, snijd het
door en verwijder het.
Maak uw apparaat onbruikbaar alvorens het
te verwijderen. Trek het snoer los, snijd het
door en verwijder het.
53
Page 54

Page 55

Page 56

www.kueppersbusch.de
K05-180187/01
Küppersbusch Hausgeräte GmbH
Postfach 10 01 32, D-45801 Gelsenkirchen,
Küppersbuschstraße 16, D-45883 Gelsenkirchen
Telefon: (0209) 401-0, Telefax: (0209) 401-303
www.kueppersbusch.de
Teka Austria GmbH
Eitnergasse 13, A-1230 Wien
Telefon: (01) 86680-15, Telefax: (01) 86680-50
www.kueppersbusch.at
943895
 Loading...