

Page 1

DF PROFI II CPCI
Installation Instructions
V1.7
27.02.2017
Project No.: 5302
Doc-ID.: DF PROFI II CPCI
KUNBUS
Page 2

h:\dokumente\project\5302_df_profi_ii\anwenderdoku\installation\cpci\kunbus\version_1.6\df profi ii
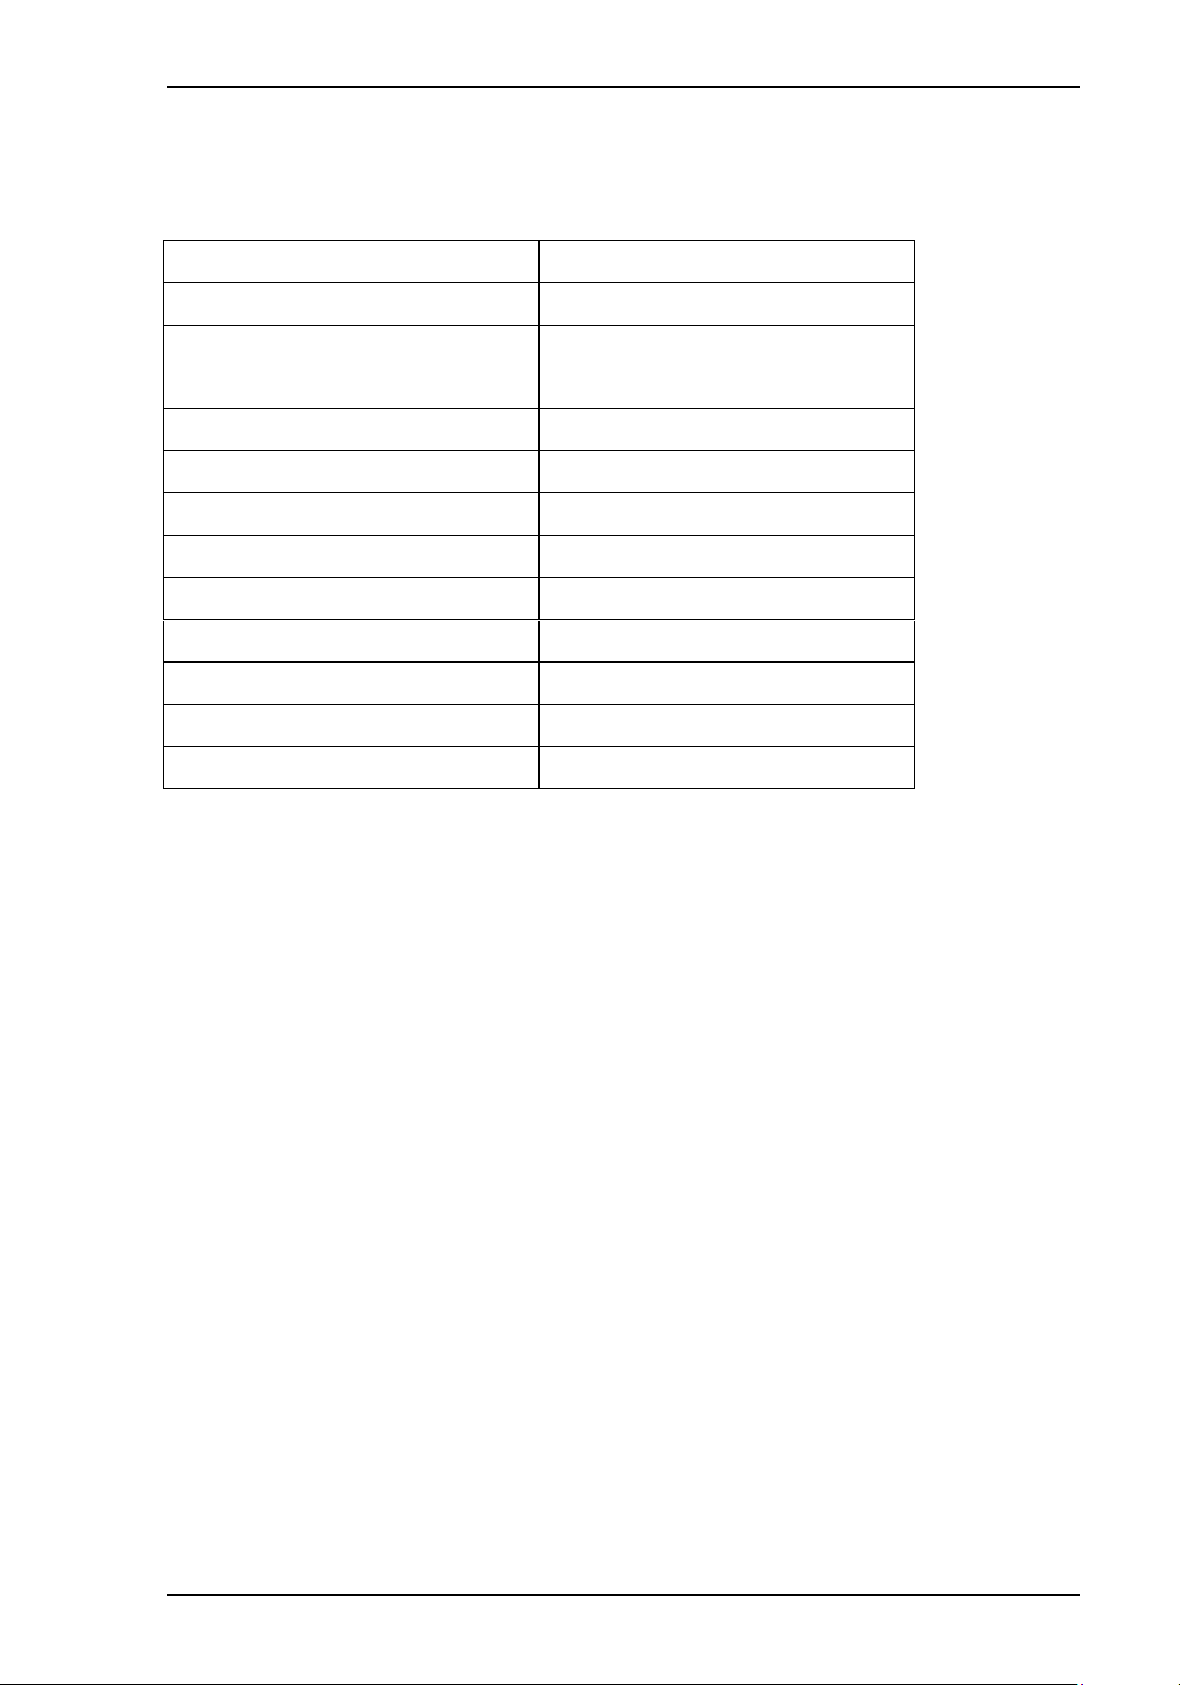
Version
Date
Description
V1.7
27.02.2017
KUNBUS Branding
V1.6
30.07.2013
New Declaration of Conformity added
V1.5
23.09.2009
Technical data table extended
V1.4
09.09.2009
Hot Plugging Note added
V1.3
04.08.2009
Document-Adjustment
V1.2
08.01.2008
Technical data table extended
V1.1
14.11.2006
Extension for using DF Profi II as Slave
V1.0
13.08.2002
Initial Version
KUNBUS GmbH
Heerweg 15c
D-73770 Denkendorf
Phone +49 711 300 20 678
Fax +49 711 300 20 677
Copyright 2017 by KUNBUS GmbH
This document is protected by copyright. Reproduction, duplication, publishing, transfer or
disclosure of the contents of this document are only permitted after prior written agreement
has been obtained from KUNBUS GmbH.
cpci_e.doc
Revision History
Page 3

DF PROFI II CPCI - Installation Instructions Contents
Contents
1 Installation of the Board ................................................................................................ 1
2 Safety Instructions ........................................................................................................ 2
3 Pin Assignment ............................................................................................................. 3
4 Description of the LEDs ................................................................................................ 4
5 Technical Data .............................................................................................................. 5
6 Declaration of Conformity ............................................................................................. 6
KUNBUS V1.7 / 27.02.2017 i
Page 4

Contents DF PROFI II CPCI - Installation Instructions
List of Figures
Figure 1: DF PROFI II CPCI Board ........................................................................................ 1
Figure 2: PROFIBUS Terminator ........................................................................................... 3
Figure 3: Declaration of Conformity, page 1 ........................................................................... 6
Figure 4: Declaration of Conformity, page 2 ........................................................................... 7
Figure 5: Declaration of Conformity, page 3 ........................................................................... 8
List of Tables
Table 1: Pin Assignment ........................................................................................................ 3
Table 2: Technical Data ......................................................................................................... 5
ii V1.7 / 27.02.2017
KUNBUS
Page 5

DF PROFI II CPCI - Installation Instructions Installation of the Board
1 Installation of the Board
The DF PROFI II CPCI is a plug & play compatible board. The configuration entirely takes
place by means of the delivered software or the BIOS of your PC respectively. Thus, no
jumpers or DIP-switch adjustments are necessary.
To mount the board, please proceed as follows:
Please see also the operating instructions of your PC.
Switch off the Compact PCI System and interrupt the power supply
Select a free CPCI slot.
Plug the DF board into the determined slot. Pay attention
to a proper adjustment of the board in the guidance (avoid canting!).
Screw down the board.
Note: When mounting, please follow the safety instructions for
electronic modules against electrostatic charge.
The DF PROFI II CPCI does not support Hot Plugging. If installing/
uninstalling the board the Compact PCI system must be switched off and
the power supply must be interrupted.
Figure 1: DF PROFI II CPCI Board
KUNBUS V1.7 / 27.02.2017 1
Page 6
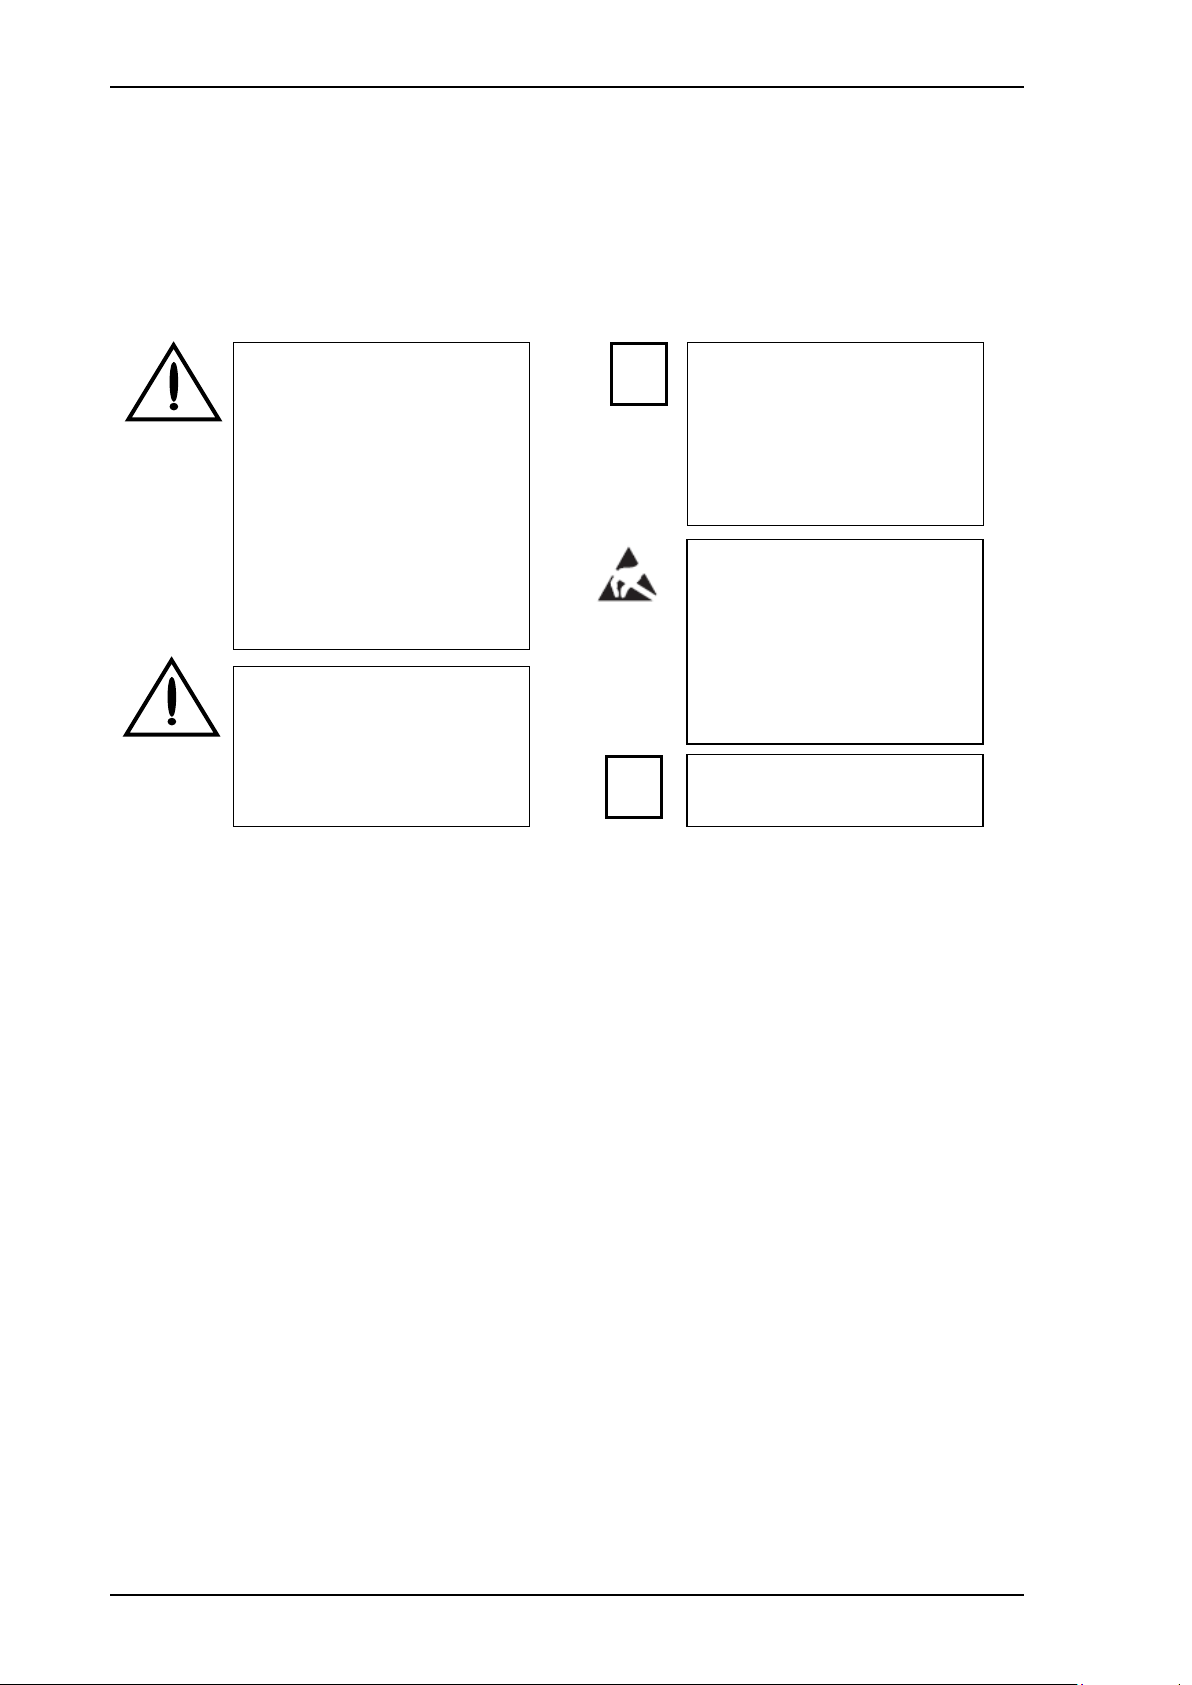
Safety Instructions DF PROFI II CPCI - Installation Instructions
WARNING: Disregarding this
warning may result in damage to
equipment and/or serious personal
injury. Only qualified personnel may
start up and operate this device.
According to the safety instructions in
this text, qualified personnel are
persons who are authorized to start
up, to ground, and to mark devices,
systems, and equipment according to
the standards of safety technology.
In addition, these persons must be
familiar with all warning instructions
and maintenance measures in this
text.
WARNING: FNL is designed
exclusively for PELV operation
according to EN 60950 / EN 60204 /
VDE 0805-1. Only protective extralow voltages according to the defined
standards may be used to supply
and connect the alarm contact.
Shielding
The shielding ground of the
connected twisted pair cables is
electrically connected to the female
connector. When connecting network
segments, avoid ground loops,
potential transfers, and voltage
equalization currents via the braided
shield.
i
NOTE: Electrostatic discharge!
The device contains components that
can be damaged or destroyed by
electrostatic discharge. When
handling the device, observe the
necessary safety precautions against
electrostatic discharge (ESD), in
accordance with EN 61340-5-1 and
EN 61340-5-2, as well as
IEC 61340-5-1 and IEC 61340-5-2.
i
Housing
Only staff authorized by KUNBUS is
permitted to open the housing.
2 Safety Instructions
2 V1.7 / 27.02.2017
KUNBUS
Page 7

DF PROFI II CPCI - Installation Instructions Pin Assignment
Pin Number
Signal
Function
Direction
1 - shielding
3
RxD/TxD-P
Data+
Input/Output
5
0V (potential free 80 mA)
Feeding of bus terminator
Input
6
5V (potential free 80 mA)
Feeding of bus terminator
Output
8
RxD/TxD-N
Data-
Input/Output
220
390
390
0V
Data-
Data
+5V
150
390
390
Cable type A
Cable type B
3 Pin Assignment
Table 1: Pin Assignment
Remark: To assure correct operation of the PROFIBUS, a terminating resistor must be
mounted at each bus end (Purchase No.: 4000-7-002-H).
Figure 2: PROFIBUS Terminator
KUNBUS V1.7 / 27.02.2017 3
Page 8

Description of the LEDs DF PROFI II CPCI - Installation Instructions
4 Description of the LEDs
Green LED:
On: Firmware loaded and started
Off: Firmware not loaded
Yellow LED:
On: PROFIBUS started
Off: PROFIBUS stopped
Red LED:
On: PROFIBUS failure (min. one slave not connected to the bus or with external
diagnosis)
Off: No PROFIBUS failure
4 V1.7 / 27.02.2017
KUNBUS
Page 9
DF PROFI II CPCI - Installation Instructions Technical Data
Processor
Net+Arm 40, 33 MHz
PROFIBUS Controller
ASPC2, 48 MHz
Memory
1 Mbyte SRAM
2 Mbyte Flash Type Memory
PCI Interfaces
32 Bit (supports both 5 V and 3.3 V)
PROFIBUS Interfaces
1 * Sub-D 9 pins
Interface Physics
RS485 (isolated)
PROFIBUS Data Rates
9600 Bit/s - 12000 KBit/s
Data Size of Process Image
max. 8 KByte
PROFIBUS Isolation Voltage
500 VDC
Power Consumption
+5 V / 1100 mA
Ambient Temperature Range
0 - 55 °C
Dimensions
160 mm * 100 mm
5 Technical Data
Table 2: Technical Data
KUNBUS V1.7 / 27.02.2017 5
Page 10

Declaration of Conformity DF PROFI II CPCI - Installation Instructions
6 Declaration of Conformity
Figure 3: Declaration of Conformity, page 1
6 V1.7 / 27.02.2017
KUNBUS
Page 11

DF PROFI II CPCI - Installation Instructions Declaration of Conformity
Figure 4: Declaration of Conformity, page 2
KUNBUS V1.7 / 27.02.2017 7
Page 12

Declaration of Conformity DF PROFI II CPCI - Installation Instructions
Figure 5: Declaration of Conformity, page 3
8 V1.7 / 27.02.2017
KUNBUS
Page 13

DF PROFI II CPCI - Installation Instructions Declaration of Conformity
Final Page!
KUNBUS V1.7 / 27.02.2017 9
 Loading...