

Kuma Stoves M 430, Madera M 430 Assembly And Operating Instructions Manual
Premium Pellet
Grill - Smoker - Barbecue
Assembly and Operating Instructions
Manufactured by Kuma Stoves Inc.
Visit www.maderagrills.com for recipes, videos and other helpful information.
Model: M 430
Rathdrum Idaho, USA

Thank you for selecting a Madera Premium Pellet Grill. We’d like to take this opportunity to share
with you a bit about ourselves. Madera Grills are manufactured by Kuma Stove and Iron Works. We
have been making high quality, heavy construction wood stoves for over 30 years. “Quality and per-
formance welded together” has been our motto. Over the years we’ve maintained the mind set that
when someone buys one of our products they’re making a signicant investment in their home. We
appreciate our customers and know that there is plenty of other worthy competition on the market so
we build our products right and built them to last. We have now brought that approach and experi-
ence to the Madera pellet grill.
We are a family owned and operated business that still desires to maintain a good relationship with
each and every one of our customers. Our mission is to provide you with a quality product that will
last. If you should have a problem with your grill we will do what is needed to get it resolved and keep
you cooking.
You may have noticed a portion of the Bible included with your owner’s packet. It is a gift from us to
you. Our faith in Jesus is very important to us and we want to share it with you because of the hope
we have in Him. That hope comes from the message of truth that is found in the enclosed Gospel of
John.
We’re honored to be a part of your family tradition of great outdoor cooking. We anticipate that you
will enjoy the use of your new Madera Premium Pellet Grill. From our family to yours –Happy Cook-
ing!
Table of contents
Section 1- Unpacking, Contents List and Grill Assembly
Section 2- Important Safety Information
Section 3- Initial Priming and Seasoning the Grill
Section 4- Cooking With the Madera
Section 5- Care and Maintenance
Section 6- Troubleshooting Guide
Section 7- Basic Service, Replacement Parts and Accessories
Section 8- Warranty Information
2
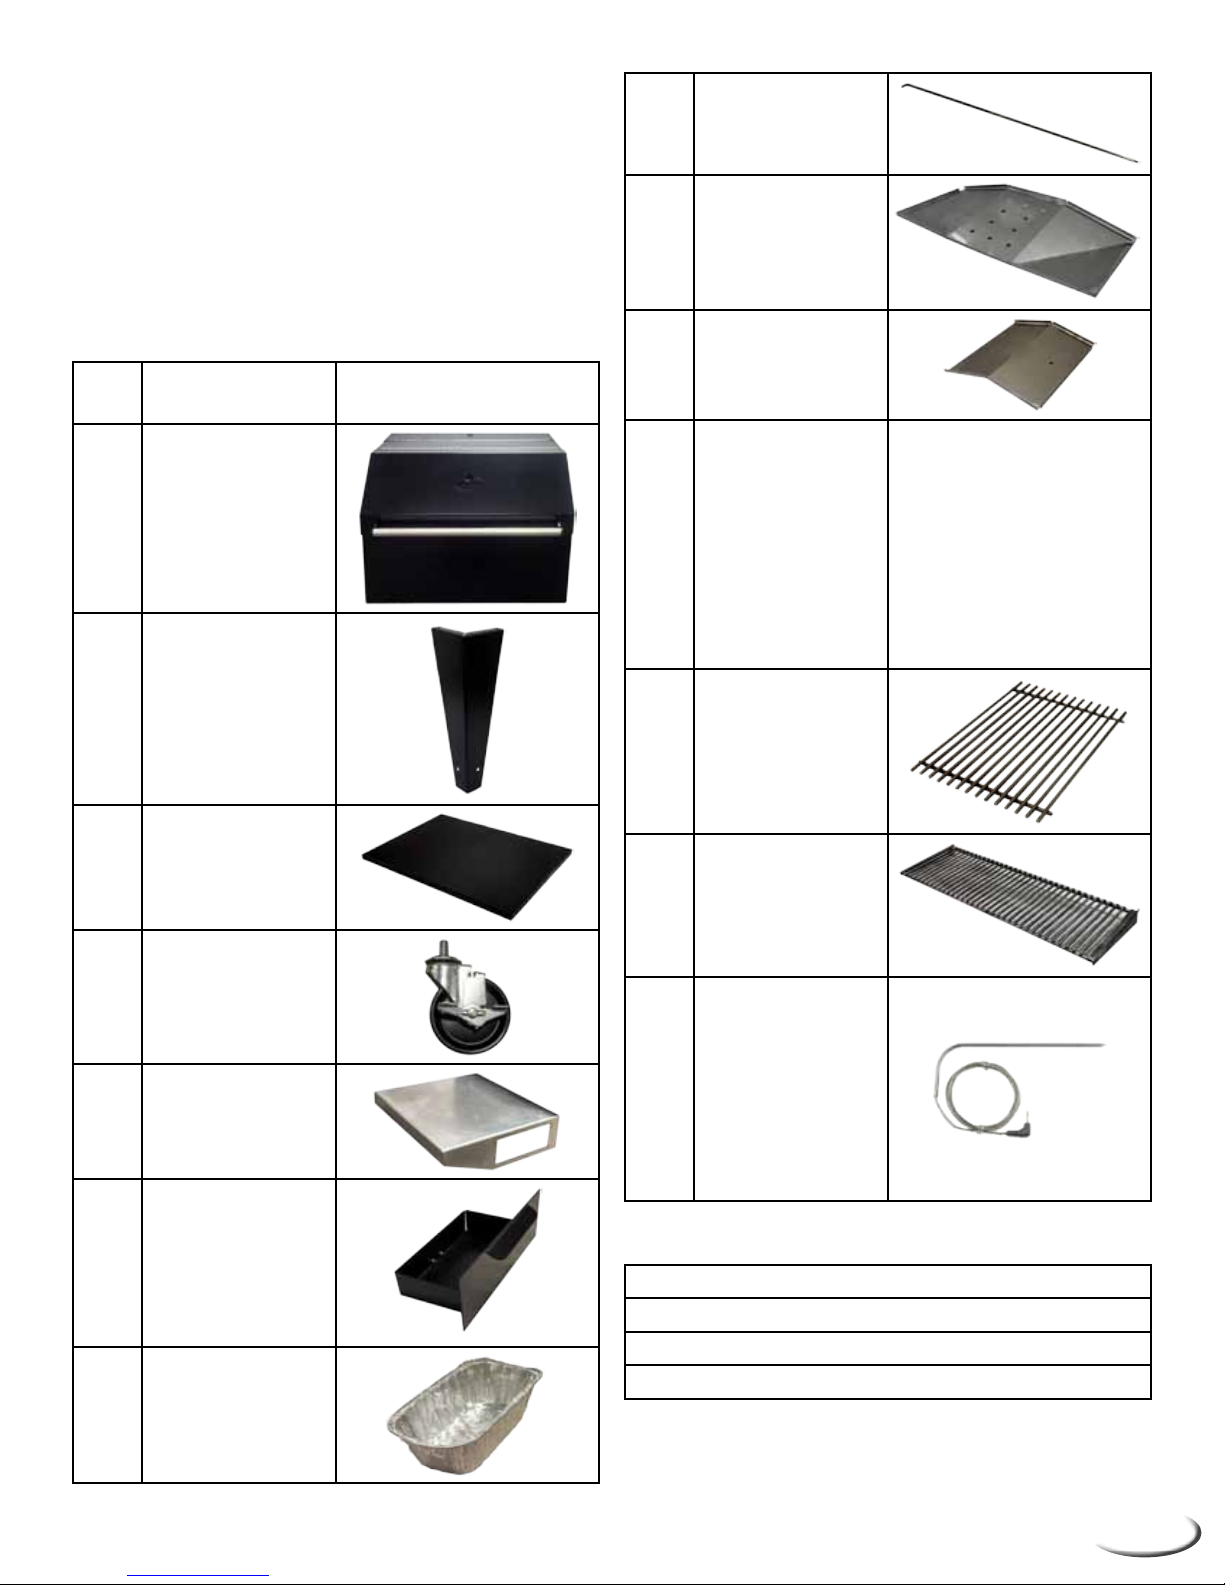
Section 1- Unpacking, Contents
List and Assembly
1 Quick Grill Zone
linkage
Step 1:
Unpack your grill and remove all of the components from the box and from inside the grill rebox.
Grill Parts List:
QTY
1 Grill body with
4 Legs
ITEM
digital control
box
1 Diffuser drip tray
1 Quick Grill Zone
cover
1 Hardware/tools:
• 1- QGZ knob
• 26- 1/4-20 hex
bolts
• 34- 3/16 at
washers
• 8- 1/4-20 button
head (hex key)
screws
• 8- 1/4-20 nuts
3 Cooking grids
• 4- 1/2-13 nuts
• 4- 1/2 star washers
• 4- 6-32 button head
(hex key) screws
• 5/32 hex key tool
• 5/64 hex key tool
• 3- Tool pegs with
backer screw
1 Lower Shelf
4 Casters
(2 locking,
2 non-locking)
2 Side Shelves
(one left, one
right)
2 Grease drawers
4 Disposable
grease trays
1 Upper cooking
grid
1 Meat probe
Required Tools:
7/16 wrench
3/4 wrench
5/16 wrench
Large at blade screwdriver
3
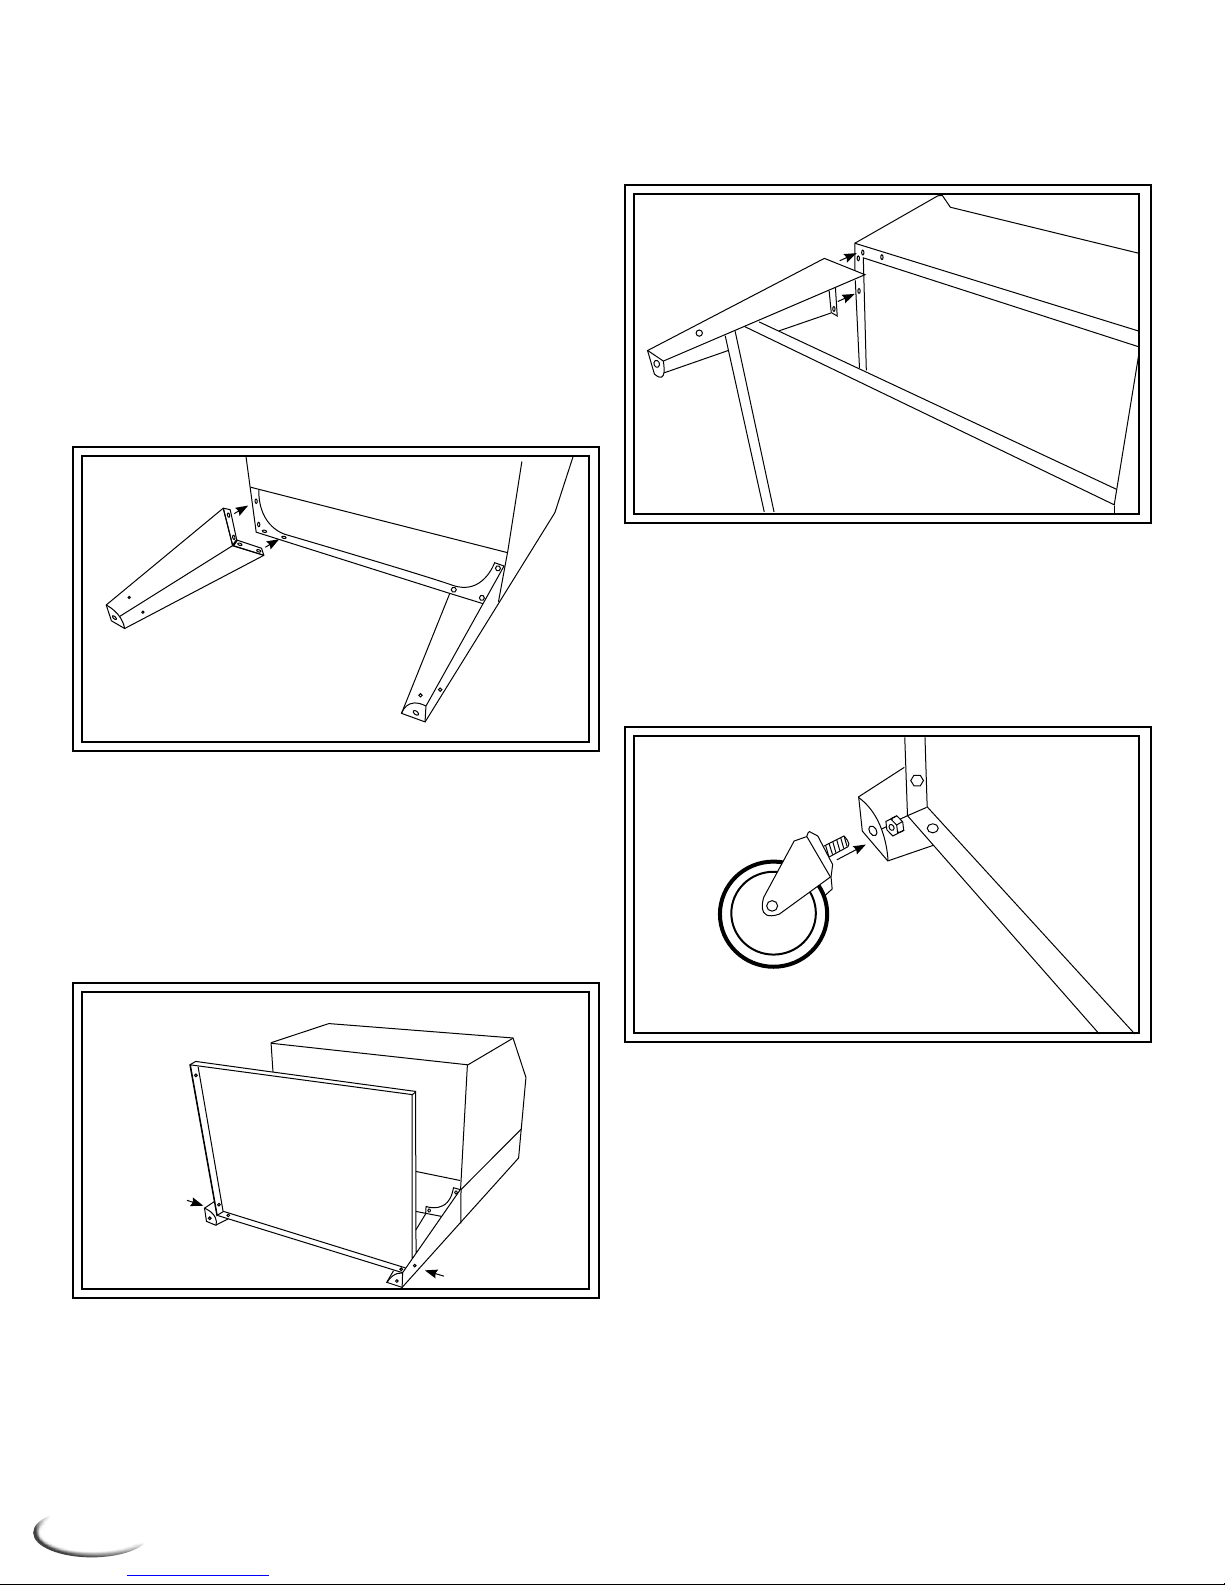
Assembly Instructions
Step 1
Lay the grill body on it’s back taking care to pro-
tect the nish. You may choose to lay the grill on
the pallet for a slightly elevated working surface.
Do not set the grill body on it’s bottom at any time
(this could damage the combustion fan).
Step 2
Install the rear legs to the grill body using the 1/420 hex screws and 1/4 washers. Leave the bolts
loose until step 4.
1/4-20 nuts, and 1/4 washers. Tighten the nuts
from behind with a 7/16 wrench while securing
bolts with the 5/32 hex key tool provided.
Step 5
Install the 2 locking casters on the front legs and
the two non-locking casters on the rear legs using
1/2-13 nuts and 1/2 star washers. Tighten with a
3/4 wrench.
Step 3
Install the lower shelf to the rear legs using the
1/4-20 button head screws, 1/4-20 nuts, and 1/4
washers. Tighten the nuts from behind with a
7/16 wrench while securing bolts with the 5/32
hex key tool provided.
Step 4
Install the front legs to the grill body using the
1/4-20 hex screws and 1/4 washers. Tighten all
4 legs with a 7/16 wrench. Attach the lower shelf
to the front legs using 1/4-20 button head screws,
Step 6
With help from another person, set upright and
nish attaching the lower shelf to the rear legs using the remaining 1/4-20 button head screws.
Step 7
Peel the plastic lm back from around the mounting holes of the side shelves. Install the side
shelves to the grill body using the 1/4-20 hex
screws and 3/16 washers. IMPORTANT: The
side shelf with the cut out for the digital control
box is installed on the left side as you are facing
the grill. Tighten with a 7/16 wrench.
4
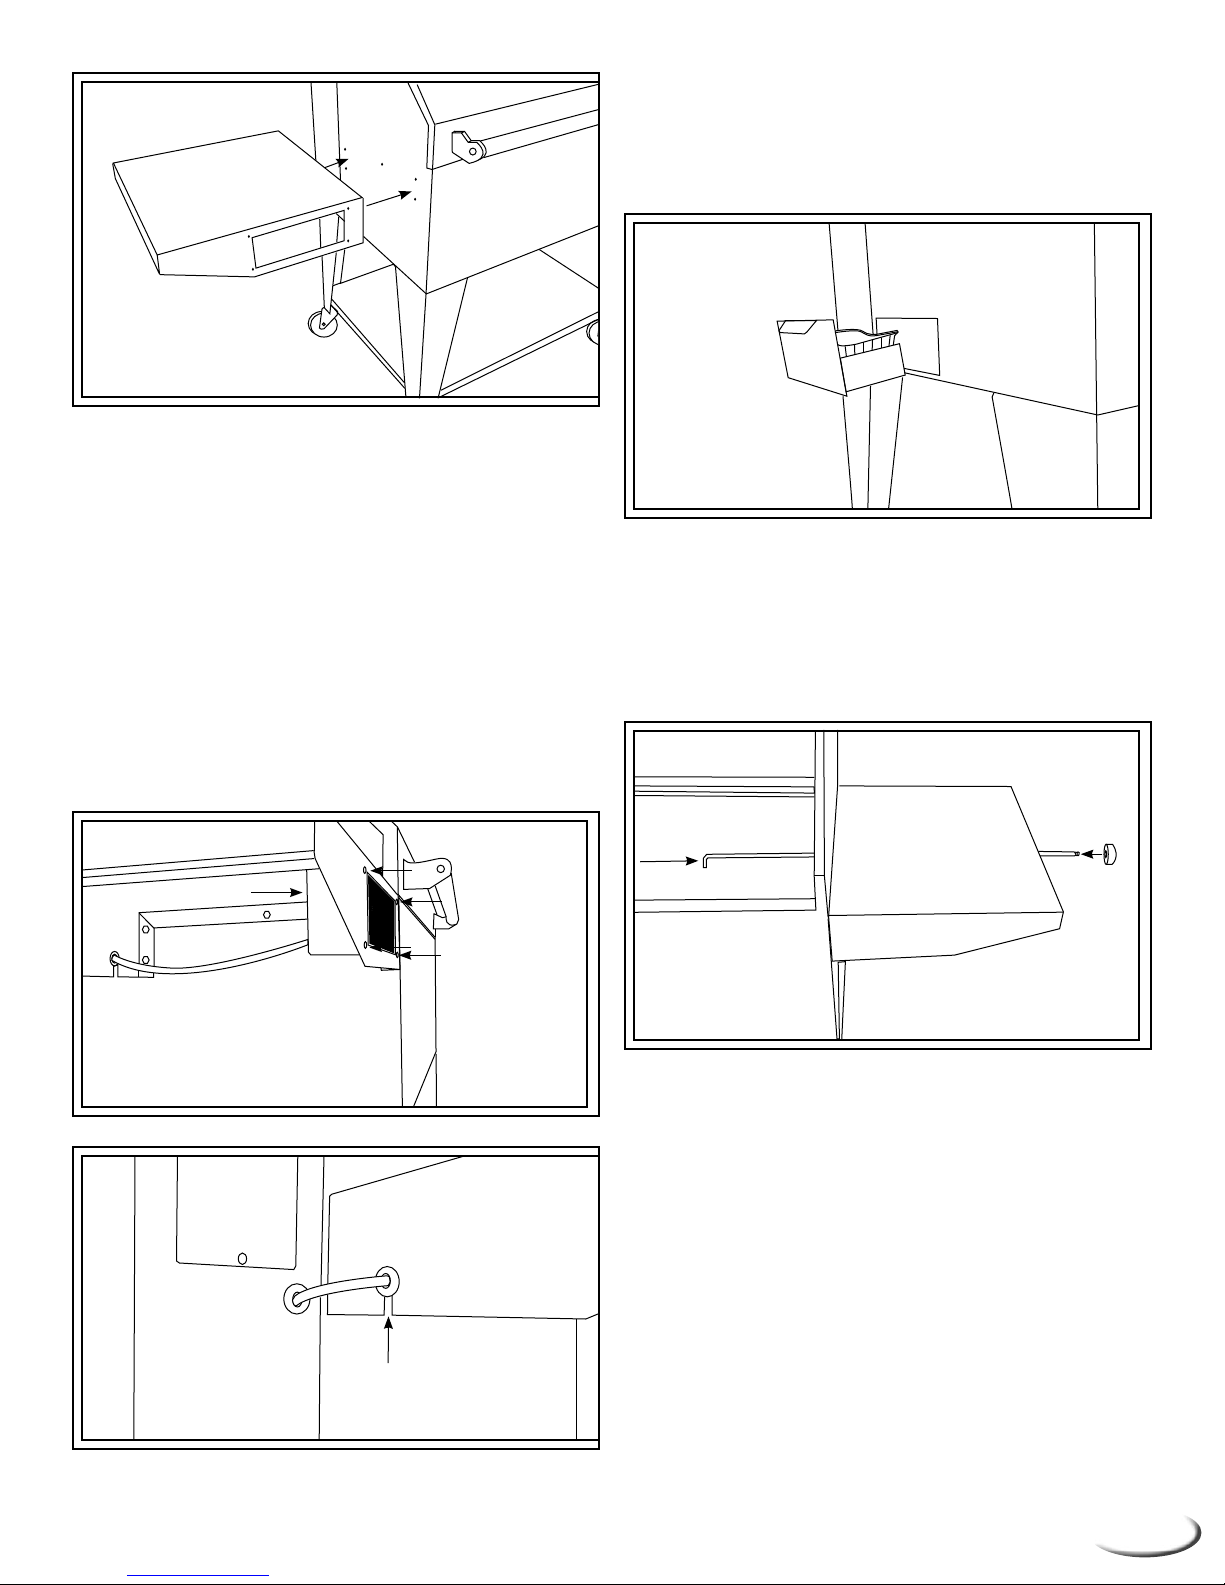
Step 8
From underneath the left shelf, insert the digital
control box face through the cut out and attach
with the 6-32 button head screws using the 5/64
hex key tool. Make sure the control board face
is ush with the face of the shelf before tightening. Slip the control cable up through the keyhole
in the back of the shelf. There is a grommet
pre-installed onto the control cable that is to be
inserted into the key hole to support and protect
the cable. Once the side shelves and control box
is installed, nish removing the plastic lm.
Step 9
Remove the grease drawers located on the side
of the grill, place the disposable grease trays into
the drawers and insert them back into the side of
the grill. They will click into place.
Step 10
From inside the grill, insert the Quick Grill Zone
linkage through the hole on your right and
through the hole in the side shelf. Attach the knob
to the end of the linkage.
Step 11
Install the diffuser drip tray. There is a shelf at the
front and back of the grill that the drip tray rests
on. With the Quick Grill Zone linkage out of the
way, set the drip tray in place as shown in the picture below. It must be inserted below the Quick
Grill Zone slide tracks at the front of the grill rst
then below the slide tracks at the back. Once in
place, push the tray all the way to the back of the
grill.
5
 Loading...