

: )
Instructions
f
or
use
Mikrowellen-Kombigerät
)
f
~
0
0
°' .
LO
,......
M
LO
Microwave
EMWK
oven
870.0
Küppersbusch
ALLERFEINSTE
KÜCHENTECHNIK

)
)
English
Th1s
microwave comb1nation oven will make
cook.
rlease read the operat1ng instructions carefully
take
full
advantage of
The operating instructions start off with a few important
points on safety.
parts of your new appl1ance.
how
to operate
The charts are designed as a step-by-step guide to making
settings. Here you will also find popular dishes, suitable
utensils, shelf height and optimal settings.
of course, been tested
There are also a number of tips on maintenance and
cleaning so that your appliance will keep smart for years
come.
it.
all
the technical features.
You
are then familiarized with the individual
We
show you
in
our culinary studio.
it
a pleasure to
in
order to
all
it can
All
of which have,
do
and
to
in
Just
you will find information on rectifying minor problems your- ·
seif.
lf you
You
And
your new microwave combination oven.
case there
do
have
will soon get your bearings.
now
go for it and enjoy thoroughly modern cooking with
is
a problem, at the back of the booklet
anY,
questions, first look carefully
in
the index.
45
Contents
Points to remember
Page
Disposing of packing
Before connecting your new appliance
Safety advice
How to avoid damage to the appliance
Installation and connection
Setting the time
matP-rial
and your old appliance
Your new appliance
The control panel
Heating modes
Oven and accessories
Before using for the first time
Microwave
Utensils
48
48
48
50
51
52
53
54
55
56
57
Setting procedure
Ouick-start feature
Charts for defrosting, heating and cooking
Tips on your microwave oven
Test
dishes
Auto-programmes
Setting procedure
Defrosting chart
Cooking chart
Oven without microwave
Setting procedure
Oven to switch off manually
Oven to switch off automatically
57
58
59
64
64
66
67
68
69
69
Oven and microwave combined
Setting procedure
46
70
Contents
Charts on baking, roasting
and grilling
Page
Meat, poultry and fish
Tips on roasting and grilling
Cakes and pastries
Bakes and gratins
Deep-frozen precooked foods
Baking tips
Care
Problems and repairs
What to
Repair, E and
do
if there
FD
numbers
is
a problem
71
74
76
80
80
82
83
85
85
47
Disposing of packing
material and your old
appliance
Points
..J
Dispose of the packing material responsibly.
Our products need good protective packing for transportation purposes. Any packing
absolute minimum.
mentally friendly and is recyclable. Wooden parts are not
chemically treated. 80 to 1 00% of the cardboard is made
up of recycled paper. Wrapping is made of polyethylene
(PE),
CFC-free polystyrene foam
Synthetic materials
and can be recycled. Processing and recycling mean
that raw materials can be conserved and the volume
waste reduced.
to the dealer where the appliance was purchased.
to
remember
All
packing material used
banding of polypropylene
are
pure hydrocarbon compounds
In
Germany, you can return the packing
is,
however, kept to an
(PP)
and packing chips
(PS).
is
environ-
of
of
Before connecting
your new appliance
O Before disposing of your old appliance,
dered unserviceable, after which
nearest recycling centre, the address
obtained from your local authority.
O Before using your new appliance, you should read the
operating instructions carefuily. This booklet contains
important information on safety as weil as instructions on
how to use and look after your appliance.
0 Keep the operating instructions
in
instructions
place for future reference or for a subsequent owner, as
the case may be.
0
Do
not operate the appliance if it has been damaged
any
way.
O Our appliances meet the appropriate safety requirements
for electrical appliances.
Repairs should only be carried out
trained by the manufacturer. Repair
is
sons
to the
extremely hazardous, both to the appliance and
user.
the case of built-in appliances)
it
(as
by
it
should be ren-
can be taken
of
which can
weil as the assembly
service technicians
by
unauthorized per-
in
a safe
to
the
be
in
Saf ety advice
General
CJ
Only use the appliance for preparing food.
::l The suriaces of heating and cooking appliances become
hot when
hot,
from the appliance.
::l Make sure that the connection cords of electrical appli-
ances never get caught
tion may become damaged.
as
in
use. The inside of the oven becomes very
do
the elements. Always keep children weil away
in
the hot oven door. The insula-
48
Points
:J
lf the oven door
has been repaired by an authorized service technician.
There
Cl
In
at the fuse.
::J
Do not store anything inflammable
ignite if the app
place any objects which may catch fire on the hob.
to
remember
is
damaged,
is
a danger of exposure to microwave energy.
do
not use the oven until it
the event of a fault, pull out the plug or shut off power
in
the oven as it could
lian
ce
is
switched on inadvertently. Do not
Microwave
0 Danger
of
burns!
When heating up liquids, always place a teaspoon
container to prevent delayed boiling, where boiling tem-
is
perature
At the slightest movement
reached without any of the tell-tale bubbles.
of
the container, the hot liquid
can suddenly boil over or erupt. This can cause injury
and burning.
·
--.
~~ . .<,
·_.
~
~1'°\°lf;'9~
··
in
the
O Baby food:
Never heat baby food
in
jars or bottles with the lid
or
teat
on. After heating the baby food, stir or shake thoroughly
to ensure that the heat is distributed evenly. Always
check the temperature before giving the food to the
is
child. There
a danger
0 Never heat food or drinks
of
burns.
in
sealed containers as they
can explode.
::J
Never overheat drinks containing alcohol
as
they can
explode.
0 Never heat food
in
insulated containers as there
is
a dan-
ger of combustion.
::J
Food sealed
in
plastic film can burst open and the foil
may melt.
0 Never cook eggs in their shells or heat up hard-boiled -
eggs as they can explode. This also applies
and crustaceans.
In
the case of both fried and poached
to
shellfish
egg, always prick the yolk beforehand.
49
Continued on the next page
Points
.:i
0 Whenever you are drying herbs, fruit, bread or mush-
:J
:J
O Always use the microwave settings and times indicated
'::l Microwave-heated food conducts heat to the utensils,
to
remember
In
the case of food with a non-porous skin such as
apples, tomatoes, potatoes and sausages, always prick
the skin before
rooms, always supervise the operation
catch
Never heat cooking
ignite.
The handles and lids of porcelain or ceramic crockery
may have miniscule holes
trapped, causing the part to burst.
in
or time, the food could ignite and damage the appliance.
which can become very hot as a result. For this reason,
you should always use
food.
fire
the operating instructions. lf you use too high a setting
heat1ng
if
over-dried.
oil
or
in
an
it
may burst.
as
they could
the microw
in
which moisture can become
oven cloth when removing
ave
oven
as
it
could
How to avoid damage
to the appliance
Installation and
connection
or
0 Do not place a baking tray on the floor of the oven
as
it with aluminium foil
Baking and roasting times will be inaccurate and damage
to the enamel may result.
O Never pour water directly into the hot oven as it can
damage the enamel.
O Fruit juice dripping from the baking tray will
is
nent stains. lt
which
0 Do not prop yourself up against the oven door or sit on it
when
O The oven door must shut tightly. Always keep the
sealing surfaces clean.
:J
Never switch on the microwave oven without any food
the oven compartment. as this would overload the appliance. The only exception to this
(see
::J
These operating instructions apply to built-in and tabletop appliances.
is
deeper.
it
is
open.
notes on utensils).
always advisable to use the glass pan
this will c2·jse a build-up
leave
is
a short utensil test
line
of
heat.
perma-
door
in
:J
Place the table-top appliance on a firm, even surface.
The vents at the
free.
kept
:J
lf the appliance
please follow the special assembly instructions.
rea
r and base of the appliance must be
is
tobe
used as part
of
a built-in unit,
50
Points
~
The appliance
should only be connected to a correctly installed safety
socket. There should be a 16 amp fuse
mains voltage must correspond to the voltage given on
the rating plate.
:l
Always contact a qu;-ilified electrician
be moved or the lead changed. lf the plug
accessible after installation, there must be local means of
isolation
contact gap of
to
remember
via
an
is
supplied with
all-pole isolation switch with a minimum
an
integral plug and
(UB
if
the outlet has to
is
auto). The
no longer
3 mm.
1
.-
1
O Never use multiple plugs, plug connectors or extension
leads. This could cause overloading and ultimately
Electrical connection. Warning!
All
appliances with a
fire.
3 core lead must be earthed.
In
Great Britain appliances with a rated power consumption
higher than
Please ensure that the voltage and current indicated on the
rating plate agrees with the voltage of your electricity supply.
220/240 volts lf your appliance has been equipped with a mains lead with a
moulded-on type plug, you must comply with the following
regulations: The plug moulded on to the cord incorporates a
fuse. For replacement, use a 13 amp BS 1362 fuse. Only
ASTA
cover/carrier must be replaced
fuse. The plug must not be used if the fuse cover/carrier
lost. A replacement cover/carrier must be obtained from
electrical goods retailer. lf the socket outlets
are
plug must be cut off and
fitting the plug please note the following points:
approved or certified fuses should be used. The fuse
not suitable for the plug fitted to the appliance, then the
3,
1 kW must have a permanent connection.
(i.e
., 220/240 V
an
AC).
in
the event
appropriate one fitted. When
of
changing the
in
your home
is
an
lmportant
The wires
the following code:
Green and Yellow
Blue
Brown
As
the colours of the wires
may not correspond with the coloured markings identifying
the terminals
1 . The wire which
be connected to the EARTH terminal
is
coloured GREEN, or GREEN and YELLOW.
in
the mains lead are coloured
Earth
Neutral
Live
in
the mains lead of this appliance
in
your plug, proceed
is
coloured GREEN and YELLOW must
marked with the letter E or by the earth symbol @ or
as
follows:
in
accordance with
in
your plug, which
.
51

Points
2.
3.
When wiring the plug, ensure that
securely retained
the
to
remember
The wire which
to the
coloured
The wire which
the neutral terminal which
coloured BLACK.
ri1ains
LIVE
RED
lead clamp
is
coloured BROWN must be connected
terminal which
.
is
coloured BLUE must
in
each terminal. Do not forget to tighten
on
the plug.
is
marked with the letter L or
)Je
connected
is
marked with the letter N
all
strands
of
wire are
to
or
Time
When the appliance is
connected
Küppersbusch
Warning! A cut off plug inserted into a
serious shock hazard. Ensure that the cut off plug
posed off saf
Voltage 220/240 V AC
Fuse rating
Seerating plate for further information.
Pul!
off the protective
three zeros will blink
You can set the time as follows:
1 . Depress buttons 90 and 600 simultaneously.
2.
Turn the right knob until the correct time appears.
You
can also blank out the time as follows:
1 . Depress buttons 90 and 600 simultaneously.
Turn
2.
ely.
13 amps
foil
from the operating panel.
in
the display.
the right knob past 24.00 and then back to 0.00.
13 amp socket
is
is
dis-
a
90
180
.
90
.>,
. . ' . . •
. ; ·
...
·
,;
.
,
""
,J
i:
;~
~~~;
180 · 360
' '·,· '
5
{'·~:v>
· ·
''
'+'t·'l'·
\}.
)JL
:
:
~
;~
~~
~~;i
:;
:
:
·~ :
3eO
600
MAX
•
600
MAX
. · .. · .·\·.
) 1 -
.11
~"
.f
~
~
~~:
~~
~.·-
~
~:
;~
!
After a few seconds, the display wi
Please note:
O The set programme or time may be cancelled due
ious causes such
blink
",
\ .
~+
.
,„
~~;-t
:~
:~~
0 The display dims between 10 p.m. and 6 a.m.
.
. .
L
~~
ll
go dark.
as
a power failure. The zeros w
in
the display. Reset the time and the programme .
ill
to
var-
then
52
Your
new
appliance
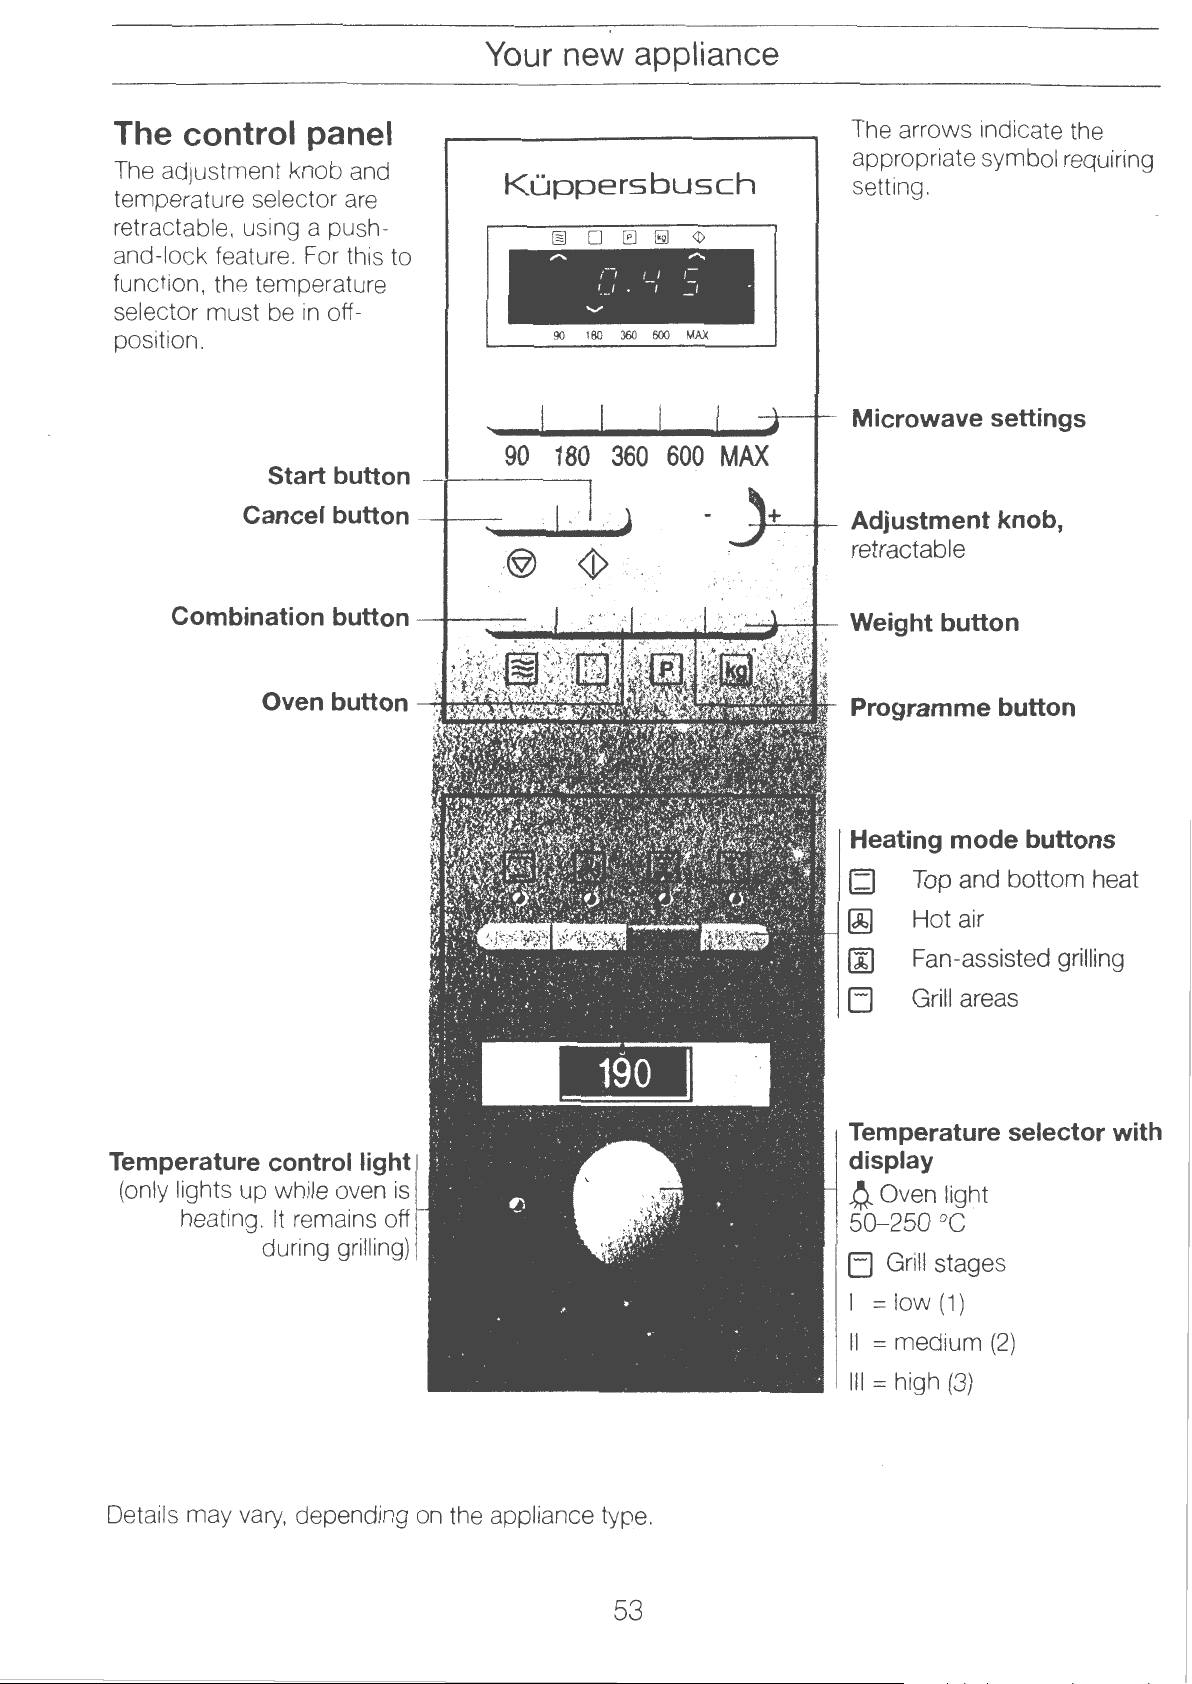
The control panel
The adjustment knob and
temperature selector are
retractable, using a pushand-lock feature. For this to
function, the temperature
selector must be
position.
in
off-
Start button
Cancel button
Küppersbusch
"" ""
90
90
->-----~
---
180
..
, ,'
·©
;--,
I_/ , -,
........
160
360
360
..
J
·~·
···
1 1 I-
600
600
..::
1 •
MAX
MAX
.......,.+
____
The arrows indicate the
appropriate symbol requiring
setting.
Microwave settings
Adjustment knob,
retractable
Programme button
Temperature control light
(only lights up while oven
heating.
lt
remains off
during grilling)
is
Heating mode buttons
(d
~
00
EJ
Top and bottom heat
Hot air
Fan-assisted grilling
Grill areas
Temperature selector with
display
~
Oven light
50-250 °C
EJ
Grillstages
= low
1
II
= medium (2)
III
= high
(1)
(3)
Details may vary, depending on the appliance type.
53
Your
new
appliance
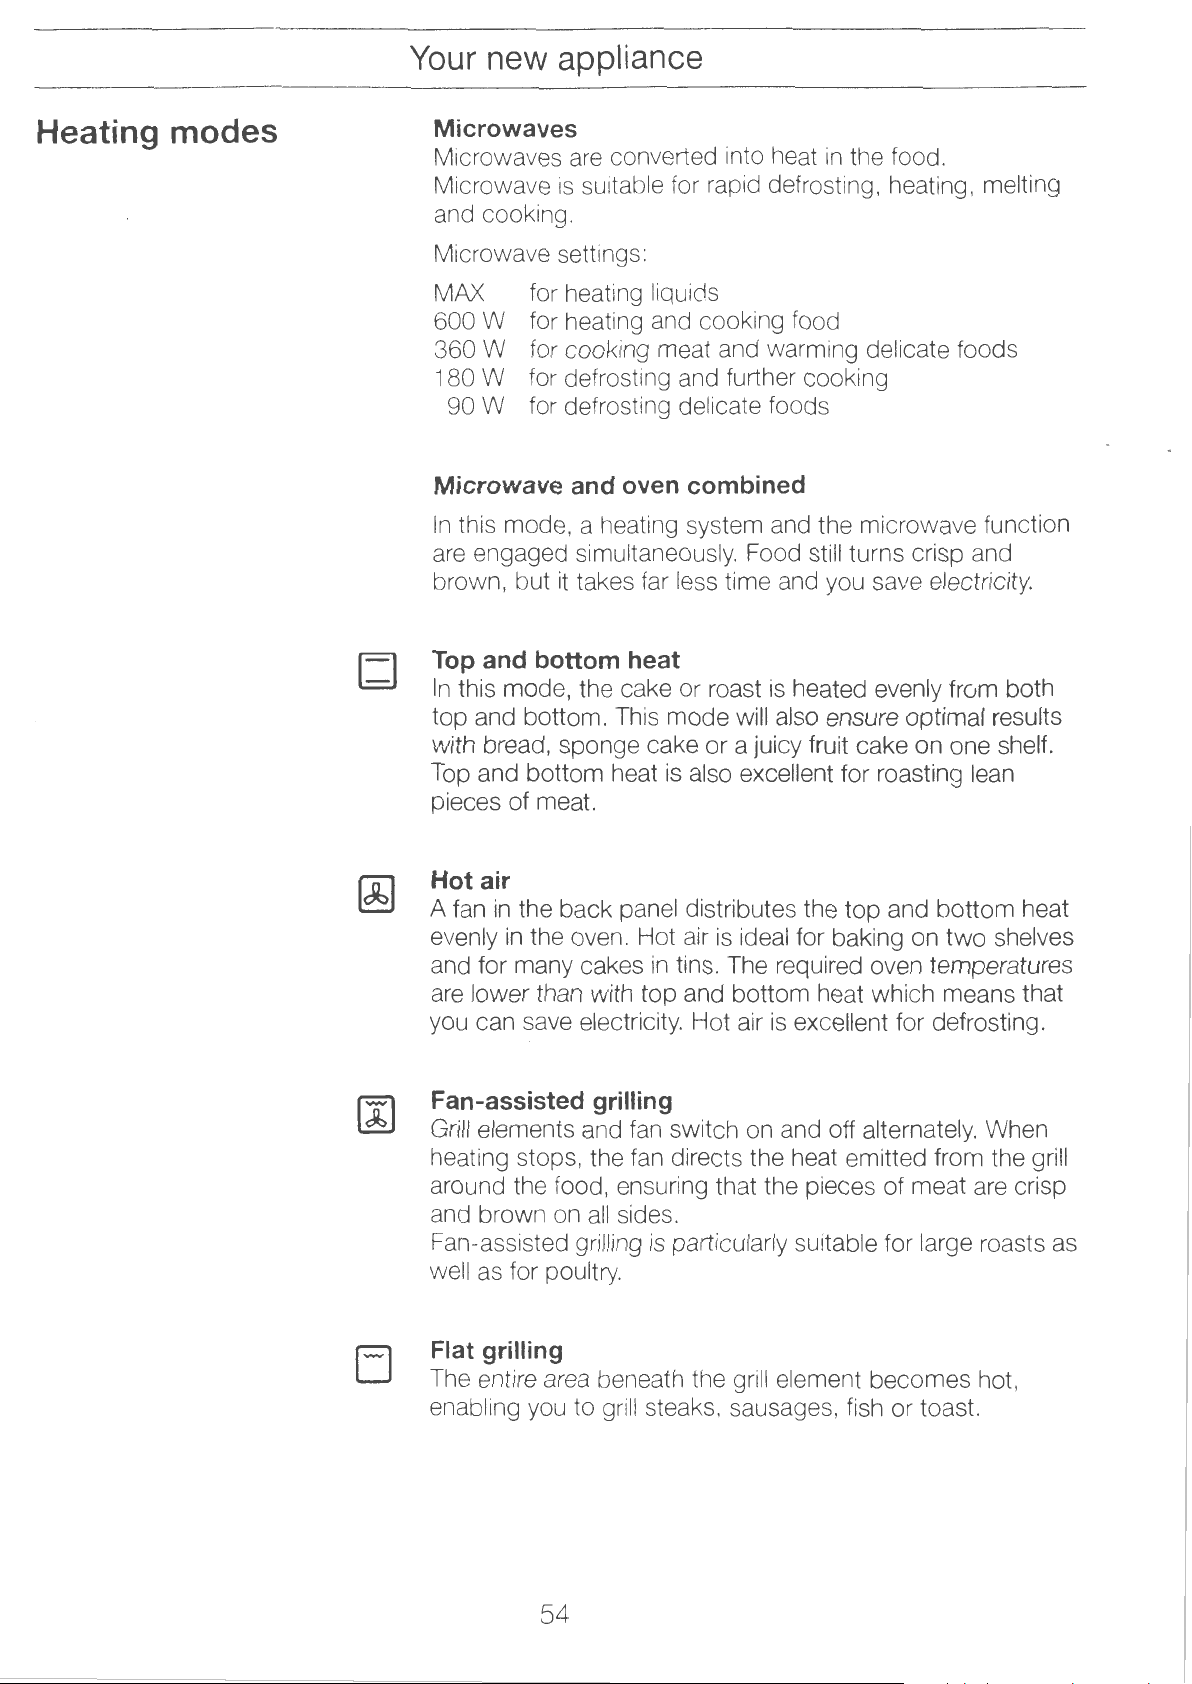
Heating modes
Microwaves
Microwaves
Microwave
and cooking.
Microwave settings:
MAX for heating liquids
600 W for heating and cooking food
360 W for cooking meat and warming delicate foods
180 W for defrosting and further cooking
90 W for defrosting delicate foods
Microwave and oven combined
In
this mode, a heating system and the microwave function
are engaged simultaneously. Food still turns crisp and
brown, but
Top
and bottom heat
In
this mode, the cake or roast
top and bottom. This mode will also ensure optimal results
with bread, sponge cake or a juicy fruit cake on one shelf.
Top and bottom heat
pieces of meat.
are
converted into heat
is
suitable for rapid defrosting, heating, melting
it
takes far less time and you save electricity.
is
also excellent for roasting lean
in
the food.
is
heated evenly from both
EJ
Hot air
A fan
evenly
and for many cakes
are lower than with top and bottom heat which means that
you can save electricity. Hot air
Fan-assisted grilling
Grill elements and
heating stops, the
around the food, ensuring that the pieces of meat are crisp
and brown on
Fan-assisted grilling
weil
Fiat grilling
The entire area beneath the grill element becomes hot,
enabling you to grill steaks, sausages, fish or toast.
in
the back panel distributes the top and bottom heat
in
the oven. Hot air
all
as
for poultry.
in
fan
fan
sides.
is
is
ideal for baking on
tins. The required oven temperatures
is
excellent for defrosting.
switch on and off alternately. When
directs the heat emitted from the grill
particularly suitable for !arge roasts
two
shelves
as
54
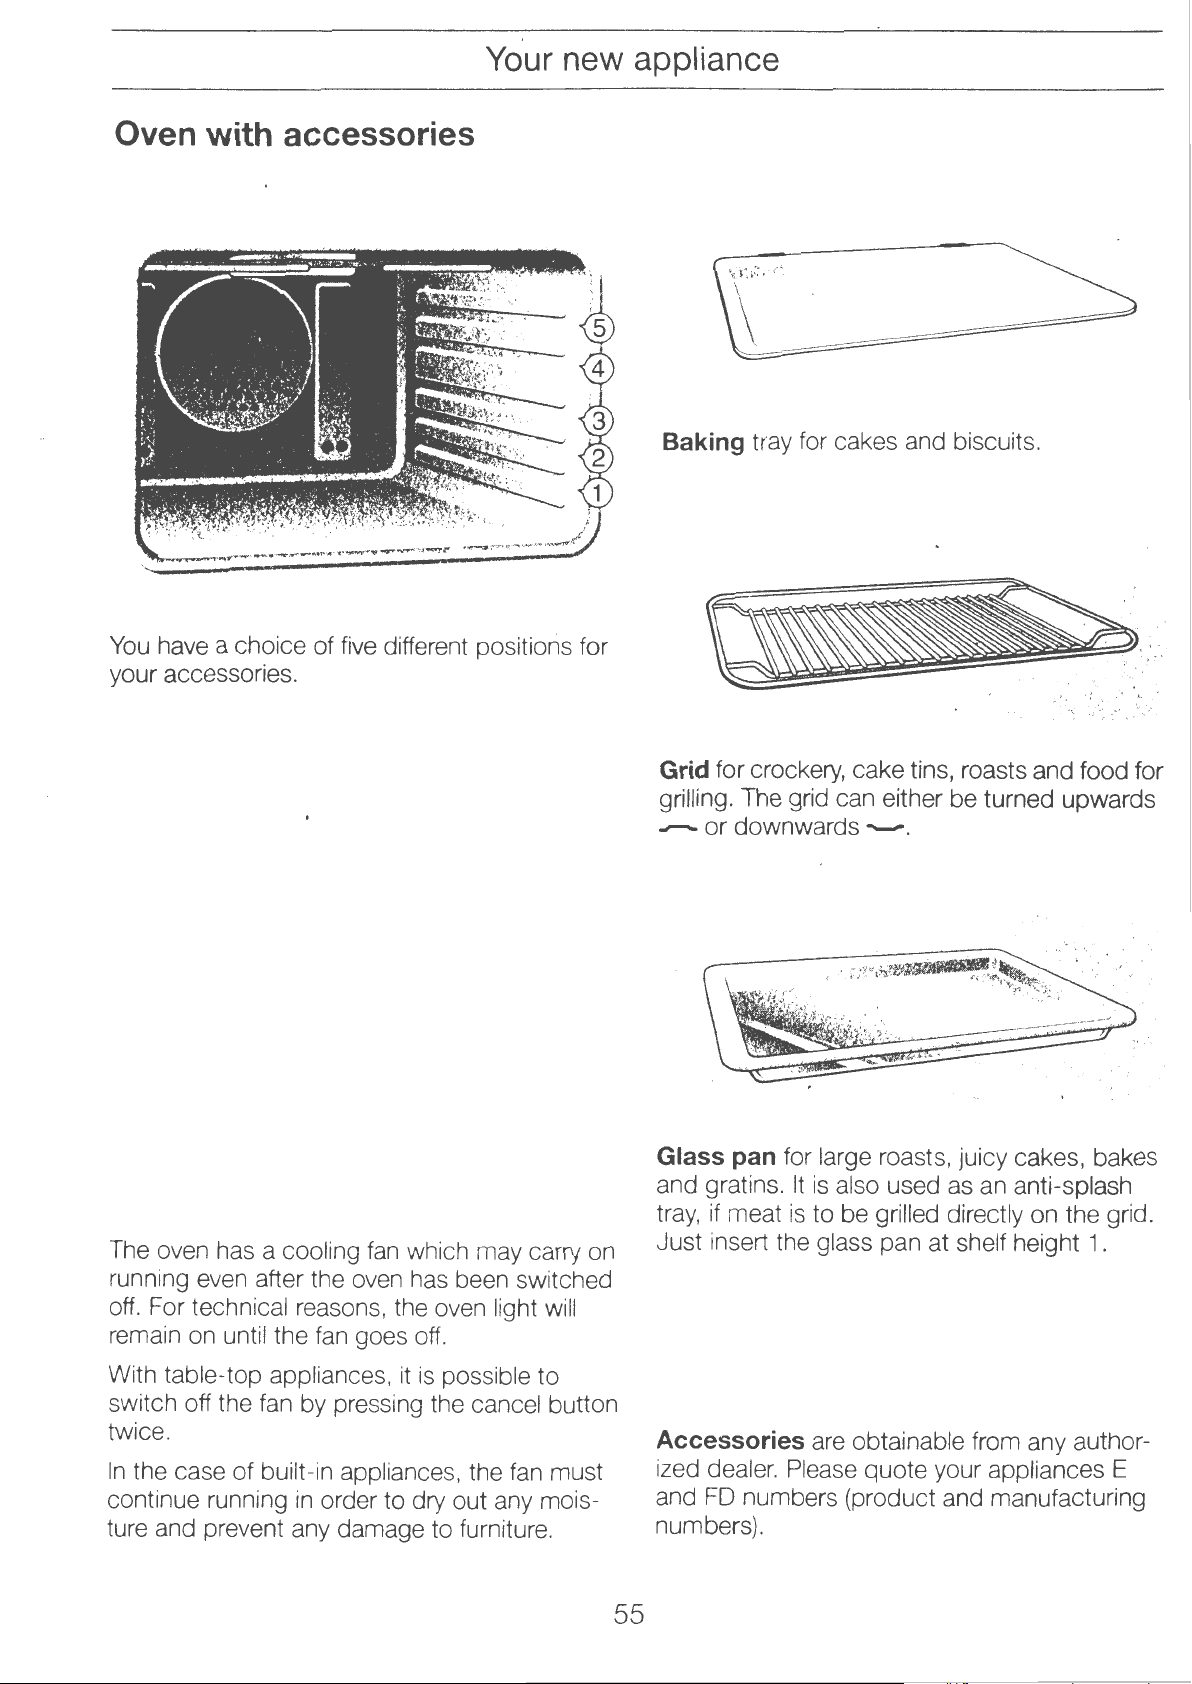
Oven with accessories
..,__.,,,_,,
....
~---·-~-~
.• „ .
•. _ ....
.....-."
-"
.......
Your new appliance
Baking tray for cakes and biscuits.
f.
'
.,.....~·
·-~
"'
,..,.
/
'
You
have a choice of five different positions for
your accessories.
fan
The oven has a cooling
which may carry on
running even after the oven has been switched
off. For technical reasons, the oven light will
remain on until the
fan
goes off.
:!.,
~
..
' . : ' '
·,\·,
::·.-
./~·,
·.
··_:',
•
"-. .
_'··,_·,_.
Grid for crockery, cake tins, roasts and food for
grilling. The grid can either be turned upwards
--
or
downwards-.
Glasspan for large roasts, juicy cakes, bakes
and gratins. lt
tray,
if meat
Just insert the glass pan at shelf height
is
also used as an anti-splash
is
tobe
grilled directly on the grid.
1.
With table-top appliances,
it
is
possible to
switch off the fan by pressing the cancel button
twice.
In
the case of built-in appliances, the fan must
continue running
in
order to dry out any mois-
ture and prevent any damage to furniture.
Accessories are obtainable from any author-
ized dealer. Please quote your appliances E
and
FD
numbers (product and manufacturing
numbers).
55
Your
new appliance/Microwave
Before using for the
first time
The microwave
oven
Heat the closed. empty oven for 60 minutes.
To
do
this. press button
to 250. Switch off the temperature selector after 60 minutes.
lt you want the oven to switch off automatically after
60 minutes:
press the button
which to start entering the length of time.
Set 60 minutes using the adjustment knob.
Press the start button.
oven.
A signal
lier by pressing the cancel button or opening the oven door.
lt
is
Try
for example, which has been left from breakfast - it tastes
like it's just been made!
Take a !arge cup without any gold or silver decoration and
put a teaspoon
height
will
advisable to air the kitchen due to the resulting smell.
out the microwave oven rightaway. Warm up that coffee,
1,
with the cup
O
sound after 60 seconds.
in
it.
b)
, setting the temperature selector
as
weil.
You
now have three seconds
Do
not switch on the microwave
Position the grid
in
the middle
You
can turn it off ear-
in
the oven at shelf
of
the grid.
in
Utensils
Now
press the MAX button.
Using the adjustment knob, set 1 minute.
Press the start button.
You
A signal will sound after 1 minute.
by pressing the cancel button.
The coffee
This
is
charts.
While you drink your coffee, read the "Safety Advice" once
again
Use utensils made of glass, porcelain, ceramic material or
heat-resistant plastic. These materials !et microwaves
through.
This
is
microwaves and food
metal containers.
containers such
comes too close to the oven wall, otherwise sparking may
occur.
In
the case of metal oven accessories, no sparking will occur
if you use
sil
on a grid or
is
hot .
but one of many examples which can be found
at
the front of the manual. This
not
so
with metal utensils. Metal does not conduct
will
therefore stay cold
You
can, however, use open, flat metal
as
aluminium trays. Make sure that no metal
it
as
indicated
in
the glass pan.
in
the charts . Always place the uten-
can cancel this earlier
in
is
very importan.t.
in
covered
the
56

Microwave
In
many cases. you c
food. This will also make for less washing up.
se
Only u
facturers guarantee that
crockery decorated with gold or silver if the manu-
an
use serving dishes for heating the
it
is
suitable for
111icrowave
cookery.
Utensil test
Setting procedure:
Heated food
very hot as a result. For this reason, you should always use
an
oven cloth whe n removing food.
For information on your particular dish, please refer
charts.
The microwave oven should not be switched on without
food inside. The only exception
test, which should be carried out
your crockery
Place the empty utensil for 30 seconds to
appliance at MAX setting. Check how hot it
The utensil should be cold or warm to the touch. lf it is hot
there
1.
2.
is
Press the button for the required setting.
You
the time.
Turn
appears.
g1ves
off heat to the utensil, which can become
to
this
is
the following utensil
if
you are not sure whether
is
suitable for the microwave oven:
1 minute into the
is
occasionally.
any sparking, it
now
have three seconds
the adjustment knob until the required length
You
can
is
not suitable.
in
which
now
enter other settings and times.
to
start entering
to
of
the
time
or
3. Pressstart button.
The operation starts.
Once the set time has expired, a signal will sound for thirty
You
seconds.
pressing the cancel button.
can turn it oft earlier by opening the
door
or
Correction:
lf the start button has not yet been pressed, you can correct
entries at any time.
in
lf the appliance is already
cancel button twice and reset.
microwave mode, press the
Cancel:
Press the cancel button twice. The time will reappear.
Please note:
:l
MAX microwave setting can be set for
600 W for one hour and
up to
tings one after the other.
1 hour and 30 minutes.
all
other settings can be set for
You
30
minutes,
can enter
up
to
3 set-
:l
lf you have entered a microwave setting, the arrow will be
il
luminated
::J
lf you have selected several settings, the total time
appears
in
in
the display.
57
the display above the selected setting.
Continued on the next page

Microwave
Microwave setting
MAX "Quick-start"
:J lf you have set more than one hour,
after the hour readout.
the point behind the
:J
Microwave operation
open the oven door. Once the oven door
microwave operation will continue.
is
an
There
for 1 to 5 minutes.
Setting procedure:
Press the MAX button twice briefly. 1 minute will appear
the display. Every time MAX
advance one minute to a maximum of 5 minutes if so
required.
Press the start button to start time count-down.
extra fast way
As
soon
"h"
will start blinking.
will
be interrupted
in
which to enter the MAX setting
is
pressed, the readout will
an
"h"
will appear
as
the cycle has started,
as
soon
is
as
shut again,
you
in
58

Charts
Microwave
The
t1mes
depend on the quality and type of food.
The charts often refer to time ranges. Select the shortest
1nitially
time
Whenever quantities differ from those indicated
the general rule
double the quantity double the time.
half the quantity half the time.
Many dishes
cooking. Whenever you open the oven
microwave oven switches off immediately. lt will continue
running once you close the door.
ind1cated
and then extend
ha
1n
the charts
is
as
fo1iows:
ve
to be stirred or turned while they are
are
it if
necessary.
approx1rnate and
in
the charts,
door
to
do
this, the
) Defrosting
Defrosting
at
Grid
Press the start button after
setting
1 chicken
shelf height 1
Deep-frozen food
or eise on
Cover any exposed parts such as chicken drumsticks and
wings or fatty edges of roasts with small pieces
foil, making sure that the foil does not come into contact with
the walls of the oven.
defrosting time has elapsed.
Turn the food half-way through the defrosting time. Large
pieces
Leave the defrosted food to stand for a further
approximately to allow the temperature to stabilize.
case of poultry, you can then remove the giblets.
Amount Select microwave setting (W)
1
kg
Ci.
pla.te.
of
food should be turned several times.
is
Set
180
placed
You
the
length
W,
15
in
as
shallow a dish as possible
of
can remove the foil after half the
1 0 minutes
of
time (minutes)
min. + 90
W,
15-20
aluminium
In
the
min.
2 ch1ckens
1 capon
1
duck
meat jülnt
1
kg
1.3
kg
2
kg
750 g
1
kg
1.5
kg
2
kg
each
59
180W,
180
180W.
180
180
W,
W,
W,
25
20
25
10
180W, 20
180
W,
40
min.+
min.+
min.+
5
min.+
min.+
min.+
min.+
90
W,
15-25
90
W,
20-25
90
VV,
25-35
90
W,
25-35
90
W,
25-35
90
W,
25-35
90
W,
30-40
Cont1nued on the next page
min.
min.
min.
min.
min.
min . .
min.

Microwave
Defrosting
Grid at shelf height 1
Press the start button after
setting
2 steaks
fish
butt er
bread
rolls
cake
Amount
600
g
500
g
1 kg
250
g
500
g
1 kg
4
in
no.
250
g
500
g
Select microwave setting (W)
Set the length of time (minutes)
180W,
180
180
180
180
180
180
180
180
10
min.+
W,
5 min. +
W,
10 min. + 90
W,
3
min.+
W,
8
min.+
W,
10
min.+
W,
2 - 3 min.
W,
5 - 8 min.
W,
9-13
min.
90W,
90
W,
W,
90
W,
90
W,
90
W,
5-10min.
10-15
15-20
3-
4-
8-12
min.
5 min.
7 min.
min.
min.
berries, stone-fruit
Preparing food with the
microwave oven
1 kg
250
500
g
g
180
W,
14-
180
W, 5 - 8 min.
180
W,
10-14
18 min.
min.
Cream cakes and gateaux are defrosted without
wave. Position the gateau at shelf height 1.
Press button
The fan directs the air around the cooking
the food will defrost fast er than when left
Always cover the f ood.
Remove precooked meals from their aluminium packaging
and prepare them
wave oven. This will allow them
evenly.
~
and set temperature selector
in
a utensil suitable for use
to
heat
to
~·
compartment
to
stand.
in
the micro-
up
more rapidly and
micro-.
and
lf
you warm
heat at different speeds.
Stir or turn the food occasionally while it
allow
Leave the food
heating,
it
up
different foods at the same time, they will
to heat
to
up
more rapidly and evenly.
to
stand for a further 1 to 2 minutes after
allow the temperature
to
stabilize.
60
is
cooking. This will

Microwave
Preparing food with micro- Amount
wave, Grid at shelf height 1
Press the start button after
setting
Vegetables,
add some liquid
Mushrooms,
Leek, fresh
~
fresh
cook 250 g
c~ok
cook 250 g
Peppers, fresh
Peas,
Mixed vegetables, deep-frozen
deep-frozen
cook 450 g
cook
500 g
500 g
450 g
Select microwave setting
(W)
Set the length of time (minutes)
W,
600
600
600
600
600 W,
600
6-8 min.
W,
6-8 min.
W,
6-8
min.
W, 9-11 min.
8-10
W,
10-12 min.
min.
Spinach, deep-frozen
Vegetables, chilled
Starch foods
Potatoes
add some liquid
Rice,
add double the quantity
of liquid
Starch foods, chilled
cook
300g
600
heat 150 g 600
300 g
600
boil 250 g 600
500 g
600
750 g 600
cook 125 g 600
250 g 600
heat 250 g 600
W,
10-13
W,
21/2
-31/2
1
/
2
-4
1
min.
W,
3
W,
6-8
W,
8 min. + 180
W,
9 min.
W, 5 min.
W, 8 min
W,
2
. +
1
1
/
-3
2
min.
min.
/
min.
2
+ 360
180 W,
+
180
/
min.
2
W,
W,
W,
6-8
min.
5-8
min.
15-17
10-12
min.
min.
500 g 600 W, 6-8 min.
Coarse ground cereals*, cook 100 g
600
W, 8 min.+
180
W,
20 min.
add three times the quantity of
liquid
* Depending on the type of cereal, grain and coarse-ground cereals should be allowed
up to
30
min„
61
Continued on the next page
to
soak for

Microwave
Preparing food with microwave, Grid
Press the start button after
setting
Grain*,
speit grain, oats, barley. Add
double the quantity of liquid
* Depending on the type of cereal, grain and coarse-ground cereals should be allowed
up
to
Meat
Cured/smoked pork on the bone
Slices
deep-frozen
Slices
of
of
at
shelf height 1
P.Q. wheat, speit, unripe
30 min.
meat
meat
in
sauce, heat 400 g
in
sauce, chilled
cook 100 g
cook
heat
Amount
1 kg
400 g
Select microwave setting (W)
Set the length of time (minutes)
600
W,
360
600
600
6 min. + 90
W,
45-50
W,
13-15
W,
5-7
min .
min.
min.
W,
25 min.
to
soak for
Sauce for mince, e.g. Bolognese,
deep-frozen
Sauce for mince, chilled heat
Soups
Stew, deep-frozen
Stew, chilled
Consomme, deep-frozen
One-course dishes
One-course dishes, deep-frozen
One -course dish, chilled
heat
heat
heat
heat
heat
heat
300 g
600 g
500 g
500 g
400 g
350-400
35
0-400
600
W, 8-11
600
W,
15-18
600
W,
13-17
600
W,
5-7
MAX,
g 600 W, 6 min. +
g 600 W,
7-10
4-'-
min.
min.
min .
6 min.
min.
min.
360
W,
6-8
min.
Precooked meal, sterilized
Desserts
Blancmange
heat
cook
350-450
g
600 W,
500 g 600
62
W,
6-8
6-8
min.
min.

Microwave
Preparing food with microwave, Grid at shelf height 1
Press the start button after
setting
stewed fruit
Babyfood
in
heat up
In
;
jar
an
Feeding bottles
(place bottle on a plate, and put a spoon
) Miscellaneous foods
Butter, chilled soften
Amount
Select microwave setting (W)
Set the length of time (minutes)
boil
250 g
600
open container, stir and check the temperature
heat 200 g
heat 200
in
the bottle)
250
ml
g
360
MAX,
90
W,
8-11 min.
W,
2-2
1
/
-1 min.
2
W,
1-3
1
/
2
min.
min.
Honey, crystallized melt
200 g
180
Cake icing melt 150 g 600
(take it out of the packet)
Butter, chilled melt
50 g
180
Drinks
put a spoon
Coffee, tea
Milk, depending on required heat
in
the container
...
warm
up
150
ml
300
ml
1/2
1
1 MAX,
1
150
ml
MAX,
MAX,
MAX,
MAX,
temperature
300
ml
MAX,
W,
W,
W,
1-2
2-3
3-4
7-8
1
1-3
1-2
4-5
4-5
/r2
min.
min.
min.
min.
min.
min.
min.
min.
min.
63
Continued
on
the next page

Microwave tips
There are no setting indications for the amount of food
you are preparing.
Microwave/test
Extend or reduce cooking times according to the following
rule
of thumb:
double the quantity
half the quantity
dishes
= double the time
= half the time
The food has become too
dry.
The food has not yet defrosted,
ked after the set time has
elapsed.
The food
edges but not done
middle after the set time has
elapsed.
After defrosting, the poultry
or meat
on the outside but has still
not defrosted
is
not hot or
is
overheated at the
is
partially cooked
in
is
not coo-
in
the
the middle.
Test dishes
Test dishes
in
accordance
Set a shorter cooking time or select a lower microwave setting. Cover the food and add more liquid.
Set a longer time. Select a higher microwave setting than
indicated. Larger quantities need longer. Consider the depth
of the food. Deeper foods need longer.
Stir the food occasionally and next time select a lower setting and a langer period of time.
Select a lower microwave setting. Switch on hot air
out selecting a temperature. Large amounts of food need to
be turned frequently when defrosting.
These dishes are used by testing institutes to test the quality
and function of microwave appliances. The power output
measured with the grid at shelf height
with German lndustrial Standard
DIN 44566
Weight
Setting, W
2.
Time, minutes
~
with-
is
Chicken, defrosting
Wrap aluminium foil around exposed parts (e.g. drumsticks, parson's nose). After the first stage of
the cooking has elapsed, turn the chicken and remove the foil. Allow 10-15 minutes' standing
at
time
Minced beef, defrosting
Turn
at
Rasberries. defrosting 250 g 180 W
Allow 5-10 minutes' standing time for them to defrost further.
Goulash, defrosting and heating
Covered. Separate and stir the goulash after 9 minutes.
the end for
the mince after the first stage of the cooking has elapsed. Allow 10-15 minutes standing time
the end for
it
to defrost further.
it
to defrost further.
1
kg
500 g
500 g
180W
+
90W
180W
+
90W
600W
14-16
14-16
9-11 min.
13-15
5-
13-15
min.
min.
min.
7 min.
min.
64

Microwave/test
dishes
Dish
Spinach. defrosting and heating
Covered. Separate and stir the spinach after 9 minutes.
Haddock
and cooking
Covered (shelf height
Peas, defrosting and cooking
Covered
Lentil stew, heating
Covered
Meat loaf, cooking
Chicken, cooking
fillet, defrosting
2).
Weight
450 g
400 g
300 g
1 kg
750 g
850 g
Setting, W
600W
600W
600W
600W
600W
600W
Time, minutes
14-16
min.
12-15 min.
6-
7 min.
14-16
20-22
16-18
min.
min.
min .
Covered.
time has elapsed.
Turnafter
Test dishes
Dish Weight
Soufflee*
(Test
Allow
Sponge mix
(Test
Allow to stand until cold
Meat loaf*
(Test
Allow to stand for 5 minutes
Minced beef*
Defrost (manufacturer)
A)
to
stand until cold
B)
C)
8 minutes. Leave
in
accordance with IEC publication 705, second edition 1988
to
stand
Utensil
1 kg Pyrex 226 S
Art.-No. 03.226.85
475 g
Pyrex
Art.-No. 03.828.80
828 F
900 g Pyrex 838 F
Art.-No. 03.838.80
500 g
HP, Montabaur
Art.-No.
710 (top part o
in
the appliance for a further 8 minutes after set
Time, minutes
approx. 27 min.
approx.
approx. 30 min.
approx.
approx. 10 min.
nl
Setting, W
360W
600W
360W
180W
+90W
y)
7 min.
5 min.
Allow to stand for 5 minutes .
Strawberries
Defrost
Allow to stand for 5 minutes
• Glass pan, shelf height
250 g Reppel & Vollmann,
2
Kierspe (mahufacturer)
Art.-No.
4100
65
180W
approx . 6 min.

Auto-programmes
Auto-defrost and
auto-cook
programmes
Küppersbusch
90
180
360
600
MAX
90
180
360
600
MAX
-j+
This appliance has 6 defrost programmes and 6 cooking
programmes. Setting
Enter the programme number and the weight of the food.
Everything eise
Setting procedure: A
1.
Press programme button. P:O will be illuminated
display.
2.
Enter the programme number using the adjustment
knob, e.g.
3.
Press the weight button.
The programme number disappears and the lowest possible weight appears
4.
Enter the weight of the food with the adjustment knob.
Example: 0.7
5.
Press the start button
The weight readout disappears and the time length
appears.
1s
3.
1.5
is
very
easy.
done automatically.
in
the display.
kg=
0.7
kg=
1.5
in
the
The time counts down.
Once the set time has expired, a signal will sound for thirty
seconds.
opening the door.
Correction:
Press the cancel button twice and reset.
Cancel:
Press the cancel button twice. The time reappears.
Please note:
::J
lf you want to find out the programme or
while the programme
weight buttons. The required readout
display for 4 seconds.
You
can turn
it
off by pressing the cancel button
weig~t
is
running, press the programme or
will
appear
again
in
the
or
66

Auto-programmes
1 .
Auto-defrost
programmes
Food
Pork, oft the bone
Shallow-frozen foods
Remove the deep frozen food from the packing and
The food
is
best defrosted on a glass plate or lid. At
events, a flat utensil suitable for microwave should be used,
placed on the glass pan at shelf height
Place poultry on the
pide,
Only defrost the amount of bread required
out.
Once the food has defrosted,
1 O minutes
in
order for the temperature to stabilize.
Programme
button
X 1 X
Programme
number
(20
minutes
1s
best suited for
th1s
progro.mme.
1 .
breast facing upwards.
as
it
soon dries
it
should stand for a further
in
the case of !arge pieces of meat),
Weight
button
Weight range Start
(kg) button
0.5-1.5 kg
we1gh
all
X
it.
Beef, off the bone
Chicken
Vegetable
Dry cake
Bread
X
X
X
X
X
2
3
4
5
6
X
X
X
X
X
0.5-1.5 kg
0.4-1.6 kg X
0.3-1.0 kg X
0.3-1.5 kg
0.2-1.5 kg
X
X
X
67

Auto-programmes
Auto-cook
programmes
Insert the grid or glass pan at shelf height
1.
The food should always be covered.
1
times the quantity of water to rice and enter the
Add 1
entire weight
/
2
(i.e.
rice plus water).
You
can also use other
types of cereal (e.g. unripe speit grain, buckwheat, etc.).
Select a large utensil
a~
deep as possible,
as
cereals tend to
froth when cooking.
Cut potatoes or fresh vegetables into pieces and add
approximately
1 tablespoon water per 100
Deep-frozen vegetables
You
will obtain even better results
in
a cream sauce are not suitable.
if
you stir the food after
g.
of the time has elapsed.
Programs
fish should be arranged
11
and
12
are primarily suitable for fillet of fish. The
in
layers
in
the dish, keeping it
as
as possible.
Once the food has cooked, leave
it
to stand for a further 2 to
3 minutes for the temperature to stabilize.
2
/
flat
3
Food
Rice
Potatoes
Vegetables, fresh
Vegetables,
deep-frozen
Fish,
fresh
Fish,
deep-frozen
Programme
button
X 7 X
X
X
X
X
X
Programme
number
8
9
10 X
11
12
Weight
button
Weight range Start
(kg) button
0.2-1.0
X
X
0.2-1.0
0,2-1.0 kg
0.2-1.0
X
X 0.2-0.8
0.2-1.0
kg
kg
kg
kg
kg
X
X
X
X
X
X
68

Oven without
microwave
Setting procedure
Oven
without
microwave
Oven to switch off
manually:
Oven to switch off
automatically:
1 . Press the button for the required heating mode.
2.
Use the temperature selector
ature or grill stage.
When the food
selector.
1 . Press the button for the required heating mode and set
the temperature selector.
2.
Press the oven button O .
You
have 3 seconds
of time .
3.
Use the adjustment knob
time.
4.
Press the start button.
The cycle starts running.
Once the set time has elapsed, a signal will sound for
30 seconds.
door or pressing the cancel button.
is
ready, swifch off the temperature
in
which to start entering the length
You
can switch this off earlier by opening the
toset
toset
the required temper-
the required length
of
The time will reappear.
lmportant: Switch off the temperature selector, otherwise
will
the oven
Cancelling:
Press the cancel button twice. The time will reappear.
Please note:
0
You
carry on heating once the oven
can set a time up to 4 hours:
0 lf you have set more than one hour,
after the hour display. The point behind the "h" will start
blinking.
O Oven operation will be interrupted as soon
the oven door. Once the oven door
will
carry
on
operating.
door
is
closed.
an
"h" will appear
as
you open
is
closed, the oven
69

Oven
and
Oven and microwave
combined
Setting procedure:
microwave
1. Press the button for the required heating mode , and set
the temperature
combined
se1sctor.
Küppersbusch
,,.....
/-1
I_/.-,
1 I
.......
I-
~/
.....
90
180
360
600
MAX
1 )
2. Press the combination button
3.
Press the button for the microwave setting required.
have 3 seconds
4.
Turn
the adjustment knob until the required length of time ·
appears.
required .
5.
Press the start button.
The microwave and oven
You
in
which to start entering the setting.
can now enter other settings and times,
will
§].
You
switch off simultaneously.
Once the time has expired, a signal will sound for thirty
seconds.
or pressing the cancel button.
Switch off the temperature selector.
You
can turn
it
off earlier by opening the oven door
Correction:
Press the cancel button twice and reset.
Cancel:
Press the cancel button twice. The time will reappear.
-
Please note:
if
0 lf you have entered a microwave setting, the arrow will
light up above the selected setting.
hour,
an
0 lf you have set more than one
after the hour display. The point behind the "h" will start
blinking.
O Microwave operation will be interrupted as soon as you
open the oven door. Once the oven door
on
the microwave oven will carry
operating.
"h" will appear
is
closed again,
70

Charts
Meat, poultry
and fish
Charts
What utensils can you
use?
Roasting
bJ
00
Basically,
all
heat-resistant utensils suitable for microwave
cooking. Meta! roasting tins are only suitable for roasting
without the microwave oven. For !arge roasts of meat, you
can also use the glass pan.
lf the meat
should also be used as
is
placed directly onto the grid, the glass pan
an
anti-splash
tray.
Utensils can become very hot, so you should always use an
oven-cloth to remove food from the oven.
When taking out the food, place any glass utensil on a piece
on
of dry kitchen towel and not
a cold or wet surface as the
glass could crack.
in
The following information applies to roasting
utensil whereby the meat will become brown and crisp.
closed utensils, the roast retains more
oven stays clean.
20°c
higher, however.
You
have to set the temperature 1 0
of
a deep, open
In
its juices and the
to
Grilling
__
,„....,
EJ
.....
__
..,
~
--·-··r „
...
.._..--..-·--·
-· ...... _ ..
...., . .,,...
Always keep the oven door shut when grilling.
The food being grilled should be of the same thickness if
(at
possible
least 2 to 3 cm), to ensure that it browns evenly
and remains succulent. lt should be placed directly onto the
to
grid. lf you only have one piece of food
positioned beneath the grill, slightly
to
be grilled, it is best
the right or left
of
the
grid centre. The grid can either be turned upwards - or
downwards - , so that you can vary
how
far it
is
from the
grill elements.
In
order to catch the juices from the meat, position the glass
1,
..
,.
The food being grilled should be turned after about
thirds of the time indicated
pan at shelf height
You
may notice that the grill element switches off and on
automatically during grilling. This
as weil.
in
the charts.
is
normal ..
How
two
often this
occurs will depend on the setting you have selected.
71
Continued on the next page

Meat
Meat
Braised beef
(e.
g.
prime
Fillet of beef
Roast beef, rare to medium
Steaks, well-done
Steaks, rare to medium
Pork without rind
(e.g.
neck)
rib)
Weight
1
kg
1.5
kg
kg
2
kg
1
1.5
kg
kg 1
2
1
kg
1 kg open
1.5 kg
kg
2
Utensil
closed
open 1
open
grid
grid
Sh elf
height
2
2
2
1
2
5
5
2
2
2
Heating Temp. °C
mode Grill
[d
[d
[d
bl
[d
[d
00
EJ
EJ
00
00
00
200-210
180-200
180-190
210-230
200-210
190-210
200-210
Setting 3
Setting 3
190-200
180-190
160-170
Combination
button
§)
§1
§1
kg open
Pork with rind
(e.g. shoulder, knuckle) 1.5 kg
Cured/smoked pork,
on the bone
Meat loaf
Sausages
Roast
Leg of lamb, off the bone
veal
1
kg
2
1 kg
750 g
approx. grid and
750 g glass pan
1
kg
2 kg
1.5
kg
2
2
2
open
open
2
1
4
open
open 2
2
2
--
00
00
00
EJ
EJ
00
00
-
00
190-210
180-200
170-190
Setting 1
Setting 3
180-190
170-180
190-200
§1
§)
§1
72

Meat
Microwave setting
(W}
Length of time (minutes)
360
W,
10
360
360
180
90
180
180
360
W,
10 + 180
W,
20 + 180
W,
20 + 90
W,
65-75
W,
35 + 90
1
V\
40 + 90
,
W,
40-45
+ 180
W,
30-40
W,
55-65 min.
W,
65-75 min.
W,
10-15 min.
min.
W,
60-70
W,
60-70
min. X
Start Total time,
button minutes
min.
X
X
X
X
X
min. X
min. X
40-
50
65-
75
85-
95
80
100
120
30-
35
25
20
65-
75
95-105
100-110
100
140
160
40-
45
The chart applies to food being
placed into a cold oven.
Deep-frozen meat must be completely defrosted.
Turnroastbeef half-way through the
cooking time. After cooking, wrap
aluminium
foil
and allow to stand
in
in
the oven for 10 minutes.
When cooking pork, first cut into the
rind and place the meat into the
utensil with the rind-side down first, if
it
is
lf
tobe
you
turned.
are
roastirig a
lean
piece of
meat, add 2 to 3 tablespoons of
liquid.
The meat
is
turned half-way through
the roasting time. Large pieces of
meat-
1 . 5 kg and above- should be
tur'led twice.
When the roast
is
done,
it
should be
left to stand for a further 1 O minutes
after the oven has been switched off.
600
180
180
180
W,
W,
W,
W,
20-25
45-50
70-80
10 + 90
min. X
min. x
min. x
W,
40-50
min. X
20-
15
4570-
50-
25
50
80
60
73

Poultry/Fish
Poultry
2 chicken halves
Chicken pieces
1 whole chicken
2 whole chickens
Duck
Goose
Weight
400
g Grid and
each glass pan
500
g
1 kg open 2
1 kg each 2
1.7 kg
3 kg
Utensil
Grid and
glass pan
open
Grid and
glass pan
Sh elf
height
3
4
1
1
Heating
mode Grill
El
El
El
El
00
00
Temp. °C
Setting 2
Setting 2
Setting 2
Setting 2
210-220
220-230
Combination
button
§]
§]
§]
§]
§]
Fish
Grilled fish
Poached trout
Deep-frozen fish
Fish slices (e.g. steaks)
Tips
on
roasting and
grilling
Weight Utensil Shelf
height
300
1
kg
300
400g
g
g
Grid and 3
glass pan 2
covered 1
covered
Grid and
glass pan
2
4
Heatinp Temp. °C
mode Grill
El
El
El
Setting 3
Setting 2
Setting 3
Combination
button
[@
[@
The roast has become too dark Check shelf height and oven temperature
and the crackling
places
The roast looks good but the
sauce
is
burnt
is
burnt
in
N2xt time , use a smaller roasting utensil
or
74
add
more
liquid.

Poultry/Fish
Microwave setting
(W)
Length of time (minutes)
360
W,
360
360
360
180
180
W,
W,
W,
W,
W,
20 + 90
25-30
10-15
20-25
30-40
15 + 90
min.
min.
min.
min.
W,
W,
30-40
50-60
min.
min.
Start
button
X
--~
X
X
X
X
X
Total time,
minutes
25-30
10-15
20-25
30-40
45-55
70-80
The chart
is
based
on
the poultry
being placed into a cold oven.
Deep-frozen poultry must be entirely
defrosted.
Whole birds must be turned at least
once.
With duck or goose, prick the skin
under the wings so that the fat can
escape.
an
The poultry will become
crispier brown
times with butter, salt water, chicken
grease or orange juice.
if
you baste
even
it
several
Microwave
Length
180
360 W,
600
600
180W,
of
W,
12-15
25-30
W,
6-8
W,
12-15
15-18min.
SC!tting
(W)
time (minutes)
min.
min.
min.
min.
Start Total time,
button minutes
X
X
X
X
X
12-15
25-30
6-
8
12-15
15-18
The chart
is
based on the fish
being placed into a cold oven.
-
The roast looks good but the
sauce
is
too light and watery
The chart does not contain
any information for the
weight of your particular
roast
Next time, use a larger roasting utensil and less liquid.
Choose the nearest chart weight below the weight of what
are
you
cooking and extend the time.
75

Cakes and pastries
Cakes and pastries
What baking forms can
you use?
Charts:
Cakes
Victoria sponge, plain*
in
forms
Dark metal baking tins are the
can also use light-coloured baking tins.
lf the microwave oven is used as weil, utensils should
used which let microwave through and are heat-resistant
a minimum temperature uf 250°C. You can also use spring
forms if you put the form on the grid.
The following charts indicate
best use, where to position the accessories and
make the setting.
Combination
heights.
Utensil
Sh
height mode
Bowl, 2
ring-shaped
ob1ong
or
2
mode
most
what
is not suitable for baking at
suitable. With
heating
mode
elf Heating Temperature
oc
[d
~
170-190
140-160
hot
air you
be
to
you
should
how
to
two
shelf
Combination
button
Cakes base with
short-pastry edge
Flan base
Sponge cake
Nut cake
Fruit flan or cheesecake
short pastry*
----
Fruit cake
sponge mixture
Savoury flans •
(e.g. quiche or onion
-
--
--·- -
------
• Allow cak e to cool
flan)
down
Spring form
Flan tin
Spring form
Spring form
Dark spring
form
Spring form
bowl form
Spring form
in
the appliance for approx. 20 minutes.
or
2
2
2
2
2
~
~
[d
~
~
~
~
----
160-180
150-170
170-190
170-180
170-190
170-180
170-180
§1
§1
§1
§1
76

Cakes and pastries
Microwave setting
(W)
Length of time (minutes)
The values
a cold oven.
preheat the oven, baking times should be reduced by 5
1 o minutes. Temperature and cooking times will depend on
the type and quantity of pastry. For this reason, the charts
indicate ranges.
Start off by using the lower value and set
necessary.
in
the charts are based on the food being put into
Th
is saves electricity.
lf,
however, you prefer
it
higher next time if
A lower temperature ensures more even browning.
Start Baking time, The values
button minutes based
in
the charts are
on
the food being put into
a cold oven.
60-70
60-70
Always place cake tins
of
the grid.
in
the middle
to
to
90
360
90
180
W,
W,
W,
W,
20-25
30-40
30-35
35-45
X
X
X
X
25-35
25-35
25-35
20-25
30-40
30-35
35-45
~.
:.-~
.. -....
.
,~
.
----
~
...
.,.~
,
...
...
...
-,:
.....
___
„
~.._....
-
.....
-""!"'--~
'
·
·"'·
77

Cakes and pastries
Cakes
with a dry topping 1 tray 2
(sponge mixture)
with a moist topping
(e.g. yeast dough with apple
crumble)*
Swiss
Plaited bun with 500 g flour
Stollen with 500 g flour
Pizza
Yeast bread with 1.2 kg flour** 1 tray
(preheat)
on
baking trays
roll
(preheat) 1 tray
Utensil
2 trays 2+4
1 tray
2 trays 1+4
1 tray
1 tray
1 tray 1
2 trays
Sh
height
2
2
1+4
2
elf
Heating
mode
00
00
00
00
bJ
bJ
bJ
00
00
~
Temperature
oc
150-170
140-160
160-170
150-170
190-210
190-210
170-190
170-190
160-180
170-190
Baking time,
minutes
30-40
40-50
45-55
50-60
15-20
30-40
60-70
30-40
45-55
50-60
* Use the glass pan for fruit cakes containing a lot of juice.
**
Never pour water directly into the hot oven.
Small baked items
Small baked items
Biscuits
Shortbread biscuits
--
-----------
Push
edge towards the oven door.
A second baking tray
from any authorized dealer.
Utensil Sh elf Heating
1 tray
2 trays
1 tray
1 tray
2 trays 1+4
in
the baking tray
height
3
2+4
2
2
mode
bJ
00
bJ
00
00
as
far as
is
obtainable as a special accessory
it
will go, with the slanting
Temperature Cooking time,
oc
170-190
140-160
160-180
130- 150
130-150
minutes
10-25
20-30
25-30
25-30
35-45
Meringues
-- - - -
----
Choux pastry
·--·-----
1 tray
1 tray
2
2
78
00
---
00
-
60-80
170
-19
0
120-150
30-40

Cakes
and
pastries
Small baked items Utensil
Macaroons
-----·-··---
Puff pastry 1 tray
---------
Rolls (e.g. rye bread rolls) 1 tray
)
1 tray 2
2 trays
2 trays 2+4
Shelf
height
2+4
--
2
--
Heating Temperature
:::i
mode
bJ
~
~
~
bJ
c
120-140
100-120
170-190
160-
170
200-220
Cooking time,
minutes
30
-40
35-45
20-30
35-40
25-30
79

Bakes and gratins
Bakes and gratins
Baked sweets (e.g. baked
quark with fruit)
Baked savouries made of
cooked ingredients
(e.g. macaroni cheese)
Baked savouries made of raw
ingredients (e.g. potato gratin)
Strudel, sweet
Toast, browned,
T oasties, 9 pieces ·
9 pieces
Utensil
soufflee dish
soufflee dish
soufflee dish*
soufflee dish
or glass pan
grid
grid
Shelf
height
2
1
2
5
4
Heating Temp. °C
mode
~
EJ
EJ
~
El
El
grill stage
180-190
Setting 1
Setting 1
190-200
Setting 3
Setting 3
Combination
button
~
~
~
~
1 kg raw potatoes
*
Deep-frozen
precooked f oods
Strudel with fruit filling
Strudel with other filling
Ready-baked cake
French fries
Pizza
Utensil
baking try
baking try
in
original
wrapping
the grid
baking try
grid with
baking paper
on
Sh
elf Heating Temp. °C
height mode
1
1 .
1
3
2
~
~
00
bl
@
grill
190-200
170-180
180-190
220-230
170-180
Combination
button
§]
~
~
~
Baguette-type pizza
grid with
baking paper
2
80
@
170-180
§]

Bakes and gratins
Microwave setting
Length of time (minutes)
180
W,
25-30
min.
(W)
Start
button minutes
X
Total time,
25-30
The values
based on the f
a cold oven.
Place the bake on the grid
sil
suitable for microwave cooking
in
the charts are
:>od
being put into
in
a uten-
.-
360
600
180
W,
W,
W,
15-25
25-30
25-30
min.
min.
min.
X
X
X
15-25
25-30
25-30
5-
6
5-
8
Microwave setting
Length
360
360
180
180
90
W,
W,
W,
W,
W,
of
time (minutes) button minutes
15-20
15-20
25-35
12-14
14-17
min.
min.
min.
min. X
min. X
(W)
Start
X
X
X
Total time,
15-20
15-20
25-35
20-25
12-14
14-17
The values
based on the food being put into
a cold oven.
Follow the various manufacturers'
instructions on the packets. Our
values are approximate values.
Remove deep-frozen meals from the
aluminium packing and place
utensil suitable for microwave cooking, e.g. a soup bowl or a glass or
ceramic soufflee dish.
in
the charts are
in
a
81

Tips and advice
on baking
Baking
tips
lf you want
to
use one of
your own baking recipes
How
to find out if the cake
done
The cake sinks
The cake has risen
in
the
middle but is lower at the
edges
The top
of
the
cake
is
too
dark
is
Go by a similar type of cake
About ten minutes before the end of the baking time, prick
the deepest part of the cake with a th
When the mixture no longer sticks
switch off the oven and use the residual heat to finish cooking.
Use less liquid next time or set the oven temperature 10°C
lower. Make sure that you stir the mixture for long enough
(see recipe).
Do not grease the side of the spring-form. After baking ,
loosen the cake carefully from the sides with a knife.
Position the cake at a lower shelf height. Select a lower temperature and bake the cake for slightly langer. Use dark
metal tins. ·
or
biscuit
in
the charts.
in
wooden skewer.
to
the skewer, you can
The base
of
the cake is too
dark
The base
of
the fruit cake is
too light in colour. The juice
is running out
The bread
or
cake (e.g.
cheesecake) looks good but
is
soggy inside (run through
with streaks
You have used
heights
baked
on
of
water)
two
shelf
in
baking. The food
the higher tray
is
darker than on the lower one
is
far
The bake
too dark on
top
Position the cake at a higher shelf height and select a lower
temperature next time.
Use the glass pan as it
Use a little less liquid next time and bake at a lower temperature for slightly longer. lf the cakes are to have a moist
ping, bake the base first, sprinkle it with ground almonds
breadcrumbs and then put on the topping. Always tollow
recipes and baking times.
Select a slightly lower temperature
bake more evenly.
Trays which are put into the oven at the same time need not
necessarily be ready at the same time. Leave the lower trays
to bake for a further 5 to 10 minutes
Remove the crust and brown the food briefly under the grill.
Do not use parmesa n cheese for browning as it browns too
fast and tastes bitter . Next time, position the tin
shelf height and
redL1ce the temperature by 10°.
is
deeper.
to
ensure that the cakes
or
put them
in
earlier.
at
a lower
top-
or
The biscuits do not come off
the tray
Put the tray
biscuits immediately.
back
into the oven briefiy and then remove the
82

Baking
tips/Care
of
your
appliance
The
cake
of the tin
does not come out
Care
Outside of the
appliance:
)Air vent cover:
Loosen the sides of the cake once again carefully with a
knife. Turn the cake upside down again and cover the cake
tin
several times with a cold wet cloth. Grease the tin thor-
oughly next time. sprinkling on breadcrumbs
All
you need to
cloth. Never use any harsh cleaning agents
this will cause dull marks.
This can be removed and cleaned when the door
the case of table-top appliances, you can only remove the air
· vent cover from white appliances. When replacing the cover,
the notches should be facing upwards.
do
is
to wipe the appliance with a damp
as
weil.
or
abrasives as
is
open.
In
Oven:
For easier cleaning
Seif-clean enamel
to
to
come
cram
be
Your oven will remain smart for years
ber the following: '
0 Never use any hard abrasive pads or scourers.
O With very juicy cakes,
is
the tray. lt
is
impossible to remove juice which has dropped from
the baking
O The grill element
you can switch on the oven light.
better to use the glass pan as it
tray,
even with oven cleaning agent.
do
not try
is
fixed and cannot
if you remem-
too
much onto
is
deeper. lt
taken out.
'
.
The back and roof of the oven are coated
clean enamel, which cleans automatically while the oven is
being used. Occasionally, however, heavier stains will only
disappear after using the oven several times.
remove any residue from spices etc. with a soft brush or dry
cloth.
ion
A slight discolourat
clean feature.
of the enamel will not affect the seif-
in
a catalytic, seif-
You
can
Never use any oven cleaners.
83

Care of your appliance
Cleaning the other enamel
surfaces
Cleaning the door seal
Cleaning the door sealing
surfaces
Any light
vinegar solution.
lf the enamel suriaces
oven cleaner. Only use on a cold oven.
:i
Allow the cleaner to work.
oven to 50°C for 2 minutes and no more,
the enamel
sta1ns
In
the event of
can be wiped away with hot soapy water or
are
heavily stained,
par~1cularly
will
become marked.
stubborn stains. warm the
it
is
best to use
as
0 Wipe out the oven thoroughly.
The door
water (not
When the door
carefully
Always keep the door sealing suriaces clean,
ensure that the oven door always shuts properly.
seal
can be removed and cleaned
in
the dishwasher).
seal
has been removed, close the oven door
in
order to avoid any damage.
in
hot soapy
in
otherwise
order to
CJeaning the glass cover
on the oven roof
Accessories
Twist and remove the glass cover from its socket while the
oven
is
cold
(see
illustration, white arrow). Clean any light
stains on the glass cover with a detergent, and use a green
scourer on more stubborn stains.
When reinserting, make sure that the over screws firmly into
place.
Soak accessories immediately after use.
remove any remaining soiling easily with a brush or a washing-up sponge. The grid can be cleaned with stainless steel
cleaners. The glass pan can be cleaned
You
can then
in
the dishwasher.
84

What to do if there
is a problem
Problemsand repairs
lf
a problem does occur,
very minor. The following chart contains various tips.
it
may often be due to something
Problem
The appliance does not
Possible cause
Faulty fuse
function
Appliance not plugged
The microwave oven does not Door
switch on
)
Start button has not been
is
not properly closed
in
Tips and remedies
Check whether the oven fuse
the fuse box
in
Plug
the appliance.
is
in
order.
Check whether there are
remains of food or a small
object jammed
Make sure that the
in
the door.
door
sealing
surfaces are clean.
Press the start button.
pressed
The food
slower
to
heat and Microwave setting
is
too low Use a higher setting.
is
cook than before A !arger amount than usual was Double the amount - double
put
in
the appliance the time.
The food was colder than usual Stir or turn the food
occasionally.
in
Repair
lf the suggestions overleaf have not helped, you can turn
to
our customer service network. Repairs must only be carried
is
out by authorized service technicians. lt your appliance
not
repaired properly, you could be putting yourself in consider-
You
able danger.
bers of the nearest service centres
will find the addresses and telephone num-
in
the telephone directory.
The service centres named will also be pleased to tell you
is
which
Always quote your appliance's
FD
•
centre.
open the oven door.
In
order that you
in
the event of a problem, we would suggest that you enter
your nearest service centre.
number (manufacturing
You
will find the rating plate with the numbers if you
do
not have to spend a long time searching
E number (product no.) and
no.)
when contacting the service
your appliance data here rightaway.
ENo .............................................................................
FD
No ....
„.„
............. „ ..
„.„.„
.. „ ........ „ ......
„„„„.„
.....
„.„
„.1
..
.
85

•

Notizen
Memo
Prendre
Prendere
des
notes
appunti
Aantekening
„
)
„
. )

Küppersbusch Vertriebsgesellschaft
mbH
Österreich:
Postfach
10
01
32
45801 Gelsenkirchen
Hausanschrift:
Küppersbuschstr.
16
45883 Gelsenkirchen
Telefon: (0209) 4
Teletex: 20
931810
Telefax: (0209) 4
01
01
- 0
- 3 03
Küppersbusch Ges.m.b.H.
Eitnergasse
1231
Wien
13
Telefon: (0222) 86 680-0
Telefax: (0222) 86 680-72
)
Küppersbusch
Ai._.LERFEINSTE
KLJCHENTECHNIK
L.LJ
__J
z
 Loading...