

Kuchef TK-1818R2A Instruction Manual
AFTER SALES SUPPORT
1300 886 649
info@tempo.org
AUS
MODEL: TK-1818R2A PRODUCT CODE:47365 10/2014
N13275
INSTRUCTION MANUAL
Espresso Machine
Model Number TK-1818R2A

2
AFTER SALES SUPPORT
1300 886 649
info@tempo.org
AUS
MODEL: TK-1818R2A PRODUCT CODE:47365 10/2014
Welcome
Congratulations on choosing to buy a Kuchef® product.
All products brought to you by Kuchef® are manufactured to the highest
standards of performance and safety and, as part of our philosophy of
customer service and satisfaction, are backed by our comprehensive
3 Year Warranty.
We hope you will enjoy using your purchase for many years to come.

3
AFTER SALES SUPPORT
1300 886 649
info@tempo.org
AUS
MODEL: TK-1818R2A PRODUCT CODE:47365 10/2014
02 Welcome
04 Warranty Details
05 General Safety Instructions
07 Product Overview
08 Getting Started
11 Instructions
18 Other Useful Information
22 Recipes
23 Repair and Refurbished Goods or Parts Notice
Contents

4
AFTER SALES SUPPORT
1300 886 649
info@tempo.org
AUS
MODEL: TK-1818R2A PRODUCT CODE:47365 10/2014
Espresso Machine
Warranty Details
The product is guaranteed to be free from defects in workmanship and parts
for a period of 36 months from the date of purchase. Defects that occur
within this warranty period, under normal use and care, will be repaired,
replaced or refunded at our discretion, solely at our option with no charge for
parts and labour. The benefits conferred by this warranty are in addition
to all rights and remedies in respect of the product that the consumer
has under the Competition and Consumer Act 2010 and similar state and
territory laws.
Our goods come with guarantees that cannot be excluded under the
Australian Consumer Law. You are entitled to a replacement or refund for
a major failure and to compensation for any other reasonably foreseeable
loss or damage. You are also entitled to have the goods repaired or
replaced if the goods fail to be of acceptable quality and the failure does
not amount to a major failure.
YEAR WARRANTY
3

5
AFTER SALES SUPPORT
1300 886 649
info@tempo.org
AUS
MODEL: TK-1818R2A PRODUCT CODE:47365 10/2014
General Safety Instructions
Read this manual thoroughly before first use, even if you are familiar with this
type of product. The safety precautions enclosed herein reduce the risk of fire,
electric shock and injury when correctly adhered to. Keep the manual in a safe
place for future reference, along with the completed warranty card, purchase
receipt and carton. If applicable, pass these instructions on to the next owner of
the appliance.
Always follow basic safety precautions and accident prevention measures when
using an electrical appliance, including the following:
Electrical safety and cord handling
• Voltage: Make sure your outlet voltage and circuit frequency correspond to
the voltage stated on the appliance rating label.
• Wall outlet: Only plug the appliance into a properly earthed electrical outlet.
• Do not immerse: To protect against fire and electric shock, do not immerse
the cord, plug or the appliance itself in water or other liquid, or expose any of
the electrical connections to water.
• Protect the cord: Do not kink, bend, squash or damage the power cord
and protect it from sharp edges and heat. Do not let it touch hot surfaces,
including the machine’s hot surfaces. Make sure the cord does not hang over
the edge of a table or benchtop and nothing is placed on top of the cord.
• No extension cord, no timer: Do not use the appliance with an extension
cord. Do not use it with a timer or a separate remote control system.
• Damage: Do not pick up or operate the appliance if the power supply cord,
plug or housing is damaged. Do not use the appliance after it malfunctions or
has been damaged in any manner. A damaged cord or plug must be replaced
by appropriately qualified personnel in order to avoid a hazard. In case of
damage, unplug the machine and contact our after sales support line for advice.
• Disconnect: Unplug the espresso machine from the power supply:
• If anything unusual occurs during the brewing process.
• Before cleaning, servicing or moving the machine (allow it to cool before
cleaning).
• If you will not use it for an extended time (e.g. when going on holidays).
To disconnect, turn any control to the off position and unplug the machine
from the wall outlet. When unplugging, grab the plug, do not pull the cord.
• RCD: Unless your home is already fitted with a residual current device (safety
switch), we recommend installing an RCD with a rated residual operating
current not exceeding 30mA to provide additional safety protection when
using electrical appliances. See your electrician for professional advice.

6
AFTER SALES SUPPORT
1300 886 649
info@tempo.org
AUS
MODEL: TK-1818R2A PRODUCT CODE:47365 10/2014
General Safety Instructions (Cont.)
Usage conditions and restrictions
• Domestic use only: This appliance is intended for indoor domestic use
only, which includes use in households, staff kitchen areas in shops,
offices, in farm houses and in other working environments, use by clients
in hotels, motels, bed and breakfast establishments, other residential type
environments and in catering and similar non-retail applications.
• Intended purpose: This appliance is NOT suitable for commercial or outdoor
use. Do not use it for anything other than its intended purpose, and only use
it as described in this manual. Any other use may cause fire, electric shock or
injury. We accept no liability for any damage due to improper use or handling.
• Accessories: Do not use this appliance with accessories that are not supplied.
• Usage restriction: The appliance is not intended for use by persons (including
children) with reduced physical, sensory or mental capabilities, or lack of experience and knowledge, unless they have been given supervision or instruction
concerning use of the appliance by a person responsible for their safety.
• Children: Young children should be supervised to ensure they do not play
with the appliance. Close supervision is necessary when any appliance is
used by or near children.
• Work surface: Place the espresso machine on a flat, stable, heat resistant
surface, in a dry environment, away from water.
• Do not use on hot surfaces: Never place the machine on a hot surface such
as a hotplate or inside a heated oven. Never use it around an open flame.
• When in use: Do not move the appliance and do not leave it unattended.
CAUTION: Hot!
• Surfaces: The temperature of accessible surfaces may be high during
operation. Do not touch any hot surfaces; use knobs and handles.
• Steam wand/nozzle: Take care when handling the steam wand as it becomes
very hot during use. This may cause burns in case of contact. Do not direct
the steam nozzle towards your hands or any body parts.
• During operation: To avoid burns and/or other injuries from hot steam or
water, never remove the water container or porta filter while brewing coffee or
frothing milk. Exercise extreme caution when moving the unit with hot liquids.
• Porta filter: Use caution when removing the porta filter. The metal parts may
still be very hot. Also, there may be hot water floating on top of the filter. Hold
it only by the handle when disposing of the brewed coffee grounds.
7
AFTER SALES SUPPORT
1300 886 649
info@tempo.org
AUS
MODEL: TK-1818R2A PRODUCT CODE:47365 10/2014
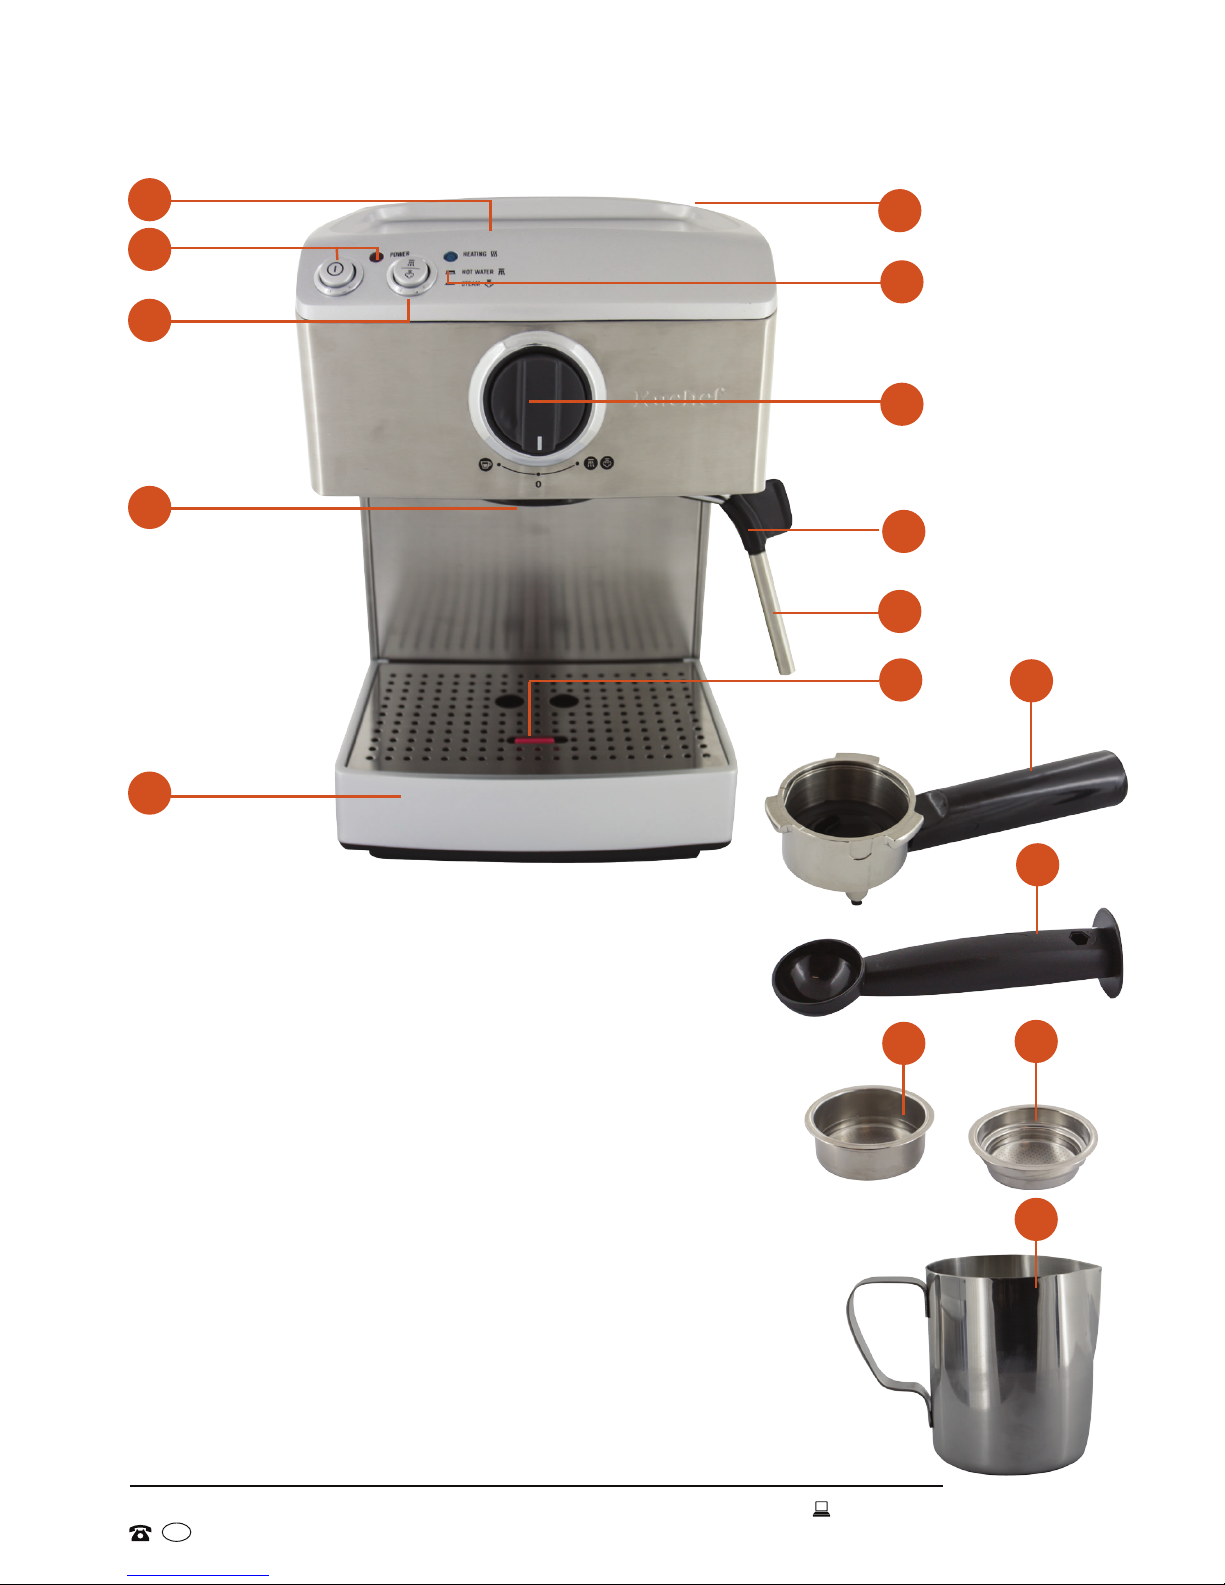
Product Overview
14
15
4
5
1
2
3
6
8
10
9
7
12
1 Cup warming area
2 ON/OFF button and POWER indicator light
3 HOT WATER/STEAM selector
4 Group head
5 Removable drip tray with drainer
6 1.6L Water container and lid (at the back)
7 HEATING indicator light
8 Function dial (espresso <-- 0 –-> water/steam)
9 Steam wand and nozzle with cool touch grip
10 Stainless steel frothing attachment
11 Drip tray floater (pops up when the drip tray is full)
12 Stainless steel porta filter with cool touch handle
13 Measuring spoon with tamp
14 Deep filter (for 2 cups espresso, or a double shot)
15 Shallow filter (for 1 cup espresso)
16 500ml Milk jug
17 Silicone mat (not pictured, for optional use on the drip
tray drainer)
11
13
16
8
AFTER SALES SUPPORT
1300 886 649
info@tempo.org
AUS
MODEL: TK-1818R2A PRODUCT CODE:47365 10/2014
Getting Started
Before first use
• Unpack the appliance but keep all packaging materials until you have made
sure your new espresso machine is undamaged and in good working order.
Plastic wrapping can be a suffocation hazard for babies and young children,
so ensure all packaging materials are out of their reach.
• Inspect the cord and plug for damage or wear before each use. Do not
use the appliance if the appliance or its cord have been damaged or are not
working properly. In case of damage, contact the after sales support line.
• Read all instructions in this manual and make sure you understand all
warnings. Refer to the Product Overview on page 5 to familiarise yourself with
the product and identify all parts.
• Remove and wash the water container (see page 11), porta filter and filters,
drip tray and drainer, and the measuring spoon in warm water and a little
mild detergent to remove any dust from transport. Rinse and dry each part
thoroughly, then refit the drip tray and drainer. Wipe the steam wand clean.
• Flush the internal brewing system as follows:
1. Fill water into the container (see page 11 for details).
2. Put a filter into the porta filter – without any ground coffee at this stage –
and engage it onto the brew head (see page 10 for details).
3. Place a larger container underneath the outlet openings.
4. Plug the machine into a wall outlet and set the hot water/steam selector to
the HOT WATER position (button released).
5. Press the ON/OFF button to turn the appliance on, and set the function dial
to the position. As soon as the HEATING light goes out, hot water will
start flowing from the outlets.
6. While watching the container so it does not overflow, leave the pump
running until about half the water has passed through. Then turn the
function dial to the neutral position to switch off the pump.
7. Empty the hot water out of the container and place it under the steam wand
8. Turn the function dial to the position. CAUTION: Take care, as soon
as the heating light goes out, steaming hot water will start flowing from the
steam wand, and there may be some splattering!
9. While watching the container, let the water pass through until the amount
left in the container has reached the MIN mark.
10. Then turn the function dial to the neutral position to switch off the pump.
• Follow this same procedure if the appliance has not been used for a week,
or for a longer period of time.
 Loading...