

Page 1
N13275
Model Number 104906
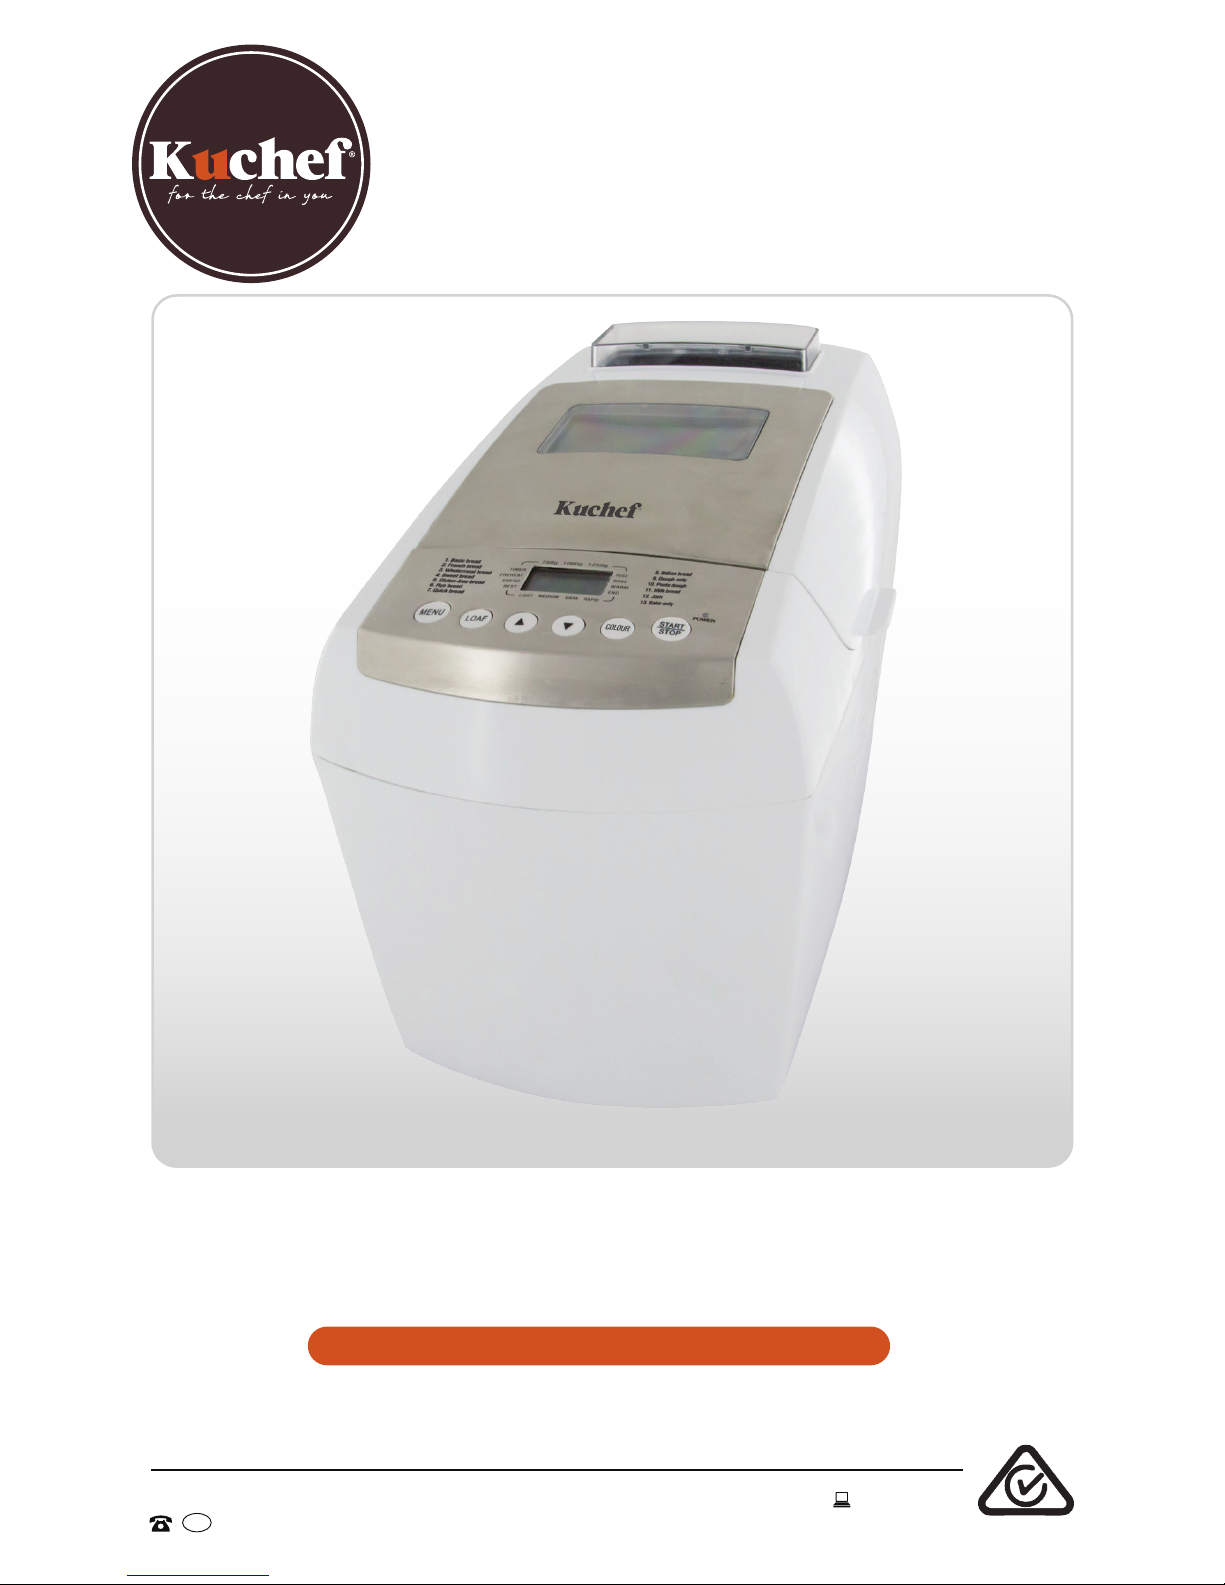
Bread Maker
INSTRUCTION MANUAL
AFTER SALES SUPPORT
1300 886 649
info@tempo.org
AUS
MODEL: 104906 PRODUCT CODE: 50138 07/2015
IM Version No: V1.3 Issue Date: 09 April 2015
Page 2

2
AFTER SALES SUPPORT
1300 886 649
info@tempo.org
AUS
MODEL: 104906 PRODUCT CODE: 50138 07/2015
Welcome
Congratulations on choosing to buy a Kuchef® product.
All products brought to you by Kuchef® are manufactured to the highest
standards of performance and safety and, as part of our philosophy of
customer service and satisfaction, are backed by our comprehensive
3 Year Warranty.
We hope you will enjoy using your purchase for many years to come.
Page 3

3
AFTER SALES SUPPORT
1300 886 649
info@tempo.org
AUS
MODEL: 104906 PRODUCT CODE: 50138 07/2015
Contents
02 Welcome
04 Warranty Details
05 General Safety Instructions
08 Product Overview
09 Getting Started
16 Instructions
21 FAQs and Troubleshooting Guide
25 Other Useful Information
28 Recipes
43 Repair and Refurbished Goods or Parts Notice
Page 4

4
AFTER SALES SUPPORT
1300 886 649
info@tempo.org
AUS
MODEL: 104906 PRODUCT CODE: 50138 07/2015
The product is guaranteed to be free from defects in workmanship and parts
for a period of 36 months from the date of purchase. Defects that occur
within this warranty period, under normal use and care, will be repaired,
replaced or refunded at our discretion, solely at our option with no charge for
parts and labour. The benets conferred by this warranty are in addition
to all rights and remedies in respect of the product that the consumer
has under the Competition and Consumer Act 2010 and similar state and
territory laws.
Our goods come with guarantees that cannot be excluded under the
Australian Consumer Law. You are entitled to a replacement or refund for
a major failure and to compensation for any other reasonably foreseeable
loss or damage. You are also entitled to have the goods repaired or
replaced if the goods fail to be of acceptable quality and the failure does
not amount to a major failure.
YEAR WARRANTY
3
Bread Maker
Warranty
Details
Page 5

5
AFTER SALES SUPPORT
1300 886 649
info@tempo.org
AUS
MODEL: 104906 PRODUCT CODE: 50138 07/2015
General Safety Instructions
IMPORTANT SAFETY INSTRUCTIONS
READ CAREFULLY AND KEEP FOR FUTURE REFERENCE
Read this manual thoroughly before first use, even if you are familiar with this
type of product. The safety precautions enclosed herein reduce the risk of re,
electric shock and injury when correctly adhered to. Keep the manual in a safe
place for future reference, along with the completed warranty card, purchase
receipt and carton. If applicable, pass these instructions on to the next owner of
the appliance.
Always follow basic safety precautions and accident prevention measures when
using an electrical appliance, including the following:
Electrical safety and cord handling
• Correct voltage: Make sure your local outlet voltage and circuit frequency
correspond to the voltage indicated on the appliance rating label. If it does not
match, contact the after sales support line and do not use the appliance.
• Safe connection: Connect the appliance to a properly earthed mains socket.
Insert the plug properly into the mains socket. Do not alter the plug.
• Do not immerse: To protect against electric shock, do not immerse the cord,
plug or the appliance itself in water or other liquid. Only clean these parts
with a damp cloth; never wash the motor housing in water. If the appliance is
accidentally immersed, immediately unplug it, dry it and have it checked by
qualied service personnel.
• Moisture: Ensure your hands are dry before handling the plug or switching on.
• Protect the power cord: Do not kink, squash or strain the power cord and
protect it from sharp edges and heat. Do not let it hang over the edge of a
benchtop; do not place anything on top of the cord. Do not wrap it around the
appliance, and never pull the cord to lift up, carry or unplug the appliance.
• No extension cord: Fully unwind the power supply cord before using the
appliance. Do not use this appliance with an extension cord.
• Check the power cord: Check the power cord regularly for visible damage. If
it is damaged, it must be replaced by the manufacturer, its authorised service
centres or similar qualied personnel in order to avoid any hazards.
• Do not use when damaged: Do not pick up or operate an appliance with
a damaged cord or plug, or after the appliance malfunctions or has been
dropped or damaged in any manner. A damaged cord must be replaced by
the manufacturer or a qualied person in order to avoid a hazard. In case of
damage, contact our after sales support line for advice.
Page 6

6
AFTER SALES SUPPORT
1300 886 649
info@tempo.org
AUS
MODEL: 104906 PRODUCT CODE: 50138 07/2015
General Safety Instructions (Cont.)
• Domestic indoor use only: This appliance is intended for indoor
household use only. It is not suitable for commercial use. Do not use it
outdoors or in areas with high heat or humidity levels.
• Intended use: Do not use the appliance for anything other than its
intended purpose: baking household quantities of bread, making dough or
cooking jam.
• Use of accessories: Only use this appliance with the accessories sold
with it, and only use it as described in this manual. The use of accessory
attachments from other brands may cause injury and damage. We assume
no responsibility for any eventual damages caused by improper or faulty
use or noncompliance with these instructions.
• No external timer: This appliance is not intended to be operated by means
of an external timer or separate remote control system.
• Usage restrictions: This appliance is not intended for use by persons
(including children) with reduced physical, sensory or mental capabilities, or
lack of experience and knowledge, unless they have been given supervision
or instruction concerning use of the appliance by a person responsible for
their safety.
• Supervise children: Children should be supervised to ensure they do
not play with the appliance. Close supervision is necessary when any
appliance is used by or near children.
• Unattended: Never leave the appliance unattended or move it during
operation.
• Disconnect after use: Switch off the appliance and unplug the cord from
the outlet when you have nished using the appliance, before changing
accessories and before cleaning. When disconnecting, grip the plug, do not
pull the cord.
• Unattended: Do not leave the appliance unattended when it is connected to
power.
• RCD: Unless your home is already fitted with a residual current device
(safety switch), we recommend installing an RCD with a rated residual
operating current not exceeding 30mA, to provide additional safety
protection when using electrical appliances. See your electrician for
professional advice.
Usage conditions and restrictions
Page 7

7
AFTER SALES SUPPORT
1300 886 649
info@tempo.org
AUS
MODEL: 104906 PRODUCT CODE: 50138 07/2015
• Hot surfaces: The temperature of accessible surfaces may be high when
the appliance is operating. Do not touch hot surfaces while the appliance
is in use, or immediately after use. The viewing window and baking tin
will get very hot during the baking process. Always wear oven mitts when
touching the window and removing the baking tin.
• Moving parts: Avoid contact with moving parts.
• Electrical safety: ALWAYS switch off the appliance and unplug it from the
power source after use. NEVER remove the baking tin or disconnect the
plug while the appliance is in use.
General Safety Instructions (Cont.)
• Location: Place the appliance on a heat-resistant, dry and stable surface,
such as a kitchen table or benchtop, so that the appliance cannot tilt or slip.
Leave a space of at least 10cm from the wall, cupboards, other appliances
or ammable items.
• Protect from heat: Do not place the appliance near a hot gas or electric
stove, in a heated oven, or near an open ame or other heat source.
• Do not cover: Do not cover any hot surfaces with any objects. Do not put
ammable materials on top of the appliance. Do not block, cover or touch
the ventilation holes while the appliance is in use.
• Before you start: Check that the lid and baking tin are correctly mounted.
• Filling: To avoid spilling, remove the baking tin from the appliance to ll it.
• Switching on: Only switch on the appliance when it is lled with
ingredients or dough in order to prevent overheating.
• Cleaning: Allow the unit to cool down completely before cleaning it and
before attaching or taking off parts.
• After use: Never use the baking tin for storage of ingredients.
• Repair: Do not replace components yourself except any spare parts
provided by the distributor to avoid any damage or injury.
Safe usage
CAUTION!
Page 8
8
AFTER SALES SUPPORT
1300 886 649
info@tempo.org
AUS
MODEL: 104906 PRODUCT CODE: 50138 07/2015
9
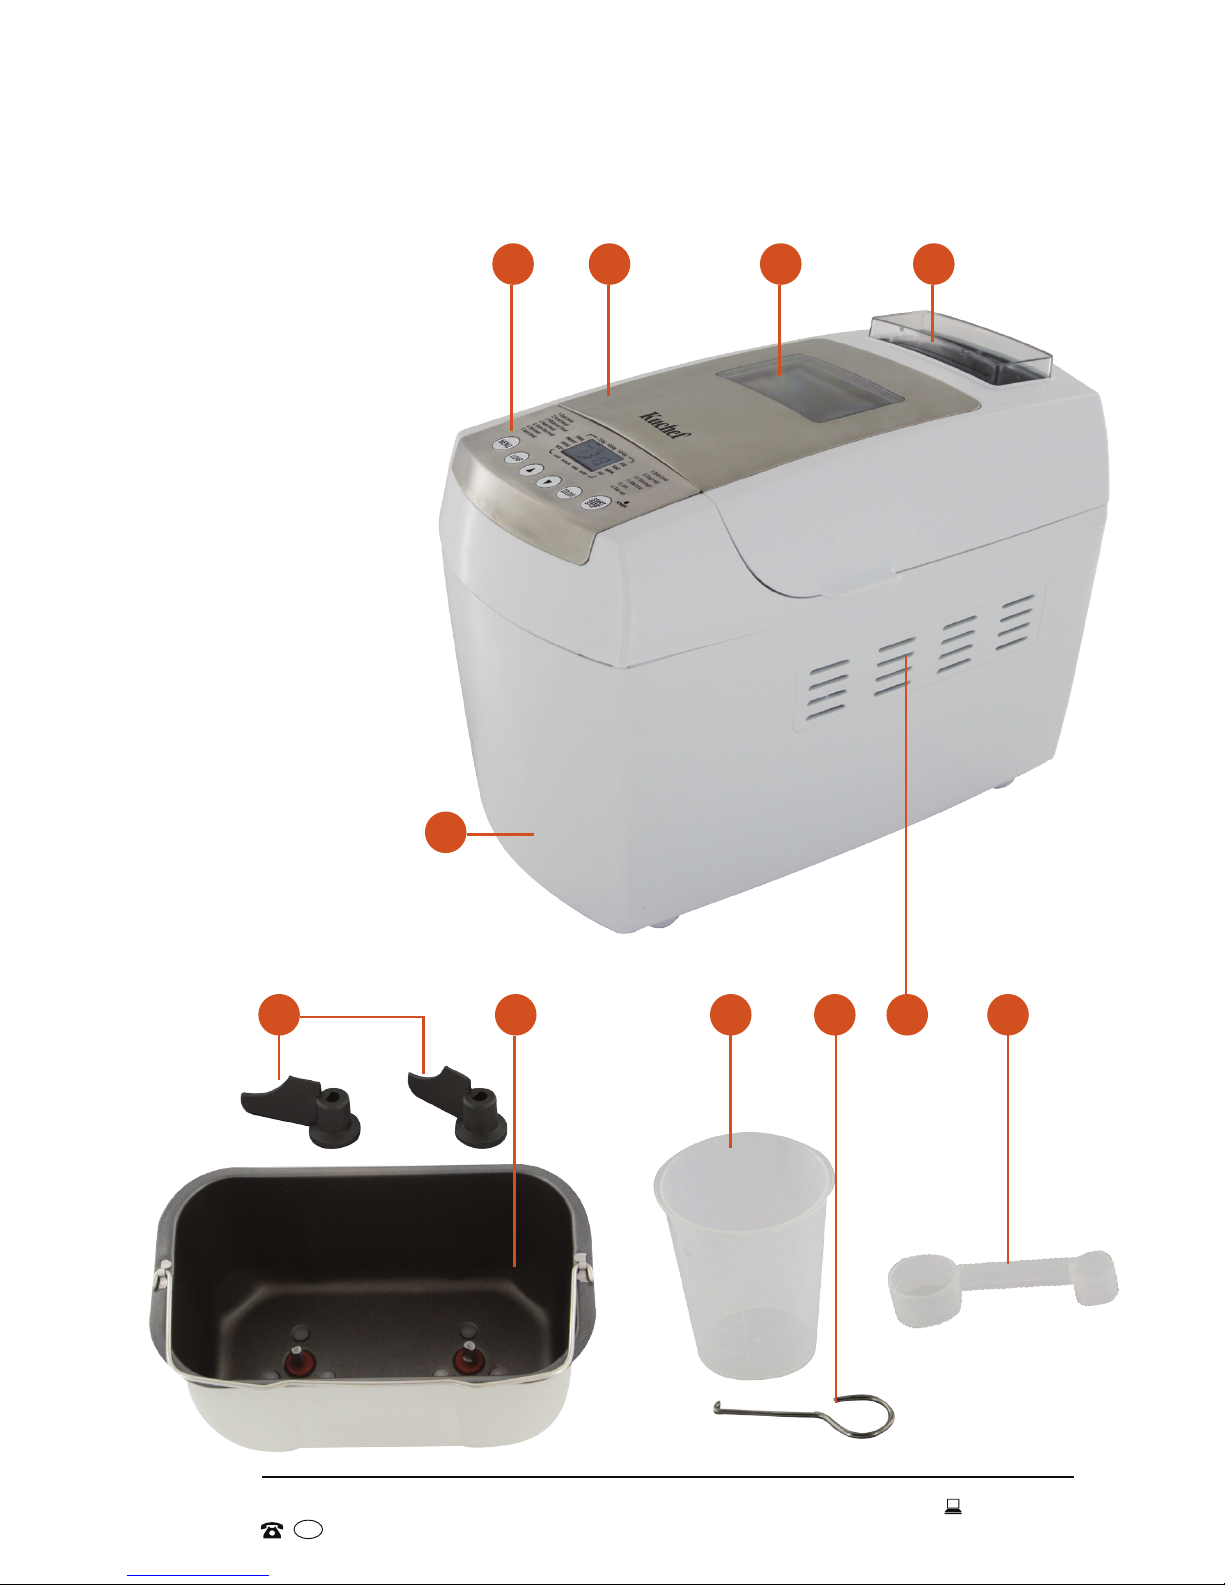
Product Overview
4
Scope of delivery
A Bread maker
1 Control panel (see
pages 9–10 for details)
2 Lid (removable)
3 Viewing window
4 Fruit and nut dispenser
5 Kneading blades (2)
6 Baking tin
(non-stick coated)
7 Measuring cup
8 Kneading blade
remover
9 Ventilation holes
(on both sides)
10 Measuring spoon
(1 tbsp, 1 tsp)
B Other inclusions
(not shown):
Instruction manual
Quick start guide
Baking tips
Warranty card
32
1
87
10
5 6
A
Page 9
9
AFTER SALES SUPPORT
1300 886 649
info@tempo.org
AUS
MODEL: 104906 PRODUCT CODE: 50138 07/2015
Getting Started
Button Function / Options Program
(if applicable)
MENU Press to select the program:
Basic, French, Wholemeal, Sweet, Gluten-free, Rye, Quick,
Italian, Dough only, Pasta dough, Milk bread, Jam, Bake only.
LOAF Press to select the loaf size:
750g, 1000g, 1250g.
1 Basic, 2 French,
3 Wholemeal,
4 Sweet, 5 Glutenfree, 6 Rye, 8 Italian,
11 Milk
/
(DELAYED
START TIMER)
Press to set the delayed start time in 10
minute increments. (For example, to start
the program in 40 minutes, press four
times). For program 13 (Bake only), you
can also use this button to prolong the
baking time by one hour.
1 Basic, 2 French,
3 Wholemeal,
4 Sweet, 6 Rye,
11 Milk
COLOUR Press to select the crust colour:
Light, Medium, Dark; or press to
accelerate the baking process of
programs 1, 2 and 3 and reduce the total
program time by one hour.
Colour: 1 Basic,
2 French, 3 Wholemeal, 4 Sweet,
5 Gluten-free, 6 Rye,
8 Italian, 11 Milk
Rapid: 1 Basic,
2 French, 3 Wholemeal
START/STOP Press to start the program or begin the timer countdown.
Press and hold for a few seconds to stop and cancel the
program, then press MENU and select a different program.
POWER ON The power on indicator will turn red as soon as you press the
START button.
Control panel
Page 10
10
AFTER SALES SUPPORT
1300 886 649
info@tempo.org
AUS
MODEL: 104906 PRODUCT CODE: 50138 07/2015
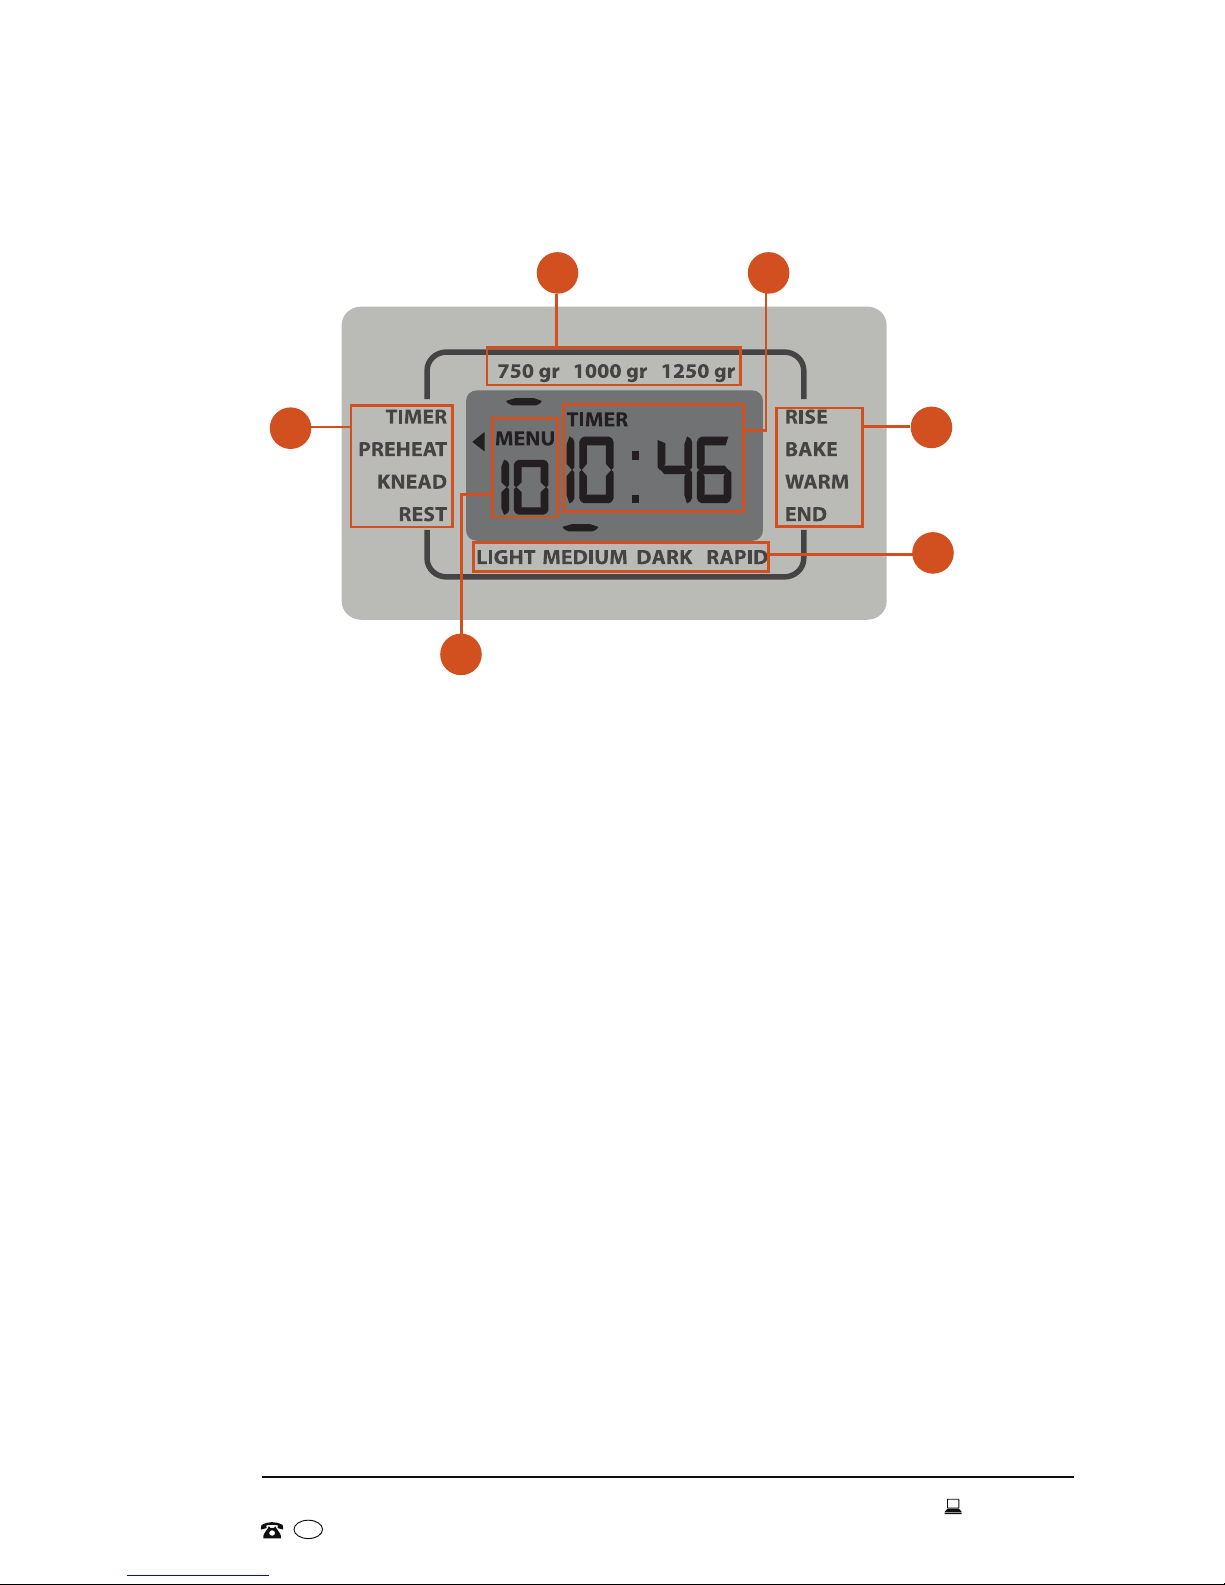
Getting Started (Cont.)
The LCD screen displays the selections you have made for the bread-making
process, including the size of your loaf, the chosen crust colour and the
stage of the bread-making process. When plugged into a power point, the
appliance will sound a signal and the LCD screen will light up.
1 Current program stage: During the different stages of the baking
process, the arrow on the display shows the current stage: Timer,
Preheat, Knead, Rest, Rise, Bake, Warm (1hr) and End.
2 Loaf size: The small bar in the top row of the display shows the selected
loaf size: 750g, 1000g, 1250g.
3 Timer: Depending on the stage of the bread-making process, the
display will show the total program time of the selected program, or the
countdown timer if you have set a delayed start, or the time remaining
once the program has started. The maximum delay time is 15 hours.
4 Crust colour: The small bar in the bottom row of the display shows the
selected crust colour: Light, Medium, Dark. The Rapid option is available
for programs 1, 2 and 3.
5 Menu: This is the selected program (see page 18 for details of all
available programs).
LCD screen
2
1
5
1
3
4
Page 11
11
AFTER SALES SUPPORT
1300 886 649
info@tempo.org
AUS
MODEL: 104906 PRODUCT CODE: 50138 07/2015
Before first use
• Unpack the appliance and keep the original packaging carton and
materials in a safe place. It will help prevent any damage if the product
needs to be transported in the future. In the event it is to be disposed of,
please recycle all packaging materials where possible.
• Plastic wrapping can be a suffocation hazard for babies and young
children, so ensure all packaging materials are out of their reach and
disposed of safely.
• Inspect the cord and plug for damage or wear before each use. Do not use
if any part is damaged.
• Make sure the appliance is disconnected from the power supply. Wash the
kneading blades, measuring spoon and measuring cup with a soft cloth
or sponge in warm water and a little washing-up detergent to remove any
dust from transport. Do not use any abrasives in order not to damage the
non-stick coating. Rinse with clean water and dry thoroughly.
Getting Started (Cont.)
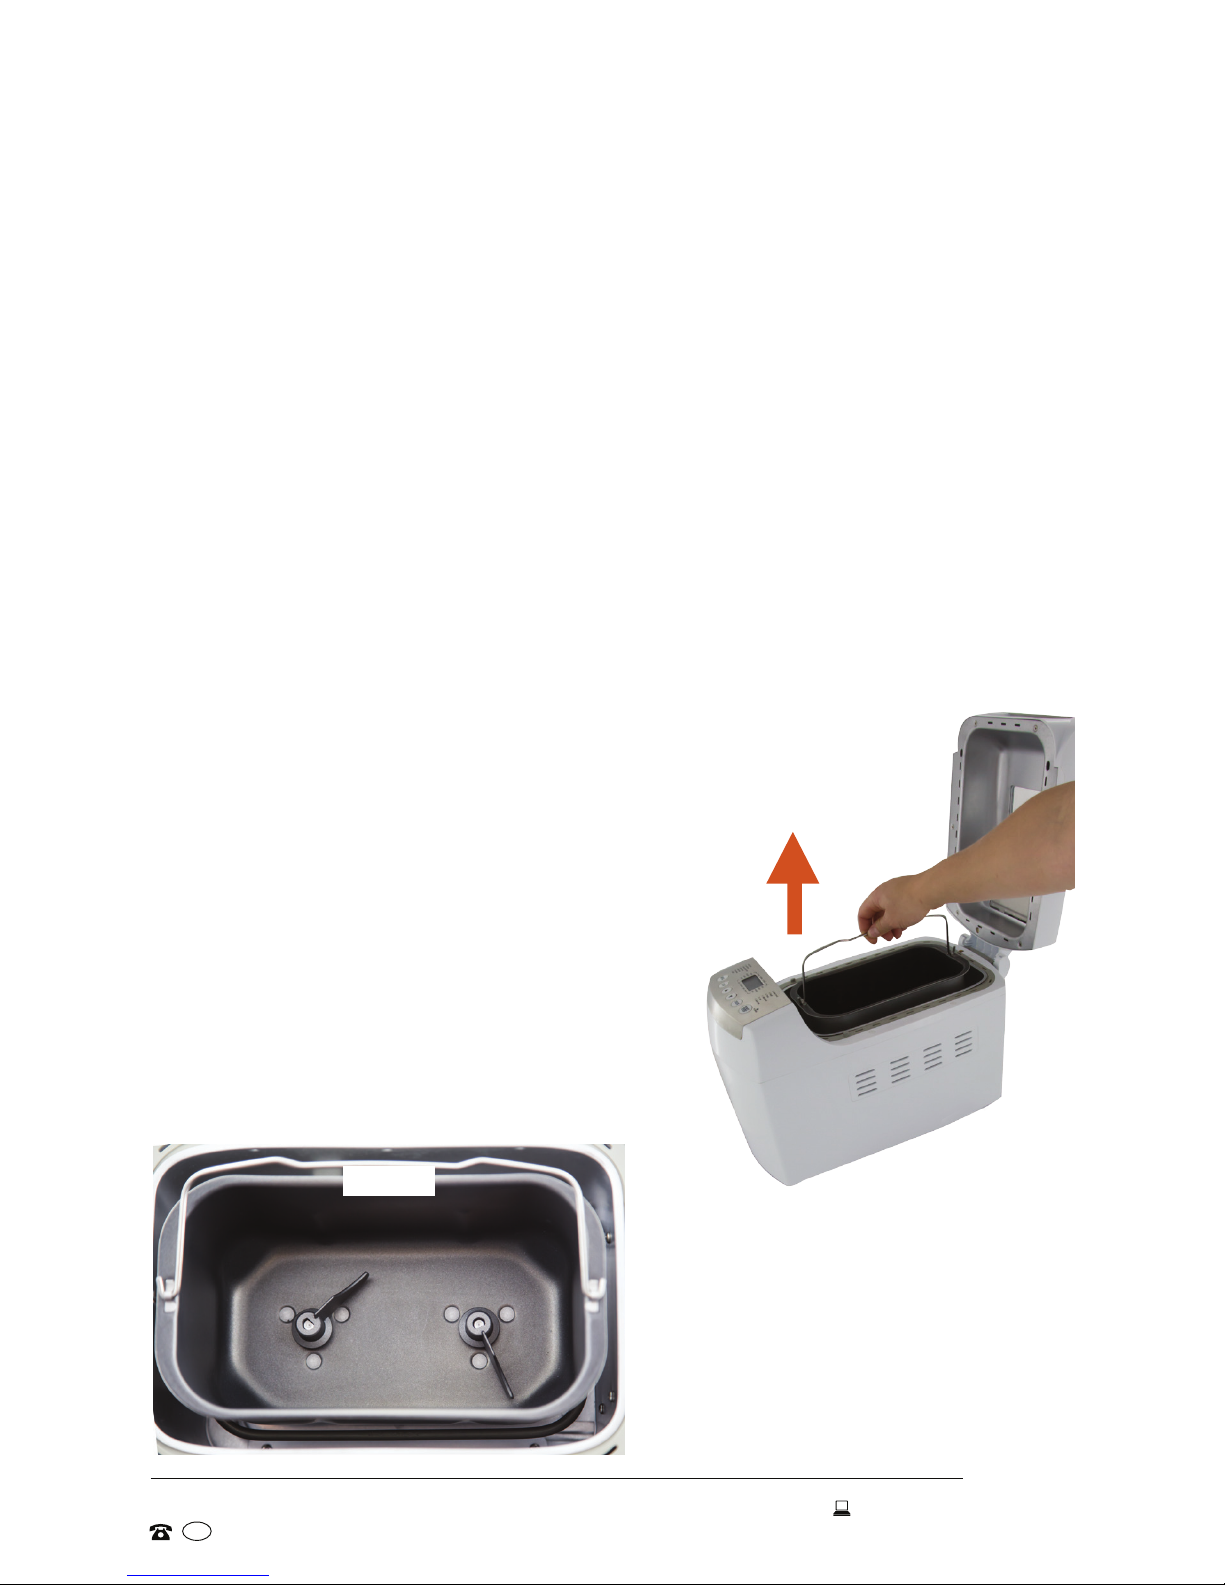
Fig. 1
Fig. 2
• Lift the baking tin out of the bread
maker (Fig. 1) and wipe it with a soft,
damp cloth, then dry thoroughly.
Reinsert the tin rmly into the bread
maker until it clicks securely into place.
If it does not seem to t properly, or
gets stuck at an angle, move the pan
a little and press down rmly on both
sides of the rim until it clicks securely
into place.
• Place the kneading blades onto the
spindles inside the baking tin (Fig. 2).
They only t one way.
• Your new bread maker is now
ready for use.
Page 12

12
AFTER SALES SUPPORT
1300 886 649
info@tempo.org
AUS
MODEL: 104906 PRODUCT CODE: 50138 07/2015
Getting Started (Cont.)
Bread-making programs
The table on this page spread lists all 13 programs. For options available under
each program, please see the table on page 18.
Program Bread type (product)
1
Basic
This most commonly used program is suitable for baking white
(wheat) bread. It is the default program that is automatically
selected when the machine is switched on.
2
French
This program is for typical French-style bread made with white,
protein-rich our, with a crisp crust and soft, slightly chewy
interior.
3
Wholemeal
This program is for heavier wholemeal or wholegrain bread.
It includes a special ‘hold/preheat’ time for softening grains.
Wholemeal loaves are generally smaller and more compact.
4
Sweet
On this setting, the baking time and temperature are adjusted for
sweeter bread or fruit loaves with higher fat and sugar contents.
5
Gluten-free
Use this program for baking gluten-free bread in the bread maker.
Take particular care with your recipe to ensure all ingredients are
gluten-free. When using a commercially prepared gluten-free
bread-baking mix, follow the instructions on the packet.
• Ensure that the our and yeast are all gluten-free.
• Xanthan gum (food additive number 415) and Guar gum (415)
act as substitutes for gluten and give structure to the dough
so it can rise. These ingredients are generally available from
health food stores.
• Tapioca our is gluten-free and often used as a thickening
agent.
IMPORTANT: For more information on the suitability and
availability of gluten-free ingredients, contact the Coeliac
Society in your area, or consult a health professional for advice.
We assume no responsibility for the suitability of any particular
recipes or ingredients for people with special dietary needs.
6
Rye
This program is suitable for bread with a high rye content. It
includes a special ‘hold/preheat’ time for softening grains.
Loaves with high rye content are generally smaller and more
compact.
Page 13

13
AFTER SALES SUPPORT
1300 886 649
info@tempo.org
AUS
MODEL: 104906 PRODUCT CODE: 50138 07/2015
Getting Started (Cont.)
Program Bread type (product)
7
Quick
This is a quick (80 minute) program with fewer stages and
reduced rising and rest times. This makes the bread slightly
rmer and more compact.
8
Italian
This is a program for light, Italian-style bread, which often
contains olive oil and herbs such as oregano or thyme.
9
Dough
This program is for kneading yeast dough only (no baking). Use
it to knead yeast dough that you want to shape yourself by
hand and bake in an oven, or for pizza crusts, pastry or bread
rolls. The dough is heated so that it can rise, but it will not be
baked. After the kneading process you can bake the dough in a
traditional or pizza oven.
10
Pasta
dough
This program is similar to the dough program, but it is specially
designed for preparing yeast-free dough for pasta, wafes,
biscuits or pies. It simply mixes and kneads the dough; there is
no baking involved. When the dough is ready, take it out of the
bread maker and continue processing as appropriate.
11
Milk bread
This program is suitable for baking bread made with milk or
dairy products.
12
Jam
Use this program for processing fresh fruit or making marmalade
or jam. Place all ingredients in the bread pan and follow the
general usage instructions to start cooking jam. At the end of
the program, remove the pan wearing oven mitts. Carefully pour
the hot processed fruit into a heat resistant and refrigerator
safe container, leaving 1cm space at the top. Cover tightly. The
jam will thicken upon cooling. Do not exceed any the quantities
indicated to avoid the jam boiling over and ending up in the
baking chamber.
13
Bake only
This program is for baking bread from a dough prepared
manually, or for extending the baking time by up to an hour, to
achieve a darker, crispier crust. There is no mixing or kneading
involved. The baking time for this program is one hour, and the
program can be used several times in a row.
If the dough is baked before the end of the set time, simply
press the START/STOP button to stop the baking process.
Page 14

14
AFTER SALES SUPPORT
1300 886 649
info@tempo.org
AUS
MODEL: 104906 PRODUCT CODE: 50138 07/2015
Getting Started (Cont.)
Basic bread-making ingredients
Flour
Flour is the main ingredient of bread and releases gluten, which allows the
bread to rise and gives substance to the bread. Always check the packaging
to see if the our is suited for baking bread. Also make sure to always weigh
the correct amount of our required in your recipe as the weight of our can
vary signicantly from type to type.
NOTE: Do not use self-raising our unless stated in your recipe.
Yeast
Yeast allows the dough to rise and makes the bread light and easy to digest.
We recommend using dry yeast (ready-to-use) as this type has a longer shelf
life and tends to produce more consistent results than fresh yeast. But make
sure to check the use-by date, as stale yeast may prevent the rising process.
Salt
Salt enriches the our and reinforces the gluten in the our for a better rising
process. Make sure to measure salt quantities accurately, as adding too
much, or omitting it altogether, will not only spoil the taste of your bread but
also affect the rising process.
Butter/oil
Butter, margarine or oil improve the taste of the bread and make it softer.
Make sure any solid fats are at room temperature, and cut into chunks.
Sugar
Sugar provides nutrition for the yeast and is essential for the rising process.
You can use rened sugar or brown sugar, but also honey or syrup. Sugar
also adds sweetness to the taste of the bread and helps brown the crust.
Water
We recommend using tap water, at room temperature. If it is too cold, the
yeast activation will not start, and if it is too warm, the yeast activation
will process too quickly. (Warmer water may only be used for the 'Quick’
program.)
Milk and milk powder
Milk and other dairy products enhance the taste and nutritional value of the
bread and produce a nice brown crust. If substituting fresh milk for water,
deduct the quantity of milk from the amount of water mentioned in the recipe.
IMPORTANT!
Do not use milk, other dairy products, eggs or meat when using the delayed
start timer. These ingredients must be kept refrigerated to ensure food safety.
Page 15

15
AFTER SALES SUPPORT
1300 886 649
info@tempo.org
AUS
MODEL: 104906 PRODUCT CODE: 50138 07/2015
Getting Started (Cont.)
Other ingredients (extras)
Other ingredients such as raisins, dried fruit, nuts, sunower or pumpkin seeds
can be added to the fruit and nut dispenser for release into the dough at the
right time. If you prefer softer grains, soak them rst, but make sure they are dry
before adding them to the dispenser.
TIP
For a special loaf, try experimenting with a few extra ingredients
such as herbs, cheese, bacon, olives, grains or dried fruit.
Cut into small pieces and add through the dispenser.
Prepackaged bread mix (with yeast included)
Pour the bread mix in the baking tin and add water to it. Select program
1 Basic and choose the loaf size.
NOTE: Packaged bread mix does not always mention how much yeast is
included, so you might have to experiment a little before obtaining the
best result.
Prepackaged bread mix (with yeast separate)
First put the yeast in the baking tin, then the bread mix and then the water.
Select the program according to the type of our in your bread mix.
Quantities
• Measure all ingredients correctly and then stick to the quantities
recommended in the recipe. Do not exceed the recommended quantities.
• Use the included measuring cup and measuring spoon — do not pile up
the ingredients in the measuring spoon.
• Always use scales to weigh our and butter.
MAXIMUM AMOUNTS
Never use more than the below quantities for this appliance!
750g flour + 2tsp dried yeast (for regular types of bread)
NOTE: For "Gluten-free Bread" made from a package mix, 3tsp of dried
yeast may be used, and for "Quick Bread" 4tsp of dried yeast.
Page 16

16
AFTER SALES SUPPORT
1300 886 649
info@tempo.org
AUS
MODEL: 104906 PRODUCT CODE: 50138 07/2015
Instructions
Setting up the bread maker
Adding ingredients
BASIC ORDER
First wet ingredients (as per recipe): water, oil, eggs
Then dry ingredients (as per recipe): our, yeast, salt, sugar, milk powder
• Remove the baking tin from the appliance and place the clean kneading
blades on the spindles inside the tin (see Fig. 2, page 11).
• Put all the ingredients in the baking tin in the correct order (see below).
IMPORTANT!
Before using the bread maker, make sure you (and anyone who uses this
appliance) have read and understood the general advice in the "Getting
Started" section and the safety instructions on the previous pages.
• First add tap water to the baking tin, then add the required type(s) of our.
NOTE: The order of ingredients is different when using a prepackaged
bread mix; see the relevant section on the previous page.
NOTE: When using rye our, take into account that this dough does not
rise much. For that reason, use at least 30% wheat our and max.
70% rye our.
• Make a little hole in the our in one corner of the baking tin and add the salt.
• Close the hole and make another hole in the opposite corner. Add the
yeast and close the hole so that salt and yeast do not mix immediately.
• Always add some sugar, as this will inuence how well the bread rises.
• If the recipe includes butter, add it in small chunks.
• Add any extra ingredients (such as grains, nuts or dried fruit) to the fruit
and nut dispenser for release into the dough at the right time. Do not add
more than t into the dispenser with the lid closed. If required, you may
add more when the extra ingredients are released (see page 19).
IMPORTANT!
• Room temperature: All ingredients should be at room temperature.
Warm water may only be used for the 'Quick' program.
• Avoid spillage: Make sure not to spill any ingredients into the baking
chamber (the area surrounding the baking tin). Keep the outside of the
baking tin clean and make sure that the heating element does not come into
contact with dough or ingredients.
Page 17

17
AFTER SALES SUPPORT
1300 886 649
info@tempo.org
AUS
MODEL: 104906 PRODUCT CODE: 50138 07/2015
Instructions (Cont.)
• Place the baking tin in the appliance. If it does not seem to t properly,
move the pan a little and press down rmly on both sides of the rim until it
clicks securely into place.
• Fold down the handle, close the lid rmly and then plug in the bread maker.
Your appliance will now switch on, emit a sound signal and the LCD screen
will be activated. You are now ready to make your program selection.
Selecting a program
Use the buttons on the control panel to make your program selection. Each
press of a button will be conrmed by a sound signal.
• Program: Press the MENU button, repeatedly, to select a program. The types
of bread you can bake with the appliance are listed in the table on pages 12–
13; the table on page 18 lists the options available under each program. Upon
your selection, the LCD will display the total time for the selected program.
• Loaf size: Press the LOAF button to select the loaf size (750g, 1000g, 1250g).
The bar at the top of the screen moves with each press of the button to
indicate the selected loaf size. The table on page 9 lists the programs for
which you can select the loaf size.
• Crust colour: Press the COLOUR button to select the crust colour (Light,
Medium, Dark, and Rapid, if available). The table on page 9 lists the programs
for which you can select the crust colour. (The 'Rapid' option, if available,
indicates that the program time can be reduced by approximately 1 hour.)
• Timer: If you want to use the delayed start timer for the appliance to start
at a later time, use the / buttons to set the delay period. Each press
of these buttons increases/decreases the delay period by 10 minutes. The
table on page 9 lists the programs for which you can set this function.
Setting the delayed start timer: You must set the timer to the delay period,
not to the time you want the program to nish. For example, it is now
10:00pm and you want your bread (a 750g Italian loaf) ready at 6:00am the
next morning (so in 8 hours). As the selected loaf takes 3:34hrs to bake,
you must deduct this program time from the 8 hour delay period and set
the timer to 4:30.
IMPORTANT!
• The yeast must be on top of the our when using the delay timer so it
does not get mixed with water, salt or sugar, otherwise the yeast activity
will be affected.
• Do NOT use perishable ingredients when selecting a delayed start!
Page 18

18
AFTER SALES SUPPORT
1300 886 649
info@tempo.org
AUS
MODEL: 104906 PRODUCT CODE: 50138 07/2015
Instructions (Cont.)
Program Loaf size Crust Rapid Delayed
start
Total
time
Dispenser Keep
warm
1
Basic
750g • • • 3:23 • •
1000g • • • 3:26 • •
1250g • • • 3:30 • •
2
French
750g • • • 3:39 •
1000g • • • 3:43 •
1250g • • • 3:48 •
3
Wholemeal
750g • • • 3:24 • •
1000g • • • 3:27 • •
1250g • • • 3:31 • •
4
Sweet
750g • • 3:16 • •
1000g • • 3:19 • •
1250g • • 3:22 • •
5
Gluten-free
750g • 3:15 • •
1000g • 3:18 • •
1250g • 3:20 • •
6
Rye
750g • • 3:48 • •
1000g • • 3:51 • •
1250g • • 3:55 • •
7
Quick
1250g 1:20 •
8
Italian
750g • 3:34 •
1000g • 3:37 •
1250g • 3:40 •
9
Dough
1:30
10
Pasta
0:14
11
Milk bread
750g • • 3:17 • •
1000g • • 3:20 • •
1250g • • 3:24 • •
12
Jam
1:05
13
Bake only
1:00 •
Page 19

19
AFTER SALES SUPPORT
1300 886 649
info@tempo.org
AUS
MODEL: 104906 PRODUCT CODE: 50138 07/2015
Instructions (Cont.)
Starting the program
• Press the START/STOP button to start the selected program, or to start the
timer countdown, if the delayed start timer has been set.
NOTE: If you want to change any of the current settings (at any time after
the unit has started operation), press and hold the START/STOP
button for a few seconds and the program will stop. You may then
change the options.
Adding extra ingredients
• For the programs 1, 3, 4, 5, 6 and 11 the appliance will emit a sound signal
after approximately 20 minutes to let you know that any extra ingredients
from the fruit and nut dispenser will be added to the dough.
• If you want to add more ingredients, do so at this point of time.
IMPORTANT!
• DO NOT PRESS STOP! Never press STOP to add ingredients. Doing so
will stop the entire baking process.
• DO NOT OPEN THE LID! Never open the lid during the baking process.
Doing so will allow hot air to escape and the bread will not rise. The lid
features a large viewing window so you can observe the process through
the window.
• DO NOT TOUCH! The viewing window and baking tin get very hot during
the baking process. Always use oven mitts to touch hot surfaces and to
remove the bread from the tin.
• DO NOT COVER! Never touch, block or cover the ventilation holes. This
is important as it could cause smoke development if the dough rises over
the baking tin and touches the heating element.
• WARNING! If there is smoke in the baking chamber because dough
came into contact with the heating element, keep the lid closed to avoid
ames developing. If ames have already ared up, press the STOP
button immediately and pull out the plug. Never put out smoldering
dough with water.
Memory backup
In case of a power failure (max. 7 minutes) during the ‘delayed start’ or
preheating process, the bread maker will memorise the stage of the baking
process and the selected program. If an electricity breakdown occurs after
the rst kneading phase, the baking process will be stopped entirely since a
good result can no longer be obtained.
Page 20

20
AFTER SALES SUPPORT
1300 886 649
info@tempo.org
AUS
MODEL: 104906 PRODUCT CODE: 50138 07/2015
Instructions (Cont.)
End of the baking process
At the end of the baking process the bread maker will emit different sound
signals and the screen will display 0:00.
Keeping warm
For most of the programs, the appliance will automatically start the ‘keep
warm’ phase, which lasts for approximately one hour. Never keep the baked
bread longer than one hour in the appliance after the end of the baking
process, as the bread will lose its crustiness.
Removing bread from the appliance
• First press STOP, then remove the plug and carefully open the lid.
• Use oven mitts to remove the baking tin from the appliance and to remove
the bread from the tin.
ERROR MESSAGES
• You can start a new program immediately after the previous one. However,
it is possible that the LCD screen displays E01 or E00 when you press
START. [ E01 ] indicates that the inner unit's temperature is still higher
than 50°C; [ E00 ] indicates that the inner unit's temperature is too low. If
either of these messages are displayed, immediately press STOP, remove
the baking tin and let the appliance cool down (or warm up).
• Two other error messages may appear on the LCD screen. [ EEE ] is an
open circuit alarm, which indicates that the sensor connector is loose, or
the circuit/element is disconnected; [ HHH ] is a short circuit alarm, which
indicates a short circuit or that the sensor connector is welded together. In
either of those cases, press STOP, disconnect the unit and call for service.
TIP
If necessary, use a wooden spoon or spatula to help you remove the bread
from the rim of the baking tin. Then turn over the baking tin and slap gently
on the bottom of the tin to ease out the bread.
• Let the bread cool down on a wire rack.
Removing the kneading blades
• If the blades get stuck in the bread, use the kneading blade remover to
remove them, but only do so after the bread has completely cooled down.
• If the kneading blades are stuck in the baking tin and you cannot remove
them, place the baking tin in warm water to let it soak and try again.
Page 21

21
AFTER SALES SUPPORT
1300 886 649
info@tempo.org
AUS
MODEL: 104906 PRODUCT CODE: 50138 07/2015
FAQs and Troubleshooting Guide
Problem Possible cause Solution
The bread does not
rise.
The top of the bread
is not even.
You are not using the right
type of yeast.
Use dry yeast labelled ‘readyto-use’. This kind of yeast
does not have to pre-rise.
You are not using enough
yeast, or the yeast used is
too old.
Use a measuring spoon.
Check the expiry date of the
yeast (keep it in the fridge).
Before kneading, the yeast
has come into contact with
the liquid.
Make sure you add the
ingredients to the baking tin
according to the instructions
and in the right order: water
and other liquids rst.
You used too much salt or
too little sugar.
Check the recipe and
measure the right quantities
by using the supplied
measuring spoon or scales.
The our used is not of
good quality, or unsuitable
for baking bread. The
suitability of various types
of our depends on the
temperature, humidity and
storage conditions, and on
the period it was harvested.
Try another type, brand or
batch of our.
The dough is too rm
because you did not use
enough liquid.
Baker's our with a higher
amount of protein absorbs
more water than other our;
try adding an extra 10-20mL
of water.
The bread is full of air
holes.
You are using too much
yeast.
Check the recipe and
measure the right quantities
by means of the supplied
measuring spoon.
You used too much liquid,
or the liquid is too warm.
Some types of our absorb
more water than others; try
using 10-20mL less water.
Why is the bread so
light and sticky?
You are not using enough
yeast or the yeast you are
using is too old/expired.
Use a measuring spoon.
Check the expiry date of the
yeast (keep it in the fridge).
There was a power
breakdown.
Remove the bread from the
baking tin and start again
with fresh ingredients.
Page 22

22
AFTER SALES SUPPORT
1300 886 649
info@tempo.org
AUS
MODEL: 104906 PRODUCT CODE: 50138 07/2015
FAQs and Troubleshooting Guide (Cont.)
Problem Possible cause Solution
The bread has collapsed
after the rising phase.
Your our is not suitable
for baking bread.
Try using another brand or
type of our.
You have used too much
liquid.
Try using 10-20mL less
water.
You used too little salt.
Check the recipe and
measure the right quantities
by means of the supplied
measuring spoon.
You used too much
yeast.
Check the recipe and
measure the right quantities
by means of the supplied
measuring spoon.
The lid has been opened
during the baking
process.
Do not open the lid during
the baking process.
The air is too humid or it
is too warm.
Make sure to bake in a well
aerated room.
The bread has risen too
much.
You used too much
water/yeast.
Check the recipe and
measure the right quantity
by means of the supplied
measuring spoon or
measuring cup.
Check if the other
ingredients do not already
contain water.
The water used was too
warm.
Make sure the water is not
too warm.
You did not use enough
our.
Weigh the our precisely by
using scales.
You used too little salt.
Check the recipe and
measure the right quantity
by means of the supplied
measuring spoon.
The bread is too dry and
too rm.
You are not using
enough liquid.
Some types of our absorb
more water than others, try
using 10-20mL more water.
You are not using
enough yeast, or the
yeast used is too old.
Use the supplied measuring
spoon. Check the expiry
date of the yeast (keep it in
the fridge).
Page 23

23
AFTER SALES SUPPORT
1300 886 649
info@tempo.org
AUS
MODEL: 104906 PRODUCT CODE: 50138 07/2015
FAQs and Troubleshooting Guide (Cont.)
Problem Possible cause Solution
The bread is too dark
You are using too much
sugar.
Check the recipe and
measure the right quantity
by means of the supplied
measuring spoon.
You chose the wrong
crust colour.
Choose the right colour
before baking.
The bread is not ready yet,
moist in the middle.
You are using too much
additional ingredients,
such as nuts, butter,
dried fruit, syrup, etc.
Check the recipe and adjust
the right quantity using
scales or the measuring cup.
The soaked raisins are
still too wet.
Make sure that soaked
ingredients are sufciently
dried.
The bottom and the sides
are covered with too much
our.
You have used too much
our or not enough
liquid.
Check the recipe and
measure the right quantity by
using scales or the supplied
measuring cup.
Why are the ingredients
not well mixed?
You have not correctly
mounted the kneading
blades inside the baking
tin.
Place the blades inside the
baking tin before adding the
ingredients.
There has been a power
breakdown.
You can continue the baking
process but the result might
be disappointing, if the
kneading has already started.
The bread has not risen.
There has been a power
breakdown.
If the dough has already
risen you can try baking it in
your oven.
You forgot to place the
kneading blades inside
the baking tin.
Place the kneading blades
into the tin rst.
My yeast dough (for
baking bread rolls) has not
risen.
The Pasta dough
program (10) is does not
include heating for yeast
activation.
Select the Dough program
(9) for preparing yeast dough
for bread or rolls.
The bread collapsed on
the sides and the bottom
is moist.
You left the bread for
too long in the baking tin
after the baking process
has nished.
Remove the bread from the
bread maker after the baking
process has ended.
The kneading blade
rattles.
Make sure the kneading blades are securely tted onto
the spindles inside the baking tin.
Page 24

24
AFTER SALES SUPPORT
1300 886 649
info@tempo.org
AUS
MODEL: 104906 PRODUCT CODE: 50138 07/2015
FAQs and Troubleshooting Guide (Cont.)
Problem Possible cause Solution
There is a burnt smell
during the baking process.
There is smoke coming
from the steam holes.
You might have spilled
ingredients onto the
heating element.
During the mixing process,
a small amount of our, or
some raisins, may have
ended up in the baking
chamber. Remove these
ingredients as soon as the
machine has cooled down.
The kneading blade is
stuck in the bread when
trying to remove the bread
from the baking tin.
This common problem is easily xed. The supplied
kneading blade remover is designed especially for the
purpose of removing the blades from the bread. Put the
hook inside the bottom end of the kneading blade that
has come off. Once the blade is caught on the hook,
slide it gently out of the bread. Remove it carefully so
you do not tear the bread. Should this occur, it will not
affect the taste.
The dough is too stiff.
Some types of our absorb
more water than others, try
using 10-20mL extra water
next time.
Crusts are piling up
underneath the kneading
blade.
Clean the kneading blade
after every use.
The crust is wrinkly and
gets soft when the bread
cools down.
The steam released
inside the bread after
baking could soften the
crust.
Try using 10-20mL less
water, of halve the sugar to
reduce the amount of steam
generated.
How do I get a crusty
crust?
To make your bread crustier, try using the ‘French’
program and/or choose a 'Dark’ crust color. Or try
baking your bread for an extra 5–10 minutes in a
traditional oven at 200°C.
I cannot cut even slices.
The bread was still too
warm.
Let your bread cool down on
a wire rack before slicing it.
If none of our suggestions help you solve the problem with your bread maker,
contact our after sales support centre for advice using the details on the
bottom of the page.
Malfunction
Do not use the appliance in case of a malfunction or when the power cord is
damaged. In such a case, contact our after sales support centre for advice.
Page 25

25
AFTER SALES SUPPORT
1300 886 649
info@tempo.org
AUS
MODEL: 104906 PRODUCT CODE: 50138 07/2015
Other Useful Information
Cleaning the bread maker
• Baking tin
Wash the baking tin with a soft cloth in warm water with a little dish
detergent. Do not use any sharp or abrasive agents to protect the nonstick coating. Make sure the tin is completely dry before reinstalling it into
the bread maker.
• Kneading blades
Wash the kneading blades the same way as the baking tin. If a kneading
blade is difcult to remove from the spindle, ll the tin with warm water
and allow it to soak for approximately 30 minutes. The blade should then
come off easily for cleaning. Wipe the blade carefully with a damp cloth.
• Lid
If necessary, you can remove the lid for cleaning. Just lift it up and rmly
pull it upwards until it comes off the hinge. Wipe it clean, then reinsert it
rmly onto the hinge.
• Housing
Wipe the outer surface of the bread maker housing with a damp cloth. Do
not use any abrasive cleaners to clean it as this will degrade the surface.
Do not use a wet cloth.
• Fruit and nut dispenser
Take the plastic lid off the fruit and nut dispenser and wipe it clean or
wash it in warm, soapy water. Rinse and dry. Wipe the inside of the
dispenser with a damp cloth; do not use a wet cloth. Dry with a soft,
clean cloth.
IMPORTANT!
Never immerse the housing into water for cleaning.
Never let the heating element come into contact with water.
Never wash any parts of the bread maker or accessories in a dishwasher.
IMPORTANT!
Disconnect the appliance from the power and let it cool prior to cleaning.
Page 26

26
AFTER SALES SUPPORT
1300 886 649
info@tempo.org
AUS
MODEL: 104906 PRODUCT CODE: 50138 07/2015
Storage
• Before packing the bread maker away for storage, ensure it has completely
cooled down, is clean and dry and the lid is closed.
• We recommend storing the bread maker in its original carton, which will
protect it from dust, with all parts and accessories (measuring cup, spoon and
blade remover) stored inside.
• Store the bread maker in a clean and dry place, out of children's reach.
• Do not place heavy objects on top during storage.
Service and repair
The unit has no user-serviceable parts contained within. Do not attempt to repair,
disassemble or modify the appliance. If your bread maker requires repair or
service, contact our after sales support centre for advice.
Other Useful Information (Cont.)
IMPORTANT!
Trying to repair the appliance yourself, undertaking incorrect repairs or
making modifications will expose you to considerable danger and will void
your warranty.
Spare parts
Our after sales support centre stocks the following spare parts for the
104906 KUCHEF Bread Maker. To purchase a part, call the centre on
1300 886 649 or email us at info@tempo.org
• Baking tin (bread pan)
• Measuring cup
• Measuring spoon
• Kneading blades
• Kneading blade remover (hook)
Page 27

27
AFTER SALES SUPPORT
1300 886 649
info@tempo.org
AUS
MODEL: 104906 PRODUCT CODE: 50138 07/2015
Technical specifications
Model 104906
Rated Power Input 890W
Voltage and Frequency 220-240V AC, 50/60Hz
Browning Levels 3 (Light, Medium, Dark)
Loaf Sizes 3 (750g, 1000g, 1250g)
Programs 13 (see pages 12–13 for details)
Kneading Blades 2
Baking Tin Non-stick coated
Accessories Measuring cup
Measuring spoon
Kneading blade remover (hook)
Dimensions (mm) 300 (H) x 428 (D) x 260 (W)
Weight 6.450kg
This product complies with the following standards:
• AS/NZS 60335.1 and AS/NZS 60335.2.9:2009+A1 for electrical safety
• EN55014-1:2006+A1 for electromagnetic compatibility
Responsible disposal
At the end of its working life, do not throw this appliance out with your
household rubbish. Electrical and electronic products contain substances
that can have a detrimental effect on the environment and human health
if disposed of inappropriately. Observe any local regulations regarding the
disposal of electrical consumer goods and dispose of it appropriately for
recycling. Contact your local authorities for advice on recycling facilities in
your area.
Other Useful Information (Cont.)
Page 28

28
AFTER SALES SUPPORT
1300 886 649
info@tempo.org
AUS
MODEL: 104906 PRODUCT CODE: 50138 07/2015
Recipes
Before you start baking
Baking bread in your new bread maker is easy and will reward you with delicious,
freshly baked bread to enjoy, day after day. However, it is important that you
follow a few basic rules, which we have listed again below. Take the time to read
this advice, be patient and experiment with different recipes or bread mixes until
you have found your perfect loaf. Happy baking!
A FEW IMPORTANT BREAD-MAKING RULES
Baking 'from scratch'
The recipes in this section are for baking bread using commonly available
ingredients from supermarkets or grocery stores. When baking bread 'from
scratch', it is most important that all ingredients are properly measured,
at room temperature and added in the order they are listed, starting with
water (and then other wet ingredients), and following with flour (and
other dry ingredients).
Maintaining this order of ingredients is very important to ensure all ingredients
are properly mixed and to prevent premature yeast activation when using the
timer. To ensure that the yeast does not mix with the salt immediately, make
a little hole in the our and add the yeast, close the hole, then make another
little hole at the opposite side for the salt.
Add extra ingredients such as fruit, nuts or seeds in the fruit and nut
dispenser on top of the machine where they will be released into the dough at
the appropriate time.
Using a bread mix
If you use a prepackaged bread mix with yeast included, pour it in the baking
tin rst and then add water to it. (If the yeast is separate, put it in the tin rst,
then add the bread mix and then then water.) Select a program that matches
the type of our in the bread mix.
Using the delayed start timer
If you use the delay timer, make sure the yeast is not in contact with water,
salt or sugar, which could affect the yeast activity.
NOTE: Tablespoon (tbsp) = at measuring spoon (large)
Teaspoon (tsp) = at measuring spoon (small)
Cup = standard Australian 250mL measuring cup (ll the supplied
measuring cup up to the 250mL marking)
Page 29

29
AFTER SALES SUPPORT
1300 886 649
info@tempo.org
AUS
MODEL: 104906 PRODUCT CODE: 50138 07/2015
(1) Basic white bread
Ingredients 750g 1000g 1250g
Water 270 mL 330 mL 400 mL
Oil 1 tbsp 2 tbsp 3 tbsp
Bread Flour 3 cups 4 cups 5 cups
Dried Yeast 1 tsp 1 tsp 1.5 tsp
Salt 1 tsp 1 tsp 1.5 tsp
Sugar 1 tbsp 2 tbsp 3 tbsp
Milk Powder 1 tbsp 2 tbsp 3 tbsp
Recipes (Cont.)
• Take the baking tin out of the bread maker and place the clean kneading
blades on the spindles inside the tin.
• Pour the measured quantity of tap water into the tin, then add the oil.
• Add the flour.
• At one side of the our mount, make a little hole and add the yeast, close
the hole, then make another little hole at the opposite side for the salt.
• Sprinkle the sugar and milk powder on top.
• Place the baking tin rmly in the appliance, making sure it clicks securely into
place. Fold down the handle, close the lid rmly and plug in the machine.
• Using the buttons on the control panel, make your program selection
(program 1, loaf size, crust colour). If you want to use the delayed start
timer, set the delay period now.
• Press the START/STOP button to start the program (or the timer countdown).
Do not open the lid during the baking process!
• At the end of the bread-making process the appliance will automatically
enter a keep warm cycle of approximately one hour – do not leave the
bread in the machine for longer.
• Press the START/STOP button, unplug the machine and carefully open
the lid. Use oven mitts to remove the baking tin from the appliance and to
remove the bread from the tin. Let it cool down on a wire rack.
• If the kneading blades are stuck in the bread, use the kneading blade
remover to remove them, but only do so after the bread has completely
cooled down.
• Slice the bread using a serrated-edge or electric knife. Enjoy!
Method
Page 30

30
AFTER SALES SUPPORT
1300 886 649
info@tempo.org
AUS
MODEL: 104906 PRODUCT CODE: 50138 07/2015
• Take the baking tin out of the bread maker and place the clean kneading
blades on the spindles inside the tin.
• Pour the measured quantity of tap water into the tin, then add the oil.
• Add the flour.
• At one side of the our mount, make a little hole and add the yeast, close
the hole, then make another little hole at the opposite side for the salt.
• Sprinkle the sugar on top.
• Place the baking tin rmly in the appliance, making sure it clicks securely into
place. Fold down the handle, close the lid rmly and plug in the machine.
• Using the buttons on the control panel, make your program selection
(program 2, loaf size, crust colour). If you want to use the delayed start
timer, set the delay period now.
• Press the START/STOP button to start the program (or the timer countdown).
Do not open the lid during the baking process!
• At the end of the bread-making process the appliance will automatically
enter a keep warm cycle of approximately one hour – do not leave the
bread in the machine for longer.
• Press the START/STOP button, unplug the machine and carefully open
the lid. Use oven mitts to remove the baking tin from the appliance and to
remove the bread from the tin. Let it cool down on a wire rack.
• If the kneading blades are stuck in the bread, use the kneading blade
remover to remove them, but only do so after the bread has completely
cooled down.
• Slice the bread using a serrated-edge or electric knife. Enjoy!
Ingredients 750g 1000g 1250g
Water 270 mL 330 mL 400 mL
Oil 1.5 tbsp 2 tbsp 3 tbsp
Bread Flour 3 cups 4 cups 5 cups
Dried Yeast 1 tsp 1 tsp 1.5 tsp
Salt 1 tsp 1.5 tsp 2 tsp
Sugar 1 tbsp 1 tbsp 2 tbsp
Recipes (Cont.)
(2) French-style bread
Method
Page 31

31
AFTER SALES SUPPORT
1300 886 649
info@tempo.org
AUS
MODEL: 104906 PRODUCT CODE: 50138 07/2015
(3) Wholemeal bread
Ingredients 750g 1000g 1250g
Water 310 mL 390 mL 450 mL
Oil 1.5 tbsp 2 tbsp 2 tbsp
Bread Flour 350g 400g 450g
Wholemeal Flour 150g 200g 300g
Dried Yeast 1 tsp 1 tsp 1.5 tsp
Salt 1 tsp 2 tsp 2 tsp
Brown Sugar 1.5 tbsp 2 tbsp 2.5 tbsp
Recipes (Cont.)
• Take the baking tin out of the bread maker and place the clean kneading
blades on the spindles inside the tin.
• Pour the measured quantity of tap water into the tin, then add the oil.
• Add the two types of flour.
• At one side of the our mount, make a little hole and add the yeast, close
the hole, then make another little hole at the opposite side for the salt.
• Add the brown sugar.
• Place the baking tin rmly in the appliance, making sure it clicks securely into
place. Fold down the handle, close the lid rmly and plug in the machine.
• Using the buttons on the control panel, make your program selection
(program 3, loaf size, crust colour). If you want to use the delayed start
timer, set the delay period now.
• Press the START/STOP button to start the program (or the timer countdown).
Do not open the lid during the baking process!
• At the end of the bread-making process the appliance will automatically
enter a keep warm cycle of approximately one hour – do not leave the
bread in the machine for longer.
• Press the START/STOP button, unplug the machine and carefully open
the lid. Use oven mitts to remove the baking tin from the appliance and to
remove the bread from the tin. Let it cool down on a wire rack.
• If the kneading blades are stuck in the bread, use the kneading blade
remover to remove them, but only do so after the bread has completely
cooled down.
• Slice the bread using a serrated-edge or electric knife. Enjoy!
Method
Page 32

32
AFTER SALES SUPPORT
1300 886 649
info@tempo.org
AUS
MODEL: 104906 PRODUCT CODE: 50138 07/2015
(4) Sweet bread
Ingredients 750g 1000g 1250g
Water 260 mL 320 mL 390 mL
Oil 2 tbsp 3 tbsp 3 tbsp
Bread Flour 3 cups 4 cups 5 cups
Dried Yeast 1 tsp 1 tsp 1.5 tsp
Salt 1 tsp 1 tsp 1.5 tsp
Sugar 3 tbsp 4 tbsp 5 tbsp
Milk Powder 1.5 tbsp 2 tbsp 3 tbsp
Recipes (Cont.)
• Take the baking tin out of the bread maker and place the clean kneading
blades on the spindles inside the tin.
• Pour the measured quantity of tap water into the tin, then add the oil.
• Add the flour.
• At one side of the our mount, make a little hole and add the yeast, close
the hole, then make another little hole at the opposite side for the salt.
• Add the sugar and milk powder.
• Place the baking tin rmly in the appliance, making sure it clicks securely into
place. Fold down the handle, close the lid rmly and plug in the machine.
• Using the buttons on the control panel, make your program selection
(program 4, loaf size, crust colour). If you want to use the delayed start
timer, set the delay period now.
• Press the START/STOP button to start the program (or the timer countdown).
Do not open the lid during the baking process!
• At the end of the bread-making process the appliance will automatically
enter a keep warm cycle of approximately one hour – do not leave the
bread in the machine for longer.
• Press the START/STOP button, unplug the machine and carefully open
the lid. Use oven mitts to remove the baking tin from the appliance and to
remove the bread from the tin. Let it cool down on a wire rack.
• If the kneading blades are stuck in the bread, use the kneading blade
remover to remove them, but only do so after the bread has completely
cooled down.
• Slice the bread using a serrated-edge or electric knife. Enjoy!
Method
Page 33

33
AFTER SALES SUPPORT
1300 886 649
info@tempo.org
AUS
MODEL: 104906 PRODUCT CODE: 50138 07/2015
Recipes (Cont.)
(6) Rye bread
Ingredients 750g 1000g 1250g
Water 310 mL 390 mL 450 mL
Oil 1.5 tbsp 2 tbsp 2 tbsp
Rye Flour 350g 400g 450g
Wheat Flour 150g 200g 300g
Dried Yeast 1 tsp 1 tsp 1.5 tsp
Salt 1 tsp 2 tsp 2 tsp
Brown Sugar 1.5 tbsp 2 tbsp 2.5 tbsp
• Take the baking tin out of the bread maker and place the clean kneading
blades on the spindles inside the tin.
• Pour the measured quantity of tap water into the tin, then add the oil.
• Add the two types of flour.
• At one side of the our mount, make a little hole and add the yeast, close
the hole, then make another little hole at the opposite side for the salt.
• Add the sugar.
• Place the baking tin rmly in the appliance, making sure it clicks securely into
place. Fold down the handle, close the lid rmly and plug in the machine.
• Using the buttons on the control panel, make your program selection
(program 6, loaf size, crust colour). If you want to use the delayed start
timer, set the delay period now.
• Press the START/STOP button to start the program (or the timer countdown).
Do not open the lid during the baking process!
• At the end of the bread-making process the appliance will automatically
enter a keep warm cycle of approximately one hour – do not leave the
bread in the machine for longer.
• Press the START/STOP button, unplug the machine and carefully open
the lid. Use oven mitts to remove the baking tin from the appliance and to
remove the bread from the tin. Let it cool down on a wire rack.
• If the kneading blades are stuck in the bread, use the kneading blade
remover to remove them, but only do so after the bread has completely
cooled down.
• Slice the bread using a serrated-edge or electric knife. Enjoy!
Method
Page 34

34
AFTER SALES SUPPORT
1300 886 649
info@tempo.org
AUS
MODEL: 104906 PRODUCT CODE: 50138 07/2015
(5) Gluten-free bread
Ingredients 1250g
Eggs 2 (100g)
Water 330 mL
Oil 3 tbsp
Lemon Juice (or Cider Vinegar) 1 tsp
Xanthan Gum (or Guar Gum) 1 tbsp
Rice Flour 320g
Tapioca Flour (Arrowroot) 75g
Soy Flour 50g
Potato Flour 220g
Dried Yeast 2 tsp
Salt 1.5 tsp
Sugar 4 tsp
Milk powder 3 tbsp
Recipes (Cont.)
• Combine the eggs, water, oil, lemon juice in a small bowl using a fork.
• Mix the dry ingredients (gum, rice flour, tapioca flour, soy flour, potato
flour, yeast, salt, sugar) in a separate, large bowl using a fork.
• Add the liquid ingredients to the dry ones and combine using a pliable
spatula. Mix into a soft dough until all ingredients are well combined.
• Using the spatula, add the dough into the baking tin with the clean
kneading blades inside. You may need to press down the dough with the
spatula after each addition to prevent air bubbles forming.
• Place the baking tin rmly in the appliance, making sure it clicks securely into
place. Fold down the handle, close the lid rmly and plug in the machine.
• Using the buttons on the control panel, make your program selection
(program 5, loaf size 1250g, crust colour Dark).
• Press the START/STOP button to start the program. Do not open the lid
during the baking process!
• At the end of the bread-making process, press the START/STOP button,
unplug the machine and carefully open the lid. Use oven mitts to remove
the baking tin and bread. Let it cool down on a wire rack.
• Slice the bread using a serrated-edge or electric knife. Enjoy!
Method
Page 35

35
AFTER SALES SUPPORT
1300 886 649
info@tempo.org
AUS
MODEL: 104906 PRODUCT CODE: 50138 07/2015
(5) Gluten-free bread (using a bread mix)
Ingredients 1000g
Dried Yeast 3 tsp
Gluten-free bread mix 450g
Egg 1
Water 330 mL
Olive Oil 2 tbsp
Salt 1 tsp
Sugar 1 tbsp
Recipes (Cont.)
• Take the baking tin out of the bread maker and place the clean kneading
blades on the spindles inside the tin.
• Add the ingredients to the baking tin according to the packet instructions.
Alternatively:
• Sprinkle the yeast on the bottom on the baking tin, then add the bread
mix.
• Combine the egg, water and oil in a small bowl using a fork.
• Pour the liquid ingredients on top of the bread mix.
• Add the salt and sugar.
• Place the baking tin rmly in the appliance, making sure it clicks securely into
place. Fold down the handle, close the lid rmly and plug in the machine.
• Using the buttons on the control panel, make your program selection
(program 5, loaf size 1000g, crust colour Dark).
• Press the START/STOP button to start the program. Do not open the lid
during the baking process!
• At the end of the bread-making process the appliance will automatically
enter a keep warm cycle of approximately one hour – do not leave the
bread in the machine for longer.
• Press the START/STOP button, unplug the machine and carefully open
the lid. Use oven mitts to remove the baking tin from the appliance and to
remove the bread from the tin. Let it cool down on a wire rack.
• Slice the bread using a serrated-edge or electric knife. Enjoy!
Method
Page 36

36
AFTER SALES SUPPORT
1300 886 649
info@tempo.org
AUS
MODEL: 104906 PRODUCT CODE: 50138 07/2015
Ingredients 1250g
Eggs 2 (100g)
Warm Water (45–50ºC)
330 mL
Oil 3 tbsp
Bread Flour 5 cups
Dried Yeast 4 tsp
Salt 1.5 tsp
Sugar 3 tbsp
Milk Powder 2 tbsp
(7) Quick bread
Recipes (Cont.)
• Crack the eggs into the baking tin with the clean kneading blades inside.
• Pour the measured quantity of warm water into the tin, then add the oil.
• Add the flour.
• At one side of the our mount, make a little hole and add the yeast, close
the hole, then make another little hole at the opposite side for the salt.
• Add the sugar and milk powder.
• Place the baking tin rmly in the appliance, making sure it clicks securely into
place. Fold down the handle, close the lid rmly and plug in the machine.
• Using the buttons on the control panel, make your program selection
(program 7).
• Press the START/STOP button to start the program. Do not open the lid
during the baking process!
• At the end of the bread-making process the appliance will automatically
enter a keep warm cycle of approximately one hour – do not leave the
bread in the machine for longer.
• Press the START/STOP button, unplug the machine and carefully open
the lid. Use oven mitts to remove the baking tin from the appliance and to
remove the bread from the tin. Let it cool down on a wire rack.
• If the kneading blades are stuck in the bread, use the kneading blade
remover to remove them, but only do so after the bread has completely
cooled down.
• Slice the bread using a serrated-edge or electric knife. Enjoy!
Method
Page 37

37
AFTER SALES SUPPORT
1300 886 649
info@tempo.org
AUS
MODEL: 104906 PRODUCT CODE: 50138 07/2015
Recipes (Cont.)
(8) Italian bread
Italian bread with rosemary and raisins
Ingredients 1000g 750g
Water 300mL 260mL
Olive Oil 2 tbsp 1.5 tbsp
Bread Flour 500g 400g
Dried Yeast 1 tsp 1 tsp
Salt 2 tsp 1.5 tsp
Dried Oregano 1 tbsp 1 tsp
Ingredients 750g
Eggs 2 medium
Water 175mL
Olive Oil 4 tbsp
Bread Flour 400g
Dried Yeast 1 tsp
Salt 1 tsp
Sugar 1 tbsp
Dried Rosemary 3 tbsp
Raisins 125g
• If you choose the recipe that includes eggs, crack them into the baking tin
with the clean kneading blades inside.
• Add the measured quantities of water and oil.
• Add the flour.
• At one side of the our mount, make a little hole and add the yeast, close
the hole, then make another little hole at the opposite side for the salt.
• Sprinkle the dried oregano (or the sugar and dried rosemary, as
required) on top.
• If required, add the raisins to the fruit and nut dispenser.
• Place the baking tin rmly in the appliance, making sure it clicks securely into
place. Fold down the handle, close the lid rmly and plug in the machine.
• Using the buttons on the control panel, make your program selection
(program 8, loaf size, crust colour).
• Press the START/STOP button to start the program. Do not open the lid
during the baking process!
• At the end of the bread-making process the appliance will automatically
enter a keep warm cycle of approximately one hour – do not leave the
bread in the machine for longer.
• Press the START/STOP button, unplug the machine and carefully open
the lid. Use oven mitts to remove the baking tin from the appliance and to
remove the bread from the tin. Let it cool down on a wire rack.
• Slice the bread using a serrated-edge or electric knife. Enjoy!
Method
Page 38

38
AFTER SALES SUPPORT
1300 886 649
info@tempo.org
AUS
MODEL: 104906 PRODUCT CODE: 50138 07/2015
(9) Pizza Dough
Ingredients
Milk 240 mL
Olive Oil 2 tbsp
Bread Flour 450g
Dried Yeast 1 tsp
Salt 1 tsp
Recipes (Cont.)
(10) Pasta Dough
Ingredients
Plain Flour 490g
Eggs 4 (200g)
The Dough program (9) is for
kneading yeast dough only (no
baking). Use it to knead yeast dough
that you want to shape yourself by
hand and bake in an oven, or for
pizza crusts, pastry or bread rolls.
The dough is heated so that it can
rise, but it will not be baked. After
the kneading process you can bake
the dough in a traditional oven (at
220°C), or top it with your favourite
toppings and bake in a pizza oven
for approximately 20 minutes or until
crispy and cooked
to your liking.
The Pasta Dough program (10) is
similar to the dough program, but it is
specially designed for preparing yeastfree dough, for example, for pasta,
wafes, cake, biscuits or pies. This
program simply mixes and kneads the
dough; there is no baking involved.
When the dough is ready, take it
out of the bread maker and continue
processing as appropriate.
(12) Strawberry jam
Ingredients
Strawberries 500g
Sugar 250g
Lemon Juice (fresh) 3 tbsp
Lemon Juice
(concentrated)
1 tbsp
This program is for processing fresh
fruit or making marmalade or jam.
Place all ingredients in the bread
pan and follow the general usage
instructions to start cooking jam.
At the end of the program, remove
the pan wearing oven mitts. Carefully
pour the hot processed fruit into a
heat resistant and refrigerator safe
container, leaving 1cm space at the
top. Cover tightly. The jam will thicken
upon cooling. Do not exceed any the
quantities indicated to avoid the jam
boiling over and ending up in the
baking chamber.
Page 39

39
AFTER SALES SUPPORT
1300 886 649
info@tempo.org
AUS
MODEL: 104906 PRODUCT CODE: 50138 07/2015
Ingredients 750g 1000g
Full cream milk 310 mL 375 mL
Oil 1 tbsp 3 tbsp
Bread Flour 450g 600g
Dried Yeast 1.5 tsp 2 tsp
Salt 1.5 tsp 2 tsp
Sugar 1.5 tbsp 2 tbsp
(11) Milk bread
• In a pot on the stovetop, bring the milk to almost boiling point, then let it
cool to room temperature.
• Pour the cooled milk into the baking tin with the clean kneading blades
inside, then add the oil.
• Add the flour.
• At one side of the our mount, make a little hole and add the yeast, close
the hole, then make another little hole at the opposite side for the salt.
• Add the sugar.
• Place the baking tin rmly in the appliance, making sure it clicks securely into
place. Fold down the handle, close the lid rmly and plug in the machine.
• Using the buttons on the control panel, make your program selection
(program 11).
• Press the START/STOP button to start the program. Do not open the lid
during the baking process!
• At the end of the bread-making process the appliance will automatically
enter a keep warm cycle of approximately one hour – do not leave the
bread in the machine for longer.
• Press the START/STOP button, unplug the machine and carefully open
the lid. Use oven mitts to remove the baking tin from the appliance and to
remove the bread from the tin. Let it cool down on a wire rack.
• Slice the bread using a serrated-edge or electric knife. Enjoy!
Method
Recipes (Cont.)
Page 40

40
AFTER SALES SUPPORT
1300 886 649
info@tempo.org
AUS
MODEL: 104906 PRODUCT CODE: 50138 07/2015
Other bread varieties
The bread maker can be used for making different types of bread following
the method described on the previous pages. A few suggestions are listed
below and opposite; feel free to experiment with other recipes, as long as the
quantities are similar. Remember, always add the ingredients in the order
they are listed, and add any extra bits to the fruit and nut dispenser.
Ingredients 1000g 750g
Water 330 mL 250 mL
Bread Flour 400g 300g
Wholegrain Flour 200g 100g
Dried Yeast 2 tsp 1.5 tsp
Salt 1 tsp 1 tsp
Butter 25g 20g
Sugar 1.5 tbsp 1 tbsp
Recipes (Cont.)
Wholegrain bread Corn bread
Bacon bread
Ingredients 1000g
Water 300 mL
Olive Oil 2 tbsp
Bread Flour 350g
Corn Flour 150g
Dried Yeast 2 tsp
Salt 1 tsp
Sugar 1 tsp
Ingredients 1000g
Water 250 mL
Bread Flour 300g
Whole Wheat Flour 300
Dried Yeast 2 tsp
Salt 1 tsp
Sugar 1 tbsp
Onion (slightly cooked) 1
Smoked Bacon (cooked) 200g
Multigrain bread
Ingredients 1000g
Water 375 mL
Oil 3 tbsp
Bread Flour 375g
Wholemeal Flour 225g
Dried Yeast 2 tsp
Salt 2 tsp
Sugar 3 tbsp
Milk Powder 2 tbsp
Mixture of seeds
(sunower, sesame,
linseeds, kibble
wheat, cracked
buckwheat)
2 tbsp
each
Page 41

41
AFTER SALES SUPPORT
1300 886 649
info@tempo.org
AUS
MODEL: 104906 PRODUCT CODE: 50138 07/2015
Nut bread
Ingredients 750g
Water 310 mL
Wholegrain Flour 500g
Dried Yeast 2 tsp
Salt 1 tsp
Butter 25g
Sugar 1 tbsp
Nuts 65g
Chocolate bread Panettone
Ingredients 1000g
Egg 1
Milk 250 mL
Bread Flour 400g
Wholemeal Flour 100g
Dried Yeast 2 tsp
Salt 1 tsp
Butter 25g
Sugar 2 tbsp
Dark Chocolate Bits 100g
Ingredients 1000g
Egg 1
Milk 175 mL
Bread Flour 500g
Dried Yeast 2 tsp
Salt 1 tsp
Aniseed (powder) 1 tsp
Butter 60g
Sugar 1.5 tbsp
Raisins 50g
Chopped Walnuts 50g
Dried Fruit 50g
Raisin bread
Ingredients 1000g
Water 330 mL
Bread Flour 600g
Dried Yeast 2 tsp
Salt 1 tsp
Butter 25g
Sugar 2 tbsp
Raisins 250g
Recipes (Cont.)
Page 42

42
AFTER SALES SUPPORT
1300 886 649
info@tempo.org
AUS
MODEL: 104906 PRODUCT CODE: 50138 07/2015
Page 43

43
AFTER SALES SUPPORT
1300 886 649
info@tempo.org
AUS
MODEL: 104906 PRODUCT CODE: 50138 07/2015
Unfortunately, from time to time, faulty products are manufactured which need to
be returned to the supplier for repair.
Please be aware that if your product is capable of retaining user-generated data
(such as les stored on a computer hard drive, telephone numbers stored on
a mobile telephone, songs stored on a portable media player, games saved on
a games console or les stored on a USB memory stick) during the process of
repair, some or all of your stored data may be lost. We recommend you save this
data elsewhere prior to sending the product for repair.
You should also be aware that rather than repairing goods, we may replace them with
refurbished goods of the same type or use refurbished parts in the repair process.
Please be assured though, refurbished parts or replacements are only used
where they meet ALDI’s stringent quality specifications.
If at any time you feel your repair is being handled unsatisfactorily, you may
escalate your complaint. Please telephone us on 1300 886 649 or write to us at:
Tempo (Aust) Pty Ltd ABN 70 106 100 252
PO BOX 6056 Frenchs Forest, Sydney, Australia NSW 2086
Telephone: 1300 886 649 (Aust) - Fax: (02) 9975 2688
Tempo Help Desk: 1300 886 649 (Aust)
(Operating Hours: Mon-Fri 08:30am to 06:00pm EST)
Email: info@tempo.org
YEAR WARRANTY
3
Repair and Refurbished
Goods or Parts Notice
Bread Maker
Page 44

AFTER SALES SUPPORT
1300 886 649
info@tempo.org
AUS
MODEL: 104906 PRODUCT CODE: 50138 07/2015
Warranty returns
Should you for any reason need to return this product for
a warranty claim, make sure to include all accessories with
the product.
Product does not work?
If you encounter problems with this product, or if it fails to
perform to your expectations, make sure to contact our
After Sales Support Centre on 1300 886 649 before
returning it to the store for a refund.
For an electronic copy of this manual, go to www.kuchef.com.au and download a
copy.
Instruction Manual Revision Index
Version No Issue Date Description
V1.0 18 March 2015 Original release
V1.1 25 March 2015 Minor updates
V1.2 08 April 2015 Compliance update: pages 8, 11, 15, 28, 34
V1.3 09 April 2015 Compliance update: page 15
 Loading...