

Kuchef 104706 Instruction Manual
N13275
Model Number 104706
Bread Maker
INSTRUCTION MANUAL
AFTER SALES SUPPORT
1300 886 649
info@tempo.org
AUS
MODEL: 104706 PRODUCT CODE: 51381 10/2015
IM Version No: V1.3 Issue Date: 20 August 2015

2
AFTER SALES SUPPORT
1300 886 649
info@tempo.org
AUS
MODEL: 104706 PRODUCT CODE: 51381 10/2015
Welcome
Congratulations on choosing to buy a Kuchef® product.
All products brought to you by Kuchef® are manufactured to the highest
standards of performance and safety and, as part of our philosophy of
customer service and satisfaction, are backed by our comprehensive
3 Year Warranty.
We hope you will enjoy using your purchase for many years to come.

3
AFTER SALES SUPPORT
1300 886 649
info@tempo.org
AUS
MODEL: 104706 PRODUCT CODE: 51381 10/2015
Contents
02 Welcome
04 Warranty Details
05 General Safety Instructions
08 Product Overview
08 Scope of delivery
09 Control panel buttons
10 Display screen indicators
12 Getting Started
12 Unpacking
12 Before rst use
14 Instructions
14 Bread-making programs
16 Operation cycles
16 Program duration
18 Basic bread-making ingredients
20 Dosage / quantities
21 Additional functions
23 Step-by-step instructions for using the bread maker
26 FAQs and Troubleshooting Guide
31 Other Useful Information
31 Cleaning the bread maker
32 Storage
32 Service, repair and spare parts
33 Technical specications
33 Compliance
33 Responsible disposal
34 Recipes
51 Repair and Refurbished Goods or Parts Notice
4
AFTER SALES SUPPORT
1300 886 649
info@tempo.org
AUS
MODEL: 104706 PRODUCT CODE: 51381 10/2015
The product is guaranteed to be free from defects in workmanship and parts
for a period of 36 months from the date of purchase. Defects that occur
within this warranty period, under normal use and care, will be repaired,
replaced or refunded at our discretion, solely at our option with no charge for
parts and labour. The benets conferred by this warranty are in addition
to all rights and remedies in respect of the product that the consumer
has under the Competition and Consumer Act 2010 and similar state and
territory laws.
Our goods come with guarantees that cannot be excluded under the
Australian Consumer Law. You are entitled to a replacement or refund for
a major failure and to compensation for any other reasonably foreseeable
loss or damage. You are also entitled to have the goods repaired or
replaced if the goods fail to be of acceptable quality and the failure does
not amount to a major failure.
YEAR WARRANTY
3
Bread Maker
Warranty
Details

5
AFTER SALES SUPPORT
1300 886 649
info@tempo.org
AUS
MODEL: 104706 PRODUCT CODE: 51381 10/2015
General Safety Instructions
IMPORTANT SAFETY INSTRUCTIONS
READ CAREFULLY AND KEEP FOR FUTURE REFERENCE
Read this manual thoroughly before first use, even if you are familiar with this
type of product. The safety precautions enclosed herein reduce the risk of re,
electric shock and injury when correctly adhered to. Keep the manual in a safe
place for future reference, along with the completed warranty card, purchase
receipt and carton. If applicable, pass these instructions on to the next owner of
the appliance.
Always follow basic safety precautions and accident prevention measures when
using an electrical appliance, including the following:
• Correct voltage: Make sure your local outlet voltage and circuit frequency
correspond to the voltage indicated on the appliance rating label. If it does not
match, contact the after sales support line and do not use the appliance.
• Safe connection: Connect the appliance to a properly earthed mains socket.
Insert the plug properly into the mains socket. Do not alter the plug.
• Do not immerse: To protect against electric shock, do not immerse the cord,
plug or the appliance itself in water or other liquid. Only clean these parts
with a damp cloth; never wash the motor housing in water. If the appliance is
accidentally immersed, immediately unplug it, dry it and have it checked by
qualied service personnel.
• Moisture: Ensure your hands are dry before handling the plug or switching on.
Do not use the appliance next to a kitchen sink.
• Protect the power cord: Do not kink, squash or strain the power cord and
protect it from sharp edges and heat. Do not let it hang over the edge of a
benchtop; do not place anything on top of the cord. Do not wrap it around the
appliance, and never pull the cord to lift up, carry or unplug the appliance.
• No extension cord or adaptor: Fully unwind the power supply cord before us-
ing the appliance. Do not use this appliance with an extension cord or adaptor.
• Check the power cord: Check the power cord regularly for visible damage. If
it is damaged, it must be replaced by the manufacturer, its authorised service
centres or similar qualied personnel in order to avoid any hazards.
• Do not use when damaged: Do not pick up or operate an appliance with
a damaged cord or plug, or after the appliance malfunctions or has been
dropped or damaged in any manner. A damaged cord must be replaced by
the manufacturer or a qualied person in order to avoid a hazard. In case of
damage, contact our after sales support line for advice.
Electrical safety and cord handling

6
AFTER SALES SUPPORT
1300 886 649
info@tempo.org
AUS
MODEL: 104706 PRODUCT CODE: 51381 10/2015
General Safety Instructions (Cont.)
• Disconnect after use: Switch off the appliance and unplug the cord from
the outlet when you have nished with the appliance, before changing
accessories and before cleaning. When disconnecting, grip the plug, do
not pull the cord.
• Unattended: Do not leave the appliance unattended when connected to
power.
• RCD: Unless your home is already fitted with a residual current device
(safety switch), we recommend installing an RCD with a rated residual
operating current not exceeding 30mA, to provide additional safety
protection when using electrical appliances. See your electrician for
professional advice.
• Domestic indoor use only: This appliance is intended for indoor
household use only. It is not suitable for commercial use. Do not use it
outdoors or in areas with high heat or humidity levels.
• Intended use: Do not use the appliance for anything other than its
intended purpose, and only use it as described in this manual. Any other
use may cause re, electric shock or injury.
• Use of accessories: Only use this appliance with the accessories sold
with it. The use of accessory attachments from other brands may cause
injury and damage. We assume no responsibility for any eventual damages
caused by improper or faulty use or noncompliance with these instructions.
• No external timer: This appliance is not intended to be operated by
means of an external timer or separate remote control system.
• Usage restrictions: This appliance is not intended for use by persons
(including children) with reduced physical, sensory or mental capabilities, or
lack of experience and knowledge, unless they have been given supervision
or instruction concerning use of the appliance by a person responsible for
their safety.
• Supervise children: Children should be supervised to ensure they do
not play with the appliance. Close supervision is necessary when any
appliance is used by or near children.
• Unattended: Never leave the appliance unattended or move it during use.
• Location: Place the appliance on a heat-resistant, dry and stable surface,
such as a kitchen table or benchtop, so that the appliance cannot tilt
or slip. Leave a space of at least 20cm from the wall, cupboards, other
appliances or ammable items.
Usage conditions and restrictions

7
AFTER SALES SUPPORT
1300 886 649
info@tempo.org
AUS
MODEL: 104706 PRODUCT CODE: 51381 10/2015
• Hot surfaces: The temperature of accessible surfaces may be high when
the appliance is operating. Do not touch hot surfaces during use, or
immediately afterwards; the element surface is subject to residual heat.
• Removing the bread: Thee baking tin will get very hot during the baking
process. Always wear oven mitts when touching the appliance and
removing the baking tin from the chamber and the bread from the tin.
• Moving parts: Avoid contact with moving parts.
• Electrical safety: ALWAYS switch off the appliance and unplug it from the
power source after use. NEVER remove the baking tin or disconnect the
plug while the appliance is in use.
General Safety Instructions (Cont.)
• Do NOT place the appliance on household equipment or on a tablecloth,
runner or similar table covering.
• Protect from heat: Do not place the appliance near a hot gas or electric
stove, in a heated oven, or near an open ame or other heat source.
• Do not place items on top: Do not cover any hot surfaces with any
objects. Do not put ammable materials on top of the appliance. Do not
block, cover or touch the ventilation holes while the appliance is in use.
• Before you start: Check that the lid and baking tin are correctly mounted.
• Ingredient dispenser: Do not use the unit without the ingredient dispenser
installed. Handle the dispenser with care in order not to damage it.
• Lid: Do not open the lid or leave it open during operation except for the
cases described in this manual.
• Process chamber: Do not place foreign objects in the process chamber.
Do not put your hands into the process chamber during operation.
• Filling: To avoid spilling, remove the baking tin from the appliance to ll it.
• Switching on: Only switch on the appliance when it is lled with
ingredients or dough in order to prevent overheating.
• End of baking: In order not to damage the non-stick coating of the baking
tin, do not tap on the tin bottom or edges but shake the tin gently when
taking bread out. Hold the tin by the handle using oven mitts or pot holders.
• Cleaning/storage: Allow the unit to cool down completely before cleaning
it and before attaching or taking off parts.
• After use: Never use the baking tin for storage of ingredients.
• Repair: Do not replace components yourself except any spare parts
provided by the distributor to avoid any damage or injury.
CAUTION!
8
AFTER SALES SUPPORT
1300 886 649
info@tempo.org
AUS
MODEL: 104706 PRODUCT CODE: 51381 10/2015
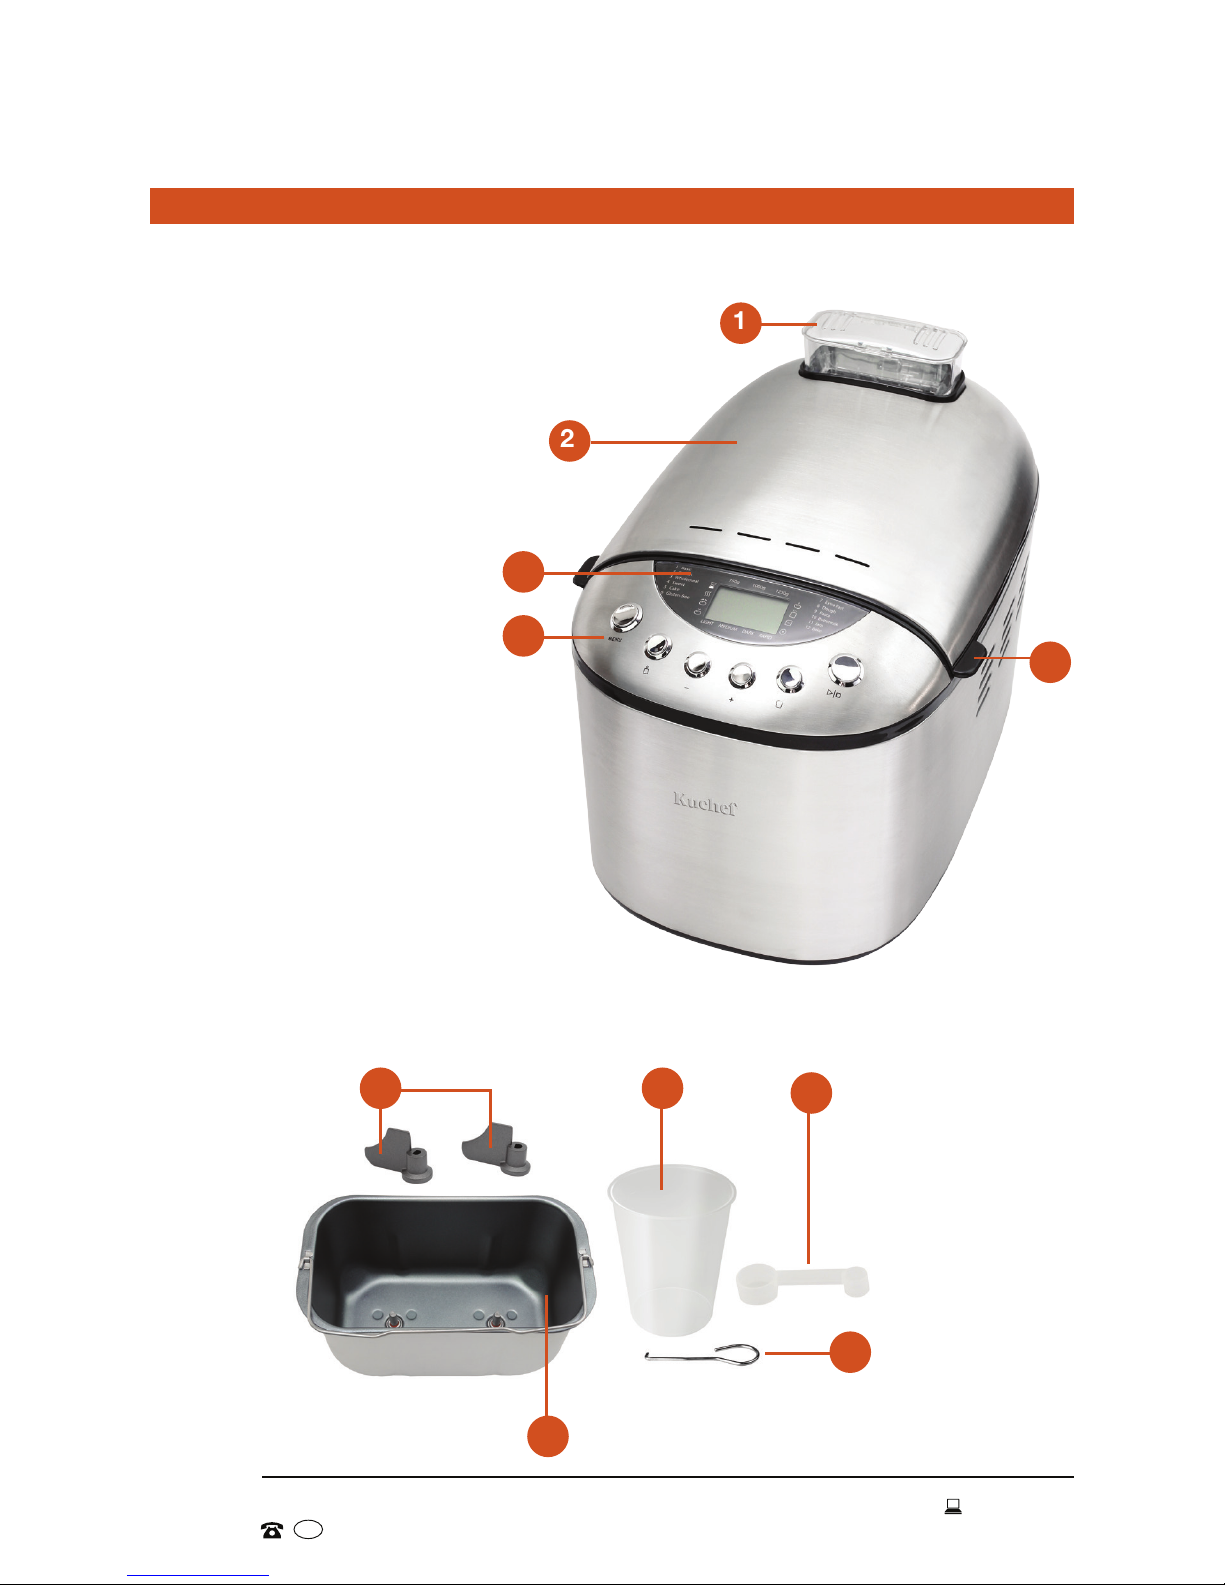
Product Overview
4
Scope of delivery
3
1
2
A Bread maker
B Accessories
9
8
5
6 7
10
A Bread maker
1 Automatic ingredient dispenser
2 Lid (removable)
3 Display
4 Control panel (see opposite)
5 Handle (on both sides)
B Accessories
6 Kneading paddles (2)
7 Measuring cup
8 Measuring spoon
(1tbsp / 1tsp)
9 Hook
(kneading paddle remover)
10 Baking tin (non-stick coated)
C Documentation (not shown)
Instruction manual
Quick start guide
Baking tips
Warranty certicate
9
AFTER SALES SUPPORT
1300 886 649
info@tempo.org
AUS
MODEL: 104706 PRODUCT CODE: 51381 10/2015
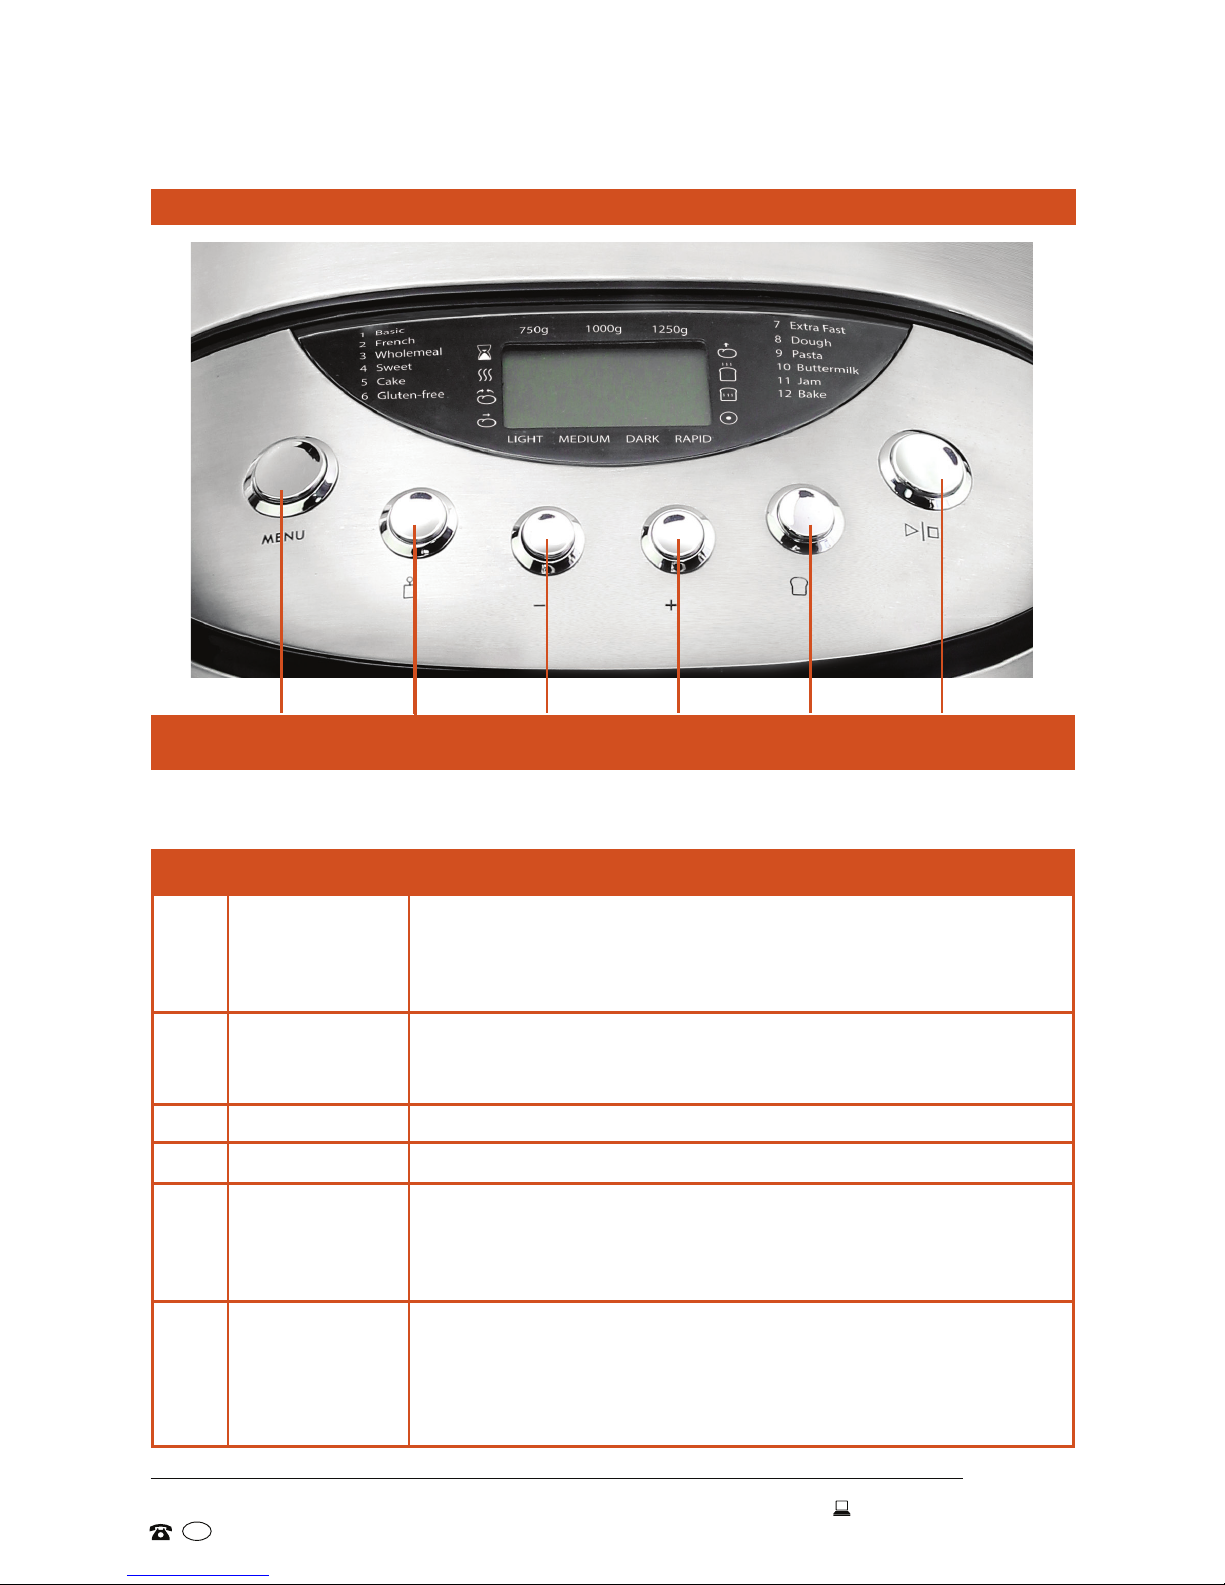
Product Overview (Cont.)
Button Function / Options
11 MENU Press to select the baking program:
1-Basic, 2-French, 3-Wholemeal, 4-Sweet, 5-Cake,
6-Gluten-free, 7-Extra Fast, 8-Dough, 9-Pasta,
10-Buttermilk, 11-Jam, 12-Bake.
12 LOAF WEIGHT Press to select the loaf size/weight: 750g, 1000g, 1250g
(available for programs 1, 2, 3, 4). Loaf weight determines
baking time.
13 TIMER - Press to set the delay time (decrease) -- see page 22.
14 TIMER + Press to set the delay time (increase) -- see page 22.
15 CRUST
COLOUR
Press to select the crust colour: Light, Medium or Dark
(for programs 1, 2 and 3), or select Rapid to accelerate the
kneading and rising process and reduce the total program
time by approximately one hour.
16 START/STOP • Press to start the program. The machine will emit a short
sound signal, the two dots in the time index will ash and
the countdown will start. Other buttons are now inactive.
• Press and hold to stop the program; the appliance will
sound a short signal and stop the program.
MENU LOAF TIMER TIMER CRUST START/
WEIGHT - + COLOUR STOP
Every time you press a button, the machine will acknowledge receipt of the
signal with a short beep.
Control panel buttons
10
AFTER SALES SUPPORT
1300 886 649
info@tempo.org
AUS
MODEL: 104706 PRODUCT CODE: 51381 10/2015
Product Overview (Cont.)
When plugged in, the appliance will sound a signal and the display screen will
light up. It shows the selections you have made and the current stage in the
bread-making process.
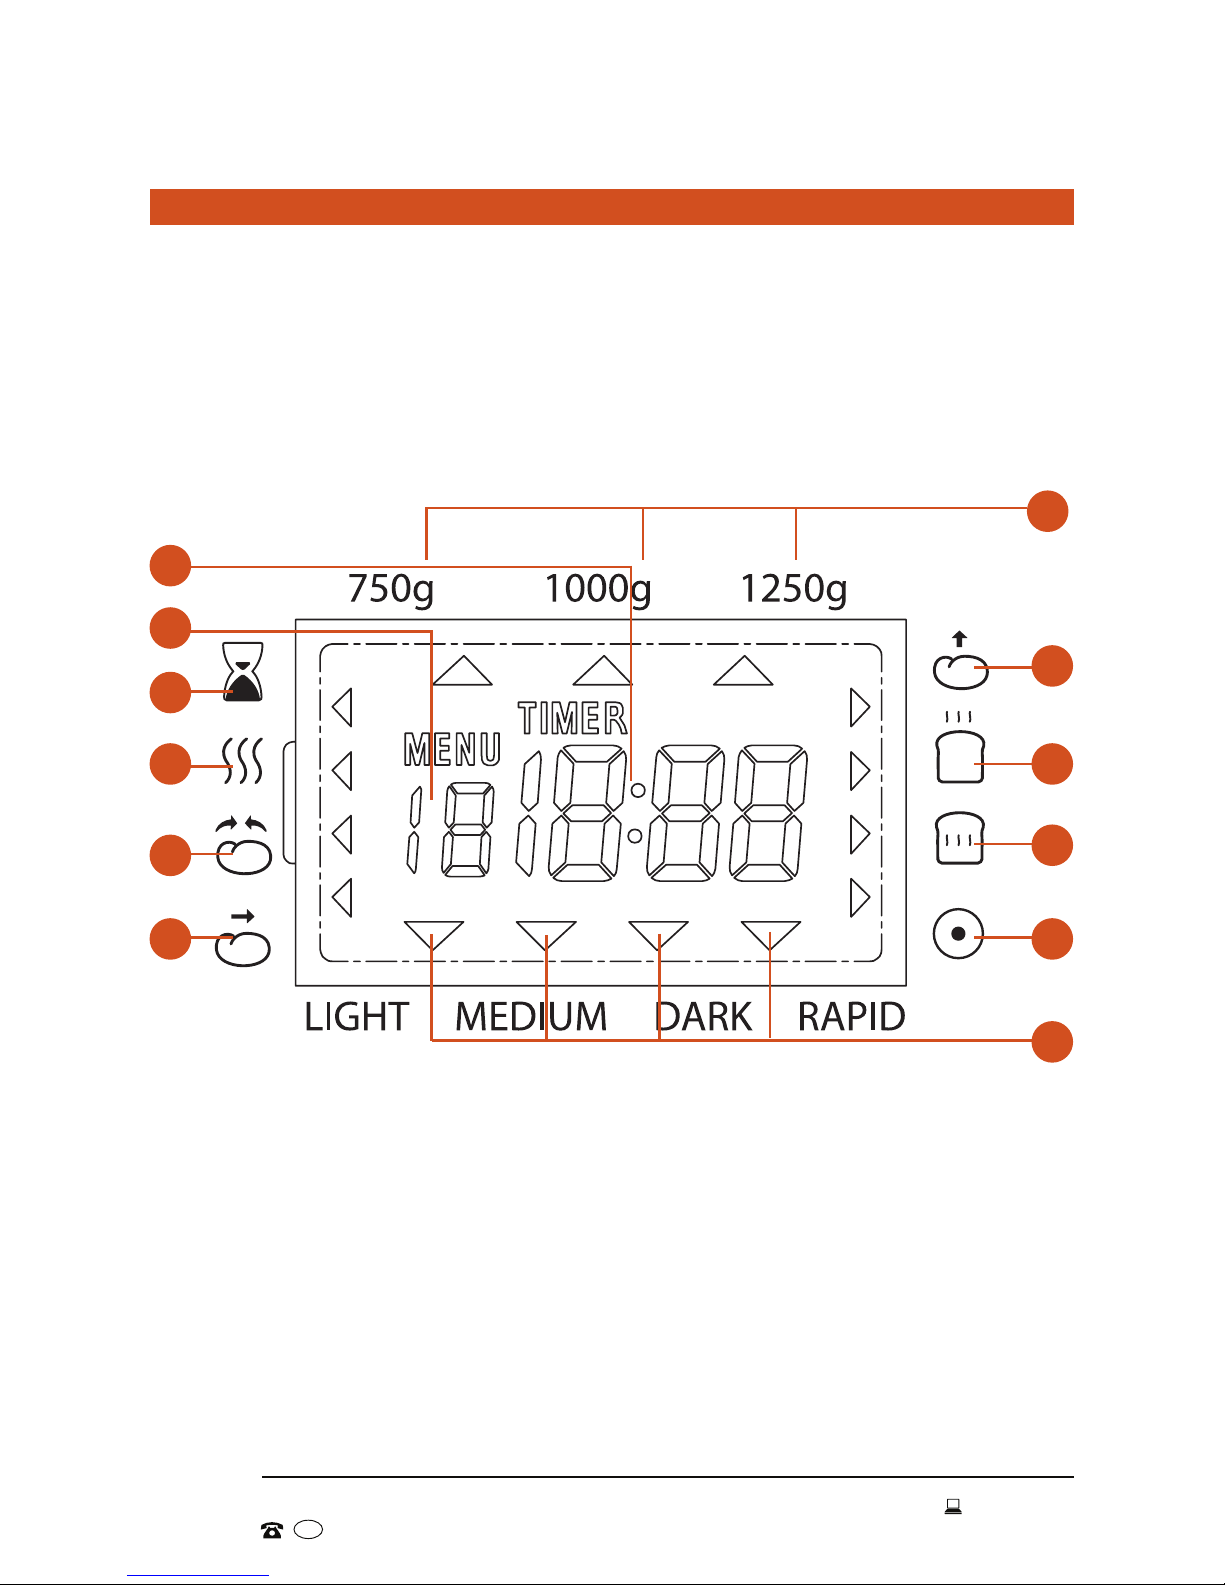
Display screen indicators
17
26
25
24
23 21
20
19
18
28
27
22
11
AFTER SALES SUPPORT
1300 886 649
info@tempo.org
AUS
MODEL: 104706 PRODUCT CODE: 51381 10/2015
Indicator Description
17 Loaf weight selection The arrow in the top row shows the selected
loaf size: 750g, 1000g, 1250g.
18 Dough proong (rising) symbol The arrow pointing to this symbol indicates
that the dough is proong (rising).
19 Baking symbol The arrow pointing to this symbol indicates
that the dough is being baked. Do not open
the lid, a deated loaf will not rise!
20 Keep warm symbol The arrow pointing to this symbol indicates
that the bread is being kept warm after
baking has nished.
21 Program end symbol This symbol is not in use on the 104706
Bread Maker.
22 Crust colour selection The arrow in the bottom row shows the
selected crust colour: Light, Medium, Dark
or Rapid.
23 Pause symbol The arrow pointing to this symbol indicates
that the dough is resting after pre-kneading
so that gluten bonds can form in the doughlike mass to enable further dough kneading.
24 Dough mixing symbol The arrow pointing to this symbol indicates
that dough pre-kneading or kneading is in
progress.
25 Preheating symbol The arrow pointing to this symbol indicates
that the machine is preheating (in the
Wholemeal and Buttermilk programs).
26 Delay symbol
The arrow pointing to this symbol indicates
that the delay timer is set.
27 Baking program number This is the number of the selected baking
program.
28 Time of delay / remaining
run time
This is the total time of the selected
program, or the countdown timer if you have
set a delayed start, or the time remaining
once the program has started. The
maximum delay time is 15 hours.
Product Overview (Cont.)

12
AFTER SALES SUPPORT
1300 886 649
info@tempo.org
AUS
MODEL: 104706 PRODUCT CODE: 51381 10/2015
• This product has been packaged to protect it against transportation
damage. Remove all packaging materials from around and inside the
appliance and keep the original packaging carton and materials in a
safe place. It will help prevent any damage if the product needs to be
transported in the future, and you can use it to store the appliance when
it is not in use. In the event that the carton is to be disposed of, please
recycle all packaging materials where possible.
• Plastic wrapping can be a suffocation hazard for babies and young
children, so ensure all packaging materials are out of their reach and
disposed of safely.
• Inspect the cord and plug for damage or wear before each use. Do not use
if any part is damaged.
Getting Started
NOTE
The bread maker may produce fumes or odour when it is rst heating up.
This is due to the components being new and can be disregarded safely.
It is entirely harmless. Leave the unit powered on until all odour and/or
smoke has dissipated. Ensure there is adequate ventilation.
Unpacking
Before first use
• Place the appliance on a heat-resistant, dry and stable surface, such as a
kitchen table or benchtop, leaving a space of at least 20cm from the wall,
cupboards, other appliances or ammable items.
• Hold the baking tin by the handle and lift it out of the process chamber.
• Close the lid and insert the plug of the power cord into an appropriate wall
outlet. As soon as you switch on power at the outlet, the appliance will
sound a long signal and the display will show the number of the rst baking
program «1», its operation time index «3:30» and denoting the standard
baking settings (crust colour: medium; weight: 1250g).
• Press the MENU button repeatedly until you have selected program 12
(BAKE), then press the START/STOP button and let the unit warm up for
10minutes.
• After 10 minutes, press and hold the START/STOP button to switch the
bread maker off. Unplug the power cord.
• Grip the lid by the handle, open the bread maker and let it cool down.
• Remove the automatic ingredient dispenser by pulling it upwards.
13
AFTER SALES SUPPORT
1300 886 649
info@tempo.org
AUS
MODEL: 104706 PRODUCT CODE: 51381 10/2015
• Make sure the appliance is disconnected from the power supply. Wash the
removable parts and accessories (baking tin, kneading paddles, ingredient
dispenser, measuring spoon and cup, and the hook) with a soft sponge
in warm water and a little washing-up detergent to remove any dust from
transport. Do not use any abrasives in order not to damage the non-stick
coating. Rinse with clean water and dry thoroughly.
• Reinsert the baking tin rmly into the process chamber until it clicks
securely into place. If it does not seem to t properly, or gets stuck at an
angle, move the tin a little and press down rmly on both sides of the rim
until it clicks securely into place.
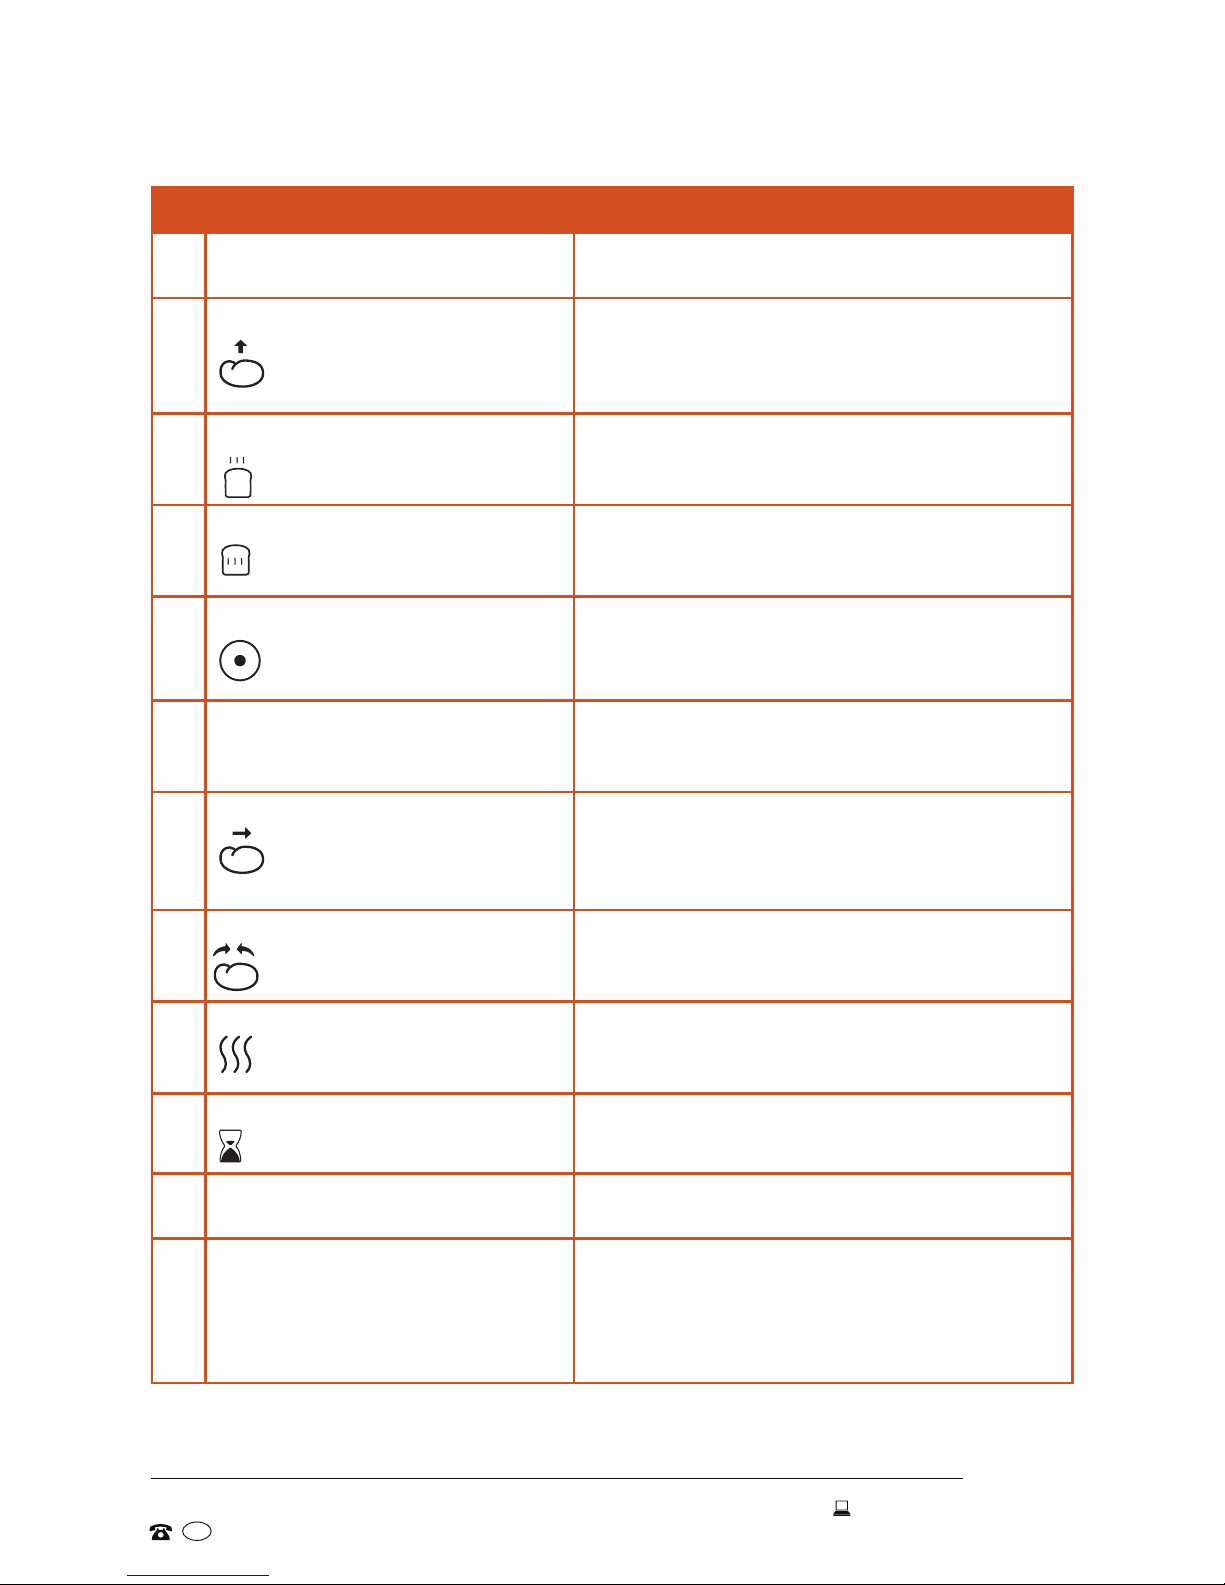
• Place the kneading paddles onto the spindles inside the baking tin (Fig. 1).
They only t one way.
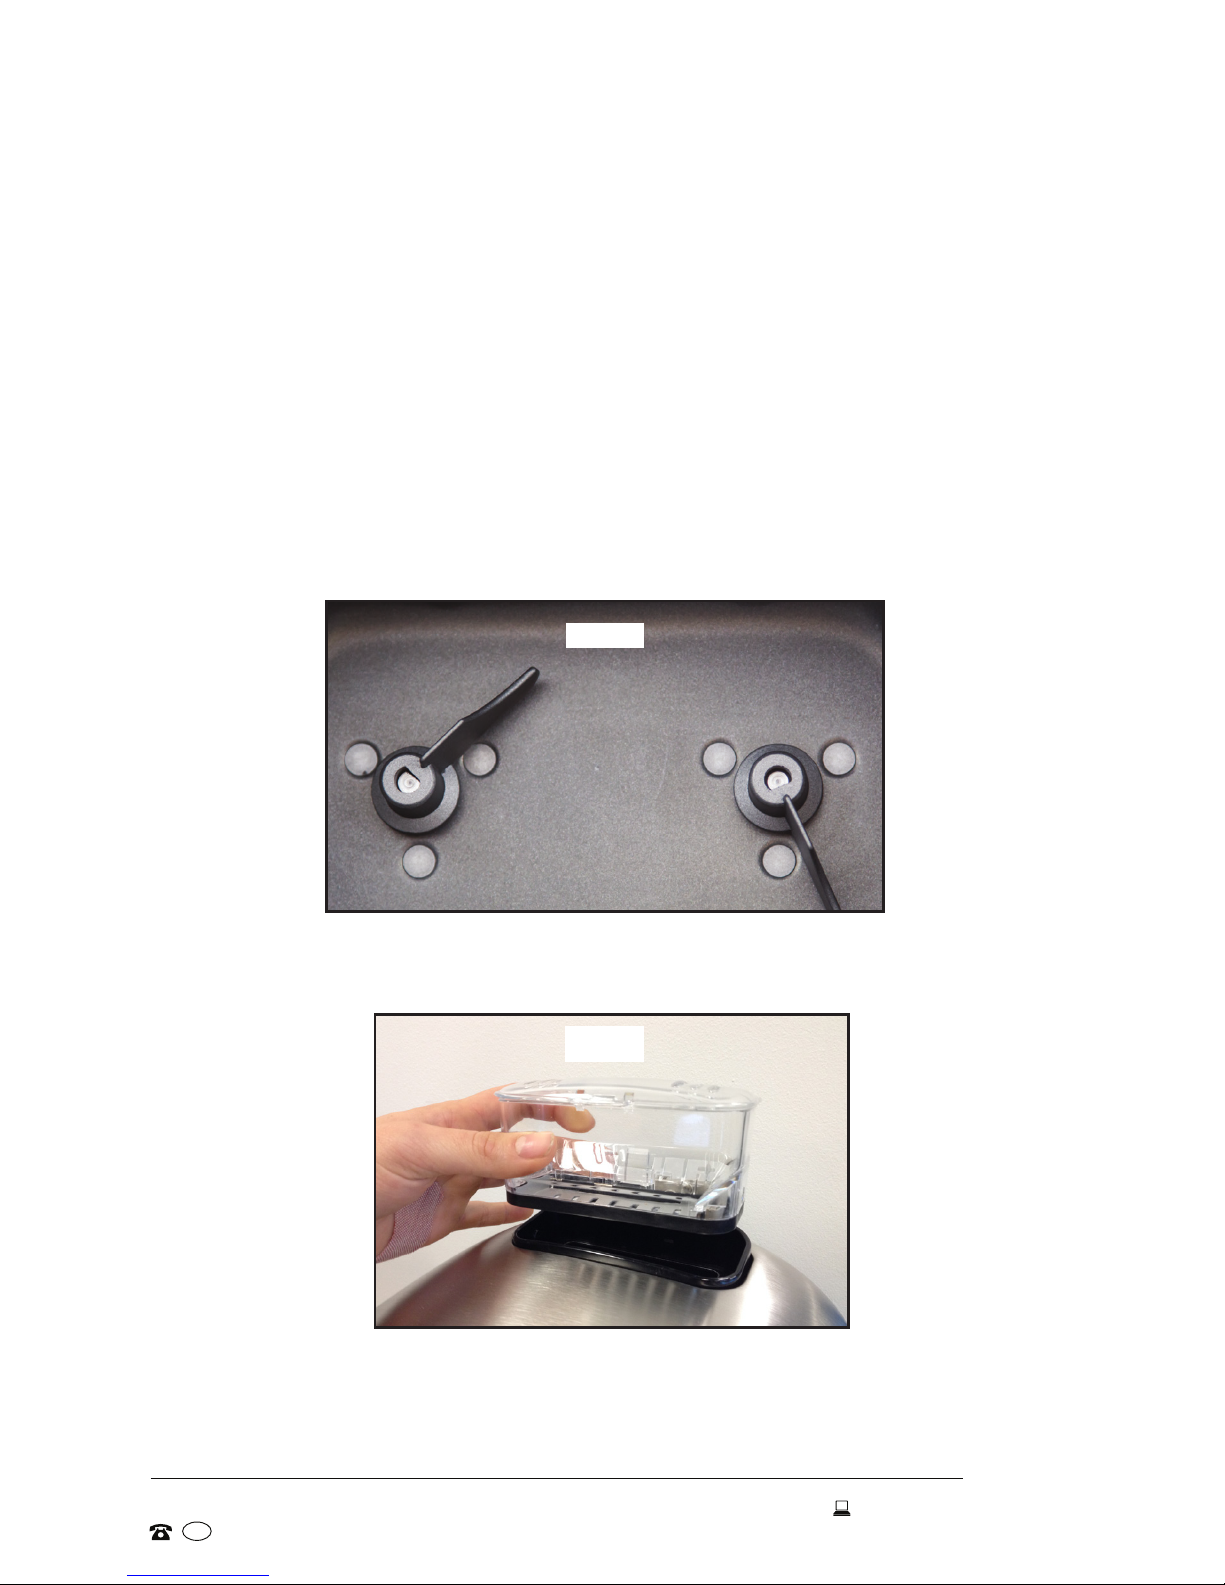
• Close the lid and install the automatic ingredient dispenser back in its
place (Fig. 2).
• Your new bread maker is now ready for use.
Getting Started (Cont.)
Fig. 1
Fig. 2

14
AFTER SALES SUPPORT
1300 886 649
info@tempo.org
AUS
MODEL: 104706 PRODUCT CODE: 51381 10/2015
Instructions
The table on this page spread lists all 12 programs. For more details about
these programs, please see the tables on pages 16 and 17.
Program Bread type (product)
1
Basic
This basic program includes the three most important breadmaking stages: repeated dough kneading, rising and baking. It
is the default program that is automatically selected.
2
French
This program is for typical French-style bread made with
white, protein-rich our. It has a crispy crust and a large,
porous crumb.
3
Wholemeal
This program is for slightly heavier wholemeal loaves, which are
generally smaller and more compact. It includes a preheating
stage to help soften the bread consistency. Using the delay
timer is not recommended for this program.
4
Sweet
The baking time and temperature are adjusted for sweeter
bread or fruit loaves with higher fat and sugar contents.
5
Cake
Use this program with baking soda or baking powder for
cakes that are made without yeast. It includes repeated
kneading, baking and a warm-keeping stage.
6
Gluten-free
Use this program for baking gluten-free bread. It includes
repeated kneading, baking and a warm-keeping stage.
Take particular care with your recipe to ensure all ingredients
are gluten-free. Alternatives include ours made from rice,
potato, corn or buckwheat. Tapioca is also gluten-free and
often used as a thickening agent. Xanthan gum (food additive
number 415) and Guar gum (412) act as substitutes for
gluten and give structure to the dough so it can rise. These
ingredients are generally available from health food stores.
When using a commercially prepared gluten-free breadmaking mix, follow the instructions on the packet.
IMPORTANT: For more information on the suitability and availability of gluten-free ingredients, contact the Coeliac Society
in your area, or consult a health professional for advice. We
assume no responsibility for the suitability of any particular
recipes or ingredients for people with special dietary needs.
Bread-making programs

15
AFTER SALES SUPPORT
1300 886 649
info@tempo.org
AUS
MODEL: 104706 PRODUCT CODE: 51381 10/2015
Instructions (Cont.)
Program Bread type (product)
7
Extra Fast
This is an extra fast setting for making bread in 80 minutes.
To achieve this fast result, you will have to add warm
water (46-52˚C) to the baking tin. Please use a cooking
thermometer to ensure the correct water temperature, as it
plays a crucial role in extra fast bread-making. If the water is
too cold the dough will not rise in time, and an excessively
high temperature will result in yeast destruction.
8
Dough
This program is for making yeast dough only. It includes
repeated kneading and a proong stage. Use it to knead
yeast dough that you want to shape yourself by hand and
bake in an oven, or for pizza crusts, pastry or bread rolls. The
dough is heated so that it can rise, but it will not be baked.
9
Pasta
This program is similar to the dough program, but designed
for preparing yeast-free dough for pasta, wafes, biscuits
or pies. It simply mixes and kneads the dough; there are
no proong or baking stages. When the dough is ready,
take it out of the bread maker and continue processing as
appropriate.
10
Buttermilk
This program is suitable for baking bread made with buttermilk, a skimmed cream by-product of butter churning.
Buttermilk gives bread a pleasant, slightly sour taste and an
extra ne texture. Natural yoghurt mixed with some lemon
juice may be substituted for buttermilk. The program includes
a preheating stage to help soften the buttermilk.
11
Jam
Use this program for processing fresh fruit for marmalade or
jam. Simply wash and cut fruit into chunks and place with
sugar and other recipe ingredients in the baking tin for jammaking. Do not exceed quantities stated in the recipe on page
46 to avoid the jam boiling over into the process chamber.
12
Bake
This program is for baking bread from a dough prepared
manually, or for extending the baking time by up to 90
minutes, to achieve a darker, crispier crust. There are no
kneading or proong stages. The default baking time for this
program is one hour and can be extended to 90 minutes in 10
minute steps. If the dough is baked before the end of the set
time, press the START/STOP button to stop the process.

16
AFTER SALES SUPPORT
1300 886 649
info@tempo.org
AUS
MODEL: 104706 PRODUCT CODE: 51381 10/2015
Instructions (Cont.)
The bread maker performs the following operations: preheating, pre-kneading,
pause, repeat kneading, dough proong, baking, and warm-keeping.
The table below lists the 12 available programs and the stages they include.
Program
Pre-
heating
Pre-
kneading
Pause
Repeat
kneading
Extras
Proofing/
Rising
Baking
Warm-
keeping
1
Basic
• • • • • • •
2
French
• • • • • • •
3
Wholemeal
• • • • • • • •
4
Sweet
• • • • • • •
5
Cake
• • • •
6
Gluten-free
• • • • • •
7
Extra Fast
• • • • •
8
Dough
• • • •
9
Pasta
• •
10
Buttermilk
• • • • • • • •
11
Jam
• • •
12
Bake
• •
The table on the following page lists the 12 available programs with the
baking time and total program time for all available options.
Operation cycles
Program duration
 Loading...