

Page 1
7 COMBINATION INSTRUMENT 46
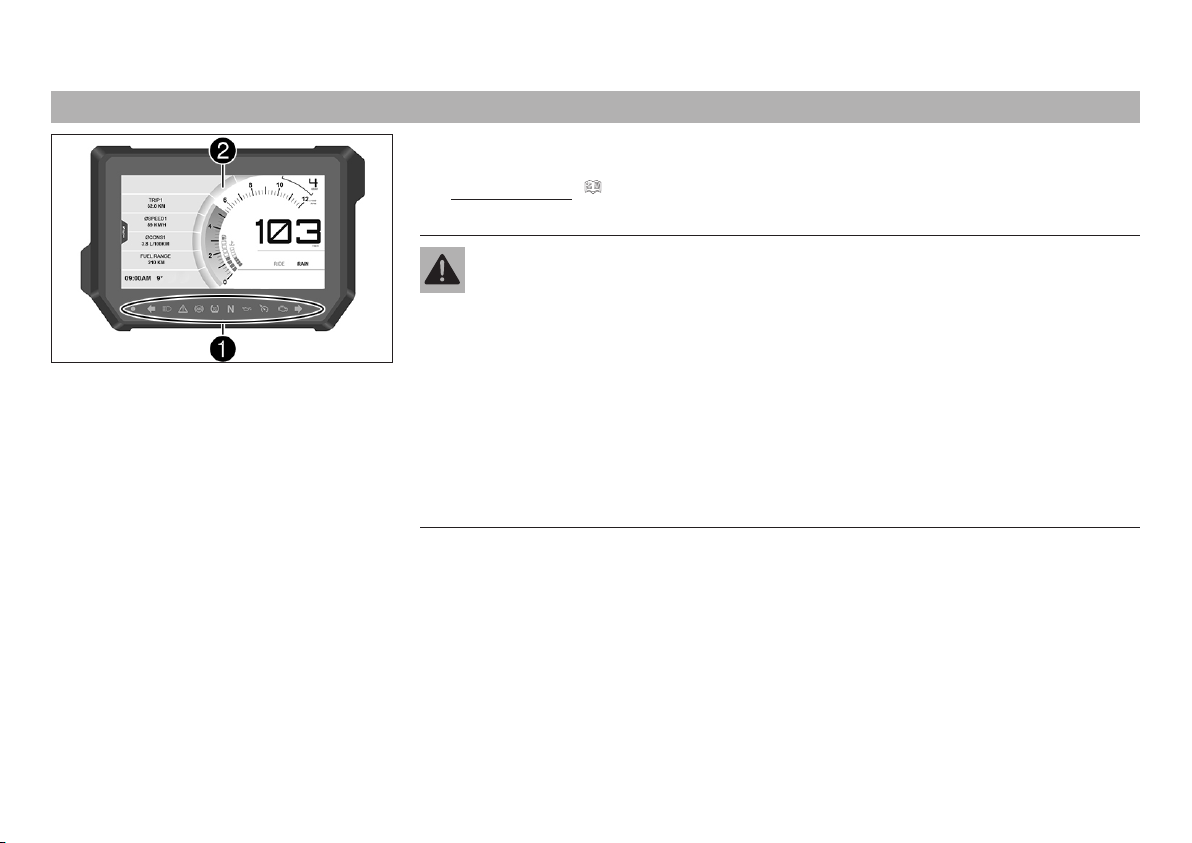
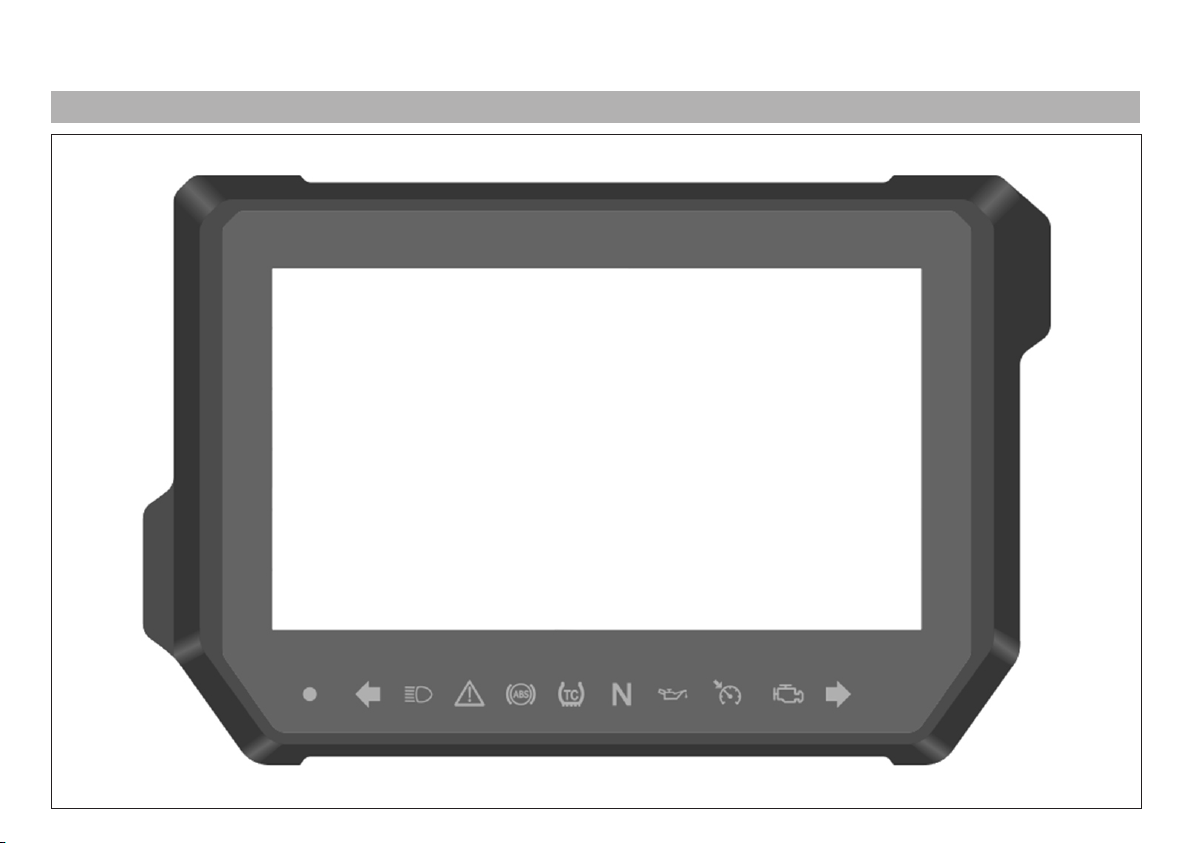
7.1 Combination instrument
The combination instrument is attached in front of the handlebar.
The combination instrument is divided into two function areas.
indicator lamps ( p. 50)
1
Display
F00901-10
2
Warning
Danger of burns Parts of the combination instrument become very hot in certain
situations.
The display becomes particularly hot in the case of external temperatures above
55 °C (131 °F), extended periods in standing position, e.g. at a traffic light, or in
direct sunlight.
– Do not touch the combination instrument with bare hands in the situations
referred to.
– Where appropriate protective clothing.
– If you have been burned, hold the area affected under lukewarm water immedi-
ately.
Page 2
7 COMBINATION INSTRUMENT 47
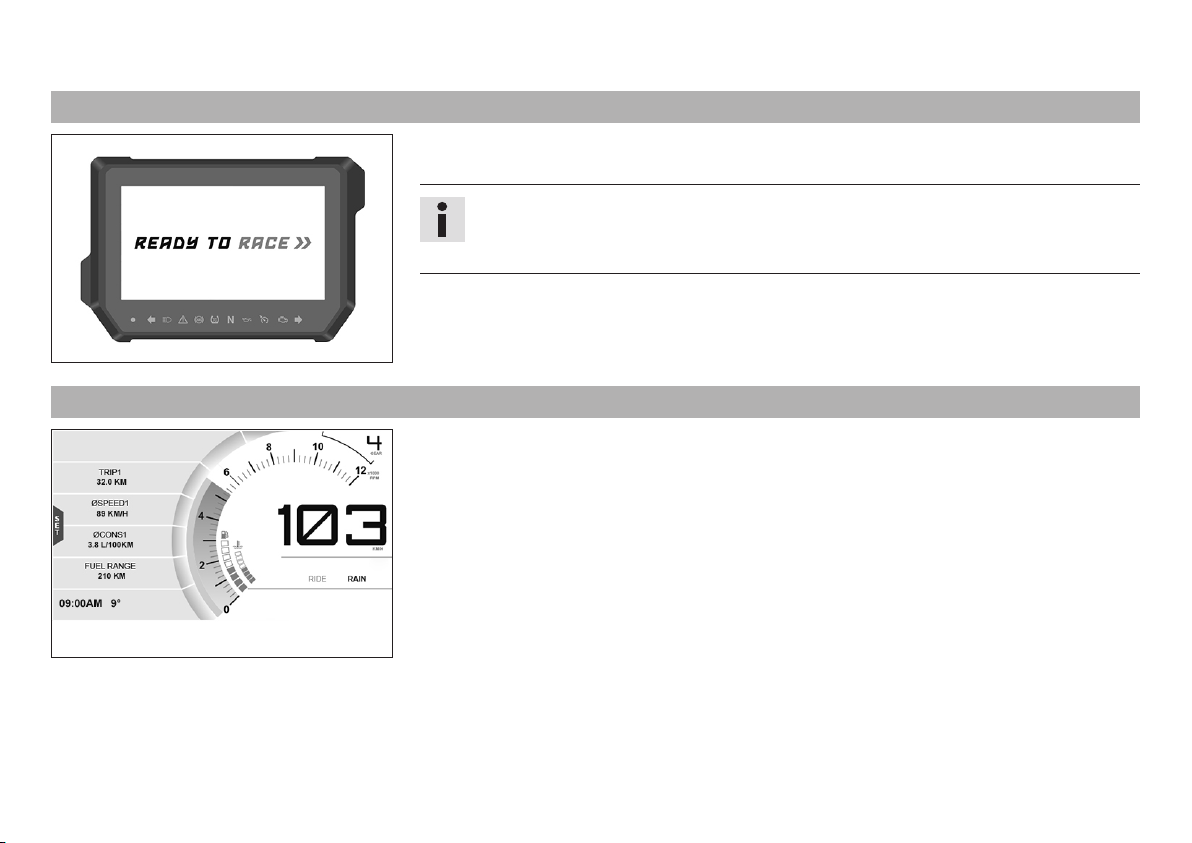
7.2 Activation and test
Activation
The combination instrument is activated when the ignition is switched on.
Info
The brightness of the displays is controlled by a brightness sensor in the combination instrument.
Test
The welcome text appears on the display and the indicator lamps are briefly activated for a
402820-01
7.3 Day-Night mode
function test.
Day mode is shown in a bright color.
F00902-01
Page 3
7 COMBINATION INSTRUMENT 48
Night mode is shown in a dark color.
Info
The light sensor in the combination instrument measures the brightness of the environment and automatically switches the display to day or night mode. The display
is brightened, darkened or switched to the other mode depending on the brightness
measured by the light sensor.
The display mode cannot be changed manually.
F00903-01
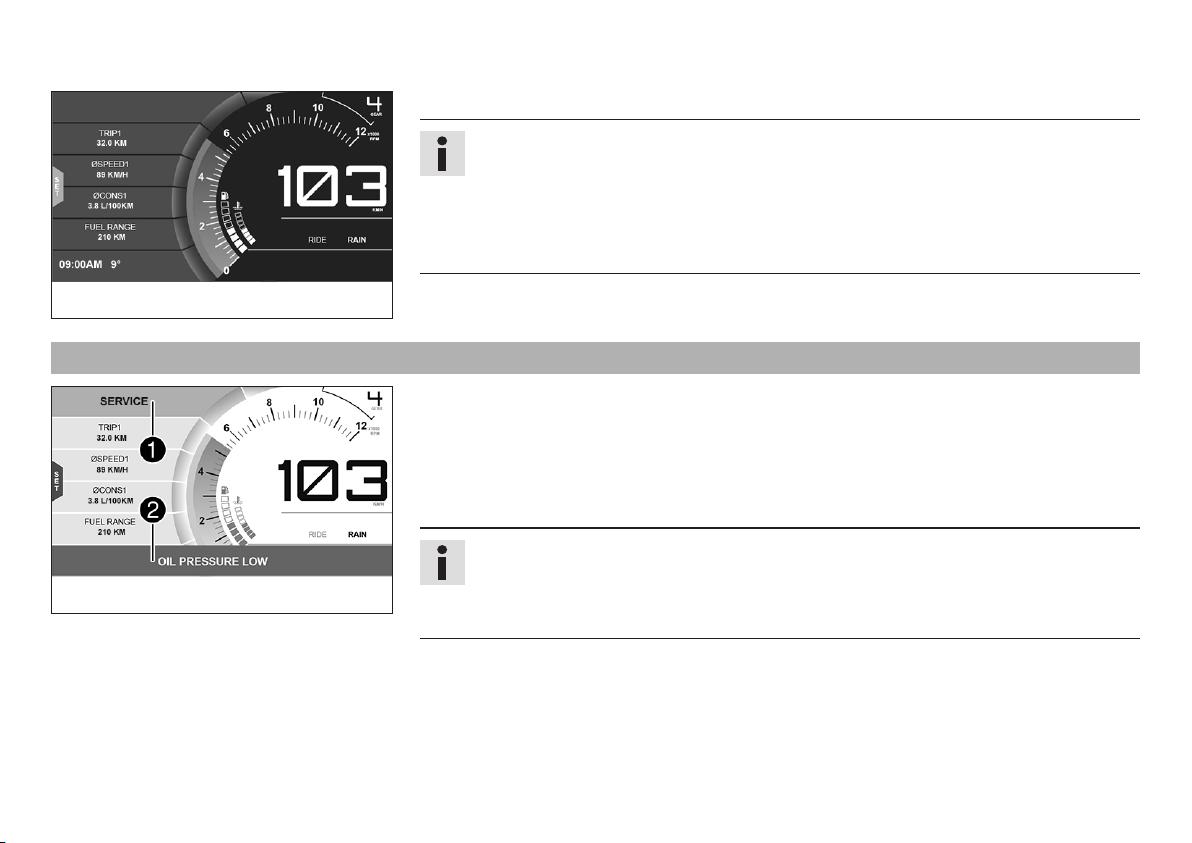
7.4 Warning notes
Warning notes appear on the top and/or bottom edge of the display, these are marked yellow or red depending on their relevance.
Yellow warning notes1indicate errors or information which requires prompt intervention
or an adjustment to the riding style.
Red warning notes2indicate errors or information which requires immediate intervention.
Info
Warning notes are cleared by pressing any button.
F00911-10
All existing warning notes are displayed in the Warnings menu until these are no
longer active.
Page 4
7 COMBINATION INSTRUMENT 49
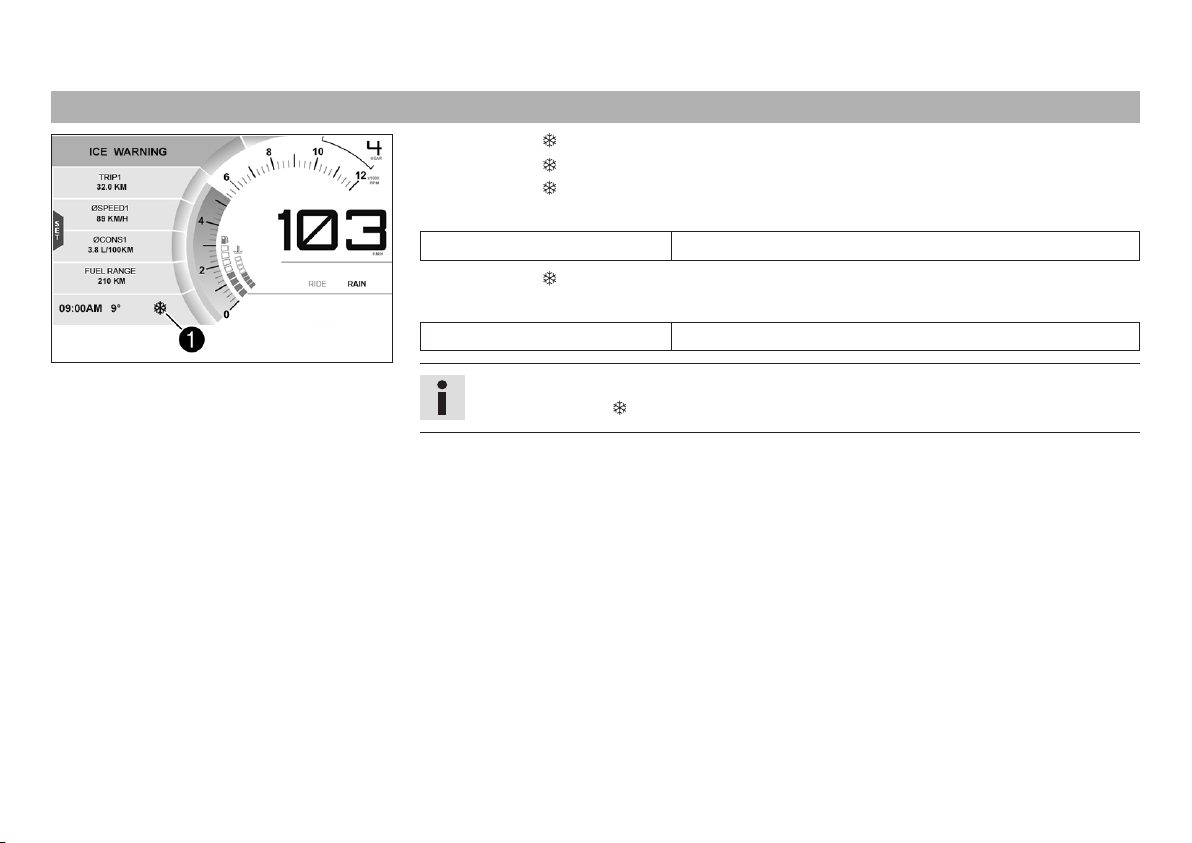
7.5 Warning of icy roads
The ice symbol goes on when there is an increased risk of ice on the roads.
The ice symbol is shown in area1of the display.
The ice symbol appears on the display when the ambient temperature drops below the
specified value.
Temperature 3 °C (37 °F)
The ice symbol goes out on the display when the ambient temperature rises back up
above the specified value.
F00913-10
Temperature 6 °C (43 °F)
Info
If the ice symbol lights up, the warning note ICE WARNINGalso appears.
Page 5
7 COMBINATION INSTRUMENT 50
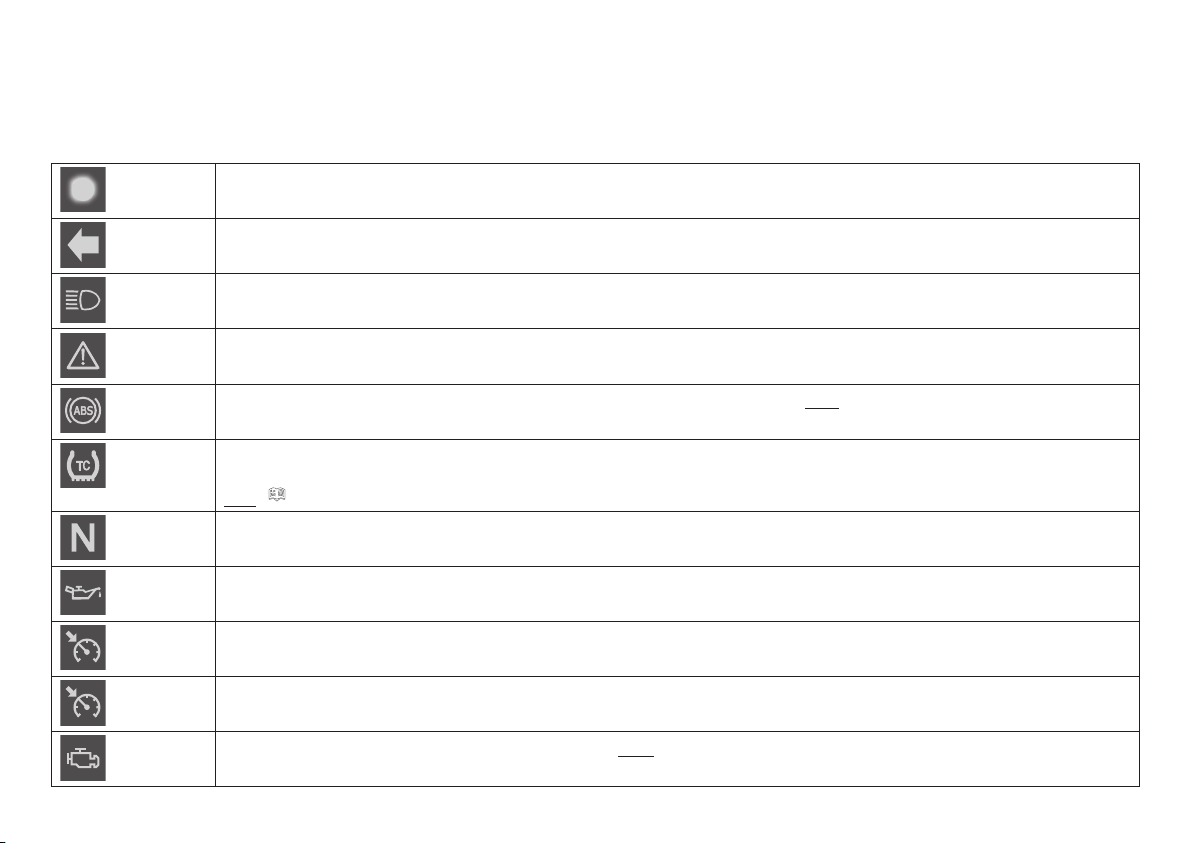
7.6 Indicator lamps
F00909-01
Page 6
7 COMBINATION INSTRUMENT 51
The indicator lamps offer additional information about the operating state of the motorcycle.
When the ignition is switched on, all indicator lamps light up briefly.
Possible states
Race-on indicator lamp lights up/flashes yellow/orange/red – Status or error messages relating to Race-on
system/alarm system.
The left turn signal indicator lamp flashes green with a steady rhythmic flash – The left turn signal is switched on.
The high beam indicator lamp lights up blue – The high beam is switched on.
The general warning lamp lights up yellow – An operating safety (warning) message was detected. This is also
shown on the display.
ABS indicator lamp lights up yellow – Status or error messages relating to ABS. The ABS indicator lamp flashes if
the ABS mode Offroad is enabled.
TC indicator lamp lights up/flashes yellow – The motorcycle traction control is not enabled or is currently intervening. The TC Indicator lamp also lights up if an error is detected. In addition, the TC indicator lamp flashes if the
HHC ( p. 113) (optional) is active.
The idle indicator lamp lights up green – The transmission is in idle.
The oil pressure warning lamp lights up red – The oil pressure is too low.
The cruise control system lamp lights up yellow – The cruise control system function is switched on, but the speed
control is not active.
The cruise control system lamp lights up green – The cruise control system function is switched on and the speed
control is active.
Malfunction indicator lamp lights up yellow – The OBD has detected an emission- or safety-critical fault.
Page 7
7 COMBINATION INSTRUMENT 52
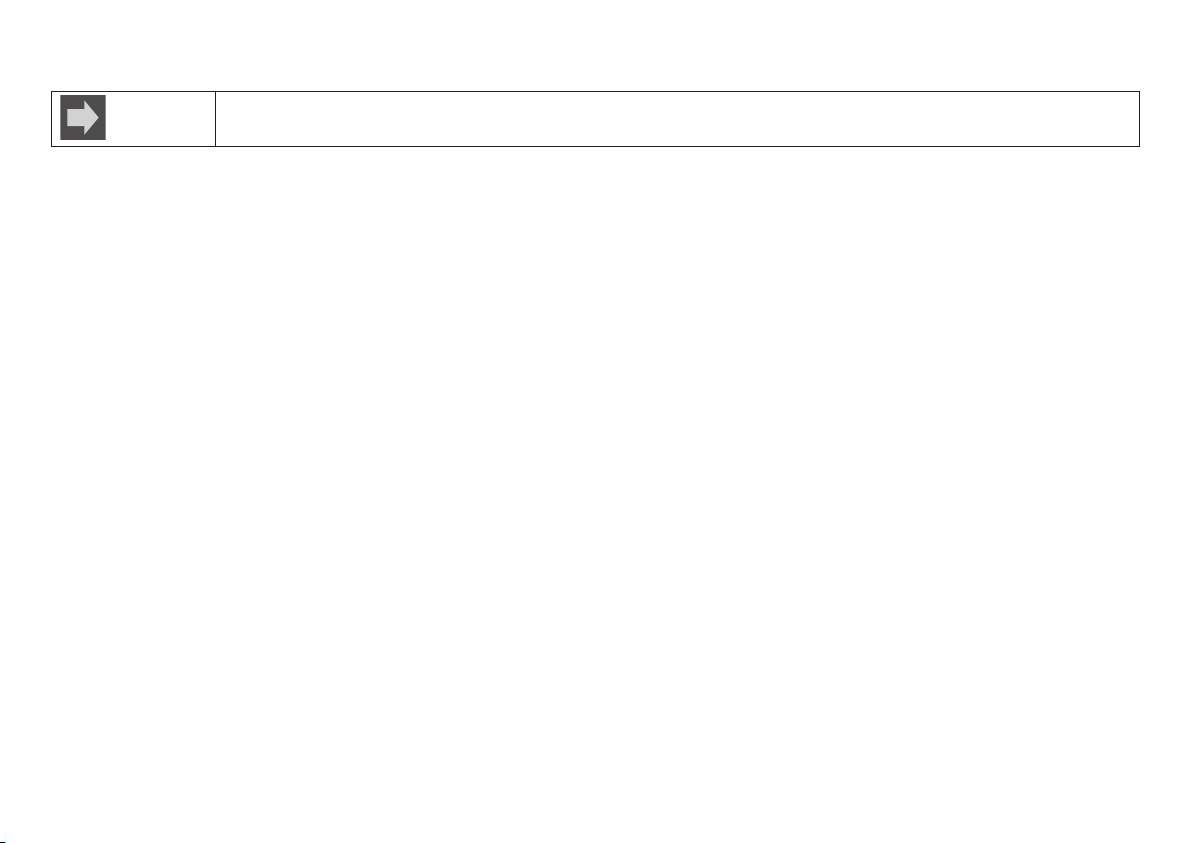
The right turn signal indicator lamp flashes green with a steady rhythmic flash – The right turn signal is switched
on.
Page 8

53
Page 9

7 COMBINATION INSTRUMENT 54
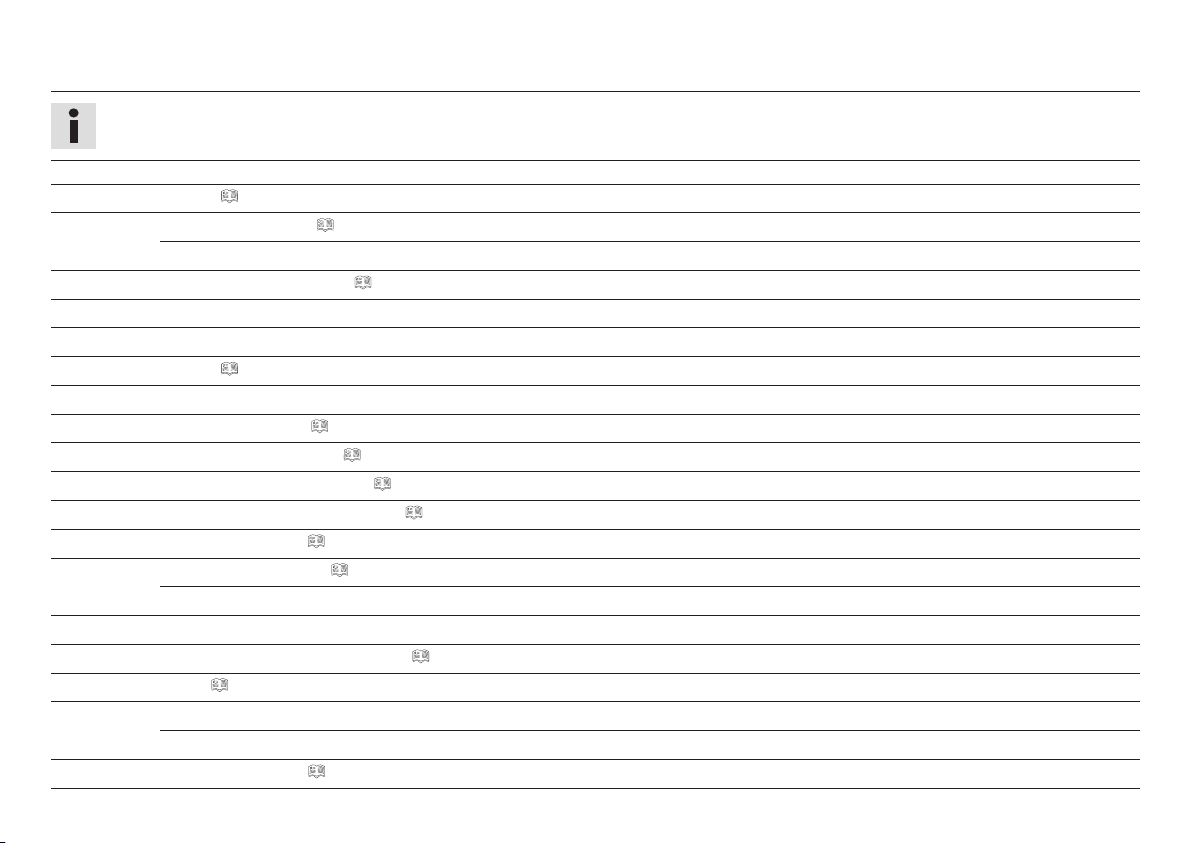
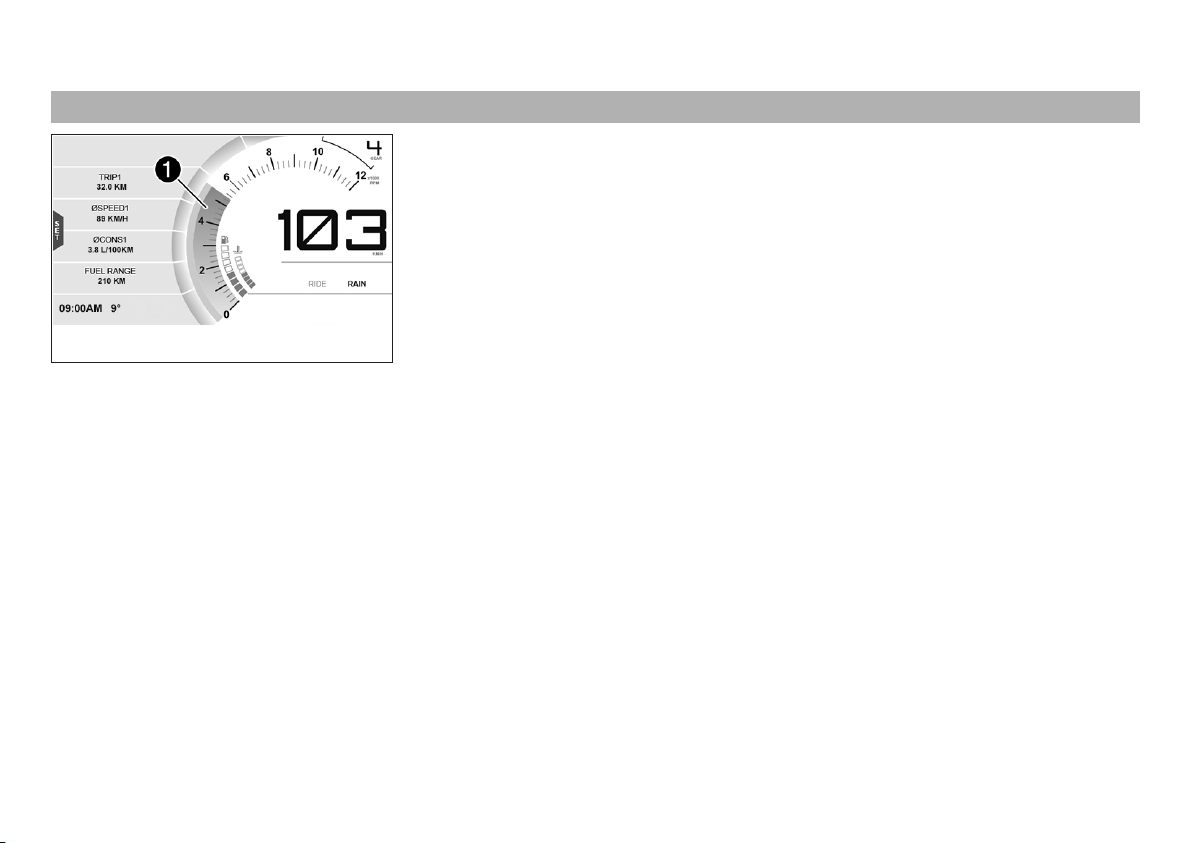
7.7 Display
F00910-10
Page 10
7 COMBINATION INSTRUMENT 55
Info
The figure shows the standard display of the combination instrument. If the menu is opened, the speed is still displayed.
1 Speed ( p. 56)
1 Shift warning light ( p. 57)
The shift warning light is integrated in the tachometer display.
2 Cruise control indicator ( p. 58)
3 Gear display
4 Unit for the speed display
5 Speed ( p. 58)
6 Unit for the speedometer
7 Ride Mode display ( p. 59)
8 Heated grip (optional) ( p. 59)
9 Sitzbankheizung (optional) ( p. 60)
10 Coolant temperature indicator ( p. 60)
11 Fuel level display ( p. 61)
12 Warning of icy roads ( p. 49)
Only shown when there is an increased risk of ice on the roads.
13 Bluetooth®(optional)
14 Ambient temperature indicator ( p. 61)
15 Time ( p. 62)
16 SET
Only shown where the menu overview is closed.
17 Favourites display ( p. 62)
Page 11
7 COMBINATION INSTRUMENT 56
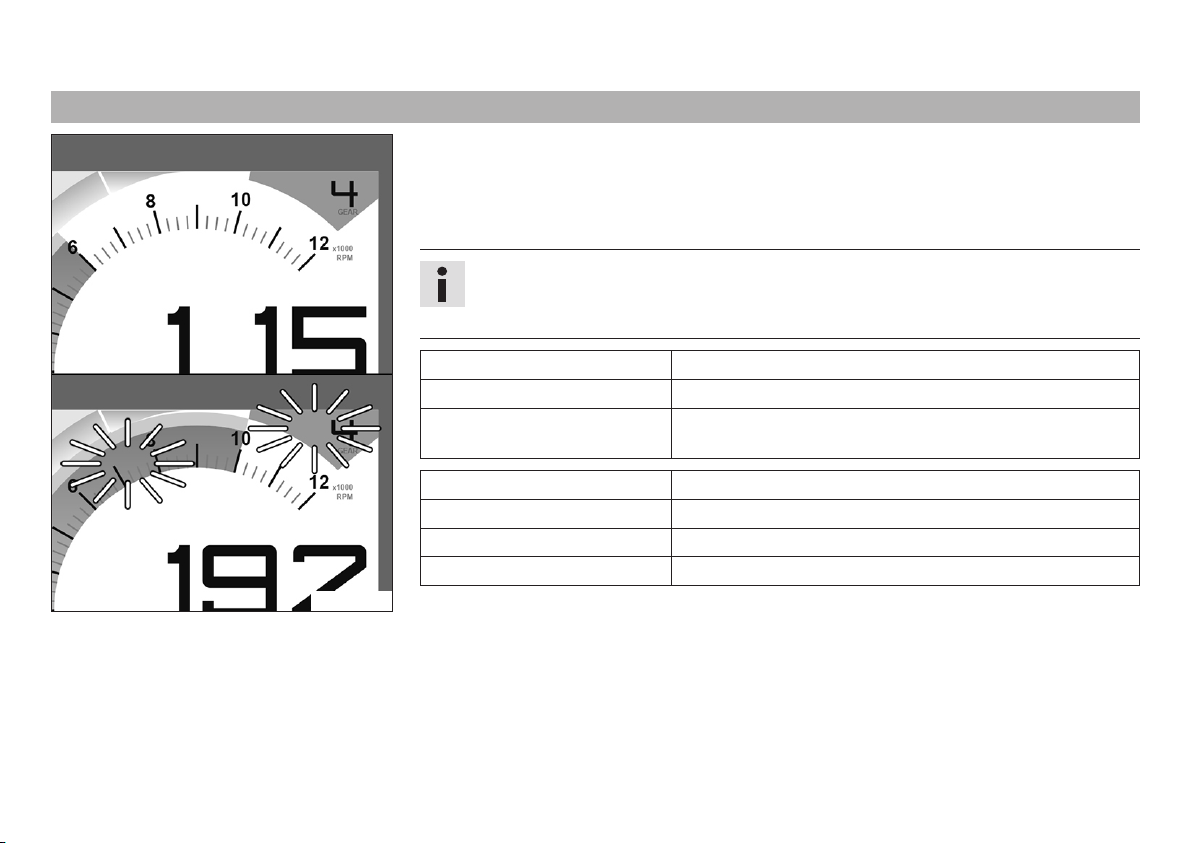
7.8 Speed
The speed1is measured in revolutions per minute.
F00912-12
Page 12
7 COMBINATION INSTRUMENT 57
7.9 Shift warning light
The shift warning light is integrated in the tachometer display.
In the Shift Light menu, the engine speed for the shift warning light can be set. The shift
warning light is always active during the running-in phase (up to 1,000 km / 621 mi). The
shift warning light can only be deactivated, and the values for RPM1 and RPM2 can only be
adjusted after this. The shift warning light lights up red at RPM1and flashes red at RPM2.
Info
In sixth-gear, the shift warning light is deactivated when the engine is warm after
the first service.
Coolant temperature ≤ 35 °C (≤ 95 °F)
ODO < 1,000 km (< 620 mi)
The shift warning light always
lights up at
Coolant temperature > 35 °C (> 95 °F)
ODO > 1,000 km (> 620 mi)
RPM1 shift warning light lights up
RPM2 shift warning light flashes
402829-01
6,500 rpm
Page 13
7 COMBINATION INSTRUMENT 58
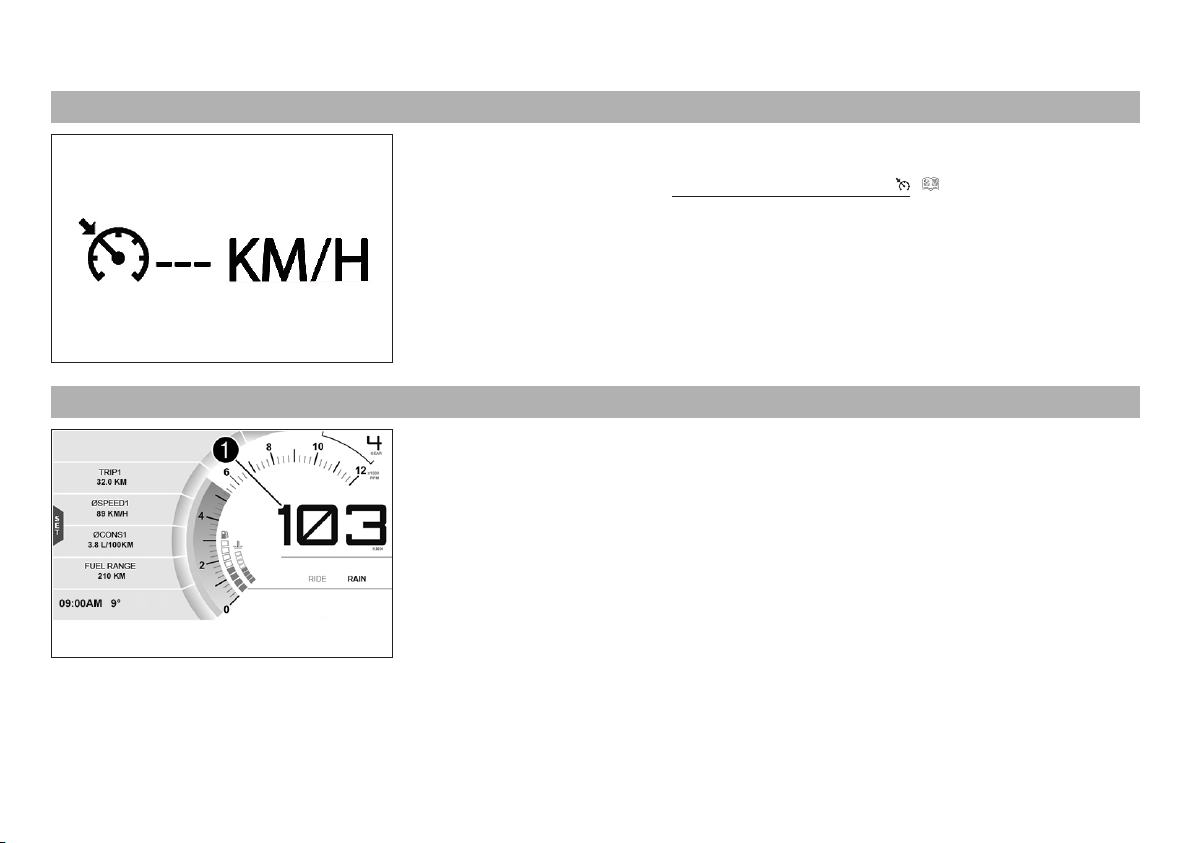
7.10 Cruise control indicator
When cruise control is activated, the operating mode is shown on the combination instrument display.
Cruise control is operated using the cruise control tip switch ( p. 28).
E00739-01
7.11 Speed
Speed1is shown in kilometers per hour km/h or in miles per hour mph.
F00912-13
Page 14
7 COMBINATION INSTRUMENT 59
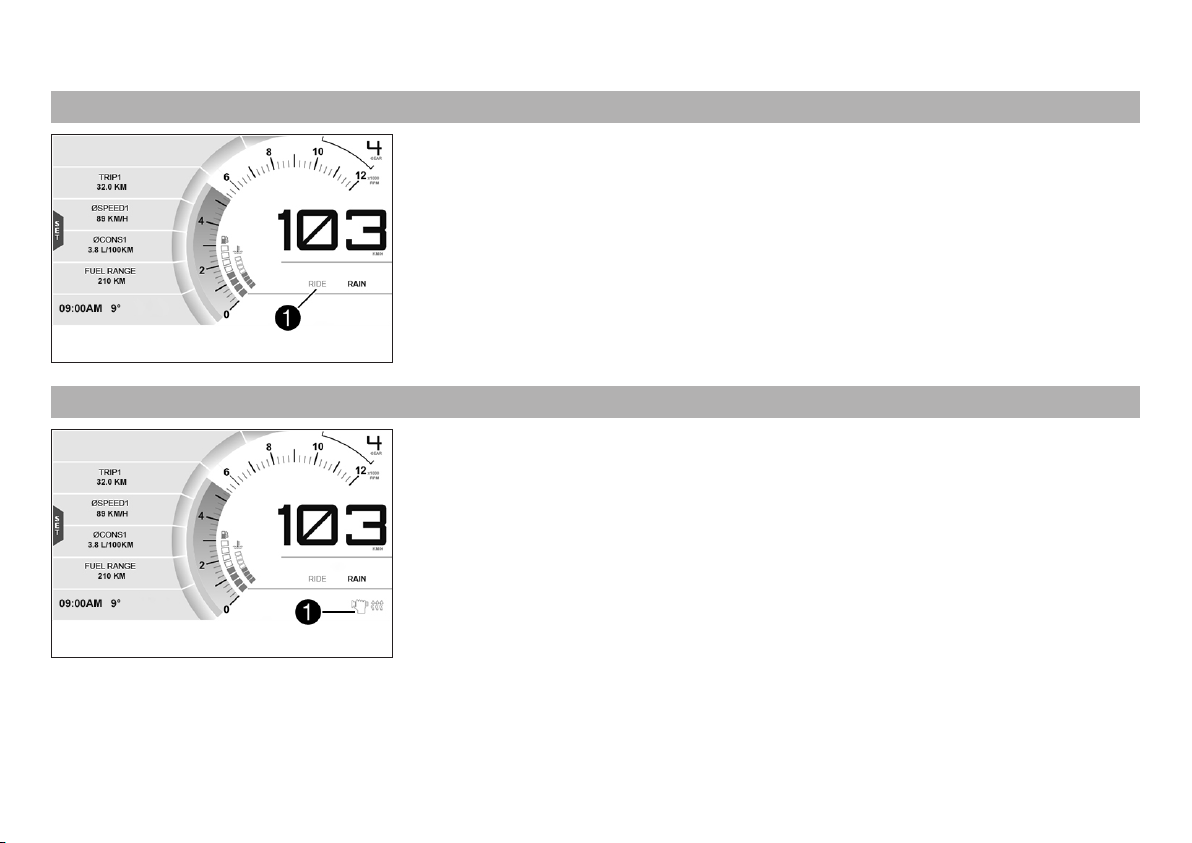
7.12 Ride Mode display
The Ride Mode setting is shown in area1of the display.
The drive mode can be configured in the Ride Mode menu.
F00912-14
7.13 Heated grip (optional)
When the heated grip is switched on, the Heated Gripssymbol appears in the1area of the
display.
The heated grip can be configured in the Heated Grips menu.
F00915-11
Page 15

7 COMBINATION INSTRUMENT 60
7.14 Sitzbankheizung (optional)
When the seat heating is switched on, the Heated Seatsymbol appears in the1area of the
display.
The seat heating can be configured in the Heated Seat menu.
Info
The heating level for the passenger seat heating can be controlled by a switch next
to the right grab handle.
F00915-10
7.15 Coolant temperature indicator
The coolant temperature indicator consists of bars. The more bars that light up, the hotter
the coolant.
Info
When all bars flash, the following warning note ENGINE TEMP HIGH appears.
Possible states
• The engine is cold – Up to three bars light up.
• Engine warm – Four bars light up.
E00738-01
• Engine hot – Five to eight bars light up.
• Engine very hot – all eight bars flash red.
Page 16

7 COMBINATION INSTRUMENT 61
7.16 Fuel level display
The fuel tank contents are shown in area1of the display.
The fuel level indicator consists of bars. The more bars are lit, the more fuel is in the fuel
tank.
Info
If the fuel level is getting low, the last segment flashes red and the following warning note also appears LOW FUEL.
The fuel level is displayed with a slight delay to prevent the indicator from constantly moving while riding.
402827-10
7.17 Ambient temperature indicator
The fuel level display is not updated while the side stand is folded out or the emergency off switch is switched off.
Once the side stand is folded up and emergency OFF switch is switched on, the fuel
level display is next updated after 2 minutes.
The fuel level display flashes if the combination instrument does not receive a signal
from the fuel level sensor.
The ambient temperature1is displayed in °C or °F.
F00912-11
Page 17

7 COMBINATION INSTRUMENT 62
7.18 Time
The time is shown in area1of the display.
The time is displayed in 24 hour format in all languages except for EN-US. The time is displayed in 12 hour format if the language is set to EN-US.
The time can be configured in the Clock/Date menu.
Info
The time must be reset after the battery was disconnected or the fuse was removed.
F00912-10
7.19 Favourites display
Up to eight items of information are shown in the Favourites display.
The Favourites display can be freely configured in the Favourites menu.
Info
One to four items of information selected are displayed on two lines. Five to eight
items of information selected are displayed on a single line.
F00916-01
Page 18

7 COMBINATION INSTRUMENT 63
7.20 Quick Selector 1 display
When the menu is closed, the Quick Selector 1 menu is opened by pressing the UP button.
Press the BACK button to close Quick Selector 1.
Info
The Quick Selector 1 can be configured in the Quick Selector 1 menu. Any information can be selected.
F00920-01
7.21 Quick Selector 2 display
When the menu is closed, the Quick Selector 2 menu is opened by pressing the DOWN button.
Press the BACK button to close Quick Selector 2.
Info
The Quick Selector 2 can be configured in the Quick Selector 2 menu. Any information can be selected.
F00921-01
Page 19

7 COMBINATION INSTRUMENT 64
7.22 Menu
Info
Press the SET button1in the standard display to open the menu.
Navigate through the menu using the UP button2or the DOWN button3.
Press the BACK button4to close the current menu or the menu overview.
K00801-10
7.22.1 KTM MY RIDE (optional)
Condition
• The motorcycle is stationary.
• Function KTM MY RIDE activated (optional).
– Press the SET button when the menu is closed.
– Press the UP or DOWN button until KTM MY RIDE is marked. Press the SET button to
open the menu.
In KTM MY RIDE an appropriate cellphone or headset can be paired with the combination
instrument via Bluetooth®.
F00924-01
Info
Not every cellphone and headset is suitable for pairing with the combination instrument.
The standard Bluetooth®2.1 must be supported.
Page 20

7 COMBINATION INSTRUMENT 65
7.22.2 Info
– Press the SET button when the menu is closed.
– Press the UP or DOWN button until Info is marked. Press the SET button to open the
menu.
General information can be accessed in Info.
F00923-01
7.22.3 Motorcycle
Condition
• The motorcycle is stationary.
– Press the SET button when the menu is closed.
– Press the UP or DOWN button until Motorcycle is marked. Press the SET button to open
the menu.
The vehicle drive mode can be configured in Motorcycle.
F00922-01
Page 21

7 COMBINATION INSTRUMENT 66
7.22.4 Settings
Condition
• The motorcycle is stationary.
– Press the SET button when the menu is closed.
– Press the UP or DOWN button until Settings is marked. Press the SET button to open the
menu.
Favorites and quick selection can be configured in Settings.
F00925-01
7.22.5 Preferences
Condition
• The motorcycle is stationary.
– Press the SET button when the menu is closed.
– Press the UP or DOWN button until Preferences is marked. Press the SET button to open
the menu.
The combination instrument display can be configured in Preferences. Settings can be
made for units or various values. Several functions can be enabled or disabled.
F00926-01
Page 22

7 COMBINATION INSTRUMENT 67
7.22.6 Pairing (optional)
Condition
• The motorcycle is stationary.
• Function KTM MY RIDE activated (optional).
• Similarly, the Bluetooth®function should also be activated in the device to be paired.
– Press the SET button when the menu is closed.
– Press the UP or DOWN button until KTM MY RIDE is marked. Press the SET button to
open the menu.
– Press the UP or DOWN button until Setup is marked. Press the SET button to open the
menu.
– Press the UP or DOWN button until Bluetooth is marked. Press the SET button to open
the menu.
– Press the UP or the DOWN button until menu item Phone, Headset Rider or Headset Pass.
is marked.
Info
Two cellphones can never be paired simultaneously with the combination instrument. Only one cellphone and one headset per submenu item can be paired with
the combination instrument at the same time.
F00967-01
– A suitable cellphone can be paired with the combination instrument in the Phone sub-
menu.
– A suitable rider headset can be paired with the combination instrument in the Head-
set Rider submenu.
– A suitable passenger headset can be paired with the combination instrument in the
Headset Pass. submenu.
Info
The following steps are identical for cellphones and headsets.
Page 23

7 COMBINATION INSTRUMENT 68
– Press the SET button.
– When pairing the device for the first time, press the UP or DOWN button until Pairing is
marked. Press the SET button to open the menu.
– Navigate to the device required using the UP or DOWN button. Confirm the selection
using the SET button.
– Confirmation of the Passkey successfully completes the pairing.
Info
When a suitable device has been successfully paired, the name of the paired
cellphone or headset appears in each case in the Phone, Headset Rider or Head-
set Pass. menu.
Press the UP or DOWN button until paired device is marked on the display. The
paired device can be deleted by pressing the SET button.
The device most recently linked is automatically paired with the combination
instrument when Bluetooth®is switched on and as soon as this device is in range
and has not been previously deleted.
Not every cellphone or headset is suitable for pairing with the combination
instrument.
7.22.7 Audio (optional)
Condition
• Function KTM MY RIDE activated (optional).
• Similarly, the Bluetooth®function should also be activated in the device to be paired.
– Press the SET button when the menu is closed.
– Press the UP or DOWN button until KTM MY RIDE is marked. Press the SET button to
open the menu.
F00927-01
Page 24

7 COMBINATION INSTRUMENT 69
Warning
Danger of accidents Headphone volume which is too high distracts attention
from traffic activity.
– Always select headphone volume which is low enough for you to still clearly
hear acoustic signals.
– Press the UP or DOWN button until Audio is marked. Press the SET button to open the
menu.
– Press and hold the UP button to increase the audio volume.
– Press and hold the DOWN button to reduce the audio volume.
– Press the UP button briefly to change to the next audio track.
– Press the DOWN button briefly to change to the previous audio track.
– Press the SET button to play or pause the audio track.
Info
The audio function can be added to Quick Selector 1 or Quick Selector 2 for easier operation.
Page 25

7 COMBINATION INSTRUMENT 70
7.22.8 Telephony (optional)
Condition
• KTM MY RIDE Function activated (optional).
• Similarly, the Bluetooth®function should also be activated in the device to be paired.
• Headset linked with appropriate cellphone.
Warning
Danger of accidents Headphone volume which is too high distracts attention
from traffic activity.
– Always select headphone volume which is low enough for you to still clearly
hear acoustic signals.
– Press the SET button to accept an incoming call.
– Press the BACK button to reject an incoming call.
– Press and hold the UP button to increase the audio volume.
– Press and hold the DOWN button to reduce the audio volume.
Info
The call duration and contact are displayed. Depending on the cellphone
settings, the contact is shown by name.
F00968-01
Page 26

7 COMBINATION INSTRUMENT 71
7.22.9 Trip 1
– Press the SET button when the menu is closed.
– Press the UP or DOWN button until Info is marked. Press the SET button to open the
menu.
– Press the UP or DOWN button until Trip 1 is marked. Press the SET button to open the
menu.
Trip 1 shows the distance since the last reset, such as between two refueling stops. Trip 1 is
running and counts up to 9999.
ØCons1 indicates the average fuel consumption based on Trip 1.
F00934-01
ØSpeed1 indicates the average speed based on Trip 1 and Trip Time1.
Trip Time1 shows the journey time on the basis of Trip 1 and runs as soon as a speed signal
is received.
Fuel Range indicates the possible distance you can cover with the fuel reserve.
7.22.10 Trip 2
F00935-01
Press and hold the
SET button for 3-5
seconds.
– Press the SET button when the menu is closed.
– Press the UP or DOWN button until Info is marked. Press the SET button to open the
menu.
– Press the UP or DOWN button until Trip 2 is marked. Press the SET button to open the
menu.
Trip 2 shows the distance since the last reset, such as between two refueling stops. Trip 2 is
running and counts up to 9999.
ØCons2 indicates the average fuel consumption based on Trip 2.
ØSpeed2 indicates the average speed based on Trip 2 and Trip Time2.
Trip Time2 shows the journey time on the basis of Trip 2 and runs as soon as a speed signal
is received.
All entries in the Trip 1 menu are reset.
Page 27

7 COMBINATION INSTRUMENT 72
Fuel Range indicates the possible distance you can cover with the fuel reserve.
7.22.11 General Info
7.22.12 TPMS
F00936-01
Press and hold the
SET button for 3-5
seconds.
– Press the SET button when the menu is closed.
– Press the UP or DOWN button until Info is marked. Press the SET button to open the
menu.
– Press the UP or DOWN button until General Info is marked. Press the SET button to open
the menu.
Date shows the date.
ODO shows the total distance covered.
Battery indicates the battery voltage.
Oil Temperature indicates the engine oil temperature.
Condition
• Model with TPMS.
– Press the SET button when the menu is closed.
– Press the UP or DOWN button until Info is marked. Press the SET button to open the
menu.
All entries in the Trip 2 menu are reset.
F00937-01
Page 28

7 COMBINATION INSTRUMENT 73
Warning
Danger of accidents The tire pressure control system does not eliminate the
necessity to check the tires before going on a ride.
To avoid false alarms, the tire pressure values are evaluated over a period of
several minutes.
– Check the tire pressure before every ride.
– Correct the tire pressure if the tire pressure deviates from the specified
value.
– Even if the tire pressure values are correct, stop the vehicle immediately if
its behavior indicates a pressure loss in the tires.
– Press the UP or DOWN button until the TPMS menu appears in the display.
Guideline
Tire air pressure, solo/with passenger/full payload
Front: with cold tires 2.4 bar (35 psi)
Rear: with cold tires 2.9 bar (42 psi)
The TPMS menu displays the tire air pressure of the front and rear tires.
TIRE FRONT indicates the tire air pressure at the front.
TIRE REAR indicates the tire air pressure at the rear.
Page 29

7 COMBINATION INSTRUMENT 74
7.22.13 Warnings
Condition
• Message or warning is present.
– Press the SET button when the menu is closed.
– Press the UP or DOWN button until Info is marked. Press the SET button to open the
menu.
– Press the UP or DOWN button until Warnings is marked. Press the SET button to open
the menu.
– Use the UP or DOWN button to navigate through the warnings.
F00938-01
7.22.14 Heated Grips (optional)
F00944-01
In the Warnings menu, all warnings that have occurred are displayed and stored.
Condition
• The motorcycle is stationary.
• Menu Heated Grips activated.
– Press the SET button when the menu is closed.
– Press the UP or DOWN button until Motorcycle is marked. Press the SET button to open
the menu.
– Press the UP or DOWN button until Heated Grips is marked. Press the SET button to open
the menu.
– Activate the menu item using the UP or DOWN button.
– Press the SET button to select the heating level or to switch the heated grip on or off.
Page 30

7 COMBINATION INSTRUMENT 75
7.22.15 Heated Seat (optional)
Condition
• The motorcycle is stationary.
• Menu Heated Seat Ride activated.
• Menu Heated Seat Pas activated.
– Press the SET button when the menu is closed.
– Press the UP or DOWN button until Motorcycle is marked. Press the SET button to open
the menu.
– Press the UP or DOWN button until Heated Seat is marked. Press the SET button to open
F00945-01
7.22.16 Ride Mode
F00939-01
the menu.
– Activate the menu item using the UP or DOWN button.
– Press the SET button to select the heating level or to switch the seat heating on or off.
Info
The heating level for the passenger seat heating is selected using the switch
next to the right grab handle.
– Press the SET button when the menu is closed.
– Press the UP or DOWN button until Motorcycle is marked. Press the SET button to open
the menu.
– Press the UP or DOWN button until Ride Mode is marked. Press the SET button to open
the menu.
– Press the UP or DOWN button to activate the menu item and select it with the SET but-
ton. By pressing the SET button, engine and traction control settings that are coordinated with each other can be selected.
SPORT – homologated performance with very direct response; the traction control
allows greater slip on the rear wheel.
Page 31

7 COMBINATION INSTRUMENT 76
STREET – homologated performance with balanced response; the traction control
allows normal slip on the rear wheel.
RAIN – reduced homologated performance for better ridability; the traction control
allows normal slip on the rear wheel.
OFFROAD – reduced homologated performance for better ridability; the traction
control allows high slip on the rear wheel.
7.22.17 MTC
Condition
• The motorcycle is stationary.
– Press the SET button when the menu is closed.
– Press the UP or DOWN button until Motorcycle is marked. Press the SET button to open
the menu.
– Press the UP or DOWN button until MTC is marked. Press the SET button to open the
menu.
– Activate the menu item using the UP or DOWN button.
F00940-01
– Switch the MTCon or off by pressing the SET button.
Info
After the ignition is switched on, the motorcycle traction control is reactivated.
Press and hold the
SET button for 3-5
seconds.
Activation of motorcycle traction control.
Page 32

7 COMBINATION INSTRUMENT 77
7.22.18 MTC+MSR (optional)
Condition
• The motorcycle is stationary.
– Press the SET button when the menu is closed.
– Press the UP or DOWN button until Motorcycle is marked. Press the SET button to open
the menu.
– Press the UP or DOWN button until MTC+MSR is marked. Press the SET button to open
the menu.
– Activate the menu item using the UP or DOWN button.
F00941-01
– Switch the MTC+MSRon or off by pressing the SET button.
Info
When the ABS or active Drive Mode Offroad is switched off, the MSR is not
active.
After the ignition is switched on, motorcycle traction control and engine braking
control are enabled again.
Press and hold the
SET button for 3-5
seconds.
Activation of motorcycle traction control and engine braking control.
Page 33

7 COMBINATION INSTRUMENT 78
7.22.19 ABS
Condition
• The motorcycle is stationary.
– Press the SET button when the menu is closed.
– Press the UP or DOWN button until Motorcycle is marked. Press the SET button to open
the menu.
Warning
Voiding of the government approval for road use and the insurance coverage If
the ABS is switched off completely, the vehicle's approval for road use is invali-
F00942-01
– Press the UP or DOWN button until ABS is marked. Press the SET button to open the
– Activate the menu item using the UP or DOWN button.
– Press the ABS button to switch off SET or to select between ABS modes.
dated.
– Only operate the vehicle in closed-off areas remote from public road traffic if
the ABS is switched off completely.
menu.
Info
The ABS can only be reactivated by switching on the ignition again.
When the Road ABS mode is enabled, ABS controls both wheels.
When the Offroad ABS mode is enabled, ABS only controls the front wheel. The
rear wheel is not controlled by ABS and may lock during braking maneuvers.
Press and hold the
SET button for 3-5
seconds.
Activation of the different ABS modes.
Page 34

7 COMBINATION INSTRUMENT 79
7.22.20 HHC (optional)
Condition
• The motorcycle is stationary.
– Press the SET button when the menu is closed.
– Press the UP or DOWN button until Motorcycle is marked. Press the SET button to open
the menu.
– Press the UP or DOWN button until HHC is marked. Press the SET button to open the
menu.
– Activate the menu item using the UP or DOWN button.
F00943-01
7.22.21 Favourites
F00946-01
– Switch the HHCon or off by pressing the SET button.
Condition
• The motorcycle is stationary.
– Press the SET button when the menu is closed.
– Press the UP or DOWN button until Settings is marked. Press the SET button to open the
menu.
– Press the UP or DOWN button until Favourites is marked. Press the SET button to open
the menu.
– Press the UP or DOWN button to activate the menu item and select it with the SET but-
ton.
Up to eight items of information can be selected in the Favourites menu.
Page 35

7 COMBINATION INSTRUMENT 80
7.22.22 Quick Selector 1
Condition
• The motorcycle is stationary.
– Press the SET button when the menu is closed.
– Press the UP or DOWN button until Settings is marked. Press the SET button to open the
menu.
– Press the UP or DOWN button until Quick Selector 1 is marked. Press the SET button to
open the menu.
– Press the UP or DOWN button to activate the menu item and select it with the SET but-
F00947-01
7.22.23 Quick Selector 2
F00948-01
ton.
Information can be selected in the Quick Selector 1 menu.
When the menu is closed, the Quick Selector 1 menu is opened by pressing the UP button.
Condition
• The motorcycle is stationary.
– Press the SET button when the menu is closed.
– Press the UP or DOWN button until Settings is marked. Press the SET button to open the
menu.
– Press the UP or DOWN button until Quick Selector 2 is marked. Press the SET button to
open the menu.
– Press the UP or DOWN button to activate the menu item and select it with the SET but-
ton.
Information can be selected in the Quick Selector 2 menu.
When the menu is closed, the Quick Selector 2 menu is opened by pressing the DOWN button.
Page 36

7 COMBINATION INSTRUMENT 81
7.22.24 Distance
Condition
• The motorcycle is stationary.
– Press the SET button when the menu is closed.
– Press the UP or DOWN button until Preferences is marked. Press the SET button to open
the menu.
– Press the UP or DOWN button until Units is marked.
– Press the SET button to open the menu.
– Press the UP or DOWN button until Distance is marked. Press the SET button to open the
F00950-01
7.22.25 Temp
F00951-01
menu.
– Activate the menu item using the UP or DOWN button.
– Press the SET button to confirm the desired unit.
Condition
• The motorcycle is stationary.
– Press the SET button when the menu is closed.
– Press the UP or DOWN button until Preferences is marked. Press the SET button to open
the menu.
– Press the UP or DOWN button until Units is marked.
– Press the SET button to open the menu.
– Press the UP or DOWN button until Temp is marked. Press the SET button to open the
menu.
– Activate the menu item using the UP or DOWN button.
– Press the SET button to confirm the desired unit.
Page 37

7 COMBINATION INSTRUMENT 82
7.22.26 Pressure
Condition
• The motorcycle is stationary.
– Press the SET button when the menu is closed.
– Press the UP or DOWN button until Preferences is marked. Press the SET button to open
the menu.
– Press the UP or DOWN button until Units is marked.
– Press the SET button to open the menu.
– Press the UP or DOWN button until Pressure is marked. Press the SET button to open the
F00952-01
7.22.27 Consumption
F00953-01
menu.
– Activate the menu item using the UP or DOWN button.
– Press the SET button to confirm the desired unit.
Condition
• The motorcycle is stationary.
– Press the SET button when the menu is closed.
– Press the UP or DOWN button until Preferences is marked. Press the SET button to open
the menu.
– Press the UP or DOWN button until Units is marked.
– Press the SET button to open the menu.
– Press the UP or DOWN button until Consumption is marked. Press the SET button to open
the menu.
– Activate the menu item using the UP or DOWN button.
– Press the SET button to confirm the desired unit.
Page 38

7 COMBINATION INSTRUMENT 83
7.22.28 Language
Condition
• The motorcycle is stationary.
– Press the SET button when the menu is closed.
– Press the UP or DOWN button until Preferences is marked. Press the SET button to open
the menu.
– Press the UP or DOWN button until Language is marked. Press the SET button to open
the menu.
– Press the UP or DOWN button to activate the menu item and select it with the SET but-
F00954-01
ton.
The menu languages are US English, UK English, German, Italian, French, and Spanish.
Page 39

7 COMBINATION INSTRUMENT 84
7.22.29 Shift Light
Condition
• The motorcycle is stationary.
• ODO > 1000 km (621 mi).
– Press the SET button when the menu is closed.
– Press the UP or DOWN button until Preferences is marked. Press the SET button to open
the menu.
– Press the UP or DOWN button until Shift Light is marked. Press the SET button to open
the menu.
– Activate the menu item using the UP or DOWN button.
– Press the SET button to switch the shift warning light on or off and to adjust the engine
speed for the gear shift recommendation.
Info
When the engine speed reaches RPM 1, the speed display lights up red.
When the engine speed reaches RPM 2, the speed display flashes red.
F00969-01
7.22.30 Setting the time and date
Condition
The motorcycle is stationary.
Page 40

7 COMBINATION INSTRUMENT 85
– Press the SET button when the menu is closed.
– Press the UP or DOWN button until Preferences appears. Press the SET button to open
the menu.
– Press the UP or DOWN button until Time/Date is marked. Press the SET button to open
the menu.
F00949-01
Setting the clock
– Press the UP or DOWN button until the time is marked.
– Press the SET button.
The hour next to "Clock" flashes.
– Press the UP or DOWN button until the current hour is set.
– Press the SET button.
The minute next to "Clock" flashes.
F00957-01
– Press the UP or DOWN button until the current minute is set.
– Press the SET button.
The time is stored.
Page 41

7 COMBINATION INSTRUMENT 86
Setting the date
– Press the UP or DOWN button until the date is marked.
– Press the SET button.
The day next to "Date" flashes.
– Press the UP or DOWN button until the current day is set.
– Press the SET button.
The month next to "Date" flashes.
F00958-01
7.22.31 DRL
– Press the UP or DOWN button until the current month is set.
– Press the SET button.
The year next to "Date" flashes.
– Press the UP or DOWN button until the current year is set.
– Press the SET button.
The date is stored.
Condition
• The motorcycle is stationary.
– Press the SET button when the menu is closed.
– Press the UP or DOWN button until Preferences is marked. Press the SET button to open
the menu.
F00959-01
Page 42

7 COMBINATION INSTRUMENT 87
Warning
Danger of accidents When visibility is poor, the daytime running light is not a
substitute for the low beam.
Automatic switching between the daytime running light and low beam may only
be partially available when visibility is significantly impaired due to fog, snow
or rain.
– Ensure that the appropriate type of lighting is always selected.
– If necessary switch off the daytime running lights using the menu before
going on a ride or when stopped so that the low beam is switched on permanently.
– Note the legal regulations regarding the daytime running light.
– Press the UP or DOWN button until DRL is marked. Press the SET button to open the
menu.
– Activate the menu item using the UP or DOWN button.
– Press the SET button to switch the daytime running light on or off.
7.22.32 Quick Shift + (optional)
Condition
• The motorcycle is stationary.
– Press the SET button when the menu is closed.
– Press the UP or DOWN button until Preferences is marked. Press the SET button to open
the menu.
– Press the UP or DOWN button until Quick Shift + is marked. Press the SET button to open
the menu.
– Activate the menu item using the UP or DOWN button.
F00960-01
– Switch the Quick Shift +on or off by pressing the SET button.
Page 43

7 COMBINATION INSTRUMENT 88
7.22.33 Heated Grips (optional)
Condition
• The motorcycle is stationary.
– Press the SET button when the menu is closed.
– Press the UP or DOWN button until Preferences is marked. Press the SET button to open
the menu.
– Press the UP or DOWN button until Heated Grips is marked. Press the SET button to open
the menu.
– Activate the menu item using the UP or DOWN button.
F00961-01
7.22.34 Heated Seat Rid (optional)
F00962-01
– Switch the Heated Gripson or off by pressing the SET button.
Condition
• The motorcycle is stationary.
– Press the SET button when the menu is closed.
– Press the UP or DOWN button until Preferences is marked. Press the SET button to open
the menu.
– Press the UP or DOWN button until Heated Seat Rid is marked. Press the SET button to
open the menu.
– Activate the menu item using the UP or DOWN button.
– Switch the Heated Seat Ridon or off by pressing the SET button.
Page 44

7 COMBINATION INSTRUMENT 89
7.22.35 Heated Seat Pas (optional)
Condition
• The motorcycle is stationary.
– Press the SET button when the menu is closed.
– Press the UP or DOWN button until Preferences is marked. Press the SET button to open
the menu.
– Press the UP or DOWN button until Heated Seat Pas is marked. Press the SET button to
open the menu.
– Activate the menu item using the UP or DOWN button.
F00963-01
7.22.36 Cornering Light Test
F00964-01
– Switch the Heated Seat Pason or off by pressing the SET button.
Condition
• The motorcycle is stationary.
– Press the SET button when the menu is closed.
– Press the UP or DOWN button until Preferences is marked. Press the SET button to open
the menu.
– Press the UP or DOWN button until Cornering Light Test is marked. Press the SET button
to open the menu.
– Activate the menu item using the UP or DOWN button.
Info
The Cornering Light Testis performed on the left cornering light in the Left submenu.
The Cornering Light Testis performed on the right cornering light in the Right submenu.
The Cornering Light Test is completed in the Off submenu.
Page 45

7 COMBINATION INSTRUMENT 90
– Press the SET button in order to perform or switch off the desired Cornering Light Test.
Info
The respective cornering light segments light up in succession, starting with the
lower segment.
When the test of the respective cornering light is complete, the upper segment
lights up continuously.
7.22.37 Service
Condition
• The motorcycle is stationary.
– Press the SET button when the menu is closed.
– Press the UP or DOWN button until Preferences is marked. Press the SET button to open
the menu.
– Press the UP or DOWN button until Service is marked. Press the SET button to open the
menu.
The next service due is shown in the Service menu.
F00965-01
Page 46

7 COMBINATION INSTRUMENT 91
7.22.38 Extra Functions
Condition
• The motorcycle is stationary.
• Motorcycle with optional supplementary function.
– Press the SET button when the menu is closed.
– Press the UP or DOWN button until Preferences is marked. Press the SET button to open
the menu.
– Press the UP or DOWN button until Extra Functions is marked. Press the SET button to
open the menu.
F00966-01
– Use the UP or DOWN button to navigate through the extra functions.
The optional extra functions are listed in Extra Functions.
Info
The current KTM PowerParts and the available software for your vehicle can be found
on the KTM website.
Page 47

Page 48

Page 49

 Loading...