

Page 1
OWNERS HANDBOOK
MANUALE D’USO
MANUEL D’UTILISATION
MANUAL DE INSTRUCCIONES
400/640 LC4-E 640 LC4-E SUPERMOTO
BEDIENUNGSANLEITUNG
Art.Nr. 3.205.97 10/2000
2001
Page 2

Page 3
ENGLISH
2
IMPORTANT
WE STRONGLY SUGGEST THAT YOU READ THIS MANUAL
CAREFULLY AND COMPLETELY BEFORE GOING ON YOUR FIRST
RIDE. IT CONTAINS A GREAT DEAL OF INFORMATION AND
ADVICE WHICH WILL HELP YOU USE AND HANDLE YOUR BIKE
PROPERLY. IN YOUR OWN INTEREST, PLEASE PAY PARTICULAR
ATTENTION TO NOTICES THAT ARE MARKED AS FOLLOWS:
WARNING
IGNORING THESE INSTRUCTIONS, CAN ENDANGER YOUR
BODY AND YOUR LIFE.
!
CAUTION
!
IGNORING THESE INSTRUCTIONS COULD CAUSE DAMAGE TO
PARTS OF YOUR MOTORCYCLE OR THAT THE MOTOR-CYCLE
IS NOT ROAD-SAFE ANYMORE.
Please insert the series numbers of your motorcycle in the boxes below
Chassis number
Engine number
Stamp of dealer
TAMPERING WITH NOISE CONTROL SYSTEM PROHIBITED
Owners are warned that the law may prohibit:
(a) The removal or rendering inoperative by any person other than for purposes of mainten-
ance, repair or replacement, of any device or element of design incorporated into any new
vehicle for the purpose of noise control prior to its sale or delivery to the ultimate purchaser
or while it is in use; and
(b) the use of the vehicle after such device or element of design has been removed or rendered
inoperative by any person.
CONSUMER INFORMATION FOR AUSTRALIA ONLY
KTM SPORTMOTORCYCLE AG RESERVES THE RIGHT TO MODIFY ANY EQUIPMENT, TECHNICAL SPECIFICATIONS, COLORS,
MATERIALS
, SERVICES OFFERED AND RENDERED, AND THE LIKE SO AS TO ADAPT THEM TO LOCAL CONDITIONS WITHOUT
PREVIOUS ANNOUNCEMENT AND WITHOUT GIVING REASONS
, OR TO CANCEL ANY OF THE ABOVE ITEMS WITHOUT SUBSTI-
TUTING THEM WITH OTHERS. IT SHALL BE ACCEPTABLE TO STOP MANUFACTURING A CERTAIN MODEL WITHOUT PREVIOUS
ANNOUNCEMENT
. IN THE EVENT OF SUCH MODIFICATIONS, PLEASE ASK YOUR LOCAL KTM DEALER FOR INFORMATION.
W
E SHALL NOT BE HELD LIABLE FOR ANY PRINTING ERRORS.
Page 4

ENGLISH
3
Introduction
We would like to congratulate you on your purchase of a KTM motorcycle.
You are now the owner of a state-of-the-art sports motorcycle that guarantees to
bring you lots of fun and enjoyment, provided that you clean and maintain it
appropriately. Before you go for your first ride, be sure to read this manual
carefully and thoroughly in order to familiarize yourself with how to operate
your new motorcycle and with its characteristics, even if this means that you
have to dedicate some of your valuable time to this task. Only by doing so will
you learn how to tune your motorbike to your specific needs and how to protect
yourself against injury. Besides, this manual contains important information on
motorcycle maintenance. At the time this manual was typeset, it was up-to-date
with the latest state of this production series. It cannot be completely ruled out,
however, that there may exist minor discrepancies resulting from further design
upgrades of these motorcycles.
This manual is an important part of your motorbike and should be passed on to
any subsequent owner in case you decide to sell it.
Many motorcyclists have a good working knowledge of motorcycle mechanics; if
this is true in your case, you will be able to use this manual to carry out most of
the maintenance steps yourself. If, on the other hand, you are not very familiar
with motorcycles, it might be better to have a professional KTM dealer perform
those steps marked *described in the chapter entitled “Maintenance Work on
Chassis and Engine” of this manual.
For your own safety use only KTM-approved parts and accessories. KTM is not
liable for damage that arises in connection with the use of other products.
Take special care to follow the recommended run in, inspection, and maintenance
intervals. Heeding these guidelines will significantly increase the life of your
motorcycle. Have services carried out by a KTM dealer so that your warranty
claim remains intact.
We wish you a lot of fun when driving !
KTM Austria’s certificate of achievement for its Quality System ISO 9001 is the
beginning of an on-going total re-engineering quality plan for a brighter tomorrow.
KTM SPORTMOTORCYCLE AG
5230 MATTIGHOFEN, AUSTRIA
ALL RIGHTS RESERVED TO MAKE ALTERATIONS TO DESIGN AND MODEL.
©
by KTM SPORTMOTORCYCLE AG, AUSTRIA All rights reserved
Page 5

ENGLISH
4
Page
SERIAL NUMBER LOCATIONS .............................................4
Chassis number................................................................4
Engine number, engine type.............................................4
OPERATION INSTRUMENTS ...............................................4
Clutch lever......................................................................4
Hand decompression lever................................................4
Choke lever......................................................................5
Hand brake lever..............................................................5
Speedometer, indicator lamps...........................................5
Ignition lock .....................................................................5
Combination switch..........................................................6
Starter tip switch, emergency OFF switch.........................6
Filler cap...........................................................................6
Fuel..................................................................................6
Fuel tap............................................................................7
Shift lever.........................................................................7
Kickstarter........................................................................7
Foot brake pedal ..............................................................7
Compression damping of fork ..........................................8
Rebound damping of fork ................................................8
Compression damping of shock absorber .........................8
Rebound damping of shock absorber ...............................8
Baggage carrier ................................................................8
DRIVING INSTRUCTIONS ....................................................9
PERIODIC MAINTENANCE-SCHEDULE..............................14
MAINTENANCE WORK ON CHASSIS AND ENGINE ..........16
Tool set..........................................................................16
Removing the seat..........................................................16
Checking and adjusting steering head bearing................17
Changing the spring preload of the shock absorber........17
Lubricate shock absorber linkage....................................17
Checking rubber ring on the rear shock absorber............18
Checking chain tension...................................................18
Correct chain tension......................................................18
Chain maintenance.........................................................18
Chain wear.....................................................................19
General information on KTM disc brakes........................19
Adjisting of free travel at the hand brake lever ...............19
Checking of brake fluid level - front brake......................20
Refilling the front brake fluid reservoir............................20
Checking the front brake pads........................................20
Page
Changing the basic position of the foot brake pedal.......20
Check the rear brake fluid level ......................................21
Refilling the rear brake fluid reservoir .............................21
Checking the rear brake pads.........................................21
Dismounting and mounting the front wheel...................22
Dismounting and mounting the rear wheel.....................23
Checking the shock absorbtion rubbers in the rear hub
.......23
Tires, air pressure............................................................24
Checking spoke tension..................................................24
Battery ...........................................................................25
Charging the battery......................................................25
Main fuse.......................................................................26
Fuses for individual power-consuming units ...................26
Exchanging the headlight lamp.......................................26
Replacing the parking light bulb.....................................26
Exchanging the brake light and tail light bulb.................27
Cooling system...............................................................27
Checking the cooling liquid level ....................................28
Adjusting idling speed ....................................................28
Adjusting the throttle cable ............................................28
Draining the carburetor float chamber............................29
Adjusting the choke cable...............................................30
Adjusting the clutch cable...............................................30
Checking the adjustment of the hand decompression cable .....
30
Engine oil .......................................................................30
Checking the engine oil level..........................................30
Oil circuit........................................................................31
Oil and fine screen filter change, bleeding of the oil system
31
Changing oil filter ..........................................................32
TROUBLE SHOOTING........................................................33
CLEANING..........................................................................36
CONSERVATION FOR WINTER OPERATION ....................36
STORAGE...........................................................................36
Re-initation after time of storage....................................36
TECHNICAL SPECIFICATIONS - CHASSIS...........................37
TECHNICAL SPECIFICATIONS - ENGINE ..........................38
CONSUMER INFORMATION FOR USA ONLY ..................40
HEAD WORD INDEX..........................................................43
WIRING DIAGRAM................................................APPENDIX
INDEX
Page 6
ENGLISH
5
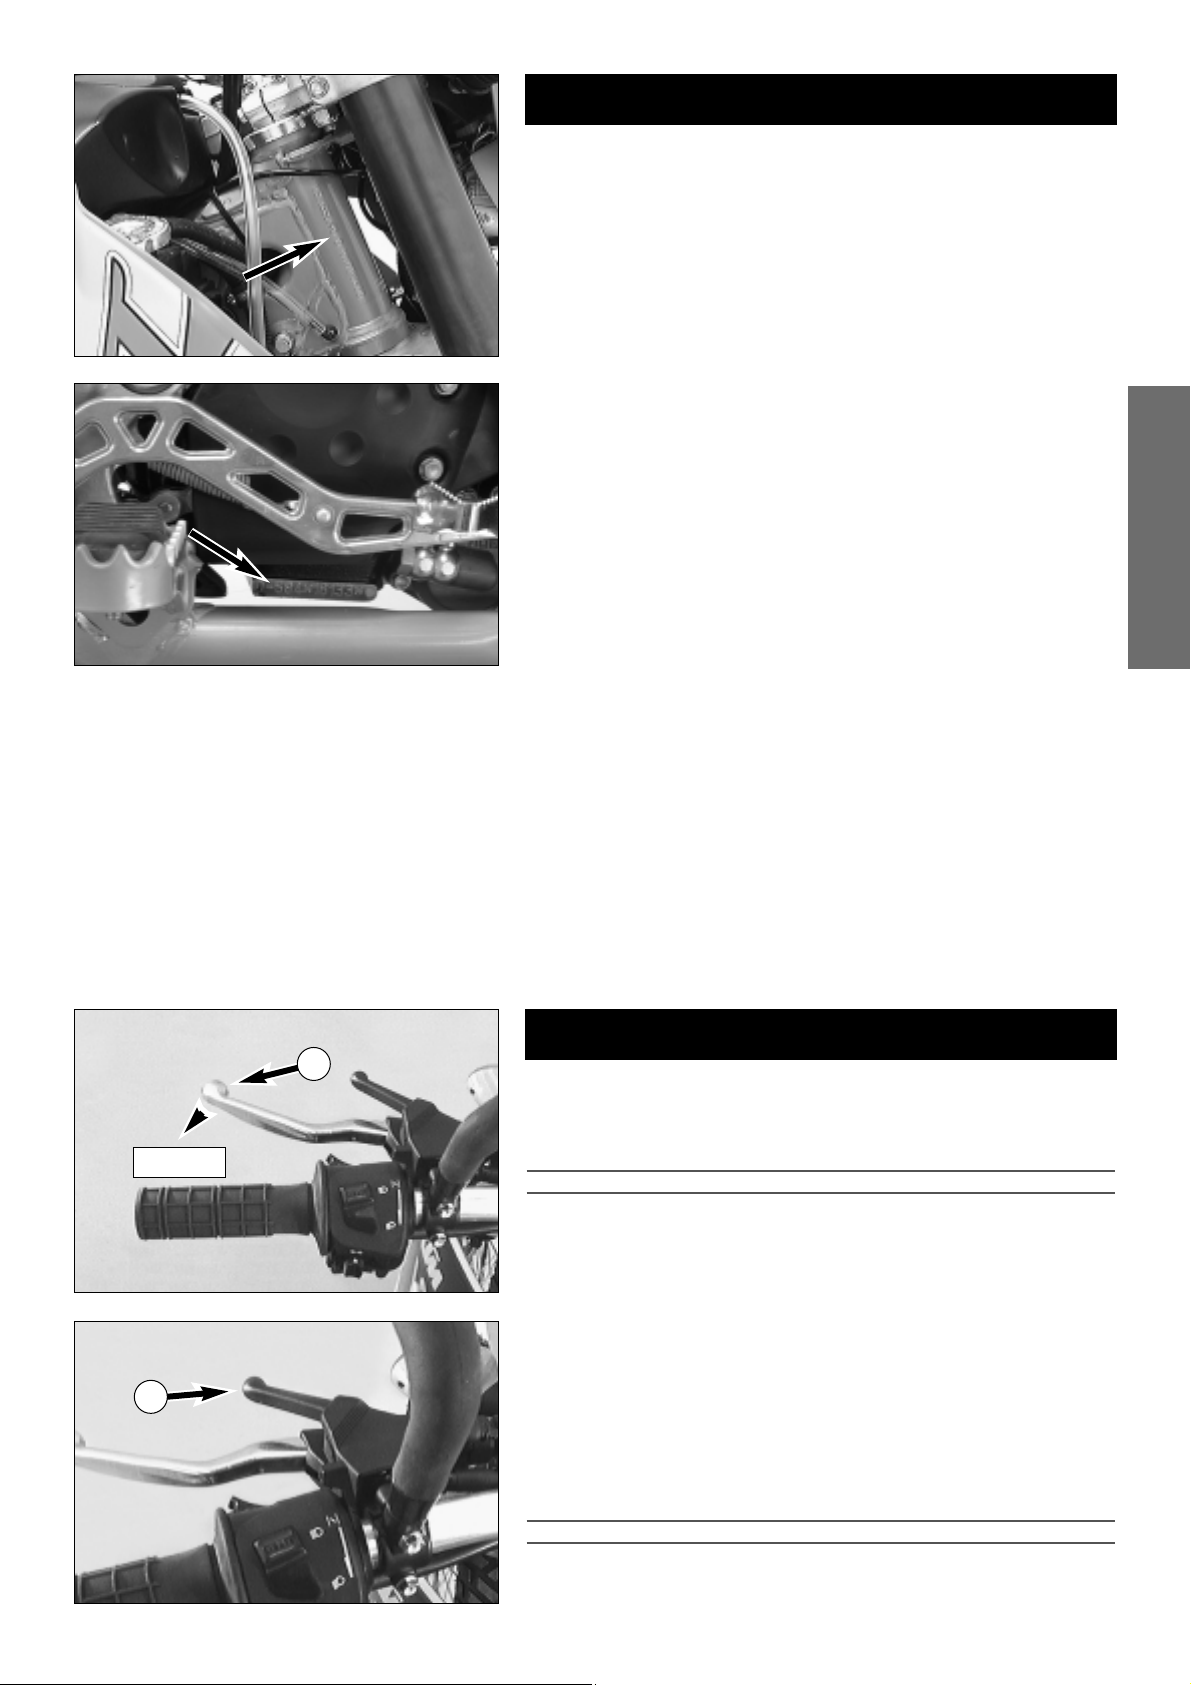
Chassis number
The chassis number is stamped on the right side of the steering head tube.
Write this number into the relevant area on page 1.
Engine number, engine type
The engine number and engine type are stamped on the right hand side of
the engine below the chain sprocket. Write this number into the relevant
area on page 1.
Clutch lever
The clutch lever 1 is fitted on the left hand side of the handle bar. When
engine is cold, there should allways be a play of 1–3 mm (0,04–0,1 in) at
this lever (measured at outer edge).
!
CAUTION
!
IF THERE IS NO PLAY ON THE CLUTCH LEVER, THE CLUTCH WILL START TO SLIP. THE
CLUTCH WILL THEN OVERHEAT
, DESTROYING THE CLUTCH LININGS.
Hand decompression lever
The hand decompression lever 2 is only used in two special cases:
a)When the engine stalled.
It is possible that the starter motor is not able to crank the engine on the
next attempt. This is due to the fact that the automatic decompressor
doesn’t work properly. If this happens, pull the manual decompression
lever and start again. Afterwards normal starting will be possible.
b) When you want to push the motorcycle.
While pushing, pull the hand decompression lever to make it easier to get
the engine going.
!
CAUTION
!
T
HE SETTING OF THE HAND DECOMPRESSION CABLE SHOULD BE REGULARLY CHECKED
(SEE MAINTENANCE WORK). A LACK OF PLAY IN THE HAND DECOMPRESSION LEVER CAN
RESULT IN ENGINE DAMAGE
.
SERIAL NUMBER LOCATIONS
OPERATION INSTRUMENTS
1-3 mm
1
2
Page 7
ENGLISH
6
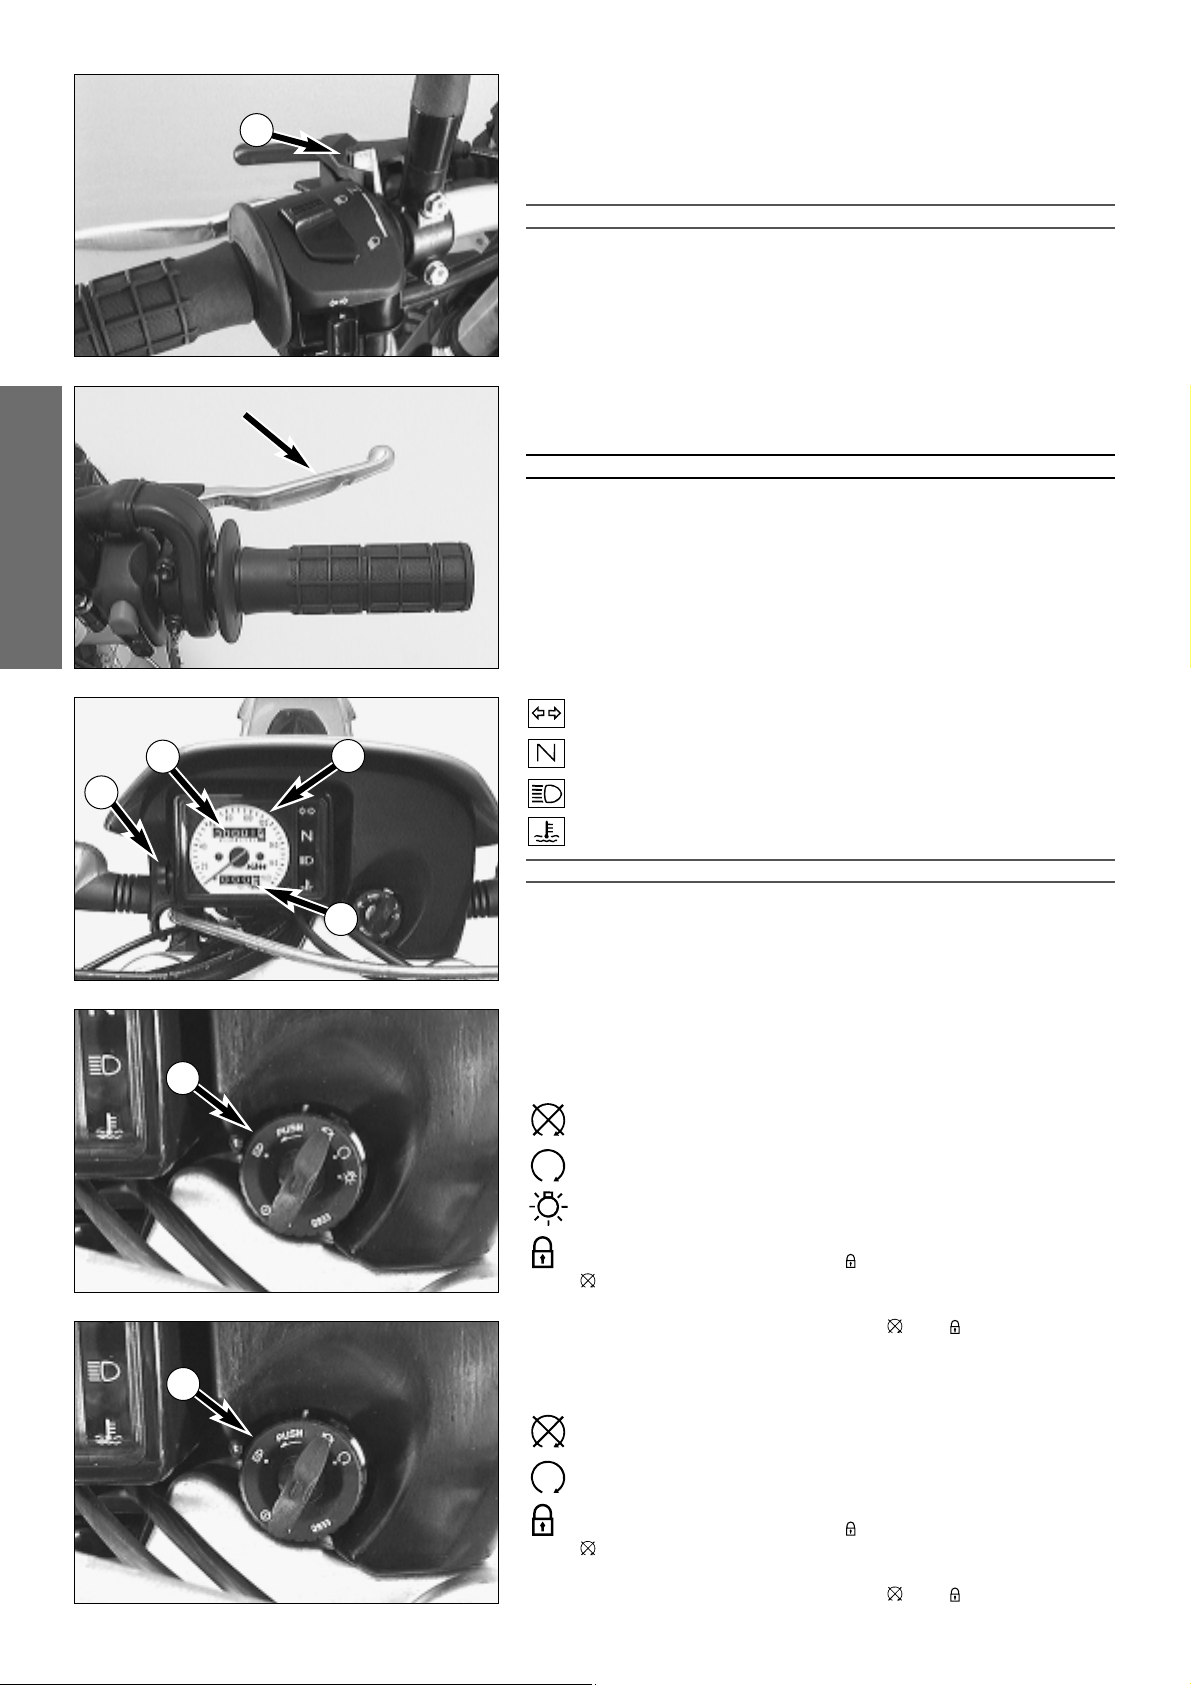
Choke lever
If the choke lever 1 is pulled backwards, a bore will be opened in the
carburetor through which the engine may draw in additional fuel. This
produces a „rich“ fuel/air mixture necessary for cold start. If the choke lever
is pushed forward up to the stop, the bore will be closed again. In this
position the choke cable must have a play of approx. 2 mm.
!
CAUTION
!
I
F THERE IS NO PLAY IN THE CHOKE CABLE, THE BORE OF THE COLD STARTER SYSTEM
CANNOT BE COMPLETELY CLOSED
. THIS RESULTS IN HIGH FUEL CONSUMPTION, AN
UNEVEN RUNNING ENGINE
, AND AN EXTREME WEAR OF PISTON AND CYLINDER.
Hand brake lever
The hand brake lever is mounted on the handlebar on the right and
actuates the front wheel brake.
WARNING
IF THE RESISTANCE IN THE HAND BRAKE LEVER OR FOOT BRAKE PEDAL FEELS “SPONGY”
(
TOO MUCH GIVE), THIS IS AN INDICATION THAT SOMETHING IS WRONG WITH THE
BRAKE SYSTEM
. DON’T RIDE YOUR MOTORCYCLE ANYMORE WITHOUT FIRST HAVING THE
BRAKE SYSTEM LOOKED OVER BY A
KTM DEALER.
Speedometer, indicator lamps
The mileage indicator A in the speedometer 2 indicates overall mileage. The
day mileage indicator
B can be set to 0 by means of the setting wheel C.
Turn the setting wheel forward until only zeros can be seen in the display.
The green indicator lamp flashes when the flasher light is working in
the same rhythm as the flasher light.
The green indicator lamp lights up when the gear is switched to idle.
The blue indicator lamp lights up when the high beam is on.
The red cooling liquid temperature warning lamp lights up at a
cooling liquid temperature of 105°C (223°F).
!
CAUTION
!
P
OSSIBLE CAUSES FOR THE RISE IN TEMPERATURE AND THE LIGHTING OF THE RED COO
-
LING LIQUID TEMPEREATURE WARNING LIGHT:
– SLOW RIDING WITH LARGE LOADS AT A HIGHER AIR TEMPERATURE
– T
OO LITTLE COOLING LIQUID IN THE SYSTEM
– THE COOLING FAN ON THE LEFT COOLER IS NOT WORKING
– EXCESSIVE USE OF THE CLUTCH AT SLOW SPEED (SEE PAGE 27 )
Ignition lock with 4 switch positions
Switch positions of ignition lock 3:
Ignition off, light off (engine can't be started)
Ignition on, light off (engine can be started)
Ignition on, light on (engine can be started) Riding just with lights!
Ignition off, light off, handlebar blocked
To switch the ignition to position turn the ignition key to position
and firmly press it into the lock. Turn the handlebar all the way to
the left, then turn the ignition key to the left.
The ignition key can be withdrawn in position and .
Ignition lock with 3 switch positions
Switch positions of ignition lock 4:
Ignition off, light off (engine can't be started)
Ignition on, light on (engine can be started)
Ignition off, light off, handlebar blocked
To switch the ignition to position turn the ignition key to position
and firmly press it into the lock. Turn the handlebar all the way to
the left, then turn the ignition key to the left.
The ignition key can be withdrawn in position and .
1
2
3
4
A
B
C
Page 8
ENGLISH
7
Combination switch
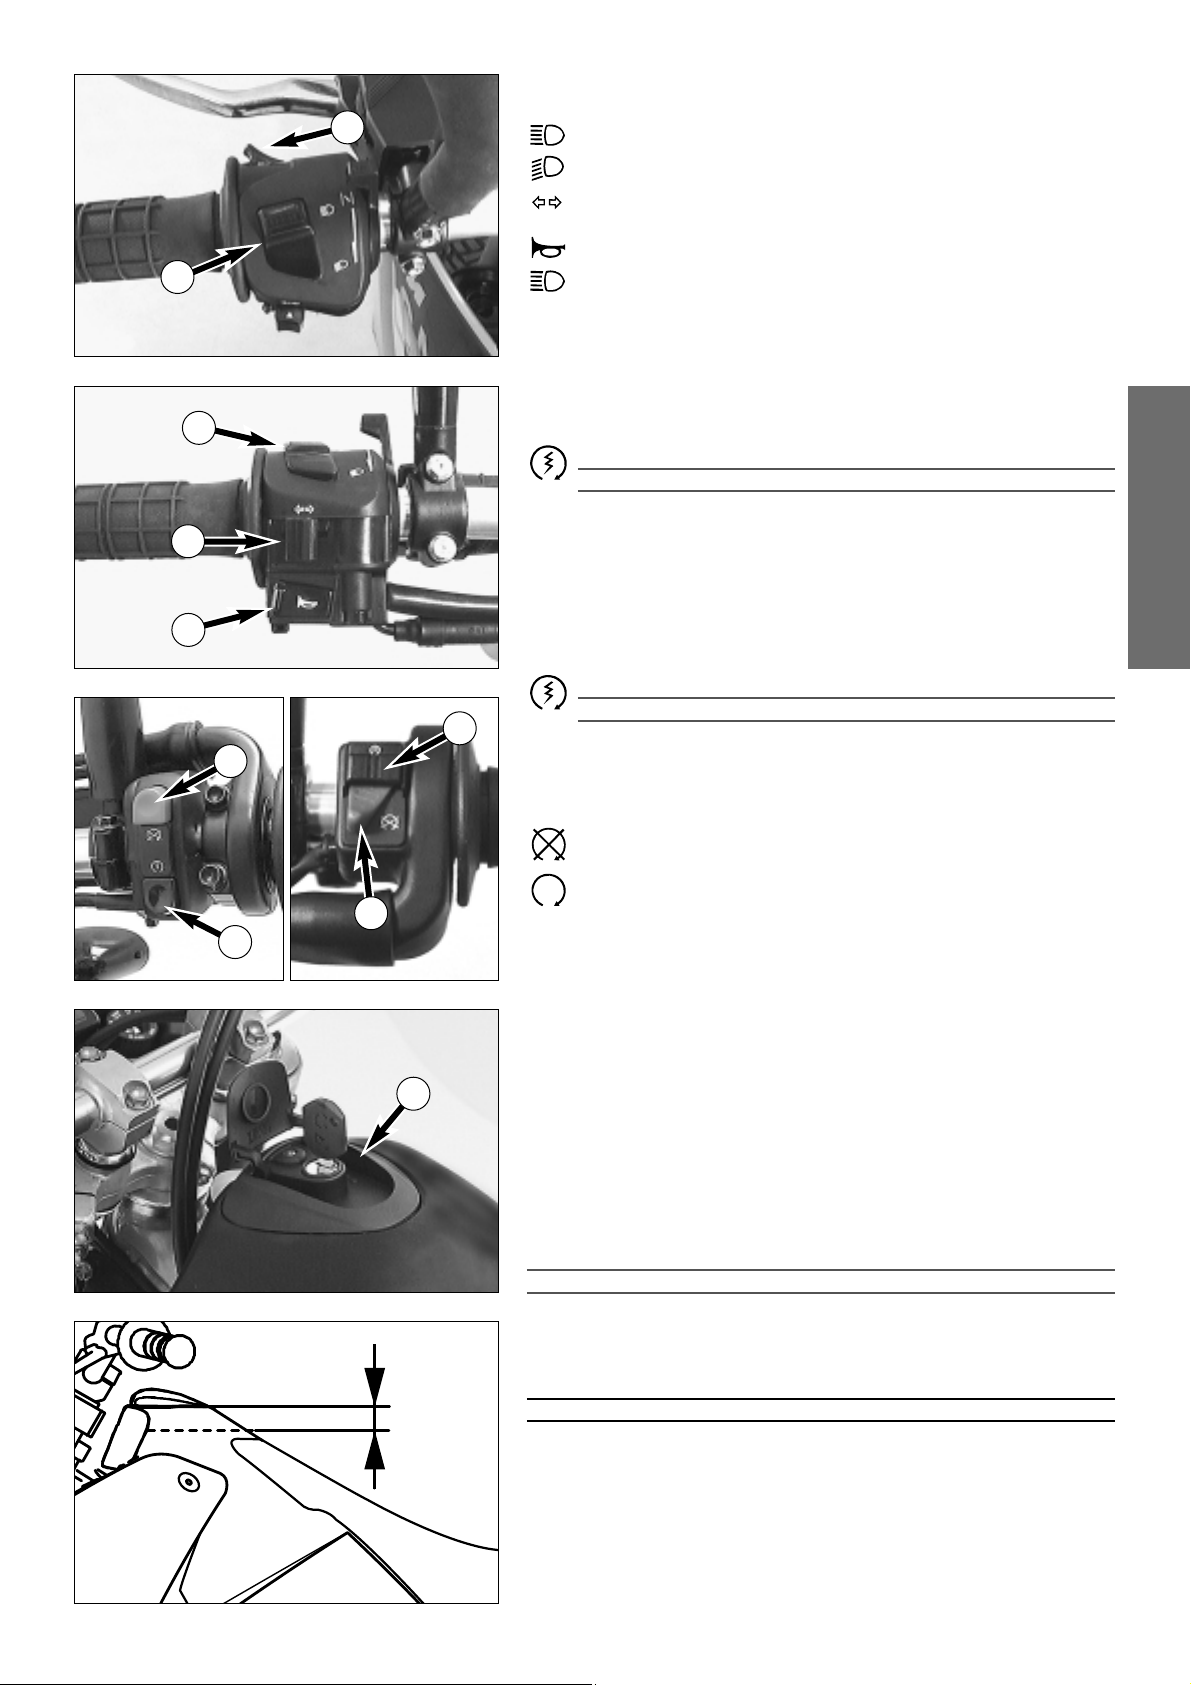
The rocker switch LIGHTS 1 actuates the high beam or low beam.
= High-beam light
= Low-beam light
The indicator switch
2 returns to central position after actuation.
Press flasher switch towards switch housing to switch off the flasher.
The horn is sounded with button
3.
The light signal (high beam) is actuated with button
4.
Starter tip switch, emergency OFF tip switch (LC4-E 640)
Use the starter tip switch 5 to operate the electric starter.
!
CAUTION
!
M
AXIMUM PERIOD FOR CONTINUOUS STARTING
: 5 SECONDS. WAIT AT LEAST
5 SECONDS BEFORE TRYING AGAIN.
The emergency OFF button
6 is meant for use in emergency situations and
should not be used to turn off the engine.
The models for Australia are equipped with an emergency OFF switch.
Starter tip switch, emergency OFF switch (LC4-E 400)
Use the starter tip switch 7 to operate the electric starter.
!
CAUTION
!
M
AXIMUM PERIOD FOR CONTINUOUS STARTING: 5 SECONDS. WAIT AT LEAST
5
SECONDS BEFORE TRYING AGAIN
.
The emergency OFF switch
8 is mainly a safety and emergency switch and
should normally be ON.
If this symbol is visible on the switch, the engine can be started
(i.e. the ignition circuit and the starter circuit are switched on).
If this symbol is visible on the switch, the engine can not be started
(i.e. the ignition circuit and the starter circuit are interrupted).
Filler cap
The filler cap 9can be locked and is provided with a fuel evaporation control system.
To open the cap insert the ignition key, turn it 90° counterclockwise, then
lift off the filler cap.
To close the tank insert the filler cap, turn the ignition key 90° clockwise
and take out the key.
Fuel
The LC4-E engine needs premium gasoline with an octane number of 95
or higher.
!
CAUTION
!
–U
SE LEADED OR UNLEADED PREMIUM GRADE GASOLINE (95 OCTANES). NEVER USE
ANY GASOLINE HAVING LESS THAN
95 OCTANES BECAUSE IT MAY DAMAGE THE
ENGINE
.
WARNING
G
ASOLINE IS HIGHLY FLAMMABLE AND POISONOUS. EXTREME CAUTION SHOULD BE USED
WHEN HANDLING GASOLINE
. DO NOT REFUEL THE MOTORCYCLE NEAR OPEN
FLAMES OR BURNING CIGARETTES
. ALWAYS SWITCH OFF THE ENGINE BEFORE REFUELLING.
B
E CAREFUL NOT TO SPILL GASOLINE ON THE ENGINE OR EXHAUST PIPE WHILE THE
ENGINE IS HOT
. WIPE UP SPILLS PROMPTLY. IF GASOLINE IS SWALLOWED OR SPLASHED IN
THE EYES
, SEEK A DOCTOR’S ADVICE IMMEDIATELY.
Fuel expands when its temperature rises. Therefore do not fill the tank to
the top (see fig.).
4
1
1
2
3
35 mm
9
6
7
5
8
Page 9
ENGLISH
8
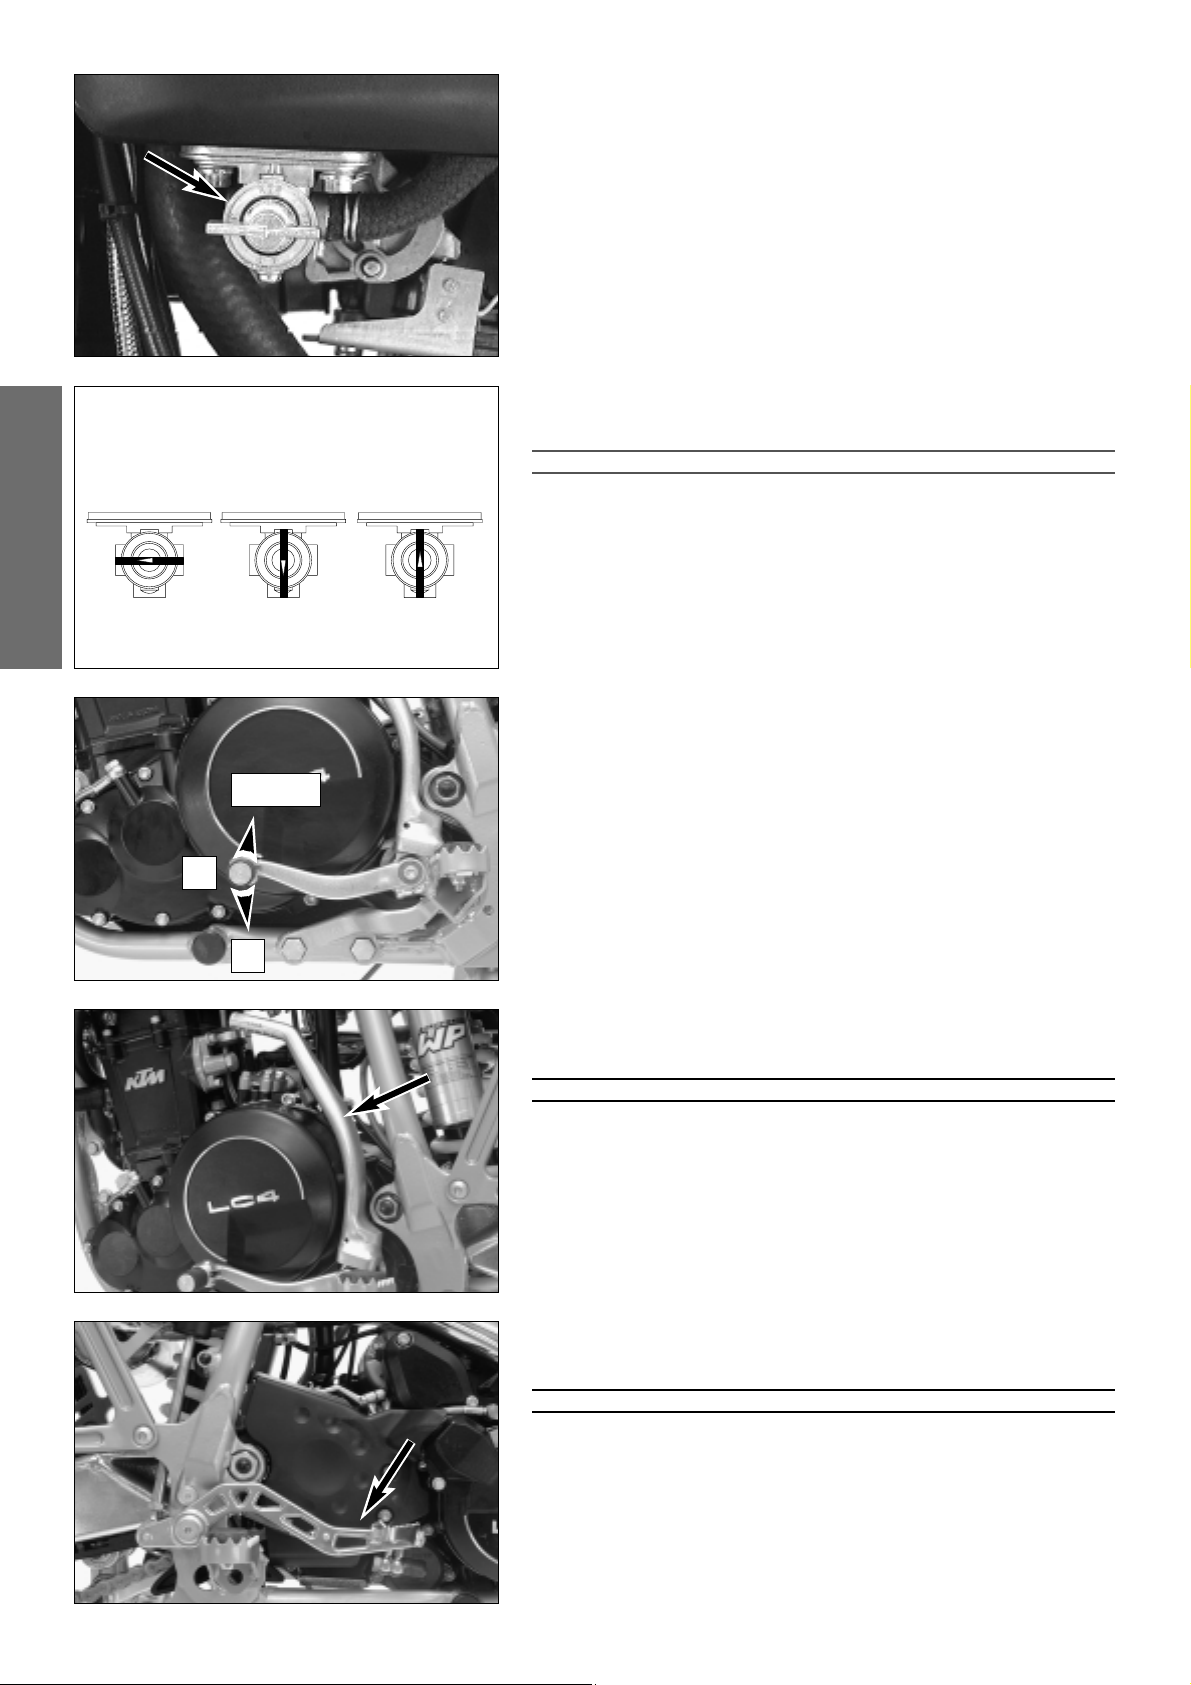
Fuel tap
OFF In this position the fuel tap is closed. No fuel may flow to the
carburetor.
ON When using the motorcycle, the twist grip must be set to the ON
position. Now fuel may flow to carburetor. In this position the tank
empties down to the fuel reserve of approx. 2.5 liters.
RES The reserve, approximately 2.5 liters, cannot be tapped until the twist
grip is turned to the RES position. Fill the tank as soon as possible and
remember to turn the twist grip back to the ON position so that you
will have backup fuel next time, too.
!
CAUTION
!
T
HE FUEL TAP SHOULD BE LOCKED WHENEVER THE MOTORCYCLE IS PARKED. IF THE TAP
IS NOT CLOSED THE CARBURETOR MAY OVERFLOW AND FUEL CAN GET INTO THE
ENGINE
.
Shift lever
The shift lever is mounted on the left side of the engine. The position of
the gears is shown in the illustration. Neutral, or the idle speed, is located
between first and second gear.
Kickstarter
The kickstarter is mounted on the left side of the engine. Its upper part can
be swivelled.
WARNING
-W
HEN STARTING THE ENGINE, MAKE SURE THAT YOU ALWAYS WEAR STURDY
MOTORCYCLING BOOTS IN ORDER TO AVOID INJURY
. YOU MIGHT SLIDE OFF THE
KICKSTARTER
, OR THE ENGINE MAY CAUSE THE KICKSTARTER TO RECOIL, THEREBY
CAUSING INJURIES TO FOOT AND LEG
.
-
ALWAYS KICK THE KICKSTARTER BRISKLY ALL THE WAY AND, WHILE DOING SO, NEVER
OPEN THE THROTTLE
. KICKSTARTING WITH INSUFFICIENT MOMENTUM AND AN OPE-
NED THROTTLE LEVER INCREASES THE DANGER OF A POSSIBLE RECOIL.
Foot brake pedal
The foot brake pedal is located in front of the right footrest. Its basic
position can be adjusted to your seat position (see maintenance work).
WARNING
IF THE RESISTANCE IN THE HAND BRAKE LEVER OR FOOT BRAKE PEDAL FEELS “SPONGY”
(
TOO MUCH GIVE), THIS IS AN INDICATION THAT SOMETHING IS WRONG WITH THE
BRAKE SYSTEM
. DON’T RIDE YOUR MOTORCYCLE ANYMORE WITHOUT FIRST HAVING
THE BRAKE SYSTEM LOOKED OVER BY A
KTM DEALER.
OFF ON RES
2,3,4,5
1
N
S
E
R
F
F
O
N
O
S
E
R
F
U
E
L
F
U
E
F
L
F
O
N
O
S
E
R
F
U
E
F
L
F
O
N
O
Page 10
ENGLISH
9
2
2
1
1
3
4
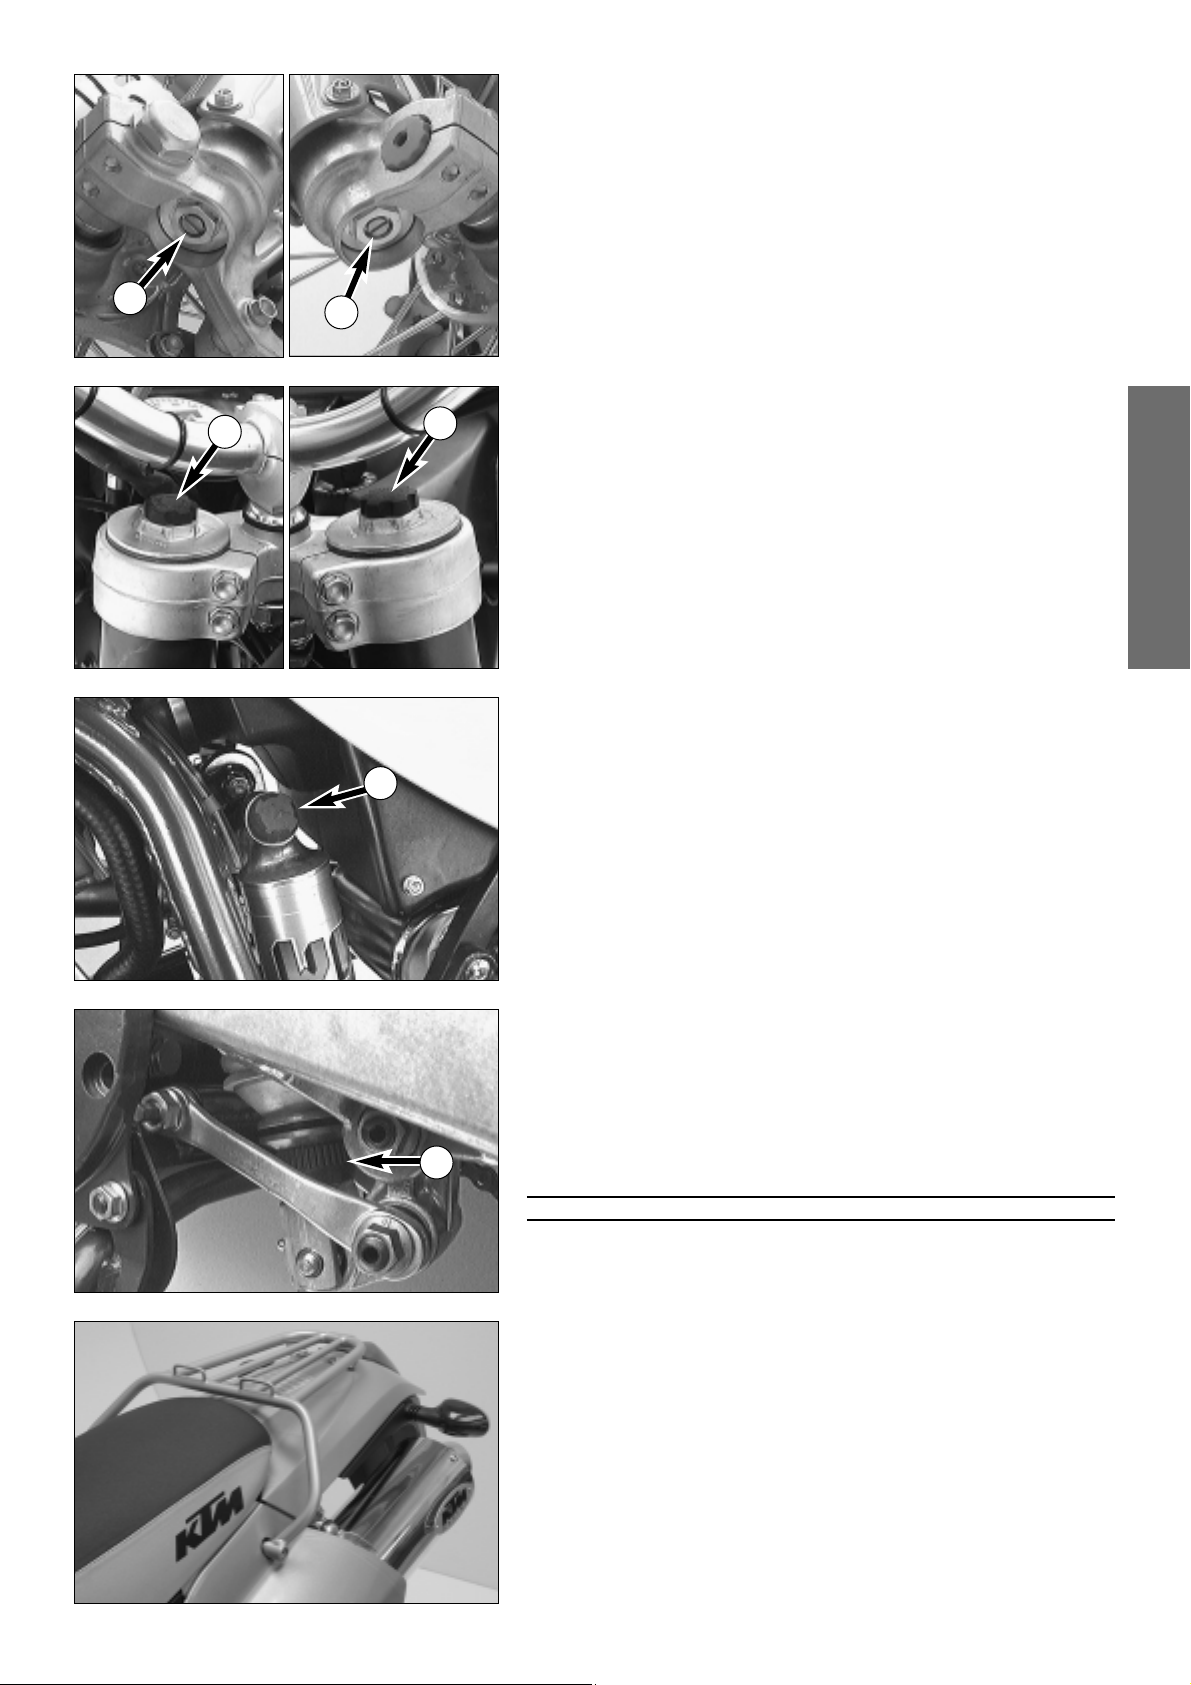
Compression damping of fork
The compression damping is to be set at the lower end of the fork tubes. It
only regulates the degree of damping during compression.
By using the knob
1 (COM), the degree of damping of the compression
can be adjusted. Turn the knob clockwise to increase damping, turn it
counterclockwise to reduce damping during compression.
BASIC SETTING
– turn rotary knob clockwise as far as it will go
– turn it back counter-clockwise by as many clicks as are specified for the
relevant type of fork
WP 0518V707........20 Klicks (400/640 LC4-E)
WP 0518V721........14 Klicks (640 LC4-E Supermoto)
Rebound damping of fork
The rebound damping is to be set at the upper end of the fork tubes. It only
regulates the degree of damping during rebounding.
By using the knob
2 (REB), the degree of damping of the rebound can be
adjusted. Turn the knob clockwise to increase damping, turn it counterclockwise to reduce damping during rebounding.
BASIC SETTING
– turn rotary knob clockwise as far as it will go
– turn it back counter-clockwise by as many clicks as are specified for the
relevant type of fork
WP 0518V707........12 Klicks (400/640 LC4-E)
WP 0518V721........14 Klicks (640 LC4-E Supermoto)
Compression damping of shock absorber
With the knob 3 the degree of damping of the compression can be adjusted to 7 positions. Turn the knob counterclockwise to increase damping,
turn it clockwise to reduce damping during compression.
BASIC SETTING
WP 0118V710.............Position 6 (400/640 LC4-E)
WP 0118V720.............Position 5 (640 LC4-E Supermoto)
Rebound damping of shock absorber
With the setting wheel 4 the degree of damping of the rebound can be
adjusted to 11 positions. Turn the knob to the left side to increase damping,
turn it to the right side to reduce damping during rebounding.
BASIC SETTING:
WP 0118V710.............Position 7 (400/640 LC4-E)
WP 0118V720.............Position 7 (640 LC4-E Supermoto)
WARNING
–N
EVER CHANGE DAMPING BETWEEN THE TEST DRIVES MORE THAN 2 CLICKS.
–THE DAMPING UNIT OF THE SHOCK ABSORBER IS FILLED WITH HIGHLY COMPRESSED
NITROGEN
. NEVER TRY TO TAKE THE SHOCK ABSORBER APART OR TO DO ANY
MAINTENANCE WORK YOURSELF
. SEVERE INJURIES COULD BE THE RESULT.
Baggage carrier
The baggage carrier may be loaded with up to 10 kg. The two lateral hoops
serve as handles for the passenger
Page 11

ENGLISH
10
– Adjust the hand brake lever and the foot brake pedal to the
most comfortable positions for you.
– Get used to handling the motorcycle on an empty car park,
before starting on a longer drive. Also try to drive as slowly
as possible and in standing position, to improve your feeling
for the vehicle.
– Do not drive along off-road tracks which go beyond your
ability and experience.
– Hold the handlebar with both hands and leave your feet on
the foot rests while driving.
–
Remove your foot from the foot brake pedal when you are
not braking. If the foot brake pedal is not released the brake
pads rub continuously and the braking system is
overheated.
– You may only be accompanied by a passenger if your
motorcycle is fitted and registered for such purposes. The
passenger must hold tight to the brackets or hold on to the
driver during the drive, with his feet on the passenger foot
rests.
– Do not make any alterations to the motorcycle and always
use ORIGINAL KTM SPARE PARTS. Spare parts from other
manufacturers can impair the safety of the motorcycle.
– Motorcycles are sensitive to alterations in the distribution of
weight. If you are taking luggage with you, this should be
secured as close as possible to the middle of the vehicle;
distribute the weight evenly between the front and rear
wheel. Never exceed the maximum permissible laden
weight and the axle weights. The maximum permissible
laden weight is made up of the following components:
– Motorcycle ready for operation and tank full
– Luggage
–
Driver and passenger with protective clothing and helmet.
– Pay attention to running in instructions.
Running in the LC4-E models
Even finely machined surfaces of engine parts have rougher
surfaces than parts that slide on each other for a long time.
Therefore, every engine must be run in. For this reason, do not
demand maximum performance from the engine for the first
100 kilometers. The vehicle must be run in at low, changing
performance level for the first 1000 KM (620 miles). The
engine speed of 4800 r.p.m. must not be exceeded during the
first 1000 kilometers (620 miles). During this break-in time,
you should ride your motorcycle in different conditions. The
following table shows you the maximum velocity values in the
different gears at 4800 r.p.m. as based on the rear wheel
transmission ratio of your motorcycle.
Exceeding the above listed rotations as well as pushing high
rpm when the engine is cold will have an adverse effect on the
life of your engine.
km/h (mph)
NOTE:
D
URING THE STAGE OF RUNNING THE ENGINE IN, THAT IS THE FIRST
1000 KM (620 MILES), THE ENGINE OIL USED SHOULD BE OF A MINE-
RAL OIL FORMULA. THIS ALSO APPLIES IF THE ENGINE HAS BEEN REPAIRED.
Check the following before each start
When you start off, the motorcycle must be in a perfect technical condition. For safety reasons, you should make a habit of
performing an overall check of your motorcycle before each
start.
The following checks should be performed:
1 CHECK THE OIL LEVEL
Insufficient oil results in premature wear and consequently
to engine damage.
2 FUEL
Check that there is sufficient fuel in the tank; when closing
the filler cap.
3 CHAIN
A loose chain can fall off; an extremely worn chain can tear,
and insufficient lubrication can result in unnecessary wear to
the chain and rear sprockets.
4 TIRES
Check for damaged tires. Tires showing cuts or dents must
be replaced. The tread depth must comply with the legal
regulations. Also check the air pressure. Insufficient tread
and incorrect air pressure reduce the driving performance.
5 BRAKES
Check correct functioning of the braking system. Check for
sufficient brake fluid in the reservoir. The reservoirs have
been designed in such a way that brake fluid does not need
to be refilled even when the brake pads are worn. If the
level of brake fluid falls below the minimum value, this indicates a leak in the braking system or completely worn out
brake pads. Arrange for the braking system to be checked
by a KTM specialist garage, as complete failure of the
braking system can be expected.
Also check the state of the brake hoses and the thickness of
the brake linings.
Check free travel at hand brake lever and foot brake pedal.
6 CABLES
Check correct setting and easy running of all control cables.
7 COOLING LIQUID
Check the level of cooling liquid when the engine is cold.
8 ELECTRICAL SYSTEM
Check headlight, parking light, tail light, brake light,
flashers, indicator lamps and horn for faultless operation.
9 LUGGAGE
If you are taking luggage with you, check that this is
securely fastened.
WARNING
–WEAR SUITABLE CLOTHING WHEN DRIVING A MOTORCYCLE. CLEVER
KTM DRIVERS ALWAYS WEAR A HELMET, BOOTS, GLOVES AND A
JACKET
, REGARDLESS OF WHETHER DRIVING ALL DAY OR JUST FOR A
SHORT TRIP
. THE PROTECTIVE CLOTHING SHOULD BE BRIGHTLY
COLOURED SO THAT OTHER USERS OF THE ROADS CAN SEE YOU AS
EARLY AS POSSIBLE
. YOUR PASSENGER OF COURSE WILL ALSO NEED
SUITABLE PROTECTIVE CLOTHING
.
–A
LWAYS TURN ON THE LIGHT TO MAKE SURE THAT OTHER DRIVERS
BECOME AWARE OF YOU AS EARLY AS POSSIBLE
.
–D
O NOT DRIVE AFTER HAVING CONSUMED ALCOHOL.
–O
NLY USE ACCESSORIES THAT HAVE BEEN RELEASED BY KTM. FOR
EXAMPLE
, FRONT PANELLING CAN IMPAIR THE DRIVING PROPERTIES OF
THE MOTORCYCLE
. CASES, EXTRA TANKS ETC. CAN ALTER THE WEIGHT
DISTRIBUTION AND THUS ALSO IMPAIR THE VEHICLE
’S DRIVING
PROPERTIES
.
–T
HE FRONT AND REAR WHEEL ARE ONLY ALLOWED TO BE TIRED WITH
TIRES THAT HAVE THE SAME PROFILE TYPE
.
Instructions for initial operation
– Verify that your KTM dealer performed the PREPARATION
OF VEHICLE jobs (see Customer Service Manual).
– Read the entire manual carefully before your first drive.
– Familiarize yourself with the operating elements.
DRIVING INSTRUCTIONS
400 LC4-E 640 LC4-E Supermoto
15:45 t 16:42 t 17:42 t
1st 30 (19) 35 (22) 35 (22)
2nd 45 (30) 50 (32) 50 (32)
3rd 60 (38) 70 (44) 70 (44)
4th 75 (47) 90 (57) 90 (57)
5th 85 (54) 100 (63) 100 (63)
gear
ratio
Page 12
ENGLISH
11
ENGLISH
11
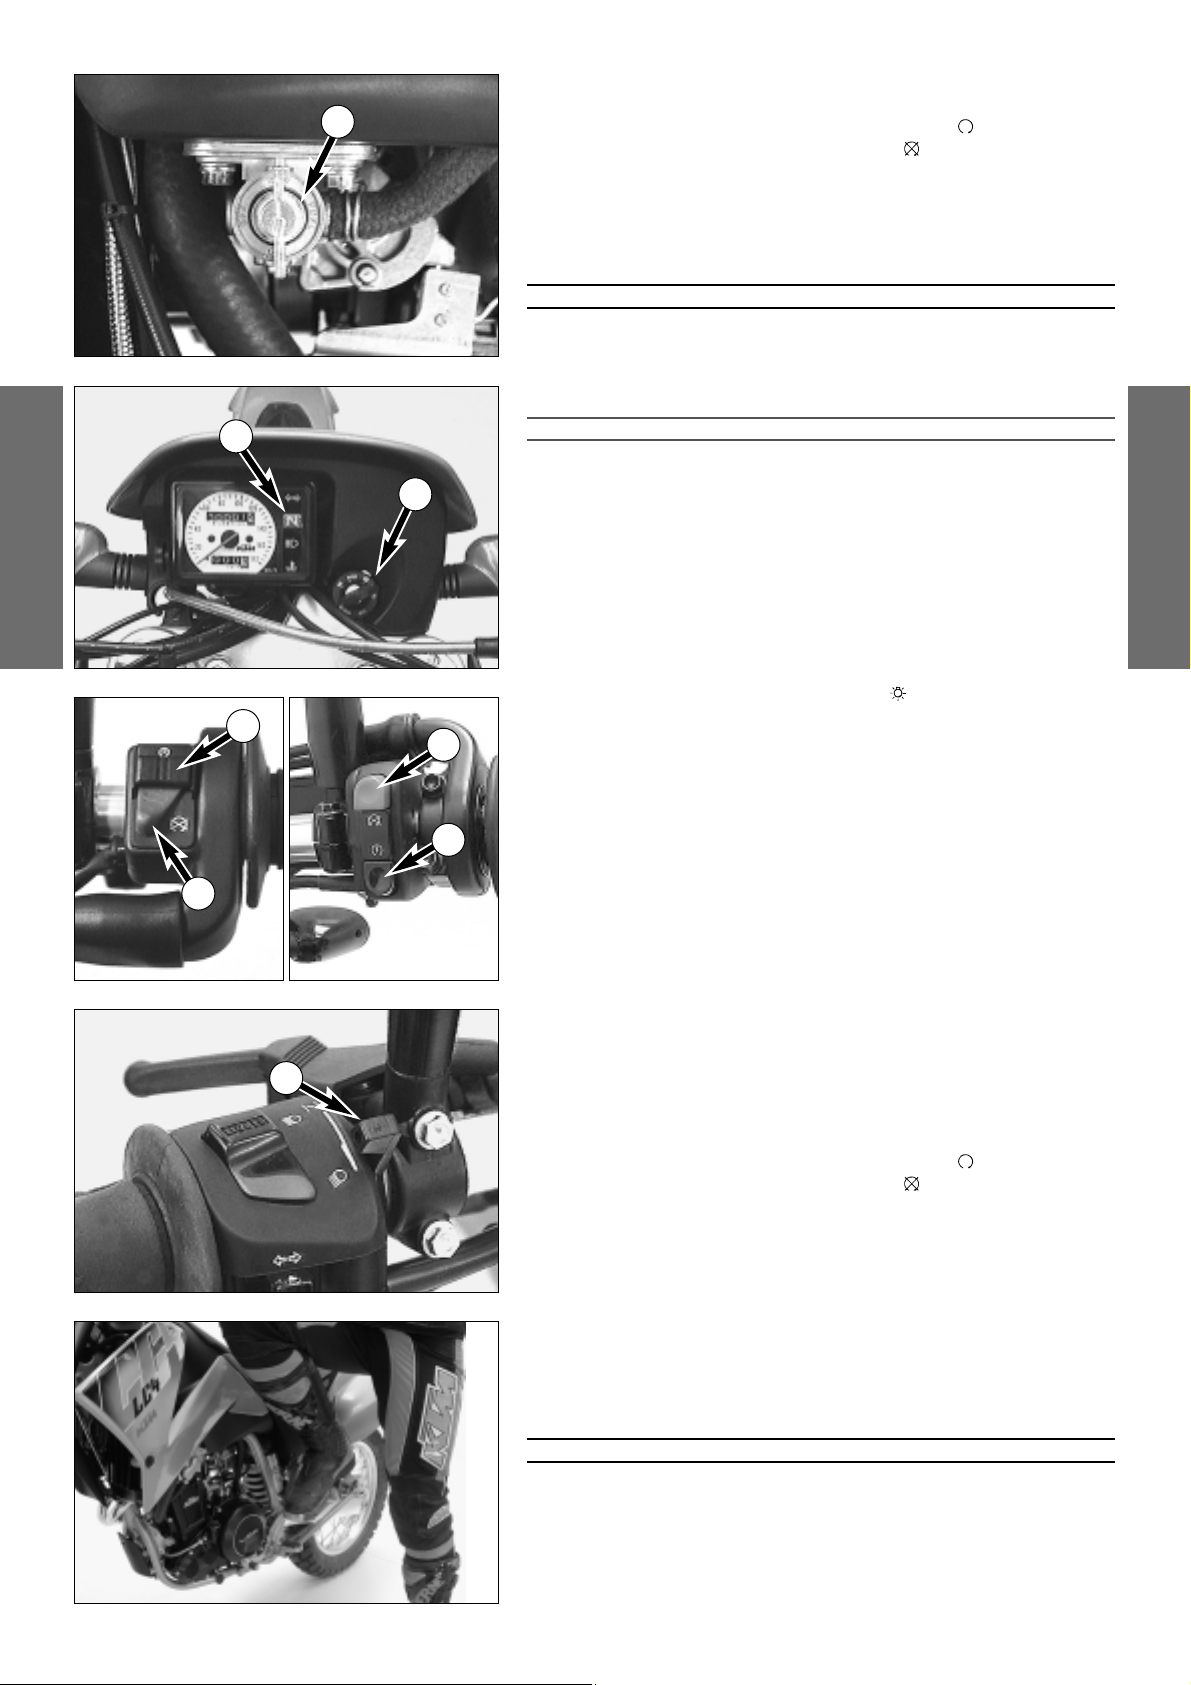
Starting when the engine is cold
1 Open the fuel tap
1
2 Switch on ignition (turn ignition key 2into position ).
3 Switch on emergency OFF switch
3
(symbol must be visible).
4 Switch transmission to idle (green indicator lamp N
4
lights up).
5 Operate cold starting device (choke)
5
.
6 Do not accelerate; operate starter button
6
.
7 If the engine starts, push the choke lever back a little bit, as soon as the
engine runs unevenly.
8 Lift motorcycle off center stand.
WARNING
–
T
O AVOID INJURIES
,
IT IS RECOMMENDED TO WEAR BOOTS WHEN USING THE
KICKSTARTER
.
–DO NOT START THE ENGINE AND ALLOW IT TO IDLE IN A CLOSED ROOM
. EXHAUST
FUMES ARE POISONOUS AND CAN CAUSE LOSS OF CONSCIOUSNESS AND DEATH
.
A
LWAYS PROVIDE ADEQUATE VENTILATION WHILE THE ENGINE IS RUNNING
.
!
CAUTION
!
–M
AXIMUM PERIOD FOR CONTINUOUS STARTING: 5 SECONDS. WAIT AT LEAST
5 SECONDS BEFORE TRYING AGAIN
.
–D
ON’
T RIDE YOUR MOTORCYCLE WITH FULL LOAD AND DON’T REV ENGINE WHEN
COLD
. BECAUSE THE PISTON IS WARMING UP FASTER THAN THE WATER COOLED
CYLINDER
, IT CAN CAUSE ENGINE DAMAGE. ALWAYS LET THE ENGINE WARM UP
BEFORE AND REFRAIN FROM DRIVING WITH FULL LOAD UNTIL THE ENGINE IS WARM
.
IF THE ENGINE IS DOES NOT CRANK WHEN YOU ACTUATE THE STARTER TIP SWITCH:
– the transmission is switched to idle
– Check if the emergency OFF switch is on
– Check if the ignition is on
– the headlight is on (ignition lock in position ).
– If this is not the case, the battery is discharged
– If the lights are on, proceed as described in the „Trouble-shooting“
section or contact a KTM dealer.
IF THE ENGINE CRANKS BUT DOES NOT START, WHEN YOU ACTUATE
THE STARTER TIP SWITCH:
– Check if the fuel tap is open
– Check if the choke lever has been operated
– Check if sufficient fuel is in the tank
– If this is not the case, refill the tank
– if sufficient fuel is in the tank, proceed as described in the „Trouble-
shooting“ section or contact a KTM dealer.
NOTE:
T
HIS MOTORCYCLE IS EQUIPPED WITH A SAFETY STARTER SYSTEM. THE ENGINE CAN ONLY
BE STARTED WHEN THE TRANSMISSION IS SWITCHED TO IDLE OR THE CLUTCH LEVER IS
PULLED
, RESPECTIVELY.
Starting when the engine is warm or hot
1 Open the fuel tap
1
2 Switch on ignition (turn ignition key 2into position ).
3 Switch on emergency OFF switch 3(symbol must be visible).
4 Switch transmission to idle (green indicator lamp N
4
lights up).
5 Do not accelerate; operate starter button
6
.
6 Lift motorcycle off center stand or swing up side stand, respectively.
What to do when the engine is „flooded”
The throttle must be fully opened when starting. If necessary change
spark-plug.
Kickstart instructions
Start as described above, then push the kickstarter hard ALL THE WAY.
WARNING
–WHEN STARTING THE ENGINE, MAKE SURE THAT YOU ALWAYS WEAR STURDY
MOTORCYCLING BOOTS IN ORDER TO AVOID INJURY
. YOU MIGHT SLIDE OFF THE
KICKSTARTER
, OR THE ENGINE MAY CAUSE THE KICKSTARTER TO RECOIL, THEREBY
CAUSING INJURIES TO FOOT AND LEG
.
–
ALWAYS KICK THE KICKSTARTER BRISKLY ALL THE WAY AND, WHILE DOING SO, NEVER
OPEN THE THROTTLE
. KICKSTARTING WITH INSUFFICIENT MOMENTUM AND AN OPE-
NED THROTTLE LEVER INCREASES THE DANGER OF A POSSIBLE RECOIL.
1
2
4
6
3
3
6
5
Page 13
ENGLISH
12
Starting off
Pull the clutch lever. Put the engine into first gear, slowly
release the clutch lever and open throttle at the same time.
WARNING
–B
EFORE YOU START OFF, CHECK THAT THE MAIN STAND HAS BEEN
SWUNG UP FULLY
. IF THE STAND DRAGS ON THE GROUND
, THE
MOTORCYCLE CAN GO OUT OF CONTROL
.
–A
LWAYS TURN ON THE LIGHT TO MAKE SURE THAT OTHER DRIVERS
BECOME AWARE OF YOU AS EARLY AS POSSIBLE
.
Shifting/Riding
You are now in first gear, refered to as the drive or uphill gear.
Depending on the conditions (traffic, road gradient, etc.), you
can shift to a higher gear. Close throttle, at the same time pull
clutch lever and shift to the next higher gear. Let clutch lever
go again and open throttle. If you turned on the choke, make
sure you turn it off again as soon as engine is warm.
When you reach full speed through turning the throttle grip all
the way, turn throttle back to 3/4; the speed hardly decreases
although the engine will use less gas. Never open the throttle
wider than the engine can handle. Excessive turning of the
throttle grip will increase full consumption.
By shifting down, use the brakes if necessary and close throttle
at the same time. Pull clutch lever and shift down to the next
gear. Let clutch lever go slowely and open throttle or shift
down again.
If the engine is killed f.ex. at a crossing, simply pull the clutch
lever and start. It is not necessary to switch the gear to
NEUTRAL.
WARNING
–O
BSERVE THE TRAFFIC REGULATIONS, DRIVE DEFENSIVELY AND TRYING
TO LOOK AHEAD AS FAR AS POSSIBLE SO THAT ANY HAZARDS CAN BE
RECOGNIZED AS EARLY AS POSSIBLE
.
–A
DJUST YOUR DRIVING SPEED ACCORDING TO THE CONDITIONS AND
YOUR DRIVING SKILLS
.
–DRIVE CAREFULLY ON UNKNOWN ROADS
–AVOID ABRUPT LOAD CHANGES WHILE RIDING AROUND BENDS AND
ON WET OR SLIPPERY GROUND
. OTHERWISE YOU MIGHT EASILY LOSE
CONTROL OVER YOUR MOTORCYCLE
.
–
WHILE RIDING YOUR MOTORCYCLE, NEVER SWITCH THE IGNITION
LOCK TO POSITIONS
AND .
– RENEW THE VIZOR ON YOUR HELMET OR THE GLASS OF YOUR GOGG-
LES ON TIME SO AS TO ENSURE OPTIMUM VISION IN ANY SITUATION.
–WHEN DRIVING OFF-ROAD, ALWAYS HAVE A FRIEND ON A SECOND
MOTORCYCLE TO KEEP YOU COMPANY
, SO THAT YOU CAN HELP EACH
OTHER SHOULD DIFFICULTIES ARISE
.
–R
EPLACE THE HELMET VISOR RESPECTIVELY GOGGLE GLASSES IN PLENTY
OF TIME
. WHEN LIGHT SHINES DIRECTLY ON SCRATCHED VISOR OR
GOGGLES
, YOU WILL BE PRACTICALLY BLIND.
–AFTER FALLING WITH THE MOTORCYCLE, CHECK ALL FUNCTIONS
THOROUGHLY BEFORE STARTING UP OPERATIONS AGAIN
.
–A
DEFORMED HANDLEBAR MUST ALWAYS BE REPLACED. UNDER NO
CIRCUMSTANCES SHOULD YOU STRAIGHTEN THE HANDLEBAR WHICH
WOULD CONSEQUENTLY LOSE ITS STABILITY
.
!
CAUTION
!
–H
IGH RPM RATES WHEN THE ENGINE IS COLD HAVE AN ADVERSE
EFFECT ON THE LIFE OF YOUR ENGINE
. WE RECOMMEND YOU RUN
THE ENGINE IN A MODERATE RPM RANGE FOR A FEW MILES GIVING IT
A CHANCE TO WARM UP
. AFTER THAT NO FURTHER PRECAUTIONS IN
THIS RESPECT NEED BE TAKEN
. THE ENGINE HAS REACHED ITS OPERA-
TING TEMPERATURE AS SOON AS THE RADIATORS BECOME WARM
.
–N
EVER HAVE THE THROTTLE WIDE OPEN WHEN CHANGING DOWN TO
A LOWER GEAR
. THE ENGINE WILL OVERSPEED, DAMAGING THE
VALVES
. IN ADDITION, THE REAR WHEEL BLOCKS SO THAT THE
MOTORCYCLE CAN EASILY GET OUT OF CONTROL
.
–L
ONG WHEELIES LEAD TO A DROP IN THE OIL PRESSURE WHICH CAN
LEAD TO ENGINE DAMAGE
.
–N
EVER USE YOUR MOTORCYCLE WITHOUT AN AIR FILTER. OTHERWISE
DUST AND DIRT MAY ENTER THE ENGINE AND CAUSE INCREASED WEAR
.
!
CAUTION
!
– THE RED COOLANT WARNING LAMP LIGHTS UP WHEN THE COOLANT
TEMPERATURE HAS REACHED
105°C.
POSSIBLE CAUSES FOR THE INCREASE IN TEMPERATURE
:
-
LOW DRIVING VELOCITY AND HIGH LOAD SITUATION IN HIGH AIR
TEMPERATURES
-
LEVEL OF COOLANT IN THE SYSTEM IS INSUFFICIENT
-FAN AT LEFT RADIATOR IS NOT RUNNING
-IMPROPER USE OF THE CLUTCH WHILE DRIVING AT LOW VELOCITIES
PLACE A CLOTH ON THE RADIATOR CAP
. OPEN THE CAP SLOWLY, SO
THE EXCESS PRESSURE IN THE COOLING SYSTEM CAN ESCAPE
. -
CAUTION SCALDING HAZARD! -
AND CHECK THE COOLING
LIQUID LEVEL
.
D
O NOT DRIVE ON
, UNTIL THERE IS SUFFICIENT LIQUID IN THE COLING
SYSTEM
. HOWEVER
, CALL ON ONE OF
KTM’S DEALERS AS SOON AS
POSSIBLE IN ORDER TO HAVE THE DEFECT REMEDIED
.
–I
F ANY ABNORMAL VIBRATIONS OCCUR WHILE DRIVING
, CHECK THAT
THE ENGINE FASTENING BOLTS ARE TIGHT
.
–I
N THE EVENT THAT
, WHILE RIDING ON YOUR MOTORCYCLE
, YOU
NOTICE ANY UNUSUAL OPERATION
-RELATED NOISE, STOP IMMEDIA-
TELY, TURN THE ENGINE OFF, AND CONTACT AN AUTHORIZED KTM
DEALER.
Braking
Close throttle and apply the hand and foot brakes at the same
time. When driving on sandy, wet or slippery ground use
mainly the rear wheel brake. Always brake with feeling,
blocking wheels can cause you to skid or fall. Also change
down to lower gears depending on your speed.
When driving downhill, use the braking effect of the engine.
Change down one or two gears but do not overspeed the
engine. In this way, you will not need to brake so much and
the brakes will not overheat.
WARNING
– IN THE RAIN, OR AFTER THE MOTORCYCLE HAS BEEN WASHED, BRA-
KING ACTION MAY BE DELAYED DUE TO WET BRAKE DISCS. FIRST, THE
BRAKES MUST BE BRAKED DRY
.
–
ON SALT-SPRAYED OR DIRTY ROADS BRAKE ACTION MAY BE DELAYED
AS WELL
. FIRST, THE BRAKES MUST BE BRAKED CLEAN.
–WHEN YOU BRAKE, THE BRAKE DISCS, BRAKE PADS, BRAKE CALIPER
AND BRAKE FLUID HEAT UP
. THE HOTTER THESE PARTS GET
, THE WEA-
KER THE BRAKING EFFECT. IN EXTREME CASES, THE ENTIRE BRAKING
SYSTEM CAN FAIL
.
Stopping and parking
Apply the brakes fully and put the engine into neutral. To stop
the engine, switch off the ignition. Turn the fuel tap to the
OFF position, park on an area where the ground is firm, and
lock the motorcycle.
WARNING
– ALWAYS PARK YOUR MOTORBIKE ON A SOLID AND HORIZONTAL SUR-
FACE.
–NEVER LEAVE YOUR MOTORCYCLE WITHOUT SUPERVISION AS LONG AS
THE ENGINE IS RUNNING
.
–M
OTORCYCLE ENGINES PRODUCE A GREAT AMOUNT OF HEAT WHILE
RUNNING
. THE ENGINE RADIATORS, EXHAUST, EXHAUST SYSTEM, BRAKE
DISCS
, AND SHOCK ABSORBERS CAN BECOME VERY HOT. DONOT
TOUCH ANY OF THESE PARTS AFTER OPERATING THE MOTORCYCLE
,
AND TAKE CARE TO PARK IT WHERE PEDESTRIANS ARE NOT LIKELY TO
TOUCH IT AND GET BURNED
–NEVER PARK YOUR MOTORCYCLE IN PLACES WHERE THERE EXIST FIRE
HAZARDS DUE TO DRY GRASS OR OTHER EASILY FLAMMABLE
MATERIALS
.
!
CAUTION
!
–C
LOSE THE FUEL TAP WHEN LEAVING YOUR VEHICLE.OTHERWISE THE
CARBURETOR CAN OVERFLOW AND FUEL WILL ENTER THE ENGINE
.
–A
LWAYS TAKE OUT THE IGNITION KEY WHEN PARKING YOUR
MOTORCYCLE SO THAT IT CANNOT BE USED BY UNAUTHORIZED
PERSONS
.
Page 14
ENGLISH
13
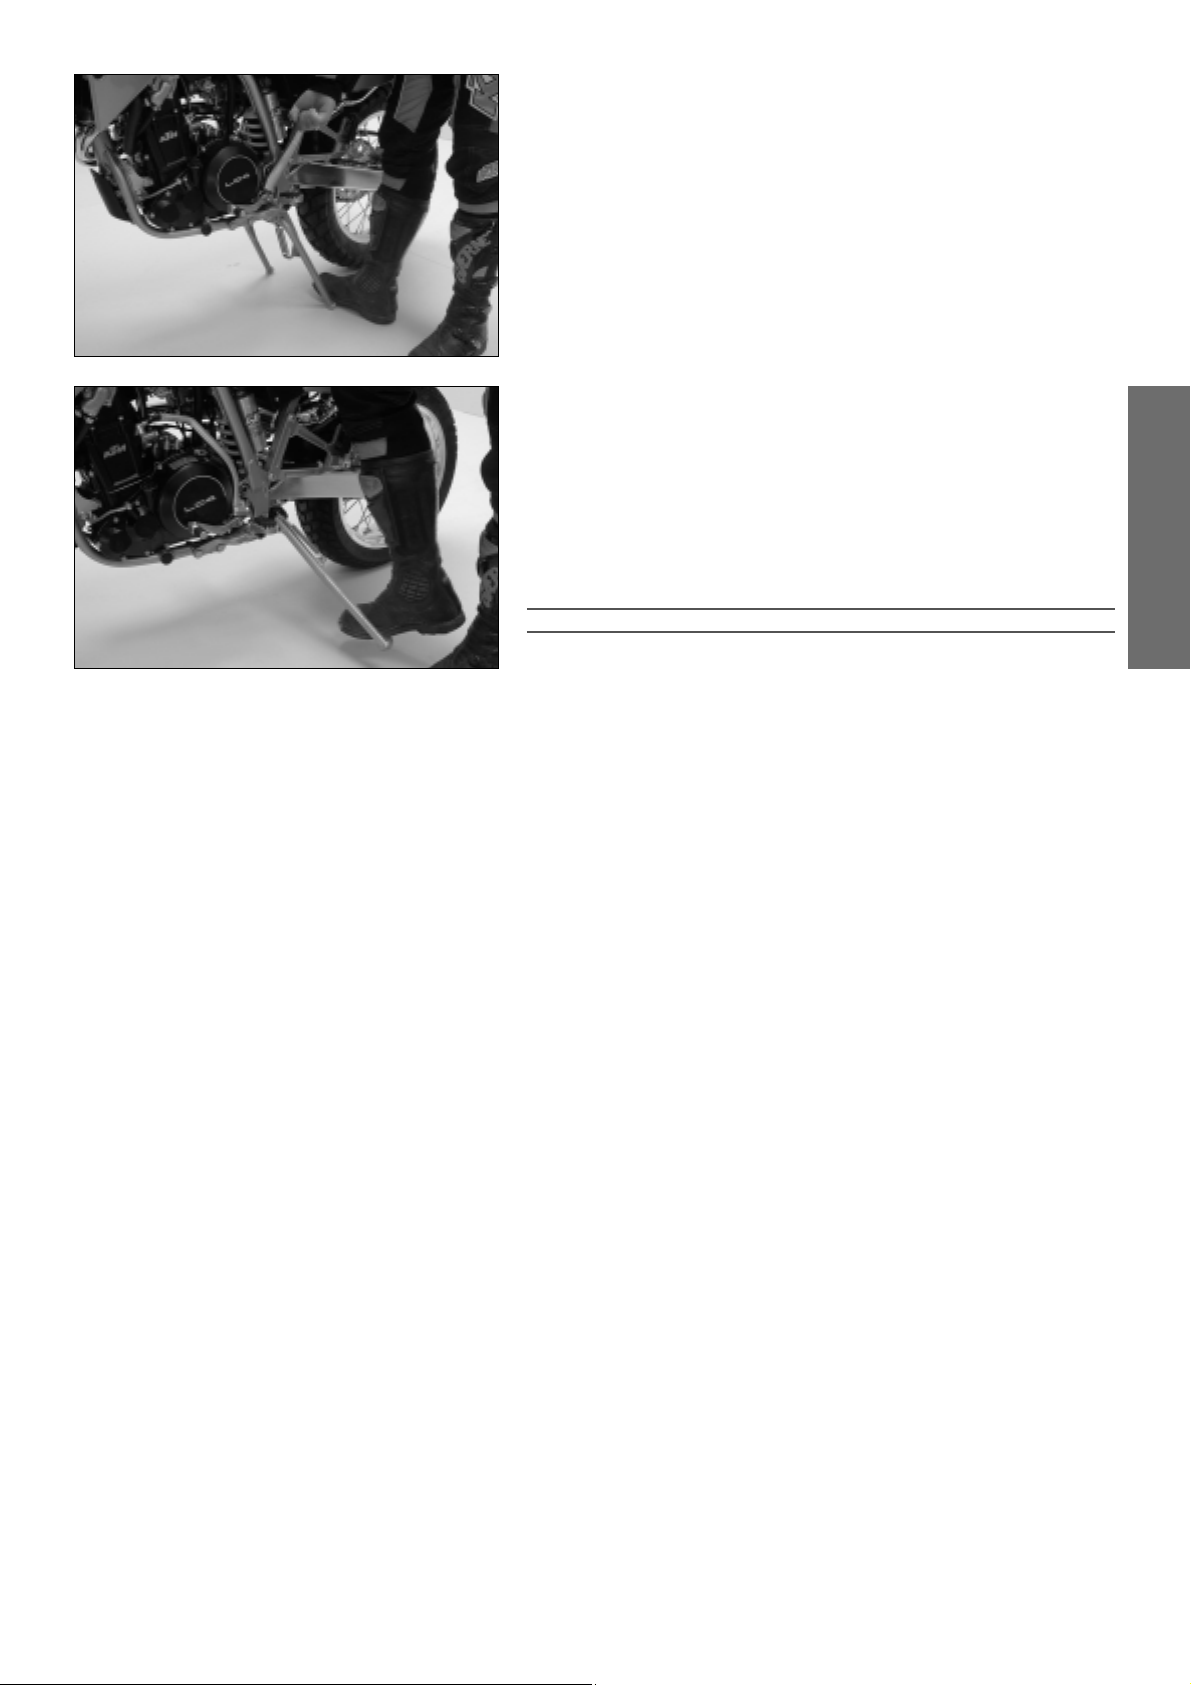
NOTE REGARDING THE CENTER STAND:
We advise the following procedure to place the motorcycle on the center
stand as effortlessly as possible:
a) press main stand to ground using foot
b) swing out kickstarter and pull motorcycle backwards at an angle as illust-
rated (see illustration).
Make sure that the ground is solid and that your motorcycle is standing
securely.
INFORMATION ABOUT THE SIDE STAND:
Use your foot to push the side stand forward as far as possible, and lean
your motorcycle to the side. Make sure that your motorcycle is standing
safely on solid ground. Just in case, you can also put in a gear.
Motorcycles that have a side stand are provided with a safety starting
system. If the side stand has been swung out from the motorcycle, the
engine can only be started if the transmission has been switched to idle or if
the clutch lever has been pulled in.
If you put in a gear with the side stand in its swung-out position, and if you
let go of the clutch lever, the engine will stop.
!
CAUTION
!
T
HE SIDE STAND IS DIMENSIONED FOR THE WEIGHT OF THE MOTORCYCLE ONLY. IF YOU
ARE SITTING ON THE MOTORBIKE AND THUS APPLY AN ADDITIONAL LOAD ONTO THE SIDE
STAND
, YOU MAY CAUSE DAMAGE TO THE SIDE STAND OR THE FRAME
, AND YOUR
MOTORBIKE MAY FALL OVER
.
Page 15

ENGLISH
14
Page 16
ENGLISH
15
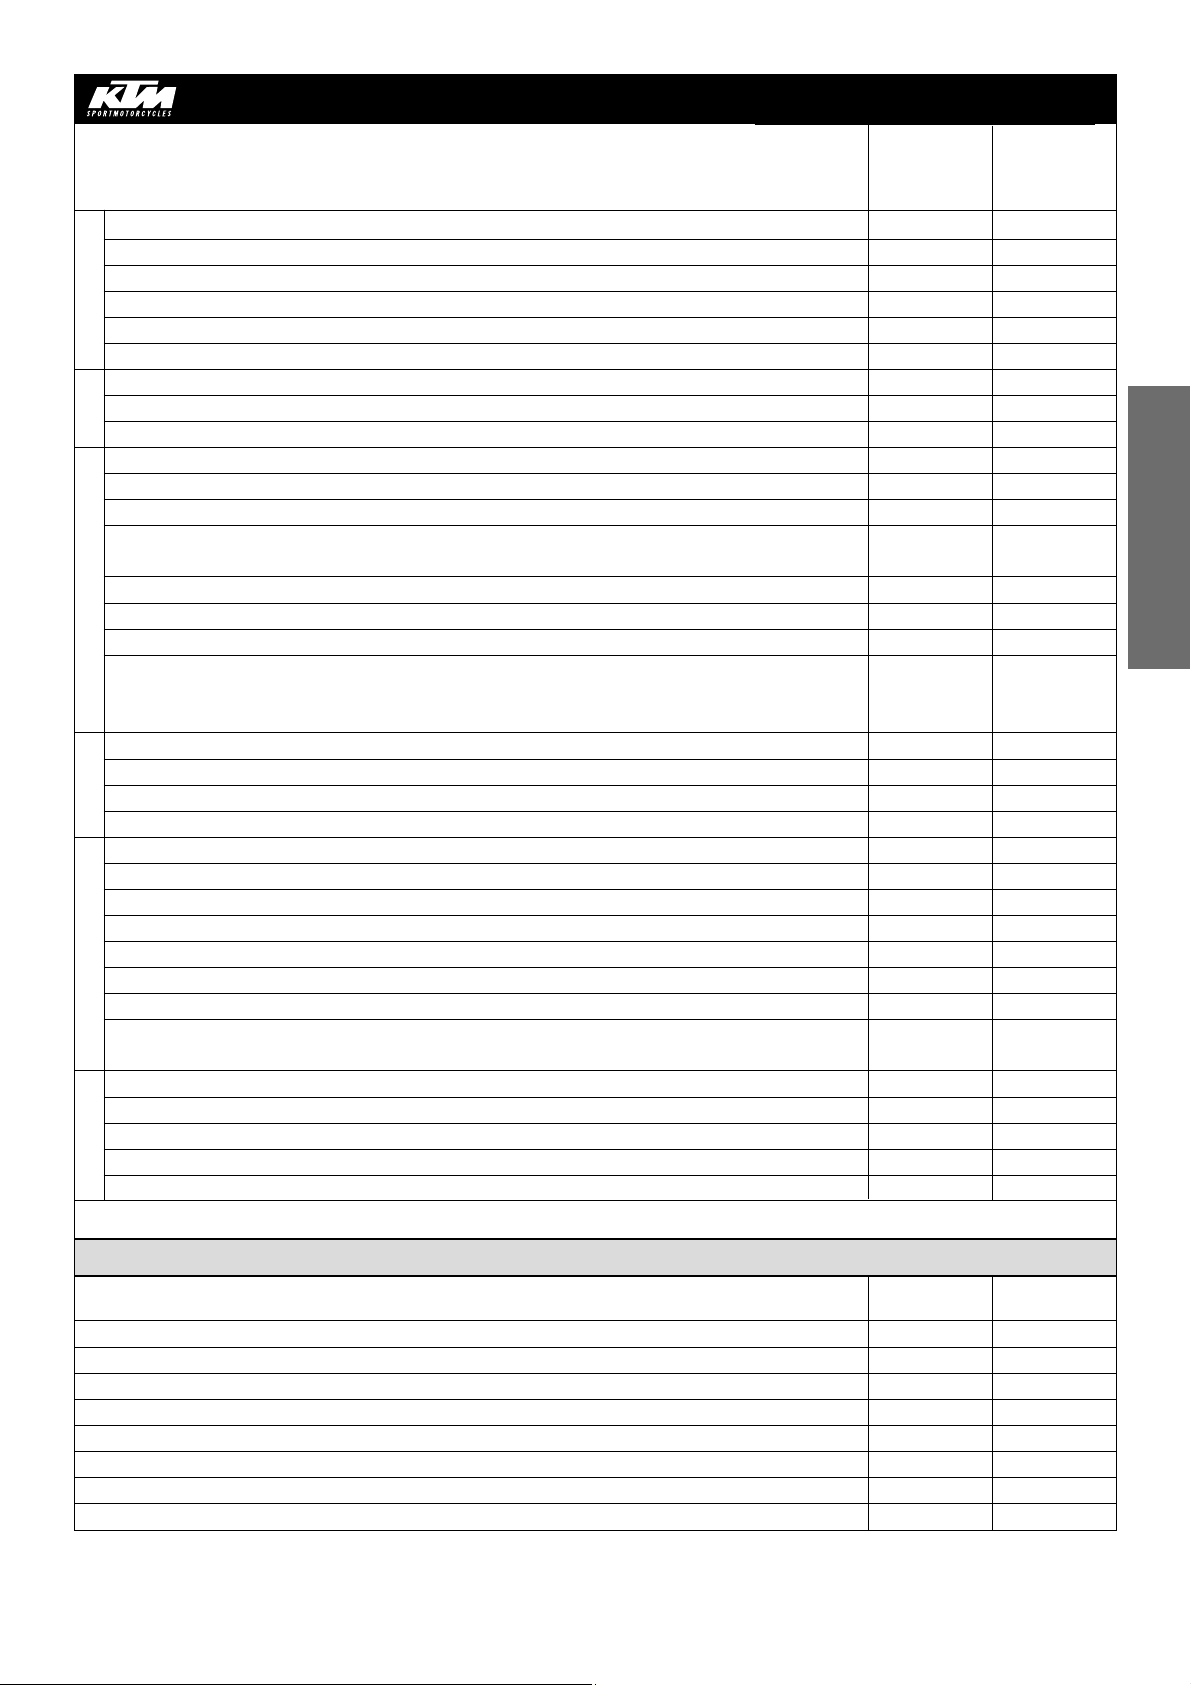
PERIODIC MAINTENANCE SCHEDULE
1. Service
after
1000 km
2. Service after
5000 km, then
every 5000 km or
once a year
IF MOTORCYCLE IS USED FOR COMPETITION 5000 KM SERVICE SHOULD BE CARRIED OUT AFTER EVERY RACE!
S
ERVICE INTERVALLS SHOULD NEVER BE EXCEED BY MOOR THAN
500
KM
.
M
AINTENANCE WORK DONE BY
KTM
AUTHORISED WORKSHOPS IS NOT A SUBSTITUTE OF CARE AND CHECKS DONE BY THE RIDER
!
A washed motorcycle can be checked more quickly which saves money!
Change engine oil, oil filter, and fine filter ●●
Clean oil screens and magnet of drain plug ●●
Check oil lines for damage and kink-less arrangement ●●
Check and adjust spark plug, replace it every 10,000 km ●
Check and adjust valve clearance ●●
Check engine fastening screws for tight fit ●●
Check carburetor connection boots for cracks and leaks ●
Check idle setting ●●
Check bleeder hoses for damage and kink-free arrangement ●●
Check cooling system for leaks, antifreeze protection ●●
Check radiator fan for proper operation ●
Check exhaust system for leaks and suspension ●●
Check actuating cables for damage, smooth operation, and kink-less arrangement, ●●
and adjust and lubricate them
Clean air filter and air filter box ●
Check cables for damage and kink-less arrangement ●
Check headlamp adjustment ●
Check electrical system for function (low/high beams, stop light, turn indicators, ●●
headlamp flasher, tell-tale lamps, speedometer illumination, horn,
side-stand switch, clutch switch, emergency-off switch)
Check brake fluid level, lining thickness, and brake discs ●●
Check brake lines for damage and leaks ●●
Check/adjust smooth operation, free travel of handbrake/footbrake levers ●●
Check screws of brake system for tight fit ●●
Check suspension strut and fork for leaks and proper operation ●●
Check O-ring of suspension strut for wear ●
Clean fork dust sleeves ●
Bleed fork legs ●●
Check swinging-fork pivot ●●
Check/adjust steering-head bearing ●●
Lubricate reversing lever ●
Check all chassis screws for tight fit (fork plates, fork leg, axle nuts/screws, ●●
swinging-fork pivot, reversing lever, suspension strut)
Check spoke tension and rim joint ●●
Check tire condition and inflation pressure ●●
Check chain, chain wheels, chain wheel guides for wear, tight fit, and tension ●●
Lubricate chain ●●
Check wheel bearings and jerk damper for play ●
IMPORTANT RECOMMENDED MAINTENANCE PROCEDURES TO BE PERFORMED BASED ON A SEPARATE SUPPLEMENTARY ORDER
Perform complete fork maintenance ●
Perform complete suspension strut maintenance ●
Perform complete reversing lever maintenance ●
Clean and lubricate steering-head bearing and sealing elements ●
Clean and adjust the carburetor ●
Treat the electrical contacts and switches with contact spray ●
Treat battery connections with contact grease ●
Change the brake fluid ●
WHEELS CHASSIS BRAKES ADD-ON-PARTS
CARBURETOR
ENGINE
400/640 LC4-E
640 LC4 Adventure
every 2 years
or 20000 km
at least
once a year
Page 17
ENGLISH
16
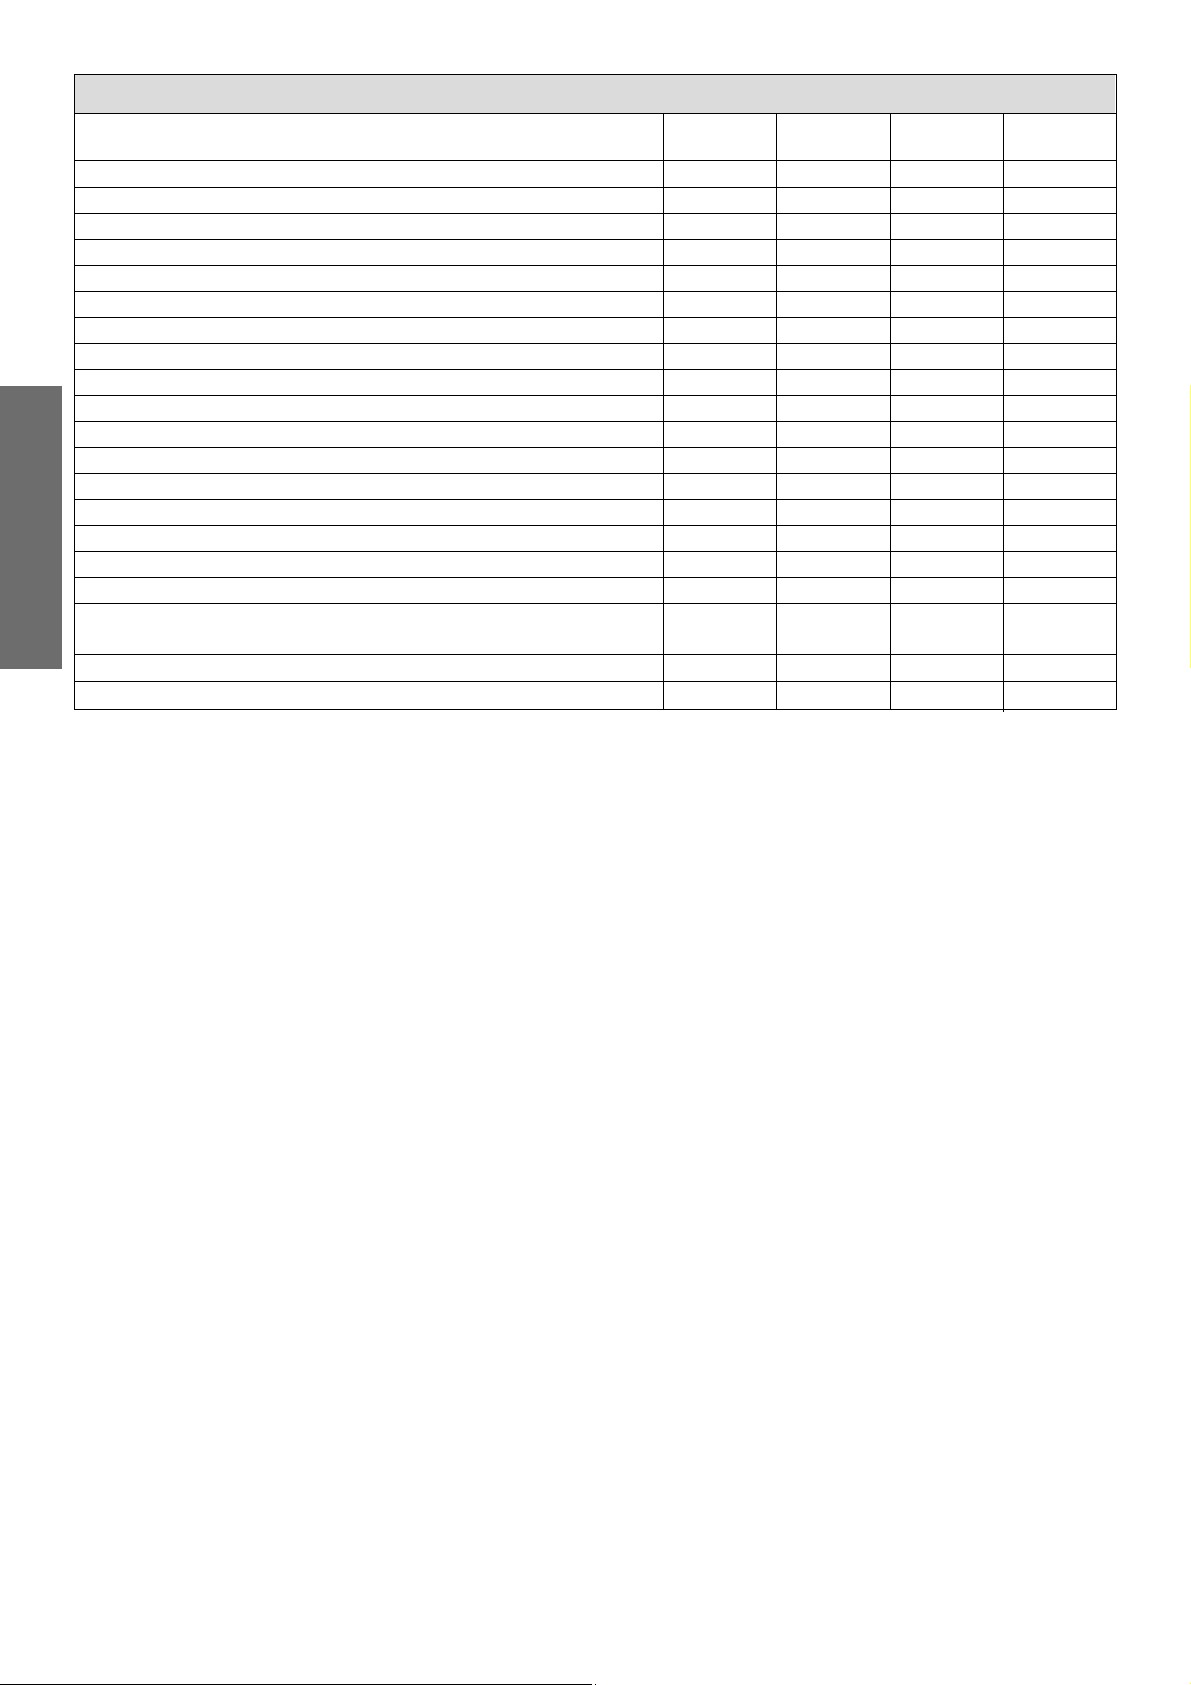
VITAL CHECKS AND CARE PROCEDURES TO BE CONDUCTED BY THE OWNER OR THE MECHANIC
Check oil level ●
Check brake fluid level ●
Check brake pads for wear ●
Check lighting system for proper operation ●
Check horn for proper operation ●
Lubricate and adjust actuating cables and nipples ●
Bleed fork legs in regular intervals ●
Remove and clean fork dust sleeves in regular intervals ●
Clean and lubricate chain as necessary ●●
Check chain tension ●●●
Clean air filter and filter box ●
Check tire pressure and wear ●
Check coolant level ●
Check fuel lines for leaks ●
Drain float chamber ●
Verify smooth operation of all controls ●
Check brake performance ●●
Treat exposed metal components (except for the braking and exhaust ●
systems) with wax-based anti-corrosion agents
Treat ignition/steering lock and light switch with contact spray ●
Check all screws, nuts, and hose clamps for their tight fit ●
once a yearfor cross
country use
after every
cleaning
before each
start
Page 18
ENGLISH
17
WARNING
ALL SERVICING AND ADJUSTMENT PROCEDURES DESIGNATED BY AN ASTERISK * REQUIRE THE KNOWLEDGE
AND SKILLS OF A PROFESSIONAL. IN THE INTEREST OF YOUR OWN SAFETY, HAVE THESE PROCEDURES CARRIED
OUT AT A KTM SERVICE STATION! AT KTM YOUR MOTORCYCLE WILL RECEIVE OPTIMAL SERVICING BY SPECIALLY TRAINED MECHANICS.
!
CAUTION
!
–W
HEN CLEANING THE MOTORCYCLE, DO NOT USE A HIGH PRESSURE CLEANING UNIT IF POSSIBLE
, OTHERWISE WATER WILL PENETRATE THE BEARINGS,
CARBURETOR, ELECTRIC CONNECTORS ETC.
–W
HEN TRANSPORTING YOUR KTM, ENSURE THAT IT IS HELD UPRIGHT WITH RESTRAINING STRAPS OR OTHER MECHANICAL FASTENING DEVICES
. IFTHE
MOTORCYCLE SHOULD FALL OVER
, FUEL CAN LEAK FROM THE CARBURETOR OR FUEL TANK
–DO NOT USE TOOTHED WASHERS OR SPRING WASHERS WITH THE ENGINE FASTENING SCREWS, AS THESE WORK INTO THE FRAME PARTS AND KEEP
WORKING LOOSE
. INSTEAD, USE SELF-
LOCKING NUTS.
–L
ET YOUR MOTORCYCLE COOL DOWN BEFORE BEGINNING ANY MAINTENANCE WORK IN ORDER TO AVOID GETTING BURNED.
–D
ISPOSE OF OIL, GREASE, FILTERS, FUELS, CLEANING AGENTS ETC. ACCORDING TO YOUR LOCAL REGULATIONS.
–U
NDER NO CIRCUMSTANCES MAY USED OIL BE DISPOSED OF IN THE SEWAGE SYSTEM OR IN THE OPEN COUNTRYSIDE. 1 LITER USED OIL CONTAMINATES
1,000.000 LITERS WATER.
–
IF YOU UNFASTEN SELF-LOCKING NUTS, YOU HAVE TO REPLACE THEM BY NEW ONES.
–
IF YOU UNFASTEN SCREWS AND NUTS SECURED BY LOCTITE, YOU HAVE TO REATTACH AND SECURE THEM IN THE SAME WAY. SEE TECHNICAL SPECIFICATI-
ONS - FASTENING TORQUES ON PAGE 39.
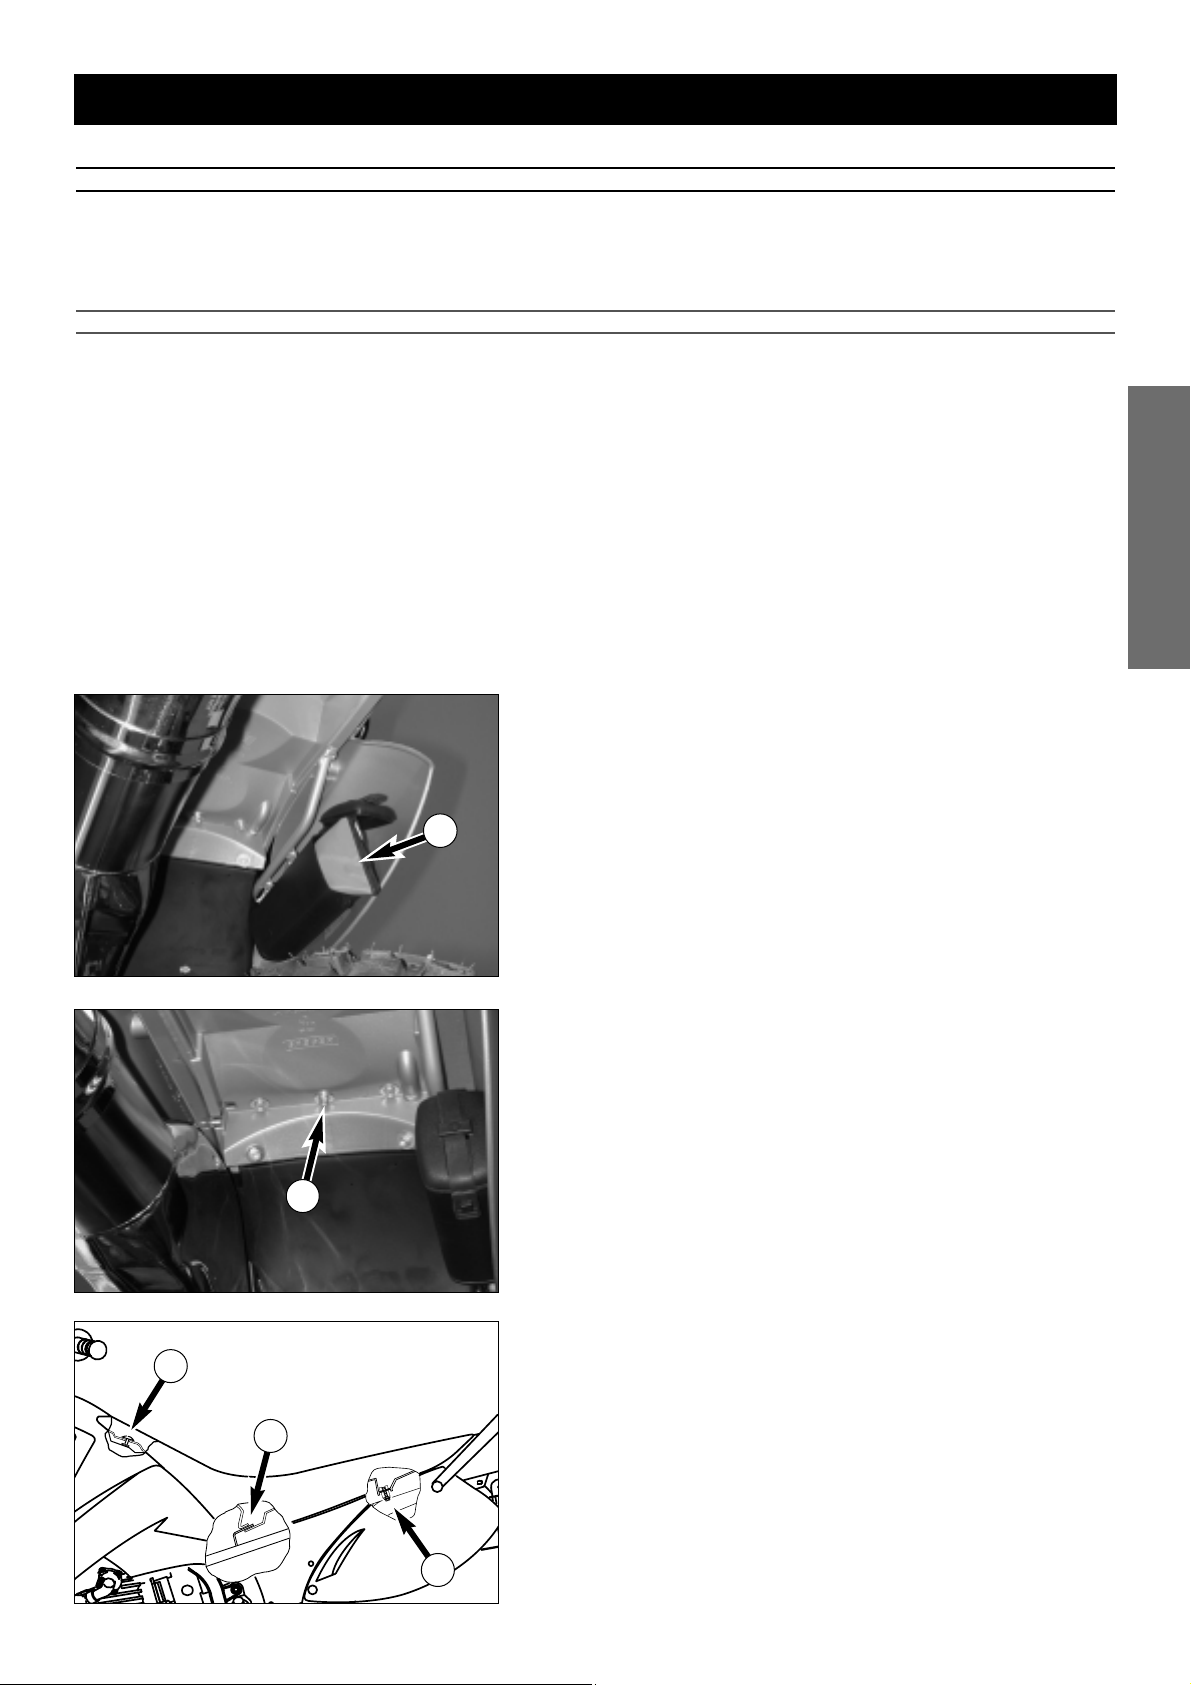
Tool set
The tool set 1 is located in the tool box under the right side cover.
Removing the seat
Remove the collar screws 2 from the underside of the fender. Lift the rear
of the seat, pull backwards, and unhook it from the oval-head screw
3.
To mount the seat hook it into the oval head screw, lower the rear part of
the seat and push the whole seat forwards. If necessary push the middle of
the seat slightly down to let the retaining bracket
4
engage with the seat.
Finally fasten the seat with the corresponding screw.
MAINTENANCE WORK ON CHASSIS AND ENGINE
1
2
2
4
3
Page 19
ENGLISH
18
Checking and adjusting steering head bearing *
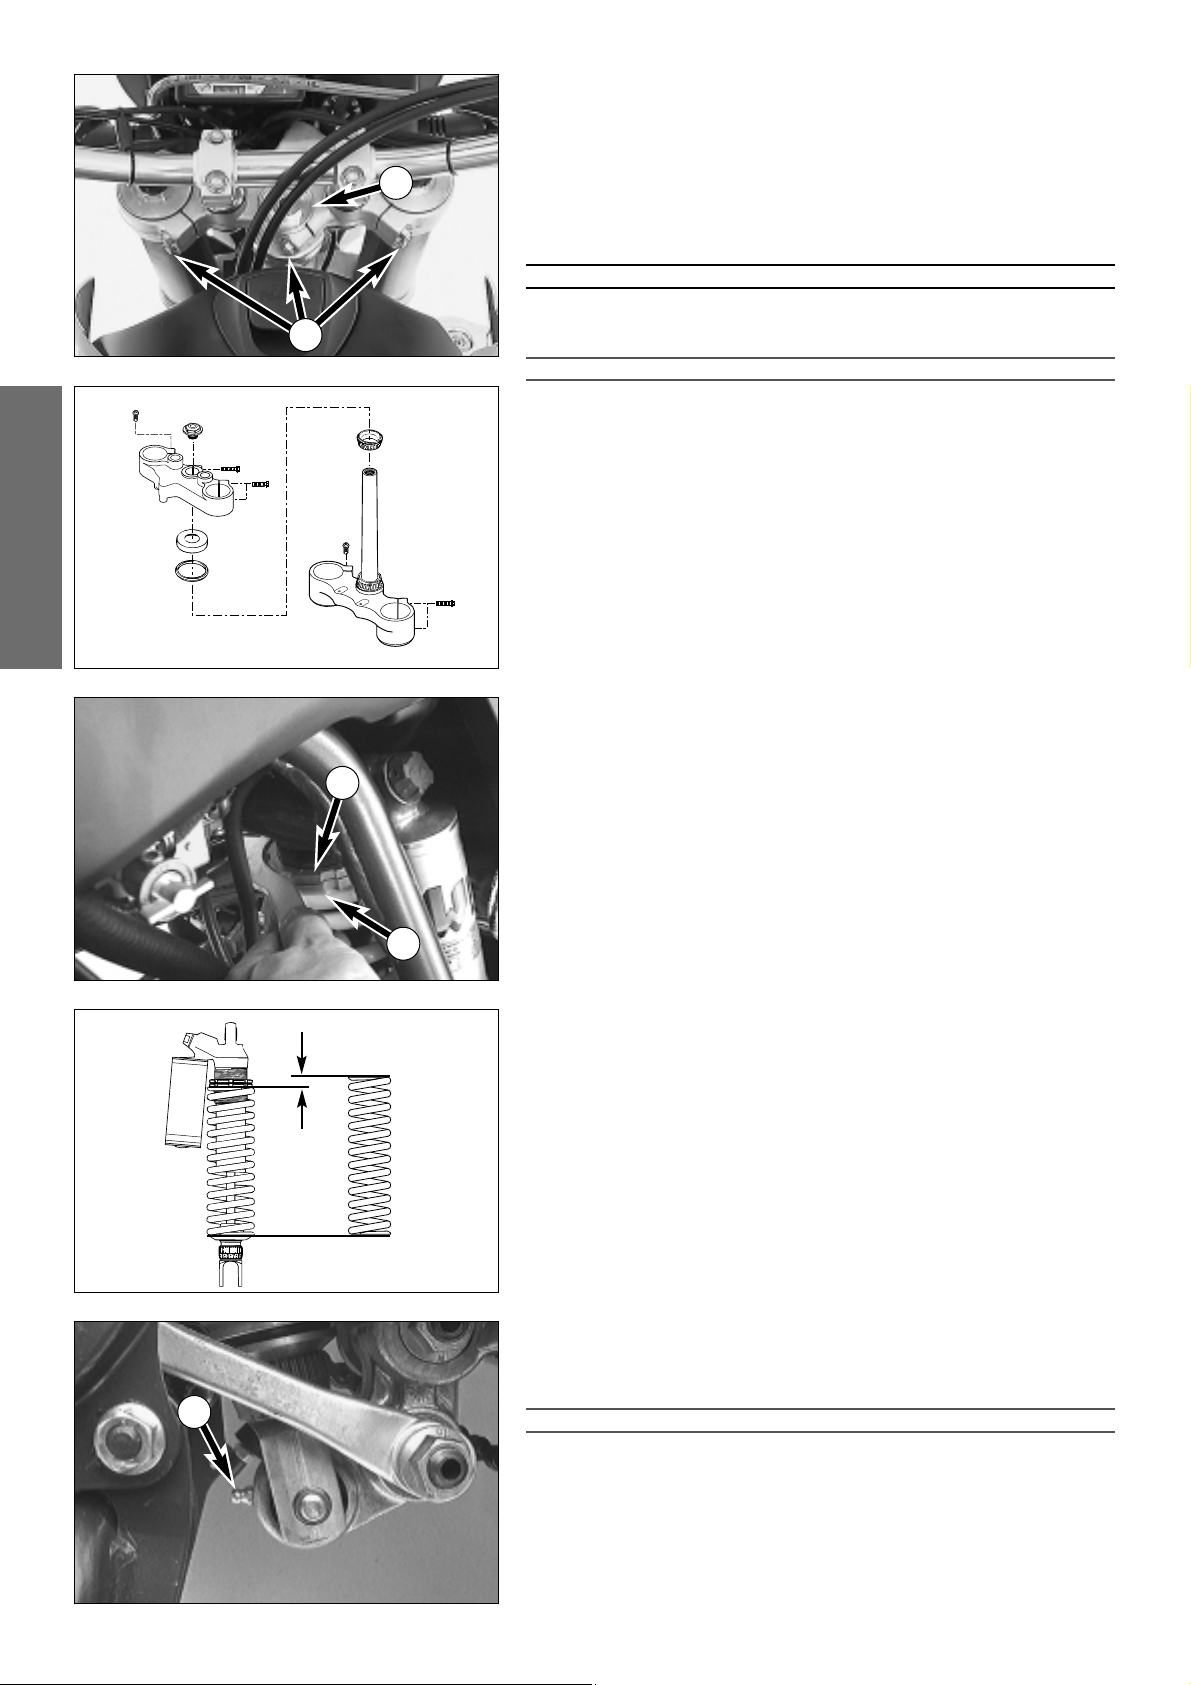
Check steering head bearing for play periodicaly. To check this put
motorcycle on a stand so that the front wheel is off the ground. Now try to
move the fork forward and backward. To adjust, loosen the five clamp
screws
1 of the top triple clamp and turn steering stem bolt clockwise 2
until there is no more play. Don’t tighten the steering stem bolt all the way,
otherwise the bearings will be damaged. With a plastic hammer, lightly rap
on the triple clamp to avoid tension. Re-tighten the five clamp screws with
15 Nm (11 ft.lb).
WARNING
IF THE STEERING HEAD BEARING IS NOT ADJUSTED TO BE FREE OF PLAY, THE MOTOR-
CYCLE WILL SHOW AN UNSTEADY DRIVING PERFORMANCE AND CAN GET OUT OF
CONTROL
.
!
CAUTION
!
I
F YOU DRIVE WITH PLAY IN THE STEERING HEAD BEARING FOR LONGER PERIODS
, FIRST
THE BEARINGS AND THEN THE BEARING SEATS IN THE FRAME WILL BE DESTROYED
.
At least once a year, the steering head bearings should be greased.
Changing the spring preload of the shock absorber
KTM sets the shock absorber for a driver only, weighing approximately 75
kg (165 lb). If you want to take a passenger with you, of if you weigh
considerably more or less than 75 kg (165 lb), you should change the spring
preload accordingly
A. This is easily done.
NOTE:
– Before changing the spring preload note down the basic setting, e.g.
how many threads are visible above the adjusting ring.
– One rotation of the adjusting ring
4 changes the spring preload by
approximately 1,75 mm (0,07 in).
Loosen the locking ring
3 with the hook wrench from the tool set. Change
the spring preload with the adjusting ring
4 and retighten the locking ring.
BASIC SETTING – SPRING PRELOAD
WP 0118V710.............A = 27mm (400/640 LC4-E)
WP 0118V720.............A = 15mm (640 LC4-E Supermoto)
Lubricating the shock absorber linkage
The bearings in the rocker arm must be greased (Shell Advance Grease) in
regular intervals. For this purpose, a grease nipple
5 is mounted on the
rocker arm.
!
CAUTION
!
A
FTER EACH TIME THE MOTORCYCLE IS WASHED, IT IS ESPECIALLY IMPORTANT TO
GREASE THE GREASE NIPPLE TO PUSH ANY WATER OUT OF THE BEARINGS
.
A
2
1
3
4
5
Page 20
ENGLISH
19
Checking rubber ring on the WP rear shock absorber
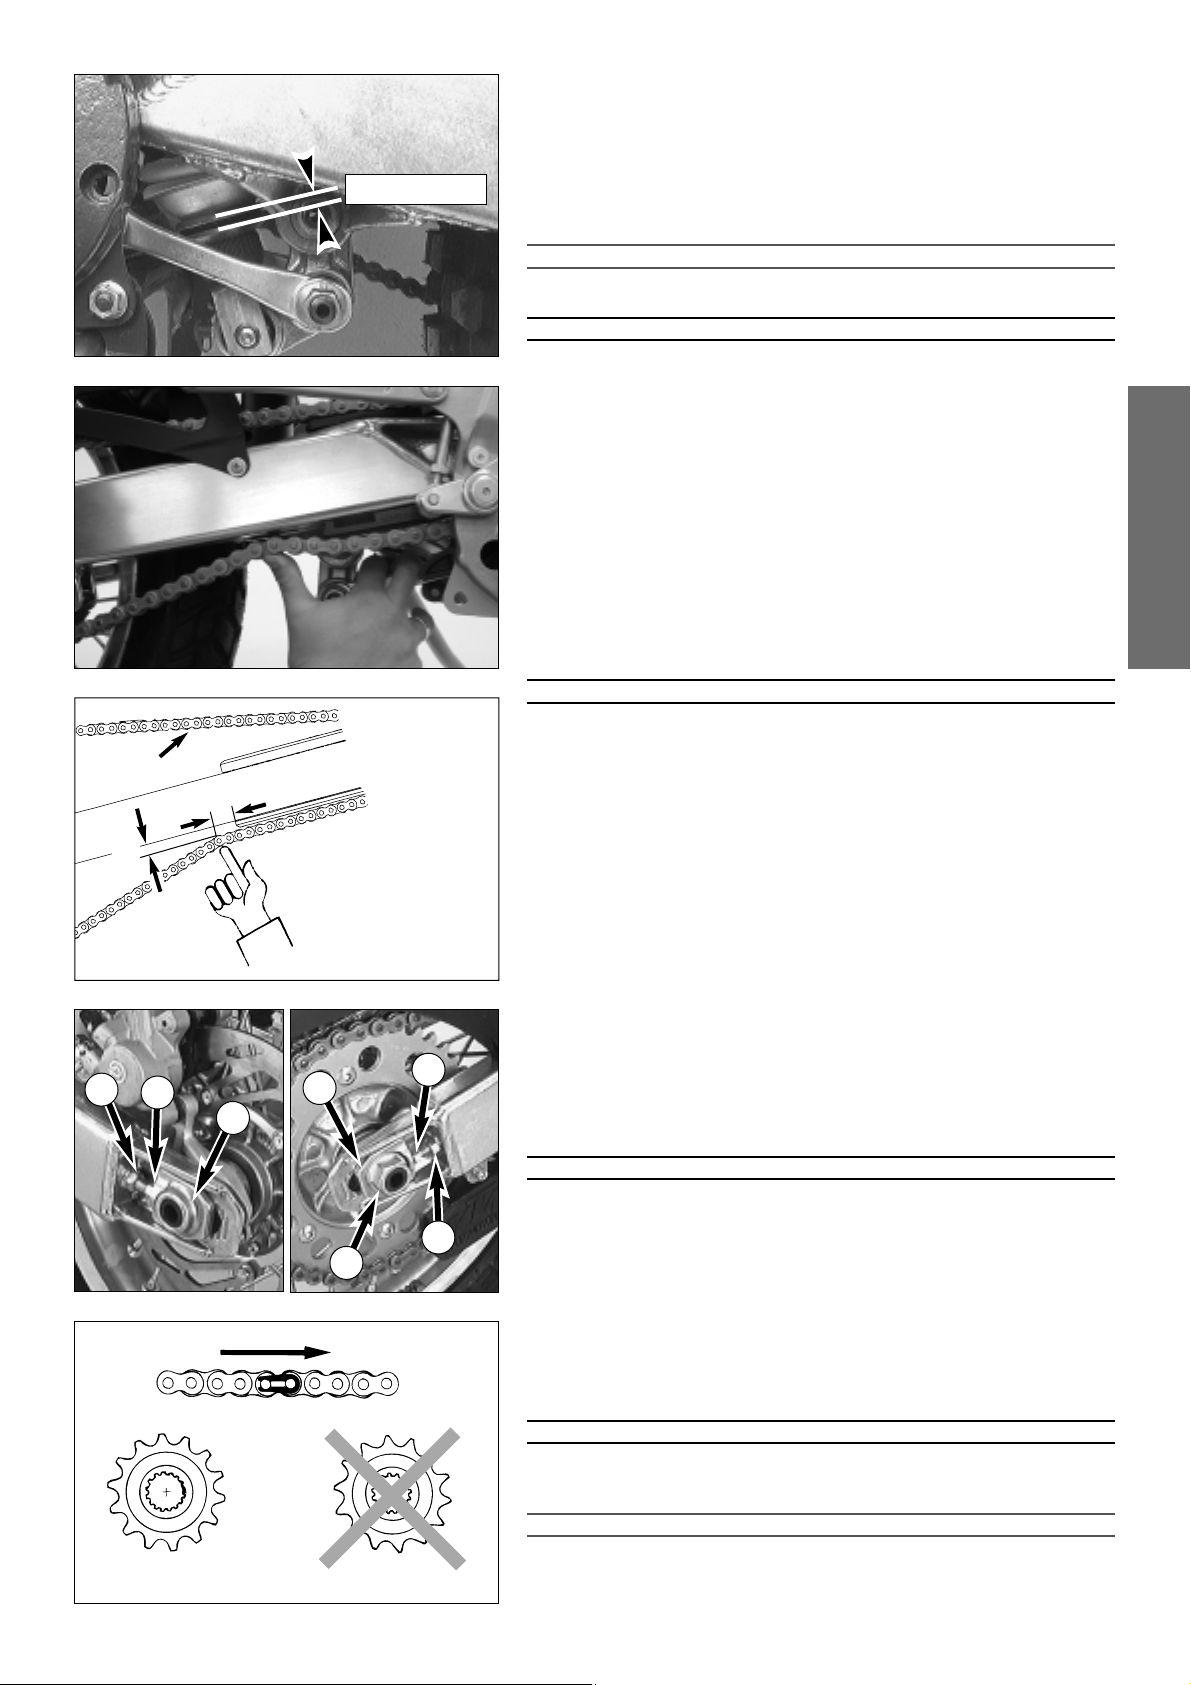
A rubber ring mounted on the rear shock absorber serves as a vibration
damper. This ring gets pressed together with time and loses its shock
absorbing quality.
Measure the distance between the two discs at various points around their
circumferences. The space should be at least 2.5 mm (0,1 in) wide. Have
the rubber ring replaced by an KTM dealer when compaction due to wear
has exceeded this lower limit.
!
CAUTION
!
N
OT REPLACING THE RUBBER RING IN TIME CAN RESULT IN DAMAGE TO THE REAR SHOCK
ABSORBER
.
WARNING
THE DAMPING UNIT OF THE SHOCK ABSORBER IS FILLED WITH HIGH COMPRESSED
NITROGEN
. N
EVER TRY TO TAKE THE SHOCK ABSORBER APART OR TO DO ANY
MAINTENANCE WORK YOURSELF
. SEVERE INJURIES COULD BE THE RESULT.
Checking chain tension
Support the motorcycle on the center stand or side stand, respectively.
Switch transmission to neutral.
Push the chain upwards appr. 30 mm (1,2 in) from the end of the chain
sliding component until the upper part of the chain is tensioned (see
illustration)
Now, the distance
A between chain and swingarm should be 0 mm. The
upper part of the chain
B must be tight (see illustration).
Correct chain tension, if necessary!
WARNING
–IF CHAIN TENSION IS TOO GREAT, PARTS WITHIN THE SECONDARY POWER TRANSMIS-
SION (CHAIN, CHAIN SPROCKETS, TRANSMISSION AND REAR WHEEL BEARINGS) WILL BE
SUBJECTED TO UNNECESSARY STRESS
, RESULTING IN PREMATURE WEAR AND EVEN
CHAIN BREAKAGE
.
–T
OO MUCH SLACK IN THE CHAIN, ON THE OTHER HAND, CAN RESULT IN THE CHAIN
JUMPING OFF THE CHAIN WHEELS
. IF THIS HAPPENS
, THE CHAIN COULD ALSO BLOCK
THE REAR WHEEL OR DAMAGE THE ENGINE
.
–I
N EITHER CASE THE OPERATOR IS LIKELY TO LOSE CONTROL OF THE MOTORCYCLE.
Correct chain tension
Loosen collar nut 1, loosen counter nuts 2, and turn right and left
adjusting screws
3
equally far. Tighten counter nuts 2.
Before tightening the wheel spindle, verify that the chain adjusters
4
are
sitting close to the adjusting screws and that the rear wheel has been
aligned with the front wheel.
Tighten collar nut
1
with 80 Nm (60 ft.lb).
WARNING
I
F YOU DON’T HAPPEN TO HAVE A TORQUE WRENCH AT HAND, MAKE SURE YOU HAVE
THE TIGHTENING TORQUE CORRECTED BY A
KTM DEALER AS SOON AS POSSIBLE. A
LOOSE AXLE MAY LEAD TO AN UNSTABLE DRIVING BEHAVIOR OF YOUR MOTORCYCLE.
Chain maintenance
For long chain life, good maintenance is very important. O-ring chains
require only modest maintenance. The best way is to use lots of water, but
never use brushes or solvents. After letting the chain dry, you can use a
special O-ring chain spray (Shell Advance Bio Chain).
WARNING
N
O LUBRICATION IS ALLOWED TO REACH THE REAR TIRE OR THE BRAKE DISK, EITHERWISE
THE ROAD ADHERENCE AND THE REAR WHEEL BRAKING EFFECTS WOULD BE STRONGLY
REDUCED AND THE MOTORCYCLE COULD EASILY GET OUT OF CONTROL
.
!
CAUTION
!
W
HEN MOUNTING THE CHAIN JOINT, THE CLOSED SIDE OF THE SAFETY DEVICE MUST
POINT IN RUNNING DIRECTION
.
Also check sprockets and chain guides for wear, and replace if necessary.
✓
A
B
15:45
16:42
A = 0 mm
17:42
30mm
3
4
2
1
4
3
2
min. 2,5 mm
Page 21
ENGLISH
20
Chain wear
In order to check the chain wear, regard the following instructions:
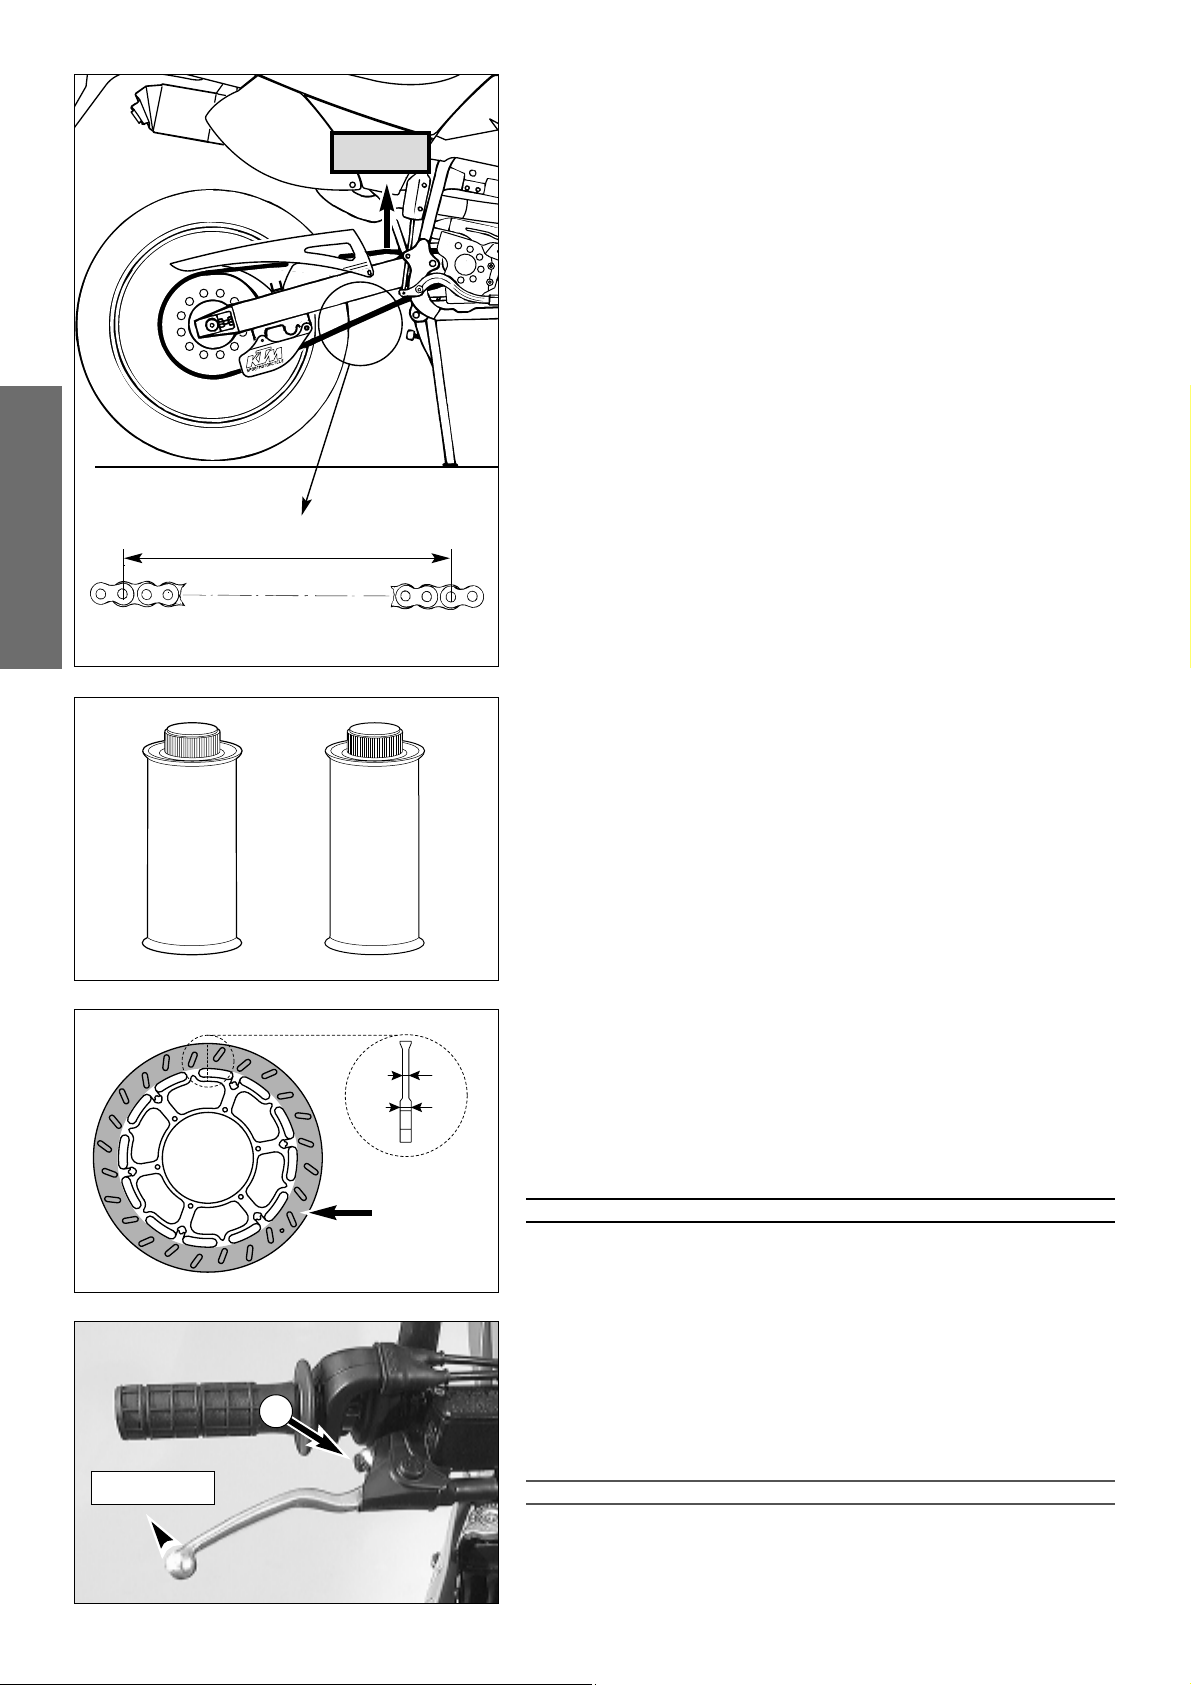
Shift the gear into idling and pull the upper chain strand with approx. 10-15
kilogramm (33 lb) upwards (see figure). Now one can measure a space of
18 chain reels at the lower chain strand. The chain should be replaced at the
latest when a space of 272 mm (10,70 in) is measured. Chains do not
always wear off evenly, therefore repeat the measurement at different
places on the chain.
NOTE:
If you mount a new chain, the sprockets should also be replaced. New
chains wear faster if used on old used sprockets.
General informations about KTM disc brakes
BRAKE CALIPERS:
The brake calipers of this series “float“. This means that the brake calipers
are not solidly attached to the caliper support. Thus, the brake pads are
always in optimum contact with the brake disc.
BRAKE PADS:
The motorcycles are delivered with organic brake pads and have also been
type-coded with these pads. Said pads are suitable for almost the entire
range of application of these motorcycles.
It is only for competitive racing in extremely dirty conditions (e.g., water in
combination with sand and mud) that we recommend brake pads that have
sintered linings. However, take notice of the fact that brake pads with sintered linings have not been type-coded! Besides, they may cause greater wear
on the brake discs.
BRAKE FLUID RESERVOIRS:
The brake fluid reservoirs on the front and rear wheel brakes have been
designed in such a way that even if the brake pads are worn it is not
necessary to top up the brake fluid. If the brake fluid level drops below the
minimum either the brake system has a leak or the brake pads are
completely worn down.
In this case, consult an authorized KTM dealer immediately.
BRAKE FLUID:
KTM fills the brake systems with Shell Advance Brake DOT 5.1 brake fluid,
one of the best brake fluids that is currently available. We recommend that
you continue to use it. DOT 5.1 brake fluid is based on glycol ether and of
an amber color. If you do not have any DOT 5.1 for refilling, you may use
DOT 4 brake fluid. However, you should replace it as soon as possible
by DOT 5.1.
Never use DOT 5 braking fluid. It is based on silicone oil and has a purple
color. Gaskets and brake hoses are not compatible with it.
BRAKE DISCS:
Wear reduces the thickness of the brake disc in the area of contact
1 with
the brake pads. At its thinnest spot
A, the brake disc must not be more
than 0.4mm thinner than its nominal dimension
B. The nominal dimension
can be gaged in a location beyond the area of contact with the brake pads.
Check wear in several spots.
WARNING
–BRAKE DISCS SUFFERING FROM WEAR GREATER THAN 0.4 MM CONSTITUTE A SAFETY
HAZARD
. HAVE THE BRAKE DISC REPLACED IMMEDIATELY AS SOON AS IT REACHES ITS
WEAR LIMIT
.
–A
S A MATTER OF PRINCIPLE, HAVE ANY REPAIR OF THE BRAKE SYSTEM CARRIED OUT
BY A LICENSED
KTM MECHANIC.
Adjusting of free travel at the hand brake lever
Free travel at the hand brake lever may be readjusted by using adjusting
screw
2. In this way, the position of the point of pressure (i.e., the
resistance you feel on the hand brake lever when the brake pads are
pressed against the brake disc) can be adjusted for any hand size.
!
CAUTION
!
A
T THE HAND BRAKE LEVER, FREE TRAVEL MUST AT LEAST BE 3 MM. ONLY THEN MAY
THE PISTON IN THE HAND BRAKE CYLINDER BE MOVED
(TO BE RECOGNIZED BY THE GREA-
TER RESISTANCE OF THE HAND BRAKE LEVER
). IF THIS FREE TRAVEL IS NOT PROVIDED,
PRESSURE WILL BUILD UP IN THE BRAKING SYSTEM, AND THE FRONT WHEEL BRAKE MAY
FAIL DUE TO OVERHEATING
.
15 KG
max. 272 mm
1 2 3
16 17 18
DOT
5.1
DOT
5
✓
✕
min. 3 mm
2
A
B
1
Page 22
ENGLISH
21
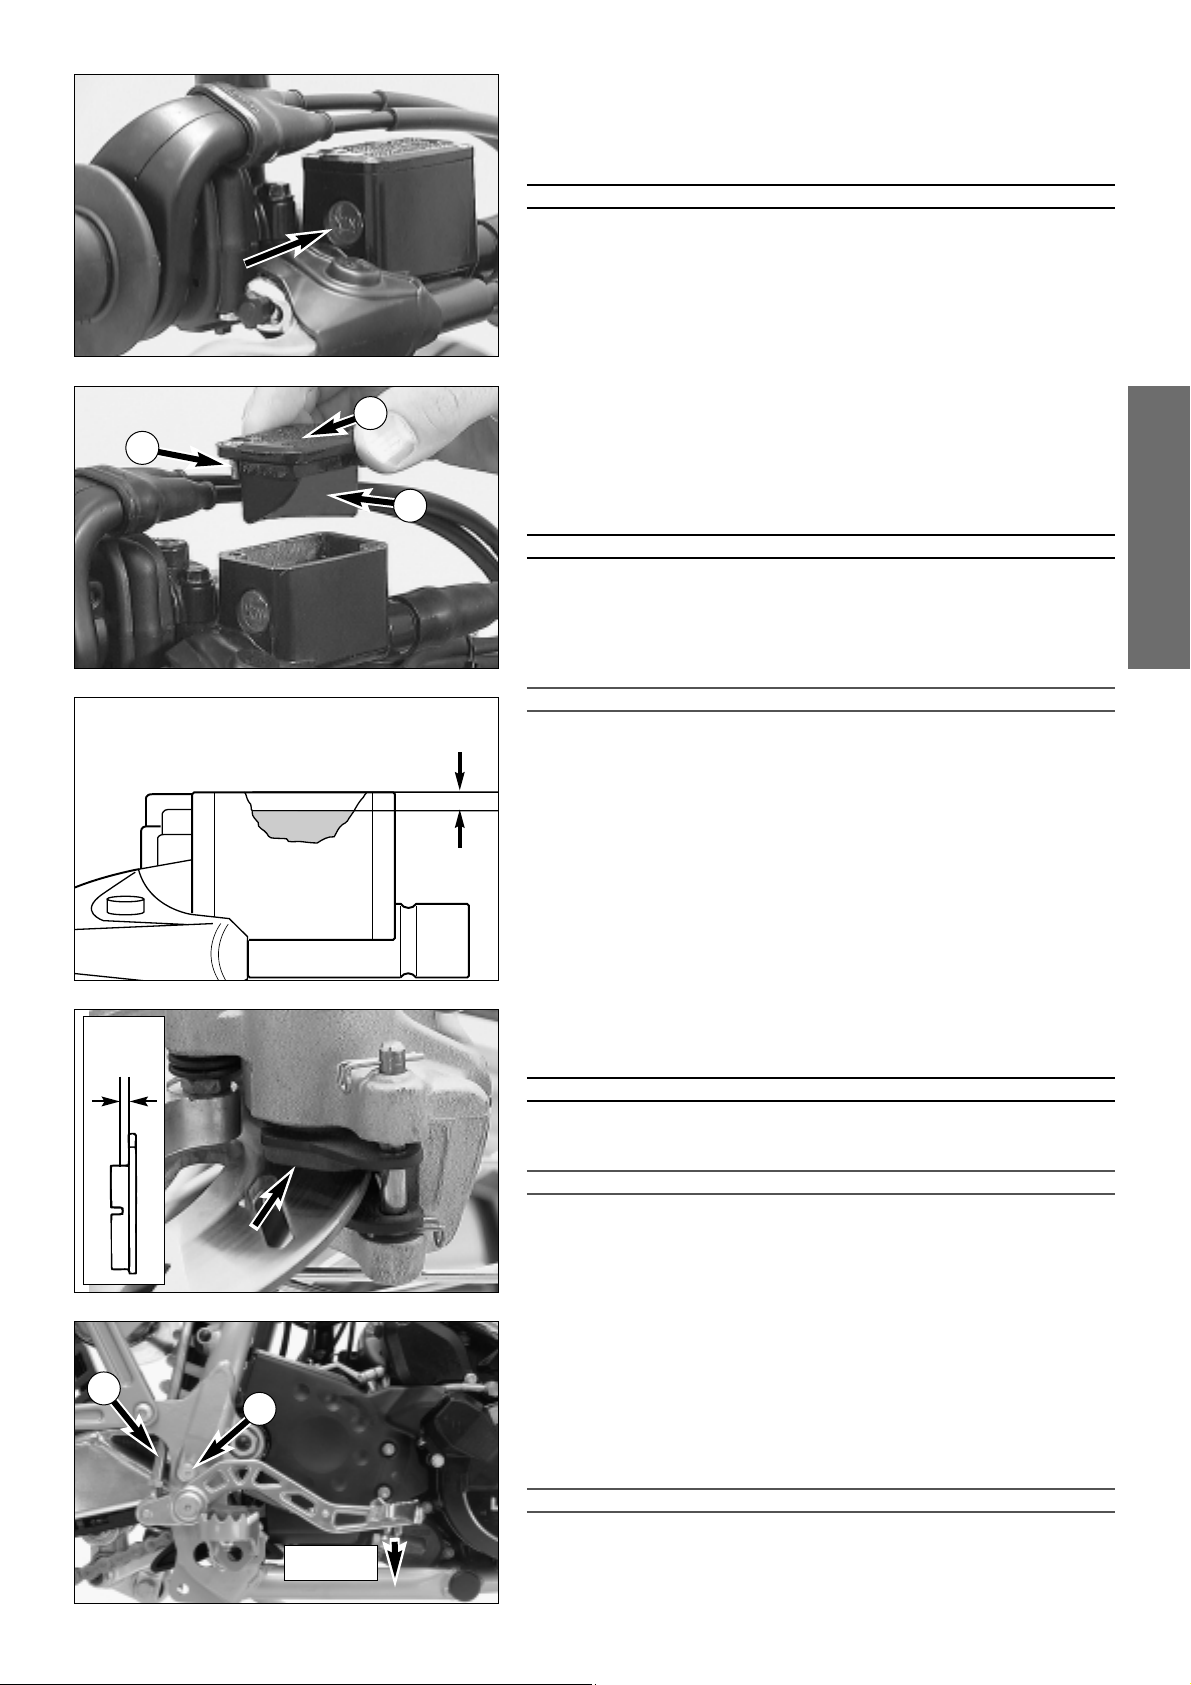
Checking of brake fluid level - front brake
The brake fluid reservoir is linked with the hand brake cylinder at the
handlebar and the reservoir is provided with an inspection glass. With the
reservoir in a horizontal position, the brake fluid level should not go below
middle of the glass.
WARNING
IF THE BRAKE FLUID LEVEL DROPS BELOW THE MINIMUM EITHER THE BRAKE SYSTEM HAS A
LEAK OR THE BRAKE PADS ARE COMPLETELY WORN DOWN
. IN THIS CASE, CONSULT AN
AUTHORIZED
KTM DEALER IMMEDIATELY.
Refilling the front brake fluid reservoir*
Loosen screws 1 and remove lid 2 and membrane 3.
If necessary, dismount the mirror and loosen the throttle grip.
Place hand brake cylinder in a horizontal position and fill the brake fluid
reservoir to 5 mm (0,2 in) below the rim with brake fluid DOT 5.1 (Shell
Advance Brake DOT 5.1). Replace membrane and lid, tighten screws. Rinse
off spilled or overflowing brake fluid with water.
WARNING
–NEVER USE DOT5 BRAKE FLUID! IT IS BASED ON SILICONE OIL AND OF A PURPLE
COLOR
. S
EALS AND BRAKE HOSES MUST BE ESPECIALLY ADAPTED TO IT
.
–S
TORE BRAKE FLUID OUT OF REACH OF CHILDREN.
–B
RAKE FLUID CAN CAUSE SKIN IRRITATION. AVOID CONTACT WITH SKIN AND EYES. IF
YOU GET BRAKE FLUID IN YOUR EYES
, RINSE WITH PLENTY OF WATER AND CONSULT
A DOCTOR
.
!
CAUTION
!
–D
ON’T LET BRAKE FLUID GET IN CONTACT WITH PAINT, IT IS AN EFFECTIVE PAINT
REMOVER
.
–USE ONLY CLEAN BRAKE FLUID TAKEN FROM A TIGHTLY SEALED CONTAINER.
Checking the front brake pads
The brake pads can be inspected from below. The linings must be at least
1 mm (0,04 in) thick.
WARNING
A
T THEIR MOST WORN POINT BRAKE PAD LININGS SHOULD NOT BE THINNER THAN
1 MM, OTHERWISE THEY COULD LEAD TO BRAKE FAILURE. FOR YOUR OWN SAFETY
DON
’T PUT OFF HAVING YOUR BRAKE PADS CHANGED.
!
CAUTION
!
I
F THE BRAKE PADS ARE REPLACED TOO LATE SO THAT THE LINING IS PARTLY OR ENTIRELY
WORN AWAY
, THE STEEL COMPONENTS OF THE BRAKE PAD WILL RUB AGAINST THE BRAKE
DISC
, IMPAIRING THE BRAKING EFFECT AND DESTROYING THE BRAKE DISC.
Changing the basic position of the foot brake pedal*
The basic position of the foot brake pedal can be altered by turning the stop
roller
4
. The free play at the foot brake pedal must then be adjusted by
means of the piston rod
5
.
Measured on the outside, the foot brake pedal must have 3-5 mm
(0,12–0,20 in) of free play, before the piston rod can move the piston in the
brake cylinder (to be recognised from the resistance on the foot
brake pedal).
!
CAUTION
!
I
F THIS FREE PLAY IS NOT PRESENT, THEN PRESSURE CAN BUILD UP IN THE BRAKE SYSTEM
WHEN DRIVING
, CAUSING CONSTANT FRICTION OF THE BRAKE PADS.THE BRAKING SYSTEM
OVERHEATS AND CAN FAIL COMPLETELY IN EXTREME CASES
.
3-5mm
5 mm
min.
1 mm
1
2
3
4
5
Page 23
ENGLISH
22
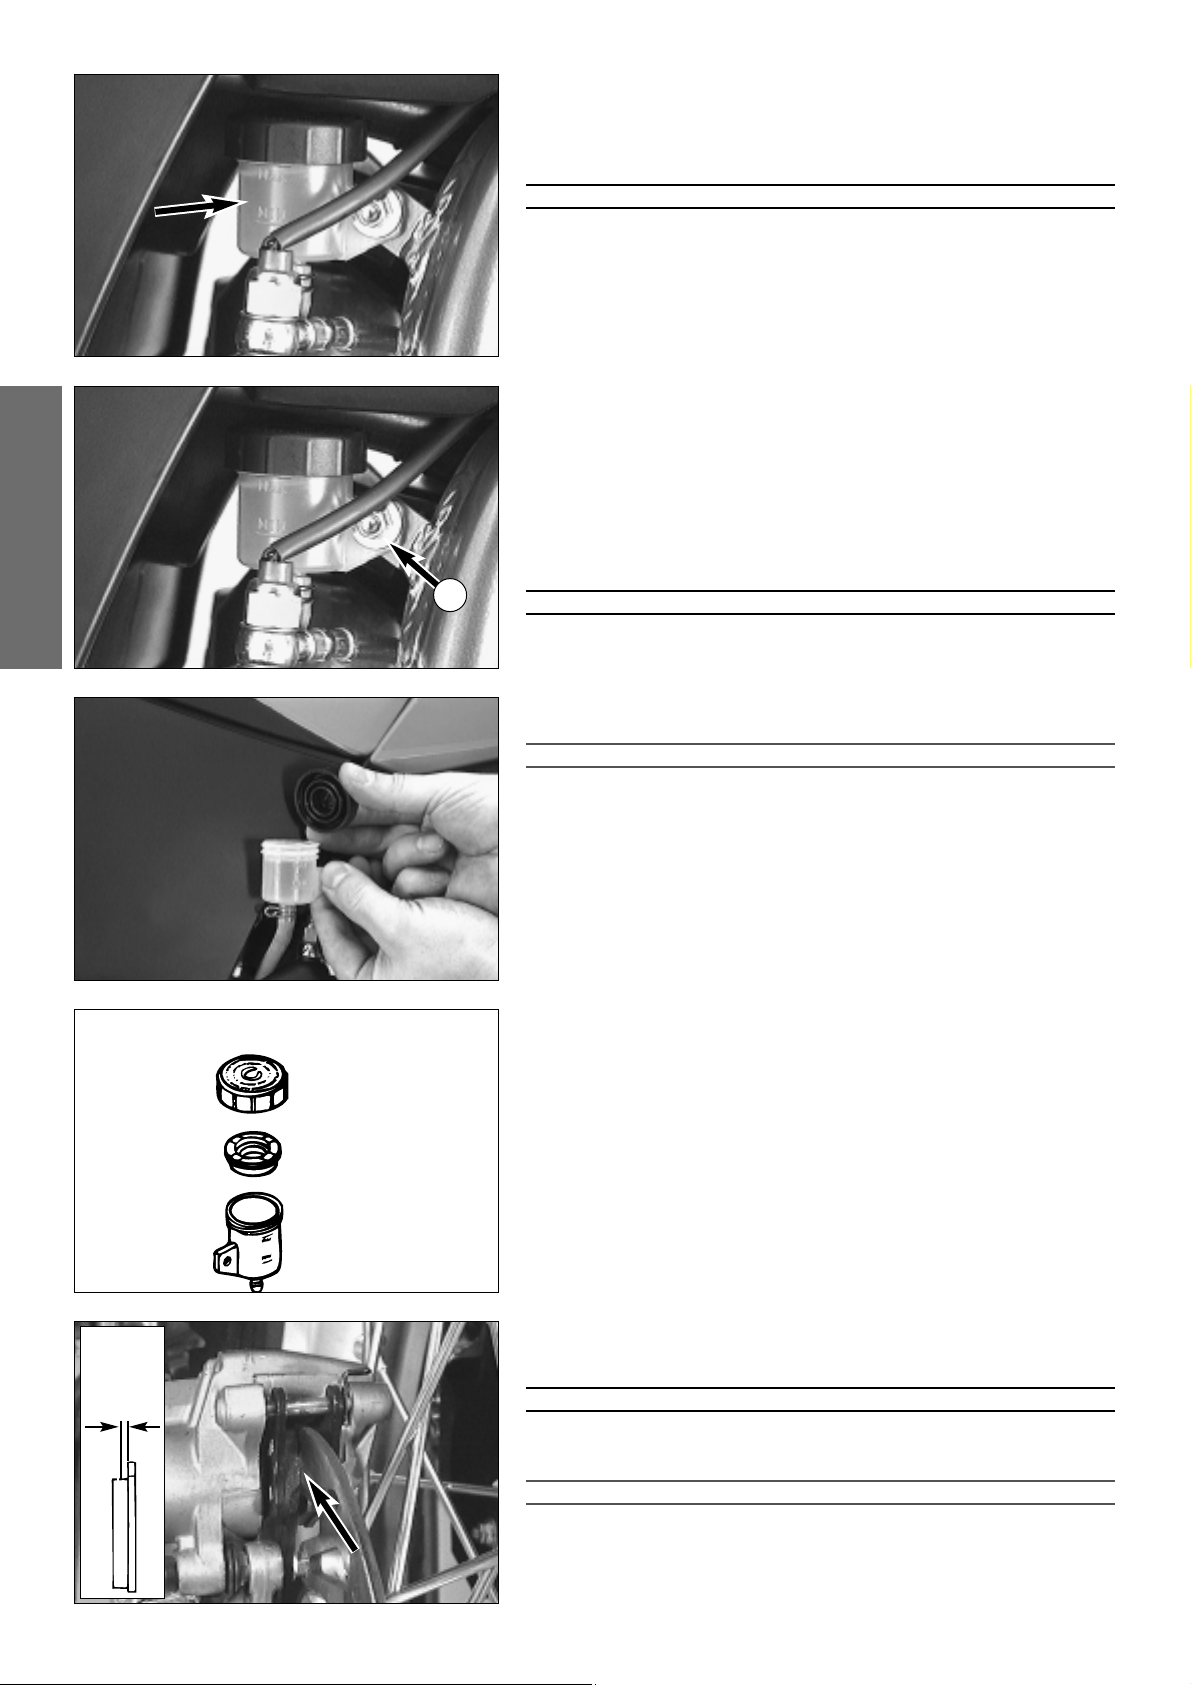
Checking rear brake fluid level
The reservoir for the rear disc brake is located on the left-hand side of the
vehicle next to the carburetor carburetor connection boot. The brake fluid
level may not drop below the „MlN” marking when the vehicle is in an
upright position.
WARNING
I
F THE BRAKE FLUID LEVEL DROPS BELOW THE MINIMUM EITHER THE BRAKE SYSTEM HAS A
LEAK OR THE BRAKE PADS ARE COMPLETELY WORN DOWN
. IN THIS CASE, CONSULT AN
AUTHORIZED
KTM DEALER IMMEDIATELY.
Refilling the rear brake fluid reservoir*
When the brake fluid level has dropped to the MIN mark, you need to refill
the brake fluid reservoir.
For easier access to the brake fluid reservoir it is recommended to remove
the hexagon screw
1
. Then move the container outwards as indicated in
the illustration. Remove plug
2
with rubber boot 3and add brake fluid
DOT 5.1 (Shell Advance Brake DOT 5.1) up to the „MAX“ mark. Replace
rubber boot and plug. Overflown or spilled brake liquid must be rinsed off
with water. Mount the screw and fix the brake fluid reservoir to the frame,
always making sure to prevent kinks in the connecting hose.
WARNING
–NEVER USE DOT5 BRAKE FLUID! IT IS BASED ON SILICONE OIL AND OF A PURPLE
COLOR
. SEALS AND BRAKE HOSES MUST BE ESPECIALLY ADAPTED TO IT.
–S
TORE BRAKE FLUID OUT OF REACH OF CHILDREN.
–BRAKE FLUID CAN CAUSE SKIN IRRITATION. AVOID CONTACT WITH SKIN AND EYES. IF
YOU GET BRAKE FLUID IN YOUR EYES
, RINSE WITH PLENTY OF WATER AND CONSULT
A DOCTOR
!
CAUTION
!
–D
ON’T LET BRAKE FLUID GET IN CONTACT WITH PAINT, IT IS AN EFFECTIVE PAINT
REMOVER
.
–USE ONLY CLEAN BRAKE FLUID TAKEN FROM A TIGHTLY SEALED CONTAINER
.
Checking the rear brake pads
The brake pads can be inspected from the rear. The thickness of the linings
may not be less than 1 mm (0.04 in).
WARNING
AT THEIR MOST WORN POINT BRAKE PAD LININGS SHOULD NOT BE THINNER THAN
1 MM, OTHERWISE THEY COULD LEAD TO BRAKE FAILURE. FOR YOUR OWN SAFETY
DON
’T PUT OFF HAVING YOUR BRAKE PADS CHANGED.
!
CAUTION
!
I
F THE BRAKE PADS ARE REPLACED TOO LATE SO THAT THE LINING IS PARTLY OR ENTIRELY
WORN AWAY
, THE STEEL COMPONENTS OF THE BRAKE PAD WILL RUB AGAINST THE BRAKE
DISC
, IMPARING THE BRAKING EFFECT AND DESTROYING THE BRAKE DISC.
min.
1 mm
1
2
3
Page 24
ENGLISH
23
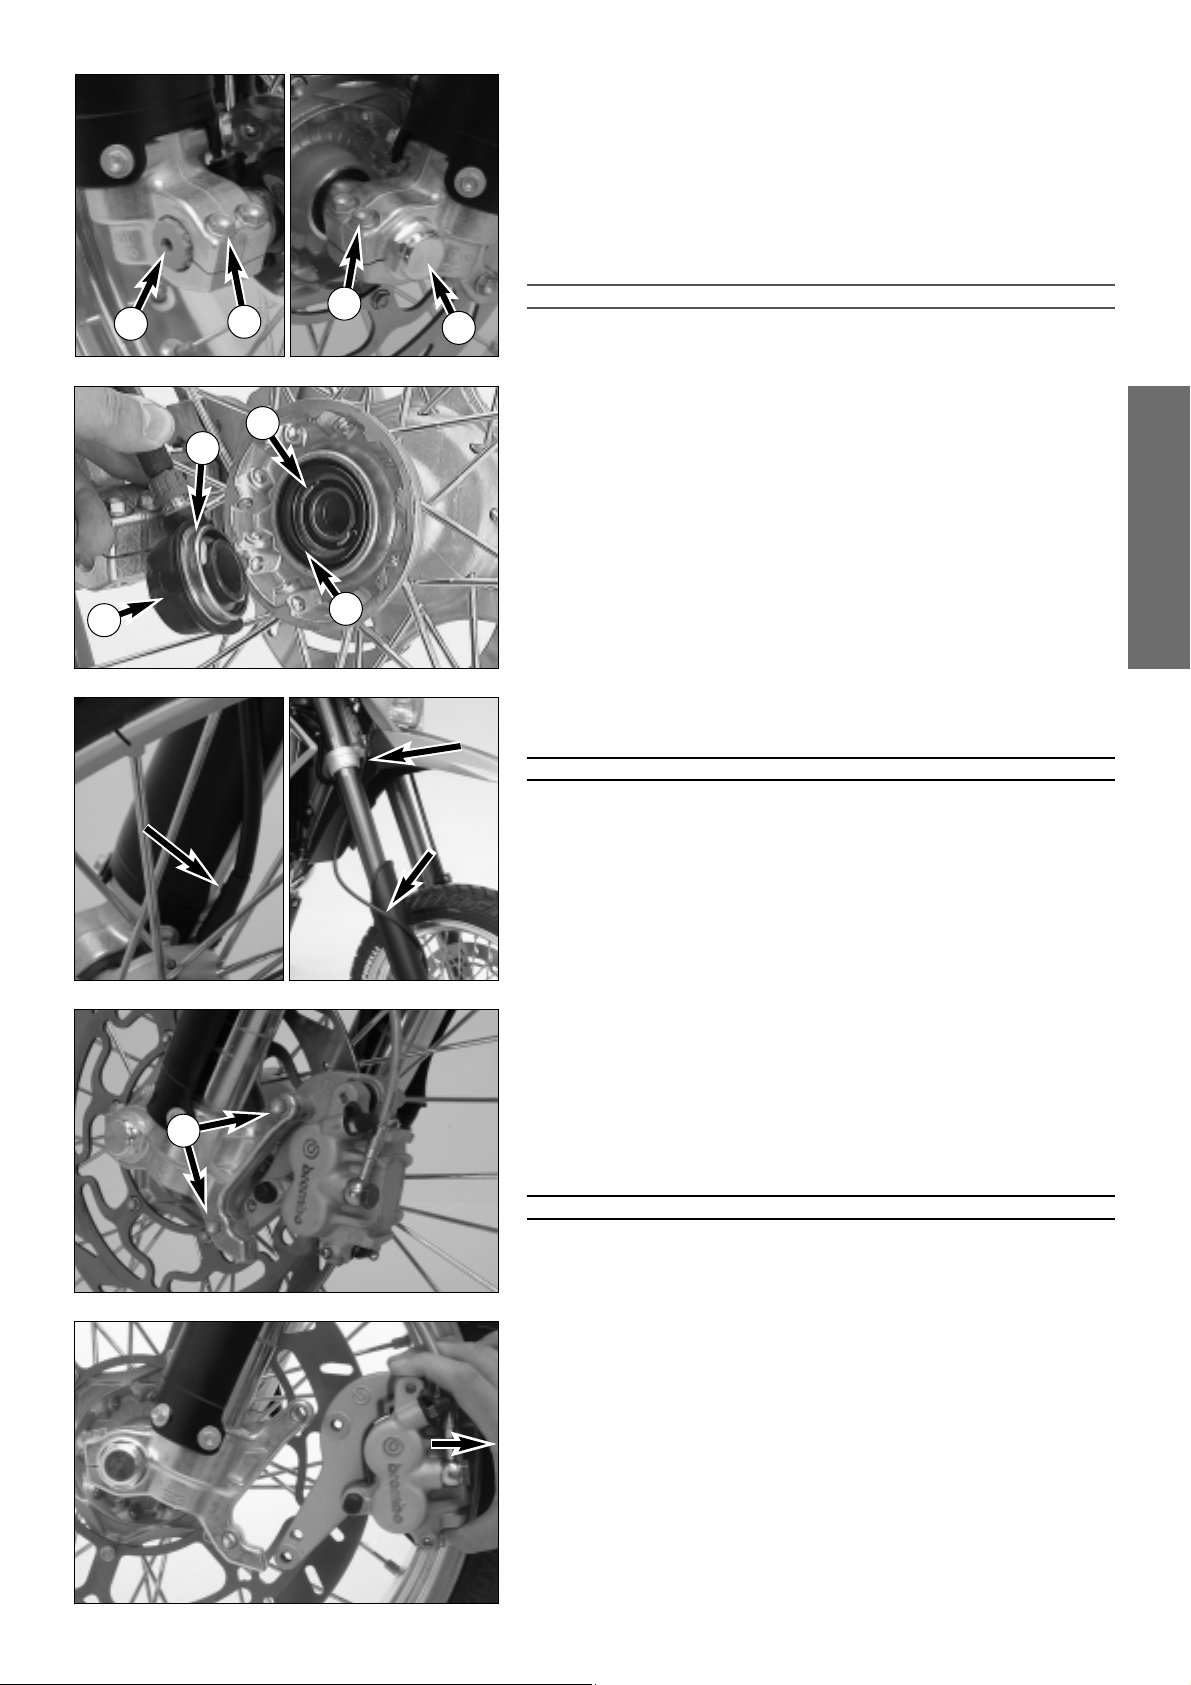
Dismounting and mounting the front wheel (400/640 LC4-E)
To remove the front wheel, jack the motorcycle up on its frame so that the
front wheel no longer touches the ground.
Loosen both clamp screws
2 on the left fork leg. Then loosen the collar
nuts
1 before loosening the clamp screws 2 on the right fork leg.
Hold the front wheel and withdraw the wheel spindle
3.
Note: The wheel spindle can be withdrawn more easily by turning it moderately with a 6 mm ALLAN/IMBUS key while pulling.
Remove front wheel carefully from the fork and take the speedometer drive
4 off the hub.
!
CAUTION
!
D
O NOT OPERATE THE HAND BRAKE WHEN THE FRONT WHEEL HAS BEEN DISMOUNTED.
A
LWAYS PLACE THE WHEEL ON THE GROUND WITH THE BRAKE DISC POINTING UPWARDS.
O
THERWISE THE BRAKE DISC MAY BE DAMAGED
.
Prior to mounting the front wheel, clean and grease sealing ring
5 and run-
ning surface
6 at the speedometer drive.
To mount the front wheel, lift it into the fork. Insert speedometer drive into
the hub. Make sure that the driving tabs
7 engage with the slots of the
drive.
Position front wheel and speedometer drive, and mount wheel spindle.
The speedometer shaft must be placed as running along the outsideof the
fork guard and pass the triple clamp in front between fender and fork leg.
Screw on the collar nuts
1 without tightening them. Make sure that the
speedometer drive runs upwards and parallel to the fork leg (see below).
Tighten the clamp screws
2on the right fork leg so as to prevent the wheel
spindle from twisting, and then tighten the collar nuts with 40 Nm.
Loosen the clamp screws on the right fork leg. Take the motorcycle down
from its stand. Press the front wheel brakes and push down on the fork a
few times vigorously so that the fork legs come into alignment.
Only after this has been accomplished, tighten the clamp screws on both
fork legs with 10 Nm(7 ft. lbs).
WARNING
–IF YOU DON’T HAPPEN TO HAVE A TORQUE WRENCH AT HAND, MAKE SURE YOU
HAVE THE TIGHTENING TORQUE CORRECTED BY A
KTM DEALER AS SOON AS
POSSIBLE
. A LOOSE AXLE MAY LEAD TO AN UNSTABLE DRIVING BEHAVIOR OF YOUR
MOTORCYCLE
.
–A
FTER MOUNTING THE FRONT WHEEL, KEEP OPERATING THE HAND BRAKE UNTIL THE
PRESSURE POINT RETURNS
.
–IT IS VERY IMPORTANT TO KEEP THE BRAKE DISK FREE FROM OIL AND FATTY MATTERS
,
EITHERWISE THE BRAKING EFFECTS WOULD BE STRONGLY REDUCED.
Dismounting and mounting the front wheel (Supermoto)
The front wheel of the Supermoto is essentially removed in the same manner as the front wheel of the LC4-E. However, the brake caliper has first to
be removed. To remove the front brake caliper, remove both screws
8 and
pull the caliper backwards from the brake disc.
After mounting the front wheel, slide the brake caliper to the brake disc.
Remove the grease from the threads of both screws
8 and apply Loctite
243. Tighten the screws with 25 Nm(19 ft. lbs).
WARNING
–T
HE SCREWS 8 MUST BE SECURED WITH LOCTITE 243.
1
2
2
3
8
5
4
7
6
Page 25
ENGLISH
24
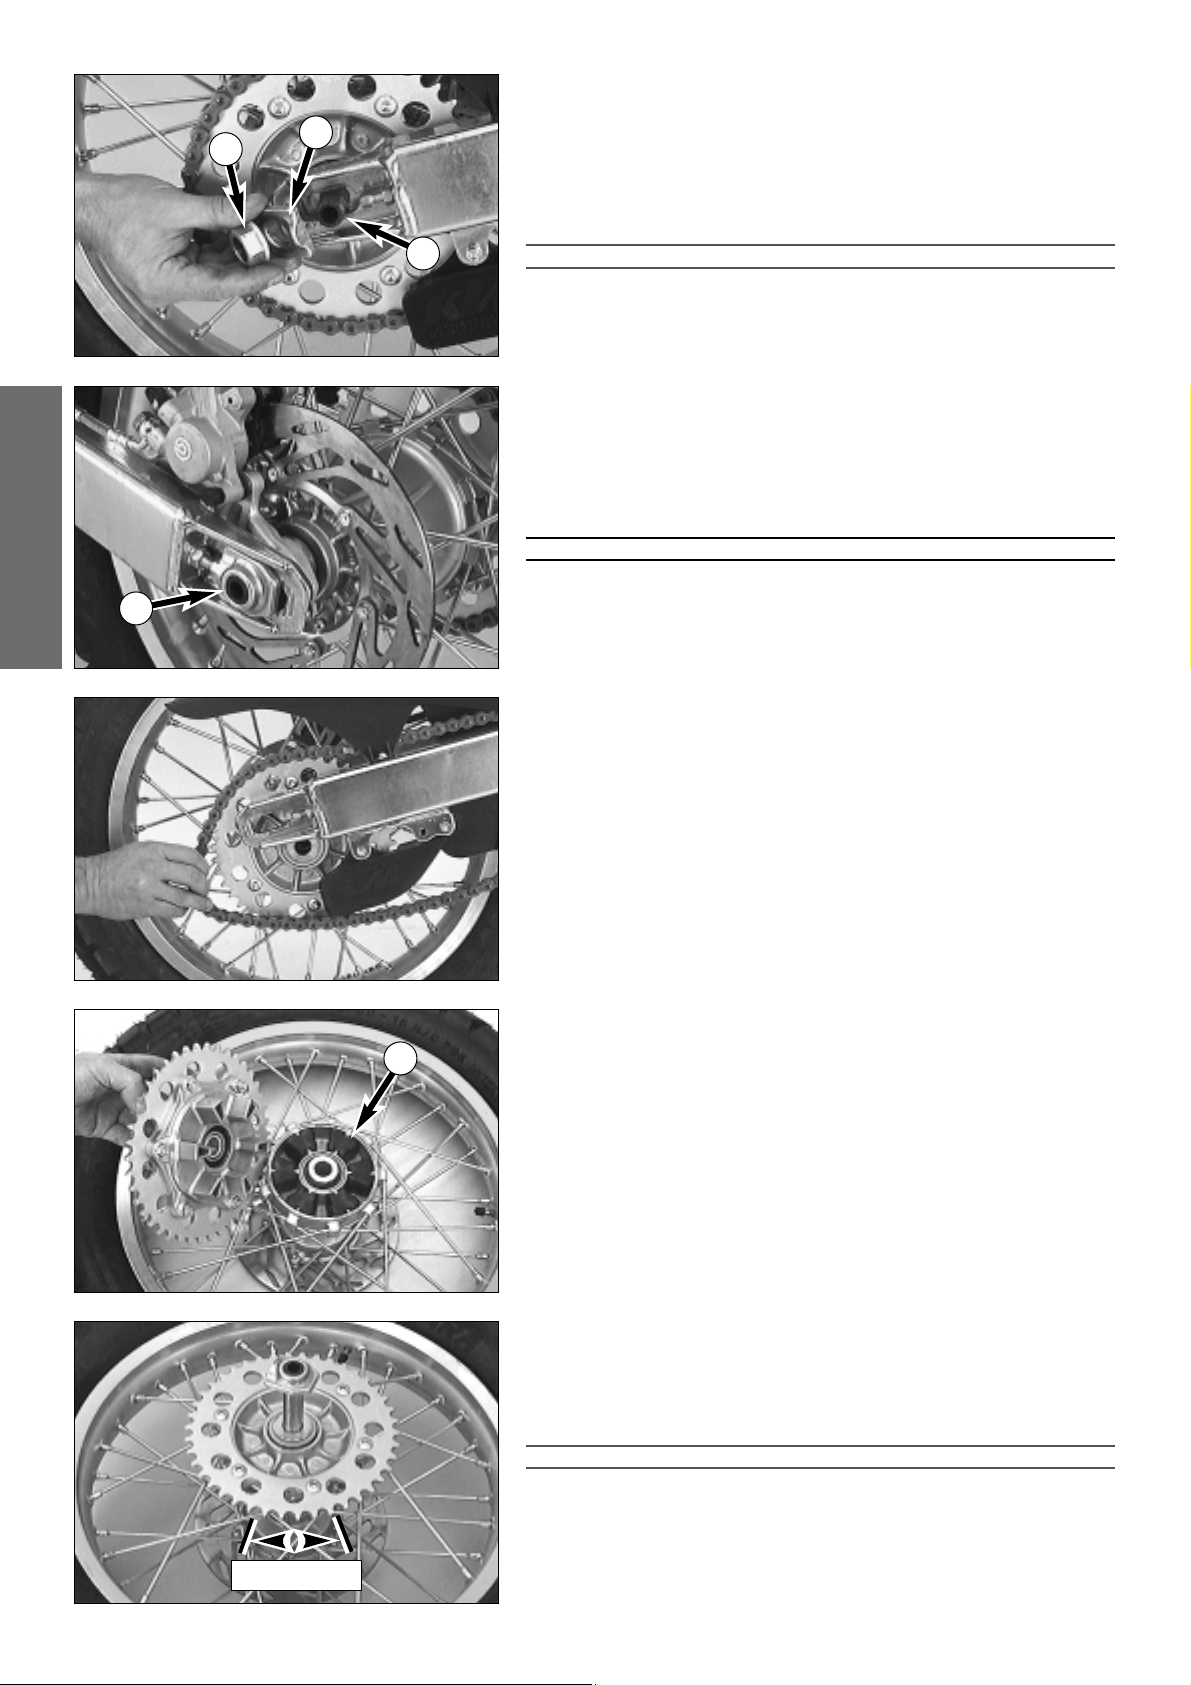
Dismounting and mounting the rear wheel*
Park the motorcycle on the center stand. The rear wheel must not touch the
ground.
Loosen the collar nut
1, remove chain tensioner 2, hold the rear wheel
and pull out the wheel spindle
3 until the rear wheel is free but the brake
caliper support is still held. Push the rear wheel as far forward as possible,
take the chain from the rear sprocket and carefully take the rear wheel out
of the swingarm.
!
CAUTION
!
–D
O NOT OPERATE THE REAR BRAKE WHEN THE REAR WHEEL HAS BEEN DISMOUNTED.
–ALWAYS PLACE THE WHEEL ON THE GROUND WITH THE BRAKE DISC POINTING
UPWARDS
. OTHERWISE THE BRAKE DISC MAY BE DAMAGED.
–I
F THE AXLE IS DISMOUNTED, CLEAN THE THREAD OF THE WHEEL SPINDLE AND
COLLAR NUT THOROUGHLY AND APPLY A NEW COAT OF GREASE
(SHELL ADVANCE
GREASE
) TO PREVENT THE THREAD FROM JAMMING.
NOTE:
IF THE REAR WHEEL HAS BEEN DISMOUNTED
, YOU SHOULD ALSO CHECK THE
SHOCK ABSORPTION RUBBER
.
The rear wheel is remounted in reverse order. Before tightening the collar
nut to 80 Nm (60 ft.lb), push the rear wheel forwards so that the chain
tensioners lie on the tension screws.
WARNING
–I
F YOU DON’T HAPPEN TO HAVE A TORQUE WRENCH AT HAND, MAKE SURE YOU
HAVE THE TIGHTENING TORQUE CORRECTED BY A
KTM DEALER AS SOON AS
POSSIBLE
. A LOOSE WHEEL SPINDLE MAY LEAD TO AN UNSTABLE DRIVING BEHAVIOR
OF YOUR MOTORCYCLE
.
–A
FTER MOUNTING THE REAR WHEEL, KEEP OPERATING THE FOOTBRAKE UNTIL THE
PRESSURE POINT RETURNS
.
–IT IS VERY IMPORTANT TO KEEP THE BRAKE DISK FREE FROM OIL AND GREASE
, OTHER-
WISE THE BRAKING EFFECT WOULD BE STRONGLY REDUCED.
Checking the shock absorption rubbers in the rear hub*
LC4-E models have a damped rear wheel hub. For this purpose, the engine
power is conveyed from the rear sprocket via 6 shock absorption rubbers
4
to the rear wheel. These 6 absorption rubbers wear with increasing
operation time, and should be checked for wear whenever the rear wheel is
dismounted.
For this purpose, lie the rear wheel on a work bench with the rear sprocket
upwards, and put the wheel spindle in the hub. Now hold the rear wheel
firmly and try to turn the rear sprocket. The rear sprocket may not turn
more than maximum 5 mm (0,2 in) measured on the outside. If the play in
the chain wheel is larger, all 6 shock absorption rubbers are to be replaced.
Check the shock absorption rubbers for signs of damage and dirt.
!
CAUTION
!
I
F THE SHOCK ABSORPTION RUBBERS ARE NOT REPLACED IN GOOD TIME, THE REAR
SPROCKET CARRIER AND THE REAR HUB WILL BE DAMAGED
. ALLWAYS REPLACE ALL
6
ABSORPTION RUBBERS, NEVER SINGLE RUBBERS.
1
2
3
3
max. 5 mm
4
Page 26
ENGLISH
25
400/640 LC4-E
front rear
Road, driver only 1,8 bar (26psi) 2,0 bar (29psi)
Road, with passenger 2,0 bar (29 psi) 2,2 bar (31psi)
640 Supermoto front rear
Road, driver only 2,0 bar (29psi) 2,2 bar (31psi)
Road, with passenger 2,2 bar (31psi) 2,4 bar (34psi)
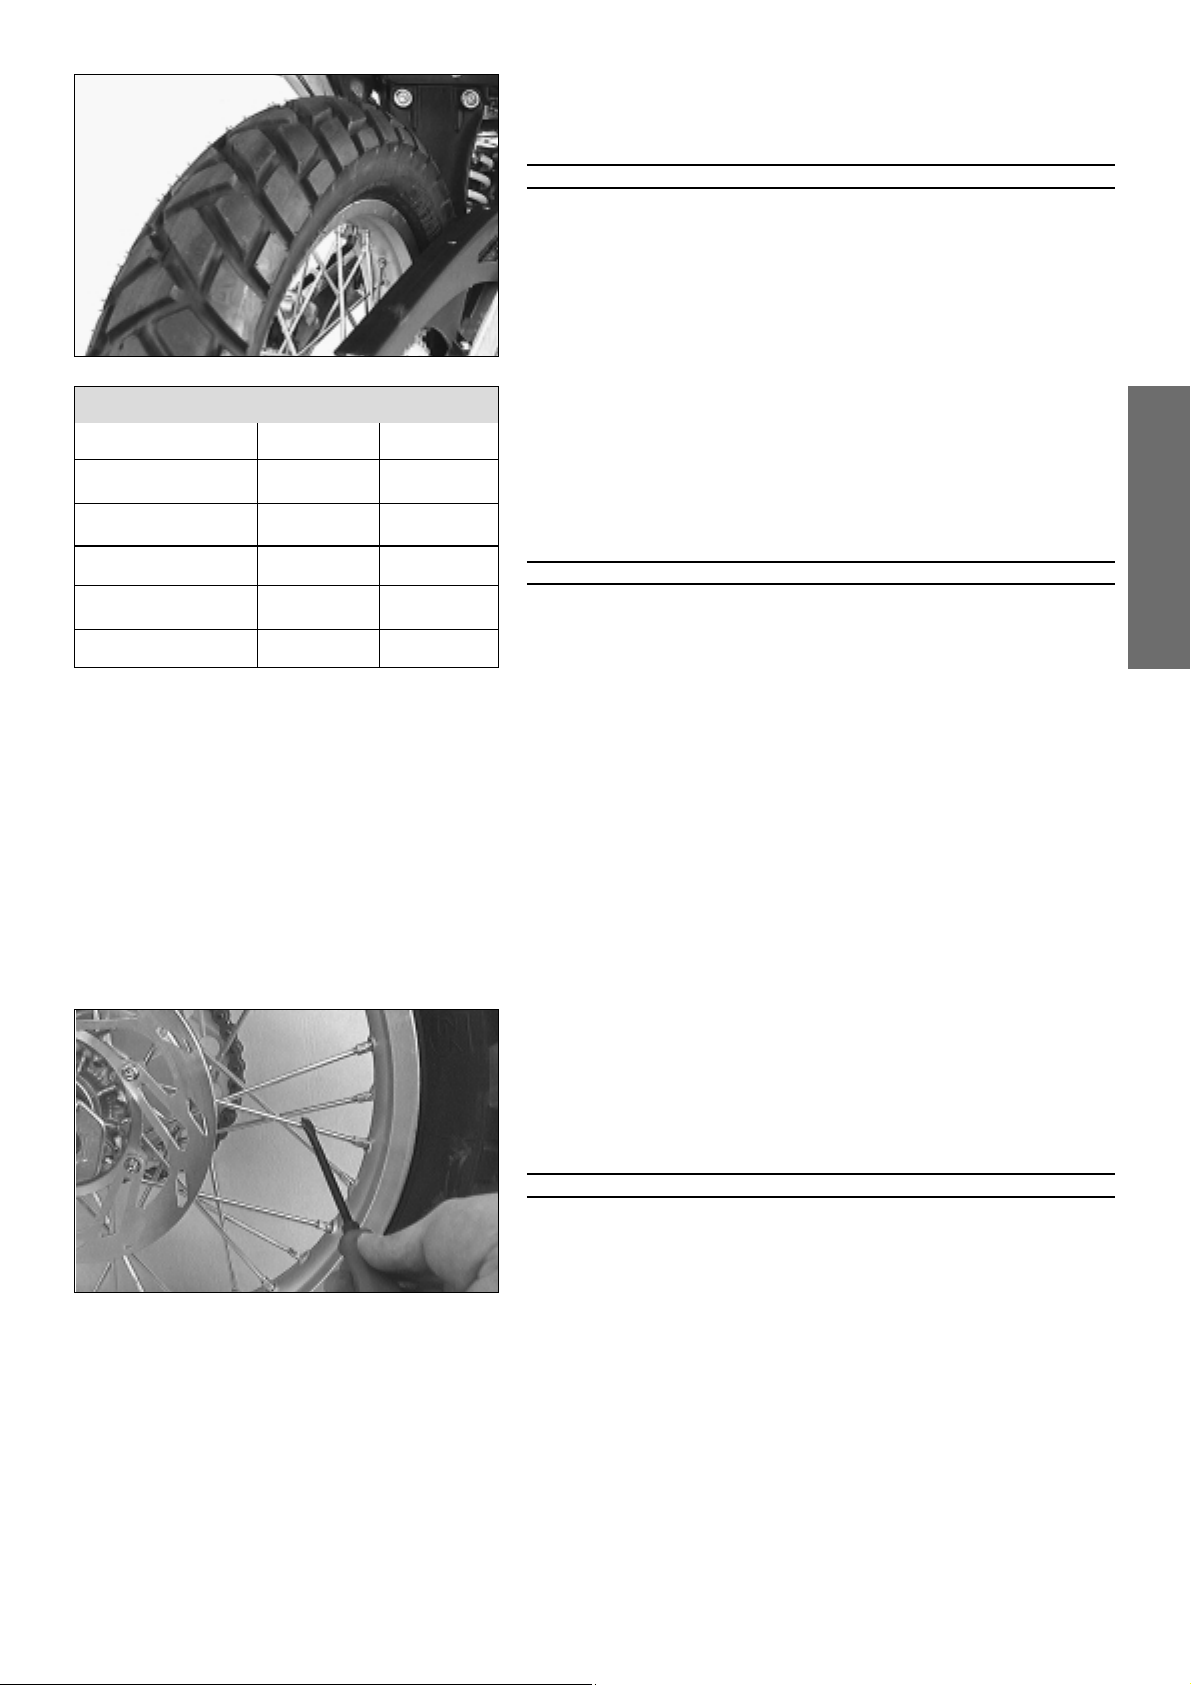
TIRES - AIR PRESSURE
Tires, air pressure
Tire type, tire condition, and how much air pressure the tires have in them
affect the way your motorcycle rides, and they must therefore be checked
whenever you’re getting ready to go anywhere on your motorcycle.
WARNING
In order to ensure riding safety and optimal riding performance, only KTMapproved tires may be used. Other tires can have a negative effect on riding
performance (e.g. vibration at higher speeds).
Approved tires for 400/640 LC4-E (as of September 2000)
METZELER . . . . . . . . . . . . . .E
NDURO 3, ENDURO 4
MICHELIN . . . . . . . . . . . . . .S
IRAC
PIRELLI . . . . . . . . . . . . . . . .MT60, MT70, MT90
– Tire type and size can be found in the technical specifications and in the
homologation certificate
– Tire condition has to be checked every time you want to ride your
motorcycle. Before leaving check for punctures and nails or other sharp
objects that might have become embedded in the tire.
– Refer to the specific regulations in your country for minimum tire tread
requirements. We recommend replacing tires at the latest when the
tread is down to 2 mm.
– Tire pressure should be checked regularly on a “cold” tire. Proper pres-
sure ensures optimum driving comfort and extends the life of your tires.
WARNING
–D
O NOT MOUNT TIRES WHICH HAVE NOT BEEN APPROVED BY KTM. OTHER TIRES
COULD HAVE ADVERSE EFFECTS ON THE WAY YOUR MOTORCYCLE RIDES
.
–U
SE TIRES OF THE SAME BRAND AND TYPE FOR THE FRONT AND REAR WHEELS.
–FOR YOUR OWN SAFETY REPLACE DAMAGED TIRES IMMEDIATELY
.
–W
ORN TIRES CAN HAVE A NEGATIVE EFFECT ON HOW YOUR MOTORCYCLE
PERFORMS
, ESPECIALLY ON WET SURFACES
–I
F AIR PRESSURE IS TOO LOW
, ABNORMAL WEAR AND OVERHEATING OF THE TIRE
CAN RESULT
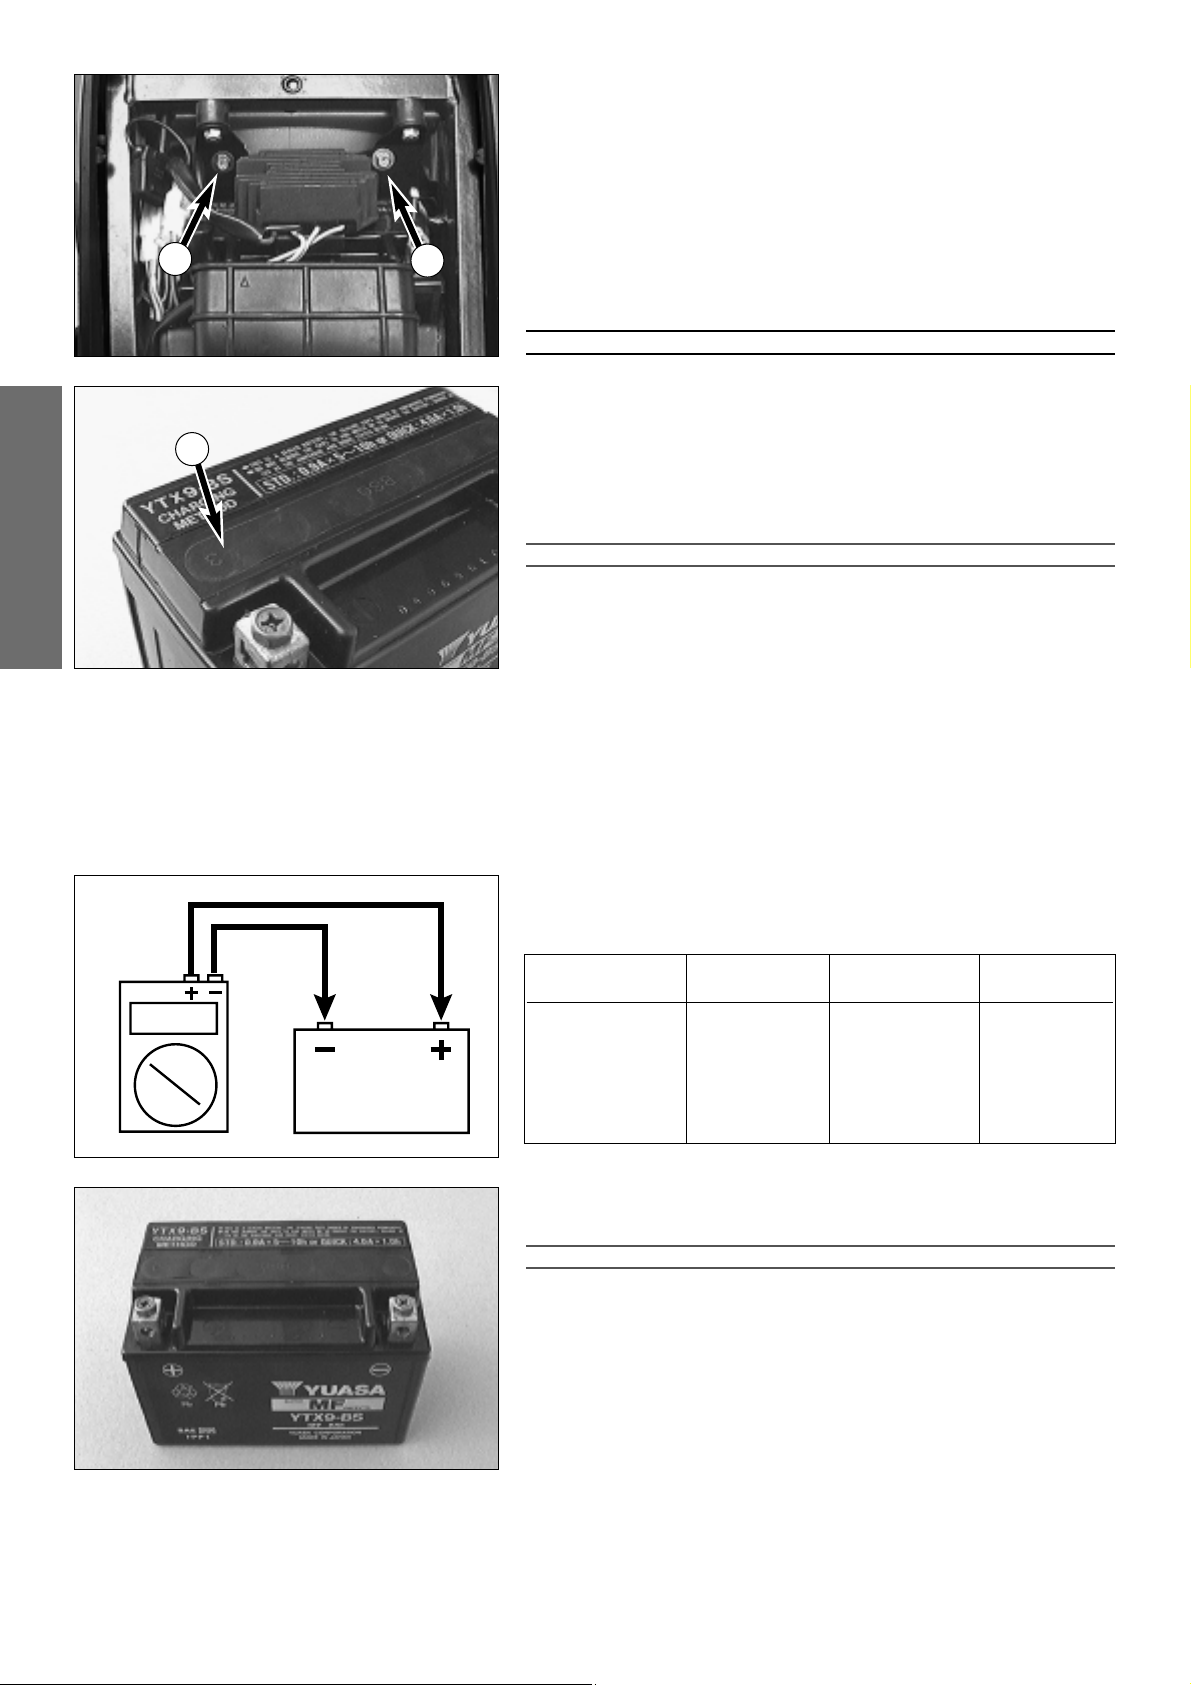
Checking spoke tension
The correct spoke tension is very important for the stability of the wheels
and thus for riding safety. A loose spoke causes the wheel to become unbalanced and before long other spokes will have come loose. Check spoke
tension, especially on a new motorcycle, in regular intervals. For checking,
tap on each spoke with the blade of a screw driver (see illustration). A clear
tone must be the result. Dull tones indicate loose spokes. If necessary, have
the spokes retightened and the wheel centered by a KTM dealer.
WARNING
SPOKES CAN TEAR IF YOU CONTINUE TO RIDE WITH THEM LOOSE. THIS MAY LEAD TO AN
UNSTABLE HANDLING OF YOUR MOTORCYCLE
.
Page 27
ENGLISH
26
Battery
The battery is mounted under the seat (remove the seat, see page 16)
The battery has a closed system and therefore requires no maintenance. It is
not necessary to check the electrolyte level or to refill water. Simply keep
the battery poles clean and slightly grease them with an acid-free grease if
necessary.
Removing the battery:
First disconnect the negative and then the positive pole of the battery.
Remove screws
1
and swing retaining bracket and voltage regulator out of
the way.
Remove battery.
When replacing, connect first the positive and then the negative pole.
WARNING
–I
F ELECTROLYTE (SULPHURIC ACID) LEAKS FROM THE BATTERY
, PROCEED WITH GREAT
CARE
. T
HE ELECTROLYTE CAN CAUSE SEVERE BURNS.
–I
N THE CASE OF SKIN CONTACT RINSE THOROUGHLY WITH WATER
.
–I
N THE CASE OF CONTACT WITH THE EYES, THOROUGHLY RINSE EYES WITH WATER
FOR AT LEAST
15 MINUTES. IMMEDIATELY CONSULT A DOCTOR!
–THE BATTERY IS A CLOSED MODEL BUT CAN NEVERTHELESS EMIT EXPLOSIVE GASES
.
A
VOID SPARKS AND OPEN FIRE NEAR THE BATTERY.
–D
EFECT BATTERIES MUST BE STORED OUT OF THE REACH OF CHILDREN. ENSURE
PROPER DISPOSAL OF DISCARDED BATTERIES
.
!
CAUTION
!
–T
O AVOID DAMAGE, DO NOT REMOVE THE LOCKING BAR 2 !
–N
EVER DISCONNECT THE BATTERY WHILE THE ENGINE IS RUNNING. THIS WILL
DESTROY THE RECTIFIER
-REGULATOR.
BATTERY STORAGE:
When preparing the motorcycle for a longer period of standstill, remove the
battery and recharge it. Storage temperature: 0 - 35°C (30 - 95°F). Do not
expose to direct sun radiation.
Charging the battery
Remove the battery and check the charging level. Use a voltmeter to
measure the voltage between the battery poles (off-load voltage).
Accurate results can only be obtained if the battery has neither been charged nor discharged during a period of 30 minutes preceding the measuring.
If the battery is empty, it can be recharged for a maximum period of
10 hours at 0.8 A and a maximum of 14.4 V.
!
CAUTION
!
–T
O AVOID DAMAGE, DO NOT REMOVE THE LOCKING BAR
–ALWAYS CONNECT THE BATTERY TO THE CHARGING UNIT BEFORE TURNING THE
CHARGING UNIT ON
.
–W
HEN RECHARGING THE BATTERY IN CLOSED ROOMS ENSURE SUFFICIENT VENTI-
LATION. EXPLOSIVE GASES ARE RELEASED DURING THE BATTERY CHARGING PROCESS.
–C
HARGING TIME AND CHARGING VOLTAGE SHOULD NOT EXCEED THE STATED VALUES.
O
THERWISE ELECTROLYTE WILL BE RELEASED THROUGH THE SAFETY VALVES.
–AVOID QUICK CHARGING IF POSSIBLE.
off load voltage charging level charging time
charging voltage
Volt % 0,8 A
>12,7 100 ––
~12,5 75 4 h
max.
~12,2 50 7 h
14,4 V
~12,0 25 11 h
~11,8 0 14 h
VOLT
1
1
2
Page 28
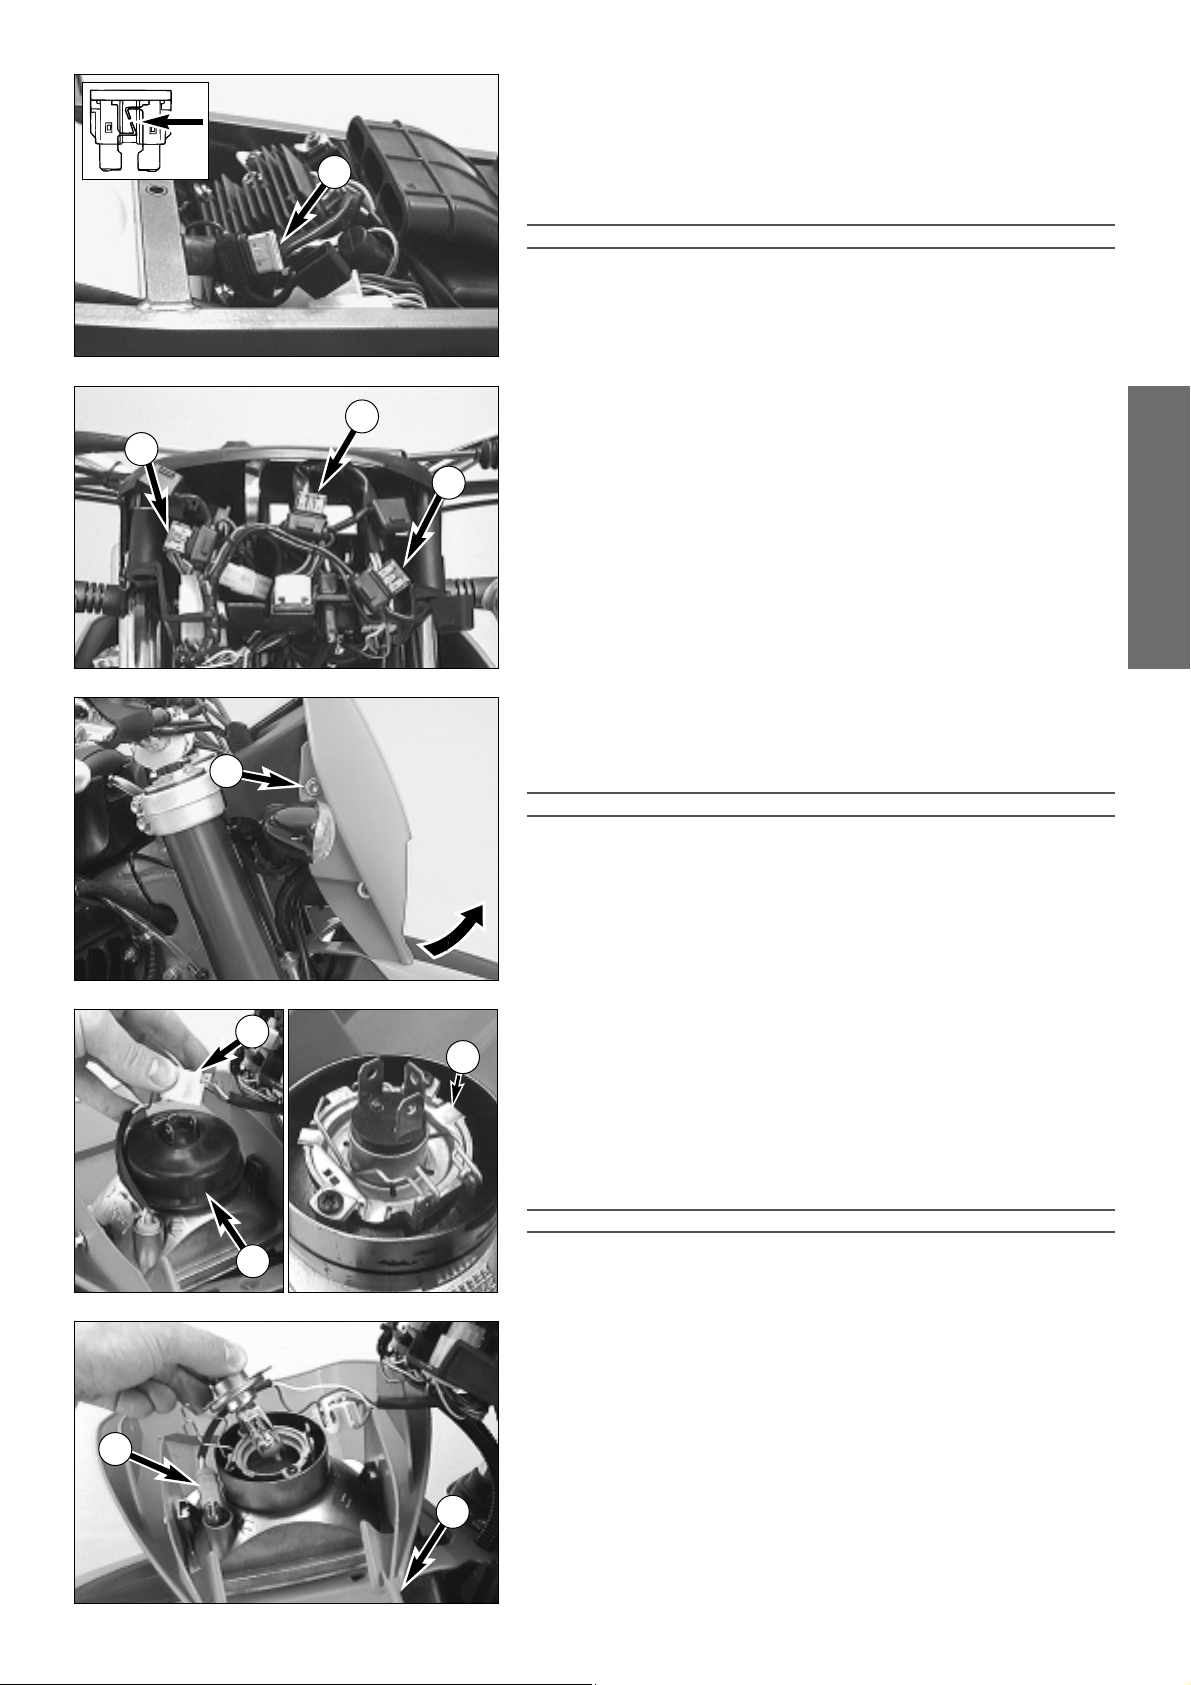
ENGLISH
27
Main fuse
Located near the battery under the seat, the main fuse 1 protects all power
consumers.
Replace a blown fuse only with an equivalent one. If a new fuse that has
just been set in gets blown again, you are strongly advised to have it
inspected by a KTM dealer.
The fuse capacity is 20 Ampere.
!
CAUTION
!
U
NDER NO CIRCUMSTANCES IS A STRONGER FUSE ALLOWED TO BE SET IN OR A FUSE
ALLOWED TO BE
“REPAIRED”. AN INEXPERT TREATMENT COULD DAMAGE THE WHOLE
ELECTRICAL INSTALLATION
!
Fuses for individual power-consuming units
Additional fuses separately protecting different power-consuming units are
mounted under the headlight mask.
For instructions to remove and mount the headlight mask please refer to
"Exchanging the headlight lamp".
Fuse
2
(10 Ampere) protects the following power-consuming units:
– headlight
– parking light
Fuse
3
(10 Ampere) protects the following power-consuming units:
– flasher lights
– brake light
– horn
– radiator fan motor
Fuse
4
(10 Ampere) protects the following power-consuming units:
– ignition
– starter system
Replace a blown fuse only with an equivalent one. If a new fuse that has
just been set in gets blown again, you are strongly advised to have it
inspected by a KTM dealer.
!
CAUTION
!
U
NDER NO CIRCUMSTANCES IS A STRONGER FUSE ALLOWED TO BE SET IN OR A FUSE
ALLOWED TO BE
“REPAIRED
”. AN INEXPERT TREATMENT COULD DAMAGE THE WHOLE
ELECTRICAL INSTALLATION
!
Exchanging the headlight lamp
Remove the headlight mask:
Remove screws
5
on the left and on the right side.
Depress the front section of the fender, pull the headlight mask upwards,
unhook it from the lower part of the fender, then swing it forwards.
Exchanging the headlight lamp
Disconnect plug
6
from the bulb.
Remove the rubber cap
7
Unhook the retaining bracket, then remove the bulb.
When inserting the new bulb make sure that the wider of the 3 tongues
8
is located in the corresponding groove in the socket.
!
CAUTION
!
N
EVER TOUCH THE GLASS OF THE BULB WITH YOUR FINGERS. THE GLASS OF THE BULB
MUST REMAIN ABSOLUTELY FREE FROM GREASE
. HEAT WILL OTHERWISE CAUSE THE
GREASE TO EVAPORATE AND SETTLE DOWN ON THE REFLECTOR
.
Hook in the retaining bracket, mount the rubber cap and connect the plug
to the bulb.
Mounting the headlight mask
Appropriately position the headlight mask. The headlight must be
located below the cockpit.
Depress the front part of the fender, pull the headlight mask upwards and
insert the retaining pins
9
into the corresponding bores of the fender.
Mount the screws 5.
Replacing the parking-light bulb
Disassemble the headlight as described above and simply pull the bulb
socket
bk out of the reflector.
1
2
3
4
5
6
7
10
9
8
Page 29
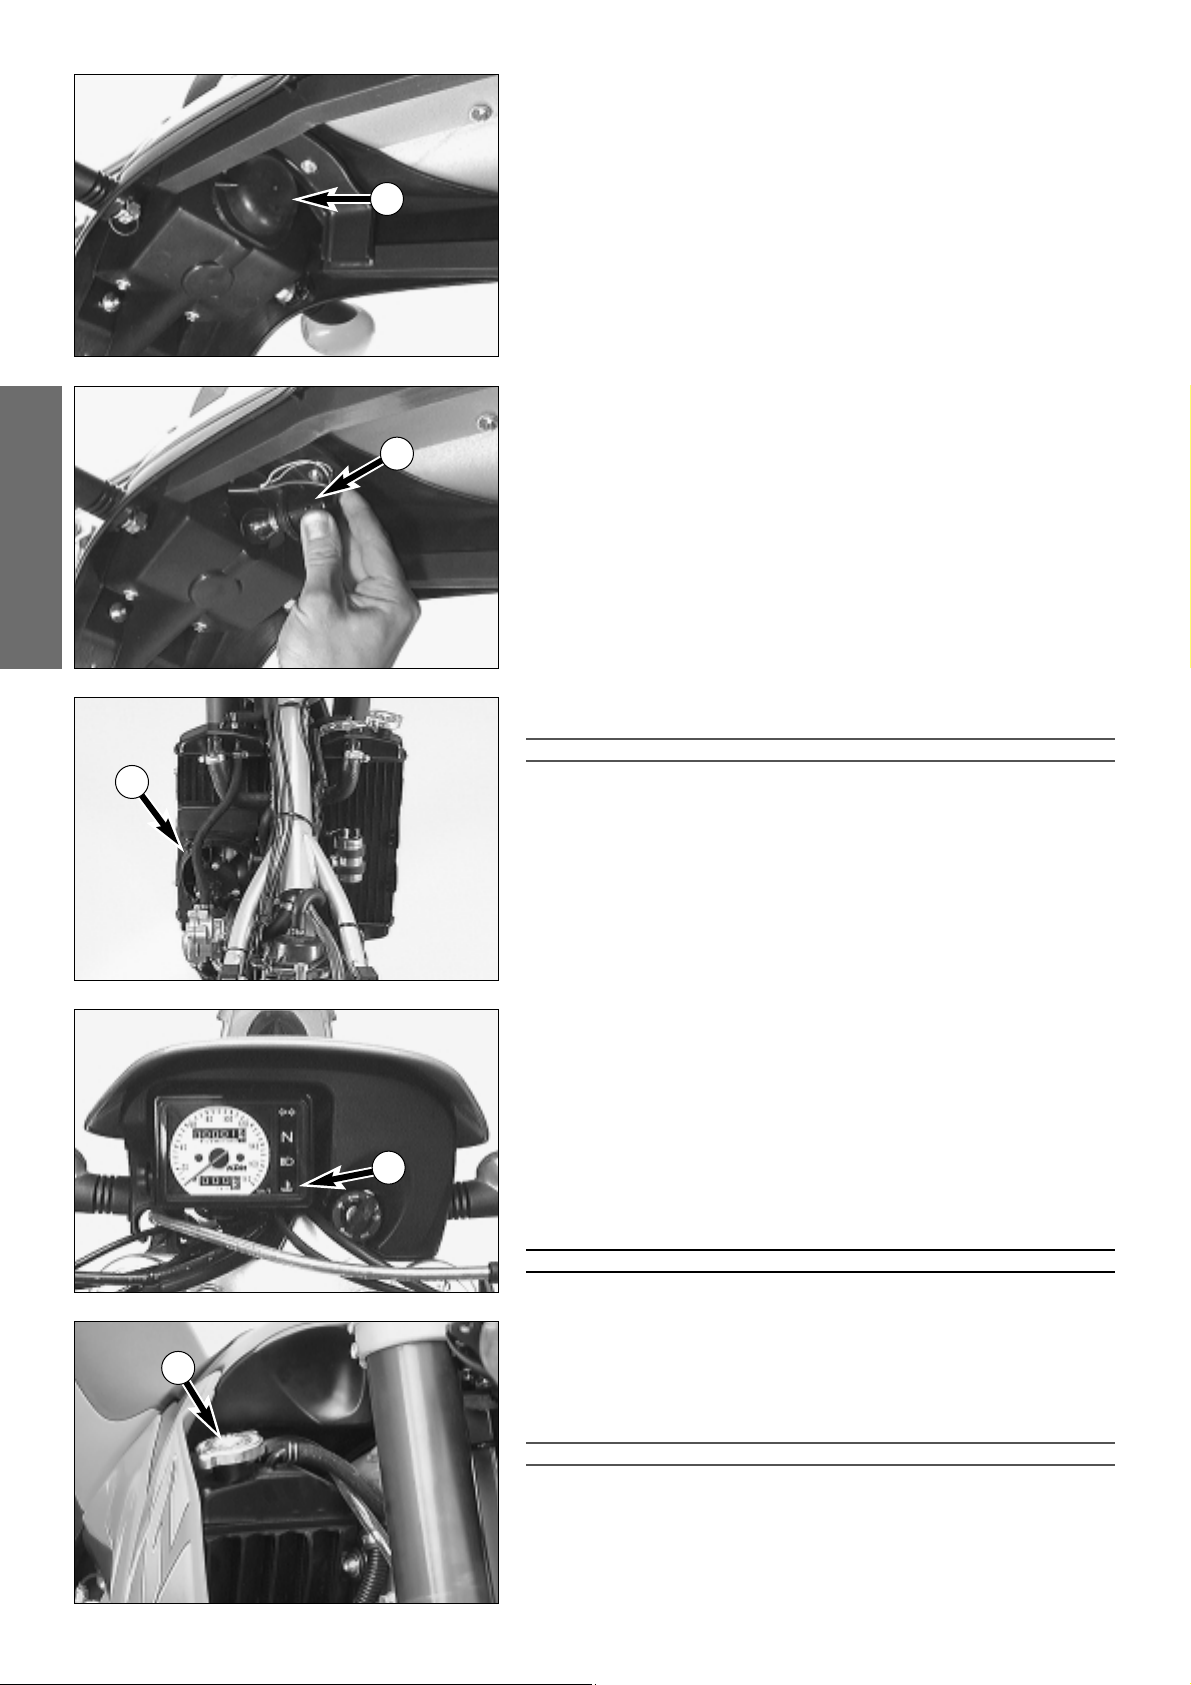
ENGLISH
28
Exchanging the brake light and tail light bulb
Remove the cap 1on the underside of the license plate retainer.
Turn the lamp socket
2
approximately 30° counterclockwise and pull it out
of the tail light housing.
Slightly depress the bulb, turn it approx. 30° counterclockwise and pull it
out of the socket.
To mount the lamp reverse the worksteps indicated above.
Cooling system
Coolant is circulated by a water pump located in the engine. When the
engine is cold the cooling liquid circulates only through the cylinder and the
cylinder head. After the engine has reached its operating temperature
(about 70°C, 158°F), the thermostat opens and the cooling liquid is also
pumped through both aluminum radiators.
Air blowing in through the radiators cools the cooling liquid. The slower the
speed of the motorcycle, the less the cooling liquid is cooled down. Dirty
radiator fins also reduce the cooling efficiency.
If little or no air blows through the radiators, for example when riding
through slow traffic or waiting at traffic lights, the coolant temperature will
rise. If the coolant temperature rises to 85° C (185°F), the fan
3 on the left
radiator will switch on. This fan will provide additional air circulation
through the radiator thereby preventing the cooling system from
overheating.
!
CAUTION
!
T
HE RED COOLING LIQUID TEMPERATURE WARNING LIGHT
4 WILL BEGIN TO LIGHT UP
,
IF THE COOLING LIQUID TEMPERATURE REACHES APPROX. 105°C (223°F) AND HENCE-
FORTH HAS EXCEEDED ITS NORMAL OPERATING TEMPERATURE
.
P
OSSIBLE CAUSES:
–S
LOW RIDING WITH LARGE LOADS AT A HIGHER AIR TEMPERATURE:
I
F POSSIBLE INCREASE YOUR RUNNING SPEED, SO THAT MORE AIR CAN BLOW
THROUGH THE RADIATORS
. S
HOULD THE WARNING LIGHT STILL BE ON OFF AFTER
300 METERS, STOP IMMEDIATELY, SWITCH OFF THE ENGINE AND LOOK FOR OTHER
POSSIBLE CAUSES
.
–T
OO LITTLE COOLING LIQUID IN THE SYSTEM
:
L
ET THE ENGINE COOL DOWN, AND CHECK THE SYSTEM FOR LEAKAGE’S. ALSO
EXAMINE THE COOLING LIQUID LEVEL
CAUTION SCALDING HAZARD! DO NOT
DRIVE ON
, UNTIL THERE IS SUFFICIENT LIQUID IN THE COOLING SYSTEM. GOTO
YOUR NEAREST
KTM GARAGE AND GET IT SEEN TO. IF YOU DRIVE WITH THE COO-
LING LIQUID TEMPERATURE WARNING LIGHT ON, YOU WILL CAUSE EVEN MORE
DAMAGES TO THE ENGINE
.
–T
HE COOLING FAN ON THE LEFT COOLER IS NOT WORKING:
T
HE COOLING FAN MUST BE RUNNING, WHEN THE COOLING LIQUID TEMPERATURE IS
105°C (223°F) AND THE IGNITION IS ON. IF THE FAN IS NOT WORKING, AND THERE
APPEARS TO BE SUFFICIENT COOLING LIQUID
, THE ONLY THING YOU CAN DO IS TO
DRIVE ON TO YOUR NEAREST
KTM GARAGE AT THE LEAST POSSIBLE ENGINE LOAD.
–E
XCESSIVE USE OF THE CLUTCH AT SLOW SPEED
WARNING
I
F POSSIBLE, ALWAYS CHECK LEVEL OF COOLING LIQUID WHEN ENGINE IS COLD. IF YOU
HAVE TO OPEN THE RADIATOR CAP WHEN ENGINE IS HOT
, USE A RAG TO COVER THE CAP
AND OPEN SLOWLY TO RELEASE PRESSURE
.
A mixture of 40% antifreezer and 60% water is used as cooling liquid.
How-ever, the anti-freeze protection must be at least -25° C (-13° F). Aside
from antifreezing protection, this mixture also provides great corrosion
protection which is why it must not be replaced by pure water.
!
CAUTION
!
F
OR THE COOLING SYSTEM, USE ONLY HIGH-GRADE ANTIFREEZER (SHELL ADVANCE
COOLANT). USING LOWERGRADE ANTIFREEZE AGENTS, CAN CAUSE CORROSION AND
COOLANT FOAMING
.
Pressure induced by heating of the cooling liquid in the cooling system is
controlled by a valve in the radiator cap
5; a water temperature rising up to
120° C (248° F) is admissible, without fear of problems.
1
2
5
3
4
Page 30
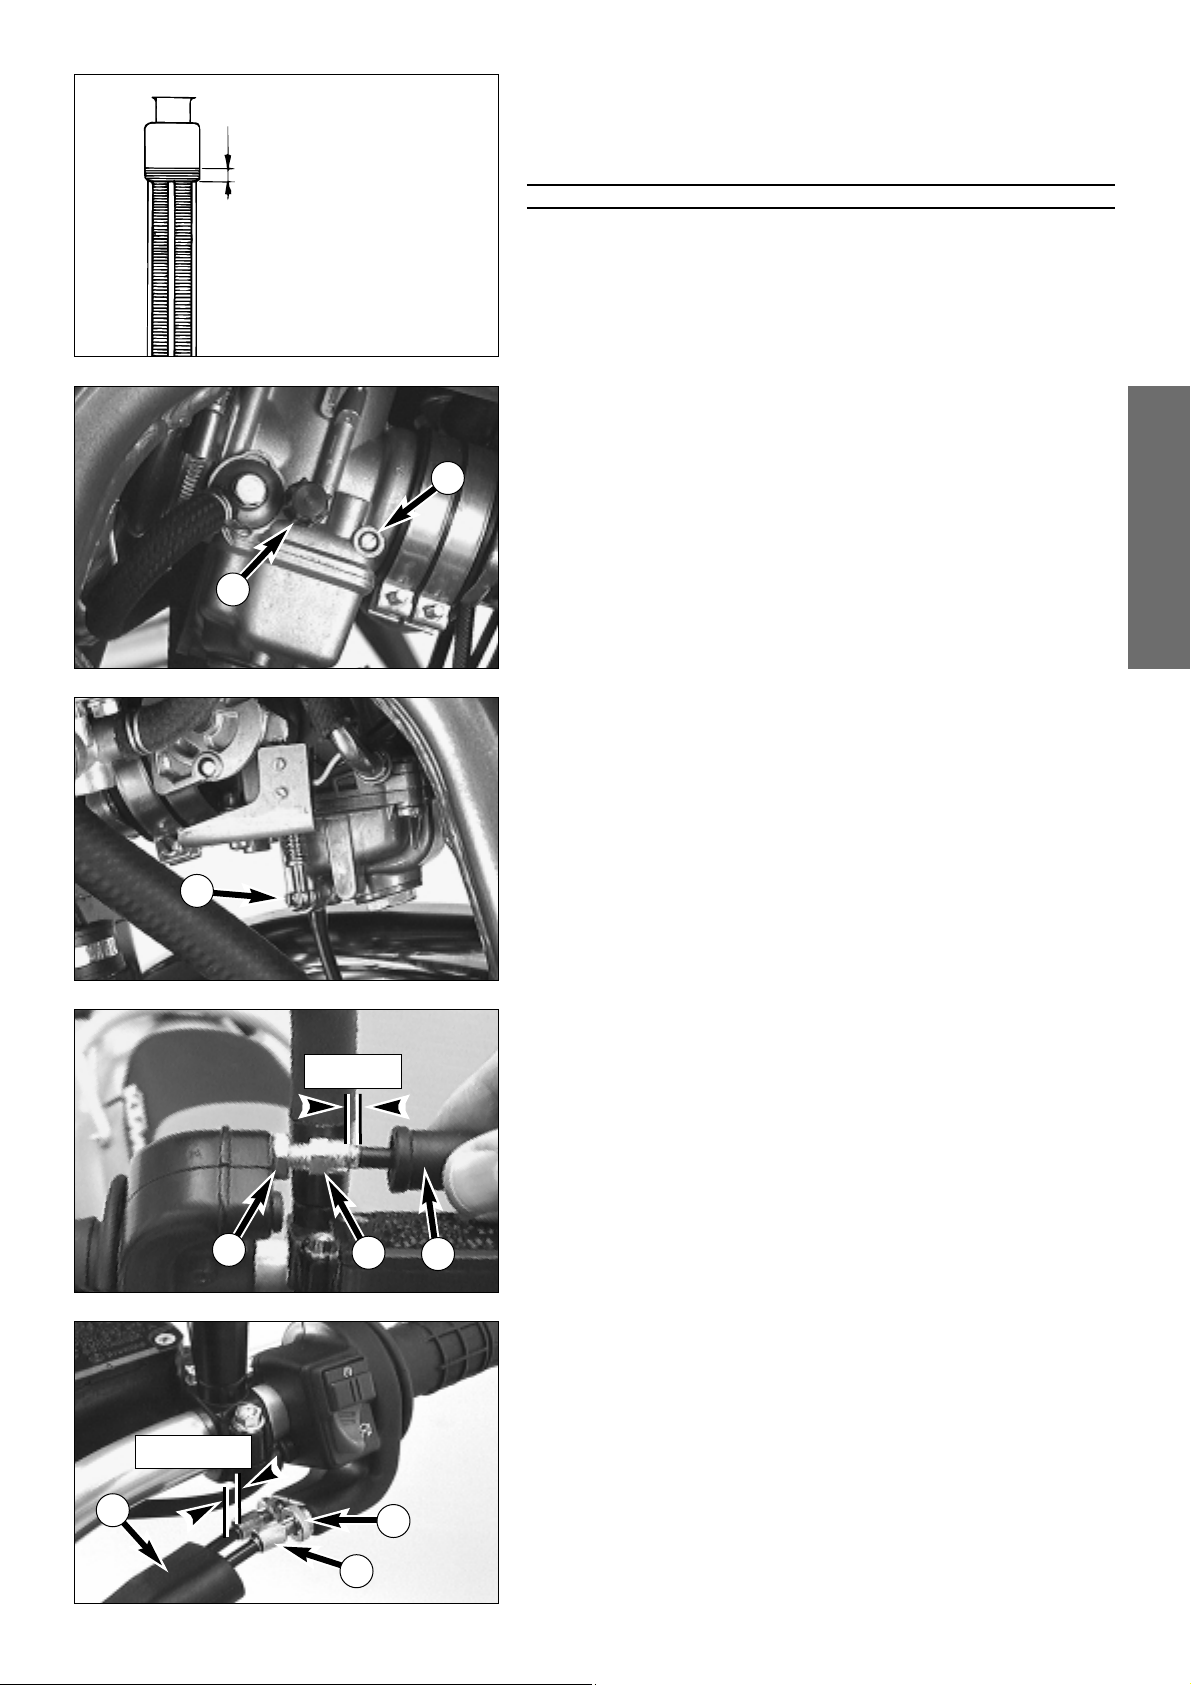
ENGLISH
29
Checking the cooling liquid level
The cooling liquid should be 10 mm (0,4 in) above the cooling elements
when the engine is cold (cf. diagram). In the event of the cooling liquid
being drained, always fill the system before hand, then top off while the
engine is running.
WARNING
I
F POSSIBLE, ALWAYS CHECK LEVEL OF COOLING LIQUID WHEN ENGINE IS COLD. IF YOU
HAVE TO OPEN THE RADIATOR CAP WHEN ENGINE IS HOT
, USE A RAG TO COVER THE CAP
AND OPEN SLOWLY TO RELEASE PRESSURE
.
Adjust idling speed (Dell’Orto)*
The throttle stop screw 1 is used to adjust the basic position of the slide.
Turning in clockwise direction will increase the idling speed, turning in
counterclockwise direction will reduce the idling speed. Normal idling speed
1400 - 1500 rpm.
The mixture control screw
2 never should be changed.
Adjust idling speed (Mikuni)*
Use the adjusting screw 3to adjust the basic position of the throttle valve
and, thus, the idle speed.Turning in clockwise direction will increase the
idling speed, turning in counterclockwise direction will reduce the idling
speed. Normal idling speed 1400 - 1500 rpm.
Adjusting the throttle cable (Dell’ Orto carburetor)*
There must always be a 3-5 mm (0.1-0.2 in) play in the throttle cable. To
check this, move back the protective cover
4 on the throttle grip. You must
be able to lift the outer covering of the cable 3-5 mm from the adjusting
screw
5, until resistance is felt.
To adjust, loosen the counter nut
6 and turn the adjusting screw accor-
dingly. Finally tighten counter nut and slide the protective cover back on.
To check the correctness of this setting, start the engine, turn the handlebar
left and right, in both cases as far as it will go. This must not cause any
changes in idling speed. Otherwise, you have to increase the backlash of
the throttle cable.
Adjusting the throttle cable (Mikuni carburetor)*
The throttle cables must at all times maintain a slack of 3-5 mm. To test
this, slide the protection cover
7
on the throttle grip backwards. You
should now be able to raise one of the cables so that its exterior covering is
3-5 mm from the adjustment screw
8
before resistance becomes noticeable. Should a correction be necessary, this can be carried out at both adjusting screws.
To make the adjustment, loosen the counter screws
9
and turn the adju-
sting screws
8
correspondingly. Afterwards tighten the counter nuts and
slide on the protection cover.
3-5 mm
when engine is cold
10 mm
1
2
3
4
5
6
3-5 mm
7
8
9
Page 31
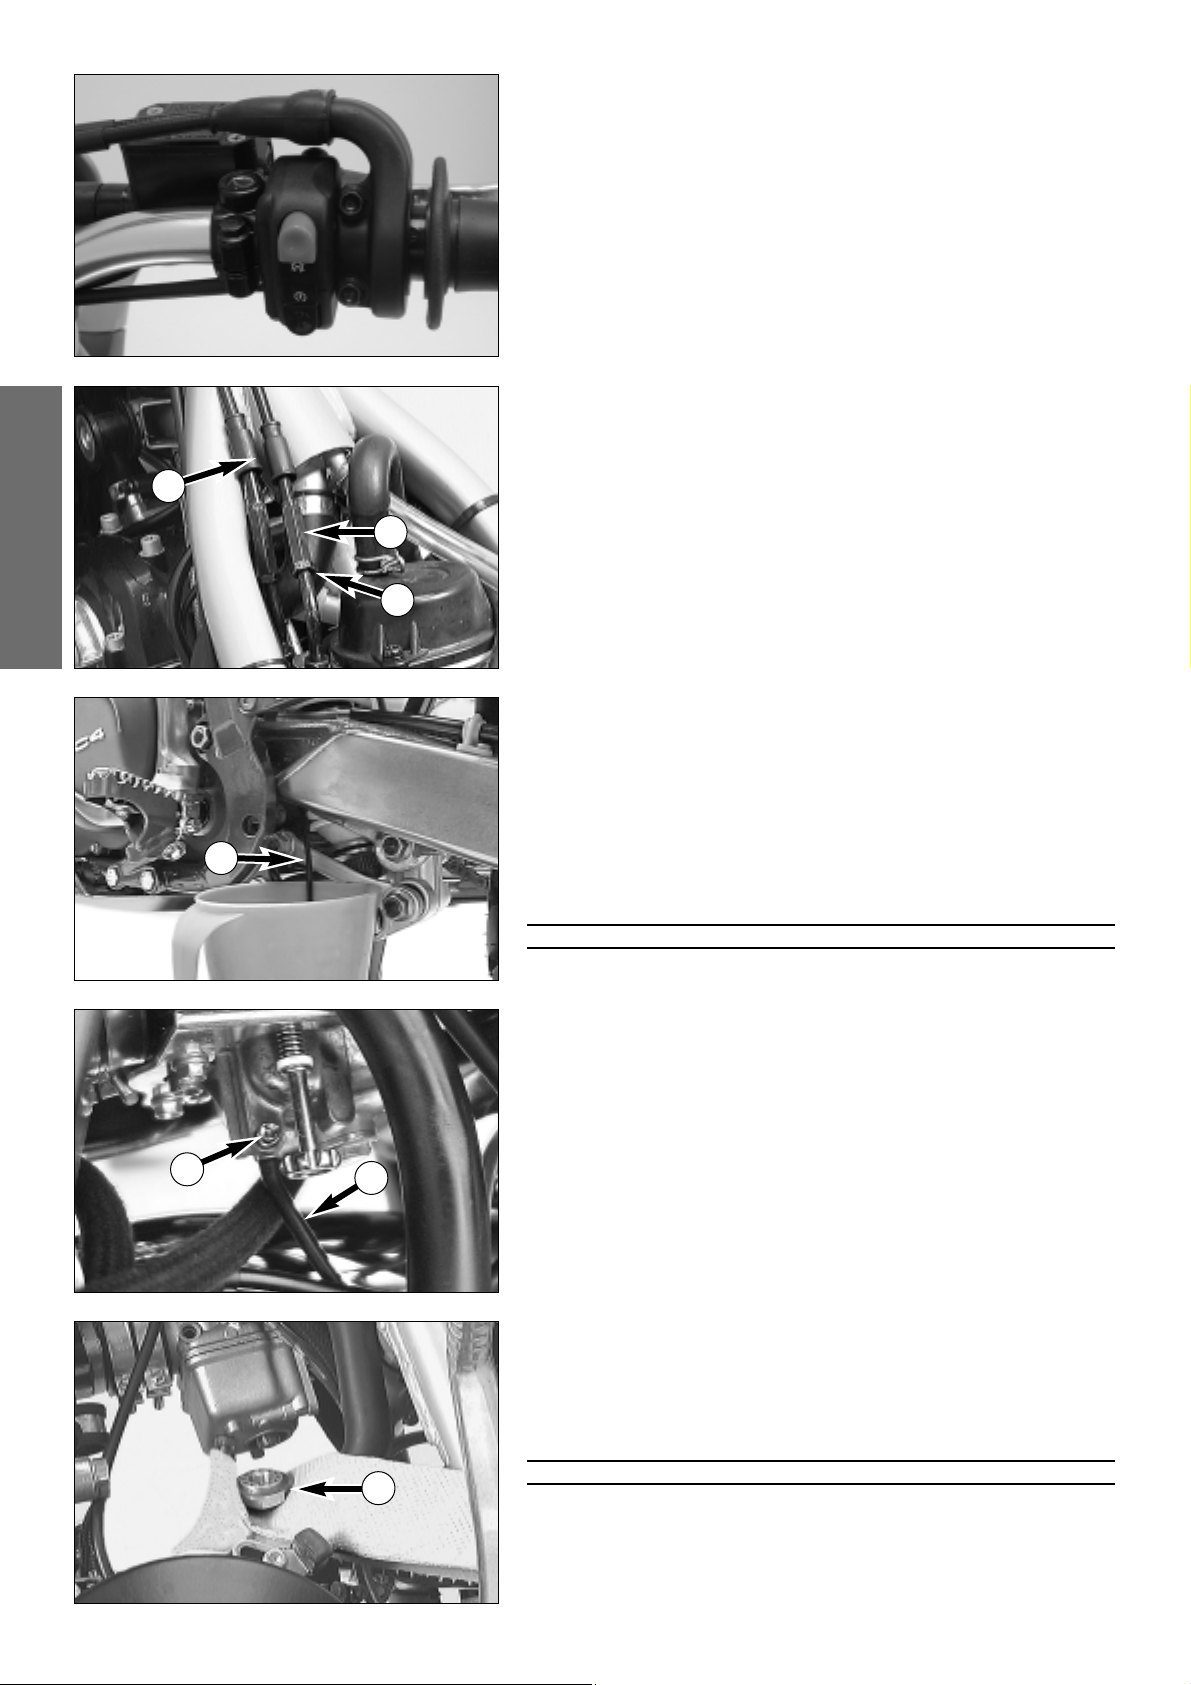
ENGLISH
30
Adjusting the throttle cable (Mikuni carburetor)*
When starting to turn the throttle grip, you should feel an initial backlash of
3-5 mm.
For models outfitted with the throttle twist grip depicted in the illustration,
the throttle cables have to be adjusted at the carburetor.
If a correction is necessary, start by removing the tank. Slide back the protection cover
1. To set the backlash, loosen the counter nut 2 and turn
the adjusting screw
3 accordingly. Then, fasten the counter nut and slide
the protection cover back on.
Make sure that the throttle grip will return to the idle position automatically
once you let go of it.
To check the correctness of this setting, start the engine, turn the handlebar
left and right, in both cases as far as it will go. This must not cause any
changes in idling speed. Otherwise, you have to increase the backlash of
the throttle cable.
Draining the carburetor float chamber (Mikuni)*
Following every wet-cleaning procedure, the float chamber of the carburetor should be drained in order to remove any water that may have penetrated into it. Water in the float chamber causes engine malfunction.
Carry out this job with the engine being cold.
Close the fuel tap.
Put one end of the hose
4 that leads downward behind the engine into a
collecting vessel.
Open the drain plug
5 (turning it counterclockwise) by several turns, and
drain the fuel from the float chamber.
Then, retighten the drain plug and open the fuel tap.
WARNING
F
UEL IS HIGHLY FLAMMABLE AND TOXIC. BE EXTREMELY CAUTIOUS WHEN HANDLING
FUEL
. NEVER PERFORM ANY WORK ON THE FUEL SYSTEM NEAR OPEN FIRE OR BURNING
CIGARETTES
. ALWAYS ALLOW THE ENGINE TO COOL DOWN FIRST. WIPE UP ANY SPILT
FUEL IMMEDIATELY
. MATERIALS SATURATED WITH FUEL ARE HIGHLY FLAMMABLE, AS
WELL
. I
F YOU HAVE ACCIDENTALLY SWALLOWED FUEL OR IF IT HAS GOTTEN INTO YOUR
EYES
, GO SEE A PHYSICIAN IMMEDIATELY.
Draining the carburetor float chamber (Dell’Orto) *
Following every wet cleaning procedure, the float chamber of the carburetor should be drained in order to remove any water that may have penetrated into it. Water in the float chamber causes engine malfunction.
Perform this task on a cold engine. Close the fuel tap, and place a cloth
underneath the carburetor, which is able to absorb any escaping fuel.
Unscrew the plug
6, and clean it with compressed air. Then, mount the
plug together with its gasket, open the fuel tap, and check the float chamber for any leaks.
WARNING
F
UEL IS HIGHLY FLAMMABLE AND TOXIC. BE EXTREMELY CAUTIOUS WHEN HANDLING
FUEL
. NEVER PERFORM ANY WORK ON THE FUEL SYSTEM NEAR OPEN FIRE OR BURNING
CIGARETTES
. ALWAYS ALLOW THE ENGINE TO COOL DOWN FIRST. WIPE UP ANY SPILT
FUEL IMMEDIATELY
. MATERIALS SATURATED WITH FUEL ARE HIGHLY FLAMMABLE, AS
WELL
. IF YOU HAVE ACCIDENTALLY SWALLOWED FUEL OR IF IT HAS GOTTEN INTO YOUR
EYES
, GO SEE A PHYSICIAN IMMEDIATELY.
1
2
3
4
4
5
6
Page 32
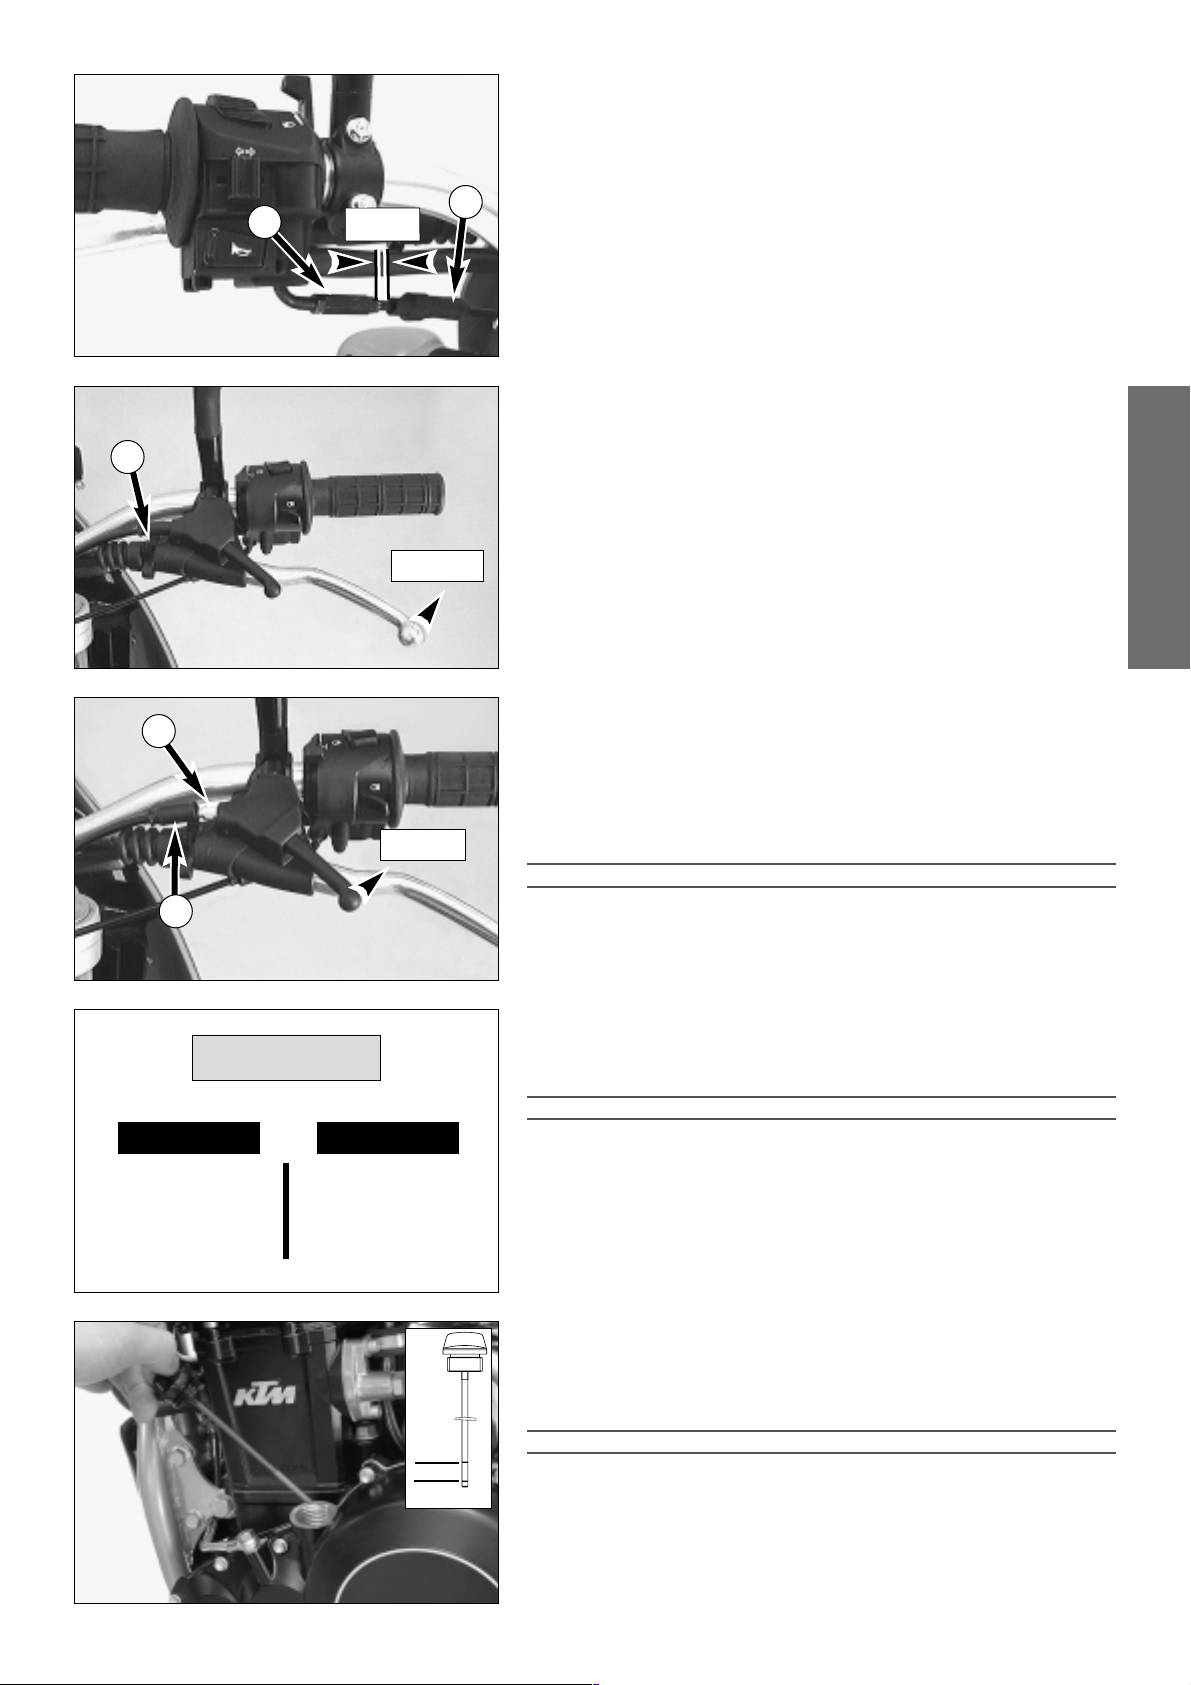
ENGLISH
31
Adjusting the choke cable*
At the choke cable, there must always exist a play of approx. 2 mm (0.1 in).
To check this, push choke lever fully forward and pull protective cover
1
from the adjuster piece 2. Now, it must be possible to lift the outer
covering of the cable by approx. 2 mm from the adjuster piece until feeling
a resistance. If necessary, loosen counter nut and readjust play by turning
the adjuster piece. Tighten counter nut, and slide on protective cover.
Adjusting the clutch cable
When the engine is cold, the play at the clutch lever should be 1–3 mm
(0.04–0.12 in) (measured at the outer edge).
To adjust the clutch cable turn the adjusting nut
3 accordingly.
Checking the adjustment of the hand decompression cable*
To check, set piston at compression, so that the valves are closed. While
doing this, slowly operate the kickstarter through its stroke until the clicking
sound (disengaging) of the automatic decompression can be heard. Now
the decompression lever must be operated 25 mm (1 in) until resistance is
felt (the exhaust valves begin to open). To adjust move back the protective
cover
4, loosen the counter nut and correct the adjusting screw 5
accordingly. Tighten counter nut and push back protective cover.
!
CAUTION
!
I
F THERE IS NO PLAY IN THE DECOMPRESSION LEVER, THIS CAN RESULT IN ENGINE
DAMAGE
.
NOTE:
No adjustment need be made to the automatic decompressor.
Engine oil
Only use fully synthetic branded oils (Shell Advance Ultra 4) meeting or surpassing the quality requirements of API classes SG or SH (see specifications
on the container).
!
CAUTION
!
I
NSUFFICIENT OIL OR POOR QUALITY OIL RESULTS IN PREMATURE WEAR OF THE ENGINE.
Checking engine oil level
Allow the engine to run at idle speed for about 4 minutes. Turn off the engine
and place the motorcycle on a flat, level surface (center stand). Wait 5 minutes, unscrew and remove the oil dipstick, and wipe it clean with a cloth.
SCREW THE DIPSTICK IN ALL THE WAY AND REMOVE IT AGAIN.
The oil level should be between the two marks on the dipstick, however, it
must never rise above the MAX mark. Otherwise, engine oil would get into
the air filter box by way of the engine venting system.
Add engine oil if necessary.
!
CAUTION
!
–I
NSUFFICIENT OIL OR POOR QUALITY OIL RESULTS IN PREMATURE WEAR OF THE
ENGINE
.
–C
HECKING THE ENGINE OIL LEVEL WHEN THE ENGINE IS COLD RESULTS IN A FALSE
READING ON THE OIL DIPSTICK AND THEREFORE AN INCORRECT OIL LEVEL
.
–D
O NOT OVERFILL THE ENGINE CASE.
–D
O NOT UNDERFILL THE ENGINE CASE.
Finally, check oil system and engine for leaks.
25 mm
MAX
MIN
2 mm
1-3 mm
1
2
3
4
5
–
+
0°C
32°F
15W 40
15W 50
10W 40
10W 50
API: SG, SH
TEMPERATUR
Page 33
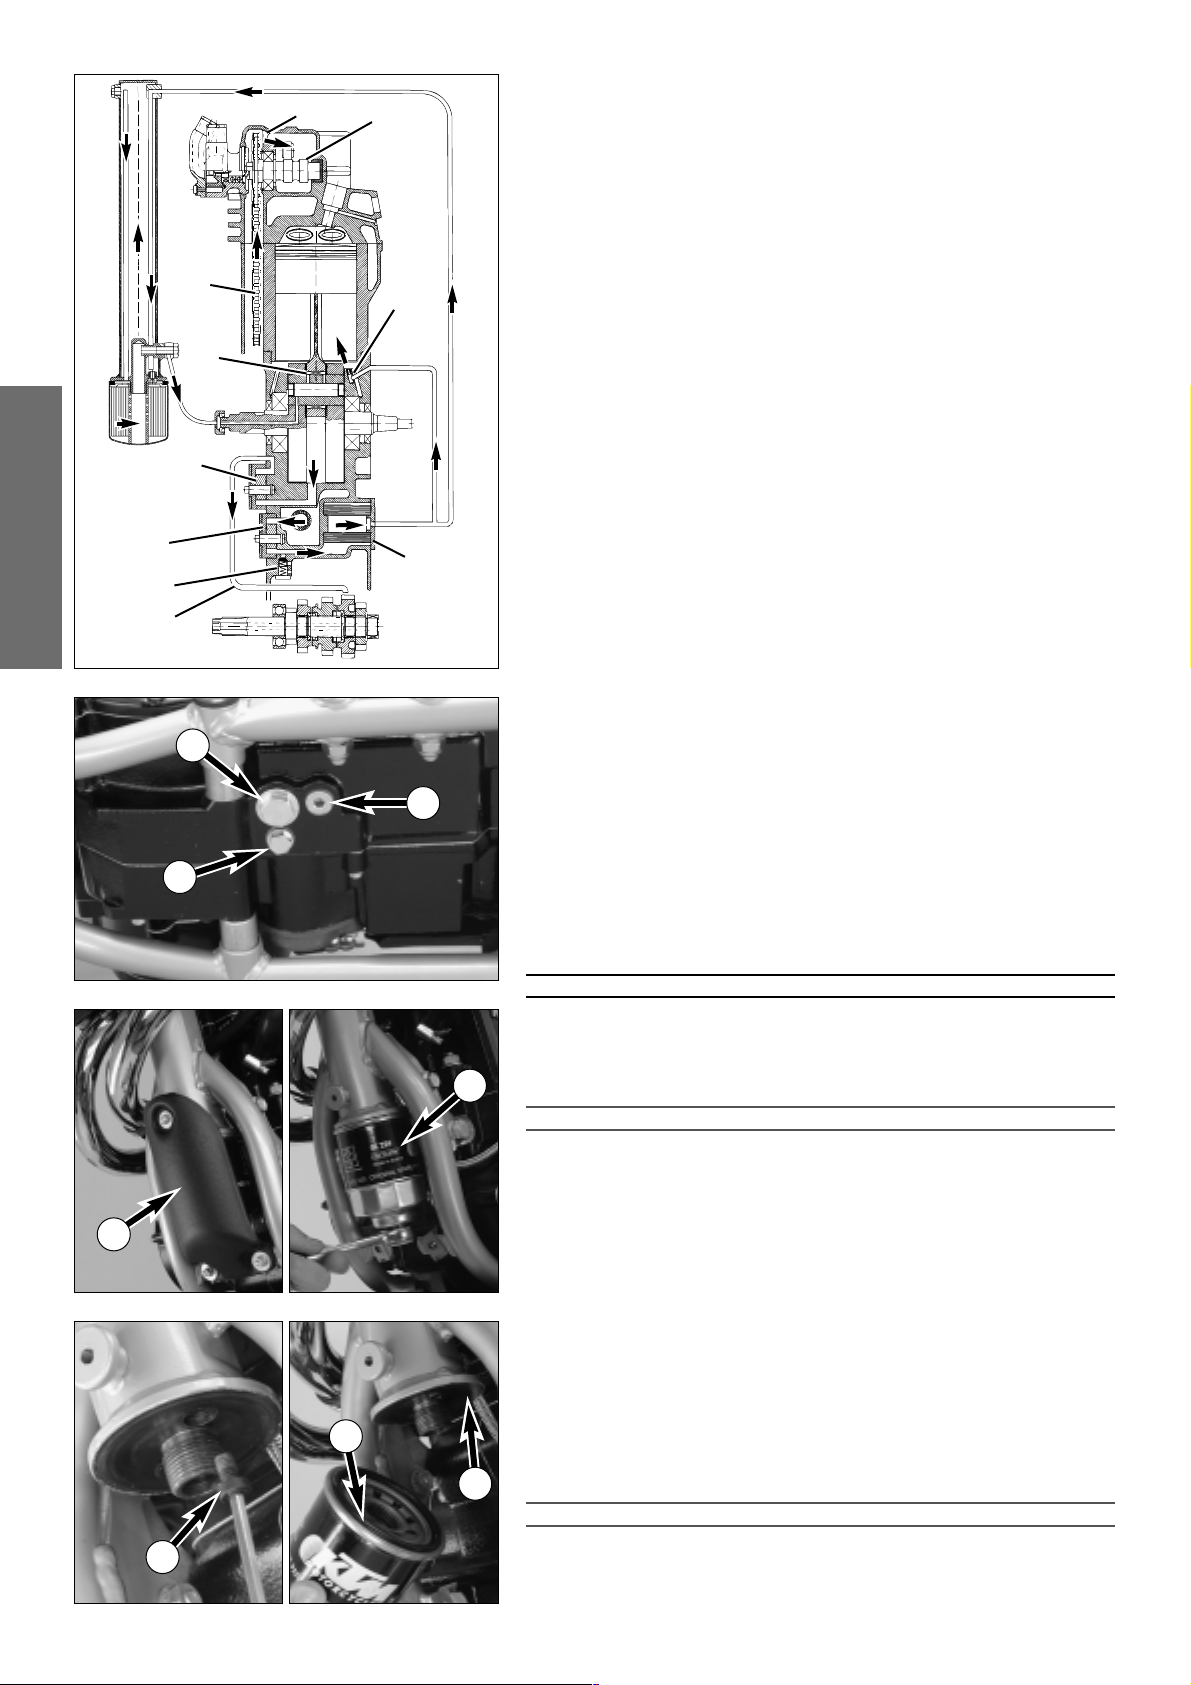
ENGLISH
32
Oil circuit
The oil pump 1 pumps the motor oil past the bypass valve 2 and through
the oil filter
3 . Beyond the oil filter, one of the oil lines forks off to a jet 4
that injects motor oil to the piston pin bearing and the piston head. The
second oil line leads the main oil flow to the frame breast pipe
5 where the
motor oil is cooled off. Then the motor oil flows through the fine screen filter
6 that removes even the finest of contaminants from the motor oil. The
cleansed motor oil is pumped via an oil line and the clutch cover into the
crankshaft to the conrod bearing
7 and drains from there into the crank
case. A additional oil pump
8 suctions the motor oil out of the crank case
and pumps it through the oil canal
9 to the gear wheels of the 4th and 5th
gears. The motor oil reaches the oil sump via the gear wheels. The timing
chain
bk also dips into the oil sump and propels motor oil upwards to the
cylinder head. The motor oil reaches the carnshaft
bm and the valves
through the bore
bl.
Oil and screen filter change, bleeding of the oil system *
Note: The frame breast pipe is integrated into the oil circuit for the sake of
more effectively cooling the motor oil. It is thus important when changing
the oil to also remove the fine screen filter, to drain the motor oil from the
breast pipe and to de-aerate the oil system.
If the oil system is not bled at all or bled insufficiently, the bearings of the
engine will not get enough lubrication, which in turn may result in engine
failure.
Therefore, we recommend that you have the engine oil changed by your
authorized KTM mechanic. During the guaranty period, the oil change must
be performed by an authorized KTM mechanic. Otherwise, the guarantee
will become void.
The engine oil change is to be carried out when the engine is still warm.
WARNING
A
N ENGINE HAVING BEEN RUN WARM, AND THE ENGINE OIL IN IT IS VERY HOT - DO NOT
BURN YOURSELF
.
Place the motorcycle on a horizontal surface
.
Remove the two plugs
bn
and
bo
, and drain oil into a container.
!
CAUTION
!
P
LUGAMUST NOT BE REMOVED, THIS IS PART OF THE BY-PASS VALVE.
Remove the screws and the cover
bp
. Loosen the fine screen filter 6with
an oil filter wrench and then screw it off by hand.
The screw
bq
must be removed to allow the motor oil to flow out of the
frame breast pipe.
Clean the plugs thoroughly with petroleum and compressed air in order to
remove any metal filings. After the oil has drained completely, clean the
sealing areas and remount the plugs together with their gaskets. Tighten
plug
bn
with 30 Nm and plug bowith 20 Nm. Tighten the screw bqwith
10 Nm. Clean sealing surfaces on the frame breast pipe
br
, fill new fine
screen filter with engine oil, and oil rubber gasket
bs
. Replace fine screen filter and screw it back in place, your bare hand will do.
Remove oil dipstick on the clutch cover, fill with 1,3 litre engine oil and
attach plug again.
!
CAUTION
!
–U
SE ONLY ORIGINAL KTM FINE SCREEN FILTERS. USING ANOTHER FILTER BRAND CAN
RESULT IN DAMAGE TO THE ENGINE
.
– I
F THE ENGINE OIL HAS BEEN DRAINED FROM THE FRONT PIPE OF THE FRAME, YOU
MUST BLEED THE OIL SYSTEM
!
A
13
14
8
7
1
2
3
4
5
6
9
10
1211
15
6
16
18
17
Page 34
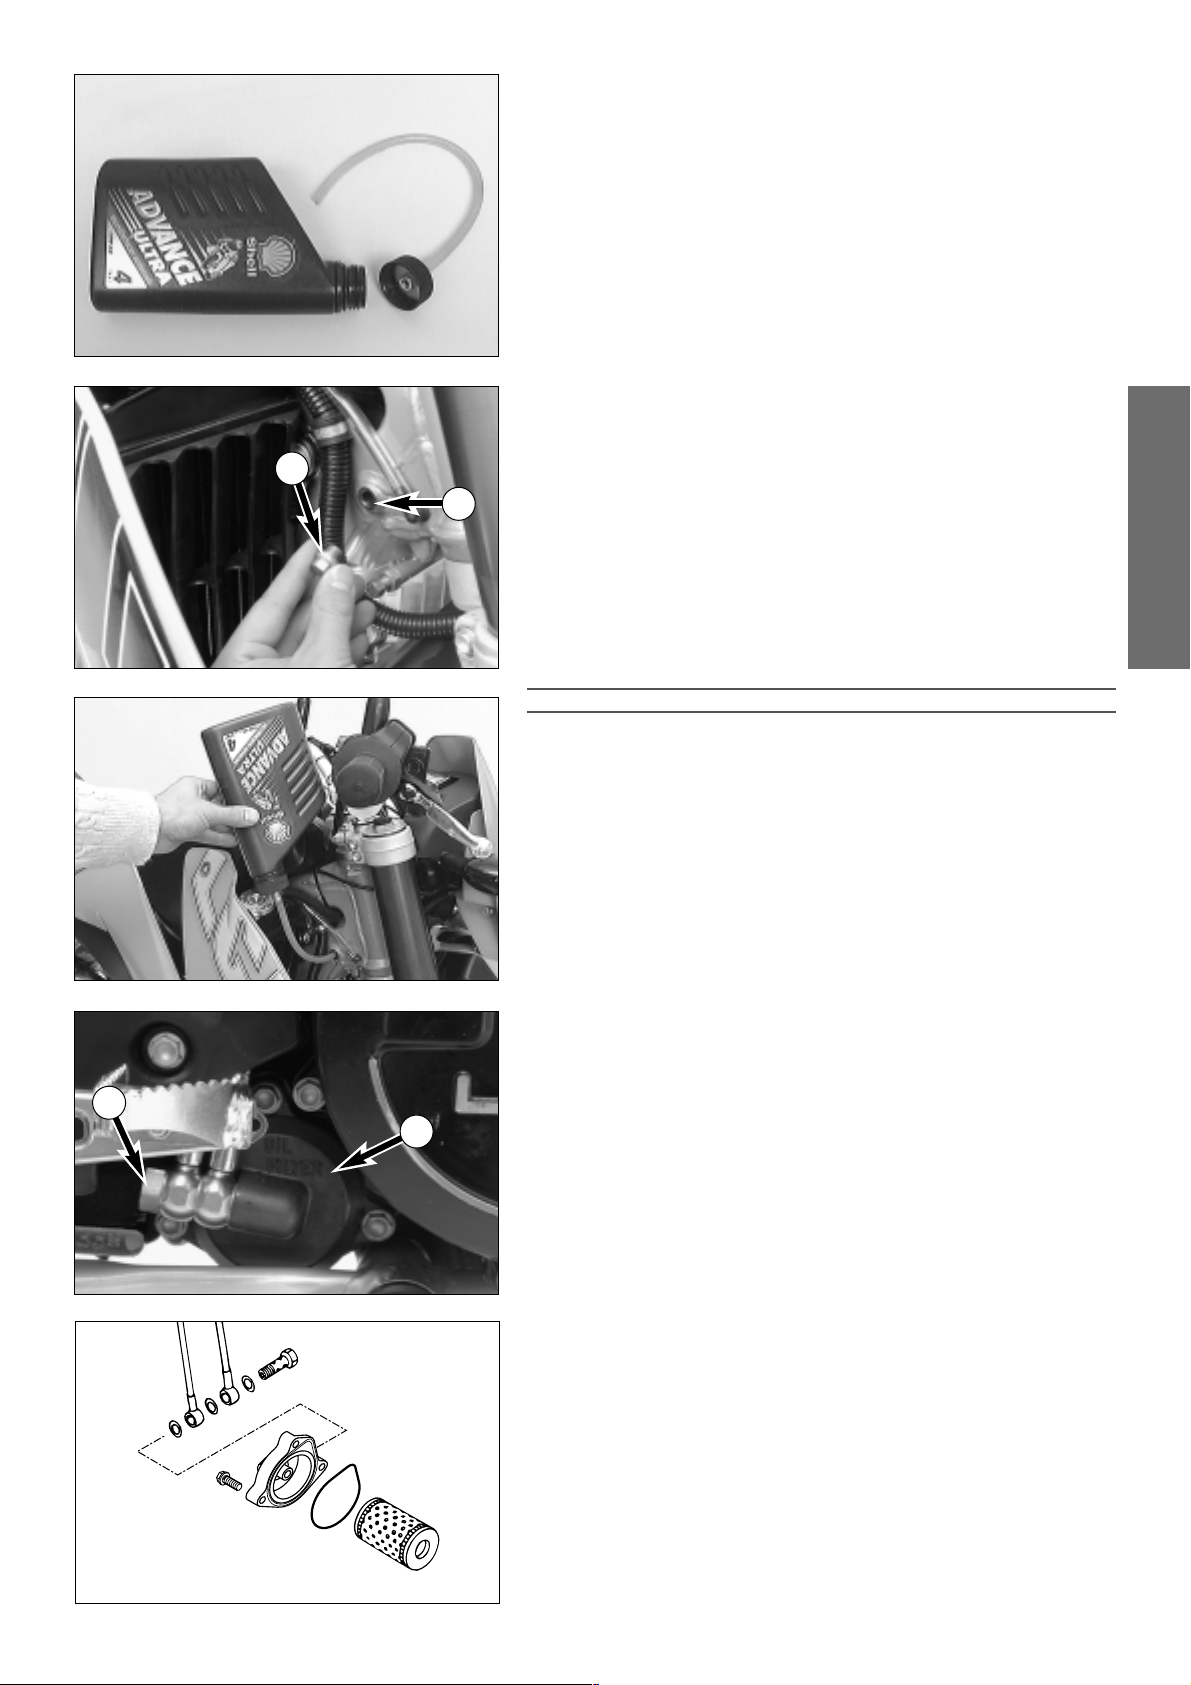
ENGLISH
33
To facilitate bleeding of the oil system, we have added a hose connection
piece and a plastic hose to the set of tools. Take an empty oil can (1 liter)
and drill a 7 mm-diameter hole into the lid. Screw the hose connection
piece into the lid from the outside, and secure it from the inside with the
M8 hexagon nut.
Slip the plastic hose onto the hose connection piece, and you will have your
filling tool.
Fill 0.6 liters of engine oil into the can and remove the plug
1 next to the
steering head. Introduce the plastic hose into the vent hole
B, (see page
30) and fill 0.6 liters of engine oil into the frame’s front tube. Remove plastic hose, start engine, and let it idle (approx. 20 seconds) until oil escapes
at the hole
B. As soon as oil starts to escape, turn off the engine, and
mount the plug together with the gasket.
Let the motor run until it warms. Check the oil drain plugs and the fine
screen filter to make sure they are properly sealed. Check the level of the
motor oil. Place the motorcycle on a horizontal surface (main stand) and
wait for 5 minutes. Remove the dip stick and wipe it with a piece of cloth
SCREW THE DIPSTICK IN ALL THE WAY AND REMOVE IT AGAIN.
The oil level should be between the two marks on the oil dipstick, however,
it must never rise above the MAX mark.
Otherwise, engine oil would get into the air filter box by way of the engine
venting system.
Add engine oil, if necessary.
!
CAUTION
!
–I
NSUFFICIENT OIL OR POOR QUALITY OIL RESULTS IN PREMATURE WEAR OF THE ENGINE.
–C
HECKING THE ENGINE OIL LEVEL WHEN THE ENGINE IS COLD RESULTS IN A FALSE REA-
DING ON THE OIL DIPSTICK AND THEREFORE AN INCORRECT OIL LEVEL.
–DO NOT OVERFILL THE ENGINE CASE.
–D
O NOT UNDERFILL THE ENGINE CASE.
Afterwards check the entire oil system and motor to make sure they are
properly sealed. Attach the covering of the fine screen filter to the frame
breast pipe.
N
OTE: DISPOSE OF USED OIL PROPERLY
! UNDER NO CIRCUMSTANCES MAY USED OIL BE
DISPOSED OF IN THE SEWAGE SYSTEM OR IN THE OPEN COUNTRYSIDE
. 1 LITER OIL CON-
TAMINATES 1.000.000 LITER WATER
Changing oil filter *
Replace the oil filter when changing the engine oil. Press the foot brake
pedal and place a screwdriver or similar between foot brake pedal and
stopper roll so that the oil filter cover is more accessible. Remove banjo bolt
4
and the three screws. Remove oil filter cover 5 and oil filter. Clean filter
housing, oil filter cover, and sealing surfaces. Check oil duct in oil filter
cover if clogged.
Check the O-ring
6
for damage. O-rings need not be replaced unless
damaged. Press the O-ring into the groove of the filter cover. Fit new oil
filter
7
with rubber gasket on the fitting in oil filter cover and mount cover
with filter. Mount three screws and tighten with 5 Nm (4 ft.lb). Mount
hollow screw with seal rings and tighten with 15 Nm (11 ft.lb). Start engine
and check oil system for leakage.
4
5
6
7
4
5
B
1
Page 35

ENGLISH
34
TROUBLE SHOOTING
If you let the specified maintenance work on your motorcycle be carried out, disturbances can hardly be expected. Should an error
occur nevertheless, we advise you to use the trouble shooting chart in order to find the cause of error.
We would like to point out that many operations cannot be performed by oneself. In case of uncertainty, please contact a KTM-dealer.
TROUBLE
Engine doesn’t crank.
The engine doesn't crank.
The neutral indicator lamp
doesn't light up.
The engine cranks only with
pulled clutch lever
Engine cranks with gear
engaged.
Engine cranks but doesn’t
start.
CAUSE
Operating errror
Discharged battery.
Defect ignition lock or emergency
OFF switch
Blown fuse safe-starting system.
Blown main fuse.
Defect safe-starting system.
Defect safe-starting system.
Operating error
The motorcycle has been out of
operation for a longer period of
time. Therefore old fuel has accumulated in the float chamber
Fuel supply interrupted
Flooded engine
Sooty or wet spark plug
Electrode gap too large
Spark plug connector or spark plug
faulty
The plug connection of the CDIunit, the pulse generator or the
ignition coil has oxydized
Water in carburetor or jets blocked
Claped out side stand
Faulty side stand switch
REMEDY
Turn on the ignition, switch the gear to neutral and switch the
emergency OFF switch on.
Recharge the battery and investigate the causes for dischar-
ging; contact a KTM dealer.
Check ignition lock and emergency OFF switch, contact a
KTM dealer.
Replace fuse (below the headlight mask).
Remove seat and replace the main fuse. If fuse blows again
contact a KTM dealer.
Contact a KTM dealer.
Contact a KTM dealer.
Open fuel tap, tank fuel, you did not use choke i.e. the warmstart device. Pay attention to starting off information (see
driving instructions).
The easily inflammable components of the new fuels evaporate during longer periods of standstill.
When the motorcycle has been out of operation for more
than a week, it is therefore recommended to drain the old fuel
from the float chamber. The engine will immediately start off
when the float chamber is filled with new fuel.
Loosen fuel hose at carburettor, lead into a basin and open
fuel tap
– if fuel leaks out, the carburetor might need cleaning
– if no fuel leaks out, check tank ventilation, i.e. clean fuel tap
Fully open the throttle when starting or exchange the spark
plug, respectively
Clean and dry the spark plug or exchange it, respectively
Adjust spark plug elektrode gap to 0,7 mm
Dismount spark plug, connect ignition cable, hold to ground
(blank place on engine) and actuate starter, a strong spark
must be produced at the spark plug
– If no spark is created exchange the spark plug.
– If the new spark plug doesn't produce a spark either, dis-
connect the spark plug connector from the ignition cable,
hold it a distance of approx. 5 mm from ground and start.
– If a spark now occurs, replace spark plug cap
– If no spark is produced, control ignition system
Remove the seat, the right side cover and the fuel tank. Clean
the plug connection and treat it with contact spray
Dismount and clean carburetor
Clap up side stand
Renew side stand switch
Page 36

ENGLISH
35
TROUBLE
Engine fails to idle
Engine does not rev high
Engine will not reach full
power
Engine overheats
CAUSE
Glogged idling jet
Oncorrect adjustment of adjusting
screws on carburetor
Defective spark plug
Defective ignition system
Carburetor fuel level too high
because
Float needle is dirty or worn out
Float leaks
The cold starting system is perma-
nently activated due to a lack of
play in the choke cable.
Defective membrane of slide
(Mikuni carburetor)
Carburetor leaking
(Mikuni carburetor)
Loose carburettor jets
Electronic ignition timing faulty
Fuel supply partically interrupted or
carburetor dirty
Float leaks
Defective membrane of slide
(Mikuni carburetor)
Carburetor leaking
(Mikuni carburetor)
Air filter very dirty
Valve clearance to small
Loss of compression because hand
decompressor has no play
Electronic ignition timing faulty
Insufficient cooling liquid
Radiator fins are extremely dirty
Foam forms in cooling system
Bent radiator hose
Thermostat defective
Blown fan fuse
Defect thermoswitch
Fan defective
REMEDY
Disassemble carburetor and clean jets
Have carburetor adjusted
Replace spark plug
Have ignition system checked
Dismount carburetor and check if worn out
Replace float needle
Replace float
Adjust choke cable.
Replace membrane
Check vacuum hose and venting hose of carburetor for correct position (no kinks)
Tighten jets
Have ignition system checked
Clean and check fuel system as well as carburetor
Replace the float
Replace membrane
Check vacuum hose and venting hose of carburetor for correct position (no kinks)
Clean or replace air filter, contact a KTM dealer
Have valve clearance adjusted
Check setting of the hand decompression cable
Have ignition system checked
Refill cooling liquid (see maintenace work), check cooling
system for leaks
Clean radiator with water jet
Replace cooling liquid, use antifreezer with brand name
Shorten or replace cooling hose
Remove and check thermostat (opening temperature 70°C
(158°F) or replace it, contact a KTM dealer
Replace fuse and check if fan operates properly (see below)
Contact a KTM dealer
Check if fan operates properly. To do this, start the engine,
then bypass the connections to the thermoswitch (bottom
right radiator), contact a KTM dealer
Page 37

ENGLISH
36
ENGLISH
36
TROUBLE
High oil consumption
All switched on lamps blown
out
Headlight and parking light
fail
Flasher lights, brake light,
fan and horn fail
The NEUTRAL lamp is not
on even though the gear is
in NEUTRAL
The battery is discharged
CAUSE
Buckling gear ventilation hose
Engine oil level too high
Engine oil too thin (viscosity)
Voltage regulator faulty
Blown fuse
Blown fuse
Defect indicator lamp.
Defect neutral switch.
Loose connections, defect cable.
The ignition (power consumer)
hasn’t been switched off
The battery isn’t charged by the
generator because
REMEDY
Readjust or replace ventilation hose
Check engine oil level when the engine is warm; correct if
necessary
Use thicker engine oil; see chapter „Engine oil“
Remove seat and check connections. Have voltage regulator
checked
Replace fuse (below the headlight mask).
Replace fuse (below the headlight mask).
Replace indicator lamp
Connect cable to ground; neutral switch must be replaced if
indicator lamp lights up.
Check connections and cables.
Recharge the battery according to the relevant instructions.
Remove seat and check voltage regulator connections; voltage
regulator and generator should be checked by a KTM dealer.
Page 38

ENGLISH
37
Clean your motorcycle regularly in order to maintain the beauty of its plastic surfaces.
The best manner would be to use warm water that has been mixed with a normal trade washing detergent and a sponge. The hard
dirt can be removed before with the help of a soft water jet.
!
CAUTION
!
N
EVER CLEAN YOUR MOTORCYCLE WITH A HIGH-PRESSURED CLEANER OR A HIGH-PRESSURED WATER JET. THE WATER COULD OTHERWISE RUN INTO THE
ELECTRICAL COMPONENTS
, CONNECTORS, SHEATHED CABLES, BEARINGS, CARBURETOR ETC. AND CAUSE DISTURBINGS OR LEAD TO A PREMATURE DESTRUC-
TION OF THESE PARTS.
– You should use normal trade-mark detergents to clean the engine. Strongly dirted parts should be cleaned additionally with the
help of a paint brush.
– After the motorcycle has been rinsed with a soft water jet, it should be dried by air pressure and a cloth. Then take a short drive
until the engine has reached the working temperature and also use the brakes. Due to the heat, the water also evaporates at the
unapproachable parts of the engine and the brakes.
– Slide back the protective covers on the handlebar-mounted instruments so that any water that may have seeped into this part of
the motorcycle is allowed to evaporate.
– After the motorcycle has cooled down, oil and grease all sliding and pivot points. Treat the chain with a chain spray too.
– To prevent failures in the electric system, you should treat the ignition lock, the emergency OFF switch, light switch and the socket
connectors with contact spray.
Should you desire to make a pause over a longer space of time, please observe the following instructions:
– Clean motorcycle thoroughly (see chapter: CLEANING)
– Change engine oil, oil filter and fine screen filter (old engine oil contains aggressive contaminations).
– Check antifreezer and amount of cooling liquid.
– Warm up the engine once again, close the fuel cock and wait until the engine dies. Then open the drain plug of the float chamber
to remove the remaining fuel.
– Remove spark plug and fill in approx. 5 ccm of engine oil into the cylinder through the opening. Actuate kick-starter 10 times in
order to distribute the oil onto the cylinder walls and mount the spark plug.
– Set piston to compression so that the valves will be closed (slowly operate the kickstarter, until you can hear the automatic
decompressor click (release)
– Let fuel flow out of tank into an appropriate container.
– Correct tire pressure.
– Lubricate pivot points of the control levers, foot rests, etc. as well as the chain.
– Service the shock absorber linkage
– Disassemble and charge battery (see chapter: BATTERY).
– The storage place should be dry and not subject to excessive temperature fluctuations.
– Cover the motorcycle with an air permeated tarpaulin or blanket. Do not use non air permeable materials as a possible humidity
might not be able to escape and could cause corrosion.
!
CAUTION
!
I
T WOULD BE VERY BAD TO LET THE ENGINE RUN FOR A SHORT TIME DURING THE STORAGE PERIOD. THE ENGINE WOULD NOT GET WARMED UP ENOUGH
AND THE THUS DEVELOPED STEAM WOULD CONDENSE DURING THE COMBUSTION PROCESS AND CAUSE THE VALVES AND EXHAUST TO RUST
.
RE-INITIATION AFTER TIME OF STORAGE
– Mount the charged battery (regard polarity).
– Fill up tank with fresh fuel.
– Check motorcycle as before each start (see driving instructions).
– Take a short, careful test ride first.
NOTE: Before you put your motorcycle away for the winter, you have to check all parts for their function and wear. Should any service jobs, repairs, or any refitting be necessary, you should have them carried out during the off-season (lower workload at mechanics’
shops). This way, you can avoid the long waiting times at your mechanic at the beginning of the next biking season.
CLEANING
STORAGE
In the event that the motorcycle is also used in winter and on roads where one has to expect salt spraying, you will have to take
precautions against the aggressive road salt.
– clean motorcycle thoroughly and let it dry
– treat engine, carburetor, swing arm, and all other bare or galvanized parts (except for brake discs) with a wax-based anti-corrosion
agent.
WARNING
KEEP ANTI
-CORROSION AGENT FROM GETTING INTO CONTACT WITH THE BRAKE DISCS
, FOR OTHERWISE THIS WILL SIGNIFICANTLY REDUCE THE BRAKING
POWER
.
!
CAUTION
!
A
FTER RIDES ON SALTED ROADS, CLEAN MOTORCYCLE THOROUGHLY WITH COLD WATER AND LET IT DRY WELL!
CONSERVATION FOR WINTER OPERATION
Page 39
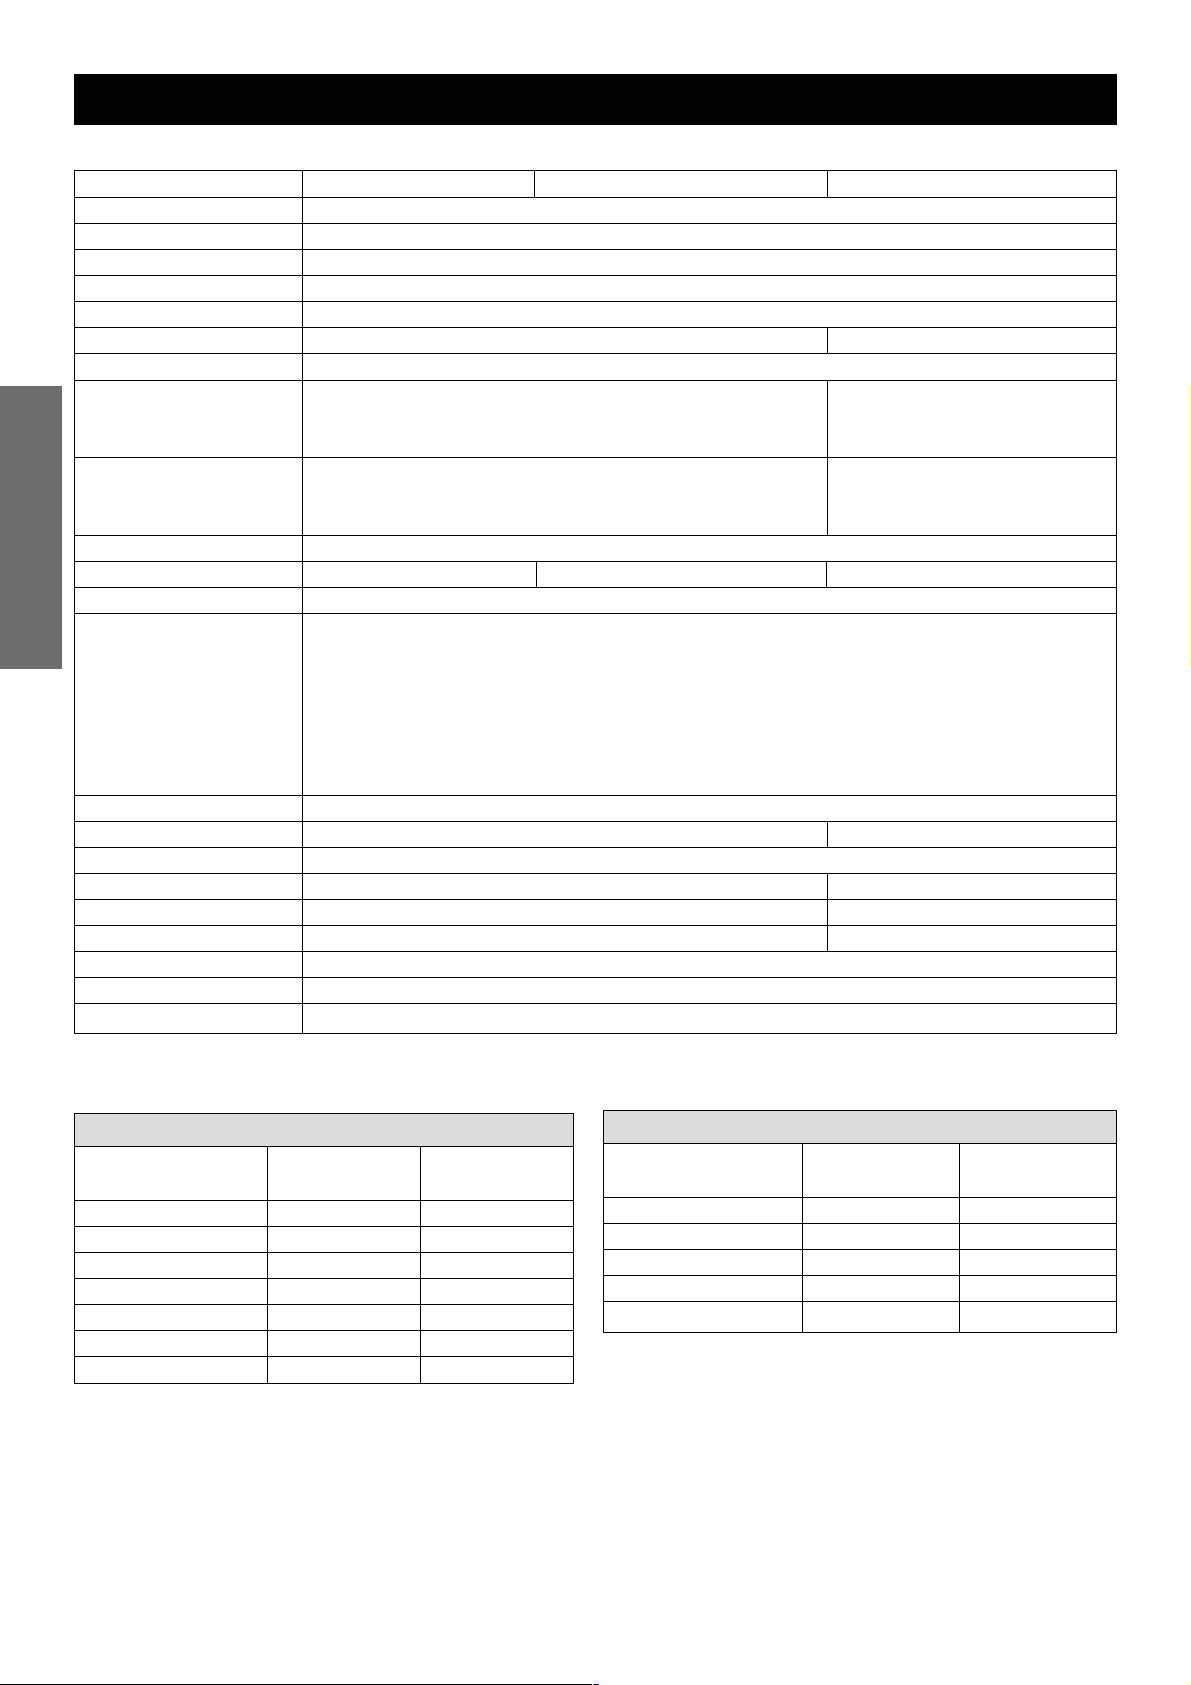
ENGLISH
38
TECHNICAL SPECIFICA TIONS - CHASSIS 400/640 LC4-E, 640 LC4-E SUPERMOTO 2001
400 LC4-E 640 LC4-E 640 LC4-E Supermoto
Frame Central chrome-moly-steel frame
Fork White Power – Up Side Down 43
Wheel travel front/rear 270 / 300 mm (10,6 / 11.8 in)
Rear suspension Central shock absorber (WP) with PRO-LEVER linkage to rear- swing-arm with needle bearing
Front brake Disc brake with carbon-steel brake disc, brake caliper floated
Front brake disc Ø 300 mm (11.8 in) Ø 320 mm (12.6 in)
Rear brake Disc brake with carbon-steel brake disc 220 mm (8.7 in), brake caliper floated
Tyres front 90/90-21 120/70-17
Air press. road, driver only
1.8 bar (26 psi) 2.0 bar (29 psi)
Air press. road with passenger
2.0 bar (29 psi) 2.2 bar (31 psi)
Tyres rear 140/80-18 160/60-17
Air press. road, driver only
2.0 bar (29 psi) 2.2 bar (31 psi)
Air press. road with passenger
2.2 bar (31 psi) 2.4 bar (34 psi)
Fuel tank capacity 11 or 18 liter (2.9 or 4.8 US gallons), 2.5 liter (0,6 US gallons) reserve
Final drive ratio 15:45t 16:42t 17:42t
Chain O – Ring 5/8 x 1/4"
Bulps headlight . . . . . . . . . . . . . . H4 12V 60/55W (socket P43t)
parking light . . . . . . . . . . . 12V 5W (socket W2,1x9,5d)
instrument lights . . . . . . . . 12V 1,2W (socket W2x4,6d)
indicator lamps . . . . . . . . . 12V 1,2W (socket W2x4,6d)
brake – rear light . . . . . . . . 12V 21/5 W (socket BaY15d)
flasher light . . . . . . . . . . . . 12V 10W (socket Ba15s)
license plate illmination . . . 12V 5W (socket W2,1x9,5 d)
Battery maintenance-free battery 12V 8Ah
Steering angle 62,5 ° 63°
Wheel base 1510 ± 10 mm (59.4 ± 0.4 in)
Seat high 955 mm (37.5 in) 935 mm (36.8 in)
Ground clearance 355 mm (14.0 in) 335 mm (13.2 in)
Dead weight without fuel 136kg (300 lbs) 137 kg (302 Ibs)
Max. permissible front axle load
211 kg (465 lbs)
Max. permissible rear axle load
335 kg (740 lbs)
Max. permissible laden weight
350 kg (773 lbs)
400/640 LC4-E 640 LC4-E
SUPERMOTO
WP 0518V707 WP 0518V721
Compression adjuster
20 14
Rebound adjuster
12 14
Spring
4,4 N/mm 5,0 N/mm
Spring preload
6 mm (0,24in) 8 mm (0,32in)
Air chamber length
150 mm (5,9in) 130 mm (5,1in)
Fork oil
SAE 5 SAE 5
STANDARD ADJUSTMENT - FORK
400/640 LC4-E 640 LC4-E
SUPERMOTO
WP 0118V710 WP 0118V720
Compression adjuster
65
Rebound adjuster
77
Spring
66 / 260 66 / 260
Spring preload
27 mm(1,1in) 15 mm(0,6in)
STANDARD-ADJUSTMENT - SHOCK ABSORBER
Page 40
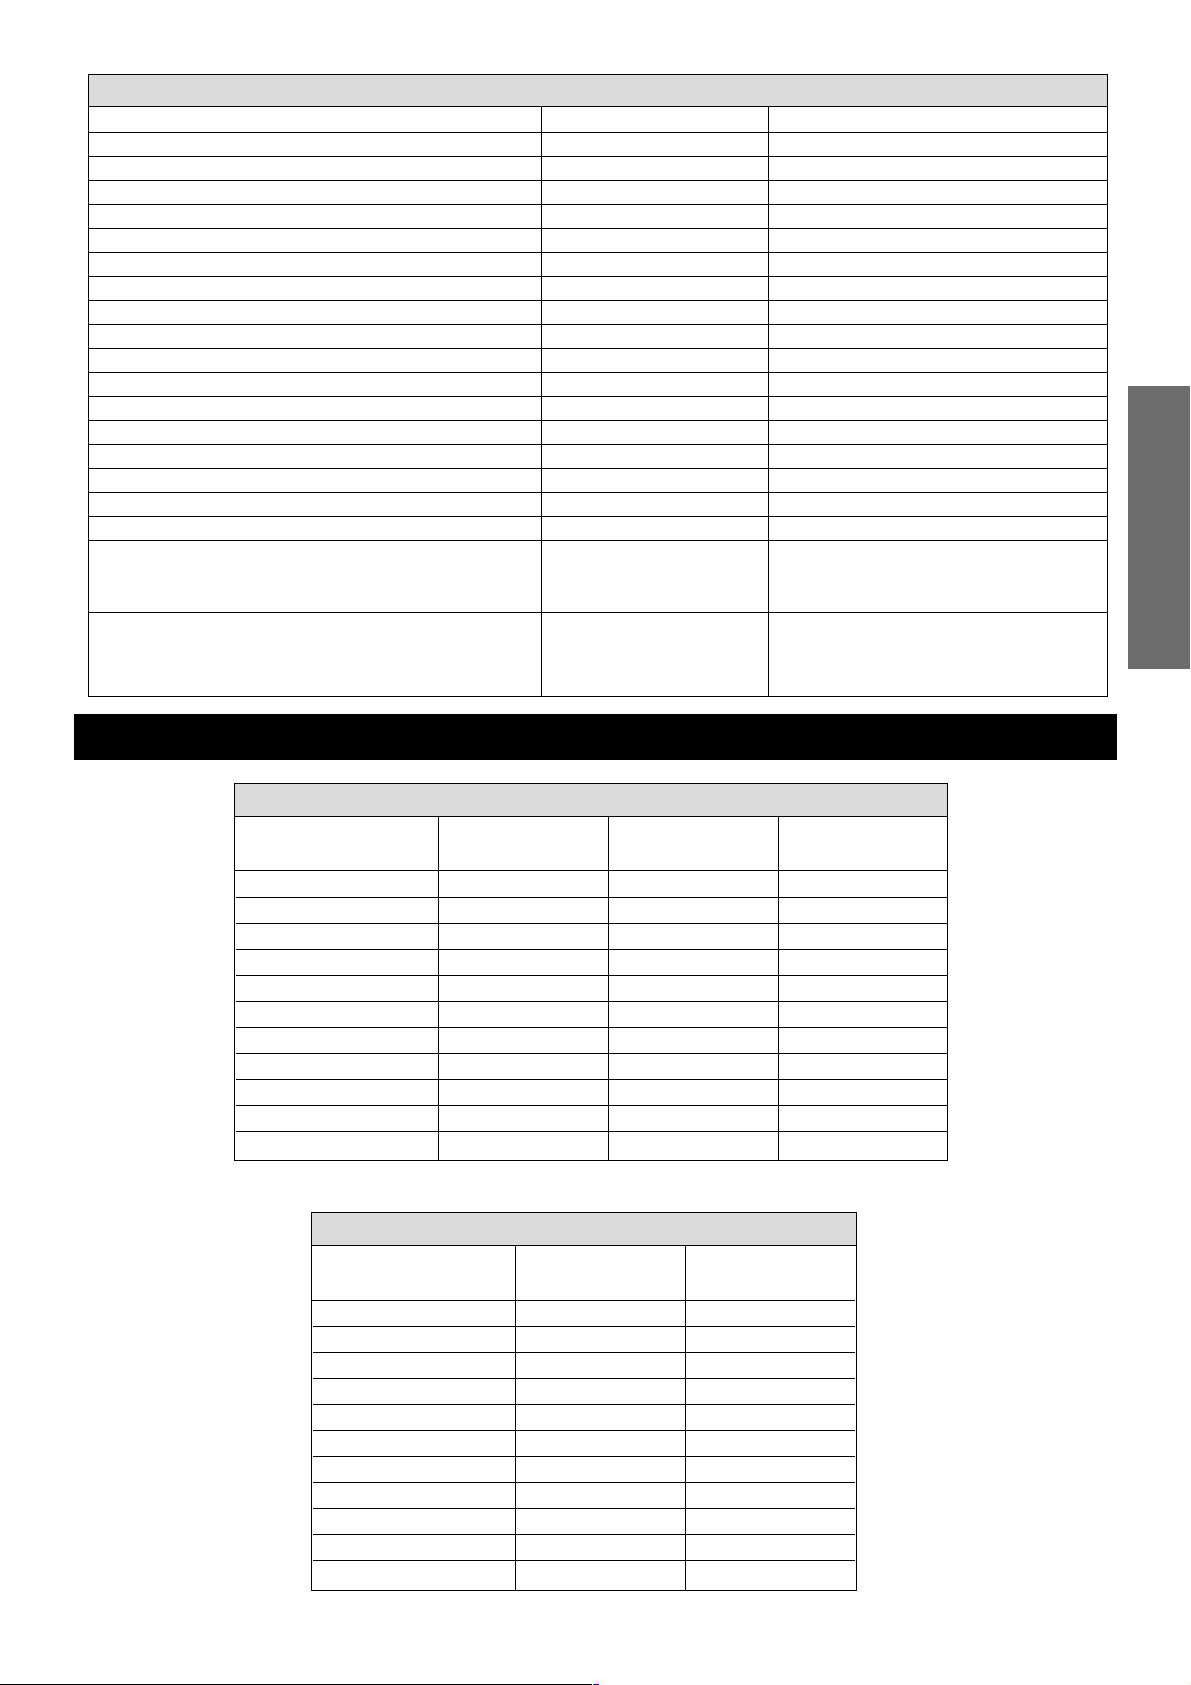
ENGLISH
39
TECHNICAL DATA – ENGINE 400/640 LC4-E, 640 LC4-E SUPERMOTO 2001
Collar nut front axle M16x1,5, M17 40 Nm (30ft.lb)
Collar nut rear axle M20x1,5 80 Nm (59ft.lb)
Shock absorber top M10 45 Nm (33ft.lb)
Shock absorber bottom M10 45 Nm (33ft.lb)
Collar screws brake disk front M6 Loctite 243 + 10Nm (7ft.lb)
Collar screws brake disk rear M6 Loctite 243 + 10Nm (7ft.lb)
Screw brake caliper front M8 Loctite 243 + 25 Nm (19ft.lb)
Bearing bolt linkage arm/frame M12 60 Nm (44ft.lb)
Collar nuts rocker arm bolts M14x1,5 100 Nm (74ft.lb)
Engine mounting screw M10 45 Nm (33ft.lb)
Ball joint for push rod M8 Loctite 243 + 25 Nm (19ft.lb)
Sprocket screws on nuts M8 Loctite 243 + 35 Nm (25ft.lb)
Collar nut swingarm bolt M14x1,5 100 Nm (74ft.lb)
Clamping screws top triple clamp (USD 43) M8 20 Nm (15ft.lb)
Clamping screws bottom triple clamp (USD 43) M8 15 Nm (11ft.lb)
Clamping screws fork stubs M8 10 Nm (7ft.lb)
Screws handlebar clamp M8 Loctite 243 + 20 Nm (15ft.lb)
Allan head screw handle bar support M10 Loctite 243 + 40 Nm (30ft.lb)
Other screws on chassis M6 10 Nm (7ft.lb)
M8 25 Nm (19ft.lb)
M10 45 Nm (33ft.lb)
Other collar nuts on chassis M6 15 Nm (11ft.lb)
M8 30 Nm (22ft.lb)
M10 50 Nm (37ft.lb)
TIGHTENING TORQUES - CHASSIS LC4-E
BASIC CARBURETOR SETTING
Type PHM 38 ND PHM 38 ND BST40-225
Carb.-setting number 100197 100197 090298
Main jet 130 130 142,5
Needle jet AR 264 AR 264 689 X-6
Idling jet 50 50 45
Jet needle K 23 K 23 6G5
Needle clip pos. f. top 2. from top 2. from top 3. from top
Mixt. adj. screw open 1.5 turns 1,5 turns 2,25 turns
Throttle valve 50/1 50/1 –
Starting jet 45(50,55) 45(50,55) –
Performance restrictor slide stop 51mm – –
400 LC4-E
25 kW
400 LC4-E
31 kW
400 LC4-E
USA
BASIC CARBURETOR SETTING
Type BST40-225 BST40-225
Carb.-setting number 080298 090298
Main jet 142,5 142,5
Needle jet 689 X-6 689 X-6
Idling jet 45 45
Jet needle 6G5 6G5
Needle clip pos. f. top 3. from top 3. from top
Mixt. adj. screw open 2,25 2,25
Throttle valve – –
Starting jet – –
Performance restrictor slide stop 17mm –
640 LC4-E
25 kW
640 LC4-E
36 kW
Page 41
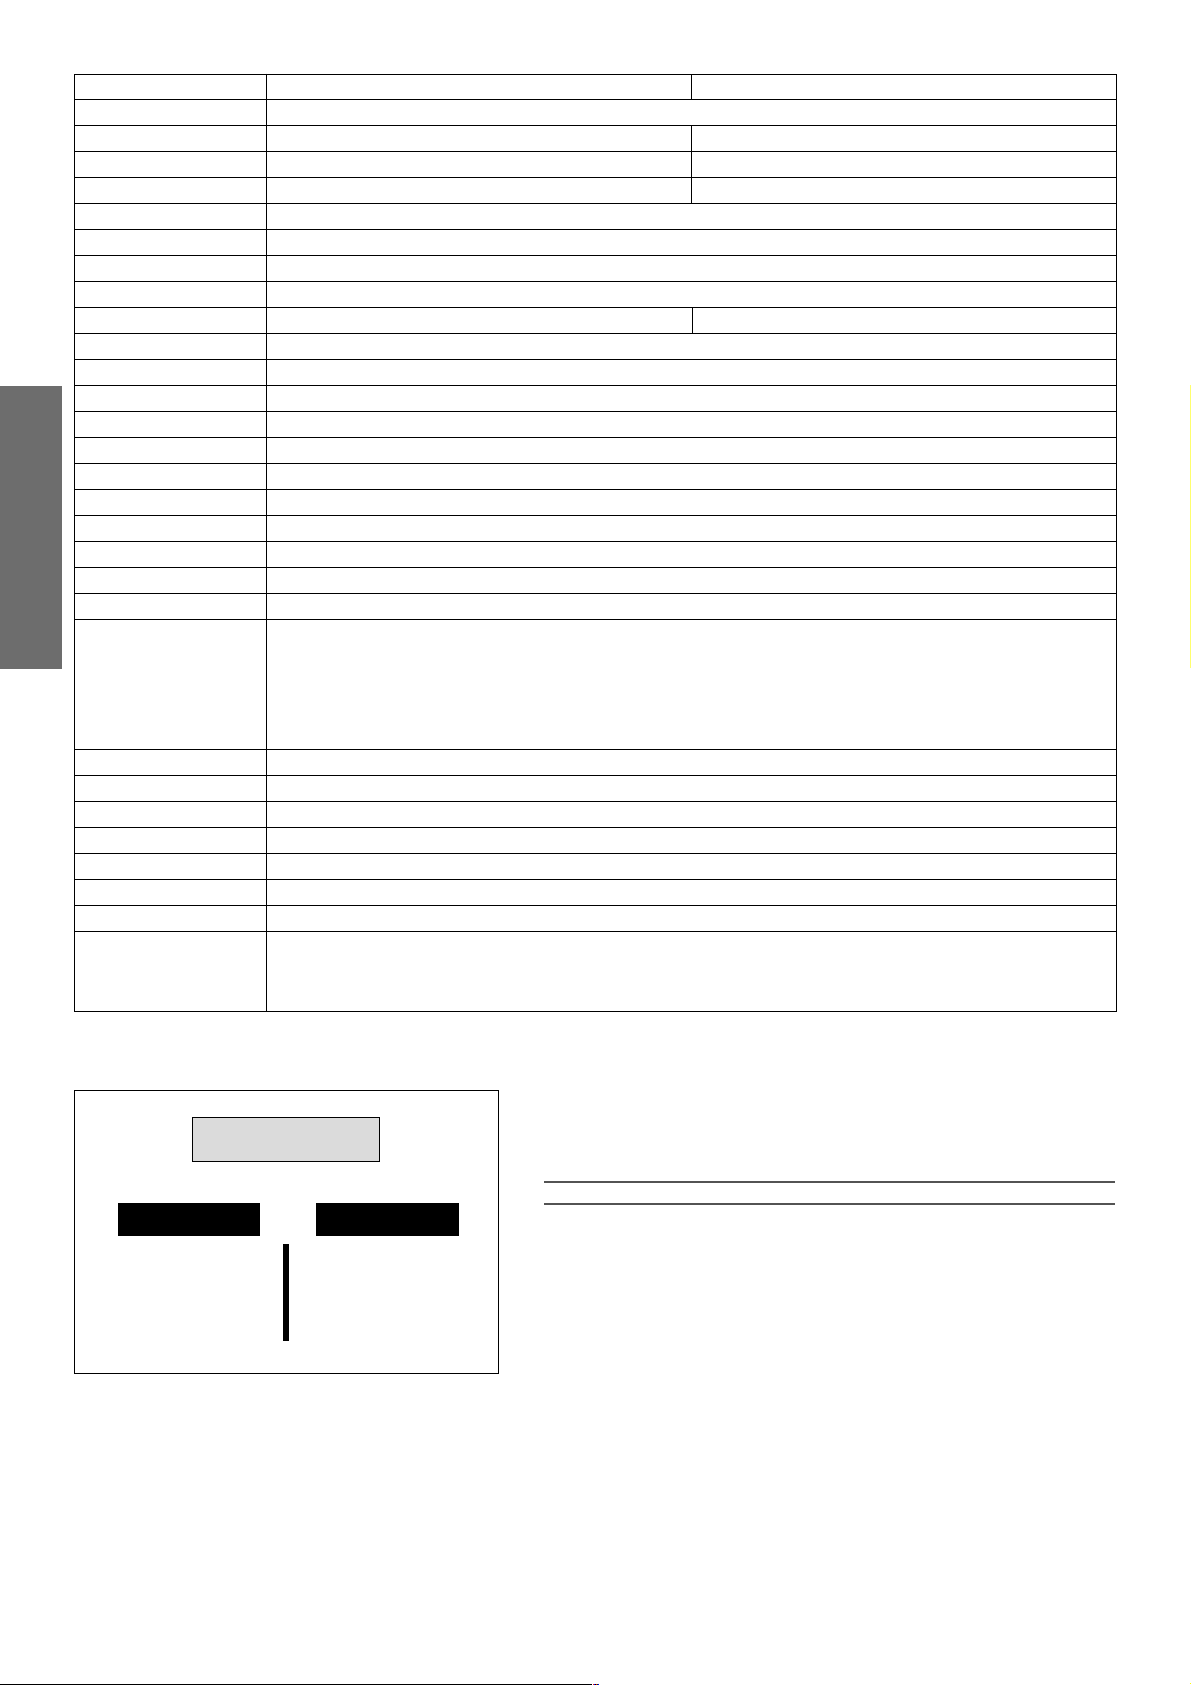
ENGLISH
40
Engine 400 LC4-E 640 LC4-E
Design Liquid-cooled single cylinder 4-stroke engine with balancer shaft and electric starter
Displacement 398 ccm 624,6 ccm
Bore / Stroke 89 / 64 mm 101 / 78 mm
Ratio 10,8 : 1 11 : 1
Fuel unleaded premium gasoline with a least RON 95
Valve timing 4 valves over rocker arm and 1 overhead camshaft, camshaft drive through single chain
Camshaft 249/1
Valve diameter Intake: 36 mm Exhaust: 30 mm
Valve clearence cold Intake: 0,20 mm Exhaust: 0,20 mm 0,15 mm Exhaust: 0,15 mm
Crank shaft bearing 2 cylinder roller bearing
Connecting rod bearing needle bearing
Top end bearing bronze bushing
Piston forged/cast aluminium alloy
Piston rings 1 compression ring, 1 taper face ring, 1 oil scraper ring
Engine lubrication two Eaton-oilpumps
Engine oil see bellow #
Engine oil quantity appr. 2,1 liters including frame
Primary ratio straight geared spur wheels 30 : 81 teeth
Clutch multi disc clutch in oil bath
Transmission 5-speed claw shifted
Gear ratio 1st 14:35
2nd 15:24
3rd 18:21
4th 20:19
5th 22:18
Ignition system contactless DC-CDI ignition with digital advanced system type KOKUSAN
Ignition timing adjustment to max. 38° BTDC at 6000 rpm
Generator 12V 200W
Spark plug NGK DPR8 EA9
Spark plug gap 0,9 mm
Cooling system liquid cooled, permanent rotation of cooling liquid through mechanic driven water pump
Cooling liquid 1 liter, 40% antifreeze, 60% water, at least –25 ° C (–13 ° F)
Starting equipment electric starter and kickstarter
#
–
+
0°C
32°F
15W 40
15W 50
10W 40
10W 50
API: SG, SH
TEMPERATUR
Engine oil
Only use fully synthetic branded oils (Shell Advance Ultra 4) meeting or
surpassing the quality requirements of API classes SG or SH (see specifications on the container).
!
CAUTION
!
POOR OIL QUALITY OR MINOR QUANTITY EFFECT EARLY ENGINE-WEAR.
Page 42
ENGLISH
41
REPORTING SAFETY DEFECTS
If you believe that your vehicle has a defect which could cause a crash or could cause injury or death,
you should immediately inform the National Highway Traffic Safety Administration (NHTSA) in adition
to notifying KTM Sportmotorcycle USA, Inc.
If NHTSA receives similar complaints, it may open an investigation, and if it finds that a safety defect
exists in a group of vehicles, it may order a recall and remady campaign. However, NHTSA cannot
become involved in individual problems between you, your dealer, or KTM Sportmotorcycle USA Inc.
To contact NHTSA, you may either call the Auto Safety Hotline toll-free at 1–800–424–9393 (or
366–0123) in Washington D.C. area) or write to: NHTSA, U.S. Department of Transportation, Washing-
ton, D.C. 20590. You can also obtain other information about motor vehicle safety from the Hotline.
NOISE EMISSION WARRANTY
KTM Sportmotorcycle AG warrants that this exhaust system, at the time of sale, meets all applicable U.S.
EPA Federal noise standards. This warranty extends to the first person who buys this exhaust system for
purposes other than resale, and to all subsequent buyers.
Warranty claims should be directed to: KTM Sportmotorcycle USA Inc. 1906 Broadway,
Lorain, Ohio 44052, Telephone: (216) 246–6301
TAMPERING WARNING:
TAMPERING WITH NOISE CONTROL SYSTEM PROHIBITED. FEDERAL LAW PROHIBITS THE FOLLO-
WING ACTS OR CAUSING THEREOF:
(1)The removal or rendering inoperative by any person other than for purposes of maintenance, repair,
or replacement, of any device or element of design incorporated into any new vehicle for the purpose
of noise control prior to its sale or delivery to the ultimate purchaser or while it is in use, or
(2)the use of the vehicle after such device or element of design has been removed or rendered inopera-
tive by any person.
AMONG THOSE ACTS PRESUMED TO CONSTITUTE TAMPERING ARE THE ACTS LISTED BELOW.
1)Removal of, or puncturing the muffler, baffles, header pipes or any other components which conducts
exhaust gases.
2)Removal or puncturing of any part of the intake system.
3)Lack of proper maintenance.
4) Replacing any moving part of the vehicle, or parts of the exhaust or intake system, with parts other
than those specified by the manufacturer.
WARNING STATEMENT:
This product should be checked for repair or replacement if the motorcycle noise has increased significantly
through use. Otherwise, the owner may become subject to penalties under state and local ordinances.
VEHICLE MINIMUM STOPPING DISTANCE ON DRY PAVEMENT
This figures indicate braking performance that can be met or exeeded by the vehicle to
which they apply, without the wheels, under different conditions of loading. The infor-
mation presented results obtainable by skilled drivers under controlled road and vehicle
conditions, and the information may not be correct under other conditions.
CONSUMER INFORMATION FOR USA ONLY
STOPPING DISTANCE FROM 60 MPH
Model KTM 640 LC4
Light Load
Maximum Load
0 50 100 150 200
165 ft
171 ft
Page 43
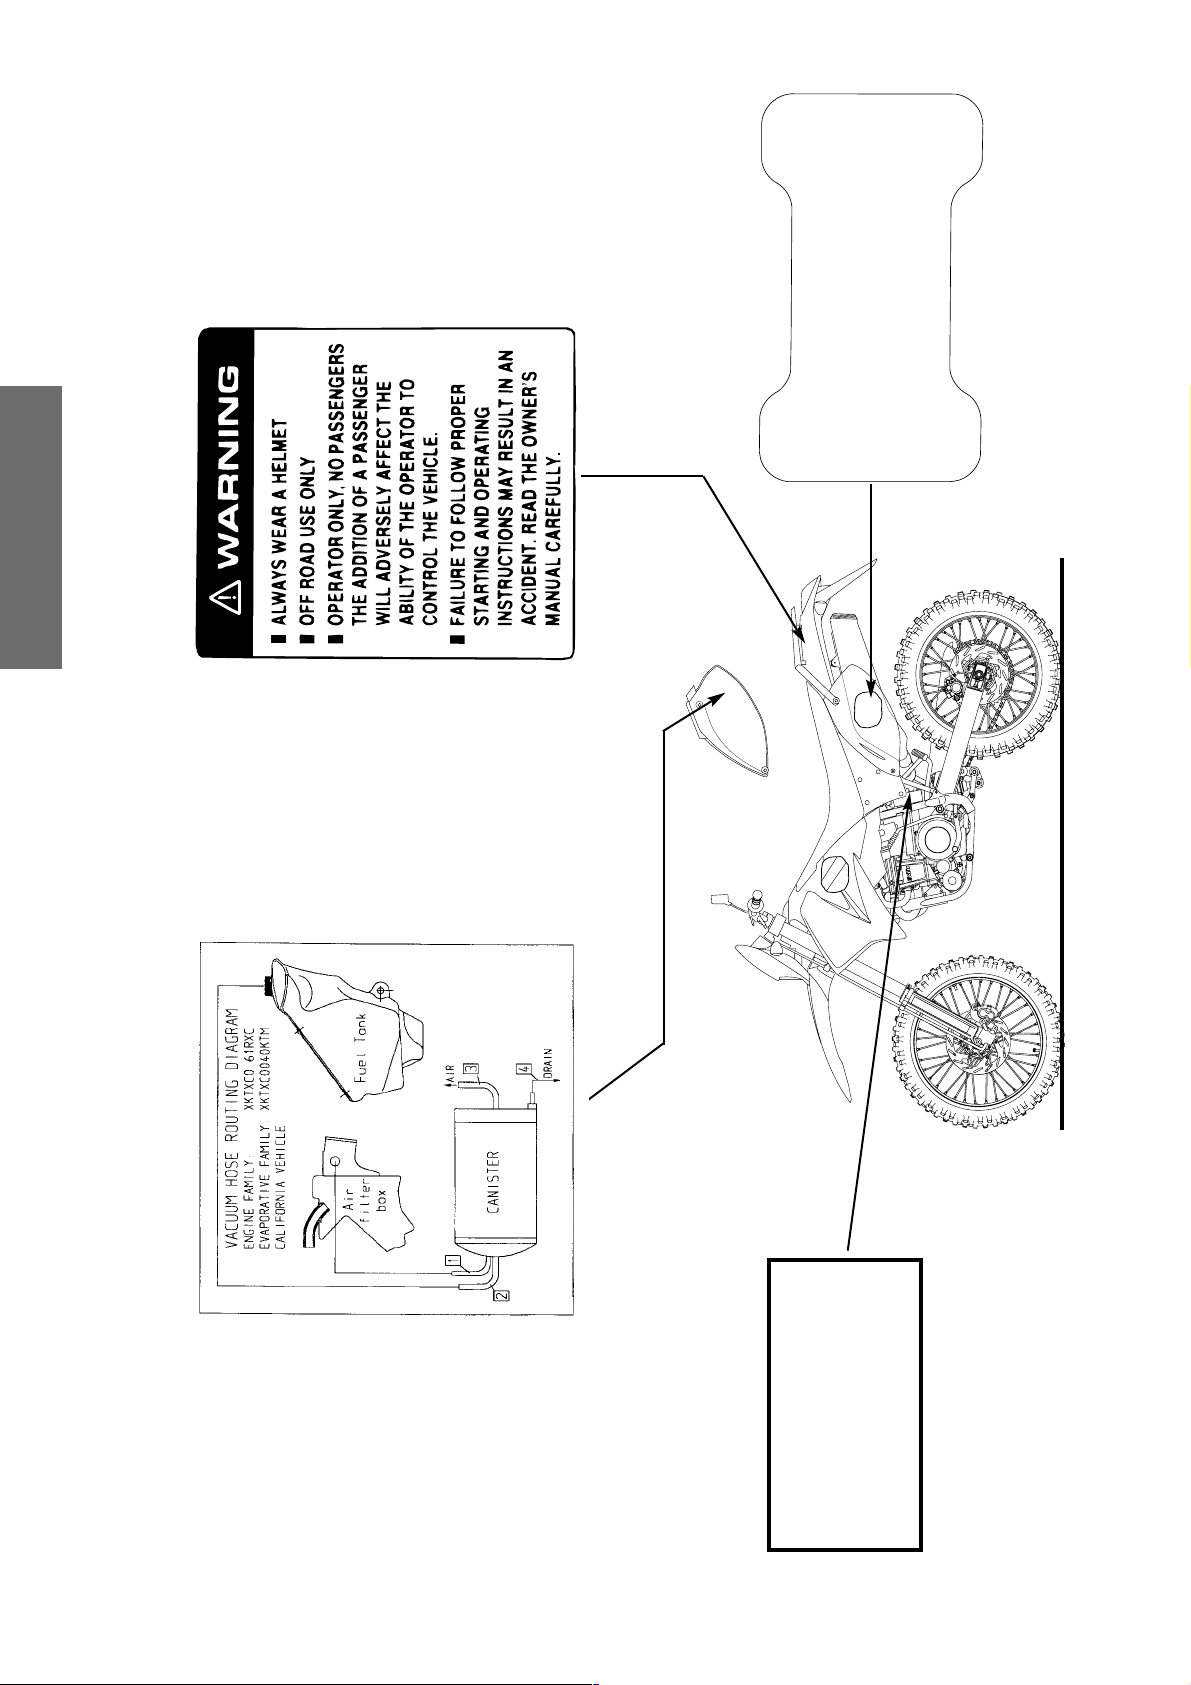
ENGLISH
42
WARNING
THIS SHOCK ABSORBER CONTAINS
NITROGEN GAS UNDER HIGH PRES-
SURE. DO NOT ATTEMPT REFILLING
OR REBUILDING THE SHOCK, SINCE
THE SHOCK MAY BE DAMAGED.
REFER TO THE OWNERS MANUAL
KTM 400/640 LC4-E, 640 LC4-E Supermoto 2001
THIS KTM EXHAUST SYSTEM 583.05.083.200
MEETS EPA NOISE EMISSION REQUIREMENTS
OF 80 dBA FOR MODEL SPECIFIC CODE KTM
5840625. INSTALLATION OF THIS EXHAUST
SYSTEM ON MOTORCYCLES NOT SPECIFIED
MAY VIOLATE FEDERAL LAW.
400/640 LC4-E
400/640 LC4-E
Page 44
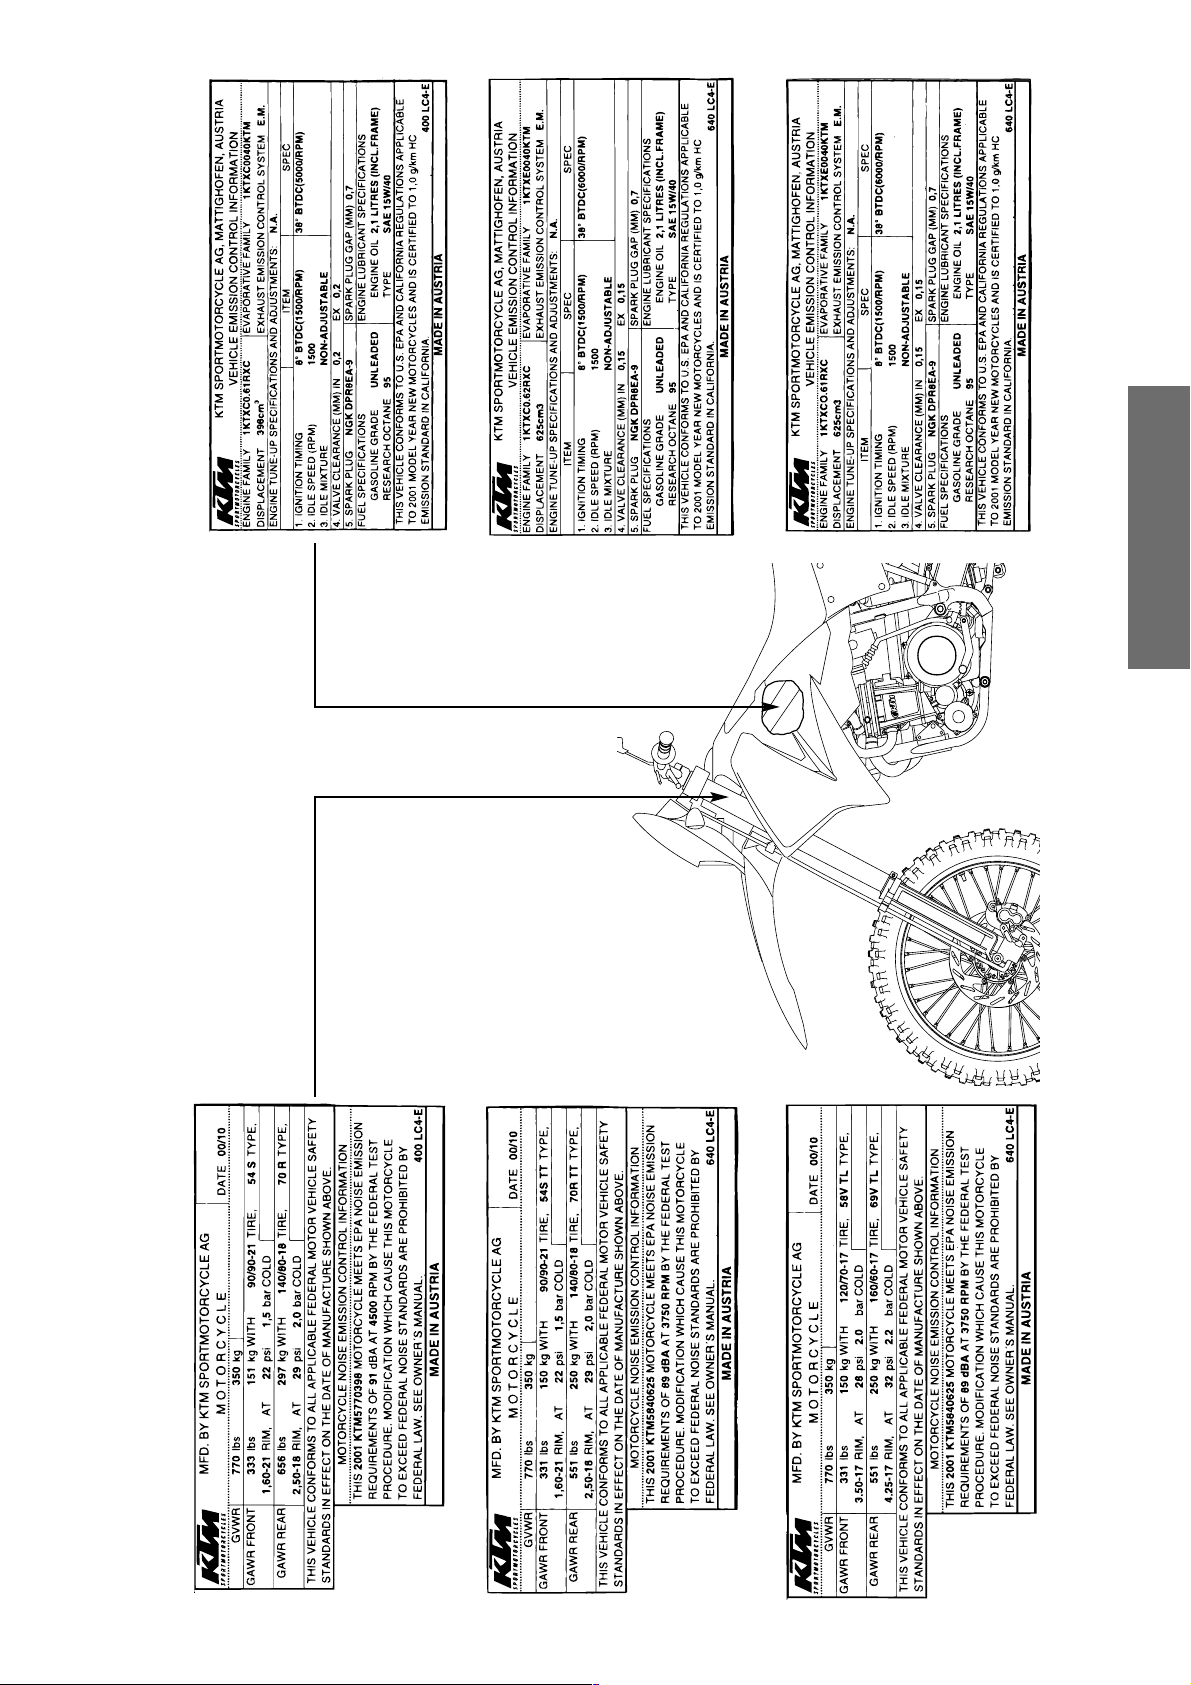
ENGLISH
43
KTM 400/640 LC4-E, 640 LC4-E Supermoto 2001
Page 45

ENGLISH
44
page
Adjisting of free travel at the hand brake lever....................19
Adjusting idling speed.........................................................28
Adjusting the choke cable...................................................30
Adjusting the clutch cable...................................................30
Adjusting the throttle cable.................................................28
Baggage carrier.....................................................................8
Battery................................................................................25
Chain maintenance.............................................................18
Chain wear .........................................................................19
Changing oil filter ..............................................................32
Changing the basic position of the foot brake pedal ...........20
Changing the fine screen filter ............................................31
Changing the spring preload of the shock absorber ............17
Charging the battery...........................................................25
Chassis number.....................................................................4
Check the rear brake fluid level...........................................21
Checking and adjusting steering head bearing ....................17
Checking chain tension.......................................................18
Checking of brake fluid level - front brake ..........................20
Checking rubber ring on the rear shock absorber................18
Checking spoke tension ......................................................24
Checking the adjustment of the hand decompression cable 30
Checking the cooling liquid level.........................................28
Checking the engine oil level ..............................................30
Checking the front brake pads............................................20
Checking the rear brake pads..............................................21
Checking the shock absorbtion rubbers in the rear hub.......23
Choke lever ..........................................................................5
Cleaning .............................................................................36
Clutch lever ..........................................................................4
Combination switch..............................................................6
Compression damping of fork...............................................8
Compression damping of shock absorber..............................8
Conservation for Winter Operation.....................................36
Consumer Information for USA only ..................................40
Cooling system ...................................................................27
Correct chain tension..........................................................18
Dismounting and mounting the front wheel .......................22
Dismounting and mounting the rear wheel.........................23
Draining the carburetor float chamber ................................29
Driving Instructions...............................................................9
page
Engine number, engine type .................................................4
Engine oil............................................................................30
Exchanging the brake light and tail light bulb......................27
Exchanging the headlight lamp...........................................26
Filler cap ...............................................................................6
Foot brake pedal...................................................................7
Fuel ......................................................................................6
Fuel tap ................................................................................7
Fuses for individual power-consuming units........................26
General information on KTM disc brakes ............................19
Hand brake lever ..................................................................5
Hand decompression lever....................................................4
Head word index ................................................................43
Ignition lock..........................................................................5
Kickstarter.............................................................................7
Lubricate shock absorber linkage ........................................17
Main fuse ...........................................................................26
Maintenance work on chassis and engine ...........................16
Oil and fine screen filter change, bleeding of the oil system31
Oil circuit............................................................................31
Operation Instruments..........................................................4
Periodic Maintenance- Schedule .........................................14
Re-initation after time of storage ........................................36
Rebound damping of fork.....................................................8
Rebound damping of shock absorber....................................8
Refilling the front brake fluid reservoir ................................20
Refilling the rear brake fluid reservoir..................................21
Removing the seat..............................................................16
Replacing the parking light bulb..........................................26
Serial number locations.........................................................4
Shift lever .............................................................................7
Speedometer, indicator lamps...............................................5
Starter tip switch, emergency OFF switch..............................6
Storage ..............................................................................36
Technical spezifications- engine ..........................................38
Technical spezifications- chassis ..........................................37
Tires, air pressure................................................................24
Tool set...............................................................................16
Trouble shooting.................................................................33
wiring diagram.........................................................Appendix
HEAD WORD INDEX
Page 46
KTM SPORTMOTORCYCLE AG
5230 Mattighofen
Austria
Internet: www.ktm.at
 Loading...