

Page 1

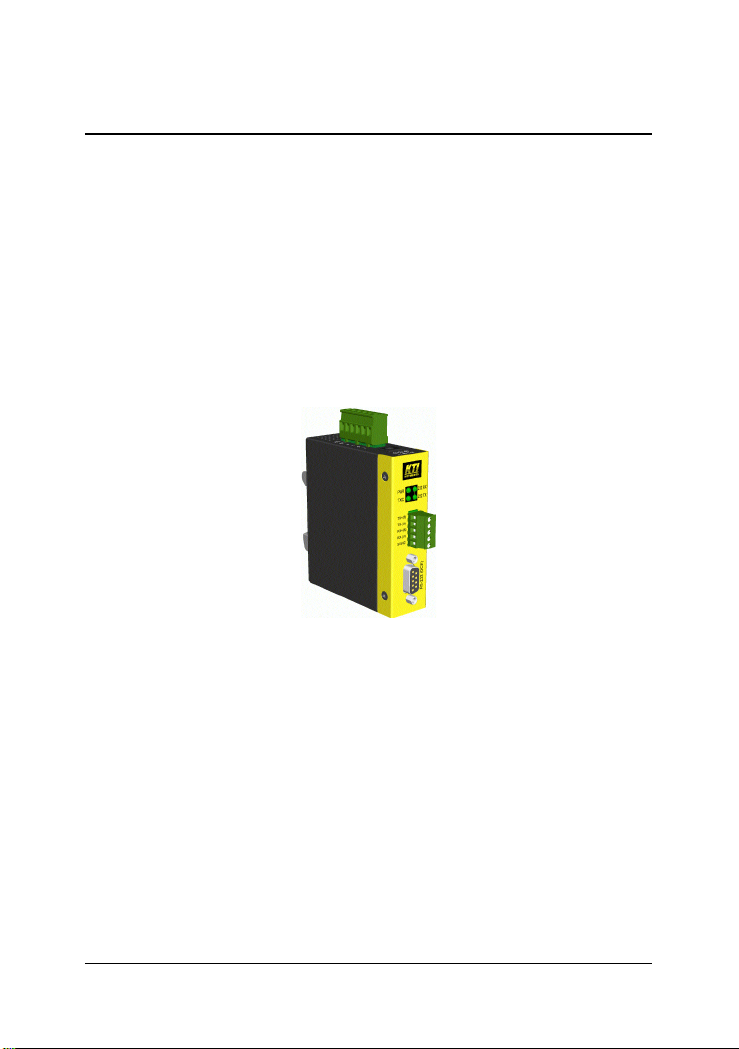
Industrial
RS-232 to RS-485/422 Converter
KSC-240
Installation Guide
DOC.070412-KSC-240
-1-
Page 2

(C) 2006 KTI Networks Inc. All rights reserved. No part of this documentation may be reproduced in any form or by any means or used to make
any directive work (such as translation or transformation) without permission from KTI Networks Inc.
KTI Networks Inc. reserves the right to revise this documentation and to
make changes in content from time to time without obligation on the part
of KTI Networks Inc. to provide notification of such revision or change.
For more information, contact:
United States KTI Networks Inc.
P .O. BOX 631008
Houston, T exas 77263-1008
Phone: 713-2663891
Fax: 713-2663893
E-mail: kti@ktinet.com
URL: http://www.ktinet.com/
International Fax: 886-2-26983873
E-mail: kti@ktinet.com.tw
URL: http://www.ktinet.com.tw/
-2-
Page 3

The information contained in this document is subject to change without
prior notice. Copyright (C) All Rights Reserved.
TRADEMARKS
Ethernet is a registered trademark of Xerox Corp.
FCC NOTICE
This device complies with Class B Part 15 the FCC Rules. Operation is
subject to the following two conditions: (1) This device may not cause
harmful interference, and (2) this device must accept any interference
received including the interference that may cause.
CE NOTICE
Marking by the symbol indicates compliance of this equipment to
the EMC directive of the Europea n Community . Such marking is indica-
tive that this equipment meets or exceeds the following technical standards:
EMC Class B
EN 50081-1/1992 : EN55022:1994/A1:1995/A2:1997 Class B
EN61000-3-2:2000
EN61000-3-3:1995/A1:2001
EN 55024:1998/A1:2001
IEC 61000-4-2:1995
IEC 61000-4-3:1995
IEC 61000-4-4:1995
IEC 61000-4-5:1995
IEC 61000-4-6:1996
IEC 61000-4-8:1993
IEC 61000-4-11:1994
-3-
Page 4

Table of Contents
1. Introduction.........................................................5
1.1 Features ........................................................................................ 6
1.2 Specifications ................................................................................ 7
2. Installation.........................................................12
2.1 Unpacking .................................................................................... 12
2.2 Safety Cautions .......................................................................... 13
2.3 DIN-Rail Mounting ....................................................................... 14
2.4 Panel Mounting............................................................................ 16
2.5 Applying Power ........................................................................... 18
2.6 Power Failure Relay Output ........................................................ 21
2.7 DIP SW Configuration.................................................................. 22
2.7.1 RS-485/422 Driver and Receiver Control ................................. 28
2.8 Making Serial RS-232 Connection .............................................. 29
2.8.1 Cable for Connection to PC COM Port ..................................... 31
3 Making RS-485/422 Connection .......................32
3.1 RS-422 Point-to-Point Circuit ...................................................... 33
3.2 RS-422 Multi-drop Network ......................................................... 3 4
3.3 RS-485 Multi-drop Network ......................................................... 3 6
3.4 RS-485 Half-duplex 2-wire Network ............................................ 38
3.5 RS-485 Full-duplex 4-wire Network ............................................ 3 9
3.6 Summary of the Converter Applications ...................................... 41
4 LED Indicators ...................................................42
4.1 LED Indicators ............................................................................. 4 2
5 Factory Def ault Configuration ..........................43
-4-
Page 5
1. Introduction
The industrial converter is designed to convert RS-232 signals to optically isolated, bala nced, full or half-duplex RS-422 or RS-485 signals at
baud rate up to 115.2Kbps. It features R TS control de sign, which allows
software to control RS-485 tra nsmission. With smart ADCTM (Auto Data
Control) design, the converter can uses send data signal to control RS485 tra nsmission automatically so no software control is required in RS485 mode. The Din-rail mountable design makes it ideal for industrial
cabinets and enclosures. Further, more designs such as signal protection, wide operating temperature range, wide power voltage range are
provided to suit for more industrial applications.
For industrial environment, the converters are designed with the following enha nced features exceeding that of commerci al medi a converters:
• High a nd wide operating Temperature
• Wide operating voltage range for DC power input
• Power input interface: Industrial screw terminal block and DC
power jack for external commercial power adapter as option
• DIN rail mounting support for industrial enclosure
• Screw panel mounting support for industrial enclosure
• Industrial-rated Emission a nd Immunity perf orma nce
-5-
Page 6

1.1 Feature s
Supports RS-232 baud rate up to 115.2Kbps
Operation with no required configuration
Provides surge protection (transient voltage) on all interface lines
Provides high ESD protection on all line signals
Optical isolated between RS-232 and RS-485/422 interfa ces
Supports RS-422, 2-wire RS-485, a nd 4-wire RS-485 network
Supports full-duplex or half-duplex for RS-485/422 interface
Provides remote R TS control for RS-485 tra nsmission
Provides ADC
TM
(Auto Data Control) f or RS-485 tra nsmission
Designed for industrial environments with:
- Surge, ESD, a nd isolation protection
- DIN-rail and pa nel mounting support
- Wide power voltage range support
- T erminal block and Jack-type power connectors
- Wide operating temperature range support
- Alarm relay output f or device power failure
- Industrial-rated emission a nd i mmunity performance
-6-
Page 7
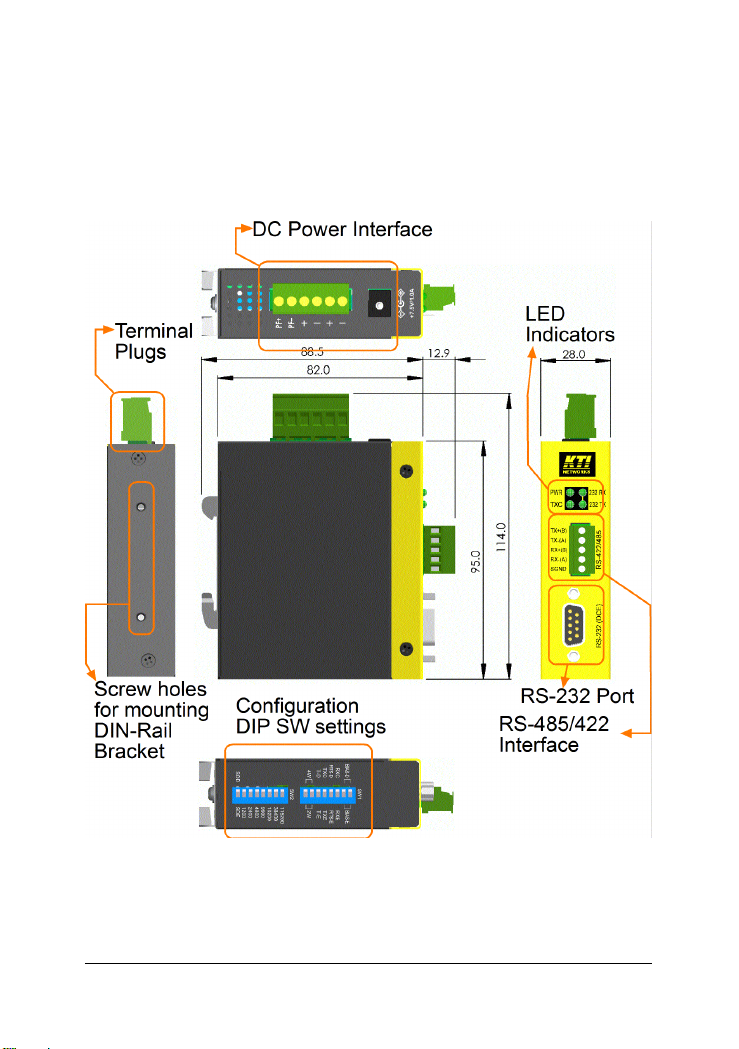
1.2 Specifications
This figure shows the important components of the device:
-7-
Page 8

Serial Interface (RS-232 Port)
Connector DB9 female
Pin Assignments DCE type
Baud Rate Support Up to 115K baud
Connector Shield Connect to chassis ground
Connection Dista nce 15 meters
High ESD T olerance +/-15KV on Tx, Rx lines
Overvoltage Protection Cutoff if over +/-28V
Isolation Optical isolation with RS-485/422 interface
RS-485/422 Interface
Connector Screw-type terminal block
Signal T ype Bala nced differenti al lines
Data Speed 115Kbps
Standard EIA-485, EIA-422
High ESD T olera nce +/-15KV on driver a nd rece iver lines
Overvoltage Protection Cutoff if over +/-28V
LED Indicators
LED DISPLA Y ST ATE INTERPRET ATION
PWR Power status ON Power on
OF F Power off
232 TX RS-232 TX BLIN K RS-232 TX Activity
232 RX RS-232 RX BLIN K RS-232 RX Activity
TX C RS-485/422 TX control O N RS-485 driver is enabled
OF F RS-485 driver is disabled
-8-
Page 9

Configuration DIP SW Settings
SW Name State Function
SW1-2&1 4W O ff 4-wire (RS-485/422 driver receiver separated)
2W On 2-wire (RS-485/422 driver receiver connected)
SW1-3 T -D Off Disable RS-485/422 receiver terminator
SW1-4 TXC Off RS-485/422 driver enable control by RTS or ADC
SW1-5 RTS-D Off Disable RTS control for RS-485/422 TX RX
SW1-6 RXC Off RS-485/422 receiver enable control by RTS or ADC
SW1-8&7 BIAS-D Off RS-485/422 line bias is disabled
SW2-1 SDD Off Disable ADC control for RS-485/422 TX RX
SW2-2 1200 On ADC Timing parameter for RS-232 baud 1200
SW2-3 2400 On ADC Timing parameter for RS-232 baud 2400
SW2-4 4800 On ADC Timing parameter for RS-232 baud 4800
SW2-5 9600 On ADC Timing parameter for RS-232 baud 9600
SW2-6 19200 On ADC Timing parameter for RS-232 baud 19200
SW2-7 38400 On ADC Timing parameter for RS-232 baud 38400
SW2-8 115200 On ADC Timing parameter for RS-232 baud 115200
T -E On Enable RS-485/422 receiver terminator
TXE On RS-485/422 driver is forced to enable
RTS-E On Enable RTS control for RS-485/422 TX RX
RXE On RS-485/422 receiver is forced to enable.
BIAS-E On RS-485/422 line bias is enabled
SDE On Enable ADC control for RS-485/422 TX RX
-9-
Page 10

DC Power Interface
Interface Screw-type terminal block
1. T wo pairs f or power wire ca scading
2. One pair for power failure relay output
DC Jack (-D6.3mm/+D2.0mm)
Operating Input Voltages +7V ~ +30V(+5%)
Power consumption 0.6W @+7.5V DC, 12VDC, 30V DC input
Basic Information
Conversion RS-232 RX data to RS-485/422 TX data
RS-485/422 RX data to RS-232 TX data
Optical Isolation Isolated between RS-232 and RS-485/422
3000V DC rms
Mecha nical
Dimension (base) W 28mm x D 82mm x H 95mm
Housing Enclosed metal with no fan
Mounting Support DIN-rail mounting, Panel mounting
Weight 240g
Environmental
Operating T emperature -20oC ~ 70oC
Storage T emperature -20oC ~ 85oC
Relative Humidity 5% ~ 90%
-10-
Page 11

Certificate
F C C Part 15 Class B
CE/EMC EMI EN50081-1 Class B
EMS EN55024
CE/L V D Safety EN 60950
EN 50081-1/1992 :
EN55022:1994/A1:1995/A2:1997
EN61000-3-2:2000
EN61000-3-3:1995/A1:2001
EN 55024:1998/A1:2001
IEC 61000-4-2:1995 ESD Test
IEC 61000-4-3:1995 RS Test
IEC 61000-4-4:1995 EFT/BURST T e st
IEC 61000-4-5:1995 Surge Te st
IEC 61000-4-6:1996 CS Test
IEC 61000-4-8:1993 Magnetic Field
IEC 61000-4-11:1994 V olatge Int. Dips
-11-
Page 12

2. Installation
2.1 Unpacking
Check that the following components have been included:
• Information CD
• The device unit
• DIN-rail mounting bracket
If any item is found missing or damaged, please contact your local reseller
for replacement.
The following are available optional a ccessories:
• Pa nel Mounting Bra cket
The bracket is used for mounting the device on a panel surface.
• Commercial-rated AC power ad apters:
- Rated AC120V/60Hz DC7.5V 1A
- Rated AC230V/50Hz DC7.5V 1A
- Rated AC100V/50-60Hz DC7.5V 1A
- Rated AC240V/50Hz DC7.5V 1A
The adapters are used for supplying DC power to the converter
via DC power jack interface.
-12-
Page 13

2.2 Safety Cautions
T o reduce the risk of bodily injury, electrical shock, fire, and damage to
the equipment, observe the following precautions.
• Do not service any product except as explained in your system
documentation.
• Opening or removing covers may expose you to electrical shock.
Only a trained service technician should service components inside
these compartments.
• If any of the following conditions occur, unplug the product from the
electrical outlet and replace the part or contact your trained service
provider:
- The power cable, extension cable, or plug is damaged.
- An object has fallen into the product.
- The product has been exposed to water.
- The product has been dropped or damaged.
- The product does not operate correctly when you follow the
operating instructions.
• Do not push any objects into the openings of your system. Doing
so can cause fire or electric shock by shorting out interior components.
• Operate the product only from the type of external power source
indicated on the electrical ratings label. If you are not sure of the
type of power source required, consult your service provider or local
power company.
-13-
Page 14

2.3 DIN-Rail Mounting
In the product package, a DIN-rail bracket is installed on the device for
mounting the converter in a industrial DIN-rail enclosure.
The steps to mount the device onto a DIN rail are:
1. Install the mounting bracket onto the device unit as shown below:
2. Attach bracket to the lower edge of the DIN rail and push the unit
upward a little bit until the bracket can clamp on the upper edge of
the DIN rail.
3 .Cla mp the unit to the DIN rail and make sure it is mounted securely .
4. Make sure that there are proper heat dissipation from and adequate
ventilation around the device.
-14-
Page 15

The final mecha nical dimensions after installing DIN rail mounting bra cket
are:
-15-
Page 16

2.4 Panel Mounting
The device is provided with an optional panel mounting bracket. The
bracket support mounting the device on a plane surface securely. The
mounting steps are:
1 .Install the mounting bracket on the device unit.
2 .Screw the bracket on the device unit.
3 .Screw the device unit on a panel.
4. Make sure that there are proper heat dissipation from and adequate
ventilation around the device. Do not place heavy objects on the
device.
-16-
Page 17

The screw locations a nd final di mension are shown below:
-17-
Page 18

2.5 Applying Power
The power specifications of the device are:
Operating V oltage +7 ~ +30VDC
Power Consumption Max. 0.6W @+30V DC, +12V DC, +7.5VD C
The device provides two types of power interfaces, terminal block and DC
power jack for receiving DC power input from external power supply .
Using T erminal Blocks
Either DC1 interface or DC2 interface can be used to receive DC power
from an external power system. Or, DC2 also can be used to deliver the
power received on DC1 to next device in ca scading way .
DC1 + Vdc Positive (+) terminal
DC1 - Vdc Negative (-) terminal
DC2 + Vdc Positive (+) terminal
DC2 - Vdc Negative (-) terminal
Three 2P terminal plugs are provided together with the device. T wo of the
three plugs are used for DC1 a nd DC2 interface s respectively . The plug is
shown below:
-18-
Page 19

Power wires: 24 ~ 12A W G (IEC 0.5~2.5mm2)
Install the power source wires with the plug properly. Screw the wire with
plug securely. Then, plug in DC1 contacts.
If cascading the power to next device is needed, install the power wires
and plug for another switch. Then, use DC2 contacts.
Note: Only up to four device units can be cascaded to receive power
from one main power input source.
-19-
Page 20

Using DC Power Jack
DC Jack Connector: Jack D 6.3mm D 2.0mm
AC Power Adapters: Optional commercial rated adapters are available
for purchasing.
Rated AC120V/60Hz DC7.5V 1A
Rated AC230V/50Hz DC7.5V 1A
Rated AC100V/50-60Hz DC7.5V 1A
Rated AC240V/50Hz DC7.5V 1A
Connect power adapter DC plug to the DC power jack of the converter
before connecting to the AC outlet. Connect the power adapter to the
AC outlet.
Note: Before you begin the installation, check the AC voltage of your
area. The AC power adapter which is used to supply the DC power
for the unit should have the AC voltage matching the commercial
power voltage in your area.
-20-
Page 21

2.6 Power Failure Relay Output
The device provides a relay output to report power failure event to a
remote alarm monitoring system. The replay output is provided with two
contacts labeled PF+ and PF- in the terminal block interface.
Use the provided 2P terminal plug for signal wiring a nd plug into the PF+/
- contacts. The function is designed as :
Power is normal PF+ contact is shorted with PF- contact.
Power failure PF+ contact is disconnected with PF- contact.
Note: Be sure the voltage applied on PF+/- contacts is within the
specification of 30VDC/1A max. or 120VAC/0.5A max.
-21-
Page 22

2.7 DIP SW Configuration
SW1-2 & 1
4W 4-wire (RS-485/422 driver receiver separated)
2W 2-wire (RS-485/422 driver receiver connected)
[2W] setting activates the internal connection between driver and receiver in RS-485/422 interface. It simplifies the installation of the converter in a 2-wire bus. RS-422 usually uses 2-wire topology only. RS-485
supports both 2-wire a nd 4-wire topology.
-22-
Page 23

SW1-3
T-D Disable RS-485/422 receiver terminator
T-E Enable RS-485/422 receiver terminator
[T-E] setting enables the internal 120 ohms terminator on the receiver
interface. A proper termination is important in a bus topology or multidrop network. The terminator is a resistor added in parallel with the
receiver's "A" a nd "B" line s in order to match the data line characteristic
impedance and reduce signal reflection. This setting is useful when the
converter is installed at the end of a RS-485 or RS-422 bus.
If the internal 120 Ohm terminator is not appropriate for your application,
use [T -D] to disable it a nd use external one.
-23-
Page 24

SW1-4
TX C RS-485/422 driver enable control by R TS or ADC
TX E RS-485/422 driver is forced to enable
[TXC] setting enables RS-485/422 driver to be controlled by R TS method
or ADC method. R TS method is described later . Refer to SW2 settings for
more description a bout ADC method.
[TXE] setting forces RS-485/422 driver to be enabled always. This setting
is applied when Ma ster function is required in an RS-485/RS-422 multidrop bus.
-24-
Page 25

SW1-5
RTS-D Disable R TS control for RS-485/422 driver
RTS-E Enable RTS control f or RS-485/422 driver
RTS control method allows the connected RS-232 device (such a s a PC)
to control RTS signal (CTS input at the converter end) by software to
enable or disable RS-485/422 driver. [RTS-D] setting is used to disable
RTS control method.
SW1-6
R X C RS-485/422 receiver enable control by R TS or ADC
R X E RS-485/422 receiver is forced to ena ble.
[RXC] setting enable to use the sa me [TXC] logic but reverse it as RXC
for the RS-485/422 receiver control. It means when the driver is enabled
the receiver is disabled. The receiver is enabled when the driver is disabled. This setting is applied when a half-duplex communication is
adopted.
-25-
Page 26

SW1-8&7
BIAS-D RS-485/422 receiver line bia s is disabled
BIAS-E RS-485/422 receiver line bi as is ena bled
The line bias is used to maintain the proper idle-state voltage to the idle
condition (when no driver is enabled on the bus). The se bia s resistors are
pull-up resistors on the data B line and pull-down resistors (to ground)
on data A line. In 4-wire configuration, the bi as resistors are pla ced on the
receiver lines. [BIAS-D] disables the internal BIAS re sistors on receiver
lines.
[BIAS-E] setting enables internal bias resistors. The bias configuration
can support up to 30 receiver nodes with no terminators. If the bias
configuration is not proper for your physical topology, set to [BIAS-D]
and use external bias design according to your application.
-26-
Page 27

SW2-1
SD D Disable ADC control for RS-485/422 driver
S DE Enable ADC control for RS-485/422 driver
ADC method involves special circuitry that senses when data is received
on the RS-232 interface and is being transmitted and automatically enables the RS-485/422 driver as well as disabling the driver within one
character length of the end of transmission. This is a useful method for
driver control since it needs no software involved.
In order to obtain a n optimal perf ormance, set SW2-2 ~ SW2-8 the associated timing parameter for each RS-232 baud rate.
SW2-2 1200 ADC Timing parameter for RS-232 baud 1200
SW2-3 2400 ADC Timing parameter for RS-232 baud 2400
SW2-4 4800 ADC Timing parameter for RS-232 baud 4800
SW2-5 9600 ADC Timing parameter for RS-232 baud 9600
SW2-6 19200 ADC Timing parameter for RS-232 baud 19200
SW2-7 38400 ADC Timing parameter for RS-232 baud 38400
SW2-8 115200 ADC Timing parameter for RS-232 baud 115200
-27-
Page 28

2.7.1 RS-485/422 Driver a nd Receiver Control
The following table lists the possible DIP SW settings related to RS-485
a nd RS-422 driver a nd receiver control:
SW1-4 SW1-6 SW1-5 SW2-1 Behavior
TXE R X C RTS-D SDD Driver is ena bled.
Receiver is disabled.
T X E RXE - - Driver is enabled.
Receiver is enabled.
TXC RXE RTS-D SDD Driver is disa bled.
Receiver is enabled.
TXC R X E R TS-E SDD Driver controlled by R TS
Receiver is enabled.
TXC R XC RTS-E SDD Driver controlled by RTS
Receiver is enabled
when driver is disabled.
TXC RXE RTS-D SDE Driver controlled by ADC
Receiver is enabled.
TXC RXC RTS-D SDE Driver controlled by ADC
Receiver is enabled
when driver is disabled.
-28-
Page 29

2.8 Making Serial RS-232 Connection
Typical RS-232 Interfa ce DCE Pin Assignment Ta ble
Pin# Signal Name Input/Output
1 Received Line Signal Detect Output
2 TX Data Output
3 RX Data Input
4 DTE Ready Input
5 Signal Ground Output
6 DCE Ready Output
7 Clear To Send Input
8 Request To Send Output
9 Ring Indicator Output
-29-
Page 30

The RS-232 to RS-485/422 converter as a n interfa ce between a n RS-232
device and RS-485 or RS-422 bus. The connection is illustrated as follows:
The following signals received on the RS-232 interface are converted to
RS-485 bus signals:
Pin# Signal Name Input/Output
2 TX Data Output
3 RX Data Input
7 Clear T o Send Input
-30-
Page 31

2.8.1 Cable for Connection to PC COM Port
Connecting to 9-pin DTE device (Computer or PC COM)
Connecting to 25-pin DTE device (Computer or PC COM)
-31-
Page 32

3 Making RS-485/422 Connection
EIA-485 [TIA-485] Bala nced (differential) interfa ce; defines the Physical
layer, signaling protocol is not defined. EIA-485 specifies bidirectional,
half-duplex data tra nsmission. Up to 32 tra nsmitters a nd 32 receivers may
be interconnected in a ny combination, including one driver a nd multi ple
receivers (multi-drop), or one receiver a nd multi ple drivers.
EIA/TIA-422 define a Bala nced (differential) interfa ce; specifying a single,
unidirectional driver with multiple receivers (up to 32). RS-422 will support Point-to-Point, Multi-Drop topology , but not Multi-Point [EIA485].
EIA-485 devices may be used in 422 circuits, but EIA-422 may not be
used in 485 circuits (because of the lack of a n Ena ble line).
The published TIA/EIA 485 a nd RS-422 sta ndards define only the electrical characteristics of the drivers and receivers as listed below. They did
not standardize such things such as cables and connectors, pinouts, bus
arbitration, signaling protocols, or physical wiring topology. Many different implementations have come into use and they are often incompatible with each other .
Characteristics RS-422 RS-485
Mode of operation Differential Differential
Unidirectional Full Duplex
Multipoint Multipoint
Allowed no. of Tx and Rx 1 Tx, 10 Rx 32 Tx, 32 Rx
Maximum cable length 4000ft length 4000ft length
Maximum data rate 10Mbps 10Mbps
Minimum Tx driver output range +/- 2V +/- 1.5V
Maxi mum Tx driver output range +/- 5V +/- 5V
Maximum Tx short-circuit current 150mA 250mA
Tx load i mpeda nce 100 54
Rx input sensitivity +/- 200mV +/- 200mV
Maximum Rx input resistance 4k 12k
Rx input voltage range +/- 7V -7V to +12V
Rx logic high >200mV >200mV
Rx logic low <200mV <200mV
-32-
Page 33

RS-485 and RS-422 are in wide use as an interface for telecommunications, industrial, medical, security a nd networking a pplications. The f ollowing sections describe examples of some of popular physical
topologies.
3.1 RS-422 Point-to-Point Circuit
This is the simplest configuration, just one driver and one receiver. If
termination is used, it is only required at the receiver . Most RS-422 cables
used to connect telecom or data-com equipment are point to point links.
The converter can convert an RS-232 device into a Driver node in this
point-to-point circuit.
The configuration is:
SW1-4 TXE Enable Driver always
SW1-6 R XC Enable Receiver R TS/ADC Control
SW1-5 R TS-D Disable R TS control
SW2-1 SD D Disable ADC control
-33-
Page 34

It also can convert an RS-232 device into a receiver node in this point-topoint circuit.
The configuration for a RECEIVER node is:
SW1-4 TX C Enable RTS/ADC Control for Driver
SW1-6 R XE Enable Receiver always
SW1-5 R TS-D Disable R TS control
SW2-1 SD D Disable ADC control
3.2 RS-422 Multi-drop Network
In this topology there is only one driver sending to one or more receivers. One termination resistor is recommended at the extreme end of the
bus to eliminate reflections. Up to 10 receivers are permitted under RS-
422. Multiple receive-only nodes may be used for point-to-multipoint
communications.
-34-
Page 35

The converter can convert an RS-232 device into a Master node in this
multi-drop network.
The configuration for MASTER node is:
SW1-4 TXE Enable Driver always
SW1-6 R XC Enable Receiver R TS/ADC Control
SW1-5 R TS-D Disable R TS control
SW2-1 SD D Disable ADC control
It also ca n convert a n RS-232 device into a SLA VE node in this multi-drop
network.
The configuration for a SLAVE node is:
SW1-4 TX C Enable RTS/ADC Control for Driver
SW1-6 R XE Enable Receiver always
SW1-5 R TS-D Disable R TS control
SW2-1 SD D Disable ADC control
-35-
Page 36

3.3 RS-485 Multi-drop Network
This topology is similar to RS-422 multi-drop. However , up to 32 receivers are permitted under RS-485. This may be used for point-to-multipoint
communications.
The converter can convert an RS-232 device into a Master node in this
multi-drop network as illustrated below:
The configuration for MASTER node is:
SW1-4 TX E Enable Driver always
SW1-6 R X C Enable Receiver R TS/ADC Control
SW1-5 R TS-D Disable R TS control
SW2-1 SD D Disable ADC control
-36-
Page 37

It is also able to convert a n RS-232 device into a SLAVE node in this multidrop network.
The configuration for a SLAVE node is:
SW1-4 TX C Enable RTS/ADC Control for Driver
SW1-6 R XE Enable Receiver always
SW1-5 R TS-D Disable R TS control
SW2-1 SD D Disable ADC control
-37-
Page 38

3.4 RS-485 Half-duplex 2-wire Network
This is the typical RS-485 topology. It takes a dva ntage of RS-485 ca pability to support multiple drivers on a bus. RS-422 devices should not be
used in this configuration. This topology enables bidirectional communication from ma ny nodes over long dista nces at low to medium data rates,
all on a single pair of wires (2-wire).
It can i mplement a very functional, very flexible a nd very economical data
network. Because signals travel in both directions, this bus should be
terminated at both ends to prevent reflections. Only one node can drive
the bus at a time, making this a half-duplex communication cha nnel. Only
one driver should be active at any one time. Therefore the transceivers
used on a half-duplex bus should support a Driver Enable function.
-38-
Page 39

The converter features RS-485 driver a nd receiver in one device. It also
provides very flexible configuration settings for Driver Enable control
a nd Receiver Enable control. The configuration for the node in RS-485 2wire network is:
SW1-2&1 2W Select 2-wire topology
SW1-4 TX C Enable RTS/ADC Control for Driver
SW1-6 R XC Enable RTS/ADC Control for Rece iver
SW1-5 RTS-E Use RTS control (optional)
SW2-1 S D E Use ADC control (optional)
SW2-2-8 Baud Baud when ADC control is ena bled (optional)
SW1-3 T-D Disable internal terminator (optional)
3.5 RS-485 Full-duplex 4-wire Network
The 4-wire network simplifies bus arbitration in multi-node RS-485. A
single Master node is the only driver allowed on the top most wire pair.
All other nodes listen to all data traffic that passes on the party-line type
multi-drop bus. Nodes may transmit on the lower pair of wires when
addressed by the master node or by using a software token-passing bus
arbitration scheme.
-39-
Page 40

The master node may drive its bus while any of the slave nodes are
driving the lower pair, making this 4-wire network a full-duplex communication cha nnel. All communication occurs from master to slave or slave
to master, so any peer to peer communications must be routed through
the master node.
To convert an RS-232 device into a Master node in RS-485 4-wire network, the configuration is:
SW1-2&1 4W Select 4-wire topology
SW1-4 TX E Enable Driver always
SW1-6 R X C Enable RTS/ADC Control f or Receiver
SW1-5 RTS-E Use RTS control (optional)
SW2-1 SDE Or use ADC control (optional)
SW2-2-8 Baud Baud when ADC control is ena bled (optional)
SW1-3 T-D Disable internal terminator (optional)
To convert an RS-232 device into a Slave node in RS-485 4-wire network,
the configuration is:
SW1-2&1 4W Select 4-wire topology
SW1-4 TX C Enable RTS/ADC Control for Driver
SW1-6 R XE Enable Receiver always
SW1-5 RTS-E Use RTS control (optional)
SW2-1 SDE Or use ADC control (optional)
SW2-2-8 Baud Baud when ADC control is ena bled (optional)
SW1-3 T-D Disable internal terminator (optional)
-40-
Page 41

3.6 Summary of the Converter Application s
The common topologies imple mented with RS-485 a nd RS-422 are:
1. RS-422 point to point in 2 -wire circuit
2. RS-422 2-wire multi-drop network
3. RS-485 2-wire multi-drop network
4. RS-485 half-duplex bidirectional network in 2-wire topology
5. RS-485 full-duplex bidirectional network in 4-wire topology
The converter is equipped with functionality a nd flexibility to convert a n
RS-232 device to a node in a ny one of the above topologies.
-41-
Page 42

4 LED Indicators
The following figure shows the locations of the LED indicators:
4.1 LED Indicators
LED DISPLA Y STATE INTERPRET ATION
PWR Power status ON The device is powered on.
OFF The device is powered off.
232 TX RS-232 TX ON RS-232 TX data is present
OF F No RS-232 TX data
232 RX RS-232 RX ON RS-232 RX data is present
OF F No RS-232 RX data
TXC RS-485 ON The driver is enabled.
Driver Enable OFF The driver is disabled and
is in tri-state (high-impeda nce).
-42-
Page 43

5 Factory Default Configuration
The following table lists the factory default settings for configuration
DIP SW :
SW Name Default Setting
SW1-2&1 4W 4-wire (RS-485/422 driver receiver separated)
SW1-3 T -D (Off) Disable RS-485/422 receiver terminator
SW1-4 TXC (Off) RS-485/422 driver enable control by R TS or ADC
SW1-5 R TS-D (Off) Disable RTS control for RS-485/422 driver
SW1-6 RXC (Off) RS-485/422 receiver enable control by R TS or AD C
SW1-8&7 BIAS-D (Off) Disa ble RS-485/422 line bias
SW2-1 SDE (On) Enable ADC control for RS-485/422 driver
SW2-2 Of f Disable ADC Ti ming for RS-232 baud 1200
SW2-3 Of f Disable ADC Ti ming for RS-232 baud 2400
SW2-4 Of f Disable ADC Ti ming for RS-232 baud 4800
SW2-5 9600 (On) Select ADC Ti ming for RS-232 baud 9600
SW2-6 Of f Disable ADC Ti ming for RS-232 baud 19200
SW2-7 Of f Disable ADC Ti ming for RS-232 baud 38400
SW2-8 Of f Disable ADC Ti ming for RS-232 baud 115200
-43-
 Loading...