

KT&C K9 Series, K7 Series Installation Manual
Installation Guide
The contents of this guide are subject to change without prior notice.
LAN
VIDEO
IN
LOOP
OUT
123
4
5
678
9
10
11
12 13
14
15
16
USB
DC12V
HD MONITOR
E-SATA
VGA
RS-232
AUDIO
TX
RXG
CNOGS1S2S3S4
OUT
IN
MONITOR
SPOT
POWER ON
POWER OFF
123
4
AUDIO
OUT
SPLIT
REC
SCHEDULE
EMERGENCY
<DVR Unit>
<Batteries>
<Power Cable>
<Remote Control>
<Screws>
<Adaptor>
<USB Memory>
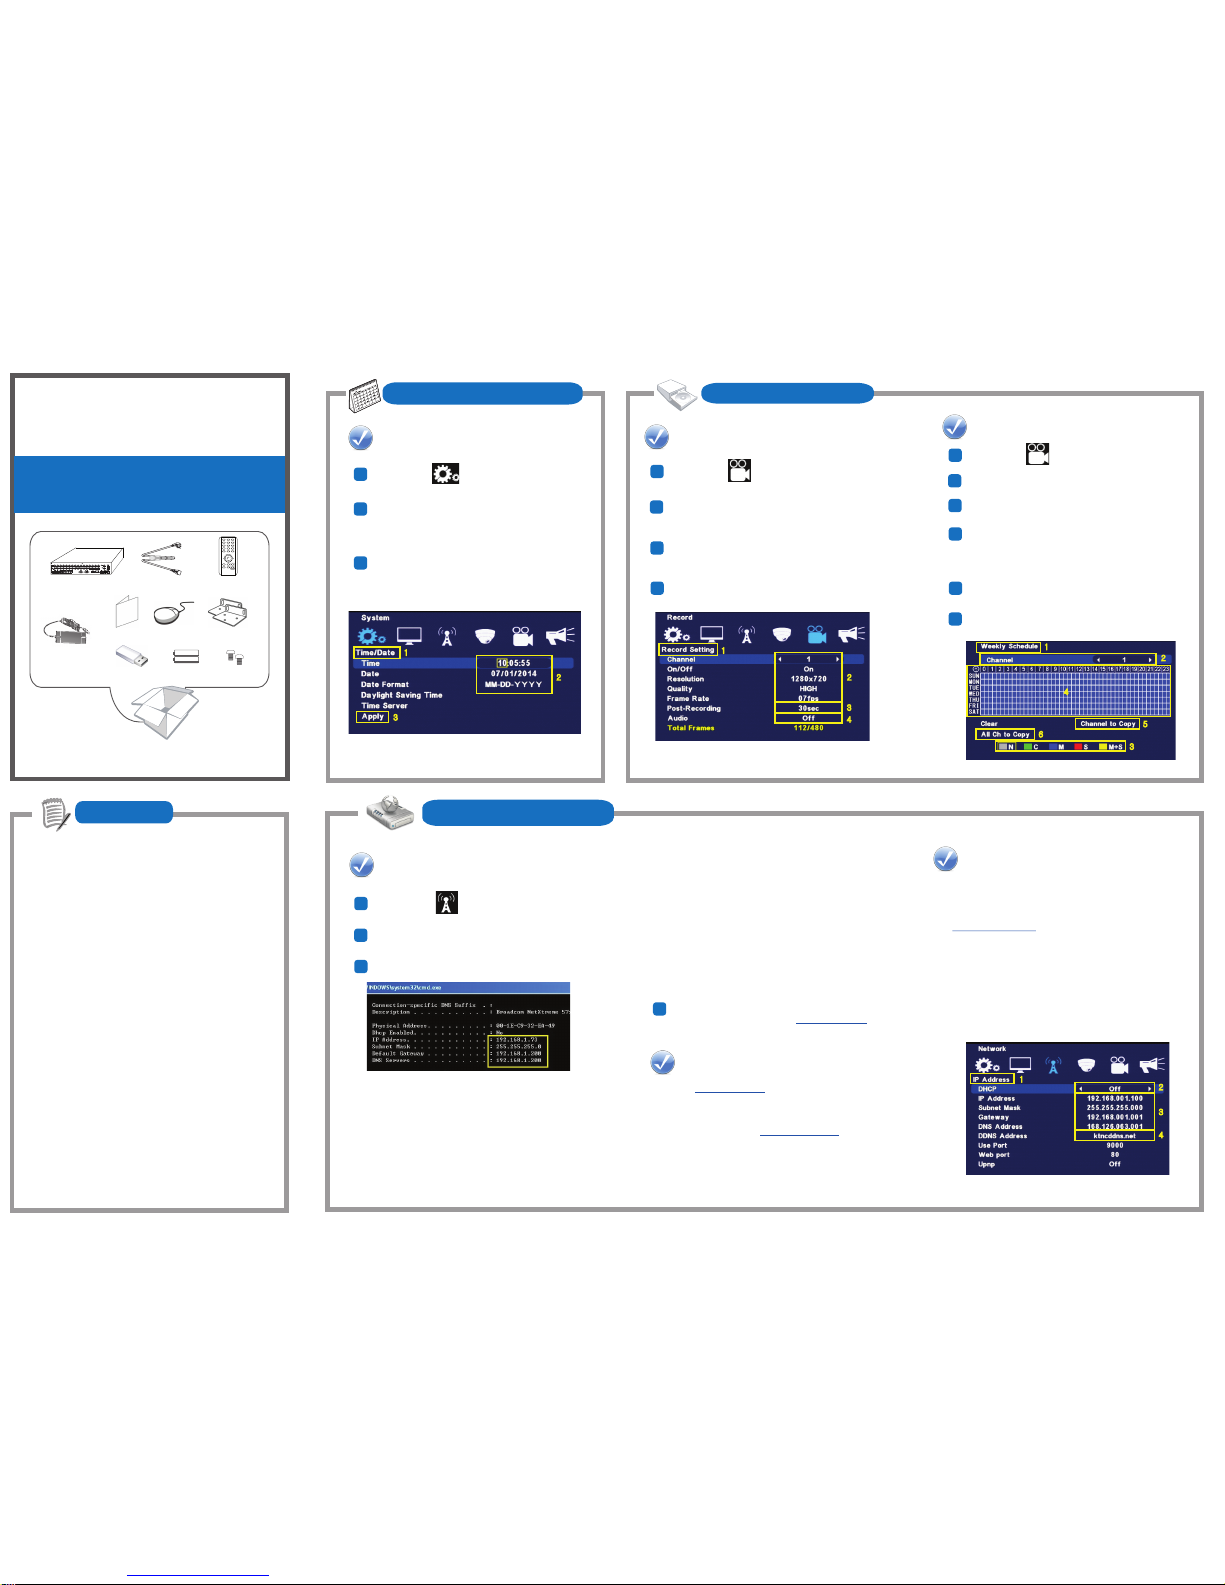
3. Network Setup
Network Setup
1
Go into Network Setup -> IP Address
2
Choose whether you will use DHCP or Static.
3
IP address Setup:
a. If using DHCP, all settings will be detected automatically.
While DHCP is a useful tool for determining the network
settings, if you set up your DVR in this manner its IP
address may change at different times for different
reasons, particularly after a power failure. If the IP
address of the DVR changes, you may have difficulties
accessing your DVR locally and/or remotely.
It is strongly recommended that you assign a fixed(static)
IP address to your DVR.
b. If using a Fixed IP (recommended), you will need to input
the information manually.
In order for remote connection to work, you must enter
valid data, compatible with your network, for all four of the
network setting fields: IP address, subnet mask, default
gateway and the DNS address (depending on your network
hardware and configuration this may be the IP address of
your router/gateway, or it may be the actual IP address of
the local DNS server).
The DNS server IP is required because your DNS server
provides critical information necessary for the DVR to
communicate with the remote user. You can obtain the
actual DNS IP from your Internet Service Provider (ISP)
or from a PC located on the same network as the DVR.
DO NOT change DDNS port information in order to use
KT&C’s dedicated DDNS server, www.ktncddns.net.
4
DDNS Setup
a. Go to www.ktncddns.net and register your DVR using
Webcode provided in the DVR’s System Setup menu.
b. Create a host name of your own to set up DDNS
connection. (Example: MyDVR.ktncddns.net)
* Note: The host name cannot include a space or
any special characters. (!@#$%^&*()<>,.)
Router Setup
a. If you are connecting through a router, make sure that you
have ‘opened up’ all the required network ports (80, 9000)
in the port forwarding section of your router setup.
Useful information about port forwarding can be found at
www.portforward.com.
b. Port 80 is the default web port used for web viewer and port
9000 is default stream/command port for K9 Series DVR.
If you only plan to view your DVR on a LAN,
you don’t have to concern yourself with port forwarding.
This method can be convenient tool to check whether your
IP information is set properly. However, if you desire remote
access to your DVR as well as using DDNS option, you MUST
select functional ports and set up the port forwarding in your
router.
Date / Time Setup
1
Go into System Setup -> Time/Date.
2
Set Time/Date accordingly.
3
Select ‘Apply’ option to save the change.
* Note: The time can only be set as military time format.
(00:00:00~23:59:59)
* Note: Message window will pop up warning you
it could cause a data loss.
2.Record Setup
Record Setting
1
Go into Record Setup -> Record Setting.
2
Select channel you want to set resolution, quality,
and frame rate. * Select ‘All’ to set all channels at once.
3
Post-Recording allows you to set record duration after
the event. (alarm, motion detection)
Audio can be used on channel 1~4.
4
Schedule Setup
1
Go into Record Setup -> Weekly Schedule.
2
Select channel.
3
Using mouse, you can select recording option to apply.
(N, C, M, S, M+S)
Apply selected recording option to time table.
4
Use ‘Channel to Copy’ to apply current channel setting to
another channel.
5
* Note: You may apply multiple recording options to a single
channel by repeating step 3 & 4 on different block of the
‘time table’. (1 block represents 30 minutes)
Use ‘All Ch to Copy’ to apply current channel setting to all
other channels.
6
Memo
1.Date / Time Setup
K9, K7 Series
<Quick Guide>
<Rack Mount Ear>
<Mouse>
2
1
3
1
2
3
4
1
2
3
4
5
6
1
2
3
4

ID
1 2 3
4 5 6
7 8 9
QUAD
(SPLIT)
AUDIO
SEQ PTZ
BACK UP
0
SETUP
SEARCH
REC
SCHEDULE
EMERGENCY
4
2
1 14
3
8
6
9
10
13
5
7
15
11
12
ID : You can control multiple DVRs with one remote controller.
Push “ID” button and enter ID number set in the DVR.
Number : To select channel or to enter password.
SETUP : To open the setup menu.
Mouse right click on live screen brings the setup menu and also
the right click on search mode opens the control bar for playback.
Open the setup menu
QUAD / SPLIT : To display split screen
△ : To move up
▽ : To move down
◁ : To move left
▷ : To move right
EMERGENCY : To switch to emergency recording
SCHEDULE : : To switch to schedule recording
AUDIO : To listen audio or block the audio
SEQ : To start auto sequencing of the screen in full screen mode
PTZ : To switch to PTZ mode
SEARCH : To open the search menu
1
Go to search mode
2
Go to backup mode
3
Listen or block audio
4
Switch to emergency recording
5
Switch to schedule recording
6
Control a PTZ Camera
7
Start auto sequencing of the screen
8
Configure relay out
9
Switch split screen on 9ch DVR
10
Select
Open the menu and
move to previous step
1
2
3
4
5
6
7
8
9
10
11
12
13
14
Mouse Control
Zoom in the image on live or playback mode
11
Backup
1
Connect USB Memory Stick to either of USB ports on the DVR.
2
Select Backup from Main menu.
3
Select on backup start date/time on the time table and click
on Start to set the backup start time.
Select on backup end date/time on the time table and click
on End to set the backup end time.
4
Select channel(s) to archive.
5
Click on Backup Start.
6
7
Select whether you want to back up the log file with the video
data.
8
Set password for the backup data if needed.
9
Select archive data format, Executable Format or Video Format.
▶Executable Format: Data will be archived in self-executable
format which will be played with its own built-in player.
Click on Backup Start again.
10
* Note: Make sure the backup size does not exceed the capacity
of the available USB memory space.
▶Video Format: Data will be archived in its own raw data format
which can be played with 'MS Backup Viewer’
which is included in software package.
Smartphone Access
1
Open the applicable app store from your smartphone.
(iPhone – Apple Store, Android – Play Store)
* Alternative: Download the app from below link into your
computer and install it to your smartphone.
▶Apple® iPhone®, iPod touch®, or iPad® : https://itunes.
apple.com/us/app/kvrmobile/id413597249?mt=8
▶Android™ phones : https://play.google.com/store/apps/
details?id=com.fnsys.mprms.co_ktnc&hl=en
2
Search for the app named ‘KVRmobile’
3
Download and install the app.
* Note: For more detailed information on how to register remote
site to the app, please refer to DVR User Manual.
This app features :
▶ Live View and Search from 1 to 16 cameras
▶ Save screenshot into your SD card
▶ View images in portrait or landscape orientation
(single & multi-channel)
▶ Control PTZ
▶ Play audio in Live & Search
▶ Register multiple remote locations
▶ Control Relay
▶ 3G/4G/Wi-Fi compatible
Remote Control
4.Smart Phone
5. Backup
Memo
5
3
6
4
7
8
9
10
BACK UP : To open the back up menu
15
 Loading...