

Page 1
KRU PS
Crystal
Crystal
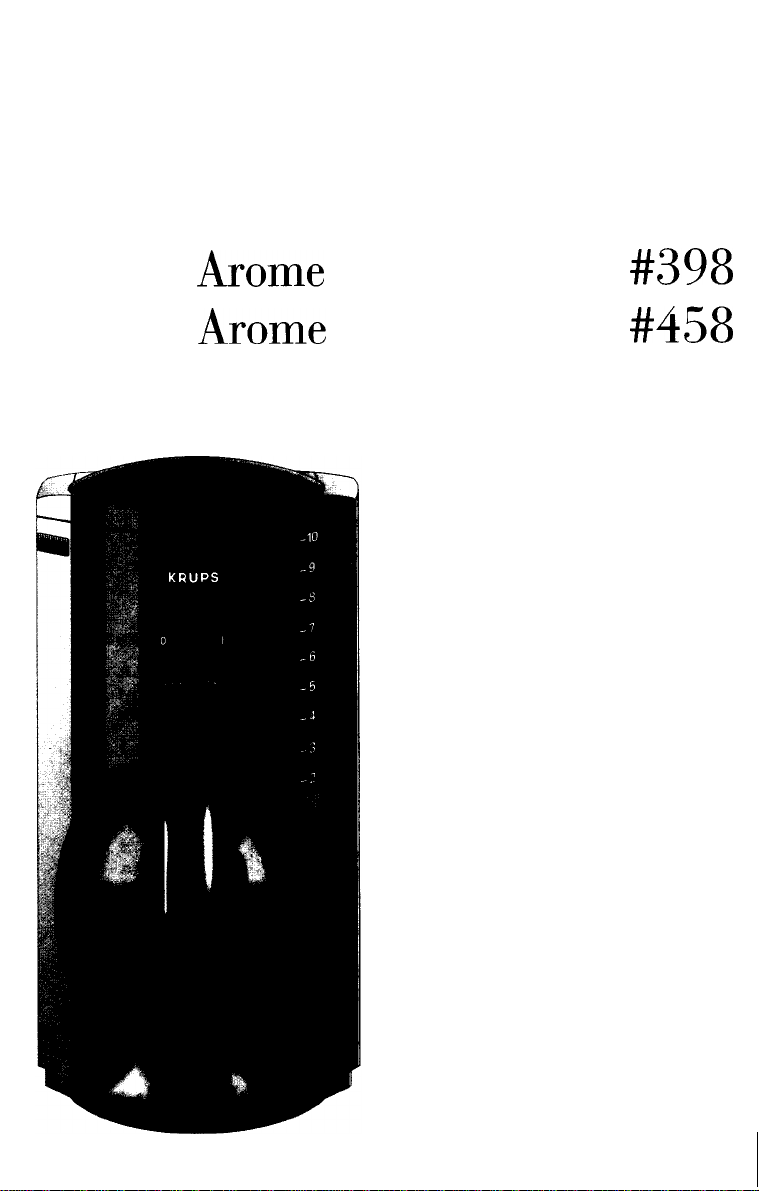
Arome
Arome
Time
Model
Model
#398
#458
Instructions
for Use
Warranty
Guarantee of
Performance
Page 2
IMPORTANT SAFEGUARDS
When using electrical appliances, basic safety
precautions should always be followed to reduce the
risk of fire, electric shock, and/or injury to persons,
including following:
0
Read &l instructions and information in this instruction
book and any other literature included in this carton
referring to this product before operating or using this
appliance.
0
Do not touch hot surfaces. Use handles or knobs.
0
To protect against electric shock, do not immerse cord,
plugs, or appliance in water or other liquid.
0
Close supervision is necessary when any appliance is
used by or near children.
0
Unplug from outlet when not in use and before cleaning.
Allow to cool before putting on or taking off parts, and
before cleaning the appliance.
0
Do not operate any appliance with a damaged cord or
plug or after the appliance malfunctions, or has been
damaged in any manner. Return appliance to an
authorized service facility for examination, repair or
adjustment.
0
The use of an accessory not evaluated for use with this
appliance may cause injuries.
0
Do not use outdoors.
0
Do not let cord hang over edge of table or counter, or
touch hot surfaces.
0
Do not place on or near a hot gas or electric burner, or in
a heated oven.
0
To disconnect, turn switch to “OFF”, then remove plug
from wall outlet.
0
Do not use appliance for other than intended use.
0
Snap lid securely onto glass carafe before serving
beverages.
0
Do not remove glass carafe from heating plate while
water is dripping from the spout.
0
Appliance with glass carafes:
A. The carafe is designed for use with these appliances.
It must never be used on a range top.
B. Do not set a hot carafe on a wet or cold surface.
C. Do not use a cracked carafe or a carafe having a
loose or weakened handle.
D. Do not clean carafe with cleansers, steel wool pads,
or other abrasive material.
SAVE THESE INSTRUCTIONS
Page 3
CAUTION
This appliance is for household use only. Any servicing other
than cleaning and user maintenance should be performed by
the nearest authorized KRUPS Service Center (see Guarantee
of Performance).
Do not immerse base in water.
To reduce the risk of fire or electric shock, do not remove the
base. No user
an authorized KRUPS Service Center only.
servicable
parts inside. Repair should be done by
SPECIAL CORD SET
INSTRUCTIONS
Regarding your cord set:
A. A short power-supply cord is provided to reduce risks
resulting from becoming entangled in or tripping over a
longer cord.
B. Longer extension cords are available and may be used if
care is exercised in their use.
C. If a long extension cord is used, (1) the marked electrical
rating of the extension cord should be at least as great as
the electrical rating of the appliance,
of the grounded type, the extension cord should be
arranged so that it will not drape over the counter top or
table top where it can be pulled on by children or tripped
over.
D. This appliance has a polarized plug (one blade is wider
than the other). As a safety feature, this plug will fit in a
polarized outlet only one way. If the plug does not fully fit
in the outlet, reverse the plug. If it still does not fit, contact
a qualified electrician. Do not attempt to defeat this safety
feature.
(2)
if the appliance is
Page 4

Krups Crystal
Arome
Krups Crystal
a
I
h
Mod. #398
Arome
Time
#458
a: “Crystal Clear” filter
cartridge
b: Water chamber
c: Water level indicator
d: Filtration indicator
(Model #398)
e: Illuminated ON/OFF
switch (Model
f:
Flavor selector buttons
(Model #398)
g: Filter holder
h: Warming plate
Program selector panel
(Model
#458)
Off
=
Switch on with-
on
out pre-program-
ming
=
Set the time
0
prog. = Pre-program time
auto. = Activate pre-
programmed time
Illuminated filtration
indicator (Model #458)
#398)
Page 5

------I
L
Page 6

1
0
1JI1
Page 7

Your new Krups coffemaker has the
following features:
0
Exclusive “Crystal Clear” vegetable based
cocoa filter destroys up to 82% of unwanted chlorine taste from water for
smooth rich coffee without any hint of
bitterness. Important minerals such as
calcium are left behind.
0
Unique hermetically designed carafe and
lid keep coffee hotter up to 20 % longer
than conventional carafes, without
sacrificing aroma or taste.
0
Filtration indicator lets you know when
the “Crystal Clear” filter needs to be
changed, and when coffeemaker needs
decalcifying.
0
Flavor selector button (model #398) lets
you select 1-3 cups or 4-10 cups for the
fullest flavor.
0
24-hour programmable timer (model
#458)
lets you program the coffeeemaker
for convenient “wake-up” coffee.
0
Programmable auto shut-off (model
lets coffee stay hot from 1-5 hours before
turning itself off.
0
Filter holder conveniently lifts out for easy
cleaning.
0
“Stop’n Serve” feature lets you pour a
cup or two while brewing. The automatic
filter seal will allow you to remove the
carafe for 20 seconds without dripping
coffee onto the warming plate.
0
Hinged water container lid will protect the
water from dust and dirt.
0
Water level indicator is easy to read.
0
Automatic warming plate has a non-stick
coating for easy cleaning. Raised edges
keep carafe firmly in place.
l
Hidden cord storage allows you to set the
cord length you need.
#458)
1. Plug in the KRUPS “Crystal Arome Time’.
Make sure the selector panel
“off” position.
2. The LCD display will be flashing
intermittently (sea figure
signal to set the digital clock.
3. Turn the selector switch to position
Set the hour and minutes by pressing the
‘h’
and “min.” buttons respectively
(see figure 2). The time is now set.
Before making your first pot of delicious
coffee, we recommend operating the
coffeemaker one or twice with water only,
without ground coffee or a paper filter to
remove any possible dust.
0
Be sure that the water container is
empty. Remove literature, etc. if inserted
in the water container.
0
The lid of the glass carafe must be
properly positioned during the brewing
process. Position the lid over the carafe
and snap into place (see figure
0
Place carafe directly underneath brewing
spout (see figure
Filling the water chamber
Open the hinged lid (see
glass carafe, pour in the desired quantity of
water (see
indicator shows how much water you are
filling into the container.
The amount of freshly brewed coffee
delivered after the brewing process will
always be slightly less than the amount of
put into the water container. This is due to
the minimum absorption of the water by the
ground coffee.
figure
4).
6).
The water level
1).
figure
(i)
is on the
This is your
0
3).
5). Using the
.
7
Page 8

Therefore, it is recommended that you add a
little extra water at the beginning so that
you will have the number of cups you
desire.
Replace the glass carafe on the warming
plate with the carafe lid in position.
Potting in the ground coffee
With the hinged lid opened, insert a paper
filter (we recommend KRUPS size 4) into the
filter holder, with the seam facing right
(see
figure
7).
We suggest using one level KRUPS
measuring scoop of ground coffee for each
cup of robust coffee (see figure 8).
After using your KRUPS coffeemaker
several times, you can adjust the measure
to suit your own taste.
Close the hinged lid, making sure that the
filter holder is securely in place.
The KRUPS “Crystal
flavor selector button. If you want to make
l-3 cups of coffee, press the ‘l-3’ button
(see figure
cycle so that the water will seep into the
ground coffee slowly enough to yield
brewed coffee that is rich, aromatic and
truly delicious.
For making 4-10 cups, the
selector button should be pressed.
Press the ON/OFF switch to the ‘I’ position.
Indicator light will illuminate and brewing
will commence (see figure 101.
9).
Arome”
features a full
This will extend the brewing
‘4-max’
flavor
The “Stop’n Serve” feature is KRUPS answer
to the impatient coffee drinker’s clamor for “a
quick cup of coffee!“. This device
automatically stops the flow of brewed coffee
through the filter cone if the glass carafe is
removed from the warming plate during the
brewing cycle. You have about 20 seconds
between the removal of the carafe and its
being reinserted to allow the service of one or
two cups of coffee. The “Stop’n Serve” device
closes off the filter cone so effectively that
there is virtually no coffee-drip onto the
warming plate
carafe is replaced, the brewing cycle and the
flow of coffee into the carafe are resumed.
A
CAUTION:
If coffee does drip onto the warming plate
after removal of the carafe, it is usually an
indiction that too much ground coffee has
been placed into the paper filter. This
causes the water that jets into the filter cone
to overflow between the paper filter and the
sides of the filter cone. The overflow carries
coffee grounds that interfere with the
shut action of the filter holder, thus allowing
brewed coffee to continue to drip through.
H
this blockage and subsequent dripping do
occur, replace the glass carafe immediately
and allow the full brewing cycle to run its
course. Do not remove the
brewing cycle is completed.
(one
drop, at most). Once the
fffter
until the
snap-
For model #458:
Turn the selector switch to the “on” position.
The red indicator light will illuminate,
indicating that the brewing process has
begun (seefigure 11).
8
This feature enables you to enjoy freshly
brewed coffee at any pre-selected time within
a 24-hour period. To use this feature, you
must first set the digital clock
(see “Setting the Time”).
Page 9

c
1. Turn the selector switch to the
setting. The R symbol will flash
intermittently in the display area.
:
2. Set the hour and minutes in which you
would like the brewing process to
commence by pressing the
buttons respectively (see figure
“Wake-Up” time is now set.
To enjoy delicious “wake-up” coffee that is
freshly brewed and hot, first set the “wakeup” time (see “Setting Wake-Up” Time).
1. Put in ground coffee.
2. Fill the water chamber to the desired
number of cups.
3. Place the carafe back on the warming
plate.
4. Turn the selector switch to the “auto.”
setting (see figure 13). The R symbol will
remain constant in the display, indicating
that the coffee-maker has been
programmed.
5. At the pre-programmed time, the
indicator light will illuminate, indicating
that the brewing process has begun.
“prog.’
‘h’
and ‘min’
12).
The programmable auto shut-off feature
allows you to keep coffee hot for up to 5
hours, and to shut off automatically, to suit
your needs. The auto shut-off will initially be
set to shut-off after 1 hour, unless otherwise
programmed. Auto shut-off will be effective
not only when you are manually preparing
coffee, but also when used with the wake-up
timer.
When you first plug in the coffeemaker, the
auto shut-off will be programmed for 1 hour.
To adjust the keep warm time:
0
Turn the switch to the “off” position.
0
Press the “min.” button. The blinking cup
will appear in the display and auto shutoff will be set at 1 hour.
0
You can increase the keep warm time in
increments of 1 hour, up to 5 hours by
keeping the “min.” button pressed and
additionally pressing the “hours” button.
0
Once you have programmed the keep
warm time, it will be stored in memory
until manually changed.
0
If no keep warm time is set, the
coffeemaker will automatically shut itself
off after 1 hour.
NOTE:
If the selector switch is left in the ‘auto.”
position, the coffemaker will turn itself on
everyday at the pre-programmed time. If
you do not wish for this to occur, turn the
coffeemaker to the “off’ position (“0”) after
each use.
The KRUPS “Crystal
Arome Time” coffeemakers feature a unique
filtration indicator that alerts you when it is
time to change the “Crystal Clear” charcoal
filter (after each 80 cycles).
At the same time, the indicator tells you that
your coffeemaker should be decalcified
(see “Decalcifying”).
Arome”
and “Crystal
9
Page 10

Model
#398;
You will know when it is time to change the
charcoal filter when the filtration indicator
(d)
turns red. Once the red indicator changes
back to grey, the filtration indicator has been
“reset” to 0 cycles.
Model
#458:
You will know it is time to change the
charcoal filter when the filtration indicator
illuminates and begins to flash. Once you
change the filter, you can stop the flashing
by pushing in the small hole directly to the
left of the light, using a pointed instrument.
This will “reset” the filtration indicator to 0
cycles.
To insert or change the “crystal clear” filter,
lift out the grey filter cartridge
next to the water chamber
Open the bottom hinged portion of the
cartridge by twisting to the left (see figure
15). Remove and discard the old filter. Insert
a new filter by dropping it into the filter
cartridge (see figure
Replace the filter cartridge back in the
chamber (see figure
NOTE:
Replacement filters can be purchased by
calling the KRUPS Consumer Service
Department (see Guarantee of
Performance).
18).
17).
(see
(a),
located
figure
(j)
14).
The power cord can be tailored to the length
required by utilising the hidden cord storage
located behind the coffeemaker
(see figure
Although your KRUPS coffeemaker has the
most advanced water heating and pumping
system, it will periodically need cleaning
with a decalcifying agent.
0
This is due to the calcium (limestone)
found in drinking water.
0
In some areas where the water is hard,
you will need decalcify more frequently
than in areas with soft water.
0
It will also depend upon how often you
use your coffemaker.
0
Always unplug the coffeemaker before
cleaning
0
Remove the filter holder and clean the
filter holder, the carafe and carafe lid in a
solution of hot water and mild liquid
soap. These parts can also be placed in
the upper level of your dishwasher for
save effective cleaning.
0
Never use scouring agents.
0
Never immerse the appliance itself in
water or any other liquid. To clean, simply
wipe off with a soft, damp cloth.
0
Never use a cloth to clean the inside of
the water chamber, as this might leave
fuzzy deposits in the chamber. Just rinse
with cold water, periodically.
18).
10
Page 11

For best
. . . . . . . . . .
(warm water might be stale and have
mineral deposits which would impair
the flavor of the coffee).
. . . . . . . . . we recommend that you
your own beans. Freshly ground beans
deliver more aroma and flavor. Use
one KRUPS measuring scoop of beans
per cup.
. . . . . . . . . . . . .
brewing.
. . . . . . never reheat coffee.
Your KRUPS #398/458 is covered by the
following warranty:
If from date of purchase within one year this
KRUPS product fails to function because of
defects in materials or workmanship,
KRUPS North America will, at its option,
repair or replace the unit with our charge,
provided the owner has a proof of date of
purchase.
results . . . . . . . . . . .
always use fresh , cold water
grind
serve coffee immediately after
This warrantY will be void if malfunction
was caused by damage to the product by
accident, misuse, use on frequency or
voltage other than marked on the product
and/or described in the instructions, abuse
including tampering, damage in transit, or
use for commercial purposes. This warranty
gives you specific legal rights, and you may
also have other rights which may van/ from
state to state.
11
Page 12

GUARANTEE OF PERFORMANCE
This fine KRUPS product is manufactured according to a rigid
code of quality standards, and, with minimum care, should
give years of satisfying service. However, should the need
arise for repairs or for replacement parts within or after the
warrantv period, please call our CONSUMER SERVICE
DEPARTMENT:
(8001
526-5377
24-hours
You will be provided with specific instruction on how to get
your product repaired, as well as the name and address of
your nearest authorized KRUPS Service Center.
The department will also be able to answer any general
product questions you may have.
Before calling the Consumer Service Department, please have
the type number of your KRUPS appliance available.
You must have this information before calling our Consumer
Service Department so that we may better answer your
questions. The type number can be located by looking at the
bottom of your appliance.
a day, 7 days a week
This product is Type
Any general
01951
cr
13901458
#398 I #458
correspondance
can be addressed to:
KRUPS North America, Inc.
P.O. Box 3900
Peoria, IL 61612
0 825 038
Imprime
au Mexique
US 65698
 Loading...