

Page 1
Page 2
527
GNA8 3 mix 8000/8008
d3d1d5
eject
S
d
turbo
c
d4
d
d2
f
e
f
a
g1 F 08B
g2 F 520
h F521
i F522
j F 523
b
b
a
nF
o303
p302
qF 532
j1
F 529
530/531
k F 528
l F 526
m F 525
r301
s384
t F 524
Page 3
1
9
d5
2
3
a
b
turbo
4
5
6
MAX
eject
S
turbo
0
turbo
7
eject
S
0
turbo
eject
S
0
8
turbo
turbo
eject
S
0
turbo
eject
S
0
turbo
S
0
eject
10
11
Page 4

4
Page 5

GNA8 3 mix 6000 XL Edition
Deutsch 6
English 12
Français 18
Nederlands 24
Español 30
Português 36
Italiano 42
Dansk 49
Norsk 55
Svenska 61
Suomi 66
ΕλληνικÀ 72
81
Slovensko Русский 82
5
Page 6

Deusch
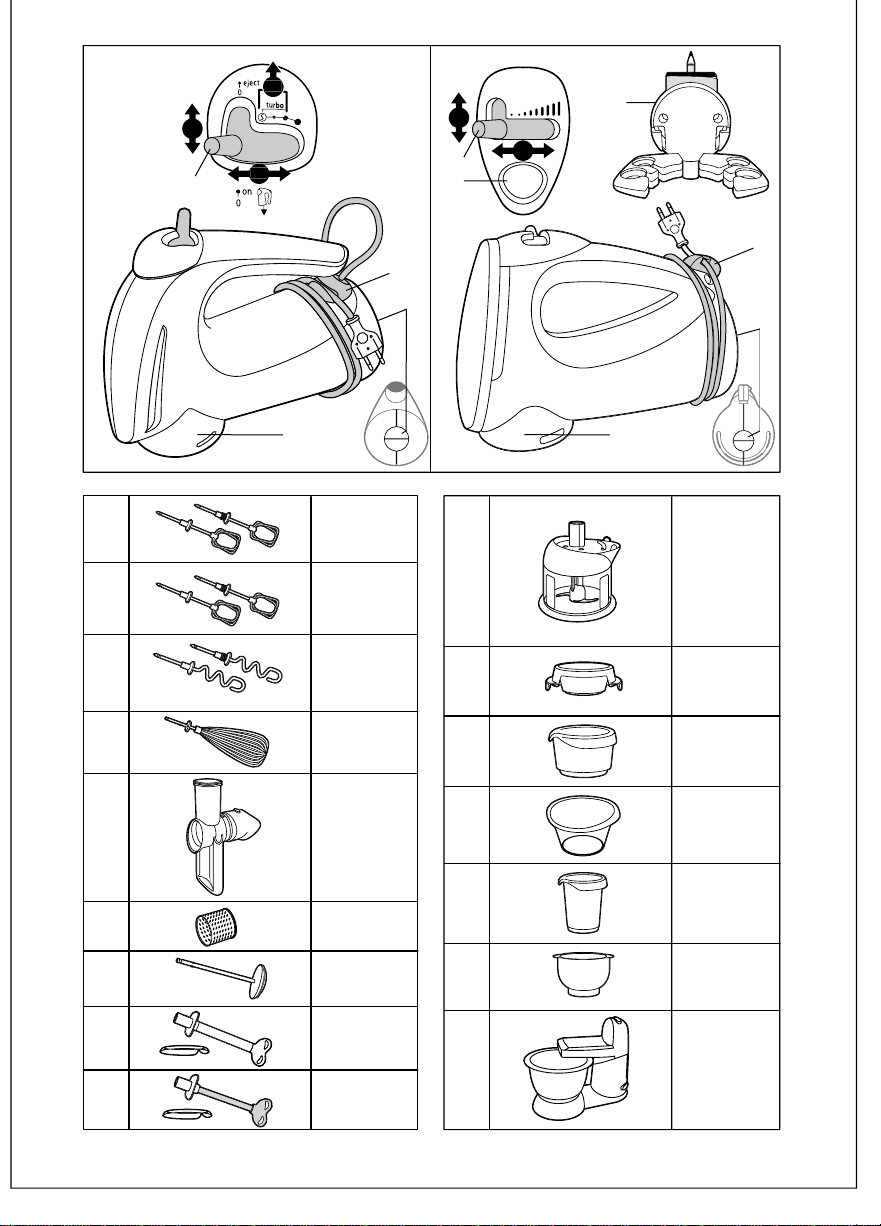
Produktbeschreibung
.Geräteelemente
a Vorderer Antrieb
b Heckantrieb
c Turbo-Taste (vorderer Antrieb) (je nach
Modell)
d Schalterpositionen:
d1 Ein/Aus mit stufenloser
Geschwindigkeitswahl
d2 Auswurf (vorderer Antrieb)
d3 Ein/Aus ( S+3 Geschwindigkeiten)
d4 Auswurf Quirl oder Ein/Aus am
Heckantrieb
d5 Turbofunktion
e Wandhalter (je nach Modell)
f Kabelaufwicklung mit Befestigungsclip
JE NACH MODELL ODER ALS SONDERZUBEHÖR
.Zubehörteile für vorderen Antrieb:
g Quirle Kunststoff
g1 Quirle Edelstahl
h Kneter
i Schneebesen
j Schnitzelwerk
j1 Schnitzeleinsätze
k Passierstab
.Zubehörteile für Heckantrieb:
l Schnellmixstab Kunststoff
m Schnellmixstab Metall
n Zerkleinerer
.Gefäße
o Passiersieb
p Schüssel 2,75 l
q Schüssel 2,5 l
r Becher 1 l
s Edelstahlschüssel 3 l
t Rührständer
Wichtige Sicherheitshinweise
•Lesen Sie die Bedienungsanleitung vor dem
ersten Gebrauch aufmerksam: ein nicht
durch die Bedienungsanleitung
vorgegebener Gebrauch entbindet Krups
von jeglicher Verantwortung.
•Ihr Gerät ist nur für den haushaltsgemäßen
Gebrauch und für den Gebrauch innerhalb
des Hauses bestimmt.
•Überlassen Sie Kindern nicht das Gerät,
wenn diese nicht beaufsichtigt werden. Die
Benutzung des Gerätes durch Kleinkinder
oder Behinderte muss unter Aufsicht
erfolgen.
•Lassen Sie das Netzkabel nicht in der
Reichweite von Kindern hängen.
•Überprüfen Sie, dass die Anschlussspannung
Ihres Gerätes mit der Spannung Ihres
Stromnetzes übereinstimmt.
Bei falschem Anschluss erlischt die
Garantie.
•Das Netzkabel darf niemals in die Nähe oder
in Kontakt mit den rotierenden Teilen des
Gerätes, einer Wärmequelle oder scharfen
Kanten kommen.
•Tauchen Sie das Gerät, das Netzkabel oder
den Netzstecker niemals in Wasser oder
andere Flüssigkeiten.
•Falls das Netzkabel oder der Netzstecker
beschädigt sind, benutzen Sie das Gerät
nicht. Um jede Gefährdung zu vermeiden
müssen Sie diese durch einen Krups
Kundendienst (siehe Krups Service Stationen)
ersetzen lassen.
•Jeder Eingriff, der über Reinigung und
normale Pflege des Gerätes hinausgeht,
muss durch einen Krups Kundendienst
durchgeführt werden.
•Benutzen Sie zu Ihrer Sicherheit
ausschließlich original Krups Zubehör und
Ersatzteile, die zu diesem Gerät gehören.
6
Page 7

•Alle Geräte unterliegen einer strengen
Qualitätskontrolle. Es werden
stichprobenartige Gebrauchtests mit den
Geräten durchgeführt, was eventuelle
Gebrauchsspuren erklärt.
•Dieses Gerät darf nur unter Aufsicht des
Benutzers betrieben werden.
•Berühren Sie nicht die Quirle oder
Kneter, das Messer des Schnellmixstabes
oder die Einsätze des Schnitzelwerks
während das Gerät in Betrieb ist. Lassen
Sie lange Haare, Schals, das Netzkabel
usw. während des Betriebes nicht über
den Werkzeugen hängen.
•Ziehen Sie vor jedem Hantieren
(Einsetzen und Entnehmen der
Zubehörteile) den Netzstecker.
•Montieren sie niemals unterschiedliche
Zubehörteile gleichzeitig (z.B.: Kneter und
Schneebesen,...).
•Achtung: Die Messer einiger
Zubehörteile sind scharf. Handhaben sie
die Messer mit Vorsicht.
Wichtig: Ihr Gerät ist mit zwei Antrieben
ausgestattet (1):
•einem vorderen Antrieb (a) zur Montage der
Zubehörteile (g,h,i,j,k) (je nach Modell)
•einem Heckantrieb (b) zur Montage der
Zubehörteile (l,m,n) (je nach Modell)
Vor dem ersten Gebrauch
•Reinigen Sie die verschiedenen Zubehörteile
Ihres Gerätes sorgfältig.
Gebrauch der Zubehörteile am
vorderen Antrieb
. Quirle und Kneter
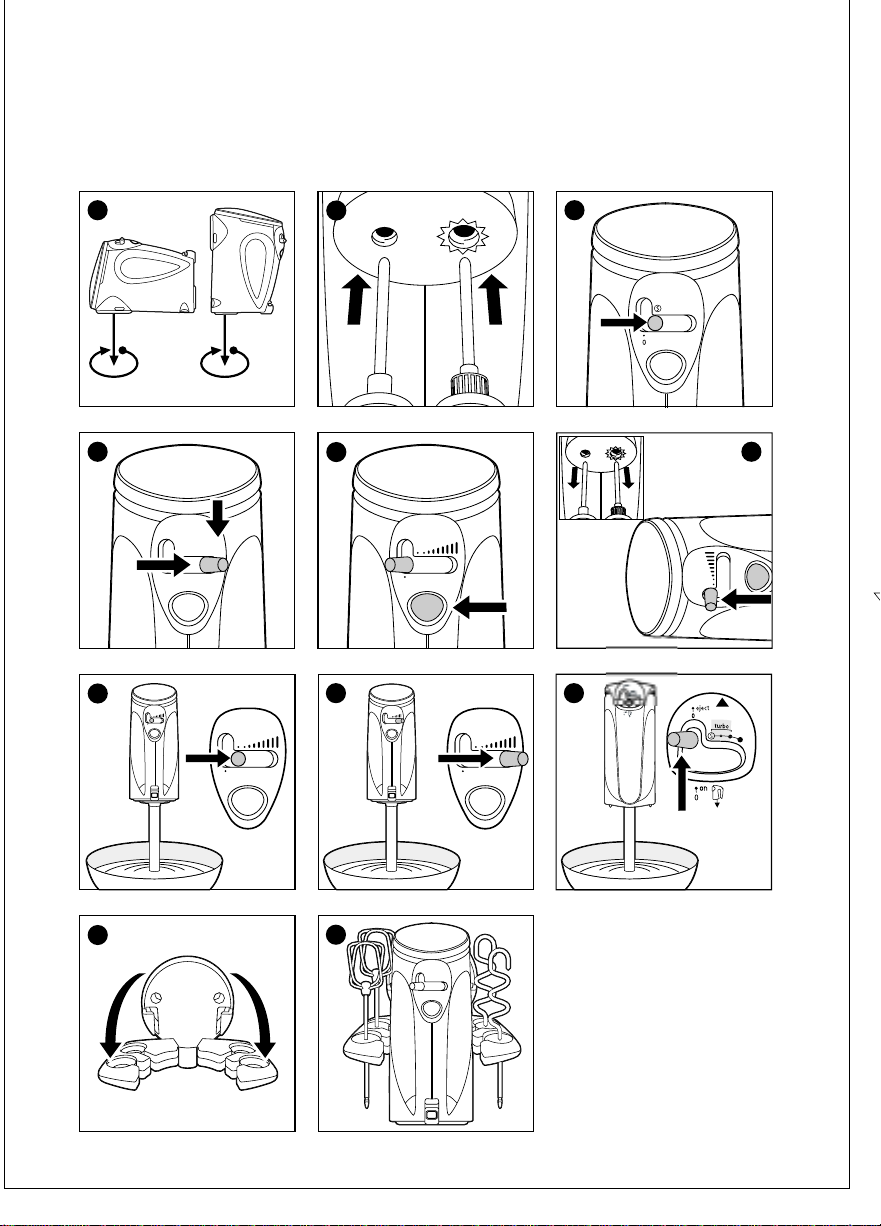
•Wenn der Schalter (d) in der Position «0» ist,
setzen Sie die Quirle oder Kneter in das
Gerät ein, bis sie sicher verriegelt sind.
Führen Sie das Werkzeug mit dem
Zahnkranz immer in die Öffnung des
Gerätes ein, welche ebenfalls mit einem
Zahnkranz gekennzeichnet ist (2).
•Stecken Sie den Netzstecker ein.
•Füllen Sie die Zutaten, je nach zu
verarbeitender Menge, in ein geeignetes
Gefäß (Krups Rührschüssel oder
Rührbecher).
Tauchen Sie die Quirle oder Kneter in das
Gefäß und schalten Sie das Gerät ein, indem
Sie den Schalter (d) nach rechts schieben. Um
Spritzer zu Beginn der Zubereitung zu
vermeiden und für empfindliche
Zubereitungen (Cremes, Soßen) ist Ihr Gerät
mit einer Antispritzfunktion (Position «S»)
ausgestattet. Um diese zu benutzen:
•Schieben Sie den Schalter (d) nach rechts in
Position «S» (3).
•Wählen sie eine höhere Geschwindigkeit,
um mit der Zubereitung fortzufahren (4).
Das Gerät ist mit einer Turbo-Taste (c oder
d5, je nach Modell) ausgestattet, die es Ihnen
erlaubt, durch einfachen Tastendruck sofort
die gesamte Leistung Ihres Gerätes zur
Verfügung zu haben (5 oder 9).
•Stellen Sie den Schalter (d) am Ende der
Zubereitung zurück auf Position «0».
•Ziehen Sie den Netzstecker.
•Lösen Sie die Quirle oder Kneter, indem Sie
den Schalter (d) auf die Position «Eject»
schieben (6).
.Schneebesen
Der Schneebesen (i) wird zur Zubereitung
luftiger Speisen verwendet (Cremes, Mayonnaise, Eischnee)
•Benutzen Sie ihn in einem hohen geraden
Gefäß (Krups Rührbecher).
•Benutzen Sie den Schneebesen niemals zur
Zubereitung schwerer Speisen (Kuchenteig,
Brotteig, Püree).
.Was die übrigen Zubehörteile betrifft,
siehe entsprechendeZubehörBedienungsanleitung.
7
Page 8

Gebrauch der Zubehörteile am
Heckantrieb
Aus Sicherheitsgründen erkennt das
Rührgerät, ob Zubehörteile am Heckantrieb
installiert sind.
Modell 3 MIX 8000/8008
•Während des Gebrauchs halten Sie den
Schalter (d) fest; sobald Sie ihn loslassen,
stellt er sich automatisch auf «0».
Um Spritzer beim Starten zu vermeiden und
bei der Zubereitung empfindlicher Speisen ist
Ihr Gerät mit einer Spritzschutzfunktion
ausgestattet. Um diese zu benutzen gehen
Sie wie folgt vor:
•Stellen Sie den Schalter (d) auf «S» und
halten ihn fest (7).
•Um mit der Zubereitung fortzufahren,
wählen Sie eine höhere Geschwindigkeit,
indem Sie den Schalter (d) festhalten (8).
Modell 3MIX 6000XL Edition
•Vergewissern Sie sich, dass der Schalter (d)
auf «0» steht.
•Öffnen Sie die Klappe (b) und setzen Sie das
Zubehör am Heckantrieb ein.
•Steht der Schalter (d) auf «0», starten Sie
das Rührgerät in dem Sie den Schalter nach
vorn drücken (9).
•Nach dem Gebrauch, wenn der Schalter auf
«0» steht, ziehen Sie den Netzstecker,
entnehmen das Zubehör und schließen die
Klappe (b).
Reinigung
•Vor der Reinigung stets den Netzstecker
ziehen.
•Reinigen Sie das Grundgerät nur mit einem
feuchten Tuch.
•Reinigen Sie die Quirle und Kneter unter
fließendem Wasser oder in der
Spülmaschine.
Aufbewahrung
Ihr Gerät hat eine Kabelaufwicklung mit
Befestigungsclip (f).
Je nach Modell ist Ihr Gerät mit einem
Wandhalter ausgestattet.
•Beim ersten Gebrauch klappen Sie den
Zubehörträger auseinander (10).
•Setzen Sie die Zubehörteile (g und h) ein,
dann erst das Rührgerät.
Somit befinden sich Gerät und Zubehörteile
direkt über der Arbeitsplatte und sind
einsatzbereit (11).
Auf der Rückseite des Wandhalters ist Platz
zur Aufbewahrung eines Notizblocks, eines
Bleistifts usw.
Was tun im Falle eines
Defekts?
•Vergewissern Sie sich, ob das Zubehör richtig
installiert wurde.
•Überprüfen Sie den Netzanschluss.
Wenn Ihr Gerät immer noch nicht
funktioniert, wenden Sie sich an den Krups-
Kundendienst (siehe Liste im Krups
Serviceheft).
Rezepte
Apple Pie
. Mürbeteig: 300 g Mehl, 150 g Butter, 30 ml
Wasser,1 Prise Salz.
. Belag: 4-5 Äpfel, 2 Essl. Zucker, je 1 Teel.
Zimt und Muskat, Saft einer Zitrone, 10 g
Butter
.1 Springform: 28 cm Ø
. Zubereitungszeit: 18-20 Min.
•Mit den Quirlen Mehl, Salz und die in Stücke
geschnittene Butter zu einer gleichmäßig
bröseligen Masse verarbeiten (min.
Geschw.).
8
Page 9

•Dann mit den Knetern den Teig kneten und
nach und nach Wasser hinzufügen (mittlere,
dann max. Geschwindigkeit), bis sich ein
Kloß gebildet hat.
•Teig 1 Stunde im Kühlschrank ruhen lassen.
•Die in dünne Scheiben geschnittenen Äpfel
mit Zucker, Zimt und Muskat in einer
Schüssel vermischen.
•2/3 des Teiges ausrollen und damit Boden
und Rand der gefetteten Form auskleiden.
Der Teig sollte am Rand etwas überstehen.
•Äpfel auf den Teig legen, mit Zitronensaft
beträufeln und Butterflocken darauf
verteilen.
•Den Rest des Teiges ausrollen und die Äpfel
damit bedecken, den überstehenden Rand
darüber klappen.
•In die Mitte des Teiges ein kleines Loch
stechen. Bei 220°C 35 Min. backen.
Sie können die Äpfel ersetzen durch: 800 g in
Stücke geschnittenen Rhabarber oder 500 g
Rhabarber und 300 g Himbeeren und 1 Essl.
Mehl, 6 Essl. Zucker und 10 g Butter.
Erdbeerkuchen
. Mürbeteig: 250 g Mehl, 125 g Butter, 125 g
Zucker, 1 Ei.
. Creme: 1/4 l Milch, 2 Eigelb, 50 g Zucker, 25
g Mehl, einige Tropfen Vanillearoma.
800 g Erdbeeren
. 1 Springform 28 cm Ø
. Zubereitungszeit: 20 Min.
•Mit den Knetern Mehl, Zucker und die in
Stücke geschnittene Butter zu einer
gleichmäßig bröseligen Masse verarbeiten
(min. Geschw.)
•Dann das Ei hinzufügen und mit den
Knetern einarbeiten bis sich ein Kloß
gebildet hat (erst mittlere, dann max.
Geschwindigkeit).
•Teig 1 Stunde im Kühlschrank ruhen lassen.
•Lassen Sie die Milch mit dem Vanillearoma
aufkochen.
•Währenddessen mit den Quirlen das Eigelb
und den Zucker schaumig schlagen (erst
mittlere, dann max. Geschwindigkeit), bis
die Mischung weißlich wird.
•Mehl hinzufügen und unterrühren (mittlere
Geschw.).
•Dann bei min. Geschwindigkeit die
kochende Milch hinzufügen und
unterrühren.
•Die Creme unter Rühren mit einem Löffel
aufkochen lassen, bis sie dicklich ist. Erkalten
lassen und weiter umrühren.
•Den Teig ausrollen und in die mit Butter
gefettete Form legen. Den Boden mehrmals
mit einer Gabel einstechen, dann mit
Aluminiumfolie bedecken und mit
getrockneten Hülsenfrüchten belegen.
•Bei 180°C 20 Min. backen.
•Hülsenfrüchte und Aluminiumfolie
entfernen.
•Den Boden abkühlen lassen, darauf die
Creme verteilen und mit Erdbeeren belegen.
•Mit Johannisbeergelee überziehen.
Schokoladenkuchen
. 3 Eier, 170 g Zucker, 170 g Butter, 150 g
Mehl, 2 Essl. Kakaopulver, 6 g Backpulver
(1/2 Tüte).
. 1 Springform: 22 cm Ø
. Zubreitungszeit: 11 Min.
•Mit den Quirlen die Eier und den Zucker in
einer Schüssel schaumig schlagen (mittl.
Geschw.).
•Butter hinzufügen und gut verrühren
(mittlere Geschwindigkeit), dann Mehl,
Kakaopulver und Backpulver unterrühren
(min. Geschw., dann mittlere
Geschwindigkeit) bis eine homogene Masse
entsteht.
•Den Teig in eine gebutterte Form geben und
bei 170°C 50 Min. backen.
•Alternativ können Sie:
- Nussstückchen, Schokoladenraspel oder
kandierte Früchte in den Teig geben.
- 2 Essl. geriebene Mandeln oder Nüsse in den
Teig geben.
- Kuchen mit Schokoladenkuvertüre (100 g
dunkle Schokolade mit 20 g Butter
schmelzen lassen) überziehen.
9
Page 10

Biskuitrolle
. 3 Eier, 90 g Zucker, 40 g Mehl,
30 g Speisestärke, 1 Glas Konfitüre oder
Gelee (Aprikose, Orange, Himbeere,
Johannisbeere.)
. 1 rechteckige Form: 33 x 22 cm
. Zubereitungszeit: 10 Min.
•Mit den Quirlen Zucker und Eigelb schaumig
schlagen (max. Geschw.) bis eine weißliche
Masse entsteht.
•Unter Rühren (min. Geschw.) Mehl und
Speisestärke hinzugeben.
•Quirle reinigen und das Eiweiß schlagen
(max. Geschwindigkeit).
•Beide Zubereitungen mischen (min.
Geschw.)
•Teig auf ein mit Backpapier belegtes
Backblech streichen und bei 170°C 15 Min.
backen.
•Wenn der Biskuitteig leicht gebräunt ist,
sofort auf ein feuchtes mit Zucker bestreutes
Tuch stürzen und das Backpapier entfernen.
•Biskuitteig in das Tuch einrollen und
abkühlen lassen.
•Danach den Biskuitteig ausrollen und mit
Konfitüre oder Gelee bestreichen.
•Erneut einrollen und die Enden abschneiden.
Alternativ können Sie:
. diesen Kuchen mit der Creme des
Erdbeerkuchens bestreichen.
. die Speisestärke durch Kakaopulver ersetzen
und den Biskuitteig mit Schlagsahne füllen.
Mandel-Aprikosenkuchen
. Blätterteig: 200 g Mehl, 100 ml Wasser, 160
g Butter, 1 Prise Salz.
. Belag: 1 kg frische Aprikosen oder 1 Dose
Aprikosen, 60 g Butter, 70 g Zucker, 70 g
gemahlene Mandeln, 1 ganzes Ei und 1
Eigelb, 2 Essl. Aprikosenkonfitüre.
. 1 Springform: 28 cm Ø
. Zubereitungszeit: 2 Stunden für den
Blätterteig und 10 Min. für den Belag
•Mehl und Salz in eine Schüssel geben. Nach
und nach Wasser hinzufügen und solange
mit den Knetern kneten bis sich ein Kloß
gebildet hat (mittlere Geschw., dann max.
Geschw.).
•20 Min. kühl ruhen lassen.
•Ausrollen des Blätterteigs:
•Den Teig zum einem 1 cm dicken Viereck
ausrollen.
•Die Butter geschmeidig rühren, bis sie die
gleiche Konsistenz wie der Teig hat. Dann
auf dem Teig verstreichen. Den Teig doppelt
falten und zu einem 2 cm dicken Viereck
ausrollen.
•Falten Sie den Teig noch zweimal und lassen
Sie ihn dann 20 Min. ruhen.
•Wiederholen Sie den letzten Vorgang
zweimal und stellen Sie den Teig dann kalt.
•Mit den Quirlen Zucker, gemahlene
Mandeln, Butter und Eier verrühren (mittlere,
dann max. Geschwindigkeit).
•Den letzten Faltvorgang noch zweimal
wiederholen bevor Sie den Teig in die Form
geben. Boden mit einer Gabel mehrmals
einstechen. Mandelmischung auf dem Teig
verstreichen und die halbierten Aprikosen
darauf verteilen.
•Bei 240°C 30 Min. backen, dann mit
Aprikosenkonfitüre besteichen.
Apfelbeignets
. Backteig: 125 g Mehl, 1 Ei, 1 Essl. Öl, 1 Prise
Salz, 150 ml Milch, 4 Äpfel, 1 Essl. Zimt, 75
g Zucker, Saft einer Zitrone.
. Öl zum Frittieren
. Zubereitungszeit: 5 Min. für den Teig
•Mit den Quirlen Mehl, Ei, Öl, Salz und 2 Essl.
Milch in einer Schüssel verrühren, bis ein
glatter Teig entsteht (mittlere Geschw., dann
max. Geschw.).
•Restliche Milch nach und nach hinzufügen
und dabei die Geschwindigkeit verringern.
Teig 1 Stunde kaltstellen.
•Währenddessen Zucker und Zimt mischen.
10
Page 11

•Äpfel schälen, das Kerngehäuse entfernen
und dann die Äpfel in Ringe schneiden, in
eine Schüssel geben, mit der Zucker-ZimtMischung bestreuen und mit Zitronensaft
beträufeln. Zugedeckt 30 Min. im
Kühlschrank durchziehen lassen.
•Apfelringe in den Backteig tauchen, so dass
sie vollständig umhüllt sind, dann in das
heiße Öl geben.
•Je 4 Stück auf einmal frittieren und heiß
servieren.
•Sie können auf die gleiche Weise die
Beignets auch mit allen anderen frischen
Früchten: Ananas, Bananen, Aprikosen,
Birnen etc. zubereiten
Brot
. 250 g Weizenmehl, 100 g Vollkornmehl, 1
Päckchen Trockenhefe, 10 g Zucker, 10 g
Butter, 200 ml Wasser, 10 g Salz
. 1 Kastenform: 24 cm
. Zubereitungszeit: 7 Min.
•Mit den Knetern Mehl, Salz, Zucker, Butter
und Hefe in einer Schüssel verkneten
(mittlere Geschwindigkeit).
•Nach und nach Wasser unterkneten, bis ein
Kloß entsteht (mittlere Geschw., dann max.
Geschw.).
•Den Teig mit einem feuchten Tuch abdecken
und an einem warmen Ort 30 min. gehen
lassen.
•Teig in die gebutterte mit Mehl bestäubte
Form geben und nochmals 1 Stunde gehen
lassen.
•25 Min. bei 240°C backen.
Wahlweise können Sie dem Teig folgendes
hinzugeben: 150 g zerkleinerte Nüsse, 300 g
Rosinen, 200 g schwarze Oliven, 200 g
Speckwürfel, 2 Essl. Kümmel, etc.
Sie können den Teig auch teilen und daraus
Brötchen formen.
. Vorbereitungszeit: 8 Min. für den Teig und 2
Stunden gehen lassen
•Mit den Knetern Mehl, Hefe, warme Milch,
Zucker, Salz und 5 Eier in einer Schüssel 2
Min. verkneten (mittlere, dann max.
Geschw.).
•Die Butter in Flocken unterarbeiten, bis der
Teig elastisch wird.
•Teig mit einem feuchten Tuch abdecken und
30 min. an einem warmen Ort gehen lassen
(bis sich das Volumen verdoppelt hat).Teig
dritteln.
•Jeden Teil zu einem Strang formen und
daraus einen Zopf machen.
•Den Zopf auf ein gefettetes, mit Mehl
bestäubtes Backblech legen und nochmals
1Stunde gehen lassen. Bei 180°C 40-45
Min. backen.
Sie können den Teig anstatt Zopf auch in einer
Kastenform backen oder daraus Brötchen
formen.
Hefezopf
. 500 g Mehl, 2 Päckchen Trockenhefe, 200 g
Butter, 50 g Zucker, 1 Prise Salz, 5 Eier, 2
Essl. warme Milch.
11
Page 12

English
Description
. Parts of the appliance
a Front outlet
b Rear outlet
c Turbo switch (front outlet) (depending
on model)
d Control button:
d1 Start / Stop and electronic speed
control
d2 Ejection (front outlet)
d3 Start / Stop (S+3 speeds)
d4 Whisk ejection or Start / Stop on back
outlet
d5 Turbo fonction
e Wall bracket (depending on model)
f Cord storage with hanging clip
DEPENDING ON MODEL AND/OR OPTION
. Accessories on front outlet
g Whisks
g1 Plastic nut-shaped whisks
g2 Stainless steel nut-shaped whisks
h Dough hooks
i Balloon whisk
j Slicer-grater
j1 Drums
k Mashing foot
. Accessories on rear outlet
l Plastic blender foot
m Stainless steel blender foot
n Mini-chopper
. Containers
o Strainer
p 2.75 litre bowl
q 2.5 litre bowl
r 1 litre blender goblet
s 3 litre stainless steel bowl
t Stand
Important safety
recommendations
•Read the instructions for use carefully before
using your appliance for the first time: any
use which does not conform to the instructions will absolve Krups from any liability.
•Your appliance is for domestic use only,
exclusively for the functions indicated and
only inside the home.
•Never leave the appliance within reach of
children without supervision. The use of this
appliance by young children or by disabled
persons must always be supervised.
•Do not leave the power cable hanging
within reach of children.
•Ensure that the voltage rating of your
appliance does in fact correspond to that of
your household electrical wiring system.
Wiring instructions for U.K and Ireland only :
APPLIANCES WITH FITTED PLUG
Important : For your convenience this
appliance is supplied complete with a plug
incorporating a 3 amp fuse.
In the event of replacing a fuse in the plug
supplied, a 3 amp fuse approved by ASTA to
BS1362 must be used.
If the socket outlets are not of the 13A BS
1363 type, and therefore do not accept the
plug connected to this appliance, cut off the
plug.
When cut off, this plug is a shock hazard if
inserted into a socket outlet and must
therefore be disposed of safely.
If the fuse cover is detachable, never use the
plug with the cover omitted.†Replacement
covers can be obtained from your service
agent.
Fit the appropriate plug according to the
instructions in paragraph «Fitting a plug».
With alternative plugs a 5 amp fuse must be
fitted either in the plug or adaptor or at the
main fuse box.
12
Page 13

APPLIANCES WITHOUT FITTED PLUG
FITTING A PLUG - IMPORTANT
The wires in the mains lead are coloured in
accordance with the following code:
BLUE : NEUTRAL
BROWN :†LIVE
But the colours may not correspond with the
coloured markings identifying the terminals in
your plug, proceed as follows:
The wire which is coloured BLUE must be
connected to the terminal which is marked
with the letter ëNí or coloured black. The
wire which is coloured BROWN must be
connected to the terminal which is marked
with the letter ëLí or coloured red.
This appliance is manufactured to conform to
the Low Voltage Electrical Equipment (Safety)
Regulations 1989 and is designed to comply
with BS 3456.†It complies with the
requirements of the EEC Directive (89/336/
EEC).
Any connection error will render the
guarantee null and void.
•The power cable must never be near or in
contact with the hot parts of your appliance,
near a source of heat or on a sharp corner.
•Do not place the appliance, the power cable
or the plug in water or any other liquid.
•If the power cable and plug are damaged,
do not use the appliance. To avoid any risk,
always have the parts replaced by an
approved Krups service centre (see «Krups
Service Stations» booklet).
•Unplug your appliance as soon as you have
finished using it and when you are cleaning
it.
•Do not use your appliance if it is not
working correctly or if it has been damaged.
If this happens, you should contact an
approved Krups service centre (see Krups
Service Stations booklet).
•Any action other than cleaning and normal
maintenance by the customer must be
performed by an approved Krups service
centre.
•For your own safety, use only Krups
accessories and spare parts which are
suitable for your appliance.
•All appliances are subject to rigorous quality
controls. Usage tests are carried out on
appliances selected at random, consequently
some may show signs of use.
•This appliance is designed for use under
supervision by the user.
•Never touch the whisks, dough hooks,
the blade of the blender foot or the
drums of the slicer-grater, when the
appliance is working. Do not allow long
hair, scarves, the lead, etc. to hang over
the accessories during operation.
•Unplug the appliance before handling it
in any way (fitting and removal of
accessories)
•Never fit accessories with different functions
at the same time (e.g. dough hooks and
balloon whisk, etc.).
•Please note: the blades of some of the
accessories are sharp. Handle the blades
with care.
Important: Your appliance is fitted with two
outlets (1):
•a front outlet (a) for fitting the accessories
(g, h, i, j, k) (depending on model)
•a rear outlet (b) for fitting accessories (l, m,
n) (depending on model).
Before using your appliance for
the first time
•Clean the various accessories of your
appliance carefully.
Using accessories on the front
outlet
. Whisks and dough hooks
•With the control button (d) in position «0»,
insert the whisks or dough hooks until they
are locked into place. Always insert the
accessory equipped with a toothed crown
into the opening indicated on the appliance
by a crown which is similarly toothed (2).
•Plug in the appliance.
13
Page 14

•Depending on the quantity to be prepared,
place the ingredients in an appropriate
container (Krups bowl or goblet).
•Plunge the whisks or dough hooks into the
container and start the appliance by turning
the control button (d) to the right.
To prevent splashing when starting or for
delicate preparations (creams, sauces), your
appliance is fitted with an anti-splash
function (position «S»). To use this:
•Push the control button (d) to the right in
position «S» (3).
•To continue with the preparation, choose a
faster speed (4).
The appliance may be equipped with a Turbo
function (c or d5 depending on model) which
allows you instant access to the full power of
your appliance (5 or 9).
•When you have finished using it, reset the
control button (d) to position «0».
•Unplug the appliance.
•Eject the whisks or dough hooks by pushing
the control button (d) to the «Eject» position
(6).
. Balloon whisk
The balloon whisk (i) is used to make light
preparations (creams, mayonnaise, and
meringues).
•Use it in a tall, narrow container (Krups
goblet or stainless steel bowl).
•Never use it for heavy preparations such as
cakes or bread dough or for mashing.
. For the other accessories, please refer to
their instructions for use.
•
To prevent splashing when starting or for
delicate preparations (creams, sauces), your
appliance is fitted with an anti-splash
function. To use this:
•Push and hold the control button (d) in
position «S» (7).
•To continue with the preparation, choose a
faster speed, still holding the control button
(d) (8).
. Model 3MIX 6000XL Edition
•Check that the control button (d) is on «0».
•Open the hatch (b) and assemble the
accessory on the back outlet.
•With the control (d) on «0», switch the
appliance on by simply pressing towards the
front of the beater. (9).
•After use, unplug the appliance with the
control button on ì0î and remove the
accessory and reclose the hatch (b).
Cleaning
•Unplug the appliance.
•Clean the body of the appliance using only a
damp cloth.
•Clean the whisks / dough hooks under
running water or in the dishwasher. Rinse
and dry.
•On completion of using your appliance it is
strongly recommended that you clean the
accessories immediately. This will remove any
clinging food from the accessories,
preventing both drying out of the residue
food, making cleaning easier, and the
possibility of bacterial growth.
Recommendations for
accessories used on the rear
outlet
For safety reasons, the hand-mixer detects the
presence of accessories on the rear outlet.
. Model 3 MIX 8000/8008
•During use, keep hold of the control button
(d); if you release it, it will automatically
return to the position «0».
14
Storage
The appliance is equipped with a cord storage
with hanging clip (f).
According to the model:
Your appliance is equipped with a wall
bracket.
•On first use, unfold the bracket for the
accessories (10).
Page 15

•Install the accessories (g and h) then the
hand-mixer.
They will be immediately above the worktop
and ready for use (11).
There is also space provided behind the
bracket for storing a notebook, pencil, etc.
•Make a small hole in the centre of the dish
and bake for 35 min at 220 °C.
You can replace the apples with: 800g
rhubarb, chopped into pieces, or 500g
rhubarb + 300g raspberries and 1 tbsp flour,
6 tbsp sugar and 10g butter.
What to do if your appliance
does not work
•Make sure the accessories have been
correctly fitted.
•Check the electrical connection.
If your appliance still does not work,
contact an approved Krups service centre (see
list in the Krups Service Stations booklet).
Recipes
Apple pie
. Shortcrust pastry: 300g flour, 150g butter,
15 ml water, 1 pinch salt.
. Filling: 4 or 5 apples, 2 tbsps sugar, 1 tsp
cinnamon, 1 tsp nutmeg, juice of a lemon,
10g butter.
. 1 pie dish: 28 cm in diameter (11” ins)
. Preparation time: 18 to 20 min.
•Using the whisks, mix the flour, salt and
butter in pieces until it «crumbs» (min.
speed).
•Then, using the dough hooks, gradually add
water while kneading (medium speed, then
max.) until it forms a ball.
•Leave to rest for 1 hour in the fridge.
•In a bowl, mix the finely sliced apples with
the sugar, cinnamon and nutmeg.
•Roll out 2/3 of the pastry, lining the buttered
pie dish above the edges.
•Place the apples on the bottom, sprinkle
with lemon juice and scatter with small
cubes of butter.
•Cover the apples with the rest of the pastry
and seal the edges together.
Strawberry tart
. Shortcrust pastry: 250g flour, 125g butter,
125g sugar, 1 egg.
. Custard cream: 1/4 l milk, 2 egg yolks, 50g
sugar, 25g flour, a few drops of vanilla
essence.
. 800g strawberries
. 1 pie dish: 28 cm in diameter (11” ins)
. Preparation time: 20 min
•Using the whisks, mix the flour, sugar and
butter in pieces until it «crumbs» (min.
speed).
•Then, using the dough hooks, add the egg
and knead until a ball forms (medium speed
at first then max).
•Leave to rest for 1 hour in the fridge.
•Boil the milk with the vanilla.
•During this time, using the whisks, process
the egg yolks and the sugar (medium speed,
then max). The mixture must turn white.
•Add the flour and mix (medium speed).
•Then at min. speed, pour in the boiling milk
with care and mix.
•Heat the preparation, stirring with a spoon
until it thickens. Allow to cool, stirring
continuously.
•Roll out the pastry and use it to line the
buttered pie dish. Pierce the bottom with a
fork, line with aluminium foil and cover with
pulses.
•Bake for 20 min at 180°C.
•Remove the pulses and the aluminium foil
and allow to cool.
•Spread the custard cream on the base of the
tart and fill with strawberries.
•Coat with redcurrant jelly.
15
Page 16

Chocolate cake
. 3 eggs, 170g sugar, 170g butter, 150g flour,
2 tbsp cocoa powder, 6g baking powder
(1/2 sachet).
. 1 loose-bottomed cake tin: 22 cm in
diameter (10” ins)
. Preparation time: 11 min
•Using the whisks, mix the eggs and sugar in
a salad bowl (medium speed): the mixture
should be smooth and slightly runny.
•Add the butter (medium speed), then the
flour, the cocoa and the baking powder
(min. speed while adding then medium
speed to smooth it).
•Pour the mixture into the buttered cake tin
and bake for 50 min at 170°C.
•You can:
- add some pieces of walnut, chocolate
shavings or crystallised orange peel to the
mixture.
- add to the cake mixture 2 tbsp ground
almonds or walnuts.
- coat your cake with chocolate icing made by
melting 100g plain chocolate with 20g
butter.
Jam Swiss roll
. 3 eggs, 90g sugar, 40g flour, 30g potato
starch, 1 pot of jam or jelly (apricot, orange,
raspberry, redcurrant, etc.).
. 1 rectangular tin: 33 x 22 cm
. Preparation time: 10 min
•Using the whisks, process the sugar and the
egg yolks (max. speed): the mixture must
turn white.
•Add the flour and the potato starch then
mix (min. speed).
•Clean the whisks and beat the egg whites
separately until stiff (max. speed).
•Mix the two preparations (min. speed).
•Line the tin with buttered greaseproof paper,
pour in the cake mixture and bake for 15min
at 170°C.
•When the cake is slightly browned,
immediately tip it out of the tin onto a damp
cloth sprinkled with sugar. Remove the
greaseproof paper.
•Roll the cake in the cloth and allow to cool.
•Then, unroll the cake and spread it with jam
or jelly.
•Roll it up again and trim the ends.
You can also:
. fill this cake with custard cream,
. replace the potato starch with cocoa powder
and line the roll with whipped cream.
Almond and apricot tart
. Puff pastry: 200g flour, 10 ml water, 160g
butter, 1 pinch salt.
. Filling: 1kg fresh apricots or 1 can of apricots
in syrup, 60g butter, 70g sugar, 70g ground
almonds, 1 whole egg + 1 yolk, 2 tbsp
apricot jam.
. 1 pie tin: 28 cm in diameter (11” ins)
. Preparation time: 2 h for the puff pastry +
10 min to complete the tart.
•Place the flour and the salt together in a
bowl. Add water gradually, kneading with
the dough hooks until a ball is formed
(medium speed then max).
•Allow to rest 20 min in a cool place.
•Turning and rolling the pastry:
•Roll out the pastry to a square 1 cm
(1/2” ins.) thick .
•Process the butter until it has the same
consistency as the pastry and roll it out in
the middle of the square. Enclose the butter
by folding in, 2 by 2, the opposite corners of
the square.
•Roll out the pastry into a rectangle 2 cm
(1” in.) thick and fold it in 3.
•Allow the pastry to rest for 20 min and
repeat the last operation 2 more times.
•Place the pastry in a cool place.
•In a bowl, mix, using the whisks, the sugar,
ground almonds, butter and the eggs
(medium speed then max).
16
Page 17

•Turn the pastry twice more before lining the
pie tin. Distribute over the base, after
pricking with a fork, the preparation with
the almonds and place the apricots, sliced
in 2, on top.
•Bake for 30 min at 240°C. then coat with
apricot jam.
Apple fritters
. Doughnut batter: 125g flour, 1 egg, 1 tbsp
oil, 1 pinch salt, 15 ml milk, 4 apples, 1 tbsp
cinnamon, 75g sugar, the juice of a lemon.
. For frying: oil.
. Preparation time: 5 min for the batter.
•Using the whisks, mix in a bowl the flour,
egg, oil, salt and 2 tbsp. milk until the
mixture is smooth (medium speed then
max).
•Add the milk gradually, at the same time
reducing the speed. Allow to rest for 1 h in a
cool place.
•During this time, mix the sugar and the
cinnamon.
•Keep the apples whole, peel them, remove
the pips and cut them into rounds. Sprinkle
them with the mixture of sugar and
cinnamon, and sprinkle with lemon juice.
Cover and leave to marinate in a cool place
for 30 min.
•Dip the apple rounds into the doughnut
batter until they are completely coated, then
into the hot oil.
•Cook in batches of 4. Serve hot.
You can prepare fritters in the same way with
all sorts of fresh fruits: pineapples, bananas,
apricots, pears, etc.
* Always take extra care when placing foods
into hot oil. Take precautions in case of
splashing, never leave hot oil unattended.
Bread
. 250g white flour, 100g wholemeal flour,
1 sachet dry baker’s yeast, 10g sugar, 10g
butter, 200g water, 1g salt.
. 1 cake tin: 24 cm (9” ins.)
. Preparation time: 7 min
•Mix in a salad bowl, using the dough hooks,
the 2 types of flour, salt, butter and yeast
(medium speed).
•Add water gradually, until a ball is formed
(medium speed then max).
•Cover the salad bowl with a damp cloth and
leave to stand for 30 min in a warm place.
•Place the dough in the buttered and floured
tin. Leave to rise again for 1 h.
•Bake for 25 min at 240°C.
You can, if you like, mix into the dough 150g
walnut pieces, 300g raisins, 200g black olives,
200g small bacon cubes, 2 tbsp cumin seeds,
etc.
You can also divide the dough into small balls
to make small individual rolls.
Braided brioche
. 500g flour, 2 sachets dry bakerís yeast, 200g
butter, 50g sugar, 1 pinch salt, 5 eggs,
2 tbsp warm milk.
. Preparation time: 8 min for the dough + 2 h
to rise.
•In a salad bowl, using the dough hooks,
combine the flour, yeast, warm milk, sugar,
salt and 5 eggs for 2 min (medium speed
then max).
•Add the butter piece by piece until you have
an elastic dough.
•Cover the salad bowl with a damp cloth and
leave to rise for 1 h in a warm place (until
the dough has doubled in volume). Then
divide the dough into 3.
•Roll each piece by hand to form 3 long
«strips» which you then braid.
•Place the braid on a buttered and floured
baking tray and again leave it to rise for 1 h.
Bake for 40 to 45 min at 180°C.
You can also leave the dough unbraided and
bake it in a cake tin or create small brioches
by dividing the dough into small balls.
17
Page 18

Français
Description
. Eléments de l’appareil
a Sortie avant
b Sortie arrière
c Touche Turbo (sortie avant) (selon mo-
dèle)
d Bouton de commandes :
d1 Marche/Arrêt et variation électronique
de vitesse
d2 Ejection (sortie avant)
d3 Marche / Arrêt (S+3 vitesses)
d4 Ejection fouet ou Marche / Arrêt en
sortie arrière
d5 Fonction Turbo
e Support mural (selon modèle)
f Enrouleur de câble avec clip d’accro-
chage
SELON MODÈLE ET/OU EN OPTION
. Accessoires sur sortie avant
g Fouets
g1 Fouets noix plastique
g2 Fouets noix inox
h Malaxeurs
i Fouet cuisinier
j Eminceur-râpeur
j1 Tambours
k Pied presse-purée
. Accessoires sur sortie arrière
l Pied mixer plastique
m Pied mixer inox
n Mini-hachoir
. Récipients
o Passoire
p Bol 2,75 l
q Bol 2,5 l
r Gobelet 1 l
s Bol inox 3 l
t Stand
Consignes importantes de
sécurité
• Lisez attentivement le mode d’emploi avant
la première utilisation de votre appareil : une
utilisation non conforme au mode d’emploi
dégagerait Krups de toute responsabilité.
• Votre appareil est destiné uniquement à un
usage domestique, exclusivement pour la
fonction indiquée et à l’intérieur de la maison.
• Ne laissez pas l’appareil à la portée des en-
fants sans surveillance. L’utilisation de cet
appareil par des jeunes enfants ou des personnes handicapées doit être faite sous
surveillance.
• Ne laissez pas pendre le câble d’alimentation
à portée de mains des enfants.
• Vérifiez que la tension d’alimentation de
votre appareil correspond bien à celle de
votre installation électrique.
Toute erreur de branchement annule la
garantie.
• Le câble d’alimentation ne doit jamais être à
proximité ou en contact avec les parties
chaudes de votre appareil, près d’une source
de chaleur ou sur un angle vif.
• Ne mettez pas l’appareil, le câble d’alimenta-
tion ou la fiche dans l’eau ou tout autre
liquide.
• Si le câble d’alimentation ou la fiche sont
endommagés, n’utilisez pas l’appareil. Afin
d’éviter tout danger, faites-les obligatoirement remplacer par un centre service agréé
Krups (voir feuillet «Krups Service Stations»).
• Débranchez votre appareil dès que vous
cessez de l’utiliser et lorsque vous le nettoyez.
• N’utilisez pas votre appareil s’il ne fonc-
tionne pas correctement ou s’il a été endommagé. Dans ce cas, adressez-vous à un centre service agréé Krups (voir feuillet «Krups
Service Stations»).
• Toute intervention autre que le nettoyage et
l’entretien usuel par le client doit être effectuée par un centre service agréé Krups.
18
Page 19

• Pour votre sécurité, n’utilisez que des acces-
soires et des pièces détachées Krups adaptés
à votre appareil.
• Tous les appareils sont soumis à un contrôle
qualité sévère. Des essais d’utilisation pratiques sont faits avec des appareils pris au
hasard, ce qui explique d’éventuelles traces
d’utilisation.
• Cet appareil est conçu pour une utilisation
sous surveillance de l’utilisateur.
• Ne touchez pas les fouets, les ma-
laxeurs, le couteau du pied mixeur ou
les tambours de l’éminceur-râpeur lorsque l’appareil est en fonctionnement.
Ne laissez pas pendre les cheveux longs,
les écharpes, le cordon, etc au dessus
des accessoires en fonctionnement.
• Débranchez l’appareil avant toute mani-
pulation (montage et démontage des
accessoires).
• Ne positionnez pas des accessoires de
fonction différente en même temps (ex :
malaxeur et fouet cuisinier..)
• Attention : les lames de certains acces-
soires sont aiguisées. Manipulez les
couteaux avec précaution.
Important : Votre appareil est équipé de
deux sorties (1) :
•une sortie avant (a) pour la mise en place
des accessoires (g, h, i, j, k) (suivant modèle)
•une sortie arrière (b) pour la mise en place
des accessoires (l, m, n) (suivant modèle).
Avant la première utilisation
• Nettoyez soigneusement les différents
accessoires de votre appareil.
Utilisation des accessoires en
sortie avant
toujours l’accessoire muni d’une couronne
dentée dans l’ouverture indiquée sur l’appareil par une couronne également dentée (2).
• Branchez l’appareil.
• Selon la quantité à préparer, placez les ingré-
dients dans un récipient approprié (bol ou
gobelet Krups).
• Plongez les fouets ou les malaxeurs dans le
récipient et mettez l’appareil en marche en
poussant la commande (d) vers la droite.
Pour éviter les projections au démarrage ou
pour les préparations délicates (crèmes,
sauces), votre appareil est équipé d’une
fonction anti-éclaboussures (position «S»).
Pour l’utiliser :
• Poussez la commande (d) vers la droite en
position “S” (3).
• Pour poursuivre la préparation, choisissez
une vitesse plus rapide (4).
L’appareil est équipé d’une fonction Turbo
(c ou d5 selon modèle) qui vous permet par
une simple pression de disposer instantanément de toute la puissance de votre appareil
(5 ou 9).
• En fin d’utilisation, remettez la commande
(d) en position «0».
• Débranchez l’appareil.
• Ejectez les fouets ou les malaxeurs en pous-
sant la commande (d) sur la position «Eject»
(6).
. Fouet cuisinier
Le fouet cuisinier (i) est utilisé pour réaliser les
préparations aérées (crèmes, mayonnaise,
blancs en neige).
• Utilisez-le dans un récipient haut et étroit (le
gobelet ou le bol inox Krups).
• Ne l’utilisez jamais pour des préparations
lourdes telles que gâteau ou pâte à pain ou
pour faire de la purée.
. Pour les autres accessoires, reportezvous à leur mode d’emploi.
. Fouets et malaxeurs
• Le bouton de commandes (d) en position
«0», insérez les fouets ou les malaxeurs
jusqu’à leur blocage complet. Introduisez
19
Page 20

Recommandations pour les
accessoires en sortie arrière
Pour des raisons de sécurité, le batteur
détecte la présence d’accessoires en sortie
arrière.
. Modéle 3 MIX 8000/8008
•Lors de l’utilisation, maintenez la commande
(d) ; si vous la relâchez, elle revient automatiquement en position «0».
Pour éviter les projections au démarrage ou
pour les préparations délicates, votre appareil
est équipé d’une fonction anti-éclaboussu-
res. Pour l’utiliser :
•Poussez et maintenez la commande (d) sur la
position “S” (7).
•Pour poursuivre la préparation, choisissez
une vitesse plus rapide en maintenant la
commande (d) (8).
. Modéle 3MIX 6000XL Edition
• Vérifiez que le bouton de commande (d) est
sur «0».
• Ouvrez la trappe (b) et assemblez l’acces-
soire sur la sortie arrière.
• La commande (d) sur «0», la mise en mar-
che se fait par simple pression vers l’avant
du batteur.(9)
• Après utilisation, débranchez l’appareil,le
bouton de commande sur «0», enlevez
l’accessoire et refermez la trappe (b).
Nettoyage
•Débranchez l’appareil.
•Nettoyez le corps de l’appareil à l’aide d’un
chiffon humide uniquement.
•Nettoyez les fouets / malaxeurs sous l’eau
courante ou au lave-vaisselle. Rincez et séchez.
Rangement
L’appareil est équipé d’un enrouleur de câble
avec un clip d’accrochage (f).
Selon modéle :
Votre appareil est équipé d’un support mural.
• A la première utilisation, dépliez le support
des accessoires (10).
• Installez les accessoires (g et h) puis le
batteur.
Ils seront directement au-dessus du plan de
travail et prêts à l’emploi (11).
Un emplacement est également prévu, à l’arrière du support, pour ranger un bloc note, un
crayon...
Si votre appareil ne fonctionne
pas, que faire ?
• Assurez-vous que les accessoires sont bien
en place.
• Vérifiez le branchement.
Si votre appareil ne fonctionne toujours
pas, adressez-vous à un centre service agréé
Krups (voir liste dans le livret «Krups Service
Stations»).
Recettes
« Apple-pie »
. Pâte brisée : 300 g de farine, 150 g de
beurre, 15 ml d’eau, 1 pincée de sel.
. Garniture : 4 ou 5 pommes, 2 cuil. à soupe
de sucre, 1 cuil. à café de cannelle, 1 cuil. à
café de muscade, le jus d’un citron, 10 g de
beurre.
. 1 moule à tarte : 28 cm Ø
. Préparation : 18 à 20 min.
• Avec les fouets, mélangez la farine, le sel et
le beurre en morceaux jusqu’à obtenir des
« miettes » (vitesse mini).
• Puis avec les malaxeurs, ajoutez l’eau peu à
peu en pétrissant (vitesse moyenne puis
maxi) jusqu’à former une boule.
• Laissez reposer 1 h au réfrigérateur.
• Dans un bol, mélangez les pommes coupées
en tranches fines avec le sucre, la cannelle
et la muscade.
20
Page 21

• Etalez les 2/3 de la pâte, garnissez-en le
moule beurré en la faisant déborder.
• Disposez les pommes sur le fond, arrosez du
jus de citron et parsemez de petits dés de
beurre.
• Couvrez les pommes avec le reste de la pâte
et soudez les bords entre eux.
• Faites un petit trou au centre de la prépara-
tion et faites cuire 35 min à 220°C.
Vous pouvez remplacer les pommes par :
800 gr de rhubarbe coupée en morceaux ou
500 gr de rhubarbe + 300 gr de framboises et
1 cuil. à soupe de farine, 6 cuil. à soupe de
sucre et 10 gr de beurre.
Tarte aux fraises
. Pâte sablée : 250 g de farine, 125 g de
beurre, 125 g de sucre, 1 oeuf.
. Crème pâtissière : 1/4 l de lait, 2 jaunes
d’oeufs, 50 g de sucre, 25 g de farine,
quelques gouttes de vanille liquide.
. 800 g de fraises
. 1 moule à tarte : 28 cm Ø
. Préparation : 20 min
• Avec les fouets, mélangez la farine, le sucre
et le beurre en morceaux jusqu’à obtenir des
« miettes » (vitesse mini).
• Puis avec les malaxeurs, ajoutez l’oeuf et
pétrissez jusqu’à former une boule (vitesse
moyenne puis maxi).
• Laissez reposer 1 h au réfrigérateur.
• Faites bouillir le lait avec la vanille.
• Pendant ce temps, avec les fouets, travaillez
les jaunes d’oeufs et le sucre (vitesse
moyenne puis maxi). Le mélange doit
blanchir.
• Ajoutez la farine et mélangez (vitesse
moyenne).
• Puis à vitesse mini, versez le lait bouillant et
mélangez.
• Faites cuire la préparation en remuant avec
une cuillère jusqu’à épaississement. Laissez
refroidir sans cesser de tourner.
• Etalez la pâte et garnissez-en le moule
beurré. Piquez le fond avec une fourchette,
tapissez-le de papier aluminium et recouvrez
de légumes secs.
• Faites cuire 20 min à 180°C.
• Enlevez les légumes secs et le papier
aluminium et laissez refroidir.
• Etalez la crème pâtissière sur le fond de tarte
et garnissez-le de fraises.
• Nappez de gelée de groseilles.
Gâteau au chocolat
. 3 oeufs, 170 g de sucre, 170 g de beurre,
150 g de farine, 2 cuil. à soupe de cacao en
poudre, 6 g de levure chimique (1/2 sachet).
. 1 moule à manqué : 22 cm Ø
. Préparation : 11 min
• Avec les fouets, mélangez dans un saladier
les oeufs et le sucre (vitesse moyenne) : le
mélange doit former un ruban.
• Ajoutez le beurre (vitesse moyenne), puis la
farine, le cacao et la levure ( vitesse mini
pour incorporer puis vitesse moyenne pour
homogénéiser).
• Versez la pâte dans le moule beurré et faites
cuire 50 min à 170°C.
• Vous pouvez :
- incorporer à la pâte des morceaux de noix,
des copeaux de chocolat ou des zestes
d’oranges confits.
- ajouter à la pâte 2 cuil. à soupe de poudre
d’amande ou de noix.
- napper votre gâteau d’un glaçage au
chocolat réalisé en faisant fondre 100 gr de
chocolat noir avec 20 g de beurre.
Biscuit roulé à la confiture
. 3 oeufs, 90 g de sucre, 40 g de farine,
30 g de fécule de pomme de terre, 1 pot de
confiture ou gelée ( abricots, oranges,
framboises, groseilles...).
. 1 moule rectangulaire : 33 x 22 cm
. Préparation : 10 min
• Avec les fouets, travaillez le sucre et les
jaunes d’oeufs (vitesse maxi) : le mélange
doit blanchir.
21
Page 22

•Ajoutez la farine et la fécule puis mélangez
(vitesse mini).
•Nettoyez les fouets et montez à part les
blancs en neige (vitesse maxi).
•Mélangez les deux préparations ( vitesse
mini).
•Garnissez le moule de papier sulfurisé
beurré, versez la pâte et faites cuire 15 min à
170°C.
•Lorsque le biscuit est légèrement doré,
démoulez-le immédiatement sur un torchon
humide saupoudré de sucre. Retirez le
papier sulfurisé.
•Roulez le gâteau dans le torchon et laissez-le
refroidir.
•Puis, déroulez le gâteau et fourrez-le de
confiture ou de gelée.
•Roulez-le de nouveau et biseautez les bouts.
Vous pouvez également :
. garnir ce gâteau de crème pâtissière,
. remplacer la fécule par du cacao en poudre
et fourrer le roulé de crème fouettée.
Tarte aux amandes et aux abricots
. Pâte feuilletée : 200 g de farine, 10 ml
d’eau, 160 g de beurre, 1 pincée de sel.
. Garniture : 1 kg d’abricots frais ou 1 boîte
d’abricots au sirop, 60 g de beurre, 70 g de
sucre, 70 g d’amandes en poudre, 1 oeuf
entier + 1 jaune, 2 cuil. à soupe de confiture
d’abricots.
. 1 moule à tarte : 28 cm Ø
. Préparation : 2 h pour la pâte feuilletée +
10 min pour terminer la tarte.
•Dans un bol, mettez la farine et le sel.
Ajoutez peu à peu l’eau en pétrissant avec
les malaxeurs jusqu’à former une boule
(vitesse moyenne puis maxi) .
•Laissez reposer 20 min au frais.
•Feuilletage :
•Etalez la pâte en un carré de 1 cm d’épais-
seur.
•Travaillez le beurre pour qu’il ait la même
consistance que la pâte et étalez-le au milieu
du carré. Enfermez le beurre en repliant 2 à
2 les coins opposés du carré.
• Etalez la pâte en un rectangle de 2 cm
d’épaisseur et pliez-le en 3.
• Laissez reposer la pâte 20 min et recommen-
cez cette dernière opération 2 autres fois.
• Mettez la pâte au frais.
• Dans un bol, mélangez, avec les fouets, le
sucre, la poudre d’amandes, le beurre et les
oeufs (vitesse moyenne puis maxi).
• Donnez encore 2 tours à la pâte avant de
garnir le moule. Répartissez sur le fond
piqué avec une fourchette, la préparation
aux amandes et disposez dessus les abricots
coupés en 2.
• Faites cuire 30 min à 240°C. puis nappez de
confiture d’abricots.
Beignets aux pommes
. Pâte à beignets : 125 g de farine, 1 oeuf,
1 cuil. à soupe d’huile , 1 pincée de sel,
15 ml de lait, 4 pommes, 1 cuil. à soupe de
cannelle, 75 g de sucre, le jus d’un citron.
. Bain de friture : huile.
. Préparation : 5 min pour la pâte.
• Avec les fouets, mélangez dans un bol la
farine, l’oeuf, l’huile, le sel et 2 cuil. à soupe
de lait jusqu’à ce que le mélange soit
homogène ( vitesse moyenne puis maxi).
• Ajoutez peu à peu le lait en diminuant la
vitesse. Laissez reposer 1 h au frais.
• Pendant ce temps, mélangez le sucre et la
cannelle.
• Gardez les pommes entières, pelez-les,
enlevez les pépins et coupez-les en rondelles. Saupoudrez-les avec le mélange sucre/
cannelle, arrosez de jus de citron. Couvrez et
laissez macérer 30 min au frais.
• Plongez les rondelles de pommes dans la
pâte à beignets pour les enrober complètement, puis dans la friture chaude.
• Faites cuire 4 par 4. Servez très chaud.
Vous pouvez de la même façon préparer les
beignets avec toutes sortes de fruits frais :
ananas, bananes, abricots, poires, etc.
22
Page 23

Pain
. 250 g de farine blanche, 100 g de farine
complète, 1 sachet de levure de boulanger
sèche, 10 g de sucre, 10 g de beurre,
200 g d’eau , 1 g de sel.
. 1 moule à cake : 24 cm
. Préparation : 7 min
• Dans un saladier, mélangez, avec les
malaxeurs, les farines, le sel, le beurre et la
levure (vitesse moyenne).
• Ajoutez peu à peu l’eau jusqu’à formation
d’une boule (vitesse moyenne puis maxi) .
• Couvrez le saladier d’un linge humide et
laissez reposer 30 min dans un endroit tiède.
• Placez la pâte dans le moule beurré et fariné.
Laissez de nouveau lever pendant 1 h.
• Faites cuire 25 min à 240°C.
Vous pouvez au choix incorporer à la pâte
150 g de morceaux de noix, 300 g de raisins
secs, 200 g d’olives noires, 200 g de petits
lardons, 2 cuil. à soupe de graines de cumin,
etc.
Vous pouvez également diviser la pâte en
petites boules pour réaliser des petits pains
individuels.
Brioche tressée
. 500 g de farine, 2 sachets de levure
boulanger sèche, 200 g de beurre, 50 g de
sucre, 1 pincée de sel, 5 oeufs, 2 cuil. à
soupe de lait tiède.
. Préparation : 8 min pour la pâte + 2 h de
levée.
• Dans un saladier, mélangez, avec les
malaxeurs, la farine, la levure, le lait tiède, le
sucre, le sel et les 5 oeufs pendant 2 min
(vitesse moyenne puis maxi).
• Ajoutez le beurre morceau par morceau
jusqu’à obtenir une pâte élastique.
• Couvrez le saladier avec un linge humide et
laissez lever 1 h dans un endroit tiède
(jusqu’à ce que la pâte ait doublé de
volume). Partagez alors la pâte en 3.
• Roulez chaque morceau sous la main pour
former 3 longues « lanières » que vous
tresserez.
• Posez la tresse sur une plaque à pâtisserie
beurrée et farinée et laissez-la de nouveau
gonfler pendant 1 h. Faites cuire 40 à
45 min à 180°C.
Vous pouvez également ne pas tresser la pâte
et la cuire dans un moule à cake ou confectionner de petites brioches en divisant la pâte
en petites boules.
23
Page 24

Nederlands
Beschrijving
. Onderdelen van het apparaat
a Uitgang voor
b Uitgang achter
c Turbo toets (uitgang voor) (afhankelijk
van het model)
d Bedieningsknop:
d1 Aan/Uit en elektronische
snelheidsregeling
d2 Uitwerping (uitgang voor)
d3 Aan / Uit ( S+3 snelheden)
d4 Uitwerpen van de garde of Aan / Uit
op de achteruitgang
d5 Turbo Functie
e Wandhouder
(afhankelijk van het model)
f Snoeroprolvoorziening met
bevestigingsclip
AFHANKELIJK VAN HET MODEL EN/OF APART AAN TE
SCHAFFEN
. Accessoires op uitgang voor
g Gardes
g1 Plastic garden in nootvorm
g2 Roestvrijstalen garden in nootvorm
h Deeghaken
I Koksgarde
j Fijnsnijder- rasp
j1 Trommels
k Pureervoet
. Accessoires op uitgang achter
l Kunststof staafmixervoet
m Roestvrijstalen staafmixervoet
n Mini-hakker
. Kommen
o Zeef
p Mengkom 2,75 l
q Mengkom 2,5 l
r Mengbeker 1 l
s Roestvrijstalen mengkom 3 l
t Standaard
Veiligheidstips
•Lees deze gebruiksaanwijzing zorgvuldig
door voordat u het apparaat in gebruik
neemt: als het apparaat niet overeenkomstig
de gebruiksaanwijzing wordt gebruikt,
vervalt de aansprakelijkheid van Krups.
•Uw apparaat is alleen bestemd voor
huishoudelijk gebruik, uitsluitend voor de
aangegeven functie en binnenshuis.
•Houd het apparaat buiten bereik van
kinderen. Het gebruik van het apparaat door
jonge kinderen dient uitsluitend onder
toezicht plaats te vinden.
•Laat het snoer nooit binnen handbereik van
kinderen hangen.
•Controleer of de netspanning aangegeven
op uw apparaat overeenkomt met de
netspanning bij u thuis.
Verkeerde aansluiting maakt de garantie
ongeldig.
•Het snoer dient nooit in de nabijheid van of
in contact met de warme onderdelen van
het apparaat, een warmtebron of op een
scherpe hoek te komen.
•Plaats het apparaat, het snoer of de stekker
nooit in water of andere vloeistoffen.
•Indien het snoer of de stekker beschadigd is
dient U gebruik van het apparaat te
vermijden. Teneinde gevaarlijke situaties te
voorkomen dient U deze onderdelen door
een door Krups erkende onderhoudsdienst
te laten vervangen (zie de folder «Krups
Service Stations»).
•Haal na gebruik en als u het apparaat
schoonmaakt de stekker uit het stopcontact.
•Maak geen gebruik van het apparaat als het
niet goed functioneert of als het beschadigd
is. Neem in zoín geval contact op met de
Krups reparatie-service (zie adres in het
boekje «Krups Service Stations»).
•Maak geen gebruik van het apparaat als het
snoer of de stekker beschadigd is. Om elk
risico te vermijden, bent u verplicht ze te
laten vervangen door de Krups reparatieservice (zie adres in het boekje «Krups
Service Stations»).
24
Page 25

•Voor uw eigen veiligheid, dient u uitsluitend
gebruik te maken van Krups accessoires en
onderdelen, afgestemd op het apparaat.
•Alle apparaten werden aan een strenge
kwaliteitscontrole onderworpen. Met
willekeurig gekozene apparaten worden
praktijktesten gehouden, dit verklaart
eventuele sporen van gebruik.
•Dit apparaat werd ontworpen om onder
toezicht van de gebruiker te functioneren.
•Raak nooit de gardes, deeghaken, het
mesje van de staafmixervoet of de
trommels van de fijnsnijder-rasp aan als
het apparaat in werking is. Laat geen
lang haar, shawls, het snoer, etc boven
de werkende accessoires hangen.
•Haal de stekker uit het stopcontact
voordat u de accessoires monteert of
demonteert.
•Plaats nooit tegelijkertijd verschillende
accessoires (bv. een deeghaak met de
koksgarde).
•Let op: de messen van sommige acces-
soires zijn vlijmscherp. Wees er uiterst
voorzichtig mee.
Belangrijk: Uw apparaat is voorzien van twee
uitgangen (1):
•een uitgang voor (a): voor plaatsing van de
accessoires (g, h, i, j, k) (afhankelijk van het
model)
•een uitgang achter (b): voor plaatsing van de
accessoires (l, m, n) (afhankelijk van het
model).
Voor het eerste gebruik
•Maak de accessoires van het apparaat
zorgvuldig schoon.
Gebruik van de accessoires van
de uitgang voor
Plaats het accessoire dat voorzien is van een
gekartelde rand altijd in de opening waarop
een gelijk gekartelde rand is aangegeven (2).
•Steek de stekker in het stopcontact.
•Doe de ingrediënten in een kom (Krups
mengkom of mengbeker) die geschikt is
voor de te mengen hoeveelheid.
•Dompel de gardes of deeghaken in de
ingrediÎnten van de kom en stel het apparaat
in werking door de bedieningsknop (d) naar
rechts te drukken.
Om spatten tijdens de start of bij fijne
bereidingen (room, sauzen) te voorkomen, is
uw apparaat voorzien van een anti-spat
functie (stand «S»). Om deze te gebruiken:
•drukt u de bedieningsknop (d) naar rechts
op stand «S» (3).
•Om de bereiding te vervolgen, kiest u een
snellere stand (4).
Het apparaat is uitgerust met een Turbo
functie (c of d5 afhankelijk van het model), u
hoeft er alleen maar op te drukken om
onmiddellijk over het volle vermogen van het
apparaat te beschikken (5 of 9).
•Na gebruik, zet u de bedieningsknop (d)
weer op stand «0».
•Haal de stekker uit het stopcontact.
•Werp de gardes of deeghaken uit door de
bedieningsknop op stand «Eject» te drukken
(6).
. Koksgarde
De koksgarde (i) wordt gebruikt voor luchtige
bereidingen (room, mayonaise, eiwitschuim).
•Gebruik de koksgarde in een hoge, smalle
schaal (de Krups mengbeker of
roestvrijstalen mengkom).
•Gebruik de koksgarde nooit voor zware
bereidingen zoals gebak - of brooddeeg of
om te pureren.
. Voor het gebruik van de andere accessoires, verwijzen wij u naar hun
gebruiksaanwijzing.
. Gardes en deeghaken
•Terwijl de bedieningsknop (d) op stand «0»
staat, steekt u de gardes of deeghaken in de
mixer totdat ze volledig geblokkeerd zijn.
25
Page 26

Aanbevelingen voor het
gebruik van de accessoires van
de uitgang achter
Om veiligheidsredenen spoort de mixer de
aanwezigheid van accessoires op de uitgang
achter op.
. Model 3 MIX 8000/8008
•Tijdens het gebruik, dient u de
bedieningsknop (d) vast te houden; als u de
bedieningsknop loslaat, springt deze
automatisch terug op stand «0».
Om spatten tijdens de start of bij fijne
bereidingen (room, sauzen) te voorkomen, is
uw apparaat voorzien van een anti-spat
functie (stand «S»). Om deze te gebruiken:
•drukt u de bedieningsknop (d) op stand «S»
en houd hem vast (7).
•Om de bereiding te vervolgen, kiest u een
snellere stand terwijl u de bedieningsknop
vasthoudt (d) (8).
. Model 3MIX 6000XL Edition
•Controleer of de bedieningsknop (d) op «0»
staat.
•Open het luikje (b) en sluit het accessoire op
de achterste uitgang aan.
•Met de bedieningsknop (d) op «0», kan het
apparaat simpel gestart worden door druk
naar voren uit te oefenen op de mixer.(9)
•Na gebruik trekt U de stekker uit het
stopcontact, zet U de bedieningsknop op
«0», neemt U het accessoire uit en sluit U
het luikje (b).
Schoonmaken
•Haal de stekker uit het stopcontact.
•Maak het apparaat uitsluitend schoon met
een vochtige doek.
•Maak de gardes/deeghaken schoon onder
stromend water of in de vaatwasmachine.
Daarna afspoelen en afdrogen.
Opbergen
Het apparaat is uitgerust met een
snoeroprolvoorziening met bevestigingsclip (f).
Afhankelijk van het model :
Uw apparaat is voorzien van een wandhouder.
•Voor het eerste gebruik, ontvouwt u de
houder van de accessoires (10).
•Installeer de accessoires (g en h), vervolgens
de mixer.
U kunt het apparaat boven het werkblad
hangen, klaar voor gebruik (11).
Aan de achterkant van de houder is ruimte
voor het opbergen van een bloknoot, potlood
e.d.
Wat te doen als uw apparaat
niet werkt
•Controleer of de accessoires goed geplaatst
zijn.
•Controleer of de stekker in het stopcontact
zit.
Als uw apparaat daarna nog steeds niet
werkt, kunt u zich wenden tot de Krups
reparatie-service (zie adres in het boekje
«Krups Service Stations»).
Recepten
Apple-pie
. Kruimeldeeg: 300 gr. bloem, 150 gr. boter,
15 ml. water, 1 mespunt zout.
. Vulling: 4 à 5 appels, 2 eetlepels suiker, 1
theelepel kaneel, 1 theelepel nootmuskaat,
sap van een citroen, 10 gr. boter.
. 1 taartvorm: 28 cm Ø
. Bereidingstijd : 18 à 20 min.
•Meng de bloem, het zout en de klontjes
boter met behulp van de gardes totdat er
kruimels ontstaan (op minimum snelheid).
26
Page 27

•Gebruik vervolgens de deeghaken om te
kneden, terwijl u geleidelijk water toevoegt
(eerst op gemiddelde, vervolgens op
maximum snelheid). Stop zodra er een
deegbal ontstaat.
•Laat het deeg 1 uur rusten in de koelkast.
•Meng in een kom de in dunne plakjes
gesneden appels met suiker, kaneel en
nootmuskaat.
•Rol 2/3 deel van het deeg uit, leg het deeg
in de ingevette taartvorm; laat het deeg over
de rand hangen.
•Leg de plakjes appel op de bodem, schenk
er citroensap over en leg er klontjes boter
op.
•Bedek de appels met de rest van het deeg
en hecht de randen aan elkaar vast.
•Maak een kleine opening in het midden van
het deeg en bak de apple-pie 35 min. op
220 °C.
U kunt de appels vervangen door: 800 gr. in
stukken gesneden rabarber of 500 gr.
rabarber + 300 gr. frambozen en 1 eetlepel
bloem, 6 eetlepels suiker en 10 gr. boter.
Aardbeientaart
. Zanddeeg: 250 gr. bloem, 125 gr. boter, 125
gr. suiker, 1 ei.
. Banketbakkersroom: 1/4 l. melk, 2 eidooiers,
50 gr. suiker, 25 gr. bloem, enkele druppels
vloeibare vanille.
. 800 gr. aardbeien
. 1 taartvorm: 28 cm Ø
. Bereidingstijd: 20 min.
•Meng met behulp van de gardes de bloem,
suiker en klontjes boter totdat er kruimels
ontstaan (op minimum snelheid).
•Gebruik vervolgens de deeghaken, voeg het
ei toe en kneed totdat er een deegbal
ontstaat (eerst op gemiddelde, vervolgens
op maximum snelheid).
•Laat het deeg 1 uur rusten in de koelkast.
•Kook de melk met de vanille.
•Meng ondertussen met behulp van de
gardes de eidooiers met de suiker (eerst op
gemiddelde, vervolgens op maximum
snelheid). Het mengsel moet wit worden.
•Voeg de bloem toe en meng (op gemiddelde
snelheid).
•Voeg vervolgens de kokende melk toe en
meng (op minimale snelheid).
•Kook dit mengsel terwijl u met een lepel
roert totdat het dik wordt. Laat het afkoelen
terwijl u blijft roeren.
•Rol het deeg uit en leg het in de ingevette
taartvorm. Prik met een vork gaatjes in de
bodem, dek het deeg af met aluminiumfolie
en leg daarop gedroogde bonen.
•Bak het deeg 20 min. op 180°C.
•Verwijder de bonen en het aluminiumfolie
en laat het deeg afkoelen.
•Bestrijk het deeg met de banketbakkersroom
en schik daarop de aardbeien.
•Schenk er bessengelei over.
Chocoladetaart
. 3 eieren, 170 gr. suiker, 170 gr. boter,
150 gr. bloem, 2 eetlepels cacaopoeder, 6 gr.
bakpoeder (1/2 zakje).
. 1 springvorm: 22 cm Ø
. Bereidingstijd: 11 min.
•Meng in een kom met behulp van de gardes
de eieren en de suiker (op gemiddelde
snelheid): het mengsel moet een lint
vormen.
•Voeg de boter toe (gemiddelde snelheid),
vervolgens de bloem, de cacao en het
bakpoeder (eerst op minimum snelheid om
te mengen, daarna op gemiddelde snelheid
om het beslag glad te maken).
•Schenk het beslag in de ingevette taartvorm
en bak de taart 50 min. op 170°C..
•U kunt:
- door het beslag stukjes noot,
chocoladekrullen of gekonfijte
sinaasappelschil mengen.
- aan het beslag 2 eetlepels amandelpoeder of
noten toevoegen.
- uw taart voorzien van chocoladeglazuur
door 100 gr. pure chocola en 20 gr. boter te
smelten.
27
Page 28

Biscuitrol met jam
. 3 eieren, 90 gr. suiker, 40 gr. bloem, 30 gr.
aardappelzetmeel, 1 pot jam of gelei
(abrikozen, sinaasappel, frambozen, bessen).
. 1 rechthoekige vorm: 33 x 22 cm.
. Bereidingstijd: 10 min.
•Meng met behulp van de gardes de suiker
en de eidooiers (maximum snelheid): het
mengsel moet wit worden.
•Voeg de bloem en het aardappelzetmeel toe
en meng (op minimum snelheid).
•Maak de gardes schoon en klop in een
andere kom de eiwitten stijf (maximum
snelheid).
•Meng de twee bereidingen (minimum
snelheid).
•Dek de vorm af met ingevet bakpapier,
schenk het beslag erin en bak dit 15 min. op
170°C.
•Als het biscuit lichtbruin gekleurd is, haal het
dan onmiddellijk uit de vorm en leg het op
een vochtige doek die bestrooid is met
suiker. Verwijder het bakpapier.
•Rol het biscuit in de doek en laat het
afkoelen.
•Vervolgens rolt u het biscuit weer uit en vult
u het met jam of gelei.
•Rol het dan weer op en werk de randen
schuin af.
U kunt ook:
. het biscuit garneren met
banketbakkersroom,
. het aardappelzetmeel vervangen door
cacaopoeder en de biscuitrol vullen met
slagroom.
Amandel-abrikozentaart
. Bladerdeeg: 200 gr. bloem, 10 ml. water,
160 gr. boter, 1 mespunt zout.
. Vulling: 1 kg verse abrikozen of 1 blik
abrikozen op siroop, 60 gr. boter, 70 gr.
suiker, 70 gr. amandelpoeder, 1 heel ei +
1 eigeel, 2 eetlepels abrikozenjam.
. 1 taartvorm: 28 cm Ø
. Bereidingstijd: 2 uur voor het bladerdeeg +
10 min. om de taart af te maken.
28
•Doe de bloem en het zout in een kom. Voeg
geleidelijk water toe terwijl u kneedt met
behulp van de deeghaken tot er een deegbal
ontstaat (eerst op gemiddelde, vervolgens
op maximum snelheid).
•Laat het deeg 20 min. rusten in de koelkast.
•Bladerdeeg vouwen:
•Rol het deeg uit tot een vierkant van 1 cm
dikte.
•Meng de boter tot het dezelfde stevigheid
heeft als het deeg en leg dit in het midden
van het deeg. Dek de boter af door 2 aan 2
de tegenoverliggende hoeken van het
vierkant samen te vouwen.
•Rol het deeg uit tot een rechthoek van 2 cm
dikte en vouw het in drieÎn.
•Laat het deeg 20 min. rusten en herhaal de
laatste handeling nog 2 maal.
•Zet het deeg in de koelkast.
•Meng in een kom met behulp van de gardes
de suiker, het amandelpoeder, de boter en
de eieren (eerst op gemiddelde, vervolgens
op maximum snelheid).
•Behandel het deeg nog 2 maal voordat u het
in de vorm legt. Verdeel het
amandelmengsel over de bodem waar u van
tevoren met een vork gaatjes in hebt
geprikt, en leg daarop de doormidden
gesneden abrikozen.
•Bak de taart 30 min. op 240°C.. Schenk er
vervolgens abrikozenjam over.
Appelbeignets
. Beignetbeslag: 125 gr. bloem, 1 ei,
1 eetlepel olie, 1 mespunt zout, 15 ml melk,
4 appels, 1 eetlepel kaneel, 75 gr. suiker, het
sap van een citroen.
. Frituurolie
. Bereidingstijd: 5 min. voor het beslag.
•Meng met behulp van de gardes in een
mengkom de bloem, het ei, de olie, zout en
2 eetlepels melk totdat het mengsel glad en
gelijkmatig is (eerst op gemiddelde,
vervolgens op maximum snelheid).
•Voeg de melk geleidelijk toe terwijl u de
snelheid verlaagt. Laat het beslag 1 uur in de
koelkast rusten.
Page 29

•Meng intussen de suiker met de kaneel.
•Schil de appels, laat ze heel, verwijder het
klokhuis, snijd de appels in schijfjes. Bestrooi
de schijfjes met het mengsel van suiker/
kaneel, schenk er citroensap over. Afdekken
en 30 min. in de koelkast in laten trekken.
•Dompel de schijfjes appel volledig onder in
het beignetbeslag, vervolgens in de hete
friteuse.
•Frituur er 4 tegelijk. Serveer de
appelbeignets warm.
U kunt op deze wijze beignets maken van
allerlei soorten verse vruchten: ananas,
bananen, abrikozen, peren, enz.
Brood
. 250 gr. witte bloem, 100 gr. volkoren bloem,
1 zakje droge bakkersgist, 10 gr. suiker,
10 gr. boter, 200 gr. water, 1 gr. zout.
. 1 cakevorm: 24 cm
. Bereidingstijd: 7 min.
•Meng in een schaal met behulp van de
deeghaken beide soorten bloem, zout, boter
en gist (gemiddelde snelheid).
•Voeg geleidelijk water toe totdat er een
deegbal ontstaat (eerst op gemiddelde,
vervolgens op maximum snelheid).
•Dek de schaal af met een vochtige doek en
laat het deeg 30 min. rijzen in een
lauwwarme ruimte.
•Doe het deeg in de ingevette en met bloem
bestoven cakevorm. Laat het deeg opnieuw
een uur rijzen.
•Bak het brood 25 min. op 240°C.
U kunt desgewenst toevoegen aan het deeg:
150 gr. noten in stukjes, 300 gr. rozijnen, 200
gr. zwarte olijven, 200 gr. spekreepjes,
2 eetlepels komijn, enz.
U kunt het deeg ook in balletjes verdelen voor
het maken van broodjes.
•Meng in een schaal met behulp van de
deeghaken bloem, gist, lauwe melk, suiker,
zout en de 5 eieren gedurende 2 min. (eerst
op gemiddelde, vervolgens op maximum
snelheid).
•Voeg de boter klontje voor klontje toe totdat
een elastisch deeg ontstaat.
•Dek de schaal af met een vochtige doek en
laat het deeg 1 uur rijzen in een lauwwarme
ruimte (totdat het deeg tweemaal in volume
is toegenomen). Verdeel het deeg vervolgens
in drie stukken.
•Rol elk stuk met de hand tot 3 lange repen
die u in elkaar vlecht.
•Plaats de vlecht op een ingevette en met
bloem bestoven bakplaat; laat de vlecht
opnieuw 1 uur rijzen. Bak de gevlochten
brioche 40 à 45 min. op 180°C.
In plaats van vlechten, kunt u het deeg ook
bakken in een cakevorm; of u maakt kleine
brioches door het deeg in balletjes te
verdelen.
Gevlochten brioche
. 500 gr. bloem, 2 zakjes droge bakkersgist,
200 gr. boter, 50 gr. suiker, 1 mespunt zout,
5 eieren, 2 eetlepels lauwe melk.
. Bereidingstijd: 8 min. voor het deeg + 2 uur
om te rijzen.
29
Page 30

Español
Descripción
. Elementos del aparato
a Parte delantera
b Parte posterior
c Tecla Turbo (parte delantera) (según
el modelo)
d Botón de mando:
d1 Puesta en marcha / Paro y variación
electrónica de velocidad
d2 Botón de eyección (parte delantera)
d3 Puesta en marcha / Paro ( S+3
velocidades)
d4 Eyección varilla o Puesta en marcha /
Paro parte posterior
d5 Función Turbo
e Soporte mural (según el modelo)
f Enrollador del cable de conexión con
clip de sujeción
SEGÚN EL MODELO Y/O EN OPCIÓN
. Accesorios que se acoplan a la parte
delantera
g Varillas
g1 Varillas amasadoras de plástico
g2 Varillas amasadoras de acero inoxidable
h Varillas de espiral
i Espumadera
j Picadora-ralladora
j1 Tambores
k Pie pasapurés
. Accesorios que se acoplan en la parte
posterior
l Pie batidor de plástico
m Pie batidor de acero inoxidable
n Mini picadora
. Recipientes
o Colador
p Bol de 2,75 l
q Bol de 2,5 l
r Vaso 1 l
s Bol de acero inoxidable de 3 l
t Base
Consejos importantes de
seguridad
• Lea atentamente las instrucciones de uso
antes de utilizar el aparato por primera vez:
un uso no conforme con dichas
instrucciones liberaría a Krups de cualquier
responsabilidad.
• Este aparato está destinado únicamente a un
uso doméstico, se deberá utilizar solamente
para la función indicada y en el interior de la
casa.
• No deje el aparato al alcance de los niños sin
vigilancia. El uso de este aparato por parte
de personas muy jóvenes o discapacitadas se
debe hacer bajo vigilancia.
• No deje que el cable de alimentación quede
colgando al alcance de los niños.
• Verifique que la tensión de alimentación
eléctrica del aparato corresponda con la de
su instalación eléctrica.
Cualquier error de conexión anula la
garantía.
• El cable de alimentación no debe estar
nunca cerca ni en contacto con las partes
calientes del aparato, cerca de una fuente de
calor ni sobre un ángulo recto.
• No sumerja nunca el aparato, el cable de
alimentación o el enchufe dentro del agua o
en cualquier otro tipo de líquido.
• Si el cable de alimentación o la clavija
estuvieran dañados, no utilice el aparato. A
fin de evitar cualquier riesgo, es
imprescindible hacerlos sustituir en un centro
de servicio técnico autorizado Krups (ver
folleto “Krups Service Stations”).
• Desenchufe el aparato cuando deja de
utilizarlo y para limpiarlo.
• No utilice el aparato si no funciona
correctamente o si ha resultado dañado. En
este caso, diríjase a un centro de servicio
técnico autorizado Krups (ver folleto “Krups
Service Stations”).
30
Page 31

• Cualquier manipulación por parte del cliente
que no sea la limpieza y el mantenimiento
habitual deberá ser efectuada en un centro
de servicio técnico autorizado Krups.
• Para su seguridad, utilice únicamente
accesorios y piezas de recambio Krups
adaptados para su aparato.
• Todos los aparatos han sido sometidos a
controles de calidad estrictos. Para ello, se
realizan pruebas de funcionamiento
escogiendo aparatos de forma aleatoria, lo
que puede explicar que encuentre rastros de
utilización en su aparato.
• Este aparato ha sido diseñado para una
utilización bajo vigilancia.
• No toque las varillas de batir ni las
amasadoras ni los tambores del
cortador-rallador cuando el aparato esté
en funcionamiento. No deje que el
cabello largo, bufanda, el cable de
alimentación eléctrica, etc., quede
colgando por encima de los accesorios
en funcionamiento.
• Desenchufe el aparato antes de
cualquier manipulación (montaje y
desmontaje de los accesorios).
• No coloque accesorios de función diferente
al mismo tiempo (ej. : amasadora y
espumadera, ...).
• Atención: las cuchillas de algunos
accesorios están muy afiladas.
Manipúlelas con mucha precaución.
Importante: Su aparato está equipado con
dos salidas (1):
•una salida delantera (a) para la colocación de
los accesorios (g, h, i, j, k) (según modelo)
•una salida posterior (b) para la colocación de
los accesorios (l, m, n) (según modelo).
Antes de utilizarlo por primera
vez
• Limpie cuidadosamente todos los accesorios
del aparato.
Utilización de los accesorios de
la parte delantera
. Varillas y varillas amasadoras
• Con el botón de mando (d) colocado en la
posición «0», introduzca las varillas o las
amasadoras hasta su completo bloqueo.
Introduzca siempre el accesorio provisto de
una corona dentada en la abertura del
aparato que está marcada también con una
corona dentada (2).
• Enchufe el aparato.
• Según la cantidad que vaya a preparar,
ponga los ingredientes en el recipiente más
apropiado (bol o vaso Krups).
• Sumerja las varillas o las amasadoras en el
recipiente y ponga el aparato en marcha
empujando el mando (d) hacia la derecha.
Para evitar salpicaduras al poner en marcha el
aparato o para los preparados delicados
(cremas, salsas), el aparato está equipado de
una función antisalpicaduras (posición
« S »). Para utilizarla:
• Empuje el mando (d) hacia la derecha hasta
llegar a la posición «S» (3).
• Para continuar con la preparación, elija una
velocidad más rápida (4).
El aparato incluye una función Turbo (c o d5
según el modelo) que permite, con una simple
presión, disponer instantáneamente de toda la
potencia del aparato (5 o 9).
• Al finalizar, vuelva a colocar el mando (d) en
la posición «0».
• Desenchufe el aparato.
• Extraiga las varillas o las amasadoras
empujando el mando (d) hasta la posición
«Eject » (6).
. Espumadera
La espumadera (i) se utiliza para realizar
preparaciones esponjosas (natillas, mayonesa,
clara a punto de nieve).
• Utilícela en un recipiente alto y estrecho (el
vaso).
• No la utilice nunca para preparados pesados,
como masa de pasteles o de pan, ni para
hacer puré.
31
Page 32

. Para los demás accesorios, consulte las
instrucciones de uso correspondientes.
Recomendaciones para la
utilización de los accesorios de
la parte posterior
Por razones de seguridad, la batidora detecta
la presencia de accesorios en la parte
posterior.
. Modelo 3 MIX 8000/8008
•Durante su utilización, mantenga presionado
el mando (d); si lo suelta, volverá
automáticamente a la posición «0».
Para evitar salpicaduras cuando pone en
marcha o para preparaciones delicadas, su
aparato dispone de una función
antisalpicaduras. Para utilizarla:
•Empuje el mando (d) hasta la posición “S” y
manténgalo (7).
•Para seguir con la preparación, elija una
velocidad superior manteniendo empujado
el mando (d) (8).
. Modelo 3MIX 6000XL Edition
• Compruebe que el mando (d) esté en la
posición «0».
• Abra la trampilla (b) y encaje el accesorio en
la parte posterior.
• Con el mando (d) en «0», la puesta en
marcha se hace por simple presión hacia la
parte delantera de la batidora amasadora.
(9)
• Al finalizar, desenchufe el aparato, con el
mando colocado en «0», saque el accesorio
y vuelva a cerrar la trampilla (b).
Limpieza
•Desenchufe el aparato.
•Limpie el cuerpo del aparato únicamente
con un paño húmedo.
•Limpie las varillas / amasadoras debajo del
agua del grifo o en el lavavajillas. Aclare y
seque.
Para guardarlo
El aparato dispone de un enrollador del cable
de conexión con un clip de sujeción (f).
Según el modelo:
Su aparato dispone de un soporte mural.
• En la primera utilización, despliegue el
soporte de los accesorios (10).
• Instale los accesorios (g y h) y a continuación
la batidora.
Estarán colocados directamente encima de la
superficie de trabajo y listos para su uso (11).
Un lugar para guardar un bloque de notas,
lápiz,... está previsto en la parte posterior del
soporte.
¿Qué hacer si su aparato no
funciona?
• Asegúrese que los accesorios estén
correctamente colocados.
• Compruebe la conexión.
Si el aparato sigue sin funcionar, diríjase a
un centro servicio técnico autorizado Krups
(ver lista en el folleto «Krups Service
Stations»).
Recetas
« Apple-pie »
. Masa brisa: 300 g de harina, 150 g de
mantequilla, 15 mil de agua, 1 pizca de sal.
. Relleno: 4 o 5 manzanas, 2 cucharas soperas
de azúcar, 1 cuchara de café de canela, 1
cuchara de café de nuez moscada, el zumo
de 1 limón, 10 g de mantequilla.
. 1 molde para tarta: 28 cm Ø
. Preparación : 18 à 20 min.
• Con las varillas, mezcle la harina, la sal y la
mantequilla, a trozos, hasta obtener unas
«migajas» (velocidad mini).
• Con las varillas amasadoras, añada el agua
poco a poco amasando (velocidad media,
después maxi) hasta formar una bola.
32
Page 33

• Deje reposar la masa 1 h en la nevera.
• En un bol, mezcle las manzanas cortadas a
finas rodajas con el azúcar, la canela y la
nuez moscada.
• Extienda 2/3 de la masa y colóquela en el
molde untado con mantequilla, dejando que
sobresalga un poco de masa por el borde.
• Coloque las manzanas en el fondo, vierta
por encima el zumo de limón y ponga unos
daditos de mantequilla.
• Cubra las manzanas con el resto de la masa
y selle los bordes.
• Haga un agujero en el centro de la
preparación y cuézala en el horno durante
35 min. a 220°C.
Puede sustituir las manzanas por: 800 g de
ruibarbo cortado a trozos, o por 500 g de
ruibarbo y 300 g de frambuesas, más 1
cucharada de harina, 6 cucharadas de azúcar
y 10 g de mantequilla.
Tarta de fresones
. Masa «sablée»: 250 g de harina, 125 g de
mantequilla, 125 g de azúcar, 1 huevo.
. Crema pastelera: 1/4 l de leche, 2 yemas de
huevo, 50 g de azúcar, 25 g de harina, unas
gotas de vainilla líquida.
. 800 g de fresones
. 1 molde para tarta: 28 cm Ø
. Preparación: 20 min.
• Mezcle con las varillas la harina, el azúcar y
la mantequilla a trozos hasta obtener unas
«migajas» (velocidad mini).
• Con las amasadoras, añada el huevo,
amasando (velocidad media, después maxi)
hasta formar una bola.
• Deje reposar la masa 1 h en la nevera.
• Hierva la leche con la vainilla.
• Mientras tanto, con las varillas, trabaje las
yemas de huevo y el azúcar (velocidad
media, después maxi). La mezcla deberá
adquirir un tono blanco.
• Añada la harina y mezcle (velocidad media).
• A continuación, y a velocidad mini, vierta la
leche hirviendo y mezcle.
• Cueza esta preparación, removiendo con
una cuchara hasta que espese. Deje enfriar
sin dejar de remover.
• Extienda la masa y colóquela en el molde
untado con mantequilla. Pinche el fondo con
un tenedor, fórrelo con papel de aluminio y
cúbralo con legumbres secas.
• Cueza la masa 20 min. a 180°C.
• Quite las legumbres secas y el papel de
aluminio y déjela enfriar.
• Extienda la crema pastelera sobre el fondo
de la tarta y cúbrala de fresones.
• Cubra con jalea de grosellas.
Pastel de chocolate
. 3 huevos, 170 g de azúcar, 150 g de
mantequilla, 2 cucharas soperas de cacao en
polvo, 6 g de levadura química (1/2 bolsa)
. 1 molde para cake: 22 cm Ø
. Preparación: 11 min.
• Mezcle en una ensaladera, con las varillas,
los huevos y el azúcar (velocidad media): la
mezcla debe quedar firme y homogénea.
• Añada la mantequilla (velocidad media), la
harina, el cacao y la levadura (velocidad mini
para incorporar y velocidad media para
homogeneizar).
• Vierta la masa en un molde untado con
mantequilla y cuézala 50 min. a 170°C.
• Puede:
- incorporar a la masa nueces troceadas,
virutas de chocolate o cortezas de naranjas
confitadas;
- añadir a la masa 2 cucharas soperas de
almendras o nueces en polvo;
- cubrir el pastel con un glaseado de
chocolate realizado fundiendo 100 g de
chocolate negro con 20 g de mantequilla.
Brazo de gitano con mermelada
. 3 huevos, 90 g de azúcar, 40 g de harina, 30
g de fécula de patata, 1 tarro de mermelada
o jalea (albaricoque, naranja, frambuesa,
grosella...)
33
Page 34

. 1 molde rectangular: 33 x 22 cm
. Preparación: 10 min.
•Trabaje con las varillas el azúcar y las yemas
de huevo (velocidad maxi); la mezcla deberá
adquirir un tono blanquecino.
•Añada la harina y la fécula y mezcle
(velocidad mini).
•Limpie las varillas y monte las claras a punto
de nieve (velocidad maxi).
•Mezcle las dos preparaciones (velocidad
mini).
•Cubra el molde con papel sulfurizado
untado con mantequilla, vierta la masa y
cuézala 15 min. a 170°C
•Cuando el bizcocho esté ligeramente
dorado, sáquelo del molde inmediatamente
sobre un paño húmedo espolvoreado de
azúcar. Retire el papel sulfurizado.
•Enrolle el bizcocho en el paño y déjelo
enfriar.
•Después, desenrolle el pastel y cúbralo con
mermelada o jalea.
•Vuelva a enrollarlo y corte las puntas.
También puede:
. rellenar el pastel con crema pastelera
. sustituir la fécula por cacao en polvo y
rellenar el brazo de gitano con nata
montada.
Tarta de almendras y albaricoques
. Masa de hojaldre: 200 g de harina, 10 mil
de agua, 160 g de mantequilla, 1 pizca de
sal.
. Relleno: 1 Kg de albaricoques frescos o 1
lata de albaricoques en almíbar, 60 g de
mantequilla, 70 g de azúcar, 70 g de
almendras molidas, 1 huevo entero y 1
yema, 2 cucharas soperas de mermelada de
albaricoque.
. 1 molde para tarta: 28 cm Ø
. Preparación: 2 horas para la masa de
hojaldre + 10 min. para terminar la tarta.
•Introduzca en un bol la harina y la sal.
Añada poco a poco el agua, con la ayuda de
las varillas amasadoras, hasta formar una
bola (velocidad media, después maxi).
• Déjela reposar 20 min. en un lugar fresco.
• Hojaldre:
• Extienda la masa en un cuadrado de 1 cm de
espesor.
• Trabaje la mantequilla para que tenga la
misma consistencia que la masa y extiéndala
en el centro del cuadrado. Después cierre la
masa, juntando de 2 en 2 las esquinas
opuestas de este cuadrado.
• Vuelva a extender la masa en un cuadrado
de 2 cm de espesor y haga 3 dobleces.
• Deje reposar la masa 20 min. y repita esta
última operación otras 2 veces.
• Deje la masa en un lugar fresco.
• Con las varillas, mezcle en un bol el azúcar,
las almendras molidas y los huevos
(velocidad media, después maxi).
• Dé otras 2 vueltas a la masa antes de forrar
con ella el molde. Pinche el fondo con un
tenedor, reparta la preparación de las
almendras y disponga por encima los
albaricoques cortados por la mitad.
• Cueza 30 min. a 240°C y unte por encima la
mermelada de albaricoque.
Buñuelos de manzana
. Masa de buñuelos: 125 g de harina, 1
huevo, 1 cuchara sopera de aceite, 1 pizca
de sal, 15 mal de leche, 4 manzanas, 1
cuchara sopera de canela, 75 g de azúcar, el
zumo de 1 limón.
. Baño de fritura: aceite.
. Preparación: 5 min. para la masa.
• Mezcle en un bol, con las varillas, la harina,
el huevo, el aceite, la sal y 2 cucharas
soperas de leche hasta conseguir una mezcla
homogénea (velocidad media, después
maxi).
• Añada poco a poco la leche, disminuyendo
la velocidad. Deje reposar 1 hora en un lugar
fresco.
• Mientras tanto, mezcle el azúcar y la canela.
• Pele las manzanas sin cortarlas, quíteles las
pepitas y córtelas a rodajas. Espolvoréelas
con la mezcla de azúcar y canela y rocíelas
con zumo de limón. Tápelas y deje macerar
30 min. en un lugar fresco.
34
Page 35

• Introduzca las rodajas de manzana en la
masa de buñuelo hasta cubrirlas totalmente
y después fría los buñuelos en aceite
caliente.
• Fríalos de 4 en 4. Sírvalos muy calientes.
Puede preparar de la misma forma buñuelos
con todo tipo de frutas: piña, plátano,
albaricoque, pera, etc.
Pan
. 250 g de harina blanca, 100 g de harina
completa, 1 paquete de levadura seca de
panadero, 10 g de azúcar, 10 g de
mantequilla, 200 g de agua, 1 g de sal.
. 1 molde para «cake»: 24 cm.
. Preparación: 7 min.
• Mezcle en una ensaladera, con las varillas
amasadoras, las harinas, la sal, la
mantequilla y la levadura (velocidad media).
• Añada poco a poco el agua hasta formar
una bola (velocidad media, después maxi).
• Cubra la ensaladera con un paño húmedo y
deje reposar durante 30 min. en un lugar
tibio.
• Coloque la masa en el molde untado con
mantequilla y con un poco de harina. Deje
reposar de nuevo durante 1 hora.
• Cueza 25 min. a 240°C.
También puede incorporar a la masa, según su
gusto: 150 g de nueces troceadas, 300 g de
uvas pasas, 200 g de aceitunas negras, 200 g
de chicharrones, 2 cucharas soperas de
comino, etc.
Puede dividirse la masa en bolitas para hacer
panecillos individuales.
• Mezcle en una ensaladera, con las varillas
amasadoras, la harina, la levadura, la leche
tibia, el azúcar, la sal y los 5 huevos durante
2 min. (velocidad media, después maxi).
• Añada la mantequilla trozo a trozo, hasta
obtener una masa elástica.
• Cubra la ensaladera con un paño húmedo y
deje que la masa aumente durante 1 hora
en un lugar tibio (hasta que la masa haya
doblado su volumen). Parta la masa en tres
trozos.
• Haga rodar cada trozo de masa bajo la
mano para formar 3 tiras largas que
trenzará.
• Coloque la trenza en una placa de pastelería
untada con mantequilla y con harina y déjela
de nuevo aumentar durante 1 hora. Cueza
de 40 a 45 min. a 180°C.
Si lo desea, en lugar de trenzar la masa puede
cocerla en un molde para «cake» o
confeccionar «brioches» pequeños después
de dividirla en bolitas.
Brioche trenzado
. 500 g de harina, 2 paquetes de levadura
seca de panadero, 200 g de mantequilla, 50
g de azúcar, 1 pizca de sal, 5 huevos, 2
cucharas soperas de leche tibia.
. Preparación: 8 min. para la masa y 2 horas
de dejarla reposar
35
Page 36

Português
Descrição
. Elementos do aparelho
a Saída da frente
b Saída de trás
c Tecla Turbo (saída da frente) (consoante
o modelo)
d Tecla de comandos:
d1 Ligar/Desligar e variação electrónica de
velocidade
d2 Ejecção (saída da frente)
d3 Ligar / Desligar ( S+3 velocidades)
d4 Ejecção de varas ou Ligar / Desligar em
saída de trás
d5 Função Turbo
e Suporte de parede (consoante o
modelo)
f Enrolador do cabo com gancho
CONSOANTE O MODELO E /OU EM OPÇÃO
. Acessórios na saída da frente
g Batedores de varas
g1 Varas em forma de noz, plástico
g2 Varas em forma de noz, inox
h Batedores
i Batedor de vara especial
j Ralador
j1 Tambores
k Varinha mágica
. Acessórios na saída de trás
l Varinha de plástico
m Varinha de inox
n Mini-picadora
. Recipientes
o Passador
p Taça 2,75 l
q Taça 2,5 l
r Copo 1 l
s Taça inox 3 l
t Pé
Conselhos de segurança
•Leia atentamente as instruções antes de
utilizar o aparelho pela primeira vez : uma
utilização não conforme às instruções liberta
a Krups de qualquer responsabilidade.
•O seu aparelho foi concebido apenas para
utilização doméstica, exclusivamente para a
função indicada e dentro de casa.
•Não deixe o aparelho ao alcance das
crianças, sem a vigilância de um adulto. A
utilização deste aparelho por crianças ou
pessoas deficientes deve ser feita sob a
vigilância de um adulto.
•Não deixar o cabo de alimentação
pendurado, ao alcance das mãos das
crianças.
•Verifique se a tensão de alimentação do seu
aparelho corresponde à da instalação
eléctrica de sua casa.
Qualquer erro de ligação anula a
garantia.
•O cabo de alimentação nunca deve ficar
junto ou em contacto com as partes quentes
do seu aparelho, perto de uma fonte de
calor ou exposto a arestas cortantes.
•Nunca mergulhar o aparelho, o cabo de
alimentação ou a ficha em água ou qualquer
outro líquido.
•Se o cabo de alimentação ou a ficha se
apresentarem danificados, o aparelho não
deve ser utilizado. A fim de evitar qualquer
risco, tais componentes deverão ser
obrigatoriamente substituídos, num centro
de assistência Krups autorizado (ver folheto
“Krups Service Stations”).
•Tire a ficha da tomada no final de cada
operação e antes de qualquer operação de
limpeza.
•Não utilize o aparelho se não estiver a
funcionar correctamente ou se estiver de
algum modo danificado. Nesse caso, dirija-se
a um Serviço Após Venda Krups (ver lista no
folheto “ Serviço Krups ”).
36
Page 37

•Qualquer intervenção para além da limpeza
e manutenção habituais deve ser levada a
cabo por um Serviço Após Venda Krups.
•Para sua segurança, utilize apenas acessórios
e peças separadas Krups adaptadas ao seu
aparelho.
•Todos os aparelhos são submetidos a um
rigoroso controlo de qualidade. Testes de
utilização práticos são efectuados com
aparelhos aleatoriamente seleccionados, o
que explica a existência de eventuais indícios
de utilização.
•Este aparelho foi concebido para ser
utilizado sob supervisão do utilizador.
•Não toque nos batedores, no pé da
varinha mágica ou nos tambores do
ralador com o aparelho em
funcionamento. Não aproxime cabelos
compridos, xailes, fios, etc., sobre os
acessórios em funcionamento.
•Tire a ficha da tomada antes de montar
ou desmontar qualquer acessório.
•Não coloque vários acessórios ao mesmo
tempo (ex. : batedor e batedor de varas,...).
•Atenção: as lâminas de alguns dos
acessórios estão muito afiadas. Manipule-as com precaução.
Importante: O seu aparelho está equipado
com duas saídas (1) :
•uma saída da frente (a) para colocação dos
acessórios (g, h, i, j, k) (consoante o modelo)
•uma saída de trás (b) para colocação dos
acessórios (l, m, n) (consoante o modelo).
Antes da primeira utilização
•Lave com cuidado os diferentes acessórios
do seu aparelho.
Utilização dos acessórios na
saída da frente
. Batedores
•Com a tecla de comandos (d) na posição
“0”, introduza os batedores até encaixarem
completamente. Introduza sempre o
acessório com a coroa dentada no orifício
marcado no aparelho também por uma
coroa dentada (2).
•Ligue a ficha à tomada.
•Consoante a quantidade de alimentos a
preparar, coloque os ingredientes num
recipiente apropriado (taça ou copo Krups).
•Mergulhe os batedores no recipiente e ligue
o aparelho empurrando o comando de
funcionamento (d) para a direita.
Para evitar os salpicos ou para efectuar
preparações delicadas (cremes, molhos), o seu
aparelho está equipado com uma função
anti-salpicos (posição “S”). Para a utilizar:
•Empurre o comando (d) para a direita na
posição “S” (3).
•Para continuar a preparação, seleccione uma
velocidade mais rápida (4).
O aparelho está equipado com uma função
Turbo (c ou d5, conforme o modelo) que lhe
permite ter, bastando carregar, toda a
potência do aparelho (5 ou 9).
•No final da utilização, coloque o comando
(d) na posição “0”.
•Desligue o aparelho.
•Ejecte os batedores colocando o comando
(d) na posição “Eject” (6).
. Batedor especial
O batedor especial (i) deve ser utilizado para
realizar preparações leves (cremes, maionese,
claras em castelo).
•Utilize um recipiente alto e estreito (o copo
ou a taça inox Krups).
•Nunca utilize este acessório para
preparações pesadas, tais como bolos, pão
ou fazer puré de batata.
. Para os outros acessórios, consulte as
instruções.
37
Page 38

Recomendações para os
acessórios da saída de trás
Por razões de segurança, o aparelho detecta a
presença de acessórios na saída de trás.
. Modelo 3 MIX 8000/8008
•Aquando da utilização, prima o comando
(d); se largar o comando, este voltará
automaticamente à posição “0”.
Para evitar os salpicos ou nas preparações
delicadas (cremes, molhos), o seu aparelho
está equipado com uma função anti-
salpicos (posição “S”). Para a utilizar:
•Empurre o comando (d) para a direita na
posição “S” (7).
•Para continuar a preparação, seleccione uma
velocidade mais rápida carregando no
comando (d) (8).
. Modelo 3MIX 6000XL Edition
•Verifique se o botão de comando (d) está em
“0”.
•Abra a porta (b) e monte o acessório na
saída de trás.
•Com o comando (d) em “0”, a activação
obtém-se empurrando simplesmente o
batedor (9) para a frente.
•Após a utilização, desligue o aparelho da
tomada, coloque o botão de comando em
“0”, retire o acessório e volte a fechar a
porta (b).
Arrumação
O aparelho está equipado com um enrolador
de cabo com gancho de suspensão (f).
Consoante o modelo:
O seu aparelho está equipado com um
suporte de parede.
•Na primeira utilização, abre o suporte dos
acessórios (10).
•Instale os acessórios (g e h) e depois o
aparelho.
Ficarão directamente sobre a bancada prontos
a serem utilizados (11).
Está também prevista uma arrumação na
parte de trás do suporte para um bloco de
notas e um lápis...
Se o aparelho não funciona, o
que fazer ?
•Certifique-se que os acessórios estão bem
colocados.
•Verifique a ligação.
Se o aparelho continua sem funcionar,
dirija-se a um Serviço Após Venda Krups (ver
lista no folheto “Serviço Krups”).
Receitas
Limpeza
•Tire a ficha da tomada.
•Limpe o corpo do aparelho apenas com um
pano húmido.
•Lave os batedores com água ou ponha-os na
máquina de lavar a loiça. Passe por água e
seque.
38
“ Apple-pie ”
. Massa quebrada : 300 gr de farinha, 150 gr
de manteiga, 15 ml de água, 1 pitada de sal.
. Recheio : 4 ou 5 maçãs, 2 colheres de sopa
de açúcar, 1colher de café de canela, 1
colher de café de moscada, sumo de um
limão, 10 gr de manteiga.
. 1 forma de tarte : 28 cm Ø
. Preparação : 18 a 20 min.
•Com os batedores de varas, mexa a farinha,
o sal e a manteiga em bocados até obter “
migalhas ” (velocidade mínima).
Page 39

•Com os batedores, bata e vá adicionando
água (velocidade média e depois máxima)
até formar uma bola.
•Deixe repousar 1 h no frigorífico.
•Numa taça, misture as maçãs cortadas às
fatias finas com o açúcar, a canela e a noz
moscada.
• Estenda 2/3 da massa, forre a forma untada
deixando a massa sair por fora.
• Disponha as maçãs no fundo, regue com
sumo de limão e polvilhe com lascas de
manteiga.
• Cubra as maçãs com o resto da massa e
junte os bordos.
• Faça um pequeno buraco no meio da
preparação e coza durante 35 min a 220°C.
Pode substituir as maçãs por: 800 gr de
rubarba cortada aos pedaços ou 500 gr de
rubarba + 300 gr de framboesas e 1 colher de
sopa de farinha, 6 colheres de sopa de açúcar
e 10 g de manteiga.
Tarte de morango
. Massa areada : 250 gr de farinha, 125 g de
manteiga, 125 g de açúcar, 1 ovo.
. Creme pasteleiro : 1/4 l de leite, 2 gemas de
ovo, 50 g de açúcar, 25 g de farinha,
algumas gotas de baunilha líquida..
. 800 gr de morangos
. 1 forma de tarte : 28 cm Ø
. Preparação: 20 min
• Com os batedores de varas, misture a
farinha, o açúcar e a manteiga em bocados
até obter “ migalhas ” (velocidade mínima).
• Com os batedores, adicione um ovo e bata a
massa até obter uma bola (velocidade média
e depois máxima).
• Deixe repousar durante 1 h no frigorífico.
• Ferva o leite com a baunilha.
• Entretanto, com os batedores de varas, bata as
gemas e o açúcar (velocidade média e
depois máxima). A massa deve ficar
esbranquiçada.
• Junte a farinha e bata (velocidade média).
• Na velocidade mínima, deite o leite a ferver
e bata.
• Coza a preparação mexendo sempre com
uma colher de pau até ficar espessa.
• Estenda a massa e forre a forma
previamente untada. Pique o fundo com um
garfo, e cubra com papel alumínio e cubra
com legumes secos.
• Coza 20 min a 180°C.
• Retire os legumes secos e o papel alumínio e
deixe arrefecer.
• Estenda o creme de pasteleiro sobre o fundo
da tarte e coloque os morangos por cima.
• Cubra com geleia de groselhas.
Bolo de chocolate
. 3 ovos, 170 gr de açúcar, 170 gr de
manteiga, 150 gr de farinha, 2 colheres de
sopa de cacau em pó, 6 gr de fermento.
. 1 forma: 22 cm Ø
. Preparação : 11 min
• Com os batedores de varas, numa saladeira,
bata os ovos e o açúcar (velocidade média):
a mistura deverá formar uma tira.
• Adicione a manteiga (velocidade média),
depois a farinha, o cacau e o fermento
(velocidade mínima para incorporar e depois
a velocidade média para homogeneizar).
• Deite a massa na forma previamente untada
e coza durante 50 min a 170°C.
• Pode:
- incorporar à massa pedaços de nozes, lascas
de chocolate ou raspas de laranja
cristalizada.
- adicionar à massa 2 colheres de sopa de
amêndoa ou noz em pó.
- cobrir o bolo com chocolate, derretendo 100
gr de chocolate preto com 20 gr de
manteiga.
39
Page 40

Torta com doce de fruta
. 3 ovos, 90 gr de açúcar, 40 gr de farinha,30
gr de fécula de batata, 1 frasco de doce ou
geleia (alperces, laranjas, framboesas,
groselhas...).
. 1 forma rectangular: 33X22 cm
. Preparação: 10 min
•Com os batedores de varas, misture o açúcar
e as gemas (velocidade máxima) : deverá
obter uma preparação esbranquiçada.
•Adicione a farinha e a fécula e misture
(velocidade mínima).
•Limpe os batedores de varas e bata as claras
em castelo (velocidade máxima).
•Misture as duas preparações (velocidade
mínima).
•Forre a forma com papel vegetal
previamente untado, deite a massa e deixe
cozer durante 15 min a 170°C.
•Assim que a torta estiver ligeiramente
dourada, desenforme-a imediatamente
sobre um pano húmido polvilhado com
açúcar. Retire o papel vegetal.
•Enrole a torta no pano e deixe arrefecer.
•Depois, desenrole o bolo e recheie com doce
de fruta ou geleia.
•Enrole a torta de novo e feche as pontas.
Também pode:
. rechear torta com creme de pasteleiro,
. Substituir a fécula por cacau em pó e rechear
a torta com chantili.
Tarte de amêndoas e alperces
. Massa folhada: 200 gr de farinha, 10 ml de
água, 160 gr de manteiga, 1 pitada de sal.
. Recheio: 1 kg de alperces frescos e uma lata
de alperces em calda, 60 gr de manteiga,
70 gr de açúcar, 70 gr de amêndoas em pó,
1 ovo inteiro + 1 gema de ovo, 2 colheres de
sopa de doce de alperce.
. 1 forma de tarte: 28 cm Ø
. Preparação: 2 h para a massa folhada +
10 min para acabar a tarte.
•Numa taça, deite a farinha e o sal. Adicione
pouco a pouco a água batendo com os
batedores até formar uma bola (velocidade
média e depois máxima) .
•Deixe repousar 20 minutos num local fresco.
•Massa folhada:
•Estenda a massa formando um quadrado
com 1 cm de espessura.
•Trabalhe a manteiga até obter a mesma
consistência que a massa e disponha no
meio do quadrado. Dobre a massa por cima
da manteiga unindo os cantos opostos.
•Estenda a massa formando um rectângulo
de 2cm de espessura e dobre em três.
•Deixe repousar a massa durante 20 minutos
e repita a última operação 2 vezes.
•Reserve a massa num local fresco.
•Numa taça, bata com os batedores de varas
o açúcar, as amêndoas em pó, a manteiga e
os ovos (velocidade média e depois máxima).
•Dê mais duas voltas à massa antes de forrar
a forma. Disponha sobre a massa
previamente picada com um garfo, a
preparação à base de amêndoas e coloque
por cima as metades de alperce.
•Coza durante 30 min a 240°C e cubra com
doce de alperce.
Filhoses de maçã
. Massa : 125 gr de farinha, 1 ovo, 1 colher
de sopa de óleo, 1 pitada de sal, 15 ml de
leite, 4 maçãs, 1 colher de sopa de canela,
75 gr de açúcar e o sumo de um limão.
. Óleo para fritar..
. Preparação: 5 min para a massa.
•Com os batedores de varas, misture numa
taça a farinha, o ovo, o óleo, o sal e
2 colheres de sopa de leite até obter uma
massa homogénea (velocidade média e
depois máxima).
•Diminua a velocidade e adicione um pouco
de leite. Deixe repousar uma hora num local
fresco.
•Entretanto, misture o açúcar e a canela.
40
Page 41

•Descasque as maçãs inteiras, tire as pevides
e corte as rodelas. Polvilhe com açúcar e
canela, e regue com sumo de limão. Tape e
deixe macerar durante 30 minutos num
local fresco.
•Mergulhe as rodelas de maçã na massa e
depois no óleo quente.
•Coza 4 filhoses de cada vez. Sirva muito
quente.
Pode preparar filhoses de qualquer fruto
fresco: ananás, bananas, alperces, pêras, etc.
Pão
. 250 gr de farinha branca, 100 gr de farinha
completa, 1 saco de levedura de padeiro,
10 gr de manteiga,200 gr de água, 1 gr de
sal.
. 1 forma de cake: 24 cm
. Preparação: 7 min
•Numa saladeira, misture com os batedores
as farinhas, o sal, a manteiga e a levedura
(velocidade média).
•Adicione aos poucos a água até obter uma
bola (velocidade média e depois máxima).
•Cubra a saladeira com um pano húmido e
deixe repousar durante 30 minutos num
local morno.
•Coloque a massa numa forma previamente
untada e polvilhada com farinha. Deixe
repousar durante mais 1 hora.
•Coza durante 25 min a 240°C.
Pode adicionar à massa 150 gr de pedaços de
noz, 300 gr de passas, 200 gr de azeitonas
pretas, 200g de bacon, 2 colheres de sopa de
grãos de cominho, etc.
Pode também dividir a massa em pequenas
bolas para fazer pãezinhos individuais.
. Preparação: 8 min para a massa + 2 h de
repouso.
•Numa saladeira bata durante dois minutos,
com os batedores, a farinha, a levedura, o
leite morno, o açúcar, o sal e os 5 ovos
(velocidade média e depois máxima).
•Adicione a manteiga aos pedaços até obter
uma massa elástica.
•Tape a saladeira com um pano húmido e
deixe repousar durante 1 hora num local
morno (até a massa duplicar o seu volume).
Divida a massa em três.
•Enrole cada bocado com a mão para formar
três tiras compridas e faça uma trança.
•Coloque a trança sobre um tabuleiro
previamente untado e polvilhado com
farinha e deixe repousar durante mais uma
hora. Coza durante 40 minutos a 180°C.
Poderá também deitar a massa inteira numa
forma de cake ou fazer pequenos brioches
dividindo a massa em pequenas bolas.
Trança
. 500 gr de farinha, 2 pacotes de levedura de
padeiro, 200g de manteiga, 50 g de açúcar,
1 pitada de sal, 5 ovos, 2 colheres de sopa
de leite morno.
41
Page 42

Italiano
Descrizione
Elementi dell’apparecchio
a Apertura anteriore per inserimento
b Apertura posteriore per inserimento
c Tasto turbo (anteriore) (secondo il
modello)
d Pulsante comandi:
d1 Avviamento/Arresto e variazione
elettronica di velocità
d2 Espulsione (anteriore)
d3 Avviamento / Arresto ( S+3 velocità)
d4 Espulsione frusta o Avviamento /
Arresto nell’apertura anteriore
d5 Funzione Turbo
e Supporto murale (secondo i modelli)
f Avvolgicavo con clip di chiusura
SECONDO I MODELLI E/O IN OPZIONE
. Accessori con inserimento parte
anteriore
g Fruste
g1 Fruste normali in plastica
g2 Fruste normali in inox
h Fruste impastatrici
i Frusta professionale
j Tritatutto/grattugia
j1 Rulli
k Pressatore purea
. Accessori con inserimento parte
posteriore
l Piede mixer in plastica
m Piede mixer in inox
n Minitritatutto
. Recipienti
o Passino
p Contenitore 2,75 l
q Contenitore 2,5 l
r bicchiere 1 l
s Contenitore inox 3 l
t Supporto
Consigli di sicurezza
• Precedentemente al primo utilizzo, leggete
molto attentamente le istruzioni per l’uso:
un utilizzo non conforme alle regole,
scioglierà la Krups da ogni possibile
responsabilità.
• Il Vostro apparecchio è destinato
esclusivamente per un utilizzo domestico,
solo per la funzione indicata e all’interno
della propria abitazione.
• Non lasciate l’apparecchio alla portata dei
bambini senza sorveglianza. L’utilizzo
dell’apparecchio da parte di ragazzi o di
persone portatrici di handicap deve avvenire
sotto sorveglianza di adulti.
• Non lasciate che il cavo di alimentazione
penda alla portata dei bambini.
• Verificate che la tensione di alimentazione
segnalata sulla placchetta dell’apparecchio
sia corrispondente a quella della Vostra
installazione elettrica.
Ogni errore di collegamento elettrico o di
manipolazione annulla il diritto alla
garanzia.
• Non lasciate mai il cavo di alimentazione in
prossimità o a contatto con le parti calde
dell’apparecchio, né vicino a fonti di calore o
un angolo sporgente.
• Non immergete l’apparecchio, il cavo di
alimentazione o la spina in acqua o in
qualsiasi altro liquido.
• Non utilizzate mai l’apparecchio se il cavo di
alimentazione o la spina risultano
danneggiati. Per evitare qualsiasi pericolo,
fateli sostituire da un centro servizi
autorizzato Krups (vedere foglietto «Krups
Service Stations»).
• Scollegate l’apparecchio dopo averlo
utilizzato o mentre lo pulite.
• Non utilizzate mai l’apparecchio se non
funziona correttamente o se risulta
danneggiato.In questi casi, rivolgeteVi ad un
centro di assistenza tecnica autorizzato
Krups (vedere elenco nelle pagine gialle della
Vostra città sotto la voce «elettrodomestici riparazioni e vendita» o al n° verde :
800.012.045).
42
Page 43

• Ogni intervento al di fuori della normale
manutenzione o pulizia, deve essere
effettuato in un centro di assistenza tecnica
autorizzato Krups.
• Per una Vostra totale sicurezza, utilizzate
solo pezzi di ricambio ed accessori originali
Krups.
• Tutti gli apparecchi sono sottoposti a rigorosi
controlli qualità. Alcuni apparecchi vengono
utilizzati a caso per delle verifiche pratiche:
questo spiega eventuali tracce d’uso.
• Questo apparecchio è ideato per essere
utilizzato sotto stretto controllo del cliente.
• Durante il funzionamento non toccate
con le mani le fruste,le fruste
impastatrici, il coltello del piede mixer, o
i rulli della grattugia/tritatutto.Tanto
meno lasciate che qulalcosa penda al di
sopra di essi, es.: capelli lunghi, sciarpe,
la corda, ecc.
• Prima di ogni manipolazione
(montaggio e smontaggio degli
accessori) scollegate l’apparecchio dalla
rete elettrica.
• Non montate mai nello stesso tempo,
accessori di differenti funzioni insieme (fruste
impastatrici e frusta professionale, per
esempio).
• Attenzione : le lame di alcuni accessori
sono molto taglienti, manipolatele con
tanta attenzione.
Importante : Il Vostro apparecchio è dotato
di due possibilità di inserimento (1).
• una nella parte anteriore (a) per
l’inserimento degli accessori (g, h, i, j, k)
secondo i modelli
• una nella parte posteriore (b) per
l’inserimento degli accessori (l, m, n,)
secondo i modelli.
Precedentemente al primo
utilizzo
• Innanzi tutto pulite accuratamente gli
accessori del Vostro apparecchio.
Utilizzo degli accessori con
inserimento nella parte
anteriore dell’apparecchio.
. Fruste e fruste impastatrici
• Con il tasto di comandi (d) posto sulla
posizione «0», inserite le fruste o le
impastatrici fino al loro completo
bloccaggio. Gli accessori muniti di una
corona dentata, debbono essere sempre
introdotti nell’apertura dell’apparecchio
indicante una medesima corona dentata (2).
• Collegate l’apparecchio.
• A secondo della quantità da trattare,
mettete i componenti nell’appropriato
recipiente (contenitore o bicchiere originali
Krups).
• Introducete le fruste o le impastatrici nel
recipiente e mettete in funzione
l’apparecchio premendo il comando (d)
verso destra.
Al fine di evitare gli schizzi d’inizio o per i
preparati delicati (salse, creme, ecc.) utilizzate
la funzione anti-splash «S», di cui è dotato
il Vostro apparecchio.
Per utilizzarlo :
• Spingete il comando (d) verso destra, nella
posizione «S» (3).
• Per portare a termine il preparato, scegliete
la velocità più rapida (4).
L’apparecchio è dotato di una funzione
«Turbo» (c o d5 secondo il modello), che Vi
permette, con una semplice pressione, di
disporre all’istante della massima potenza del
Vostro apparecchio (5 o 9).
• A fine utilizzo, riportate il comando (d) sulla
posizione «0».
• Scollegate l’apparecchio.
• Premendo il comando (d) sulla posizione
«Eject» (6), estraete le fruste o le
impastatrici.
. Frusta professionale
La frusta professionale (i) è utilizzata per dei
preparati montati (creme, maionese, albumi a
neve).
43
Page 44

•Per questi preparati scegliete un recipiente
alto e stretto (bicchiere o contenitore inox
Krups)
•Non utilizzate mai la frusta professionale per
dei preparati pesanti quali l’impasto delle
torte, del pane o della purea.
. Per l’utilizzo degli altri accessori,
riportateVi alle relative istruzioni d’uso.
Pulizia
• Scollegate l’apparecchio.
• Con un panno solamente umido, pulite il
corpo dell’apparecchio.
• Pulite le fruste e le impastatrici sotto l’acqua
corrente o dentro la lavastoviglie. Sciacquate
ed asciugate.
Avvertenze per l’utilizzo degli
accessori con inserimento della
parte posteriore
dell’apparecchio
Per una maggiore sicurezza lo sbattitore è in
grado di rilevare se vi sono degli accessori
inseriti nella parte posteriore.
. Modello 3 MIX 8000/8008
•Al momento dell’utilizzo, tenete premuto il
comando (d), rilasciandolo, esso torna
automaticamente sulla posizione «0».
Al fine di evitare gli schizzi d’inizio o per i
preparati delicati (salse, creme, ecc.) utilizzate
la funzione anti-splash «S», di cui è dotato
il Vostro apparecchio.
Per utilizzarlo :
•portate e mantenete il comando «d» sulla
posizione «S» (7)
•Per portare a termine il preparato scegliete la
velocità più rapida mantenendo il comando
(d)sulla posizione (8).
. Modello 3MIX 6000XL Edition
• Verificate che il pulsante di comando (d) sia
sulla posizione «0».
• Aprite il supporto (b) e montate l’accessorio
sull’apertura anteriore.
• Posizionate il comando (d) sulla posizione
«0», e avviate esercitando una leggera
pressione sulla parte anteriore dello
sbattitore.(9)
• Dopo l’utilizzo, scollegate l’apparecchio,
posizionate il pulsante di comando sulla
posizione «0», estraete l’accessorio e
richiudete il supporto (b).
Sistemazione
L’apparecchio è dotato di un avvolgicavo con
clip di chiusura (f).
Secondo il modello:
Il Vostro apparecchio è dotato di un supporto
murale.
• Al primo utilizzo, aprite il supporto porta-
accessori (10).
• Inserite gli accessori (g e h) e quindi lo
sbattitore.
E’ bene tenerli direttamente sul piano di
lavoro, pronti per l’uso (11).
Dietro il supporto è anche previsto uno spazio
per riporre un blocco, una matita ....
Se il Vostro apparecchio non
funziona, che fare?
• AssicurateVi che gli accessori siano sempre
ben inseriti.
• Verificate il collegamento elettrico.
Se il Vostro apparecchio persiste nel non
funzionare, indirizzateVi presso un centro di
assistenza tecnica autorizzato Krups, il cui
elenco troverete nelle pagine gialle «Casa»
alla voce «elettrodomestici venditariparazioni» a telefonando al numero verde :
800 013.045.-
44
Page 45

Ricette
Torta di mele «Apple Pie»
. Pasta frolla : 300 gr. di farina - 150 gr. di
burro - 15 ml. d’acqua - 1 presa di sale -
. Ripieno : 4/5 mele - 2 cucchiai di zucchero -
1 cucchiaino di cannella - 1 cucchiaino di
noce moscata, l succo di un limone - 10 gr.
di burro
. 1 stampo per torte (28 cm di diametro)
. Tempo di preparazione : 18/20 min.
• Mischiate con le fruste normali ( velocità
minima) la farina, il sale ed il burro a pezzetti
fino ad ottenere una pasta a «briciole».
• Poi, con le fruste impastatrici (velocità media
e poi massima)aggiungendo poco a poco
l’acqua lavorate il composto fino ad ottenere
una palla di pasta omogenea.
• Lasciate riposare 1 ora in frigorifero.
• Mettete in un contenitore le mele tagliate a
fettine sottili ed unite lo zucchero. la
cannella e la noce moscata.
• Spianate i due terzi della pasta, stendentela
dentro allo stampo precedentemente
imburrato, facendo debordare un poco.
• Disponete sul fondo le mele insaporite,
cospargendole del succo di limone e di
fiocchetti di burro.
• Stendete la restante pasta e coprite il
composto facendo attenzione di unire bene i
bordi fra di loro (saldateli pressandoli con i
rebbi - denti- della forchetta).
• Praticate un piccolo foro al centro del
preparato e fate cuocere per 35 min a
220°C.
Potete sostituire le mele con : 5/6 pere
tagliate a pezzetti + 300 gr. di lamponi
+ 1 cucchiaio di farina + 6 cucchiai di
zucchero e 10 gr di burro.
Torta alle fragole
. Pasta frolla : 250 gr. d farina -125 gr. di
burro - 1 uovo
. Crema pasticcera : 1/4 di latte - 2 tuorli
d’uovo - 50 gr. di zucchero - 25 gr di farina -
qualche goccia di vaniglia liquida, 800 gr di
fragole
. 1 stampo per torta - 28 cm di diametro
. Tempo di preparazione : 20 min.
• Con le fruste normali, (velocità minima)
miscelate la farina con lo zucchero ed il
burro a pezzetti fino ad ottenere una pasta a
«briciole».
• Poi, aggiungete l’uovo e con le fruste
impastatrici (velocità media e massima)
lavorate la pasta fino a che non diventa una
palla omogenea.
• Lasciate riposare un’ora nel frigorifero.
• Fate bollire il latte con la vaniglia.
• Intanto, con le fruste normali, montate i
tuorli d’uovo con lo zucchero (velocità media
e poi massima). Il composto deve sbiancare
durante la lavorazione.
• Aggiungete la farina e miscelate bene
(velocità media).
• Quindi con la minima velocità aggiungete il
latte bollente e lavorate ancora fino ad
incorporarlo.
• Fate cuocere il preparato, girando con un
cucchiaio, fino a che non ispessisce.
• Lasciate raffreddare senza smettere di girare.
• Spianate la pasta e stendetela nello stampo
precedentemente imburrato. Forate con i
trebbi (denti) della forchetta la pasta stesa
sul fondo dello stampo, copritela con un
foglio di alluminio sul quale cospargerete dei
legumi secchi.
• Fate cuocere 20 min. a 180°C.
• A cottura ultimata, togliete sia i legumi che
l’alluminio e lasciate raffreddare.
• Spalmate una coltre di crema pasticcera sul
fondo e guarnite con le fragole.
Ricoprite con gelatina di ribes.
Torta al cioccolato
. 3 uova - 170 gr di zucchero - 170 gr di burro
- 150 gr di farina - 2 cucchiai di cacao in
polvere - 1/2 bustina di lievito per dolci.
. Tortiera a corona apribile (22 cm di diametro)
. Tempo di preparazione : 11 min.
• Con le fruste normali (velocità media)
miscelate in una terrina le uova e lo
zucchero fino a che il composto non sia ben
montato.
45
Page 46

•Aggiungete il burro e lavorate a velocità
media, quindi la farina, il cacao ed il lievito
(velocità minima per incorporare i
componenti, quindi media per amalgamarli.
•Versate il composto nella tortiera
precedentemente imburrata e fate cuocere
50 min a 170°C.
• Per delle varianti, potete :
- incorporare al composto pezzetti di noce, di
cioccolato o di arancio candito.
- aggiungere alla pasta due cucchiai di
mandorle tritate o di noci.
- ricoprire il dolce con una glassa al cioccolato,
ottenuta facendo sciogliere 100 gr di
cioccolato fondente con 20 gr di burro.
Rullo alla marmellata
. 3 uova - 90 gr di zucchero - 40 gr di farina -
30 gr di fecola di patate - 1 vasetto di
marmellata o gelatina ( albicocche, arancia,
lamponi, ribes )
. Una tortiera rettangolare (33 x 22 cm)
. Tempo di preparazione : 10 min.
•Con le fruste normali montate i tuorli
dell’uovo con lo zucchero (velocità massima),
il composto deve sbiancare.
•Aggiungete la farina e la fecola, quindi
lavorate ancora il composto (velocità
minima).
•Pulite le fruste dalla pasta e montate con
esse - a parte - l’albume delle uova (velocità
massima).
•Quindi miscelate insieme i due preparati
(velocità minima)
•Foderate la tortiera con carta da forno
imburrata, versate la pasta e fate cuocere
15 min a 170° C.
•Quando il biscotto risulta leggermente
dorato, toglietelo dalla tortiera e ponetelo
sopra un panno umido spolverato di
zucchero. Eliminate la carta da forno.
•Arrotolate la pasta nel panno e lasciate
raffreddare.
•Una volta raffreddata, srotolate la pasta e
cospargetevi sopra la marmellata o la
gelatina.
• Arrotolate nuovamente il biscotto e
chiudetene le estremità.
In alternativa :
. potete ricoprire la pasta con della crema
pasticcera.
. potete sostituire la fecola con del cacao in
polvere e ricoprire il biscotto con cioccolato e
panna.
Torta al cioccolato ed albicocche
. Pasta sfoglia : 200 gr di farina - 10 ml di
acqua - 160 di burro - 1 presa di sale
. Per guarnire : 1 kg. di albicocche fresche o
1 scatola di albicocche sciroppate - 60 gr di
burro - 70 gr di zucchero - 70 gr di
mandorle in polvere - 1 uovo intero - 2
cucchiai di marmellata di albicocche.
. Una tortiera dal diametro di 18 cm.
. Tempo di preparazione : 2 ore per la pasta
sfoglia - 10 min. per terminare la torta.
• Mettete in un contenitore il sale e la farina e
lavorando con le fruste impastatrici,
aggiungete poco a poco l’acqua fino al
formarsi di una palla (velocità media e poi
massima).
• Lasciate riposare 20 min. al fresco.
• Stendete la pasta fino a formare un
quadrato di 1 cm di spessore.
• Lavorate il fino ad ottenere la stessa
consistenza della pasta e spalmatelo al
centro del quadrato.
• Chiudetelo, ripiegando in due i lati opposti
del quadrato.
• Stendete la pasta a forma di un rettangolo di
2 cm di spessore, quindi ripiegatelo in 3.
• Lasciate riposare la pasta 20 min e rifate la
stessa operazione per altre due volte .
• Lasciate riposare al fresco
• In una terrina, miscelate con le fruste lo
zucchero, le mandorle in polvere il burro e
le uova (velocità media e poi massima)
• Date ancora due giri alla pasta, prima di
foderare la tortiera, quindi, dopo aver forato
con una forchetta la pasta sul fondo della
tortiera, ripartitevi sopra il preparato alle
mandorle terminando come ultimo strato le
albicocche tagliate in due.
46
Page 47

• Fate cuocere 30 min. a 240°C, quindi
lucidate la superficie con la marmellata di
albicocche.
Frittelle di mele
. Per la pasta : 125 gr di farina - 1 uovo -
1 cucchiaio di olio - 1 presa di sale - 15 ml di
latte - 4 mele - 1 cucchiaio di cannella 75 gr di zucchero - il succo di un limone.
. Olio per friggere
. Tempo di preparazione : 5 min per la
pastella.
• Con le fruste, miscelate dentro un
contenitore, la farina, l’uovo, l’olio, il sale,
2 cucchiai di latte - fino a che il preparato
non risulta ben omogeneo (velocità media,
quindi massima).
• Diminuendo la velocità, incorporate poco a
poco anche il latte. Lasciate riposare 1 ora al
fresco.
• Durante questo tempo unite insieme lo
zucchero e la cannella.
• Lasciate le mele intere, mondatele della
buccia, eliminate i semi e tagliatele a rotelle.
Insaporitele con l’insieme di zucchero e
cannella, quindi cospargetele di succo di
limone. Coprite e lasciate macerare 30 min
al fresco.
• Immergete le rotelline di mele nella pastella
ed una volta ben avvolte, ponetele dentro
l’olio bollente.
• Friggetele 4 alla volta e servitele ben calde.
Potete variare queste frittelle utilizzando altri
tipi di frutta : ananas, banane, albicocche,
pere, ecc.
Pane
. 250 gr di farina bianca - 100 gr di farina
completa - 1 sacchetto di lievito da
panettieri - 10 gr di zucchero - 10 gr di
burro - 200 gr di acqua - 1 pizzico di sale
. 1 stampo per dolci da 24 cm di diametro.
. Tempo di preparazione : 7 minuti
• In una insalatiera con le fruste impastatrici,
mischiate insieme, a velocità media, le due
farine, il sale, il burro ed il lievito.
• Aggiungete poco a poco l’acqua, fino al
formarsi di una palla (velocità media e poi
massima).
• Coprite l’insalatiera con un panno umido e
lasciate riposare per circa 30 minuti in un
luogo tiepido.
• Dopo questo tempo, ponete la pasta dentro
lo stampo imburrato ed infarinato. Lasciate
nuovamente lievitare ancora per 1 ora.
• Sacduto questo tempo, fate cuocere a
240°C per 25 minuti.
Se volete, potete apportare delle varianti
aggiungendo alla pasta : 150 di noci a
pezzettini o 300 gr di uvetta passa, o 200 gr
di olive nere snocciolate, o 200 gr di pezzetti
di lardo, o 2 cucchiai di cumino in grani, ecc.
Potete anche dividere la posta in tante
porzioni ( o palline ) per realizzare panini
individuali.
Treccia di brioche
. 500 gr di farina - 2 confezioni di lievito da
panettiere - 200 gr di burro - 50 gr di
zucchero - 1 presa di sale - 5 uova -
2 cucchiai di latte tiepido.
. Tempo di preparazione : 8 minuti per la
pasta + 2 ore di lievitazione.
• In una insalatiera, con le fruste da impastare,
miscelate insieme per 2 minuti, la farina, il
lievito, il latte tiepido, lo zucchero e le
5 uova (velocità media e poi massima).
• Aggiungete poco a poco il burro, fino ad
ottenere una pasta elastica.
• Coprite l’insalatiera con un panno umido e
lasciate lievitare per 1 ora in un luogo (fino
tanto che la pasta non abbia raddoppiato il
suo volume).
• Una volta pronta, dividetela in tre parti.
• Fate rullare ogni parte della pasta fra le mani
fino ad ottenere un cordone. Preparati i tre
cordoni, intrecciateli fra loro.
• Posate la treccia sopra una placca da
pasticceria imburrata ed infarinata e
lasciatela lievitare ancora per circa 1 ora.
• Fate cuocere per 40/45 minuti a 180°C.
47
Page 48

A scelta, potete non intrecciare la pasta e
mettere la palla intera dentro lo stampo, o
confezionare delle piccole brioches, dividendo
precedentemente la pasta in tante palline.
48
Page 49

Danmark
Beskrivelse
. Håndmixerens forskellige dele
a Forreste drev
b Bageste drev
c Turboknap (forreste drev) (afhængig af
valgt model)
d Betjeningsknap:
d1 Tænd/slukfunktion og elektronisk
hastighedsregulering
d2 Afmontering af tilbehør (forreste drev)
d3 Tænd/slukfunktion ( S+3
hastighedstrin)
d4 Afmontering af piskeris eller tænd/
slukfunktion på bageste drev
d5 Turbofunktion
e Vægophæng (afhængig af valgt
model)
f Ledningsopbevaring med klips
AFHÆNGIG AF VALGT MODEL OG/ELLER
EKSTRAUDSTYR
. Tilbehør til forreste drev
g Piskeris
g1 Piskeris i plast
g2 Piskeris i rustfrit stål
h Dejkroge
i Ballonpiskeris
h Snitte-/riveudstyr
j1 Tromler
k Puréfod
. Tilbehør til bagerste drev
l Blenderfod i plast
m Blenderfod i rustfrit stål
n Minihakker
. Beholdere
o Si
p Røreskål 2,75 l
q Røreskål 2,5 l
r Mixerbæger 1 l
s Røreskål i rustfrit stål 3 l
t Stand
Gode råd om sikkerhed
•Læs brugsanvisningen omhyggeligt
igennem, før håndmixeren tages i brug
første gang; Krups påtager sig intet ansvar
for skader, der opstår ved forkert brug.
•Håndmixeren er udelukkende til indendørs
brug i en almindelig husholdning og må kun
bruges til de formål, der er beskrevet i
brugsanvisningen.
•Anbring ikke håndmixeren inden for børns
rækkevidde uden overvågning. Lad ikke
børn anvende håndmixeren uden
overvågning.
•Lad ikke ledningen hænge ned inden for
børns rækkevidde.
•Håndmixeren må kun tilsluttes 230 volt
vekselspænding.
Garantien bortfalder ved tilslutning til
forkert spænding.
•Sørg for, at ledningen aldrig kommer i
nærheden af eller rører ved håndmixerens
varme dele eller en varmekilde og anbring
den aldrig, så den hænger over skarpe
kanter.
•Håndmixeren, ledningen eller ledningens stik
må ikke nedsænkes i vand eller anden
væske.
•Håndmixeren må ikke anvendes, hvis
ledningen eller stikket er beskadiget. De
beskadigede dele må kun udskiftes af Krups
serviceværksted (se adressen i hæftet
Service). Dette for at undgå at der opstår
farlige situationer.
•Afbryd strømmen til håndmixeren, når De er
færdig med at anvende den, og når den skal
rengøres.
•Anvend ikke håndmixeren, hvis den ikke
fungerer korrekt, eller hvis den er
beskadiget, men henvend Dem til Krups
serviceværksted.
•Reparationer og service, som ikke vedrører
almindelig vedligeholdelse og rengøring af
håndmixeren, skal foretages af Krups
serviceværksted.
•For at der ikke skal ske uheld og skader
under brugen af håndmixeren, må der kun
anvendes Krups tilbehør og reservedele, som
passer til Deres model.
49
Page 50

•Alle apparater underkastes streng
kvalitetskontrol. Hvis Deres håndmixer ser
ud til at have været anvendt, skyldes dette,
at Krups under produktionen afprøver
tilfældigt udvalgte apparater.
•Lad ikke håndmixeren være uden opsyn, når
den er i brug.
•Rør aldrig ved piskeris, dejkroge,
blenderfodens kniv eller snitte-/
riveudstyrets tromler, når håndmixeren
er i gang. Lad ikke langt hår, tørklæder,
ledningen el.lign. hænge ind over
tilbehørsdelene, når de er i brug.
•Afbryd strømmen til håndmixeren før
montering og afmontering af
tilbehørsdelene.
•Monter ikke tilbehørsdele med forskellig
funktion sammen (f.eks. dejkrog og
ballonpiskeris).
•Bemærk: Knivsbladene på nogle af
tilbehørsdelene er skarpe. Knivene skal
derfor håndteres forsigtigt.
Vigtigt! Håndmixeren har to drev (1):
•Forreste drev (a) til montering af
tilbehørsdelene g, h, i, j og k (afhængig af
valgt model)
•Bagerste drev (b) til montering af
tilbehørsdelene l, m og n (afhængig af valgt
model).
Før håndmixeren tages i brug
første gang
•De forskellige tilbehørsdele til håndmixeren
rengøres omhyggeligt.
Anvendelse af tilbehøret til
forreste drev
. Piskeris og dejkroge
•Sæt betjeningsknappen (d) på «0» og skub
piskeris eller dejkroge på plads, indtil de
låser. Sæt altid den del, der har et tandhjul
påmonteret ind i åbningen med
tandhjulssymbolet (2).
•Sæt stikket i kontakten og tænd for
strømmen til håndmixeren.
•Læg ingredienserne, der skal forarbejdes, i
en passende beholder (Krups røreskål eller
mixerbæger).
•Nedsænk piskerisene eller dejkrogene i
beholderen og start håndmixeren ved at
skubbe betjeningsknappen (d) mod højre.
For at undgå sprøjt eller stænk i starten er
håndmixeren udstyret med en anti-
stænkfunktion (position «S») (afhængig af
valgt model). Funktionen, som også er
beregnet til forarbejdning af sarte
ingredienser til f.eks. kagecreme og saucer,
anvendes således:
•Skub betjeningsknappen (d) mod højre til
position «S» (3).
•Til den videre forarbejdning vælges et højere
hastighedstrin (4).
Afhængig af valgt model er håndmixeren
udstyret med en turbofunktion (c eller d5),
som øjeblikkelig får håndmixeren til at arbejde
på højeste ydeevne (5 eller 9).
•Når forarbejdningen er færdig, sættes
betjeningsknappen (d) tilbage på position
«0».
•Sluk for strømmen til håndmixeren.
•Frigør piskeris eller dejkroge ved at skubbe
betjeningsknappen (d) hen på position
«Eject» (6).
. Ballonpiskeris
Ballonpiskeriset (i) anvendes til luftige
tilberedninger, f.eks. kagecreme, mayonnaise
og marengs.
•Brug piskeriset i en høj, smal beholder
(Krups mixerbæger eller røreskål i rustfrit
stål).
•Piskeriset må aldrig bruges til forarbejdning
af tunge ingredienser, f.eks. sandkage- eller
brøddej eller puré.
. Vedrørende anvendelse af de øvrige
tilbehørsdele henvises til den tilhørende
brugsanvisning.
50
Page 51

Anvendelse af tilbehøret til
bagerste drev
Af sikkerhedsmæssige årsager registrerer
håndmixeren tilbehørsdele, der er monteret
på bagerste drev.
. Model 3 MIX 8000/8008
•Ved anvendelse af tilbehøret fastholdes
betjeningsknappen (d) i den valgte
indstilling; hvis knappen slippes, går den
automatisk tilbage til position «0».
For at undgå sprøjt eller stænk i starten er
håndmixeren udstyret med en anti-
stænkfunktion. Funktionen, som også er
beregnet til forarbejdning af sarte
ingredienser til f.eks. kagecreme og saucer,
anvendes således:
•Skub betjeningsknappen (d) hen til position
«S» og fasthold den i denne indstilling (7).
•Til den videre forarbejdning vælges et højere
hastighedstrin, og betjeningsknappen (d)
fastholdes i den nye indstilling (8).
. Model 3MIX 6000XL Edition
•Kontroller, at betjeningsknappen (d) står på
«0».
•Åbn klappen (b) og monter tilbehøret på
bagerste drev.
•Sæt betjeningsknappen (d) på «0» og start
håndmixeren ved at skubbe knappen fremad
mod håndmixerens forreste del (9).
•Efter brug sættes betjeningsknappen på
«0»; sluk for strømmen til håndmixeren.
Tilbehøret afmonteres, og klappen (b) lukkes
igen.
•Det kan stærkt anbefales at rengøre
tilbehørsdelene straks efter brugen for at
fjerne eventuelle fastklæbede madrester;
tilbehørsdelene er nemmere at rengøre, når
madresterne ikke får lov at tørre ind, ligesom
man undgår eventuel bakterievækst.
Opbevaring
Håndmixeren er udstyret med plads til
opbevaring af ledningen samt en klips til
fastholdelse af ledningen (f).
Afhængig af valgt model er håndmixeren
udstyret med et vægophæng.
•Når vægophænget tages i brug, foldes
tilbehørsholderen ud (10).
•Anbring først tilbehøret (g og h) og herefter
håndmixeren.
Når vægophænget monteres lige over
køkkenbordet, er udstyret nemt tilgængeligt
(11).
Bag på vægophænget er der tillige plads til
opbevaring af en notesblok, blyant o.lign.
Hvis håndmixeren ikke virker?
•Kontroller, at tilbehørsdelene er monteret
korrekt.
•Kontroller at ledningens stik er sat rigtigt i
kontakten, og at der er tændt for strømmen.
Hvis håndmixeren stadig ikke virker, beder
vi Dem kontakte Krups serviceværksted (se
adressen i hæftet Service).
Rengøring
•Sluk for strømmen til håndmixeren og tag
stikket ud af kontakten.
•Selve håndmixeren må kun rengøres med en
fugtig klud.
•Piskeris/dejkroge rengøres under rindende
vand eller i opvaskemaskine, skylles og tørres
af.
Opskrifter
Æbletærte
. Mørdej: 300 g hvedemel, 150 g smør, 15 ml
vand, 1 knsp salt.
. Fyld: 4-5 æbler, 2 spsk sukker, 1 tsk kanel, 1
tsk muskat, saft af en citron, 10 g smør.
. 1 tærteform: Ø 28 cm.
. Tilberedningstid: 18-20 min.
51
Page 52

•Bland mel, salt og smør sammen med
piskerisene til dejen har samlet sig til en
grynet masse (lav hastighed).
•Derefter forarbejdes dejen med dejkrogene:
Vandet tilsættes lidt ad gangen (først middel
hastighed, dernæst høj hastighed), og dejen
æltes sammen til en kugle.
•Lad dejen hvile 1 time i køleskabet.
•Skær æblerne i smalle både, som kommes i
en skål og blandes med kanel og muskat.
•Rul 2/3 af dejen ud og læg den i den smurte
tærteform, således at dejen hænger ud over
kanten.
•Anbring æblebådene på tærtebunden,
overhæld dem med citronsaft og fordel
smørklatter over.
•Dæk æblerne med resten af dejen og klem
dejkanterne sammen.
•Skær et lille hul i midten af dejlåget og bag
tærten i 35 min. ved 220°.
Æblerne kan erstattes af 800 g rabarber, der
skæres i små stykker eller 500 g rabarber +
300 g hindbær samt 1 spsk hvedemel, 6 spsk
sukker og 10 g smør.
Jordbærtærte
. Mørdej: 250 g hvedemel, 125 g smør, 125 g
sukker, 1 æg.
. Kagecreme: 1/4 l mælk, 2 æggeblommer, 50
g sukker, 25 g hvedemel, 1/2 tsk vanilje.
. 800 g jordbær.
. 1 tærteform: Ø 28 cm.
. Tilberedningstid: 20 min.
•Bland mel, sukker og smør sammen med
piskerisene til dejen har samlet sig til en
grynet masse (lav hastighed).
•Derefter forarbejdes dejen med dejkrogene:
Ægget tilsættes og dejen æltes sammen til
en kugle (først middel hastighed, dernæst
høj hastighed).
•Lad dejen hvile 1 time i køleskabet.
•Mælken bringes i kog sammen med vaniljen.
•Imens piskes æggeblommer og sukker til en
lys masse med piskerisene (først middel
hastighed, dernæst høj hastighed).
•Tilsæt melet og bland ingredienserne godt
sammen (middel hastighed).
•Indstil håndmixeren på lav hastighed og
bland den kogende mælk i massen.
•Bring cremen i kog medens der røres rundt
med en ske, til cremen bliver tyk. Lad
cremen køle af under omrøring.
•Rul dejen ud og kom den i den smurte
tærteform. Prik tærtebunden med en gaffel
og dæk bunden til med staniol. Kom et lag
tørrede ærter eller bønner oven på staniolen.
•Bag tærten i 20 min. ved 180°.
•Fjern de tørrede ærter/bønner og staniolen
og lad tærten køle af.
•Bred kagecremen ud over tærtebunden og
fordel jordbærrene oven på cremen.
•Dæk jordbærrene med et lag ribsgelé.
Chokoladekage
. 3 æg, 170 g sukker, 170 g smør, 150 g
hvedemel, 2 spsk kakaopulver, 6 g
bagepulver
(1/2 brev).
. 1 springform: Ø 22 cm.
. Tilberedningstid: 11 min.
•Pisk æg og sukker sammen i en skål med
piskerisene (middel hastighed) til en
sammenhængende og lind masse.
•Tilsæt smørret (middel hastighed), herefter
mel, kakao og bagepulver (skift til lav
hastighed for at få ingredienserne blandet
sammen og herefter til middel hastighed for
at få dejen forarbejdet til en ensartet masse).
•Hæld dejen i den smurte form og bag kagen
i 50 min. ved 170°.
•Man kan:
- Tilsætte kagedejen hakkede valnøddekerner,
høvlet chokolade eller syltede appelsinskaller
- Komme to spsk mandel- eller valnøddemel i
dejen
- Overtrække kagen med en chokoladeglasur,
som laves af 100 g mørk chokolade smeltet
sammen med 20 g smør.
52
Page 53

Roulade med syltede frugter
. 3 æg, 90 g sukker, 40 g hvedemel, 30 g
kartoffelmel, 1 glas marmelade eller gelé
(f.eks. abrikoser, appelsiner, hindhær eller
ribs).
. 1 rektangulær form: 33 x 22 cm.
. Tilberedningstid: 10 min.
•Pisk æggeblommer og sukker sammen til en
lys masse med piskerisene (høj hastighed).
•Tilsæt hvedemel og kartofffelmel og bland
ingredienserne godt sammen (lav hastighed).
•Vask piskerisene af og pisk æggehviderne
stive i en anden skål (høj hastighed).
•Bland de stiftpiskede hvider i æggemassen
(lav hastighed).
•Beklæd formen med bagepapir og hæld
dejen i formen. Bages i ovnen i 15 min. ved
170°.
•Når rouladebunden er blevet let gylden,
vendes den ud af formen på et fugtigt
viskestykke, der er overstrøet med sukker.
Tag bagepapiret af rouladebunden.
•Rul rouladen sammen med viskestykket og
lad den køle af.
•Herefter rulles kagen ud og dækkes med
marmelade eller gelé.
•Rul rouladen sammen igen og skær den til i
begge ender.
Man kan:
. Komme kagecreme i rouladen
. Erstatte kartoffelmelet med kakaopulver og
komme flødeskum i rouladen.
Mandel-/abrikostærte
. Mørdej: 200 g hvedemel, 10 ml vand, 160 g
smør, 1 knsp salt.
. Fyld: 1 kg friske abrikoser eller 1 dåse syltede
abrikoser, 60 g smør, 70 g sukker, 70 g
mandelmel, 1 helt æg + 1 æggeblomme, 2
spsk abrikosmarmelade.
. 1 tærteform: Ø 28 cm.
. Tilberedningstid: Mørdej: 2 timer + 10 min.
til at færdiggøre tærten.
•Kom mel og salt i en skål. Tilsæt vandet lidt
ad gangen, mens ingredienserne blandes
med dejkrogene, indtil dejen har samlet sig
til en kugle (først middel hastighed, dernæst
høj hastighed).
•Lad dejen hvile 20 min. i køleskabet.
•Udrulning:
•Rul dejen ud i en 1 cm tyk firkant.
•Rør smørret, så det får samme konsistens
som dejen og bred det ud midt på firkanten.
Pak smørret ind i dejen ved at folde
firkantens modsatte hjørner sammen parvis.
•Rul dejen ud i en 2 cm tyk aflang plade, som
foldes sammen i 3 lag.
•Lad dejen hvile i 20 min. og gentag den
sidstnævnte udrulningsproces 2 gange.
•Læg dejen i køleskabet.
•Pisk sukker, mandelmel, smør og æg
sammen i en skål med piskerisene (først
middel hastighed, dernæst høj hastighed).
•Gentag endnu en gang den sidstnævnte
udrulningsproces to gange, før dejen lægges
i formen. Prik dejbunden med en gaffel og
fordel mandelmassen over bunden.
Abrikoserne halveres og kommes oven på
mandelmassen.
•Tærten bages i ovnen i 30 min. ved 240° og
dækkes herefter med et lag
abrikosmarmelade.
Æblebeignetter
. Beignetdej: 125 g hvedemel, 1 æg, 1 spsk
olie, 1 knvsp salt, 15 ml mælk, 4 æbler, 1
spsk kanel, 75 g sukker og saft af en citron.
. Friturebad: Olie.
. Tilberedningstid: Dej: 5 min.
•Monter piskerisene og pisk mel, æg, olie,
salt og 2 spsk mælk sammen i en skål til en
ensartet masse (først middel hastighed,
dernæst høj hastighed).
•Skift til lavere hastighedstrin og tilsæt
mælken lidt ad gangen. Lad dejen hvile 1
time i køleskabet.
•Imens blandes sukker og kanel.
•De hele æbler skrælles, kernehuset skæres
ud, og æblerne skæres i ringe. Strø sukker-/
kanelblandingen på æbleringene og dryp
dem med citronsaft. Dæk æblerne til og lad
dem trække 30 min. i køleskabet.
53
Page 54

•Dyp æbleringene i beignetdejen, således at
de er helt dækket af dej og kom dem i den
varme fritureolie.
•Steg 4 æbleringe ad gangen og server dem
meget varme.
Man kan tilberede beignetter med al slags
frisk frugt, f.eks. ananas, bananer, abrikoser
og pærer.
Vær altid meget omhyggelig, når maden
kommes i den varme olie. Tag forholdsregler
mod sprøjt fra olien og efterlad aldrig varm
olie uden opsyn.
Brød
. 250 g hvedemel, 100 g fuldkornsmel, 1 brev
tørgær, 10 g sukker, 10 g smør, 2 dl vand og
1 g salt.
. 1 sandkageform: 24 cm.
. Tilberedningstid: 7 min.
•Monter dejkrogene og bland de to slags
mel, salt, smør og gær sammen i en skål
(middel hastighed).
•Tilsæt vandet lidt ad gangen til dejen samler
sig til en kugle (først middel hastighed,
dernæst høj hastighed).
•Dæk skålen med et fugtigt klæde og lad
dejen hvile 30 min. et lunt sted.
•Anbring dejen i den smurte og meldryssede
form og lad dejen hæve endnu 1 time.
•Bag brødet i ovnen i 25 min. ved 240°.
Man kan f.eks. tilsætte brøddejen 150 g
hakkede valnøddekerner, 300 g rosiner, 200
g sorte oliven, 200 g bacon skåret i små
stykker eller 2 spsk kommen.
Dejen kan også deles op i små kugler og
bages som boller.
•Skær smørret i stykker og tilsæt
smørstykkerne lidt ad gangen til dejen får en
elastisk konsistens.
•Dæk skålen med et fugtigt klæde og lad
dejen hvile 1 time et lunt sted (indtil den er
hævet til dobbelt størrelse). Del herefter
dejen i 3 dele.
•Rul hver del ud i hånden til 3 lange pølser,
som flettes sammen.
•Anbring det flettede briochebrød på en
smurt og meldrysset bageplade og lad det
hæve endnu 1 time. Bag brødet i ovnen i
40-45 min. ved 180°.
Man kan undlade at flette dejen sammen og i
stedet bage den i en sandkageform eller dele
dejen i små kugler, som bages til briocher.
Flettet briochebrød
. 500 g hvedemel, 2 breve tørgær, 200 g
smør, 50 g sukker, 1 knvsp salt, 5 æg, 2 spsk
lunken mælk.
. Tilberedningstid: Dej: 8 min. + 2 timers
hævning.
•Monter dejkrogene og bland mel, gær,
lunken mælk, sukker, salt og de 5 æg
sammen i en skål i 2 min. (først middel
hastighed, dernæst høj hastighed).
54
Page 55

Norge
Beskrivelse
. Apparatets deler
a Frontåpning
b Bakåpning
c Turbobryter (frontåpning) (avhenger av
modell)
d Kontrollknapp:
d1 Start/Stopp og elektronisk
hastighetskontroll
d2 Utløser (frontåpning)
d3 Start/Stopp (S+3 hastigheter)
d4 Visputløser eller Start/Stop på
bakåpningen
d5 Turbo-funksjon
e Vegghylle (avhenger av modell)
f Ledningsoppbevaring med klype
AVHENGER AV MODELL OG/ELLER VALGFRITT
. Deler til frontåpning
g Visper
g1 Ovale visper i plastikk
g2 Ovale visper i rustfritt stål
h Eltekroker
i Ballongvisp
j Skjæring i skiver/riving
j1 Trommel
k Mosefot
. Deler til bakåpning
l Blandekniv i plast
m Blandekniv i metall
n Minihakker
. Beholdere
o Sil
p 2.75 liters bolle
q 2.5 liters bolle
r 1 liters blandebeger
s 3 liters bolle i rustfritt stål
t Stativ
Viktige råd om sikkerhet
•Les bruksanvisningen nøye før du tar
apparatet i bruk første gang. All bruk som
ikke er i overenstemmelse med disse
anvisningene vil frita Krups fra alt
garantiansvar.
•Apparatet er kun beregnet på hjemmebruk,
og bare innendørs bruk i tråd med
beskrevne bruksområder.
•La aldri apparatet være innen barns
rekkevidde uten under oppsyn. Små barn må
kun bruke apparatet under oppsyn.
•La aldri strømledningen henge ned slik at
den er innen rekkevidde for barn.
•Kontroller at voltspenningen i apparatet
samsvarer med voltspenningen i
ledningsnettet.
Garantien faller bort dersom apparatet
feiltilkobles.
•Strømledningen må aldri ligge i nærheten
av, eller komme i kontakt med, de varme
delene av apparatet; i nærheten av annen
varmekilde, eller ligge over en skarp kant.
•Plasser aldri apparatet, strømledningen eller
støpselet i vann, eller i noen annen væske.
•Bruk aldri apparatet dersom strømledningen
eller støpselet er skadet. For å unngå
skaderisiko bør du alltid få delene erstattet
av et godkjent Krups servicesenter (se liste i
serviceheftet).
•Trekk alltid ut kontakten ved endt bruk og
ved rengjøring.
•Bruk aldri apparatet dersom det ikke
fungerer ordentlig eller er blitt skadet, men
ta kontakt med et godkjent Krups service
senter (se liste i brosjyren).
•All behandling av apparatet utover
rengjøring og vanlig vedlikehold skal foretas
av et godkjent Krups service senter.
•Av hensyn til din egen sikkerhet, bruk kun
tilbehør og reservedeler spesielt tilpasset
dette apparatet.
•Alle apparater passerer strenge
kvalitetskontroller. Brukstester utføres på
tilfeldig utvalgte apparater, derfor kan
enkelte apparater vise tegn på å ha vært
brukt.
55
Page 56

•Dette apparatet er beregnet på å brukes
under tilsyn av brukeren.
•Kom aldri nær vispene, eltekrokene,
knivbladene eller skjære-/rivetrommelen
mens de er i bevegelse. La ikke langt
hår, skjerf, strømledning, etc. henge ned
over tilbehørsdelene mens de er i
bevegelse.
•Trekk alltid ut støpselet før du
behandler apparatet (tilpassing og
fjerning av deler).
•Tilpass aldri deler med ulike funksjoner
samtidig (f.eks. eltekroker og ballongvisp
o.l).
•Merk: knivbladene på noen av
tilbehørsdelene er svært skarpe. Utvis
stor forsiktighet i håndteringen av
knivbladene.
Viktig: Apparatet er utstyrt med to åpninger
(1):
•En frontåpning (a) for festing av delene (g,
h, i, j, k) (avhenger av modell).
•En bakåpning (b) for festing av delene (l, m,
n) (avhenger av modell).
Før første gangs bruk
•Rengjør de ulike delene av apparatet nøye.
Apparatet er utstyrt med en anti-sprut
funksjon (posisjon “ S ”) for å hindre sprut
når apparatet starter eller ved tilberedning av
delikate retter (kremer, sauser). For å bruke
denne:
•Vri kontrollknappen (d) mot høyre til
posisjon “ S ” (3).
•For å fortsette tilberedningen, velg en høyere
hastighet (4).
Apparatet kan være utstyrt med en Turbo-
funksjon (c eller d5, avhengig av modell) som
gir umiddelbar tilgang til apparatets fulle
styrke (5 eller 9).
•Når du er ferdig med å bruke apparatet, vri
kontrollknappen (d) til posisjon “ 0 ”.
•Trekk ut støpselet.
•Frigjør vispene eller eltekrokene ved å vri
kontrollknappen til posisjon “ Eject ” (6).
. Ballongvisp
Ballongvispen brukes til å lage delikate retter
(kremer, majones og marengs).
•Bruk den i en høy, smal beholder (Krups
beger eller bolle i rustfritt stål).
•Bruk den aldri til tunge retter som f.eks.
kaker eller brøddeig, eller til mosing.
. For det andre tilbehøret, se
instruksjonene for bruk av det.
Bruk av tilbehørsdeler på
frontåpningen
. Visper og eltekroker
•Kontrollknappen (d) skal være i posisjon “ 0
”. Stikk vispene eller eltekrokene inn til de
låses på plass. Pass på at riktig visp/krok
kommer i riktig hull (se på tannmarkeringen) (2).
•Sett i støpselet.
•Avhengig av mengden, plasser
ingrediensene i en passende beholder (Krups
bolle eller beger).
•Senk vispene eller eltekrokene ned i
beholderen og start apparatet ved å vri
kontrollknappen (d) mot høyre.
56
Anbefalinger for tilbehør brukt
på bakåpningen
Av sikkerhetsårsaker kan håndmikseren
oppfatte om det er tilbehørsdeler festet på
bakåpningen.
. Modell 3 MIX 8000/8008
•Hold kontrollknappen (d) inne under bruk.
Dersom du slipper vil den automatisk
returnere til posisjon “ 0 ”.
Apparatet er utstyrt med en anti-sprut
funksjon (posisjon “ S ”) for å hindre sprut
når apparatet starter eller ved tilberedning av
delikate retter (kremer, sauser). For å bruke
denne:
•Vri kontrollknappen (d) mot høyre til
posisjon “ S ” (7) og hold den der.
Page 57

•For å fortsette tilberedningen, velg en høyere
hastighet (8). Fortsett å holde
kontrollknappen inne.
. Modell 3MIX 6000XL Edition
•Kontroller at kontrollknappen (d) står
på “ 0 ”.
•Åpne luken (b) og fest tilbehøret på
bakåpningen.
•La kontrollknappen (d) stå på “ 0 ”, og slå
på apparatet ved å vri mot fronten av
møllen (9).
•Etter bruk settes kontrollknappen på “ 0 ”
før kontakten trekkes ut, derettes fjernes
tilbehøret og luken (b) stenges igjen.
Rengjøring
•Trekk ut støpselet.
•Rengjør motordelen kun med en fuktet klut.
•Rengjør vispene/eltekrokene under rennende
vann eller i oppvaskmaskinen. Skyll og tørk.
•Vi anbefaler at du rengjør tilbehørsdelene
med en gang du er ferdig med
tilberedningen. Dette vil lette rengjøringen
da matrester ikke vil rekke å feste seg,
samtidig som det forhindrer
bakterieutvikling.
Oppbevaring
Dette apparatet har en ledningskveiler med
festeklype (f).
Avhengig av modell:
Apparatet er utstyrt med et stativ.
•Fold ut stativet for tilbehørsdelene før du
bruker apparatet først gang (10).
•Installer tilbehørsdelene (g og h), og så
håndmikseren.
De vil være rett over arbeidsbenken, klare for
bruk (11).
Det er også rom på baksiden av stativet for
oppbevaring av en notatblokk, blyant o.l.
Dersom apparatet ikke
fungerer
•Kontroller at tilbehørsdelene er korrekt
montert.
•Kontroller de elektriske koblingene.
Dersom apparatet fortsatt ikke fungerer,
ta kontakt med et godkjent Krups service
senter (se liste i brosjyren).
Oppskrifter
Eplepai
. Paideig: 300g mel, 150g smør, 1.5 dl vann, 1
klype salt
. Fyll: 4 eller 5 epler, 2 spskj sukker, 1 ts kanel,
1 ts muskat, saften av en sitron, 10g smør.
. 1 paiform: 28 cm i diameter
. Tilberedningstid: 18-20 min.
•Bruk vispene til å smuldre sammen mel, salt
og smør i biter (laveste hastighet).
•Bruk så eltekrokene, og kna gradvis inn
vannet (middels, deretter høyeste hastighet)
til deigen formes til en ball.
•La deigen hvile i en time i kjøleskapet.
•Bland de finkuttede eplene med sukker,
kanel og muskat i en bolle.
•Kjevle ut 2/3 av paideigen, og kle den
smurte formen, også langs kantene.
•Plasser eplene på bunnen, sprut sitronsaften
over, og spre små biter av smør rundt i
formen.
•Dekk eplene med resten av deigen, og fold
kantene sammen.
•Lag et lite hull i midten av paien, og stek i 35
min ved 220°C.
Du kan erstatte eplene med: 800g rabarbra,
hakket i biter, eller 500g rabarbra + 300g
bringebær og 1 spskj mel, 6 spskj sukker og
10g smør.
57
Page 58

Jordbærterte
. Paideig: 250g mel, 125g smør, 125g sukker,
1 egg.
. Vaniljekrem: 1/4 l melk, 2 eggeplommer,
50g sukker, 25g mel, noen dråper
vaniljeessens.
. 800g jordbær
. 1 paiform: 28 cm i diameter
. Tilberedningstid: 20 min
•Bruk vispene til å smuldre sammen mel,
sukker og smør i biter (laveste hastighet).
•Bruk så eltekrokene, tilsett eggene, og kna
til deigen formes til en ball (middels, deretter
høyeste hastighet).
•La deigen hvile i en time i kjøleskapet.
•Kok opp melken sammen med vaniljen.
•Bruk samtidig vispene til å stivpiske
eggeplommer og sukker (middels, deretter
høyeste hastighet).
•Tilsett melet og bland (middels hastighet).
•Bland forsiktig i melken på laveste hastighet.
•Varm opp blandingen under røring til den
tykner. Tillat blandingen å avkjøle under
stadig omrøring.
•Kjevle ut paideigen, og kle den smurte
formen, også langs kantene. Prikk bunnen
med en gaffel og dekk formen med
aluminiumsfolie.
•Stek i 20 min ved 180°C.
•Fjern aluminiumsfolien, og la avkjøle.
•Fordel vaniljekremen på bunnen, og fyll med
jordbær.
•Dekk over med ripsgele.
Sjokoladekake
. 3 egg, 170g sukker, 170g smør, 150g mel, 2
spskj kakaopulver, 6g bakepulver.
. 1 løsbunnet kakeform: 22 cm i diameter
. Tilberedningstid: 11 min
•Bruk vispene til å blande sammen egg og
sukker i en salatbolle (middels hastighet):
Blandingen skal være jevn og lettere
flytende.
•Tilsett smør (middels hastighet), og så mel,
kakao og bakepulver (laveste hastighet
under tilsetting, deretter middels hastighet
for å jevne ut).
•Hell røren over i den smurte kakeformen, og
stek i 50 min ved 170°C.
•Du kan:
- tilsette litt valnøtter, sjokoladespon eller
krystallisert appelsinskall i røren.
- tilsette 2 spskj malte mandler eller valnøtter i
røren
- dekke kaken med sjokoladeglasur (smelt
100g sjokolade sammen med 20g smør).
Rullekake med syltetøy
. 3 egg, 90g sukker, 40g mel, 30g potetmel, 1
glass syltetøy eller gelé (aprikos, appelsin,
bringebær, rips osv.).
. 1 langpanne: 33 x 22 cm
. Tilberedningstid: 10 min
•Bruk vispene til å stivpiske sukker og
eggeplommer (høyese hastighet).
•Tilsett melet og potetmelet, og bland
sammen (laveste hastighet).
•Rengjør vispene, og stivpisk eggehvitene
separat.
•Bland hvitene sammen med den andre
blandingen (laveste hastighet).
•Kle langpannen med smurt bakepapir, hell i
røren og stek i 15 min ved 170°C.
•Når kaken er lysebrun, vend den
umiddelbart over på et fuktig
kjøkkenhåndkle strødd med sukker. Fjern
bakepapiret.
•Rull sammen kaken i håndklet, og la avkjøle.
•Rull så kaken ut igjen, og fordel syltetøyet
eller geléen utover.
•Rull kaken sammen igjen, og skjær endene
jevne.
Du kan også:
. fylle kaken med vaniljekrem
. erstatte potetmelet meg kakaopulver og fylle
kaken med pisket krem.
58
Page 59

Mandel og aprikosterte
. Paideig: 200g mel, 1dl vann, 160g smør, 1
klype salt.
. Fyll:1kg friske eller en boks hermetiske
aprikoser, 60g smør, 70g sukker, 70g malte
mandler, 1 helt egg + 1 eggeplomme, 2
spskj aprikossyltetøy.
. 1 paiform: 28 cm i diameter
. Tilberedningstid: 2 timer til paideigen + 10
min til å sette sammen terten.
•Ha mel og salt i en bolle. Bruk eltekrokene,
og kna gradvis inn vannet (middels, deretter
høyeste hastighet) til deigen formes til en
ball.
•La hvile i 20 min på et kjølig sted.
•Kjevle ut deigen til en 1 cm tykk firkant.
•Bearbeid smøret til det har samme
konsistens som deigen, og spre det utover
midten av firkanten. Pakk inn smøret ved å
folde to og to motsatte hjørner sammen.
•Kjevle ut deigen til en 2 cm tykk firkant, og
brett den i tre lag.
•La deigen hvile i 20 minutter, og gjenta den
siste operasjonen to ganger til.
•Plasser deigen på et kjølig sted.
•Bruk vispene til å blande sammen sukker,
malte mandler, smør og egg (middels
hastighet, deretter høyeste) i en bolle.
•Vend paideigen to ganger før du kler
paiformen med den. Prikk bunnen med en
gaffel, og spre deretter mandelblandingen
utover. Fordel til slutt aprikosene, delt i to,
utover formen.
•Stek i 30 min ved 240°C. Kle deretter med
aprokossyltetøy.
Frityrstekte epler
. Frityrrøre: 125g mel, 1 egg, 1 spskj olje, 1
klype salt, 1.5dl melk, 4 epler, 1 spskj kanel,
75g sukker, saften av 1 sitron.
. Til steking: Olje.
. Tilberedningstid: 5 min til røren.
•Bruk vispene til å blande sammen mel, egg,
olje, salt og 2 spskj melk i en bolle til røren
er jevn (middels hastighet, deretter høyeste).
•Tilsett melken gradvis mens du reduserer
hastigheten. La hvile 1 time på et kald sted.
•Bland sammen sukker og kanel.
•La eplene være hele, skrell dem, ta ut
kjernen og skjær dem i rundinger. Strø dem
med sukker- og kanelblandingen, og sprut
dem med sitronsaft. Dekk over, og la
marinere på et kaldt sted i 30 min.
•Dypp epleskivene i frityrrøren slik at de er
helt dekket, og ha dem i den varme oljen.
•Stek fire av gangen. Server varme.
Du kan frityrsteke alle typer frisk frukt på
samme måte: Ananas, bananer, aprikoser,
pærer osv. Vær alltid forsiktig når du senker
mat varm olje. Pass på at det ikke spruter, og
gå aldri fra varm olje.
Brød
. 250g hvitt mel, 100g grovt mel, 1 pakke
tørrgjær, 10g sukker, 10g smør, 200g vann,
1g salt.
. 1 kakeform: 24 cm
. Tilberedningstid: 7 min
•Bruk eltekrokene til å blande de to typene
mel, salt, smør og gjær (middels hastighet) i
en salatbolle.
•Tilsett vann gradvis til deigen danner en ball.
•Dekk salatbollen med et fuktig
kjøkkenhåndkle, og la heve på et varmt sted
i 30 min.
•Ha deigen i den smurte og melete formen.
La etterheve i 1 time.
•Stek i 25 min ved 240°C.
Du kan, dersom du ønsker, blande 150g
valnøtter, 300g rosiner, 200g sorte oliven,
200g små baconterninger, 2 spskj karve osv. i
deigen.
Du kan også bruke deigen til å lage
rundstykker.
59
Page 60

Flettebrød (brioche)
. 500g mel, 2 pakker tørrgjær, 200g smør,
50g sukker, 1 klype salt, 5 egg, 2 spskj varm
melk.
. Tilberedningstid: 8 min til deigen + 2 timer
til heving.
•Bruk eltekrokene til å blande mel, gjær, varm
melk, sukker, salt og 5 egg i 2 min i en
salatbolle (middels hastighet, deretter
høyeste).
•Tilsett smøret bit for bit til du har en elastisk
deig.
•Dekk salatbollen med et fuktig
kjøkkenhåndkle, og la heve på et varmt sted
i 1 time (til deigen har doblet volumet). Del
så deigen i tre deler.
•Rull delene til tre pølser, som du så fletter.
•Plasser fletten på et smurt og melet
stekebrett, og la heve i 1 time. Stek i 40-45
min ved 180°C.
Du kan også steke deigen i en kakeform uten
å flette den, eller lage små rundstykker.
60
Page 61

Sverige
Beskrivning
. Apparatens delar
a Främre drivuttag
b Bakre drivuttag
c Turboknapp för främre drivuttag
(beroende på modell)
d Kontrollvred :
d1 Start/Stopp-knapp och elektronisk
hastighetsväljare
d2 Losstagningsknapp, främre drivuttag
d3 Start/Stopp (S+3 hastigheter)
d4 Losstagningsknapp för visp eller Start/
Stopp på bakre drivuttag
d5 Turbofunktion
e Väggfäste (beroende på modell)
f Sladdförvaring med praktisk klämma
BEROENDE PÅ MODELL OCH/ELLER TILLVAL
. Tillbehör för det främre uttaget
g Vispar
g1 Vispar av plast
g2 Vispar av rostfritt stål
h Degkrokar
i Ballongvisp
j Riv/skivtillbehör
j1 Trummor
k Puréstav
. Tillbehör för det bakre uttaget
l Mixerstav i plast
m Mixerstav i rostfritt stål
n Minihackare
. Behållare
o Sil
p Skål, 2.75 liter
q Skål, 2.5 liter
r Mixerbägare 1 liter
s Skål i rostfritt stål, 3 liter
t Stativ
Säkerhetsanvisningar
•Läs bruksanvisningen noggrant innan du
använder apparaten för första gången. All
annan användning som inte följer
instruktionerna fritar Krups från allt ansvar.
• Din elvisp är endast avsedd för hushållsbruk
och inomhus.
•Lämna inte apparaten oövervakad i närheten
av barn. Låt heller inte barn använda den
utan överinsyn av vuxen.
•Låt inte sladden hänga ner så att barn kan
nå den.
•Får endast anslutas till 220-230V
växelström, jordat uttag.
Garantin gäller inte vid felaktig
anslutning.
•Se till att sladden inte kommer i kontakt
med eller kommer för nära apparatens
varma delar eller andra värmekällor. Låt inte
heller sladden hänga ner över skarpa kanter.
•Doppa aldrig din elvisp, sladden eller
kontakten i vatten eller någon annan vätska.
•Använd inte din elvisp om det finns skador
på sladden eller kontakten. Dessa måste
bytas av en auktoriserad Krups
Serviceverkstad.
•Dra alltid ur kontakten efter varje
användning och vid rengöring.
•Använd inte din elvisp om den inte fungerar
ordentligt eller om den blivit skadad.
Kontakta din återförsäljare eller en
auktoriserad Krups Serviceverkstad.
•Annan service än rengöring och normalt
underhåll måste utföras av en auktoriserad
Krups Serviceverkstad.
•Vi rekommenderar att du för säkerhets skull
endast använder Krups originaltillbehör och
reservdelar som är avsedda för din elvisp.
• Alla apparater genomgår en mycket
noggrann kvalitetskontroll. Apparater väljs
ut slumpmässigt och testkörs vilket kan
förklara att en del apparater kan visa spår av
användning..
•Vidrör aldrig vispar, degkrokar,
mixerfotens blad etc när din elvisp är
igång. Var försiktig så att långt hår,
61
Page 62

scarves etc inte hänger ner över
tillbehören under användning.
• Dra alltid ur kontakten innan du byter
tillbehör.
• Använd inte tillbehör med olika funktioner
tillsammans – d v s aldrig en degkrok och en
visp samtidigt.
• OBS ! Vissa av tillbehören har vassa
knivblad. Var försiktig när du hanterar
dem så att du inte skadar dig.
Viktigt ! Din elvisp har två uttag (1), där du
kan sätta fast tillbehör :
• ett främre uttag (a) för tillbehören (g, h, i, j,
k) (beroende på modell)
• ett bakre uttag (b) för tillbehören (l, m, n)
(beroende på modell).
Före första användning
•Diska tillbehören noggrant. Skölj och torka.
Vissa modeller av elvisp har en turboknapp
(c eller d5 beroende på modell). Med
turboknappen kan du starta direkt på mycket
hög hastighet (5 eller 9).
•När du är färdig med turbo-funktionen, vrid
tillbaka kontrollvredet (d) till läge « 0 ».
•Dra ur kontakten.
•Ta loss visparna eller degkrokarna genom att
vrida kontrollvredet (d) till läge « Eject » (6).
. Ballongvisp
Ballongvispen (i) används för att vispa lätta
ingredienser (grädde, majonnäs, maränger).
•Använd ballongvispen i en hög, smal
behållare (Krups mixerbägare eller en
behållare i rostfritt stål).
•Använd aldrig ballongvispen till tyngre smet
eller deg, eller för att göra puré.
. Övriga tillbehör, se respektive
instruktion.
Användning av tillbehör på
det främre drivuttaget
. Vispar och degkrokar
•Ställ kontrollvredet (d) i läge « 0 ».
Tryck in visparna eller degkrokarna tills de
sitter på plats. Se till att den visp/degkrok
som har tandad överkant alltid sitter i den
tandade öppningen (2).
• Sätt i kontakten.
•Välj en lämplig behållare (Krups skål eller
mixerbägare) beroende på den mängd som
skall tillredas och lägg i ingredienserna.
•Håll i handtaget och för ner visparna/
degkrokarna i skålen och starta din elvisp
genom att vrida kontrollvredet (d) åt höger.
För att undvika stänk när du startar eller när
du vispar tex. grädde, krämer eller såser har
din elvisp ett anti-stänkläge (läge « S »).
Gör så här :
•Vrid kontrollvredet (d) åt höger till läge « S »
(3).
•För att fortsätta vispa, välj en högre
hastighet (4).
62
Användning av tillbehör på
det bakre drivuttaget
Av säkerhetsskäl känner din elvisp av när det
sitter tillbehör på i det bakre uttaget.
. Modell 3 MIX 8000/8008
•Under användning måste du hålla kvar
kontrollvredet (d). Om du släpper går det
automatiskt tillbaka till läge « 0 ».
För att undvika stänk när du startar eller när
du vispar tex. grädde, krämer eller såser har
din elvisp ett anti-stänkläge.
Gör så här :
•Vrid kontrollvredet (d) åt höger till läge « S »
(7).
•För att fortsätta vispa, välj en högre
hastighet medan du fortsätter hålla
kontrollvredet (d) (8) nedtryckt.
. Modell 3MIX 6000XL Edition
• Se till att kontrollvredet (d) är i läge « 0 »
• Öppna luckan (b) och sätt dit tillbehöret i det
bakre uttaget.
• Med kontrollvredet (d) i läge « 0 », starta
apparaten genom att skjuta det mot
elvispens framkant (9).
Page 63

• Efter användning, dra ur kontakten med
kontrollvredet i läge « 0 », ta bort tillbehöret
och stäng luckan (b).
Rengöring
• Dra ur kontakten.
• Rengör apparatens utsida med en fuktig
trasa.
• Diska visparna/degkrokarna för hand eller i
diskmaskin.
• Vi rekommenderar att du rengör tillbehören
efter varje användning.
Förvaring
Apparaten är försedd med sladdförvaring och
klämma (f)
Beroende på modell :
Din apparat är utrustad med ett väggfäste.
•Vid första användning, vik ut hållaren för
tillbehören (10).
•Placera tillbehören (g och h) i hållaren, sedan
själva motordelen.
På så sätt har du dem alltid till hands i
närheten av din arbetsbänk (11).
Bakom hållaren finns utrymme för t ex ett
anteckningsblock och penna.
Om din elvisp inte fungerar
Recept
Äppelpaj
. Pajdeg: 300g mjöl, 150g smör, 15 ml vatten,
1 nypa salt.
. Fyllning: 4-5 äpplen, 2 msk socker, 1 tsk
kanel, 1 tsk muskot, saften från en citron,
10g smör.
. 1 pajform: 28 cm i diameter
. Tillagningstid: 18-20 min.
•Blanda mjöl, salt och smör till en smulig deg
med hjälp av visparna på minimihastighet.
•Byt till degkrokarna. Tillsätt vatten lite i taget
medan du kör din elvisp på
mediumhastighet. Öka till maxhastighet och
stäng av när degen formats till en boll.
• Låt degen vila i kylskåpet i 1 timme.
•Blanda de finskurna äpplena med socker,
kanel och muskot.
•Kavla ut 2/3 av degen och klä den smorda
pajformen.
•Lägg i äpplena. Droppa över citronsaft och
fördela små kuber av smör över hela formen.
•Täck över fyllningen med resten av degen
och nyp ihop kanterna.
•Stick ett litet hål i mitten av pajen och
grädda i 35 min på 220°C.
Istället för äpplen kan du använda 800 g
hackad rabarber eller 500 g rabarber och 300
g hallon samt
1 msk mjöl, 6 msk socker och 10 g smör.
•Kontrollera att tillbehören sitter på plats
ordentligt.
• Kontrollera att kontakten är i och att det
finns ström i eluttaget.
Om den fortfarande inte fungerar,
kontakta en auktoriserad Krups
Serviceverkstad.
Fruktpaj med jordgubbar
. Botten: 250g mjöl, 125g smör, 125g socker,
1 ägg.
. Vaniljsås: 1/4 l mjölk, 2 äggulor, 50g socker,
25g mjöl, 2 tsk vaniljsocker.
. 800g jordgubbar
. 1 pajform: 28 cm i diameter
. Tillagningstid: 20 min
•Blanda mjöl, socker och smör till en smulig
deg med hjälp av visparna på
minimihastighet.
63
Page 64

•Byt till degkrokarna och tillsätt ägget. Börja
på mediumhastighet, öka successivt till
maxhastighet. Stäng av din elvisp när degen
formas till en boll.
•Låt degen vila i kylskåpet i 1 timme.
•Koka upp mjölken med vaniljsockret.
•Blanda under tiden äggulor och socker med
hjälp av visparna. Börja på mediumhastighet
och öka till maxhastighet. Blandningen ska
bli vit.
•Tillsätt mjölet och blanda på
mediumhastighet.
•Sänk till minimihastighet och häll försiktigt i
den kokande mjölken. Blanda.
•Värm blandningen under omrörning tills den
tjocknar. Låt svalna men fortsätt röra.
•Kavla ut degen och klä den smorda
pajformen. Nagga botten med en gaffel,
täck över med aluminiumfolie.
•Grädda 20 min på 180°C.
•Ta bort aluminiumfolien och låt svalna.
•Bred ut vaniljsåsen i botten och fyll på med
jordgubbar.
•Bred ut ett lager röd vinbärsgelé över ytan.
Chokladkaka
. 3 ägg, 170g socker, 170g smör, 150g mjöl,
2 msk kakao, 6g bakpulver.
. 1 kakform med löstagbar botten: 22 cm i
diameter
. Tillagningstid: 11 min
•Blanda ägg och socker i en skål på
mediumhastighet med visparna.
Blandningen ska bli jämn och ganska lös.
•Tillsätt smöret och öka till mediumhastighet.
Fortsätt med mjöl, kakao och bakpulver –
sänk till minimihastighet medan du tillsätter
ingredienserna, öka till mediumhastighet för
att få en jämn smet.
•Häll blandningen i den smorda kakformen
och grädda 50 min på 170°C.
•Tips:
- Tillsätt valnötter, flisad choklad eller rivet
apelsinskal till smeten.
- Tillsätt 2 msk riven mandel/valnötter till
smeten
- Garnera kakan med chokladglasyr (smält
100 g blockchoklad med 20 g smör).
Rulltårta
. 3 ägg, 90g socker, 40g mjöl, 30g
potatismjöl, sylt(aprikos, apelsin, hallon etc.).
. 1 rektangulär kakform: 33 x 22 cm
. Tillagningstid: 10 min
•Blanda socker och äggulor på maxhastighet
med visparna. Blandningen ska bli vit.
•Tillsätt mjöl och potatismjöl och blanda på
minimihastighet.
•Diska av visparna och vispa upp äggvitorna
separat till hårt skum (maxhastighet).
•Blanda i äggvitorna (minimihastighet).
•Klä formen med bakplåtspapper, häll i
kaksmeten och grädda 15 min på 170°C.
•Ta ut formen ur ugnen när kakan blivit lätt
gyllenbrun. Stjälp upp på ett smörpapper
täckt med strösocker. Ta bort
bakplåtspapperet.
•Rulla in kakan i smörpapperet och låt svalna.
•Rulla ut kakan platt och bred på sylt.
•Rulla ihop igen och jämna till ändarna.
Tips:
. du kan använda vaniljsås istället för sylt,
. ersätt potatismjölet med kakao och använda
vispgrädde som fyllning.
Mandel och aprikospaj
. Pajdeg: 200g mjöl, 10 ml vatten, 160g smör,
1 nypa salt.
. Fyllning: 1kg färska aprikoser eller 1 burk
konserverade, 60g smör, 70g socker, 70g
hackad mandel, 1 helt ägg + 1 äggula, 2
msk aprikosmarmelad.
. 1 pajform: 28 cm i diameter
. Tillagningstid: 2 timmar för pajen + 10 min
garnering.
•Lägg mjöl och salt i en skål. Tillsätt vatten
successivt. Använd degkrokarna och knåda
tills degen formas till en boll. Börja på
mediumhastighet och öka till max.
•Låt degen vila svalt 20 minuter.
64
Page 65

•Kavla ut degen till en kvadrat, 1 cm tjock.
•Bearbeta smöret tills det har samma
konsistens som degen. Kavla ut smöret i
mitten av degkvadraten. Vik in degens
motsatta hörn mot mitten.
•Kavla ut degen igen till en rektangel, 2 cm
tjock. Vik i 3 delar.
•Låt degen vila i 20 min. Upprepa de två
senaste procedurerna (kvadraten och
rektangeln) ytterligare två gånger.
•Lägg degen kallt.
•Blanda socker, mandel, smör och ägg i en
skål med visparna. Börja på
mediumhastighet och öka till max.
•Vänd och kavla degen två gånger till innan
du kavlar ut den och klär pajformen. Nagga
botten med en gaffel och fördela mandeln.
Lägg tills sist på aprikoserna, delade i halvor,
•Grädda i 30 min på 240°C. Bred över
aprikosmarmelad.
Friterade äpplen
. Smet: 125g mjöl, 1 ägg, 1 msk olja, 1 nypa
salt, 15 ml mjölk, 4 äpplen, 1 msk kanel,
75g socker, saften från 1 citron.
. Till fritering: olja.
. Tillagningstid: 5 min för smeten.
•Blanda mjöl, ägg, olja, salt och 2 msk mjölk
till en jämn smet i en skål med hjälp av
visparna. Börja på mediumhastighet och öka
successivt till max.
•Tillsätt mjölken samtidigt som du minskar
hastigheten. Låt smeten vila kallt 1 timme.
•Blanda under tiden socker och kanel.
•Skala äpplena och kärna ur dem. Skär dem i
skivor. Strö över socker och kanel och
droppa till sist över citronsaften. Täck över
och låt stå kallt i 30 minuter.
•Doppa äppelskivorna i smeten tills de är helt
täckta och fritera sedan i oljan.
•Fritera ca 4 i taget. Servera varma.
Du kan fritera ananas, bananer, aprikoser
päron etc på samma sätt.
Var alltid försiktig när du friterar. Lämna aldrig
het olja oövervakad.
Bröd
. 250g vetemjöl, 100g rågmjöl, 1 påse
torrjäst, 10g socker, 10g smör, 200g vatten,
1g salt.
. 1 kakform: 24 cm
. Tillagningstid: 7 min
•Blanda mjöl, salt, smör och jäst i en skål med
hjälp av degkrokarna på mediumhastighet.
•Tillsätt vattnet samtidigt som du ökar till
maxhastighet. Sluta när degen formats till en
boll.
•Täck över skålen med en fuktig bakduk och
låt jäsa på varm plats i 30 minuter.
•Placera degen i den smorda och mjölade
formen. Låt jäsa i ytterligare 1 timme.
•Grädda 25 min på 240°C.
Tips : Blanda i 150 g hackad valnöt, 300 g
russin, 200 g svarta oliver, 200 g
bacontärningar eller 2 msk kumminfrön etc.
Du kan också baka ut degen till mindre bröd.
Flätad brioche
. 500g mjöl, 2 påsar torrjäst, 200g smör, 50g
socker, 1 nypa salt, 5 ägg, 2 msk varm mjölk.
. Tillagningstid: 8 min för degen + 2 timmar
jäsning.
•Blanda mjöl, jäst, varm mjölk, socker, salt
och ägg i en skål med hjälp av degkrokarna.
Börja på mediumhastighet och öka
successivt till max.
•Tillsätt smör i mindre bitar tills degen är
jämn och smidig.
•Täck över skålen med en fuktig bakduk och
låt jäsa på varm plats i 1 timme (degen ska
fördubblas i storlek). Dela degen i 3 delar.
•Rulla varje del till 3 långa rullar som du
sedan flätar.
•Placera flätan på en smord och mjölad
bakbplåt och låt jäsa ytterligare 1 timme.
Grädda 40-45 min på 180°C.
Du kan också baka ut degen i en form eller
göra mindre briocher.
65
Page 66

Suomi
Laitekuvaus
.Laitteen osat
a voiman ulosotto edessä
b voiman ulosotto takaa
c turbo kytkin (etuosaa varten) (mallista
riippuen)
d käyttökytkin:
d1 käynnistys/pysäytys ja elektroninen
nopeudensäätö
d2 irrotuspainike (etuosaa varten)
d3 käynnistys/pysäytys (S+3
nopeutta)
d4 vispilöiden irroitus tai käynnistys/
pysäytys takaosaa varten
d5 turbotoiminto
e seinäteline (mallista riippuen)
f johdon kelaus ja pidike
MALLISTA JA/TAI VARUSTUKSESTA RIIPPUEN
. Edessä käytettävät varusteet
g vispilät
g1 muoviset pähkinänmuotoiset vispilät
g2 teräksiset pähkinänmuotoiset vispilät
h taikinakoukut
i pallovispilä
j viipale/raastelaite
j1 rummut
k sosesauva
. Takana käytettävät varusteet
l muovinen sauvasekoitin
m ruostumatonta terästä oleva
sauvasekoitin
n minileikkuri
. Astiat
o siivilä
p 2.75 litran kulho
q 2.5 litran kulho
r 1 litran astia sauvasekoittimelle
s 3 litran ruostumaton teräskulho
t teline
Turvallisen käytön ohjeita
•Ennen kuin ensimmäistä kertaa käytät
vatkaintasi, lue käyttöohje huolellisesti läpi.
Mikäli käytät laitetta käyttöohjeen
vastaisesti, Krups vapautuu kaikesta
vastuusta.
•Säilytä käyttöohje mahdollista myöhempää
tarvetta varten.
•Tämä vatkain on tarkoitettu vain
kotitalouskäyttöön talon sisällä.
•Älä koskaan jätä vatkainta lasten ulottuville.
Mikäli lapset käyttävät vatkainta, käyttöä on
valvottava.
•Älä anna liitosjohdon roikkua lasten
ulottuvilla.
•Tarkista, että sijoitustaloudessa on sama
jännite kuin vatkaimen arvokilvessä.
Mikäli laite liitetään väärään
jännitteeseen, takuu raukeaa.
•Liitosjohto ei koskaan saa olla lähellä tai
koskettaa vatkaimen kuumia osia tai muuta
kuumaa pintaa tai teräviä reunoja.
•Älä koskaan upota vatkainta, liitosjohtoa tai
pistotulppaa veteen tai muuhun nesteeseen.
•Mikäli liitosjohto tai pistotulppa on
vaurioitunut, älä käytä vatkainta. Jotta
laitteen turvallisuus taataan, laitteen saa
korjata ja liitosjohdon vaihtaa vain
valtuutettu Krups huolto.
•Ota pistotulppa pois pistorasiasta heti kun
olet lopettanut vatkaimen käytön.
Pistotulppa ei saa olla pistorasiassa vatkainta
puhdistettaessa.
•Älä koskaan käytä vatkainta, mikäli se ei
toimi kunnolla tai mikäli se on vaurioitunut.
Tällaisessa tapauksessa ota yhteys Krups
huoltoon.
•Vatkainta saa huoltaa vain valtuutettu
huolto, käyttäjä saa vain puhdistaa laitteen.
•Oman turvallisuutesi vuoksi, käytä vain
alkuperäisiä Krups varusteita ja lisäosia. Vain
ne sopivat täysin vatkaimeesi.
•Kaikki laitteet käyvät tehtaalla läpi
laatukontrollin. Sattumanvaraisesti valituilla
laittella tehdään myös käytännön kokeita,
mikä selittää mahdolliset käyttöjäljet.
66
Page 67

•Tätä laitetta ei saa jättää käyntiin
valvomatta.
•Älä koskaan kosketa vispilöitä,
taikinakoukkuja tai sauvasekoittimen
terää vatkaimen käytön aikana. Pitkät
hiukset, huivit jne. on pidettävä loitolla
käytettävästä laitteesta.
•Ota pistotulppa pistorasiasta aina ennen
vatkaimen varusteiden käsittelyä
(varusteiden paikalleen laitto tai
irrottaminen).
•Älä yhdistele eri tavalla toimivia varusteita
yhtä aikaa käytettäväksi (esim.
taikinakoukkuja ja pallovispilää jne.).
•Tärkeää: Tiettyjen varusteiden
leikkuuterät ovat erittäin teräviä.
Käsittele niitä erittäin varovaisesti.
•Tärkeää: vatkaimessasi on kaksi voiman
ulosottoa (1)
•etuosassa oleva voiman ulosotto (a), johon
liitetään varusteet (g, h, i, j, k) (mallin
varustuksesta riippuen)
•takaosassa oleva voiman ulosotto (b), johon
liitetään varusteet (l, m, n) (mallin
varustuksesta riippuen).
Ennen ensimmäistä
käyttökertaa
•Puhdista huolellisesti vatkaimen eri
varusteet. Kuivaa ne huolellisesti
puhdistuksen jälkeen.
Etuosassa olevan voiman
ulosoton varusteet
.Vispilät ja taikinakoukut
•Tarkista, että käyttökytkin (d) on asennossa
“0”. Työnnä vispilät tai taikinakoukut
paikoilleen kunnes ne lukittuvat täysin. Pane
aina hammasrattaalla varustettu väline
rungon aukkoon, joka on myös merkitty
hammasrattaalla (2).
•Pane vatkaimen pistotulppa pistorasiaan.
•Valmistettavasta määrästä riippuen, mittaa
aineet sopivaan astiaan (Krups kulho tai
astia).
•Upota vispilät tai taikinakoukut astiaan ja
käynnistä vatkain kytkimellä (d) liikuttamalla
sitä oikealle.
Välttääksesi roiskeita vatkainta
käynnistettäessä tai käsitellessäsi arkoja aineita
(kerma, kastikkeet), voit hyödyntää vatkaimesi
roiskeet poistavaa erikoisominaisuutta
(asento “S”): Tee näin:
•Työnnä käyttökytkin (d) oikealle asentoon
”S” (3).
•Jatkaaksesi valmistusta, valitse suurempi
nopeus (4).
Mallista riippuen vatkaimessasi voi olla Turbo-
kytkin (c tai d5), jonka avulla hyödynnät
nopeasti vatkaimen koko tehon (5 tai 9).
•Kun olet lopettanut työskentelyn, palauta
kytkin (d) asentoon ”0”.
•Ota pistotulppa pistorasiasta.
•Irrota vispilät tai taikinakoukut työntämällä
käyttökytkin «irrotus» (d) (6).
. Pallovispilä
Pallovispilällä (i) voit vatkata kevyitä vaahtoja
(kermavaahtoa, majoneesia, valkuaisvaahtoa).
•Käytä sitä suuressa, kapeassa astiassa (Krups
astia tai ruostumaton teräskulho).
•Älä koskaan käytä sitä raskaiden ainesten
vatkaamiseen, kuten kakkutaikina tai
leipätaikina tai soseuttaminen.
. Muiden varusteiden käyttö kerrotaan
niiden mukana tulevissa ohjeissa.
Takaosassa olevan voimanoton
varusteet - käyttösuositukset
Turvallisuuden vuoksi vatkain havaitsee
varusteiden kiinnittämisen takaosassa olevaan
voimanottoon.
. Malli 3 MIX 8000/8008
•Käytön aikana paina koko ajan
käyttökytkintä (d); jos päästät sen irti,
vatkain palautuu automaattisesti “0”
asentoon.
Välttääksesi roiskeita vatkainta
käynnistettäessä tai käsitellessäsi arkoja aineita
(kerma, kastikkeet) , voit hyödyntää
vatkaimesi roiskeet poistavaa
erikoisominaisuutta (asento “S”):
67
Page 68

•Työnnä ja pidä käyttökytkin (d) asennossa
”S” (7).
•Jatkaaksesi valmistusta, valitse suurempi
nopeus, pidä edelleen kiinni
käyttökytkimestä (d) (8).
. Malli 3 MIX 6000XL Edition
•Tarkista, että käyttökytkin (d) on asennossa
«0».
•Avaa läppä (b) ja kiinnitä varuste takaosan
voiman ulosottoon.
•Käyttökytkimen (d) ollessa asennossa «0»,
kytke virta laitteeseen yksinkertaisesti vain
työntämällä käyttökytkintä vatkaimen
etuosaa kohti (9).
•Ota pistotulppa pois pistorasiasta käytön
jälkeen. Käyttökytkimen on tällöin oltava
asennossa «0». Ota sitten käyttämäsi varuste
pois ja sulje voiman ulosoton läppä (b).
Puhdistus
•Ota pistotulppa pistorasiasta.
•Pyyhi vatkaimen runko vain kostealla
pyyhkeellä.
•Pese vispilät ja taikinakoukut juoksevassa
vedessä tai astianpesukoneessa yläkorissa.
Huuhtele ja kuivaa.
•Lopettaessasi työskentelyn vatkaimella,
suosittelemme varusteiden pesua
välittömästi. Tällä tavalla ruoka ei tartu
varusteisiin, puhdistus on helpompaa eikä
bakteerikasvustolla ole mahdollisuuksia.
Säilytys
Vatkaimessasi on tila, johon voit kietoa
liitosjohdon ja johdossa on pidike (f).
Mallista riippuen:
Vatkaimeesi kuuluu seinäteline .
•Ensimmäisellä käyttökerralla avaa
varusteiden pidikkeet (10).
•Ripusta ensin varusteet (g ja h) ja sitten
vatkain.
Kiinnitä teline suoraan työpöydän yläpuolelle,
jolloin vatkain on aina valmiina käyttöön (11).
Telineen takana on myös tilaa muistilehtiön,
kynän tms. säilytykseen.
Vatkaimessa on tila johdon kelaukselle ja
johtopidike (f).
Mitä tehdä, jos vatkain ei toimi
•Varmista, että olet pannut varusteet oikein
paikalleen.
•Tarkista sähköliitäntä ja että pistorasiaan
tulee virtaa (toisella pienlaitteella).
Mikäli vatkain ei toimi tästä huolimatta, ota
yhteys valtuutettuun Krups huoltoon.
Reseptejä
Omenapiirakka
. Piirakkapohja: 300 g vehnäjauhoja, 150 g
voita, 15 ml vettä, ripaus suolaa
. Täyte: 4 tai 5 omenaa, 2 rkl sokeria, 1 tl
hienonnettua kanelia, 1 tl muskottia, yhden
sitruunan mehu, 10 g voita
. Piirakkavuoka: halkaisija 28 cm
. Valmistusaika: 18 - 20 minuuttia
•Käytä vispilöitä: sekoita jauhot, suola ja voi
murumaiseksi seokseksi (miniminopeus).
•Vaihda taikinakoukut vatkaimeen ja alusta
taikina lisäten vettä vähitellen (keskinopeus,
lopuksi maksiminopeus) kunnes taikinasta
muotoutuu pallo.
•Anna taikinan levätä jääkaapissa 1 tunnin
ajan.
•Sekoita astiassa ohuet omenaviipaleet
sokeri-kaneli-muskottiseoksen kanssa.
•Levitä voideltuun vuokaan 2/3 taikinasta,
vuoraa myös vuoan reunat taikinalla niin,
että taikina ulottuu reunan yli.
•Levitä omenaviipaleet vuoan pohjalle,
ripottele sitruunan mehu päälle, samoin
pienet voinokareet.
•Peitä omenaviipaleet lopputaikinasta tehdyllä
levyllä ja sulje reunat vuoan reunojen yli
menevän taikinan avulla.
68
Page 69

•Tee pieni reikä piiraan keskelle ja paista 35
minuuttia 220°C.
Omenoiden tilalla voit käyttää: 800 g
raparperia, paloiteltuna; tai 500 g raparperia +
300 g vadelmia sekä 1 rkl vehnäjauhoja, 6 rkl
sokeria ja 10 g voita.
Mansikkatorttu
. Piirakkapohja: 250 g vehnäjauhoja, 125 g
voita, 125 g hienoa sokeria, 1 muna.
. Vaniljakiisseli: 1/4 litraa maitoa, 2 kpl
munankeltuaista, 50 g sokeria, 25 g
vehnäjauhoja, muutama tippa vaniljaesanssia
(tai 2 tl vaniljasokeria).
. 800 g mansikoita
. Piirakkavuoka: halkaisija 28 cm
. Valmistusaika: 20 minuuttia
•Käytä vispilöitä. Sekoita jauhot, sokeri ja voi
murumaiseksi seokseksi (miniminopeus).
•Vaihda taikinakoukut vatkaimeen. Alusta
taikina: lisää muna ja alusta kunnes
taikinasta tulee pallo (keskinopeus ensin,
sitten maksiminopeus).
•Anna taikinan levätä tunti jääkaapissa.
•Kiehauta maito ja vaniljaesanssi.
•Maidon kuumetessa vispaa vispilöillä
munankeltuaiset ja sokeri (ja vaniljasokeri)
vaahdoksi (ensin keskinopeus, sitten
maksiminopeus). Vaahdota kunnes vaahto
on vaaleaa.
•Lisää jauhot ja sekoita (keskinopeus).
•Muuta nopeus minimiin, kaada kiehuva
maito varovaisesti joukkoon ja sekoita koko
ajan.
•Kuumenna seos, sekoita koko ajan kunnes
seos sakenee. Anna jäähtyä, sekoita koko
ajan.
•Vuoraa voideltu vuoka taikinalla, jonka olet
kaaviloinut levyksi. Pistele pohja haarukalla,
peitä alumiinifoliolla ja täytä kuivilla herneillä
tai pavuilla (ne estävät pohjaa
kupertumasta).
•Paista 20 minuuttia 180°C.
•Ota herneet pois, samoin alumiinifolio ja
anna pohjan jäähtyä.
•Levitä vaniljakiisseli piiraan pohjalle ja täytä
mansikoilla.
•Peitä punaviinimarjahyytelöllä.
Suklaakakku
. 3 munaa, 170 g sokeria, 170 g voita, 150 g
vehnäjauhoja, 2 rkl kaakaojauhoa, 6 g
leivinjauhetta.
. 1 irtopohja-vuoka: halkaisija 22 cm
. Valmistusaika: 11 minuuttia
•Käytä vispilöitä. Vatkaa munat ja sokeri
vaahdoksi kulhossa (keskinopeus): vaahdon
tulee olla vielä vähän juoksevaa.
•Lisää voi (keskinopeus), sitten jauhot, joihin
olet sekoittanut kaakaojauhot ja
leivinjauheen (miniminopeus lisäysvaiheessa,
sitten keskinopeus jotta taikinasta tulee
tasainen).
•Kaada taikina voideltuun kakkuvuokaan ja
paista 50 minuuttia 170°C.
• Voit:
- lisätä taikinaan muutamia
saksanpähkinäpalasia, suklaamuruja tai
sokeroituja appelsiininkuoren palasia,
- lisätä taikinaan 2 rkl manteli- tai
saksanpähkinärouhetta,
- peittää kakun suklaakuorrutuksella: sulata
100 g tummaa suklaata ja 20 g voita.
Sveitsiläinen hillokäärö
. 3 munaa, 90 g sokeria, 40 g vehnäjauhoja,
30 g perunajauhoja, 1 purkki hilloa tai
hyytelöä (aprikoosi, appelsiini, vadelma,
punainen viinimarja jne.).
. 1 suorakulmainen vuoka: 33 x 22 cm
. Valmistusaika: 10 minuuttia
•Käytä vispilöitä. Vatkaa sokeri ja munan
keltuaiset valkeaksi vaahdoksi
(maksiminopeus).
•Lisää keskenään sekoitetut jauhot ja
perunajauhot vaahtoon (miniminopeus).
•Pese ja kuivaa vispilät. Vatkaa valkuaiset
erikseen toisessa astiassa kovaksi vaahdoksi
(maksiminopeus).
•Sekoita vaahdot keskenään (miniminopeus).
69
Page 70

•Vuoraa vuoka voidellulla leivinpaperilla,
kaada taikina vuokaan ja paista 15 minuuttia
170°C.
•Kun kakku on hieman ruskistunut, kumoa se
heti kostealle pyyhkeelle, jolle olet ripotellut
hienoa sokeria. Ota leivinpaperi pois.
•Rullaa kakku kääröksi vaatteeseen ja anna
jäähtyä.
•Avaa käärö jäähtyneenä ja levitä sen päälle
hilloa tai hyytelöä.
•Rullaa kakku uudestaan kääröksi ja leikkaa
päädyt tasaisiksi.
Voit myös:
. täyttää käärön vaniljakiisselillä,
. korvata perunajauhot kaakaojauholla ja
peittää käärön kermavaahdolla.
Manteli-aprikoositorttu
. Piirakkapohja - voitaikina: 200 g
vehnäjauhoja, 10 ml vettä, 160 g voita,
ripaus suolaa.
. Täyte: 1 kg tuoreita aprikooseja tai 1 tölkki
aprikooseja sokeriliemessä, 60 g voita, 70 g
sokeria, 70 g jauhettuja manteleita, 1 kpl
kokonainen muna + 1 keltuainen, 2 rkl
aprikoosihilloa.
. 1 piirakkavuoka: halkaisija 28 cm.
. Valmistusaika: 2 tuntia piirakkapohjataikina
+ 10 minuuttia viimeistelyyn.
•Mittaa jauhot ja suola kulhoon. Lisää vesi
vähitellen, alusta taikinaa koko ajan
taikinakoukuilla kunnes siitä muotoutuu
pallo (ensin keskinopeus, sitten
maksiminopeus).
• Anna taikinan levätä 20 minuuttia viileässä
paikassa.
• Taikinan taittaminen ja kaavilointi:
•Kaaviloi taikina 1 cm paksuiseksi neliöksi.
•Pehmitä voita, ja levitä se neliönä
taikinalevyn keskelle(1/3 taikinalevystä). Sulje
voi taikinan sisälle taittamalla taikinan reunat
sen päälle, ensin 2 sivua, sitten toiset 2
sivua.
•Kaaviloi taikina 2 cm paksuksi neliöksi ja
taita kolmeen.
•Anna taikinan levätä 20 minuuttia ja toista
sen jälkeen kaavilointi 2 kertaa.
•Pane taikina kylmään.
•Vatkaa vispilöillä kulhossa sokeri, jauhetut
mantelit, voi ja munat sekaisin (ensin
keskinopeus, sitten maksiminopeus).
•Taita taikina vielä kaksi kertaa, ennen kuin
vuoraat vuoan. Pistele pohja haarukalla ja
levitä sen jälkeen mantelitäyte pohjalle. Pane
päällimmäiseksi aprikoosipuolikkaat.
•Paista uunissa 30 minuuttia 240° C, peitä
sitten aprikoosihillolla.
Omenafritit
. Friteeraustaikina: 125 g vehnäjauhoja, 1
muna, 1 rkl öljyä, ripaus suolaa, 15 ml
maitoa, 4 omenaa, 1 rkl kanelia, 75 g
sokeria, sitruunan mehua.
. Friteeraukseen: öljyä.
. Valmistusaika: taikina 5 minuuttia
•Käytä vispilöitä. Sekoita kulhossa jauhot,
muna, öljy, suola ja 2 rkl maitoa, kunnes
taikina on tasaista (keskinopeus, sitten
maksiminopeus).
•Lisää maito vähitellen, pienennä samalla
nopeutta. Anna taikinan turvota viileässä 1
tunti.
•Tällä välin sekoita sokeri ja kaneli.
•Kuori omenat (kokonaisina), poista siemenet
omenaporalla ja leikkaa omenat viipaleiksi.
Ripottele viipaleille sitruunan mehua
tummumisen estämiseksi. Käännä viipaleet
sokeri-kaneliseoksessa. Peitä ja anna
marinoitua viileässä 30 minuuttia.
•Upota omenaviipale taikinaan, niin että se
peittyy kokonaan. Nosta pois ja friteeraa
kuumassa öljyssä.
•Friteeraa 4 viipaletta kerrallaan. Tarjoa
kuumana.
Voit valmistaa frittejä kaikista tuoreista
hedelmistä samalla tavalla: ananas, banaani,
aprikoosi, persikka, jne.
Ole erittäin varovainen upottaessasi ruokaa
kuumaan öljyyn. Varo roiskeita ja valvo
kuumaa öljyä koko ajan.
70
Page 71

Leipä
. 250 g vehnäjauhoja, 100 g
kokojyvävehnäjauhoja, 1 pakkaus
kuivahiivaa, 10 g sokeria, 10 g voita, 2 dl
vettä, 1 g suolaa.
. kakkuvuoka: halkaisija 24 cm.
. Valmistusaika: 7 minuuttia
•Sekoita taikinakoukuilla kulhossa erilaiset
jauhot, suola, voi, ja hiiva (keskinopeus).
•Lisää vesi vähitellen, kunnes taikina
muotoutuu palloksi (keskinopeus, sitten
maksiminopeus).
•Peitä kulho kostealla pyyhkeellä ja anna
kohota lämpimässä paikassa 30 minuuttia.
•Pane taikina voideltuun ja jauhotettuun
vuokaan. Anna nousta uudestaan 1 tunti.
•Paista 25 minuuttia 240°C.
Voit halutessasi lisätä taikinaan 150 g
saksanpähkinöitä paloina, 300 g rusinoita,
200 g mustia kivettömiä oliiveja, 200 g
kuutioitua pekonia tai 2 rkl kuminansiemeniä
tms.
Voit myös jakaa taikinan palloiksi ja paistaa
sen sämpylöinä.
Punottu briochi
. 500 g vehnäjauhoja, 2 pakkausta kuivaa
hiivaa, 200 g voita, 50 g sokeria, ripaus
suolaa, 5 munaa, 2 rkl lämmintä maitoa.
. Valmistusaika: 8 minuuttia taikina + 2 tuntia
kohotus.
•Käytä taikinakoukkuja. Sekoita keskenään
kulhossa jauhot, hiiva, lämmin maito, sokeri,
suola ja 5 munaa 2 minuutin ajan
(keskinopeus, sitten maksiminopeus).
•Lisää voi palasina, kunnes taikina on
kimmoisaa.
•Peitä kulho kostealla pyyhkeellä ja anna
kohota 1 tunti lämpimässä paikassa (kunnes
taikina on kohonnut kaksinkertaiseksi). Jaa
sitten taikina 3 osaan.
• Pyöritä jokainen osa käsin pitkäksi
“nauhaksi”, puno nauhat keskenään ( kiedo
toistensa ympäri ).
• Pane punos voidellulle ja jauhotetulle (tai
leivinpaperilla peitetylle) leivinpellille. Anna
nousta peitettynä taas 1 tunti. Paista 40 - 45
min 180°C.
Voit myös jättää taikinan punomatta ja paistaa
sen kakkuvuoassa tai voit tehdä taikinasta
pieniä briocheja.
71
Page 72

GNA8 EU11/Gr/Ar/Ru 0827 042-A
 Loading...