

Krups 3 Mix 2000 XL GNA 2, 3 Mix 4000 XL GNA 4 Series, 3 Mix 5000 XL GNA641, 3 Mix 5000 XL GNA6 Series, 3 Mix 7000 XL GNA9 Series Series Manual

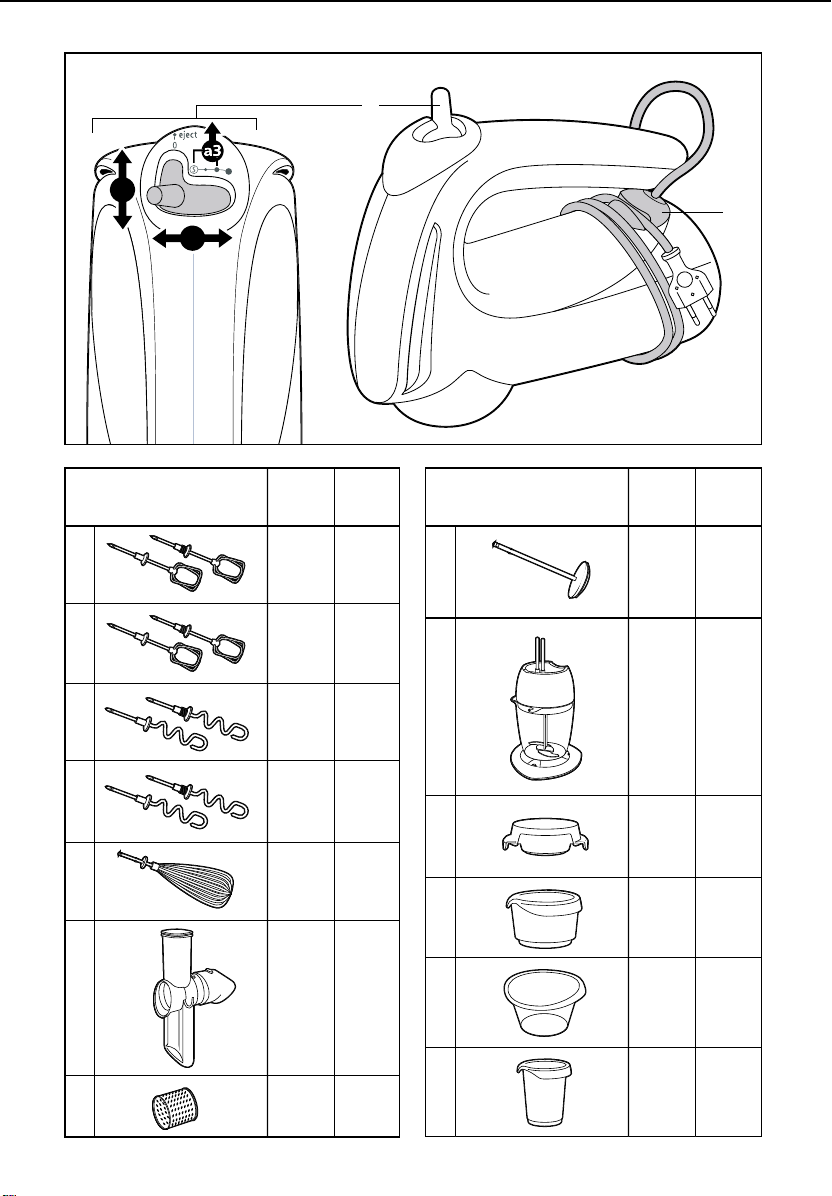
a
a1
a2
ACCESSOIRES ACCESSOIRES
c
GNA 2
GNA 4
F08B
d
GNA 6
GNA 9
F08B
F520
i
j
e
F08C
GNA 2
GNA 4
F528 F528
F08A
GNA 6
GNA 9
F08A
b
h1
e
f
F522 F522
h
F521
F523
F529
F530
F531
m
k
l
n
F303
F302
F532
301
F303
F302
F532
301
21
3
MAXMAXMAX
4
5
5

4

GNA2 3 Mix 2000 XL
GNA4 3 Mix 4000 XL
GNA6 3 Mix 5000 XL
GNA9 3 Mix 7000 XL
Deutsch 6
English 8
Français 11
Nederlands 13
Italiano 16
Español 18
Português 21
Dansk 23
0 Ελληνικ
Norsk 25
Svenska 27
Suomi 29
ΕλληνικÀ 31
5

Deutsch
Produktbeschreibung
.Geräteelemente
a Bedienungsschalter
a1 Ein-/Ausschalter und 2 oder S +3
Geschwindigkeiten (je nach Modell)
a2 Auswurftaste
a3 Turbofunktion (je nach Modell)
b Kabelaufwicklung mit Befestigungsclip
JE NACH MODELL ODER
SONDERZUBEHÖR
.Zubehörteile für vorderen Antrieb
c Quirle - Kunststoff
d Quirle - Metall
e Kleine Kneter
f Grosse Kneter
g Schneebesen
h Schnitzelwerk
h1 Schnitzeleinsätze
i Passierstab
j Zerkleinerer
.Gefäße
k Passiersieb
l Schüssel 2,75l
m Schüssel 2,5 l
n Becher 1l
Wichtige Sicherheitshinweise
•Lesen Sie die Bedienungsanleitung vor dem
ersten Gebrauch aufmerksam: ein nicht
durch die Bedienungsanleitung
vorgegebener Gebrauch entbindet Krups
von jeglicher Verantwortung.
•Ihr Gerät ist nur für den haushaltsgemäßen
Gebrauch und ausschließlich für den
Gebrauch innerhalb des Hauses bestimmt.
•Überlassen Sie Kindern nicht das Gerät,
wenn diese nicht beaufsichtigt werden. Die
Benutzung des Gerätes durch Kleinkinder
und Behinderte muss unter Aufsicht
erfolgen.
• Lassen Sie das Netzkabel nicht in der
Reichweite von Kindern hängen.
• Überprüfen Sie, dass die Anschlussspannung
Ihres Gerätes mit der Spannung Ihres
Stromnetzes übereinstimmt.
Bei falschem Anschluss erlischt die
Garantie.
• Das Netzkabel darf niemals in die Nähe oder
in Kontakt mit den rotierenden Teilen des
Gerätes, einer Wärmequelle oder scharfen
Kanten kommen.
• Tauchen Sie das Gerät, das Netzkabel oder
den Netzstecker niemals in Wasser oder
andere Flüssigkeiten.
• Falls das Netzkabel oder der Netzstecker
beschädigt sind, benutzen Sie das Gerät
nicht. Um jede Gefahr zu vermeiden, lassen
Sie diese durch einen Krups Kundendienst
(siehe Krups Service Stationen) ersetzen.
• Ziehen Sie nach jedem Gebrauch und vor
jeder Reinigung den Netzstecker.
• Benutzen Sie Ihr Gerät nicht, wenn es nicht
korrekt funktioniert oder wenn es
beschädigt wurde. Wenden sie sich in
diesem Fall an einen Krups Kundendienst
(siehe Krups Service Stationen).
• Jeder Eingriff, der über Reinigung und
normale Pflege des Gerätes hinausgeht,
muss durch einen Krups Kundendienst
durchgeführt werden.
• Benutzen Sie zu Ihrer Sicherheit
ausschließlich original Krups Zubehör und
Ersatzteile, die zu diesem Gerät gehören.
• Alle Geräte unterliegen einer strengen
Qualitätskontrolle. Es werden
stichprobenartige Gebrauchtests mit den
Geräten durchgeführt, was eventuelle
Gebrauchsspuren erklärt.
•Dieses Gerät darf nur unter Aufsicht des
Benutzers betrieben werden.
•Berühren Sie nicht die Quirle, Kneter,
oder Einsätze des Schnitzelwerkes
während das Gerät in Betrieb ist. Lassen
6

Sie lange Haare, Schals, das Netzkabel
usw. während des Betriebes nicht über
den Zubehörteilen hängen.
•Ziehen Sie vor jedem Hantieren (Einsatz
und Entnahme der Zubehörteile) den
Netzstecker.
•Montieren sie niemals unterschiedliche
Zubehörteile gleichzeitig (z.B: Kneter und
Schneebesen...).
•Achtung: die Messer einiger
Zubehörteile sind scharf. Handhaben Sie
die Messer mit Vorsicht.
Vor dem ersten Gebrauch
•Reinigen Sie die verschiedenen Zubehörteile
Ihres Gerätes sorgfältig.
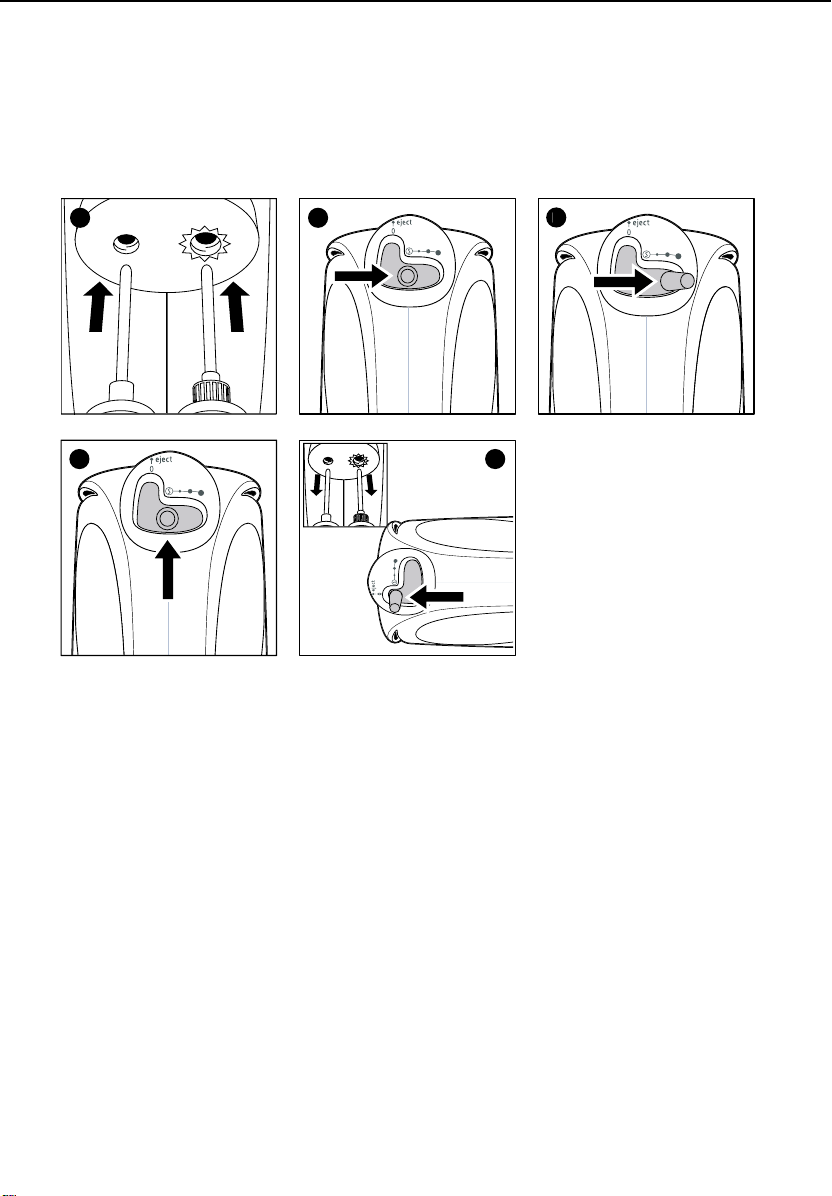
Gebrauch der Zubehörteile am
vorderen Antrieb
. Quirle und Kneter
•Wenn der Schalter (a) in der Position «0» ist,
setzen Sie die Quirle oder Kneter ein, bis sie
sicher verriegelt sind.
•Führen Sie das Werkzeug mit dem
Zahnkranz immer in die Öffnung des
Gerätes ein, welche ebenfalls mit einem
Zahnkranz gekennzeichnet ist (1).
•Stecken Sie den Netzstecker ein.
•Füllen Sie Zutaten, je nach zu verarbeitender
Menge, in ein geeignetes Gefäß (Krups
Rührschüssel oder Becher).
•Tauchen Sie die Quirle oder Kneter in das
Gefäß und schalten Sie das Gerät ein, indem
Sie den Schalter (a) nach rechts schieben.
Um Spritzer zu Beginn der Zubereitung zu
vermeiden und für empfindliche
Zubereitungen (Cremes, Soßen) ist Ihr Gerät je
nach Modell mit einer Antispritzfunktion
(Position «S») ausgestattet. Um diese zu
benutzen:
•Schieben Sie den Schalter (a) nach rechts in
Position «S» (2).
•Wählen Sie eine höhere Geschwindigkeit,
um mit der Zubereitung fortzufahren (3).
Je nach Modell ist Ihr Gerät mit einer Turbo-
Taste ausgestattet, die es Ihnen erlaubt,
durch einfachen Tastendruck sofort die
gesamte Leistung Ihres Gerätes zur Verfügung
zu haben (4).
•Stellen Sie den Schalter am Ende der
Zubereitung zurück auf Position «0».
•Ziehen Sie den Netzstecker.
•Lösen Sie die Quirle oder Kneter, indem Sie
den Bedienungsschalter (a) auf die Position
«Eject» (5) schieben.
.Schneebesen
Der Schneebesen (g) wird zur Zubereitung
luftiger Speisen verwendet (Cremes, Mayonnaise, Eischnee)
•Benutzen Sie ihn in einem hohen geraden
Gefäß (Rührbecher ).
•Benutzen Sie den Schneebesen niemals zur
Zubereitung schwerer Speisen (Kuchenteig,
Brotteig, Püree).
.Was die übrigen Zubehörteile betrifft,
siehe entsprechende ZubehörBedienungsanleitung.
Reinigung
•Ziehen Sie den Netzstecker.
•Reinigen Sie das Grundgerät nur mit einem
feuchten Tuch.
• Reinigen Sie Quirle und Kneter unter
fließendem Wasser oder in der
Spülmaschine.
Was tun im Falle eines
Defekts?
•Vergewissern Sie sich, ob das Zubehör richtig
installiert wurde.
•Überprüfen Sie den Netzanschluss.
Wenn Ihr Gerät immer noch nicht
funktioniert, wenden Sie sich an den Krups-
Kundendienst (siehe Liste im KrupsServiceheft).
7

English
Description
. Components of the hand-mixer
a Control button
a1 Start / Stop control and 2 or
S+3 speeds (depending on model)
a2 Ejection
a3 Turbo function (depending on model)
b Cord winder with holding clip
DEPENDING ON MODEL AND/OR
OPTIONAL
. Accessories on front outlet
c Nut-shaped plastic whisks
d Nut-shaped stainless steel whisks
e Small turn dough hooks
f Large turn dough hooks
g Cooking whisk
h Slicer - grater
h1 Drums
i Puréeing attachment
j Mini-chopper
. Containers
k Sieve
l 2.75 l bowl
m 2.5 l bowl
n 1 l cup
Safety recommendations
•Before using your hand-mixer, please read
the instructions carefully: any use which
does not conform to the instructions for use
will absolve Krups from all liability.
•Your hand-mixer is intended solely for
domestic use, only for the functions
indicated and within the house.
•Never leave the hand-mixer within the reach
of children without supervision. Use of this
hand-mixer by young children or
handicapped persons must be carried out
under supervision.
•Do not allow the power cable to hang down
within the reach of children.
•Check that the voltage of your hand-mixer
corresponds to that of your electrical system.
Any connection error will invalidate the
guarantee.
Wiring instructions for U.K and Ireland only :
APPLIANCES WITH FITTED PLUG
Important: For your convenience this
appliance is supplied complete with a plug
incorporating a 3 amp fuse.
In the event of replacing a fuse in the plug
supplied, a 3 amp fuse approved by ASTA to
BS1362 must be used.
If the socket outlets are not of the 13A BS
1363 type, and therefore do not accept the
plug connected to this appliance, cut off the
plug.
When cut off, this plug is a shock hazard if
inserted into a socket outlet and must
therefore be disposed of safely.
If the fuse cover is detachable, never use the
plug with the cover omitted. Replacement
covers can be obtained from your service
agent.
Fit the appropriate plug according to the
instructions in paragraph “Fitting a plug”.
With alternative plugs a 5 amp fuse must be
fitted either in the plug or adapter or at the
main fuse box.
APPLIANCES WITHOUT FITTED PLUG
FITTING A PLUG - IMPORTANT
The wires in the mains lead are coloured in
accordance with the following code:
BLUE : NEUTRAL
BROWN : LIVE
But the colours may not correspond with the
coloured markings identifying the terminals in
your plug, proceed as follows:
The wire which is coloured BLUE must be
connected to the terminal which is marked
with the letter ‘N’ or coloured black. The wire
which is coloured BROWN must be connected
to the terminal which is marked with the
letter ‘L’ or coloured red.
8

This appliance is manufactured to conform to
the Low Voltage Electrical Equipment (Safety)
Regulations 1989 and is designed to comply
with BS 3456. It complies with the
requirements of the EEC Directive (89/336/
EEC).
•The power cable must never be close to or
touching the hot parts of your hand-mixer,
close to a source of heat or a sharp edge.
•Never put the hand-mixer, the power cable
or the plug into water or any other liquid.
•If the power cable or plug are damaged, do
not use the hand-mixer. In order to prevent
any risk, these must be replaced by an
approved Krups service centre (see “Krups
Service Stations” booklet).
•Unplug your hand-mixer once you have
finished using it and when you are cleaning
it.
•Never use your hand-mixer if it is not
working correctly or if it has been damaged.
In this case, contact an approved Krups
service centre (see “Krups Service Stations”
booklet).
•Any other intervention other than cleaning
and normal maintenance by the customer
must be carried out by an approved Krups
service centre.
•For your own safety, only use the accessories
and spare parts from Krups which are
adapted to your hand-mixer.
•All hand-mixers are subject to rigorous
quality checks. Practical usage tests are
carried out on hand-mixers at random,
which may leave traces of use.
•This hand-mixer is designed to be used
under supervision of the user.
•Never touch the whisks, dough hooks or
drums of the slicer-grater while the
hand-mixer is operating. Never allow
long hair, scarves, the cable, etc. to hang
over the accessories when they are in
use.
•Unplug the hand-mixer before any
handling (attaching and removing
accessories).
•Do not combine accessories with different
functions at the same time (e.g. dough hook
and cooking whisk).
•Caution: the blades on some accessories
are sharp. Handle all knives with care.
Before using for the first time
•Carefully clean the different accessories of
your hand-mixer.
Use of accessories on front
outlet
. Whisks and dough hooks
•With the control button (a) on “0”, insert
the whisks or dough hooks until they are
fully locked in place. Always insert the
accessory fitted with a toothed ring into the
opening indicated on the hand-mixer by a
ring which is also toothed (1).
•Plug in the hand-mixer.
•Depending on the quantity being prepared,
place the ingredients into a suitable container (Krups bowl or cup).
•Place the whisks or dough hooks into the
container and start the hand-mixer by
moving the control (a) to the right.
To prevent splashes when starting or for
delicate preparations (creams, sauces), your
hand-mixer is fitted (depending on the model)
with an anti-splash function (position “S”).
To use this:
•Push the control (a) to the right into position
“S” (2).
•To continue preparation, select a faster
speed (3).
Depending on the model, the hand-mixer is
fitted with a Turbo function which instantly
gives you full power (4) when you press
towards the front of the beater
•After use, return the control (a) to the “0”
position.
•Unplug the mixer.
•Release the whisks and dough hooks by
pushing the control (a) to the “Eject”
position (5).
9

. Cooking whisk
The cooking whisk (g) is used to make light
preparations (whipped cream, mayonnaise,
egg whites).
•Use it in a tall, narrow container (the cup).
•Never use it for heavy preparations such as
cake mixtures or bread dough or for making
purée.
. For the other accessories, please refer to
their instructions for use.
Cleaning
•Unplug the mixer.
•Using only a damp cloth, clean the body of
the mixer.
•Clean the whisks / dough hooks under
running water or in the dishwasher. Rinse
and dry them.
What to do if your hand-mixer
does not work:
•Check that the accessories are correctly in
place.
•Check that the hand-mixer is correctly
plugged in.
If your hand-mixer is still not working,
contact an approved Krups service centre (see
list in the “Krups Service Stations” booklet).
10
 Loading...